
Retro transactions
Retro transaction refers to the facility of tagging not-interested transactions to loyalty program customers. That is, a not-interested transaction can be tagged to the respective customer when the customer registers into the loyalty program within the window period (allowed to convert not-interested transactions).
Configuring the window period for retro transaction
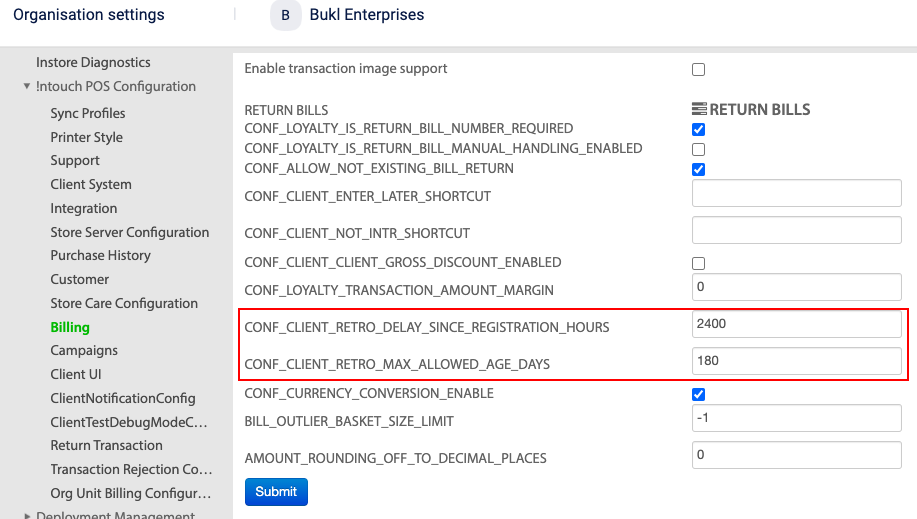
You can customize the retro transaction window period by adjusting the CONF_CLIENT_RETRO_MAX_ALLOWED_AGE_DAYS setting in Organisation > Billing configuration page.
Additionally, you have the option to incorporate a buffer time using the CONF_CLIENT_RETRO_DELAY_SINCE_REGISTRATION_HOURS configuration. For instance, if you set this value to 3 hours and a customer registers at 9:00 AM, they will be able to claim loyalty points for non-interested transactions with billing times later than 6:00 AM but not before 5:59 AM.
One-Step Tagging of a Not-interested Transaction (Retro Transaction)
In Member Care, org admins can create new retro requests and approve requests submitted through InStore or APIs.
To tag a not-interested transaction to a registered customer on Member Care, follow these steps.
- On Member Care, navigate to Transaction Requests > Transaction Link.
- Click One Step Change.

- In the Search box, enter the mobile number, email ID, or external ID of the customer to which you want to tag a transaction and select the customer from the auto-suggestions drop-down.
- In Select Transaction, enter the not-interested Transaction Number, and Transaction Date. If you have more than one transaction with the same transaction number, use Store to get transactions of a specific store.

- Click Search.

Select the transaction if there is more than one transaction (else it is selected by default) and click Tag.
- You can tag a transaction only if it is within the window period allowed. To know or update the window period for a retro transaction, see CONF_CLIENT_RETRO_MAX_ALLOWED_AGE_DAYS on the Billing Configuration page.
- You will see the error message, Transaction is too old to mark as retro.
Approve Retro Transaction Requests
To approve a retro transaction request submitted through InStore or API, do the following.
- You can tag a transaction only if it is within the window period allowed. To know or update the window period for a retro transaction, see CONF_CLIENT_RETRO_MAX_ALLOWED_AGE_DAYS on the Billing Configuration page.
- You will see the error message, Transaction is too old to mark as retro.
- On the left navigation pane, click Transaction Requests > Transaction Link. You will see the list of retro transaction requests with details, requested by, account to be merged with, store at which the request is made, and time of the request.
- In the Pending tab, navigate to the desired request and click the respective Approve button.
To decline a request, click Decline. In the Decline Coupon Request box, provide the reason for declining this request and click Proceed.
The approved and declined requests will move to the Approved and Declined tabs respectively.
Download Retro Transaction Requests
To download retro transaction request history as a CSV file, do the following:

- On the Transaction Link page, click the Download drop-down that appears on the top-right
- Set the duration of the requests that you want to download in Start Date and End Date.
- In Download, select the statuses that you want to download - Pending, Approved, and Declined
- Click Proceed.
The list gets downloaded to your computer as a CSV file.
Notification Settings for Retro Transactions
Through this setting, selected org admins can receive notifications whenever a new retro request is created and also configure SMS and email notification template for the customer when a transaction is tagged to him/her.

- Click Settings, expand ID Change Request Settings, and click Retro Transaction.
- In Alerting the supervisor, configure the following.
i. In Email these on arrival of request, select the org users to be notified through email whenever a new retro request is created and select any of the following.
- Never: Select to disable notifications to the org admins.
- Always: Select to always notify the selected recipients on new retro requests.
- Only when: Select to notify the selected recipients only when the transaction amount is less than a specific value and set the value in Transaction value <.
ii. In Communicating change to a customer, set SMS/email template.
- To configure SMS notification, click the Configure button next to Configure SMS and create the message. Use predefined tags wherever required.
- To configure email, click the Configure button next to Configure Email.
a. In Subject, enter the subject of the email.
b. In the message body, set up the message body with content and insert images. You can add predefined tags in the message wherever required. To add tags, just click the tag from the list on the left.
c. Click Save Changes.
- Click Save.

Handling retro transactions as per original transaction date.
Retroactive transactions, also known as retro transactions, refer to transactions that are applied to a loyalty program account after the transaction has taken place. This can occur for a variety of reasons, such as an error in the transaction process, a delay in the transaction being recorded, or a promotion being applied retroactively to a past purchase.
Retro case in airlines
Retroactive flight rewards refer to the ability to redeem miles or points for flights that you have already taken. Many airline loyalty programs allow you to retroactively claim rewards for flights that you have taken in the past, as long as you were a member of the loyalty program at the time of travel and you have the necessary documentation (e.g., a copy of your boarding pass or ticket receipt).
To claim retroactive rewards, you will typically need to contact the airline's customer service department and provide them with your loyalty program account information and the details of your past flights. The process for claiming retroactive rewards can vary by airline.
It's worth noting that retroactive flight rewards may not be available for all flights or may be subject to certain restrictions, such as blackout dates or limited availability. It's always a good idea to check with the airline to see what your options are for claiming retroactive rewards.
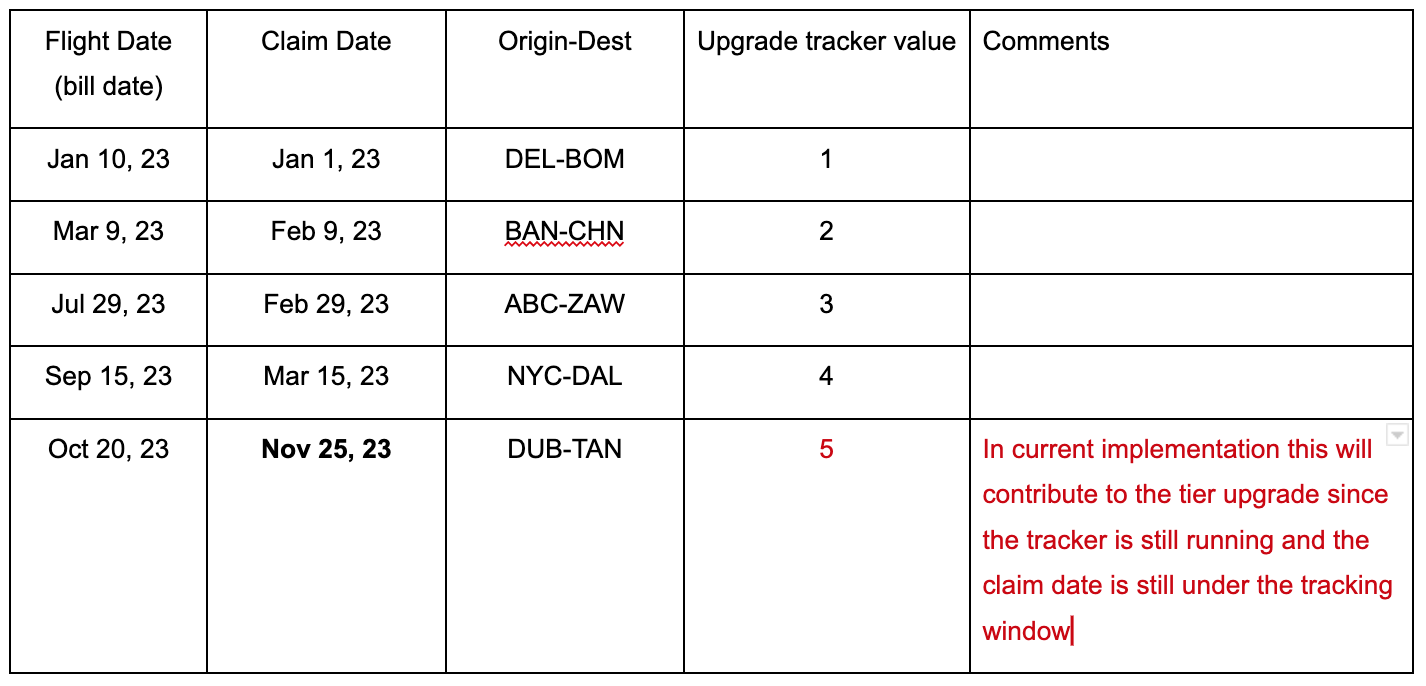
Let's understand with one example:
Take for example, a customer made a flight journey on 20th March but not given loyalty details on that date. Instead, at some point in the future (say 20th april), wishes to avail the benefits of that journey, and so reaches out to customer service for the same. In this case, the processing date (20th April) is more than the transaction date (20th March).
This might lead to a problem, because the customer might have upgraded/degraded from a tier in this time period. Say, the customer might be on the silver tier on 20th March and Gold tier on 20th April. If the journey is processed as per 20th April, benefits will be given as per the gold slab even though the customer is on the silver slab on the date of the transaction.
Let's understand with one more example:
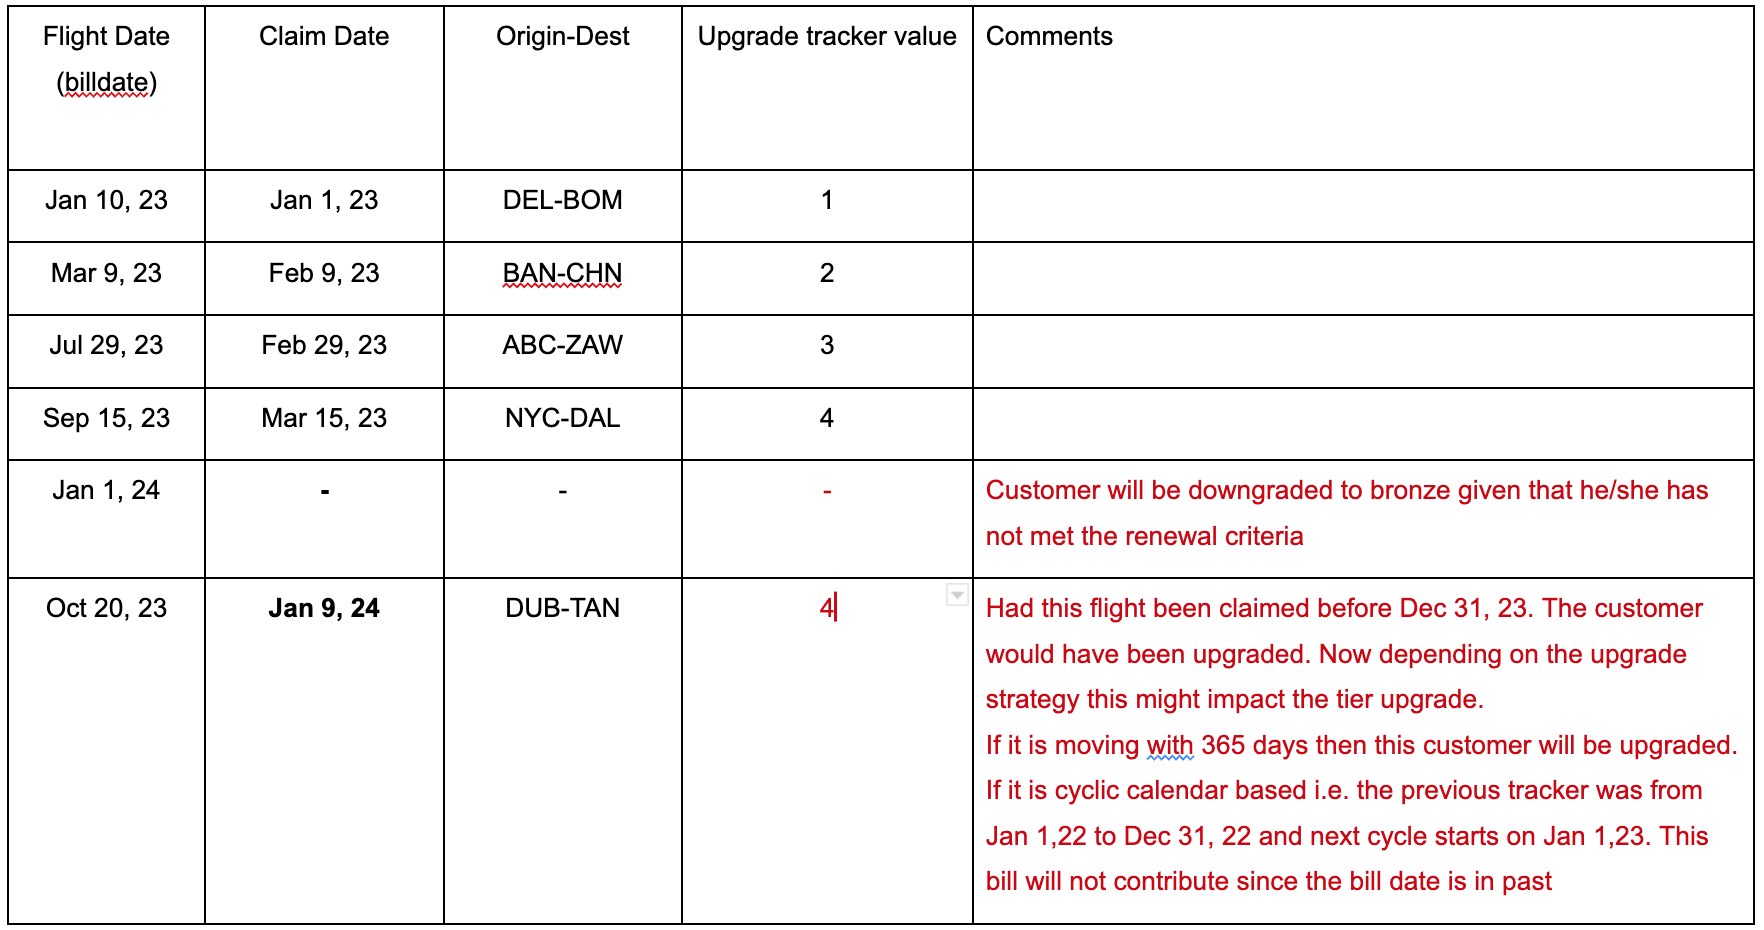
A brand has the below strategy for tier upgrade. Take 5 international flights in a year and upgrade from silver to gold. Else the customer will be downgraded.
Tier upgrade to silver - Jan 1, 23
Tier downgrade/renewal date - Jan 1, 24
Now, let's take the above same scenario, however this time the claim happens in next year.
Updated 5 months ago