CDP | JFM '22
I. Incentives Search replaces Coupon Search
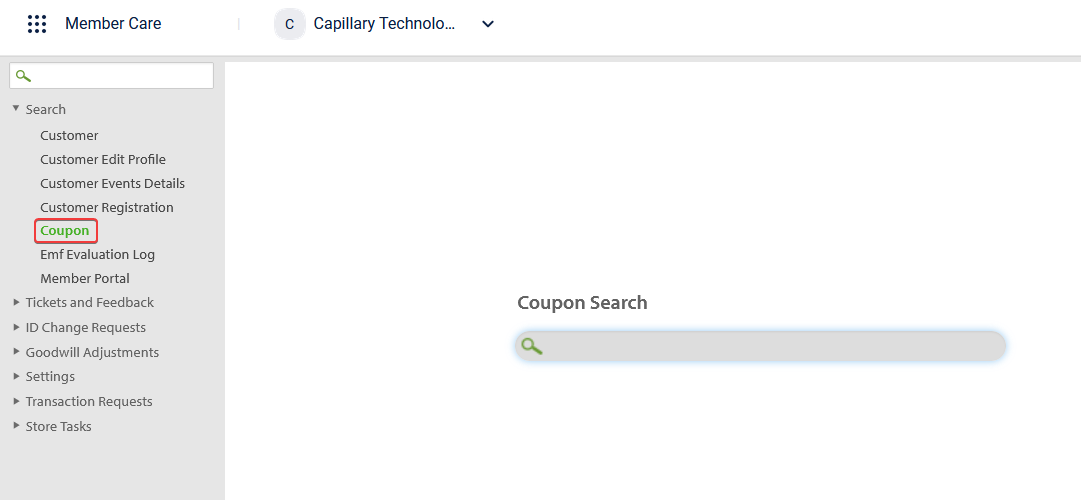
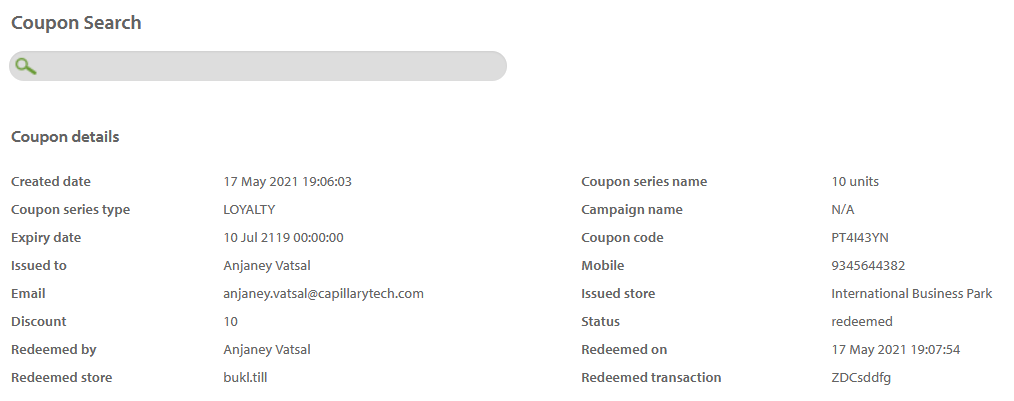
In Member Care, there was an option to search for a coupon code and view its status and other metadata as shown below.
We have now done a revamp of the Coupon_Search page and renamed it to _Incentives _search. As evident from the name, this page will serve as the single place for _Member Care users to search for details on incentives such as coupons, gift vouchers, and promotions. This is one step towards having a unified search page on Member Care.
Use Case
Let us say that you are a customer care representative of a brand that uses our Promotion Engine and you extensively use Member Care for operations service operations. Now, let us say you receive a call from a customer who says that he/she is not able to redeem a gift voucher that was issued to him/her. To solve this problem, you will need to check whether the code associated with the gift voucher is correct and also whether the voucher itself is valid. This can be achieved using the Incentives search function.
Steps
To search for a coupon code, promo code, or gift voucher code:
- Go to Member Care > Search > Incentives.
- In the drop-down box next to search, select the incentive you want to search. For example, to search for a gift voucher, you need to select the Gift Voucher Code option.
- In the Search box, enter the code click on the Search button, or press the Enter key on your keyboard.
- If the code is valid, you will see the details of the voucher. From this, you can diagnose the issue raised by the customer and proceed with the next steps.
- If the code is invalid, you can see that information on the results page as shown below.
Similarly, you can also search for Coupon Code and Promo Code.
There is no change to the Coupon Code search flow. It works the same way it used to as seen earlier.
II. Supplementary Program Details on Member Care
On Member Care, Customer Single View page, there is an option to view the list of supplementary or external programs a customer is associated with as of the current system date (see below):
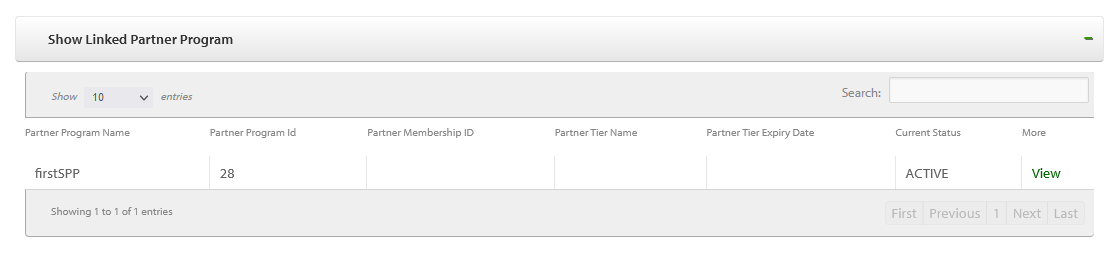
Until now, you could see the program that the customer is currently linked to (active) along with some additional useful information such as:
- The name of the supplementary or external programs a customer is currently part of
- The ID associated with the program
- The membership ID (if any) of the customer in the program
- The name of the tier (if any) the customer belongs to in the external program
- Tier expiry date (if any)
- Current status (always active as of now)
The programs with which the customer is no longer linked to or associated with will not be shown here.
You will now see a View more option which shows a sidebar that contains the details mentioned in the list below.
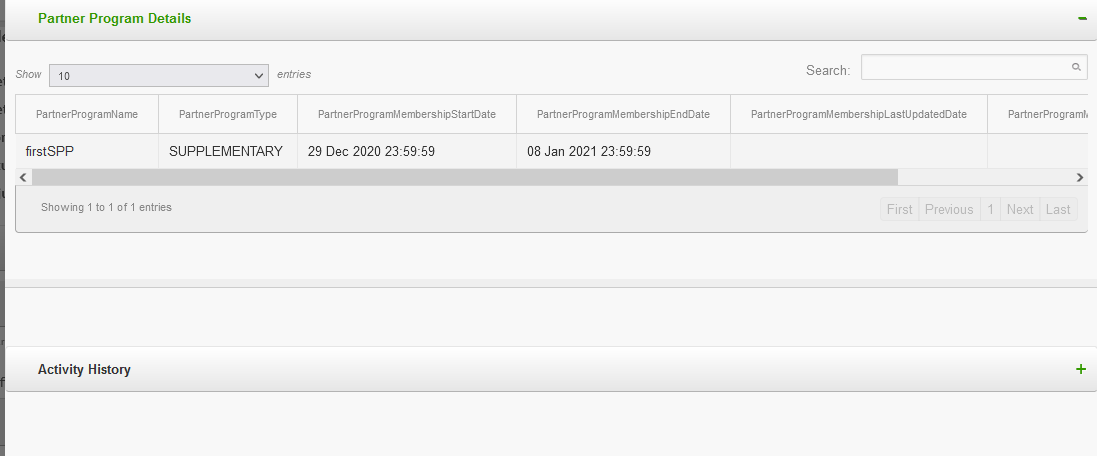
- Name of supplementary or external partner program
- Type of the program - External or Supplementary
- Membership start date
- Membership end date
- Membership last updated date
- Membership last updated activity
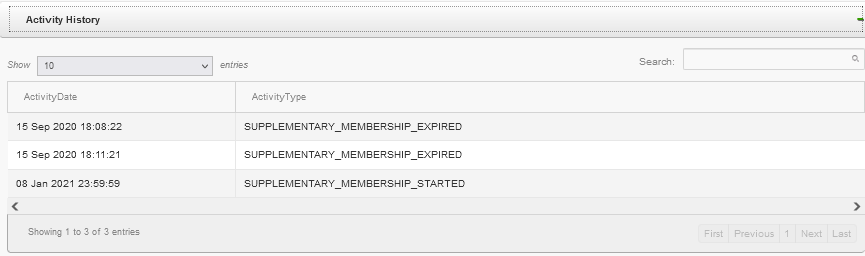
Now, when you expand the Activity History section, you can see the activity log of the customer with respect to the program. The activity log includes the details such as when the customer has joined the program, the tier was upgraded/renewed, and so on.
III. Time Zone in Interactions Tab
Problem Statement
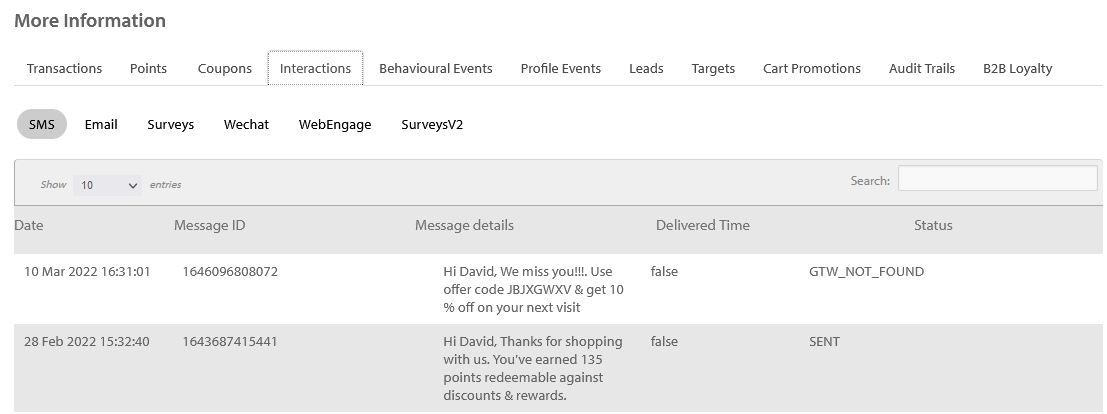
Until now, the timestamp that was visible on the _Interactions _tab under the More Information section of the Member Care Customer Single View (CSV) page was in the cluster time zone. For example, if you are looking at the SMS Interactions of a customer of an organization in the India cluster, the timestamp shown for any interaction was in the Indian time zone. If the organization is in the Singapore cluster, the timestamp was in the Singapore time zone, and so on.
This was leading to problems in cases where the Member Care users were in single time zone but the organization was set up in another. For example, let us take a case where an organization is based out of Singapore and the customer support team, which uses Member Care, is also in the same location. However, the organization was set up in the India cluster for some reason. In such a case, the _Interactions _will be in the Indian time zone. This was leading to problems for the support team as they had to convert to their time zone (from the India time zone) every time they had to diagnose a problem associated with any interaction.
Solution
To fix this problem, we have now changed the time zone of interaction events to the configured time zone of the organization itself. Any interaction that is sent via our gateway/systems will be shown in the organization's time zone.
IV. Sign in to InTouch with Capillary Google Workspace account
You can now sign in to Intouch using your Capillary Google Workspace account.
With this:
- No need to remember your Intouch password anymore
- No more Intouch password reset every month
- Convenience and security
Prerequisite
You should have a Capillary Google Workspace account (e-mail address with domain capillarytech.com)
Procedure
- In a browser, open the InTouch URL of your cluster.
- EU Cluster - https://eu.intouch.capillarytech.com/auth/login
- SG Cluster - https://apac2.intouch.capillarytech.com/auth/login
- India Cluster - https://intouch.capillary.co.in/auth/login
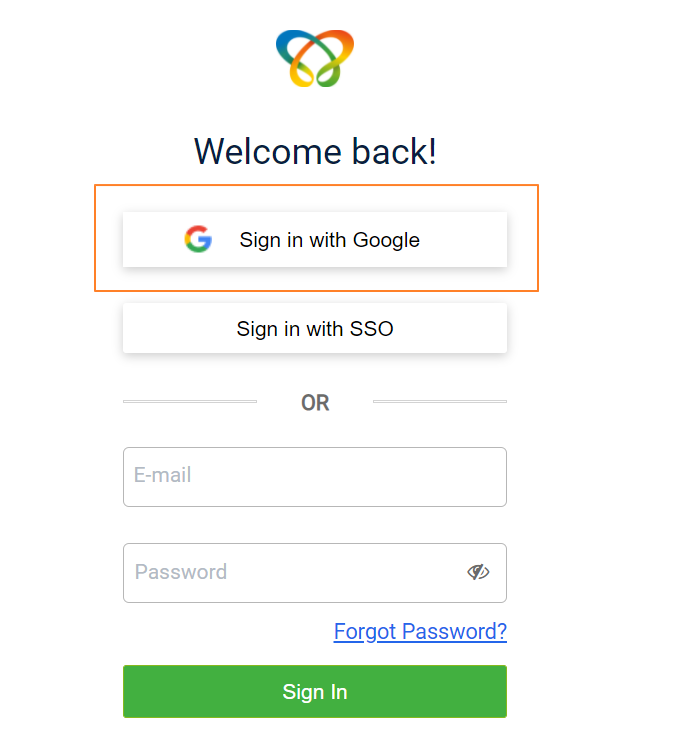
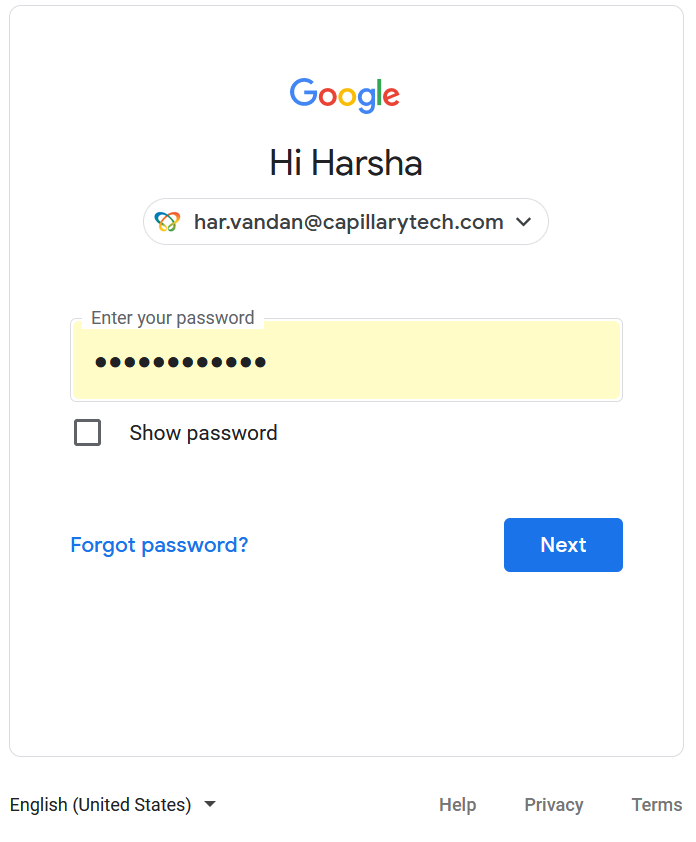
- Click on Sign in with Google as shown below.
- Enter your email ID and password as prompted and click Next.
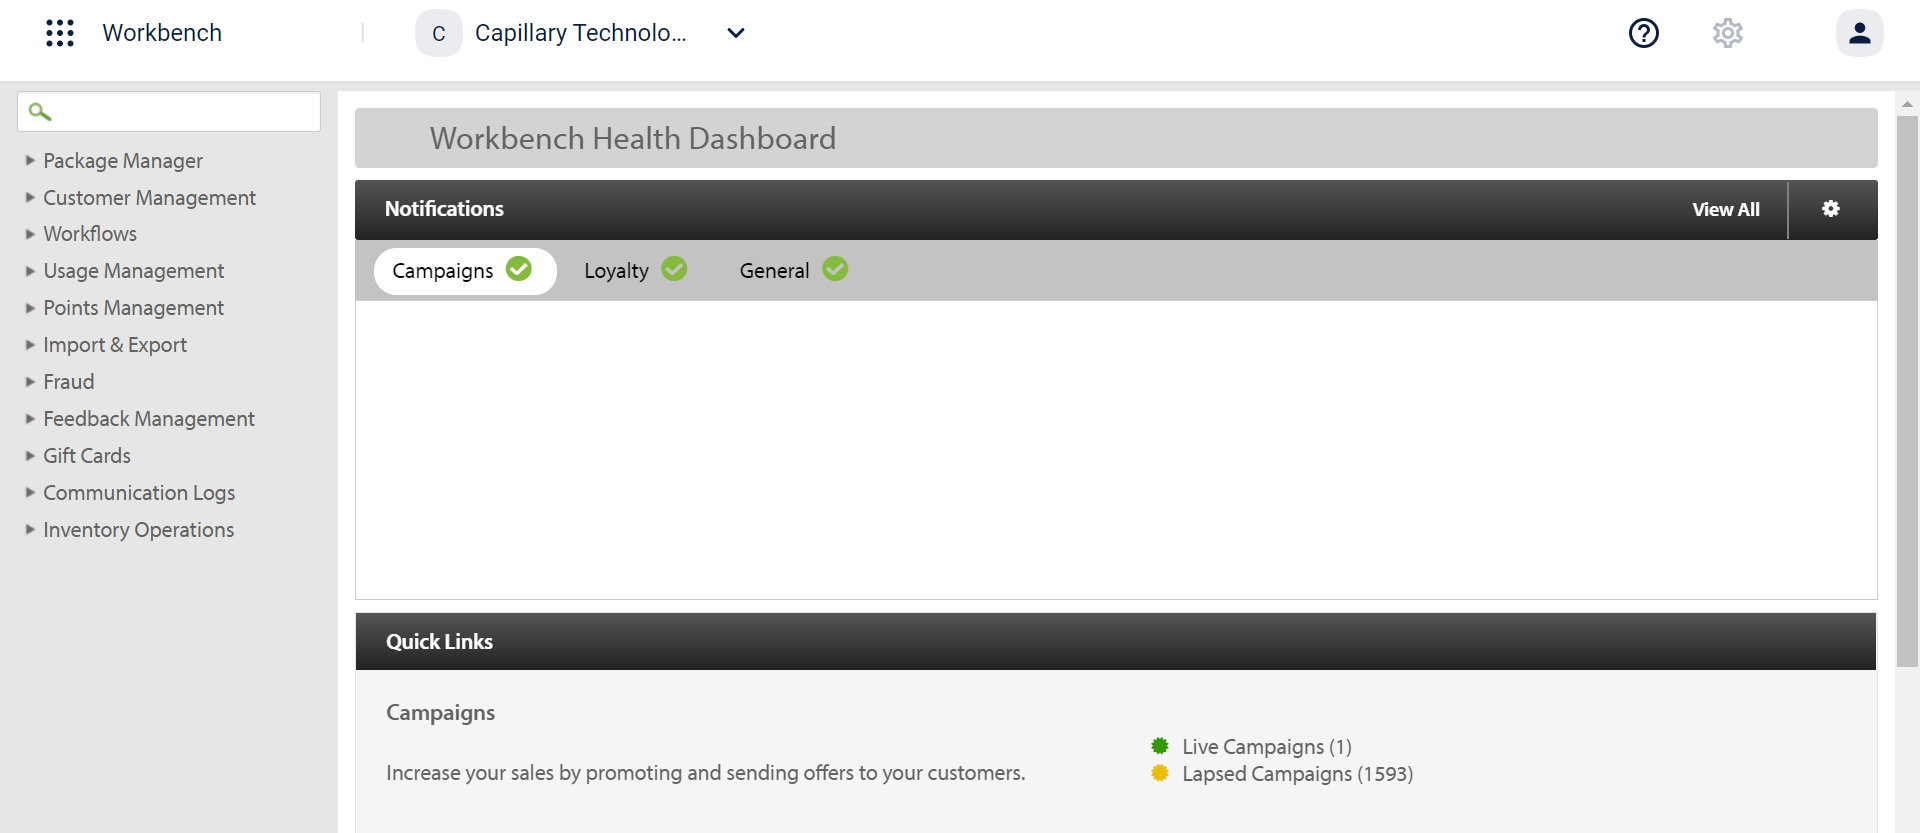
- You will see the InTouch Workbench as shown in the following.
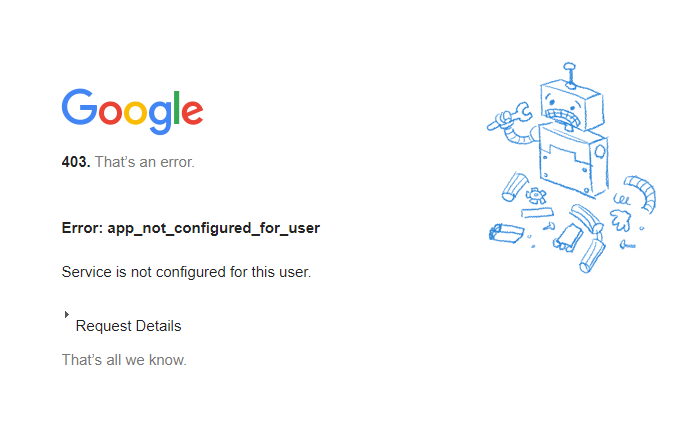
If you sign in with a non-Capillary Google Workspace account, you will see the following error.
V. New User Groups to automatically associate with the default loyalty program
Problem Statement
When a group is created using the API POST /v2/userGroup2/, the group gets added to the loyalty program only when a transaction is made by any group member on behalf of the group. So, when a customer-facing app/microsite is fetching group details, loyalty data like group slab, points, etc. are shown as null instead of the right data.
Solution
With this release, user groups are automatically added to the default loyalty program at the time of group creation. All the loyalty details like group slab and points are shown with the right values.
VI. Send SMS to customers from OU-specific Sender IDs (API)
Problem Statement
OU-enabled brands want to send SMS to customers from the Sender IDs configured for the respective OU. The API /v1.1/communications/sms did not have a provision to choose the sender ID, instead, all SMS are sent using the default sender ID of the org.
Solution
Enhancement in v1.1/communications/sms API to include sender ID (sender) from which you want to send SMS.
NOTE
- SMS can be sent with only the sender IDs configured for the org.
- To add/view Sender IDs configured for the org and OUs go to Organization Settings > Communication & Gateway > Domains in InTouch.
- If you pass the sender ID that is not configured in the org, the default sender ID of the org will be used instead.
VII. Card support in Goodwill Points Issual (Member Care)
Problem Statement
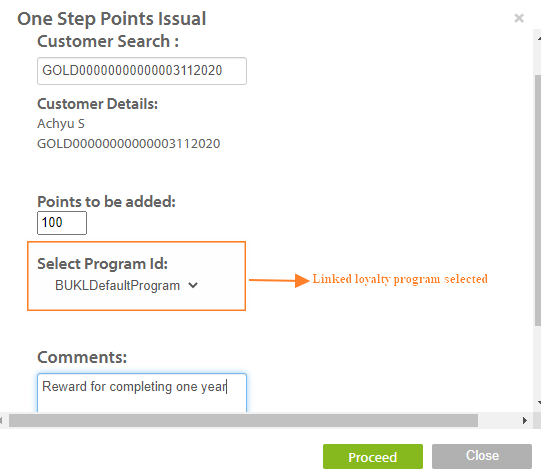
In Member Care, Customer Search in Goodwill Points Issual supports mobile, email, external id, and name to identify a customer, and issue points. But for Card linked loyalty programs, customers need to be identified by their card details and the points need to be issued in the program to which the card is linked.
Solution
Card number and Card External Id support are added to identify a customer. Based on the card details entered, the linked loyalty program is automatically selected in the Program ID field. You can still choose to select a different program other than the one linked with the card.
NOTE
Card here acts only as a customer identifier and to identify the card linked program. Cards with inactive statuses like expired and blocked can also be used to issue goodwill points. If only active cards need to be used to issue goodwill points, please check the card status before issuing the points.
You can use card details to identify customers and the associated loyalty program. You do not need to select the program manually.
You can use cards with any status (active, expired or blocked) to issue points. Hence, before issuing points, check the status of the card.
VIII. Enhancements to the Send email API to support image attachments
Problem Statement
No support was present to send images as email attachments via API. Users encode the image in base64 format but the image is not getting uploaded in the right format and the user receiving the email is not able to view the correct image and download it.
Solution
A new field “file_encoding_type” is added in [/v1.1/communications/email](https://docs.capillarytech.com/reference/send-email) and fileEncodingType in /v2/communications/email.
For all image formats like jpg, png, jpeg, and gif this field’s value needs to be set to “base64”. The image should be base64 encoded and the code to be passed in “file_data”. Only if the “file_encoding_type” is base64, images will get uploaded in the right format.
NOTE
For other file types which aren’t base64 encoded like txt, and pdf, file encoding type is not required.
IX. API Support to fetch group transactions
Use Case
In customer-facing applications, all the group-level transactions made by the group members can be shown. Loyalty details like points issued against each transaction, and their expiry details can also be viewed. This is highly useful for both B2B group accounts and B2C user groups to fetch the transaction history of the group and the loyalty details for each transaction.
For details about the API, see GET userGroup2/transactions
NOTE
Only the transactions made by group members as part of the group can be fetched. Individual transactions made by the group members are not available in this API.
X. OAuth2 Sign-in for Customer Apps
Brands want to allow their customers to access their information/ perform certain actions with the brand from 3rd party partner applications. The customer should be able to access their data with the brand from a brand’s application or an external partner’s application.
For Example, A customer visiting a partner app of the brand can authenticate themselves and fetch their data with the brand like available points, and expiry details, or perform actions like redeeming available points, transfer points, etc.
So, an external app has to access the brand’s customer data from Capillary on behalf of the brand.
Use Case
- Brands can integrate with external partners like car manufacturers and embed their apps in their tablets within the car. On the tablet, the customer can fetch their data from the brand and perform certain actions on it.
- Brands can integrate with partner apps like Paytm where the customers can register into their loyalty program, link loyalty cards to their wallets, pay for a transaction and view the available points, etc via the partner app.
- This can be applicable to any customer-facing application through which the end customer of a brand can access their data
Solution
Customer Apps can now use OAuth2 Authorization Code flow to get access to customers’ data from Capillary on behalf of the brand. This helps in enhanced security via a standard auth flow.
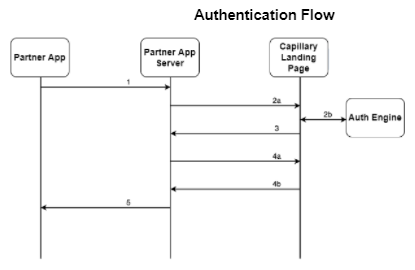
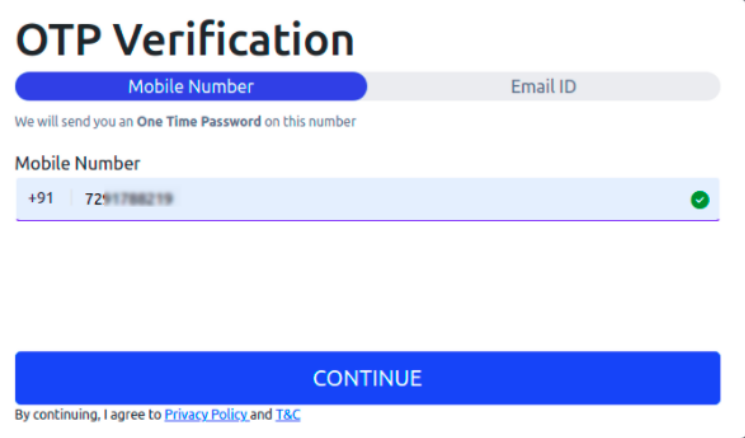
- Partner app initiates by redirecting users to the Capillary landing page along with the client key.
- Customers are authenticated via OTP on the Capillary landing page by communicating with Auth Engine APIs.
- Upon Authentication, the landing page will redirect back to a pre-configured URL along with an auth code generated by Auth Engine.
- Partner app will authenticate the auth code by sending the client key and secret and receives the access token and refresh token. The access token is limited to the user whose data is being accessed.
- The access token can be used to make calls to the wrapper APIs and can access data limited to the user who is accessing their information. The access token expires after a pre-configured duration and the partner app can refresh the token and obtain a new access token. The partner app can also invalidate these tokens if required.
To get OAuth2 enabled for your brand, contact your CSM or create a ticket with complete details.
Future Scope
UI will be provided where brands can create/view/update access scopes, and clients, generate client credentials and set up client configurations and OTP configurations.
XI. Support for Customer Status in Connect+
You can now assign Customer Status to any customer via Connect+ using v2 customer add or Fleet Customers (parent-child hierarchy) templates. The prerequisite is to have Customer Status enabled and labels created as per the directions mentioned here (internal).
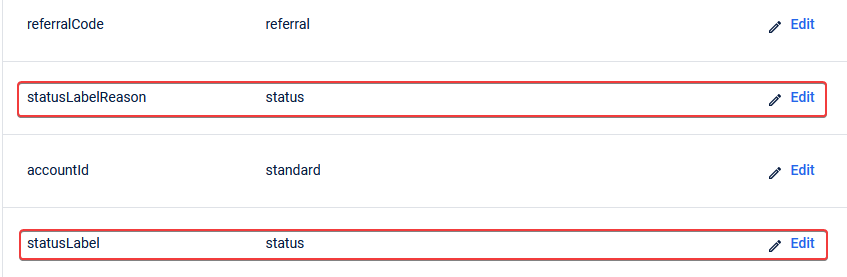
Once Customer Status has been enabled and status labels are setup, you can assign Customer Status by mapping the right headers in the CSV file to statusLabel and statusLabelReason fields as shown in the screenshot above (under customer tab in Transform-data section).

Now, if you want to set this customer’s status label as active-customer (set against Active status while setting up the labels) while registering itself, you can map the highlighted headers below to Customer Status fields in the v2 Customer add or Fleet Customers (parent child hierarchy) templates.
The mapping on Connect+ would look like this:
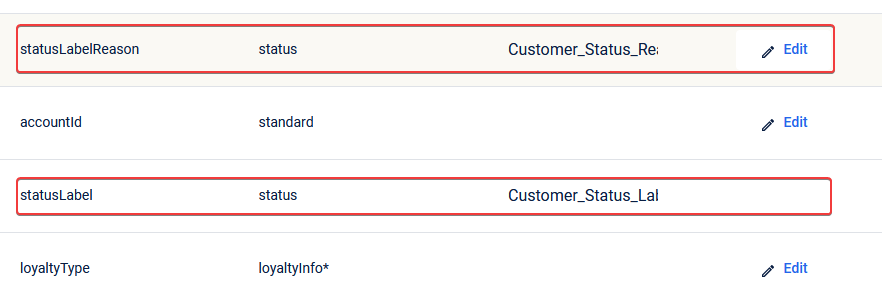
Please note that it is not mandatory to set Customer Status while registering a customer. In case you want to update status, you can do so by mapping the right header in the CSV file against the statusLabel field. statusLabelReason field is optional.
XII. Support for Subscription Status in Connect+
You can now assign channel-wise subscription status to a customer via Connect+ using Customer v2 add or Fleet Customers (parent-child hierarchy) templates.

In the Transform-data > commChannels section of the dataflow (based on the aforementioned templates), the subscription fields can be found by channel as highlighted in the screenshot above. Details on what each of these fields means can be found in API documentation here.
Now, let us assume that you want to register a customer with mobile (as primary identifier) +16500202202 along with mobilePush and email subscription preferences, which were given by the customer while registering. In such a case, part of CSV file for Connect+ ingestion would look as follows:

Here, the fields highlighted in yellow and green map to mobilePush and email subscription fields in Transform-data -> commChannels tab. The corresponding header mapping for mobilePush is given below:
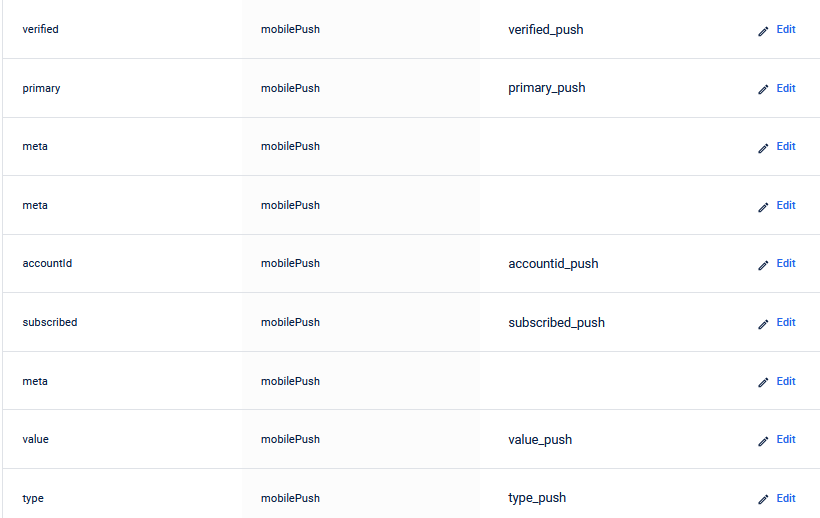
You need to set up similar mapping for email channel as well.
XIII. Support for More Transaction Date Formats
In Transaction v2 add, Transaction Lineitem Merge and Transaction v2 add with filter templates, we have added support for new date formats. The complete list of date formats supported is provided below:
| S No | Date Format | Sample |
|---|---|---|
| 1 | yyyy-MM-dd HH:mm:ss | 2022-02-03 19:00:00 |
| 2 | dd-MM-yyyy HH:mm:ss | 03-02-2022 19:00:00 |
| 3 | dd/MM/yyyy HH:mm:ss | 03/02/2022 19:00:00 |
| 4 | yyyy-MM-dd HH:mm:ss Z | 2017-05-11 15:46:48 Z |
| 5 | yyyy-MM-dd HH:mm:ssXXX | 2022-02-03 12:08:56.235-07:00 |
| 6 | dd-MMM-yy HH:mm:ss | 03-Feb-22 19:00:00 |
| 7 | M/D/YY HH:mm:ss | 2/3/22 19:00:00 |
| 8 | D/M/YY HH:mm:ss | 3/2/22 19:00:00 |
| 9 | MM/DD/YY HH:mm:ss | 02/03/22 19:00:00 |
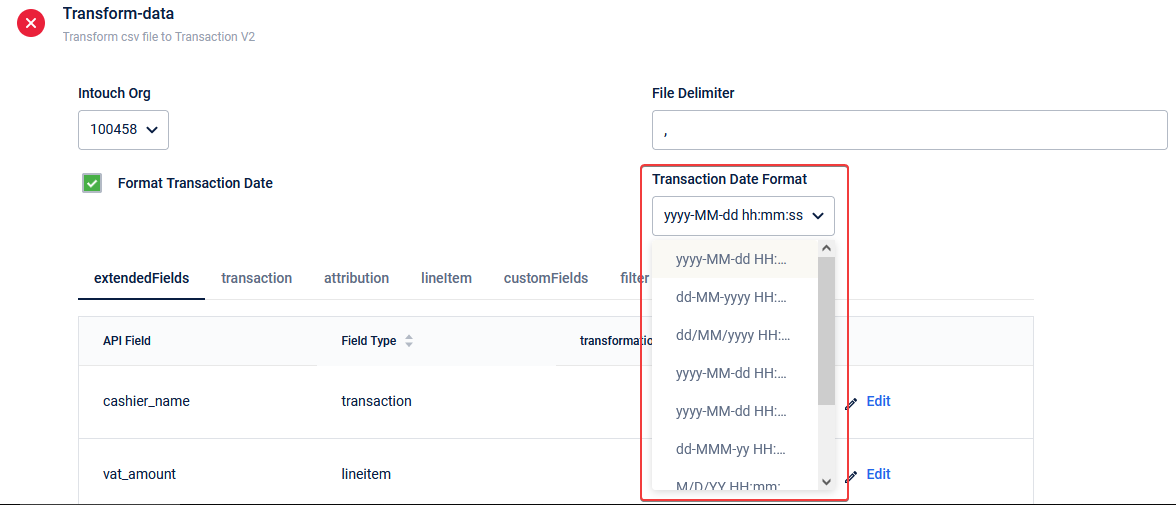
Depending on the format of the transaction date field in the CSV file, you can select the corresponding mapping in the Transform-data section of dataflow as shown below:
XIV. Redeem Coupon Template in Connect+
We have added a new template named Coupon Redeem based on the v2 Redeem Coupons API on Connect+. This is very useful in cases where brands need to redeem active coupons of loyalty customers in bulk. To understand the API fields that appear in the template for mapping, please refer to the API documentation here. More details of each tab under the Transform-data section is provided in the following
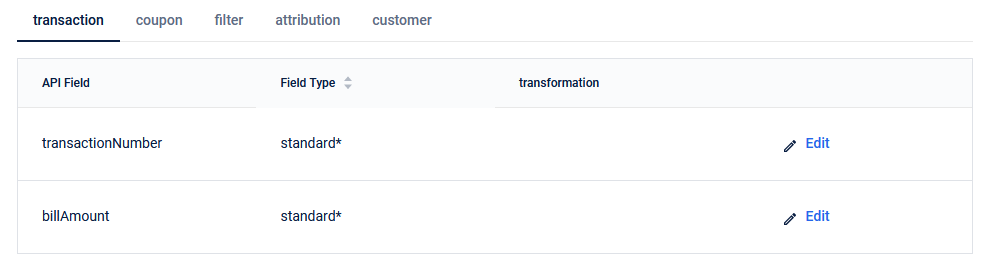
1. Transaction
Here, the transaction against which the coupon needs to be redeemed is mapped. Both transactionNumber and billAmount fields are mandatory as indicated by * under Field Type header in the screengrab below.
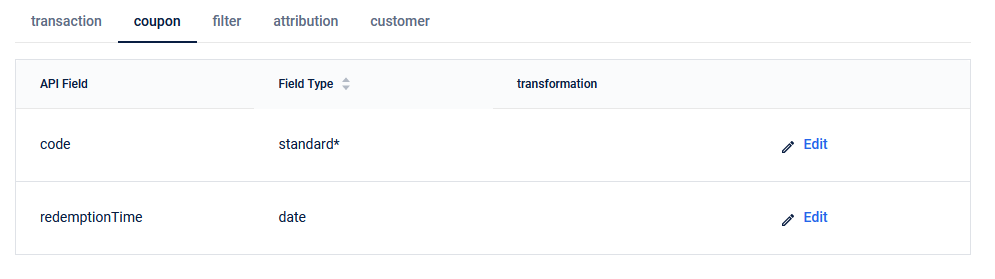
2. Coupon
Here, the code of the coupon that is to be redeemed is mandatory. redemptionTime, which refers to the date and time when the coupon has to be redeemed in YYYY-MM-DD HH:MM:SS format. This is optional though.
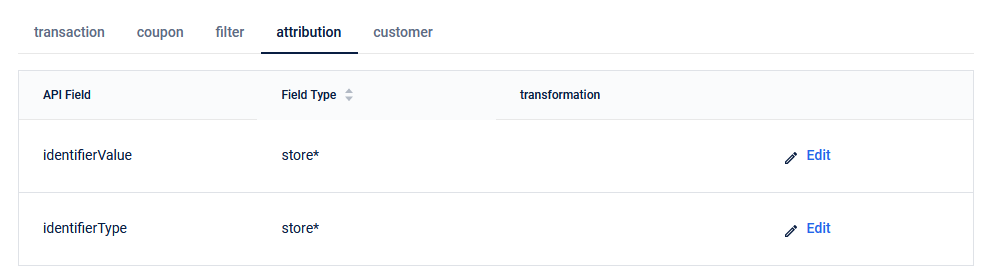
3. Filter and Attribution

These tabs are the same ones you find in any other template. If you want to filter specific rows of the CSV file that is to be ingested, you can use the Filter tab. The attribution tab is to map the store against which the coupons are to be redeemed.
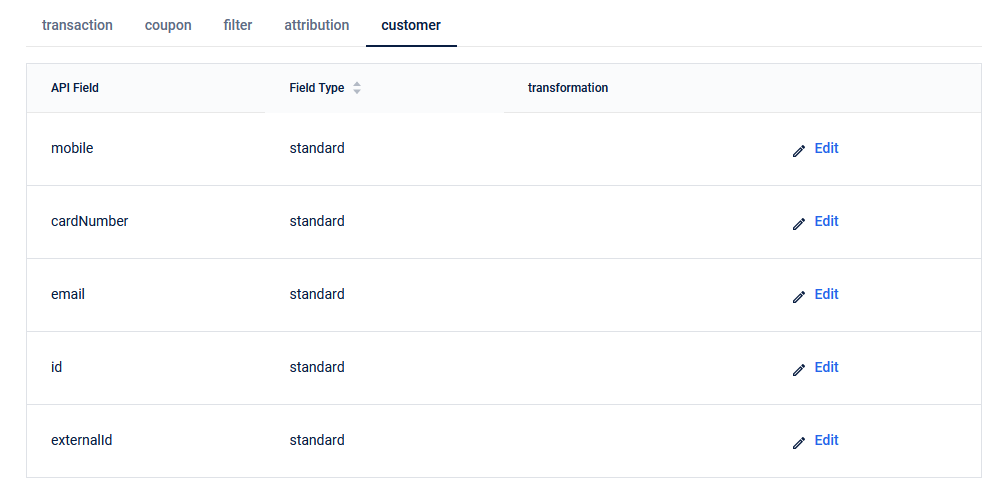
4. Customer
Here, the identifier of the customer is mapped. You need to pass at least one identifier.