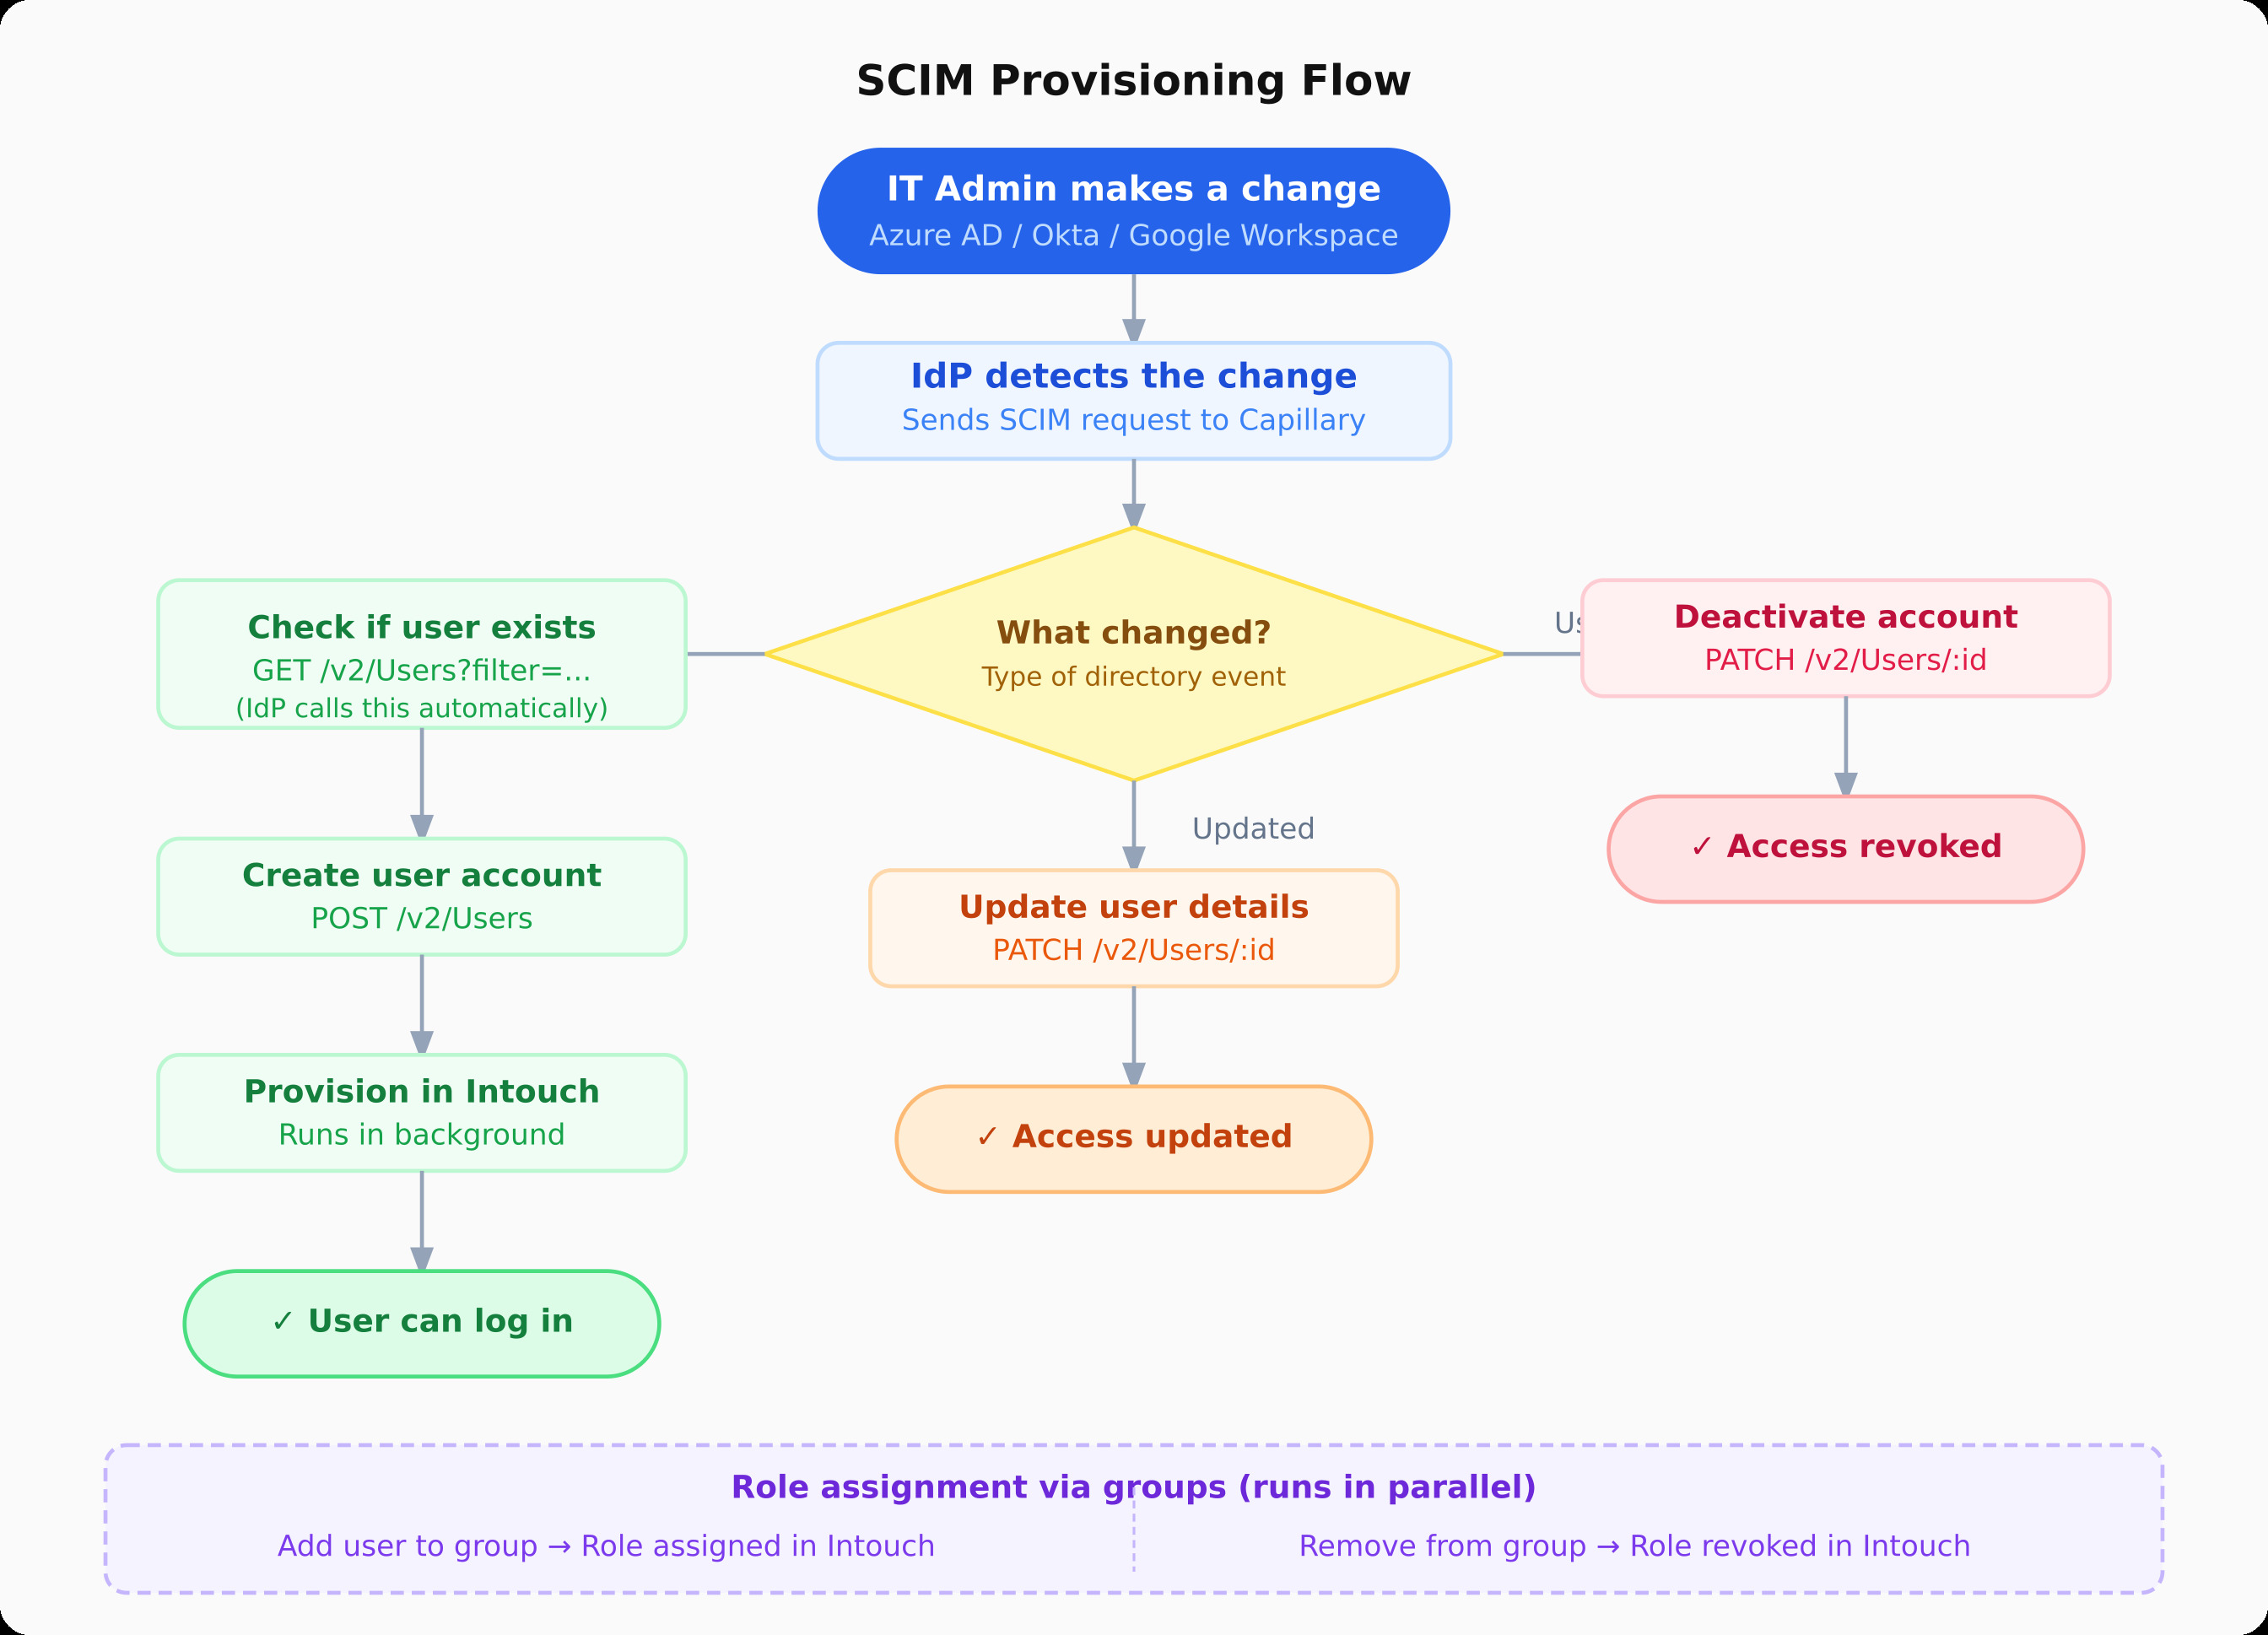
System for Cross-domain Identity Management (SCIM) is an open standard protocol that lets your identity provider (IdP), such as Microsoft Entra ID (Azure AD), Okta, or Google Workspace, automatically create, update, and deactivate user accounts in Capillary. Instead of managing users manually in two separate systems, SCIM keeps them in sync.
Why SCIM matters for Capillary
Today, Capillary supports three ways to provision users manually:
| Method | Limit | Typical wait time |
|---|---|---|
| UI invite | 10 users at a time | Minutes to hours |
| CSV upload | 200 users at a time | Hours to a day |
| Capillary Access Team request | Unlimited | 1 to 3 days |
Manual provisioning creates real problems at enterprise scale. A new employee joins but can't access Capillary for days. A former employee's account stays active long after they leave. A role change requires coordinating updates in two separate systems, with no guarantee that they will stay consistent.
With SCIM, your IdP becomes the single source of truth. Changes you make in your directory, adding a user, updating a role, removing someone, are automatically reflected in Capillary. No tickets. No waiting. No forgotten accounts.
A real example
Without SCIM
A retail brand hires a new loyalty analyst. Someone from the brand emails Capillary support to create her account and assign the right role. Capillary creates it manually maybe two days later. When she eventually leaves the company, no one remembers to inform Capillary. Her account stays active with full access, she no longer needs.
With SCIM
The brand's IT admin adds her to Azure AD and assigns her to the "Loyalty Analyst" group. That's it.
Capillary receives this automatically, creates her account, and gives her the right access. She can log in on the same day.
Six months later, she moves into a Campaign Manager role. The brand updates it in Azure AD. Her access to Capillary updates on its own.
When she eventually leaves, the brand removes her from Azure AD. Her Capillary access is gone immediately.
No emails. No tickets. No waiting. No forgotten accounts.
How SCIM works
Setting up SCIM involves four stages. Each one builds on the previous:
Stage 1: Generate a SCIM token
You start by generating a Bearer token for your Capillary organization. This token is the password your IdP uses to authenticate every request it makes to Capillary. Without it, your IdP has no way to talk to Capillary.
Call Create SCIM Token to generate the token. It is returned only once, store it securely immediately, as you can't retrieve it again. Only one active token can exist per organization at a time.
Stage 2: Connect your IdP to Capillary
In your IdP's provisioning settings, enter the Capillary SCIM endpoint URL and the bearer token. Your IdP uses these to locate Capillary and authenticate every request it sends. After configuration, your IdP automatically syncs user changes, new hires, role updates, and departures to Capillary.
Enter the following:
- SCIM base URL: This is the address your IdP sends every SCIM request to for creating a user, updating one, or managing a group; all get sent to this same URL. Which exact address you use depends on where your organization's data is hosted, its "region." For example, use
https://eu.intouch.capillarytech.com/launchpad/api/v2if your organization is in the EU data center, orhttps://apac2.intouch.capillarytech.com/launchpad/api/v2for APAC. This URL doesn't change between organizations within the same region, every EU organization uses the same EU base URL. What actually tells Capillary which organization is making the request is the SCIM token in the next field, not the URL. - Authentication method: HTTP Header
- Authorization header value:
Bearer <your-token>
Testing the connection: Most IdPs show a Test Connection button before letting you save this configuration. Clicking it sends a read-only check to Capillary to confirm the URL is reachable and the token is valid. Once the test succeeds, save the configuration.
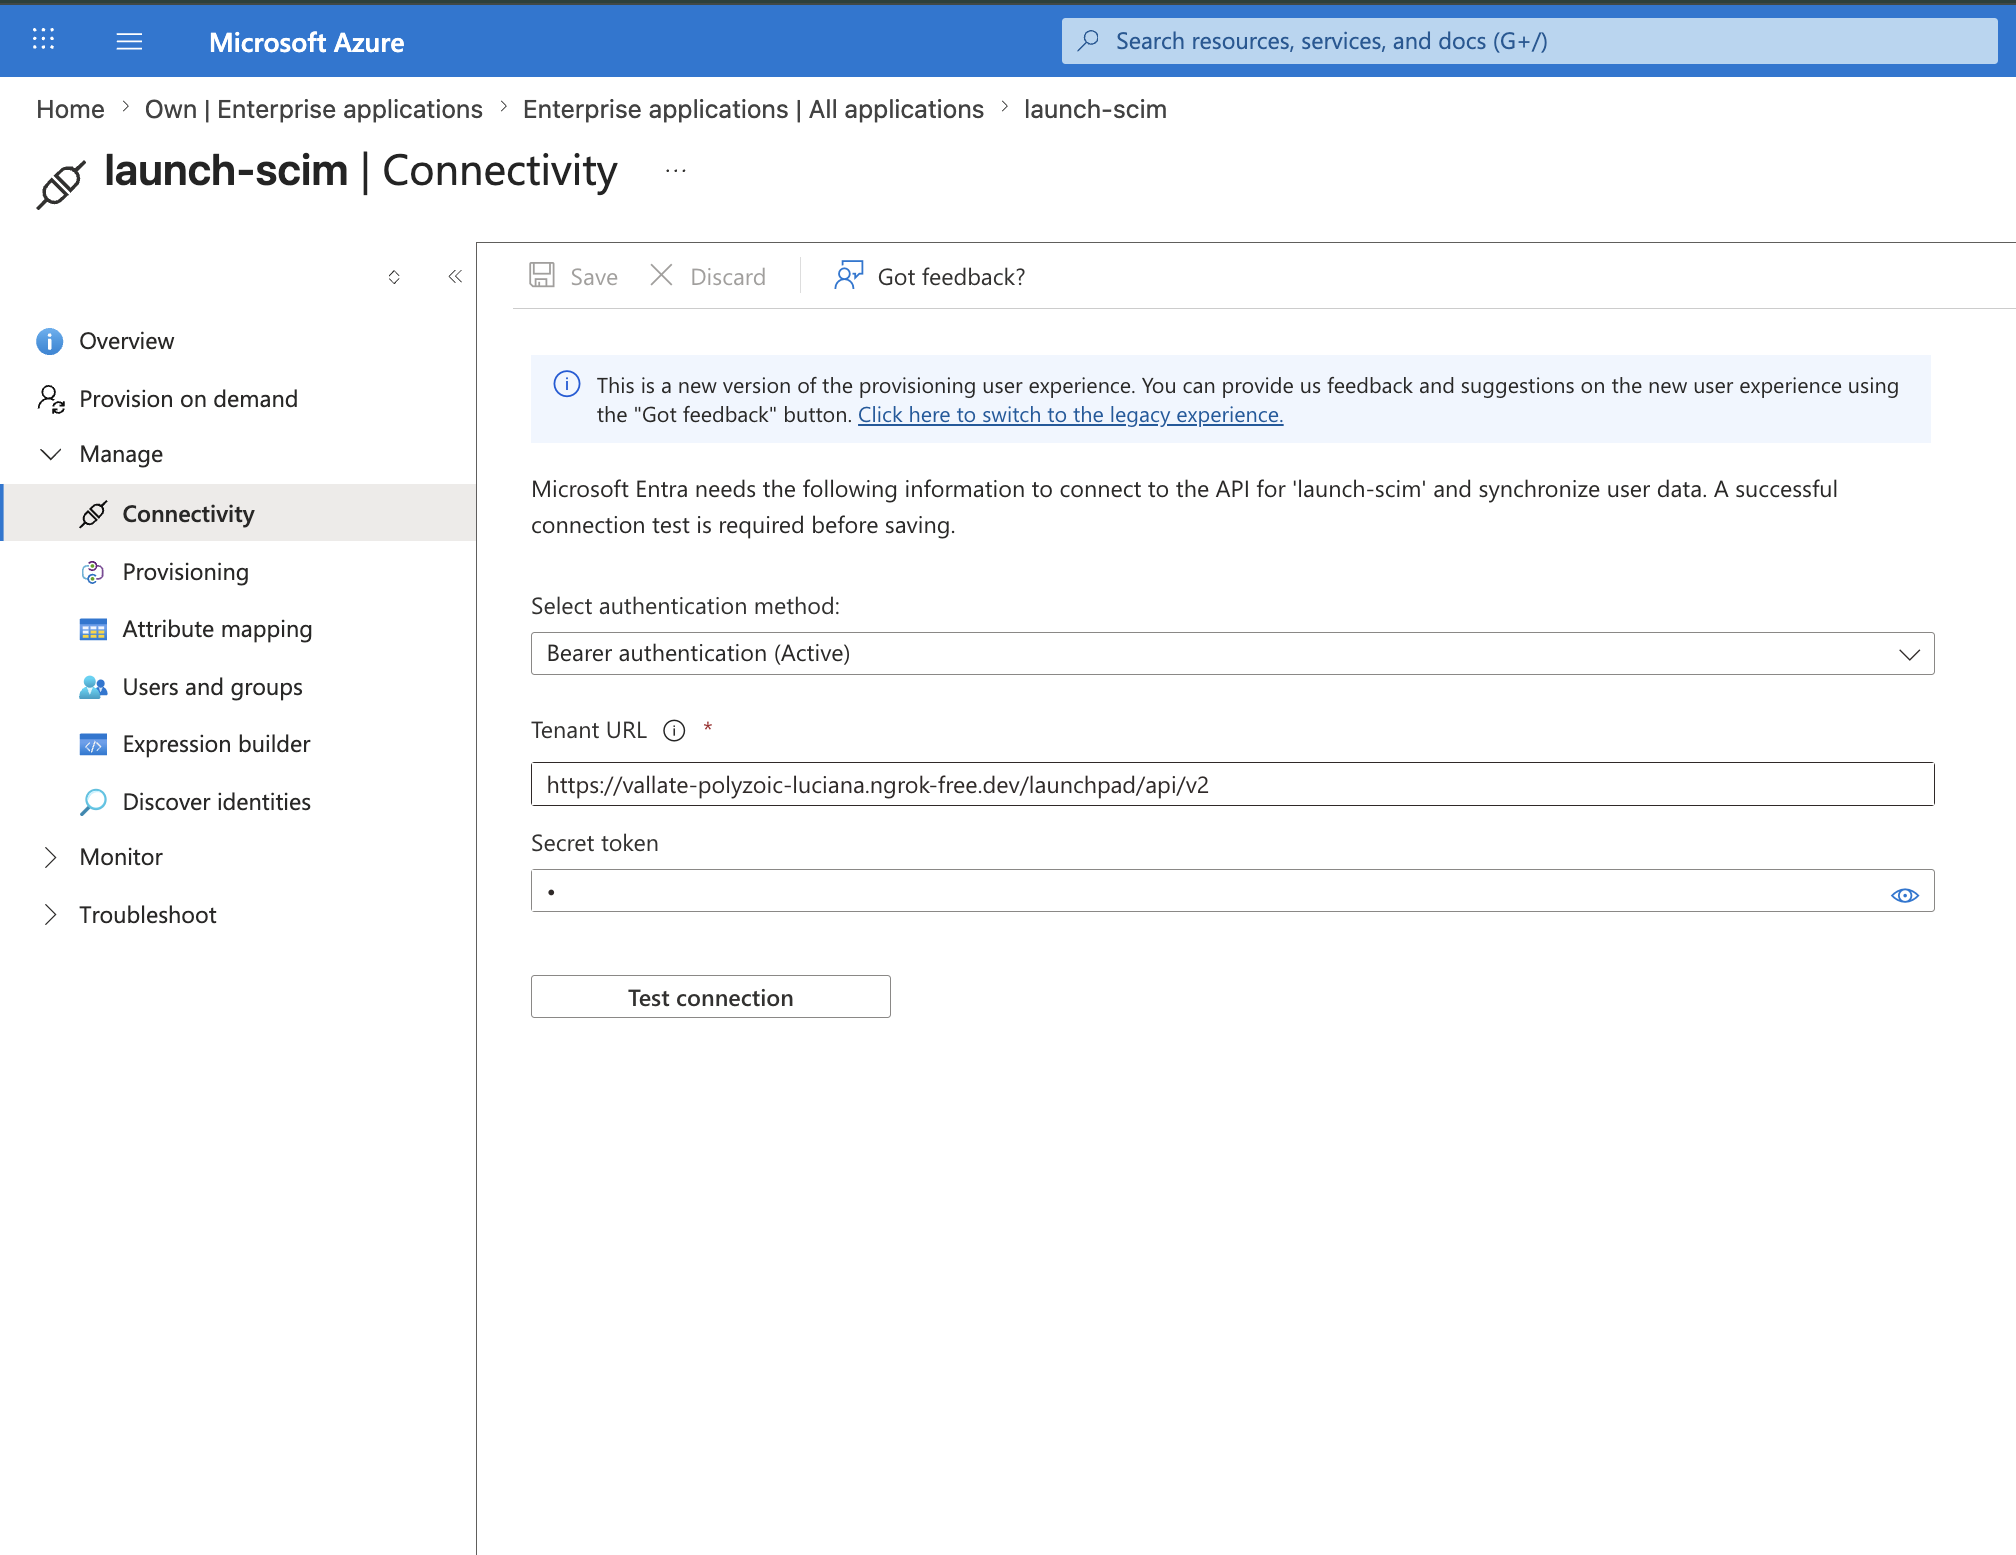
How your IdP knows what to do: You won't need to configure anything beyond the URL and token above. SCIM is a standard protocol, so your IdP already knows what action to take for every kind of change. For example, it automatically creates a user when someone's hired, updates a user's details when their profile changes, and adds or removes them from a group when their role changes. Capillary, in turn, understands and responds to all of these standard SCIM actions. This is what makes step 3 (auto user sync) and step 4 (role assignment) work without any extra setup.
Stage 3: User sync happens automatically
From here, your IdP drives everything. Whenever a user is added, updated, or removed in your directory, your IdP calls Capillary's user APIs automatically:
- It first calls Get User by Filter to check whether the user already exists in Capillary.
- If the user doesn't exist, it calls Create User to provision them.
- If the user already exists and their details have changed, it calls the update API to sync the changes.
- If the user is removed from your directory, it calls the deactivate API to revoke their access.
You don't call these APIs yourself during normal operation; your IdP does. However, you can also call them directly, for example, to confirm that a user was provisioned or to look up a specific user's current status.
NoteUser creation in SCIM is asynchronous, meaning Capillary confirms the request immediately but provisions the user in Intouch in the background. The user appears in the Get Users list only after this completes; in practice, this takes only a few seconds.
Stage 4: Role assignment via groups
In Capillary's SCIM model, a group represents a role. You create a group and give it a name that matches an existing role in your Capillary organization for example, org_level or MC AGENT. When your IdP adds a user to that group, Capillary automatically assigns them that role in Intouch. When the user is removed from the group, the role is revoked.
Note: Before creating groups, make sure the Capillary roles you want to manage via SCIM already exist in your organization. To create a role in Capillary org, go to Organization settings > Roles & Privileges > Add role in Capillary, then map the required permission sets to it using the POST /launchpad/api/v1/orgs/roles/add endpoint.
A group displayName must exactly match an existing role name. If no matching role is found, the request returns a 400 error. For example, if the role is named MC AGENT, the group name must also be MC AGENT , a group named mcagent or mc agent will not match and the group creation will fail.
Call Create Group for each role, passing the role name as the displayName. From that point on, adding a user to a group in your IdP assigns them that role in Capillary. Removing them revokes it.
This means you manage who has which role entirely from your IdP. Capillary reflects it automatically.
Token lifecycle
Each organization has at most one active SCIM token. To rotate a token:
-
Call Revoke SCIM Token to invalidate the current token.
-
Call Create SCIM Token to generate a new one.
-
Update the token value in your IdP's provisioning configuration.
Note: If you revoke a token without immediately replacing it, your IdP loses the ability to provision users until you generate a new token and update your IdP settings.
API reference
| API | Method | Description |
|---|---|---|
| Create SCIM Token | POST | Generates a bearer token for your organization. Returned once — store it immediately. |
| Revoke SCIM Token | PUT | Revokes the active token. Required before generating a new one. |
| Create User | POST | Creates a user in Capillary when they're added in your directory. |
| Get List of Users | GET | Returns all users provisioned in your organization. |
| Get User by Filter | GET | Checks whether a specific user exists. Your IdP calls this before creating a user. |
| Get User by SCIM ID | GET | Returns a single user by numeric ID or scim-{timestamp} ID. |
| Create Group | POST | Creates a group that maps to a Capillary role. |
| Add or Remove Group Members | PATCH | Adds or removes users from a group, triggering role assignment or revocation. |