
Prerequisites
The following are the prerequisites for using Neo extension to create an API.
- Enable Neo extension for your organisation. Create a ticket to Capillary Product Support Team (PST) to enable the Neo extension in your org.
- Get access to Neo extension - Create a ticket to the Capillary Customer Success team to grant you the necessary permissions to use the Neo extension. For more information on the access groups, refer to the User Management documentation here.
Access to Neo extensions is available in three different profiles. They are,- Neo View - A Neo viewer can view rule listings, rule version listings, and the data flow canvas. It supports only GET requests.
- Neo Edit - A Neo edit user includes all the capabilities of Neo View and supports certain non-critical POST requests, such as saving a data flow.
- Neo Admin - An admin has all the permissions of Neo Edit, plus admin-level access. It allows users to approve or reject a data flow, change the name and tags of a data flow, and make a data flow version live.
- Knowledge of web application development and JavaScript.
- API mapping sheet - An API mapping sheet includes detailed information about the API, such as its URL, parameters, error and success codes, and descriptions.
- The DAO function library.
Terms and abbreviations
- UI - User Interface
- Schema - A schema is a format for describing the structure of data. It specifies how data is organised, the types of data, their relationships, and the rules for their validation.
- Code flow - A code flow is the sequence and logic of operations a program or script follows during execution. It shows how control moves through the code, covering decision points, loops, function calls, and error handling.
- Canvas - A workflow canvas is a visual representation or interface to design, configure, and visualise the flow of tasks.
- Mongo DB - MongoDB is an open-source database program that can run on various platforms, including Windows, macOS, and Linux. It stores data in flexible, JSON-like documents.
- Redis - Redis is an in-memory data store that uses key-value data structures to store data. It is generally used as a caching layer.
- DAO - A Data Access Object (DAO) is a design pattern that offers an abstract interface to a database or similar mechanism. The DAO performs data operations without exposing the database details by mapping application calls to the data layer.
Building blocks/Executors
The Neo extension consists of blocks or executors used to manage the execution of specified tasks or processes. The blocks available are JSON schema, Java script, JOLT transform, and API Request, each supporting different aspects of API development.
JSON Schema
The JSON schema block is used to validate the parameters of an API request to ensure that the required parameters are available and valid. Based on the validation results, the API follows a configured code-flow path.
How it works
- Schema Creation: The schema is created in the Scripts section using the AJV library for validation.
- Validation: During API execution, the request payload is validated against the schema.
- Code Flow: Different actions or error messages are triggered depending on the validation result. Code flows after validation are defined using JavaScript.
Example scenario
Consider a scenario where we are building an API to get a customer account summary. The request payload needs to be validated before execution.
API Details
- Endpoint: v2/customers/lookup/customerDetails
- Path Parameters: Not Required
- Query Parameters: FFN, Fname, lname
- Method: GET
- Mandatory Parameters: FFN, Fname, lname
Using the JSON schema block, you can:
- Create a Schema: Validate the presence and validity of FFN, Fname, lname.
- Define Code Flows: Specify actions for different validation outcomes.
Example Schema
const schema = {
  definitions : [],
  spec:{
    type : "object",
    "properties": {
      "queryParams" :{
        type: 'object',
        properties: {
          FFN: {
            type: 'string',
            minLength: 1,
            "errorMessage": {
              minLength: "FFN must not be empty"
            }
          },
          Fname: {
            type: 'string',
            minLength: 1,
            "errorMessage": {
              minLength: "Fname must not be empty"
            }
          },
          lname: {
            type: 'string',
            minLength: 1,
            "errorMessage": {
              minLength: "lname must not be empty"
            }
          }
        },
        required: ['FFN', 'Fname', 'lname'],
        errorMessage: {
          required: {
            FFN: "FFN is missing",
            Fname: "Fname is missing",
            lname: "lname is missing"
          }
        }
      }
    },
    required: ['queryParams'],
    errorMessage: {
      required: {
        queryParams: "queryParams are missing"
      }
    }
  }
};

export {schema as default};
Defining Code Flows: In the Relations section, use the DAO functions hasError() and isSuccess() to handle the validation response.
- If validation is successful, proceed with fetching customer details.
- If validation fails, return an error message indicating missing or invalid parameters.
Refer to Schema block documentation
Java Script
The JavaScript block defines and executes JavaScript functions as part of your workflow. It can be used for various tasks such as:
- Executing code based on the result of a validation block.
- Performing data transformations, such as converting data from one format to another.
- Executing other desired actions at different points in the dataflow.
How it works
- Execution: The JavaScript block can be triggered after a validation block or at any other point in the dataflow.
- Data Transformation: It allows you to manipulate and transform data as needed.
- Custom Actions: You can write custom scripts to perform specific actions based on the requirements of your dataflow.
Example scenario
Consider a scenario where you build an API to get a customer account summary. The input parameters are validated using the JSON schema. Validation can either be a failure or a success.
API Details
- Endpoint: v2/customers/lookup/customerDetails
- Path Parameters: Not Required
- Query Parameters: FFN, Fname, lname
- Method: GET
- Mandatory Parameters: FFN, Fname, lname
Handling scenarios using the script block
- Validation Failure - To handle validation failure,
- Create a JavaScript block from the
isSuccess()path of Schema block. - Write a script to display the error code, message, and exit.
Example script for validation failure
import dao from "neo/dao";

const {
    getIn,
    getEffectiveHeaders
} = dao;

const script = {

    execute: () => {
        let errorArr = [];
        let error;
        const validationErrors = getIn()?.err;
        validationErrors?.forEach(validationError => {
            error = {
                "status": false,
                "code": 6001,
                "message" : validationError.message,
                "path" : validationError.instancePath
            }
            errorArr.push(error);
        });
        return {
           http: {
               "res": {
                    status : 400,
                    "json": {
                        "errors" : errorArr
                    }
               }
           }
        }
    }

}

export {script as default}- Validation Success - To handle validation success,
- Create a JavaScript block from the
isSuccess()path of Schema block. - Write a script to get the query parameters, update the headers, and map
FFNtoexternalId.
Example script for validation success
import dao from "neo/dao";

const {
    getEffectiveHeaders,
    getApiRequest
} = dao;

const script = {
    execute: () => {
        const requestQueryParams = getApiRequest().queryParams;

        let requestHeaders = getEffectiveHeaders();
        // Remove these headers because customer lookup api will throw error incase invalid values are passed here
        delete requestHeaders["x-cap-neo-test-variant-id"];
        delete requestHeaders["x-cap-api-attribution-entity-type"];
        delete requestHeaders["x-cap-api-attribution-entity-code"];
        delete requestHeaders["x-cap-api-attribution-till-code"];

        let queryParameters = {
            "identifierName" : "externalId",
            "identifierValue" : requestQueryParams.FFN,
            "source" : requestQueryParams.source ? requestQueryParams.source.toUpperCase() : "INSTORE"
        }
        return {
            headers : requestHeaders,
            queryParams : queryParameters
        };
    }
}

export {script as default}
Refer to the documentation for the Script block.
API Request
The API Request block is used to make an API call. In this block, you can specify various details required for making the request, such as the HTTP method, URL, headers, query parameters, body parameters, and path parameters.
Use case
Consider a scenario where Brand X needs additional information along with existing data. You need to meet the requirement without affecting other brands using the existing APIs. Creating a new API version is not an option because the requirement is brand-specific. Instead, you can use the API Request block to compose a response using data from multiple APIs.
How it works
- Method: Specify the HTTP method (GET, POST, PUT, DELETE)
- URL: Provide the endpoint URL of the API
- Headers: Define any required headers for the request
- Query Parameters: Include any query parameters needed for the request
- Path Parameters: Insert any path parameters into the URL
Example scenario
Consider a scenario where you are building an API to get customer details. The input parameters are validated using the JSON schema. The validation of the input parameters is successful, and the headers and parameters are fetched from the script block.
API Details
- Endpoint: v2/customers/lookup/customerDetails
- Path Parameters: Not Required
- Query Parameters: FFN, Fname, lname
- Method: GET
- Mandatory Parameters: FFN, Fname, lname
Define Code Flows: In the Relations section, use the DAO functions hasError() and isSuccess() to handle the validation response.
Get Mongo
Get Mongo block allows you to write a query and read from the MongoDB. It helps you interact with MongoDB directly from the Neo UI, allowing you to fetch data from a MongoDB collection based on a specific query.
Fields for Get block
- Mongo Collection Name: The name of the MongoDB collection you want to query.
- Query: The criteria for selecting which documents to retrieve. This field must be filled in, or the query will fail.
- Example: { "fieldName": "fieldValue" }
- Sort: (Optional) Specifies how to sort the results. Include the field and the sort order.
- Limit: (Optional) Limits the number of documents returned.
Use case description
Retrieval of stored data
Consider an application that needs to store and retrieve agent (user) mapping information (which is the association between agent IDs and their corresponding external IDs) in MongoDB. Here’s how it works:
- The application stores agent IDs (unique identifiers for agents) and their corresponding external IDs in MongoDB.
- When the application receives an input payload containing an agent ID, it queries MongoDB to find the corresponding external ID.
- Once the external ID is retrieved, the application uses it to make an API call to an external platform to perform specific actions, such as updating or retrieving additional data related to the agent.
Example:
- Storing Agent Mapping
- Agent ID: "A123"
- External ID: "E456"
This mapping is stored in MongoDB.
- Retrieving Agent Mapping
- Input Payload:
{ "agentId": "A123" } - The system queries MongoDB with agent ID "A123".
- MongoDB returns the corresponding external ID "E456".
The system uses external ID E456 to make an API call to an external platform, such as Capillary, to update agent information or retrieve additional data related to the agent.
Note: The DAO functions or expression handling is supported for a query.
For details, refer to the Usage of MongoDB blocks.
Put Mongo
The Put Block is used to insert, update, or upsert (update and insert) data into a MongoDB collection.
Fields for Put block
- Mongo Collection Name: The name of the MongoDB collection you want to modify.
- Mode: Choose whether to insert, update, or upsert data.
- Insert: Add new documents.
- Update: Modify existing documents.
- Upsert: Update documents or insert them if they don't exist.
- Query Key: Used in update mode to identify which document to update. This field specifies the key to build the update criteria.
- Query: Specifies how to modify the document for update or upsert operations.
Example: { $set: { "fieldName": "fieldValue" } }
Use case description
Store and update data
Consider an application that stores the agent mapping information in the MongoDB.
The system adds or updates the agent mappings in MongoDB using the MongoDB Put Block.
How It Works
Input: The blocks can take input directly from the user or the previous block in the data flow.
Output: After performing the specified operation, the result is passed on to the next block.
For details, refer to the Usage of MongoDB blocks.
Redis Evict
The Redis Evict block removes old or unused data from the cache to free up memory and ensure that stale data is not retrieved. This is especially useful when cached data becomes outdated due to updates or changes in the underlying data source.
How it works
- Eviction: The block removes specified data from the Redis cache.
- Memory Management: Helps to free up memory by clearing old or unused cache entries.
- Data Consistency: Ensures that outdated or stale data is not retrieved by evicting it from the cache.
How to use the Redis Evict block
- Identify Cache Key
Determine the key to store the data in the Redis cache that needs to be evicted. - Configure the Redis Evict Block
Specify the cache key in the Redis Evict block configuration. - Execute Eviction
Use the block to remove the specified data from the cache.
Example scenario
Consider an API getCustomer that retrieves customer details and stores the result in the cache. If there is an update to the customer details, the cached getCustomer data becomes outdated. Evict the old cached data to ensure the next retrieval gets the updated data.
For more details, refer Redis Evict block documentation.
Creating your first API
This section describes how to create your API using the Neo extension and the following is the workflow.
- Navigate to the Neo Extension portal.
- Click Create new dataflow.
- In the Name field, enter a valid name.
- (Optional) In the Tags field, enter a tag name.
- Click Done.
- In the Dataflows page, click on the new dataflow you created.
A page showing the versions of the dataflow opens. - Select version v1, the default for new dataflows.
- Define a trigger for the dataflow
You provide information related to the API being created, including the API endpoint and method. The dataflow triggers when the API is called.- In the workflow canvas, hover over the Trigger block and click the edit icon that appears.
- In the Overview: Trigger window, select the API method from the dropdown and enter a unique API url.
Note: The combination of API URL and API method must be unique across all dataflows, but different versions of the same dataflow can have the same combination. - Click Done.
- Configure the validation rules and define the code path using the Schema block
As part of the validation, you create a schema against which the request payload is validated. For validation, specify the parameter type - body, query, or path, and their properties.
The validation can result in success or failure. The path taken by the workflow in both conditions is defined here.
To define the path,- In the workflow canvas, hover over the Trigger block and click the edit icon that appears.
- In the Configure: Schema window, enter the block name in the Block name field.
- In the Script field, define the schema against which the validation occurs.
- (Optional) In the Combine inputs to this block using field, select the
AND operatorto execute actions when all inputs are received orOR operatorto execute actions when any input is received.
Note: TheAND operatoris selected by default. - (Optional) Select Is Cachable to store the schema in the cache.
- (Optional) In the Relations field, under Path 1 Relation,use DAO function
isSuccess()to handle success scenario orhasError()for failure scenario. - (Optional) Click + AddPath to define more scenarios for validation results.
- Click Done.
- Handle validation failure
You can handle the validation failure by generating correct error codes and messages. Use the script block to configure the validation failure response.- Click on the connector of the hasError() path for the validation failure scenario.
- Select the Script block.
- In the Configure: Script window, enter a unique block name in the Block name field.
- In the Script field, write a script to handle different errors and show the appropriate error messages.
- (Optional) In the Combine inputs to this block using field, select the
AND operatorto execute actions when all inputs are received orOR operatorto execute actions when any input is received.
Note: TheAND operatoris selected by default. - (Optional) Select Is Cachable to store the schema response in the cache.
- (Optional) In the Relations field, under Path 1 Relation, use DAO function
isSuccess()to handle success scenario orhasError()for failure scenario. - (Optional) Click + AddPath to define more scenarios for validation results.
- Click Done.
- Set headers and query parameters
For a validation success scenario, the API request block is invoked. Fetch the headers and set the parameters before configuring the API request block.- Click on the connector of the isSuccess() path for the validation success scenario.
- Select the Script block.
- In the Configure: Script window, enter the block name in the Block name field.
- In the Script section, write a script to fetch the headers and set the parameters.
- (Optional) In the Combine inputs to this block using field, select the
AND operatorto execute actions when all inputs are received orOR operatorto execute actions when any input is received.
Note: TheAND operatoris selected by default. - (Optional) Select Is Cachable to store the schema in the cache.
- (Optional) In the Relations field, under Path 1 Relation, use DAO function
isSuccess()to handle success scenario orhasError()for failure scenario. - (Optional) Click + AddPath to define more scenarios for validation results.
- Click Done.
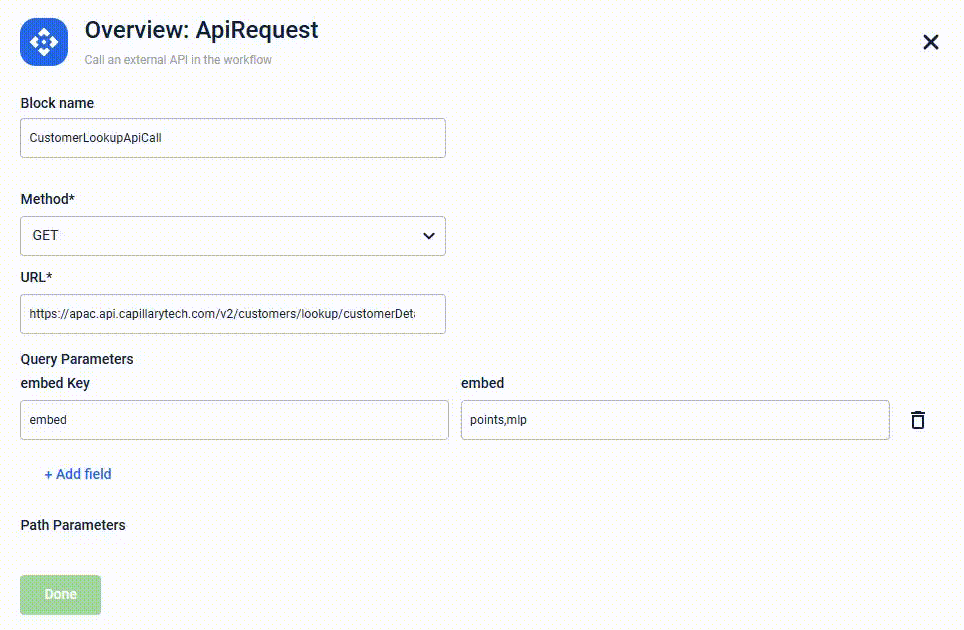
- Create an API request
After configuring the headers and parameters for a validation success scenario, use the API request block to create the API request. Specify the method, URL, query parameters, body, and path parameters within the API block. This is done using the API Request block. To create API request,- Click on the connector of the Script block where the headers and parameters are set.
- Select the API Request block.
- In the Configure: ApiRequest window, enter the block name in the Block name field.
- In the Method field, select the method from the drop-down.
- In the URL field, enter the API URL.
- Click Add field under Query Parameters, to add the required query parameters.
- Click Add field under Path Parameters, to add the required path parameters.
- Click Add field under Headers, to add the required headers.
- (Optional) In the Combine inputs to this block using field, select the
AND operatorto execute actions when all inputs are received orOR operatorto execute actions when any input is received.
Note: TheAND operatoris selected by default. - (Optional) Select Is Cachable to store the schema response in the cache.
- (Optional) In the Relations field, under Path 1 Relation, use DAO function
isSuccess()to handle success scenario orhasError()for failure scenario.- (Optional) Click + AddPath to define more scenarios for validation results.
- Click Done.
- Post-request validation
Post-request validation includes error handling and verifying the response after the API is executed. To configure post-request handling,- Use the Script block to handle the errors.
- Use the Script block, for further data processing, if required.
- (Optional) Use the API Request block to call an API.
- Save the dataflow
Save the dataflow to test and use it. To save,- Click Save.
A confirmation dialogue box appears with the message Do you want to save rule version?. You can edit the rule version later until it is in DRAFT state appears. - Click Yes to save a new dataflow version or No to continue without saving the dataflow.
On clicking Yes, a new dataflow version is created.
- Click Save.
Testing and publishing the API
Testing an API
The APIs created using the Neo extension are tested on an API platform.
The dataflow is triggered when a call is made on the URL using the method defined in the Trigger block.
To trigger and test an API,
- Open an API platform to test the API.
- Enter the method and URL in the below format.
Host: Cluster specific
Base Path:/apigateway/neo/api/v1/xto6x/execute
End Point: As defined in the Trigger block. - Enter the variant ID under the header x-cap-neo-test-variant-id.
Note: The variant ID is required to execute dataflows that are not in the Live state. - Enter the authorisation Key and Value.
- Click Send.
You can see the response of your API as defined.
To view Neo logs, log in to https://apitester.capillary.in/apitest_app/.
Note: Access permissions are required.
Publishing the API
You have to publish the API to use it. The Neo user sends the API to the Neo admin for approval. Once approved by the Neo admin, the API is published.
Following are the steps to publish an API for different roles:
Neo User
After successfully testing the API, send the dataflow version for admin approval before it can be made Live or published.
To send an API for approval,
- Select the version of an API that is tested and needs to be published.
- On the API page, click Send for approval.
- A confirmation dialogue box appears, click Yes to proceed.
The dataflow version is submitted to the Neo admin for approval.
Neo Admin
The Neo admin's approval is required for the version to be published or made Live.
To approve the dataflow,
- In the dataflow page, select the API in the WAITING_FOT_APPROVAL state.
- On the canvas page, review the flow and click Approve.
- In the confirmation dialogue box, enter a comment and click Yes.
The rule version is now approved. Once approved, the dataflow cannot be edited.