
Configure Source Account
This section provides you with information on how to set up a source account and set the connection between SDK and the org.
Using a single source account for iOS and Android
If all information apart from the Bundle ID, such as the FCM Project ID, Identifier type, etc., remains the same for both iOS and Android, you can use a single source account for both platforms. In the Bundle Name field, you can specify the Bundle IDs for both iOS and Android apps. These IDs should be separated by a semicolon.
If brands wish to switch to a single source account ID for existing integrations, they must request the app developer to make the necessary changes on their end. Subsequently, in one of the source accounts, brands should input both the values of the bundle ID and deprecate the remaining source account.
This change will not impact the subscription status response, and it will not require any action from the app developer.
For instance, in the payload below, both the iOS and Android channels share the same accountId, contrasting with previous usage where different source accountIds were employed.
{
"channel": "ANDROID",
"accountId": "~2024ba96",
"priority": "BULK",
"type": "OPTIN",
"sourceName": "MAPP_SDK"
}
{
"channel": "iOS",
"accountId": "~2024ba96",
"priority": "BULK",
"type": "OPTIN",
"sourceName": "MAPP_SDK"
}
To configure the source account, perform the following:
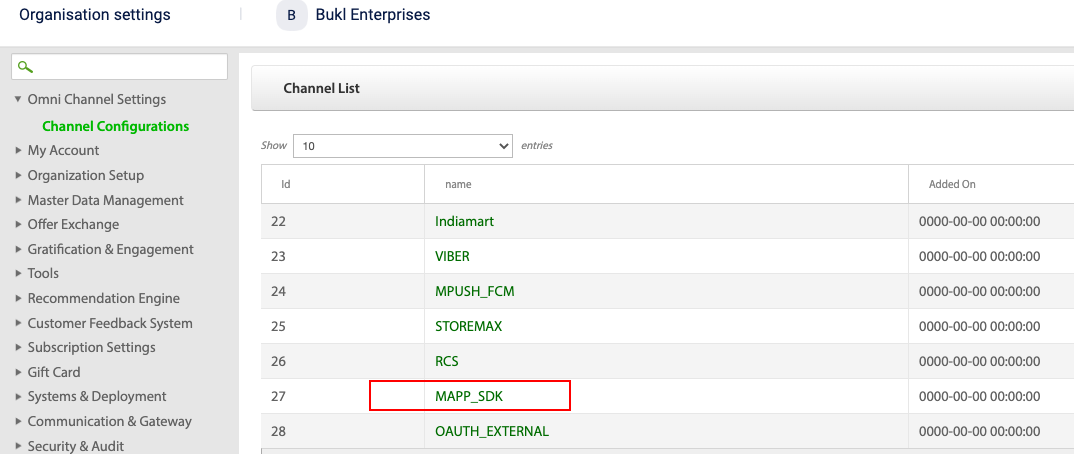
- Navigate to Organisation settings > Omni Channel Settings > Channel Configurations and click MAPP_SDK.
- Click Add new account and in the Add new accountpage, enter the following details:
- Account Name - Enter the channel account name.
- Source Account Id - Displays the service account id. This is auto-generated.
- Enable Mirror - Not required
- Account Linking Identifier - The account linking identifier is used to register a user and form a connection with the member care profile. The account linking identifier drop-down provides a selection of available identifier options. This set of options remains consistent across all Orgs, regardless of whether a specific identifier is configured for a particular Org or not.
- Android/IOS - Select the correct checkbox according to the mobile apps in your account.
- Valid till Name - Select the till from the drop-down. The drop-down displays the tills available in the respective org.
- Bundle name - Enter the app bundle name. Contact the app developer for the bundle name. You can add multiple bundle IDs separated by a semicolon. Multiple bundle names can be entered when you use the same source account for both iOS and Android. For example,
android:com.capillary.product.android.one;ios:com.capillary.product.ios.x. - App signature - Enter the app signature. This is required only for Android apps. Contact the app developer for the app signature.
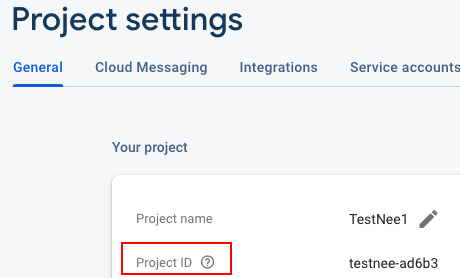
- FCM Project ID - Enter the Firebase project ID. This is available in the Project settings > General tab.
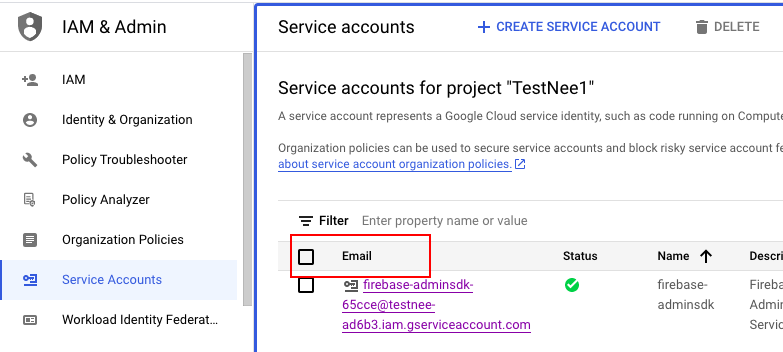
- FCM Email - Enter the FCM service account e-mail. This is available on the service account page in FCM.
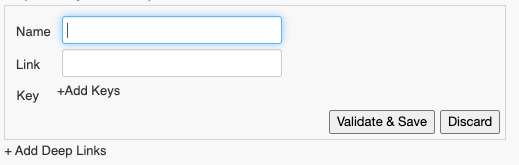
- Previous Deep Links - Displays previous deep links, if any.
- Add Deep links - This is optional. The deep links added here will be available in Engage+ creatives for push notifications.

Updated 17 days ago