Getting started
Introduction
Promotions are special loyalty programs that can run for a short period of time by rewarding customers with something extra from their basic loyalty programs. For example, you can drive sales through promotion programs by rewarding additional points or coupons to customers during a festival season or promoting a specific product. You can run promotion programs either at a transaction level, line item level, or customer level. Based on the event, the promotion type varies automatically. For example, in customer events, you cannot create transaction promotions and vice versa.
Note
- You cannot create promotion programs for all events. For example, you cannot create promotions on events, ReturnTransaction, TransactionUpdate, DelayedAccrual, SlabUpgrade, and all group events (such as GroupTransactionAdd, GroupTransactionUpdate, GroupReturnTransaction, GroupMemberJoin, and GroupMemberLeave).
- You can create transaction or transaction line-item promotions only for the TransactionAdd event. For all other applicable events, you can create only customer-level promotion programs.
- You cannot award points to the referrer or referee through loyalty promotions. Points for referral actions must be configured separately, via workflows in the default loyalty program, not through these promotion types.
To create a promotion program, do the following
- On the loyalty program configuration page, go to Workflows and then go to Loyalty Promotions.
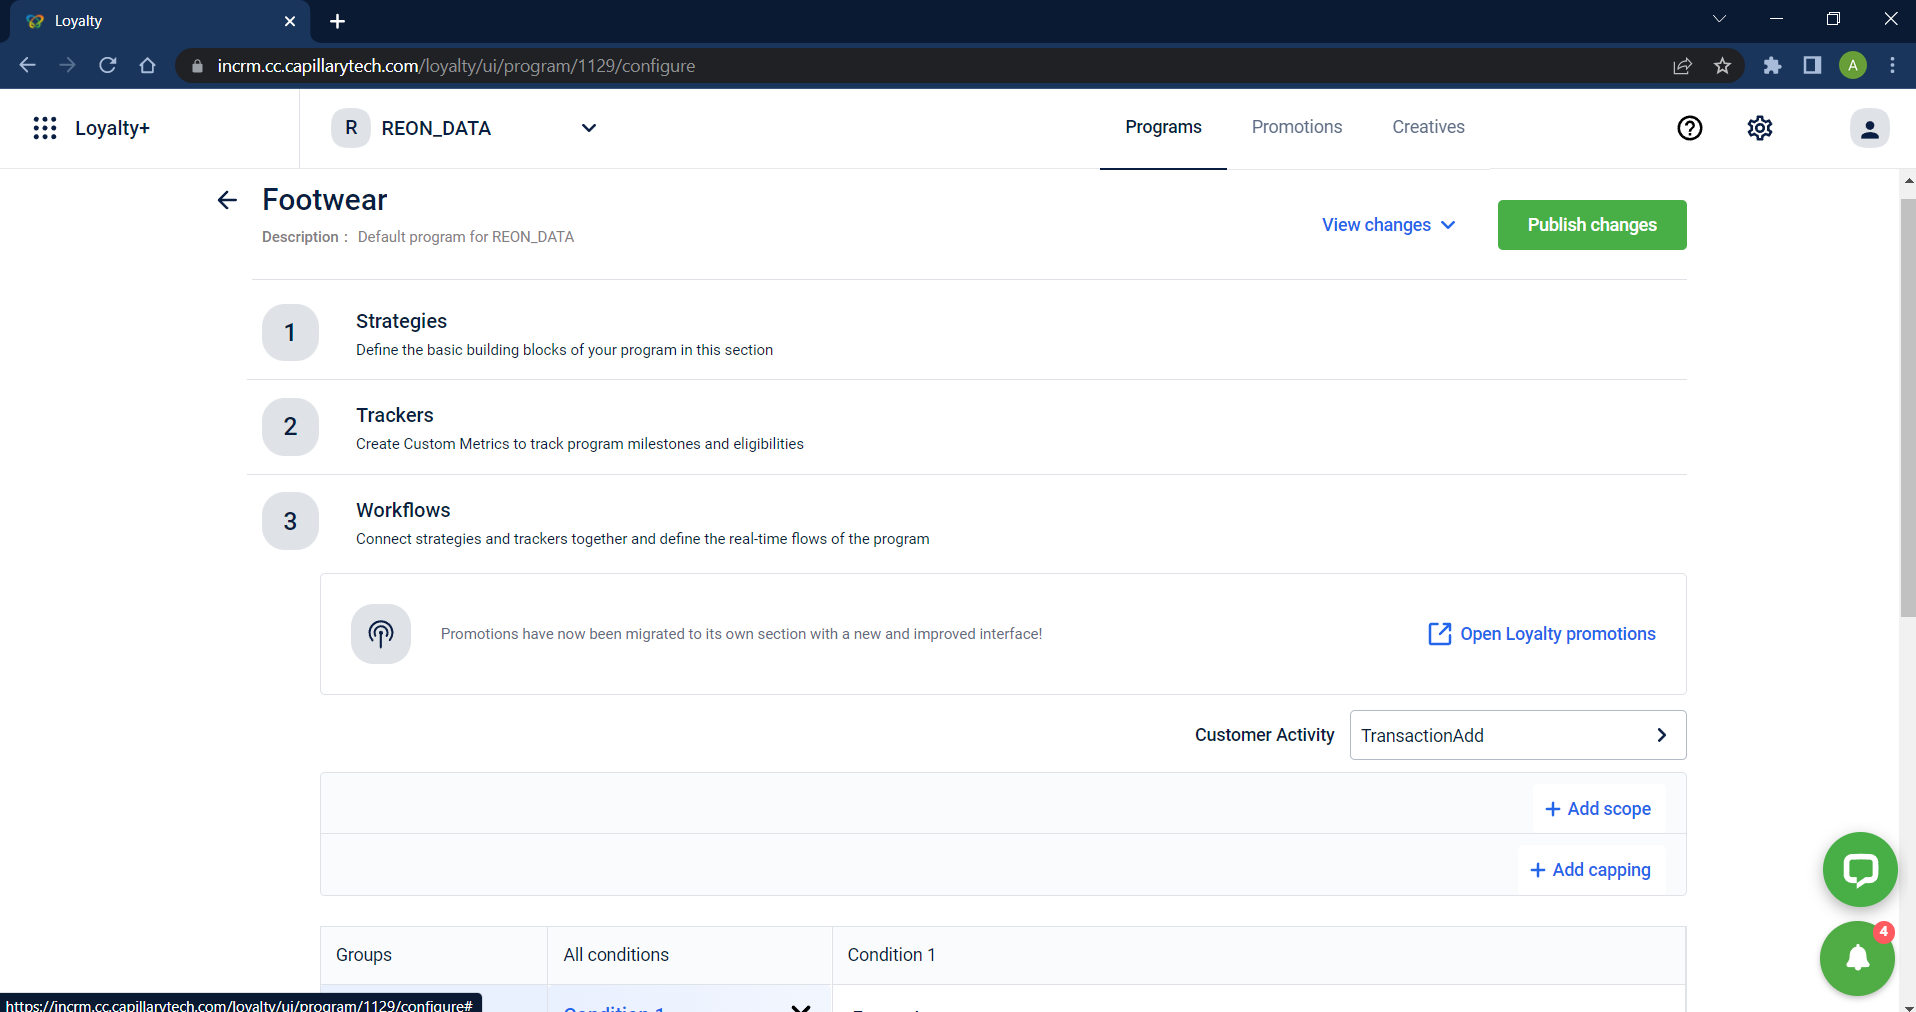
Or, you can go over to the Promotions tab on the top right.
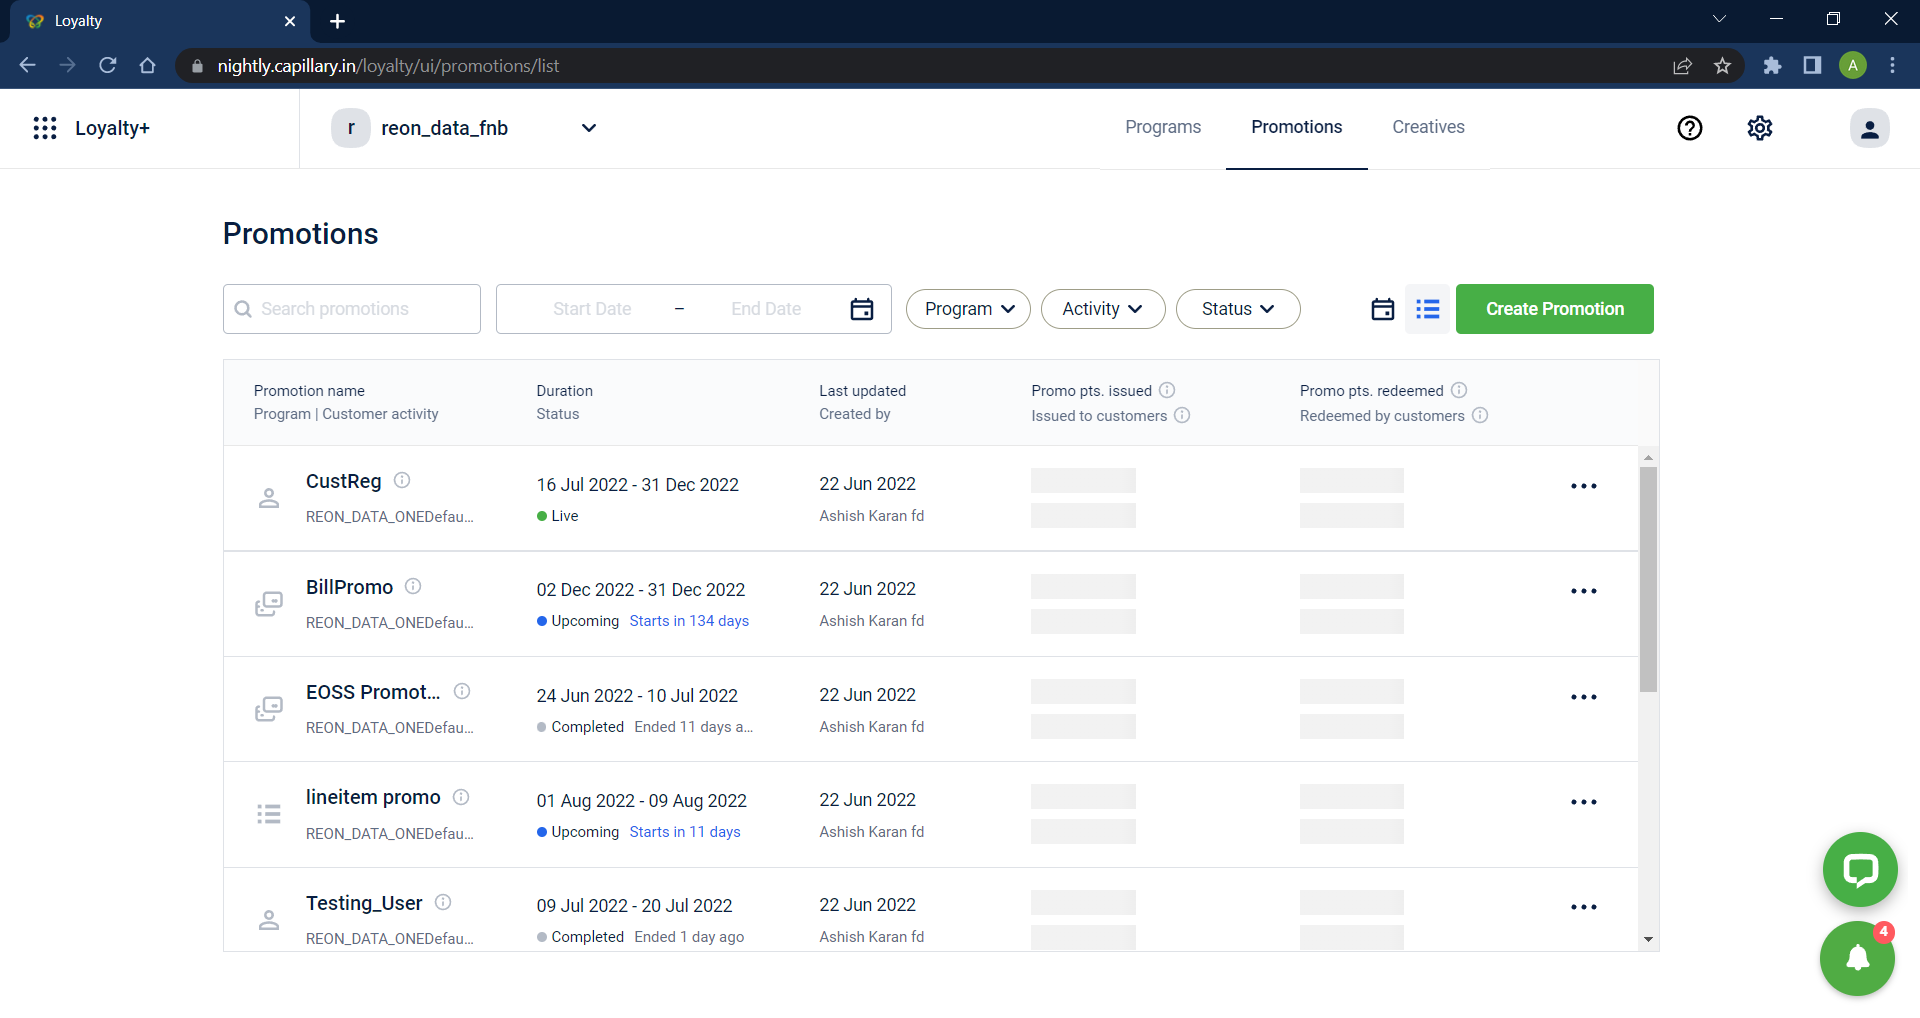
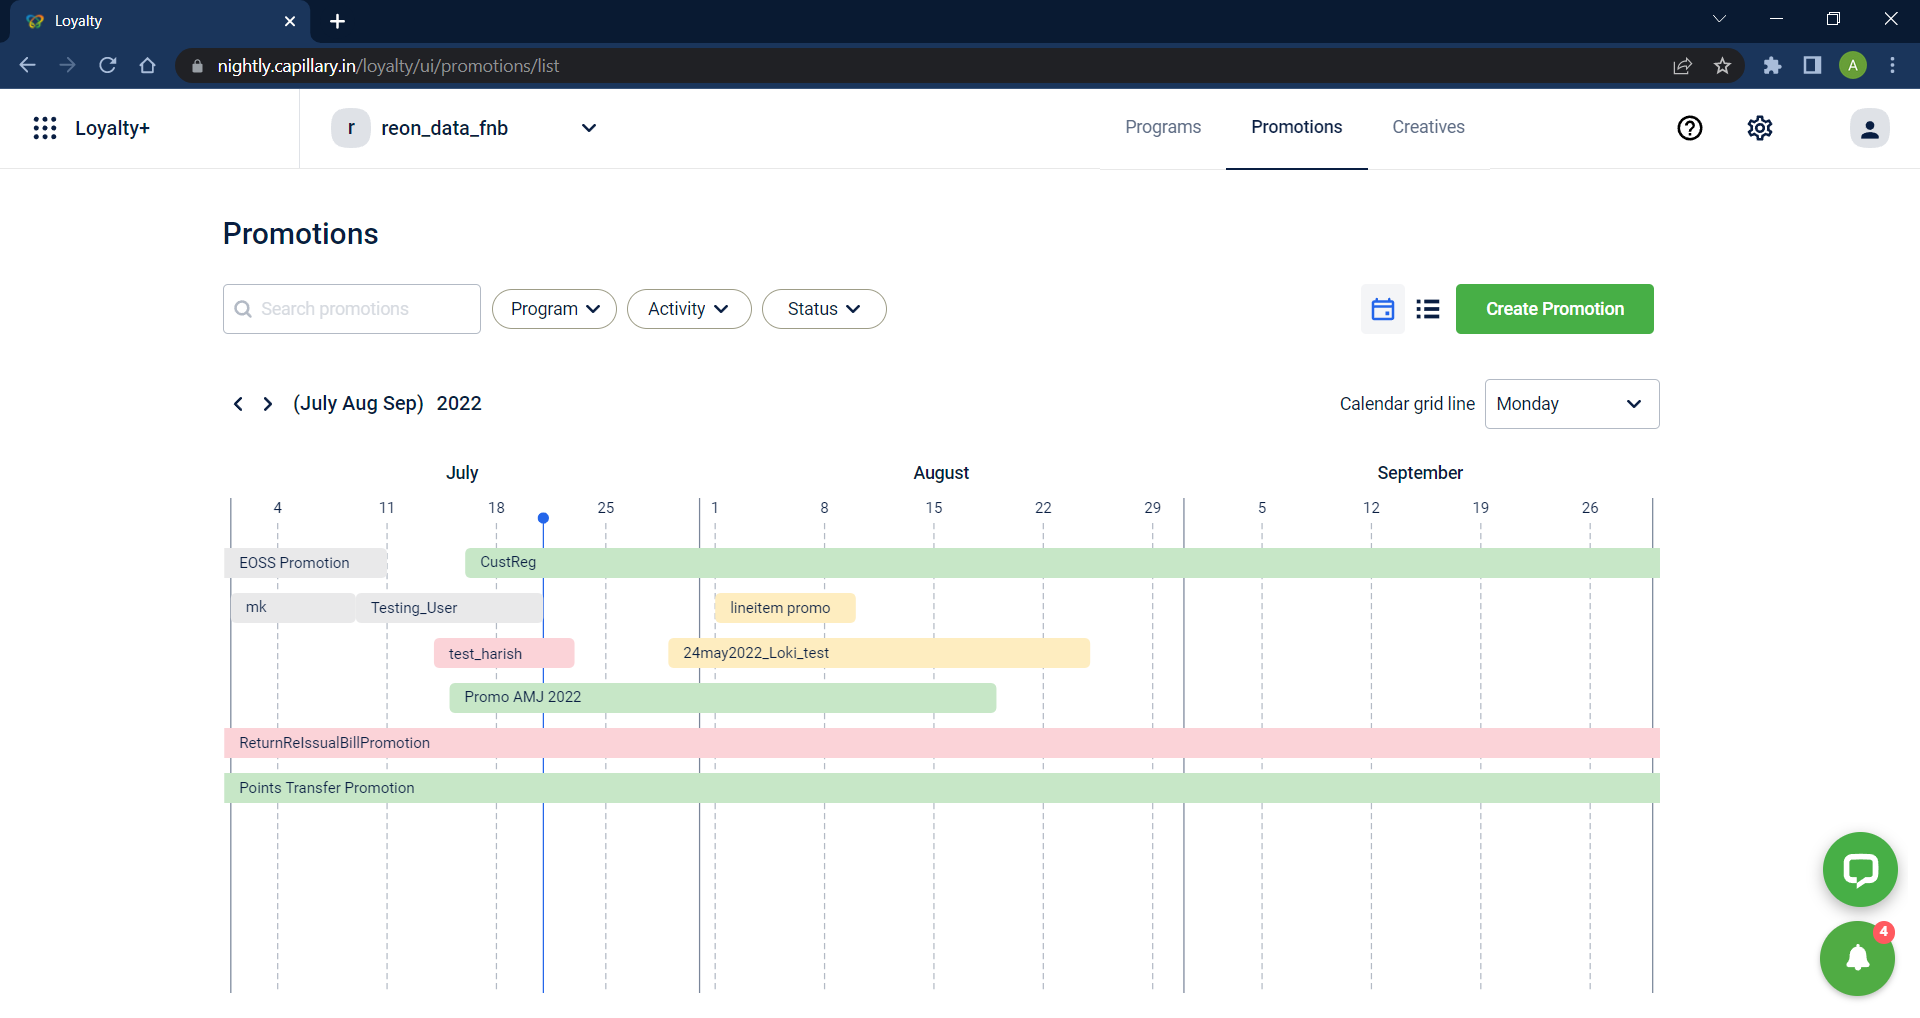
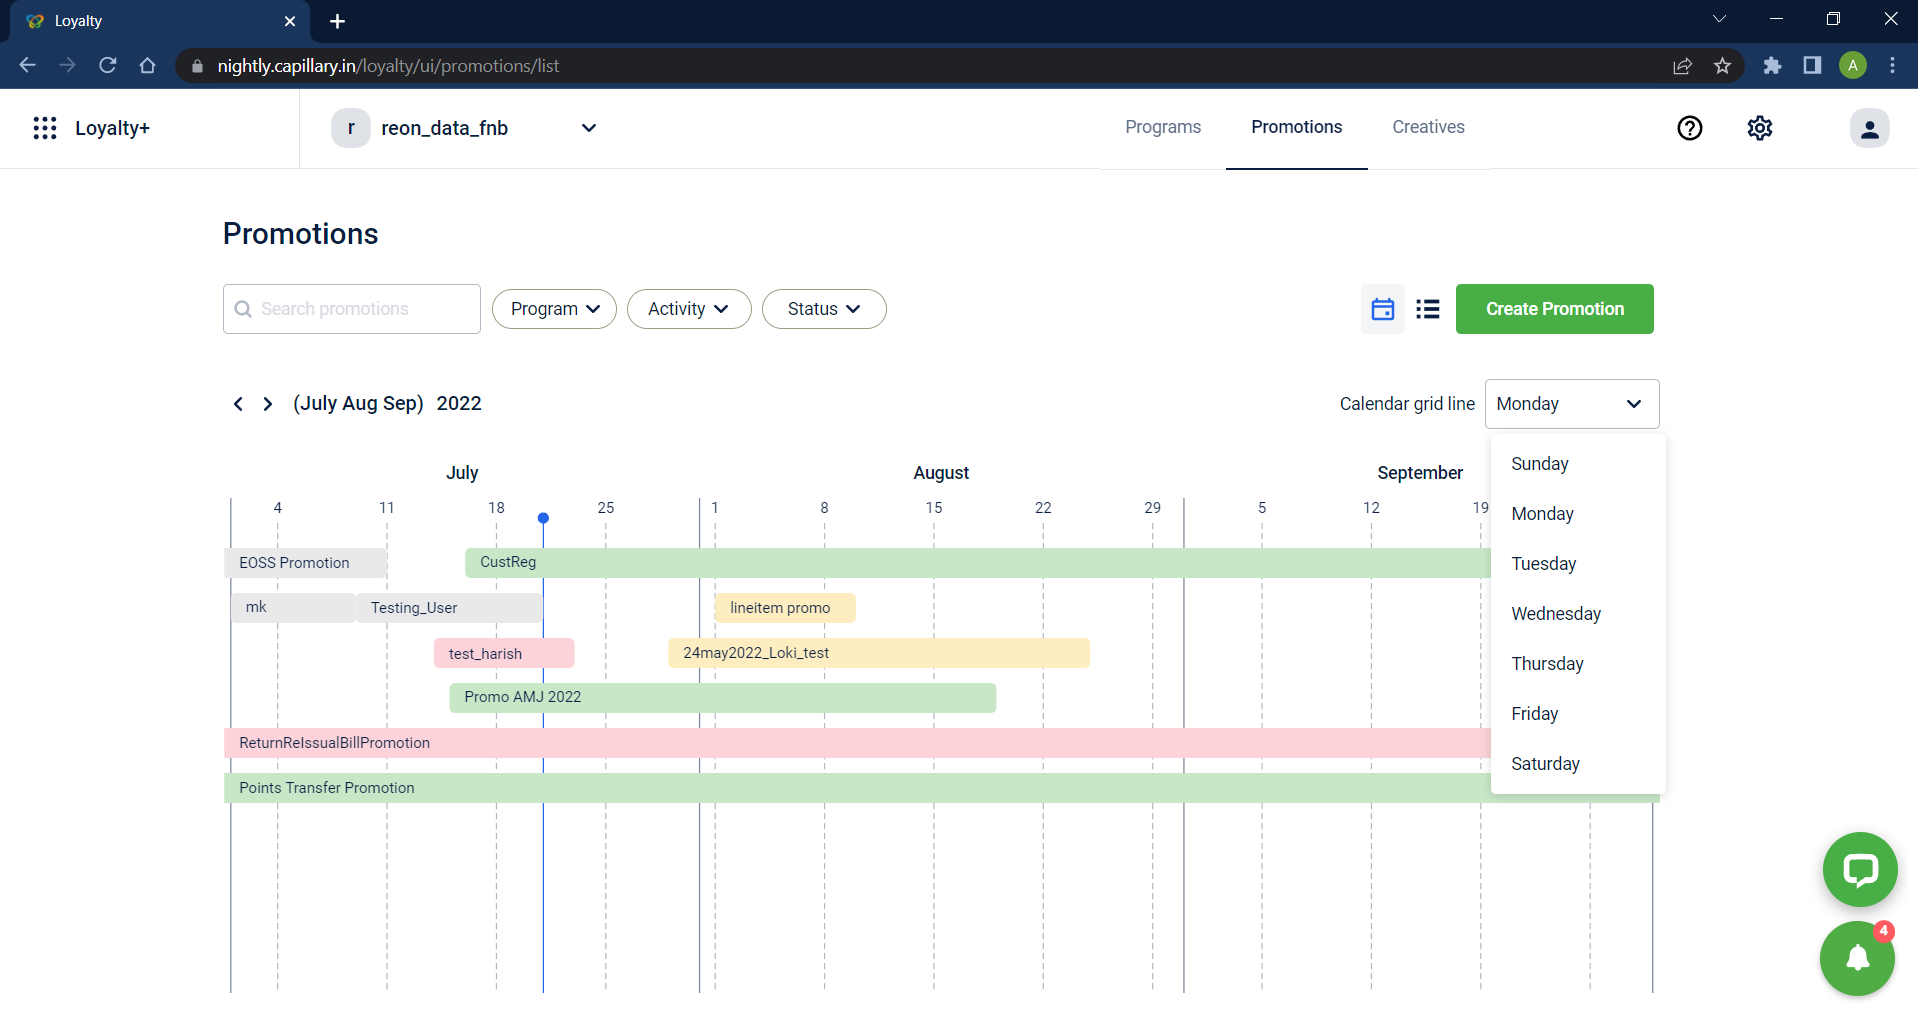
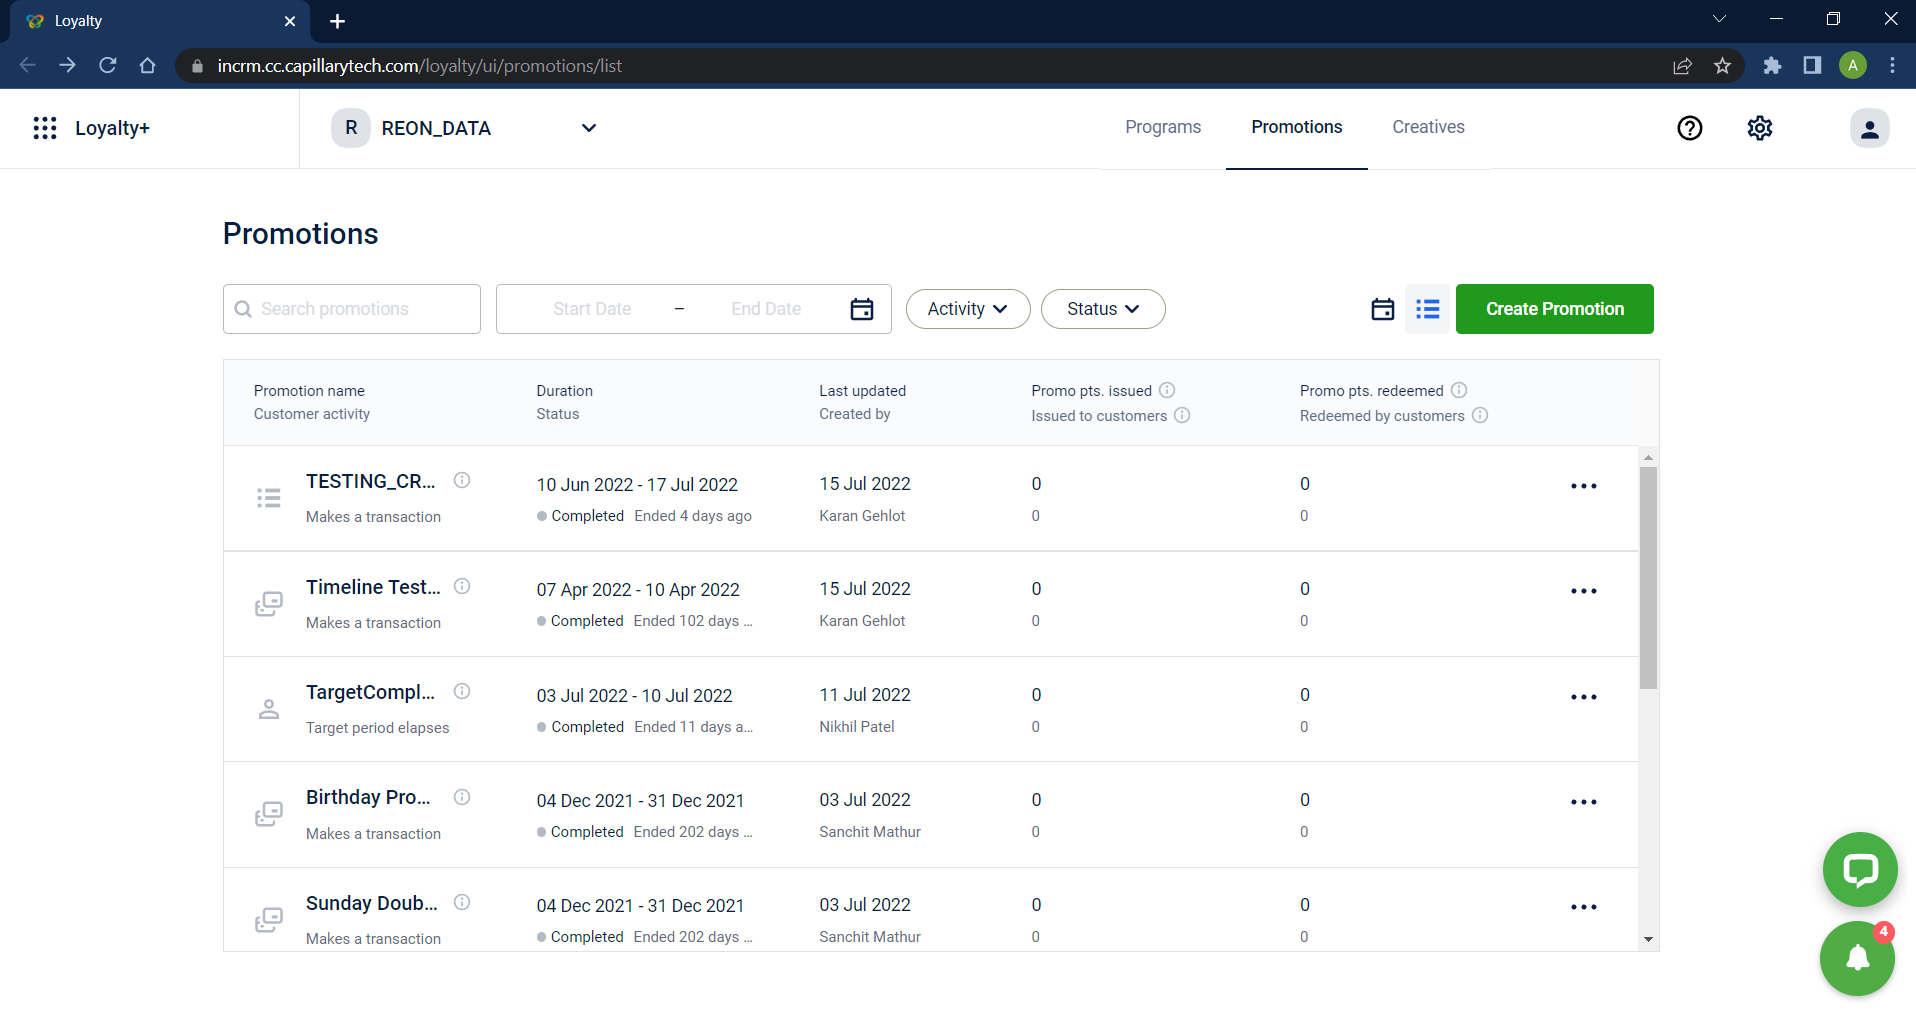
Already active promotions can be seen in list view or calendar view.
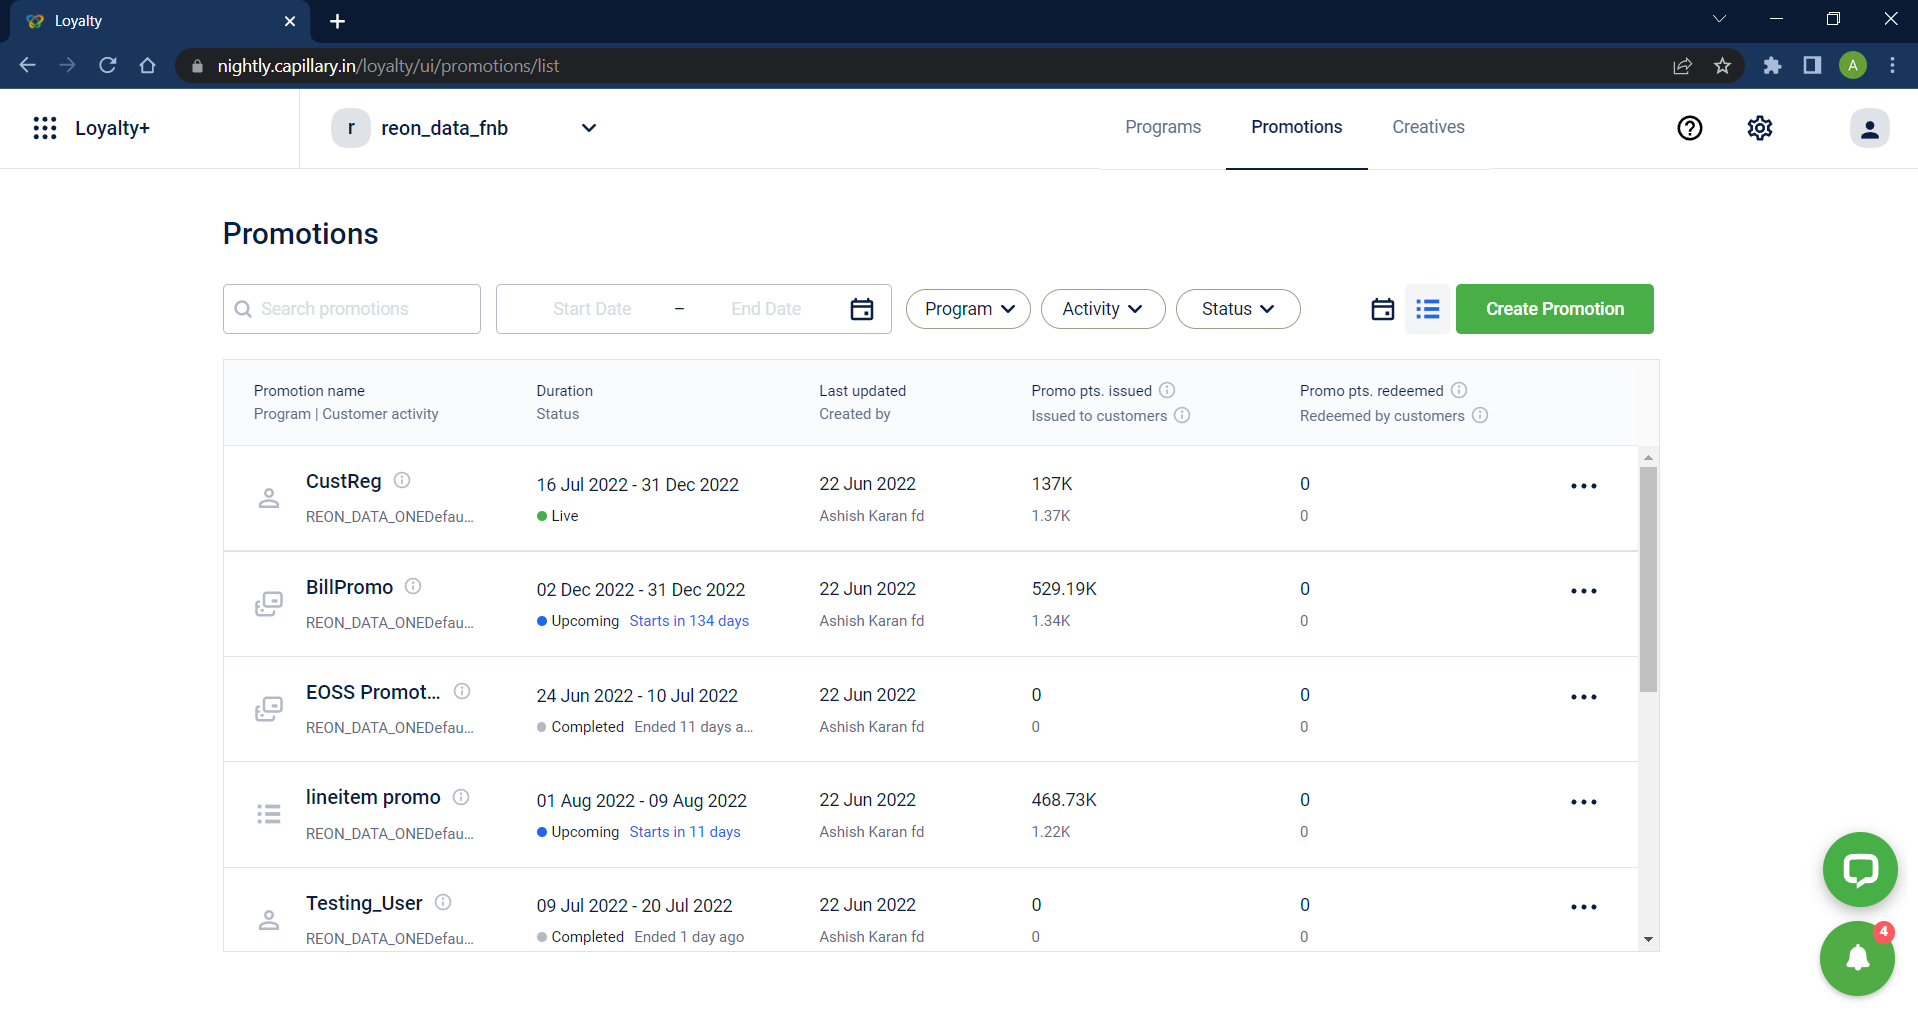
And the existing promotions can also be filtered according to program, activity and status of the promotion.
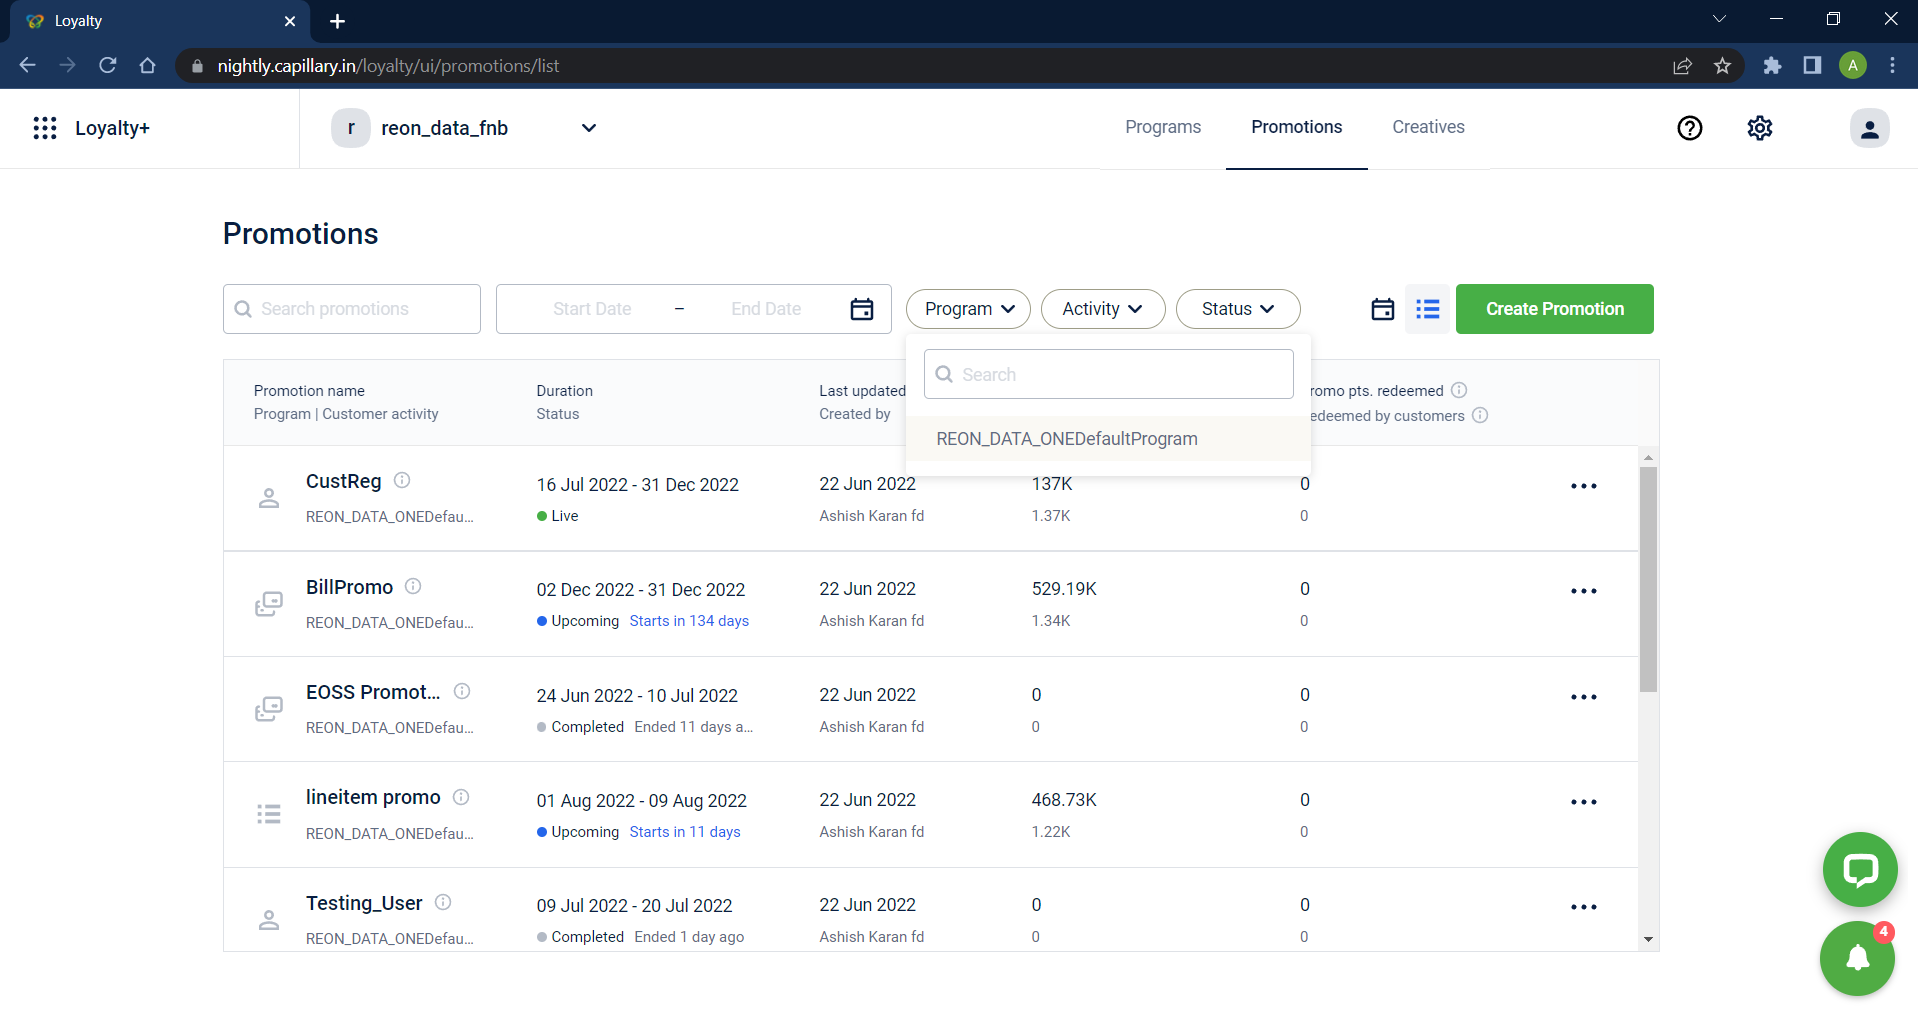
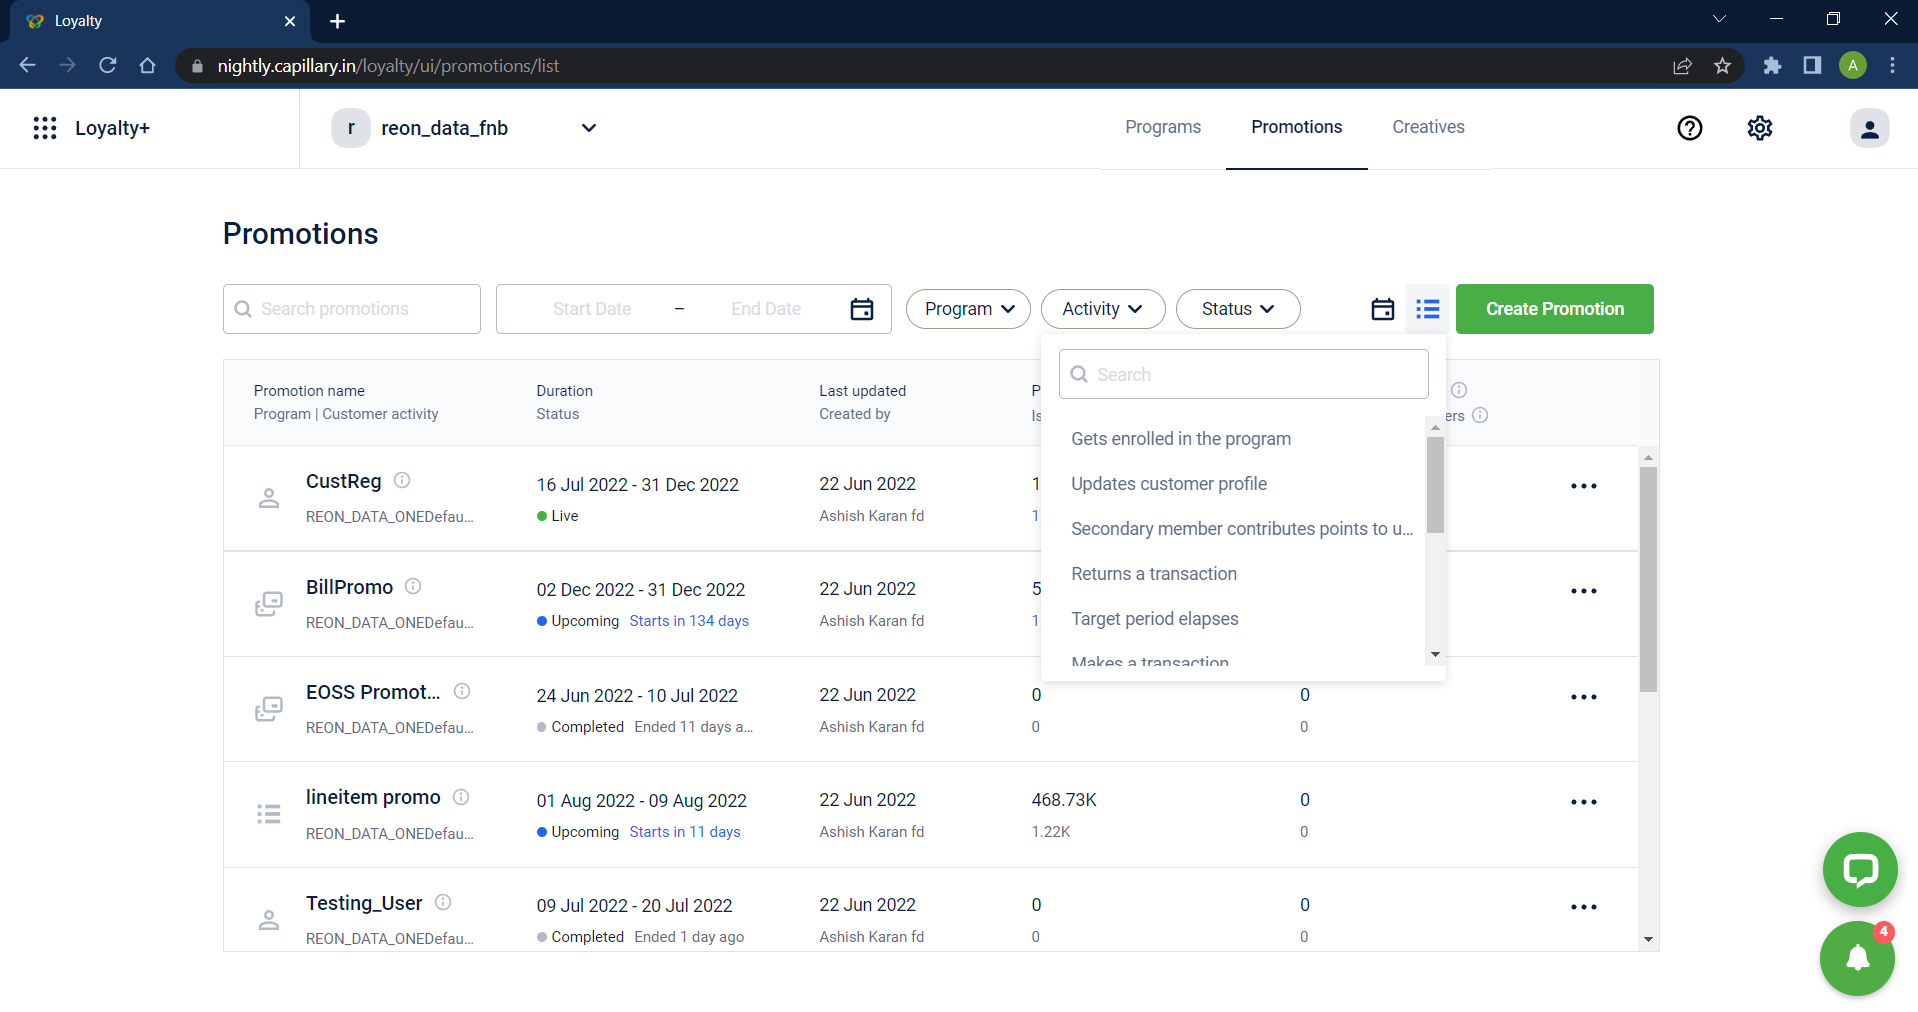
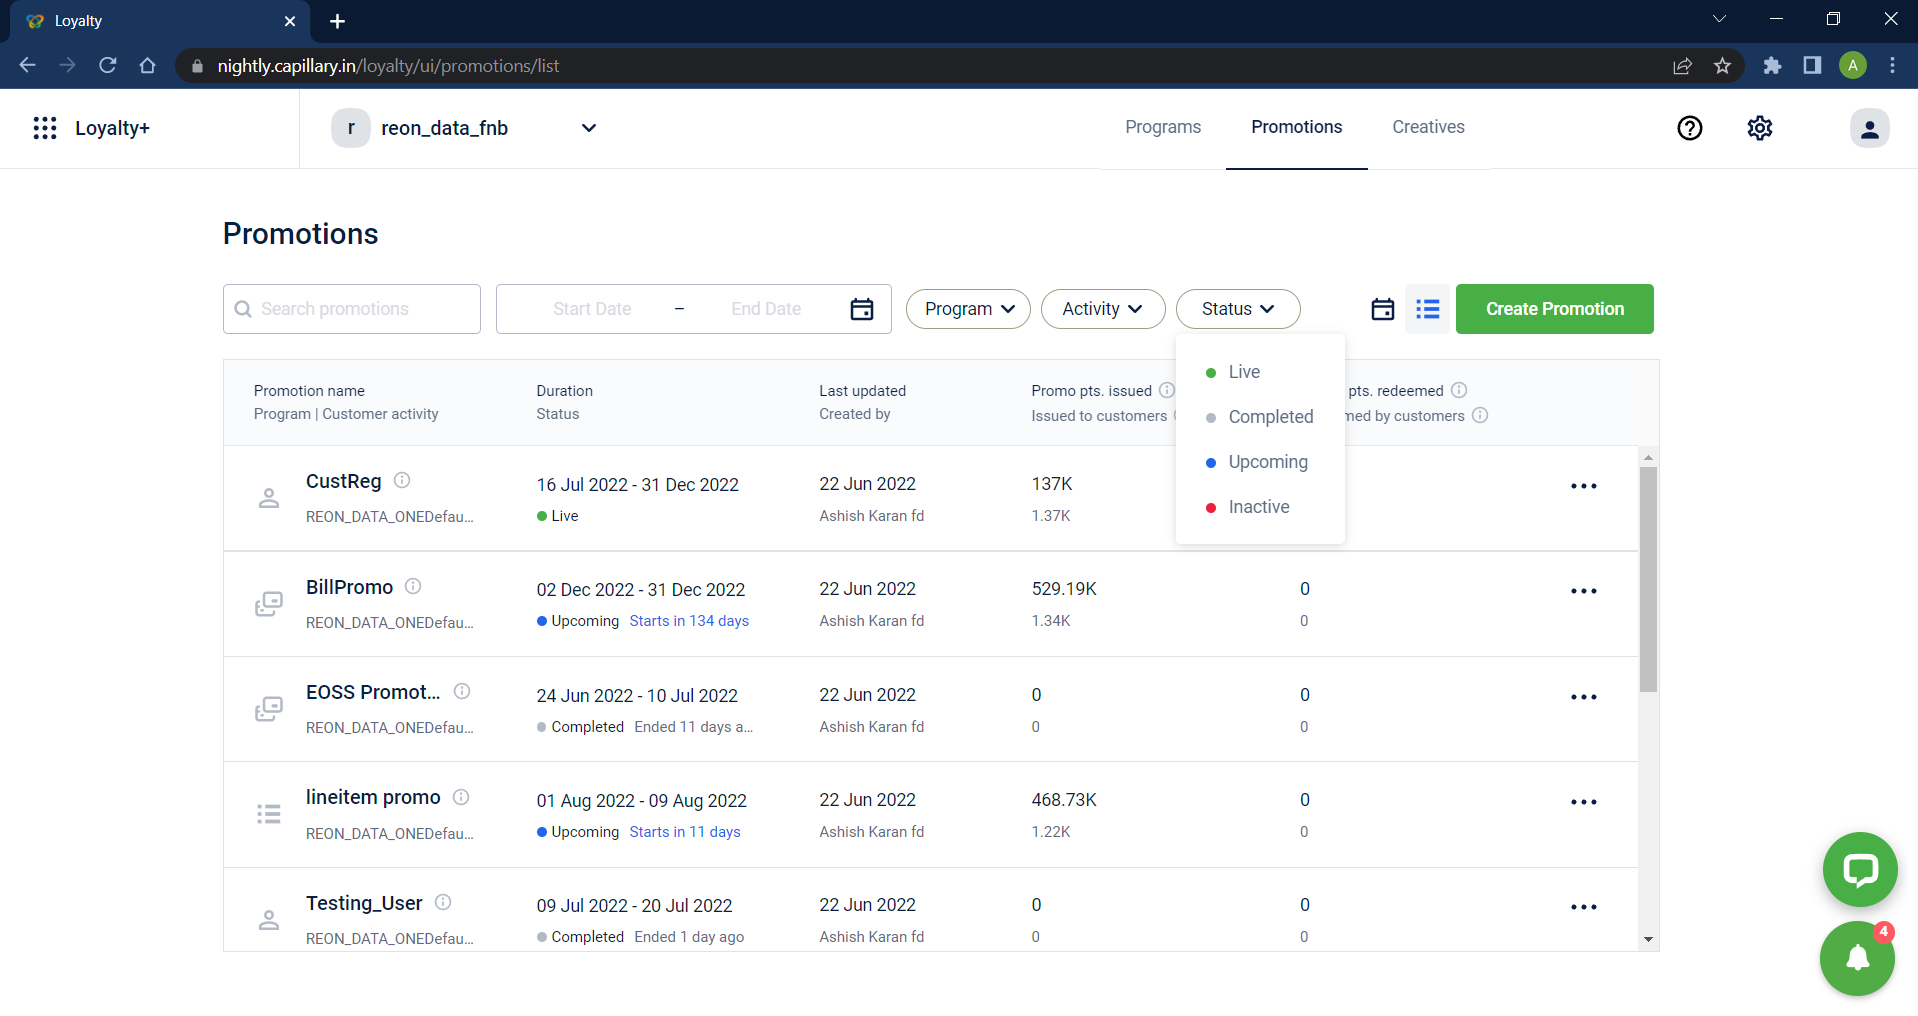
In the calendar view, a grid line can be set up according to the timeline required.
- Click on Create Promotion.
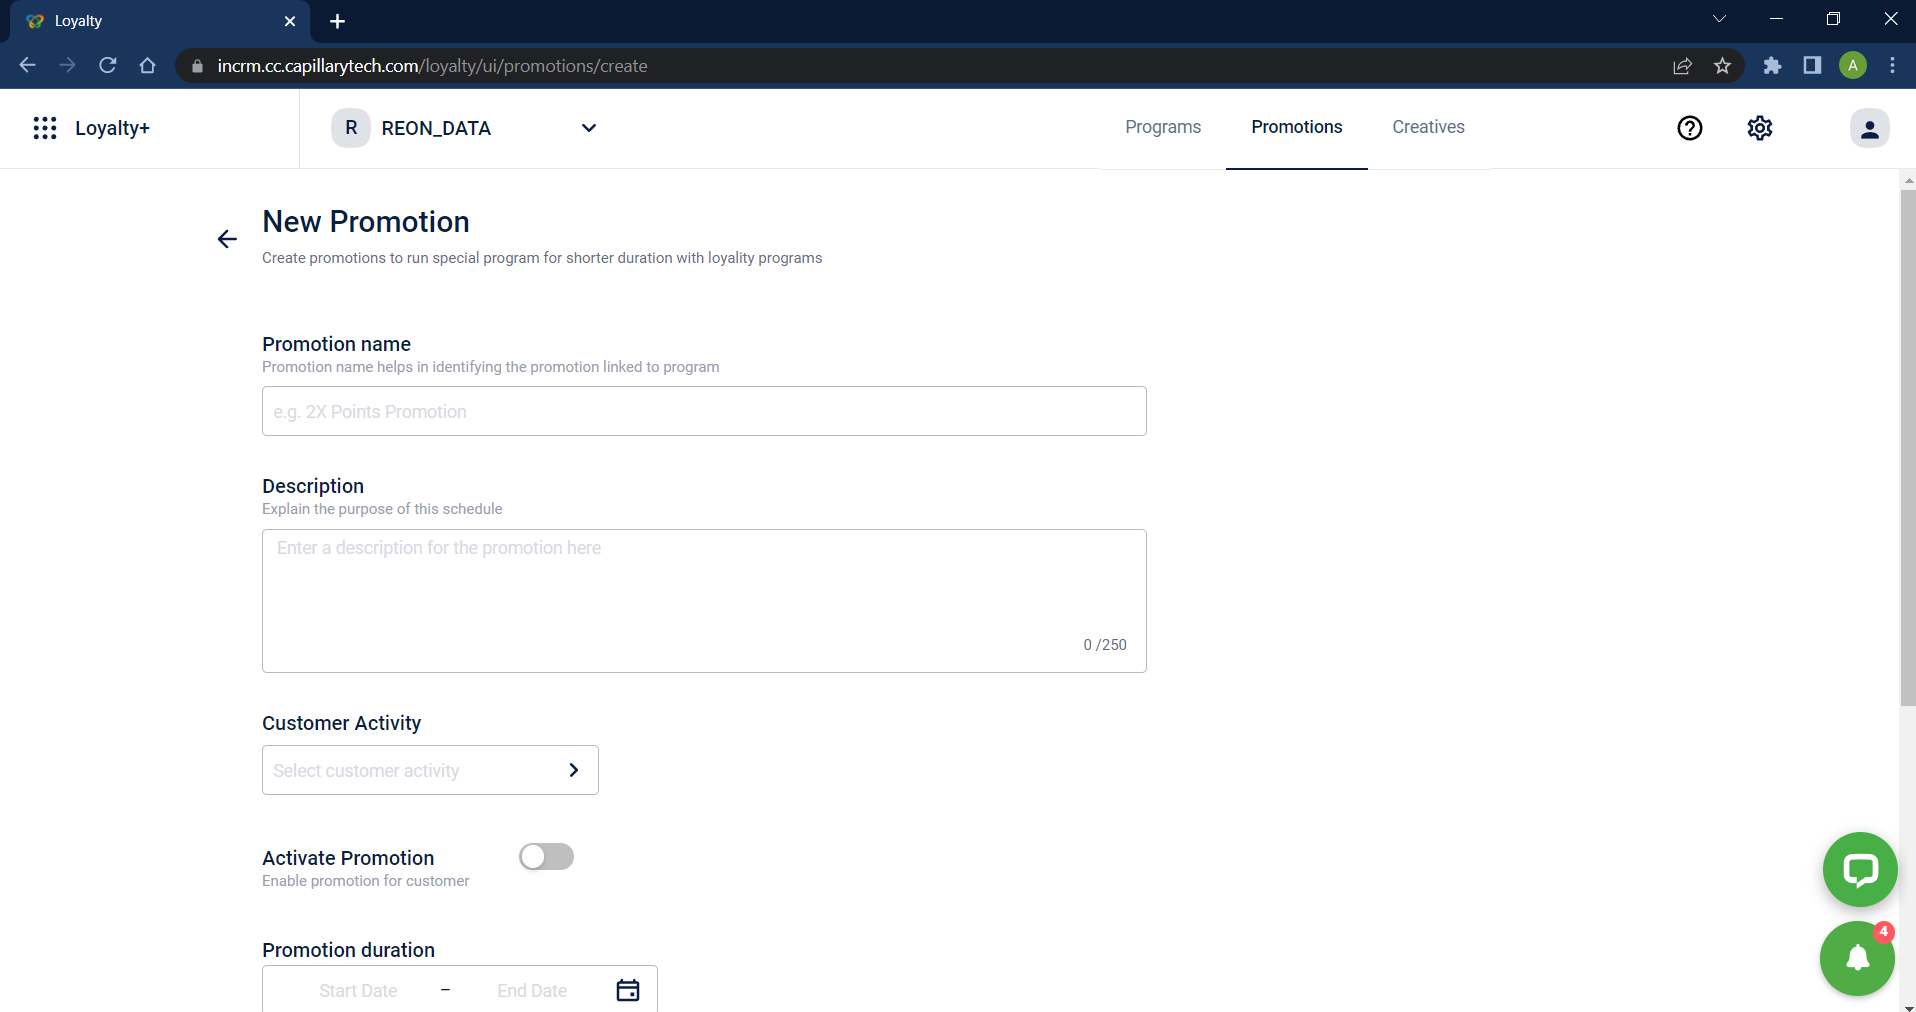
- Fill in the basic details.
- In Promotion Name, specify a name for the promotion.
- In Description, enter a short description of the current promotion.
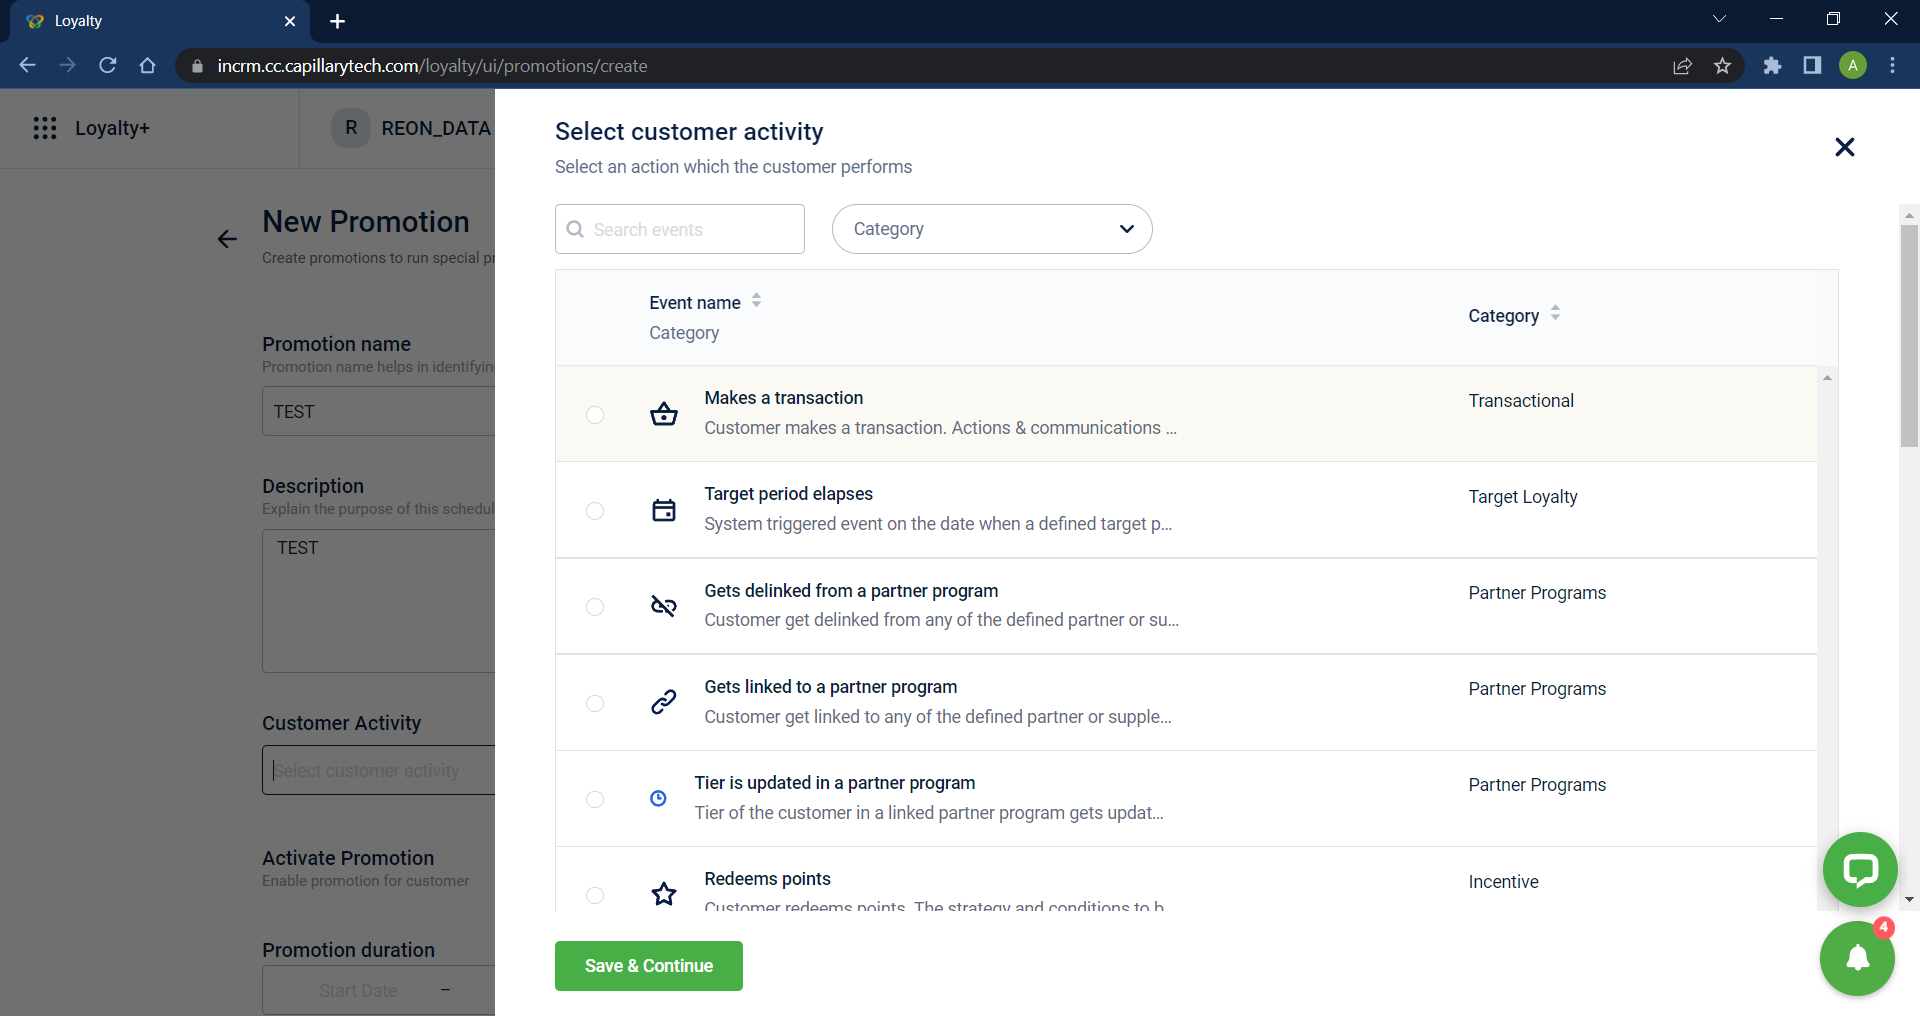
- Select Customer Activity that would trigger earning.
Customer activities
The following table lists the available customer activities:
Customer Activity | Description | Example |
|---|---|---|
Makes a transaction | Enrol a customer to a promotion when they make a purchase in-store, online, or at a point-of-sale (POS) system. | A customer purchases a pair of sneakers online or at a store. |
Milestone or Streak is updated | Enrol a customer to a promotion when they complete a [milestone](https://docs.capillarytech.com/docs/milestones-new-flow) or [streak](https://docs.capillarytech.com/docs/streaks) . * *Note:<strong>By default, all active milestones and streaks in a[loyalty program](https://docs.capillarytech.com/docs/features-of-loyalty) is tracked. You can optionally choose active milestones or streaks to track under the </strong>Milestone or streak** drop down. | A customer achieves a milestone by drinking 50 litres of water in a week. A customer achieves a streak by walking 10,000 steps everyday for a week. |
Redeems points | Enrol a customer to a promotion when they use their points to redeem rewards. | A customer uses 500 points to redeem a ₹500 discount while purchasing groceries |
Redeems a coupon | Enrol a customer to a promotion when they use coupons to get discounts or benefits. | A customer applies a 20% discount coupon during checkout in an online store. |
Gets enroled in the program | Enrol a customer to a promotion when they join a [loyalty program](https://docs.capillarytech.com/docs/features-of-loyalty). | A customer makes a transaction of above ₹10,000 and is enrolled into a loyalty program. |
Updates customer profile | Enrol a customer to a promotion when they update their personal information on their profile. | A customer updates their phone number on the app. |
- In Promotion applied on, choose Transaction Level to award points on a transaction or choose Lineitem level to issue points on the transaction line items. Note: This field is visible only when you have selected transaction-related customer activity in the previous step.
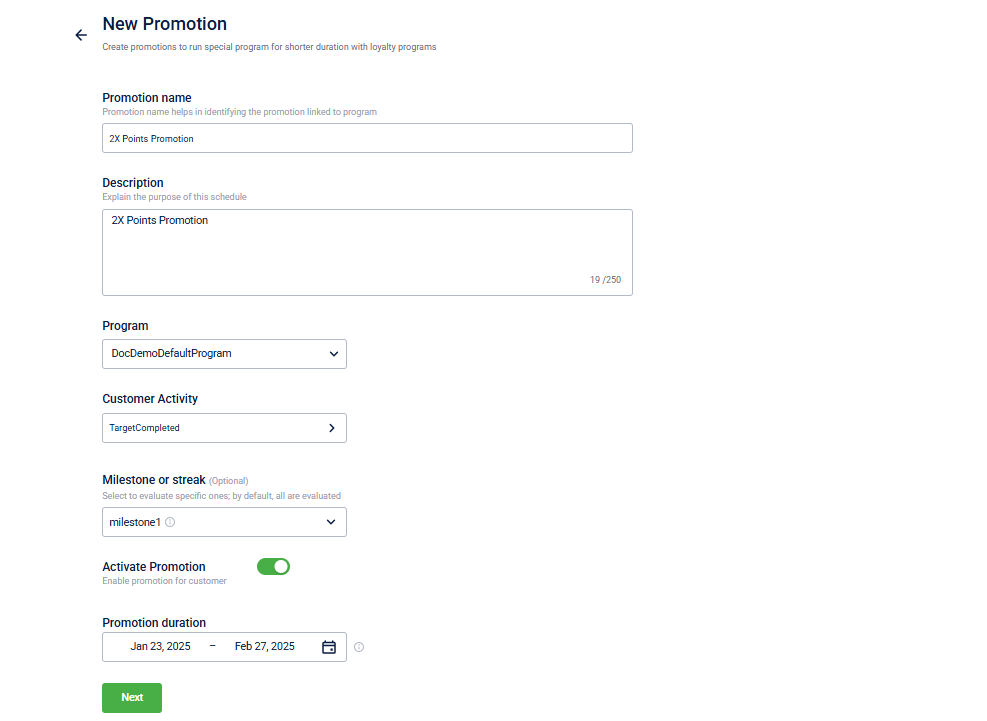
- Set Activate to Yes to enable the program.
- Set the duration of the promotion in Start Date and End Date. NOTE: Promotion duration can be in the past, up to the last 12 months. Once a promotion has started, the start date cannot be edited; however, you can still change the start date for any promotions that are upcoming.
NoteSample Scenario for Exclusive option
Assume two promotion programs where Promotion2 is set as EXCLUSIVE. Promotion1: If the transaction amount is greater than $500, reward points of 10% of the transaction amount Promotion2: If the transaction amount is greater than $750, reward points of 15% of the transaction amount.
Now when a customer makes a transaction for $800, instead of rewarding points for both the promotion programs, only promotion2 will be executed, i.e., 120 points (15% of 800).
Once the promotion program is created, configure rulesets for each event as explained in the following.
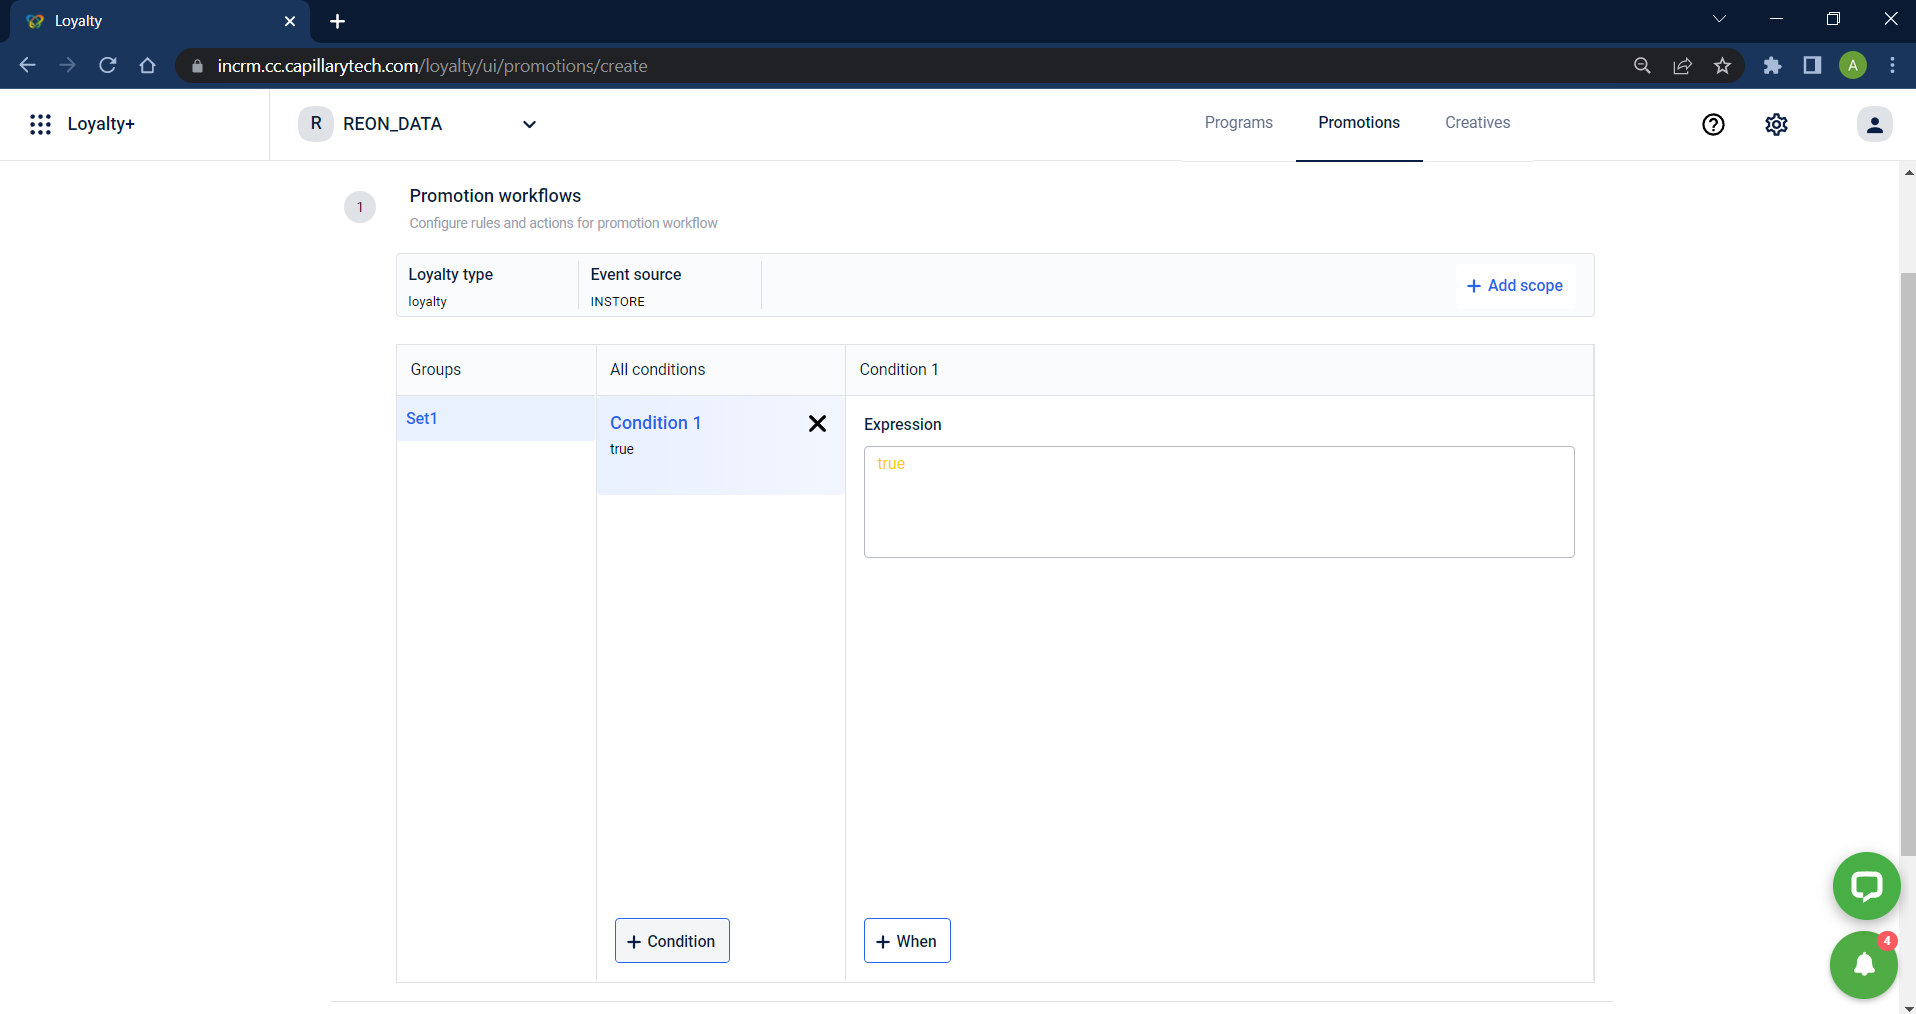
- Now the promotion workflows need to be configured. In All Conditions, click +Condition to add a new rule. Each condition you dd will have a condition sequence as the prefix. For example, Condition1, Condition2, Condition3, and so on.
NoteNote
If you want to delete any condition, click on the respective Delete icon. The sequence will be updated accordingly.
-
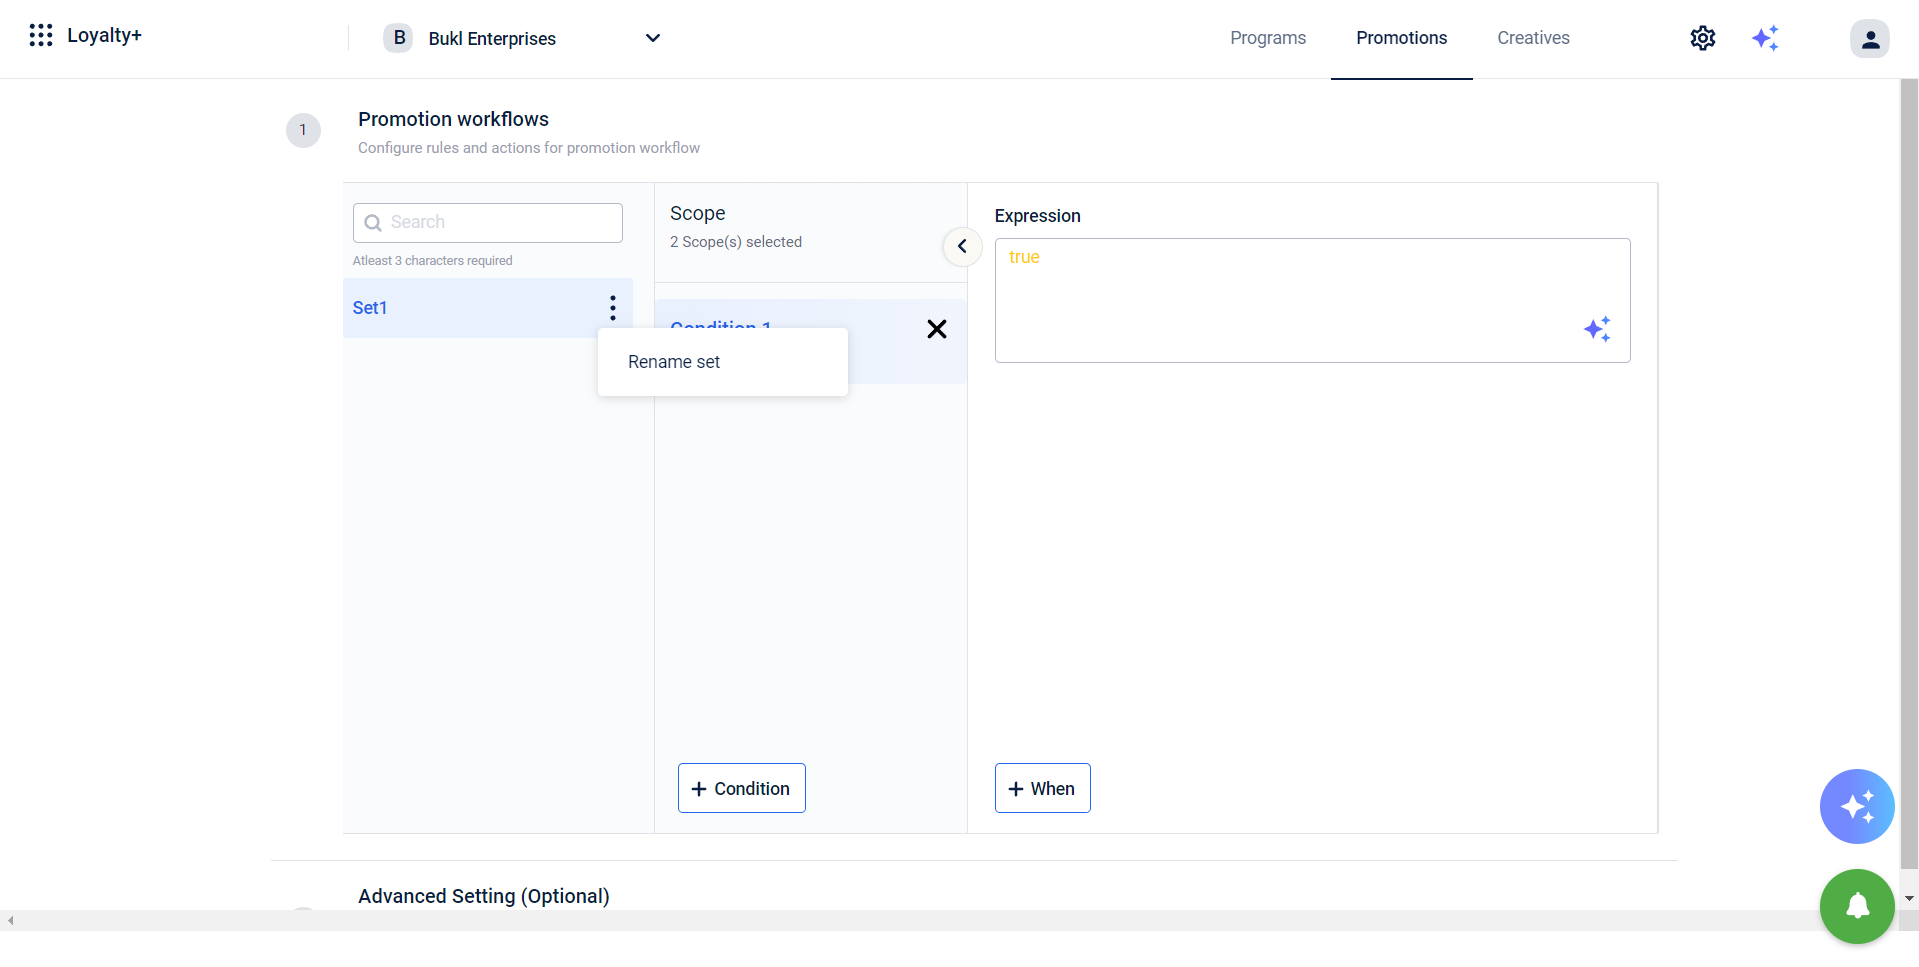
You also have the option to rename the set if you wish to modify its title, providing greater flexibility in organizing and managing your sets more effectively.
-
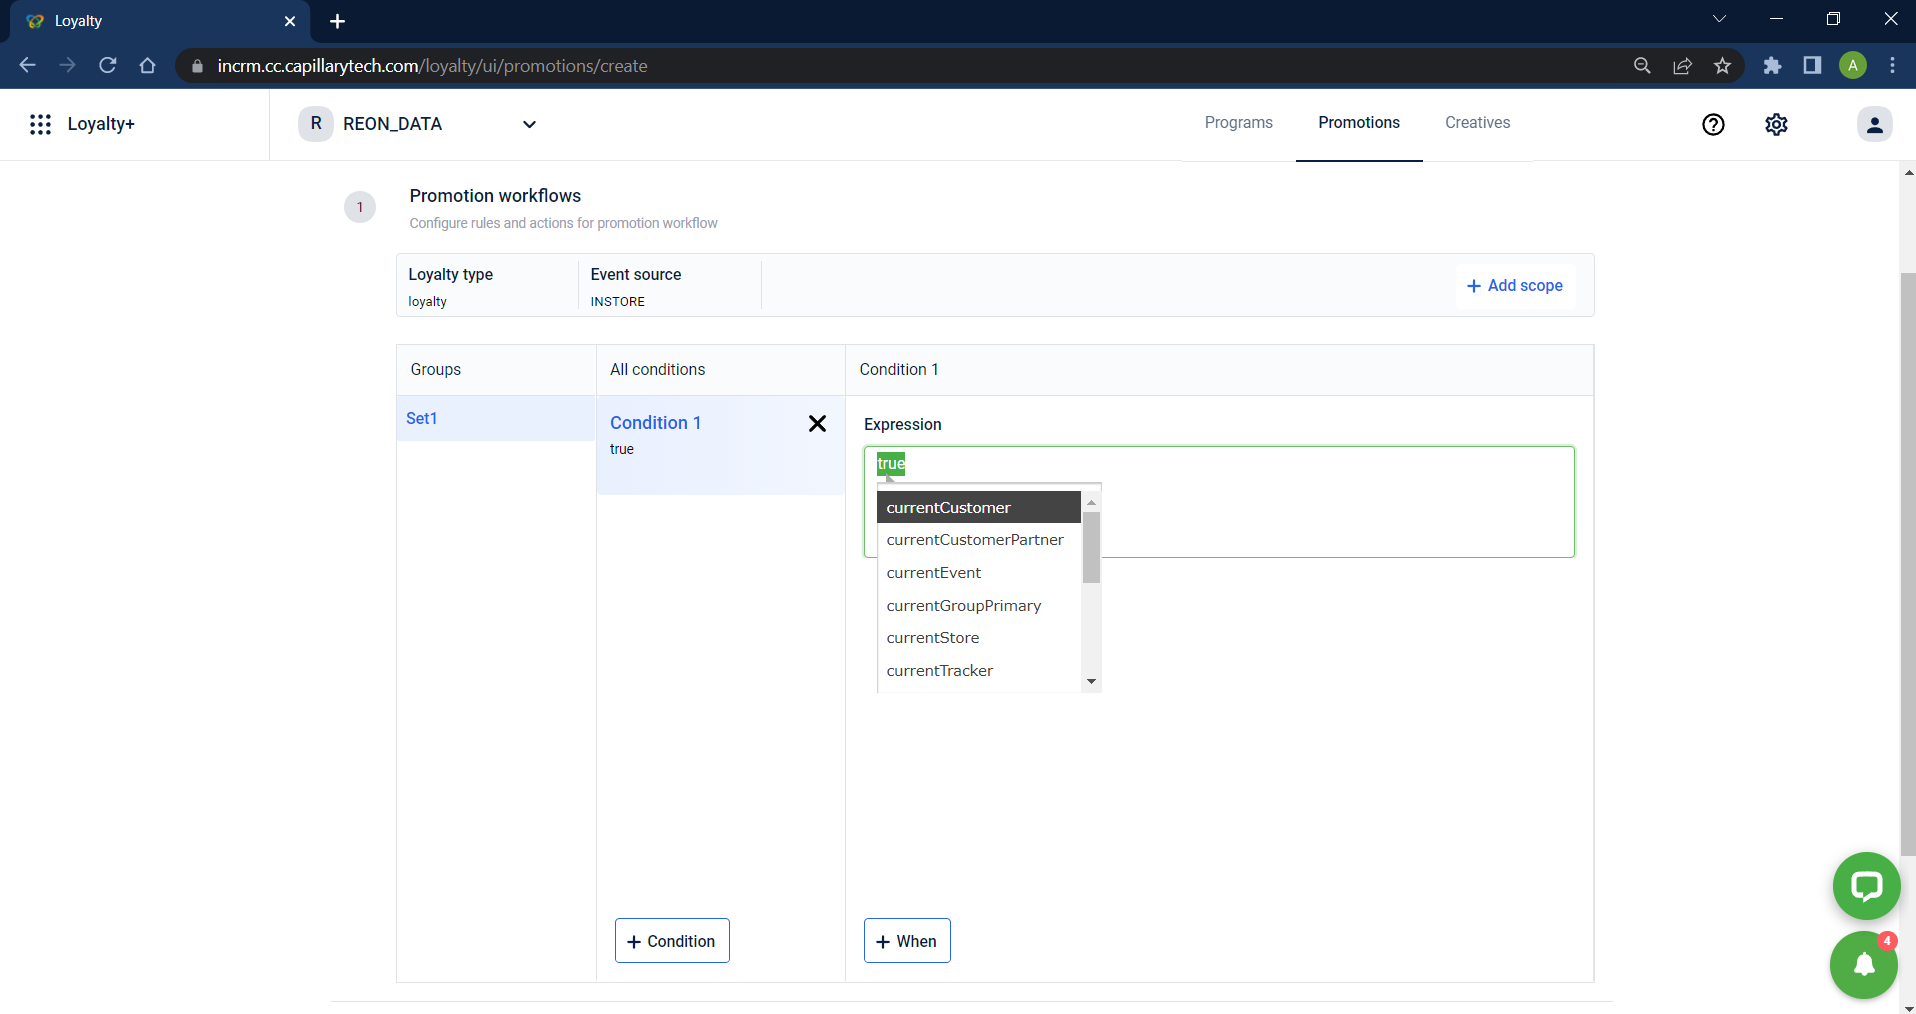
In the Expression box, define the rule expression that you want to evaluate for the current promotion. Use the predefined methods and attributes to write rule expression such that the result should be a Boolean value.
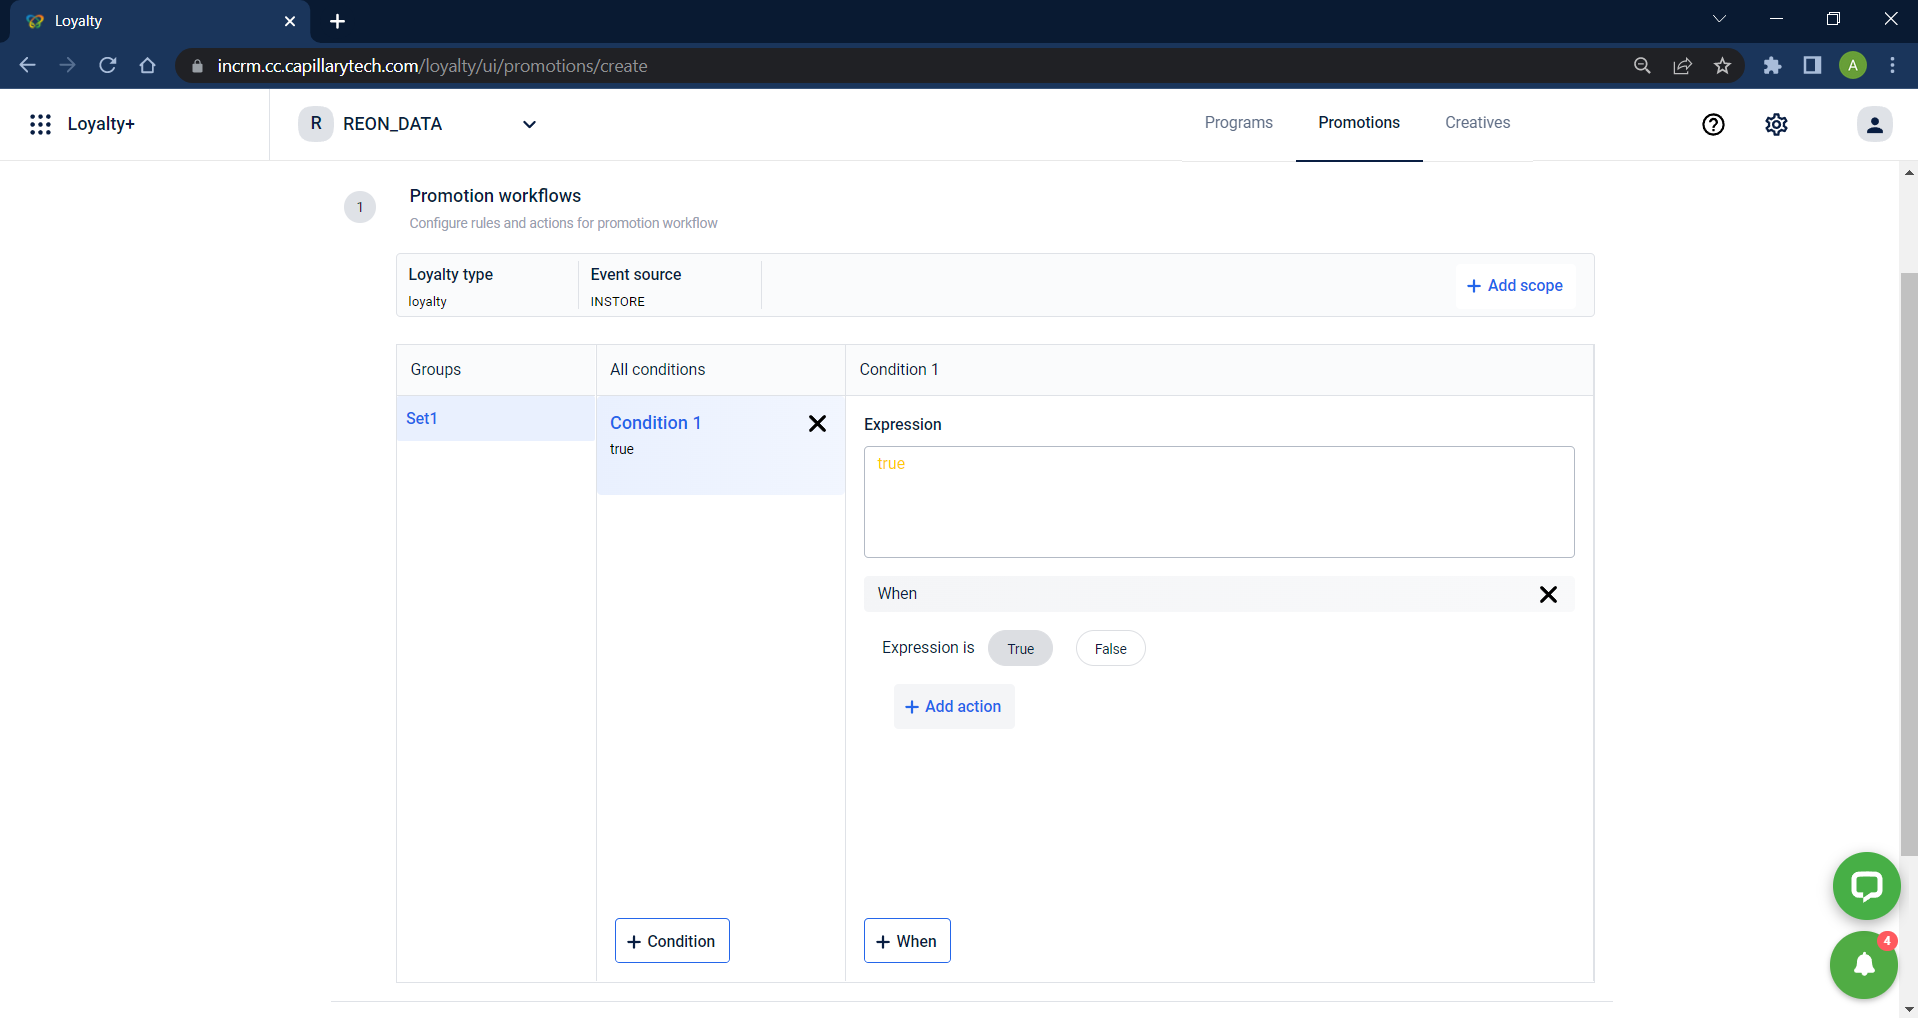
- In When, configure the following fields.
- In Expression Equals, set whether to execute an action for True case or False case.
- Click the +Add Action icon and select the respective action to execute.
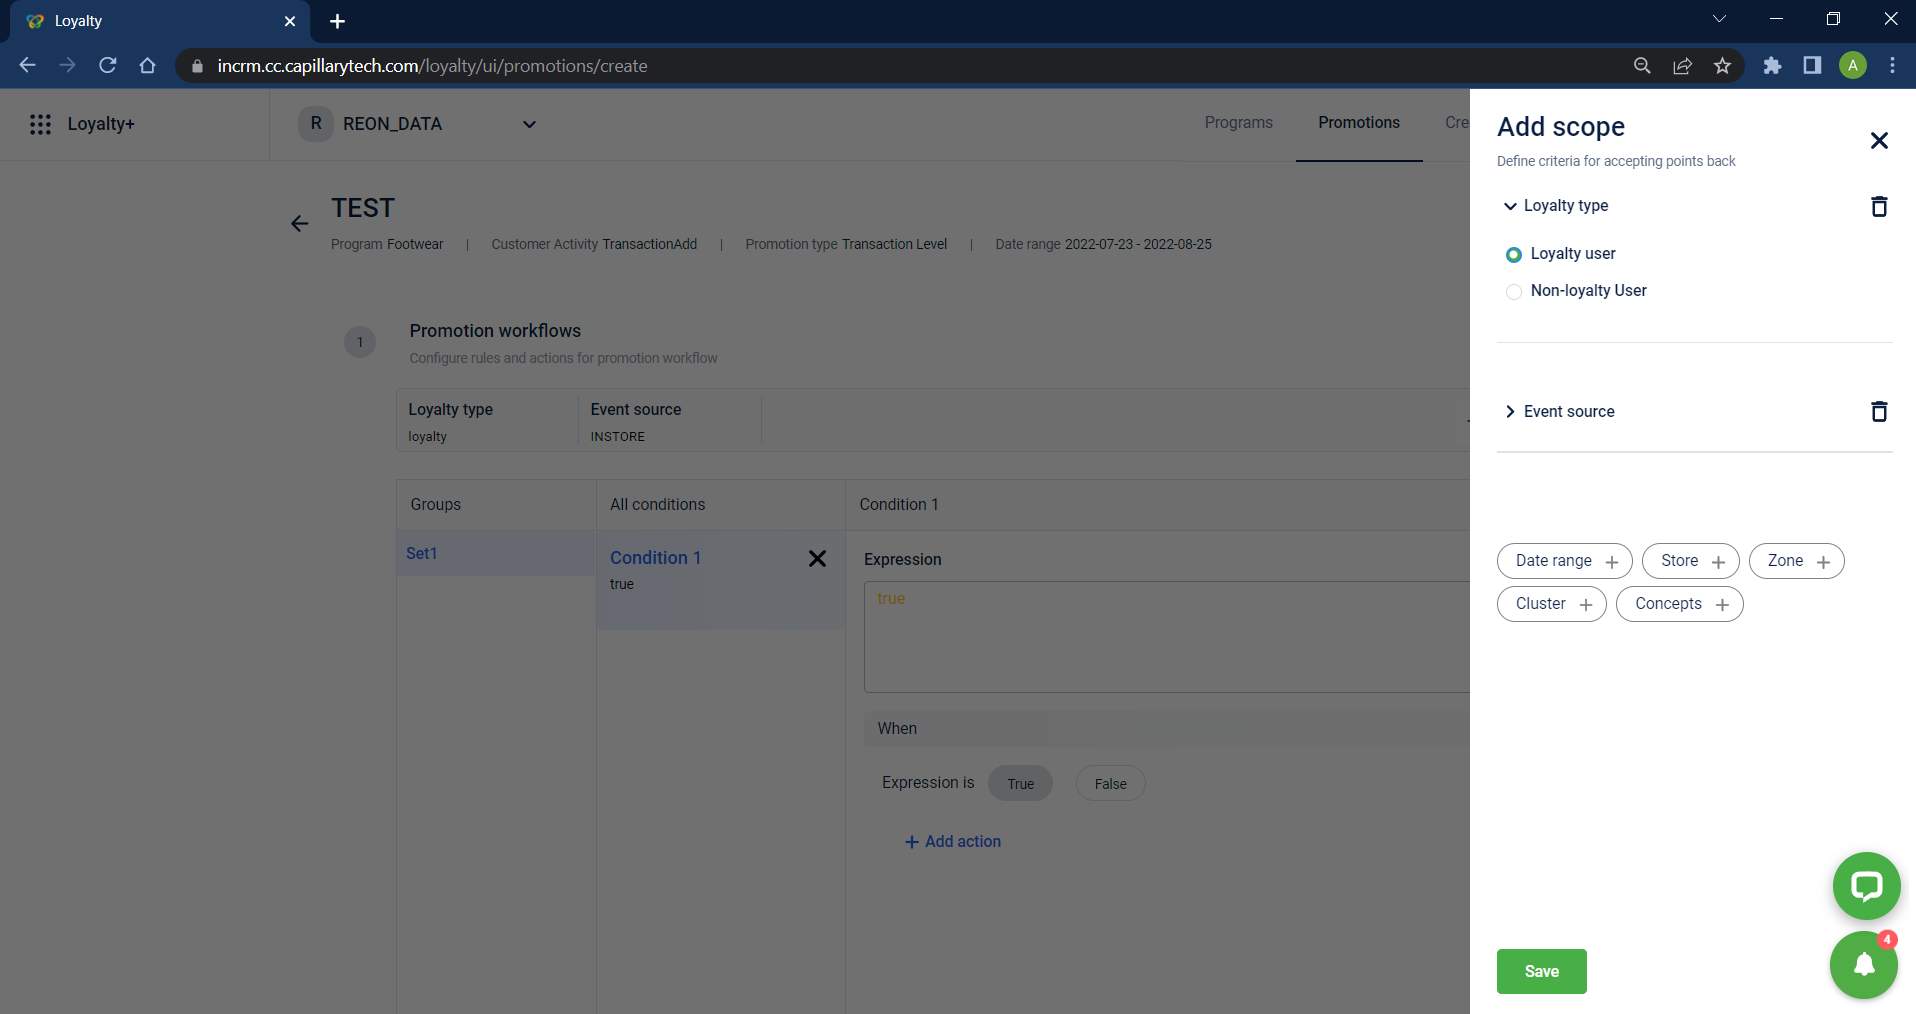
- You can also add "Scope" to the program to limit the promotion to loyalty or non-loyalty users, specific stores, zones, concepts, clusters or date ranges.
NoteNote
When selecting a specific zone or a concept from the list, Selecting ROOT selects all the listed options.
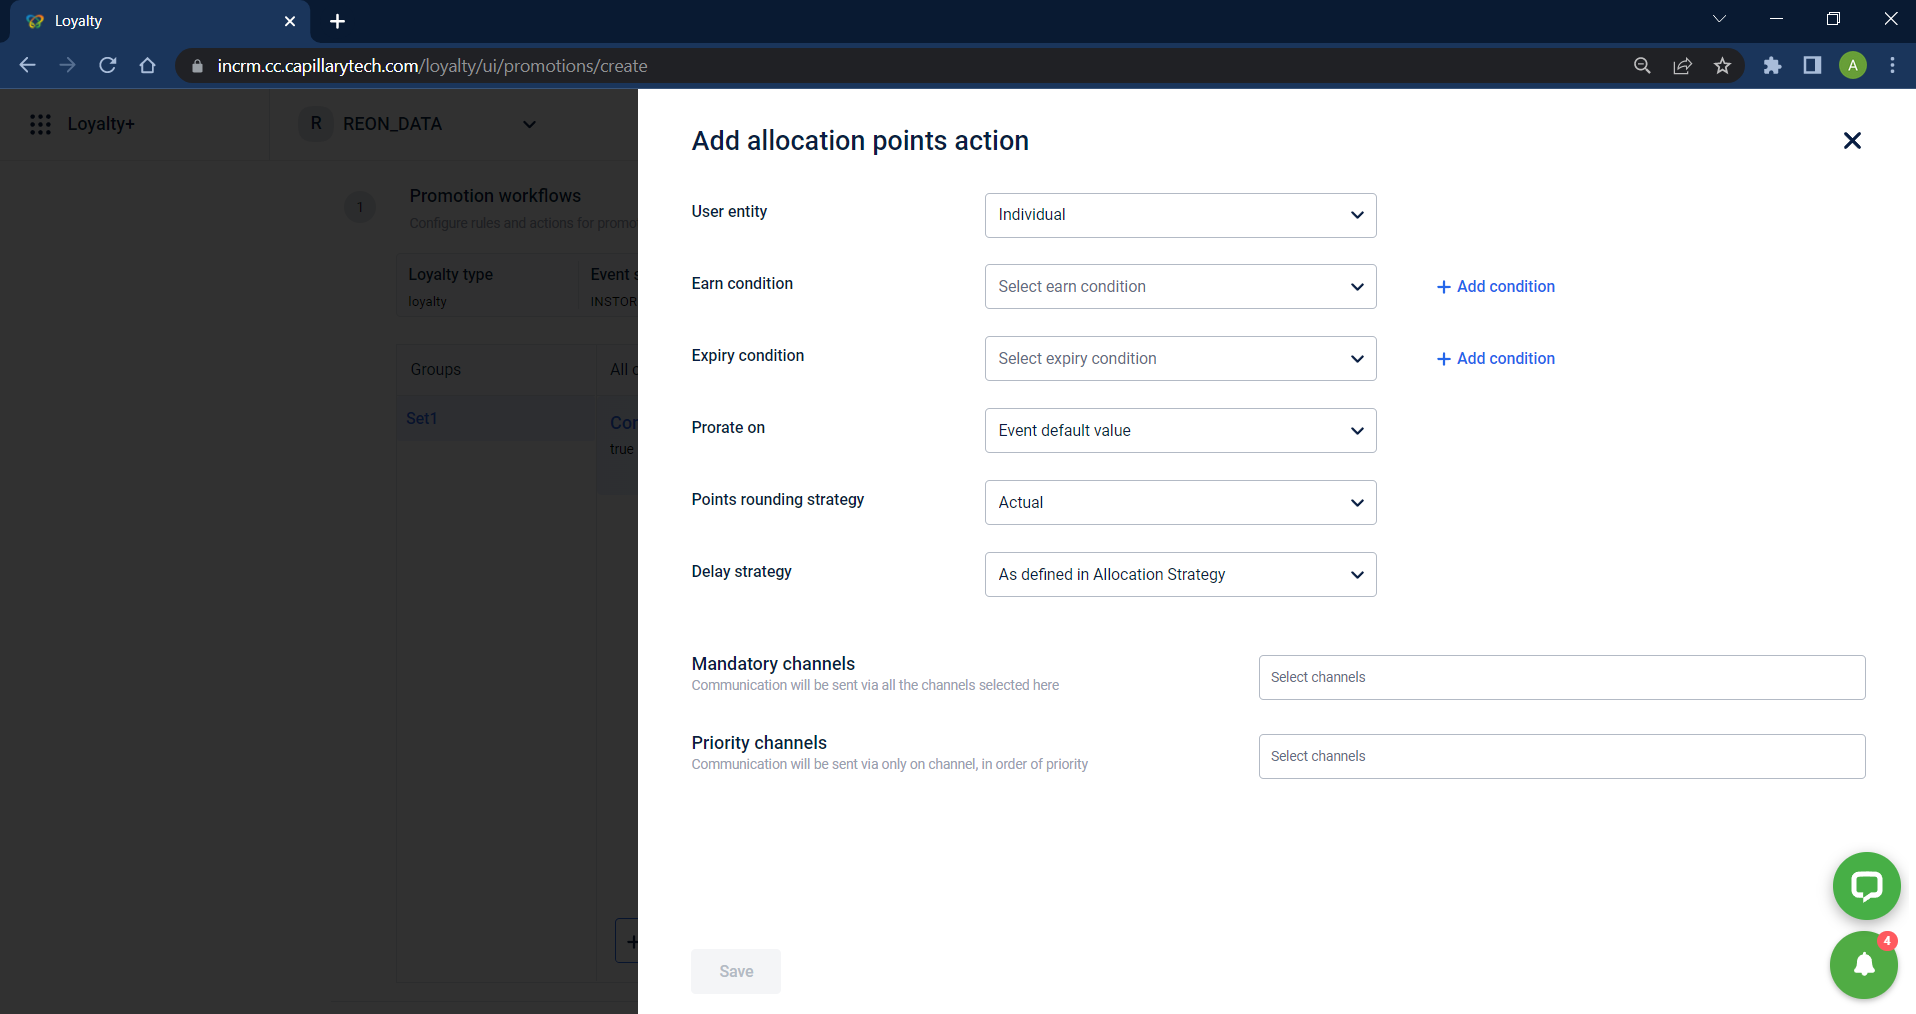
- Based on the option selected, the respective configuration field appears under the Expression equals box. For example, if the action is Allocate points, fields to configure Points Allocation appears as shown below.
Click Save to save the promotion program.
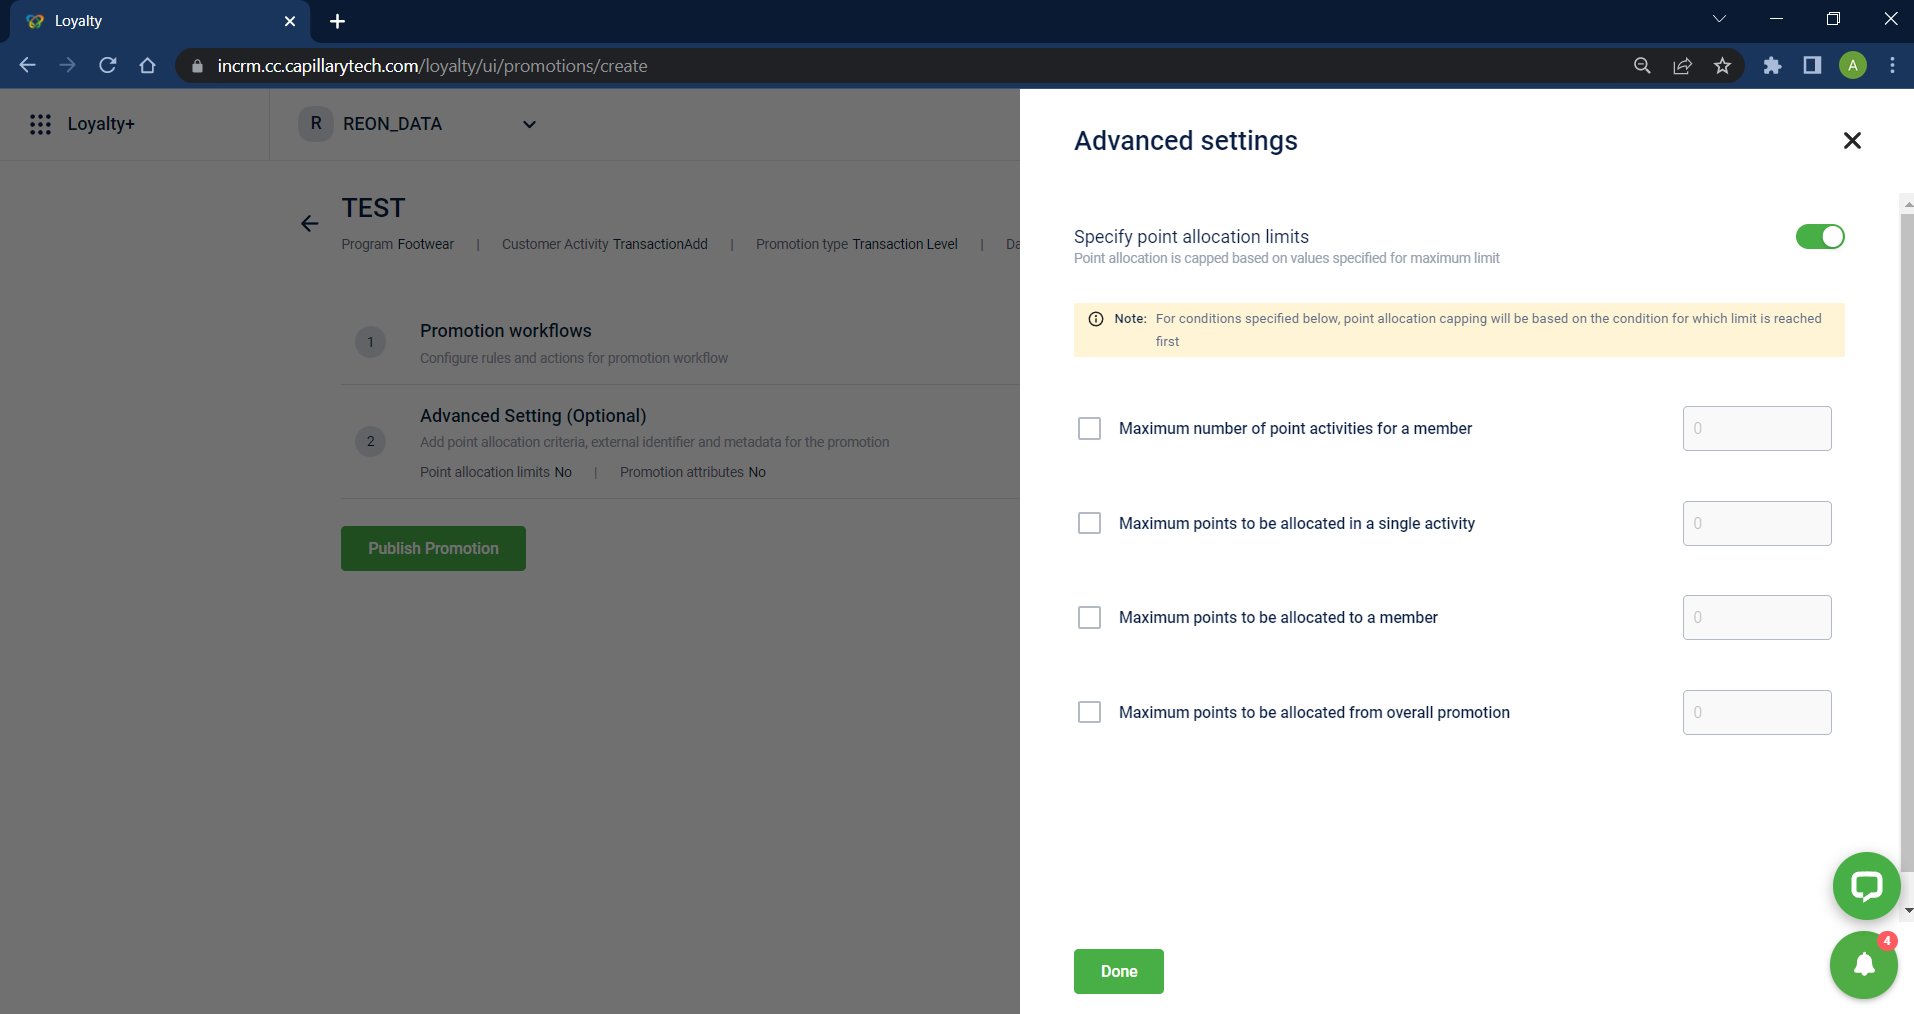
- You can add "Advanced Settings" to the program, but this step is optional.
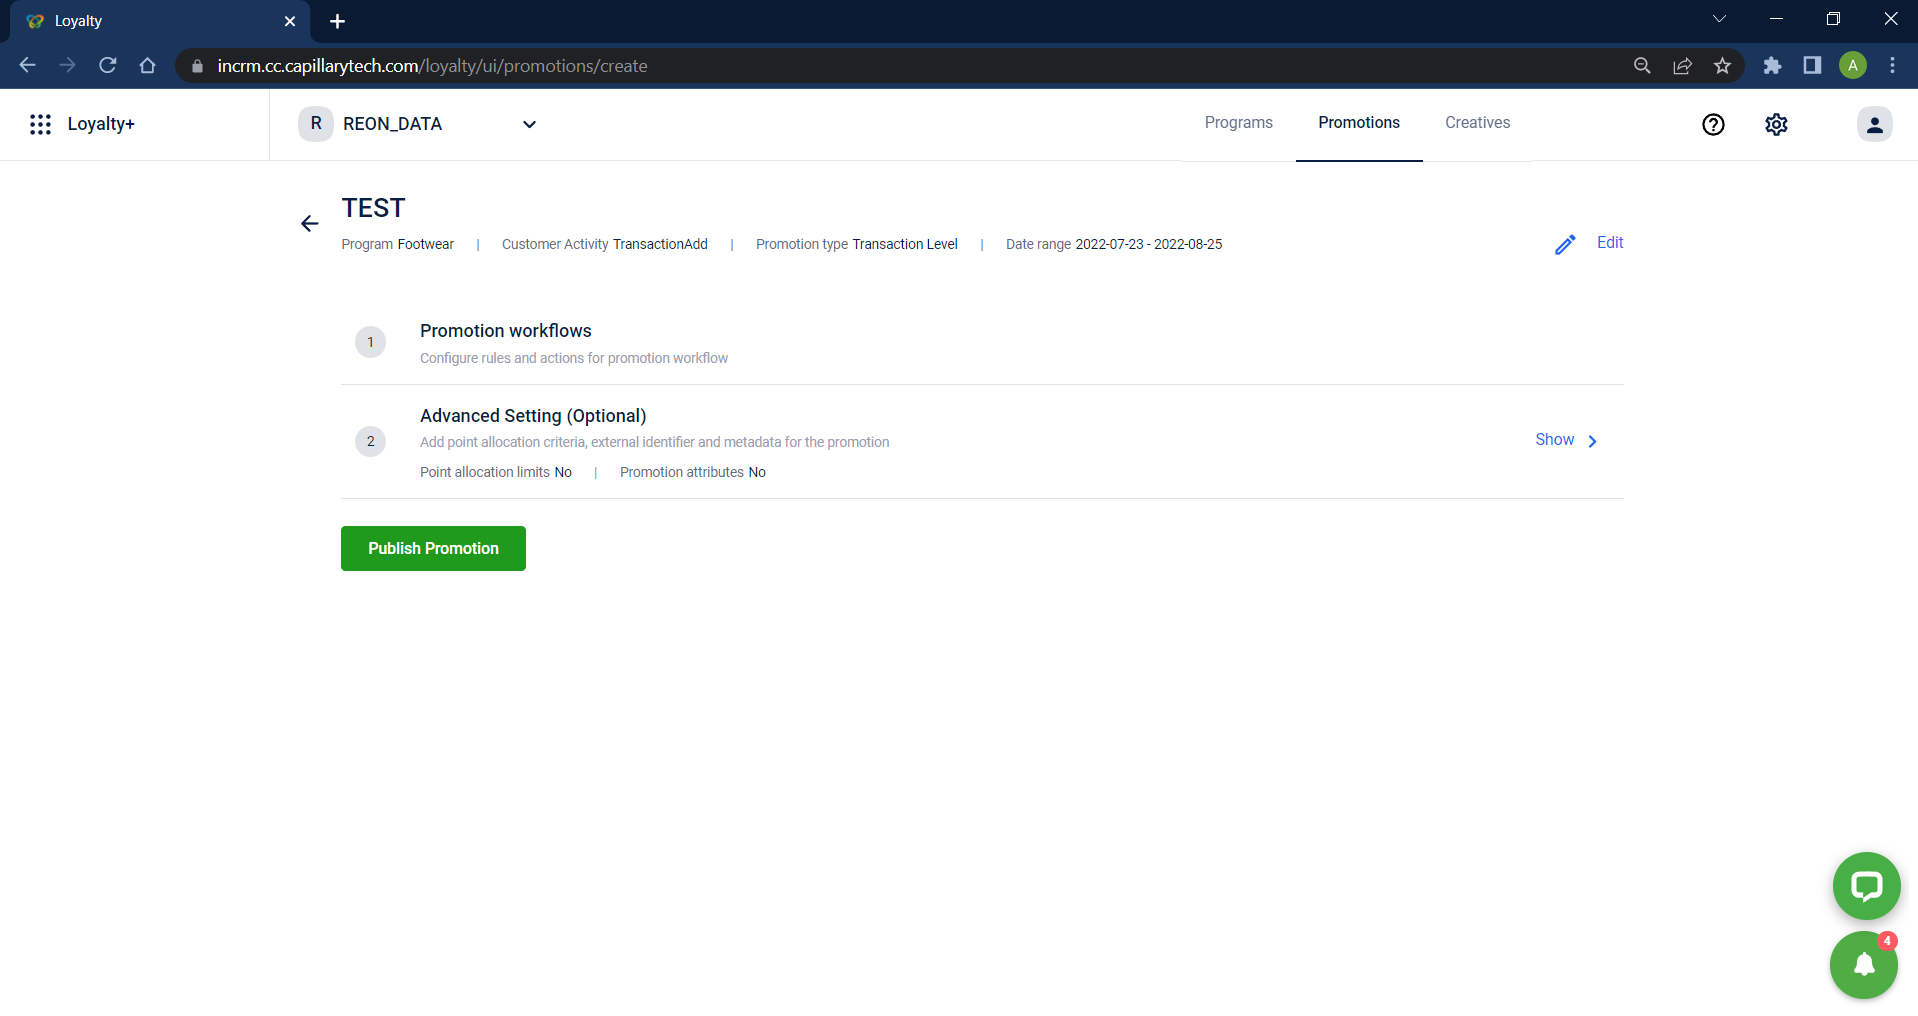
- Click Publish Promotion to apply the changes to the live program.
WarningNote
Publishing a promotion will also publish any changes made to the associated loyalty program. To publish promotions and loyalty programs separately, raise a ticket to the sustenance team. Once enabled, this change is permanent and cannot be reverted.
Advanced Settings
Issue
The issue section allows you define when the loyalty promotion will expire and limit the number of times a loyalty promotion can be issued and redeemed by a customer.
Issual Expiry
You can define the issue duration of the loyalty promotion in the issual expiry section. This is the duration within which a customer must complete the defined activity to earn the benefits of the promotion.
There are two ways a promotion can expire:
| Expiry Type | Description | Example |
|---|---|---|
| Along with promotion | The issual will expire on the day the loyalty promotion is due to expire. | A loyalty promotion is created that starts on 10th April 2025 and ends on 10th May 2025, if Along with promotion is selected the issual will also expire on the same date i.e. 10th May 2025. |
| After specific period from promotion issual | The issual will expire after a specific number of days from when it is issued to the customer. | If the value provided is 10 days and the promotion is issued to the customer on 10th April 2025, the issual will expire in ten days i.e. 20th April 2025. |

Issual Limit
You can define limits on the number of times a loyalty promotion is issued to a customer and the number of times it can be redeemed by the customer.
There are three where is a promotion limit can be defined:
| Limit Type | Description | Example |
|---|---|---|
| Maximum times a promotion can be issued across customer | The maximum number of times a loyalty promotion can be issued to all customers within a brand. To allow unlimited issuals (no cap), do not enter any value in the field. | A loyalty promotion is created with a maximum issual limit of 1000 across all customers. This means the promotion can be issued to customers a total of 1000 times throughout the entire brand’s customer base. Once this limit is reached, the promotion will no longer be available to any additional customers within the brand. |
| Max times a promotion can be issued to a customer | The maximum number of times a loyalty promotion can be issued to a single customer. | A loyalty promotion is created with a per-customer issual limit of five times. This means an individual customer can earn the promotion no more than five times total. Once this limit is reached for a specific customer, they will no longer qualify for the promotion—even if they meet the eligibility criteria again. |
| Max times one issual can be redeemed | The maximum number of times a single issued loyalty promotion can be redeemed by the customer. | A loyalty promotion is created with a maximum redemption limit of five times. This means that each time a customer earns the promotion, they can redeem it a maximum of five times for that specific issual. Once the redemption limit is reached for that instance, the customer can no longer use redeem it. |

Points Allocation limits
These limits or capping let you budget the points that will be allocated via these promotions. This can done in various ways & combinations :
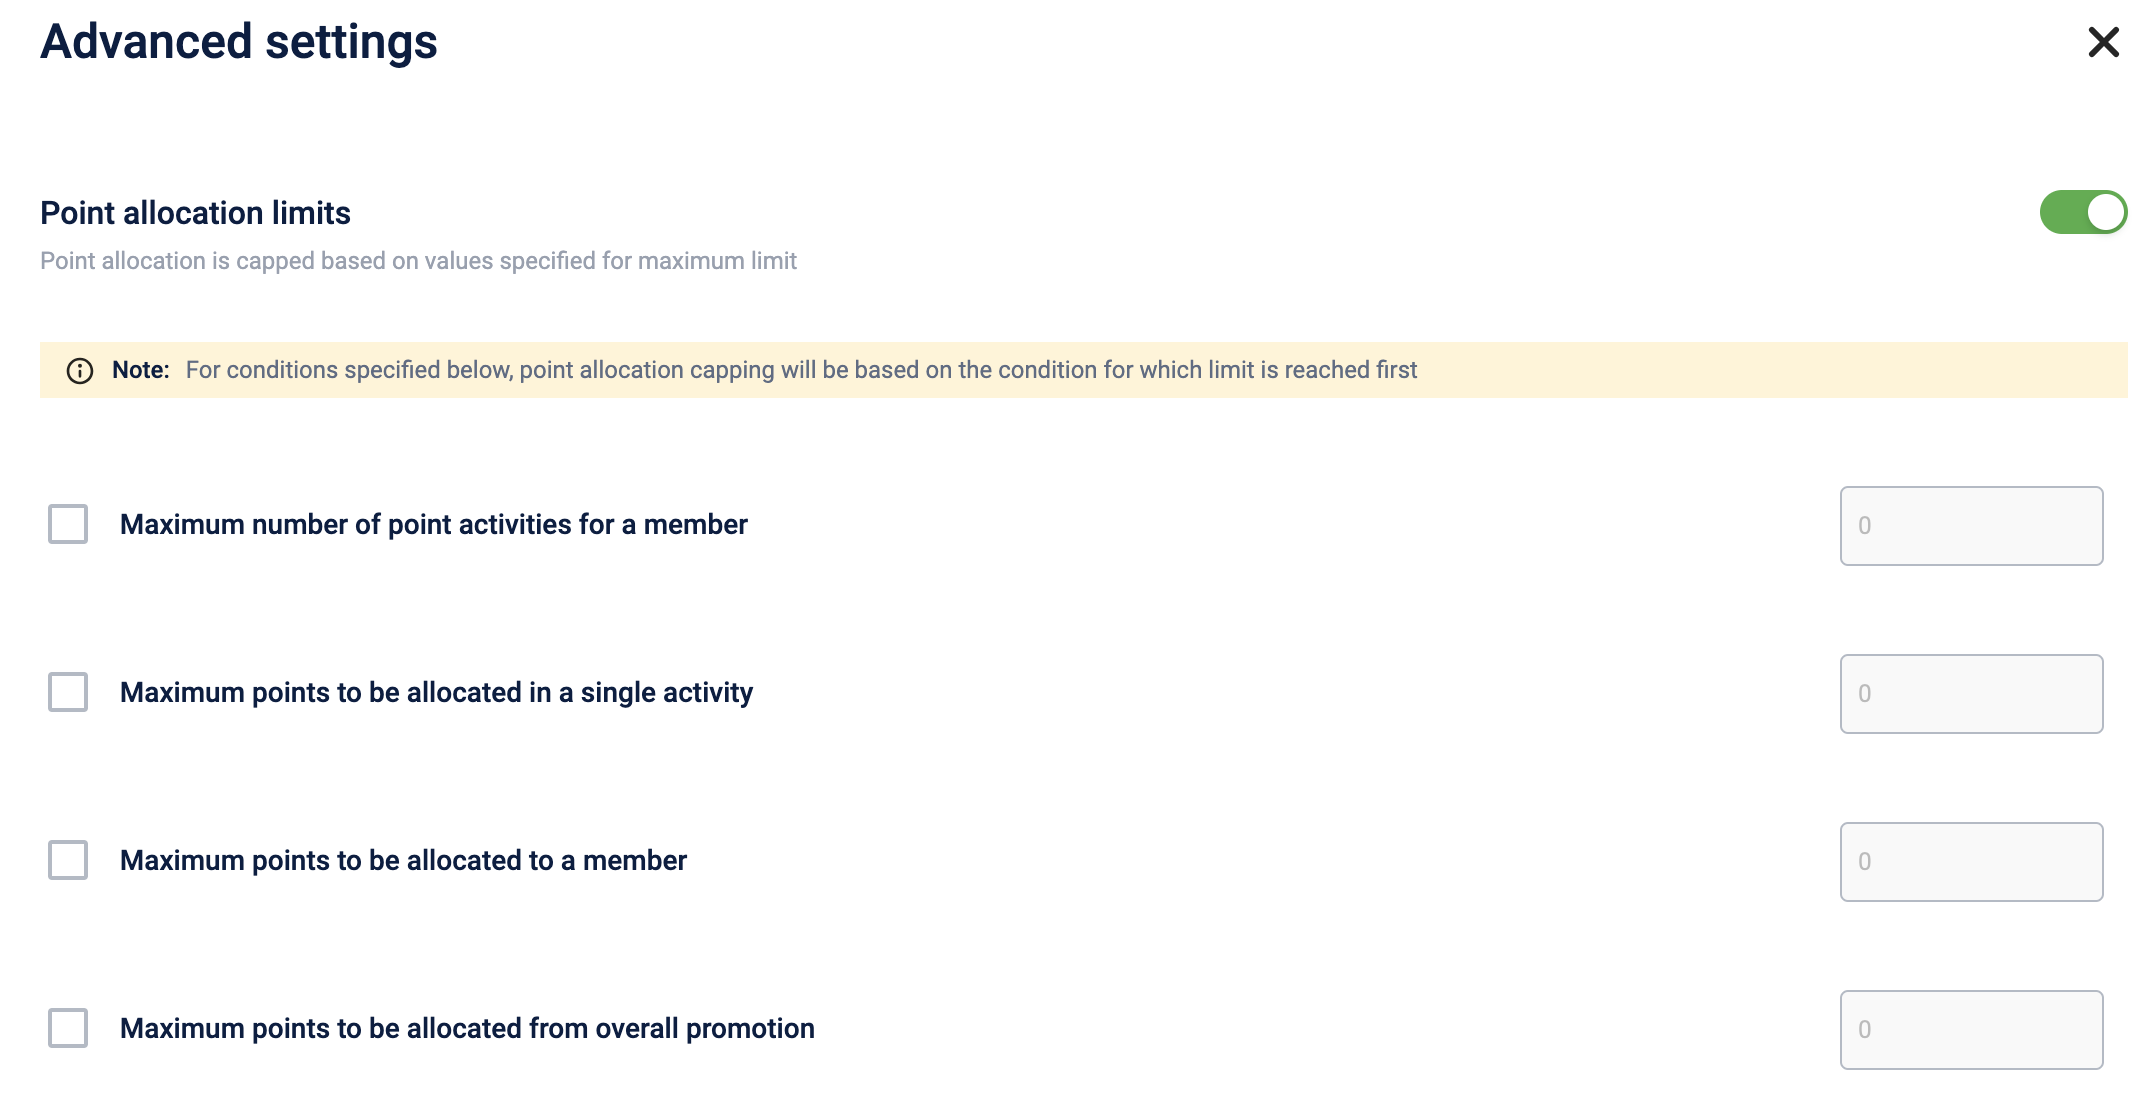
- Maximum number of point activities for a member - Define the max events or customer activities that can allocate points to a customer from the promotion. Eg - This promotion can be applied to a customer maximum 3 times.
- Maximum points to be allocated in a single activity - Define the max points that can be allocated in an event or customer activity. Eg - This promotion can only allocate 100 points in a transaction.
- Maximum points to be allocated to a member - Define the max points that can be allocated to a customer from the promotion. Eg - A customer can earn only upto 500 points from this promotion .
- Maximum points to be allocated from overall promotion - Define the max points that can be allocated from this promotion. Eg - The promotion can allocate upto 5000 points. This means, once 5000 points have been awarded from this promotion, it will be exhausted.
Limits when Advance Promotions capabilities are enabled
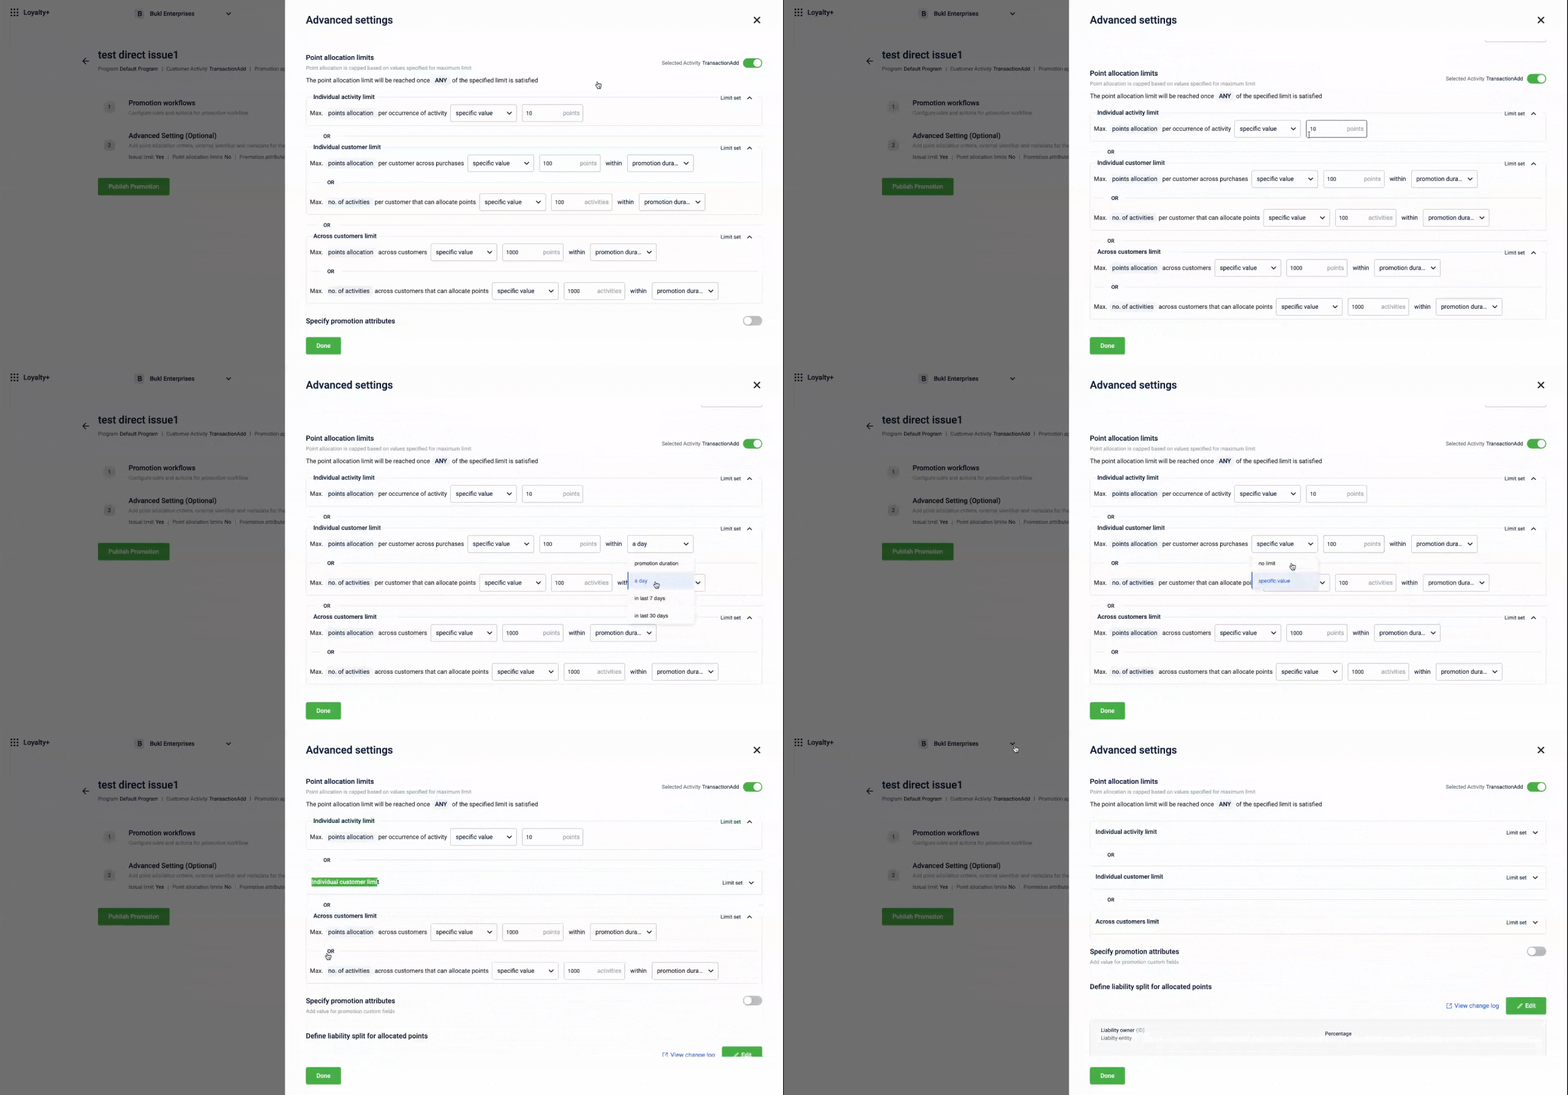
When Advance Loyalty Promotions feature is enabled, these points allocation limits become more flexible and provides wider variety of limits to be configured.
The key differentiator here, are the specific time durations for these limits. You can define these limits apply within :
Promotion Duration - This ideally means, that there is no specific time duration set in this case, because these limits are anyways applicable for the time promotion is active.
a day - Setting this means the limit is applicable within a day or 24 hours. This behaves in a moving window format, so whenever the promotion event occurs, from that instance, the system will go back 24 hours/a day and check if the limits is reached. Eg - Allocate 100 points to a customer from a promotion in a day. So in a day, a customer can only get 100 points from this promotion and event if the customer performs multiple events within the 24 hours duration, on every event, the system will go back and check for 24 hours.
in last 7 days - Setting this means the limit is applicable within last 7 days or a week. This behaves in a moving window format, so whenever the promotion event occurs, from that instance, the system will go back 7 days and check if the limits is reached. Please be mindful, it is not a fixed window, where you are defining a week from Monday to Sunday. On every event occurrence , the system will go back 7 days and check for the limit value.
in last 30 days - Setting this means the limit is applicable within last 30 days or a month. This behaves in a moving window format, so whenever the promotion event occurs, from that instance, the system will go back 30 days and check if the limits is reached. Please be mindful, it is not a fixed window, where you are defining a month from 1st to 30th. On every event occurrence , the system will go back 30 days and check for the limit value.
Limits :
Individual activity limit
- Max. points allocation per occurrence of activity - Define the max points that can be allocated in an event or customer activity. Eg - This promotion can only allocate 100 points in a transaction.
Individual customer limit
- Max. points allocation per customer across purchases - Define the max points that can be allocated to a customer from the promotion. Eg - A customer can earn only upto 500 points from this promotion .
- Max. no. of activities per customer that can allocate points - Define the max events or customer activities that can allocate points to a customer from the promotion. Eg - This promotion can be applied to a customer maximum 3 times.
Across customers limit
- Max. points allocation across customers - Define the max points that can be allocated from this promotion. Eg - The promotion can allocate upto 5000 points. This means, once 5000 points have been awarded from this promotion, it will be exhausted.
- Max. no. of activities across customers that can allocate points - Define the max events or customer activities that can allocate points across customers from the promotion. Eg - This promotion allocates to total 500 transactions.
Create Forward Cases (to Another Set)
To check multiple conditions at a time, use the Forward to Set action as explained in the following.
- After writing the rule expression, and Expression equals, set the action as Forward to Set.
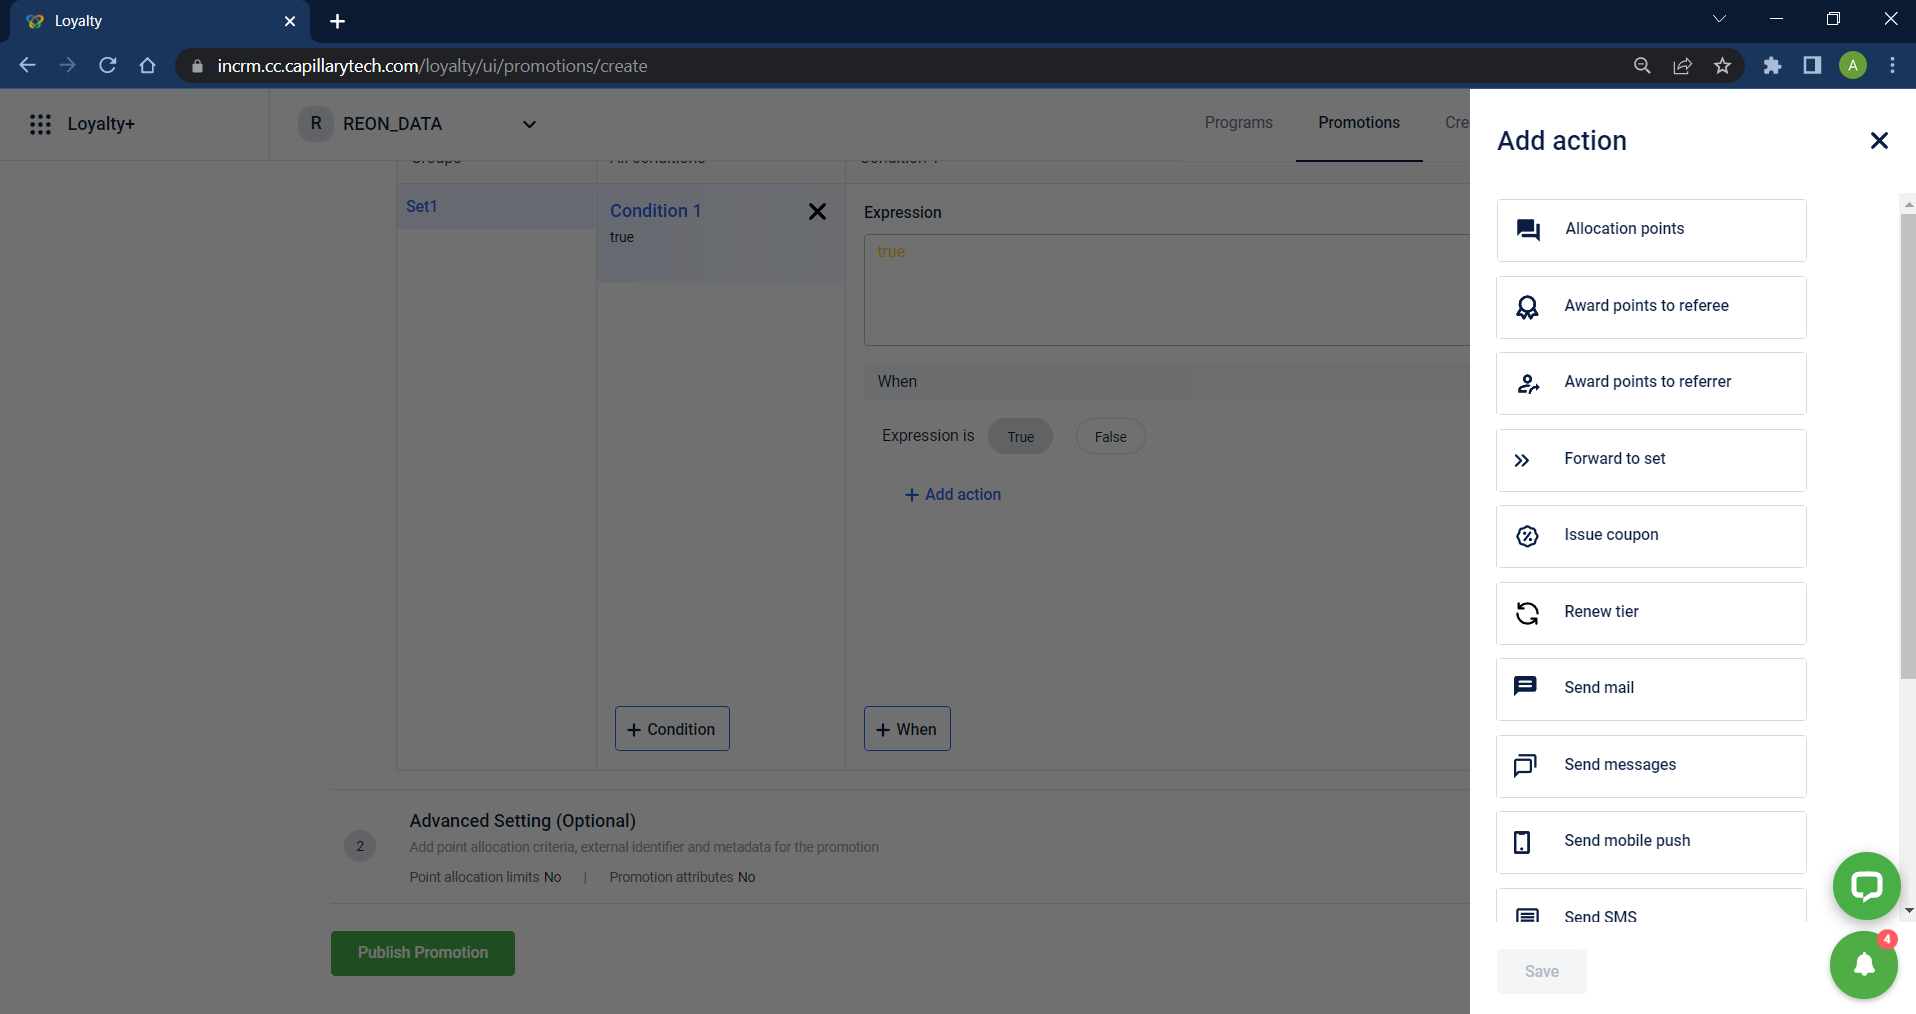
- Click Forward to Set from the list.
- Set Enable lineitem unrolling? to Yes to create rules based on transaction line items. Set Enable payment method unrolling? to Yes to create rules on payment modes.
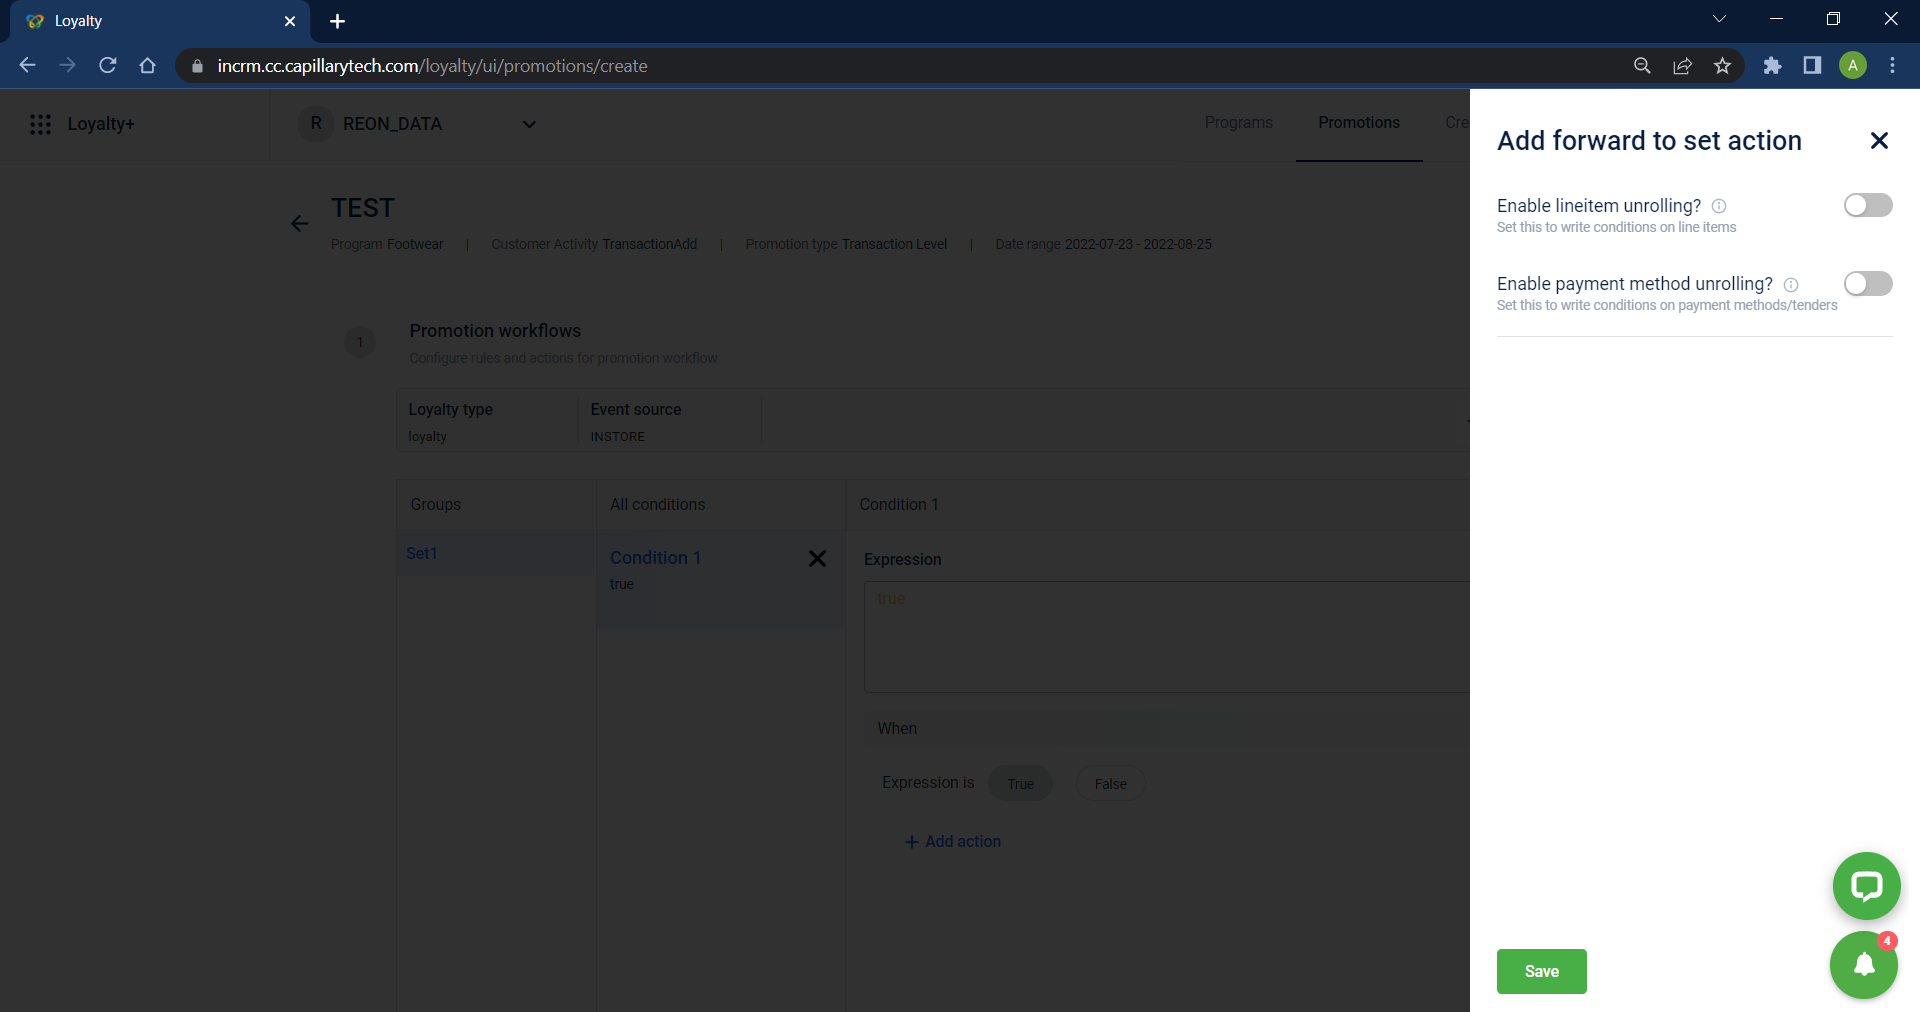
- To create rules based on line-items in the forward set (set2), set Enable lineitem unroller to Yes; to create rules based on payment mode in the forward set(set2, set Enable payment method unroller to Yes.
- For the lineitem unroller, you will see the Use lineitem Proportions? option. This option lets you issue points on line items based on the line item amount. Assume a transaction with two lineitems, where lineitem1 is $800 and lineitem2 is $1200; bill level discount is $400. Hence, the total bill amount is $1600. If points allocation is set to 10% of the transaction amount, the allocation of points in the case of Use Proportions is as follows.
- If Use Proportions is disabled, points of 10% will be awarded for each line item. That is 80 points for lineitem1 and 120 points for lineitem2.
- If Use Proportions is enabled, points will be issued on proportionate of the bill amount. That is, for line item one - 10% of (800/2000) 1600 and for lineitem2, it will be 10% off (1200/2000) 1600.
-
The Maximise Points Allocation? option considers the payment methods marked as eligible under 'Advanced Settings' and allocates points for the total eligible amount when different line items earn at different rate considering the higher earning first rather than a pro-rata basis
-
Configure action and click Save. A new set is created.
-
Click Reconfigure to apply the changes to the live program.
Rules Configuration with Sample Scenarios
Promotions for Specific Stores or Concepts
Case 1: Run promotion for specific stores
Run a promotion program specific to selected stores.
Example | Configuration |
|---|---|
Run a promotion program only for stores - demo_store1, demo_store2, and demo_store3. |
|
Case 2: Exclude promotion for specific stores
Run a promotion program to all stores, excluding a specific set of stores.
Example | Configuration |
|---|---|
Run a promotion program for all stores, excluding specific stores - demo_store1, demo_store2, and demo_store3. |
|
Case 3: Run promotion for a specific concept
Run a promotion for a specific concept (brand or business unit).
Example | Configuration |
|---|---|
Run a promotion program only for specific concepts - Demo_Concept1, Demo_Concept2, and Demo_Concept3. |
|
Case 4: Exclude promotion for specific concepts
Run a promotion program for all concepts, excluding a specific set of concepts.
Example | Configuration |
|---|---|
Run a promotion program for all concepts, except concepts - Demo_Concept1, Demo_Concept2, and Demo_Concept3. |
|
Promotion for Specific Time
Case 1: Run promotion between specific hours
Issue promotional incentives to customers who purchased between specific hours.
Rule expression: currentTxn.date.isHourBetween(<hour from>,<hour to>)| Example | Configuration |
|---|---|
| Issue promotional incentives to customers who shopped between 17:00 hours - 21:00 hours. | currentTxn.date.isHourBetween(17,21) |
Case 2: Run promotion between specific hours and minutes
Issue promotional incentives to customers who purchased between specific hours and minutes.
Rule expression: currentTxn.date.isTimeBetween(,,,)
| Example | Configuration |
|---|---|
| Issue promotional incentives to customers who shopped between 17:30 hours - 21:00 hours. | currentTxn.date.isTimeBetween(17,30,21,0) |
Promotion Use Cases that can be set up using this feature
- Promotions for Specific Stores or Concepts
- Promotion for Specific Time
- Promotion for Specific Days
- Promotions on specific days of the week
- Promotions on birthday month
- Promotions on program enrollment month
- Promotions on program enrollment week
- Promotion on Products and Lineitems
- Promotion on Tenders
- Regular Points Multiplier Promotion
- Capping of Points Issued through a Promotion
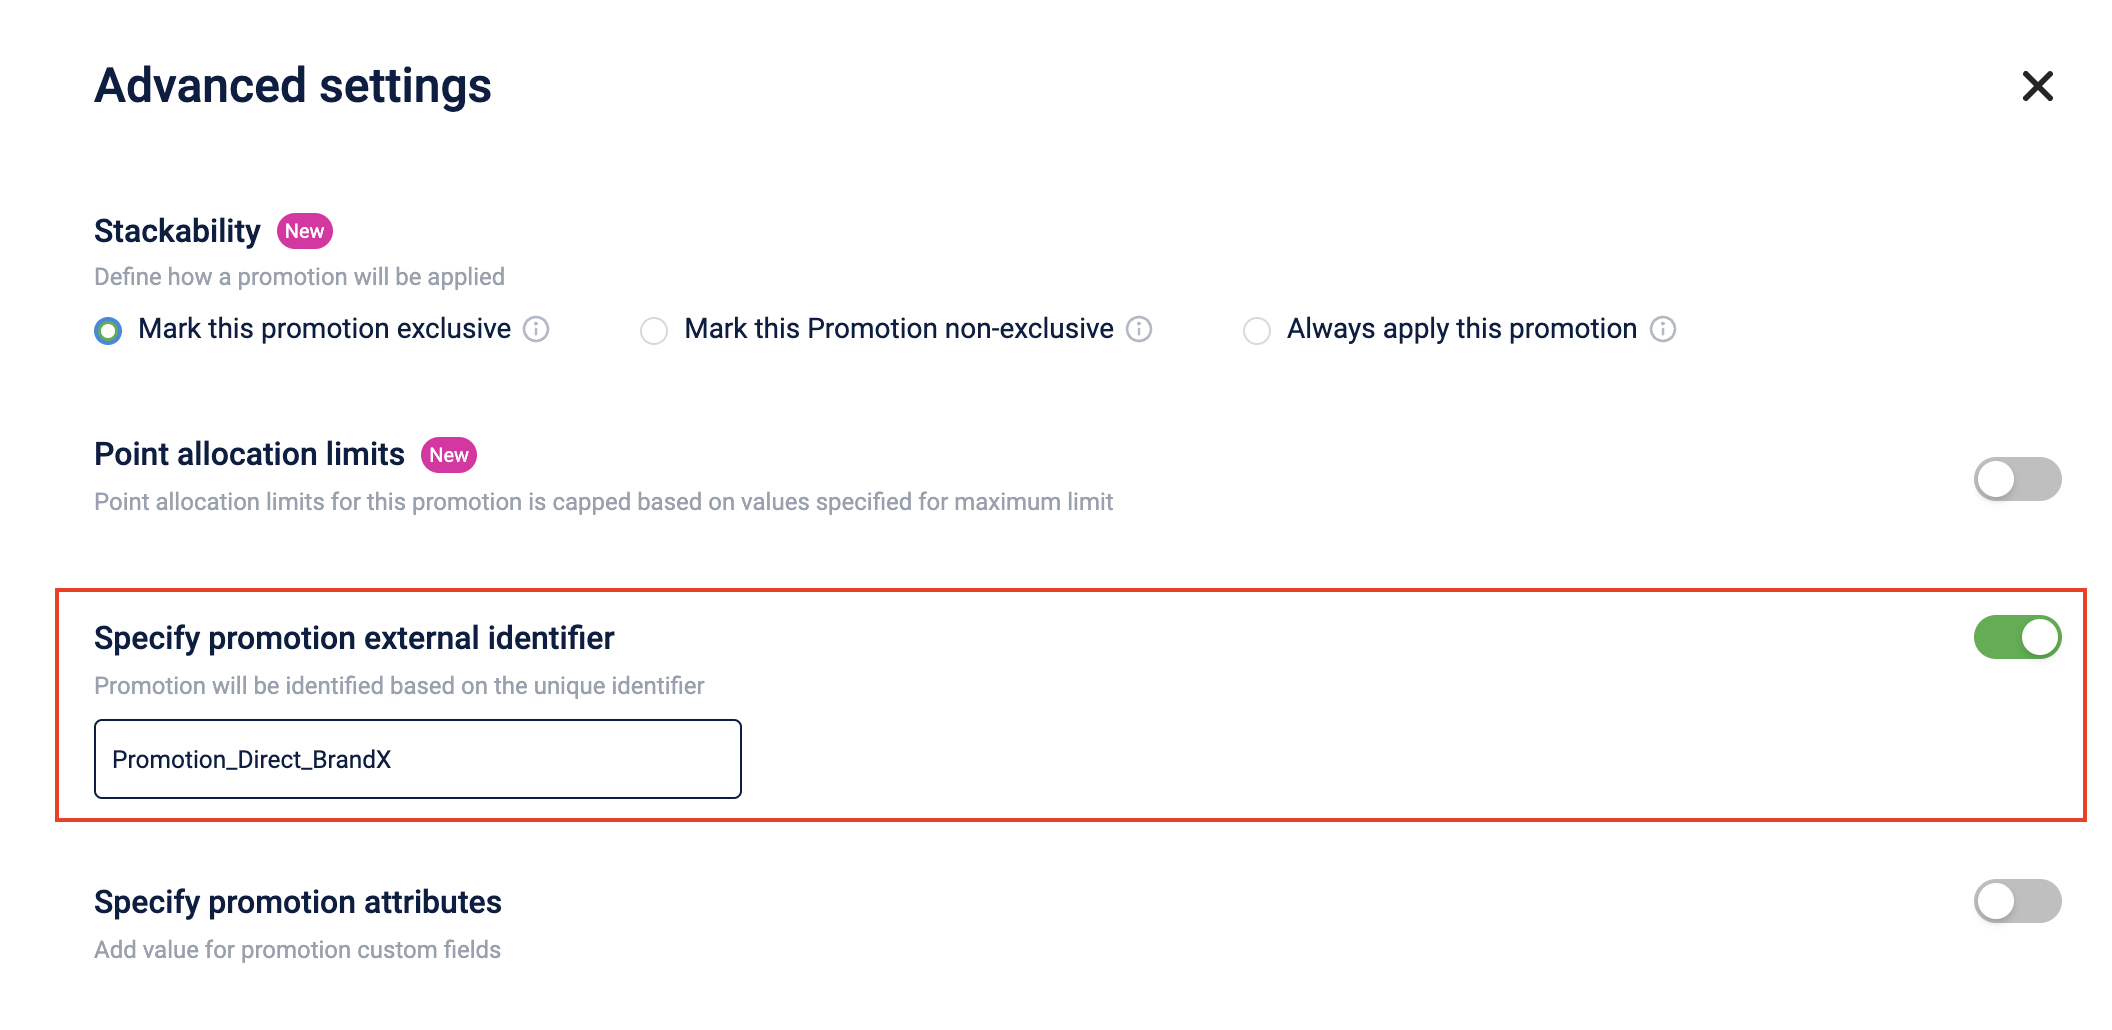
External identifier for the promotion
You can enable the Specify promotion external identifier option and enter a unique identifier value to identify a promotion using that.
Updated 12 days ago
