January-February-March 2023
Loyalty+
Step Function - Points Allocation Strategy & Issue Coupon Strategy
Problem Statement:
Currently we support 3 types of points allocation - Fixed and proration on % and points multiplier.
There are requirements from brands who want to define equal intervals of X transaction amount and allocate fixed Y points or coupons for every X amount.
Use Case:
- As a marketing manager, I would like to allocate fixed points to the customers whose transaction lies in fixed equal intervals.
Eg: On every spend of 150, allocate 6 points. - As a marketing manager, I would like to allocate a fixed number of coupons to the customers whose transaction lies in fixed equal intervals.
Feature Description:
Issue Points through Step Function
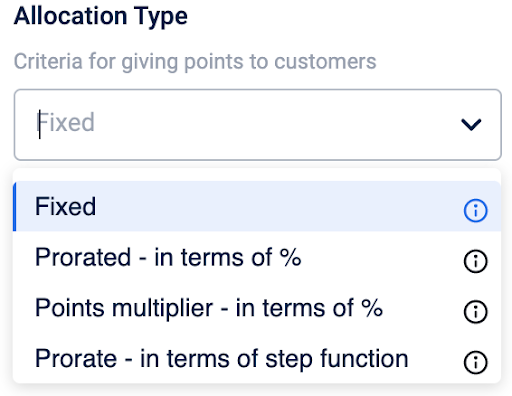
- We have introduced a new “Allocation Type” in the Points Earn condition called “Prorate based on Step function”, where you can allocate fixed points in steps.
- Quoting the above example, on every spend of 150, customers get 6 points. So, if the transaction amount of a customer falls between 151 - 300, the customer gets 6 points. If the transaction amount is between 301 - 450, customers get 12 points and so on.
- You need to define 2 things :
- Step size = The transaction amount interval (above eg - 150)
- Point per step = The fixed points to be allocated (above eg - 6)
- Because this strategy works on a source value, hence like other proration strategies, this also works, only in the Transaction Add event.
Issue Coupons through Step Function
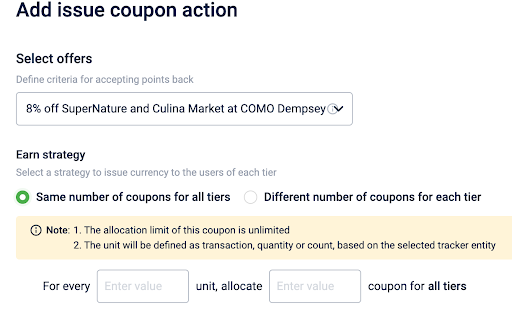
- The step function allocation of coupons has been added at the action level.
- Under the Loyalty workflows, in the “Issue coupon action” , now exists an “Earn Strategy” which allows users to issue coupons in steps across tiers. Here also, the step size would be the same for all tiers, but the no. of coupons to be issued for each tier per step can differ.
Points Transfer Functionality
Problem Statement:
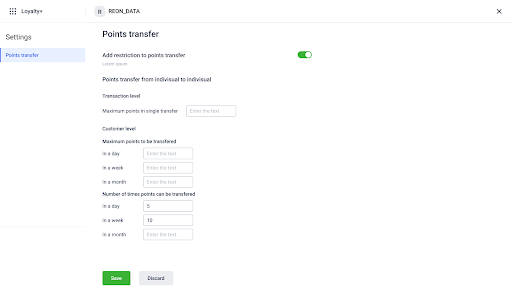
- There needs to be certain velocity limits or rules which should apply to Points transfer functionality.
- Today there are no such restrictions, and anyone can transfer any number of points to another user or user group. This can lead to unwanted fraudulent activities.
Use Case:
- As a brand manager, I want to apply velocity limits in transferring of points so that I can configure additional layers to prevent misuse of the points by transfer.
- For examples,
If a brand manager wants to restrict the points transfer limit to max 200 points per day and max number of transfers to 2 times only for a program.
Feature Description:
- This feature exists both for Group Points transfer and Individual points transfer, for those brands using Group Loyalty set-ups.
- So there can be 4 combinations of points transfer in case of group loyalty:
- Individual → Group
- Group → Individual
- Individual → Individual
- Group → Group
- Brands can define:
- Points transfer limit for daily (For a day) , Weekly (Past 7 days), and Monthly( Past 30 days). Eg - Users cannot transfer more than 500 points from one account to another in a day.
- The frequency of Point transfer for daily (For a day) , Weekly (Past 7 days), and Monthly( Past 30 days). Eg - Users cannot transfer points more than 3 times from one account to another in a day.
Manual Points Adjustments
Problem Statement:
- Currently we do negative points adjustments only when a customer is returning the bill after redeeming all the points that he/she would have earned on the original bill.
- But in some use cases, there may not be the link to the original transaction and yet some points need to be reverted. This generally happens in case of third party vendors.
In such cases, the brands would want to deduct points manually and create a new PA entry with negative points, to adjust the points balance.
Use Case:
- A transaction was done and the brand imported the points with the bill_id. Now when a customer returns the bill via a credit card of let's say HDFC, HDFC doesn’t know what was the original bill. And hence there is no way to link the original and the return bill. In such cases, HDFC would want to create a new PA entry with all points as returned. This will be similar to negative PA entry but only the return value will be -ve. Thus overall the points will be reduced for the customer.
Feature Description:
- To support this, there are 2 features introduced:
- Manual adjustments through API
- Manual adjust through Import framework
- A new “Negative Points Adjustment” API to accept a request body and mark a particular entry as a negative return entry.
- Mandatory fields will be
- user identifiers like mobile , userId, externalId etc,
- reason for manual adjustment
- points to deduct
- A new import profile “Manual Points Adjustment” profile will allow you to create negative points entries.
API Document :
Input
Query Params:
- identifierName(possible values: userId, externalId, mobile etc)
- identifierValue
- source(INSTORE, WEB_ENGAGE, WECHAT etc)
Request Body
- reasonOfReturn : Free flowing text. Max character limit -50
- pointsToBeAdjusted: point values which need to deducted for the user
- pointsAwardedId
- programId
- promotionId
- promotionIdentifier
- pointsAwardedRefType, supported values -
- bill_regular
- bill_promotions
- line_item_regular
- line_item_promotions
- customer_promotions
Contraints on Input:
- reasonOfReturn, pointsToBeAdjusted are mandatory params.
- If promotionIdentifier is passed, programId can not be empty/null.
- If promotionId and promotionIdentifier both are set, it is an invalid input combination. Either of 1 needs to be passed and not both.
- points value should be greater than 0.
API signature
Resource Information:
| URL | v2/customers/lookup/negativePointsAdjustment |
|---|---|
| Authentication | Yes |
| HTTP method | POST |
| Batch Support | No |
Request URL
\{host\}/v2/customers/lookup/negativePointsAdjustment?identifierName=id&identifierValue=\{userid\}&source=INSTORESample request body
{
    "pointsToBeAdjusted": "100.00",
    "programId": 2117,
    "reasonOfReturn": "testing"
}
Sample Response
{
    "status": "success",
    "pointsAvailable": "2399.000",
    "message": "points deducted successfully for the user ",
    "warnings": []
}
Ledger Explode APIs
Problem Statement:
So far we provided a based ledger API that gave brands and their customers a summary view of activity level earnings. However details around the actual break up was not available.
Feature Description:
- With the new ledger explode APIs customers can see the transaction or activity details. To get started use the below API for any activity details,
- API URL
/v2/pointsLedger/getLedgerExplodeInfo?event_log_ids=58365864,56203478&customFields=boolean&extendedFields=boolean&maxConversionDate=boolean&billDetails=bool - These have been implemented for the following events :
New Bill
CustomerRegistration
TransactionAdd
GroupTransactionAdd
GenericEvent
CustomerPromotionImport
BillPointsPromotionImport
LineitemsPointsPromotionImport
TargetCompleted
Goodwill allocation
Points redemption
Points transfer
API URL
/v2/pointsLedger/getLedgerExplodeInfo?event_log_ids=58365864,56203478&customFields=boolean&extendedFields=boolean&maxConversionDate=boolean&billDetails=bool
Explode API for New bill TransactionAdd GroupTransactionAdd
1.CDP side change to get bill and line item details Make a controller for get CustomerLedger inffo
-
GET /v2/pointsLedger/getLedgerExplodeInfo?event_log_ids=58365864, 56203478&customFields=boolean&extendedFields=boolean&maxConversionDate=boolean&billDetails=bool
-
Pass event id to explode_service
-
Test Scenarios:
-
Successful request should returns 200 OK
-
Should invoke explode service with expected event_log_id array
-
Given two event_log_id if one of them is invalid or not found then return null for that id and return object for valid id.
-
Create a new service class in “com/capillary/api/explode/service”
-
Invokes thrift to get the event details from emf (it’s part of 6th subtask so that subtask has to be completed before this.)
-
Once we event details, we can get even-type and based on event type we’ll get further details.
-
If eventType in (NewBill, TransactionAdd, GroupTransactionAdd)
i. Then get bill and line items details.
-
call getTransactionsWithLineitemsForUser() to get bill and lineitem details
Test Scenarios:
- Should invoke getTransactionsWithLineitemsForUser with customerId
- Should return bill and line-items details
Response Object Structure:
{
    "eventLogId": "30405652",
    "eventTypeName": "TransactionAdd",
    "eventDetail": {
        "eventTime": "",
        "maxConversionDate": "2022/12/12: 12:00:00"
    },
    "billDetails": {
        "type": "loyalty",
        "billNumber": "543653",
        "discount": "10",
        "billAmount": "190",
        "note": "this is test",
        "grossAmount": "200",
        "source": "Instore",
        "storeCode": "hil.admin",
        "tillCode": "hil.admin.1",
        "pointsEarned": {
            "regular": [{
                "value": "22",
                "isTransferable": true,
                "expiresOn": "2022/11/11: 11:00:00"
            }],
            "promised": [
                {
                    "value": "200",
                    "conversionDate": "2022/11/11: 11:00:00"
                }
            ],
            "promo": [
                {
                    "promotionName": "",
                    "promotionId": "",
                    "value": "33",
                    "expiresOn": "2022/11/11: 11:00:00",
                    "isTransferable": false
                }
            ]
        },
        "lineItems": [
            {
                "itemCode": "4756766",
                "source": "Instore",
                "amount": 10.5,
                "rate": 10.5,
                "qty": 1.0,
                "pointsEarned": {
                    "maxConversionDate": "2022/12/12: 12:00:00",
                    "regular": [
                        {
                            "value": "22",
                            "isTransferable": true,
                            "expiresOn": "2022/11/11: 11:00:00"
                        }
                    ],
                    "promised": [
                        {
                            "value": "200",
                            "conversionDate": "2022/11/11: 11:00:00"
                        }
                    ],
                    "promo": [
                        {
                            "promotionName": "",
                            "promotionId": "",
                            "value": "33",
                            "expiresOn": "2022/11/11: 11:00:00",
                            "isTransferable": false
                        }
                    ]
                }
            }
        ]
    },
    "customFields": [
        {
            "name": "gender",
            "value": "male"
        },
        {
            "name": "txn_source",
            "value": "neuApp"
        }
    ],
    "extendedFields": [
        {}
    ],
    "paymentModes": ["UPI", "CASH"]
}
Advanced Points Breakup View
Problem Statement:
- Currently, our Membercare is used by customer support executives or brands’ help level managers, to guide customers with their detailed breakup of the bill.
- A standard bill/invoice would not contain a detailed breakup of the points issued to the customer on that bill. It would simply display the total points issued on that bill.
- To know the detailed view, end users tend to call the customer support, and the kind of Advanced view of the points detail we showed on Membercare was very confusing, with all the technical jargons used.
Use case:
- As a customer support executive or loyalty manager, I would like to have a simple bill-like view of a Transaction on Membercare, to better understand the events taking place in a bill and give a clear summary of the bill to my customers.
Feature Description:
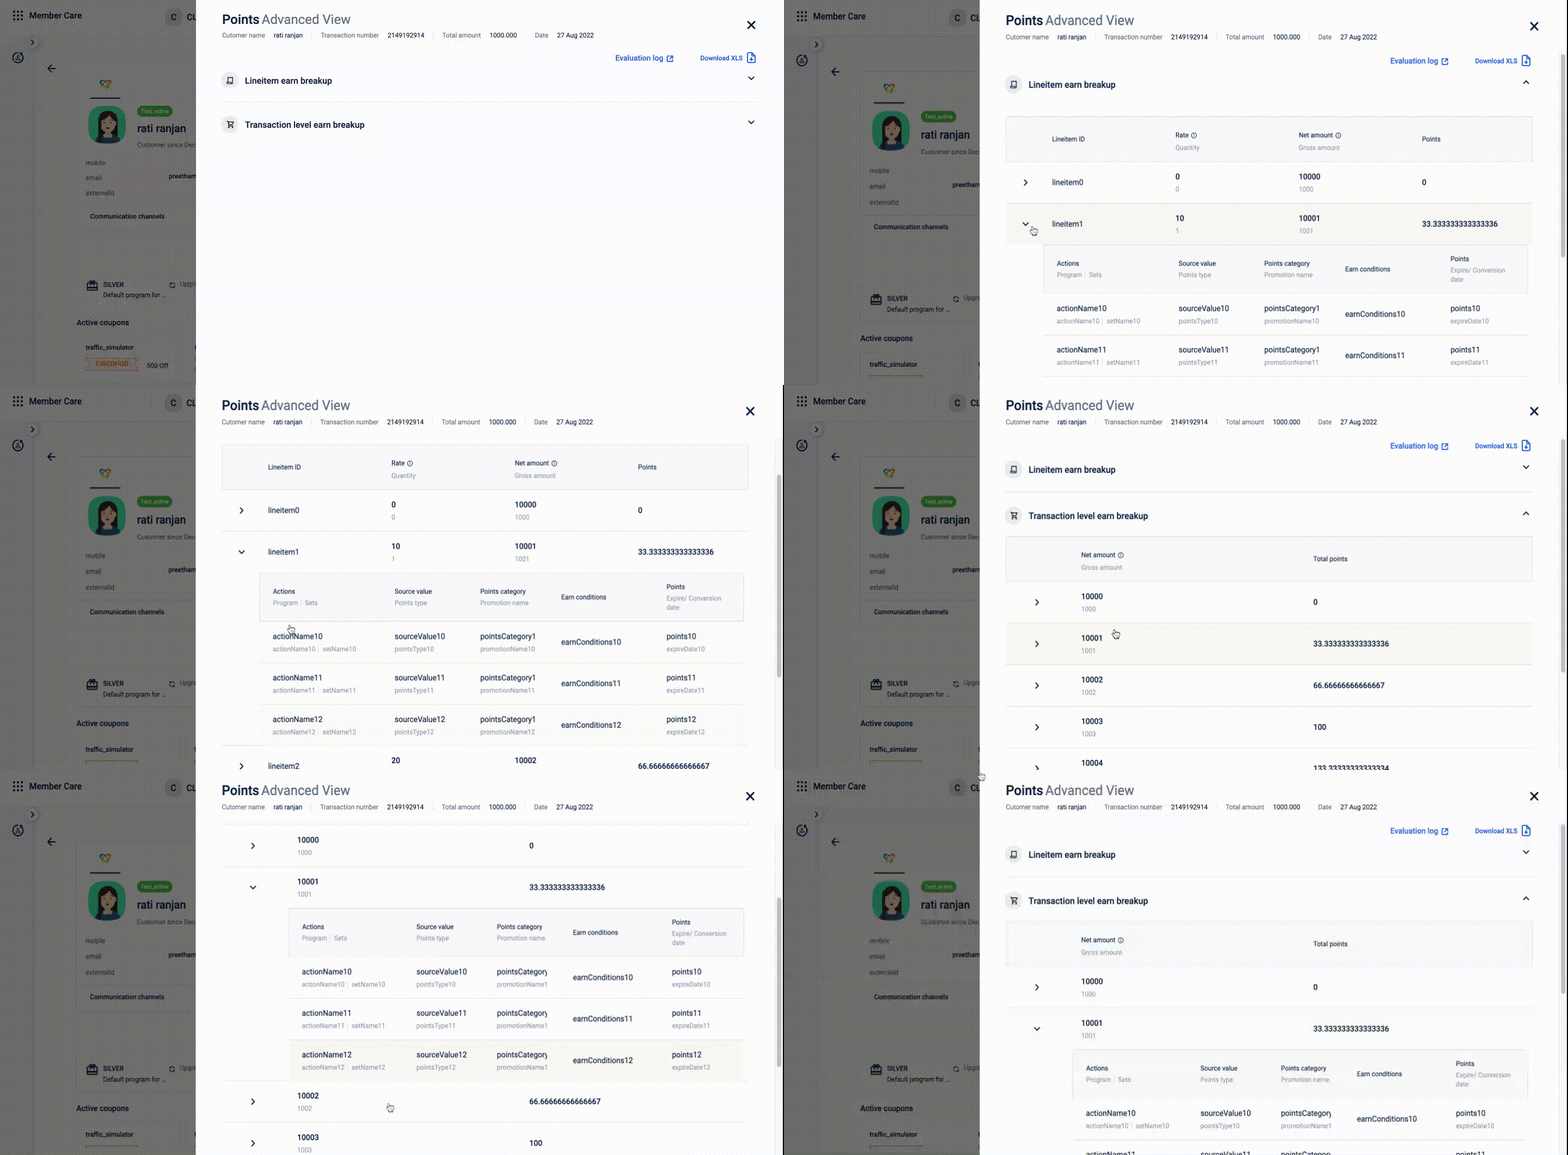
- With new improvised points break up view you can see and understand the allocation at lineitem & bill level.
- Old view would focus on program level allocations which does not help 99% of our customers and hence cumbersome to understand.
- New view focuses on line item level and bill level break up to help users better understand the allocations done.
Referral programs Enhancements
Referral code validation API
You can use the /v2/referral/validate API to check if a referral code is valid for a campaign. This API validates the referral code based on its creation date and the campaign's start and end dates.
How it works
- When you call the /v2/referral/validate API with a referral code, the system checks if the code exists and if its creation date falls within the campaign's active period.
- If the referral code's creation date is outside the campaign's start and end dates, the API returns the code as invalid, even if the code exists.
- This validation is enforced at runtime for every request.
API response
- If the referral code is valid:
{"valid": true, "referrer": <referrer_id>} - If the referral code is invalid due to date validation or does not exist:
{"valid": false, "referrer": -1}
When to use
- Use this API to confirm referral code validity before applying rewards or benefits in your referral program workflows.
- This helps prevent the use of expired or future-dated referral codes.
Recommendation
- Always validate referral codes using this API before processing referrals to ensure compliance with campaign rules.
Problem Statements :
- Currently, the referral codes are system generated and the brands cannot customize them.
- Brands may want to customize these codes and increase the recall factor for the codes.
- Currently in the referral program architecture in our system, we have a functionality called reward referrer on 1st txn of referee or many other rules that can be written on referee code.
- But the challenge is this works, only when the referral code is passed in the transaction API.
- Even though the referee enrolls using the referral code of the referrer, the referrer will not get the benefit unless the referral code is passed in transaction API.
Use Cases:
-
As a brand marketing manager, I should be able to define the referral code format that my customers use to invite their friends & family so that I can simplify it and improve recall.
-
As a brand, I want to issue rewards to referrer and referee without explicitly passing the referral code in each transaction. System should identify the referrer and execute.
Feature Description:
-
On Engage+ under the campaign settings, find the Referral Configuration Settings. Here you can customize your referral codes.
-
Now, for referral, the system will not require the referral code to be passed in the Add txn call.
-
Eg : If a rule is written, lets say
referrerCode.refereeRegCount</Image>
Points Unlock APIs - Part 1
Problem Statement:
- Currently we are defining the promised points window in the Loyalty system.
- This window is hard coded and cant be changed irrespective of any customer action.
- The only way to unlock these promised points is through external trigger, which works at a bill level. So once the trigger is sent to the Transaction Update event, the promised points on the entire bill will get converted to redeemable points.
- But what if brands want to convert points only for a particular line item and not the entire bill. This is not possible today.
Use cases:
- As a System Integrator ,I would like to be able to to configure fixed return windows for different line items , allocate promised points on each line item and convert them to redeemable points according to each line item return window, so that , The users can get regular points on each line item, as and when the return window for the line items gets over and don't have to wait for the default return windows to get over.
- As a Loyalty Program Manager, I would like to be able to give my customer an option to end the return window for any transaction or any line item in the transaction and immediately convert promised points to regular points.
- Based on an external trigger, the user must be able to relinquish the return window of delivered products, and the system must be able to convert points corresponding to that line item prematurely into redeemable points so that the user is able to rapidly realize benefits and as a brand, I get to minimize my returns and improve those operations
Feature Description:
- A new Points Unlock API is released, which lets brands unlock promised points at any time, for any specific line item or entire bill depending on the business requirement.
- The customers will not have to wait for their return window to get over to unlock their points and can relinquish the return window whenever they want to.
- The API will be able to convert promised points even if the delay strategy is
- Fixed delays from return period
- Fixed delays from transaction item extended field
- External Trigger
- Please find below, a sample response.
- In Phase 1, this is only supported for the TransactionAdd event.
{
   "pointsUnlocked": [
       {
           "billNumber": "bill-79845882",
           "pointsUnlocked": "10.000",
           "programId": 2379
       },
       {
           "billNumber": "bill-79845882",
           "itemCode": "kidswear101",
           "pointsUnlocked": "10.000",
           "programId": 2379
       },
       {
           "billNumber": "bill-79845882",
           "itemCode": "accessory_purse",
           "pointsUnlocked": "10.000",
           "programId": 2379
       }
   ],
   "warnings": \[]
}
Reason:
To unlock points when the customer wants to forgo return window period to convert promised points to regular points for any transaction or line-item, to configure return window for each line-item and convert them into regular points according to each line-item return window.
Request:
POST /v2/points/unlockPromisedPoints?entityType=CUSTOMER&entityId=121212Request Params:
entityType: USERGROUP2/CUSTOMER
entityId: 121212
Request Body:
{
    "eventName": "TransactionAdd",
    "billNumber": "16484",
    "eventLogId": 684034,
    "lineItemIds": [64384,64743,94745],
    "itemCodes": ["gd739","gd123"],
    "billDate":"2022-02-12",
    "sourceStoreId":1122,
    "sourceTilId":323,
    "sourceProgramId":2121
}| Fields | Mandatory in request |
|---|---|
| eventName | true |
| billNumber | false |
| eventLogId | false |
| lineItemIds | false |
| itemCodes | false |
| billDate | false |
| sourceStoreId | false |
| sourceTilId | false |
| sourceProgramId | false |
Request Body Combination:
Event Name | Bill Level Conversion | LineItem Level Conversion |
|---|---|---|
Generic | Combination 1 - eventLogID Combination 2 - promotionId Combination 3 - promotionIdentifier | NA |
CustomerPromotionImport | Combination 1 - eventLogID Combination 2 - promotionId Combination 3 - promotionIdentifier | NA |
TargetCompleted | Combination 1 - eventLogID Combination 2 - promotionId Combination 3 - promotionIdentifier | NA |
LineitemsPointsPromotionImport | Combination 1 - billNumber Combination 2 - eventLogId Combination 5 - promotionId | Combination 3 - lineItemId, billNumber and eventLogId Combination 4 - itemCode, billNumber and eventLogId |
BillPointsPromotionImport | Combination 1 - billNumber Combination 2 - eventLogId Combination 5- promotionId | Combination 3 - lineItemId, billNumber and eventLogId Combination 4 - itemCode, billNumber and eventLogId |
TransactionAdd | GroupTransactionAdd | Combination 1 - billNumber Combination 2 - eventLogId | Combination 3 - lineItemId, bilNumber and eventLogId Combination 4 - itemCode, billNumber and eventLogId |
Validation of request body combination will happen on api side
Validation:
- the billNumber belongs to the customerId
Use Dao from RegularTxnDaoMysqlImpl - **Indexing already exists in loyalty_log for orgId and billNumber
public List<LoyaltyLogDto> getLoyaltyLogByOrgIdAndBillingNumber(Long orgId, String billNumber)- the lineitemId belongs to the billNumber
- the lineitemId belongs to the customerId
- the itemCode exists in billNumber
- the itemCode exists in customerId
Use Dao from RegularTxnDaoMysqlImpl method getLineItemsByLoyaltyLogId -
public List<LoyaltyBillLineitemsDto> getLineItemsByLlId(Long orgId, Long llId, Long userId)- the billNumber should be unique, if not then we throw the error - Request failed. Multiple bills exist for the request with billNumber {{billId1}}, {{billId2}}, {{billId3}} …
Response:
Bill level point unlock response
{
  "pointsUnlocked": [
    {
      "billNumber": 374,
      "pointsUnlocked": 6,
      "programId" : 56
    },
    {
      "billNumber": 374,
      "itemCode": 4364,
      "pointsUnlocked": 12,
      "programId" : 78
    },
    {
      "billNumber": 374,
      "itemCode": 4365,
      "pointsUnlocked": 15,
      "programId" : 90
    }
  ]
}
Line item level point unlock response
{
  "pointsUnlocked": [
    {
      "billNumber": 374,
      "itemCode": 7583,
      "pointsUnlocked": 24,
      "programId" : 12
    },
    {
      "billNumber": 374,
      "itemCode": 4364,
      "pointsUnlocked": 12,
      "programId" : 34
    }
  ]
}
Customer promotion import point unlock response
{
  "pointsUnlocked": [
    {
      "pointsUnlocked": 24,
      "programId" : 12,
      "promotionIdentifier":"id1",
      "promotionId":12,
      "promotionName":"promotion 1"
    }
  ]
}
NoteNote
For bill level conversion of points only bill number and points converted will be given.
Error scenarios:
- Throw warning when no promised points are found against billNumber eventLogId
No promised points found for given billNumber | eventLogId- Throw error when promised points are already converted into regular points for the given identifier.
Points already unlocked for given billNumber | lineItemId | eventLog- Throw error when any eventLogId | billNumber | lineItemId not found
eventLog | lineItemId | billNumber not found.- Throw error when any mandatory params is not provided.
Missing required data required data - \{param1\}, \{param2\}- Throw error when there is conflict when duplicate promised points are found which cannot be resolved.
“Request failed. Multiple bills exist for the request with billId {\{billId1\}}, {\{billId2\}}, {\{billId3\}} …”- Throw error when converting promised points for a particular line item and params - billNumber and lineItem are not passed or else if any one of it missing then throw error.
{billNumber | lineItemId} is required. | billNumber and lineItemId is required- Throw error when any of the following params is not passed: eventName and entity.
{eventName | entity} is required.- Throw error when converting bill points and if any params required by it are not passed: eventLogId, billNumber and referenceId.
Required one of the following for bill points conversion - eventLogId or billNumber or referenceIdCode Flow:
- We will be making the new API required for points unlock in
src/main/java/com/capillary/api/v2/impl/resource/PointsResource.java- Facade Layer we will be using -
src/main/java/com/capillary/api/v2/impl/service/facade/PointsV2Facade. java- Thrift layer -
src/main/java/com/capillary/api/v2/impl/service/external/EmfServiceV2. javaPromised points with “0” days delay
Earlier, brands were not able to convert the promised points into regular points or redeemable points on the same day to provide instant gratification to their customers. There are scenarios where customers end up splitting the bill to get benefit on the same visit.
Now, with this latest addition, brands are allowed to enter “0” days in the delayed accrual strategy (i.e., the number of days after which the promised points will convert to regular points) under points earn condition.
To get started,
- Go to Loyalty+ → Strategies → Reward Currency → Add earn condition → Create the earn condition and enable delayed accrual → Enter 0 days (Refer to the ss below)

Now expire of promised points manually
As of now, there is no way to expire the promised points once issued. The points have to convert in regular/redeemable state and then they could be expired via import. There are cases where brands or a Capillary Poc wrongly issued promised points and have to revoke them so that they can limit the brands liability exposure due to implementation errors.
So, now a new option titled “Expire promised points” is made available under the points expiry import profile. With this latest addition, brands can right away expire the promised points whenever they want with a reason mapped to the expired points for remembrance.
To get started,
- Go to organization settings → Data Import → Upload the appropriate csv file & submit → Choose Profile → Under the Points deductions import profiles, choose any of the three points expiry profiles depending on the requirement → Under the “Configure template”, the last option says "Expire promised points".
- This “Expire promised points” is a check box option (refer to the ss below). When it is checked and submitted, the points in the promised state would expire for the specific set of customers.

Milestone enhancements
Event notification for the change in milestone achieved value on return of purchases
As of now, whenever a customer makes a purchase, all the milestone values which can be impacted with that purchase will be impacted, and the information of the new milestone achieved value, etc.. will be sent as an event notification.
However, whenever a customer returns a transaction, the milestone value which previously increased because of that purchase will also be decreased accordingly. But there is no event notification for such instances. To understand with an example:
Step 1: Milestone on lifetime purchases created, and milestone value is 10,000.
Step 2: Customer made a transaction worth 3000.
Step 3: Customer’s milestone achieved value increased from 0 → 3000
Step 4: Brand will get an event notification about the above step.
Step 5: After days, the customer returned the purchase of step-2.
Step 6: Now the milestone achieved value will decrease from 3000 → 0.
Step 7: But brands/customers are not getting any event notification of the same.
Now, with this latest enhancement, brands will get notified even in the case of return transactions about the decreased milestone value.
Following example shows the value in the notification:
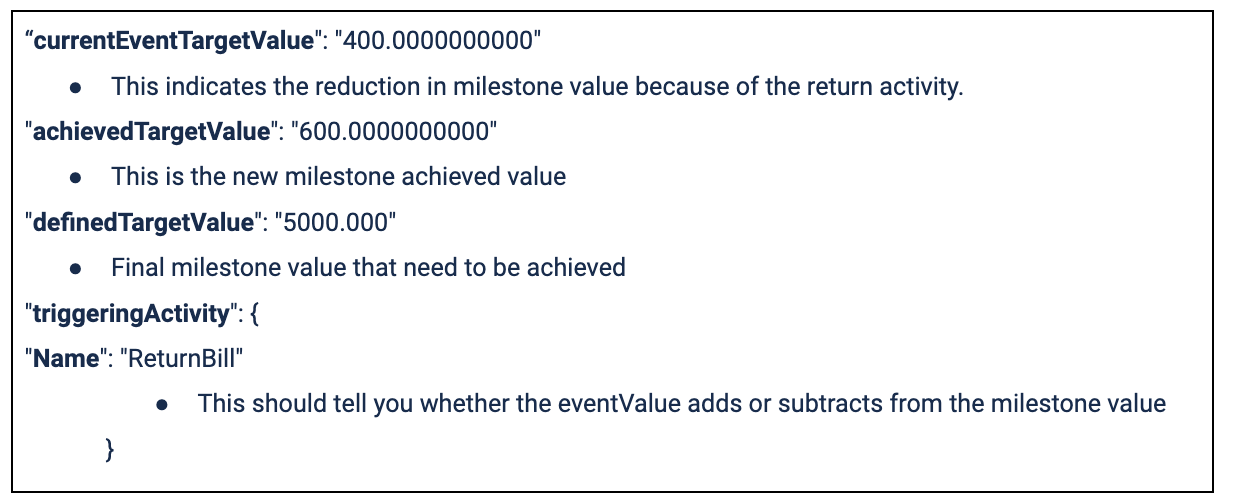
If the “Name” key is “ReturnBill”, it’s a return transaction where milestone value is decreased by the “currentEventTargetValue” (400 here). We are not returning negative since it can lead to integration issues.
Achieved milestone value in add transaction API response
As of now, whenever brands want to know about the milestone's information (like milestone achieved value, current milestone value, etc..) using the AddTxn API, that is not possible. So because of that, they are depending on other APIs, and that takes time & effort.
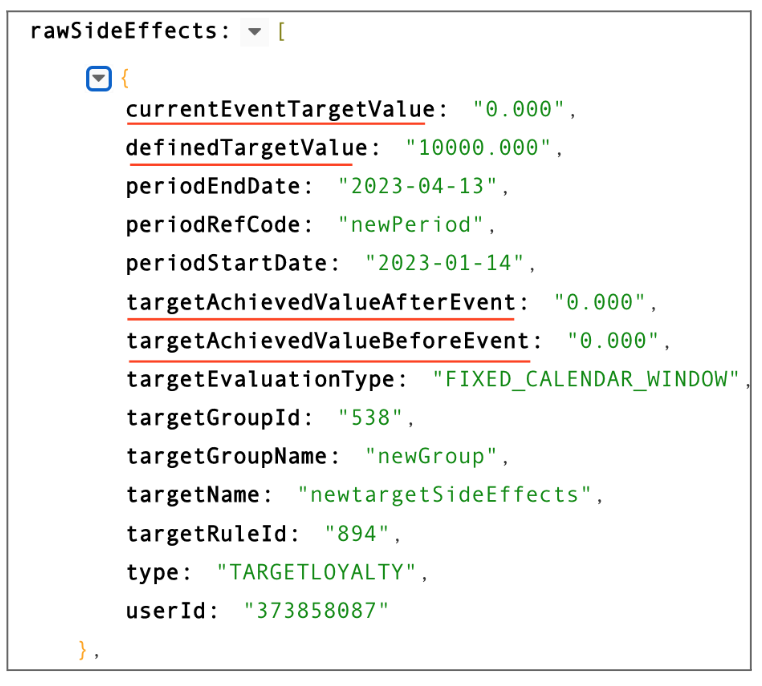
Now, with this latest enhancement, brands can get the milestone’s information using the AddTxn itself. This can be achieved by making “rawSideEffects” value as true, whenever they call the AddTxn API.
When AddTxn is called with “rawSideEffects” as true, it will have following information along with other regular information.
Return enhancements
Re-evaluation of return in the event of earn capping
Let’s say a brand is running a program with 10% earn rate with bill/event level capping of 1000.
What’s happening now: Now, if a customer buys 2 items of 11000 each, the customer will only earn points on the 1st line item (1000pts). This is because, as per the capping, 1000 is the highest and that is already achieved with the 1st line item itself. If the customer is returning the 1st line-item, after the return re-evaluation, the customer will end up earning 0 point though the net payment is 11000.
What will happen now: After this enhancement, the customer will get 1000 points even though the 1st line item is returned. This is because, even though the 1st line item is returned, still the 2nd line item is eligible to get the points as per the configured capping condition.
(No screenshot as this is a backend login)
Re-evaluation of return in the event of achieved promos/earning.
Let’s say, a brand is running a promotion, that with a minimum purchase of 10000, customers can earn 1000 points with that transaction.
What’s happening now: Now, if a customer makes a purchase of 10000 ( 2 line items each worth 5000), the customer will get the 1000 points as per the promotion. If the customer returns 1 line item for whatever reason, points return is happening on pro-ratio (.i.e., only 500 points are getting reversed).
What will happen now: After this enhancement, all the 1000 points which customers received will be returned. This is because, without that returned line item of worth 5000, the bill wouldn’t have crossed 10000 in the first place, and therefore the customer is not eligible for any points as per the promotion.
(No screenshot as this is a backend login)
Goodwill points support in Group Loyalty
You can now allocate goodwill points to user groups. Refer the API here.
Behavioural event support for UserGroup2
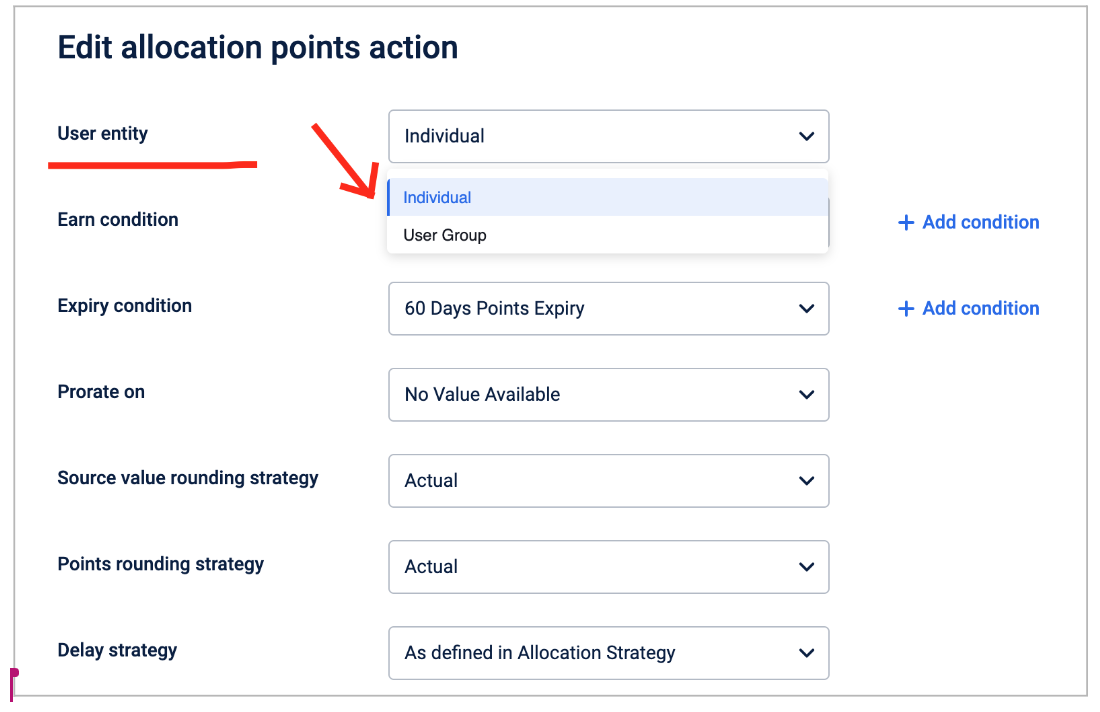
As of now, the behavioural events didn’t work for user groups. The behavioural events would only work for individual customers. Now, behavioral events can be configured for user groups as well.
This is possible at the action level.When configuring an action like Points allocation, issue coupons, etc. you will be able to see a drop down to select “individual” or” User group”. On selecting the user group option, that particular action in the behavioural events will work for the groups in your system.
Below screenshot helps in understanding:
Bug fixes in re-evaluation of return transactions
As of now, whenever someone returns some items, re-evaluation of the return bill used to happen based on the return date but not as per the purchase date. Because of this what used to happen is, if there is a promotion running when the customer returns the bill, the customer used to get those promotional points even though customers were not supposed to get them.
Following example helps in understanding better:**
Step 1: Customer made a purchase on 10th march.
Step 2: Brand is running a promotion from March 20th to March 30th. (Say 100 bonus points)
Step 3: Customer returned the item on March 25th which was bought on step1.
Step 4: Return re-evaluation happens, and customers used to get 100 points as the return bill processing date is 25th March where a promotion is active in that duration.
However, step - 4 is wrong. Customers should not get any points because when purchase of the product happened, no promotion was running. This issue occurred because return bill processing happened on the return date not on the purchase date.
With this new enhancement, in step - 4, when re-evaluation is happening, it will take the purchase date instead of the return date as the bill processing date. Because of this enhancement, even if a promotion is happening during the return, customers won’t be evaluated for the promotion.
No screenshot as this is a backend logic change.
Behavioural event payload getting passed in pointsIssued event notification
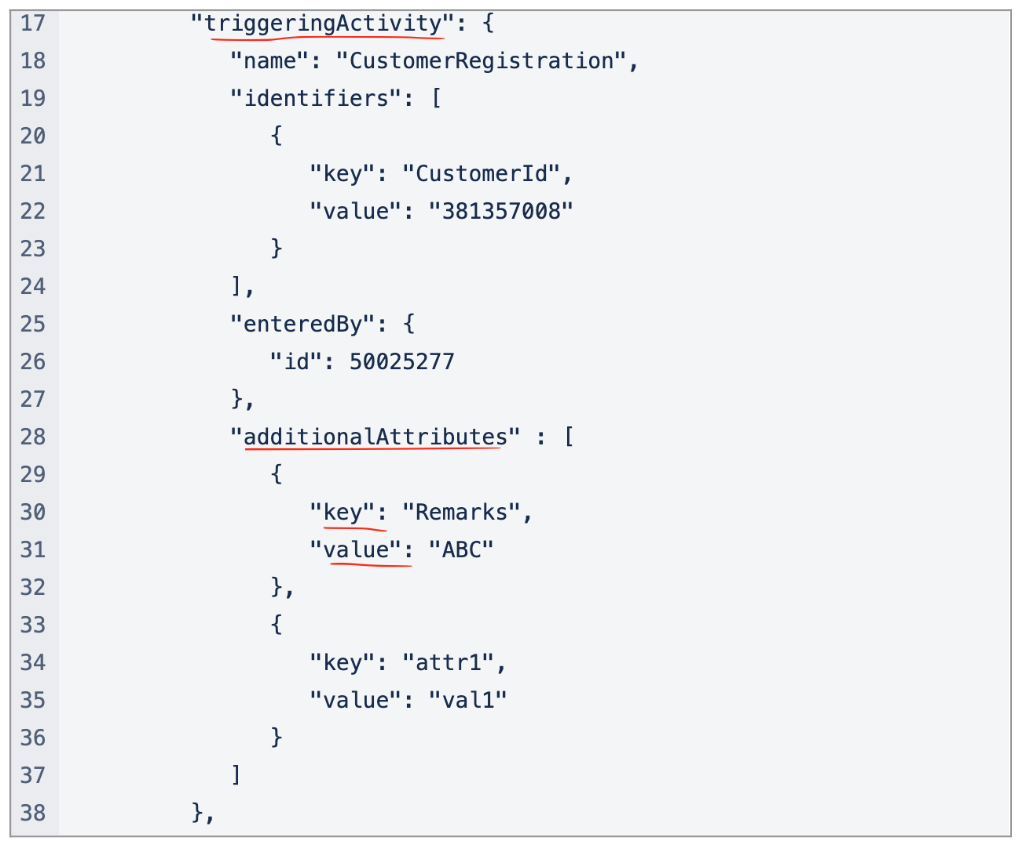
As of now, whenever brands want to know any information about points issued, they are using the “pointsIssued” payload. However, this payload does not have the “Remarks” field which contains the vendor information that brands are looking for.
The event “additionalAttributes” contains the “Remarks” information, but it would require additional effort to make additional API calls, and that is a slight inconvenience.
With this enhancement, now brands will be able to get the “Remarks” from the “pointsIssued” itself. So, they don’t have to make multiple API calls to get the “Remarks” information.
They just have to check: “triggeringActivity” -> “additionalAttributes” -> “Remarks”
Following API payload helps in understanding better:
Minor changes to new UI of coalition & subscription programs
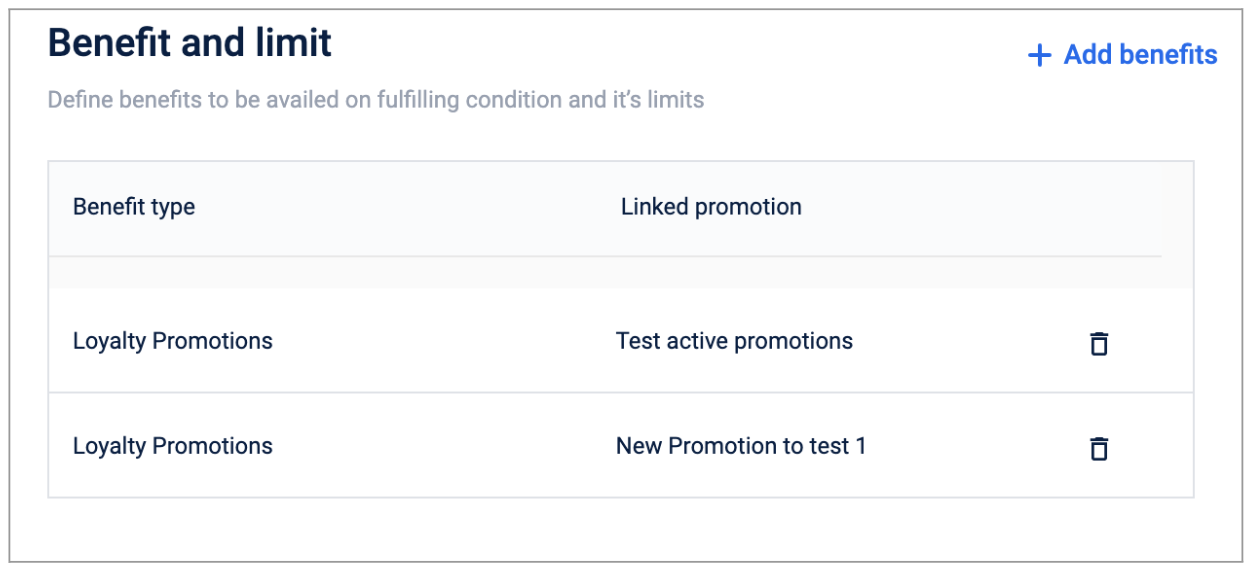
As of now, both in coalition & subscription programs creation flow, there is an option called “Benefits Limit” which users have to configure while configuring them. Basically, this is to put a limit on the amount of benefits/loyalty promotions customers can get from either coalition or subscription programs.
Also, earlier if one promotion is linked to a subscription or coalition program, it cannot be deleted. The coalition or subscription program has to end, to end the promotion linked with the program.
Now, we have made 2 new enhancements in the new UI of coalition and subscription programs where the above issues won’t be there.
Enhancement made:
- Benefits limit option is removed, as the limit will be already configured in the loyalty promotion itself. Whatever limit that previously used to stay here won’t matter, as that will always be overridden by the restrictions configured in the loyalty promotions.
- Now when a loyalty promotion/benefit is linked to a coalition or subscription program, that can be deleted very easily by clicking on the delete icon along each benefit.
Refer to the ss below:
Milestone Target Loyalty reporting
We are launching the milestone/target loyalty report.
This is Phase -1 in which we have created global databricks notebooks for all the clusters.You can export and schedule this report as per the brands requirement.
New workflow to upload custom milestones for B2B businesses
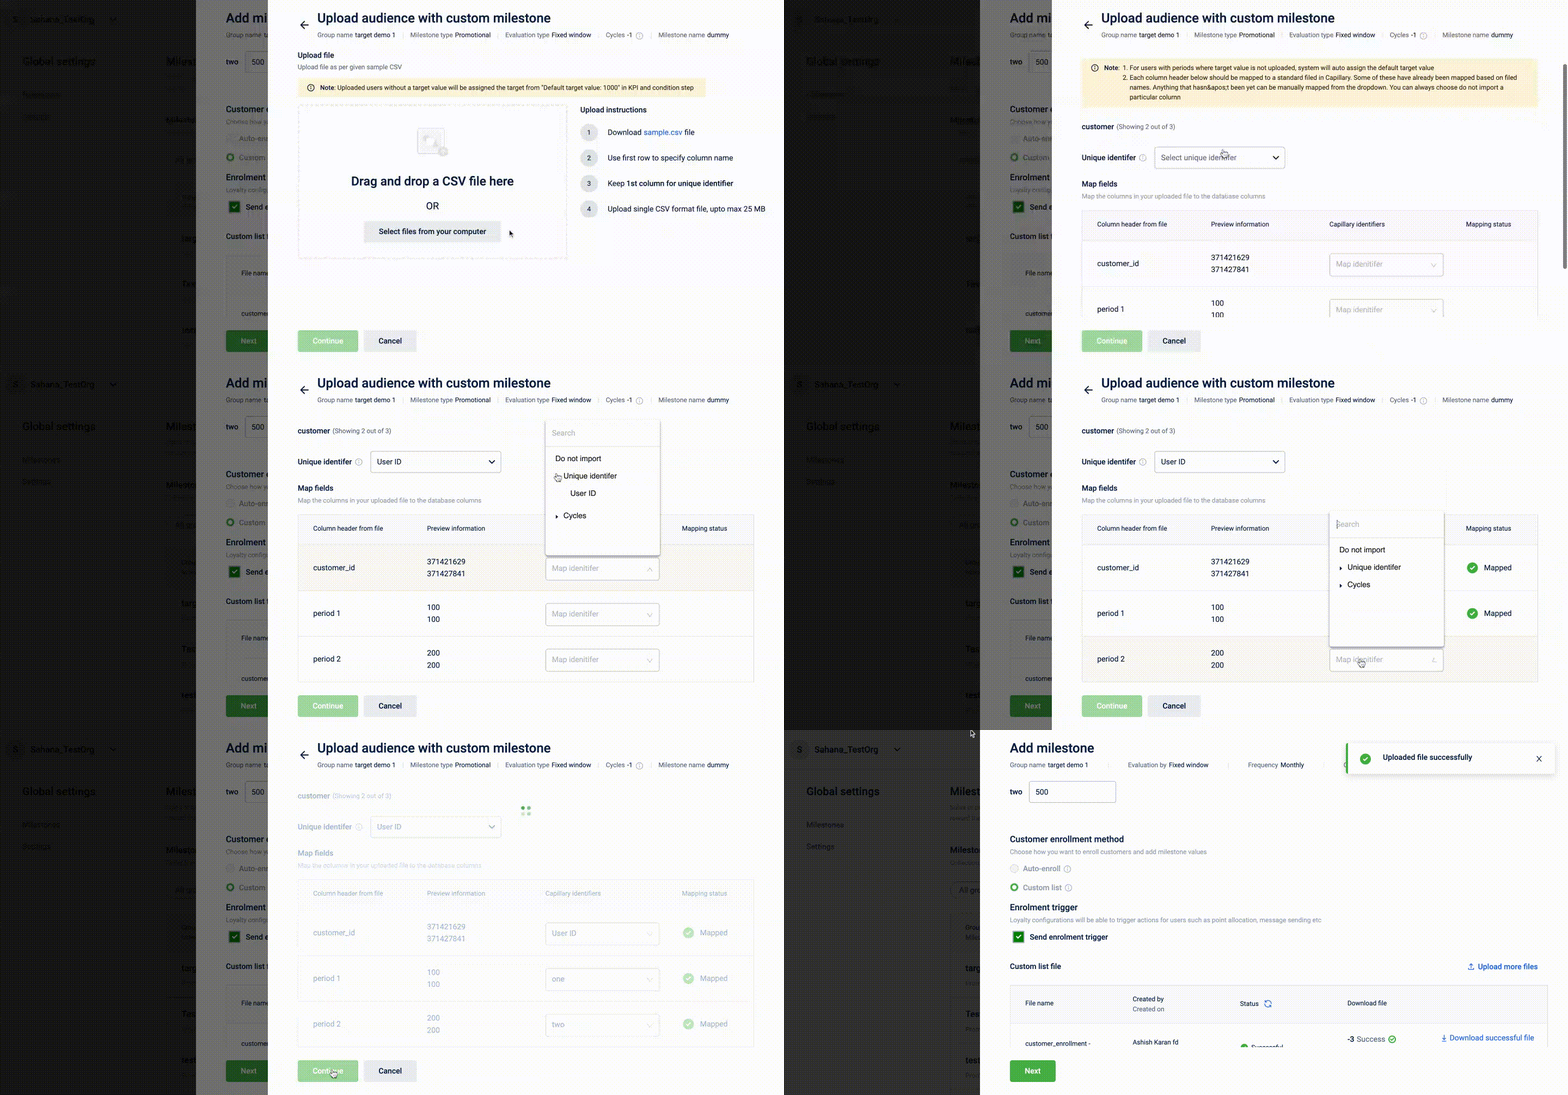
Earlier, in order to upload a customer list in a milestone, users had to do it through the data import functionality which was a bit challenging, and would give an error if any at the end of the import flow, when the user had already gone through multiple steps.
- With this enhancement, users can now upload the csv file for the custom enrolled milestones then and there without switching to the data import UI and that too in a much simpler way.
- On the same lines, as soon as the customer list is uploaded and Saved, a trigger would be sent to the customers present in the list, who have been enrolled in the milestone.
Find a detailed document here : here
Find the documentation on the support portal here: here
Handling retro transactions
Business context
Retroactive transactions, also known as retro transactions, refer to transactions that are applied to a loyalty program account after the transaction has taken place. These are the transactions where the processing date is more than the actual transaction date, which sometimes results in unfair loss to either brand or customer.
This is one of the very common scenarios in the aviation industry. Customers do not provide their loyalty information while traveling, but come back again in the future to avail the loyalty benefits.
Take for example, a customer made a flight journey on 20th March but not given loyalty details on that date. Instead, at some point in the future (say 20th april), wishes to avail the benefits of that journey, and so reaches out to customer service for the same. In this case, the processing date (20th April) is more than the transaction date (20th March).
This might lead to a problem, because the customer might have upgraded/degraded from a tier in this time period. Say, the customer might be on the silver tier on 20th March and Gold tier on 20th April. If the journey is processed as per 20th April, benefits will be given as per the gold slab even though the customer is on the silver slab on the date of the transaction.
Until now, we only have the ability to process these retro transactions based only on the processing date (20th April in above example) not the transaction date (20th March).
The enhancement
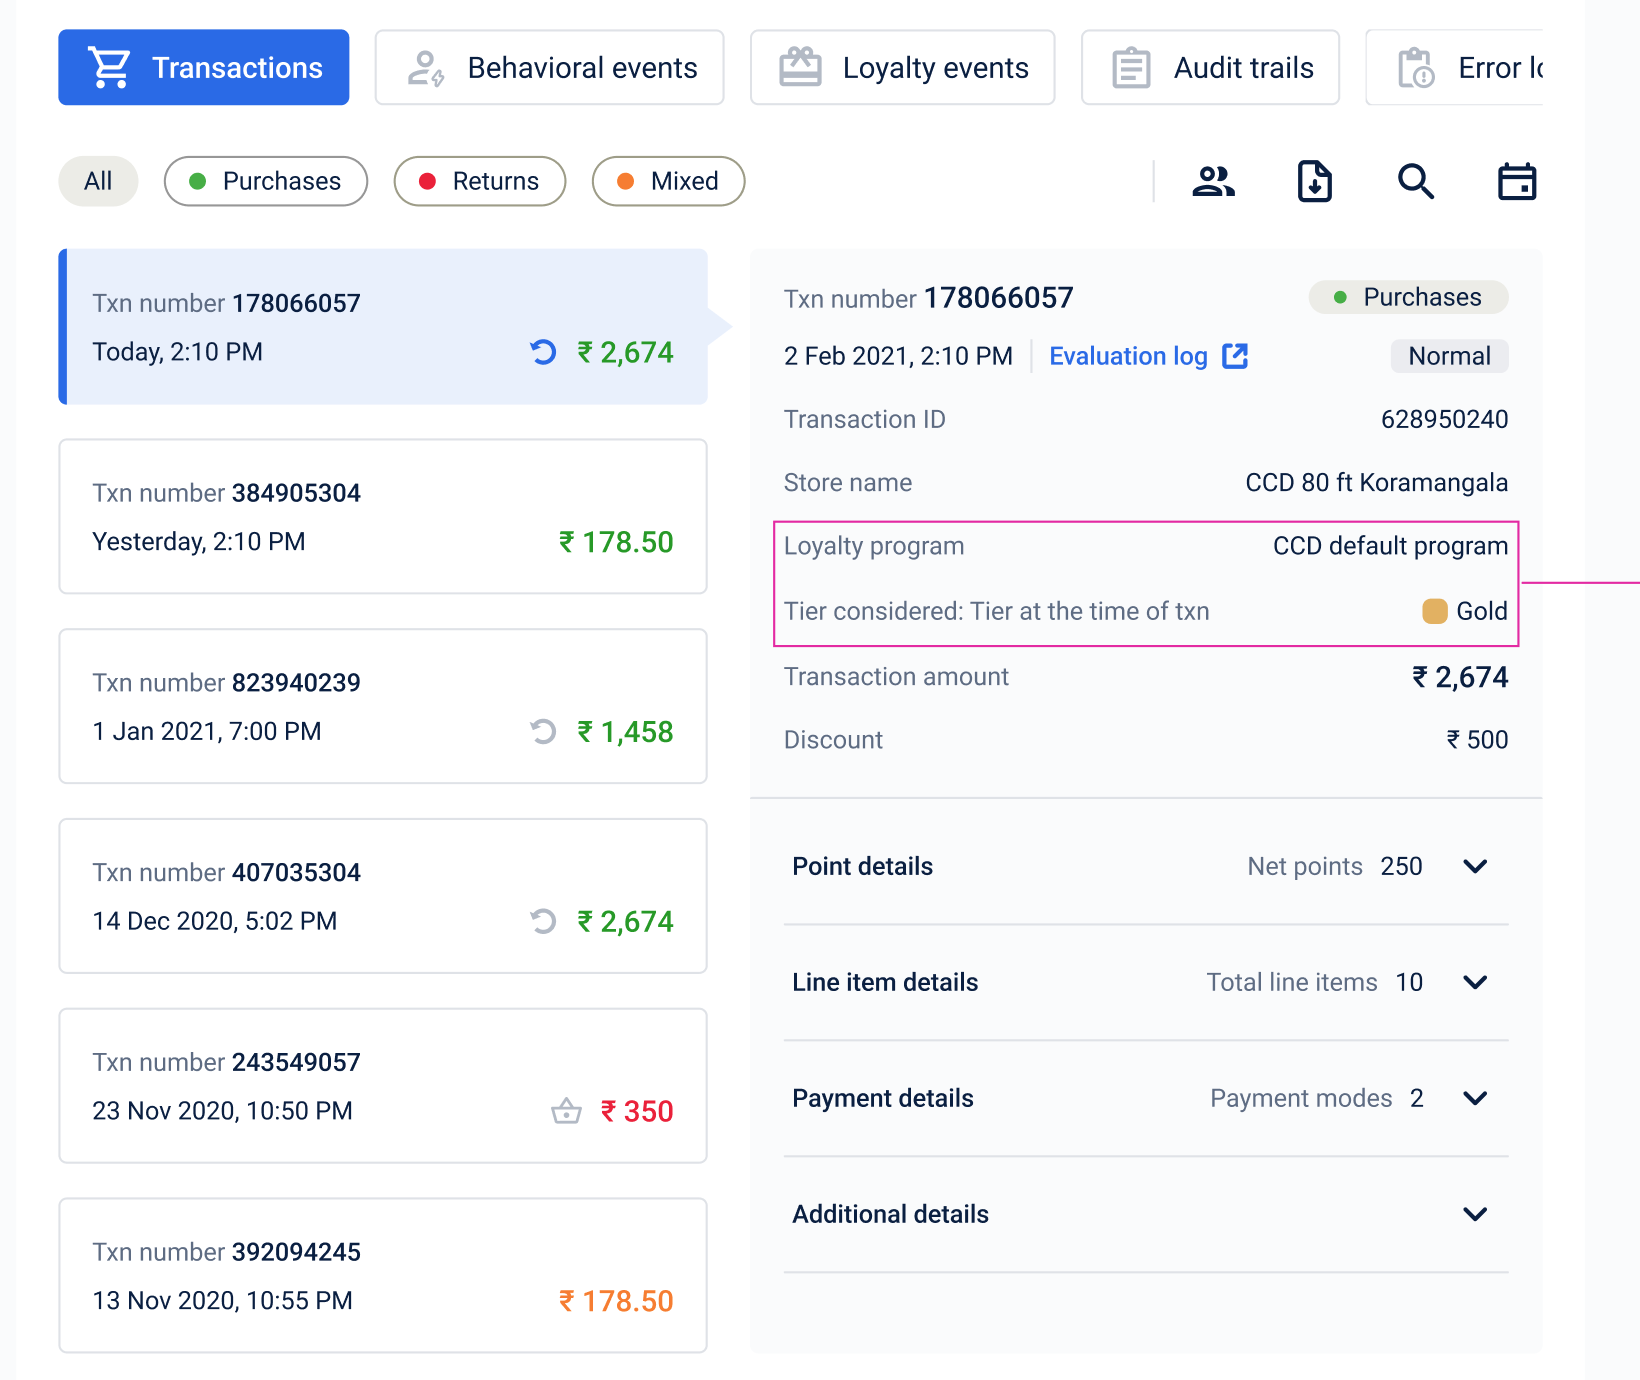
With this enhancement, now brands will have the ability to choose what date to use for retro transactions as per their policies. It will be an org level setting, where the brand can enable this option. When this is enabled, retro transactions will be processed based on the actual transaction date, and when not enabled, these retro transactions will be processed as per the processing date.
(As of now, this enablement is provided only through backend, so please reach out to the sustenance team to enable this for your org. Very soon, we will be provide an UI option to do the same)
In membercare, a clear differentiation will be visible whether the transaction is processed as per the “transaction date” or the “processing date”.
Getting target information even for the inactive periods
This is an enhancement to the GetUserTargets API’s response. As of now, whenever this API is called, it provides “only active targets” information from the user target tables.
With this enhancement, this API can get responses even for inactive periods, when called with “includeInactive” as “true”. This enhancement basically helps in showing the targets even when they are zero providing a better customer experience at the end point.
There are 3 request params for this API, they are
- trackingDate,
- targetRuleId
- includeInactive.
API Signature : v3/users{{userId}}/targetGroups
Let’s understand with an example:
We created two targets(T1, T2) for three periods (P1: Jan to Mar, P2: April - June, P3: July - Sep).
A customer enrolled during the period P2. So, this customer is inactive during P1.
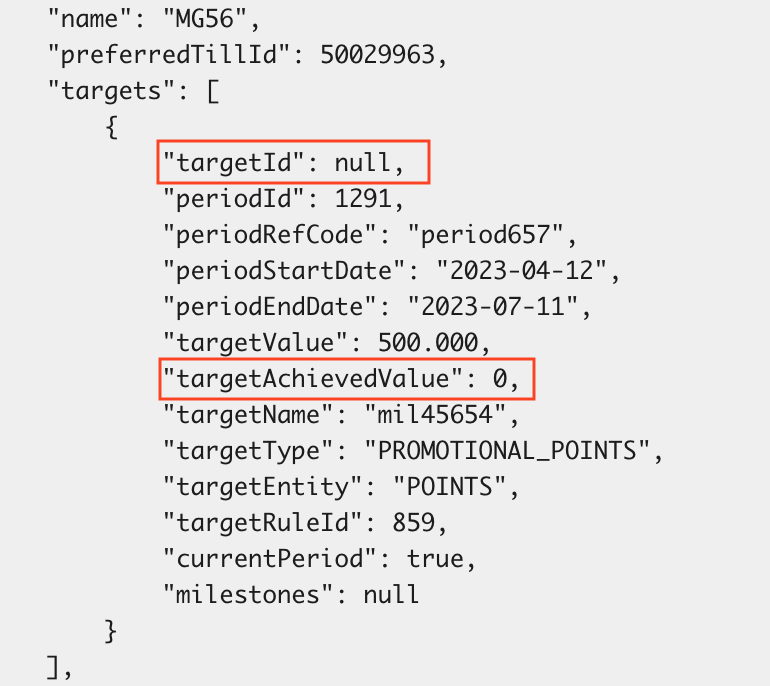
After this enhancement, if this API is called with “includeInactive” as “true” during P2, it will create return all the combination (Target periods * Targets) irrespective of active/inactive. Now the response contains target level information for all the 6 combinations.
Response for the above will be:
(P1 - T1), (P1 - T2), (P2 - T1), (P2 - T2), (P3 - T1), (P3-T2) target-period combinations information. For the response which is created artificially for inactive periods (in this case P1 period because customer is not active in that period, P3 period as call is made during P2 .i.e., P3 didn’t happened yet):
- target achieved value will be “0” and
- target id will be “null”
P.S: When trackingDate, trackingRuleId are passed, they will be honoured too accordingly.
Show points issued & communication information for sub-targets
This is also an enhancement to the existing GetUserTargets API, and this enhancement can greatly enhance the end-user experience in the following ways.
As of now, we don’t have the ability from the API to know about the points issued details, communications details that happened whenever a sub-target is achieved.
Let’s understand with below example:
Let’s say, the target value is 10,000. But the brand decided to motivate customers at few of the stages in the journey, as that can push the customers to transact more subconsciously.
A brand might want to issue 100 points when the customer reaches 5000 target value. The moment a customer reaches 5000, the customer will get 100 points and a communication will be sent.
With this enhancement, the information of “points issued & communications details” for these sub-targets achievements will also be available from the API.
Following screenshot helps better understanding:
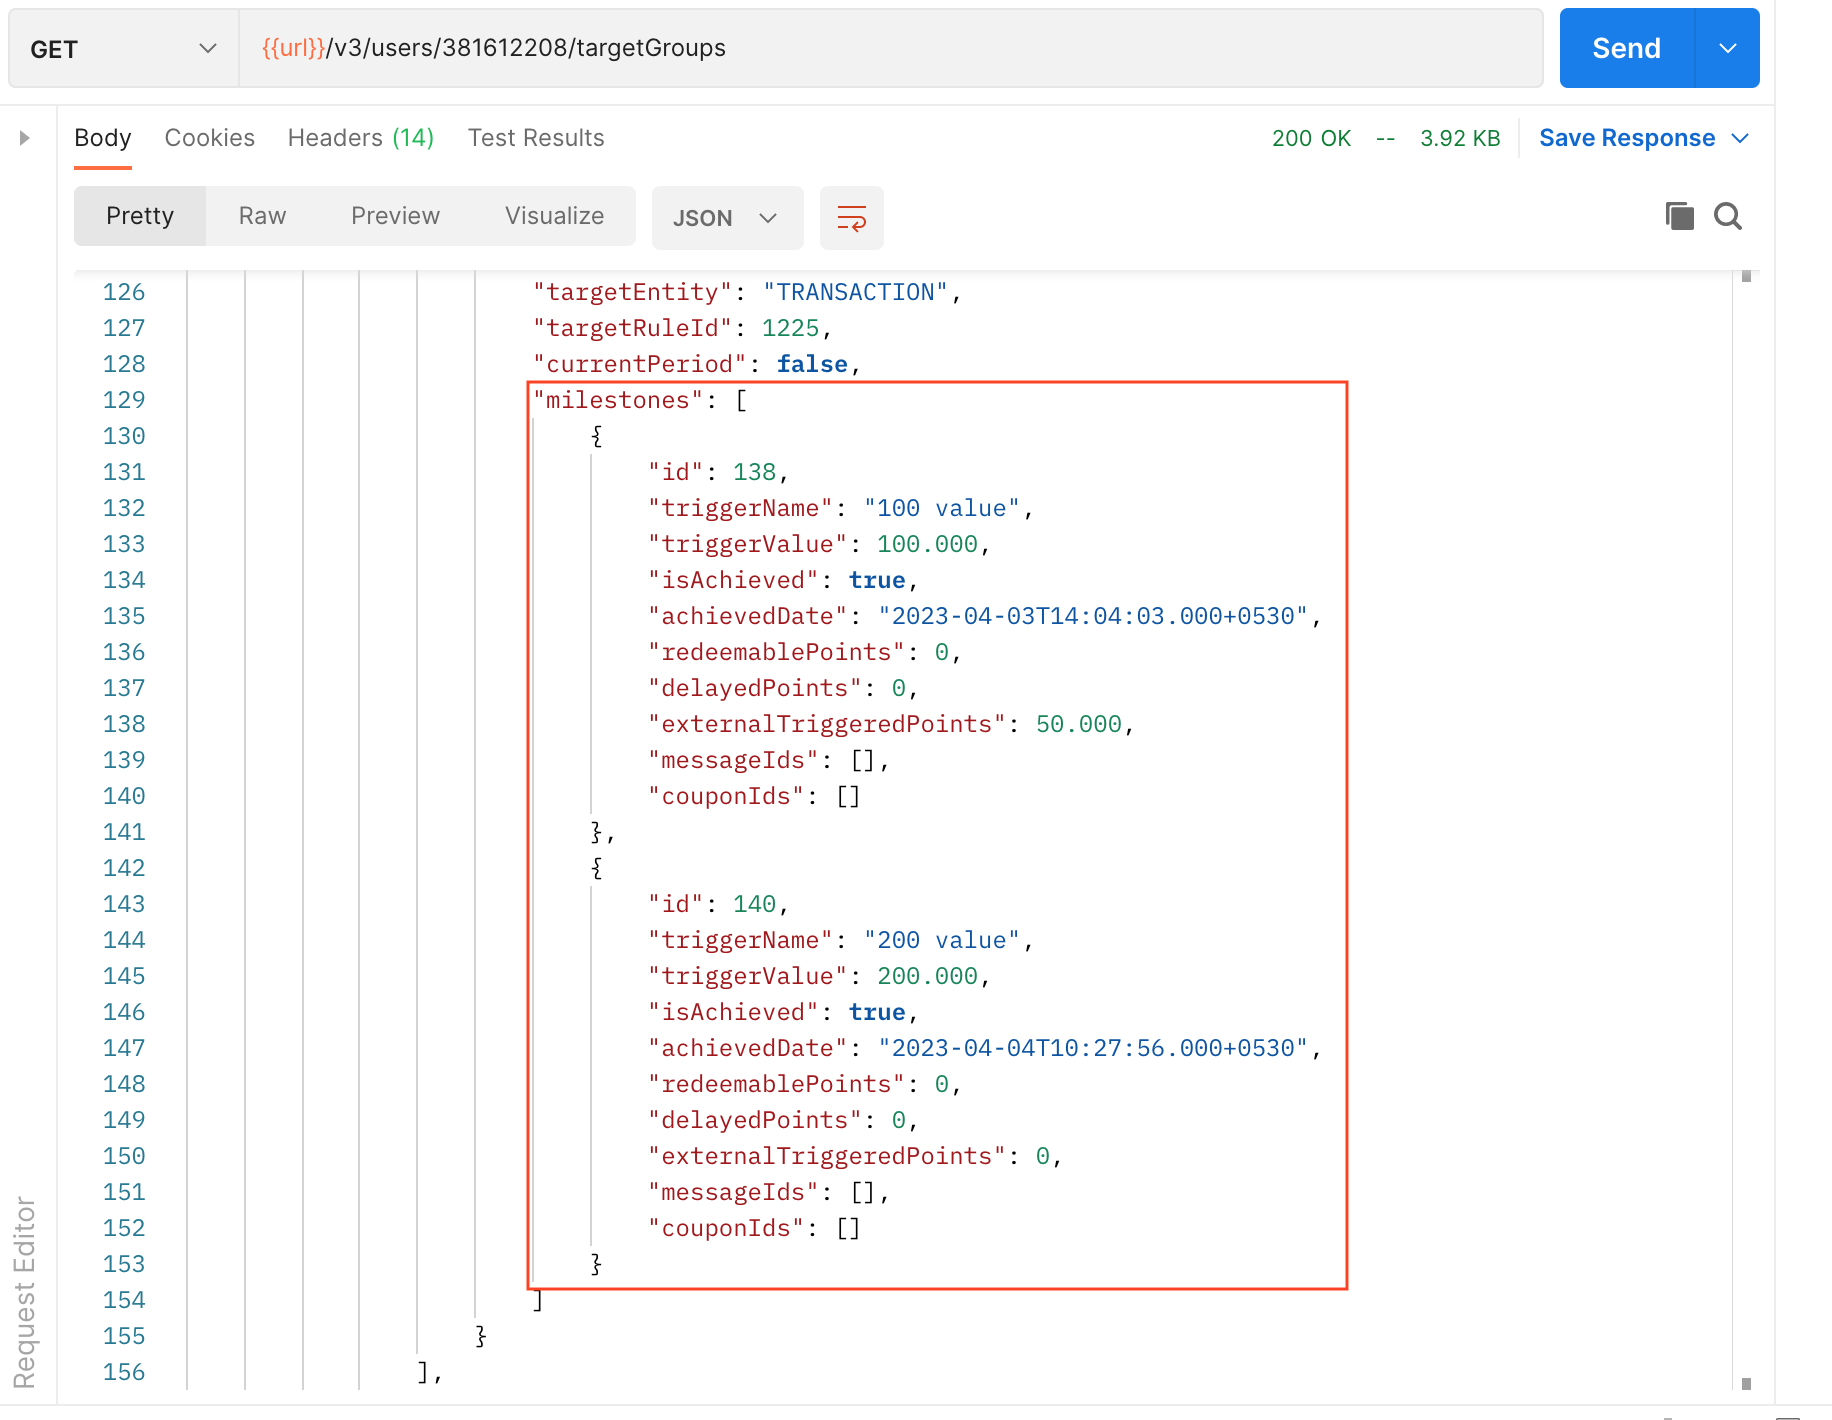
The key “milestones” contains this information.
Whenever a sub-target is achieved (basically, when isAcheived = true):
- Information of points issued for that achievement (how many redeemable points, delayed points, external triggered points) and
- Communication ids (message id) will be available in the response body.
Incentives
Rewards catalog
Optimize your rewards budget & catalog inventory
This new update allows for more equal opportunities for customers to avail benefits while also optimizing spending at the reward level.
A marketing manager can now define the following limits at a reward level:
- Max number of quantities that can be bought in a single transaction
- Max times a customer can purchase the reward in the reward duration
- Max time the reward can be purchased across all customers
- In the fetchRewardInfo call, inventory consumption status is returned
Users cannot update the above KPIs once the reward goes live, but they can enable or disable the KPI itself.
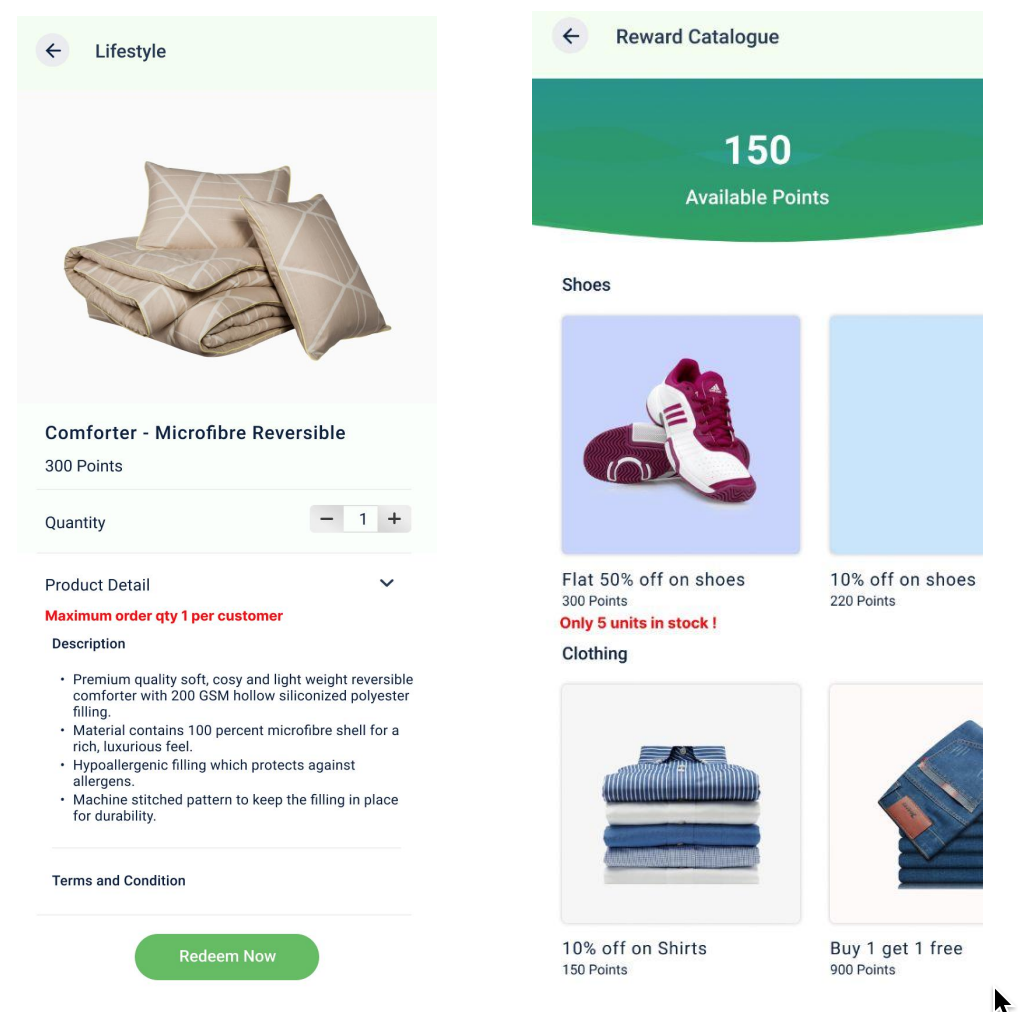
Above images are mere samples to indicate possible customer views and not product view
To get started,
You can refer to the detailed documentation here Reward Purchase Limits
Please note that the corresponding UI changes for this enhancement will be available in future sprints. For now the document attached has details on API based implementation
Enrich your rewards catalog view with the newly introduced custom fields
Now the users can add custom fields to rewards in our marketplace. This feature will give brands the flexibility to show custom/personalized data in app/web and add metadata for accounting or partner reconciliations.
Enhancement done
As a marketing manager, you can now create and store custom fields while creating and editing rewards. These custom fields can be used to customize the UI views and for reporting and reconciliation purposes.
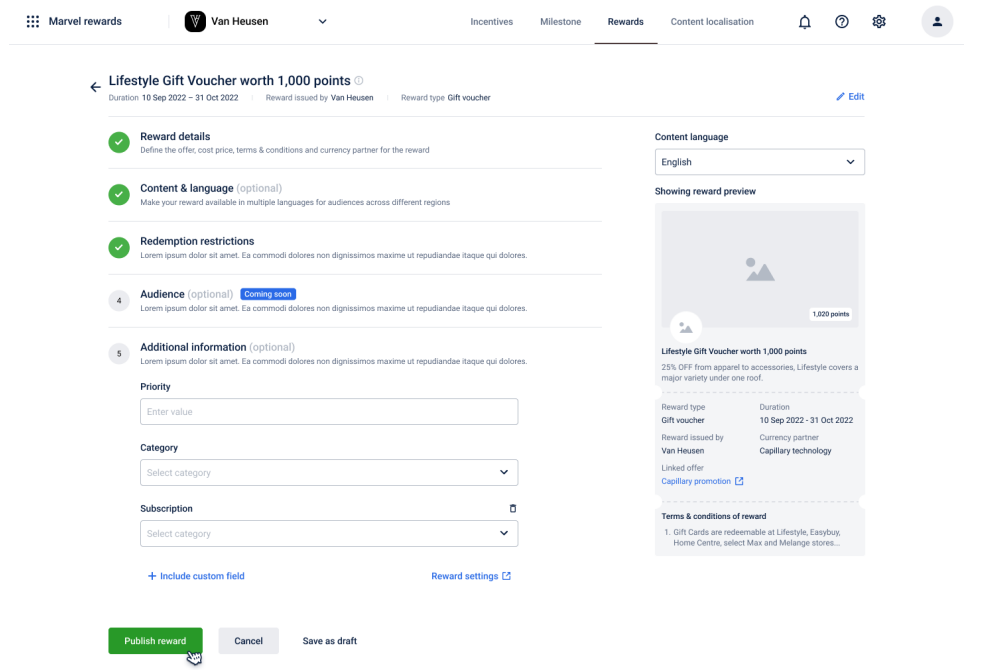
Above image is indicative and final product views can be completely different
Please note that the corresponding UI changes for this enhancement will be available in future sprints. For now the document attached has details on API based implementation
For more information, refer to the documentation here, custom fields in Marvel
Now run attractive discounts on your rewards catalog
This feature will allow brands to create, edit, and fetch promotions on their reward catalogs. The currency for all rewards is in the form of points owned by the customer.
With this update, Brands can run promotions on their reward catalog by offering discounts on the points value and showing additional promotions metadata. For example, during a festive season or clearance sale, they can offer a reward at 300 points instead of the normal 500 points. The reward will revert back to its original points value after the promotion period ends.
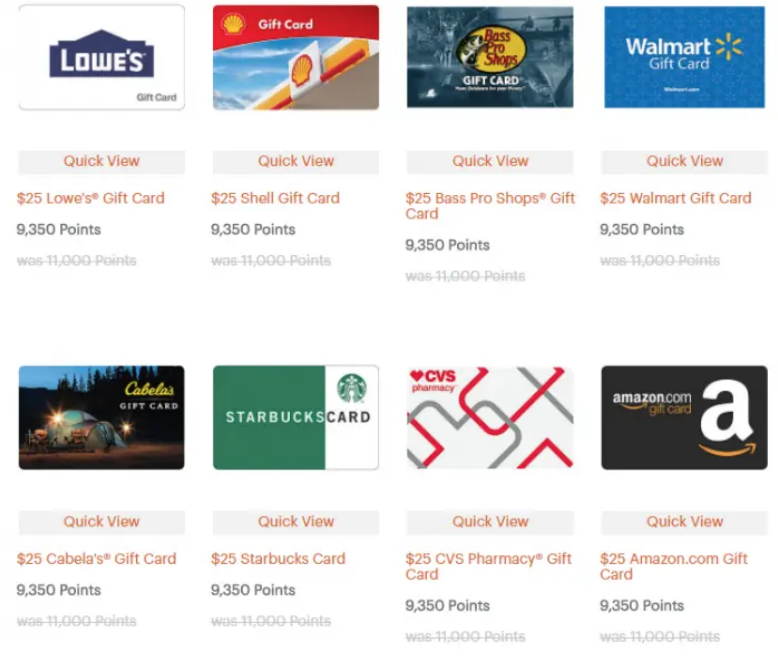
Above images are mere samples to indicate possible customer views and not product view
Please note that the corresponding UI changes for this enhancement will be available in future sprints. For now the document attached has details on API based implementation
For more information, refer to the document here, Catalog promotions in Marvel rewards
Rewards catalog now supports point redemption for unified multiple loyalty programs
This is an extension of the unified MLP where a multi program brand keeps a single wallet for the customer. This feature allows customers to use their points across multiple programs and redeem them while making a purchase from the reward catalog.
Previously, Rewards catalog did not support consolidated points redemption from multiple programs, but now, with this release, we have added this functionality to the system.
Getting started
- Just enable group_redemption=true in your emf configuration page. It would be already enabled if you're having a unified MLP setup.
- Once group redemption is enabled for an organization, Marvel will pass "group redemption" as true by default in the redemption workflow.
For more information, refer to the documentation here, point redemption for unified MLPs
New Rewards Catalog Update Enhances Member Care and Customer Satisfaction
Previously, there was no view of Rewards Catalog in Member Care because of which the brands were not able to see the details of points, rewards and transactions for any reward redeemed by a customer and they were not able to take any action against those rewards.
With this enhancement, brands can now view the transaction, reward, point details against a reward in Reward Catalog in Member care. This will provide brands with more visibility and control over their rewards and transactions.
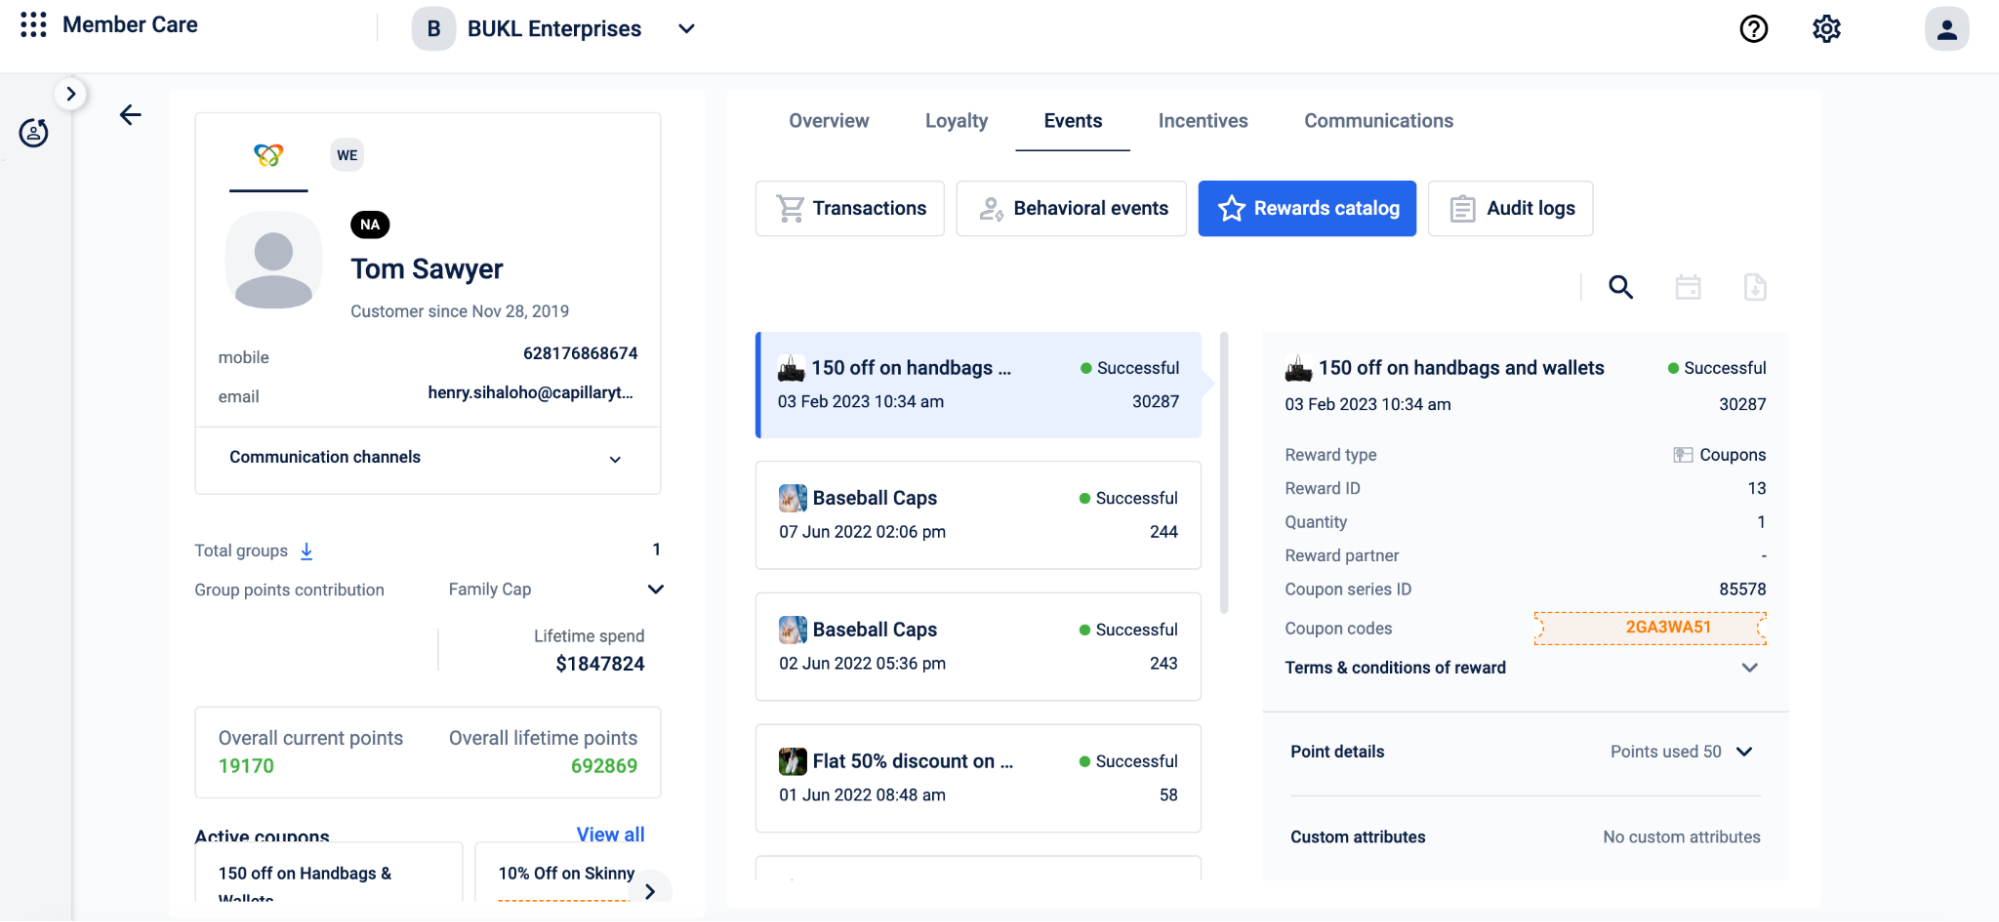
Refer to the detailed documentation here Rewards Catalog Events in Membercare
Reduce reward checkout failures and improve customer experience
When the customer buys any reward from the brands catalog, and if the call fails due to an error thrown by downstream systems like coupon engine or reward partner then customer would only see something went wrong since our product will return that message.
With the recent enhancement, error messages from partners can now be retrieved and included in the response. This will allow brands to display accurate error messages to the end-users in case of reward issuance failures.
For eg. In case of a third party reward,
- Let’s say the call failed because the customer token expired or inventory was not available
- We will exactly pass the error given by the third party system to the mobile app.
- Mobile app can re-generate the token and re-trigger the issue reward call for reward issuance
- Customer will be issued the reward in the same request and will not have a broken experience
Refer to the detailed documentation here Error handling in rewards catalog
Finally one of the most awaited reports!! Rewards Catalog 🙂
Brands that are actively using rewards catalog, we have enabled the below standard report
KPIs included

Top 10 rewards based on decreasing order of currency redeemed

Top 10 rewards based on decreasing order of number of rewards purchased

Link to the report for SG cluster
Link to the report for IN cluster
Link to the report for EU cluster
To help you quickly get started we have enabled these reports for below orgs that are using Rewards Catalog
Abbott - 1980, 2131, 2062, 151193, 151194
Avian - 1893
Boustead Ikano - 1935
Jaspal - 2095, 1996
Petron - 1963
Purina - 2094
Shell - 151195, 151181, 151197, 151219, 151199, 151196
We have enabled it for the orgs currently using Marvel. In case your org id is not there in the above list please raise a task ticket to enable it for your organization.
Cart promotions
Prevent redemptions limit breach in cart promotions
In cart promotions, when an offer is applied by the cashier on a cart and processed for payment, the customer has received the benefit but the promotion has not yet been redeemed into the system.
At the same time if another cashier applies the same promotion to another cart, the capillary system proceeds ahead as it cannot reject any redemption. This led to customers getting benefits beyond the allowed number of redemptions.
To prevent this, we have built a temporary lock/unlock system,
- If the promotion is already applied in a cart, it will be in a temporary redemption state
- If a promotion is in transient redemption state, the app will keep the offers screen locked
- On reversal of transient lock, the app will reactivate the offers screen
- Customers will not be able to lock/disable applied/all promotions unless the transaction is canceled or completed
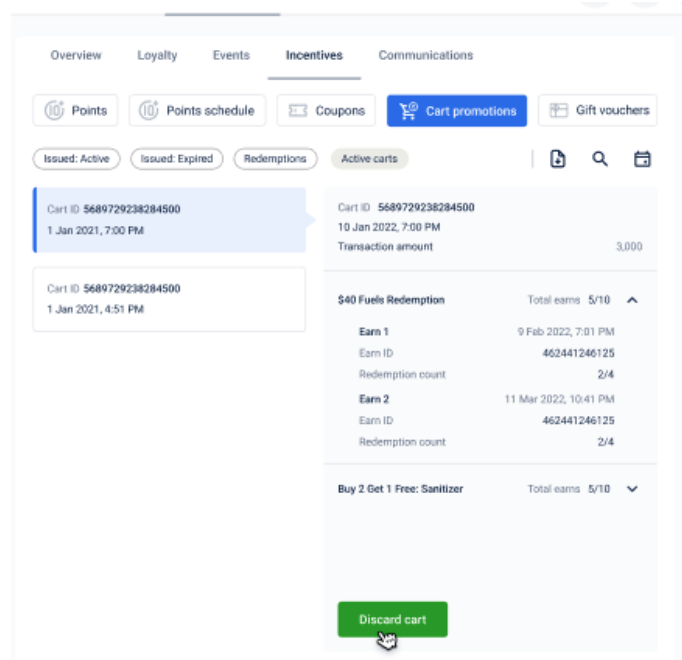
Image 1: Evaluation log of the cart, option to release the cart
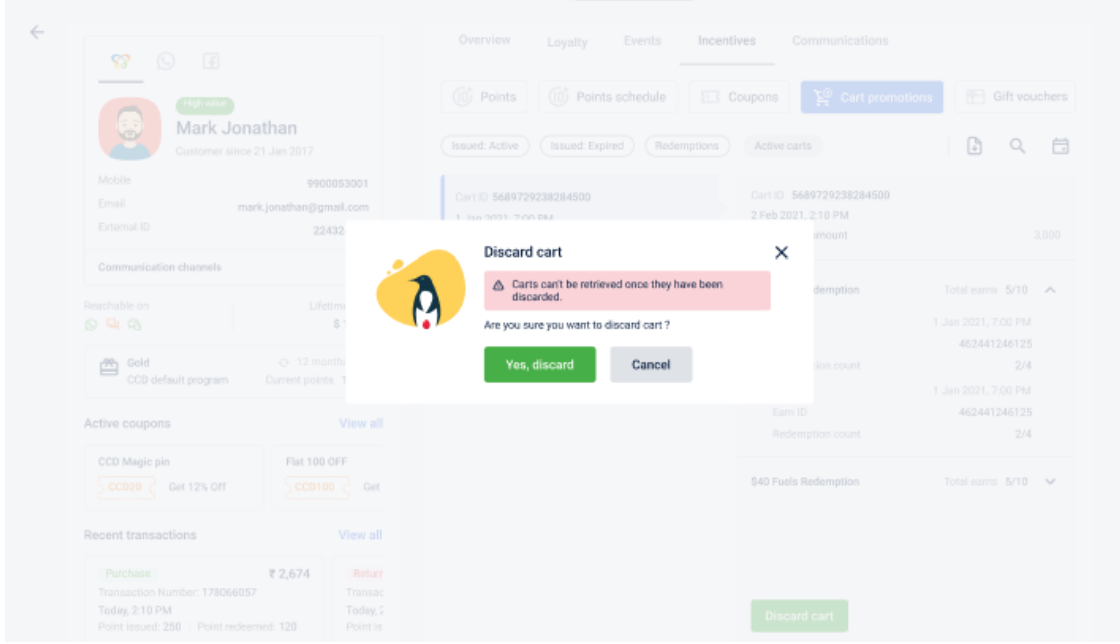
Image 2: Cart discarded/released
Click here to read more, Preventing Fraudulent redemptions in Promotion engine
Enhanced best offer logic in cart promotions
This is an extension of the promotion ranking strategy in cart promotions. Previously, brands were able to rank their strategies based on the following three options:
- Loyalty promotions
- Reward-based promotions
- Code-linked promotions
However, under Cart promotions, there was no option to rank the three types of promotions (POS, Loyalty, and Loyalty Earning Promotions). To address this, a functionality to include this option is added. The default order, in case the configuration is enabled, will be: POS, Loyalty, and Loyalty Earning.
Ex: a POS promotion can be ranked above loyalty or loyalty earning promotion. This ranking applies to both gift voucher (payment voucher) and cart promotions (discount).
For the orgs already using cart promotions stacking order, a confirmation message is added, post accepting, all types of promotions will be listed and this action can't be reversed
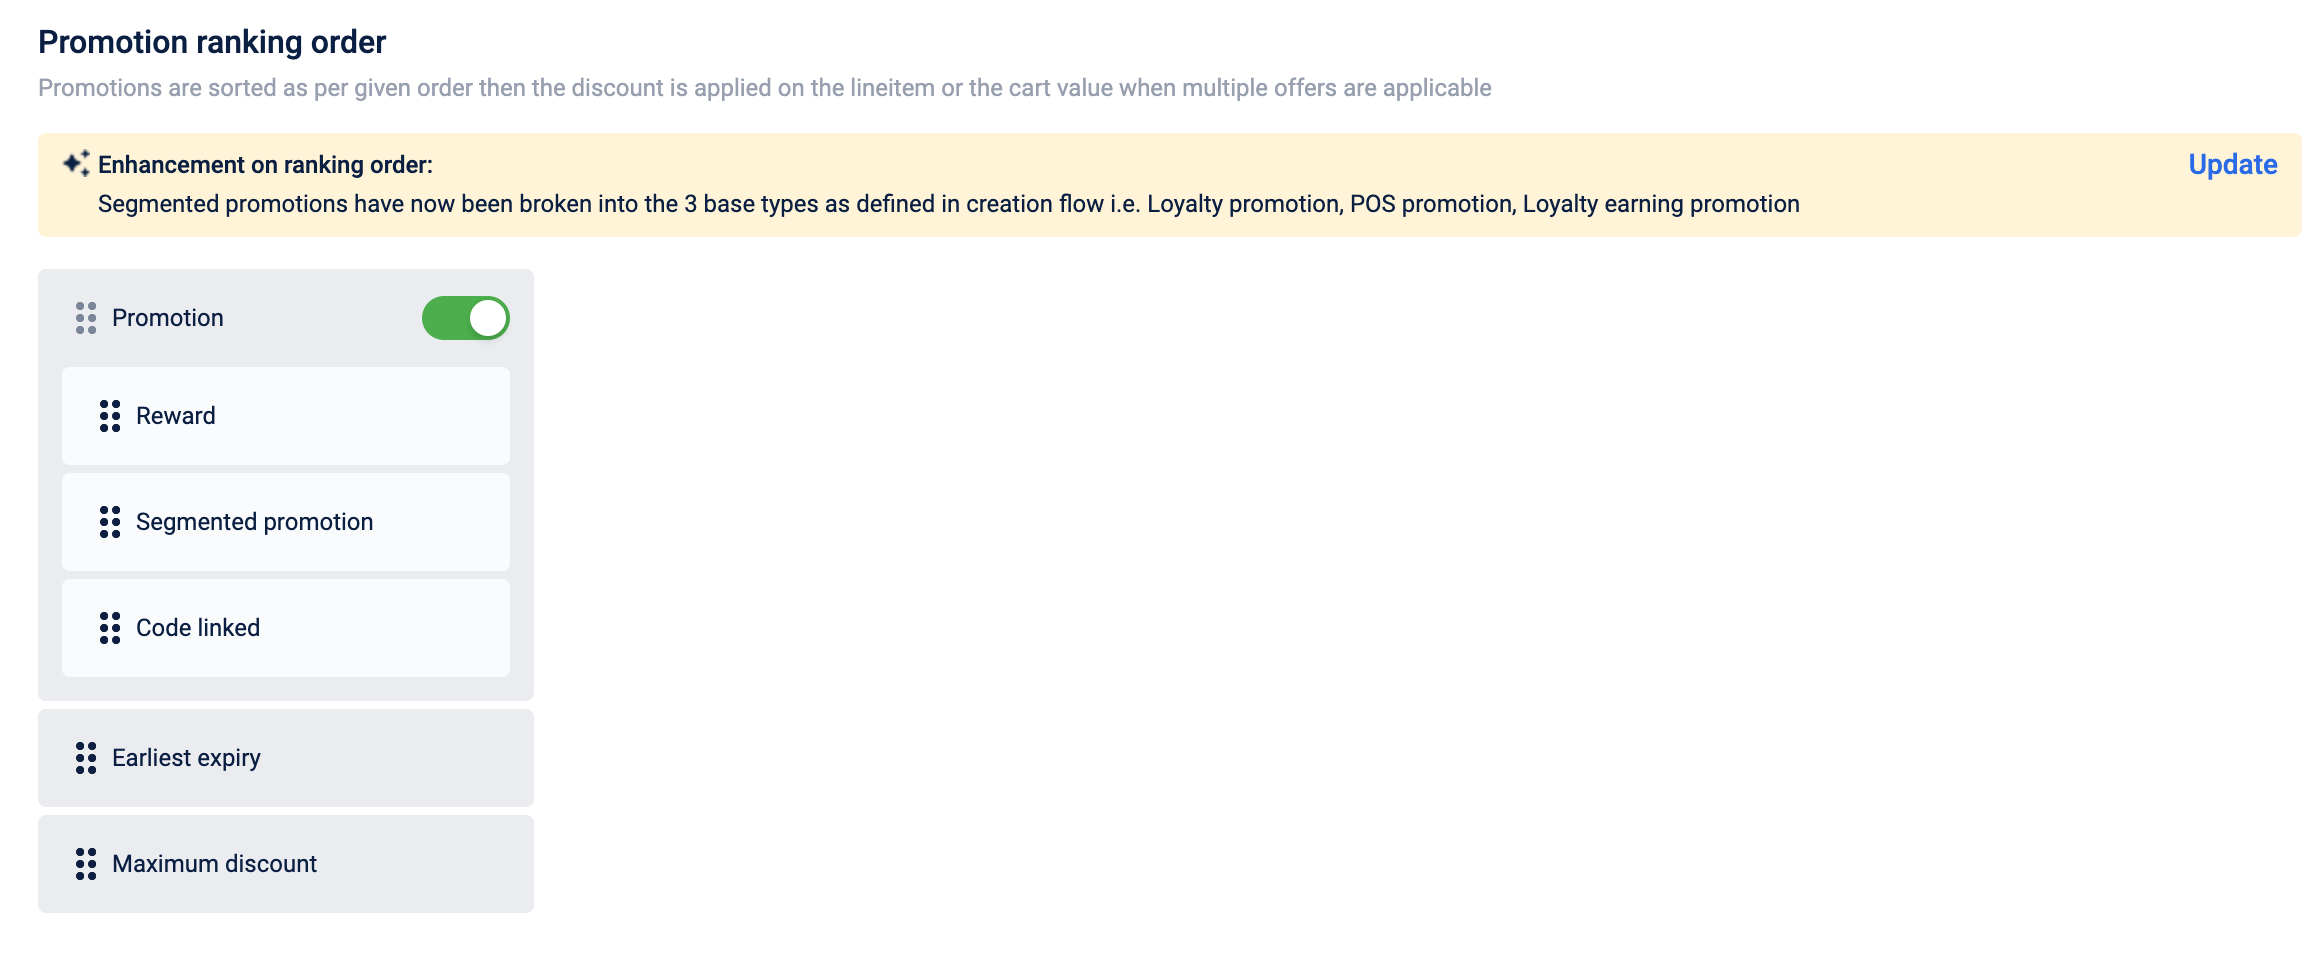
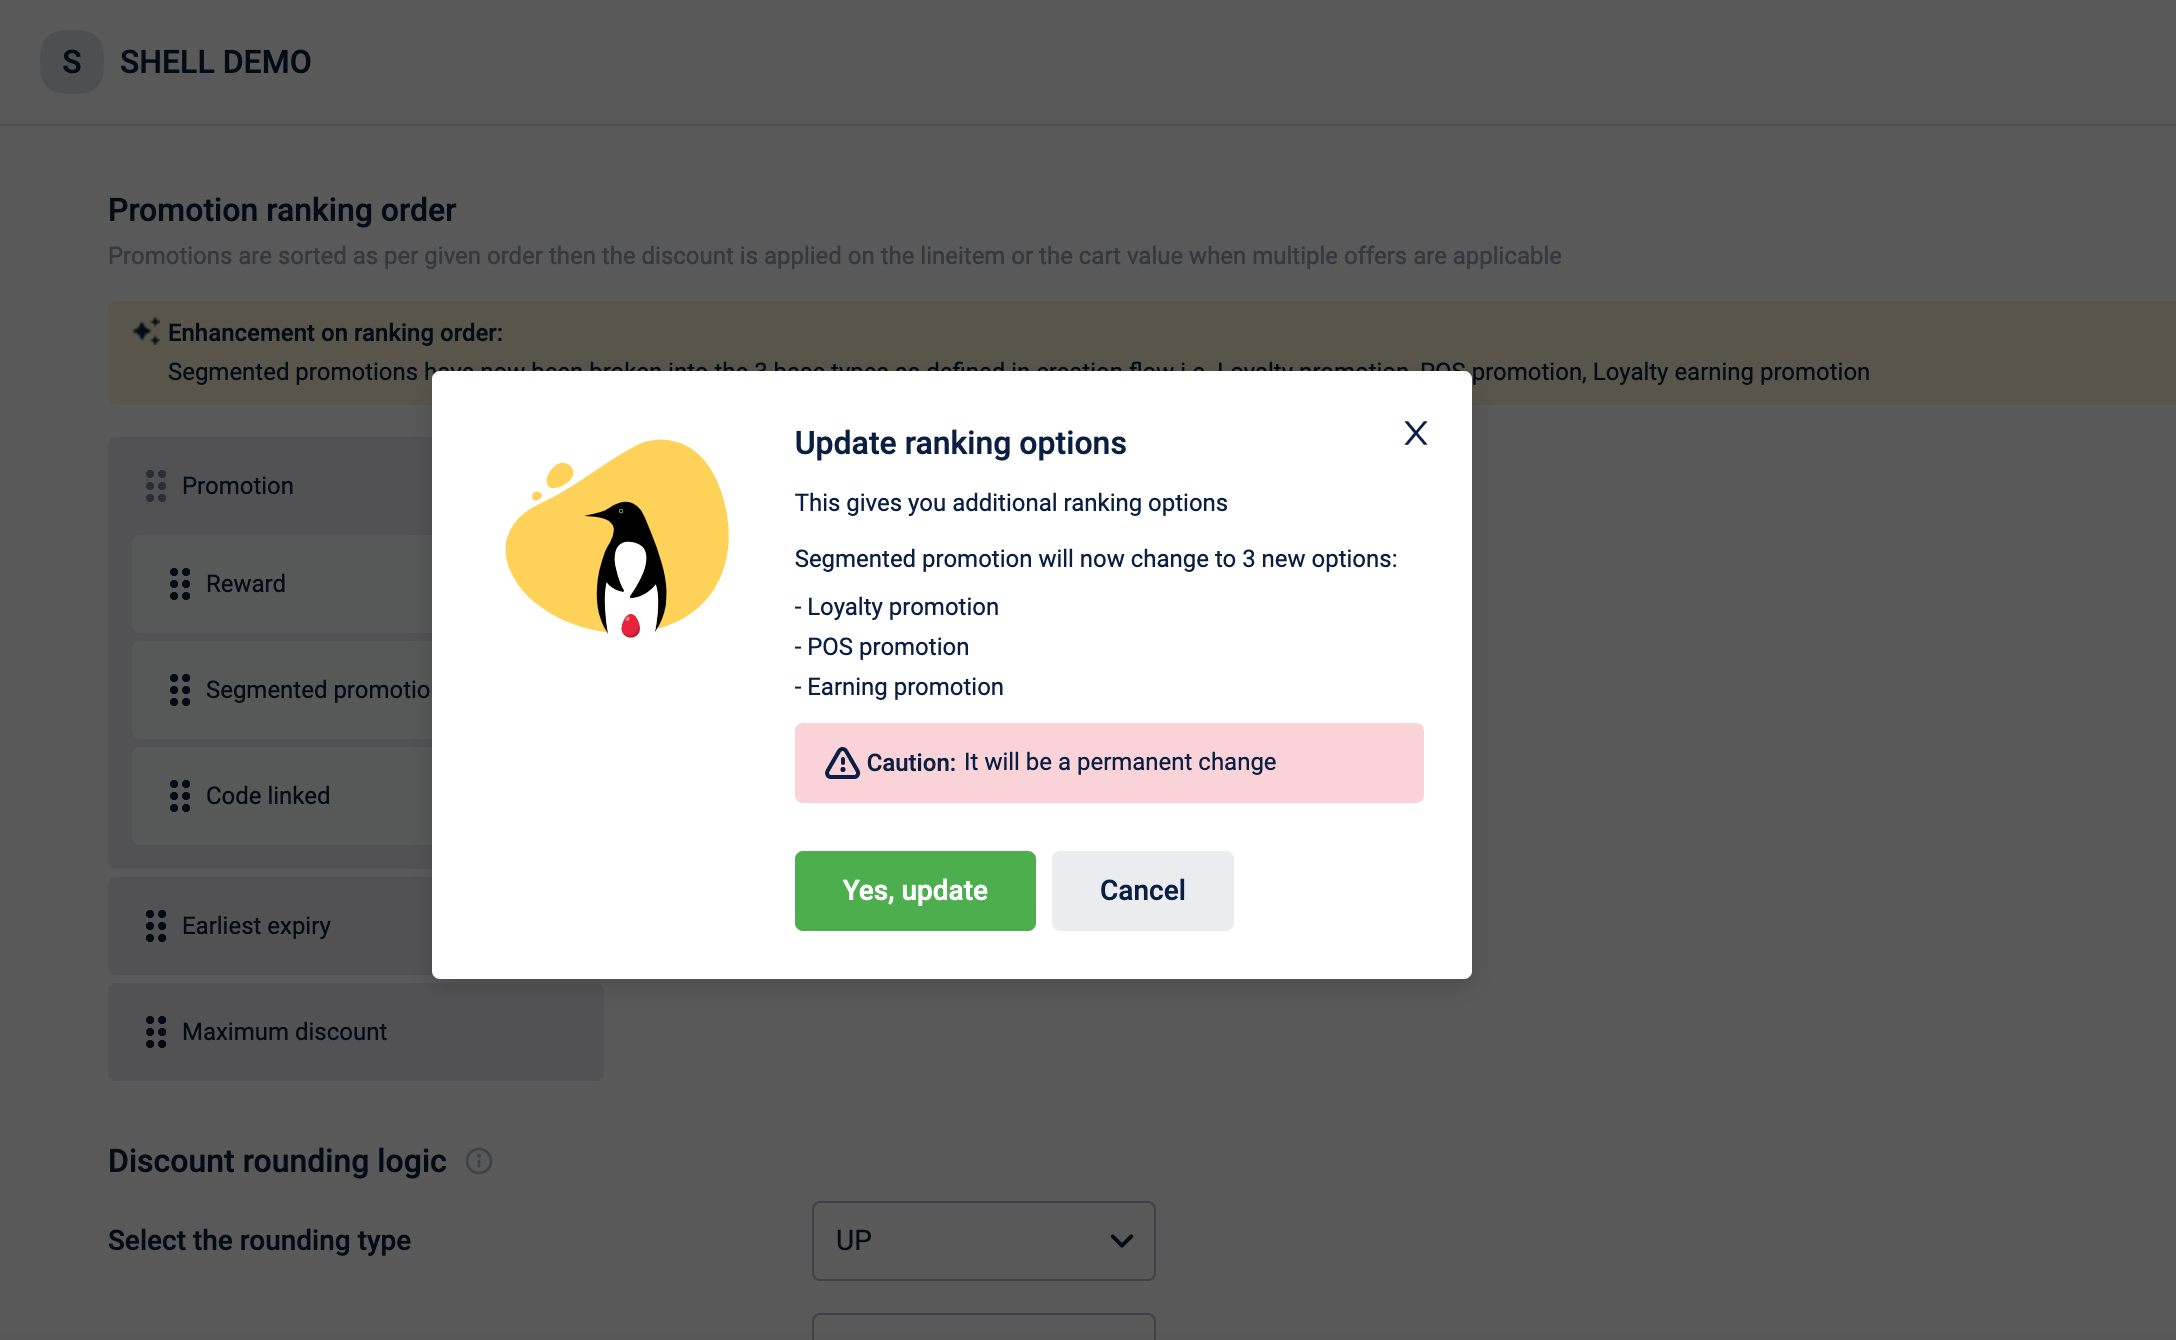
For orgs that are not using promotion stacking order, all types of promotions will be available for stacking.
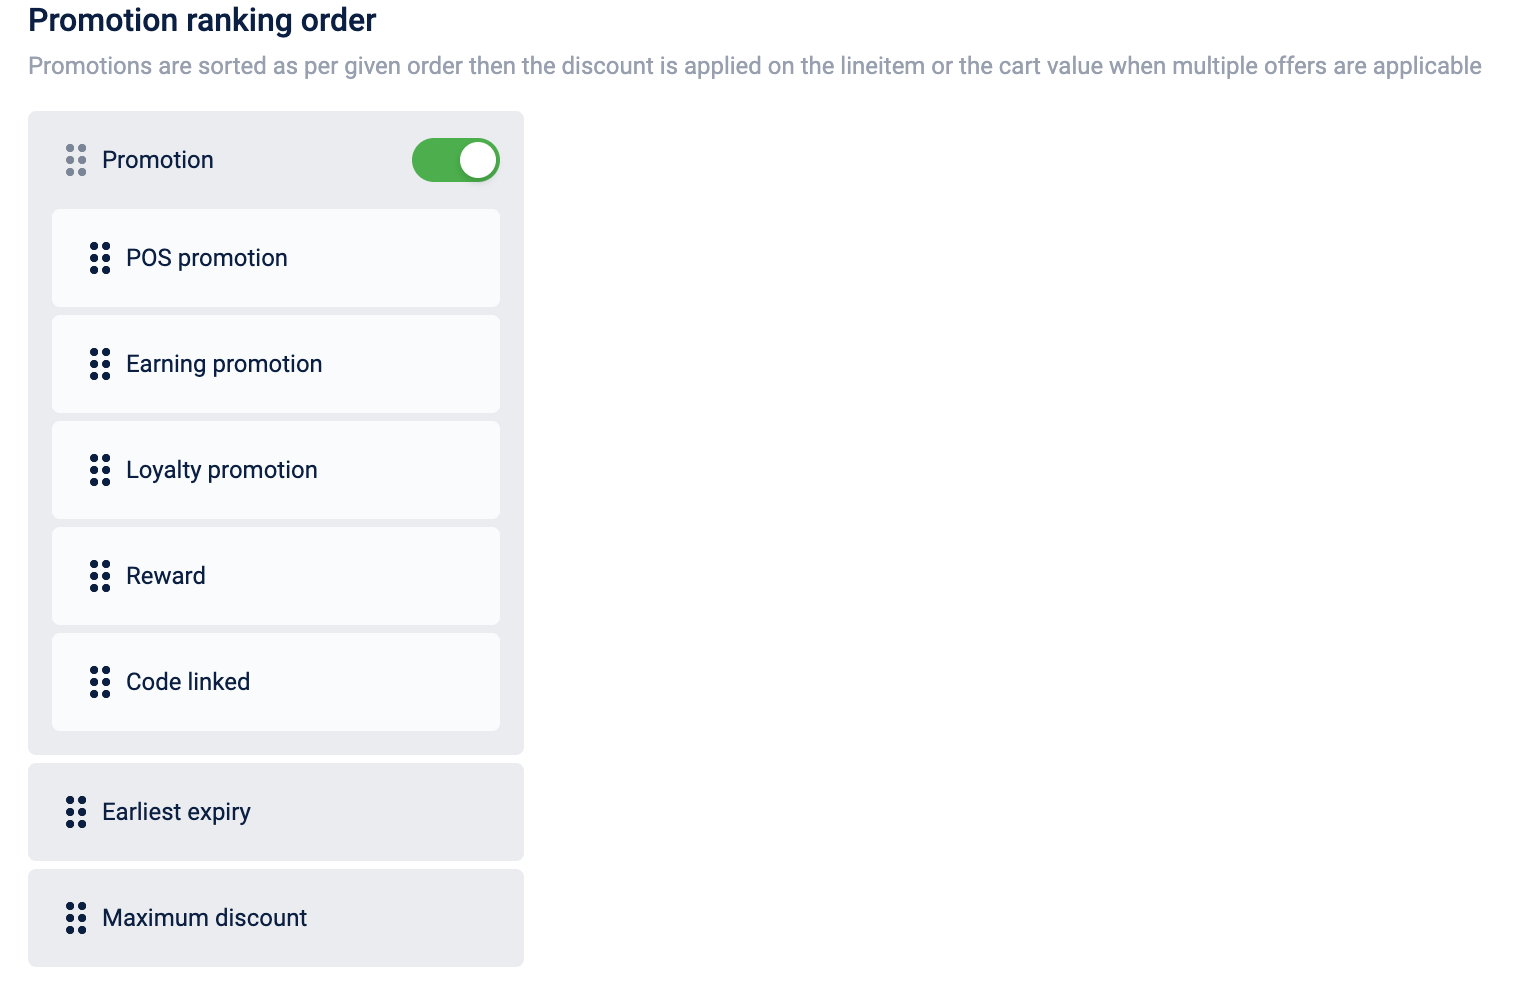
Click here to read more Enhancements in promotion Stacking order
Coupons
Now track the reversal status of a coupon
Earlier, customers couldn't see if coupon redemption was reversed due to a return. They wouldn't remember the code that was originally redeemed leading to trust issues on return of transactions. This lack of transparency resulted in increased support inquiries with support itself not able to track these reversals
Hence, brands want to indicate in their mobile UIs as to which coupon was reversed and then reinstated.
To get started
- In the GetCustomerCoupons and GetCouponDetails API we have added a new field titled “isReversed”.
- These fields will be returned as “yes” against the coupon code along with “last reversed timestamp” if the coupon was reversed.
Users can check the status of their coupon reversal on the app, including the time of reversal if the reversal has been completed.
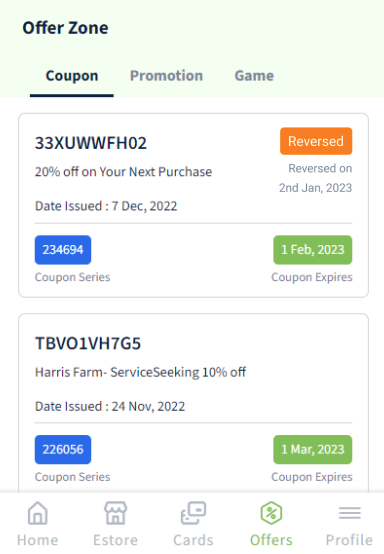
Above images are mere samples to indicate possible customer views and not product view
Refer to the detailed documentation here, Track the reversal status of a coupon
Now brands can show all the offers to guest users by region or country
Brands with multiple countries, zones or stores can now show the available offers/coupons to the respective guest customers. This will help the brands to nudge the customers to sign in and avail the offer. Offers can be filtered on concept, zone, store or till.
Brands will also be able to select & upload store names while creating a coupon series to restrict the coupon redemption to those stores.
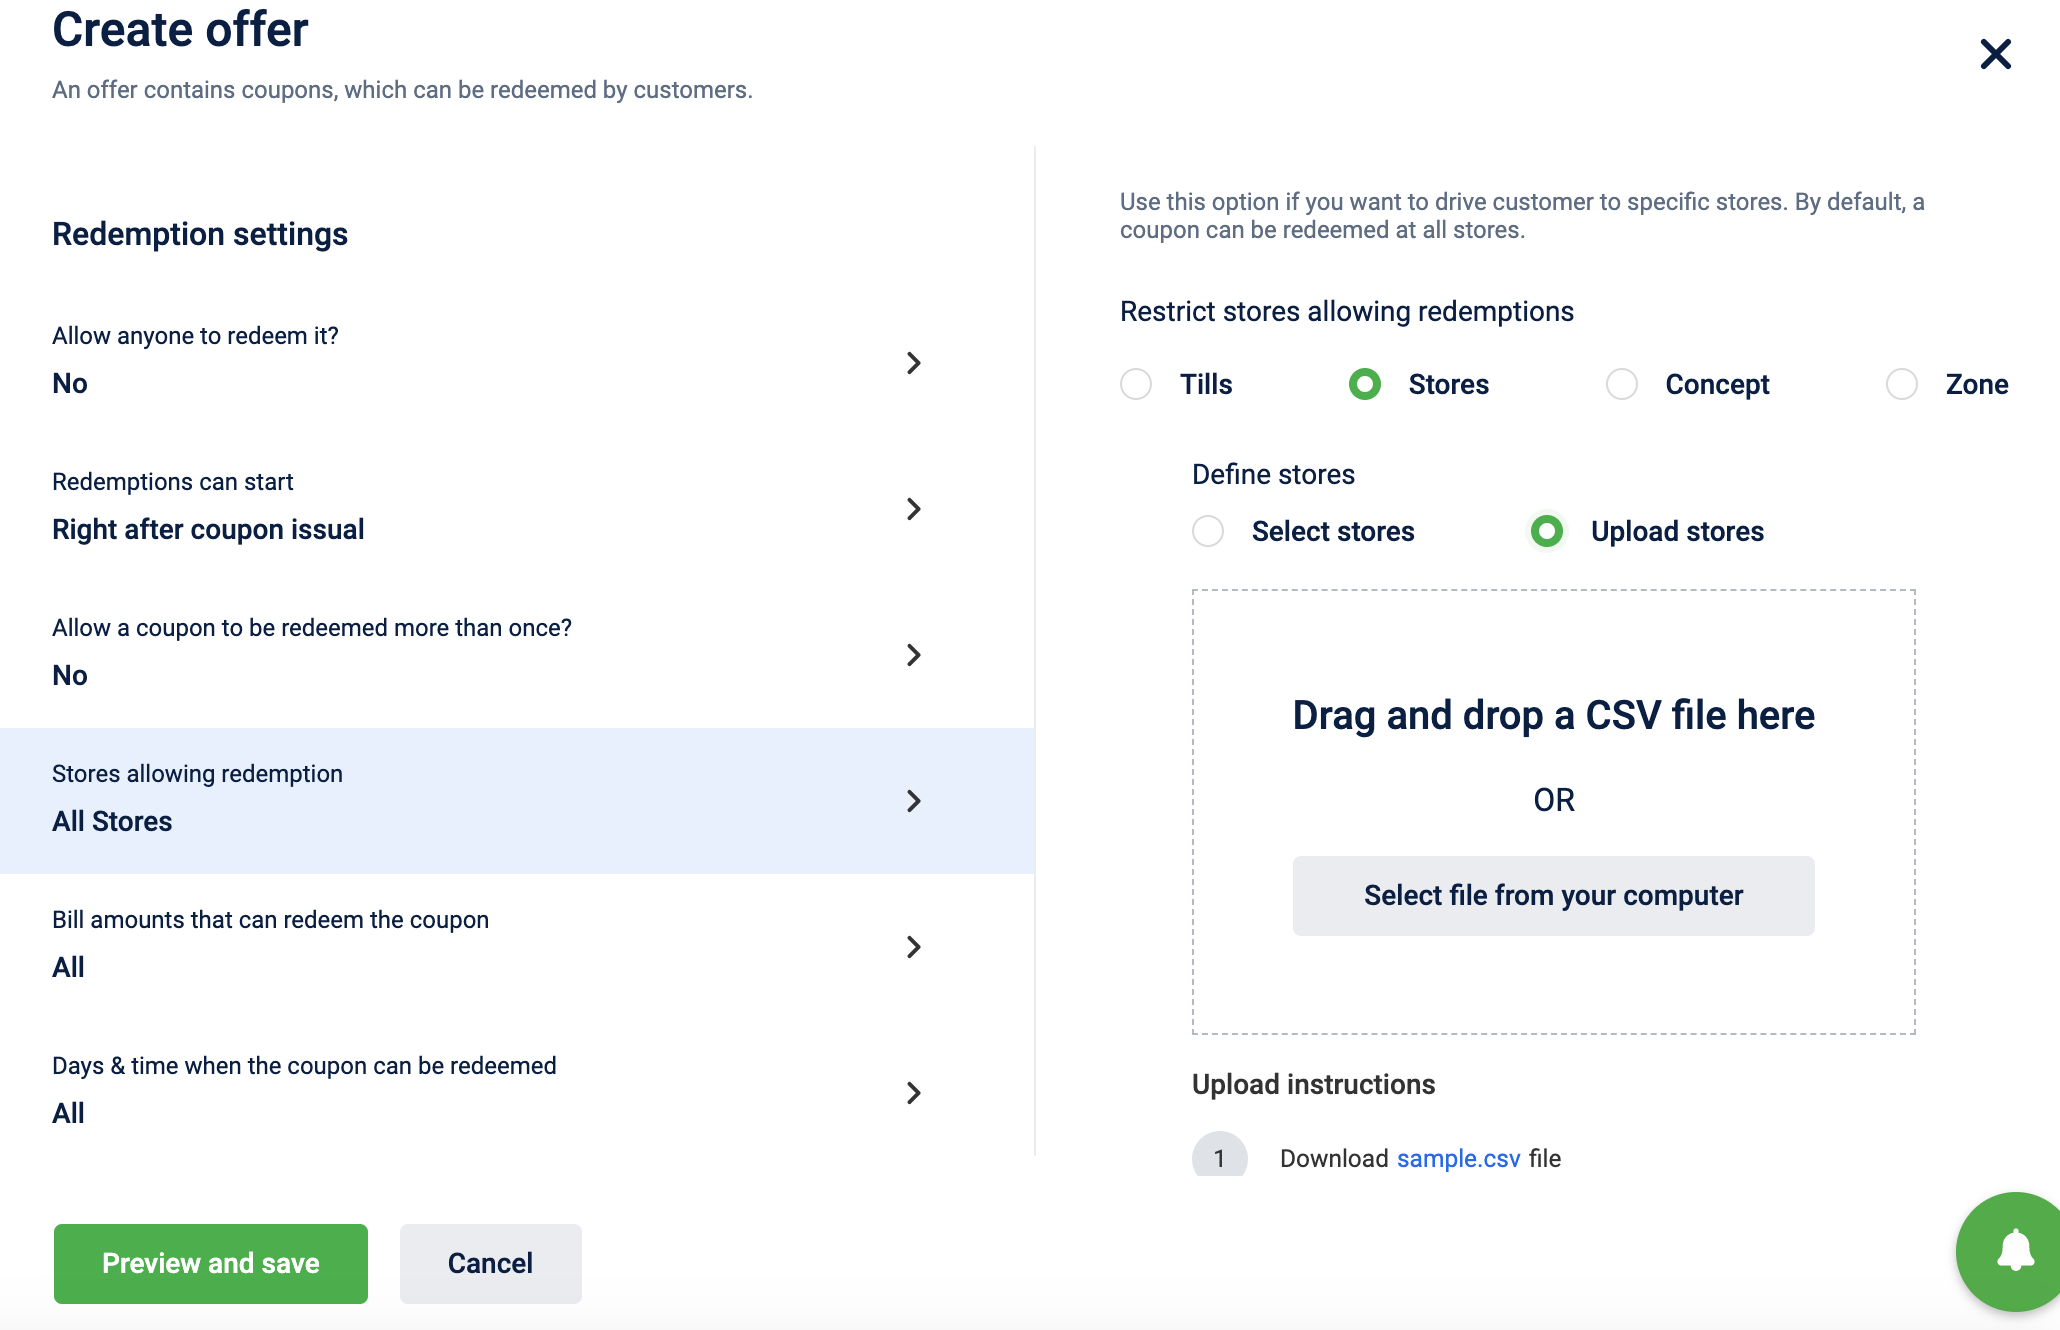
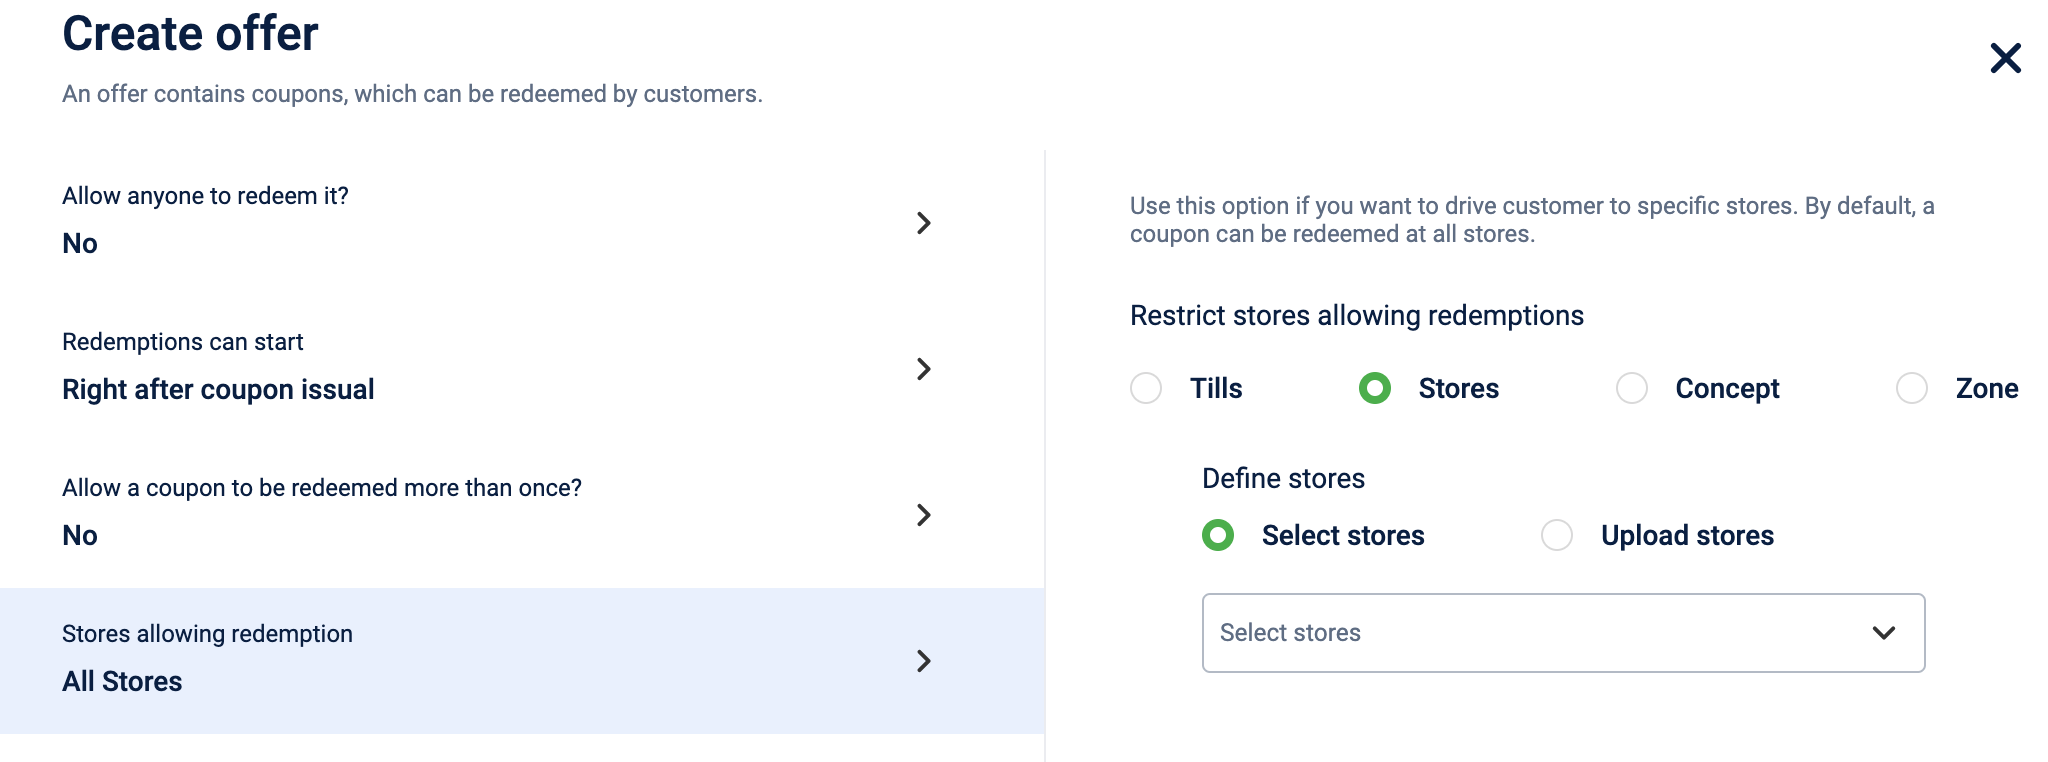
To get started
API details to getAllCouponConfigurations
Request type | GET |
Request URI | https:{host}/v2/coupon/series?orgEntityType=<orgEntityType>&orgEntityIds=<orgEntityId1>&orgEntityIds=<orgEntityId2> |
orgEntityType | Single select with below options
|
You can refer to the detailed documentation here API to fetch all coupons
Now, Product Codes are supported while creating offers via API
Previously, API for creating coupons only supported product IDs, brand and category codes could not be used when applying restrictions to offers. This was difficult for the users creating the offers as they wouldn’t know the product IDs.
Now the API is updated to support product codes for brand, category, and SKU, allowing users to create offers more efficiently. Product codes will be validated and an error will be thrown if codes are incorrect. Brands should use either product IDs or product codes, but not both.
This update will now improve the efficiency and help the users to create offers with much ease via coupon creation API.
You can refer to the detailed documentation here
Engage+
Introducing Jump Block in Journeys
Use case to understand the feature
- Assume that a brand wants to give customers who spend more than 1000 rs in their store 500 bonus points and certain other incentives.
- If a customer spends more than 5000 rupees in Journey A, they will jump to journey B (elite customers) which includes customers that have a free membership + incentives
- Brand can include a jump activity within their journey A that caters to the value of a transaction
Problem Statement
- Nowadays, creating personalized journeys is essential for brands to ensure customer retention and satisfaction. Creating hyper-personalized journeys can be a complex task especially when it is done in a single flow. Apart from that, it can be monotonous and time-consuming to create similar flows within each journey separately
- Enabling a jump functionality allows marketers to simplify their journey designing process and eliminates the redundancy of creating the same flows within multiple journeys by allowing users to jump from one journey to another if they meet certain conditions
How are we solving this?
- Within the creation of a journey, we have introduced a new action button called jump that can be easily configured within the source journey by a simple drag and drop
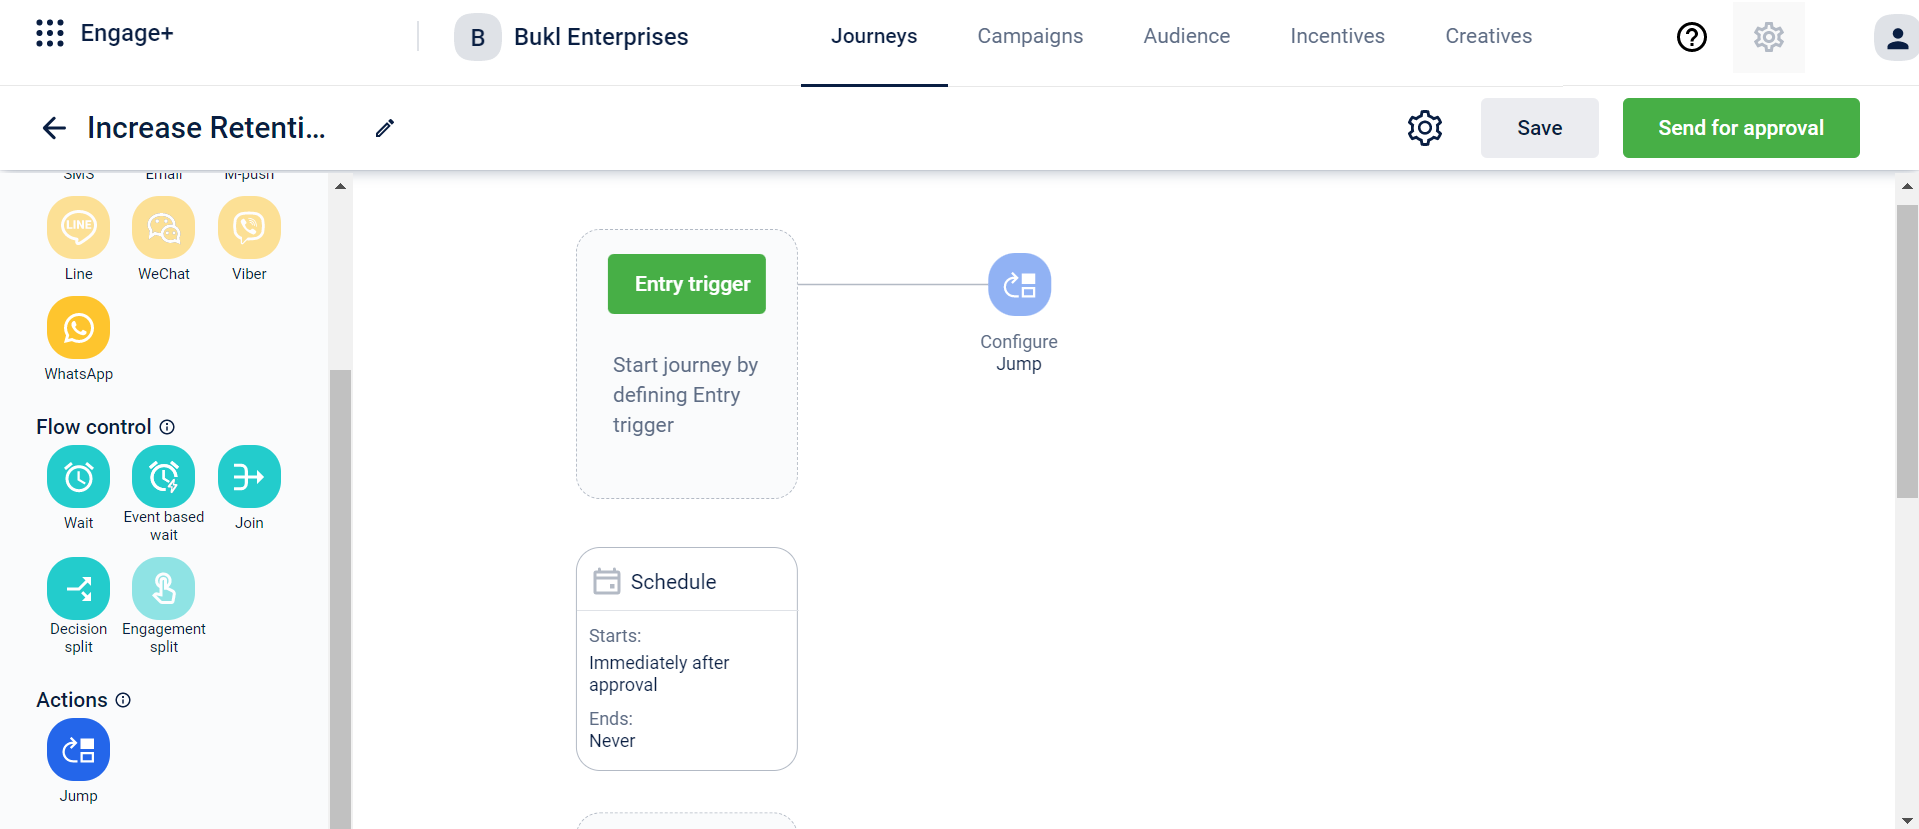
- At any step of the journey, add a jump action. Add a block name and a destination journey
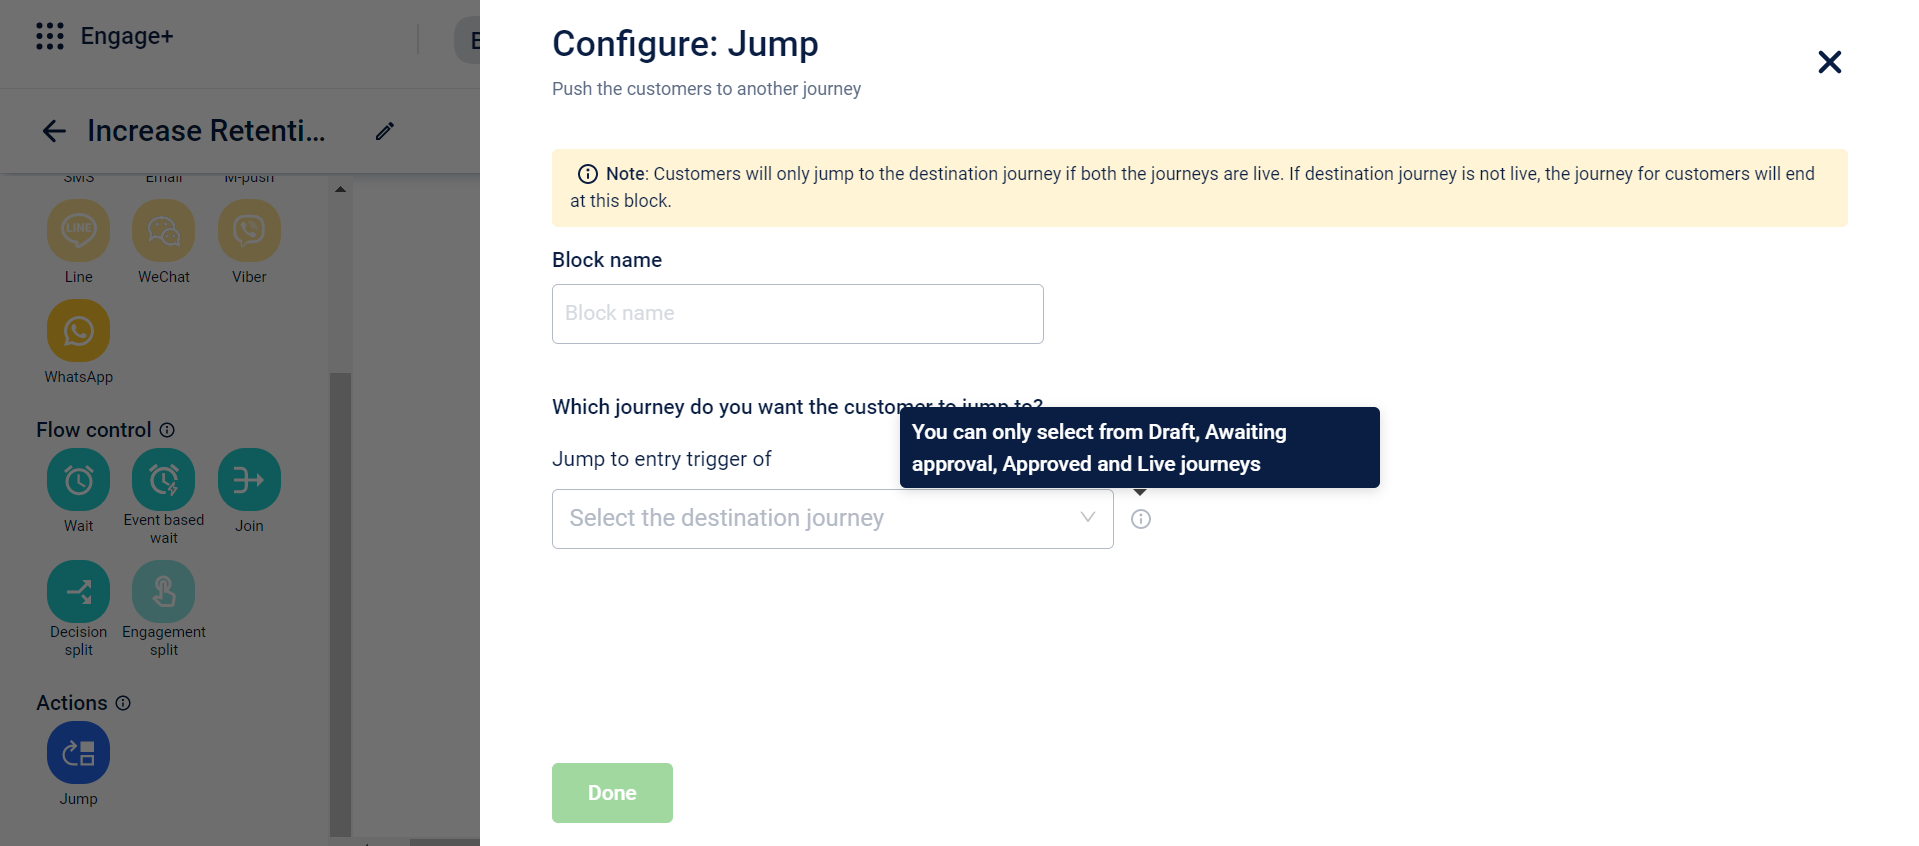
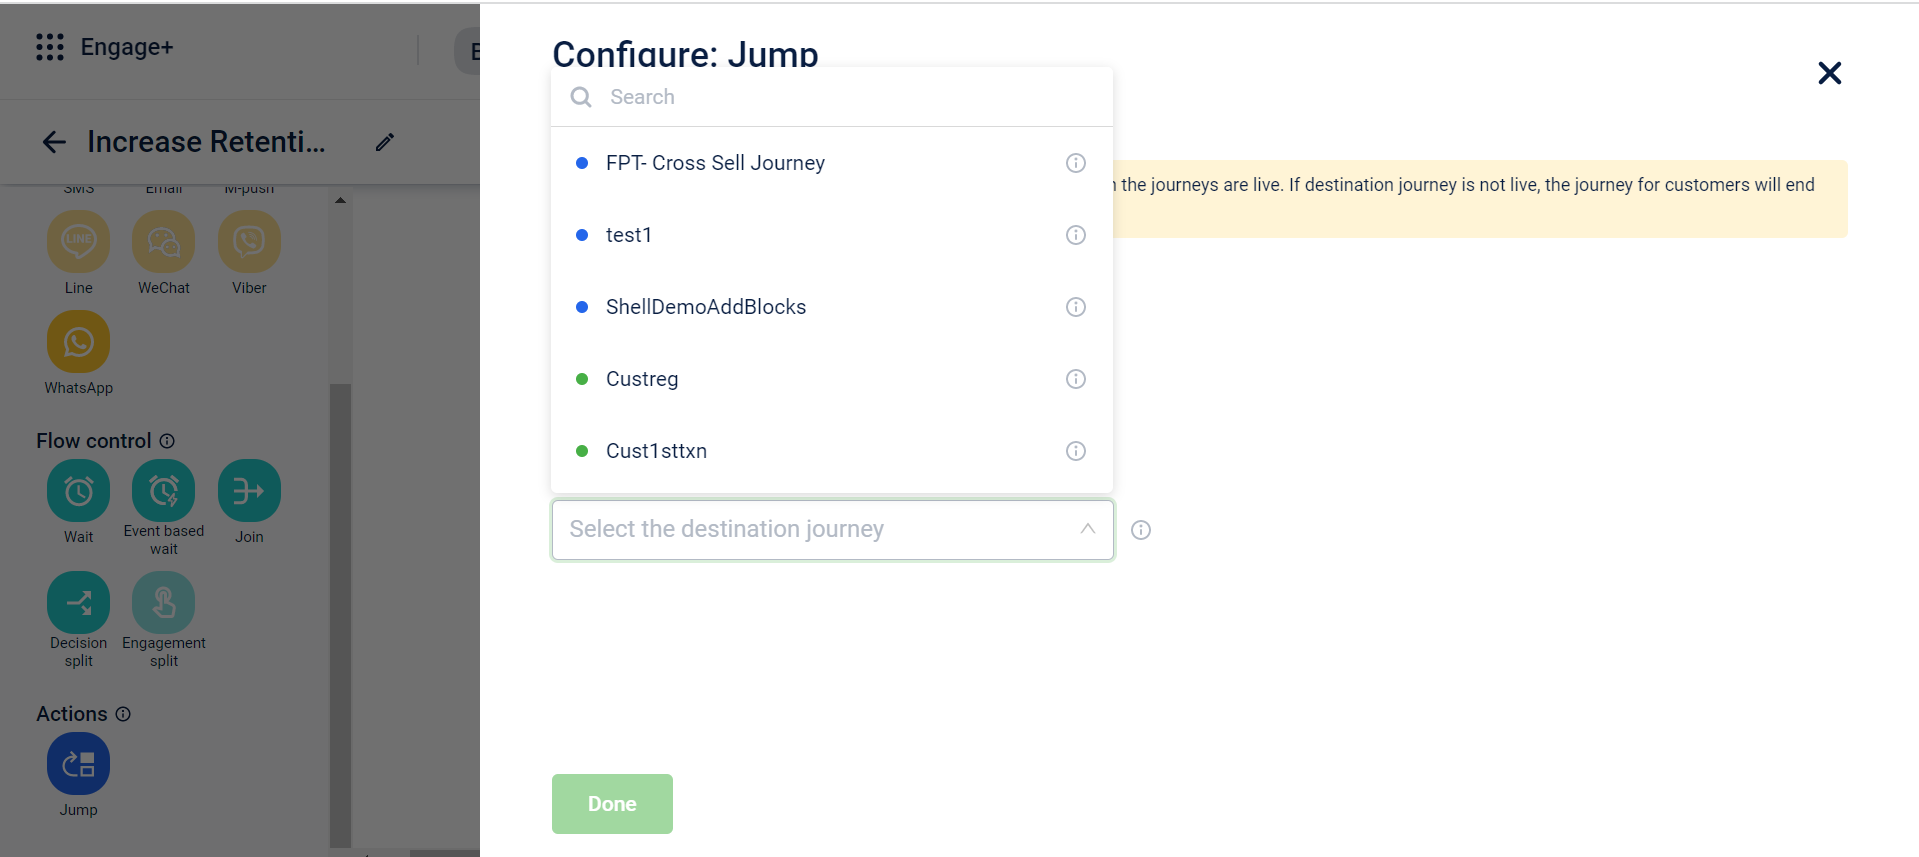
- Click on Destination Journey. A drop-down that consists of a list of journeys that are in Draft, Approved, Awaiting Approval and Live state is displayed
Status, Entry trigger and Duration of the destination journey will be displayed upon selecting the journey. You can click on ‘Go to journey’ to open the destination journey in a new tab.
- When a Jump action is configured in a journey, the entry trigger of the destination journey will display the name of the source journey upon hover in preview
Behavioral events support
Use Cases to understand the feature:
- Target users based on actions performed by them such as-
- Added items to cart but did not make a purchase, send a reminder mail in x days
- Customer registered, send a welcome email immediately
- Product searched and viewed, send an email with relevant offer after x days
- Understand user interaction on app/website such as usual day/time of using the app or making a purchase
Feature Release:
Journeys will support two kinds of behavioral events:
- Standard Behavioral events - These events are standard for all kinds of clients and are supported by default in the capillary system
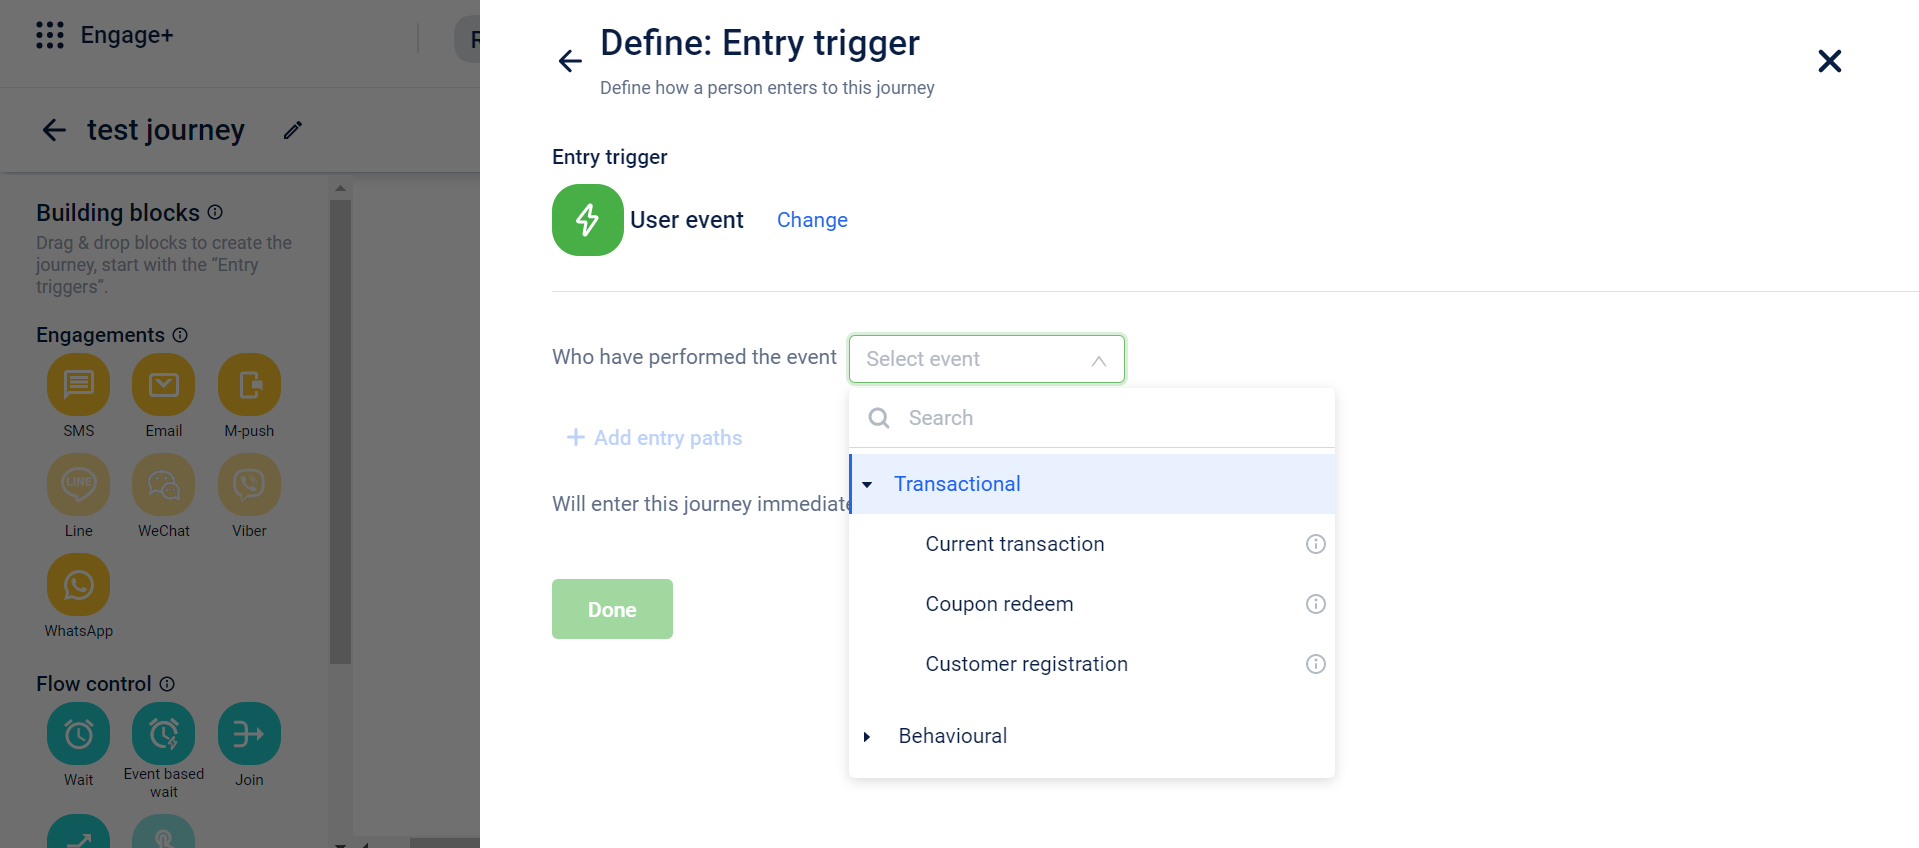
- Custom Behavioral events - These events are entirely customizable by the clients to suit their specific data points to be captured. Once the client configured these events, they will be displayed in the Custom events drop-down
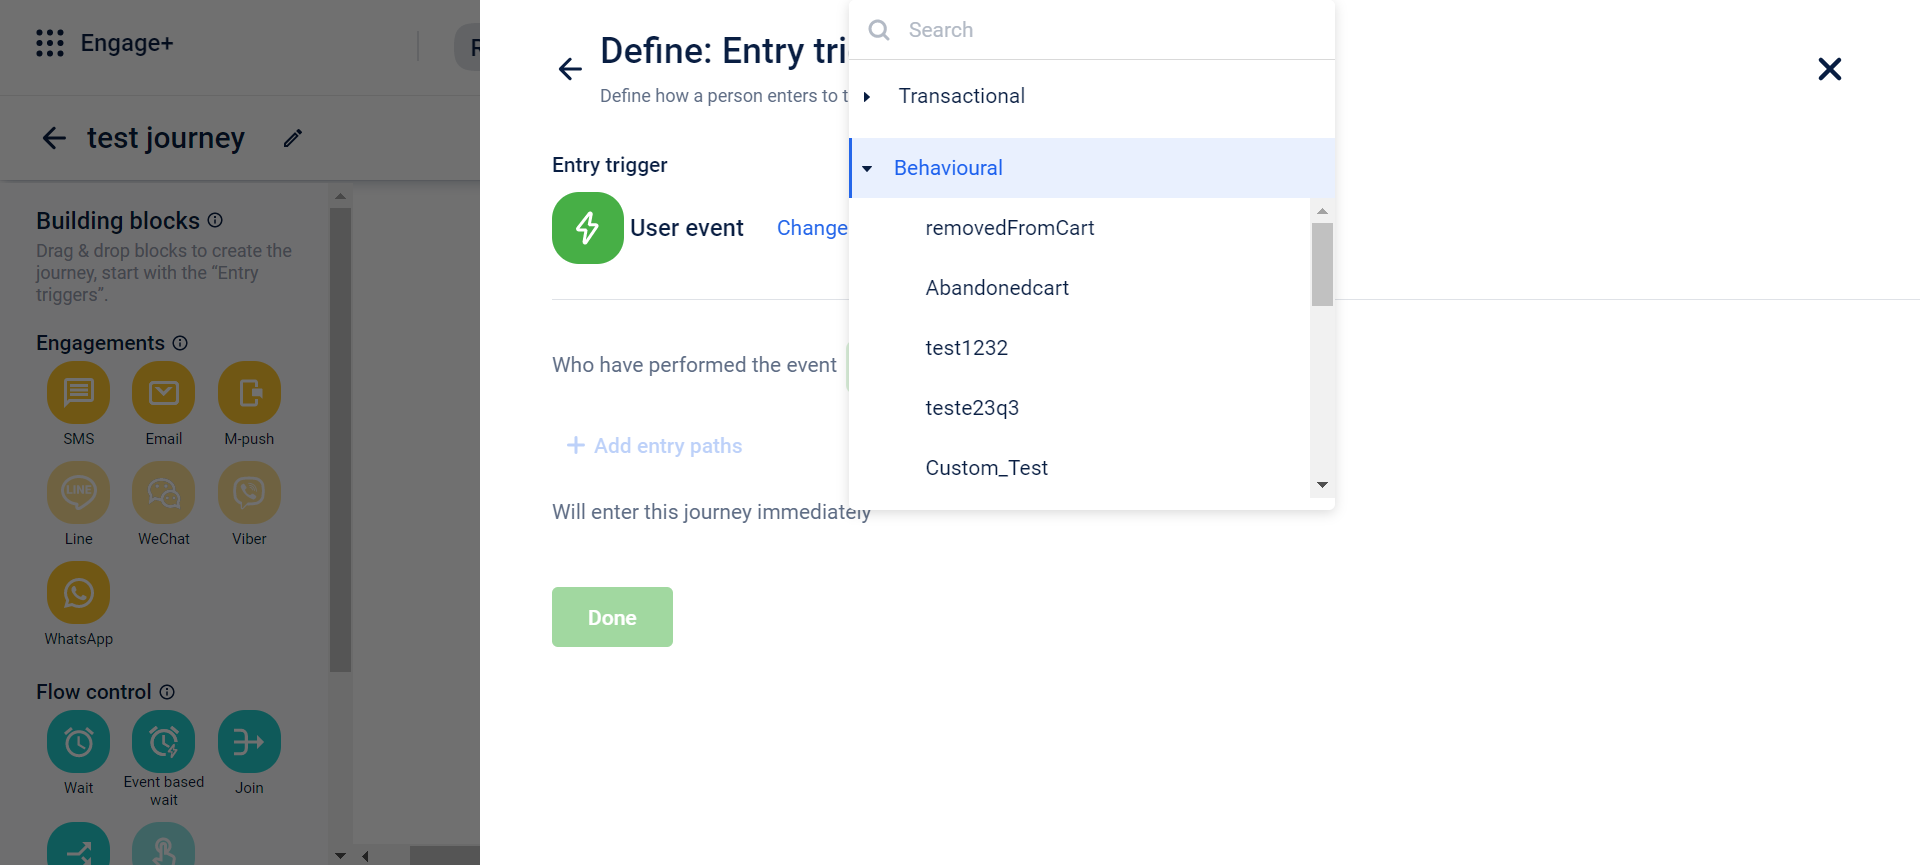
How can brands configure custom events:
- You can configure events within Organization Setting > Behavioral Events
- Click on ‘Add Event’ and a list of events pre-defined by capillary will be displayed with various customer actions and various attributes defined within each action. You can also search for an event within in the list
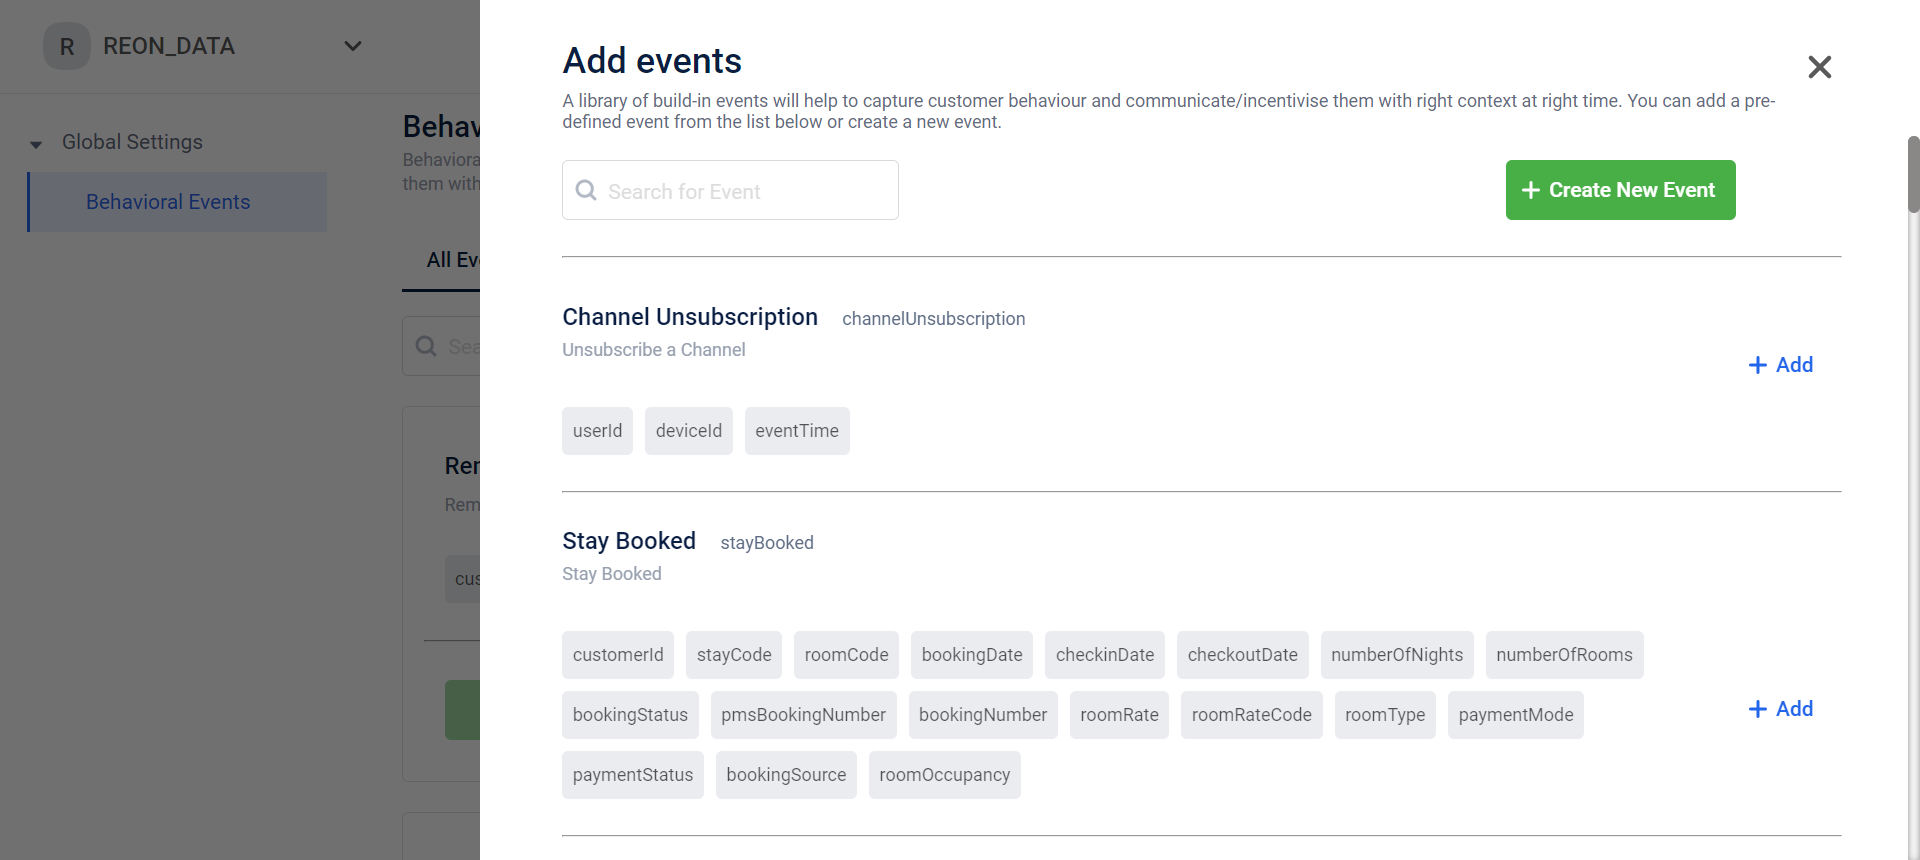
- You can either select from this list of predefined events or ‘Create New Event’. Upon creating a new event, you have to fill in details such as - event name, display name and event description. Once you fill in the event details, click on ‘Add Attribute’ to configure attributes related to the event
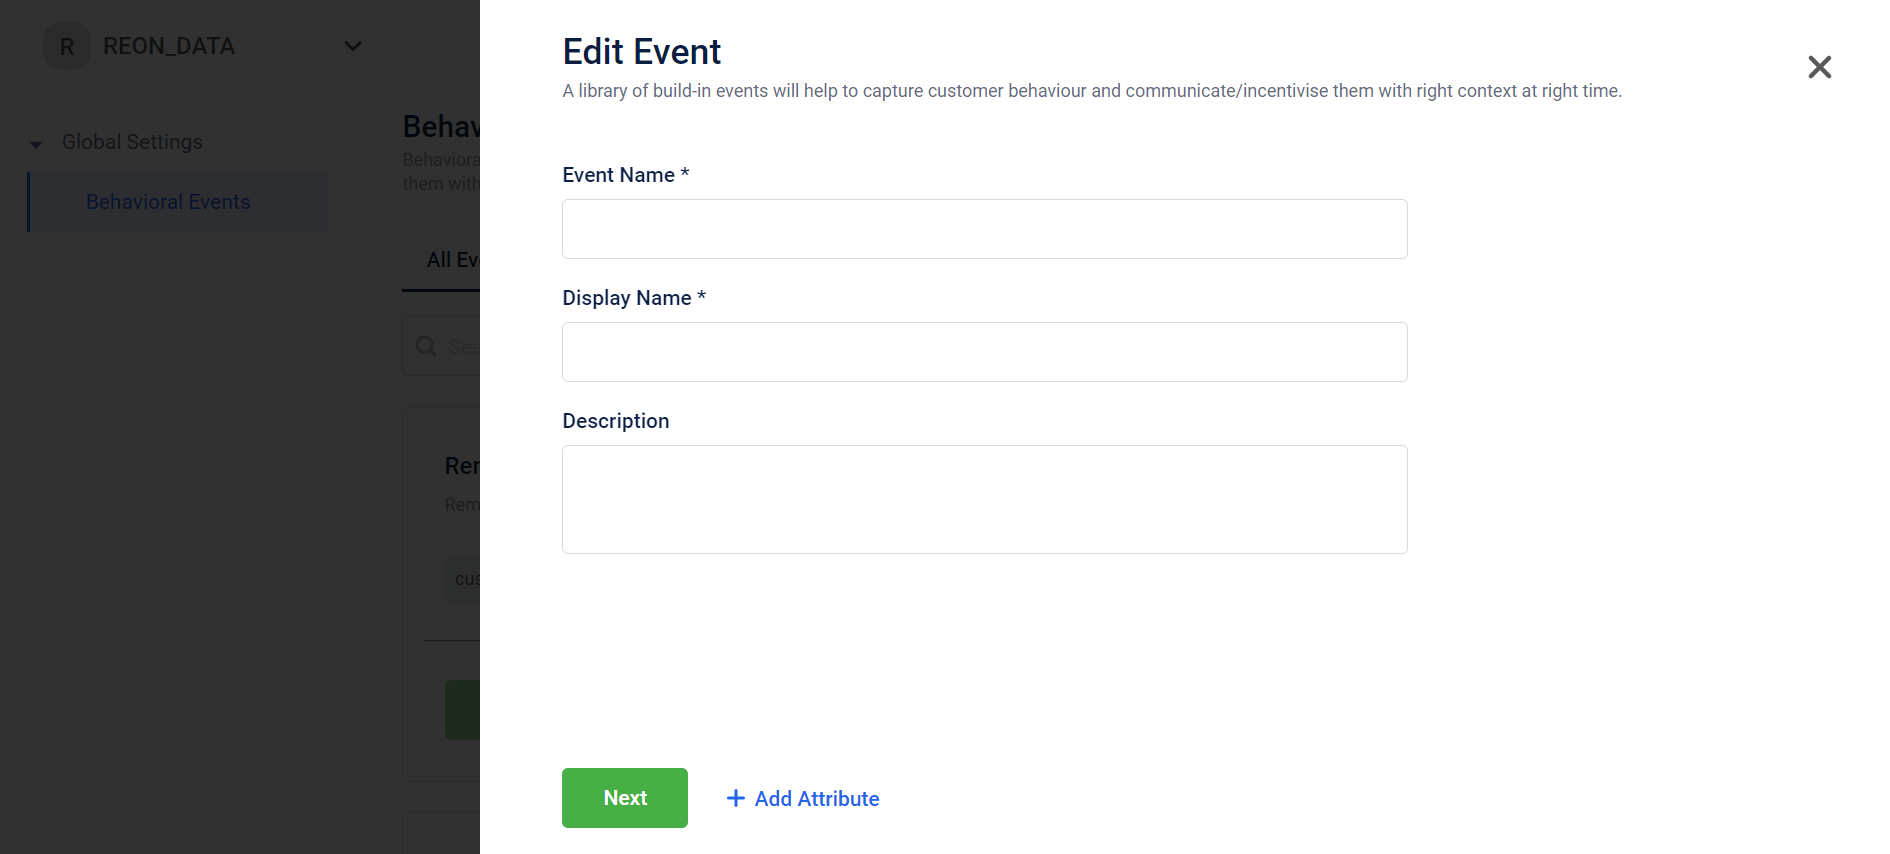
- You can also add/edit attributes within defined events. To add a new attribute enter the name of the attribute and data type. You can click on the delete icon to delete the attribute
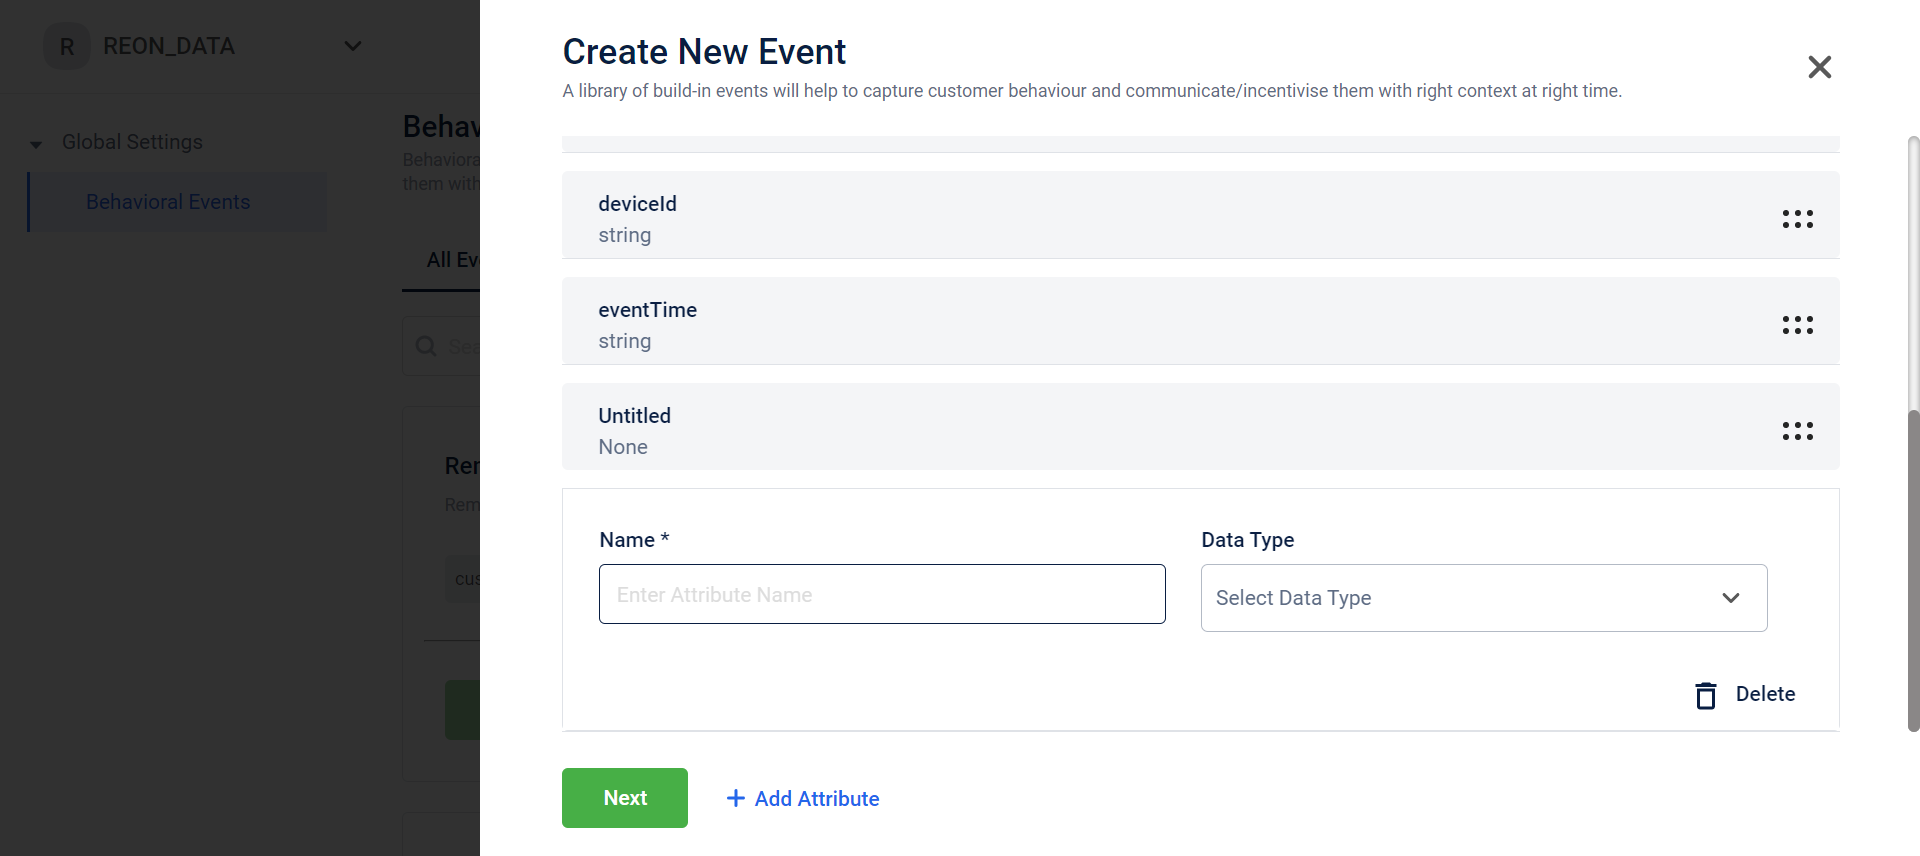
Note that you cannot delete or change the name of event/attribute supported by Capillary
- Once a new event/attribute is created, it will be displayed in the list of all events
- To know more about how to add a behavioral event - Set up behavioral events
Feature impact on customers:
- Analyze customer trends and behavior
- Analyze time and place of action of the customers to send out campaigns when they are highly interested
- Targeted campaigns can be sent to customers which will persuade them to make a desired action
- Reward the customer at various points in their journey to motivate them
Behavioral events usage in Journeys:
- Entry trigger - You can configure the entry trigger based on customer behavior. If the customer matches the behavioral criteria, they will enter the journey
- Exit Trigger - You can configure the exit trigger based on customer behavior. If the customer matches the behavioral criteria, they will exit the journey
- Event based wait - You can configure a behavioral event within the event based wait. Depending on which criteria is matched by the customer, they will continue on that respective journey
- Decision split - You can configure a behavioral event within a decision split. Depending on which criteria is matched by the customer, they will continue on that respective journey
Store CSV Upload
Use Case:
Assume that a user wants to add multiple stores within an entry trigger in journeys. They can do so by directly uploading a store csv instead of selecting every desired store from the drop-down.
Problem Statement:
It is a tedious task for a user to select say 50 stores that they want to target in an entry trigger. They might make a mistake of skipping a store or selecting the wrong store. To avoid this hassle, we have enabled a user to directly upload a csv containing store ids of all the store that a user wants to include
How are we solving this problem?
- While configuring the condition, you can click on ‘Store’. A ‘choose file’ option will be displayed. You can choose a file from your computer and upload it directly onto the condition
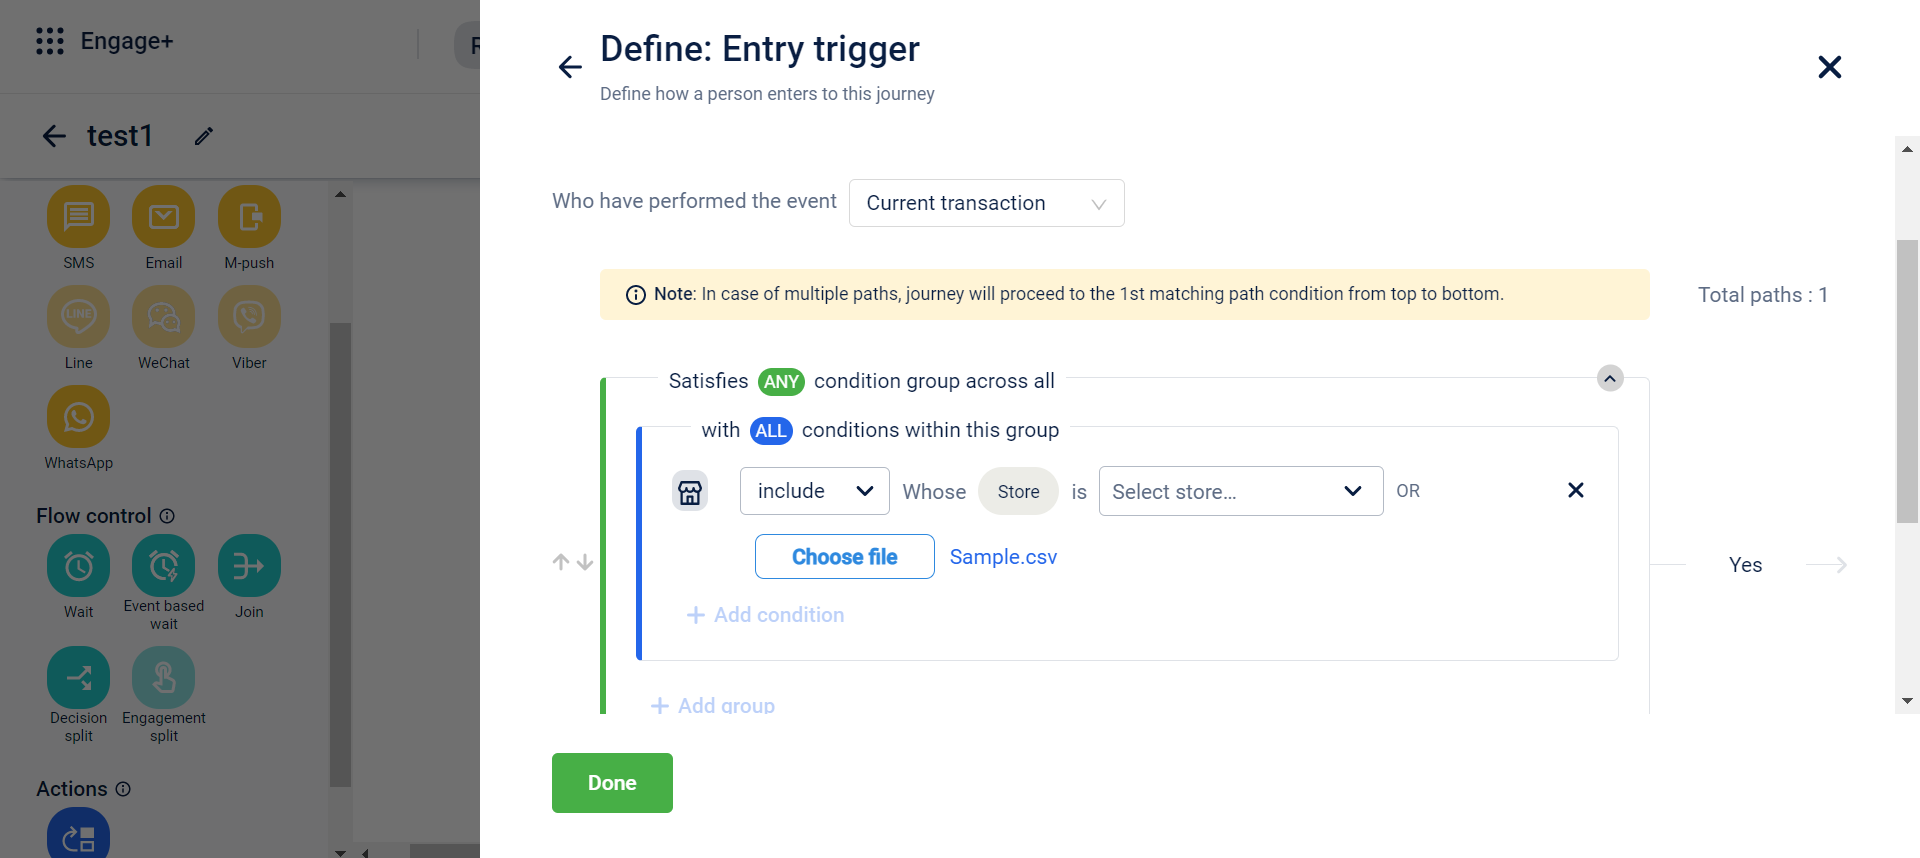
- You can also click on ‘Sample.csv’ to download the csv template which you can use to upload
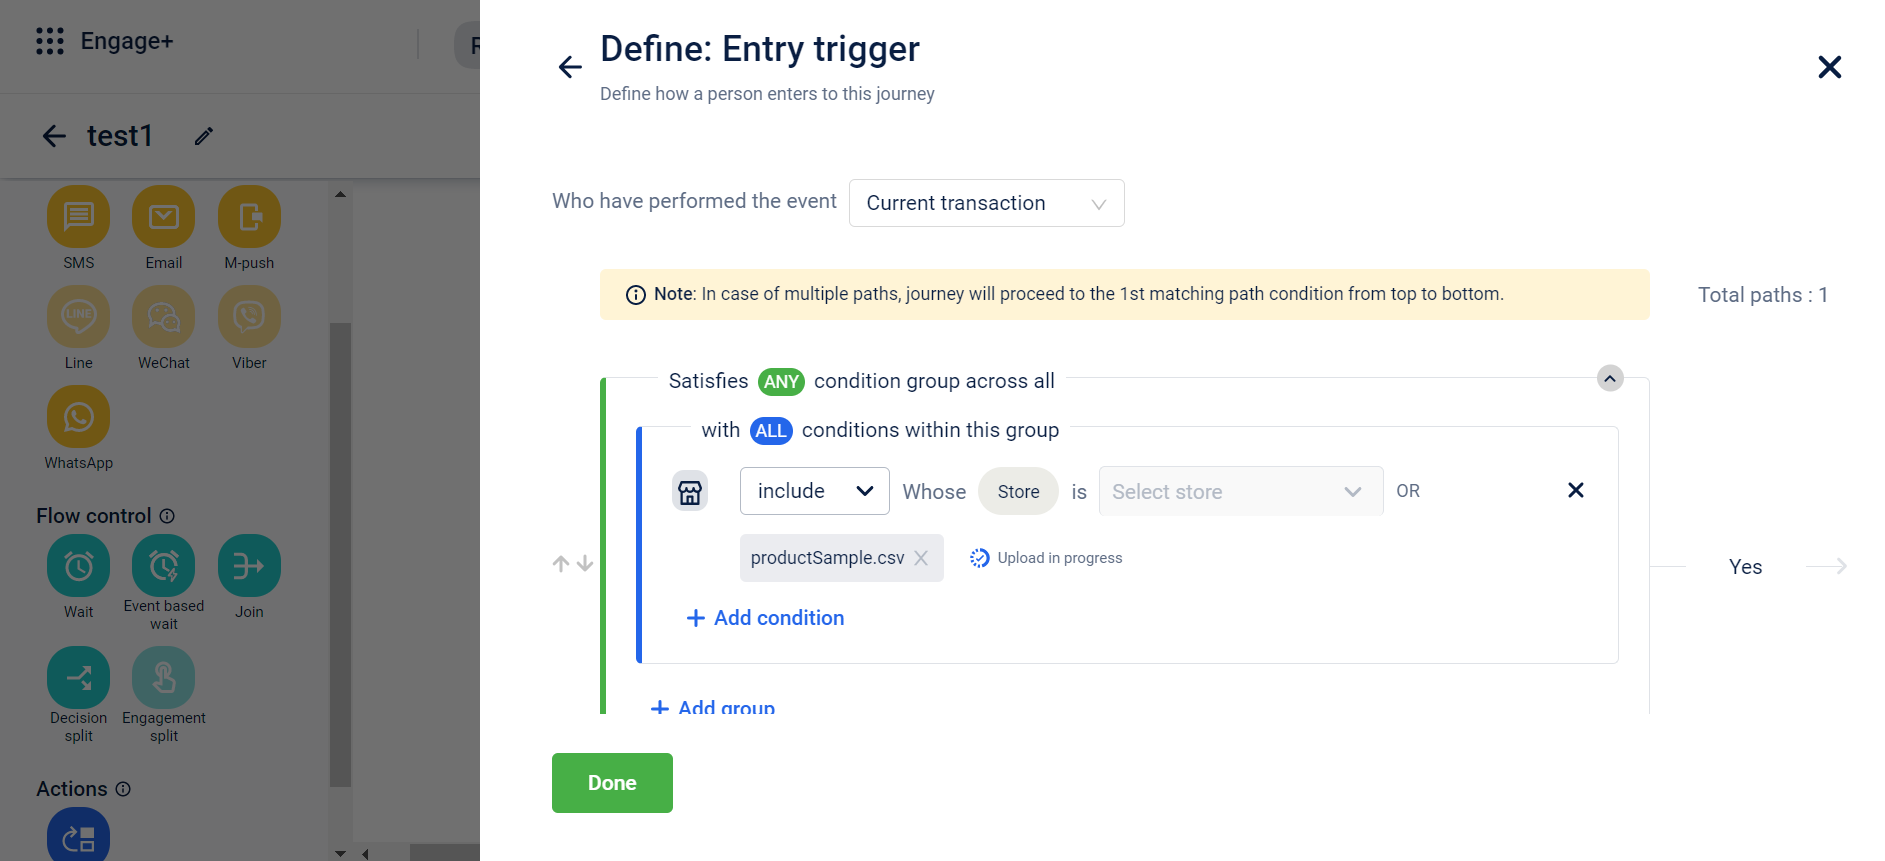
- Once you have uploaded a file, the system will check the file for the right data and format and it may take up-to 30 to 150 seconds to read
- If the data uploaded does not match the required format, a trigger is sent to the user to inform them that there are invalid entries within the csv
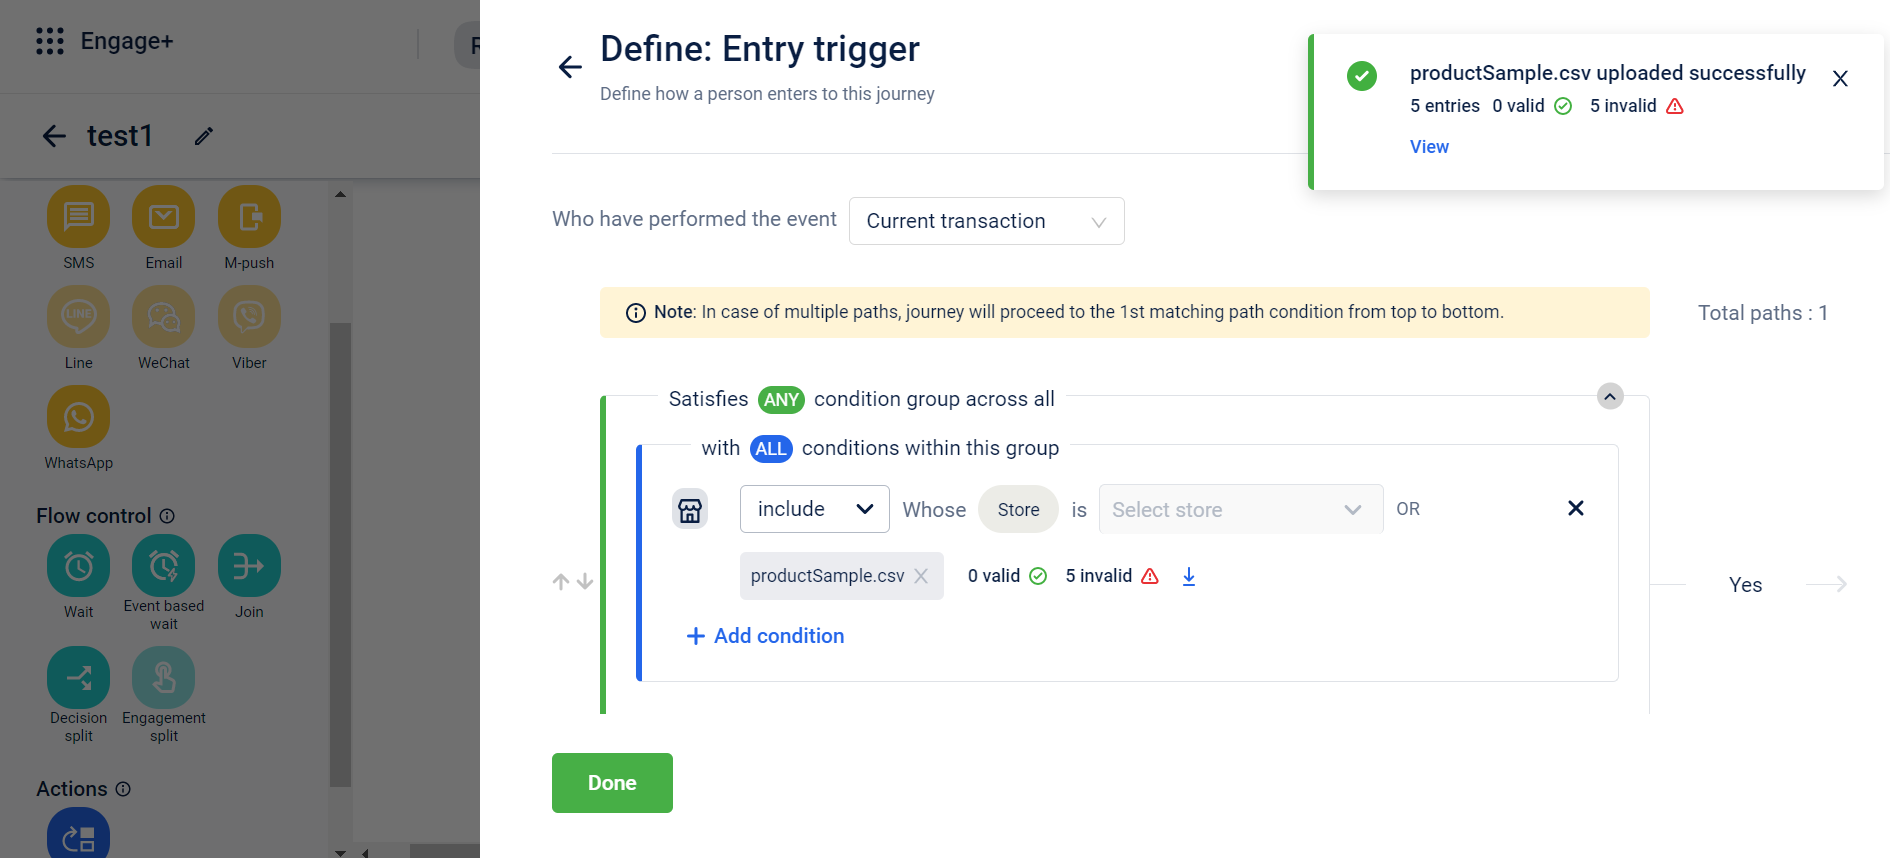
You can either select the stores from the drop-down or upload with the help of csv. Both cannot be done simultaneously
- Once the csv is successfully uploaded with no errors, you can download the data in two formats for referencing:
- Store id
- Store id, code and name
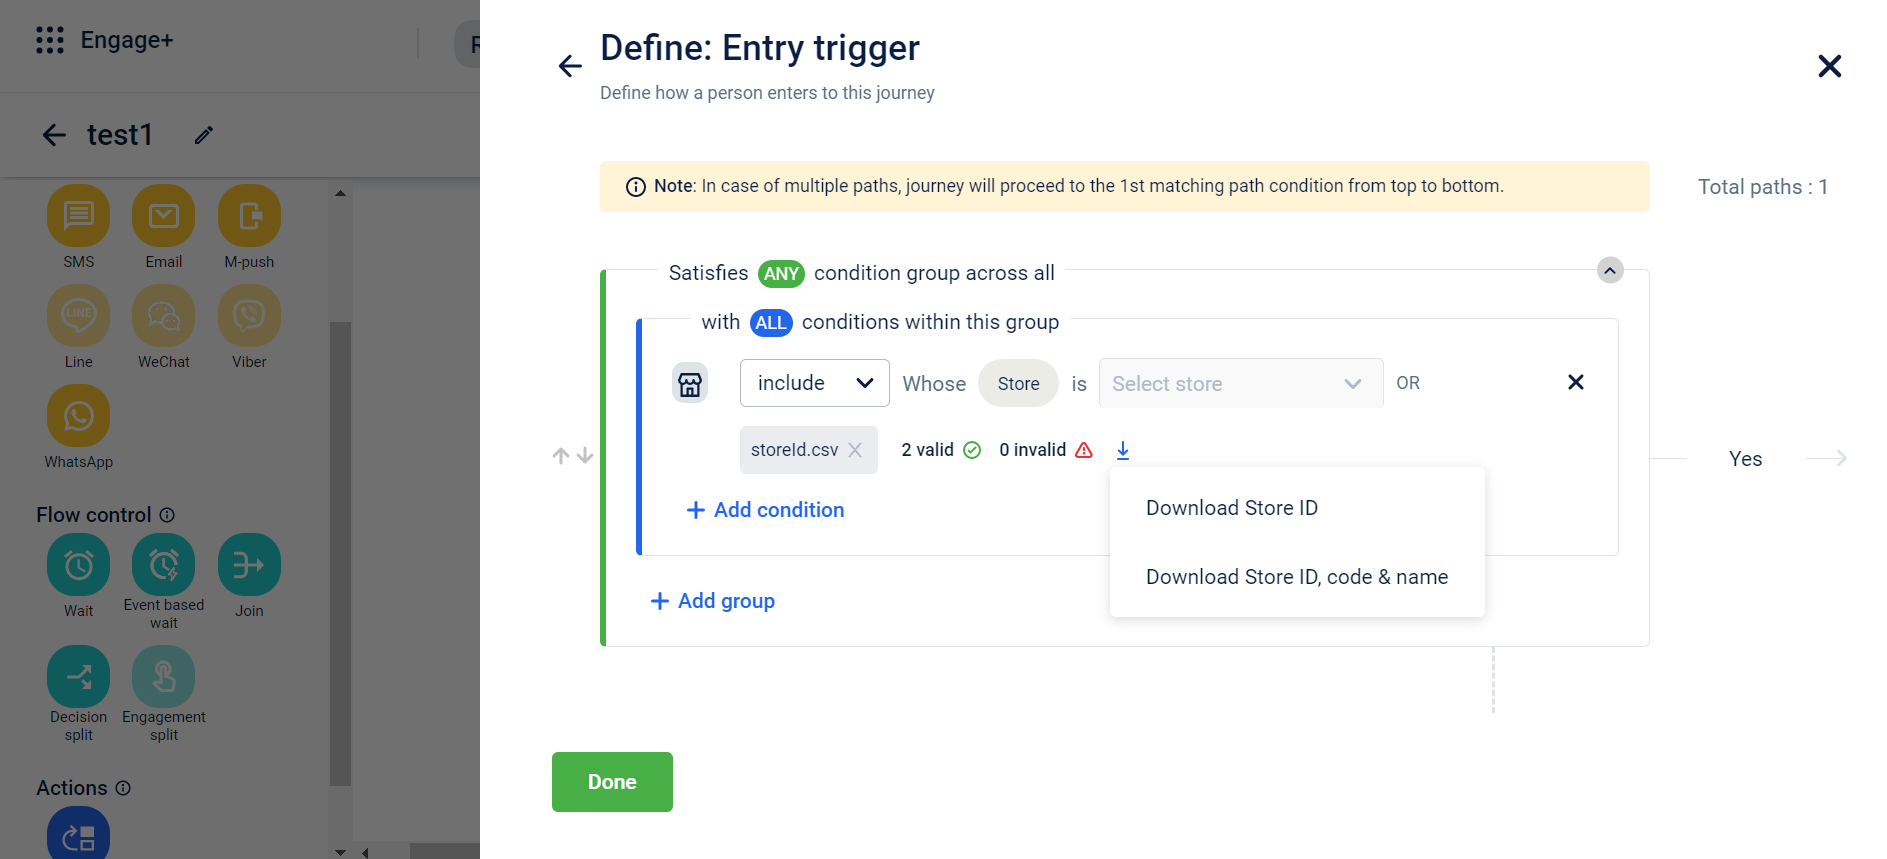
Store CSV upload usage in Journeys
- Entry Trigger
- Exit Trigger
- Decision based split
Video communication and documentation enablement for WhatsApp
Use cases to understand the feature:
Use Case 1:
- Assume that a brand wants to share a video of the opening of their new store and want to invite customers to visit the new store
- They can add the video using the video feature in the Whatsapp engagement along with a invitation message and CTA that directs user to the brands website for additional details
Use Case 2:
- Assume that a brand wants to share a interactive how-to document with their users to explain how to use a newly launched feature on their website
- They can add a pdf document in the document feature on Whatsapp engagement along with a document brief and CTA that directs users to their website to try out the new feature
Problem Statement:
Engaging customers via long-texts and pictures has become an ineffective way to increase open rates and success rates. Videos and interactive documents are more likely to increase user interaction as compared to texts or pictures. As customers are more keen on watching videos and documents it would be a desired requirement to include a video and documents feature within WhatsApp engagement
How are we solving this problem
- While creating a WhatsApp engagement, we have introduced a video and document feature in which you can add any video/doc of your choice
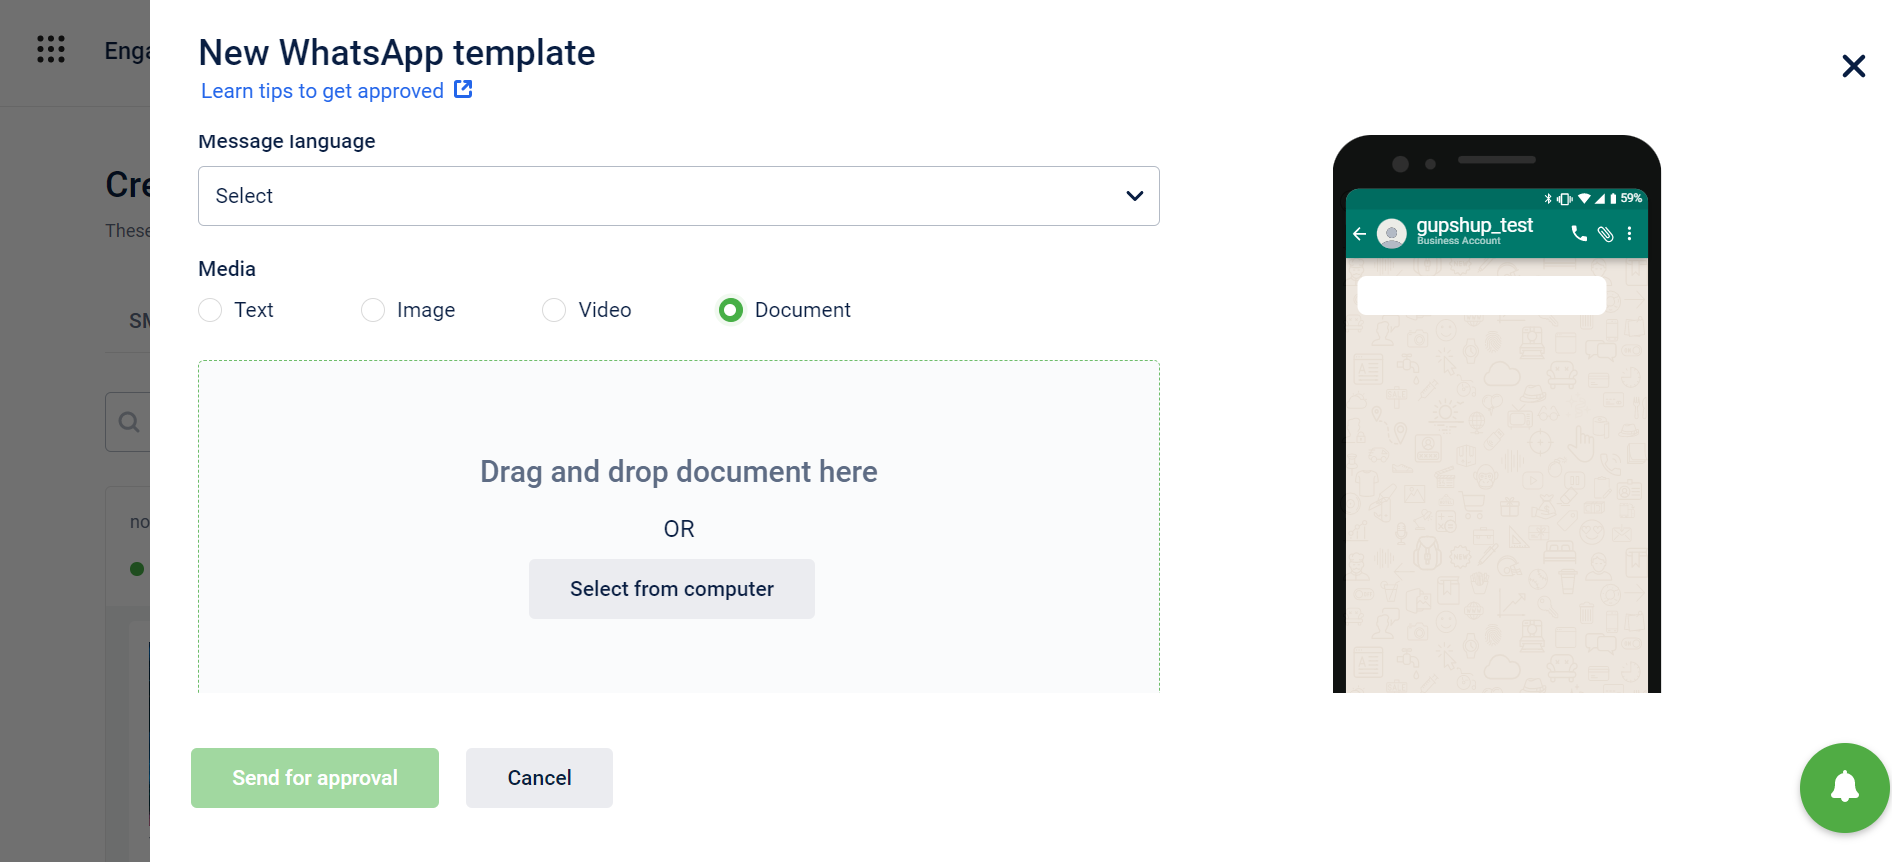
- You can select a video/document directly from your computer that you wish to send to a user and you can also add a text/CTA within the same message
- The accepted video formats would be - MP4 and 3gpp
The maximum upload size (uploaded to media node) would be 100 MB with the post processing media size (after compression and encryption) limit of 16 MB. - The supported type for documents would be PDF only and the maximum upload size would be 16MB
Customer entry to same journey
Use cases to understand the feature:
Case 1:
- A user has recently joined the membership program of the brand and the marketer wants to enable a one-time journey for the user to understand the benefits and incentives of the membership
- Marketer can click on only once option in the setting so the user doesn’t re-enter the journey
Case 2:
- A user adds products to their cart and does not check out for several days. Such users can be motivated to purchase by a simple reminder or by sending an incentive/offer
- As this can happen multiple times with a single user, marketer can enable the more than once option in the setting to send reminders/incentives to such users
Feature Release:
We will introduce a feature where a client can configure the re-entry status of users while creating a journey. This reduces the hassle of creating multiple similar journeys just to keep customers in the engagement loop and also ensures that customers are being targeted at the right time. This can be done only while creating the journey or when a journey is paused/edited.
How are we solving the problem:
- In the journeys setting we have added a feature to choose the number of time a particular user enters a journey
- You can choose from two options depending on the purpose of the journey -
- Just once
- More than once
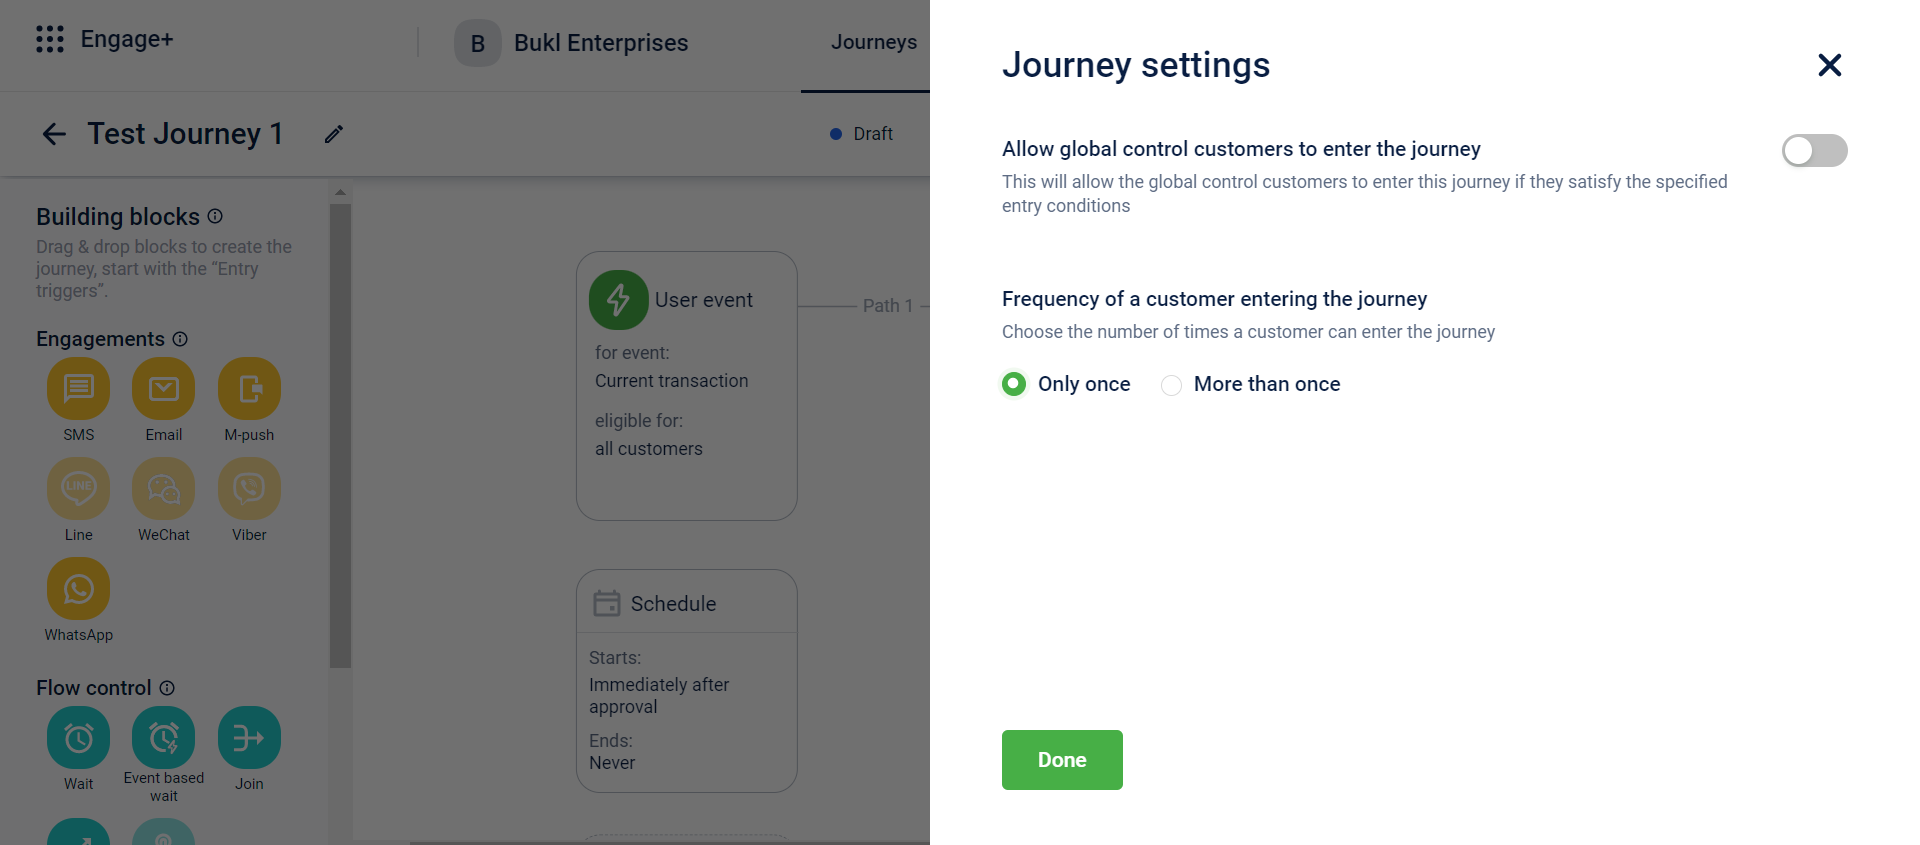
These settings are configurable only in draft/edit state and not when a journey is live
Gupshup Integration for WhatsApp Communication
Use cases to understand the feature:
- A brand has employed Capillary to send communication through on Whatsapp
- Now they want to configure templates and campaigns on E+ to send out WhatsApp communications which need to be sent from Capillary platform. Gupshup is one of the BSPs/gateway vendors through which Capillary will be able to send out communications.
New Integration for WhatsApp communication:
Gupshup is a channel-based communication platform that will act as a BSP in addition to the existing BSPs, Tanla and Twilio. Gupshup is widely used by clients in the middle-east and will enable our clients to comply properly with the requirements of Meta to send engagements via whatsapp.
How a client will get on boarded onto Gupshup:
There are three major steps to onboard a client:
- Onboarding details - This included basic information of the company that is being onboarded such as
- Business name and FB manager ID
- Country Details and Use cases
- WhatsApp Phone numbers ( UAT and PROD )
- WhatsApp Business profile setup - Display name, Type of company, Industry etc.
- Callback URLs
- Business Contact Details
These details need to be filled in a certain format: Here
- Live Agent Dashboard - This is an add-on feature and clients can choose whether or not to enable this. If enabled, the client would be required to fill the following details
- Primary use cases and WhatsApp number
- URL Preference
- Email id of the admin
- Whether the Gupshup bot is enabled on the clients number. If yes, API key and bot name should be mentioned
- CRM used by the business
- Instant Bot Enablement - This is also an add-on feature. Gupshup’s platform enables businesses to enable instant responses to customer queries. The Keyword Response enablement feature is designed to allow business to interact with their clients via WhatsApp 2-way messaging. This feature is intended to reduce the time for a business to configure a bot to interact with its customers
Migration of timeline campaigns
All organizations that were using timelines campaigns have been successfully migrated to Journeys across all clusters.
Problems faced
- There were primarily two reasons to sunset this feature:
The company has been incurring a huge cost (approx 3 to 5 Cr a month) to keep these campaigns running. - The product has been working in maintenance mode for the past 2-3 years and that can pose a challenge if we face any production outage
The way going forward:
- All timeline campaigns have been disabled from UI and backend and cannot be accessed
- All such campaigns will be configured of Journeys going forward
- For more information, please refer to this training video on Academy - Engage + Advanced Training
SDK
Android
Version 1.0.0 ( Feb 16, 2023)
Push Notification
- Added support for push notification, an out-of-app alert that appears on the user’s screen when an important update occurs.
- Notification Runtime Permission
- Token Generation
- When SDK registers for the token with FCM.
- SDK fetches the token from FCM, handles the expiry of the token, and sends it to the backend.
- Service Registration Handling
- The app handles the service registration, passes the token and payload using the Hydra pushbase APIs.
- Callback Support
- Sending callbacks to the application.
- Support navigation on click of primary and secondary CTAs.
- Lifecycle handling to give callbacks of app open, etc.
- Initializing Firebase and pushbase module.
- DLR events.
- Passing the payload of the push notification.
- Sending callbacks to the application, including:
- Notification Clicked
- Notification Dismissed
- Notification Received
- Notification View
- Building the notification.
- Supports the following navigations on click of primary and secondary CTAs:
- Deeplink
- External URL
- Token Lifecycle - Generation, handling expiry, and reporting token to the backend.
- Exposing API to accept token and payload from the application.
- Exposing API to check whether the notification is from Hydra.
Version 0.1.3 (Feb 16, 2023) - Hydra Core- 0.1.3
- Hydra Core - Implemented the core of the SDK.
- Initializing the SDK.
- Tracking User Events.
- Tracking Behavioral Events.
- Authorization workflow.
- Passing user preferences to the backend.
NOTE - Version Catalog is available from version 1.0.0 upwards.
iOS
Version 0.1.1 (February 28, 2023)
- Added dependency of Hydra Core version 0.2.1
Version 0.1.0 (February 21, 2023)
- Push Notification - Added support for push notification, an out-of-app alert that appears on the user’s screen when an important update occurs
- Notification Runtime Permission
- Token Generation
- When SDK registers for the token with FCM
SDK would fetch the token from FCM using the above information, handle the expiry of the token and send it to the backend. - App is handling the service registration, passes the token and payload using the hydra pushbase api’s
- When SDK registers for the token with FCM
- Sending callbacks to the application
- Support navigation on click of primary and secondary CTA’s
HydraCore
Version 0.2.1 (February 28, 2023)
- Preventive action taken on crash observed when access token might be empty.
Version 0.2.0 (February 20, 2023)
- Hydra Core - Implemented the core of the sdk
- Initializing the sdk
- Tracking User Events
- Tracking Behavioral Events
- Authorization workflow
- Passing User preferences to the backend
Insights+
Custom Report Archiving
Declutter Your Reports Like a Pro!
Hey there, report creators! We have a super cool feature to share with you. You can now manually archive your custom reports and keep your report listing page neat and tidy. It's like you've suddenly become a pro-organizer!
Problem Statement:
- Managing a large number of custom reports can be difficult, leading to clutter and reduced efficiency.
- Users need a way to declutter their report listing page and focus on the reports that matter most to them and their brands.
Overview of the feature:
The feature allows users to manually archive and unarchive their custom reports, keeping their report listing page organized and reducing the time spent managing reports. Also, Archived reports won't disappear forever. You can access them again by going to the Archived Reports tab. Only custom reports created by you are available to archive.
Benefits of this feature include:
- Better organization: Remove the reports you no longer need and stay organized with ease.
- Increased efficiency: Spend less time sifting through unnecessary reports and more time on the ones that matter most to you.
- More control: You get to decide which reports to keep and which ones to let go of.
Release Plan:
The feature is already live across all the orgs. We hope this feature helps you keep your reports in check like a pro! If you have any feedback or questions, please don't hesitate to reach out to the product team.
How to Archive: Steps to Archive Custom Report
FAQs: FAQ for Custom Report Archival
Do check out previous releases here: Insights+ Changelog
Updated Email Templates for Reports
Overview of the feature:
We have updated our email templates for scheduled exports, user segments, report schedules, report sharing etc.
With these new templates, you can expect a more professional, polished look that will help you communicate your data in a clear and concise way.
Release Plan:
The email templates are now updated and you can expect them in your inbox whenever you use the feature.
Capillary Data Platform
Improving security of existing API authentication flows through access groups
Problem Statement
- A lot of brands are on basic authentication for POS client-to-server integration, and it’s not easy to migrate them all to oAuth2 based auth right away.
- We therefore need to improve the security of existing API authentication flows.
- Not all the APIs are used in all kinds of integrations, hence brands using basic auth need to have access restrictions in place. For example, in POS integrations, tills used by the store staff need to perform actions like registering customers, adding transactions, issuing/redeeming points etc. They do not require access to org APIs like creating stores/tills, behavioral events etc.
In order to solve this, we need to have the capability to manage access within the basic auth.
Overview of the feature
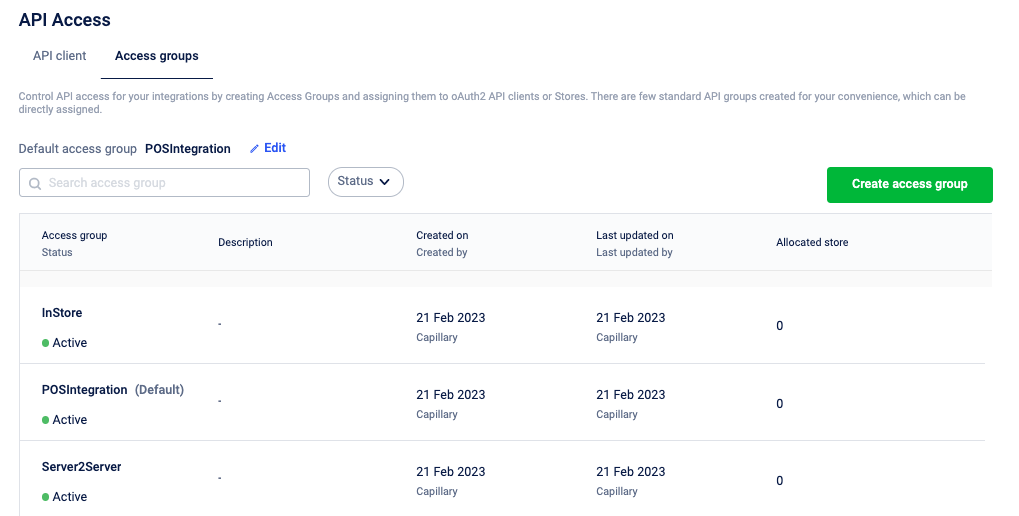
We are improving the security of existing API authentication flows by means of having access control. An access group is a set of Data API and Config API resources with defined permissions. You can use these access groups and can set API endpoint access restrictions for stores. For example, an access group Instore with only Write (POST) access to Customer resources.
By default, Built-in access groups (created by Capillary) are available and can be used for common integrations such as POS, Instore, and Admin. If required, you can also create a Custom access group.
The below image shows the whole overview of the feature.
Use case
As a brand, I would like to have access restrictions in place for all the tills to ensure every till performs only certain intended actions, thereby avoiding misuse.
Feature Description:
For detailed description, please refer to the user documentation:https://docs.capillarytech.com/docs/access-group
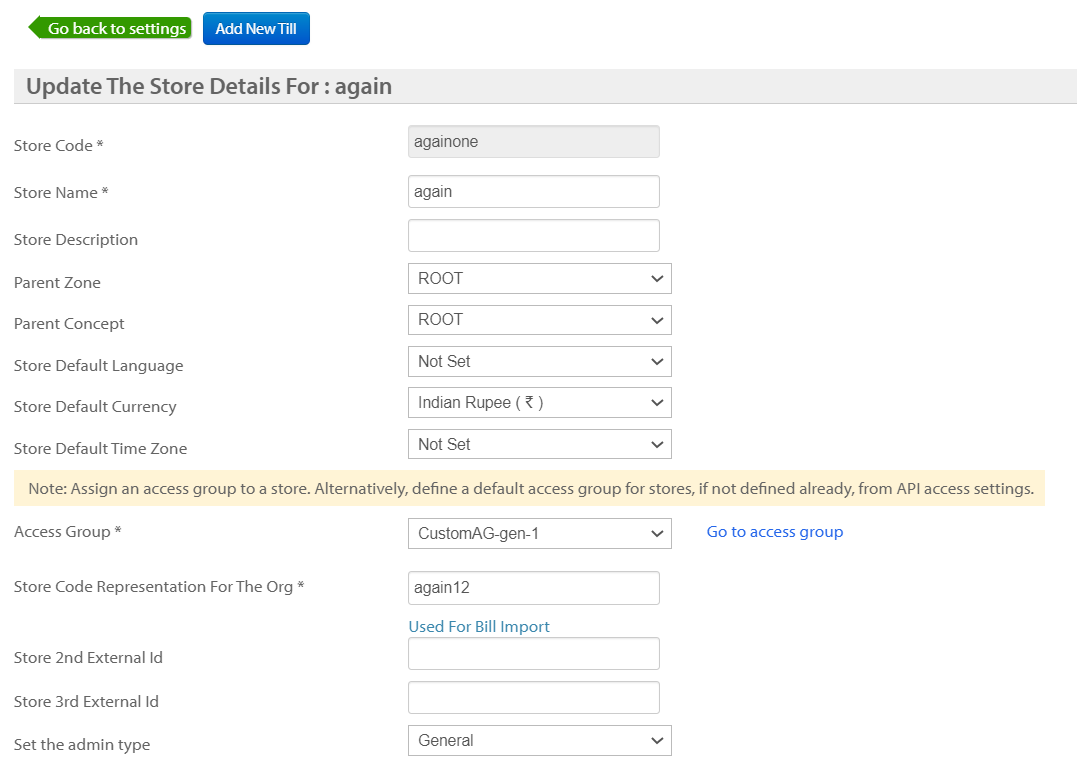
- Access groups are defined for each type of integration and the required permissions are set. The tills used for the integration are mapped to the appropriate access groups and can access only those permissions set.
- Built-in access groups are created for common integrations like POS, Instore, Admin. These are standard access groups available for all brands and are not editable from the brand’s end.
- Custom access groups can be created by brands for other use cases like Wechat, Server-Server integrations etc
In order to achieve this, we now have the following abilities built in. The following operations are possible as a part of this release:
- Brand can now create a custom access group, set permissions for the access group – we can view a set of resources, provide read & write permissions for data & config APIs separately. On successful creation, the user will be notified of the same. Any errors will also be notified to the user.
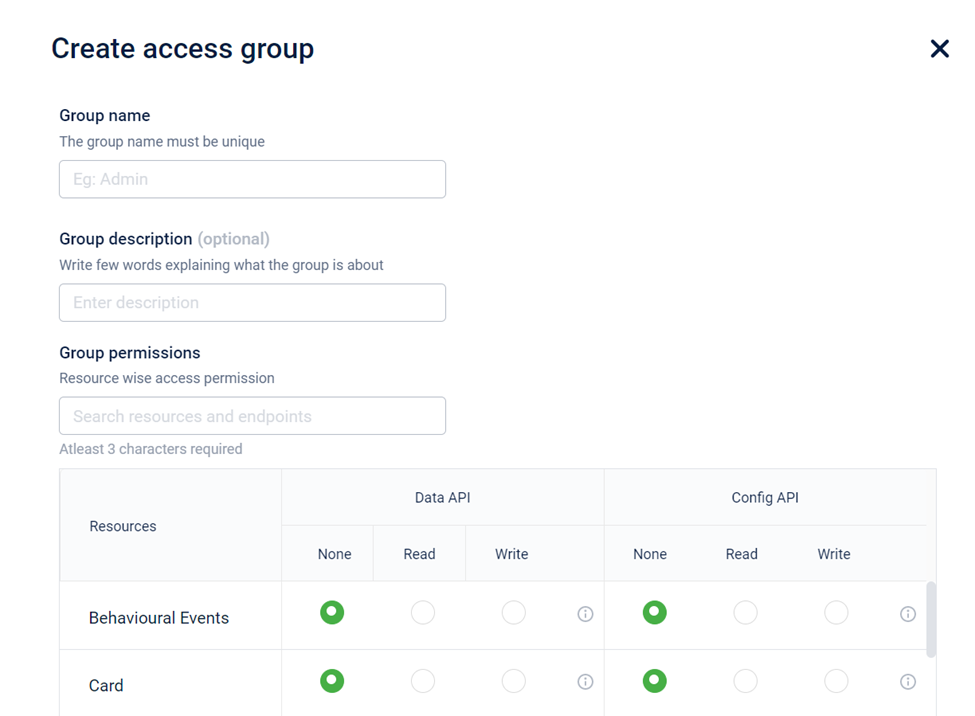
- After creating a custom access group, we can assign stores to this access group by clicking on “Allocate store” which will take us to the store page
With this release, the brand can now use a default access group if it does not set a custom access group for any of the integrations.- View default access group and have the ability to edit the default access group
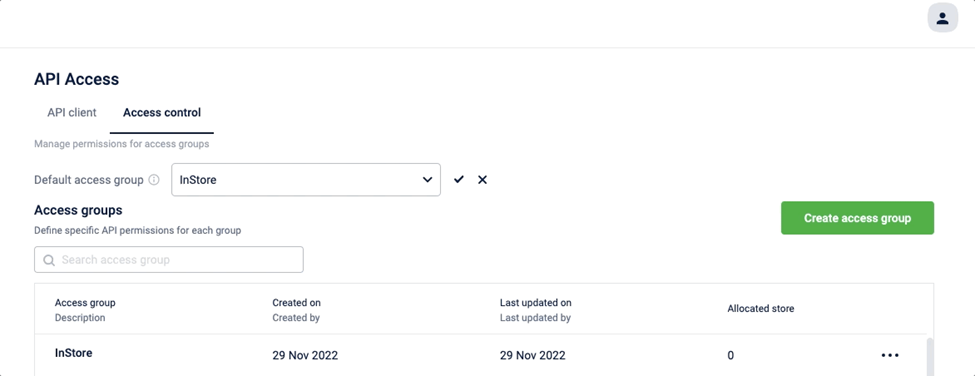
View list of all access groups with group name, status, description, created on, created by, last updated on, last updated by, and the number of allocated stores- Search for any specific access group
- Edit access groups and change group name, description and resource permissions. The default (built-in) access groups cannot be edited
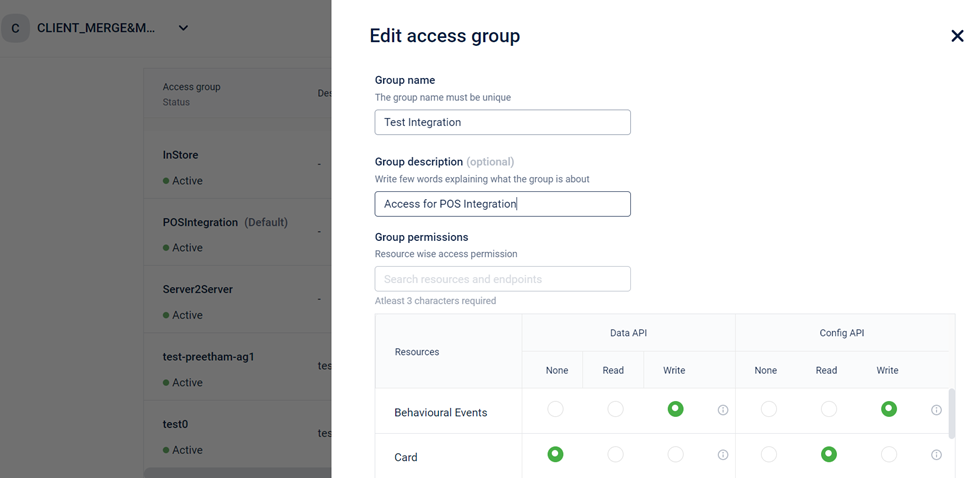
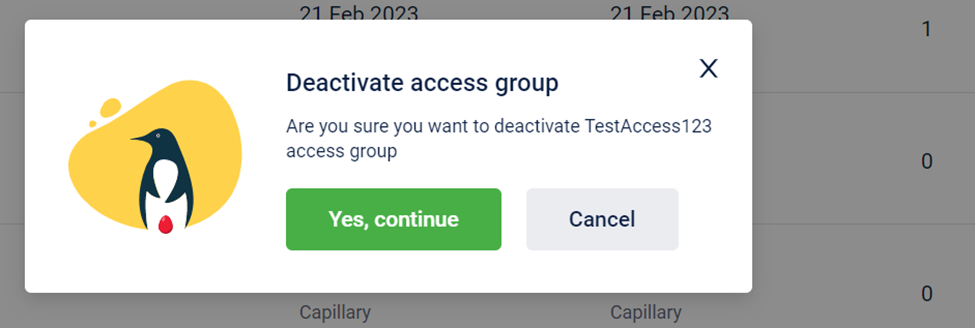
Deactivate custom access groups if there are no stores assigned to it. In case an access group has one or more stores assigned, remove the assigned stores in order to deactivate.
Impact of this release
For the existing organizations, access groups are already assigned based on the usage analysis. You can create a custom group, if additional accesses are required.
This is to ensure that existing integrations do not face any issues upon completion of this rollout.
Access group rollout will not impact the existing OAuth-based authentication. Access groups are created based on the usage of APIs by the organizations and are provided access accordingly. You can also add the required access group to your store if you need any additional access.
For FAQs, please refer https://docs.capillarytech.com/docs/access_control_faq.
Known Bugs & Product Gaps
Bugs:
https://capillarytech.atlassian.net/browse/CAP-95977
Gaps:
- oAuth2 client credentials flow is currently limited to server-to-server integration.
- While creating a new API Client, access is assigned based on the default till code selected and not based on the resource-wise access permissions that are set
- We will provide the ability to select access groups while creating a new API clients
Release Plan
9th March 2023 - EU 20% Org
10th March 2023 - EU Full Release
15th March 2023 - SG 20% Org
20th March 2023 - SG Full Release
22nd March 2023 - India 20% Org
27th March 2023 - India Full Release
Future Roadmap
Our objective is to ensure that Standard Enterprise grade security becomes the norm in our APIs usage of any kind - Server to server integrations, POS client to server integrations, B2C mobile/web apps, B2B mobile/web apps, etc. Hence, we would take steps to completely switch to oAuth2 and discontinue Basic authentication for new integrations.
In the present, our oAuth2 client credentials flow is being used extensively in server-to-server integration scenarios. In order to move to oAuth2 completely, we would extend our existing oAuth flow so that it can be used easily in POS client-to-server integration scenarios as well. We will also remove dependency on default till for API scope configuration in oAuth API client creation.
Group Loyalty on Member Care
We had built the user group entity and group loyalty programs support on our platform a couple of years ago taking the API-first route as always. However, we did not build a front end for viewing group details similar to how we can view a member’s details on Member Care’ Member View page.
Typically, Member Care users - Customer Service Representatives (CSRs) and loyalty program administrators of brands running group loyalty - would want to know, at a group level, details such as
- Group details including list of members, ownership status, member identity details, role in company (if part of hierarchy) and points contribution/contribution history
- Group loyalty details such as current slab, gap to renew, gap to upgrade and tracker details
- Group events including member transactions and points ledger details.
Similarly, at a member level, they would want to know:
- The list of groups the customer is part of, ownership status and points contribution to each group
- Hierarchy if part of a company including association details – parent and children
All of these are now available as a part of member care. If your org has user group loyalty enabled, you should be able to see the groups drop down on the Member Care search page
PII Deletion – Support on Connect+ and Member Care
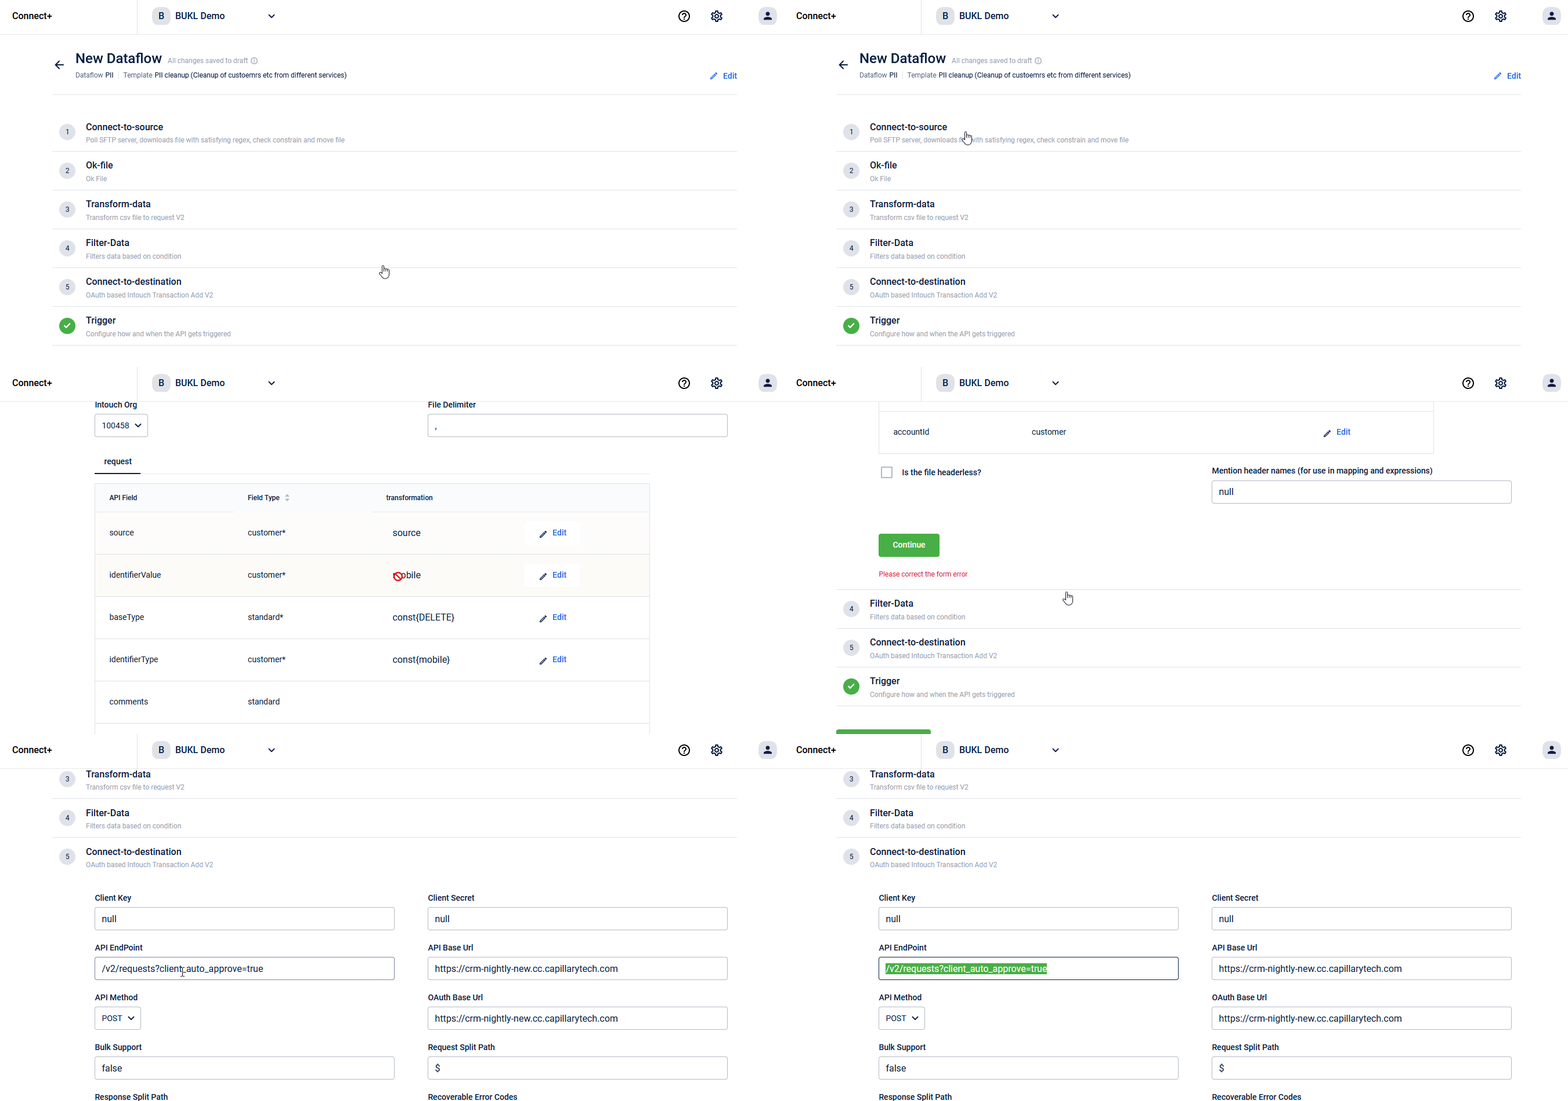
We released support for PII deletion on our platform last quarter with the new deletion request API. We have now made additional enhancements in Connect+ and Member Care towards the completion of the PII deletion feature.
On Connect+, you will find a template to raise data deletion requests in bulk:
On Member Care, CSRs and loyalty administrators who have permission to handle PII deletion will be able to raise deletion requests directly from a member profile. In the coming quarter, you will be able to put deletion requests through an approval workflow too. As of now, the approval workflow is not supported on Member Care. However, we are working on adding support right now.
SFTP to SFTP Migration Template with Encryption/Decryption on Connect+
A long pending ask on Connect+ is to add support for encryption on the egress side and decryption on the ingress side. We added support for these back in OND '22 on data ingress templates such as Transaction V2 Add, Customer V2 Add and others supporting decryption and with data egress templates such as CSV to XML converter supporting encryption. However, we were not able to release a generic template for moving files from one SFTP to another with encryption/decryption support. A template for this purpose has been asked by some of our brands who wanted to secure their customer data.
We now have a generic SFTP to SFTP migration template with encryption and decryption support. This template can be used for picking data from a SFTP location (generated by Data Export Framework on Insights+, for example), encrypting it and then moving the encrypted data to a destination SFTP folder. Note that encryption/decryption are both optional actions and you can choose to use them or skip them.
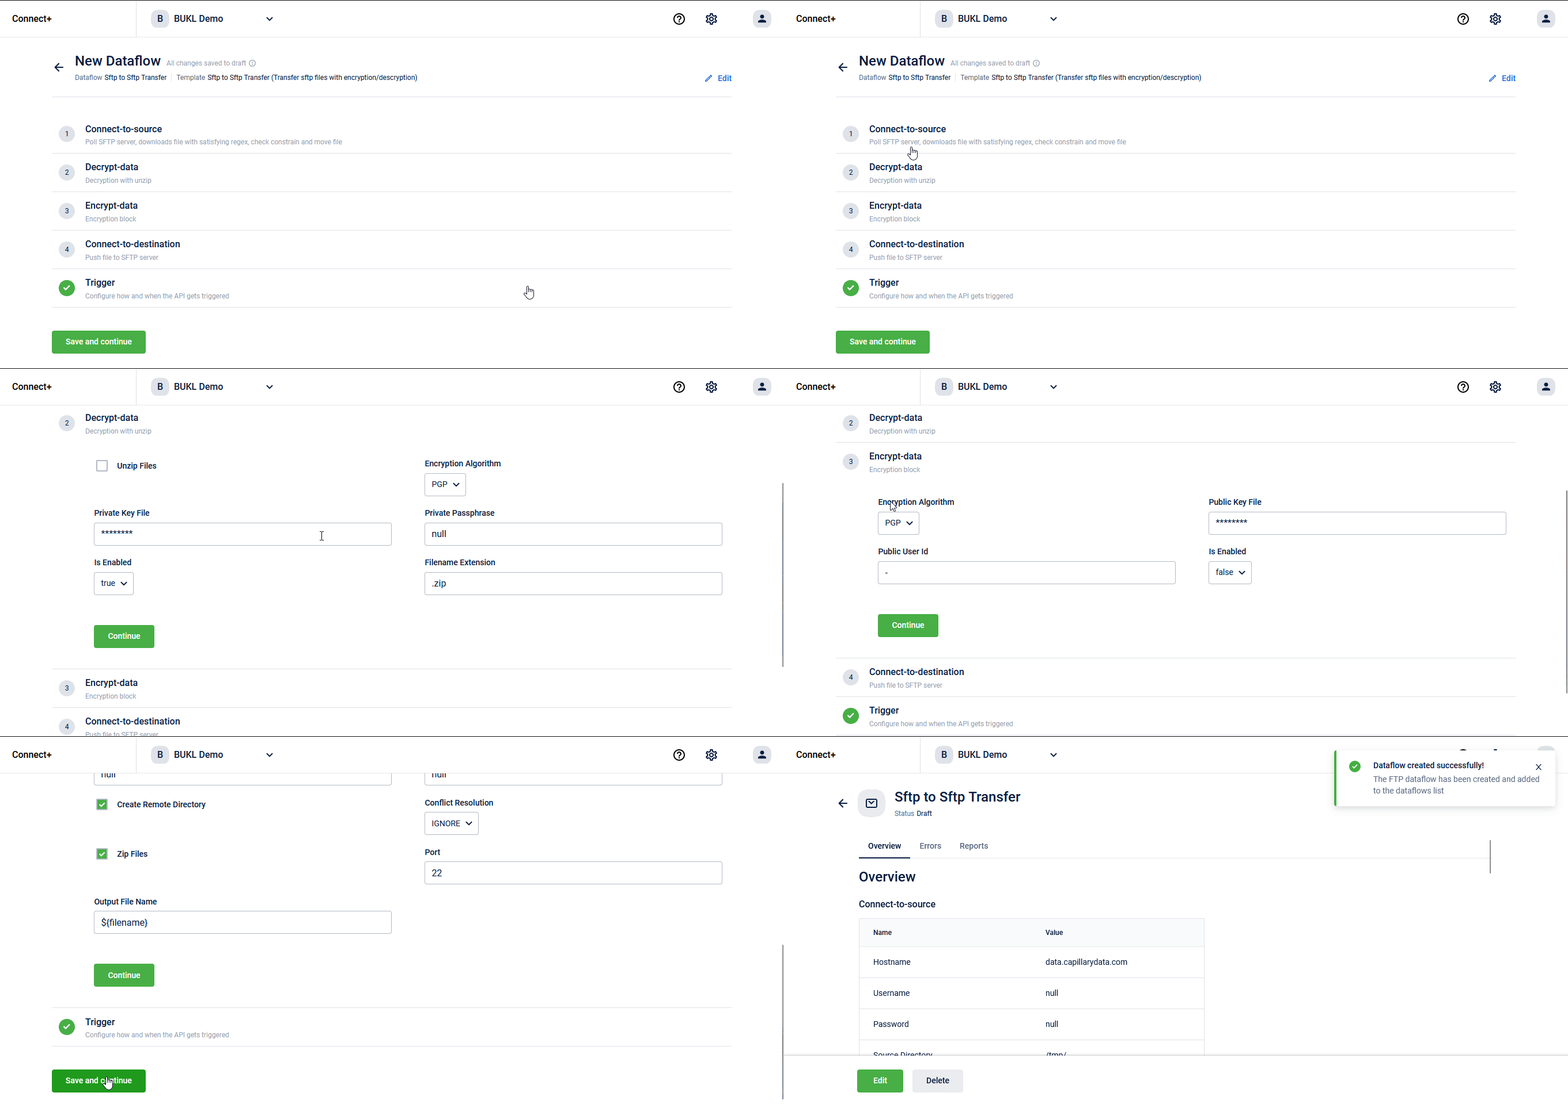
We will continue to add encryption/decryption support natively on our platform wherever there are data ingress/egress operations happening. Watch out for more in the coming quarters.
Updated 10 days ago
