
Manage ID change requests
This page provides you with information on how to modify identifiers through the Member Care page.
You can submit the following change requests:
- Goodwill requests (coupons and points)
- Change mobile number
- Change Email ID
- Change external ID
- Account merge
- Edit profile
- Delete member's account
Configure notifications, auto-approval, OTP settings , and set escalation flow
Note: This can be performed only from old Membercare
To configure Email, Mobile, External ID, or Account Merge settings, do the following:
- On Member Care, navigate to the Settings category and click ID Change Request Settings. You will see different change request types - Email, Mobile, External ID, Account, and Retro Transaction.

- Click on the option that you want to configure. You will see the corresponding options as shown below.

- Configure the following settings and then click Save.
| Option | Description |
|---|---|
| Email these on arrival of request | Select the employees of your org (org POCs) that you want to notify through emails when identifier change or account merge requests are submitted - it could be through Member Care, InStore, or API. Use the Filter box to search users by name. In Allow Request, select any of the following options. - Never: Select this if you do not want to send any alerts to org POCs. - Always: Select this to always send alerts to org POCs whenever a new request is logged. - Only when: Select this to alert org POCs based on the transaction value of the customer. |
| Auto Approve | Set Auto Approve to On if you want to automatically approve Email, Mobile, External ID, or Account Merge requests, without the requests having to be queued for approval. |
| Communicate Change to | For Email or Mobile select whether to notify to the old identifier or new identifier and click Configure to set the notification message. - Select Old ID to send a notification to the old email id or mobile number regarding the identifier change. - Select New ID to send a notification to the new mobile number or email id. For External ID, you can notify through both SMS and email. Click the respective CONFIGURE button to set the message. |
| Configure Email (not applicable for Mobile) |
|
| Configure SMS (not applicable for Email) |
|
| OTP settings (Applicable to all identifiers) | Set the to OTP slider to On to enable OTP validation for the customer identifier. |
- Click Save to save the changes.
Update Identifiers Directly (One Step Change)
Org admins can update identifiers through one-step change without the need of sending for approval.
- Open the respective identifier change request page that you want to update - mobile, email or external id
- Click One Step Change.
- Enter the current identifier (email ID/mobile number/external ID) in the Existing box.
- Enter the new identifier (email ID, mobile number, or external ID) in the Requested To box.
- Click Proceed.
Download Identifier Change Requests
You can download ID change requests (Account Merge, Mobile Reallocation, Email, Mobile, or External ID) as a CSV file. To download the list of requests, do the following.
- On the respective identifier change requests page, click the Download drop-down that appears on the top-right
- Set the duration of the requests that you want to download in Start Date and End Date
- In Download, select the statuses that you want to download - Pending, Approved, and Declined
- Click Proceed
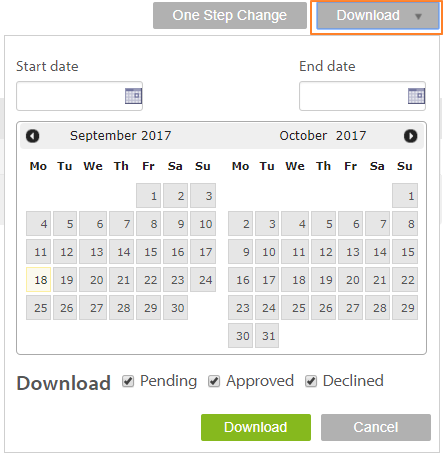
The list gets downloaded as a CSV file.
Delete member account
Navigate to the Membercare home page, then click the three-dots menu. From the ID change request dropdown, select Delete member's account and submit the request.
After a deletion request is raised for a customer, their status changes to Deletion Pending. The member account is deleted only after the deletion request is approved. For information on approving or rejecting a request, refer to Manage requests.
Important
Once a member account is deleted, you cannot re-activate it through MemberCare or API. The system enforces a one-way state transition for deleted accounts. If you need to restore access for a deleted user, you must delete all personally identifiable information (PII) and create a new account for the user.
Audit logs may show deletion events for reference. MemberCare may continue to display deleted users until all identifiers associated with the deleted account are fully purged from the system.
Merge Accounts
When duplicate accounts of a customer exist, you can merge those accounts into one. One account will be the surviving account and the other will be deactivated.
Surviving account: The customer account that remains active after merging accounts is the surviving account.
Deactivating account: The customer account that is removed after merging is the deactivating account. Once deactivated, you cannot reactivate the account and its data cannot be retrieved. However, the system validates and moves the entire data to the surviving account.
Note
In connected organizations, if a user registers in a different child organization using the same primary or secondary identifier, the system merges their profiles in the parent organization and then synchronizes those merged changes back to each child organization.
Important
When you merge accounts, the system creates only a CustomerMerge audit entry on the surviving account. All prior audit logs from the deactivating (victim) account remain associated with the victim account and are not transferred to the survivor. Event transactions are migrated, but audit log history is not. This results in incomplete audit trails on the surviving account after the merge.
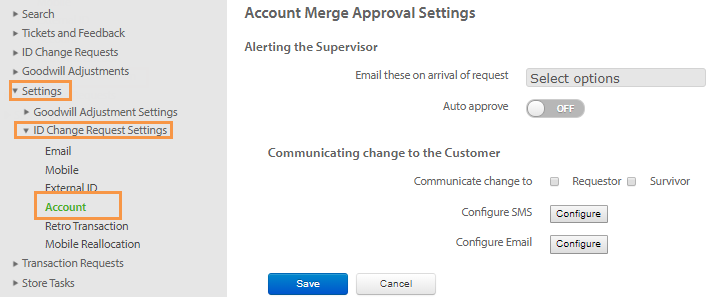
Settings for Account Merge Requests
You can configure to notify org POCs on merge requests, automatically approve merge requests without the need of the back-end team to approve it, and notify customers through SMS and email when their accounts are merged.
- On the Member Care navigation pane, click Settings > ID Change Request Settings > Account.
- In Email these on arrival of request, select the org POCs that you want to notify on new merge requests.
- Set Auto approve to On to automatically approve merge requests directly.
- In Communicate change to, select whom to notify in case of account merge.
- Check Requestor to notify the customer that requested for account merge.
- Check Survivor to notify the customer whose remains after merging.
- Check both Requestor and Survivor to notify both.
- To configure SMS notification, click the Configure button next to Configure SMS and create the message. Use predefined tags wherever required.
- To configure email, click the Configure button next to Configure Email.
- In Subject, enter the subject of the email.
- In the message body, set up the message body with content and insert images. You can add predefined tags in the message wherever required. To add tags, just click the tag from the list on the left.
- Click Save Changes.
- Click Save.
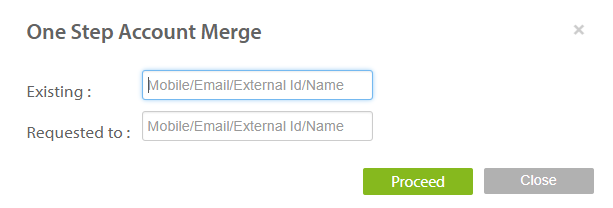
Merge Accounts Directly (One Step Change)
To merge duplicate accounts directly, you can use the One Step Change option. Only admin users of an org have access to this feature.
- In the Account Merge Change Request page, click One Step Change.
- In the Existing Box, type the email ID, mobile number, or external ID of the existing account that you want to merge.
- In the Requested To box, type the email ID, mobile number, or external ID of the account into which you want to merge - survivor account.
- Click Proceed.
Download Account Merge History
To download accounts merge history as a CSV file, do the following:

- On the Account Merge page, click the Download drop-down that appears on the top-right
- Set the duration of the requests that you want to download in Start Date and End Date
- In Download, select the statuses that you want to download - Pending, Approved, and Declined.
- Click Proceed
The list gets downloaded to your computer as a CSV file.
Effect of account merging on the customer data
After merging, the account that continues to remain is a survivor account and the account that is merged into the survivor account is a victim account.
Registration date: The registration date will be the earlier date between the two accounts
- Transactions: All transactions of the victim will be merged into the survivor's account
- Points & Coupons: All points and coupons of the victim will be merged into the survivor's account
- Rewards: All rewards of the victim will be merged into the survivor's account.
The following table provides a comprehensive list of changes that will occur when two accounts are merged.
| Parameter | Victim | Survivor | Final Values after Merging |
|---|---|---|---|
| Mobile Number/Email ID/External ID | ID1/ID1/Null | ID2/Null/ID2 | ID2/ID1/ID2 The customer identifier will be the unique id of the surviving account if the customer id is available in both accounts. If the customer id is not available in the surviving account, then the values will be picked from the deactivating account (if available in that account). |
| Registered Date | D1 | D2 | D1 - If D1 < D2, then D1 will be the final registered date. If D2 < D1, then D2 will be the final registered date. If D1=D2, then no change takes place. The new registered date will be the earliest of the two dates. |
| Tier Movement History | S1 | S2 | If S1 > S2, then S1 will be the final tier. If S2 > S1, then S2 will be the final tier. If S1=S2, then no tier upgrade takes place. The new tier will be the highest of the two tiers. |
| Tier Movement History | S1 | S2 | If S1 > S2, then S1 will be the final tier, and a new record for upgrading from S2 to S1 will be created on the retaining account. If S2 > S1, then S2 will be the final tier. As no tier upgrade happens in the continued account, no new record will be created in his/her account. If S1=S2, then no tier upgrade takes place, and hence no additional record will be created. |
| Issued Rewards | IR1 | IR2 | IR1+IR2 The issued rewards of the deactivating account will be transferred to the surviving account, enabling the customer to use all the rewards of both accounts. For unique rewards: Each reward will be transferred and tagged as issued. For common rewards: Both rewards will be merged and tagged as issued. The expiry date will be the one that has the later expiration date. Redemption behavior after merging, can be configured here . |
| Cluster Information | C1 | C2 | The final customer data after merging will be recomputed and the cluster will be categorized as per the new figure. For example, assume that the deactivating account is in cluster C1 and the surviving account is in cluster C2. After merging the accounts, based on the new data available cluster strategy is recalculated. Now, if the new result meets the strategy of the cluster C3 then the surviving account after merging will be moved to the C3 cluster. However, after merging the accounts there are chances for the customer to fall either in C1 or C2 based on the recomputed result. |
| NDNC Status | Status1 | Status2 | Status1 - If the mobile number of the deactivating account retains after merging, Status2 - If the mobile number of the surviving account retains after merging. NDNC status is specific to a mobile number. So, the NDNC status of the merged account depends on the mobile number that will continue to remain after merging. For example, if the deactivating account's mobile number is retained after merging, the NDNC status will remain the same in the surviving account. |
| NDNC Status (When the mobile number is a secondary identifier) | Registered Not Registered | Not Registered Registered | Depending on the final mobile number considered after merging, NDNC status varies. For example, if the NDNC status of the final mobile number is registered in NDNC then the same status will continue to remain. |
| Opt-in Status | Whatever the communication services the surviving account has opted-in for the same will exist even after merging. | ||
| Subscription Status | Whatever is the subscription status of the surviving account, same will continue to remain after merging. | ||
| Messages | Set of Messages1 | Set of Messages2 | Set of Messages2 Messages or notifications will not be merged or transferred from the deactivating account to the surviving account. The only messages of the surviving account continue to exist even after merging. |
| Fraud Status | Reconfirmed | Confirmed Marked as Fraud Not Fraud | Reconfirmed If the fraud status of the deactivating account is Reconfirmed then the Fraud Status of the surviving account will change to Reconfirmed. |
| Fraud Status | Confirmed Marked as Fraud Not Fraud | Reconfirmed | Reconfirmed Even though the fraud status of the deactivating account is Confirmed/Marked as Fraud/ Not Fraud the surviving account's fraud status will remain Reconfirmed. |
| Fraud Status | Confirmed | Marked as Fraud Not Fraud | Confirmed Even though the fraud status of surviving customer is Marked as Fraud/ Not Fraud the final status after merging will be changed Confirmed. |
| Fraud Status | Marked as Fraud Not Fraud | Confirmed | Confirmed If both accounts are in confirmed status the final value after merging also remains Confirmed. |
| Fraud Status | Marked as Fraud | Not Fraud | Marked as Fraud If in any one account, the customer is marked as fraud, then the final status after merging will also be Marked as Fraud. |
| Fraud Status | Not Fraud | Marked as Fraud | Marked as Fraud If in any one account, the customer is marked as fraud then the final status after merging will also be Marked as Fraud. |
| Fraud Status | Reconfirmed Confirmed Marked as Fraud | Internal | Internal If at least one account status is internal then the final account status will be Internal. |
| Fraud Status | Internal | Confirmed Marked as Fraud | Internal If at least fraud status of merging accounts is internal then the final surviving account status will be Internal. |
| Card details | C2 | C2 | C1 & C2. The cards of the victim are transferred to the survivor's account. |
| Transaction requests | Transaction Request 1 | Transaction Request 2 | Transaction request 1 & 2. The pending transaction requests of the victim are transferred to the survivor. |
| Behavioural event (BE) | BE1 | BE2 | Behavioural Event 1 & 2. BE1 is transferred to survivor account. |
| Coupons | C1 | C2 | C1& C2. The victim account's coupons are transferred and tagged as issued in the survivor account. Redemption behavior after merging can be configured here. |
| Custom fields | CF1 | CF2 | CF1 & CF2. Custom fields are merged from victim to survivor. You can also choose not to merge the custom fields using this configuration. |
| Extended fields | EF1 | EF2 | EF1 & EF2. Extended fields are merged from victim to survivor. You can also choose not to merge the custom fields using this configuration. |
When merging cards with the survivor, the application may generate warnings in the following scenarios:
- If the total number of cards under the survivor exceeds the defined maximum number of active cards per customer for individual card types.
- If the total number of cards under the survivor exceeds the defined maximum number of active cards based on global card settings.
However, you can choose to ignore the warning and proceed with adding the cards to the survivor.
NoteWhen merging accounts , CONF_MERGE_POINTS_LEDGER can be enabled to preserve detailed points history when merging customer details. To enable this, raise a JIRA ticket to product support.
Excluding card merging during account merge
By default, when merging customer accounts, the cards associated with the victim account are transferred to the survivor account automatically. In case the customer exceeds the set threshold for the maximum number of cards they can hold, the transfer of cards from a victim to a survivor account will proceed with a warning.
However, if you want do not want to transfer the cards of the victim account to the survivor account during a customer merge, you can raise a ticket and disable the CONF_ALLOW_CARD_TRANSFER_TO_SURVIVOR configuration. This ensures that the cards are not transferred along with the other existing parameters.
There is no UI to enable this configuration. You need to raise a JIRA ticket (sample ticket) to the sustenance team to enable these configurations. Turn around time is five days.
Skipping secondary identifiers when merging user data
You can use the CONF_SKIP_SECONDARY configuration to determine whether to skip using secondary identifiers when merging user data. If enabled, the system will not use secondary identifiers when a matching user is found; instead, it will only consider the primary identifier.
The section below explains the scenarios when the configuration is enabled and disabled.
Terms
- Campaign user: A user whose identifiers (such as email or mobile) are present in the campaign users list. Campaign users are not enrolled in the loyalty program and are used only for sending campaign messages. These users are not considered loyalty customers.
- Loyalty user: A user who is enrolled in the loyalty program and recognized as a customer in the system.
- Incoming transaction: An incoming transaction from a new or existing customer.
API behavior:
- The /v2/customers/lookup API does not return campaign users, even if their identifiers exist in the system. If you search for a campaign user using this API, you receive an error indicating that the customer is not found for the given identifiers.
- If you attempt to register a new user with an identifier already associated with a campaign user, the system returns an error indicating that the identifier is already in use.
- Member Care may display campaign users, but API calls to retrieve customer details will not return these users unless they are enrolled as loyalty users.
CONF_SKIP_SECONDARY is disabled
When CONF_SKIP_SECONDARY is disabled, the campaign user will merge with the loyalty user based on matches with the primary identifier or any other identifier.
Example 1:
Primary Identifier - Mobile
| Type of User | MOBILE | |
|---|---|---|
| Campaign user | E1 | M1 |
| Incoming transaction user data | E1 | M2 |
Primary Identifier (Mobile) Match:
- The system compares the Mobile identifiers.
- Campaign User has Mobile (M1) and the incoming request has Mobile (M2).
Merge Decision:
- The Campaign User's existing details (Email: E1, Mobile: M1) will be updated to Email: E1, Mobile: M2.
- Depending on the payload passed, this updated user will be considered a loyalty or non-loyalty user.
Example 2:
Primary identifier - mobile
| Type of User | MOBILE | |
|---|---|---|
| Campaign User | E1 | M1 |
| Loyalty User | NULL | M2 |
| Incoming transaction user data | E1 | M2 |
Matching Process:
Primary Identifier (Mobile) Matching:
- The system compares the primary identifier (Mobile).
- Campaign User has Mobile: M1, but the request has Mobile: M2.
- Loyalty User has Mobile: M2, which matches with the request.
Secondary Identifier (Email) Matching:
- Incoming user data's Email (E1) matches the Campaign User's Email (E1).
- However, the merge is primarily driven by the primary identifier (Mobile).
Merge Process:
- Since CONF_SKIP_SECONDARY is disabled, the merge considers both primary and secondary identifiers.
- Campaign User (Email: E1, Mobile: M1) and Loyalty User (Email: NULL, Mobile: M2) are merged.
Result:
-
Campaign user's Email remains NULL, and Mobile remains M1: Email(NULL), Mobile(M1).
-
Loyalty user's Email is updated to E1, and Mobile remains M2: Email(E1), Mobile(M2).
After Merging
| Type of User | MOBILE | |
|---|---|---|
| Campaign User | NULL | M1 |
| Loyalty User | E1 | M2 |
NoteIf the survivor user's email or mobile is Null (Loyalty user), then the victim (Campaign user) user's email or mobile will merge into a survivor.
Example 3:
Primary identifier - mobile
| Type of User | MOBILE | |
|---|---|---|
| Campaign User | NULL | M2 |
| Loyalty User | E1 | NULL |
| Incoming transaction user data | E1 | M2 |
Primary Identifier (Mobile) Match:
- The system compares the Mobile identifiers.
- Campaign User has Mobile (M2) and the incoming request has Mobile (M2).
Merge process
The merge occurs because the mobile (M2) of the campaign user matches the corresponding data in the incoming transaction user data(M2), and the email (E1) of the loyalty user matches the corresponding data in the incoming transaction user data(E1).
After Merging
| Type of User | MOBILE | |
|---|---|---|
| Campaign User | NULL | NULL |
| Loyalty User | E1 | M2 |
Note
- If the survivor (Loyalty user) user's email or mobile is null, then the victim (Campaign user) user's email or mobile will merge into the survivor.
- The loyalty user's email remains the same as E1 and mobile changes to M2 because the victim details will be merged into a survivor.
CONF_SKIP_SECONDARY is Enabled
When CONF_SKIP_SECONDARY is enabled, the system skips secondary identifiers during the merging process of campaign and loyalty users. In this scenario, merging will not happen based on secondary identifier matches alone. Instead, merging relies on primary identifier matches between campaign and loyalty users.
Example 1:
Primary Identifier - Mobile
| Type of User | MOBILE | |
|---|---|---|
| Campaign User | E1 | M1 |
| Incoming transaction user data | E1 | M2 |
Matching Process:
- Since CONF_SKIP_SECONDARY is enabled, the system ignores the secondary identifier (Email) and only considers the primary identifier (Mobile).The Campaign User has Mobile: M1, which does not match the incoming request's Mobile: M2.
Merge Process:
- No existing user with Mobile: M2 is found in the database.
- Since the primary identifier (Mobile) does not match any existing user, no merge happens with the Campaign User.
- A new loyalty user is created with the provided primary identifier (Mobile: M2).
Result:
- Campaign User: Remains unchanged: Email: E1, Mobile: M1.
- New Loyalty User: Created with: Email: NULL, Mobile: M2 (since the incoming request's primary identifier is M2, and secondary identifiers are ignored).
After Merging
| Type of User | MOBILE | |
|---|---|---|
| Campaign User | E1 | M1 |
| New loyalty user (based on the payload) | NULL | M2 |
Example 2:
Primary Identifier - Mobile
| Type of User | MOBILE | |
|---|---|---|
| Campaign User | E1 | M1 |
| Loyalty User | NULL | M2 |
| Incoming transaction user data | E1 | M2 |
Matching Process:
Primary Identifier (Mobile) Matching:
The system looks at the primary identifier (Mobile).
Customer 3 has Mobile: M2, which matches with the Loyalty User's Mobile: M2.
Secondary Identifier (Email) Matching:
Even though CONF_SKIP_SECONDARY is enabled, Customer 3's Email: E1 matches the Campaign User's Email: E1.
However, the merge is primarily driven by the primary identifier (Mobile).
Merge Process:
Since CONF_SKIP_SECONDARY is enabled, the merge is based on the primary identifier.
Customer 3 (Email: E1, Mobile: M2) matches with both the Campaign User (Email: E1, Mobile: M1) and the Loyalty User (Mobile: M2).
Result:
The merge happens because the primary identifier (Mobile) matches. Campaign User (Email: E1, Mobile: M1) and Loyalty User (Mobile: M2) are merged.
After Merging
| Type of User | MOBILE | |
|---|---|---|
| Campaign User | NULL | M1 |
| Loyalty User | E1 | M2 |
NoteIf the survivor user (Loyalty User) has NULL in either email or mobile, the corresponding field from the victim user (Campaign User) will be merged into the survivor.
In this case, since the Loyalty User's Email was NULL, it is updated to E1 from the Campaign User.
Example 3:
Primary Identifier - Mobile
| Type of User | MOBILE | |
|---|---|---|
| Campaign User (Customer 1) | NULL | M2 |
| Loyalty User (Customer 2) | E1 | NULL |
| Incoming transaction user data (Customer 3) | E1 | M2 |
Primary Identifier Matching:
- The primary identifier is Mobile.
- Customer 3 has Mobile: M2, which matches Customer 1's Mobile: M2.
Secondary Identifier Matching:
- Customer 3 has Email: E1, which matches Customer 2's Email: E1.
- Since CONF_SKIP_SECONDARY is enabled, secondary identifiers should generally be ignored. However, in this case, secondary identifiers still cause a conflict due to the match.
Merging process:
- The system identifies that Customer 3's Email (E1) matches Customer 2's Email, and Mobile (M2) matches Customer 1's Mobile. The system gives preference to the Loyalty user (Customer 2).
- The attempt to add Customer 3 fails because there is a conflict with existing users, and preference is given to the Loyalty user where the primary identifiers are not a match.
Result:
| Customer Type | Mobile | |
|---|---|---|
| Campaign User (Customer 1) | NULL | M2 |
| Loyalty User (Customer 2) | E1 | NULL |
| New request | Not added due to conflict |
Example 4:
Primary Identifier - Mobile
| Type of User | MOBILE | |
|---|---|---|
| Campaign User | E1 | NULL |
| Loyalty User | NULL | M2 |
| Incoming transaction user data | E1 | M2 |
Matching Process:
Primary Identifier (Mobile) Matching:
- The system considers the primary identifier (Mobile).
- Customer 3 has Mobile: M2, which matches with the Loyalty User's Mobile: M2.
Secondary Identifier (Email) Matching:
- Despite CONF_SKIP_SECONDARY being enabled, Customer 3's Email: E1 matches the Campaign User's Email: E1.
- However, the merge primarily relies on the primary identifier (Mobile).
Merge Process:
- Due to CONF_SKIP_SECONDARY being enabled, the merge is based on the primary identifier.
- Customer 3 (Email: E1, Mobile: M2) matches both the Campaign User (Email: E1, Mobile: M1) and the Loyalty User (Mobile: M2).
Result:
The merge occurs because the primary identifier (Mobile) matches. The Campaign User (Email: E1, Mobile: M1) and the Loyalty User (Mobile: M2) are merged.
After Merging
| Type of User | MOBILE | |
|---|---|---|
| Campaign User | NULL | NULL |
| Loyalty User | E1 | M2 |
Skipping custom and extended fields during customer merge
By default, the custom fields and extended fields are merged during a customer merge process. You can control whether custom fields or extended fields need to be merged using the CONF_SKIP_MERGE_HANDLER configuration.
- To skip merging custom fields, set the configuration value to
CUSTOM_FIELDS. - To skip merging extended fields, set the configuration value to
EXTENDED_FIELDS. This applies to extended field data for theCUSTOMERentity type.
Enabling the configuration
To enable this configuration, raise a JIRA ticket with the Capillary Product Support team.
Handling common extended fields during customer merge
The CONF_CUSTOMER_MERGE_OVERWRITE_EXTENDED_FIELD_VALUE configuration controls how conflicting extended fields are handled when both the survivor and victim profiles have the same field extended field names with different values.
- If set to
false(default):- The survivor's values for common extended fields are retained.
- Only non-conflicting extended fields from the victim are added to the survivor profile.
- If set to
true:- The victim’s values for common extended fields overwrite the survivor’s values.
- Non-conflicting extended fields from the victim are still added to the survivor profile.
Merge behavior scenarios
| Scenario | If CONF_CUSTOMER_MERGE_ OVERWRITE_EXTENDED_FIELD_VALUE = false | If CONF_CUSTOMER_MERGE_ OVERWRITE_EXTENDED_FIELD_VALUE = true |
|---|---|---|
| The survivor and victim profiles have the same extended field names but different values | The survivor’s values are retained for common fields. Example: → Result: | The victim’s values overwrite the survivor’s values for common fields. Example: → Result: |
| Only the victim profile has certain extended fields | The victim’s fields are added to the survivor profile. Example: → Added to survivor | The victim’s fields are added to the survivor profile. |
| Only the survivor profile has extended fields | The survivor’s fields remain unchanged. | The survivor’s fields remain unchanged. |
| The survivor profile has no extended fields, but the victim profile has extended fields | The survivor ~~~~profile is updated with all extended fields from the victim profile. | The survivor profile is updated with all extended fields from the victim profile. |
| Both the survivor and victim profiles have extended fields, but no overlapping extended field names | All extended fields from the victim profile are added to the survivor profile. Example: → Result: Both fields retained | All extended fields from the victim profile are added to the survivor profile. |
Blocking redemptions for victim users
When you merge customer accounts, the victim account becomes inactive while its data transfers to the survivor account. The CONF_REJECT_REDEMPTION_FOR_VICTIM_USERS configuration blocks all redemption attempts for victim users.
When enabled, the system prevents redemptions of coupons, points, rewards, and other loyalty benefits for customers whose accounts have been merged into a survivor account.
How it works
When a redemption request is made:
- The system checks if the customer is a victim user.
- If they are a victim user and
CONF_REJECT_REDEMPTION_FOR_VICTIM_USERSis enabled, the redemption is rejected - If disabled (default), the redemption is automatically redirected to the survivor account
To enable this configuration, raise a JIRA ticket with the Capillary Product Support team.
Updated about 1 month ago