
Configure Email Settings
Email campaigns help you to connect with the audience directly through email addresses. You can send two types of email:
- Bulk messages – such as promotional offers, newsletters, or announcements.
- Transactional messages – such as OTPs, confirmations, or updates.
To ensure smooth delivery, you need to set up the required email configurations before sending an email broadcast campaign. Proper setup authenticates your emails and increases their chances of reaching the inbox successfully.
Configure an email campaign
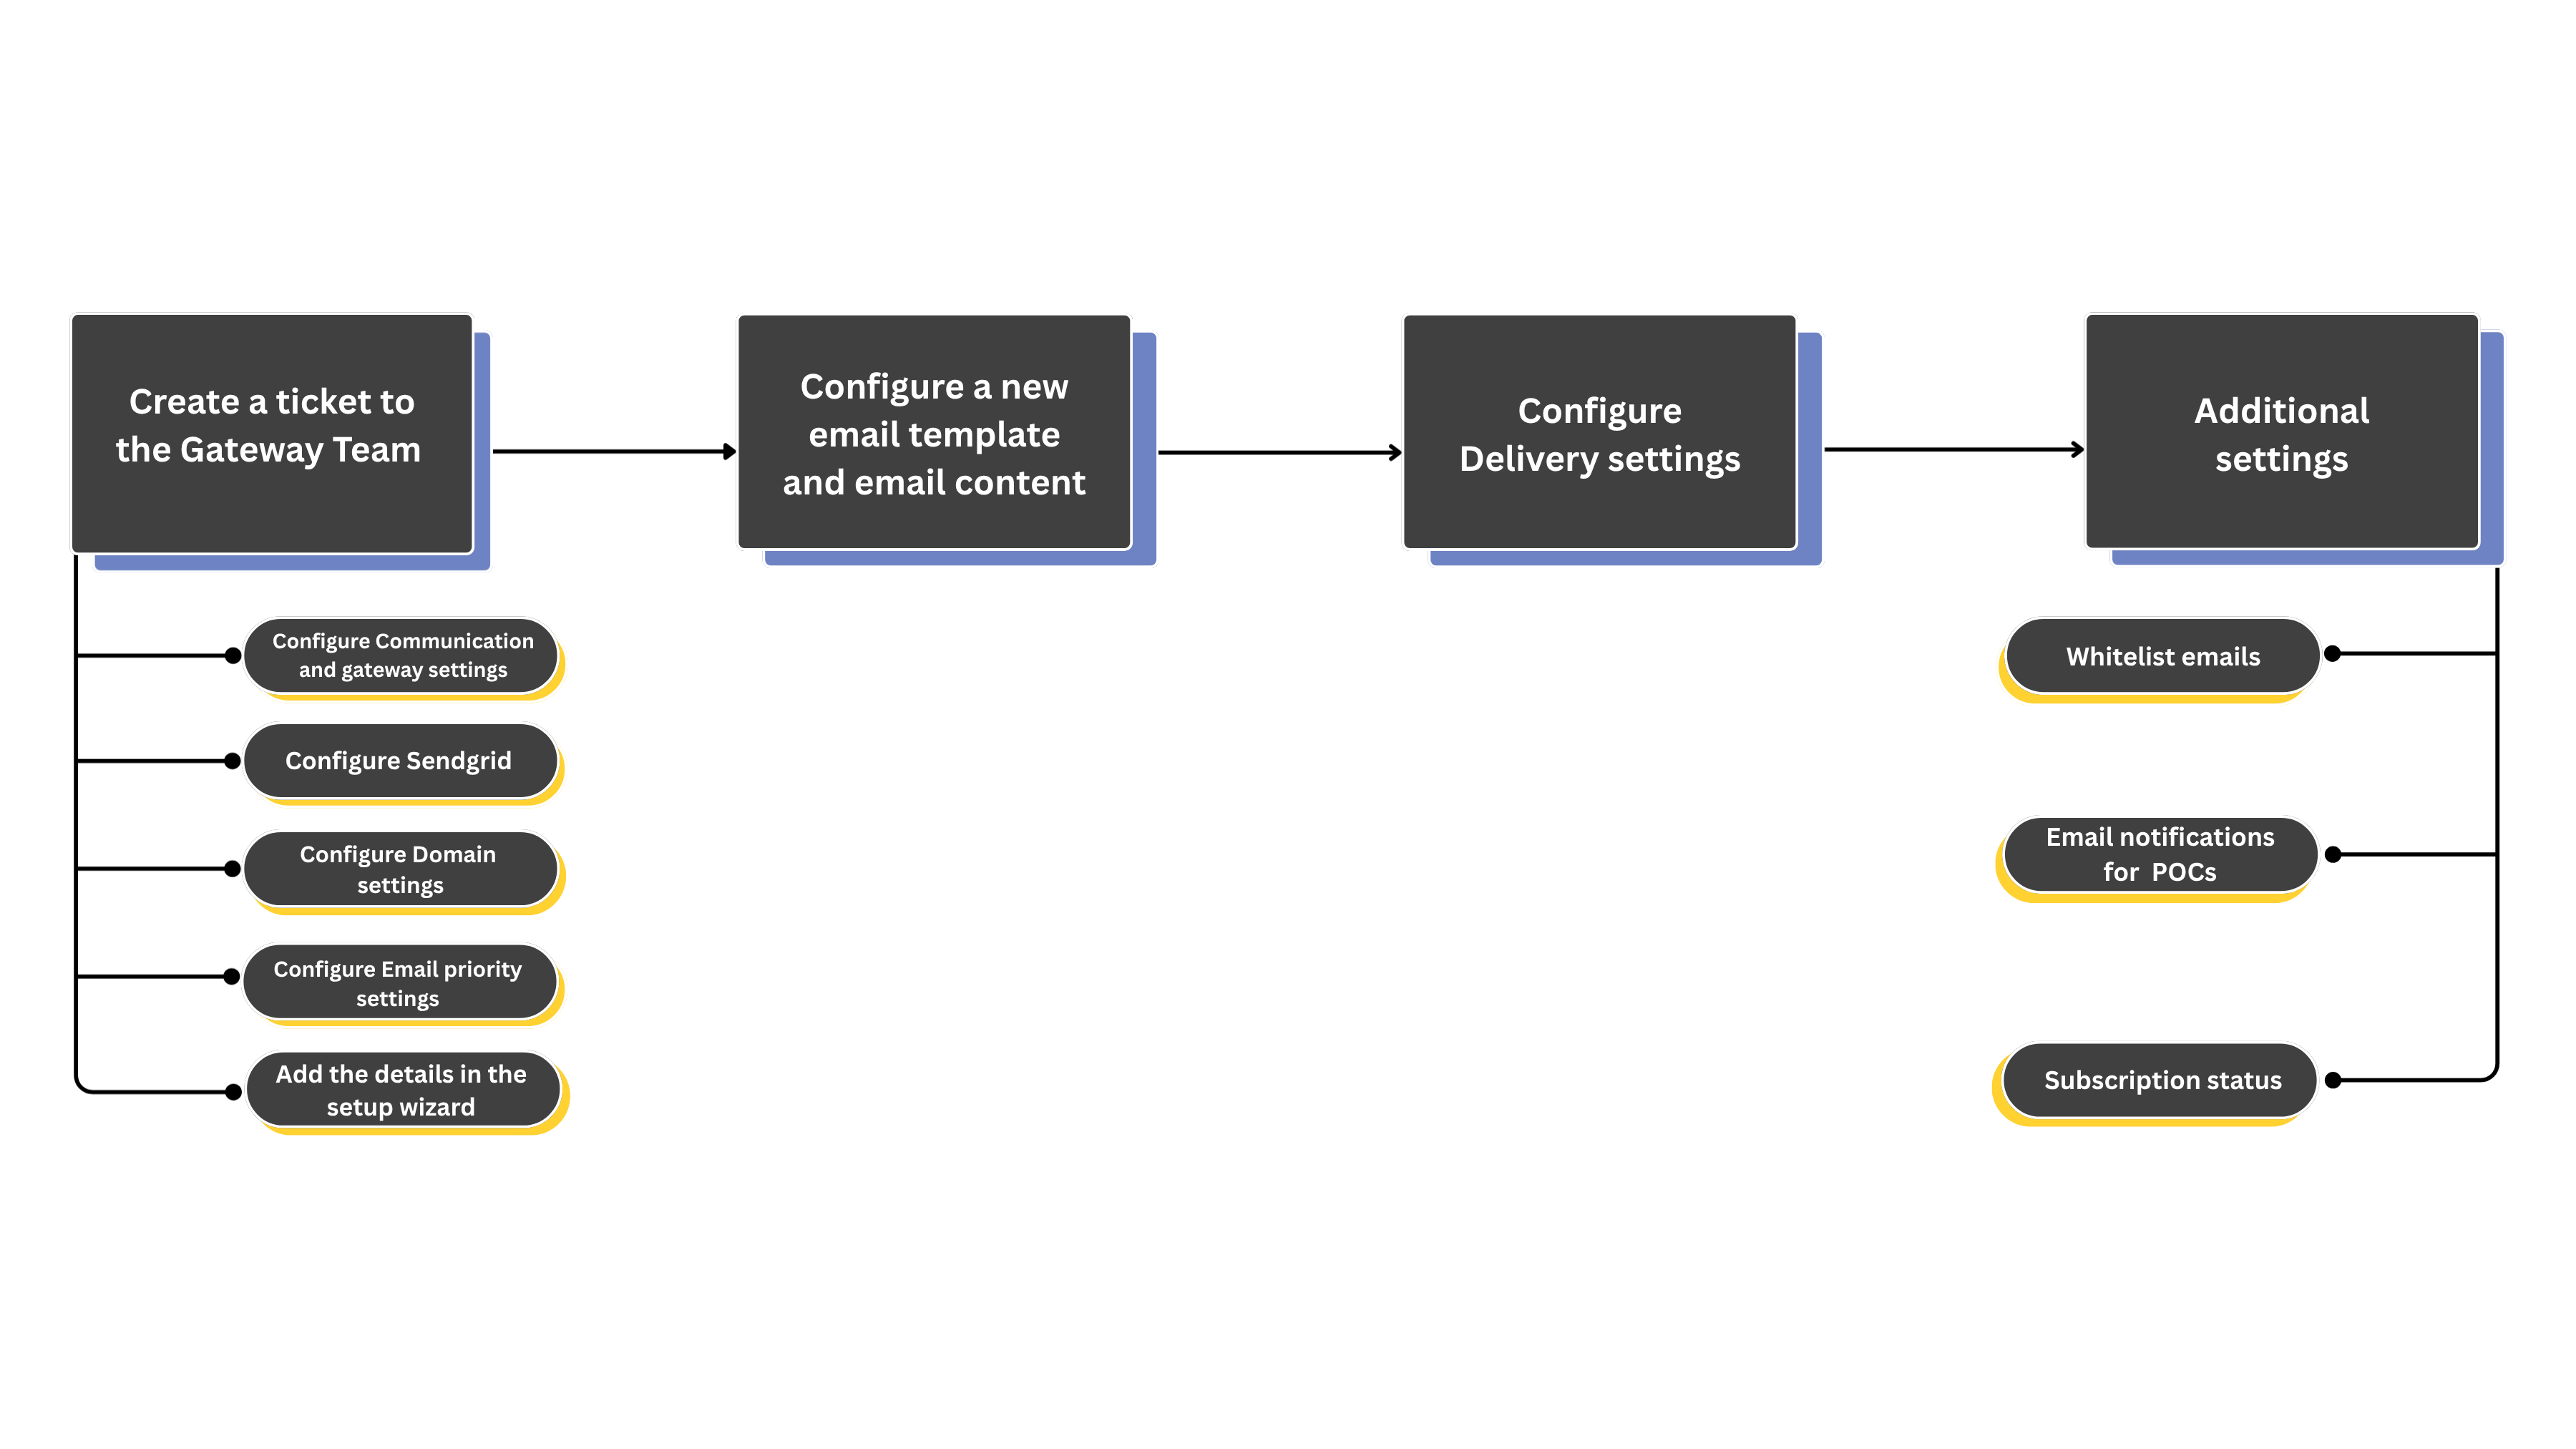
To configure an email campaign perform the steps:
Step 1: Create a ticket to the Gateway team to configure the following setups
The above configurations are the email gateway settings that must be configured before configuring and sending an email template on the UI.
Step 3: Configure Delivery settings
In addition to the mandatory settings, you can also configure the following settings as needed:
- Whitelist emails to resolve delivery issues caused by soft or hard bounces.
- Email notifications for Points of Contact (POCs) are set up to keep brand users informed about campaign messages.
- Subscription status allows customers to easily opt in or out of promotional emails in their preferred language
Configuring communication and gateway settings
To send emails you need to connect Capillary with an email vendor, which is the service that delivers emails to customers. The vendor manages the delivery of both bulk campaigns and transactional messages (such as OTPs and order confirmations). It also ensures that your emails are authenticated through DNS records like SPF, DKIM, and DMARC, and provides delivery reports including statuses such as delivered, bounced, or failed.
You can either use Capillary’s default vendor, SendGrid, or Integrate a new vendor to the capillary system of your choice into the Capillary system and configure the required settings in the respective vendor’s portal. If you choose the default vendor SendGrid, no additional configuration is required in the SendGrid portal, as it is already pre-configured. You can directly proceed with the domain configuration for your brand.
The supported vendors for emails are Falconide, Netcore, Octane, ValueFirst. To use any of these email vendors, create a ticket to the gateway team.
To configure communication and gateway settings for a new vendor, create a ticket with the Capillary Gateway team. Provide the following information: The IP address used for sending emails can be either a Custom IP (dedicated to the brand) or Capillary's IP.
| Type | Usage | Advantage | Limitation | Cost |
|---|---|---|---|---|
| Custom IP (Dedicated IP) | Recommended for established brands with high email volumes |
|
| 30 USD per IP/month |
| Capillary IP (Shared IP) | Suitable for brands with low email volumes |
|
| Not needed |
Best practices
- Use separate IPs for bulk and transactional traffic.
- Maintain consistent sending domains and IPs.
- Avoid mixing marketing and OTP/transactional emails on the same IP.
NoteIf a brand opts for a custom IP, the Gateway team creates a ticket with the engineering team for API integration. The required API details are obtained from the vendor’s portal. This integration ensures a seamless flow of information between the vendor portal and Capillary.
Configuring the domain settings
Prerequisites
- Obtain Domain name, Sender ID, Sender name, Reply-to ID, and Reply-to name from the brand.
- The vendor portal must be configured for the brand (for example, the SendGrid portal in case of SendGrid).
- CNAME records in the brand’s DNS portal should be added.
Steps to configure the domain settings
-
In the Brand organization, navigate to:
Organization Settings > Communication & Gateway > Domains > Configure Domains.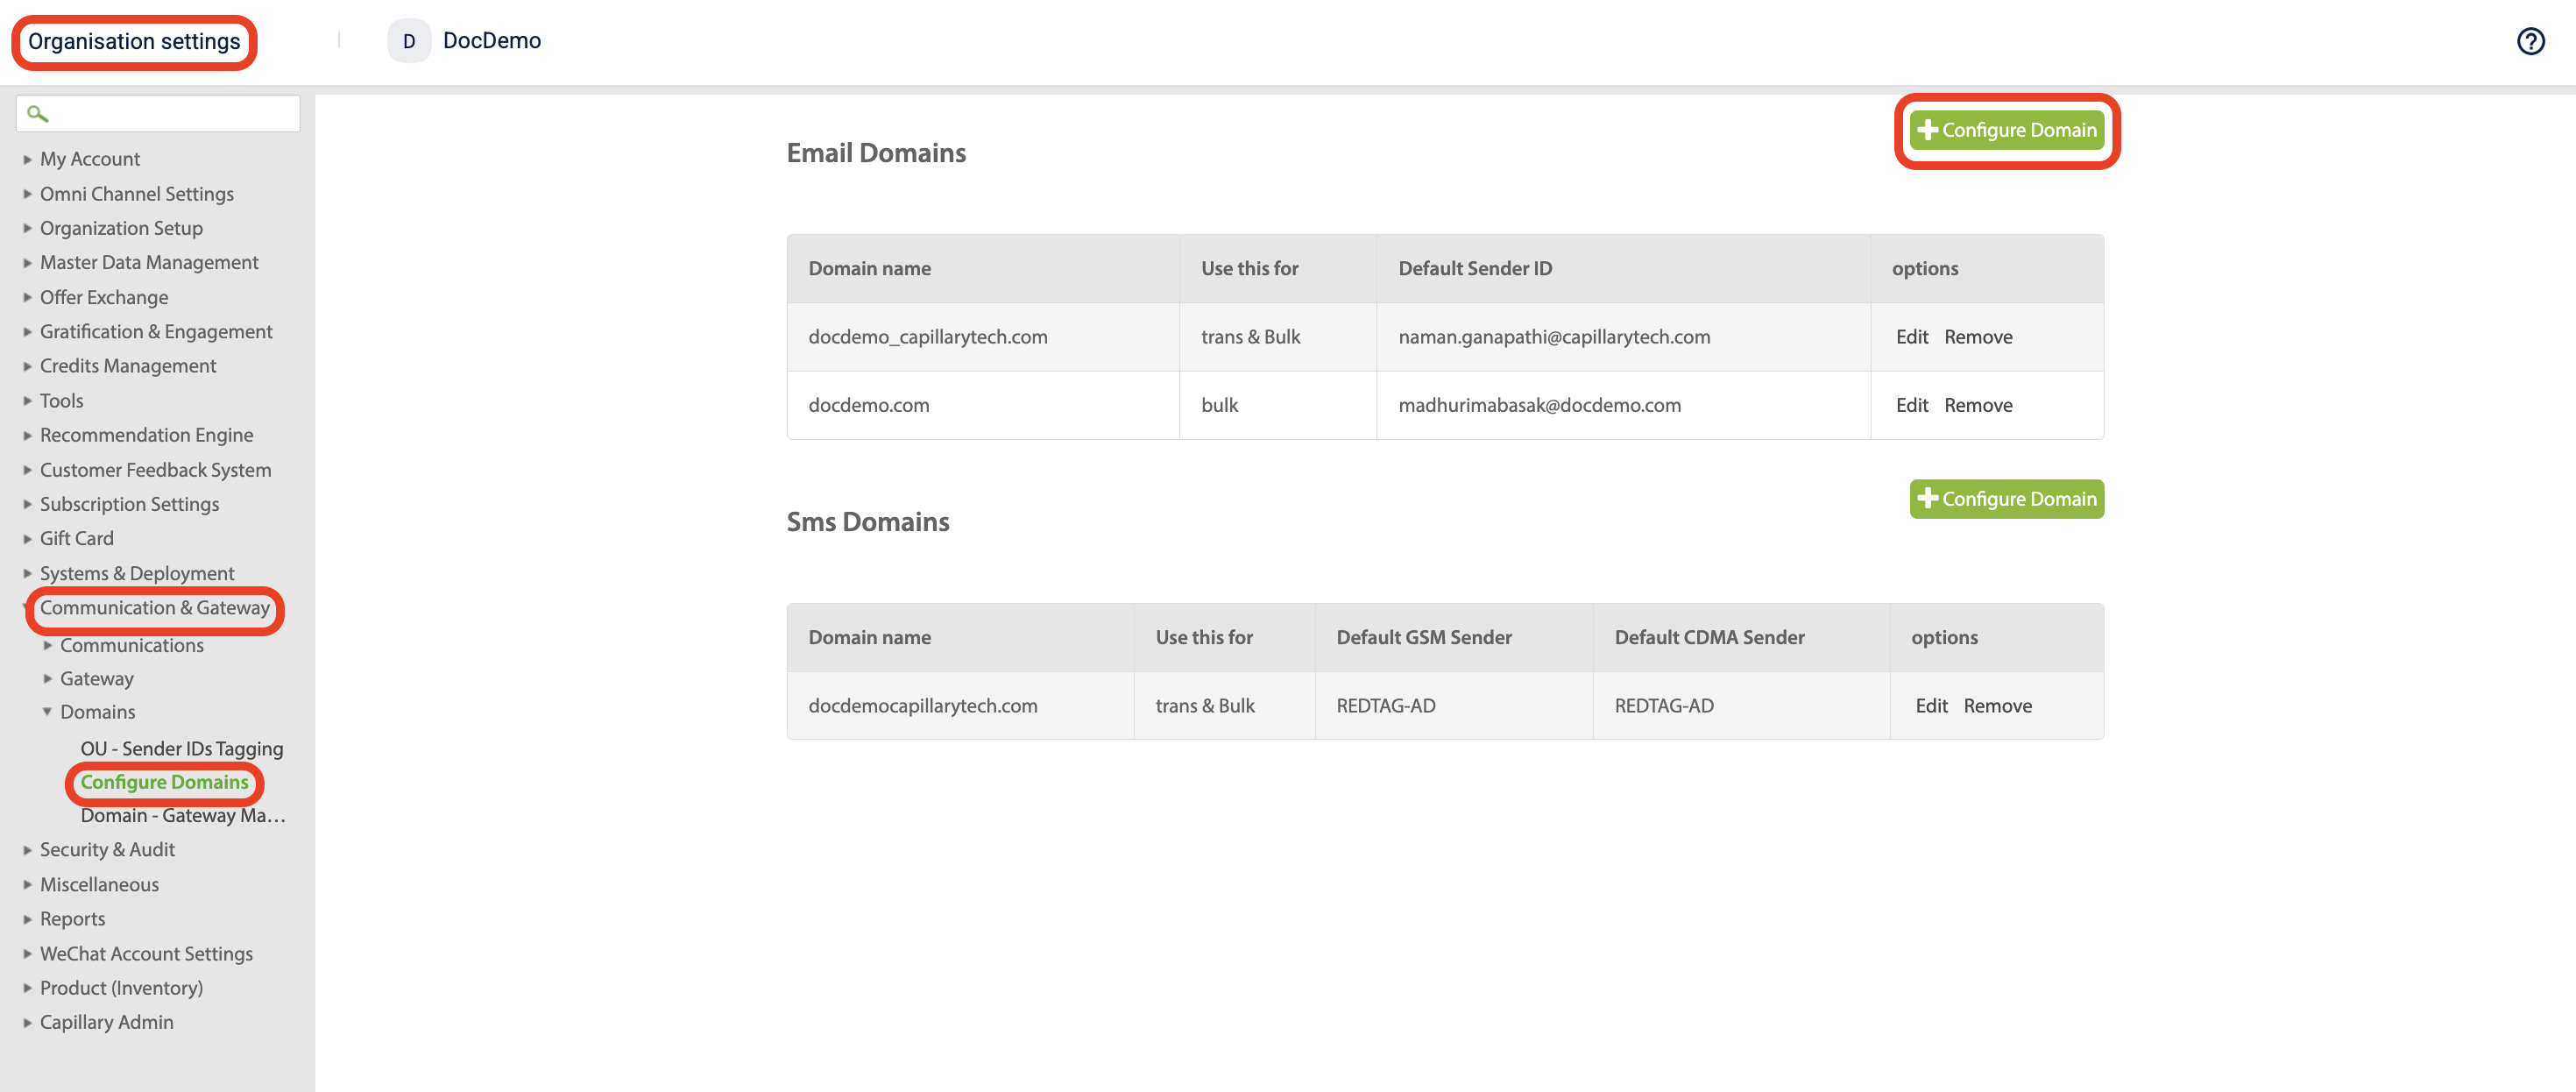
-
Select Configure Domain and enter the details provided by the brand:
| Field | Description |
|---|---|
| Domain name | The domain from which emails will be sent. For example - brandname.com. |
| Use this for | The Purpose for which the domain is configured. For example- Bulk or transactional. |
| DMARC email ID | The email ID used for receiving DMARC reports. For example - [email protected]. |
| Sender ID | The email address used to send emails to customers. For example - [email protected]. |
| Sender name | The display name shown to recipients. For example - Brandname Offers. |
| Reply-to ID | The email address where customer replies will be received. For example - [email protected]. |
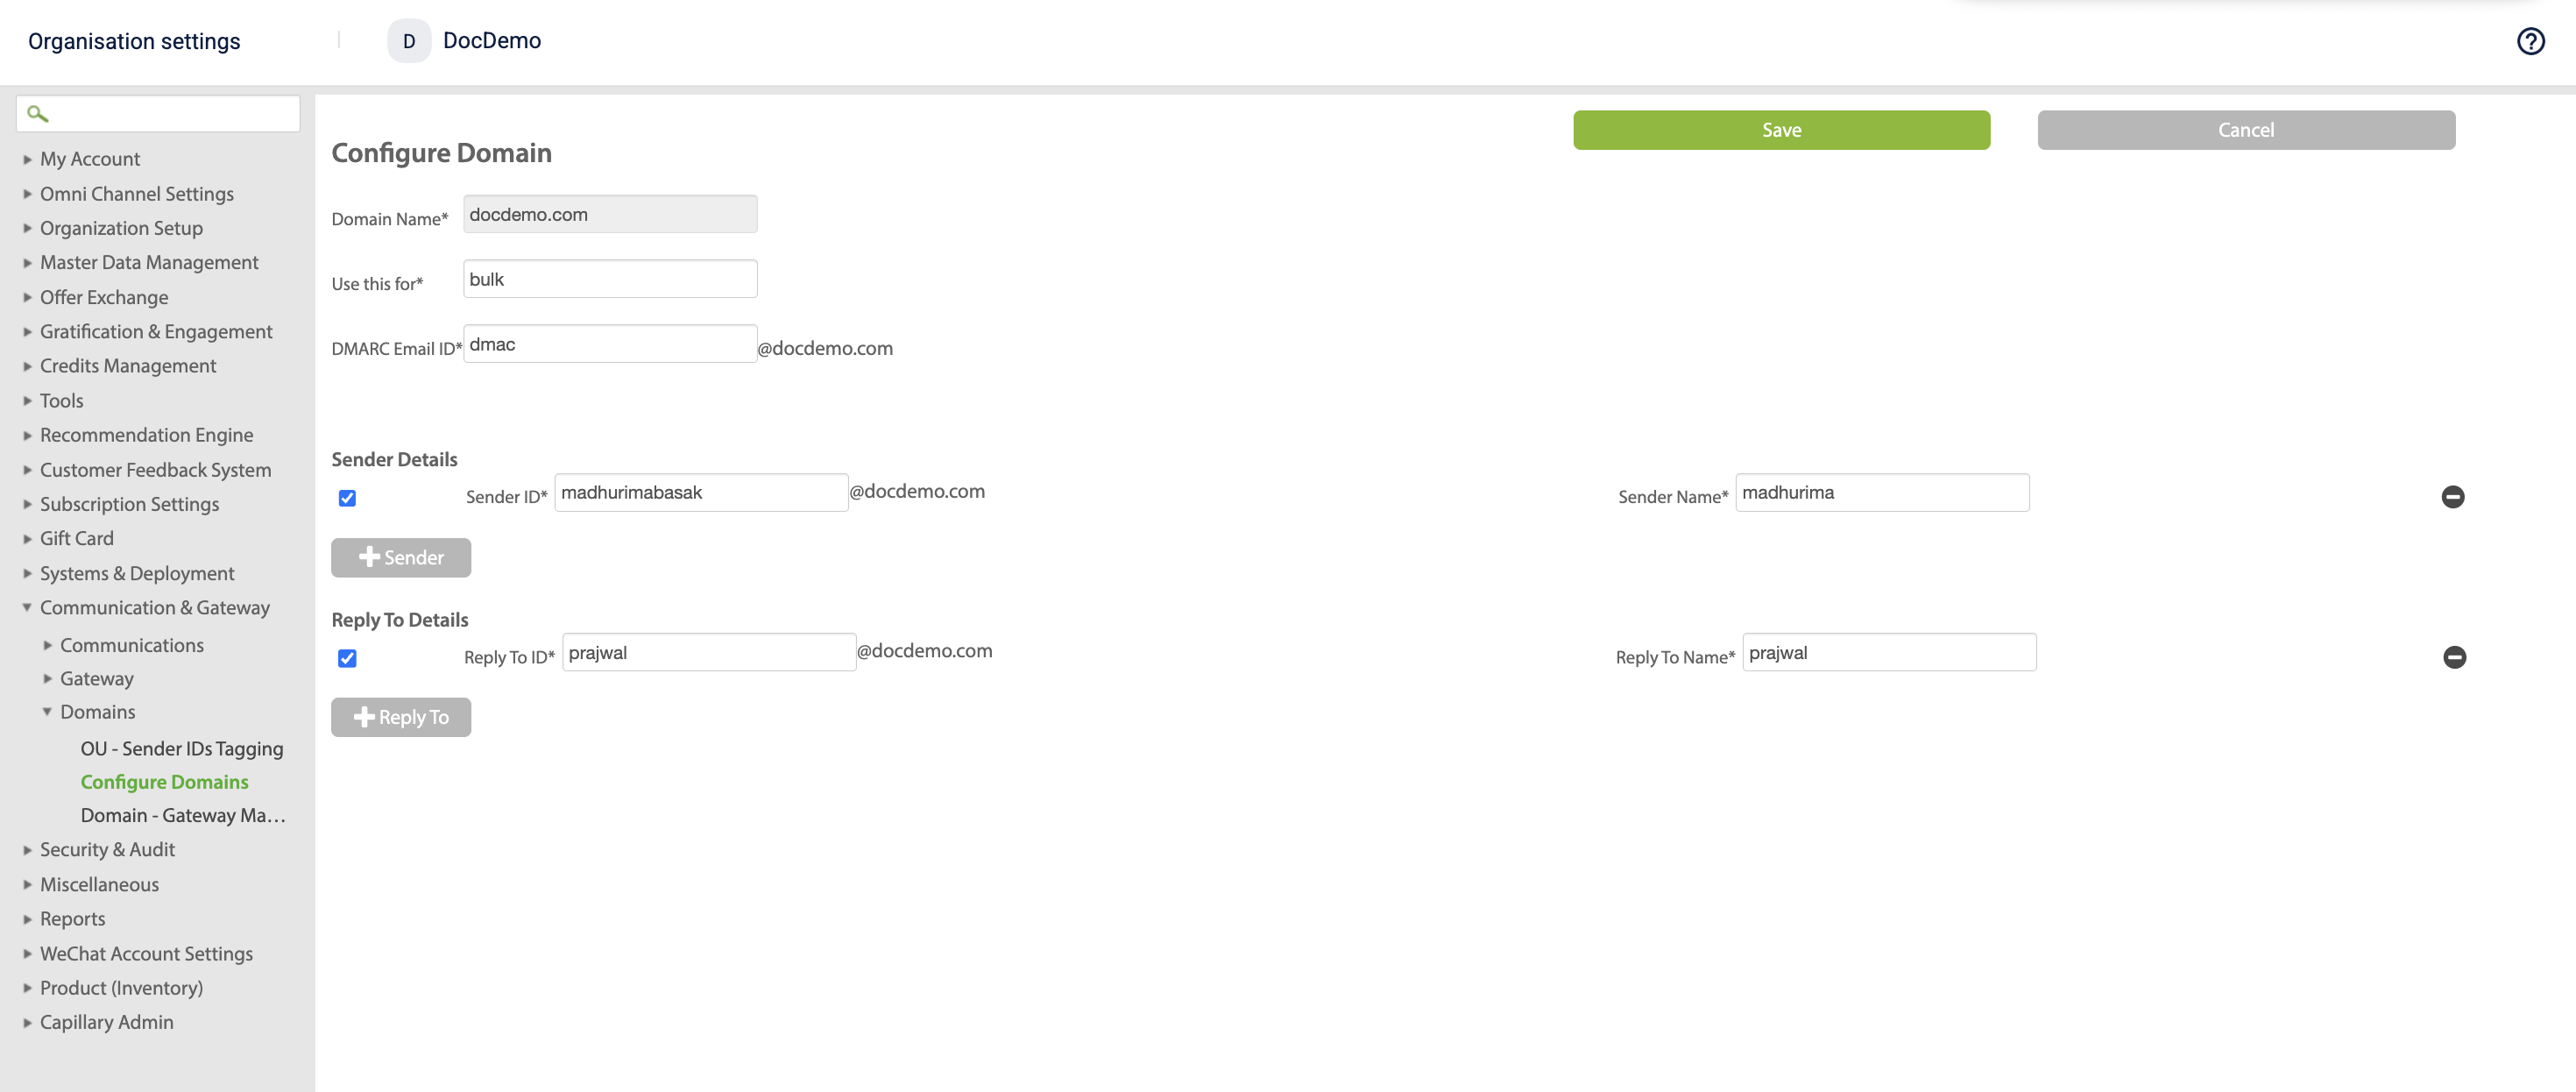
- Select Save. The configured domain appears on the Configure Domain page.
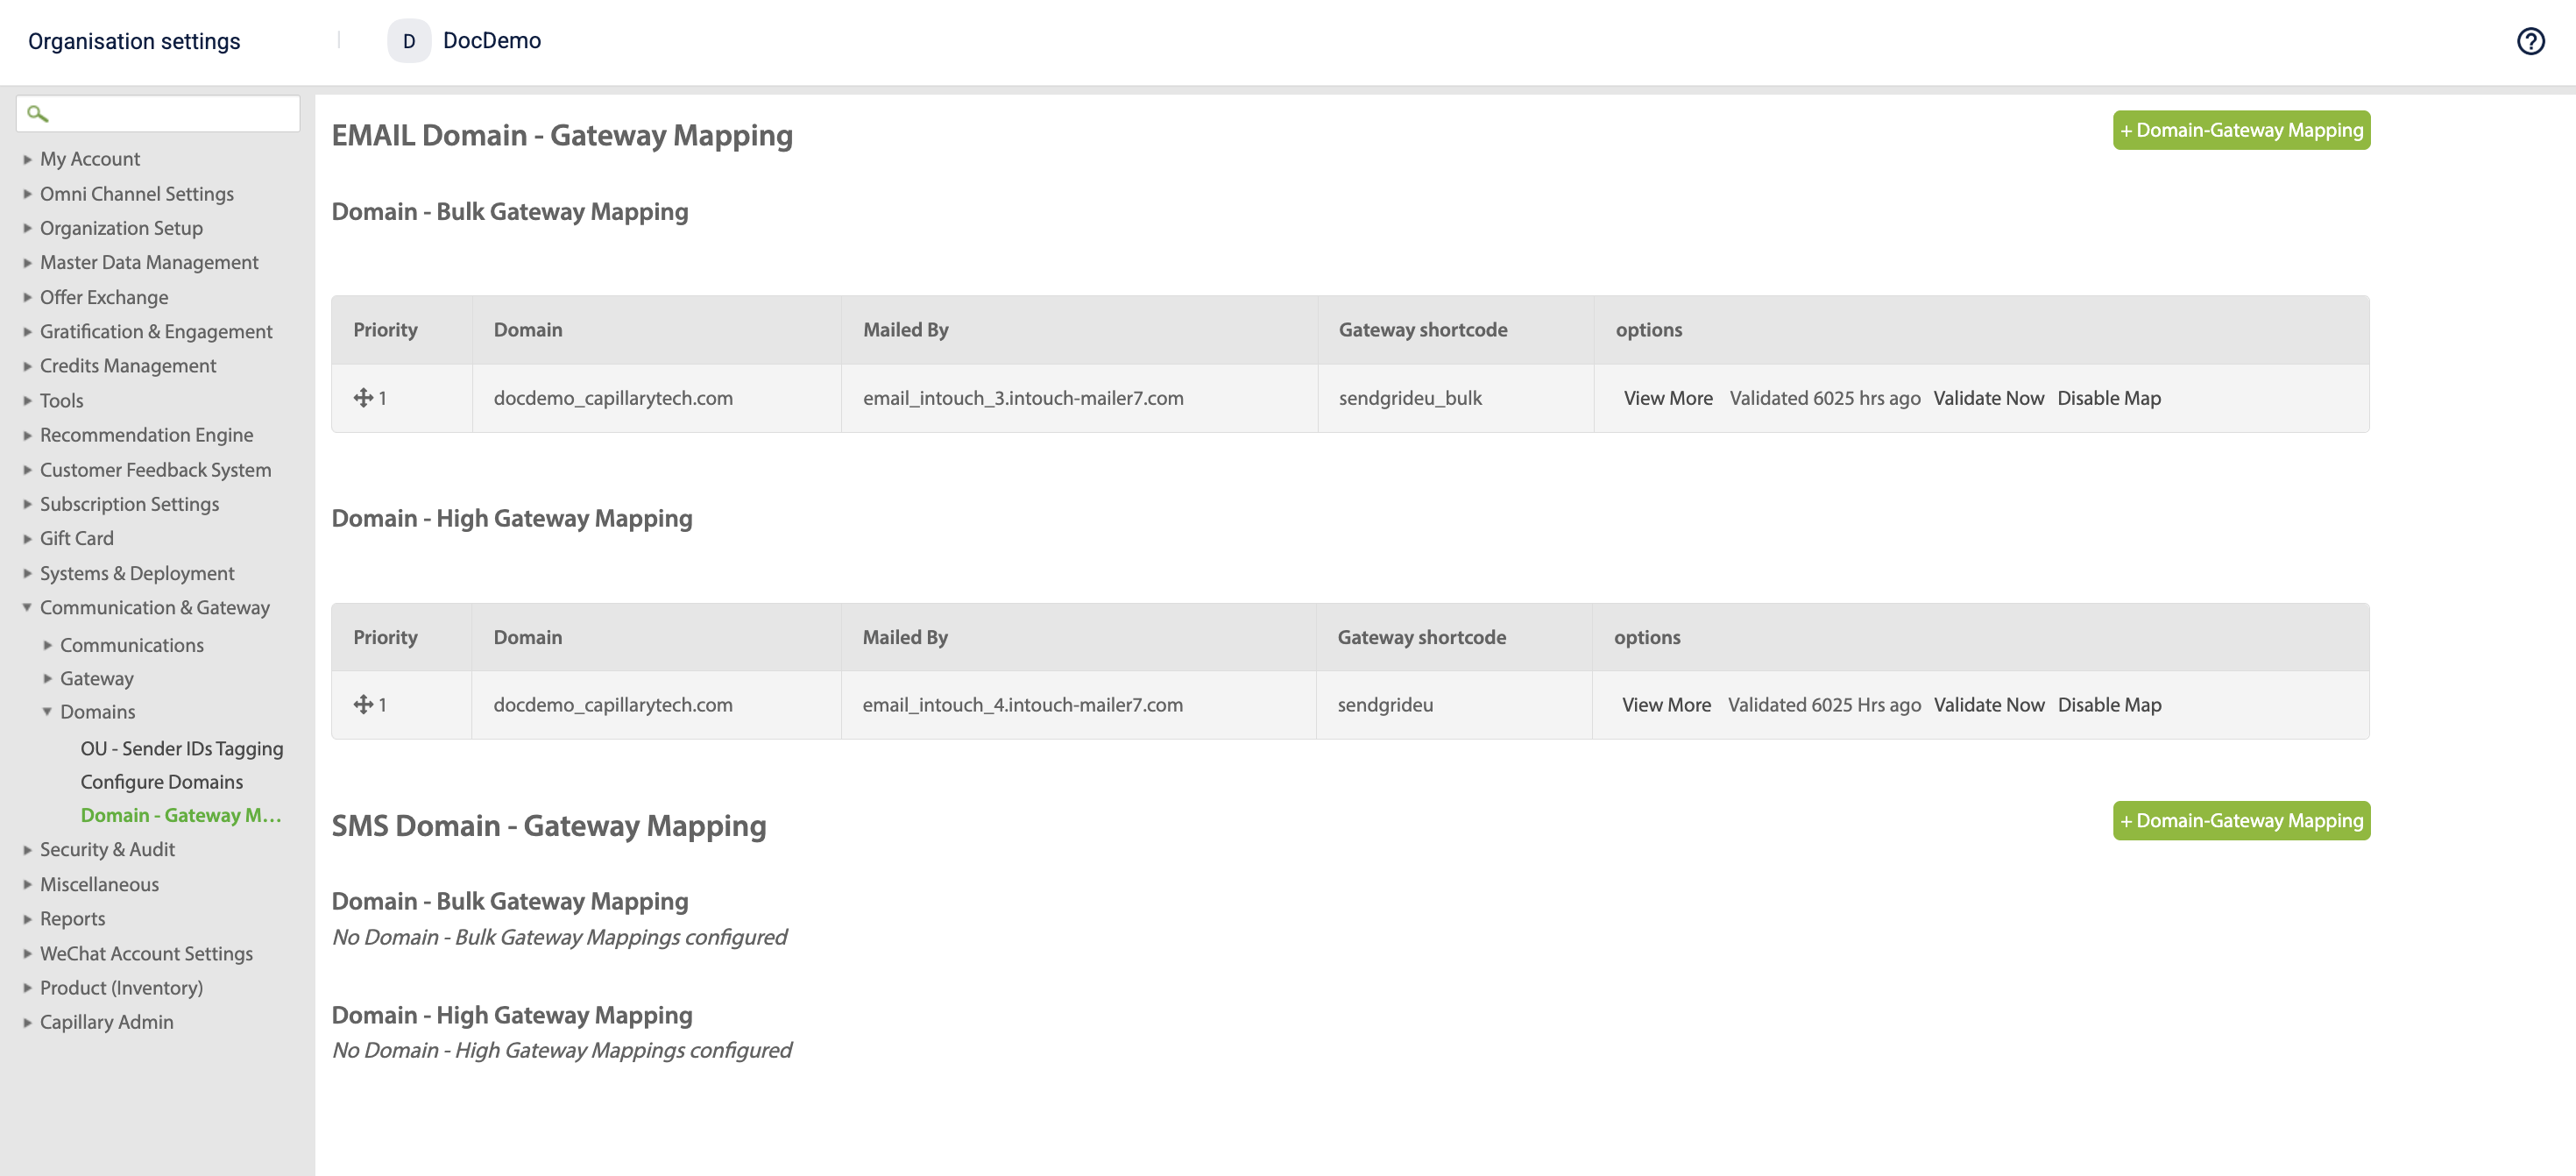
- Navigate to Domain Gateway Mapping.
- Select +Domain-Gateway Mapping.
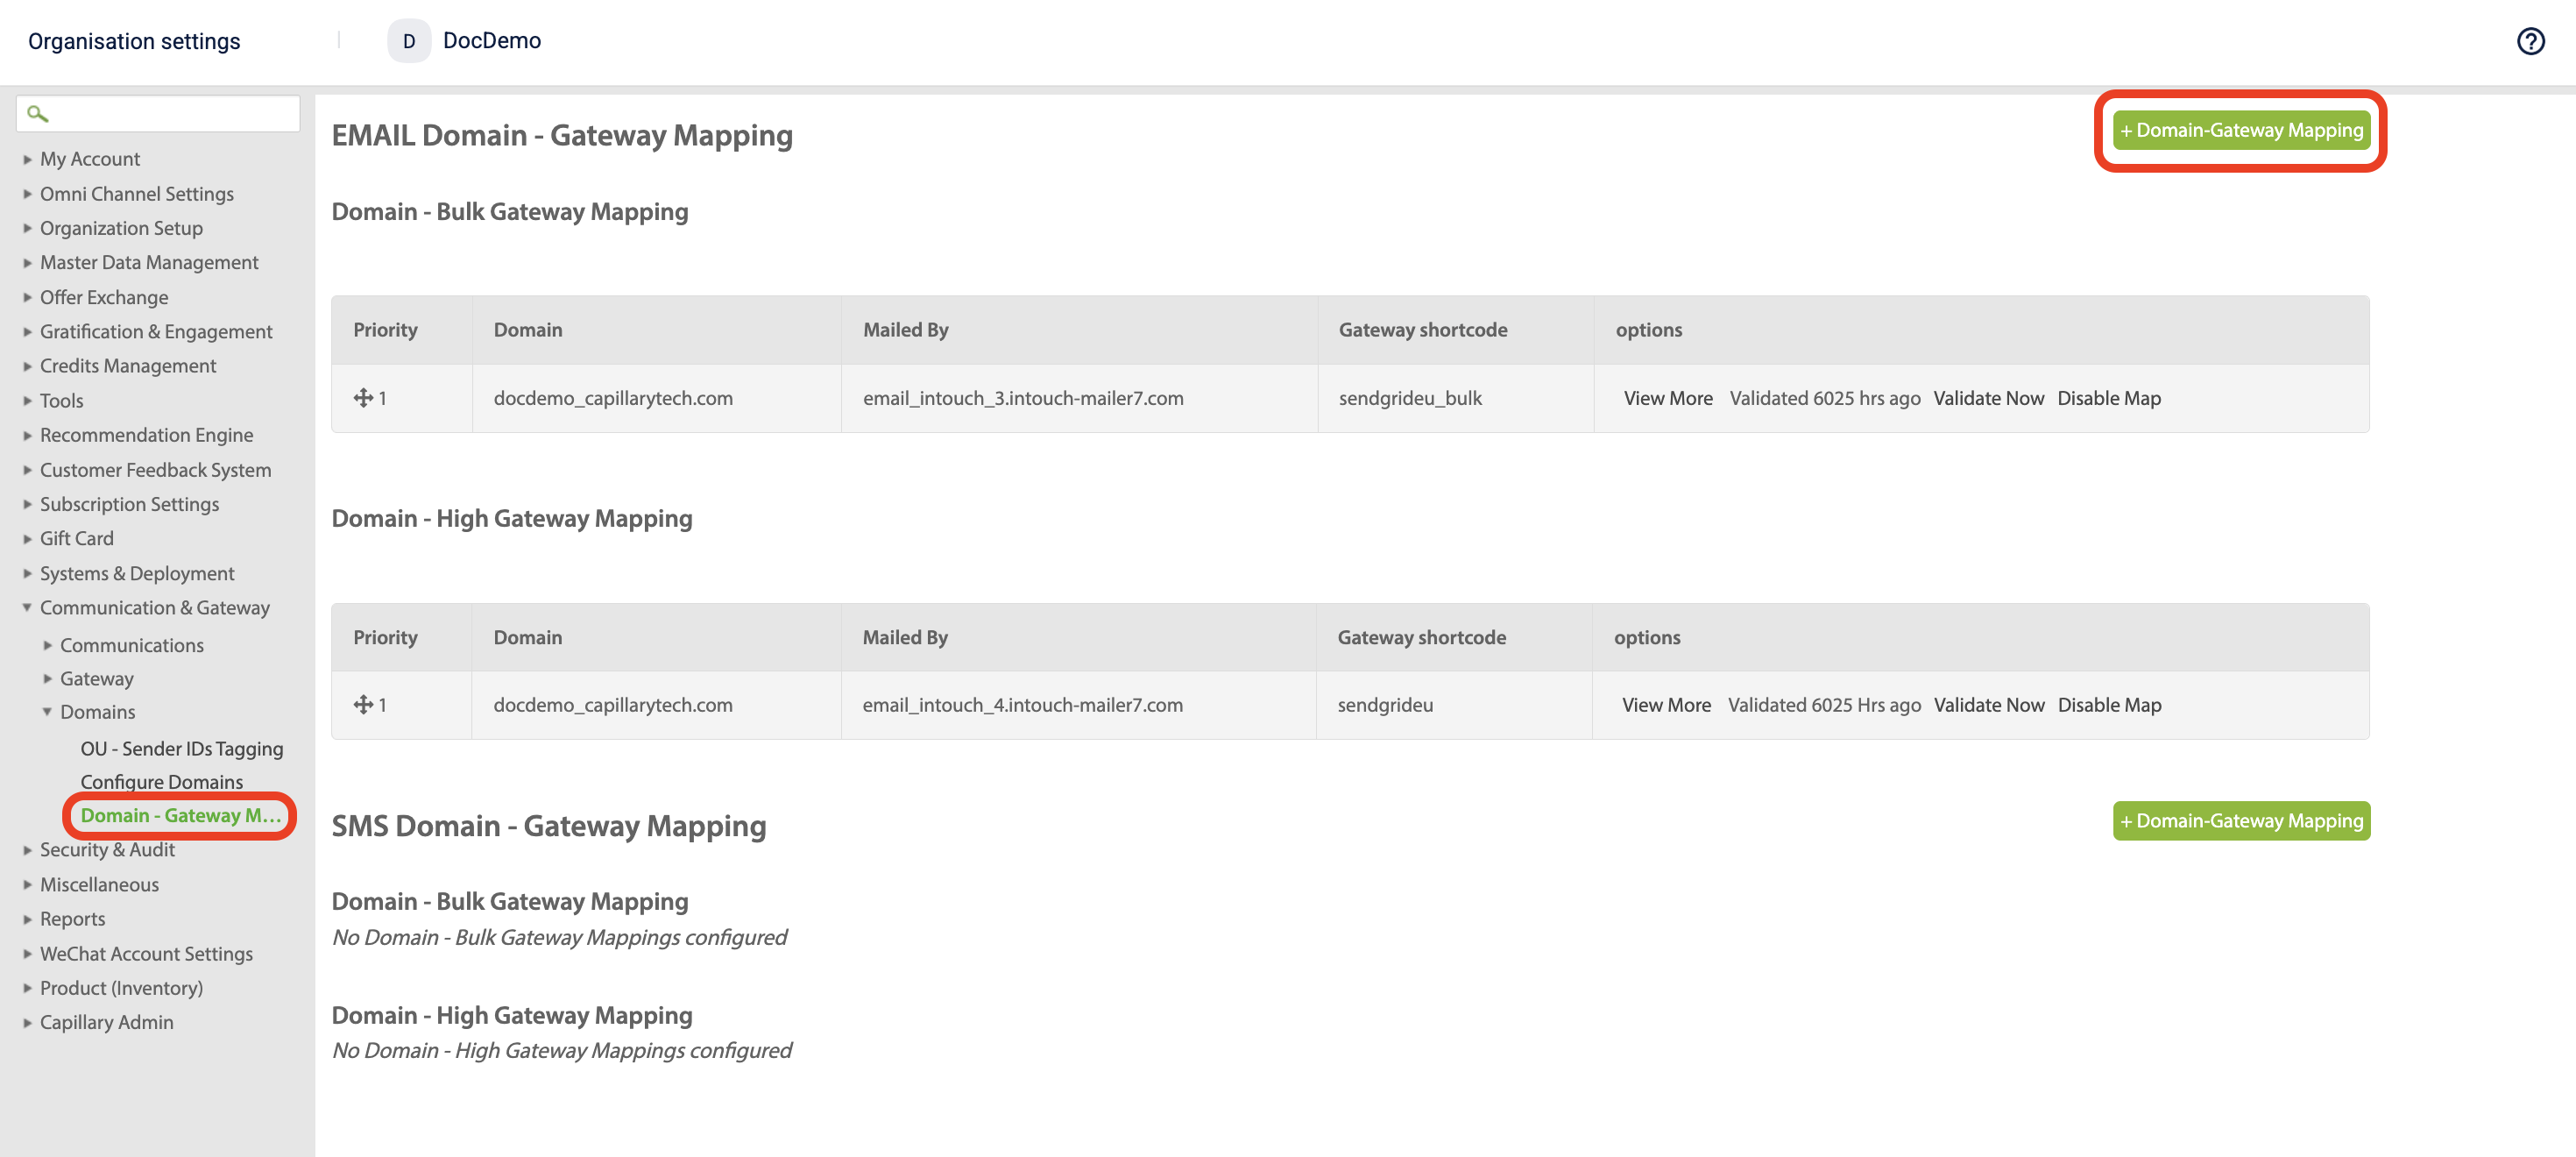
- In the mapping configuration:
- Select the Type.
- Choose the Domain from the drop down.
- Select Use System Defaults. The system automatically fetches the gateway account details.
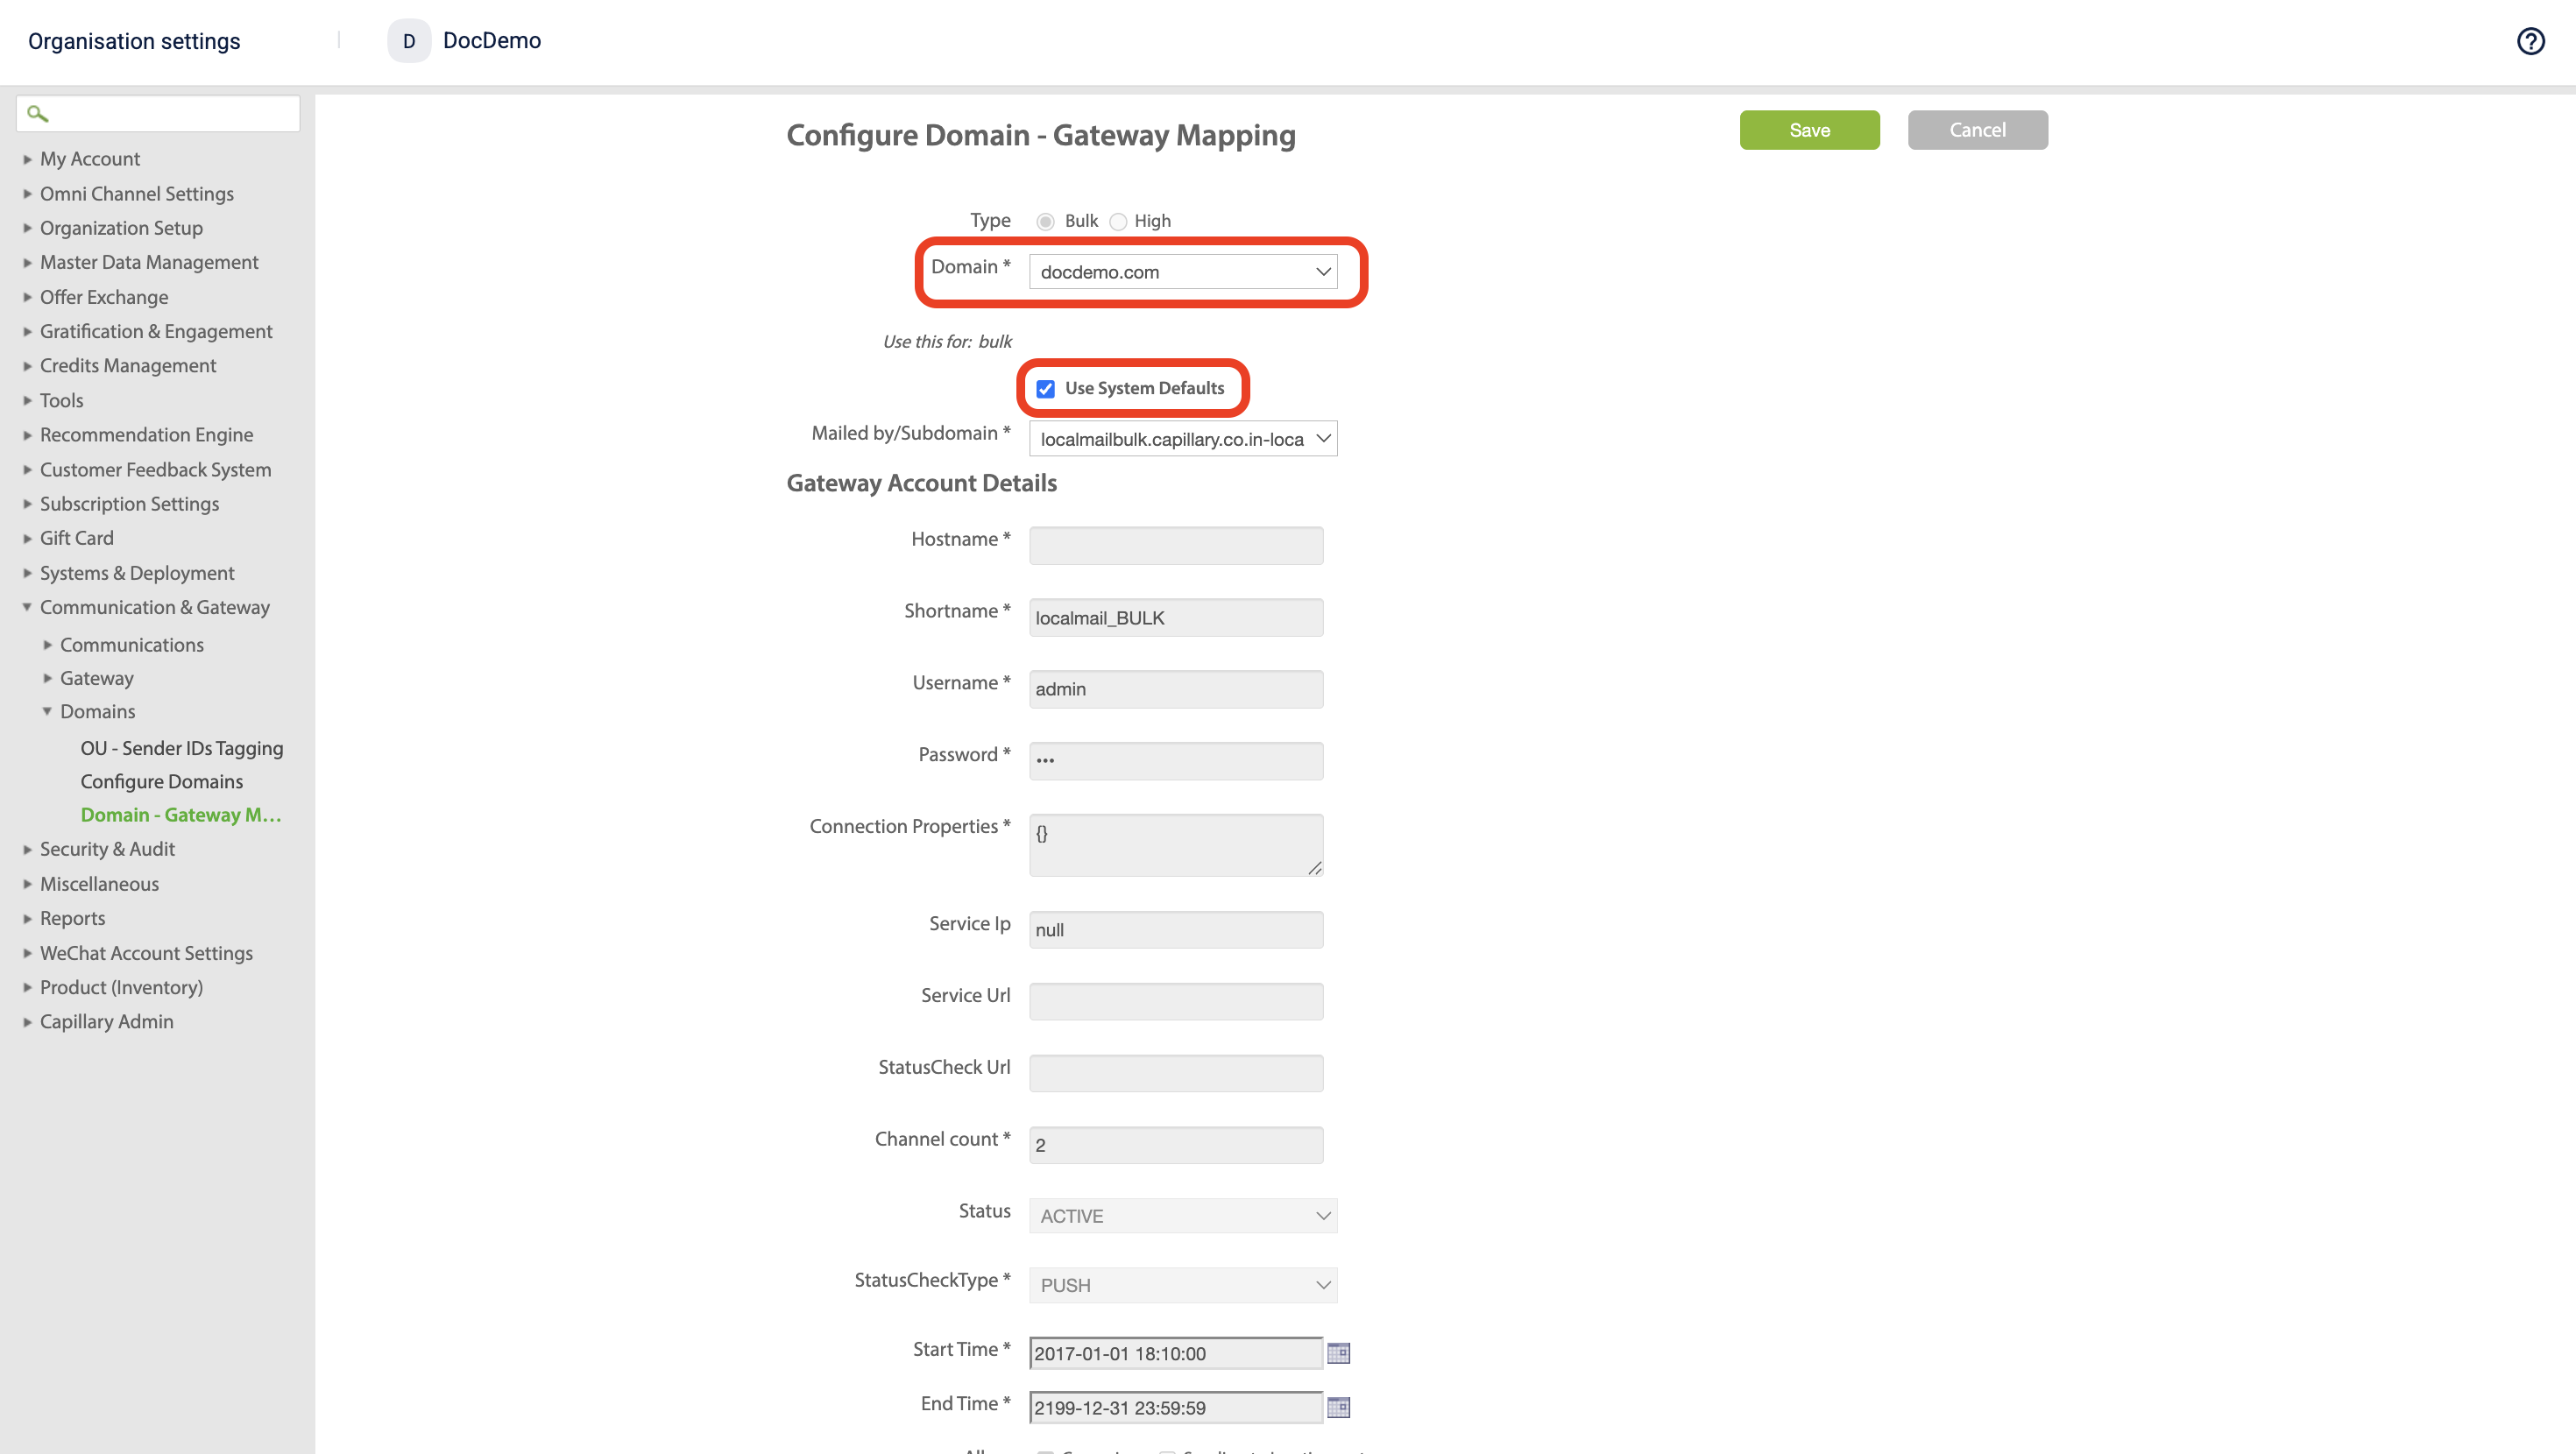
- Select Save. The new mapping appears on the Gateway Mapping page.
Configuring email priority settings
When multiple domains are available for a brand, setting a domain priority determines which domain is used to send communications. You can set the priority separately for Bulk emails and for Transactional (High) emails.
Steps to configure domain priority
- In InTouch, select the brand for which you want to set the domain priority. Then navigate to Organization Settings > Communication & Gateway > Domains > Domain Gateway Mapping.
- On the Mapping page, under Email Domain - Gateway Mapping:
- To set the priority for Bulk emails, select Update Bulk Priorities.
- To set the priority for Transactional (High) emails, select Update High Priorities.
- In the priority table, navigate to the domain you want to send messages from.
- In the Priority section, select the + icon for the domain and drag it to the top.
- Select Save.
The priority is now updated for the selected domain under the selected brand. When you send a communication, it will be sent from the domain that is set as the first priority, regardless of the other domains listed in the table.
NoteEnsure that the sending domain you select is whitelisted at the gateway or vendor. If the domain is not whitelisted, emails may be sent from a fallback or default domain instead. Contact your gateway or vendor support to whitelist the required domain before using it in email campaigns.
Adding the details in the setup wizard
The Capillary Database stores the list of organizations configured in the UI. After integrating the vendor and completing the domain settings for a brand, you must update the sender details in the database as a final step.
To add the details in the setup wizard follow the given steps below:
- Navigate to the Capillary data base from the desired cluster. For example for EU cluster - https://eu.intouch.capillarytech.com/orgadmin
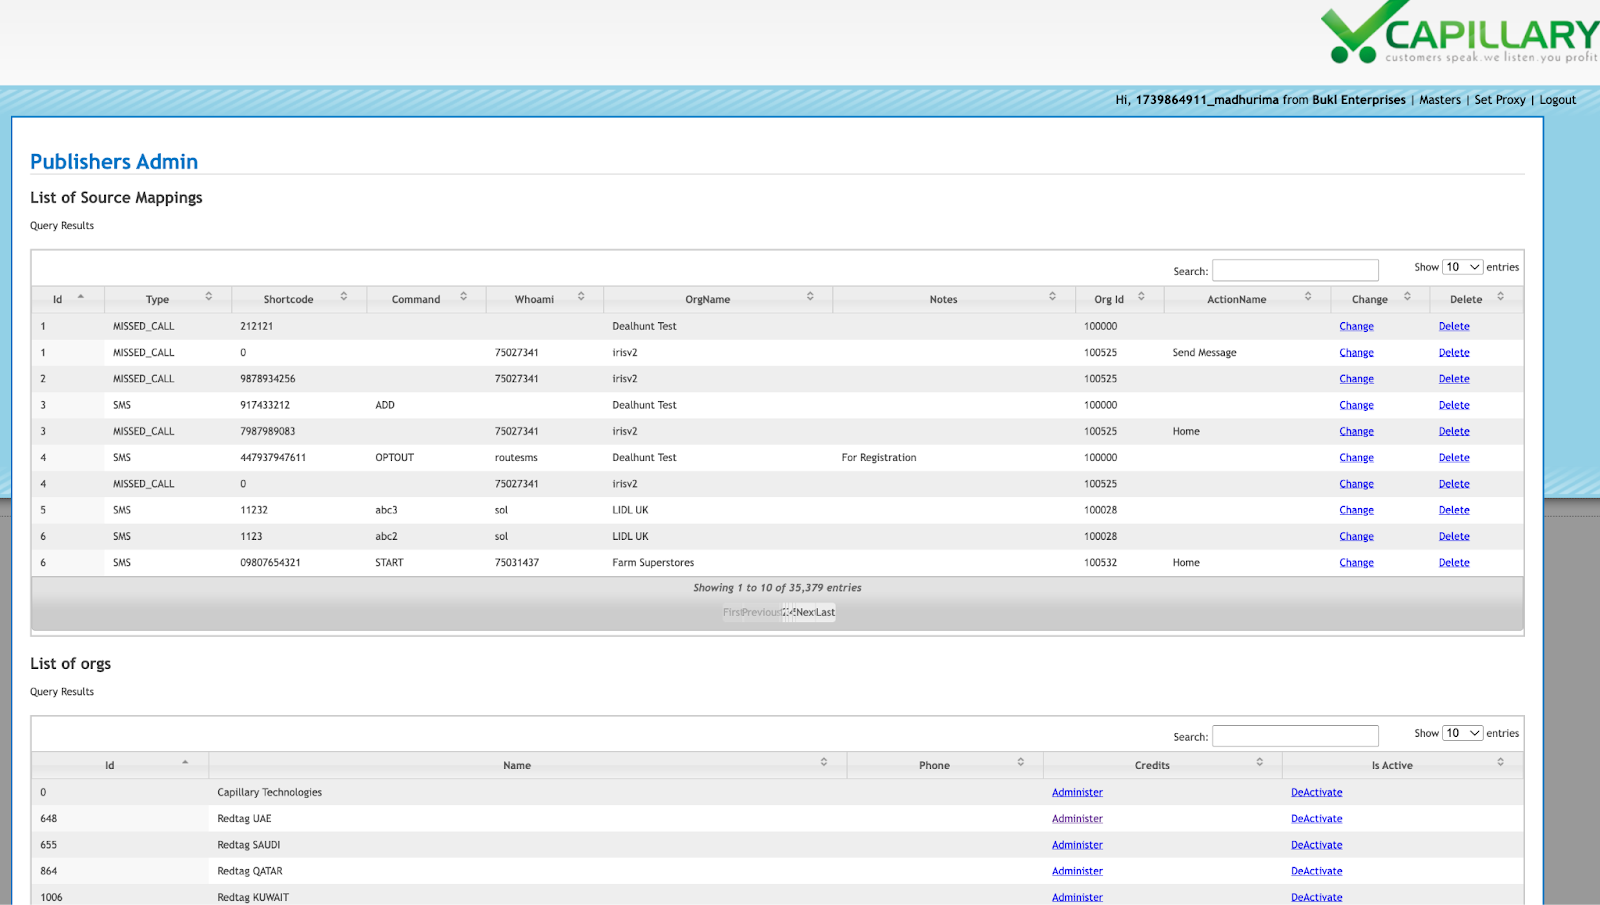
- Navigate to the list of orgs. Select the organization name that you configured in the UI.
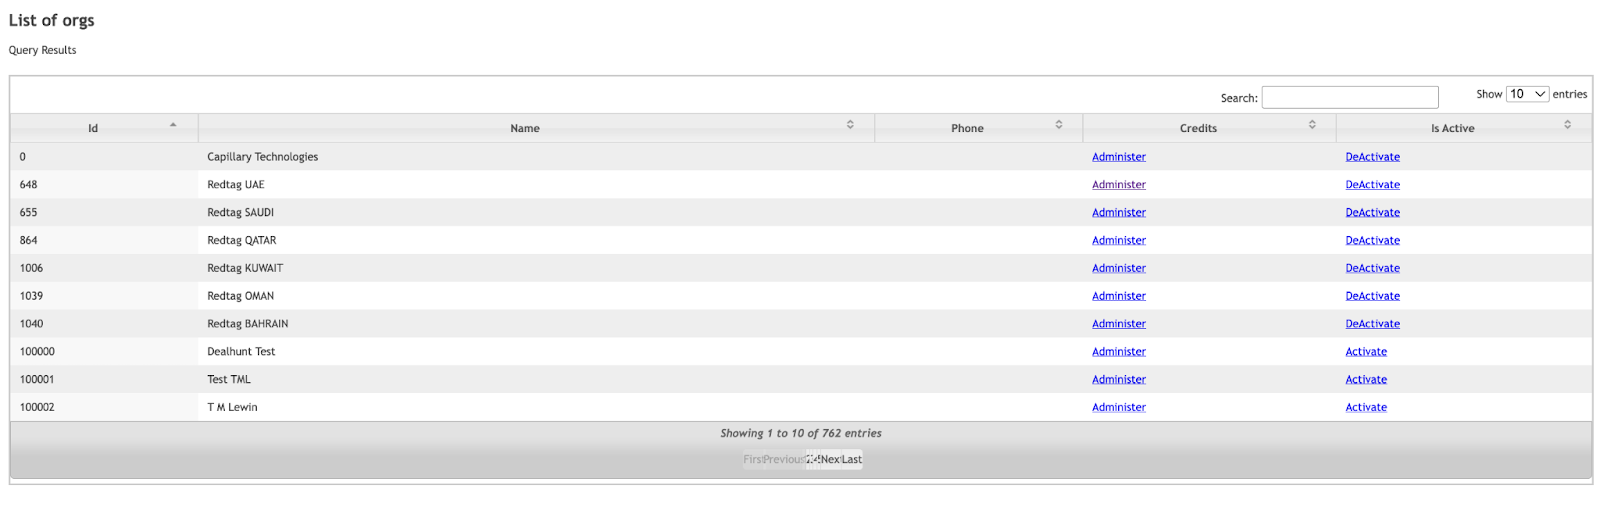
- Navigate to the Update Custom Sender and enter the following details - Sender ID for GSM, Sender ID for CDMA, Sender label for EMAIL, Sender EMAIL and Reply-to ID for EMAIL. This information is provided by the brand.
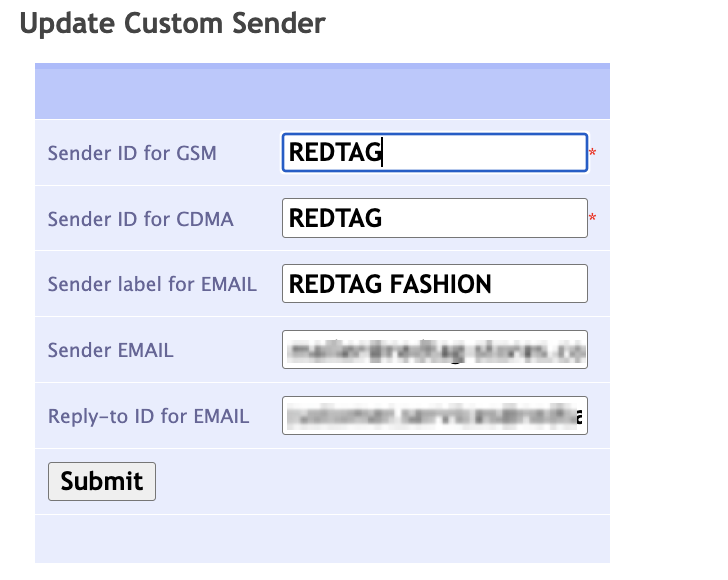
- Select Submit.
The other fields - Edit Details for the Organization, Administer 'Redtag SAUDI', Credits HIstory, Modules and Microsite are not required. Any updates made on this page will not affect the configurations made on the brand’s organization.
Configure email whitelisting
When emails experience soft or hard bounces, they may stop receiving messages sent from Capillary. To address this, you can whitelist such email addresses.
Whitelisting helps resolve specific delivery issues, but it should be used alongside broader email best practices. These include:
- Regularly cleaning your customer database.
- Removing invalid or blocked addresses.
- Having a clear policy for handling bounced addresses.
- Periodically removing inactive subscribers.
Never reactivate addresses on your unsubscribe or suppression list. While whitelisting is a corrective step, maintaining overall database hygiene is the key to preventing delivery issues.
The process for emails whitelisting on the Capillary Engage+ setting is as follows:
- On Engage+ home page, select settings.

- Navigate to Email Whitelisting.
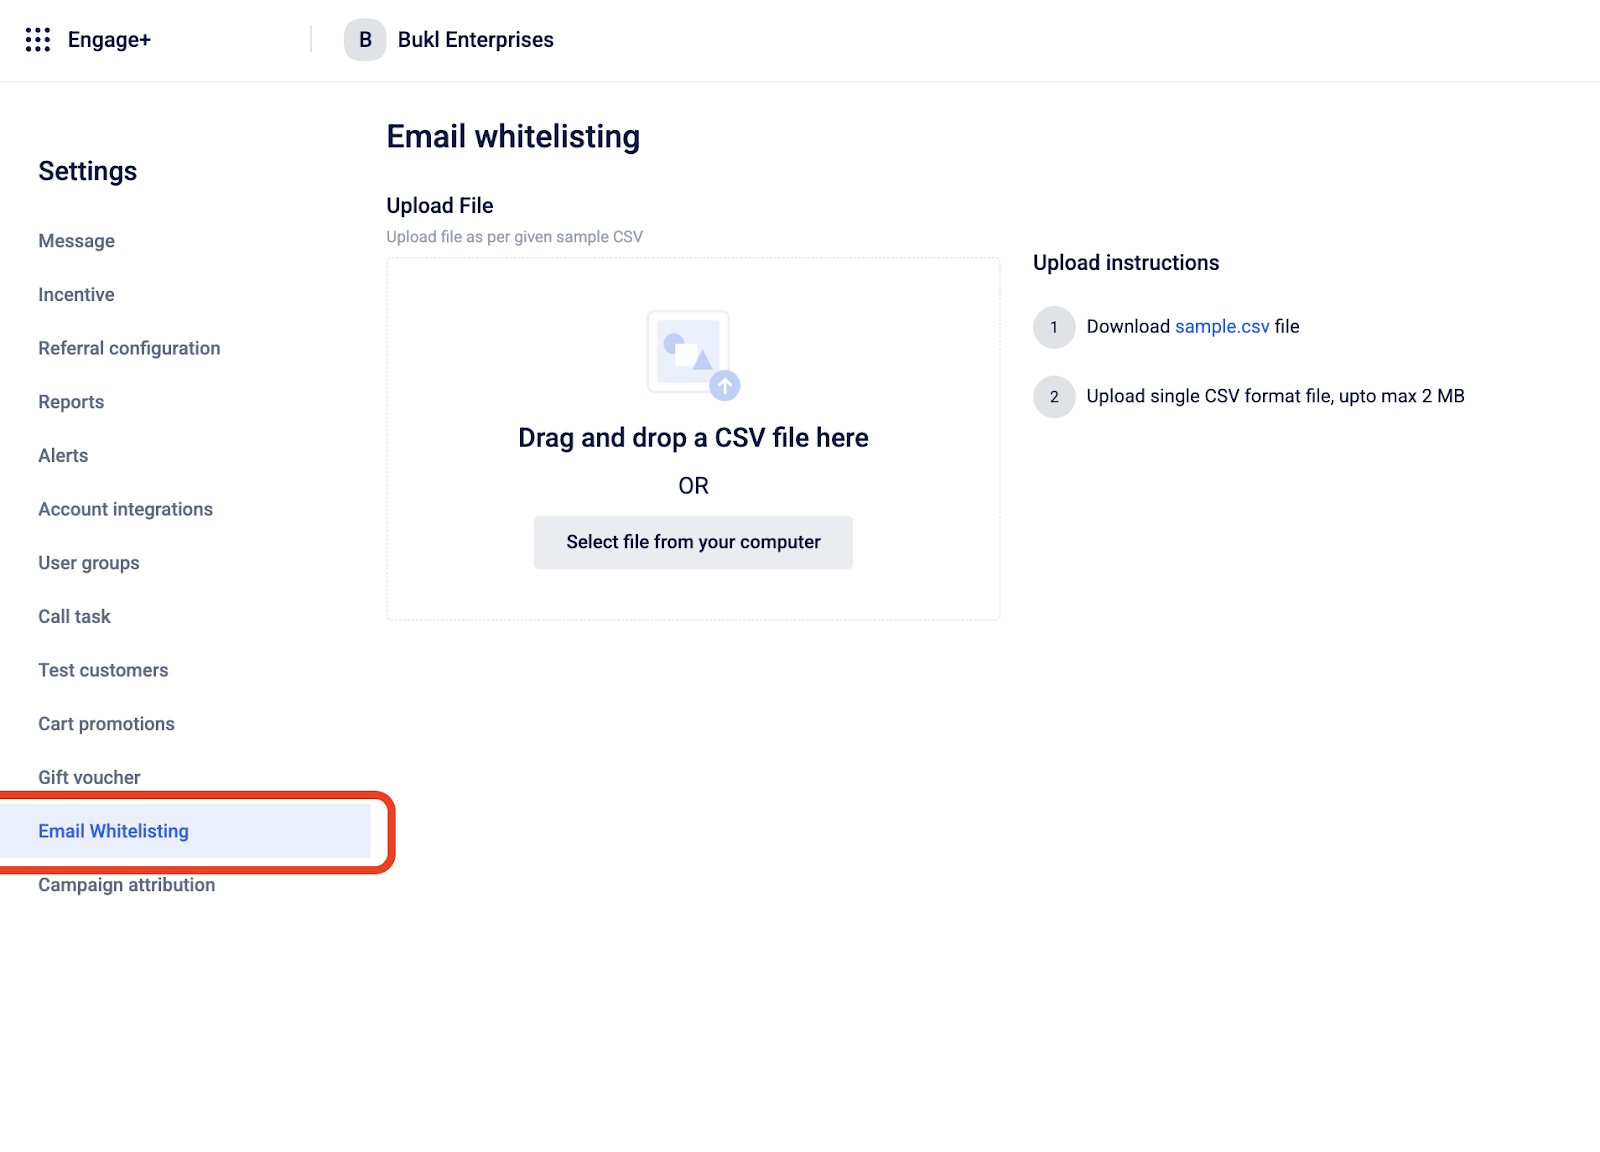
- Upload the CSV file containing the emails to be whitelisted.
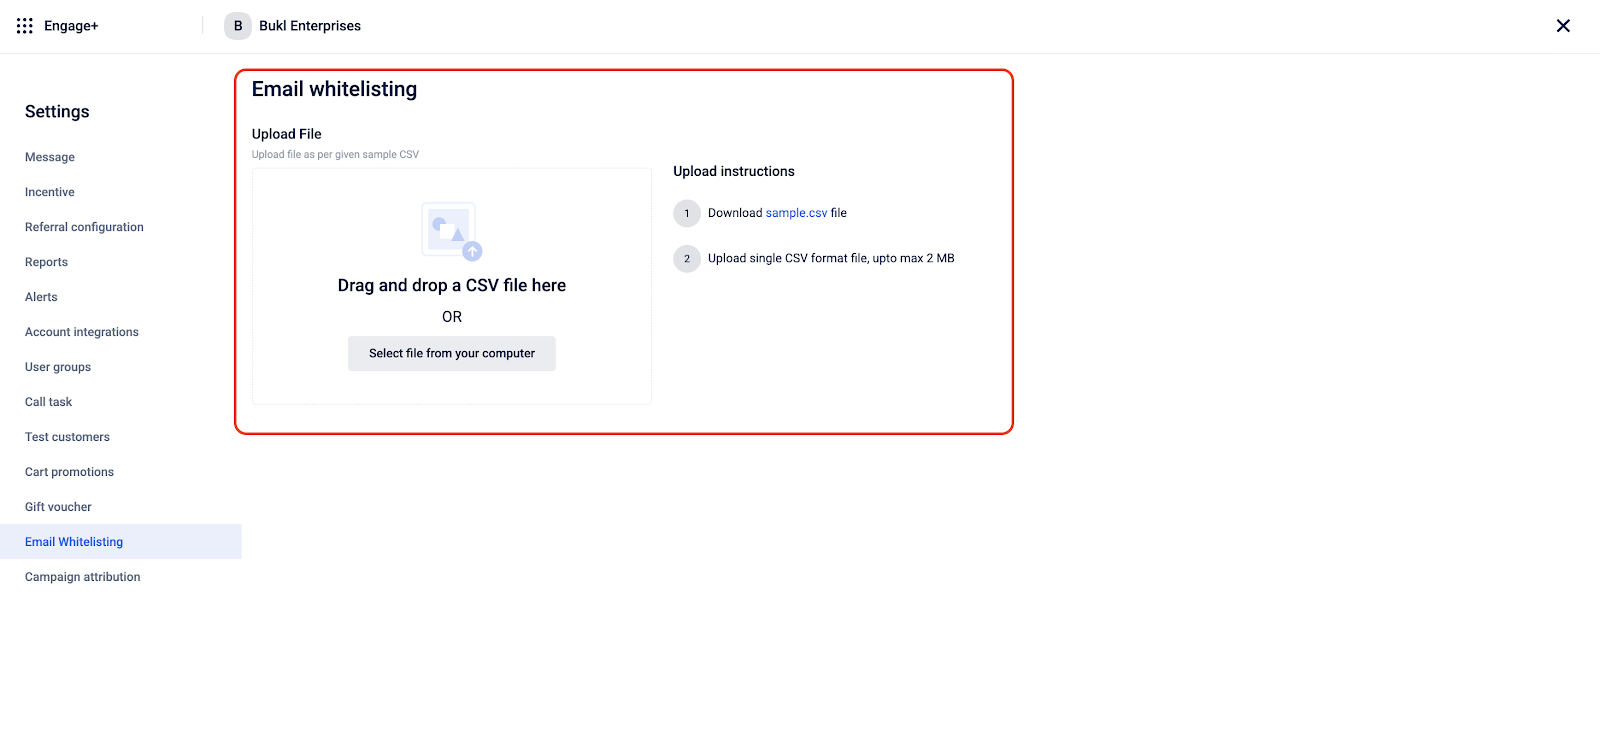
- Click Done.
NoteEnsure that recipient email addresses are not marked as hardbounced. Addresses marked as hardbounced are blocked from receiving transactional emails. You can temporarily allow delivery by whitelisting the address, but if another hardbounce occurs, the address will be blocked again.
Configure Email notifications for POCs
This allows you to send scheduled campaign messages to the brand’s Points of Contacts (POCs) as well who act as the designated user group.
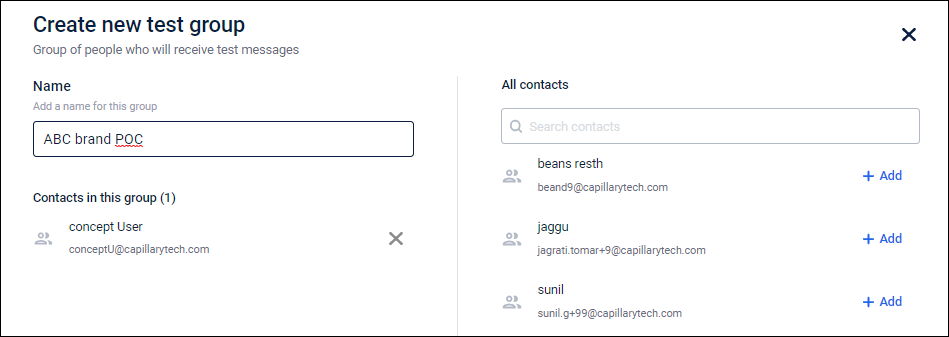
To create a POCs group, follow these steps.
- On the dashboard, click the settings icon.
- Select Users groups, and then select Create user group.
- In Name, enter a group name for POCs users.
- In the All contacts tab, select users by clicking +Add next to it, and then click Done.
Update subscription status
You can configure email subscriptions to let customers opt in or opt out of promotional emails for each source. You can also customize the success or failure messages shown after a subscription update. For details, see Subscription Message Language Configuration.