January-February-March 2022
Loyalty+
Code linked promotions
Issue promo codes to your loyal or anonymous customers via partners or physical coupons to improve engagement & acquisition.
For example, ZN34C - Get 10% off on a bill of more than 100$
About Promo Codes
- Promo code-linked promotions are mainly for driving coalition-led acquisition or incentivizing users by issuing physical coupons that can be redeemed irrespective of the customer's loyalty status. These can also be used as influencer codes.
- You might have come across cases where you get physical coupons for a brand different from the one you are shopping at. It could be sister brands like Reliance digital giving coupons for Reliance footwear or Dominos giving you a Shell coupon.
Presenting a new type of Cart Promotion called Code Linked Promotions in the Promotion Engine. As the name suggests, brands can now issue Promotional Codes to the customers which can be availed at the time of checkout or billing based on code validation.
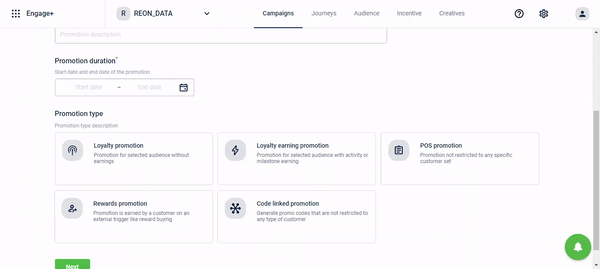
- These are limited-time offers redeemable once and distributed via physical paper discount vouchers.
- These are generally distributed directly in the stores when a customer makes a purchase / through email campaigns which can then be availed on e-comm channels or in-stores / discounts through their coalition partners on various criteria.
- Any type of promotion can be linked to this code eg. Combo promotion, fixed dollar discounts, free product, bundled pricing, etc.
- The Promo codes can be generated in two ways, either automatically or can be uploaded by the brand.
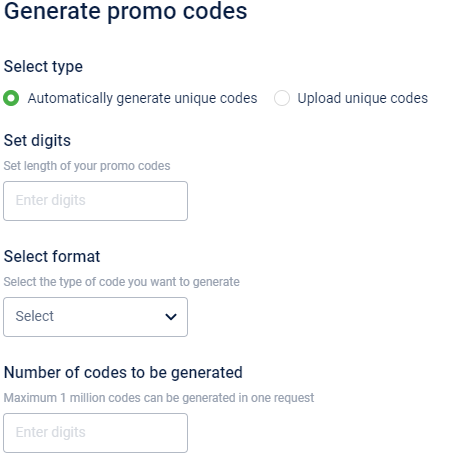
These Promo Codes -
- become invalid once the promotion expires.
- apply to both loyalty and non-loyalty customers.
- can be redeemed multiple times as per set restrictions.
Generating additional promo codes once the promotion is created:
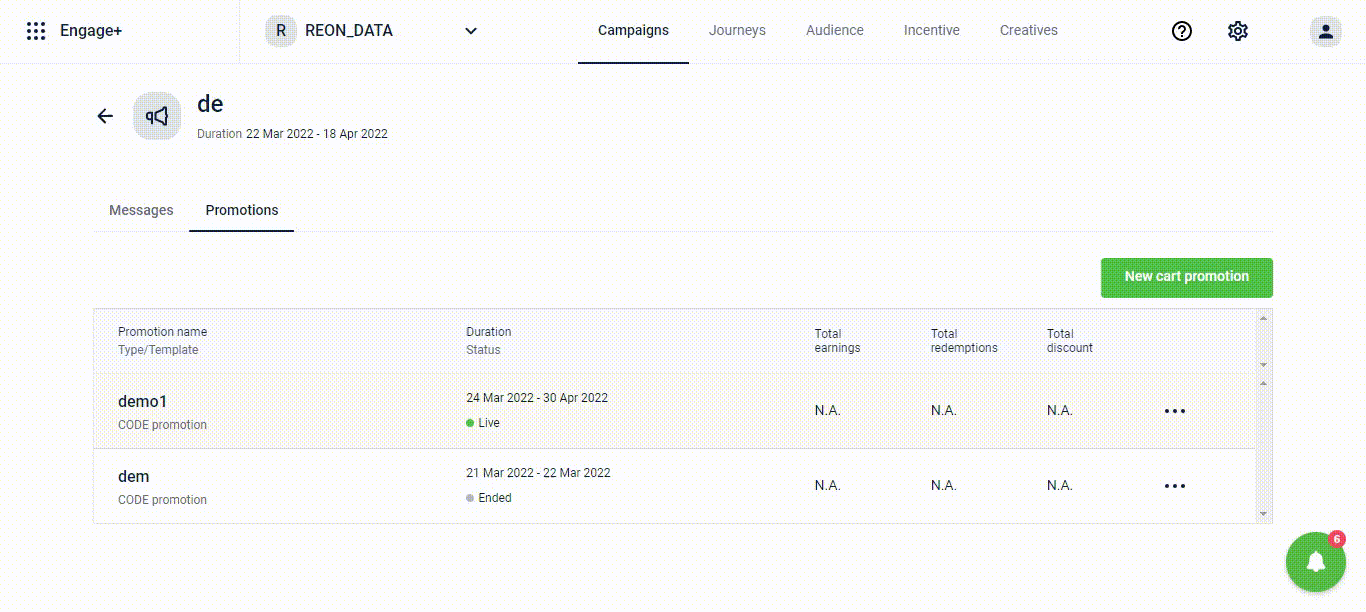
Converting a physical promo code to a digital promo code for auto-apply on the next checkout :
This is achieved through a linkcode API wherein brands would have to send in code, customerId, and promotion mode.
- Endpoint - /v1/promotions/code/link
- payload
Promo code redemption restrictions
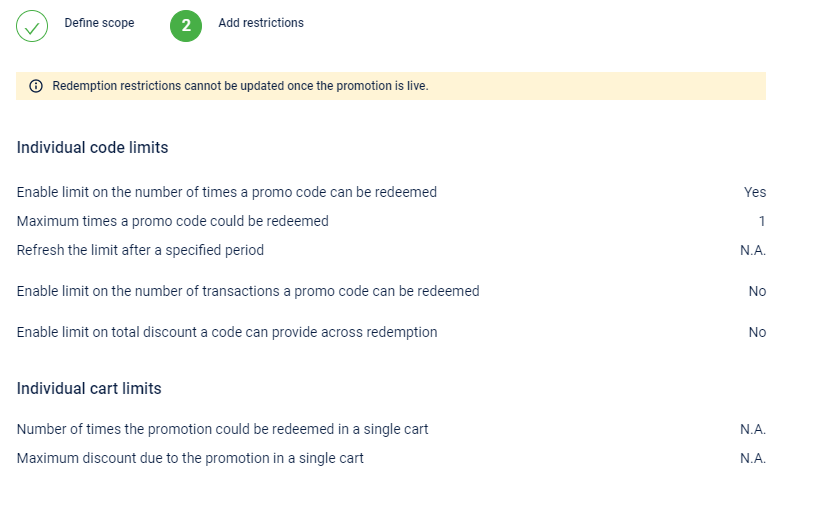
Brands can restrict the number of times a code can be redeemed based on the below parameters.
- Use Case: The trending Influencer Marketing can be successfully handled through these promotion restrictions. Brands can promote themselves on various social media platforms through influencers, who can further gift these promo codes to the customers. Brands can enable a limit on the number of times a promo code can be used and limit the number of transactions a promo code can allow.
For example, Mansi is an Instagram influencer. The brand provides her with a code called HOLIMAN100 which she can provide to her followers. But the brand can put a restriction saying only 1000 redemptions are allowed. So, the first 1000 users to use this code will get the benefit
For details on how to configure Code linked promotions, see here.
Future Scope
The users will be able to view the status of a particular promo code on Member Care including redemption details and transaction details.
Points ledger
Points as an incentive are treated by customers and brands as currency within the closed ecosystem of the brand and its affiliates. Within this ecosystem, there exists a multitude of credits, debits, and adjustments that impact this "pool" of points within a customer's account. Hence there exists a distinct need for a brand and the customer to see the list of all events listed and grouped in some logical manner that allows them to holistically make sense of what has happened in the account.
Furthermore, enterprises are leveraging app-based loyalty programs that drive superior engagement with customers, particularly Conglomerate programs and B2B Loyalty programs. In these scenarios, brands seek to provide users greater transparency about their points balances with full earn and burn ledger. This helps minimize inbound support queries from customers about their points details. These ledgers also act as engagement opportunities with the customer as they build this transparency.
Problem Statement
- There is no unified source of information to ascertain all the credit and debit impacts on a user's points account.
- There is no way to paginate all this information in a proper chronological order in an app or website.
- There is no way to search for or fetch a narrow range of information related to a user's points accounts.
- Owing to complex operations and adjustments, the direct impact on a user's points account is not always easy to determine.
Solution
A points ledger was developed to address these problems for the marketing user and to act as a robust bookkeeping system that increases transparency, and audit, and reduces chances for error. We now allow the option for a user to fetch this Ledger via GET APIs.
API to fetch Points Ledger Entries
- This API allows the user to fetch a list of events and the ledger entries corresponding to those events.
- The API supports pagination with a maximum allowed page size of 10.
- The API supports filtering options such as:
- Event Source (e.g. INSTORE, E-COMMERCE, WEBSITE, TMALL, etc.)
- Till ID
- Date Range (By default it returns for the last 7 days)
- Entry type (Credit, Debit)
- Points Category (Regular, Promised, or Trigger-based)
- This API provides the following information:
- Basic details of the customer
- Page related information
- Ledger entries with:
a. Information on the event b. The date-time when the entry was created, along with a unique event log id c. The nature of the transaction (i.e. credit or debit) d. The program and points account that is affected e. The actual points impact f. The till and store where the event occurred
Note
- For details on the API structure and how to use it, see here.
API to fetch Points Ledger Closing Balance
- The API allows the user to fetch the closing balance for a particular ledger view
- The user can provide the same query parameters used to fetch Ledger Entries and they would get the closing balance as of the last entry in that ledger.
- By default, it would return the current balance of the customer in the absence of any filter parameters.
Note
- For details on the API structure and how to use it, see here.
Ledger Behaviour and Possible Entries
Opening Balance Entry
There will always exist an opening balance entry for a user and it marks the start of the ledger and no entries will be available prior to this entry. This entry could have been generated in one of two possible ways:
- As part of the Customer Registration event - this will be a zero value entry and simply marks the start of the ledger.
- As part of the 'PointsLedgerBulkJob' event - this means that the ledger feature was not available for this customer prior to this point and the value will be the points balance of the customer at that time
Note
- Note: Opening Balance entry initiates an account and hence will be present for a user for each program and each points category (e.g. if there are 5 programs and 3 categories - there will be 15 opening balance entries)
Credit Entries
The following are the possible credit entries in the points ledger. They can be present across different events and in conjunction with other credit or debit entries depending on the nature of the event
- Points Allocation Actions across different events e.g. Transaction Add, Customer Registration, etc.
- Points Transfer (in the recipient's account)
- Redemption Reversal
- Points awarded on Referral
- Promised Points Conversion (in the regular points account)
- Trigger-based Promised Points Conversion (in the regular points account)
- Imported points
- Other bulk award events e.g. Points awarded via Engage+ Campaigns
Debit Entries
The following are the possible debit entries in the points ledger. They can be present across different events and in conjunction with other credit or debit entries depending on the nature of the event
- Points Return
- Points Expiry
- Points Redemption (including group redemptions)
- Points Transfer (in the sender's account)
- Return of Referral points
- Promised Points Conversion (in the promised points account)
- Trigger-based Promised Points Conversion (in the trigger-based points account)
- Imports for points redemption or expiry
Event Characteristics
This section defines the characteristics of some common events, particularly the special characteristics that may be unique to that event.
Transaction Add
- The transaction number and transaction ID are available in this event alone, to facilitate looking up using other APIs for further information if needed.
Customer Registration
- For newer customers (post rollout of the ledger) this event will contain an Opening Balance entry.
Points Redemption
- This event will show details of the individual program from where the points were deducted.
- In the case of a group redemption, the total value of points redeemed will be available in the 'points_on_event' field.
- If we use program Id as a filter, by default it will only show the debits from that program - in order to see the group redemptions associated with the till id mapped to that program the user can use the 'includeTillConceptEvents' query parameter.
Points Transfer
- Since the ledger shows the impact on a single user's account, it will only show the credit or debit entry depending on whether the user is a recipient or sender for that particular event.
Redemption Reversal
- It will be shown as a credit event into the account it is being reversed into.
Points Expiry
- The ledger date-time will reflect the time that the actual expiry was completed (typically the morning of the next day from the expiry date).
Transaction Return
- This event can show both credit and debit entries.
- Debit in case of points return.
- Credit in case of redemption reversals.
- The 'points_on_event' field would show the net of both the credits and the debits.
- The transaction ID of the return transaction will be provided here.
Merge Customer
- The Ledgers of the survivor and victim will remain distinct even after the merger.
- Merge event will result in a Debit entry in the Ledger of the victim and this will be the very last entry in the victim's ledger.
- Merge event will also reflect in the ledger of the survivor as a credit entry.
Note
- Note: The exception to this situation is if the victim had a negative points balance - in that scenario, the victim will have a credit entry, and the survivor will have a debit entry.
Promised Points Conversion
- Both the debit entry from the promised accounts and the credit entry to the regular account will be part of the same entry.
- Hence, the 'points_on_event' field will always be zero for this event.
Engage+
Enhanced Drag & Drop Email Editor
An enhanced Drag-and-drop editor for emails to improve the overall user experience and ease the content editing experience. You can now see the following improvements -
Title
Title as a block has been introduced in the Content block of the drag and drop editor. This helps in establishing a hierarchy in the content while creating an email.
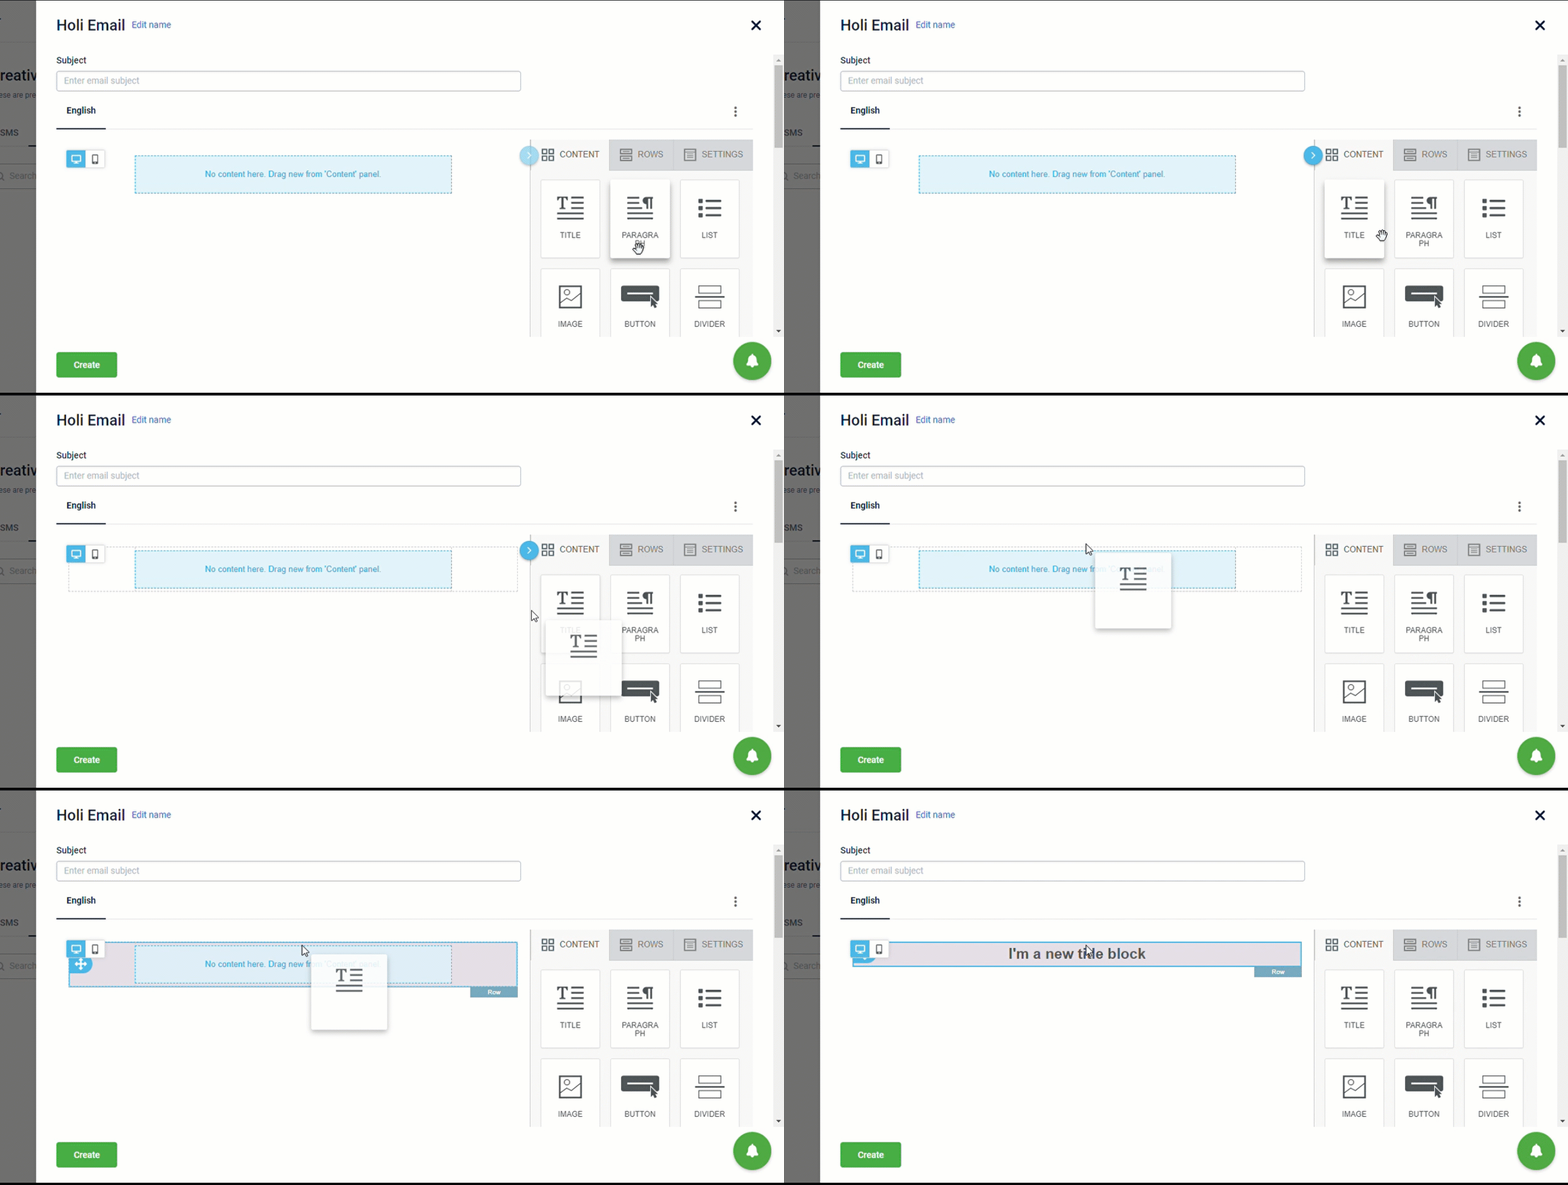
Options like Title property is used to select a proper heading style
- Flexible styling: You can now apply the styles such as text direction, alignment, font size and so on to the whole block.
- Different styles for desktop and mobile mode: Using two separate Title blocks and applying the hide on desktop/mobile setting, you can have titles with the same title tag but with different font styling. This comes super-handy if you need to differentiate title size and style on mobile and desktop, while keeping the same heading tag.
Paragraph
You can see it in the the Content block of the drag and drop editor. You can use any number of paragraphs of any length that share the same content formatting, such as font family, font size, and font weight.
The Paragraph content block is also encoded with parameters to manage copy-paste operations better with other block options to improve the formatting.
List
You can see it in the Content block of the editor. It provides specialized support lists with improved styling options, font management, copy-paste operations, and formatting options same as the Paragraph block.
It provided a more granular control over list formatting that may have different design requirements than general text.
Option of indentations, spacing and list types have also been added to improve the experience. To manage numbered list in a better way, you will also have Advanced options like "Start from" option to choose where to start numbering from.
Connect with your customers on WhatsApp
Context
- WhatsApp has an active user base of around 1.6 billion. It allows brands to send marketing messages to your customers over WhatsApp since Oct 2021.
- WhatsApp has the fastest delivery and better read rate as compared to other similar channels.
The following WhatsApp features helps in innovating campaign better and hence Capillary clients are looking for this channel:
- Use multiple media formats such as texts, images, audio, call to action buttons, and product catalog.
- Track WhatsApp campaigns to know the count of messages that were sent, delivered and read.
- Send promotional and transactional content
- Use segmented audience, personalization tags
- Two way communication such as customer support
- Online commerce activities
Changes made in Engage+
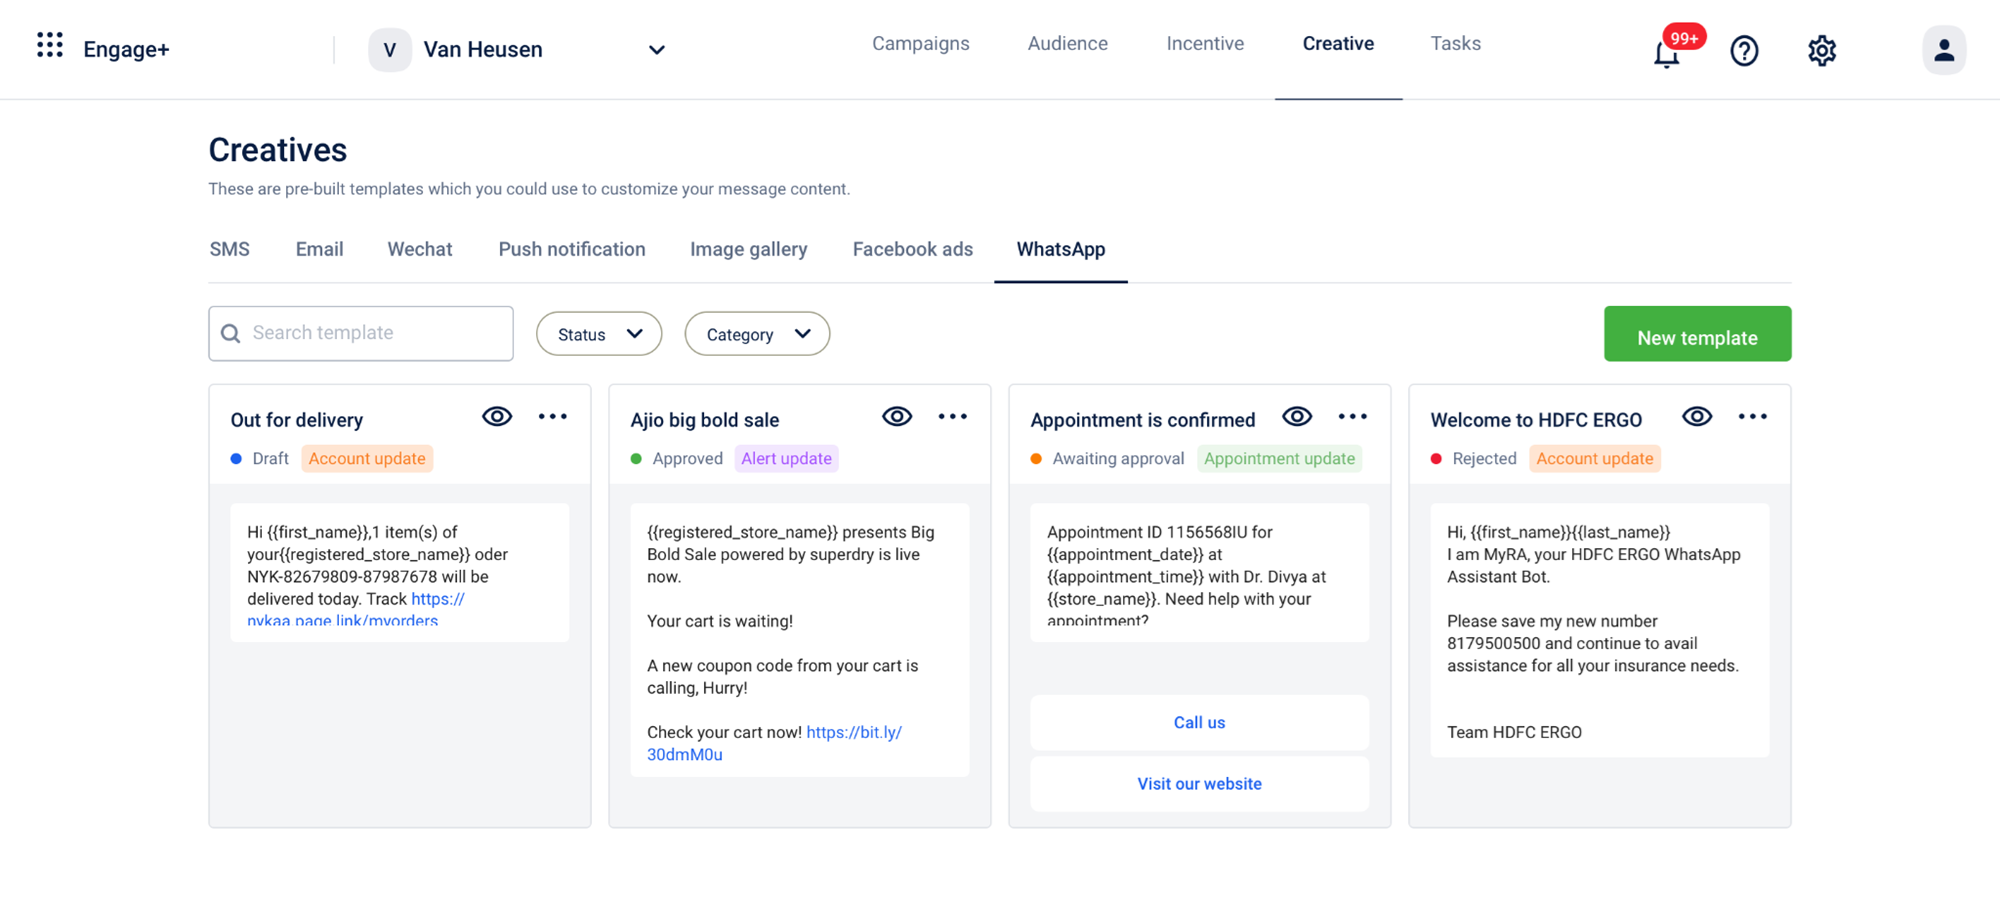
- You can now create WhatsApp message content templates in Engage+. These templates will be sent to WhatsApp for approval by Capillary.
- Once whitelisted you can see the approved templates in Engage+. When creating campaigns, you can select from these approved content templates.
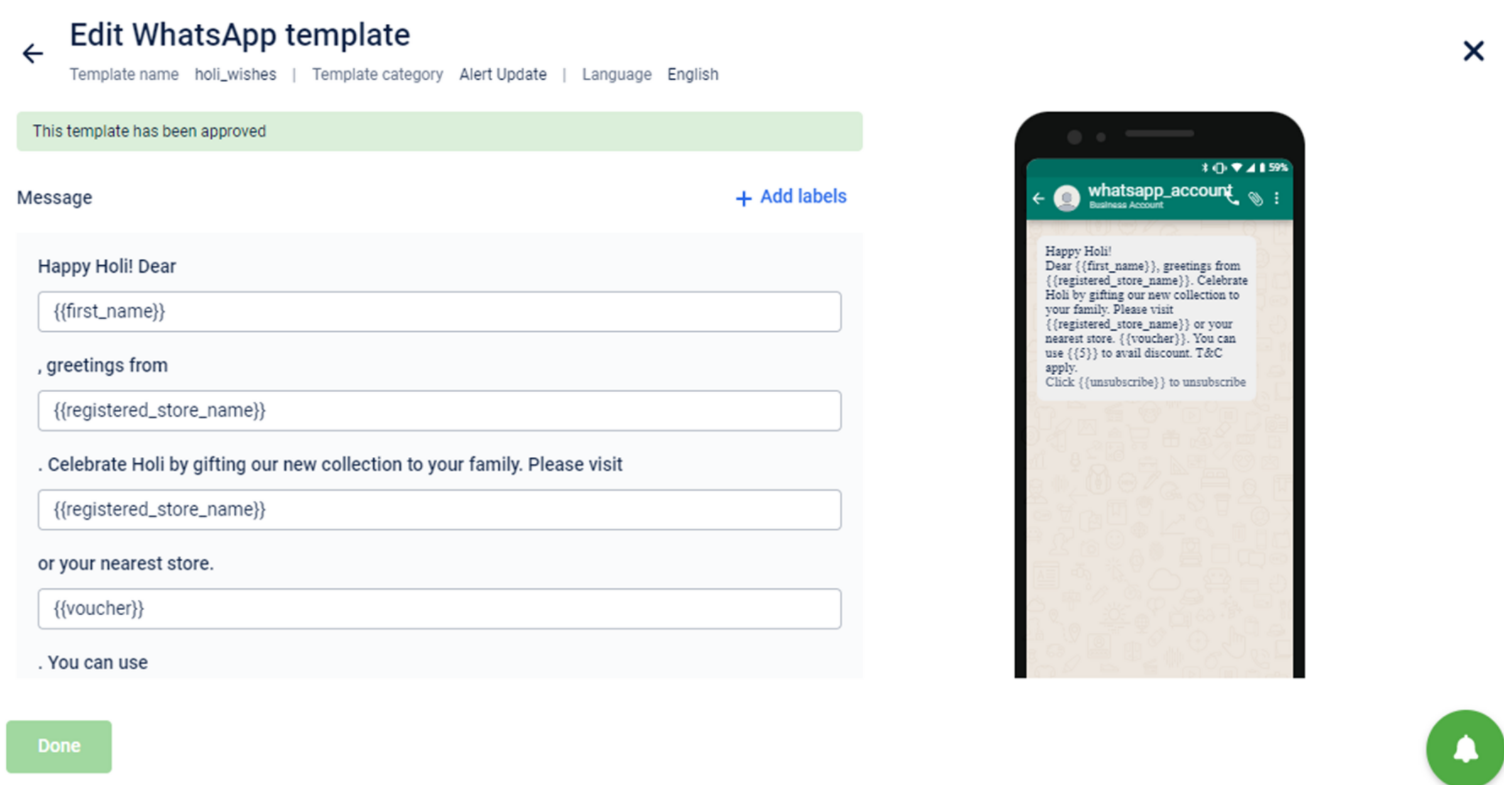
- In the selected template, you can only edit the variable part of the template. Various checks such as variable length, using only registered Header, Template id etc. are in place.
- You can also see the templates that are awaiting for approval or rejected.
NoteUsing a verified Official WhatsApp account increases customers' trust.
Benefits
- No need to maintain templates at two places - BSP portal and Capillary.
- Reduces redundancy and time from manually copying and pasting from different portals. Hence, minimizes manual errors.
- Stops message from sending if there is a mismatch between template and message content for a customer
- User doesn't need to download the customer segment list with other information such as tags (key - value pair) and share it every time with BSP
- Campaign stats such as delivery reports, hit rate, incremental sales etc. are available. For these reports BSP will have to do POS/ website integration.
Onboarding
Fill this form(link) and Gateways team will coordinate with BSPs.
Pricing
- We are integrated with two BSPs – Twilio and Tanla/ Karix. We are ready to integrate with any other client preferred BSP provided they have the desired APIs.
- Pricing strategy can be discussed with Pratik/ Siddhant Jain/ Bhuvanesh/ Rahul Ashok/ Deepak Kumar
Whatsapp Number
Client can use a new or exiting number. If existing number is being used with non-capillary supported BSP then the number can be ported.
Feature Details
Setup & Prerequisites
- Org needs to register itself with BSP's that capillary support. Currently we have two - Twilio and Tanla/ Karix.
- To enable WhatsApp channel for an Org there are certain information/ keys required.
- For Twilio we need SID, Auth Token and Messaging service SID.
- For Tanla we need Auth/ Account key and sender id
- Once the Org has above information, the same can be shared with Gateways team, who will help in onboarding
Feature usage guide
A. Creating templates in Capillary Engage+
Orgs that are WhatsApp channel will be able to create WhatsApp template in the Creatives section as shown below:
The whitelisted templates are pulled from WhatsApp directly as soon as these are approved. User will not have to wait or keep checking on BSP portal to understand template status.
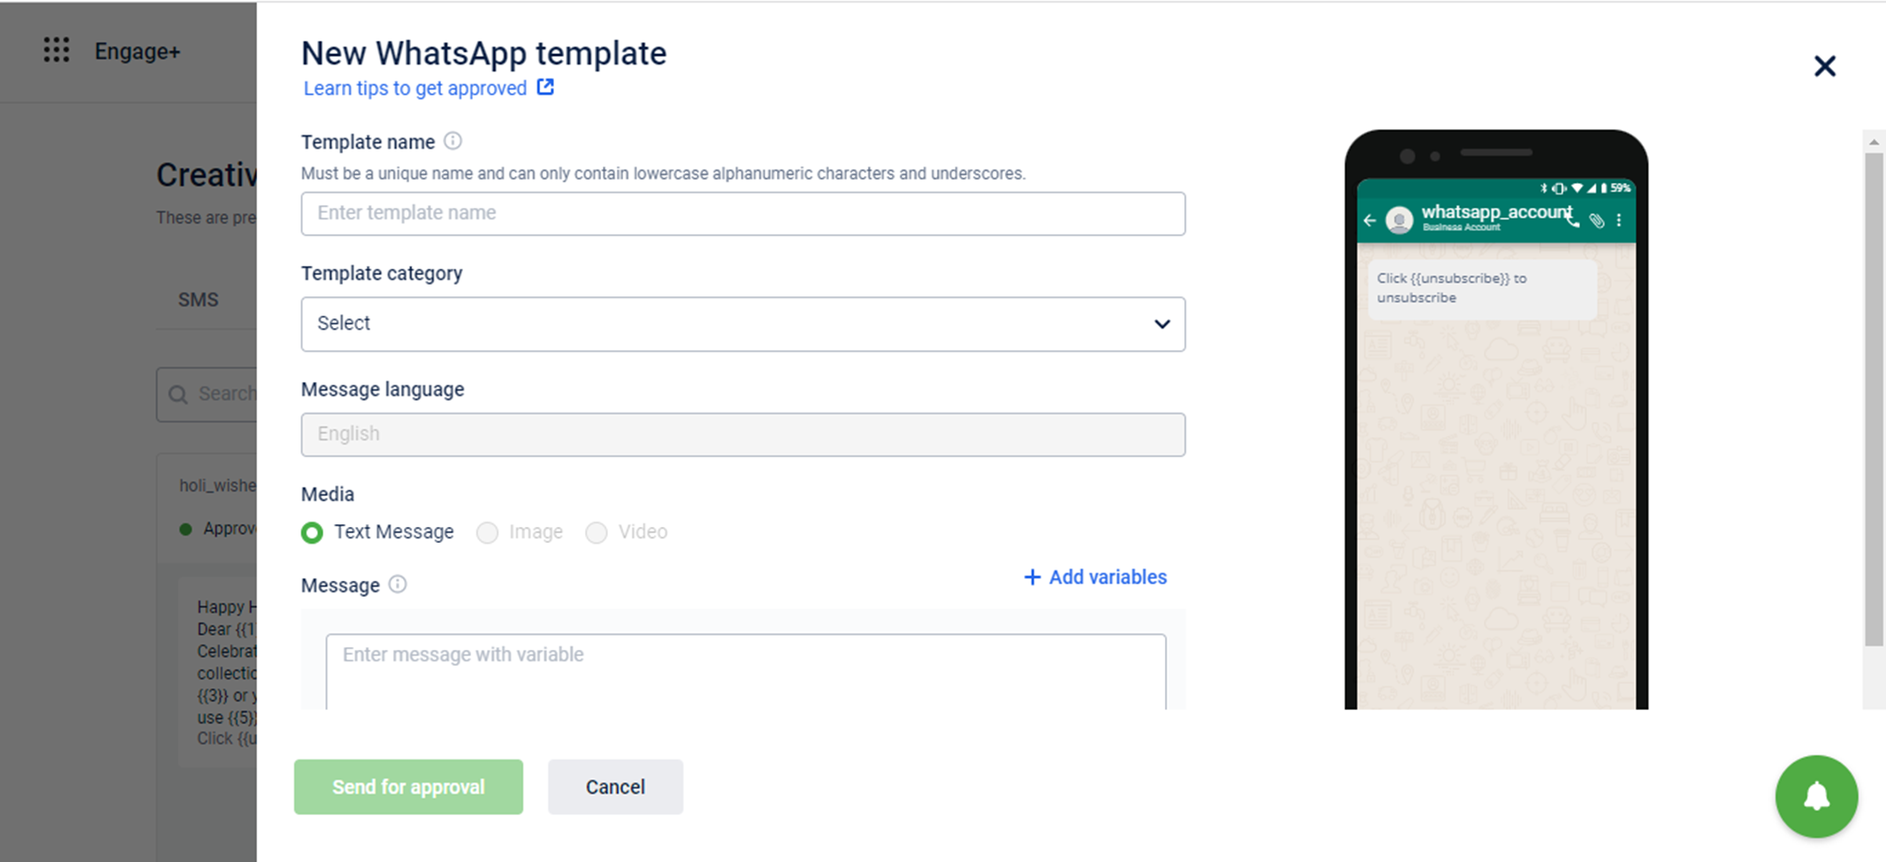
For more details, see WhatsApp template - Best Practices here.
B. Selecting and Using Approved Templates
- Once the template is approved by WhatsApp all the templates will be shown in the Creatives > Whatsapp section > Status: Approved
- In the campaign creation flow, while adding creative users can select any of the approved template.
- Selecting the template will open the edit WhatsApp screen. However, in the edit screen, only the variable portion of the template can be edited.
- The variables can be replaced with static text or labels.
C. Post campaign execution
- Delivery reports will be visible on campaign summary page, message summary page and EI.
Use Cases supported by Engage+
- Notifications/ Promotional Messages
- Account Updates
- Alerts
- Customer Support
- Order Confirmation
Supporting Loyalty Messages and Chatbot
- CRM related bot
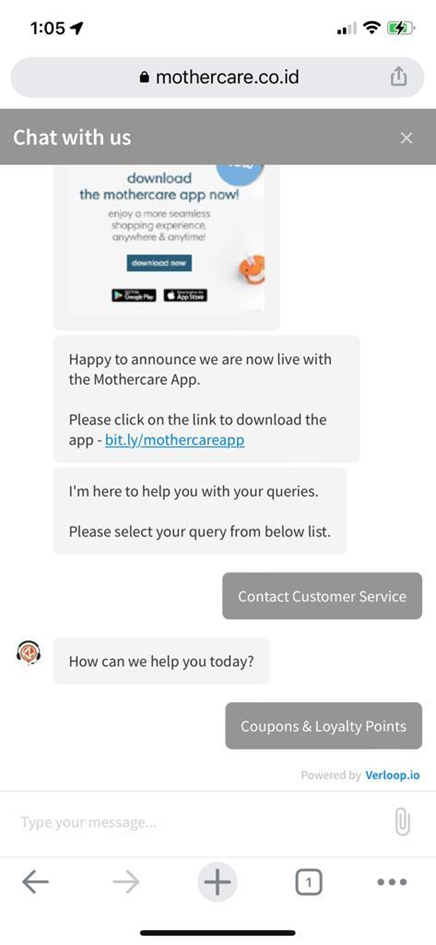
Here the bot will answer simple queries of the customer eg: how many points I have, when is my coupon getting expired, share all the active coupons I have, share store location etc. In this case, Bot needs to call our Get Customer Details Get Customer Details API and get the desired information. If any other API has the information which is being requested, the same can be shared. Have we done this before? Yes, for Arrow brand.
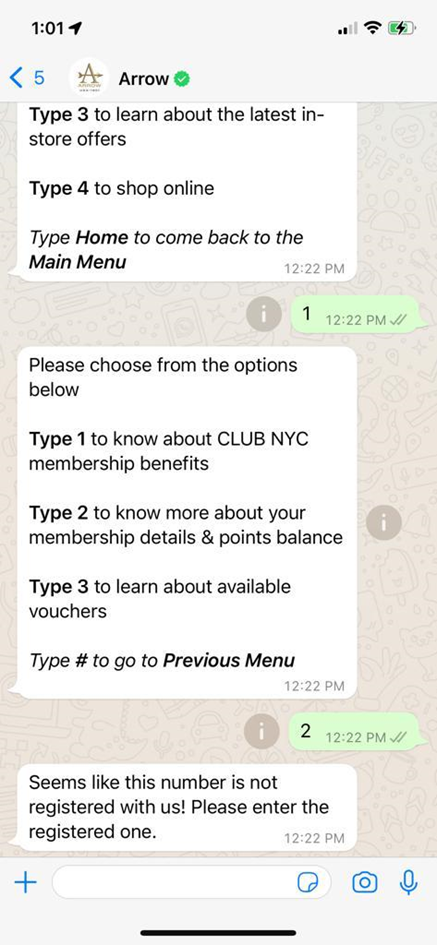
Kanmo Chatbot:
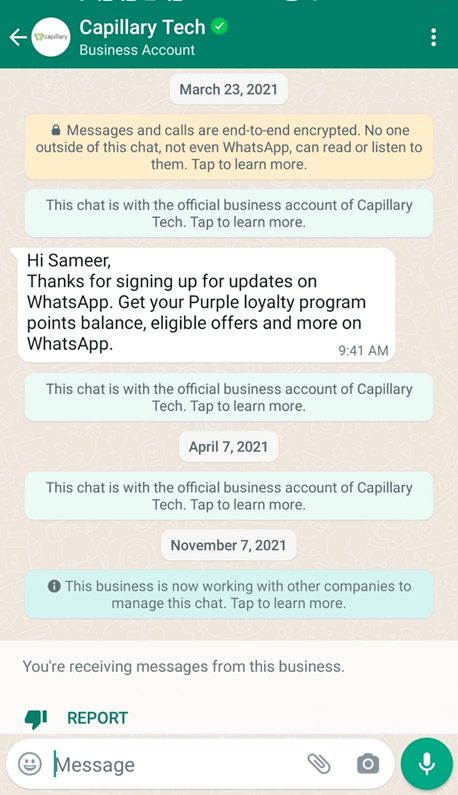
- Loyalty Message:
All standard events (transaction or customer) are posted on Event Schema (Payload) Event Schema Payload
If any brand wants to send a message on any event mentioned above then:
- Bot will have to understand when an event is happening, they can create a Webhook to understand this info.
Based on the information being passed in the event they can send a Whatsapp message (template need to be whitelisted) to the end customer.
Eg: If a transaction event happened and amount and bill number are the parameters being passed in the event. Bot can send message "Dear customer, thank you for paying {{amount}} for {{bill number}}"
This message "Dear customer, thank you for paying {{1}} for {{2}}" will be created and whitelisted. We will provide access to our event payload.
Have we done this before?
Yes, for our sales demos we sent notifications on customer_registration and transaction_add. The particular Webhook was created by our solutions team.
This particular integration effort is supported outside of our core Loyalty platform. So, for every brand and every event there is a small re-integration effort required.
For effort estimates, please reach out to the PSV team.
How to help your brands in making the decision?
- Ask them what's their use case, most of our brand >90% business is offline. So customer support, post sales service etc. don't apply to them.
- They will get a good hit rate if they send personalized promotional messages through E+.
- Our current BSP partner also supports two-way communication/ BOT flow (it can range from simple use case as described in point 1 to complex ecom ones)
- Brands can explore Capillary recommended BSP but it's best to start slow, then can first test with promotional content and keep adding more use cases as they see this channel working for them.
DND Customer database enhancements
Access to DND customer database:
Since last year Capillary, brand or Gateway companies cannot have direct access to the DND customer database. The current DND status against any customer profile in Capillary database is not accurate.
Changes made
We have made the following changes in Engage+ due to above mentioned reasons:
Change 1: Through Engage+ brand will reach out to all customers and won't honor the current NDNC status in Capillary's database.
This is because DND customer's data is maintained by Telecom Operators and they do not share it with third parties (Capillary or Gateway companies). Operators will block the messages at their level.
Change 2: Removed the option of "Send to NDNC customers" from Campaign Message delivery settings.
Since, the data regarding DND status of any customer is not accurate and operators are filtering the DND customers at their end we have removed this option. Brands can reach out to all customers and Operators can take care of not delivering the message to DND customers.
Change 3: Removed NDNC related filters from Audience Manager
Expected changes in Member Care
- NDNC Status field will show 'Info not Available'.
- 'Mobile number opt-in status' field will be removed. This field gets populated with Yes/ No if a customer has done a transaction in the last 6 months. So a NDNC customer who had transacted in the last 6 months is considered as opt-in/ Yes for communication and if hadn't transacted in the last 6 months then was considered as opt-out/ No for communication. This logic is no longer applicable.
Upcoming Changes Planned
Reading delivery status of DND customers
- The only way for Capillary to understand if a customer has opted for DND is through the delivery status we get from Gateway partners.
- If for any customer in the Audience list we get the delivery status as 'customer preference is DND', then we will update this information in the NDNC field in that customer's Member care profile.
Enable the option of "Send to NDNC customers" back in Campaign Message delivery settings.
- The only way to understand if a customer is in DND is by first sending a message and then reading the delivery status. So slowly, the brand will be able to understand the actual DND customers.
How will this help the brands?
-
Increase in Reach: In India, when a customer applies in NDNC (National Do No Call) registry, they opt out of communication from an industry (BFSI; Real Estate; Education; Health; consumer goods and automobiles; communication/ broadcasting/ entertainment/IT; tourism and leisure; food and beverages.)
A brand from any of these industries can still take explicit consent (valid for 6 months) from a DND customer and share this consent data with the Telecom operators. The consent overrides the DND status only for the brand and thus the brand can still reach out to the customer. For other countries, the Product team is trying to understand if such a similar process exists. -
Reduction in communication cost: Brands need to pay the same charges for messages to DND or Non-DND customers. In Phase 2, when we understand the DND-customers brands will be able to remove them from the Audience list and will not have to pay the SMS communication cost.
New filters in Audience Manager
Context
To boost customer engagement through campaigns, we offer various types of filters to help the user in targeting a precise audience set. Certain categories of filters are based on loyalty, user profile, transaction, etc. We continuously try to add valid filters so that brands can have more edges while creating an audience base for running campaigns.
Problem Statement
Currently, we do not calculate the value (price and quantity) of products at the item level due to which defining the audience base against a particular product is not possible. This creates a problem for brands to identify users of particular products and their purchase patterns around them.
The following are some examples of use cases that cannot be achieved:
- Brands want to target users who have bought item A more than n times (5 times) in different transactions in the respective time period.
- Brands want to target users who have TA(ATV) more than n amount ($120) bought item A more than 3 times in a defined time range.
- Brands want to target users who have spent on item A for more than n amount ($150 ) in the respective time period.
- Brands want to target users who have averagely spent on item A for more than n amount ($200) in the respective time period.
Solution
To address above mentioned pain points we have introduced 3 new filters.
1. Shopped for distinct Products/Categories/Attributes
To filter audiences who have shopped a particular product (Item) n times in different transactions.
Example: Filter users who have bought soybean more than 3 times distinctively in July.
The following table shows the number of soybeans purchased by Zoha and Raj on different days.
| Name | July 7 | July 10 | July11 | July 13 | July 25 |
|---|---|---|---|---|---|
| Zoha | 1 | 3 | |||
| Raj | 1 | 2 | 3 | 1 |
Who will make it to the filter list?
Raj, we want a user who has done more than 4 transactions distinctively that has a Soyabean item in the bill in the selected time range.
For more details, see Shopped for distinct Product/Category/Attribute
2. Average Item Value
To filter out audience on their average spent on selected items.
Example: Customers who buy Soybean more than $40 per bill in July.
Assume Zoe has bought soybean as mentioned in the following table:
Date Amount
July 5 $10
July 6 $50
July 10 $70
Will Zoe come on the list?
Yes, Zoe will fall under the filter condition. As by logic, 10+50+70 = 130 and 130/3 = (>40).
For more details, see the Average item value filter.
3. Favorite Product at the item level
To filter out audience on their absolute amount spent on respective selected items.
Example: Customers who buy Soybean for more than $150 in July.
Consider Roy has bought Soybean on different days as mentioned in the following table:
Date Amount
July 5 $20
July 7 $70
July 10 $100
Will Roy come in the list?
Yes. As we want to filter out the audience who has spent specifically on the selected item(Soybean) in the specific date range and the total amount spent on soybean is $190.
Use Cases
- Brands will be able to filter audiences based on their average spending towards a particular item.
- Brands will be able to filter audiences based on their absolute purchase amount towards a particular item.
- Brands will be able to filter audiences based on their distinct purchase of items.
- All the above-mentioned filters can be used with other filters and with help of permutation combination, various customized audience lists can be created.
For more details, see Favorite Product at the Item Level.
Notification to Brand POCs when the coupon issual limit reaches a certain threshold
Context
In the Incentives module, we provide the user with advanced settings that allow brands to configure offers in a more customized nuanced manner. Through these settings, brands can create coupon series with various rules on issual and redemption of an offer.
Problem Statement
Currently, we provide the functionality of configuring 'Issual Limit' that will allow users to put a limit on the total issuance of coupons from an offer.
We did not have functionality that can notify brands on exhaustion of the issual limit which was causing a problem to brands for running offer-related campaigns as:
- When the issual limit is exhausted, end-users (brand's audience) will not receive any offer in spite of the brand explicitly communicating about the offer.
- Certain times, brands want to increase the issual limit if the campaign is getting good engagement.
Solution
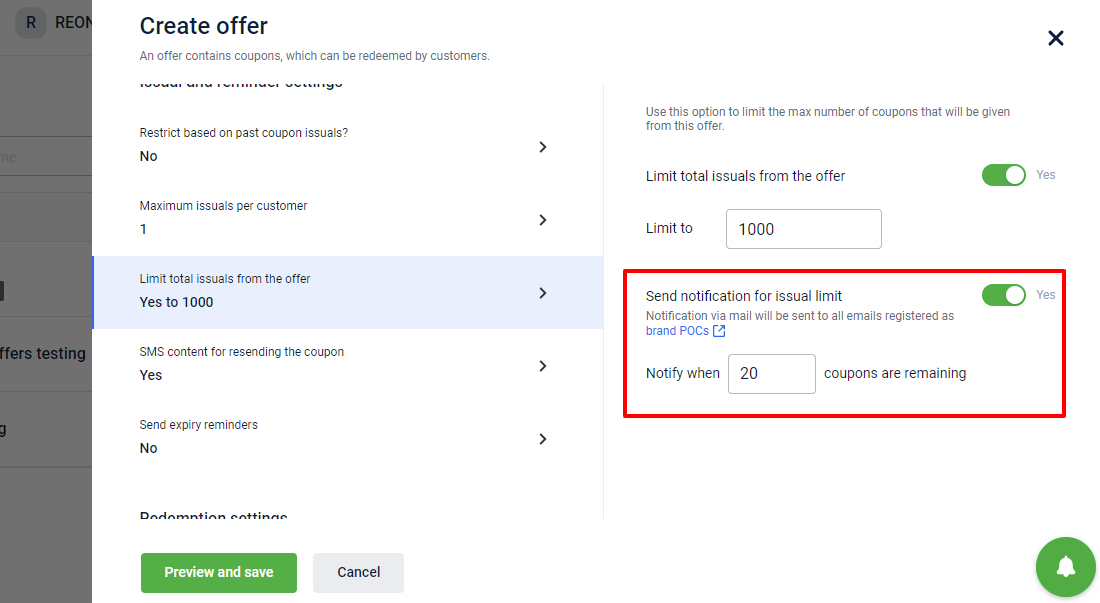
We have introduced a new field, 'Send notification for issual limit which will allow users to get notification when there are certain (user input) coupons remaining.
For example, the user can have an issual limit of 1000 for a coupon series and want to get notified when there are 20 coupon codes remaining to be issued. So, the user can input '20' in getting notify field, and an email will be sent to all the registered brand POCs.
Use Cases
- Brands will be able to get a notification before exhaustion of issual limit which will allow them to stop running a campaign at the desired respective time.
- Brands will be able to get a notification before exhaustion of issual limit which will enable them to increase buzz around the offer saying. For example, Only 20 more lucky folks will get this offer.
- Brands will be able to get the pulse of the campaign and offer engagement and can take timely calls to increase the issual limit.
- Brands that are running offers by uploading coupon codes will get notification well in advance on exhaustion of issual limit. So that, they can upload more coupon codes in advance if required and increase the limit.
For details on how to configure, see Step 5: Advanced settings of Create Offer Create offers.
Enhancements in Coupons Claimed Information
Context
For any coupon series created, we display information such as configuration details, last issued, last redeemed, redemption rate, and so on. Currently, we also explicitly show if the created coupon series is claimed or not, and if claimed then by which type of Campaign is claimed.
Problem Statement
There are various campaigns running, in which there can be various messages and offer series is claimed for it. Currently, we only show whether it is claimed either by Outbound or Loyalty. It does not help the user to identify which particular campaign/program has claimed it and the user needs to go through each campaign and figure it out. This would have a negative impact in the user experience, also decrease the productivity of users.
Major Pain Points
- Difficulty in finding the exact campaign/program which has claimed the offer series.
- Difficulty in cross-checking the information with campaign/program details and offer series.
Solution
We have introduced a new field in the information tab, ' Campaign using this offer' and 'Program using this offer' This shows the name of the Campaign or Program which has claimed the offer.
- If the offer is claimed by an outbound campaign, then you will see the name of the campaign that claimed the offer.
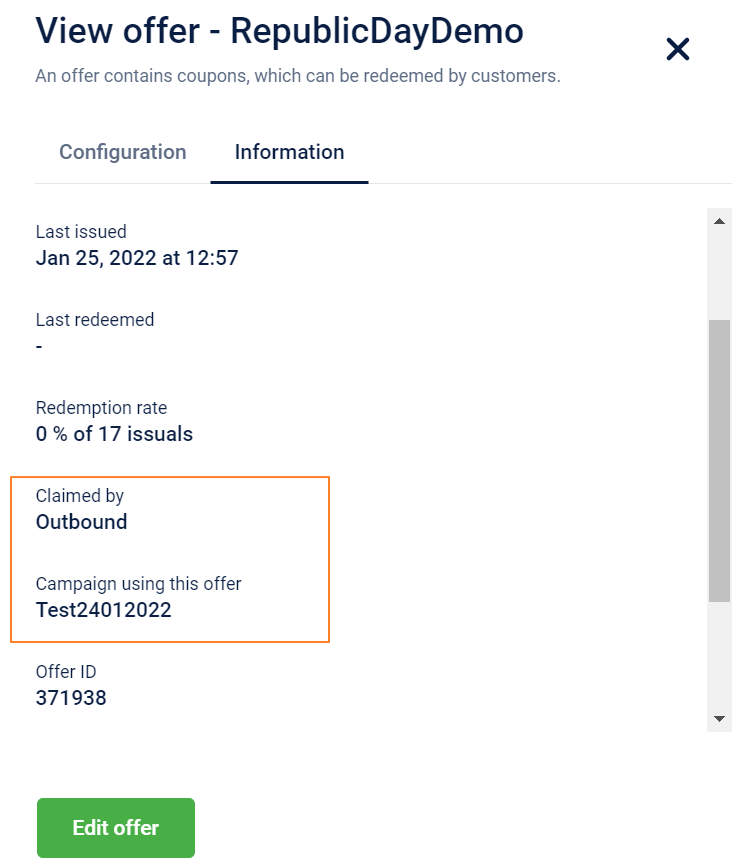
- If the offer is claimed by Loyalty, you will see the name of the program that claimed the offer.
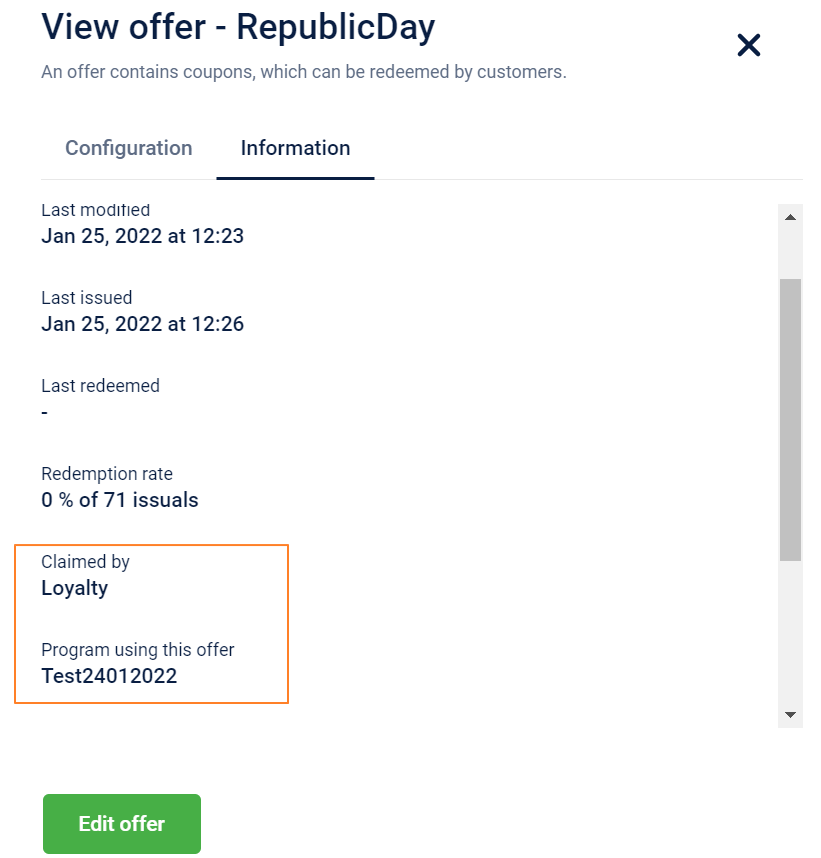
Use Cases
- Users will be able to find the campaign/program which has claimed the particular coupon series.
- It will be easy for the user to debug if any issues come regarding issual and redemption of coupon series by cross-checking easily with campaign/program details.
For details on how to view offer details, see here.
Enhancement in Customer Redemptions API
Context
Through Customer Redemptions API call, users can retrieve the points and coupons redemption history of a customer. User can use various parameters to filter the results by type, duration, coupon ids start with, and coupon ids end with.
Problem Statement
Currently, we are not able to filter customer redemptions on basis of the store. Brands having various stores and merchant stores require to filter the customer details at the store level so that adequate information is passed to respective store staff.
Solution
We have introduced a new query parameter (merchant_store_id) in the coupon redemption API to filter redemptions made in a specific merchant store.
For details, see Customer APIs Customer Redemptions API.
Use Cases
- Brands can show customer redemptions of the respective stores on the system/mobile application/web app.
- With the help of the store parameter, brands can protect the data of different stores and control the information.
- Store staff to easily browse customer redemption history for the respective store.
- If brands have various merchant stores, then the customer redemptions of only that particular merchant store can be availed.
New values supported in the status parameter of V2 GET customers/coupons API
Context
Brands issue various coupons to customers for keeping them engaged and to increase their frequency of transactions. Brands intend to remind and inform customers about their redeemed coupons, available coupon codes, expired coupons, details of the offers, etc. so that customers have all the necessary information.
Problem statement
We did not have support to provide coupon code information on basis of the relevant status of coupons issued to customers. This was creating a blocker for brands, as they were not able to show:
Active coupons which are redeemed and not redeemed.
Expired coupons which are redeemed and not redeemed.
The goal here is to provide information to customers regarding their issued coupons and relevant offer-related information.
Solution
We have launched new values in the status query parameter to filter coupons on basis of
active_redeemed - Active coupons which are redeemed.
active_unredeemed - Active coupons which are not redeemed.
expired_redeemed - Expired coupons that are redeemed.
expired_unredeemed - Expired coupons that are not redeemed.
Use cases
- Enables brands to show filter coupon codes for each customer by active, expired with redeemable status.
- Brands will be able to display desired set of coupons on their Mobile App/Web App/System and enable customers with more information. For example, brands can display active_redeemabe coupons to each customer on the brand's mobile app and nudge customers to redeem them.
- For details on how to use the new parameter values, see GET Coupon APIs v2/customers/coupons API
Insights+
Work Flow Management for Onboarding Requests
NOTE: This PAAS feature is for "Capillary Internal Users" only
Problem Statement
To view the data in the reports on the Insights + platform,organizational data /orgs need to be onboarded on EI. For any new org, vertical,facts or OU data to be viewed in reports , onboarding is performed as an initial step post which data can be visualized in the reports.
Earlier there was no proper channel to record these requests or to track them. These onboarding requests come in the form of JIRA tickets.
No proper format to take input data for onboarding.The details of the required onboarding were mentioned in the JIRA tickets itself.
No centralized view of all the onboarding requests created or their status.
There are a series of steps which need to be executed for a successful onboarding.There is no step-wise task view of these executions which could tell the status on the whole.
Use Cases
Use Cases to Raise request:
- Hierarchy Onboarding - User wants to raise a request for onboarding a product hierarchy for a given org by mentioning the product names, their hierarchical orders and the org to which they belong.
- OU Onboarding - User wants to raise a request for onboarding multiple OUs within an org by mentioning the details such as Org Id and OU Ids
- Vertical Onboarding - User wants to raise a request for onboarding multiple orgs to a specific vertical by mentioning the org Id / name and vertical name.
Use Cases to track the requests:
- Users want to filter out the requests raised for a particular org by entering the org Id
- Users want to filter out the requests raised for a particular type of Onboarding such as Hierarchical,Vertical or OU onboarding.
- Users want to filter out the requests raised by their status.
- Users want to see the current status of the request such as new,processing, tagged to version, version enabled, processed, failed, ,canceled or released.
- Users want to see all the actions taken(including past actions) as part of the request.
- Users want to see the 'created date' and 'created by' details for the requests raised.
Solution
To address the problems faced by internal teams (Product and Engg groups) for handling the Org Onboarding requests, Insights team has developed this product capability for internal Product Engg groups to conduct the Org onboarding task easily.
Below are features of the WFM Onboarding Rizer UI which covers the above use cases.
- Through the Rizer UI onboarding requests can easily be created and tracked for each type of onboarding.
- The new UI streamlines the process of request creation, tracking the actions on the requests and the statuses of these requests.
- It also has a centralized view of all the WFM requests such as Vertical , Hierarchy or OU Onboarding).
- Pre - defined input format for each type of request raised reduces the scope of error and rework.
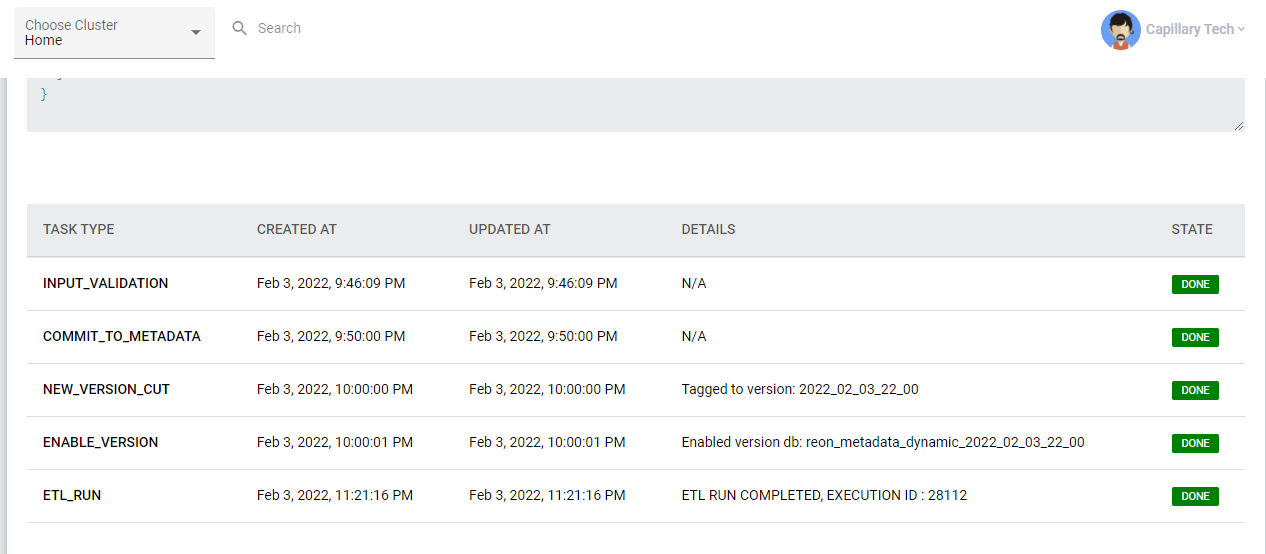
- For each of the requests raised the user can view the series of tasks executed.The execution flow is as follows .
- New
- Processing(includes input validation)
- Tagged to version
- Version enabled
- Processed
- Released
- If at any stage the onboarding process fails or is canceled, the status will change to failed/canceled accordingly
Steps to raise requests
WFM onboarding through Rizer UI allows us to create onboarding requests for the below 3 items:
- Hierarchy Onboarding
- OU Onboarding
- Vertical Onboarding
Process to be followed to create Onboarding Request on Rizer UI
- Hierarchy Onboarding:
- Requirement comes in the form of a JIRA ticket
- Click on "Add New Request" to open the below window.
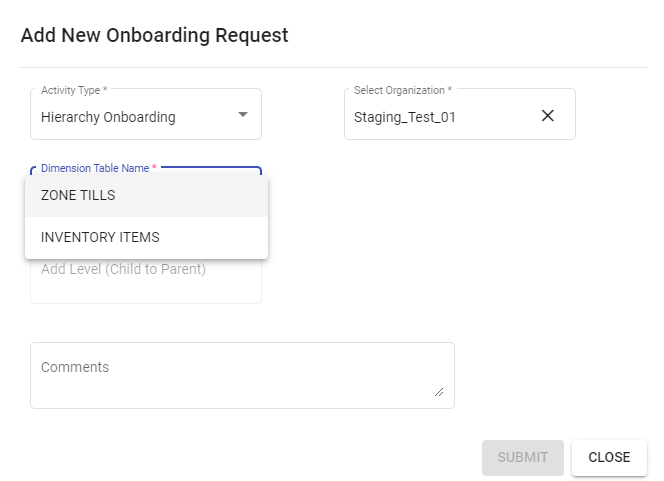
- For hierarchy onboarding two options are available:
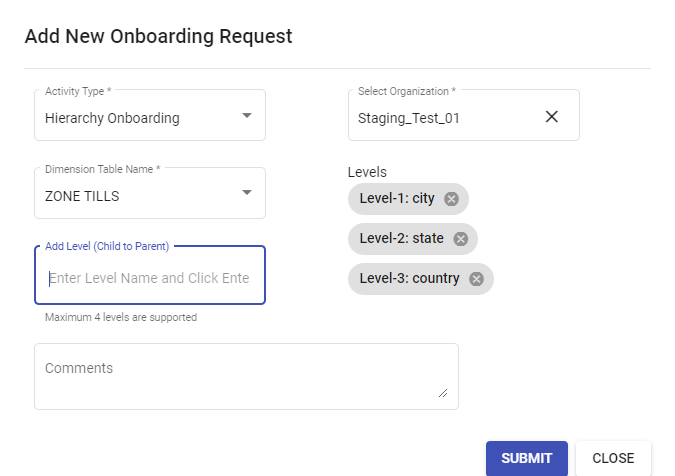
- Zone tills
- Upto four levels of Zone till hierarchy is allowed to be created.
- Addition of the Levels to be done in the order Child to Parent which essentially means that the child Zone to be added first and then the subsequent Parent Zone should be added.
- Example of such a hierarchy is shown in the screenshot below.
- Inventory Items
- Upto five levels of Inventory hierarchy is allowed to be created.
- Addition of the Levels to be done in the order Child to Parent which essentially means that the child Inventory to be added first and then the subsequent Parent Inventory should be added.
- OU Onboarding
- Requirement comes in the form of a JIRA ticket where OU ids are mentioned.
- Click on "Add New Request" to open the below window.
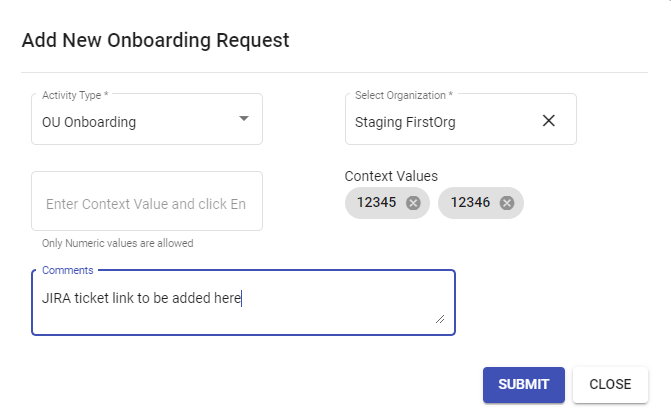
- Select the org from the list for which OU needs to be onboarded.
- Add the context ids of the OU to be added.
- Next, in the comments add the JIRA ticket which has the details mentioned.
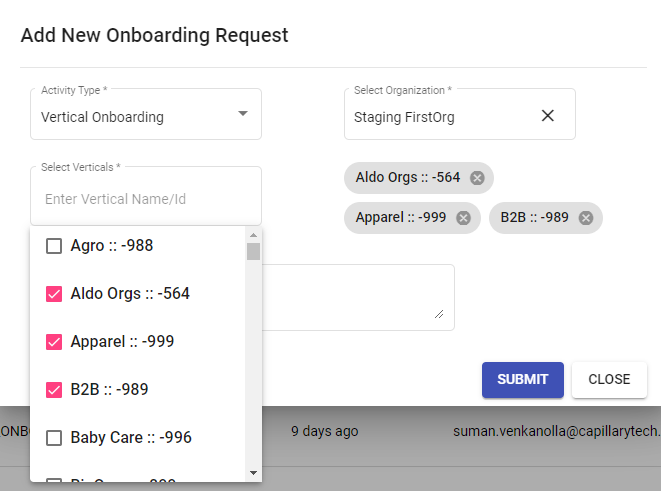
- Vertical Onboarding
- Select the org from the list for which Vertical needs to be onboarded.
- From the list select the verticals to be onboarded for that particular org.
- Next , in the comments add the JIRA ticket which has the details mentioned.
- Click on 'Submit' to confirm the request creation.
Steps to view the tasks executed on the actions:
- Against each of the requests , there is a button named 'info'.
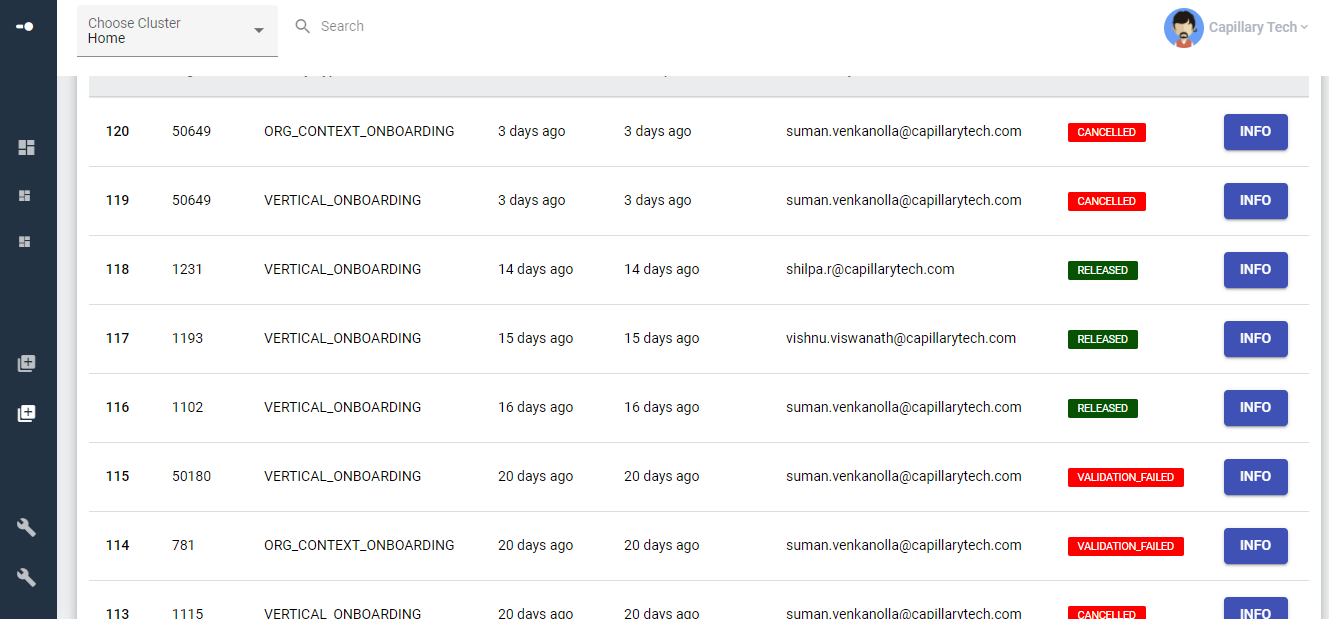
- Click on the button to view the task details.
Core Onboarding
NOTE: This PAAS feature is for "Capillary Internal Users" only
Problem Statement
To view the data in the reports on the Insights + platform,organizational data /orgs need to be onboarded on EI. For any new org, vertical,facts or OU data to be viewed in reports , onboarding is performed as an initial step post which data can be visualized in the reports.Core Table onboarding can have three sublevels:Source onboarding, Fact onboarding and Dimension onboarding.
- Earlier complex query had to be written manually for onboarding core tables or for making any changes to the existing ones.
- There was no proper channel to record these requests or to track them. These onboarding requests come in the form of JIRA tickets.
- No centralized view of all the onboarding requests created or their status.
- There are a series of steps which need to be executed for a successful onboarding.There is no step-wise task view of these executions which could tell the status on the whole.
Use Cases
Use Cases to Raise request:
- Source Table Onboarding - User wants to raise a request for onboarding a source table to EI.
- Fact Table Onboarding - User wants to raise a request for onboarding a Fact Table by mentioning the details such as Fact Name and column details
- Dimension Onboarding - User wants to raise a request for onboarding a dimension to a Fact on EI by mentioning the required details.
Use Cases to track the requests:
- Users want to filter out the requests raised for a particular type of Onboarding such as Source , Fact or Dimension.
- Users want to filter out the requests raised by their status.
- Users want to see the current status of the request such as new,processing,input_validation,workflow_validation,version_cut,validation_done,processed,failed,canceled,reverted or released.
- Users want to see all the actions taken(including past actions) as part of the request.
- Users want to see the 'created date' and 'created by' details for the requests raised.
Solution
To address the problems faced by internal teams (Product and Engg groups) for executing the table Onboarding requests, Insights team has developed this product capability for internal Product Engg groups to conduct the Core Table onboarding task easily.
Below are features of the Core Onboarding Rizer UI which covers the above use cases.
- Instead for writing complex queries now user can give JSON input with the data points which is picked up automatically into the query
- JSON input for each type of request raised reduces the scope of error and manual work
- Through the Rizer UI, onboarding requests can easily be created and tracked for each type of table onboarding.
- The new UI streamlines the process of request creation, tracking the actions on the requests and the statuses of these requests.
- It also has a centralized view of all the table onboarding requests such as Source , Fact or Dimension).
- For each of the requests raised the user can view the series of tasks executed.The execution flow is as follows .
- New
- Processing
- Input Validation
- Workflow Validation
- Validation Done
- Version cut
- Processed
- Released
- If at any stage the onboarding process fails or is canceled, the status will change to failed/canceled accordingly.
Steps to raise Request
- Source table Onboarding
Click on "Add New Request" to open the below window.
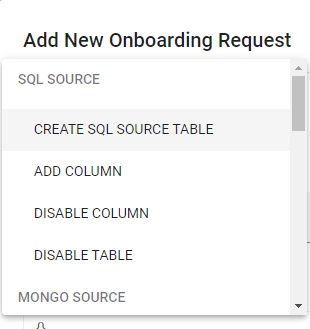
- Under the SQL Source option for below actions could be selected
- CREATE SQL SOURCE TABLE
- ADD COLUMN
- DISABLE COLUMN
- DISABLE TABLE
- Dimension Onboarding
- Click on "Add New Request" to open the below window
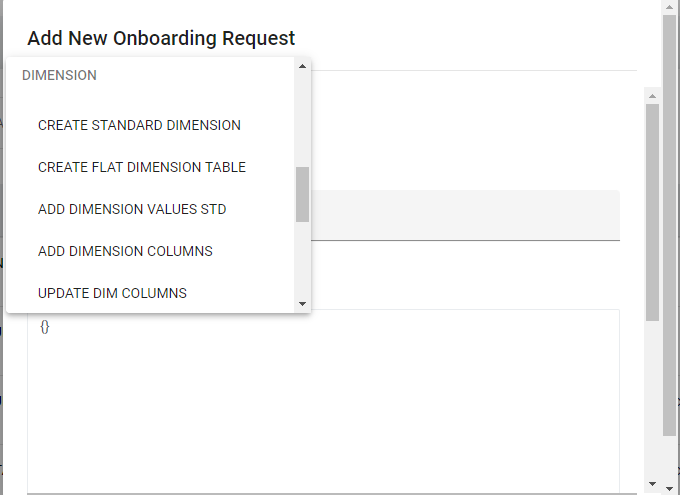
- Under the Dimension option, below actions could be selected
- CREATE STANDARD DIMENSION
- CREATE FLAT DIMENSION TABLE
- ADD DIMENSION VALUES STD
- ADD DIMENSION COLUMNS
- UPDATE DIM COLUMNS
- DISABLE DIM COLUMNS
- DISABLE DIM TABLE
- Fact Onboarding
- Click on "Add New Request" to open the below window.
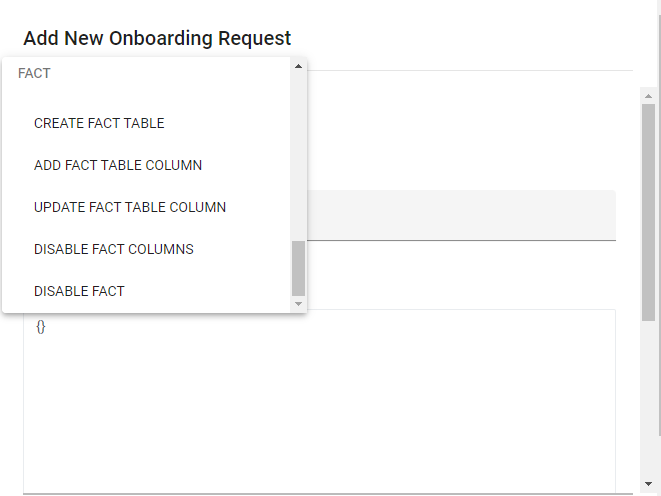
Under the Fact option, below actions could be selected
- CREATE FACT TABLE
- ADD FACT TABLE COLUMN
- UPDATE FACT TABLE COLUMN
- DISABLE FACT COLUMNS
- DISABLE FACT
- Sample JSON for Tax Onboarding
curl -XPOST http://ei-meta-api-v3:8080/v3/activity/fact/create_fact_table
-H "Content-Type: application/json" -H "X-CAP-CLIENT-TYPE:WRITE"
"name": "tax_entity_fact",
"definition": "Tax Entity Fact",
"scope": "Cart Promotion",
"columns": [{
        "name": "event_id",
        "dataType": "BIGINT",
        "columnType": "PK",
        "dimLinkingInfo": null,
        "mappedTo": [{
            "sourceTableName": "transaction_tax_entity",
            "sourceColumnName": "id"
        }],
        "sourceTableFilterExp": "",
        "kpi": null
    },
    {
        "name": "dim_event_user_id",
        "dataType": "BIGINT",
        "columnType": "DIMENSION",
        "dimLinkingInfo": {
            "dimTableName": "users",
            "joinDimColumn": null,
            "selectDimColumn": null
        },
        "mappedTo": [{
            "sourceTableName": "transaction_tax_entity",
            "sourceColumnName": "user_id"
        }],
        "sourceTableFilterExp": "",
        "kpi": null
    },
    {
        "name": "dim_event_date_id",
        "dataType": "BIGINT",
        "columnType": "DIMENSION",
        "dimLinkingInfo": {
            "dimTableName": "date",
            "joinDimColumn": "date",
            "selectDimColumn": "date_id"
        },
        "mappedTo": [{
            "sourceTableName": "transaction_tax_entity",
            "sourceColumnName": "created_on"
        }],
        "sourceTableFilterExp": "",
        "kpi": null
    },
    {
        "name": "dim_cart_promotion_id",
        "dataType": "TEXT",
        "columnType": "DIM_PK",
        "dimLinkingInfo": null,
        "mappedTo": [{
            "sourceTableName": "transaction_tax_entity",
            "sourceColumnName": "promotion_id"
        }],
        "sourceTableFilterExp": "",
        "kpi": null
    },
    {
        "name": "transaction_id",
        "dataType": "BIGINT",
        "columnType": "SRC_MEASURE",
        "dimLinkingInfo": null,
        "mappedTo": [{
            "sourceTableName": "transaction_tax_entity",
            "sourceColumnName": "transaction_id"
        }],
        "sourceTableFilterExp": "",
        "kpi": null
    },
    {
        "name": "line_item_id",
        "dataType": "BIGINT",
        "columnType": "SRC_MEASURE",
        "dimLinkingInfo": null,
        "mappedTo": [{
            "sourceTableName": "transaction_tax_entity",
            "sourceColumnName": "line_item_id"
        }],
        "sourceTableFilterExp": "",
        "kpi": null
    },
    {
        "name": "tax_external_id",
        "dataType": "TEXT",
        "columnType": "SRC_MEASURE",
        "dimLinkingInfo": null,
        "mappedTo": [{
            "sourceTableName": "transaction_tax_entity",
            "sourceColumnName": "tax_external_id"
        }],
        "sourceTableFilterExp": "",
        "kpi": null
    },
    {
        "name": "tax_name",
        "dataType": "TEXT",
        "columnType": "SRC_MEASURE",
        "dimLinkingInfo": null,
        "mappedTo": [{
            "sourceTableName": "transaction_tax_entity",
            "sourceColumnName": "tax_name"
        }],
        "sourceTableFilterExp": "",
        "kpi": null
    },
    {
        "name": "tax_amount",
        "dataType": "DOUBLE",
        "columnType": "SRC_MEASURE",
        "dimLinkingInfo": null,
        "mappedTo": [{
            "sourceTableName": "transaction_tax_entity",
            "sourceColumnName": "tax_amount"
        }],
        "sourceTableFilterExp": "",
        "kpi": null
    },
    {
        "name": "tax_additional_amount",
        "dataType": "DOUBLE",
        "columnType": "SRC_MEASURE",
        "dimLinkingInfo": null,
        "mappedTo": [{
            "sourceTableName": "transaction_tax_entity",
            "sourceColumnName": "tax_additional_amount"
        }],
        "sourceTableFilterExp": "",
        "kpi": null
    },
    {
        "name": "tax_rate",
        "dataType": "DOUBLE",
        "columnType": "SRC_MEASURE",
        "dimLinkingInfo": null,
        "mappedTo": [{
            "sourceTableName": "transaction_tax_entity",
            "sourceColumnName": "tax_rate"
        }],
        "sourceTableFilterExp": "",
        "kpi": null
    },
    {
        "name": "auto_update_time",
        "dataType": "BIGINT",
        "columnType": "FACT_REFERENCE",
        "dimLinkingInfo": null,
        "mappedTo": [{
            "sourceTableName": "transaction_tax_entity",
            "sourceColumnName": "auto_update_time"
        }],
        "sourceTableFilterExp": "",
        "kpi": null
    }
]
Capillary Data Platform
Supplementary Program Details on Member Care
In Member Care, Customer Single View (CSV) page, You can view the list of supplementary or external programs associated with a customer. You can see basic details such as program name, associated identifier, membership ID, current tier, status, and so on. There is also View more option that helps in viewing more details like program type, membership duration, and last updated date of membership/activity.
NoteNote
It does not show the details of programs with which the customer is no longer associated.
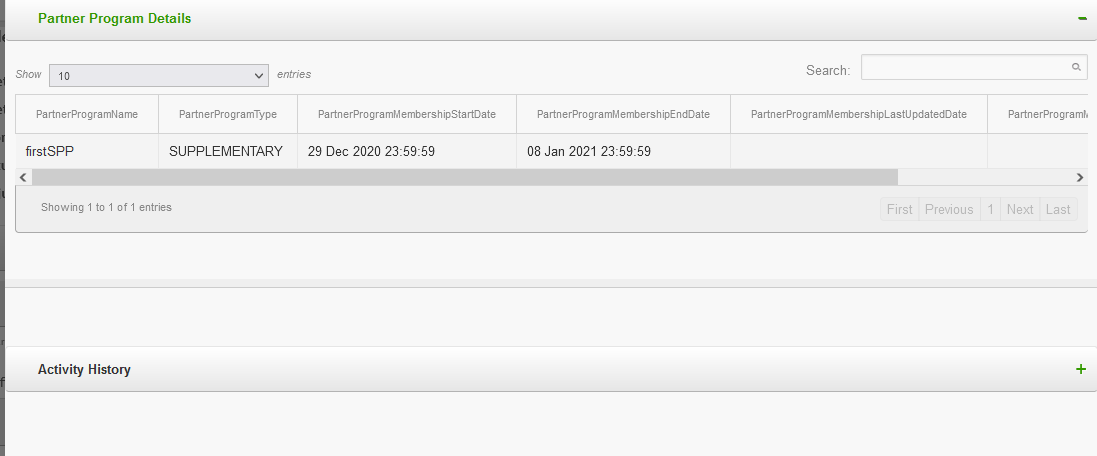
With this release, you can see the activity logs of the customer with respect to the program by expanding the Activity History - when the customer joined the program, when the membership is upgraded, when the membership is renewed, and so on.

Time Zone in Interactions Tab
Problem Statement
Until now, on the Customer Single View (CSV) page of Member Care, timestamp of interactions (in the Interactions tab) was in the cluster time zone. For example, if you are looking at the SMS Interactions of a customer of an organization in India cluster, the timestamp was in Indian time zone. If the organization is in the Singapore cluster, the timestamp was in the Singapore time zone and so on.
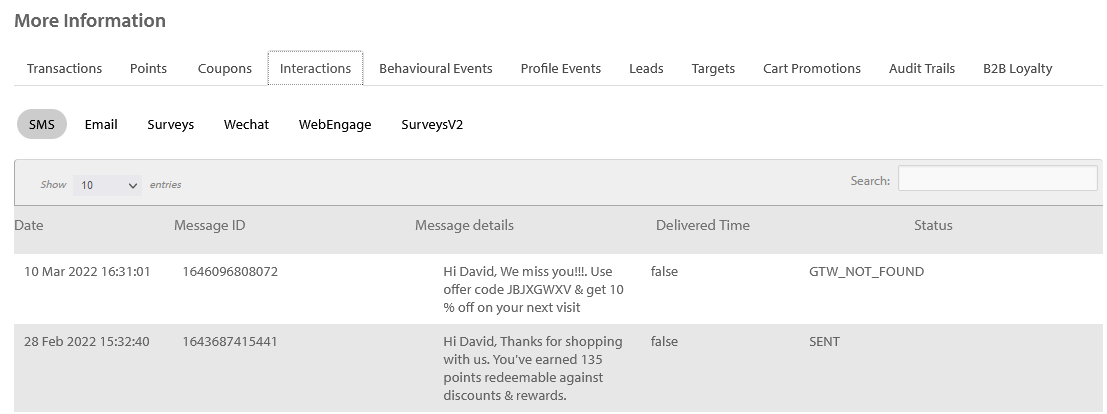
This was leading to problems in cases where the Member Care users were in one time zone but the organization was set up in another.
For example, let us take a case where an organization is based out of Singapore and the customer support team, which uses Member Care, is also in the same location. However, the organization was set up on the India cluster for some reason. In such a case, the Interactions will be in India time zone.
This was leading to problems for the support team as they had to convert the timestamp to their time zone (from India time zone) every time they had to diagnose a problem associated with an interaction.
Solution
To fix this problem, we have now changed the time zone of interactions to the time zone configured for the organization. Any interaction that is sent via our gateway/systems will be shown in the organization time zone.
Support for Customer Status in Connect+
You can now assign Customer Status to any customer via Connect+ using v2 customer add or Fleet Customers (parent child hierarchy) templates. The prerequisite is to have Customer Status enabled and labels created as per the directions.

Once Customer Status has been enabled and status labels are setup, you can assign Customer Status by mapping the right headers in the CSV file to statusLabel and statusLabelReason fields as shown in the screenshot above (under customer tab in Transform-data section).
For example, let us assume that you want to register a customer with an external ID (as primary identifier) 2NRJ272. The details of the customer are shown below (part of CSV file that needs to be ingested using Connect+):

Now, if you want to set this customer's status label as active-customer (set against Active status while setting up the labels) while registering itself, you can map the highlighted headers below to Customer Status fields in the v2 Customer add or Fleet Customers (parent child hierarchy) templates.

The mapping on Connect+ would look like this:
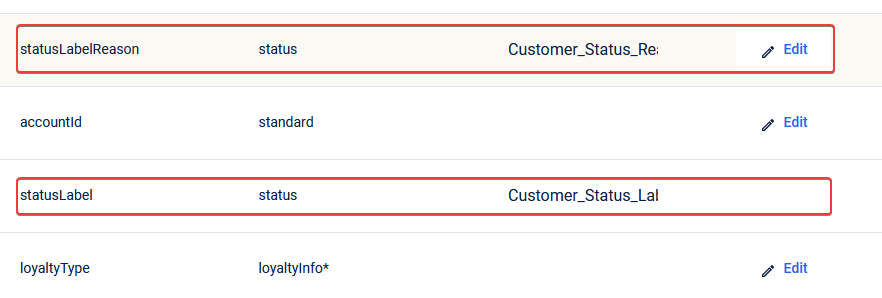
NotePlease note that it is not mandatory to set Customer Status while registering a customer. In case you want to update status, you can do so by mapping the right header in the CSV file against the statusLabel field. statusLabelReason field is optional.
Support for Subscription Status in Connect+
You can now assign channel-wise subscription status to a customer via Connect+ using Customer v2 add or Fleet Customers (parent child hierarchy) templates.
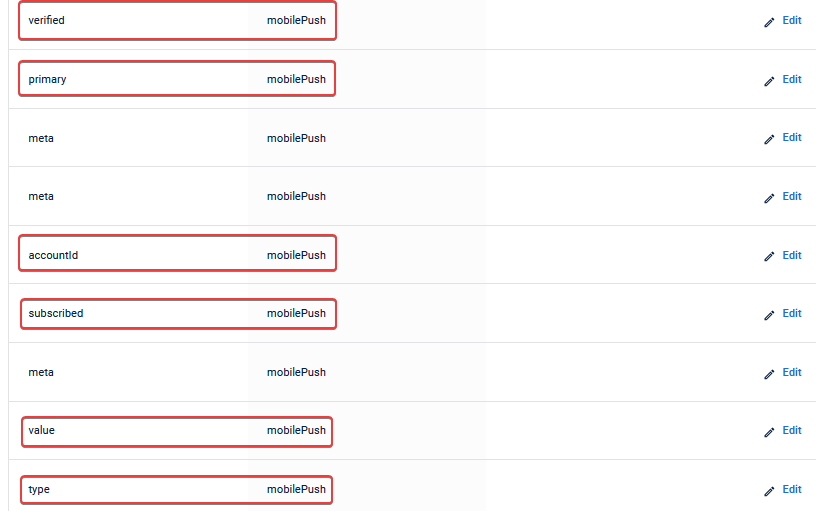
In the Transform-data > commChannels section of the dataflow (based on the aforementioned templates), the subscription fields can be found by channel as highlighted in the screenshot above. Details on what each of these fields mean can be found in API documentation Create API keys here]
Now, let us assume that you want to register a customer with mobile (as primary identifier) +16500202202 along with mobilePush and email subscription preferences, which were given by the customer while registering. In such a case, part of CSV file for Connect+ ingestion would look as follows:

Here, the fields highlighted in yellow and green map to mobilePush and email subscription fields in Transform-data -> commChannels tab. The corresponding header mapping for mobilePush is given below:
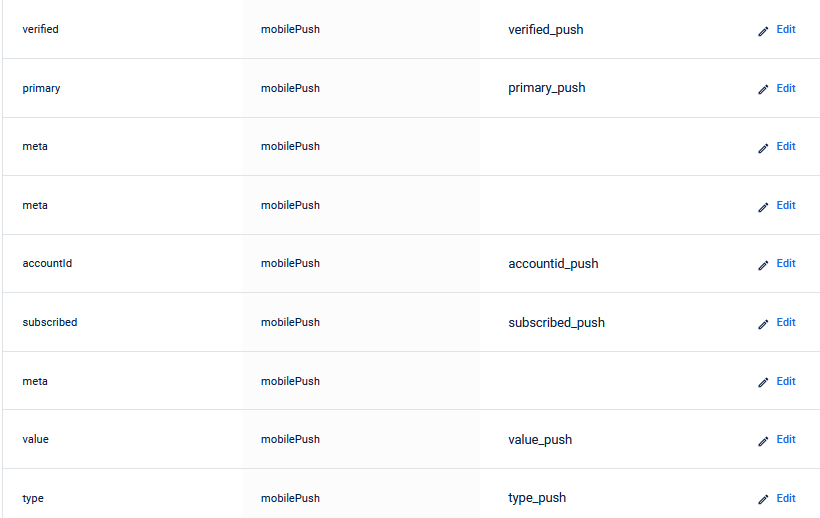
NoteYou need to set up similar mapping for the email channel as well.
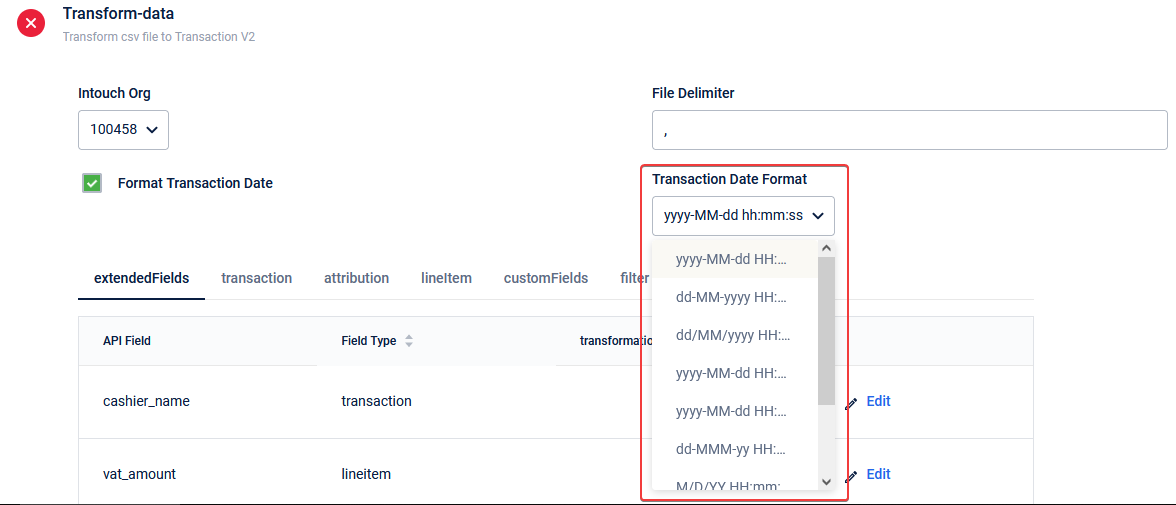
Support for More Transaction Date Formats
In Transaction v2 add, Transaction Line-item Merge and Transaction v2 add with filter templates, we have added support for new date formats. The complete list of date formats supported is provided below:
| SNO | DATE FORMAT | SAMPLE |
|---|---|---|
| 1 | yyyy-MM-dd HH:mm:ss | 2022-02-03 19:00:00 |
| 2 | dd-MM-yyyy HH:mm:ss | 03-02-2022 19:00:00 |
| 3 | dd/MM/yyyy HH:mm:ss | 03/02/2022 19:00:00 |
| 4 | yyyy-MM-dd HH:mm:ss Z | 2017-05-11 15:46:48 Z |
| 5 | yyyy-MM-dd HH:mm:ssXXX | 2022-02-03 12:08:56.235-07:00 |
| 6 | dd-MMM-yy HH:mm:ss | 03-Feb-22 19:00:00 |
| 7 | M/D/YY HH:mm:ss | 2/3/22 19:00:00 |
| 8 | D/M/YY HH:mm:ss | 3/2/22 19:00:00 |
| 9 | MM/DD/YY HH:mm:ss | 02/03/22 19:00:00 |
Depending on the format of the transaction date field in the CSV file, you can select the corresponding mapping in the Transform-data section of dataflow as shown below:
Redeem Coupon Template in Connect+
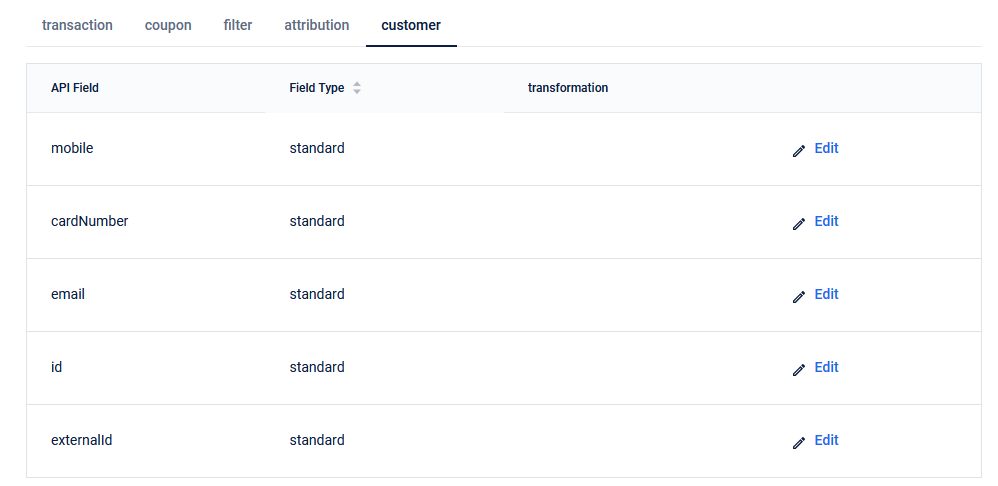
We have added a new template named Coupon Redeem based on the v2 Redeem Coupons API on Connect+. This is very useful in cases where brands need to redeem active coupons of loyalty customers in bulk. To understand the API fields that appear in the template for mapping, please refer to the API documentation here. More details of each tab under the Transform-data section is provided in the following
- Transaction
Here, the transaction against which the coupon needs to be redeemed is mapped. Both transactionNumber and billAmount fields are mandatory as indicated by * under Field Type header in the screengrab above.

- Coupon
Here, the code of the coupon that is to be redeemed is mandatory. redemptionTime, which refers to the date and time when the coupon has to be redeemed in YYYY-MM-DD HH:MM:SS format. This is optional though.

- Filter and Attribution

These tabs are the same ones you find in any other template. If you want to filter specific rows of the CSV file that is to be ingested, you can use the Filter tab. The attribution tab is to map the store against which the coupons are to be redeemed.

- Customer
Here, the identifier of the customer is mapped. You need to pass at least one identifier.
New User Groups to automatically associate with the default loyalty program
Problem Statement
When a group is created using the Create API keys API POST]() /v2/userGroup2/, the group gets added to the loyalty program only when a transaction is made by any group member on behalf of the group. So, when a customer facing app/microsite is fetching group details, loyalty data like group slab, points etc. are shown as null instead of the right data.
Solution
With this release, user groups are automatically added to the default loyalty program at the time of group creation. All the loyalty details like group slab, and points are shown with the right values.
Send SMS to customers from OU specific Sender IDs (API)
Problem Statement
OU enabled brands want to send SMS to customers from the Sender IDs configured for the respective OU. The API /v1.1/communications/sms did not have provision to choose the sender ID, instead all SMS are sent using the default sender ID of the org.
Solution
Enhancement in v1.1/communications/sms API to include sender ID (sender) from which you want to send SMS.
If no sender ID is passed, the default sender ID of the org will be used.
If an invalid sender ID (sender ID not configured in the org) is passed, the default sender ID of the org will be used.
NoteNote
SMS can be sent with only the sender IDs configured for the org.
To add/view Sender IDs configured for the org and OUs go to Organization Settings > Communication & Gateway > Domains in InTouch. If you pass the sender ID that is not configured in the org, the default sender ID of the org will be used instead.
Card support in Goodwill Points Issual (Member Care)
Problem Statement
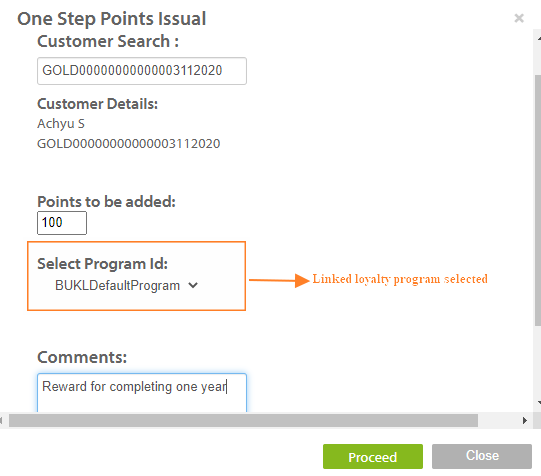
In Member Care, Customer Search in Goodwill Points Issual supports mobile, email, external id, name to identify a customer and issue points. But for Card linked loyalty programs, customers need to be identified by their card details and the points need to be issued in the program the card is linked to.
Solution
Card number and Card External Id support is added to identify a customer. Based on the card details entered, the linked loyalty program is automatically selected in the Program ID field. You can still choose to select a different program other than the one linked with the card.
NoteNote
Card here acts only as a customer identifier and to identify the card linked program. Cards with inactive statuses like expired and blocked can also be used to issue goodwill points. If only active cards need to be used to issue goodwill points, please check the card status before issuing the points.
Enhancements to the Send email API to support image attachments
Problem Statement
No support was present to send images as email attachments via API. Users encode the image in base64 format but the image is not getting uploaded in the right format and the user receiving the email is not able to view the correct image and download it.
Solution
A new field "file_encoding_type" is added in /v1.1/communications/email and fileEncodingType in /v2/communications/email.
For all image formats like jpg, png, jpeg, and gif this field's value needs to be set to "base64". Image should be base64 encoded and the code to be passed in "file_data". Only if the "file_encoding_type" is base64, images will get uploaded in the right format.
For details, see v2/communications/email and /v1.1/communications/email.
NoteNote
For other file types which aren't base64 encoded like txt, and pdf, file encoding type is not required.
API Support to fetch group transactions
Use Case
In customer facing applications, all the group level transactions made by the group members can be shown. Loyalty details like points issued against each transaction, their expiry details can also be viewed. This is highly useful for both B2B group accounts and B2C user groups to fetch the transaction history of the group and the loyalty details for each transaction.
For details about the API, see Get User Group Details GET userGroup2/transactions
NoteNote
Only the transactions made by group members as part of the group can be fetched. Individual transactions made by the group members are not available in this API.
Card Support in Goodwill Points Issual from Member Care
Problem Statement
When you want to issue Goodwill points to a customer, you need to search for the customers using mobile number, email id, external id or name. However, for a card linked loyalty program, you need to search a customer using their card details and then issue points from the program that is linked to the card.
Solution
Now, you can use card number and card external ID to identify a customer. If you enter card details, the linked loyalty program will be selected automatically in the Program ID field. You can also select a different program.
NoteNote
- You can use card details to identify customers and the associated loyalty program. You do not need to select the program manually.
- You can use cards with any status (active, expired or blocked) to issue points. Hence, before issuing points, check the status of the card.
OAuth2 Sign-in for Customer Apps
Brands want to allow their customers to access their information/ perform certain actions with the brand from 3rd party partner applications. The customer should be able to access their data with the brand from a brand's application or an external partner's application.
For Example, A customer visiting a partner app of the brand can authenticate themselves and fetch their data with the brand like available points, expiry details or perform actions like redeeming available points, transferring points, etc.
So, an external app has to access the brand's customer data from Capillary on behalf of the brand.
Use Cases
- Brands can integrate with external partners like car manufacturers and embed their apps in their tablets within the car. In the tablet, the customer can fetch their data from the brand and perform certain actions on it.
- Brands can integrate with partner apps like Paytm where the customers can register into their loyalty program, link loyalty cards to their wallets, pay for a transaction and view the available points, etc via the partner app.
- This can be applicable to any customer-facing application through which the end customer of a brand can access their data
Solution
Customer Apps can now use OAuth2 Authorization Code flow to get access to customers' data from Capillary on behalf of the brand. This helps in enhanced security via a standard auth flow.
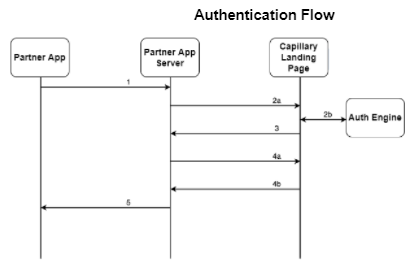
- Partner app initiates by redirecting users to Capillary landing page along with the client key.
- Customers are authenticated via OTP on Capillary landing page by communicating with Auth Engine APIs.
- Upon Authentication, the landing page will redirect back to a pre configured URL along with an auth code generated by Auth Engine.
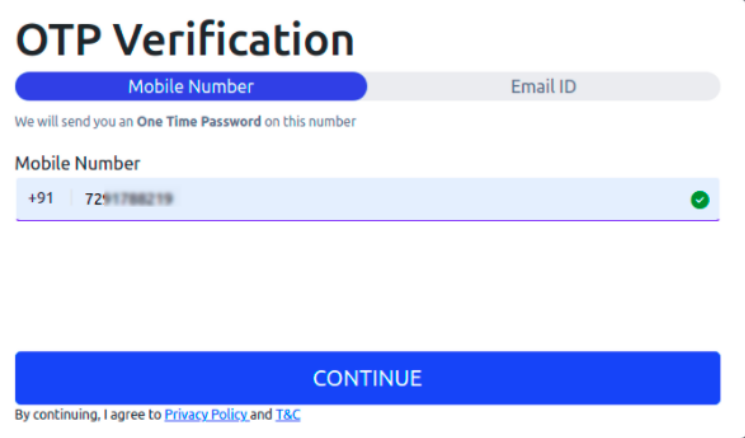
- Partner app will authenticate the auth code by sending client key and secret and receives the access token and refresh token. The access token is limited to the user whose data is being accessed.
- The access token can be used to make calls to the wrapper APIs and can access data limited to the user who is accessing their information. The access token expires after a pre-configured duration and the partner app can refresh the token and obtain a new access token. The partner app can also invalidate these tokens if required.
NoteNote
To get OAuth2 enabled for your brand, contact your CSM or create a ticket with complete details.
Future Scope
UI will be provided where brands can create/view/update access scopes, clients, generate client credentials, set up client configurations and OTP configurations.
Incentives Search replaces Coupon Search
In Member Care, there was an option to search for a coupon code and view its status and other metadata as shown below.
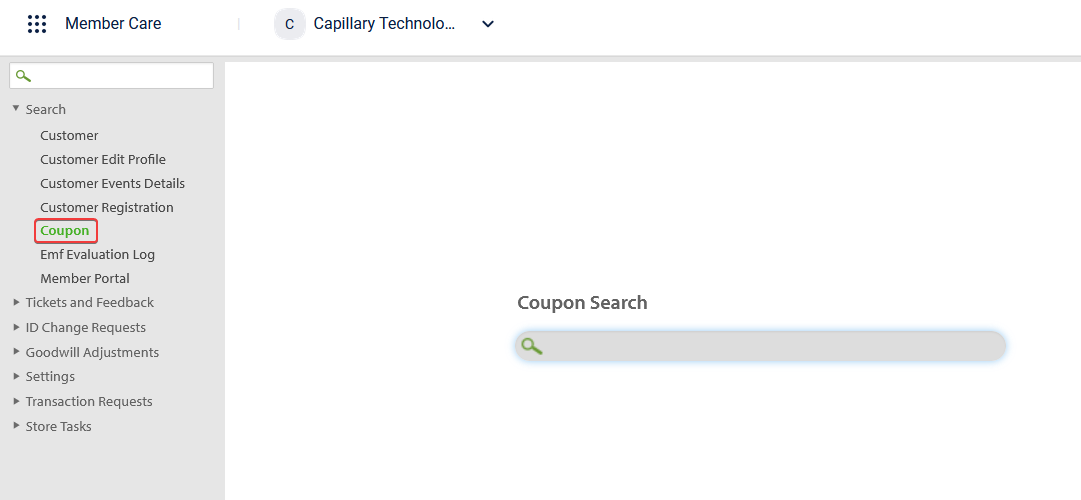
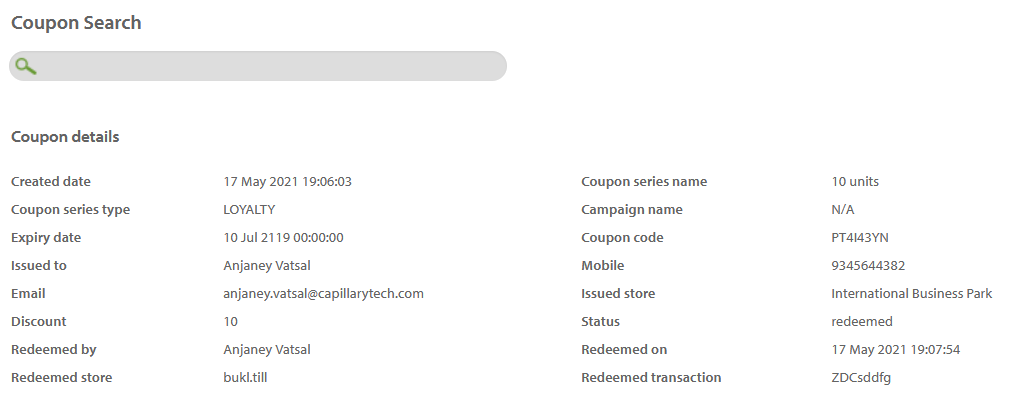
We have now done a revamp of the Coupon Search page and renamed it to Incentives search. As evident from the name, this page will serve as the single place for Member Care users to search for details on incentives such as coupons, gift vouchers and promotions. This is one step towards having a unified search page on Member Care.
Use Case
Let us say that you are a customer care representative of a brand that uses our Promotion Engine and you extensively use Member Care for operations service operations. Now, let us say you receive a call from a customer who says that he/she is not able to redeem a gift voucher that was issued to him/her. To solve this problem, you will need to check whether the code associated with the gift voucher is correct and also whether the voucher itself is valid. This can be achieved using the Incentives search function.
Steps
To search for a coupon code, promo code or gift voucher code:
- Go to to Member Care >** Search** > Incentives.
- In the drop-down box next to to search, select the incentive you want to search. For example, to search for a gift voucher, you need to select the Gift Voucher Code option.
- In the Search box, enter the code click on the **Search **button or press the **Enter **key on your keyboard.
-
If the code is valid, you will see the details of the voucher. From this, you can diagnose the issue raised by the customer and proceed with the next steps.
-
If the code is invalid, you can see that information in the results page as shown below.
Similarly, you can also search for Coupon Code and Promo Code.
There is no change to the Coupon Code search flow. It works the same way it used to as seen earlier.
Supplementary Program Details on Member Care
In Member Care, Customer Single View page, there is an option to view the list of supplementary or external programs a customer is associated with as of current system date (see below):

Until now, you could see the program that the customer is currently linked to (active) along with some additional useful information such as:
- The name of the supplementary or external programs a customer is currently part of
- The ID associated with the program
- The membership ID (if any) of the customer in the program
- The name of tier (if any) the customer belongs to in the external program
- Tier expiry date (if any)
- Current status (always active as of now)
NoteThe programs with which the customer is no longer linked to or associated with will not be shown here.
You will now see a View more option which shows a sidebar that contains the details mentioned in the list below:
- Name of supplementary or external partner program
- Type of the program - External or Supplementary
- Membership start date
- Membership end date
- Membership last updated date
- Membership last updated activity
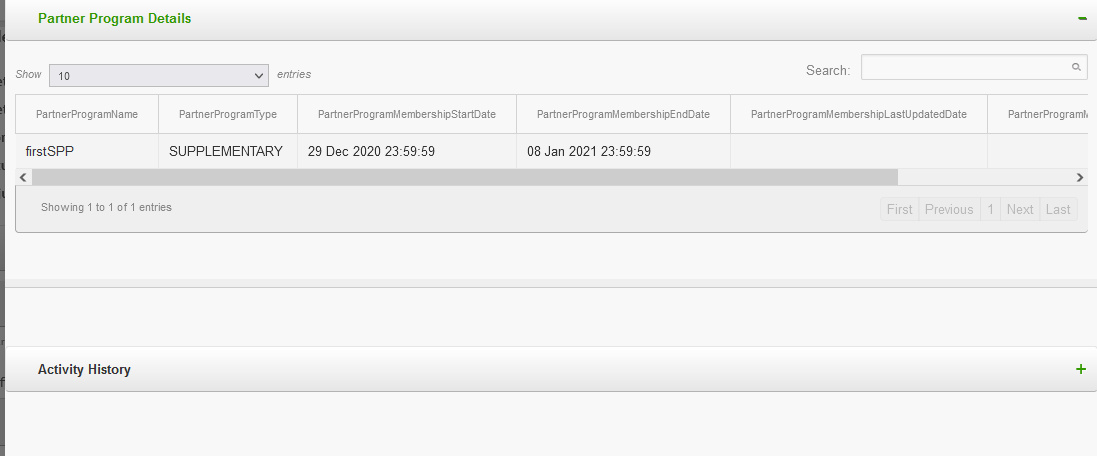
Now, when you expand the Activity History section, you can see the the activity log of the customer with respect to the program. The activity log includes the details such as when the customer has joined the program, tier was upgraded/renewed and so on.

Time Zone in Interactions Tab
Problem Statement
Until now, the timestamp that was visible on the Interactions tab under the More Information section of the Member Care Customer Single View (CSV) page was in the cluster time zone. For example, if you are looking at the SMS Interactions of a customer of an organization in India cluster, the timestamp shown for any interaction was in Indian time zone. If the organization is in the Singapore cluster, the timestamp was in the Singapore time zone and so on.
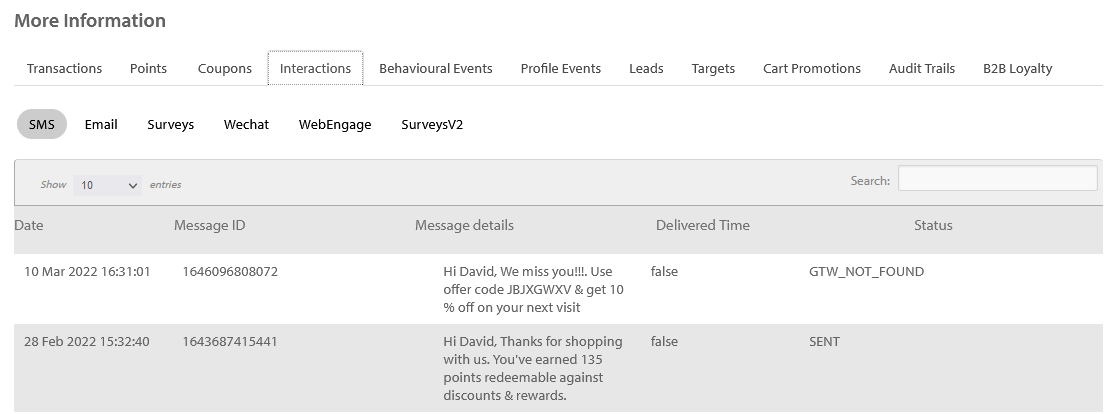
This was leading to problems in cases where the Member Care users were in one time zone but the organization was set up in another. For example, let us take a case where an organization is based out of Singapore and the customer support team, which uses Member Care, is also in the same location. However, the organization was set up in the India cluster for some reason. In such a case, the Interactions will be in India time zone. This was leading to problems for the support team as they had to convert to their time zone (from India time zone) every time they had to diagnose a problem associated with any interaction.
Solution:
To fix this problem, we have now changed the time zone of interaction events to the configured time zone of the organization itself. Any interaction that is sent via our gateway/systems will be shown in the organization time zone.
Sign in to InTouch with Capillary Google Workspace account
You can now sign in to Intouch using your Capillary Google Workspace account.
With this:
- No need to remember your Intouch password anymore
- No more Intouch password reset every month
- Convenience and security
Prerequisite
You should have a Capillary Google Workspace account (e-mail address with domain capillarytech.com)
Procedure
- In a browser, open the InTouch URL of your cluster.
- EU Cluster -
- SG Cluster -
- India Cluster -
- Click on Sign in with Google as shown below.
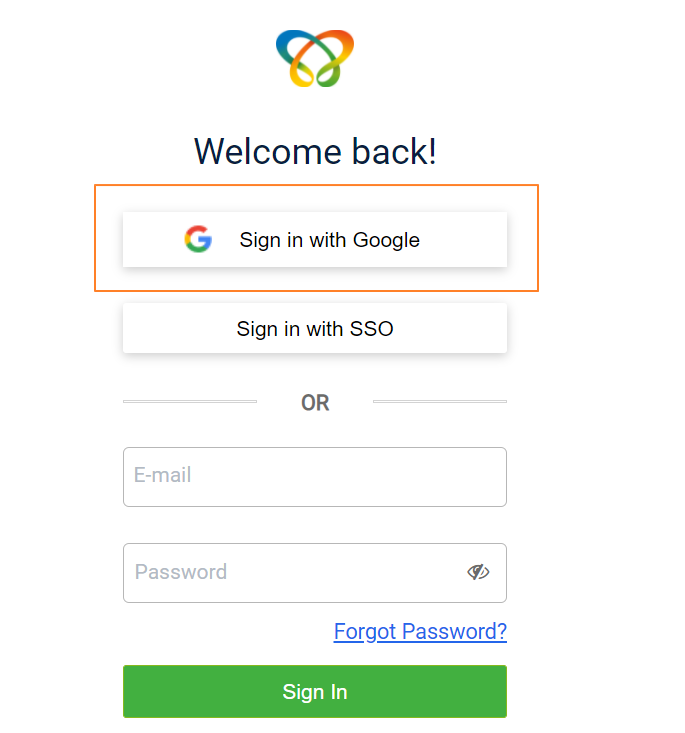
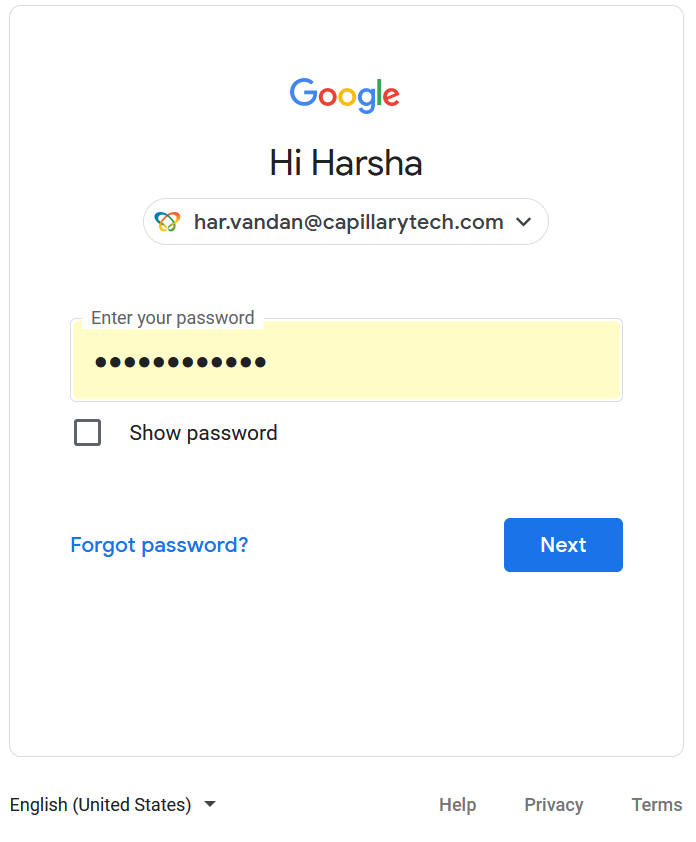
- Enter your email ID and password as prompted and click Next.
- You will see the InTouch Workbench as shown in the following.
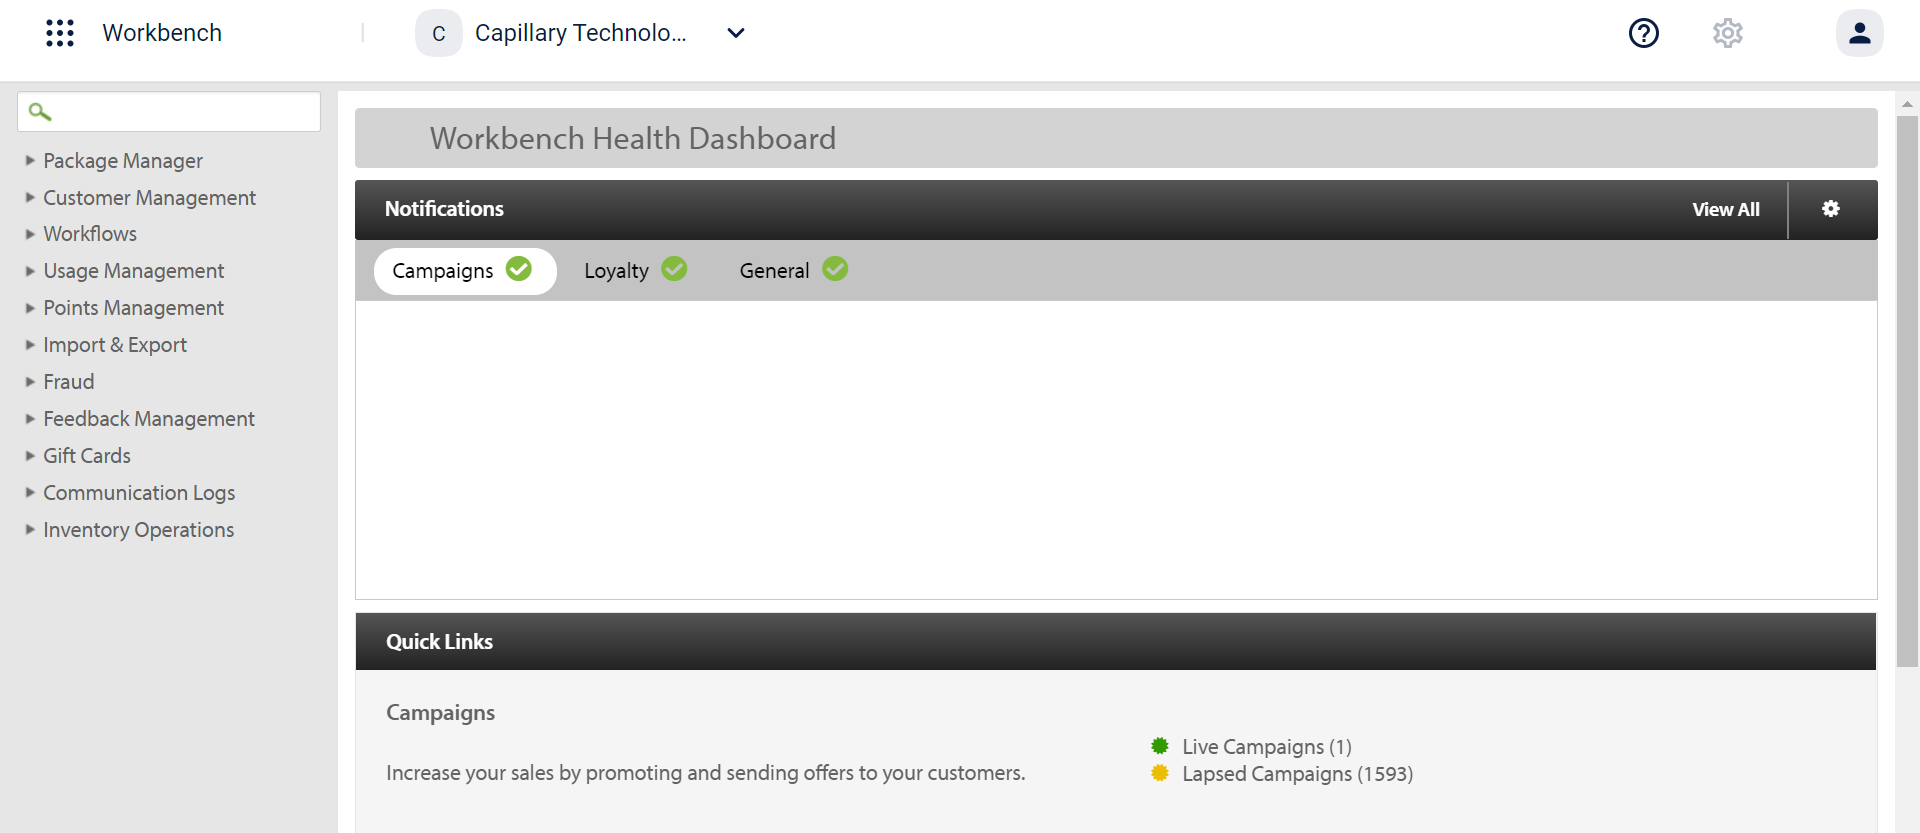
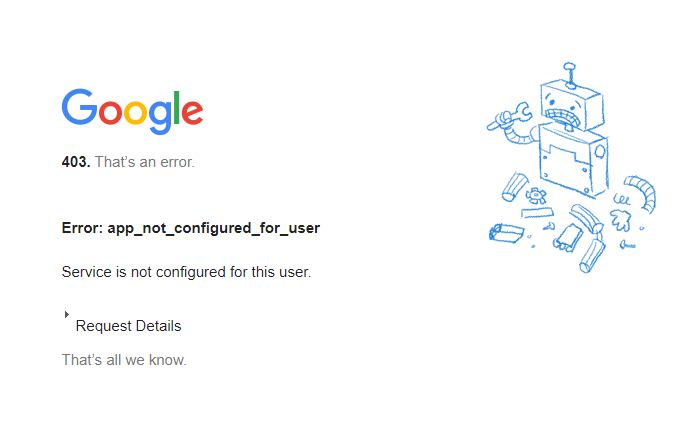
If you sign in with a non Capillary Google Workspace account, you will see the following error.
Updated 16 days ago
