Setup Behavioral events
Behavioral Events Overview
Events are activities of a customer either on an online store or at a physical store. Behavioural Event is a platform that lets you create standard and custom events to capture customer activities across channels. After you create an event, whenever it is triggered, the payload containing the defined attribute information is sent to the webhook. The Behavioral Event framework listens to this event, validates it, and sends it to the corresponding destination such as loyalty, journey, etc.
Objective
The Behavioral Events data collected across sources can be used to develop personalized content, segment customers, or even incentivize customers.
This product solves different use cases for different verticals.
For example:
-
In an offline retail or brick-and-mortar store, you can send coupons to customers for different events such as scanning a QR code of a particular product category, or showing interest in a particular item. This increases conversion without customers visiting the store again.
-
In an e-commerce platform (website or app), customers can be engaged through games or quizzes.
-
In the healthcare domain, customers can be rewarded for completing health-related activities to drive better engagement and loyalty of the customers.
-
In Consumer Packaged Goods (CPG), customers can be rewarded for participating in sales promotion events.
-
In the case of hospitality, you can send tailored messages to customers based on the stage of their purchase cycles such as inquiry, booking, check-in, and checkout.
Modules that consume Behavioral Events
Currently, events data can be consumed by Insights+ and Loyalty+. By default, Insights+ consumes any event that you create on Behavioral Events. However, you need to manually set if you want to consume by Loyalty+.
- Loyalty+: This includes both loyalty and DVS (Dynamic Voucher System).
- Consumed by Loyalty Manager to send messages to customers or incentivize them based on events data. For example, you could send a message when a product a customer is looking for is of limited stock.
- Consumed by Bounceback Campaign to run engagement programs based on the events data. For example, you could send discount coupons on product abandonment or product add-to-cart events.
- Insights+ (upcoming feature) to analyze events data. For example, most searched products frequently searched products during a festival season.
Types of Behavioral Events
The following are two types of Behavioral Events available.
-
Standard Events (Library of predefined events): These are predefined events with all the required attributes and values. The following is the list of standard events. Administrators can enable events that are required for an organization. Product Removed From Cart, Customer Logged Out, App Installed, Product Added To Cart, Customer Registered, Category Viewed, Product Viewed, Customer Logged In, Coupon Applied, Product Searched, Coupon Denied, and App Uninstalled.
-
Custom Events: If you want to capture a specific customer activity other than in Standard Events, you can create custom events with the event names, attributes, and values.
The following table provides an understanding of choosing between standard and custom events.
| SCENARIO | STANDARD EVENTS | CUSTOM EVENTS |
|---|---|---|
| Add standard attributes (such as SKU and Till) before publishing | No | Yes |
| Edit standard attributes before publish | No | Yes |
| Delete standard attributes before publishing | No | Yes |
| Add standard attributes (such as SKU and Till) after publishing | No | No |
| Edit standard attributes after publishing | No | No |
| Delete standard attributes after publishing | No | No |
| Add custom attributes (string, enum, double, date) before publishing | Yes | Yes |
| Edit custom attributes before publishing | Yes | Yes |
| Delete custom attributes before publishing | Yes | Yes |
| Edit custom attributes after publishing | No | No |
| Delete custom attributes after publishing | No | No |
| Add custom attributes (string, enum, double, date) before publishing | Yes | Yes |
New terminologies
Webhook
Enables syncing and relaying data between third-party applications and the Capillary Server facilitating automated calls and real-time updates.
WebEngage
Multi-channel user engagement platform that lets you automate communications.
Transformer
Used to convert the payload sent by the third-party app to a payload understood by Capillary. In simple terms, it is a field mapping.
Webhook Adapter
Used to track real-time events data that consists of payload understandable by the Capillary system.
Integration
Automates pushing event data from a third-party app or website to the Capillary system. There are two types of integrations-
- WebEngage to integrate Capillary Behavioural Events platform with WebEngage.
- Custom integration to integrate Capillary Behavioural Events platform to any other third-party apps.
Source Account
Source in which a customer is registered. Example: Facebook, WebEngage, WeChat, InStore, Martjack, TMall, Taobao, JD, Ecommerce, Website, and Line.
Event and Attribute
Event is customer activity such as logging out, adding items to cart, and so on. Whereas, attributes are entries of an event that needs to be captured by our system. For example, for the event product review, you could have attributes like title and review message body.
Standard Event
A predefined event with a defined set of attributes.
Custom Event
A user-defined event that lets you define your own attributes that you want to capture.
Standard Attributes
The standard attribute in a behavioural event system is a default attribute that will be applicable for all the events. There are two standard attributes, eventDateTime and storeUnitID. These attributes need not be defined during the creation of an event and are applicable for all events by default.
storeUnitID- This attribute is used only for internal usage.eventDateTime- This is a standard attribute that captures the event processing time. If a value is sent for theeventDateTimeattribute, such as 2024-03-24 12:00:00, it serves as the timestamp for the event. However, if no value is sent or the attribute is missing in the payload, the time of event processing becomes the event timestamp.
The formats that are acceptable for the eventDateTime attribute are given below:
- yyyy-MM-dd'T'HH:mm:ssXXX
- yyyy-MM-dd'T'HH:mm:s.S
- yyyy-MM-dd HH:mm:ss
- yyyy-MM-dd
- dd-MM-yyyy HH:mm:ss
- MM/dd/yyyy HH:mm:ss
- yyyy/MM/dd HH:mm:ss
- yyyy/MM/dd
- dd-MM-yyyy
- MM/dd/yyyy
- yyyyMMdd HH:mm:ss
- dd-MMM-yy
- yyyy-MM-dd'T'HH:mm:ss
- EEE MMM dd HH:mm:ss z yyyy
- MMMM,dd,yyyy
- MMMM,dd
- yyyy-dd-MM HH:mm:ss
Note
The Behavioural event system saves the value for the eventDateTime attribute in the system as is, without any timezone offset. If there is no value provided for the attribute, it processes the time according to the GMT timezone and saves the datetime value without the timezone offset.
If you do not include the time with seconds, the system defaults it to 00:00 hrs for that date.
Custom Attributes
The custom attributes are user-defined attributes for each event. You can define attributes such as customer ID, product code, booking ID, product category, etc., and map the fields to capture the corresponding information. For example, you can create an attribute named CustomerMobileNumber and map it to Customer ID > Mobile number.
These attributes can be of any of the following data types:
- Enum
- Group ID
- Till Code
- Coupon Code
- Customer ID
- Date
- Product SKU
- Product Brand
- Currency Code
- Product Category
- String
- Double
Attribute order for group-based behavioral events
When publishing a behavioral event that includes a groupId, the system must identify the customer before validating group membership. In the current validation flow, this also means that customer-related attributes need to be processed before group-related attributes.
Although JSON does not generally enforce attribute order, group-based behavioral events rely on customer identification being completed first. If group validation happens before the customer is identified, the event may fail with a group mismatch error, even when the customer belongs to the group.
Notes:
When your event payload includes both customer identifiers and a group identifier:
- Ensure a valid customer identifier (such as mobile, email, or customerId) is present.
- Pass customer-related attributes so they are processed before groupId.
- Include groupId only after customer identification can be completed.
- Add remaining event attributes as needed.
Example
{
  "event_name": "Group_Event_points",
  "groupId": "advance_8892014064_1",
  "mobile": "918897010645",
  "points": 20.19
}
Recommendation
Before publishing a group-based behavioral event, verify that the customer identifier is configured correctly for the event, the customer exists in the system, and the customer is added to the target group. This prevents group mismatch errors during event publishing.
Mapping
Also called attribute mapping that lets you map attributes of a behavioural event with the attributes of a third-party application.
Handling behavioural in connected organizations
In a connected organization setup, behavioural events can be defined as one of the following:
- Common event for both parent and child
- Child-specific event
- Parent-only event
Common event for both parent and child
When an event needs to trigger actions at both the parent and child levels, it is posted to the parent webhook along with the child organization context in the event payload.
The system reads the organization context and routes the event to the corresponding child organization. The event is then saved and processed locally within the child org (for example, to trigger a loyalty rule or an engagement journey).
Replay at parent: After the child org processes the event, it is replayed to the parent organization but not stored in the parent’s event log. Instead, it is forwarded directly to the Engage Message Framework (EMF) and Journeys for executing any parent-level workflows.
To enable this, while sending the event to the parent webhook, the event payload includes a custom attribute called orgResolver, which contains the childOrgId. The parent webhook uses this ID to route each event to the correct child organization.
How it works
- The app sends all behavioural events to the parent organization’s webhook.
- The event payload includes a custom attribute named
orgResolver, which contains the child organization ID. - The parent webhook reads the
childOrgIdand routes the event to the appropriate child organization. - The child organization processes the event and applies any relevant logic (e.g., awarding reward points).
{
  "event_flag": 5.19,
  "event_name": "clickEventPromoPoint",
  "identifier_value": "unionId918871834592",
  "eventDateTime": "2023-12-11 12:13:14",
  "orgResolver": {
    "type": "PARENT_CHILD_ORG",
    "childOrgId": 1115,
    "tillCode": "12342" //child till code
  }
}
Example:
A healthcare insurance firm operates a wellness app that is used by employees from multiple companies. Each company is set up as a child organization, while the insurance firm itself operates as the parent organization.
Both the parent and child organizations want to reward users based on the same behavioural event — for example, completing a daily step goal.
- The child organization wants to reward users with company-specific benefits, such as meal vouchers or wellness points.
- The parent organization wants to reward users with umbrella-level benefits, such as insurance premium discounts or leaderboard badges.
Solution
To avoid duplicate configurations and multiple webhooks, all behavioural events (like StepsCompleted) are sent to a single parent-level webhook.
The event payload includes the childOrgId, which identifies the company where the event originated.
- The parent webhook routes the event to the respective child organization, which processes the local reward rule.
- The same event is replayed at the parent organization, triggering parent-level rewards and workflows.
Child-specific events
If the event is specific to a child (not shared or defined at parent level), it is posted directly to the child organization webhook. These events stay local and are not replayed to the parent.
Parent-specific events
If the event is specific to a parent, it is posted directly to the parent organization webhook.
Limitations of Behavioral Events
The following are the limitations of Behavioral Events.
- No support for standard entities such as SKU, and category in filters and KPIs for custom events.
- No support for anonymous events, customer identifier is required.
- Data is captured only from predefined integrations (such as WebEngage or Webhook), and not directly from sources (such as eCommerce websites, apps, and WeChat).
- The platform registers customers from the registered user profiles data shared in the S3 bucket. If there is no WebEngage integration, customer registration needs to handle through API Integration.
- Limitations for Custom Events:
- A maximum of 10 active events are allowed in an org.
- A maximum of 20 attributes are allowed in an event.
- Custom attribute names can have only up to 50 characters.
- Custom attributes can have only enum, date, Boolean, integer, double, and string as data types.
Steps to configure and publish an event
- Create a Webhook integration for a WebEngage platform or any other third-party apps or platforms.
- Create a new custom event or add a standard event.
- Create attribute mapping.
- Run a sample test to validate whether the data is flowing correctly as desired.
- Publish the event.
Add Webhook Integration
Webhook facilitates pushing real-time data from a third-party application or website to the Capillary database through a web callback or HTTP push API. A Webhook integration is a combination of a third-party app and Till code. For every Webhook integration you create, a unique URL is generated. The respective third-party apps need to make a POST call to the URL passing events data.
There are two types of integrations
- WebEngage integration to capture events data from the WebEngage platform.
- Custom integration to capture events data from other platforms or apps other than WebEngage.
To create a Webhook integration, follow these steps.
- Click Create Webhook.
- Choose WebEngage for WebEngage integration, else choose Custom for integration with other apps.
- In Select till code, choose the Till code that you want to associate with the selected source. If an event has the attribute Till Code, then the Till Code that is captured for the event will be considered as a default one.
- Click Done
You need to use the integration URL to POST event data to Webhook through an API call.
- If an event has the Till Code attribute, then the till code tagged in the Webhook or any other integration will not be considered.
Webhook Configuration for Behavioural Events in Connected Organizations
In a Connected organization setup, you only need to configure the webhook at the parent organization level. The system automatically routes events from both the parent and all connected child organizations to this webhook.
Key Behaviours
-
Single webhook setup - Configure the webhook only in the parent organization. No separate setup is required in the child organizations.
-
Event routing - All behavioural events, whether triggered in the parent or a child organization, are routed to the parent’s webhook.
-
Processing order - Events are first processed in the child organization where they originated. The same event is then processed again at the parent level.
-
Child-only webhooks - If a webhook is set up only in a child organization (outside the connected org setup), it processes events locally. These events are not sent to the parent webhook. If needed, you can enable listening to child events when setting up the parent webhook.
Add & map custom event
Create custom events if you want to capture specific details that are not available in standard events. You can use both standard and custom attributes to create custom events.
The following are the steps involved in publishing a custom event.
To create a custom event, follow these steps.
- Log on to InTouch
- Go to > Organization Settings > Master Data Management > Data Model > Behavioral Events.
- Click + Add Events.
- Click Create New Event and follow these steps
- In Event Name, specify a name for the event without any space or special characters (except underscore). For example, DemoEvent. If there are spaces in the event name, the system automatically replaces the spaces with a double underscore. Hence, do not use double underscores while naming the event.
- In Display Name, specify a name that you want to be displayed.
- In Description, give a short description of the event.
- Click + Add Attribute to add event attributes and follow these steps.
- In Name, specify an appropriate name for the attribute. Customer Identifier is a mandatory attribute for a custom event.
- In Data Type, choose the type of the attribute.
TYPE | DESCRIPTION |
|---|---|
CUSTOMER IDENTIFIER* (MANDATORY) | This is a mandatory attribute for an event and is used to identify an existing customer and also to register a new customer if required. You need to configure identifier type, source, and associated source account.
For example, if you set customer identifier as email ID, and Source as InStore,
|
Enum | Choose this to capture the predefined values for the attribute. In POSSIBLE VALUES enter the supported values for the field separating each by a comma (do not leave space after a comma). For example, if Name is Hobby, you could have the values Music, Sports, Fishing, Archery, Gardening, Others. Enum is a data type consisting of a set of predefined values. |
Till Code | Choose this to capture Till codes. |
Coupon Code | Choose this to capture coupon codes and configure the Regex (regular expression) for coupon codes accordingly. |
A customer identifier attribute is required for any custom event. Choose this to capture customer identifiers, associated sources, and source accounts from which the event is triggered.
| |
Date | Choose this to capture date values. The following are the different date formats supported. yyyy-MM-dd'T'HH:mm:ssXXX, yyyy-MM-dd'T'HH:mm:s.S, yyyy-MM-dd HH:mm:ss, yyyy-MM-dd, dd-MM-yyyy HH:mm:ss, MM/dd/yyyy HH:mm:ss, yyyy/MM/dd HH:mm:ss, yyyy/MM/dd, dd-MM-yyyy, MM/dd/yyyy, yyyyMMdd HH:mm:ss, dd-MMM-yy, yyyy-MM-dd'T'HH:mm:ss, EEE MMM dd HH:mm:ss z yyyy, MMMM,dd,yyyy, MMMM,dd, and yyyy-dd-MM HH:mm:ss. |
Product SKU | Choose this to capture product SKUs or item codes. |
Product Brand | Choose this to capture product brands. |
Product Category | Choose this to capture product categories. |
String | Choose this to capture free-flowing text that could contain alphabets, numbers, and spaces. |
Double | Choose this to capture a double data type.
|
- Enable Required if the attribute is a required field for the event.
- Enable Is part of unique key, if you want the attribute to be a part of unique key. For information on uniqueness check, see Event uniqueness check. Any attribute that is made as part of the unique key, cannot be reverted to a non-unique field.
- Enable Is PSI data, if you want to classify the attribute as sensitive data. This is applicable for attributes that are of type Enum, String, and Double. Refer to the PSI data documentation for more information on classifying PSI data.
- Similarly, click + Add Attribute to create more attributes for the event.
- Click Next to continue
- Check EMF Consumer to show the event in Loyalty Manager, and Bounceback Campaign to reward points, coupons, or just send messages. By default, these events are consumed by Essential Insights.
- In the Add destination page, select the Loyalty check box to send the event to Loyalty and process it. If it is not selected, the event is not sent to Loyalty and will not be considered for any points, rewards or any other loyalty program. By default, the Loyalty check box is not selected. You must manually select this option to send the event to Loyalty and Journey.
- Click Done to save the event.
- Test the event to see whether data is flowing to the system as expected. For example, for the Add to Cart event, open the WebEngage portal, and try adding items to the cart. The system will automatically validate the data and complete the testing process. For detailed instructions, see Test & Publish Event.
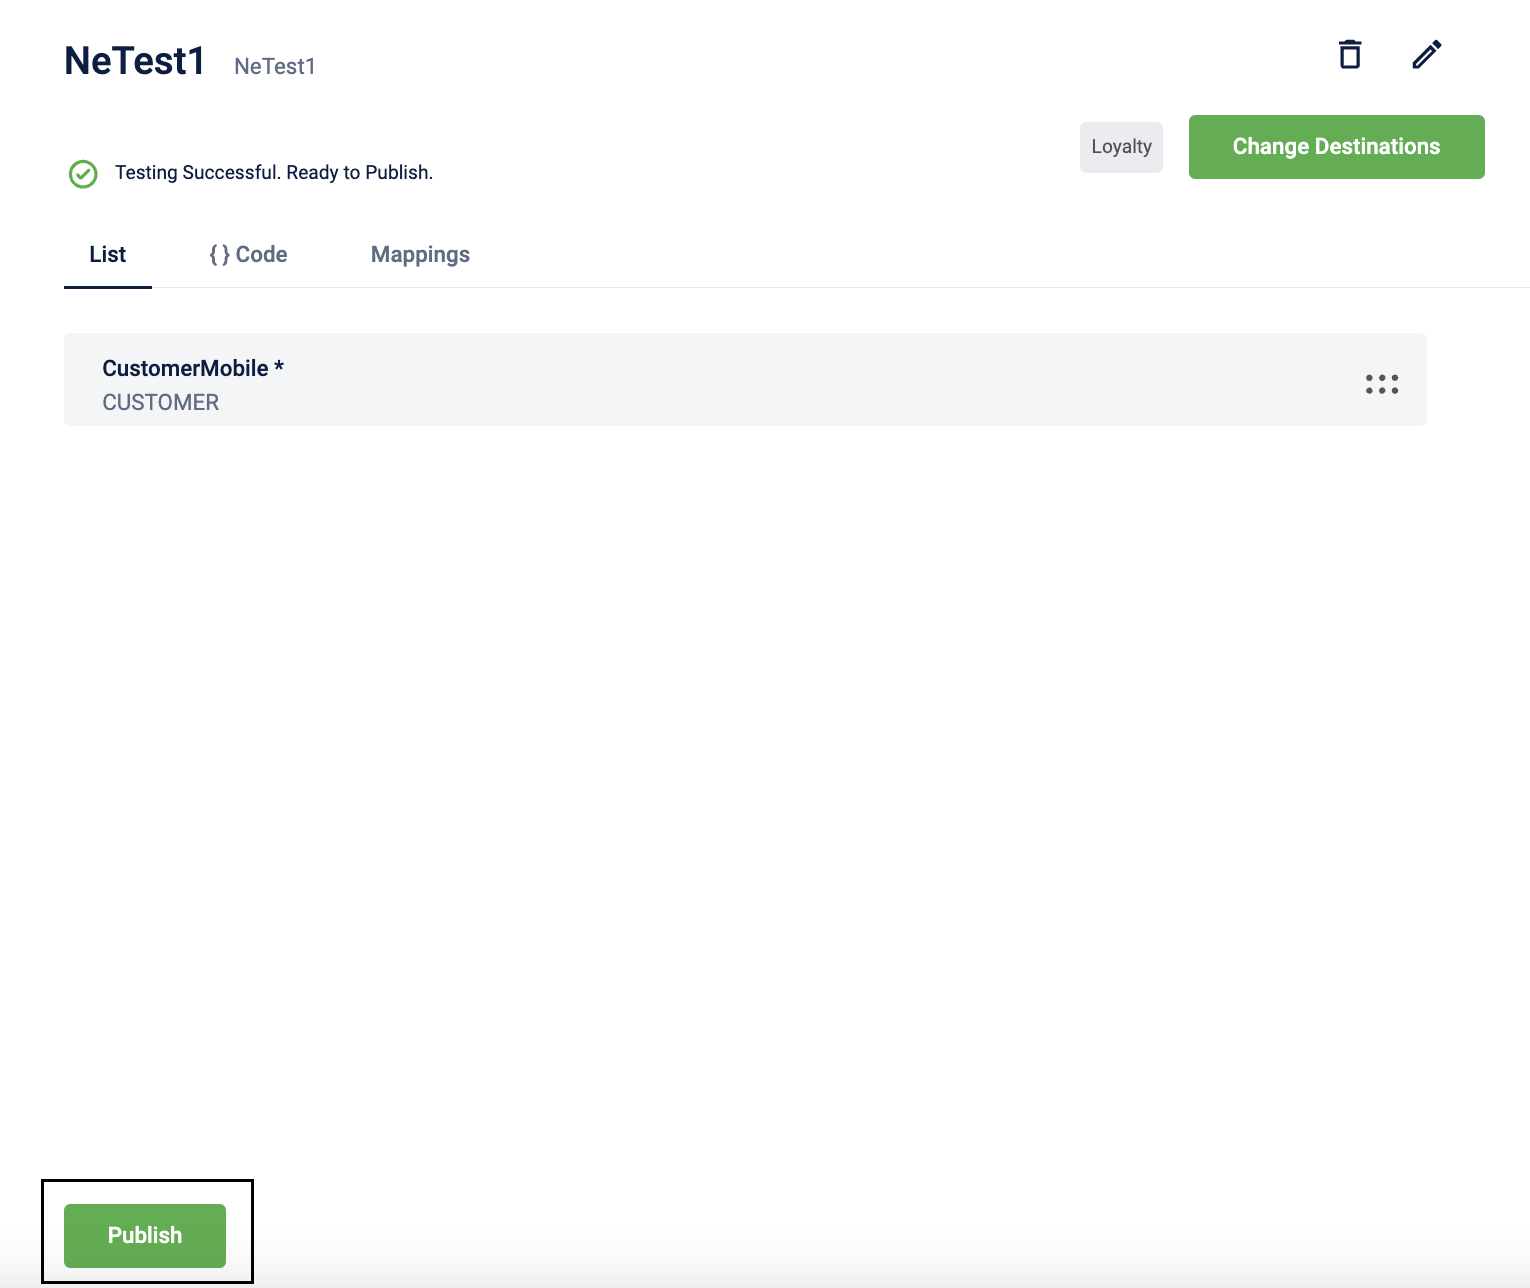
- The Publish button will be active only once the page is refreshed after pushing the event's data to the system. You need to refresh the page manually.
- Click Publish to publish the event.
- Once the event is published, you cannot edit or delete either standard or custom attributes.
- After creating, testing, or publishing the custom event successfully you can map it with the source event. For details, refer to mapping custom events to source events.
Enabling uniqueness check
In behavioural events, you can enable uniqueness checks and avoid issuing reward points for duplicate events. After the uniqueness check, duplicate events are not deleted nor does the Behavioral Event framework reject it. The EMF identifies duplicate events by checking their uniqueness. If there is a duplicate event, it is not processed. This ensures that points are not provided for duplicate events.
Use case
A behavioural event comes to Capillary from WebEngage and the timeout set for this request is 5 seconds at WebEngage. If Capillary fails to respond within 5 secs, WebEngage triggers the same request again. The uniqueness check enables to identify the duplicate events and avoids issuing reward points for duplicate events.
To enable uniqueness-check in the behavioural events, perform the following:
-
Enable the uniqueness check configuration in the webhook. There is no UI to enable uniqueness check configuration in the webhook and this must be performed using the webhook API call.
- For new orgs, use the POST call and create a webhook with uniqueness check configuration or create a webhook using UI and use PUT API call to update the webhook. For more information, see Add webhook and Update webhook.
- For existing orgs, use PUT API call and update the webhook to enable the uniqueness check.
Notes:
- Once enabled, you cannot disable the unique check configuration.
- Once uniqueness check is configured for the webhook, all the events in the org should have uniqueness check enabled.
-
In the events page, use the toggle switch and add the desired attributes to unique key. You can do this using API or from the UI. To add it from the UI,
-
Enable the Is part of unique key switch.

By default, the event name and customer identifier form the unique key. If an attribute is enabled, it is added as a part of the unique key with the event name and customer identifier.
Unique key format: EventName_Customerid_Attribute1_Attribute2_.... Unique key: md5 hash generated from combining the event name, customer identifier, and additional attributes in the EventName_Customerid_Attribute1_Attribute2 format.
Example Consider the following scenario:
- Event name:
Appointment - Customer ID: 9123456789
- Custom attribute for the event:
refIDIn this scenario, the unique key format is Appointment_9123456789_refID, and the unique key is 779069e41a8afde74b2c526bce59e51a, which is the MD5 hash of Appointment_9123456789_refID.
- Event name:
-
Make sure that the Required switch gets enabled. The unique key attributes are marked automatically when we enable the unique key switch.
Once the attribute is enabled as part of the unique key, it cannot be disabled.By default, the event name and customer identifier are part of the unique key and the enabled attribute is added as a part of the unique key along with the event name and customer identifier.
-
Map custom event to source event
There are some instances where events that come to Capillary's system are not in a format supported by Capillary. For example, the Capillary does not support an event name with a blank space. Suppose an event named Promotion Viewed is coming from WebEngage (source). You need to create a custom useevent - promotionViewed (custom event name) and map it to Promotion Viewed (source event name) using the event mapping process.
Behavioral Events lets you map a custom event to a source event. You can do it at any phase - after creating, testing, or publishing a custom event. You can map the source event name and attributes to a custom event name and attributes stored in Capillary's system.
The following are the different stages of event publishing when you can map a custom event to a source event.
Create custom event
To create a custom event, follow these steps.
- Navigate to Organization Settings > Master Data Management > Data Model > Behavioral Events.
- In the All Events tab, click + Add Event
- On the Add Events page, click + Create New Event to create, test, and publish a custom event with attributes.
Map custom events and their attributes
To map a custom event to a source event, follow these steps.
- Navigate to Organization Settings > Master Data Management > Data Model > Behavioral Events.
- In the All Events tab, search the existing or newly created custom event using the event name.
- Click +Add Mapping to map the custom event with the source event.
- On the Add Mapping page, choose the source (For example, WebEngage or Custom). Once you save mapping details, you cannot change the source.
- In Event Name, enter the event name of the source to map to the custom event name.
- Enter the source's event attribute to map the custom event and the source event attributes.
- Click Save.
View and modify a custom event
To view and edit mapping, follow these steps.
- Navigate to Organization Settings > Master Data Management > Data Model > Behavioral Events.
- In the All Events tab, search your preferred custom event using the event name.
- Click on the mapped custom event and navigate to the Mappings tab to view the event mapping.
- Navigate to the Mappings tab, click the Edit icon.
- Modify the mapping as You can modify the event name and event attributes - the event name and source attributes. The system does not allow to change the source.
- Click Save.
Add a Standard Event
- In Source, select the source of the event. For now, only WebEngage is supported.
- In Event Name, specify your preferred name for the event.
- In Attributes, enter the name of each attribute as in the Source(WebEngage). The attributes on the left refer to the names as in the Capillary system.
- Test the event to see whether data is flowing to the system or not. For example, for the Add to Cart event, open the WebEngage portal, and try adding items to the cart. The system will automatically validate the data and complete the testing process.
The Publish button will be active only once the page is refreshed after pushing the event's data to the system. You need to refresh the page manually.
- Click Publish to publish the event
Test & Publish Event
By default, an event that is created will be in draft mode. Once the event is tested successfully and if the data is flowing as desired, you can publish the event to make it live.
For testing an event, you need to either pass the data in the supported format or in the code from where you want to implement or through API.
Test event data using API
Below is the flow chart showing the steps involved in testing an event.

Here are the steps to test an event using API.
-
On the Behavioral Events home page, in the All Events tab, search for the event that needs testing and click on the event name.
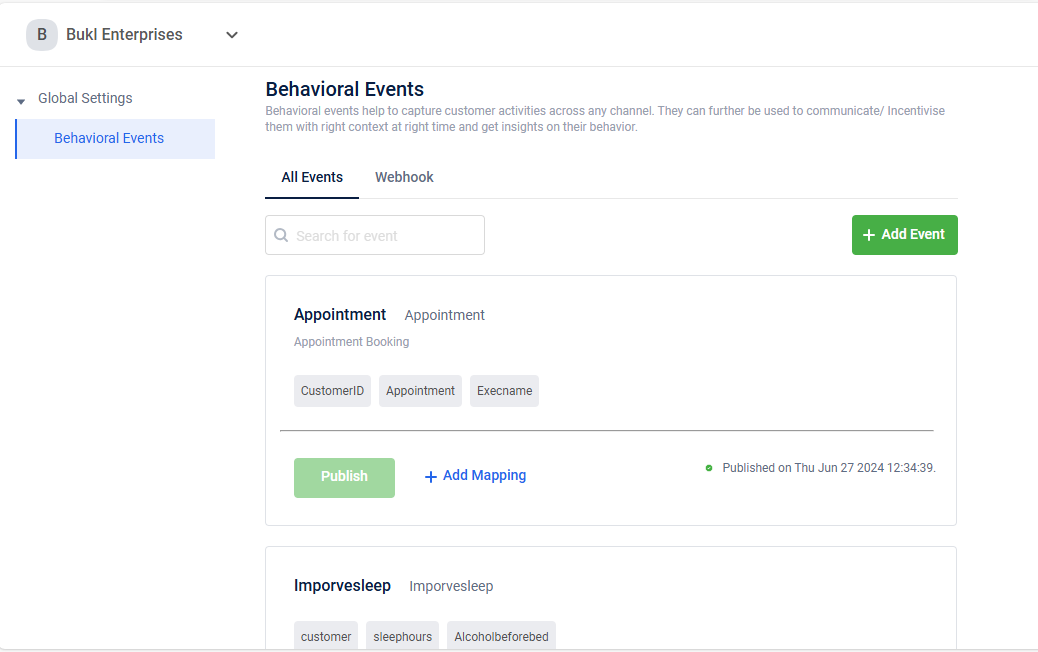
The events attribute page opens.
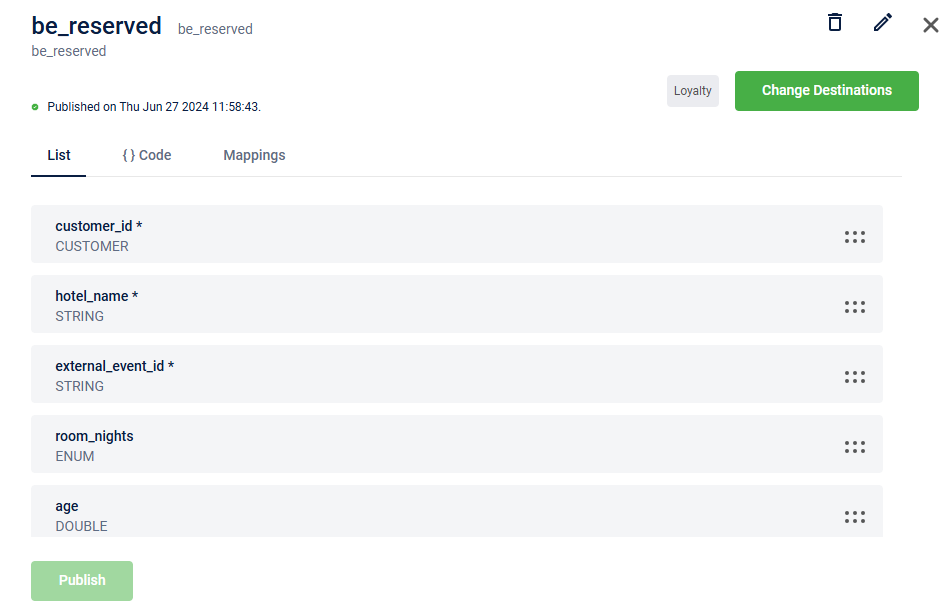
-
On the event attributes page, go to the { } Code tab. Copy the payload of the event.
-
Open an editor like Notepad to edit the payload. Fill in the correct values of the fields. This payload is used as the request payload to Post Event API.

-
On the Behavioral Events home page, go to the Webhook tab and create a new custom Webhook or copy the URL of an existing custom Webhook.
NoteCreate a custom Webhook URL. When selecting the integration under the Select Integration drop-down, choose Custom.
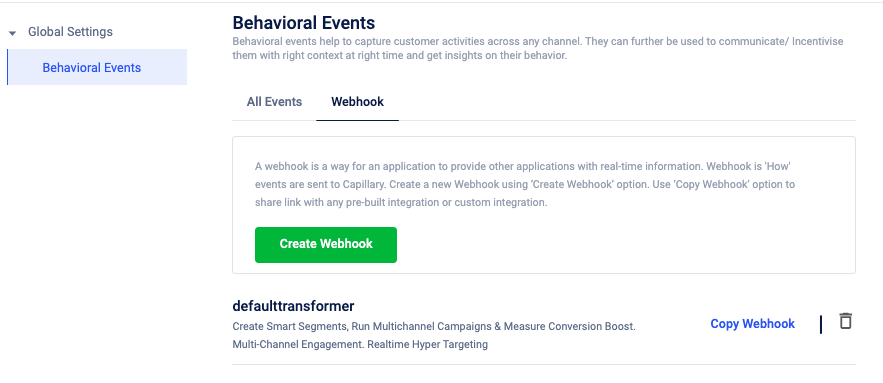
- POST the event using the webhook URL and the event payload.
- Validate if the data flow of the event is successful using the Get Events Logs API. The message and status fields indicate if the POST call was a success.
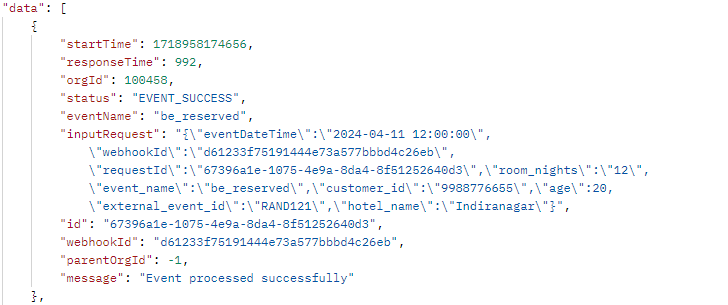
-
Refresh the Behavioral Events home page. The status changes from Testing Pending to Publish.
-
Click Publish to publish the event.
-
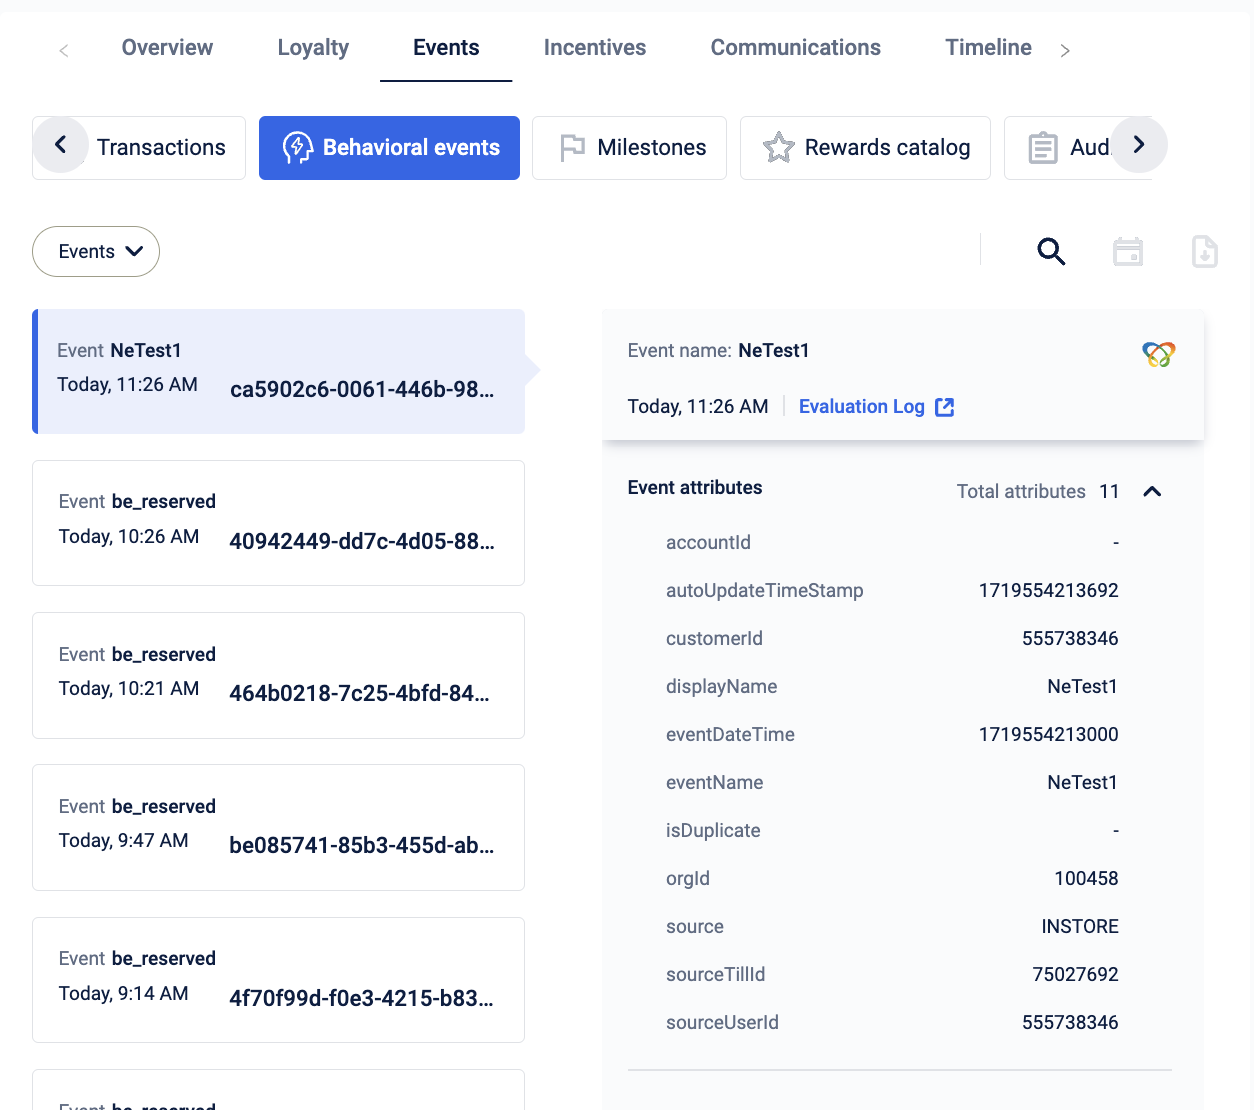
Validate event publishing in Member Care UI. From the customer home page, navigate to Events > Behavioral events to see the event published.
Timezone in behavioural events
Scenario 1: Behavioural Event payload without eventDateTime value.
- Description: The system processes event times using GMT (Greenwich Mean Time). For instance, if an event is logged at 6 PM IST (Indian Standard Time), the system records the processing time as 12:30 PM GMT.
Scenario 2: Behavioural Event payload with eventDateTime eventDateTime value
- Description: The system considers the date mentioned by the user in the specified format. This can be used in scenarios where you want to capture a past-dated event.
- Example: For example,
2024-08-05T14:30:5.3if the date format isyyyy-MM-dd'T'HH:mm:s.S
Reporting
Behavioural events created within the system are automatically onboarded into the Insights database once the data is pushed into the event. After an organization is onboarded to the automated Behavioral Events (BE) flow, the data corresponding to all the BEs will be available for reporting within 24 hours after completion of ETL sync. This would allow the users to create normal charts and migration charts powered on BE data.
Audience Filters
As soon as a behavioural event is created and its data is available in Insights, an audience filter is available in Engage+ for segregating users and creating an audience group. For more information on audience filter-based reporting, refer to the Audience group filter in reports documentation.
Updated 16 days ago
