January-February-March 2021
Insights+
This release introduces a new user interface (UI) for Insights+. The new UI is based on Engage+ to ensure a uniform user experience across both products.
We will release UI revamp in multiple phases and the first phase includes the following changes.
Enhanced audience group comparison
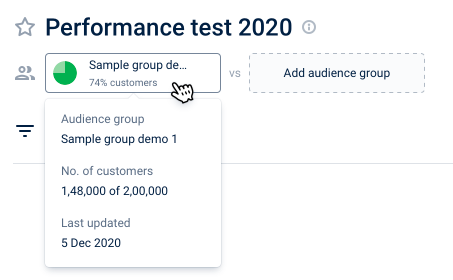
The following are the details of the selected audience displayed on the user interface(UI)
- Percentage(%) of total customers that are part of the selected audience.
- To see the details of the selected audience group, hover on the group name.
Enhanced global filters in reports
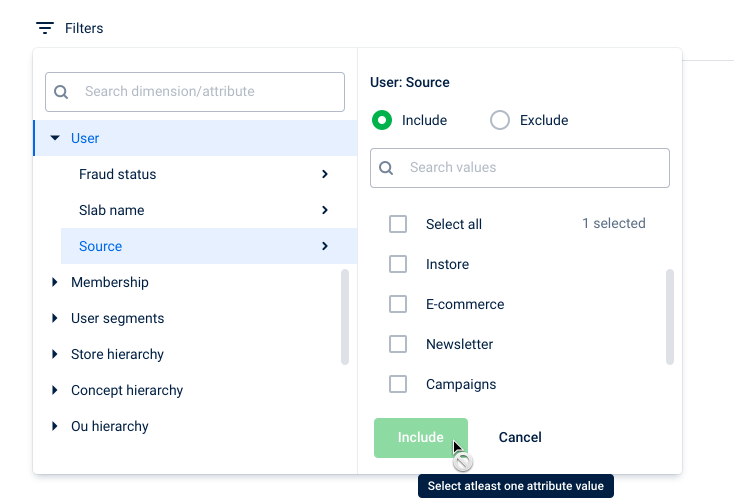
The following are the report global filter enhancements.
- Dimension attribute values appear in a separate panel for better navigation.
- User interface changes for the selected filters that appear on the report.

Enhanced date filter in reports
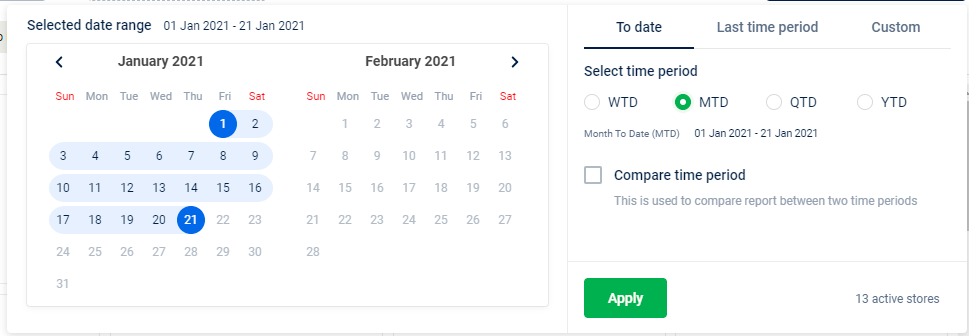
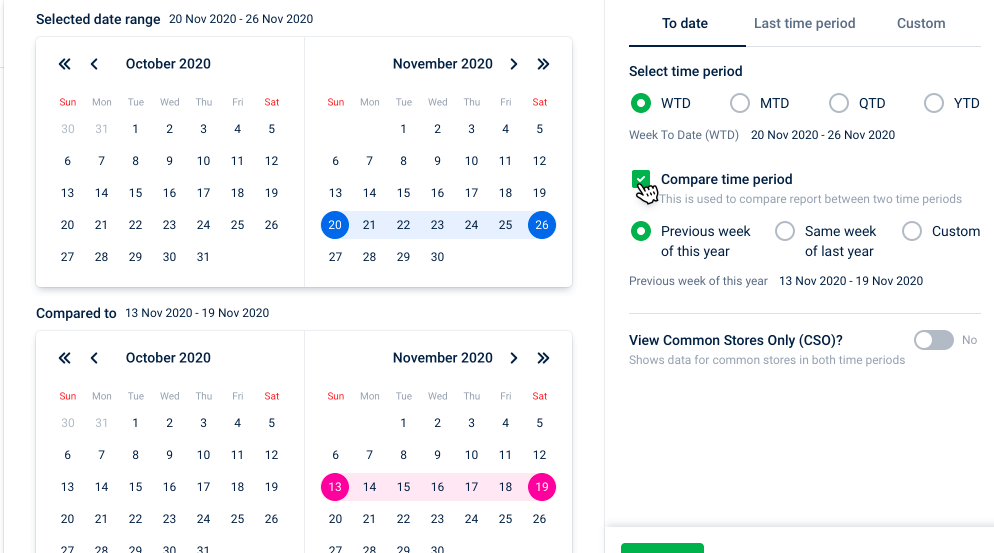
The improved date filter shows the calendar with a visual date selection indicator for better navigation and visibility. You can select the date directly from the calendar or use the standard date filters like WTD, MTD, QTD, and YTD.
Create custom categories for reports
Apart from user interface changes, there are a few enhancements to the user experience.
The following are the enhancements.
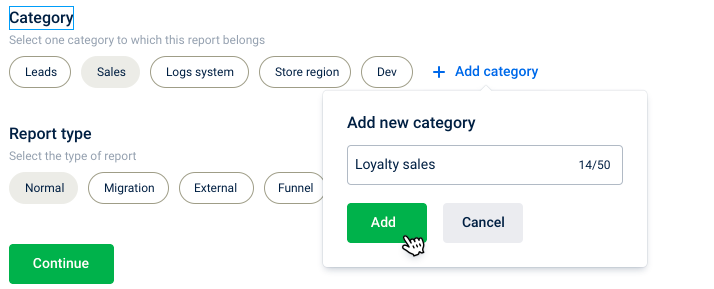
- Now, create a custom category for reports.
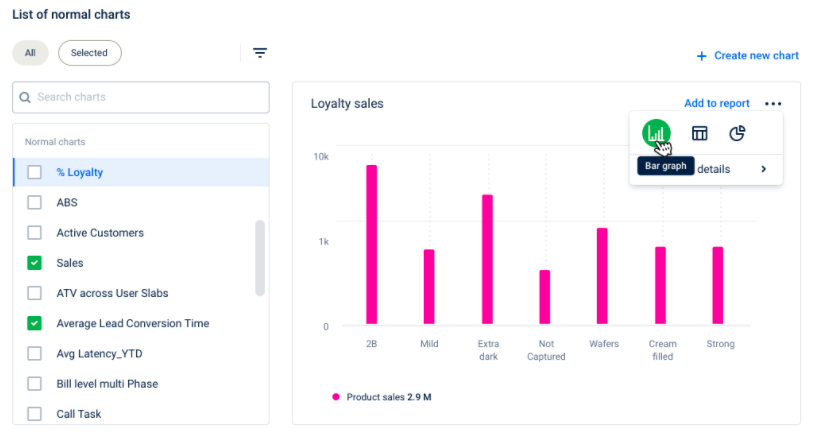
- The chart selection page shows the list of charts instead of previewing all charts, this also improves the page loading performance. You can only see the preview of the selected chart.
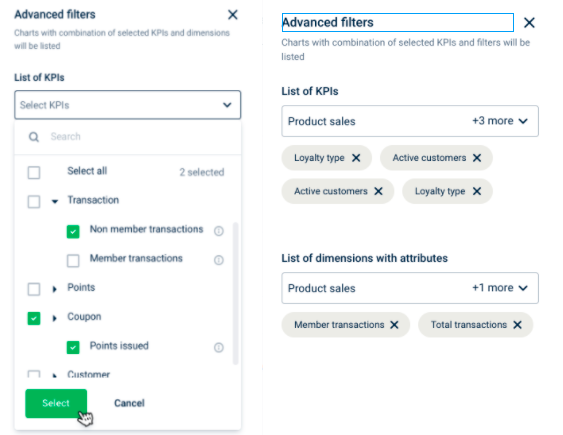
- The advanced filter option allows to search charts based on KPIs or dimensions used in charts.
Engage+
Support of OU level sender IDs
Problem Statement
Many InTouch clients have different org units (OUs) or brands set up within the parent organization. Each of these org units has its own marketing strategy. Hence, clients who have multiple OUs expect Intouch to support OUs across Capillary products.
As a part of this larger enhancement, Engage+ can now support different sender IDs for each OU to send messages.
- Only the sender IDs that are tagged to the OU will be available in the message creation flow (refer to step 8). Therefore, an OU will not be able to use the sender IDs of other OUs.
- If no sender ID is tagged to an OU, then the default sender Id of the organization will be auto-populated in the message creation flow(delivery settings).
The following are steps to tag sender IDs to an OU.
- Navigate to Organization Settings > Communications & Gateway > Domains > OU - Sender IDs Tagging.
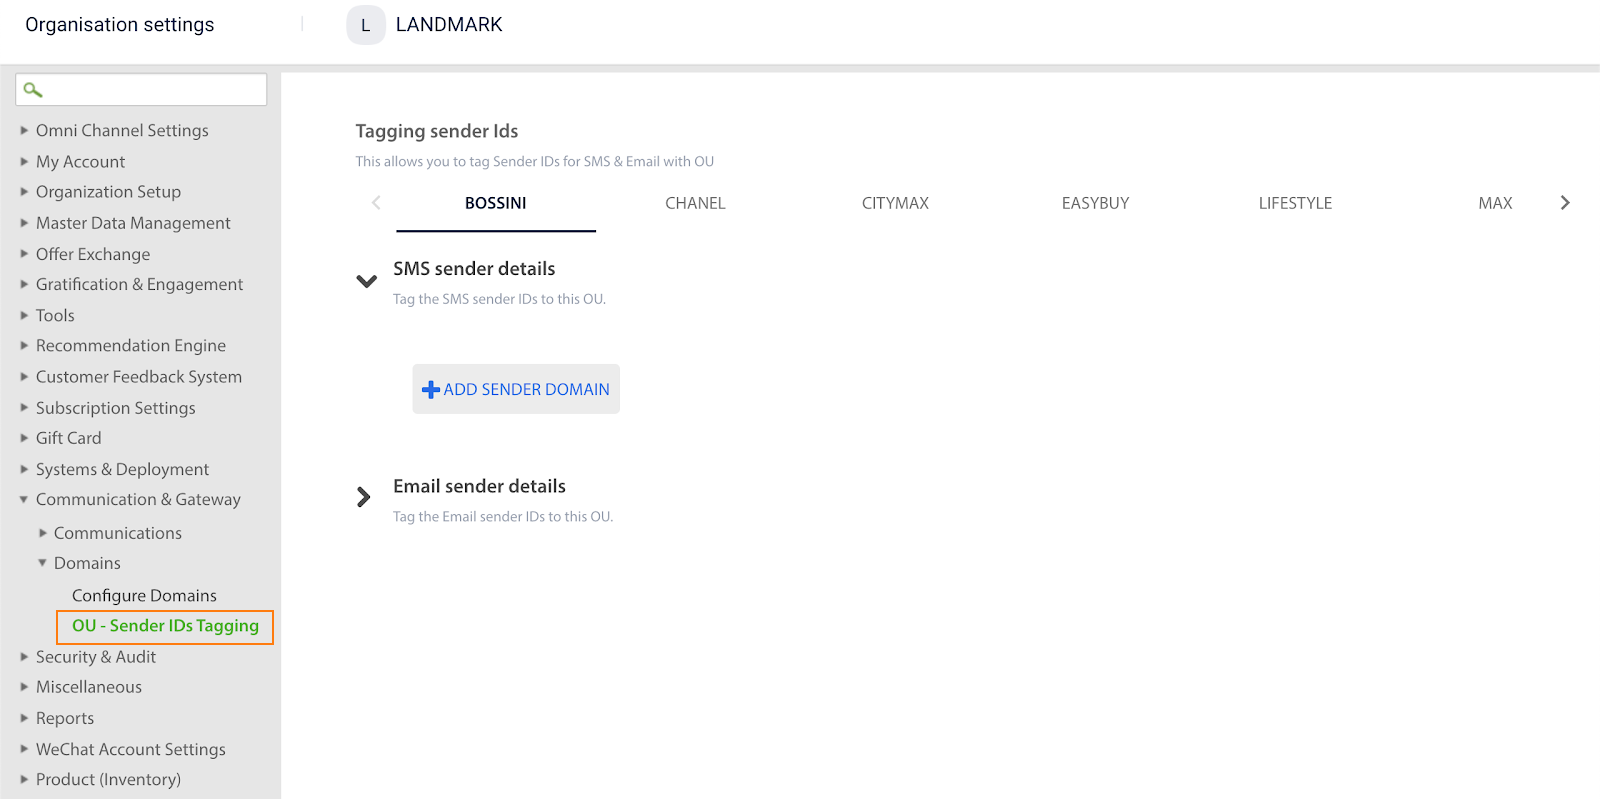
- Navigate to the OU for which you want to configure sender IDs.
- Click Add Sender Domain.
- Choose the Sender Domain in the first dropdown list.
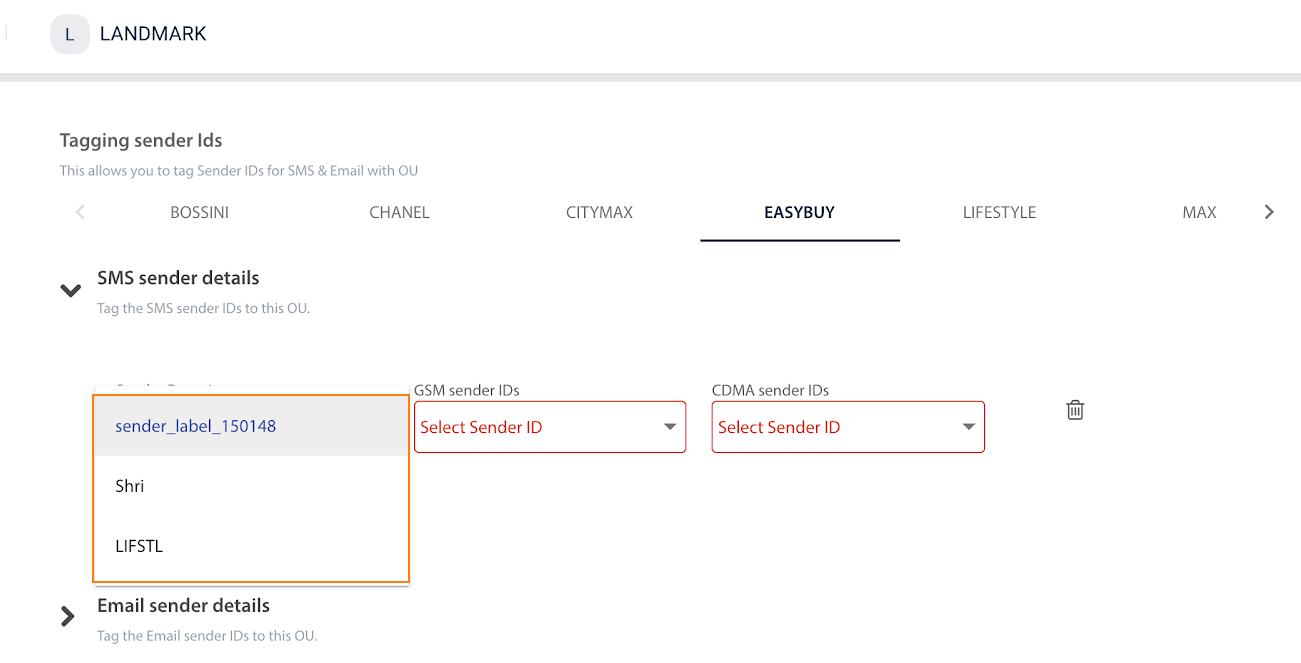
- In GSM sender IDs, select GSM sender IDs to tag to the sender domain.
- In CDMA sender IDs, select CDMA sender IDs to tag to the sender domain.
- In Default Sender IDs, select the default sender ID for each network type - GSM and CDMA. While message creation, by default, these sender IDs are selected.
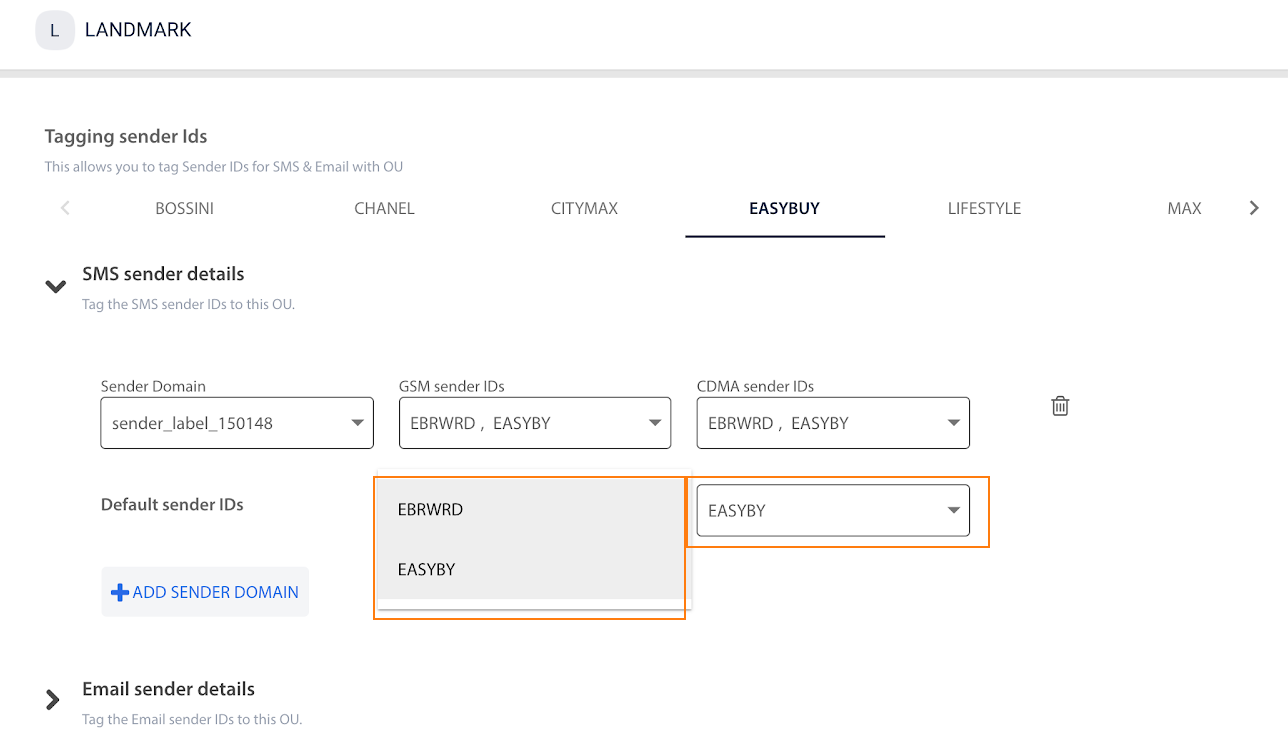
You can tag the sender Ids that belong to another domain of the OU. For that, repeat steps 2 to 6.
- Click Save.
Once configured, you can check the default sender IDs for each OU, on Engage+ > New campaign > New message > Delivery settings.
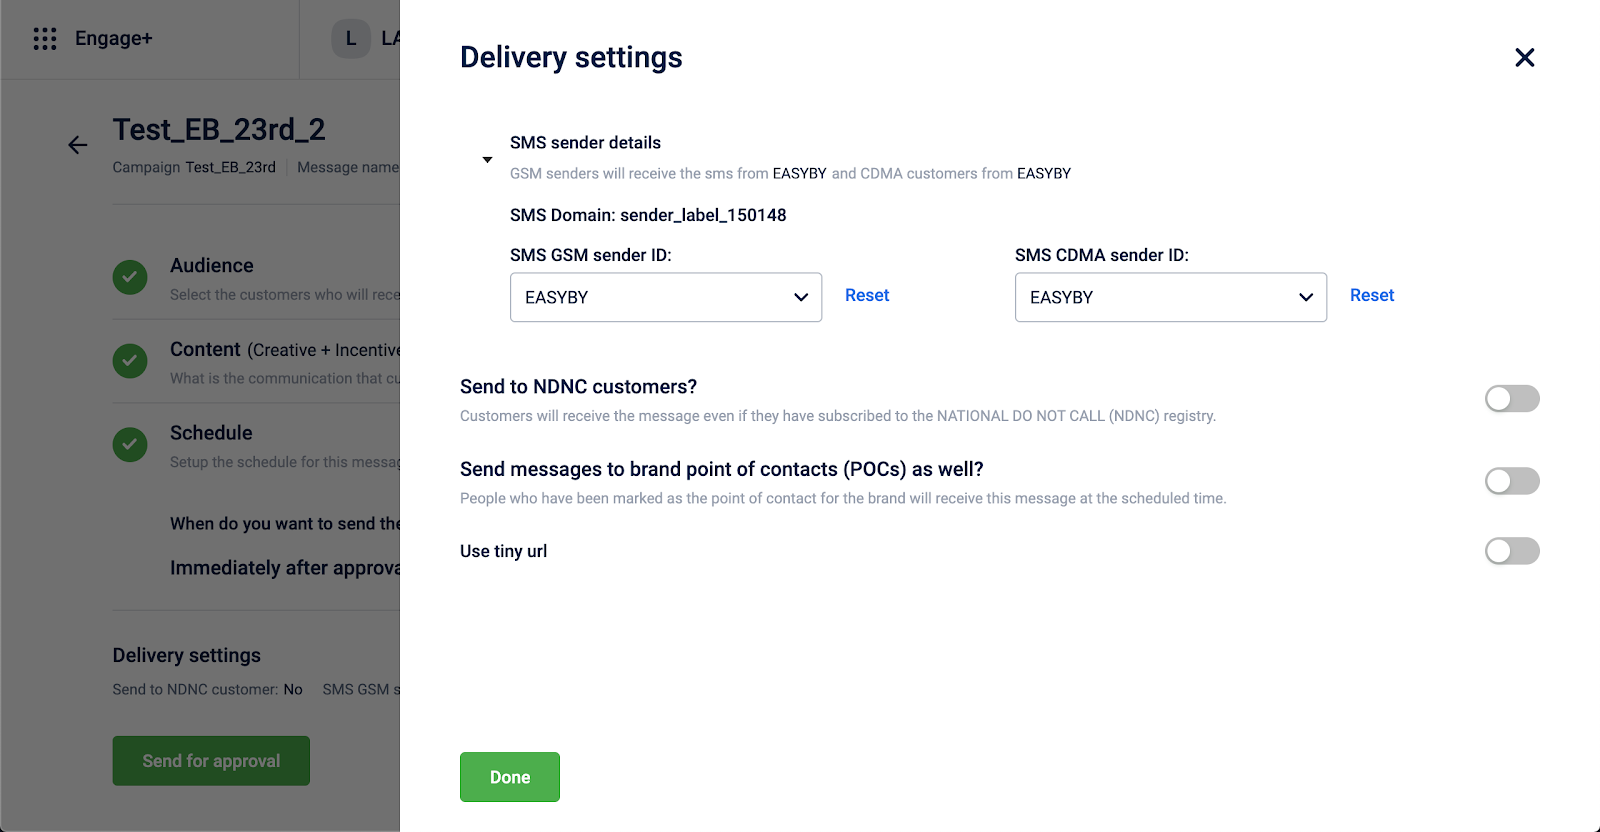
You can also select any of the other sender Ids that are tagged to the OU.
Partner broadcast messages
Partner broadcast message is an extension of the No communication - Incentive Only campaign.
Problem Statement
Brands that already have a third-party system to communicate with customers and prefer using Capillary CRM to manage issue coupons and promotions.
Solution
We have introduced a new FTP channel as an endpoint to campaigns. With this
- a CSV with user IDs and associated tags will be saved to an FTP folder.
- incentives will be issued to customers but no communication will be sent.
To enable no communication:
- On the campaign Content page, enable *No communication messages.
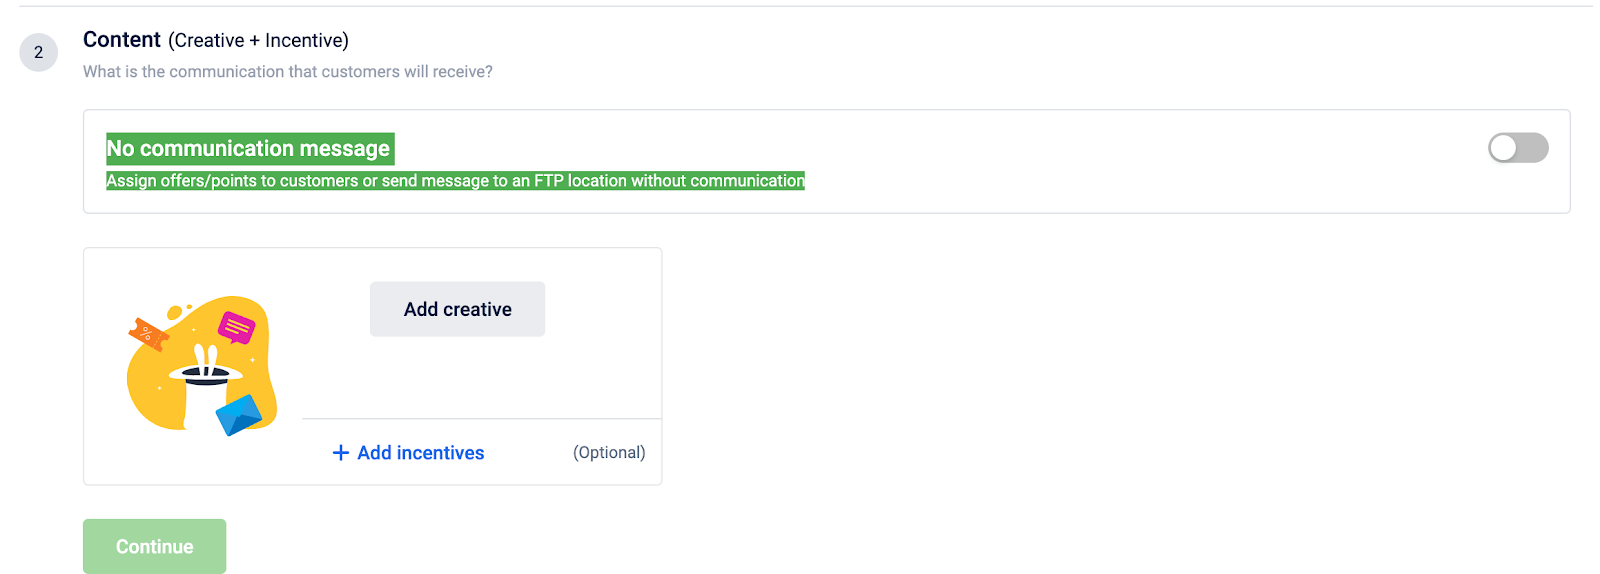
You will see an option to Add FTP location.
- Set up the FTP location where the exported file needs to save.
- Click on Add column and select the labels to be exported.
- In Message content, enter the message to send.
Once the message is executed, the customer ID along with the selected labels are exported to the defined FTP location. The last column in the CSV file will have the message content after the labels are resolved for the respective user.
For a step-by-step guide to creating Partner Broadcast Messages, view our help doc.
Viber Channel Support
Viber is one of the most popular messaging apps in the Philippines and we have added this as a new channel in Engage+. This will help multinational companies such as Petron, Shell, Abbot, etc. to target customers wherever is popular.
Subscription
Capillary will provide the brands with the subscription API (Update Subscriptions) to capture Viber consent. This API can be used to update consent that can be captured from the customer from different channels such as:
- Point of Sale where the cashier updates it on behalf of the customer.
- Missed call to a phone number.
- Microsite where customers can provide consent that can be distributed as a Campaign or through in-store QR Code scan.
- During the registration flow in a Website or App.
Integration
Capillary has integrated with Infobip (gateway) who will be in charge of sending the actual Viber Messages. Viber enablement requires filling up a form with the below details and sharing the following details with Infobip.
- Brands details
- Description of business
- Status Message
- Images
- What type of messages the brands want to send - promotional or transactional or both, etc.
Infobip will create a verified business account on Viber, map it into their system and provide access to the APIs to Capillary for sending messages.
Creatives
With the Business Account, a brand can send:
- Text Message - Limit is 1000 characters
- Text Message + Image
- Image can be selected from the computer or gallery (Dimensions: 300px x 400px,Size: 10mb)
- Text Message + Image + Button
- Button Text (20 Characters) & URL for redirection when clicked. URL needs to shart with https://
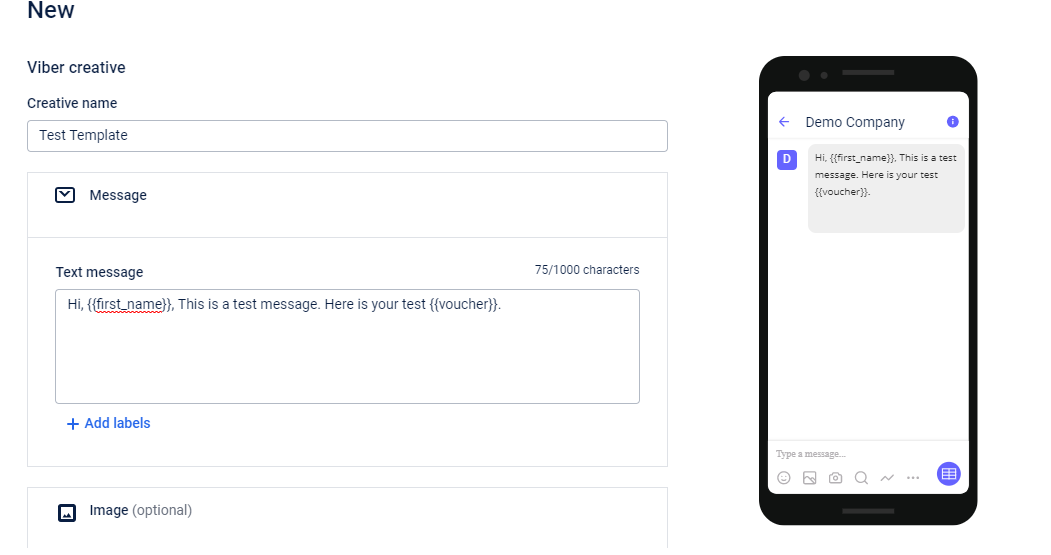
Reporting
- Only delivery reports are available.
- Reports on how many customers saw or opened the message are not available.
Message Throughput
- The default speed of a Viber instance is 100 msg/sec.
Pricing
The below rates have been negotiated between Capillary and Infobip. The sales/ CS team should add a margin on the below and share with new/ existing customers.
Country-wise Viber Pricing in Euros
| Countries | Transactional Charge | Promotional Charges | Monthly Fee |
|---|---|---|---|
| Philippines | 0.0008 | 0.0012 | 200 |
| Thailand | 0.0048 | 0.0060 | 200 |
| Vietnam | 0.0075 | 0.0090 | 200 |
| Malaysia | 0.0070 | 0.0100 | 200 |
Support Documentation
Future Roadmap:
Allow Viber channel in Message Strategy - Personalisation, Channel Optimisation and X-engage
Capillary Data Platform
Card Loyalty
There are some exciting features for card loyalty that you can check out.
The following are the key features of card loyalty.
- Create card linked loyalty program
- Import existing card data
- Generate physical cards
- Manage card requests using Member Care
- Integrate with POS or front-end using APIs
Card Linked Loyalty Program enables creating multiple loyalty cards within an Organization and linking card series with loyalty programs. Card Loyalty helps define different types of physical or digital cards based on pre-configured logic.:
The following functionalities are supported in Loyalty+ for Card Loyalty.
- Issue cards to customers during or post-registration, where card numbers are added as customer identifiers.
- Points allocation and redemption using card numbers (Loyalty Program).
- Search customers by card numbers.
- Delete or deactivate cards issued to customers.
Use Case
- Card-linked program based on the target audience
- Create different cards and loyalty programs on the values of customer segments. For example, value cards, premium cards, and family cards.
- Card-linked program based on distribution mode
- Create physical cards or digital cards based on customer preference and link them to one or more loyalty programs.
- Card-linked program based on Organization Units
- Create card-linked loyalty programs for each organization unit.
Key Features of Card loyalty
Create Card linked loyalty program
- Create a card series from InTouch Organization Settings.
- Create a card series using APIs.
- Create a card series using import. For details, see card series import.
- Link card series with an existing loyalty program. For details, see create card-linked loyalty programs.
Import existing card data
Import historical data of customers’ card details. For details, see card import.
Generate physical cards
- Generate cards from InTouch Organization Settings.
- Generate card series using APIs.
- Generate card series using import. For details, see card series import.
Manage card requests using Member Care
- Configure settings to issue cards from Member Care
- Issue a new card to a customer. For details, see the issue card to a customer.
- View card details of a customer
- Search a customer using a card number
- Update status of a card
- View card status audit log
Integrate with POS or front-end using APIs
- Register a customer with a card number. For details, see the API documentation v2 and v1.1.
- Search customer by card number. For details, see the API documentation v2.
- Issue card to an existing customer.
- Issue a card number generated in Capillary [v2].
- Issue a card number not generated in Capillary.
- First, add a card number using v2/card API.
- Then link the card number to the customer using v2/change identifier API.
- Issue an instantly generated card number with a card series.
- First, generate a card number using v2/card/generate API.
- Then link the card number to the customer using v2/change identifier API.
- Get card details of a customer.
- Get card details using card number [v2].
- Get card details using other identifiers [v2] and [v1.1].
- Update card status [v2].
- Deactivate a card.
- Reactivate a card.
- Expire a card.
- Delete a card.
- Add a transaction with a card number [v2] and [v1.1].
- Redeem points and coupons with a card number.
- Check if points are redeemable [v1.1].
- Redeem points [v1.1].
- Check if the coupon is redeemable [v1.1].
- Redeem coupon [v1.1].
For detailed release notes, see Card Linked Loyalty Program Release Notes (It is an internal document and can be accessed only by Capillary users).
Upcoming Features
- Card based reports
- Create audience lists using card data
- Export card data
Limits on Creating Entities (Custom fields, Store entities, Payment modes...)
In this release, we are rolling out limits on the creation of the following entities in phases.
- Custom fields
- Store entities
- Product Attributes
- Payment mode attributes
- Sharingan apps
- Behavioral events
- OAuth API clients
A list of such entities, their default limits, and release timelines can be found below.
Purpose
Capping is important to ensure fair usage of the platform features, achieve high system availability, and keep a check on the cost, as the higher number of entities have higher cost implementations at our end.
The following table provides a detailed cap for each entity.
  <th style={{ textAlign: "left" }}>
    Entity
  </th>

  <th style={{ textAlign: "left" }}>
    Limit
  </th>
</tr>
<td style={{ textAlign: "left" }}>
Loyalty registration custom fields
</td>
<td style={{ textAlign: "left" }}>
30
</td>
</tr>
<tr>
<td style={{ textAlign: "left" }}>
</td>
<td style={{ textAlign: "left" }}>
Loyalty transaction custom fields
</td>
<td style={{ textAlign: "left" }}>
30
</td>
</tr>
<tr>
<td style={{ textAlign: "left" }}>
</td>
<td style={{ textAlign: "left" }}>
Store custom fields
</td>
<td style={{ textAlign: "left" }}>
30
</td>
</tr>
<tr>
<td style={{ textAlign: "left" }}>
Product data model
</td>
<td style={{ textAlign: "left" }}>
Product categories
</td>
<td style={{ textAlign: "left" }}>
50
</td>
</tr>
<tr>
<td style={{ textAlign: "left" }}>
</td>
<td style={{ textAlign: "left" }}>
Product brands
</td>
<td style={{ textAlign: "left" }}>
50
</td>
</tr>
<tr>
<td style={{ textAlign: "left" }}>
</td>
<td style={{ textAlign: "left" }}>
Product Attributes
</td>
<td style={{ textAlign: "left" }}>
30
</td>
</tr>
<tr>
<td style={{ textAlign: "left" }}>
Payment modes
</td>
<td style={{ textAlign: "left" }}>
Payment mode attributes
</td>
<td style={{ textAlign: "left" }}>
10
</td>
</tr>
<tr>
<td style={{ textAlign: "left" }}>
Sharingan apps
</td>
<td style={{ textAlign: "left" }}>
Active Sharingan apps
</td>
<td style={{ textAlign: "left" }}>
100
</td>
</tr>
<tr>
<td style={{ textAlign: "left" }}>
Behavioral events
</td>
<td style={{ textAlign: "left" }}>
Behavioral events
</td>
<td style={{ textAlign: "left" }}>
20
</td>
</tr>
<tr>
<td style={{ textAlign: "left" }}>
</td>
<td style={{ textAlign: "left" }}>
Behavioral events for Loyalty+ Destination
</td>
<td style={{ textAlign: "left" }}>
10
</td>
</tr>
<tr>
<td style={{ textAlign: "left" }}>
</td>
<td style={{ textAlign: "left" }}>
Attributes in a Behavioral event
</td>
<td style={{ textAlign: "left" }}>
20
</td>
</tr>
<tr>
<td style={{ textAlign: "left" }}>
Store data model
</td>
<td style={{ textAlign: "left" }}>
Stores
</td>
<td style={{ textAlign: "left" }}>
500
</td>
</tr>
<tr>
<td style={{ textAlign: "left" }}>
</td>
<td style={{ textAlign: "left" }}>
Tills per store
</td>
<td style={{ textAlign: "left" }}>
20
</td>
</tr>
<tr>
<td style={{ textAlign: "left" }}>
</td>
<td style={{ textAlign: "left" }}>
Zones per org
</td>
<td style={{ textAlign: "left" }}>
30
</td>
</tr>
<tr>
<td style={{ textAlign: "left" }}>
</td>
<td style={{ textAlign: "left" }}>
Concepts per org
</td>
<td style={{ textAlign: "left" }}>
30
</td>
</tr>
<tr>
<td style={{ textAlign: "left" }}>
OAuth API client
</td>
<td style={{ textAlign: "left" }}>
API clients
</td>
<td style={{ textAlign: "left" }}>
15
</td>
</tr>Module
Custom fields
What if an Org needs more entities of a type?
The limit is on the count of active entities. Firstly, check if there are any redundant entities added for a type and delete them. Orgs are charged for the usage.
If that does not suffice, raise a task ticket on JIRA with the component as 'API'. The request will go through an approval process, which will require the involvement of a Capillary PoC (Project Manager or Customer Success Manager) to explain the case. We will override the limit for the org.
The estimated turnaround time for these requests will be 5 working days.
If agreed that an Org is not paying based on the usage, the updated pricing would be decided by CSM/Sales PoCs. The business teams collaborate with the Org to suggest subsequent actions.
Will existing Orgs that are overutilizing the limits be impacted?
Data capture will not be impacted due to this even if the entity limit is exceeded. So, if 50 custom fields are already active for an org and the limit is 30, it won't have any impact on the existing integrations or data import. However, the creation of new custom fields will be forbidden and errors will be thrown indicating a limit breach.
When the limit is exceeded, the imported record numbers' limitation will not allow any data ingestion. However, the limit on record imports is already fixed and can be increased if required. Using this feature, it is possible to set the limit on records at the Org level.
For specific brands that require higher import limits, such as CP All, the limit can be increased so that the FTP import gets executed without interruption.
Currently, CP All is considered as an exception.
Updated 16 days ago
