October-November-December 2022
Loyalty+
Support for Hex Code in Loyalty tiers
Problem Statement :
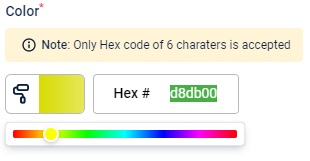
Earlier the users could choose the color of the tier in the tier settings, by dragging the mouse on the color palette. But this allowed only limited colors to be selected for the tiers.
Use Case:
As a Loyalty program manager, I would like to use silver color for my silver tier, golden color for my gold tier, green color for my highest tier etc. but the color drag palette does not support these customized colors.
Feature Description:
The tier color settings have been enhanced now. As you know each color is associated with a HEX code, so now you can edit this Hex code in the tier settings.If a color is not available in the color palette, simply type-in the HEX code of the required color, and the tier will acquire that color. The color cannot be changed for the default tier.
Bulk Configuration tool for Workflows
Problem Statement :
- Through marvel rewards, brands setup catalogs with products, coupons, cart promotions, vendor reward etc. The currency for all these rewards are points owned by the customer.
- Currently we support static currencies i.e for the entire reward period the currency stays the same for the reward unless manually updated.
- If a brand wants to run promotions on their reward catalog i.e give discounts in the point value for a certain time and show additional promotions metadata for those items, it is not supported dynamically and needs to be changed manually at every instance.
Feature Description:
- Users will now be able to download a ruleset from any activity as a template as a file into their PC.
- This downloaded file will include both the true and false conditions with their respective expressions along with the actions configured within them.
- Users will be able to see which program this template was from, along with the customer activity, ruleset type (in case of Transaction Add it will be one of the 4 root types, it doesn’t matter for all other events) and the labels of the source rulesets (if available)
- Now, the users will be simply able to upload this downloaded file wherever they require the same set of configurations. But they will have to ensure that they replicate the sets in the same customer activity ( download rule sets from Transaction Add customer activity and upload them in any program, but in Transaction Add customer activity).
Engage+
Introducing Join Block in Journeys
Journeys is an engagement automation interface that enables you to create scenario based flows to nurture your customers throughout their lifecycle. It helps marketers identify the right course of action by creating multi-campaign flows, incentivizing customers, and engaging them via multi-channel personalized communication, all at one place. It helps businesses automate their Customer engagement flow.
Problem Description
At times, customers from different paths in a journey need to be redirected to a common path in the journey at a later stage.
Use case: Marketeer wants to give a 10& off coupon code to the customers who have registered on the mobile app and the customers who have registered on the website.
How are we solving this?
- We have introduced a Join block in Journeys which will help marketers to join or point the next path to any block in the entire journey.
- Essentially a marketeer will now be able to combine users from two or more paths into a single path.
- With Join block in place, marketeers need not replicate a flow in the journey again and again in different paths.
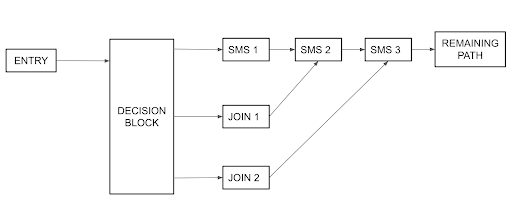
A journey workflow demonstrating the use of “Join” block
How to use a “Join” functionality?
Step 1: Wherever you want to join two paths, drag and drop the “Join” block available under “Flow control” building blocks
Step 2: Place this “Join” block after any of the paths you wish to join.
Step 3: Click on “Join” and configure the settings
Step 4: Select from the dropdown “Where do you want to join this path”
Step 5: After configuring the Join block, you can continue adding the required blocks as per the use case. Example: If you want to send 10% off to all users who registered on the app as well as those who have registered on the website, configure it in the following manner:
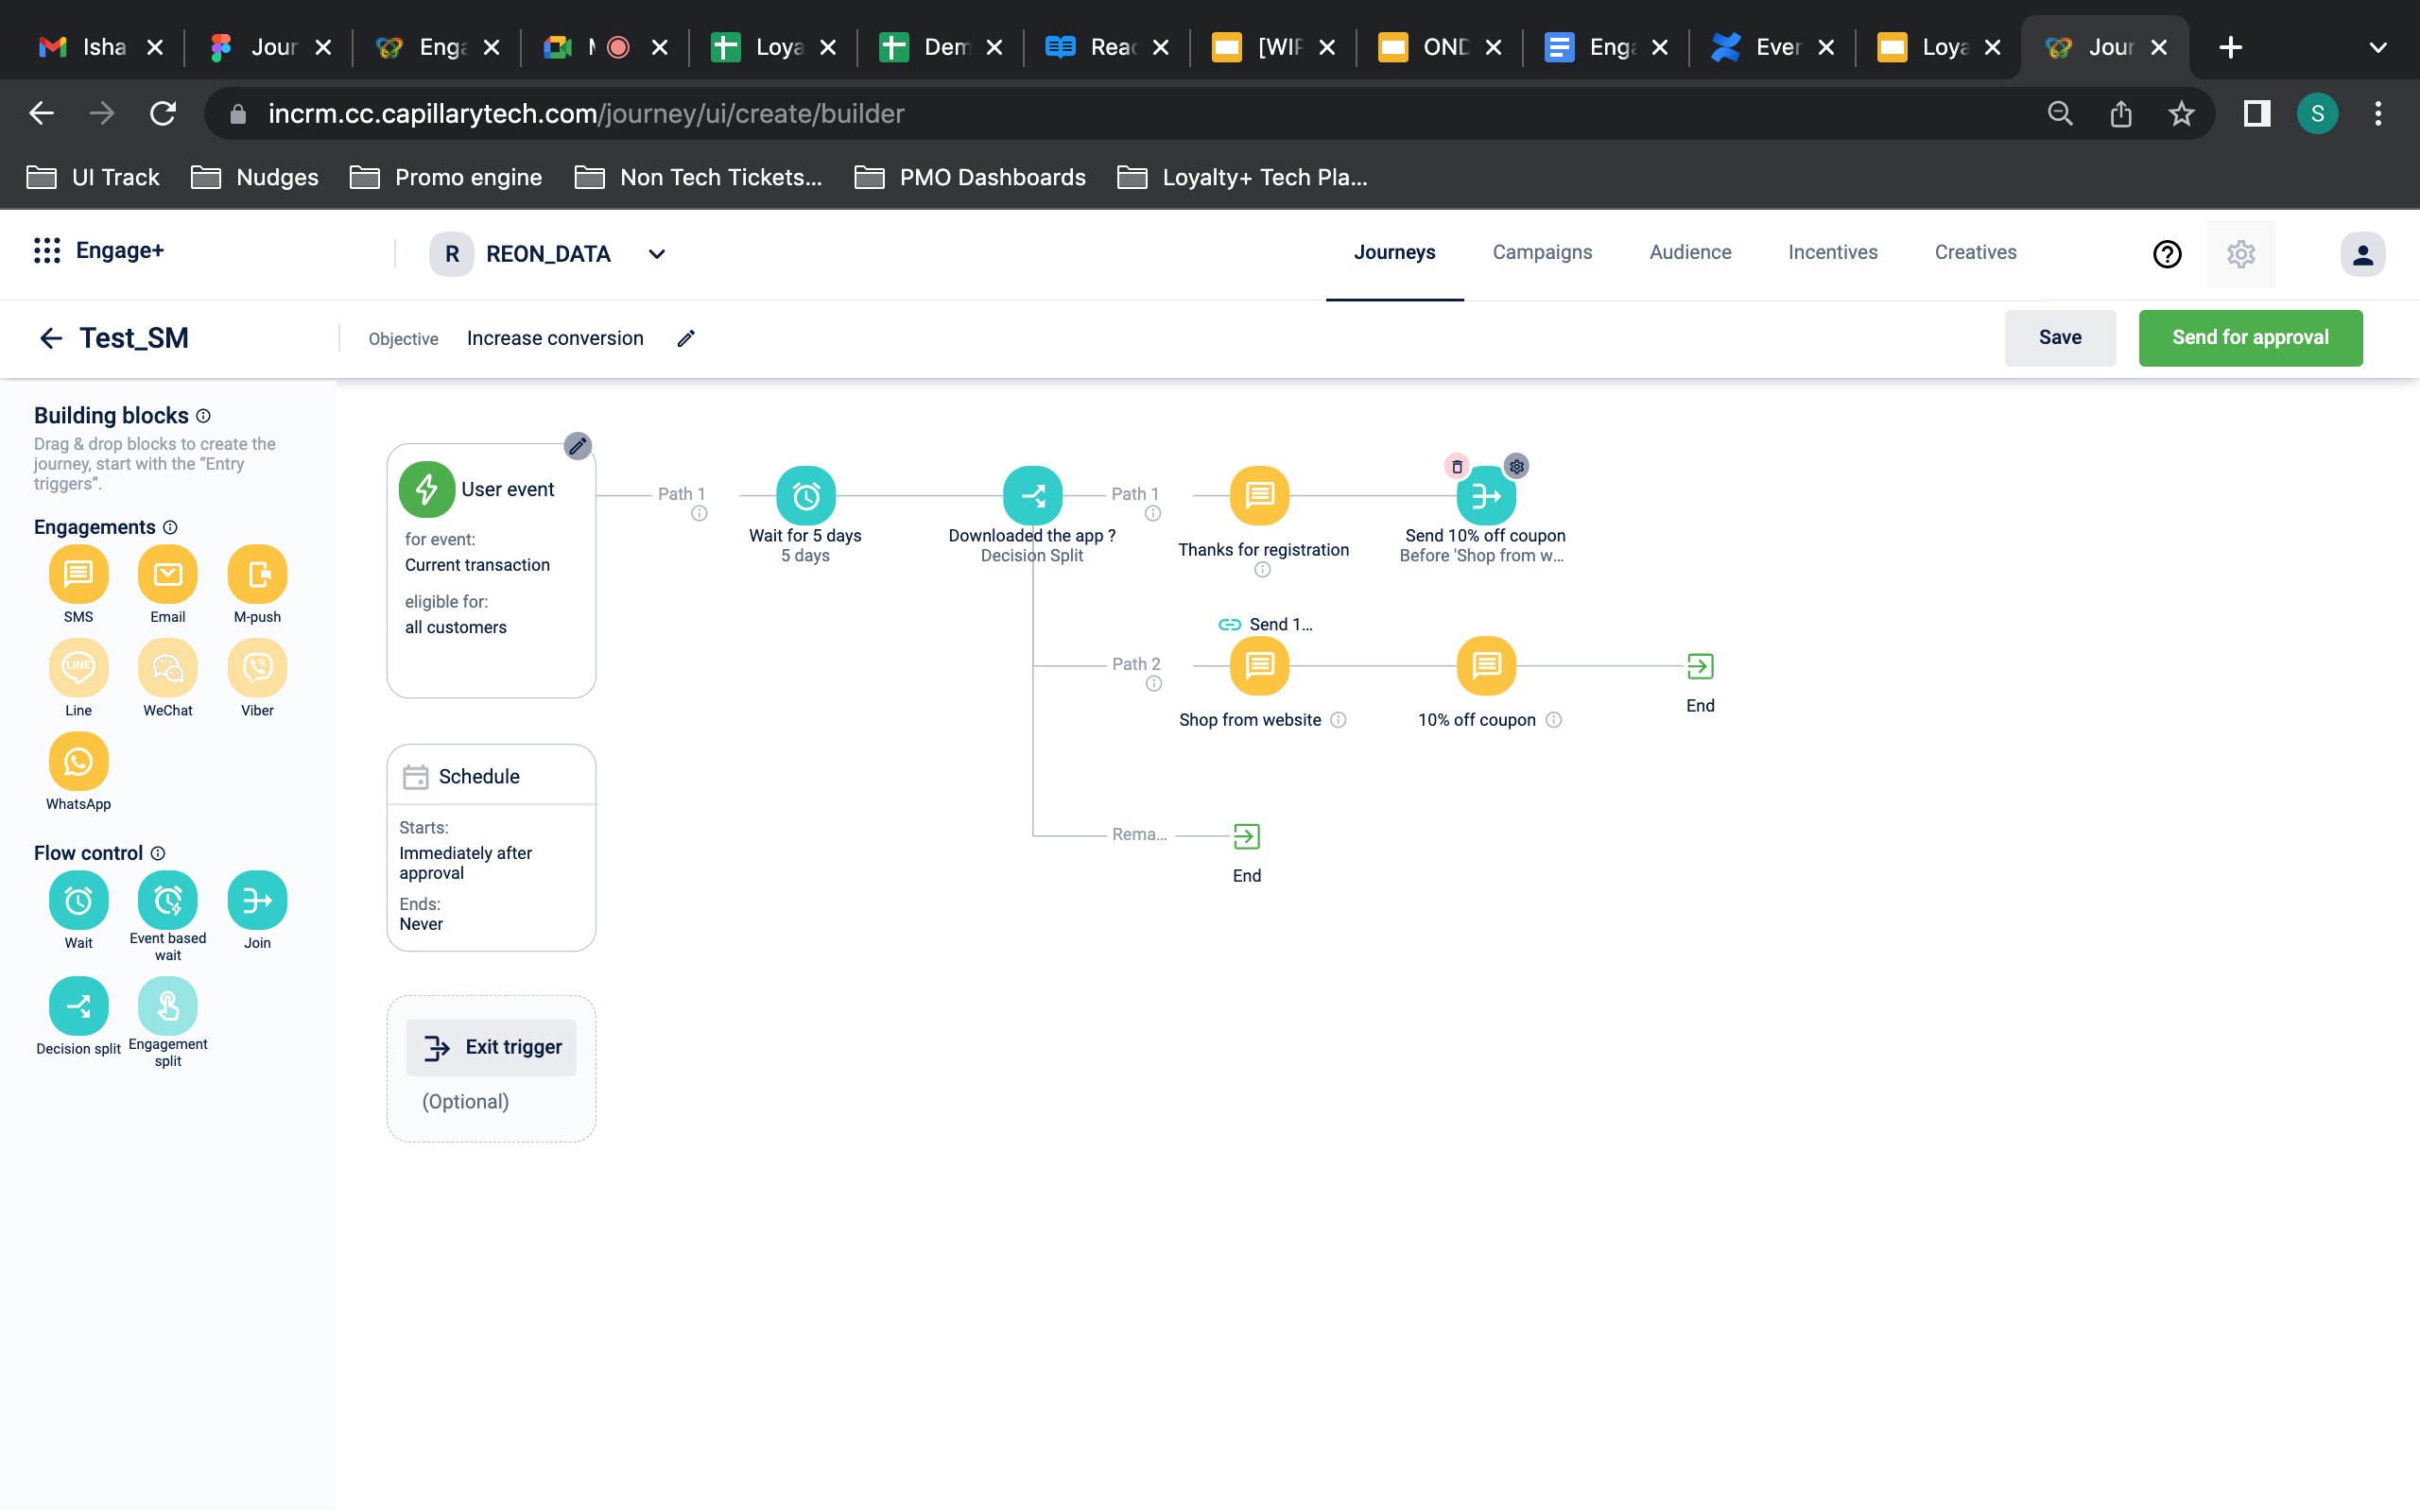
How to use “Join” block on Product UI
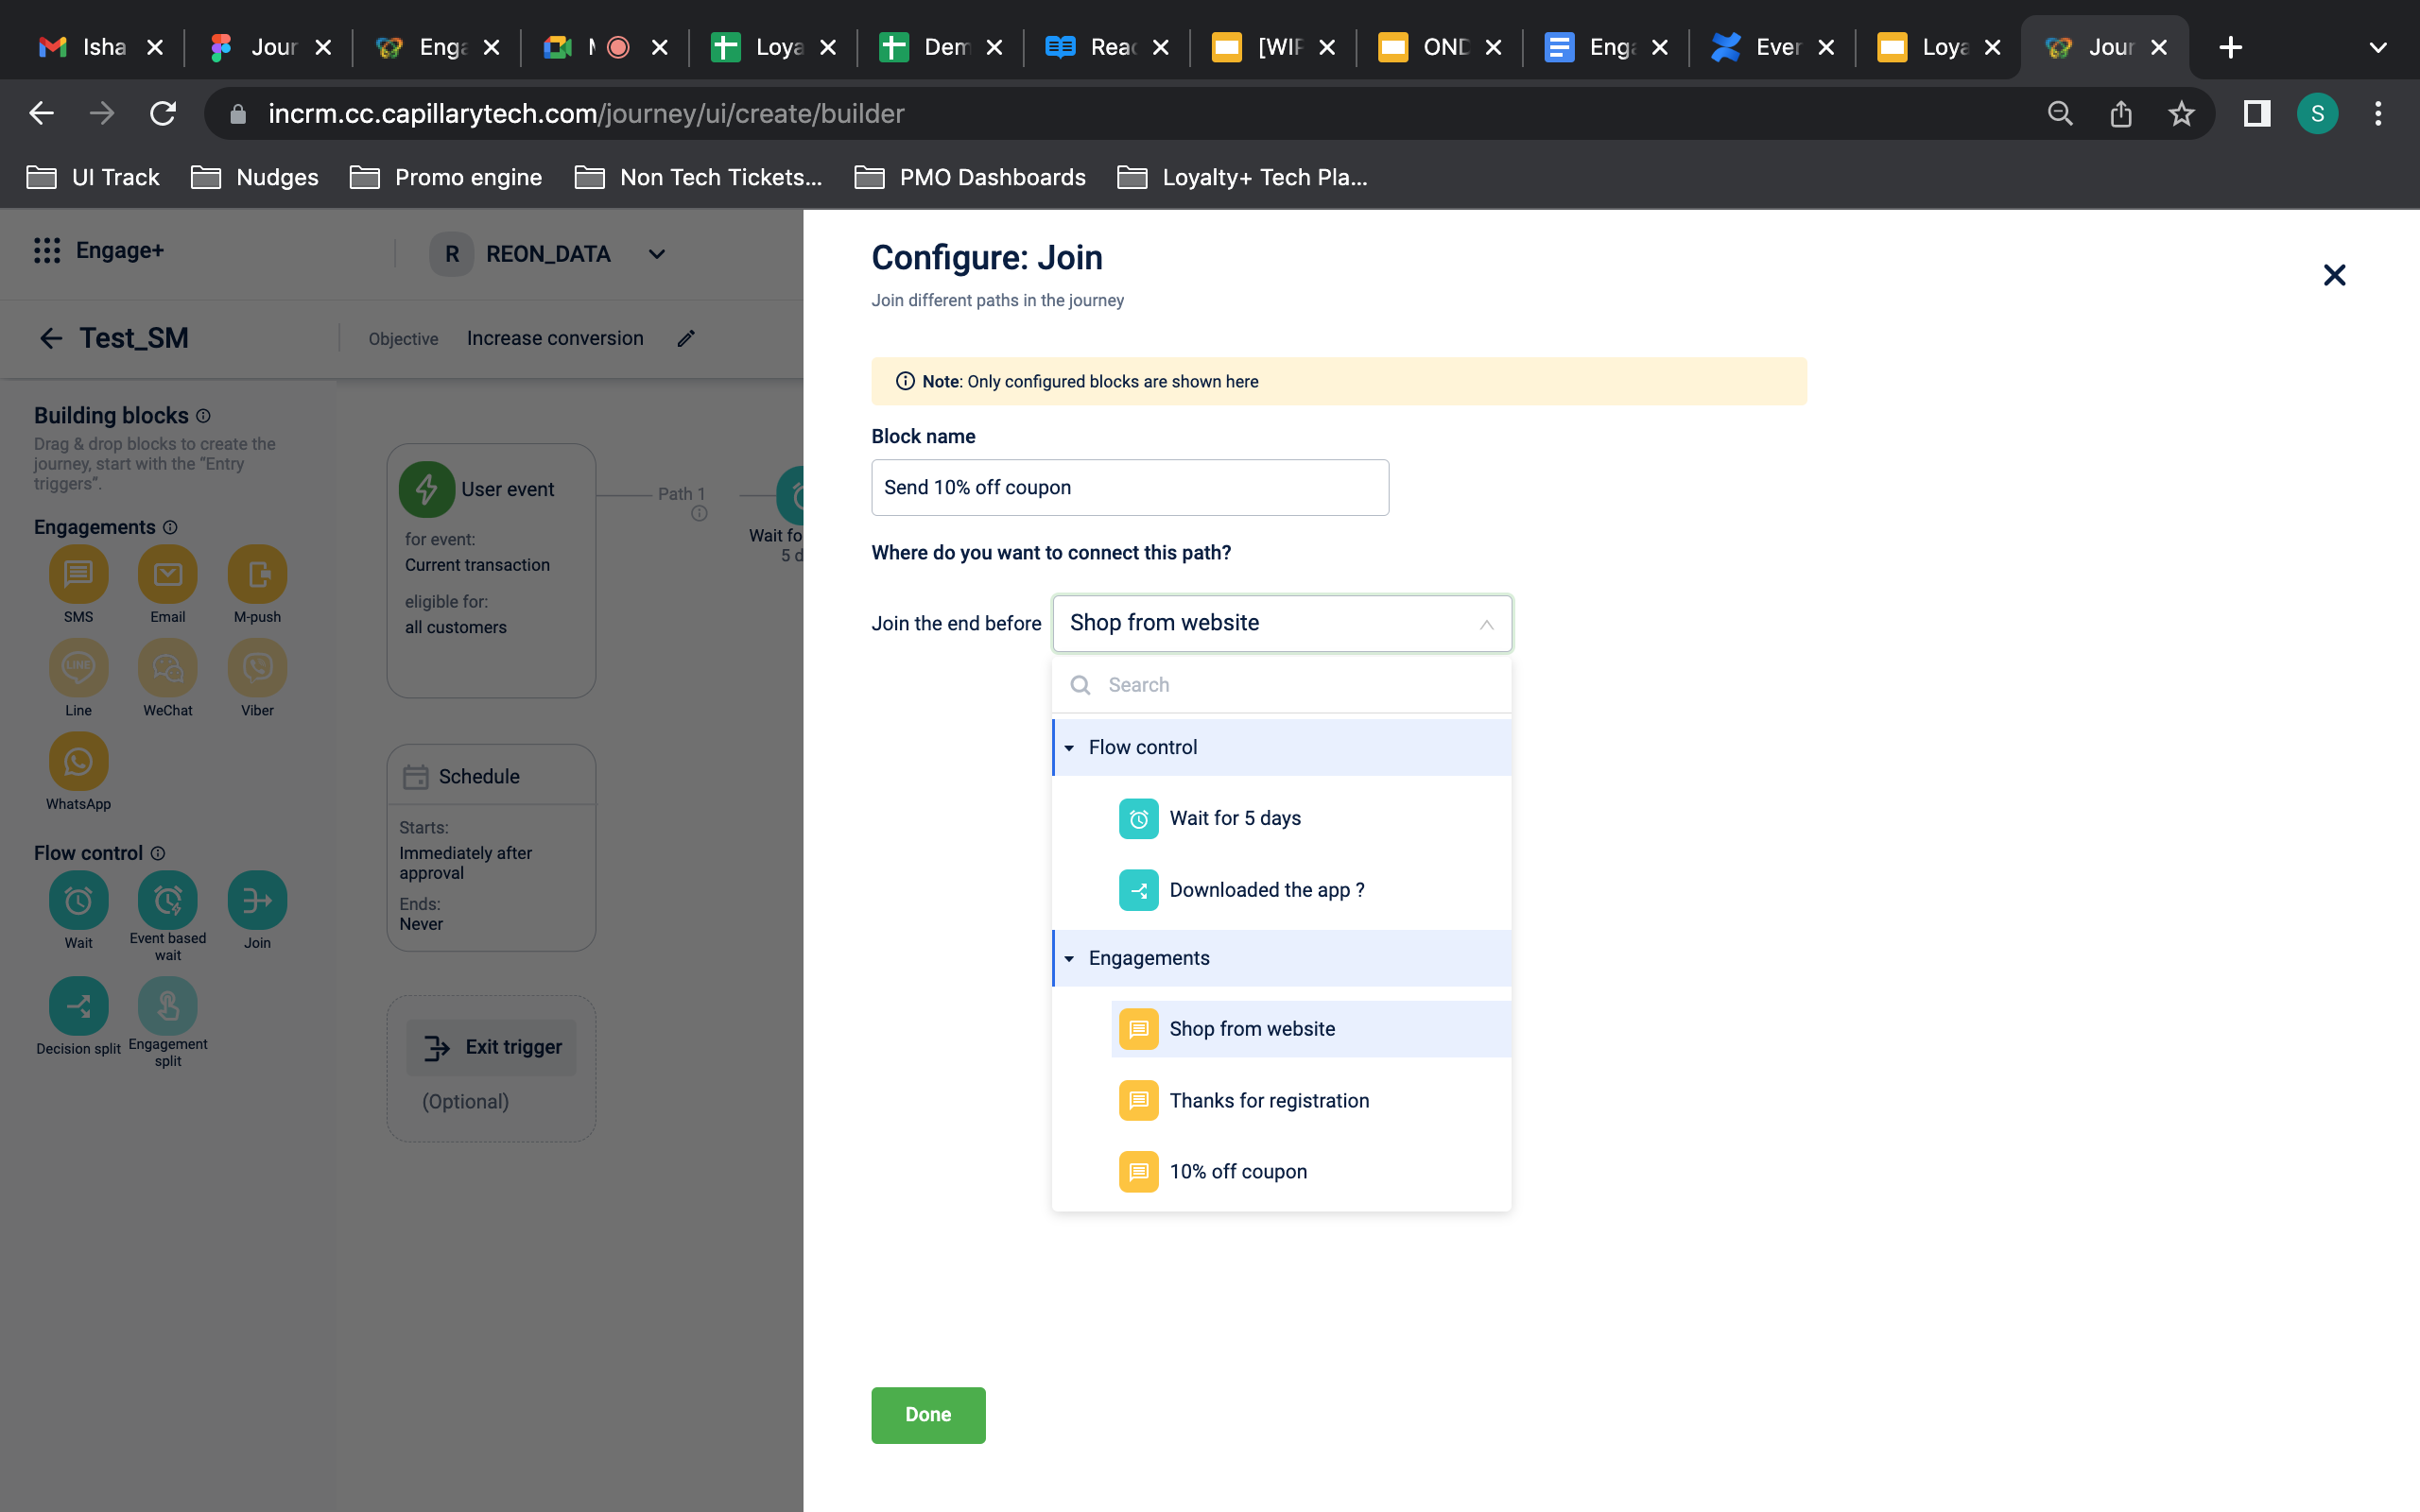
Configure “Join” block in a journey
Introduce "Wait since event" in Journeys
Problem Description
In some use cases, users want to take a desired action for the customer basis on their behavior in a point in time in past and not in future.
Use case 1: Marketeer wants to give a customer a 10% off coupon after the customer has completed 90 days since the last purchase date
Use case 2: Marketeer wants to give a customer a 10% off coupon after the customer has completed 5 days since the registration date
How are we solving this?
Wait Since Event block is a type of journey block which will help marketers to make a user wait in a specific block depending on the user’s past events.
User’s past events could be like - Registration, First or Last Purchase etc.
The Block will calculate the wait time dynamically for each user based user’s historical event date/time.
How to use the “Wait since” functionality?
Step 1: Whenever you want to enable a Wait time for any action based on the user’s past event, drag and drop the “Evant based wait” block from the “Flow control” building blocks
Step 2: Click on the block’s settings to configure the wait time
Step 3: Choose “Wait since event” under How do you want to specify the Wait time
Step 4: Specify the wait time and the event type from the dropdowns based on based on which you want to calculate the wait time
Example For Use Case 2: Wait for 5 days since Registration date from this block
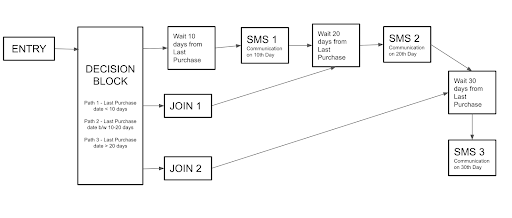
A journey workflow demonstrating the use of “Wait Since” block
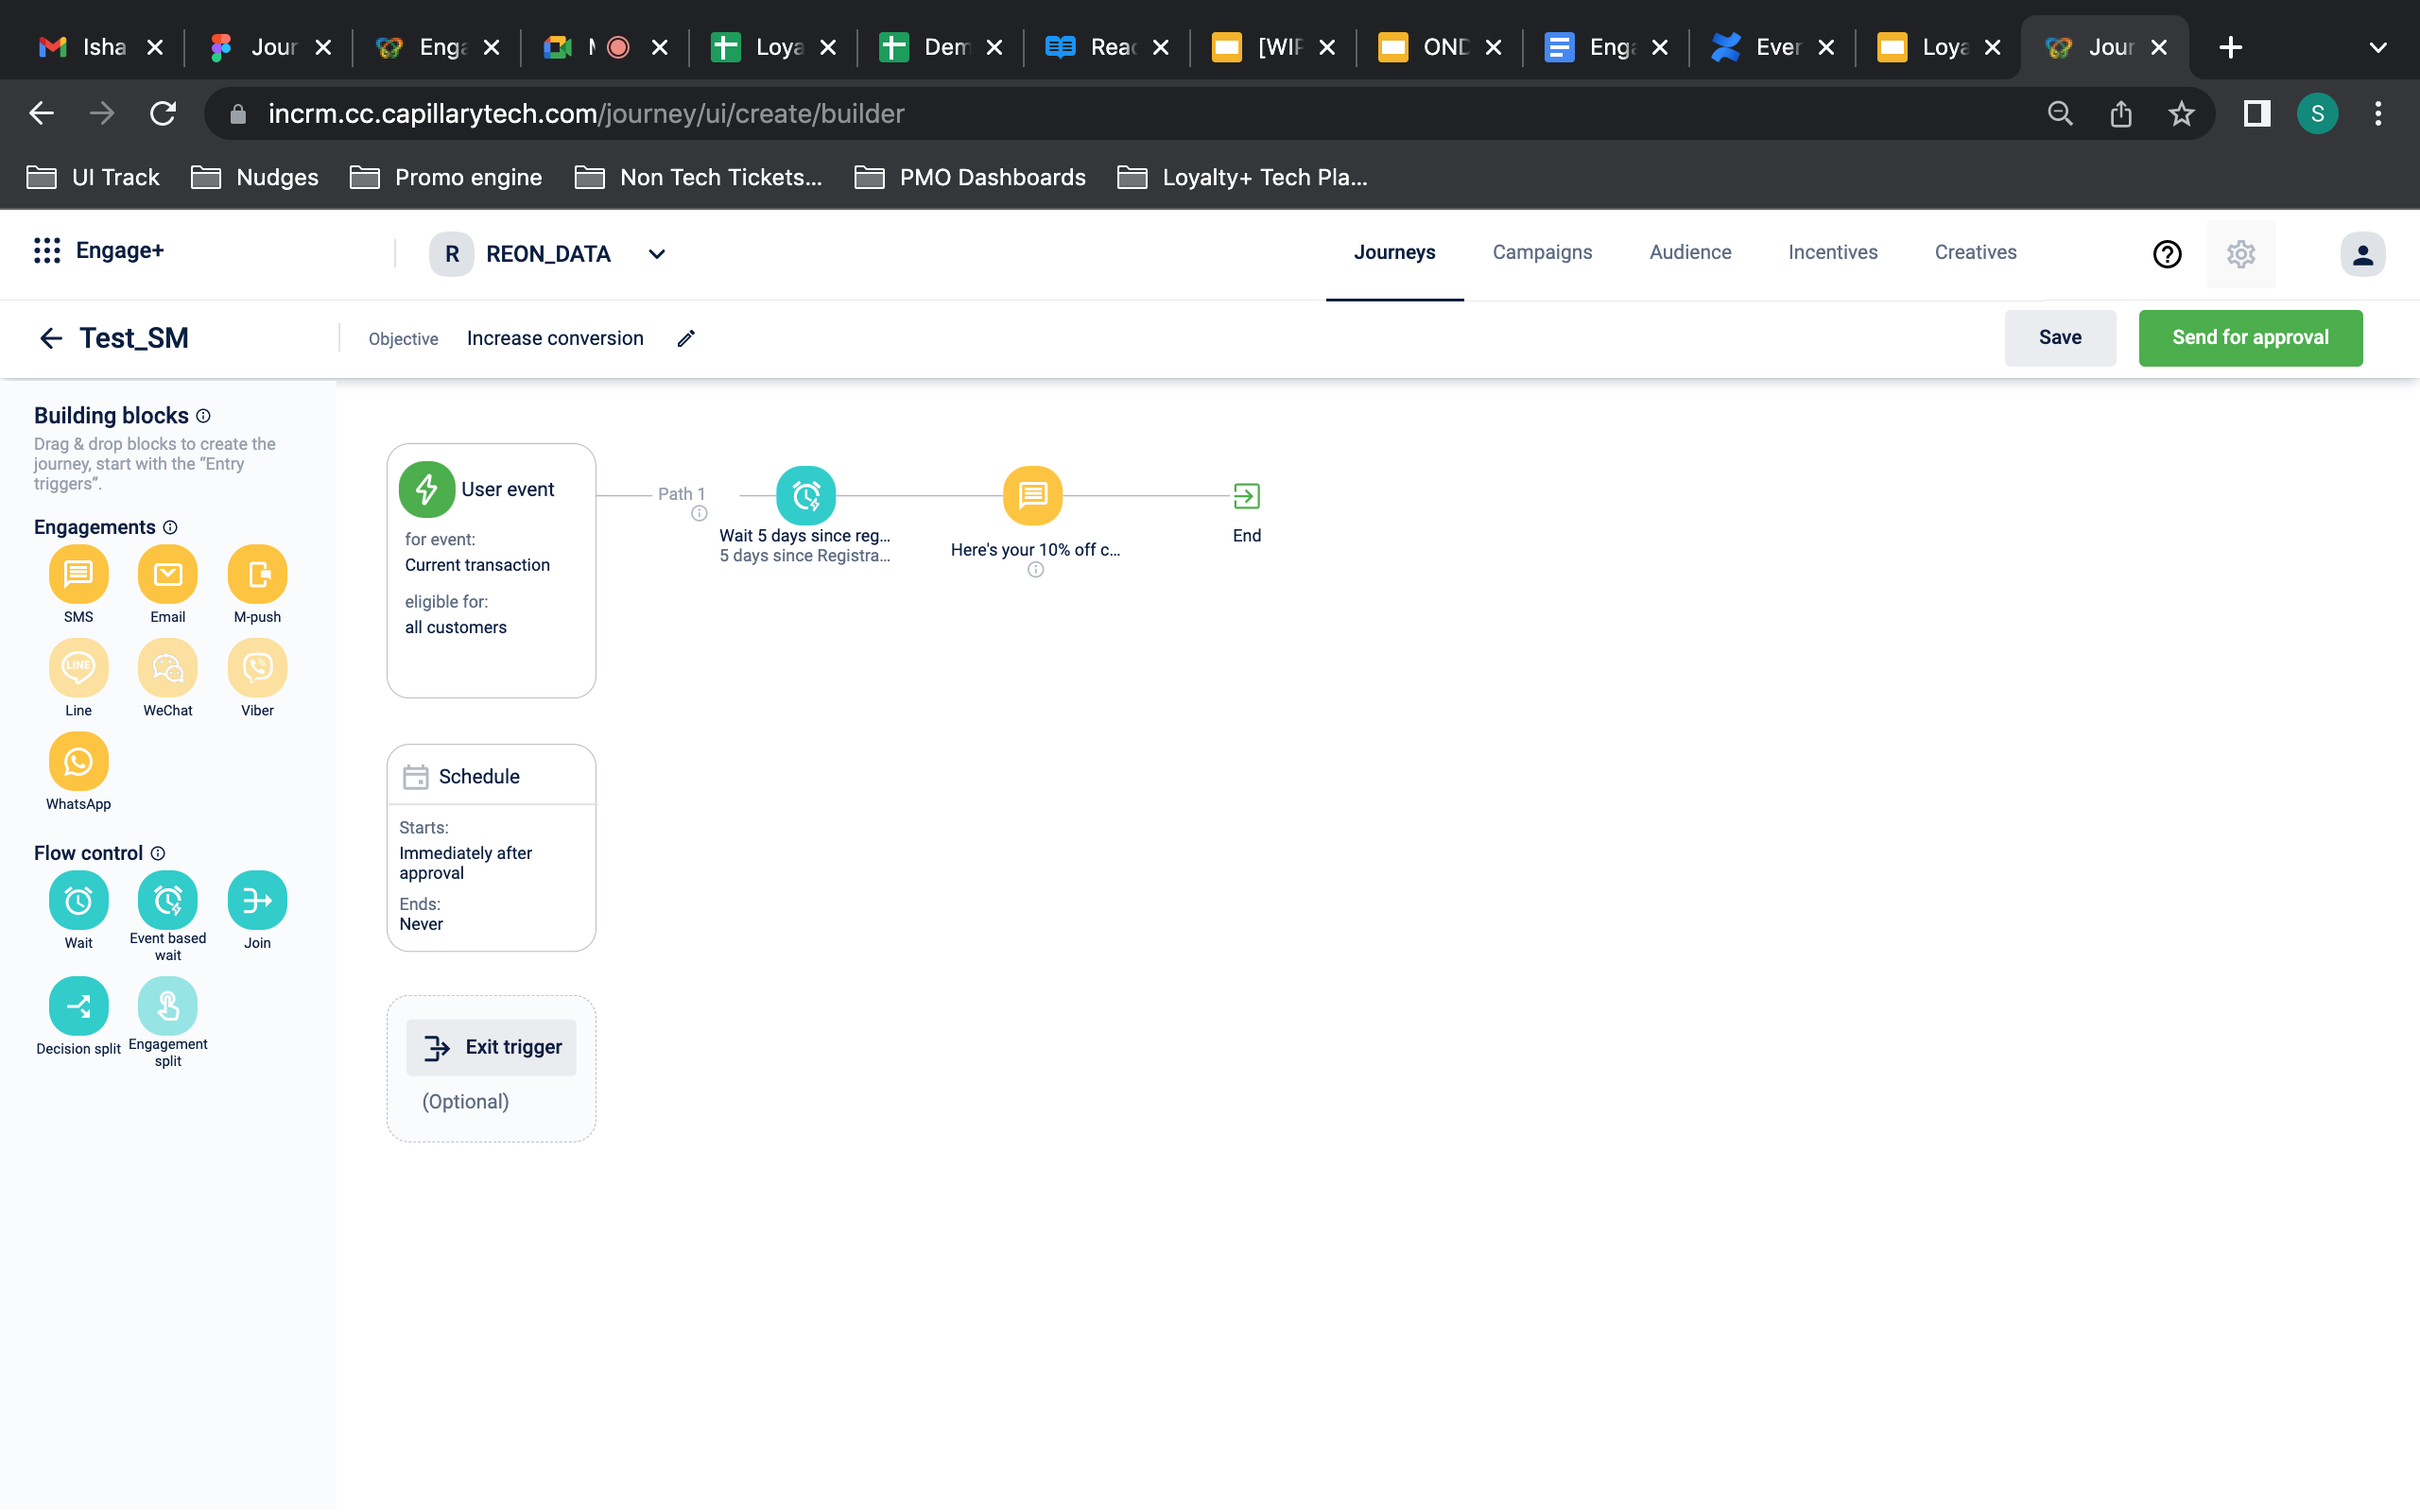
How to use “Event based wait” block on Product UI
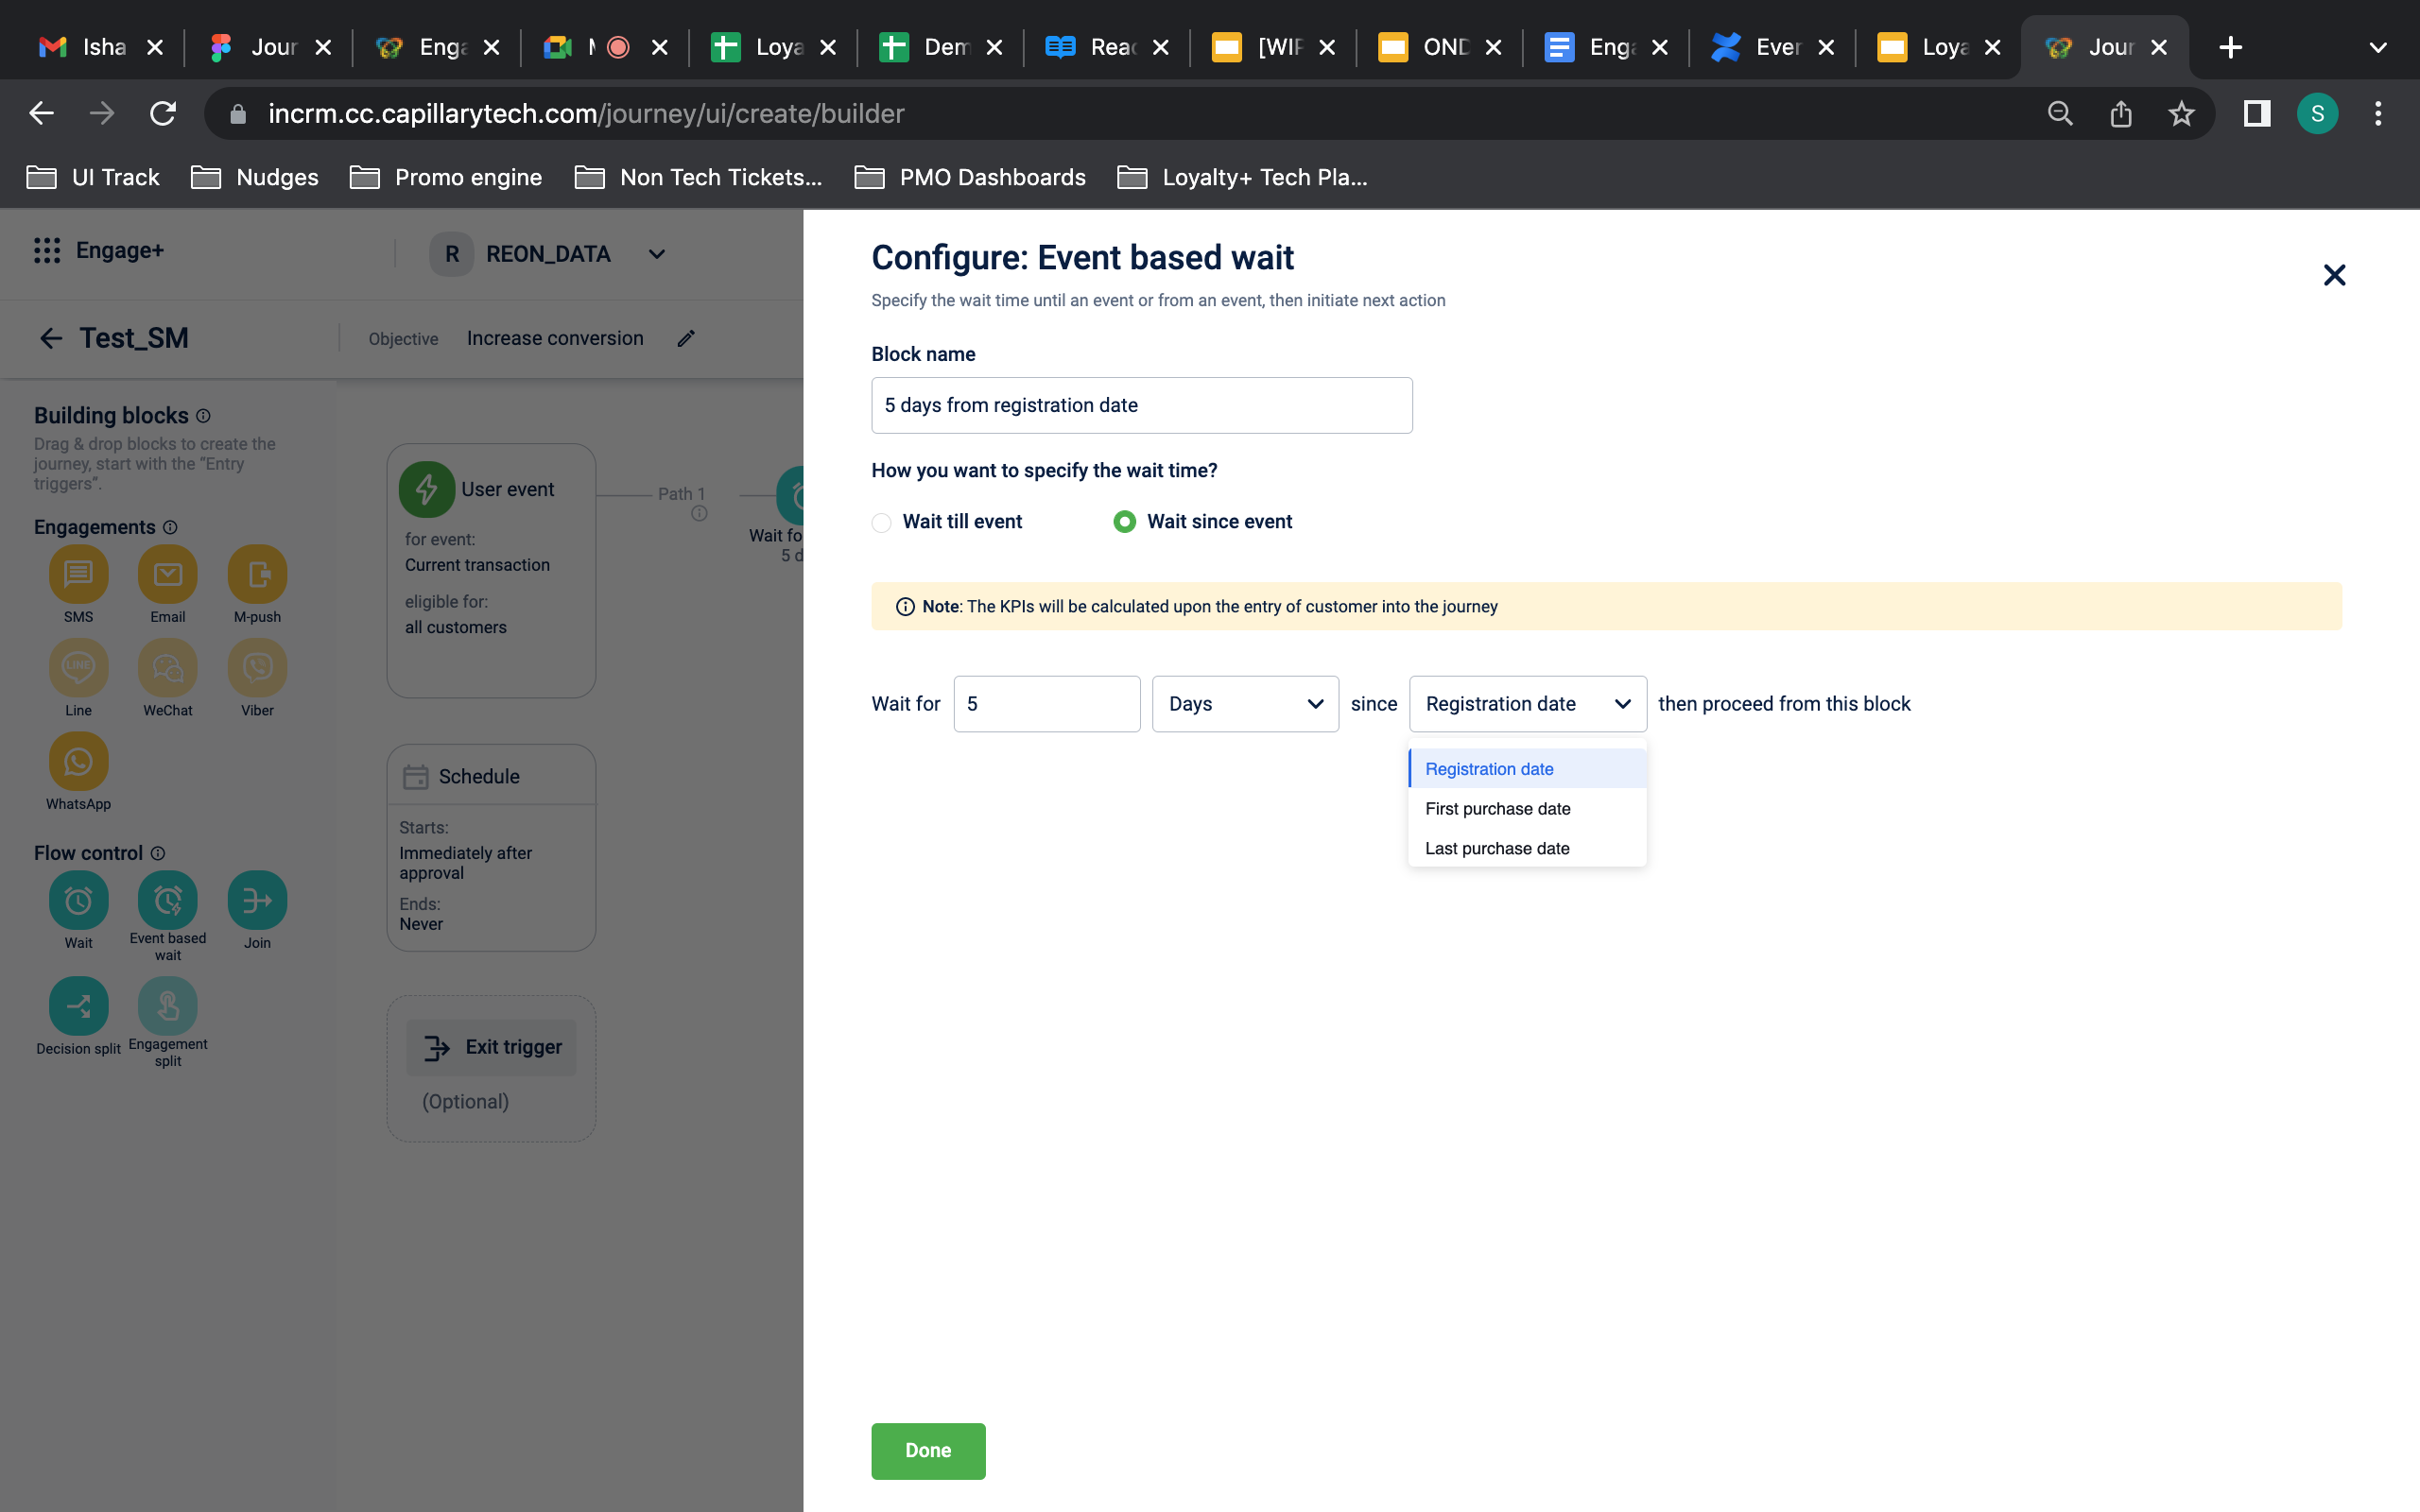
How to configure “Wait since” functionality on Product UI
Wait for Block Enhancement
Problem Description
In the “Wait” block, we only have an option to immediately send a message after waiting for a specific time.
But clients have additional requirements to reach out to the customer either after a specific time or to reach out to them on the nearest day and date.
Use Case 1:
After a user reaches a milestone, wait for 2 hours and send the communication on the nearest “Sunday”
Even if the nearest Sunday is 5 days away from the wait that user’s 2 hours wait post an event has been completed.
How are we solving this?
Wait block is enhanced to help marketers reach out to the customers at a specific time or on the Nearest date/ date.
We have dropdown options such as - immediately, At a specific time, on the nearest day & on the nearest date.
This enhancement will ensure that any communication to customers is going on preferred days such as weekends. Also ensures compliance with global mandates that customers should be reached only on certain days of the week/ date of the month.
How to configure this ?
Step 1: Wherever you want to define the Wait time, drag and drop the the “Wait” block from the Flow control building blocks.
Step 2: After dragging this Wait block, click on it to configure the settings.
Step 3: Select “Wait for a duration”
Step 4: Specify the wait time in Hours/Days/Week/Month/Years and then from the dropdown choose the desired options when you want a certain action to happen.
Step 5: From the dropdown, you can choose to trigger an action based on the specific time or day or a date. Within the day and date also, you may specify a fixed time for the action to take place.
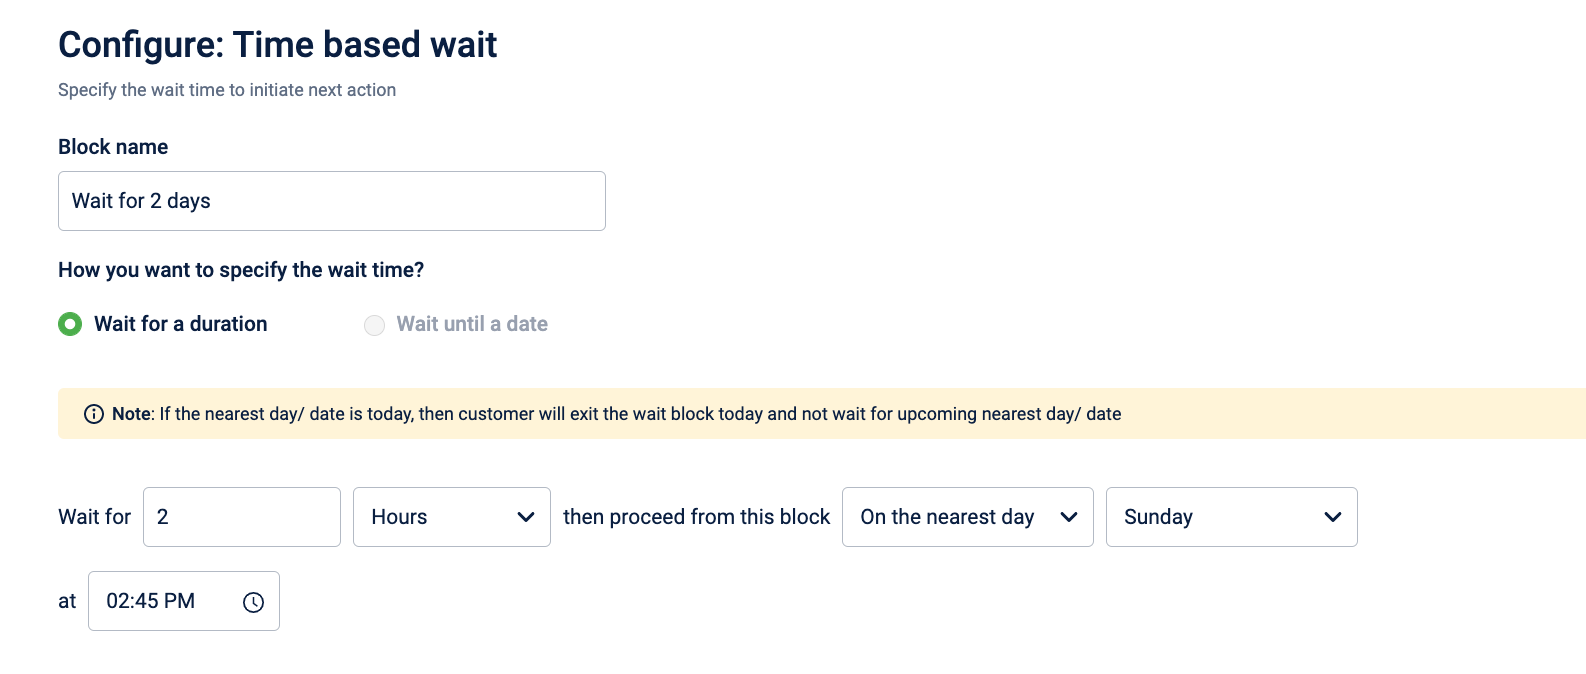
How to configure “Wait for a duration” on Product UI
DVS Store support phase 1 Enhancements
- STRING data type (Customer External Id & Transaction number)
- Customer segment DST
Problem Description
Previously in Journeys, we used to support NUMBER and Product DST data type. However with new functionalities coming in, there was a requirement to support more data types.
Feature Description
-
Now we have added support for STRING (Customer external Id & Transaction number) & Customer segment DST data type in Entry trigger, Exit trigger, and Wait till event.
-
This is supported in entry trigger, exit trigger and wait till event of a journey.
-
While selecting the entry path user will be able to select Customer external field, where one can include or exclude that particular external Id and we can also select the various matches such as - Contains, starts with, ends with and exact match.
There is a requirement to add a minimum of 3 characters here.
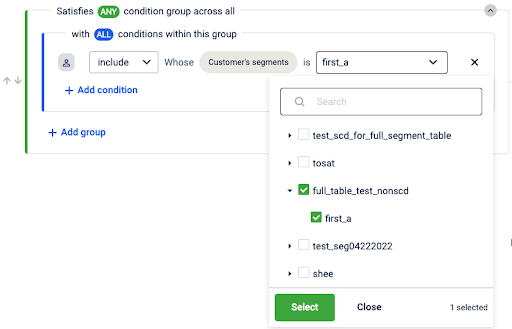

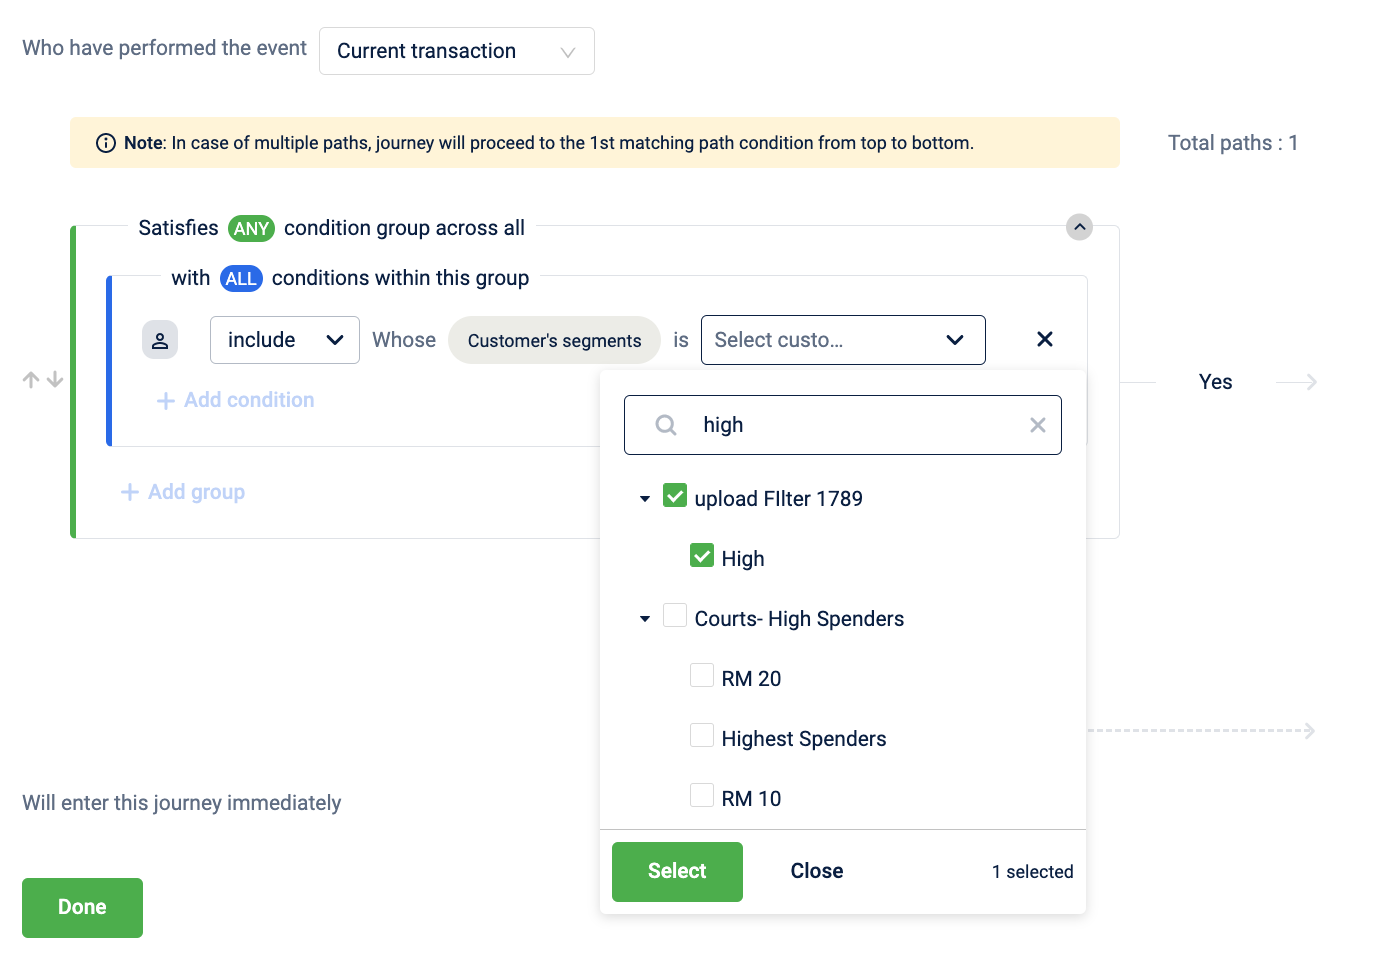
- While selecting the entry path, users will also be able to select the Customer segment where one will either be able to select multiple segments or a single segment.
Also, the search option is enabled to find the particular segment.
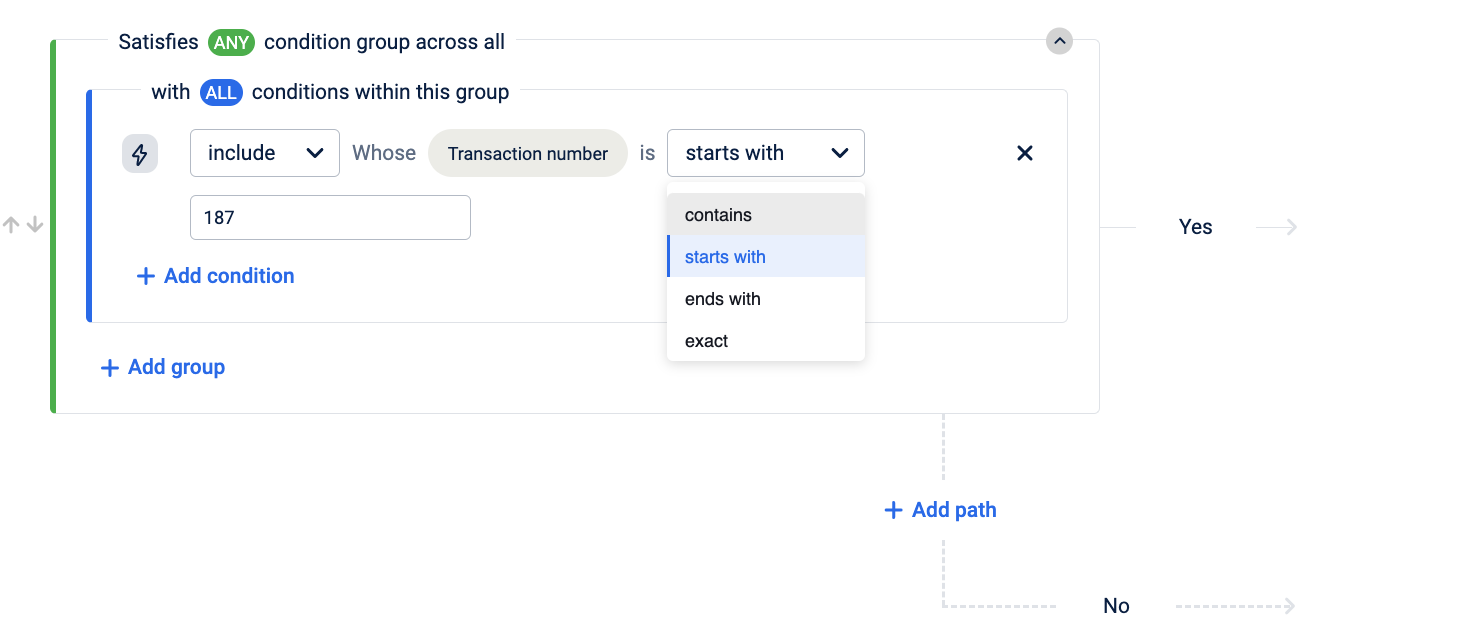
- Similarly user can also apply the condition for the Transaction number. Where one will be able to select the transaction no. with multiple conditions like start with, ends with, contain and exact transaction then let them enter the journey.
Link tracking support for dynamic link
Problem Description
Previously “SMS link tracking” option was not capable of handling the dynamic link generation.
Only the static part of the link was getting stored in the database i.e. the part without tags.
When the end user clicks to the url given in the SMS/Email, it redirects the user to the url which was stored in a database.
New Implementations
- The org which we are using should be present in the sms_link_track_org_status table and dynamic link tracking should be enabled for that org.
- The url that is passed by the client in the message body is stored in the email_links_redirection table.
- All the tags present in the url are extracted and added as a parameter to the url containing orgId, linkId(email_links_redirection table’s id) etc.
- This url is converted to tinyUrl if tinyUrl is enabled and is sent to the end user via the sms or email.
- When the users click on the url this goes to the internal-intouch-UI where using the link id the actual url is being extracted and the parameters are replaced by the actual value present in the url received
Before:
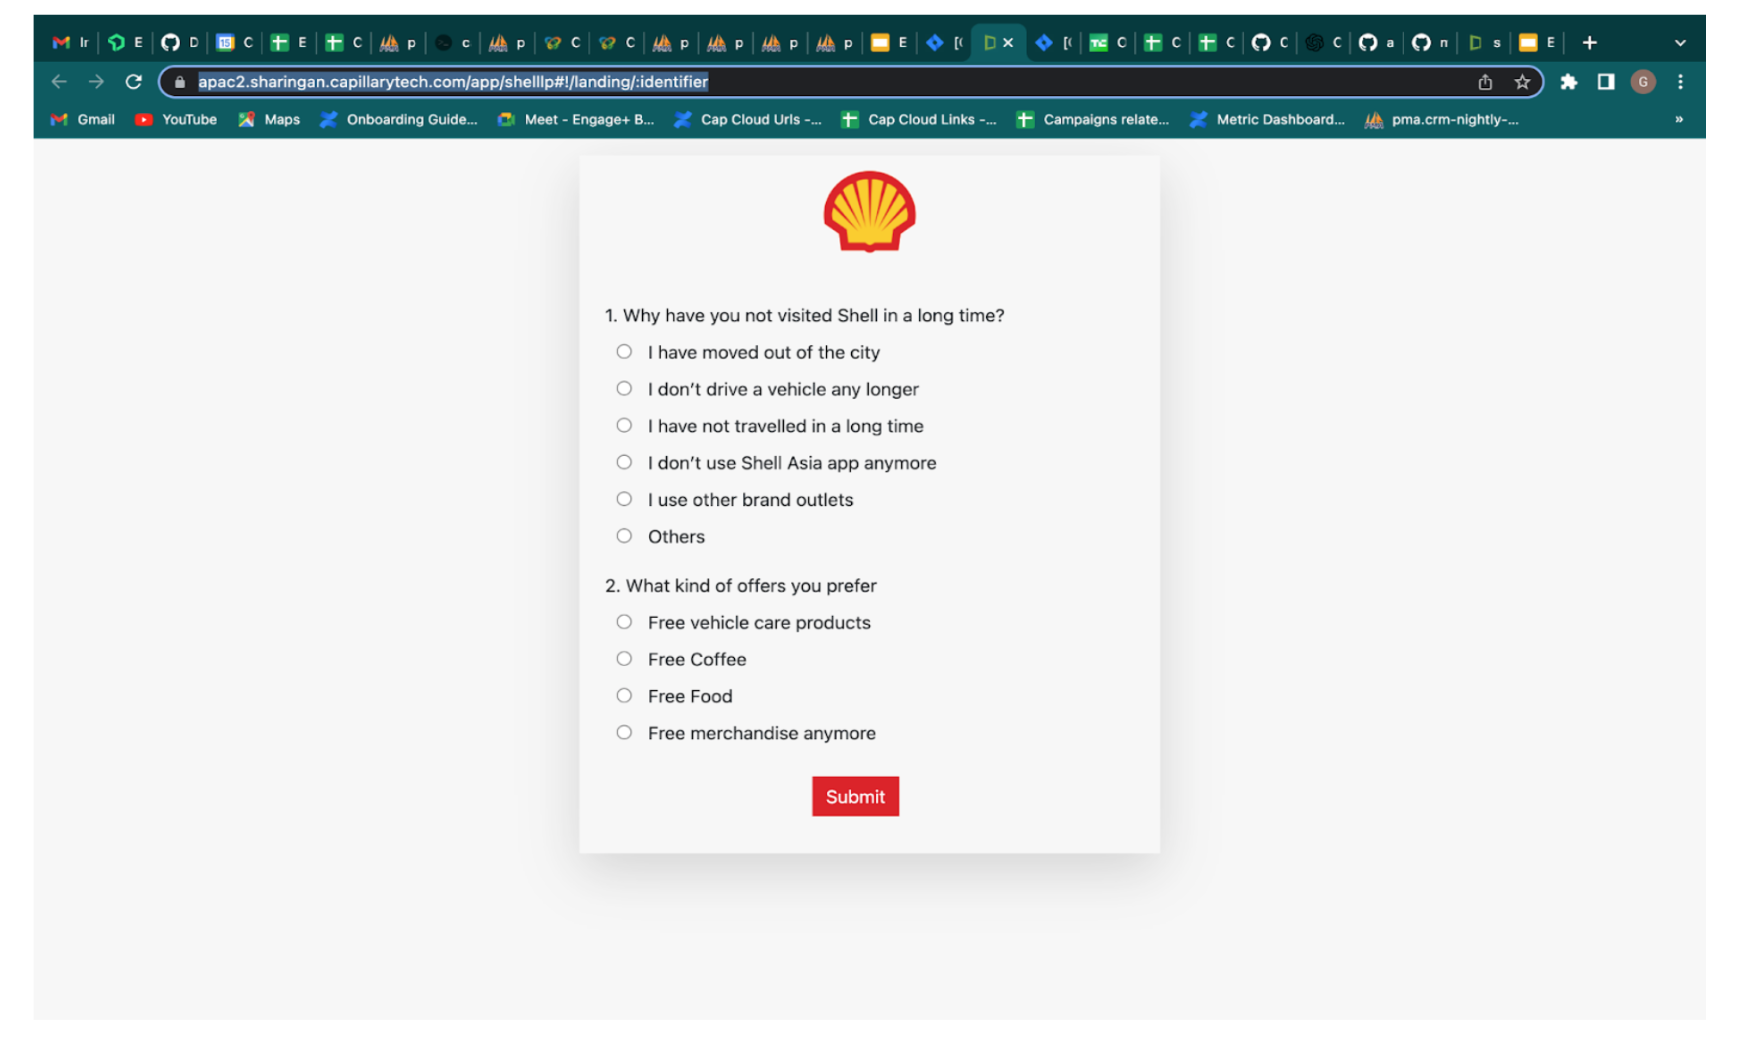
After:
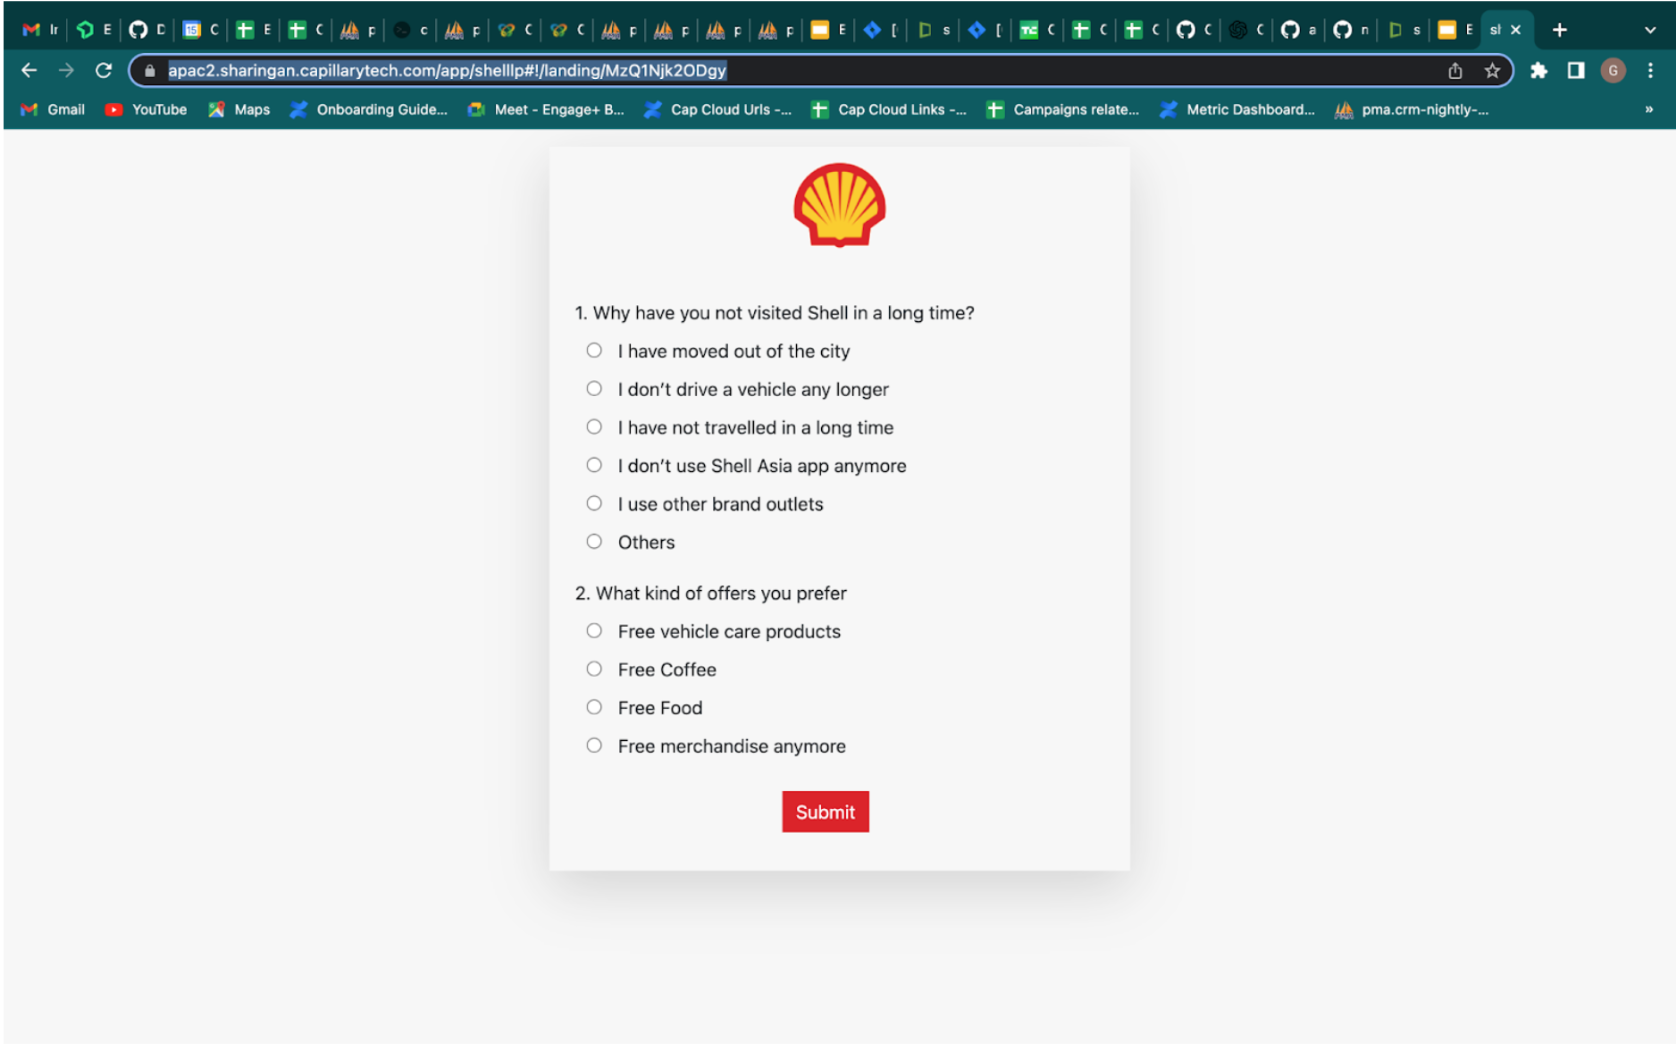
Optimization Fixes
(I) Fairness in Tag Resolver Flow (Veneno)
Problem Description:
Previously while running large campaigns, the campaign execution queues used to pile up and the small campaign’s execution gets affected.
Solution:
After the optimization, the single queues were segregated into two queues and based on the number of users in the campaign the queue is being selected.
Impact of the fix:
Automation failures due to messages being stuck in the queue got resolved to post this optimization
(II) S3 cost optimization for the creatives email channel
Problem
Creatives email templates/other channels used to make S3 GET calls to fetch and load images, leading to high data transfer out to internet cost on S3 file service.
Solution
We have put all image links behind Cloudflare CDN coupled with image transformations to reduce S3 bandwidth usage.
Image size based quality applied to provide better balance between quality and compression.
Impact
S3 data-out cost reduction observed is ~$1100/month to ~$150/month
Cloudflare bandwidth consumed ~2.1TB/month (no extra cost over ACP package)
Cache-hit rate of ~97% on CDN and low latency during asset delivery since assets are served from nearest edge locations.
(III) Build time optimization
Problem Statement
As part of the Engineering Efficiency theme, we figured out the scope of build time improvements for our CRM React apps to boost developer efficiency and lower the waiting periods for dev builds.
Current webpack config based dev builds take 13-14 mins on average on Codebuild.
Build Time of React based UI apps were quite high
Campaigns UI and Reon UI build phase took upto ~700s and ~496s respectively.
Objective
To reduce the build time by ~50-60% thereby increasing developer productivity/efficiency.
Approaches considered:
- Webpack migration from v4 to v5
- Migrate to other build tools such as
esbuild - Improve upon the existing webpack v4 config for faster builds.
Finalizing the approach:
- Improve upon the existing webpack v4 config for faster builds
- Profile the build to identify the slowest steps and phases of the build process.
- Remove (and/or) replace redundant options and slowest parts of build process with better and faster alternatives.
Findings
Babel loader(transpilation), plugins and loaders for image and css pre-processing, terser plugin(optimization) were the main bottlenecks.
Considering the effort vs efficiency gains, we decided to take a mixed approach on webpack v4 while replacing bottlenecks with better alternatives including tools based on esbuild.
Major Changes:
- Removed Terser Plugin in Favour of Esbuild Minify Plugin. One of the fastest minifier.
- Hybrid combination of esbuild loader + babel loader. Babel loader is used for transpiling ui libraries where as all other transpilation is done by esbuild loader.
- Adopted thread-loader for speeding up transpilation done by babel-loader.
- Removal of image-webpack-loaders and brotli plugin that were doing some pre and post processing which didn’t have wider impact and benefit. Updation of css plugins to faster alternatives.
- Created separate cache groups for libraries and app code for better code splitting and chunk reuse.
- Minor CSS fixes and resolution of circular dependencies.
SDK
iOS
Version 0.1.0 (December 6, 2022)
Hydra core package release with Authentication flow
Insights+
Introducing Expiry Notification Alerts for Exports
Problem Statement
Currently, the end validity for scheduled exports is a maximum of one year and creators of the exports do not receive an expiry alert notification when the schedules are about to expire.
A new duplicate export with a unique name needs to be created every time for the same expired export.
Overview of the feature
The below image shows the whole overview of the feature. The highlighted feature in red are part of the export expiry notification feature release.

Use cases
- As a brand, I want to know which of my exports are about to expire.
- As a creator of the export, I want to extend the end validity date of my exports before they cross the expiration date.
Feature Description:
Creators of the scheduled exports can now edit and extend the end validity date of their schedules before the end validity date.
- The creator will be notified 3 days before the end validity date via email and also an alert notification will be placed on the UI under the new bell icon.
- Users can either view the export details or choose to extend the end validity date from the UI as well.
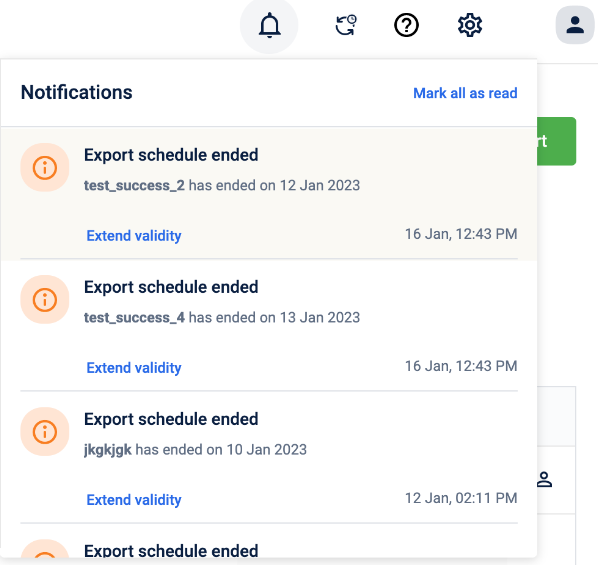
- The notification under the bell icon will be available for the 7 days post-end validity date. Users can still choose to extend the validity date of the export even if it has crossed the end validity date by editing the export and updating the export.
- Users can view the end validity status for all the scheduled exports on the export schedule listing page. The status definition is as below -
- Completed - Only for exports whose frequency is once. The user will receive a notification when the one-time exports are completed.
- Ends in 'X' days - User will be able to see when their exports are about to expire in X days.
- Expire - Exports that have expired and crossed the end validity date.
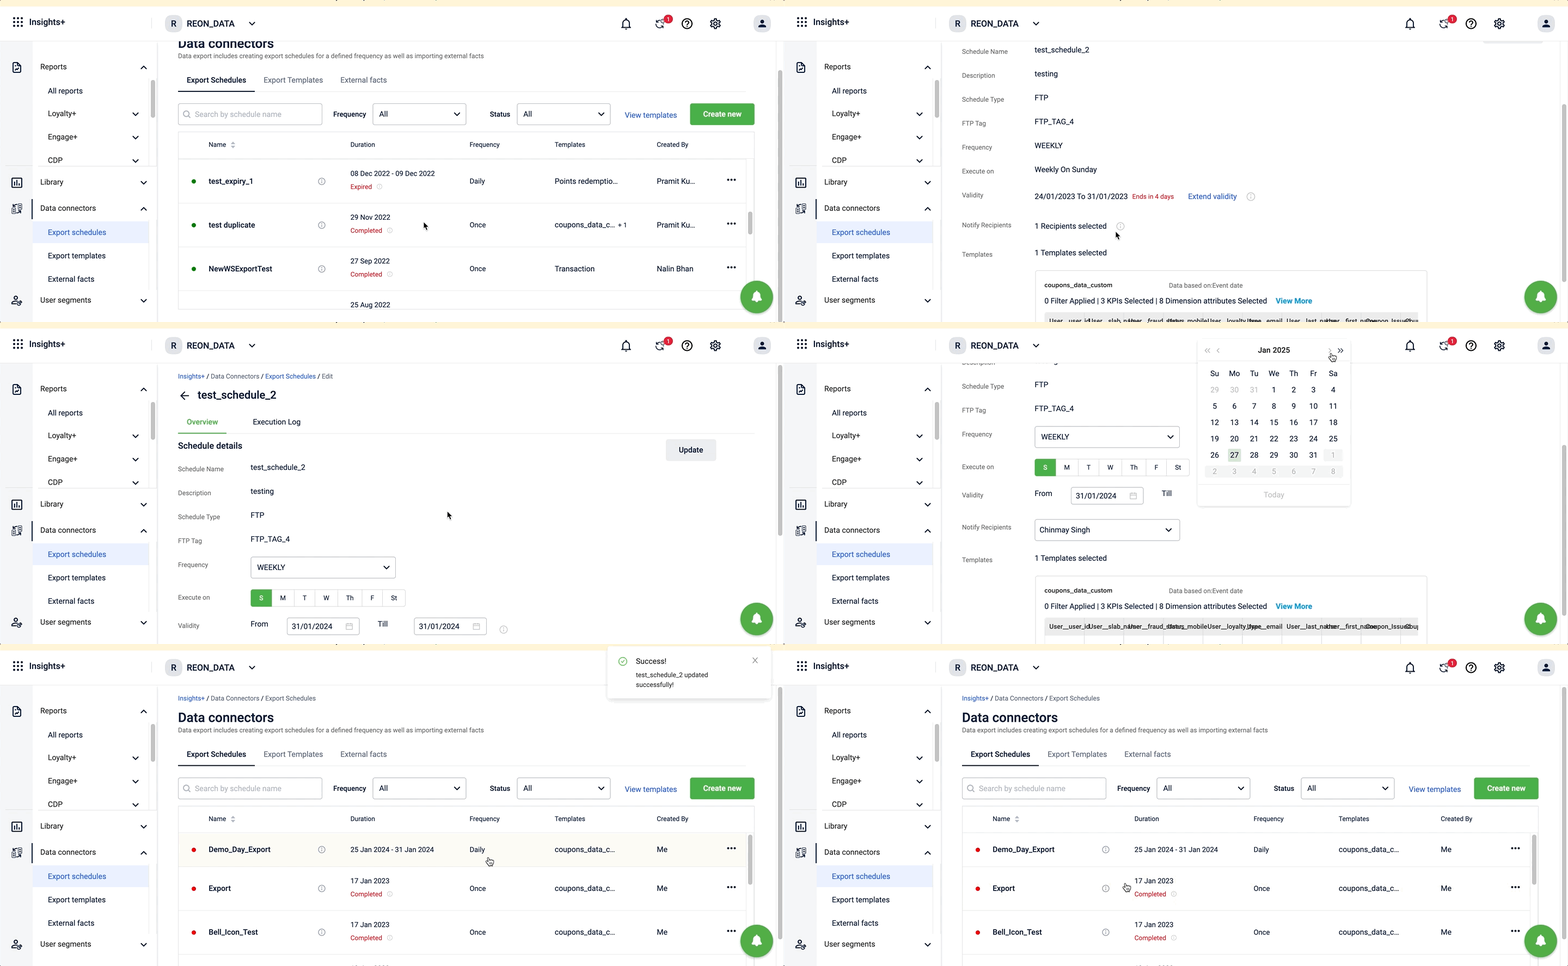
Note - The end validity Date can be edited and extended ONLY by the creator of the scheduled export.
Introducing BI Tool Connectors
Problem Statement
Currently, Business intelligence (BI) tools, such as Tableau, Power BI, etc. often require data to be manually imported from Insights+ through exports which can be a time-consuming and error-prone process. Additionally, the data may be in different formats, making it difficult to use BI tools.
Use cases
- As an analyst, I want to be able to see Capillary's databricks data in another visualization tool.
- As a leadership stakeholder, I want to see data from different sources on one external dashboard.
Feature Description:
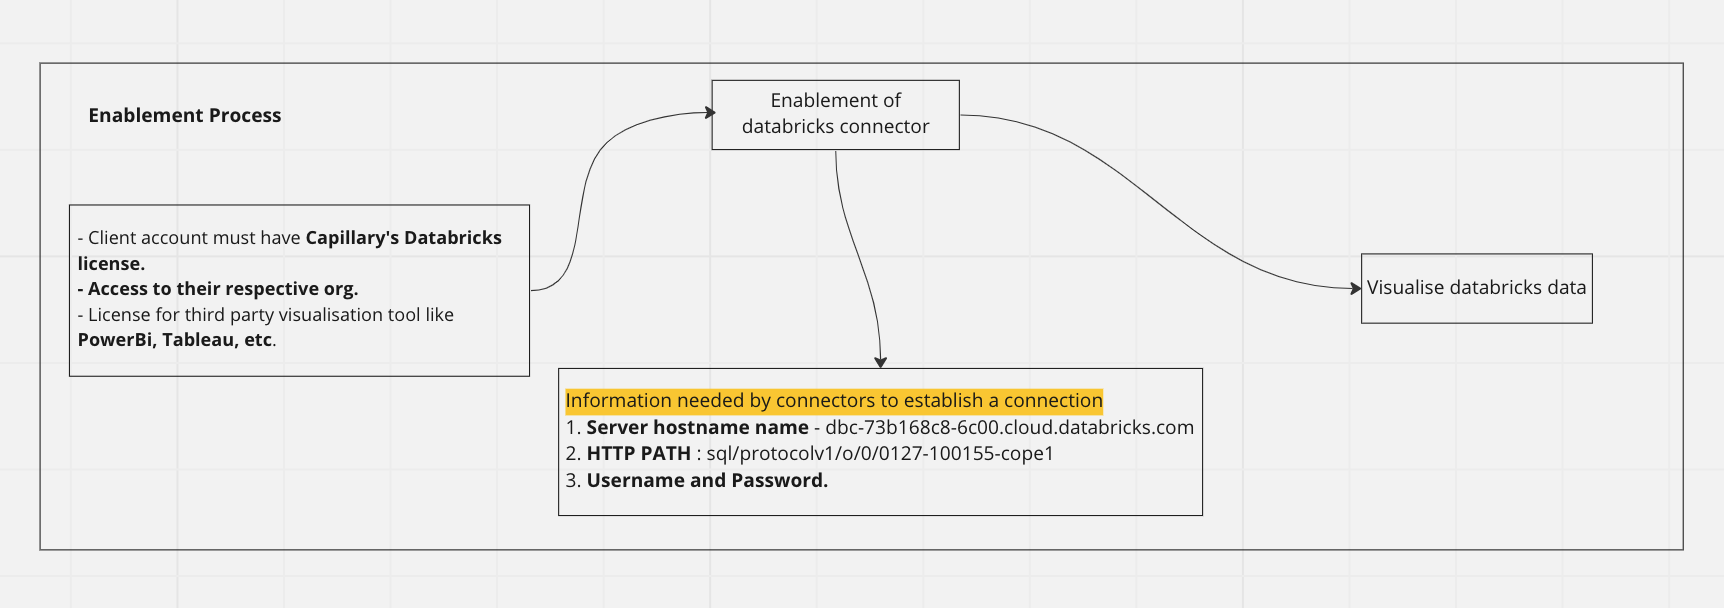
Introducing Capillary's databricks connectors, connectors can help you to import/query data directly in the visualization tool through the databricks data connector. In order to get started, you must have access to databricks. Detailed information to connect can be found here Steps to connect using BI Tool Connector
Benefits of using databricks connectors -
Challenges faced by visualization tools to read and analyze data through export framework can be minimized.
Handback data can now be easily visualized on BI tools in a structured format as available in databricks.
Seamless flow of information and easy integration with BI tools that also improve the data management process.
NO more data migration issues, now you can easily plug and play data in any third-party visualization tool.
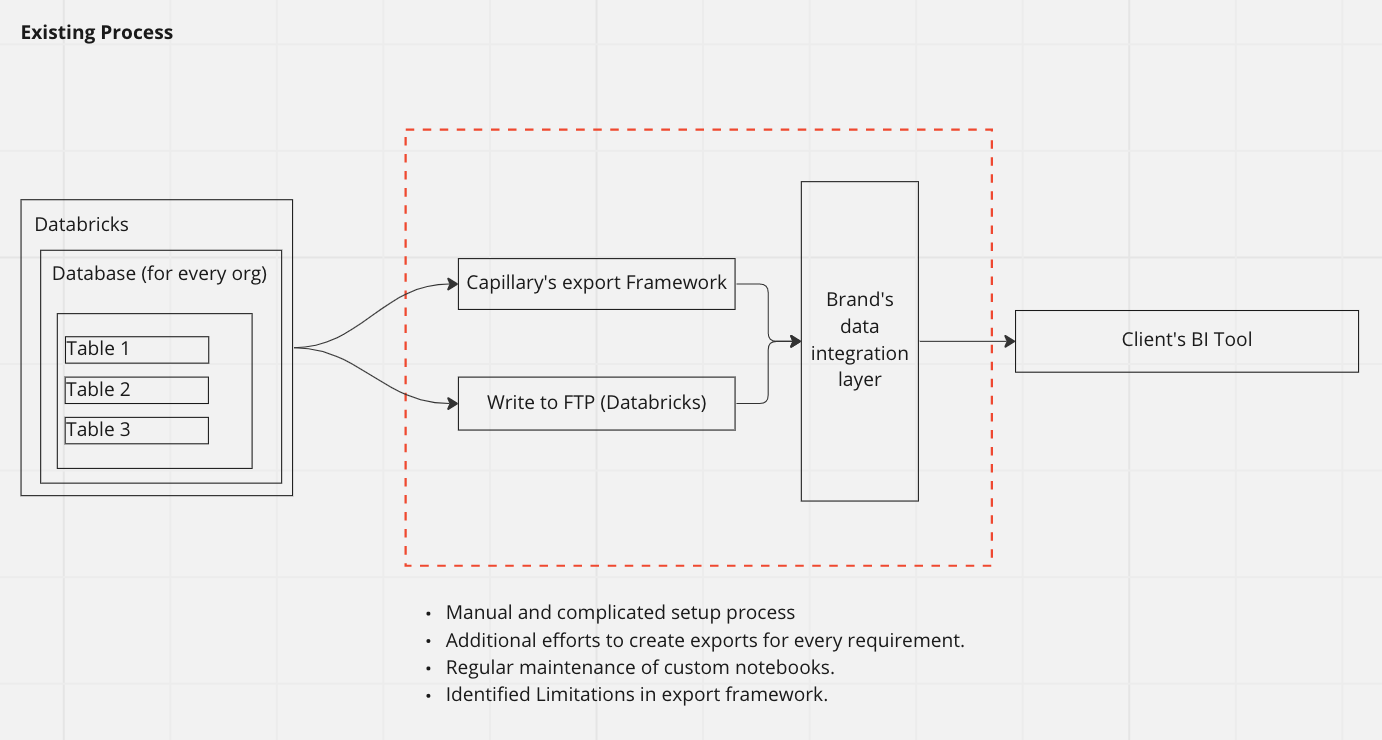
Existing Process
How data is sent to BI tools.
Using BI Tool Connector
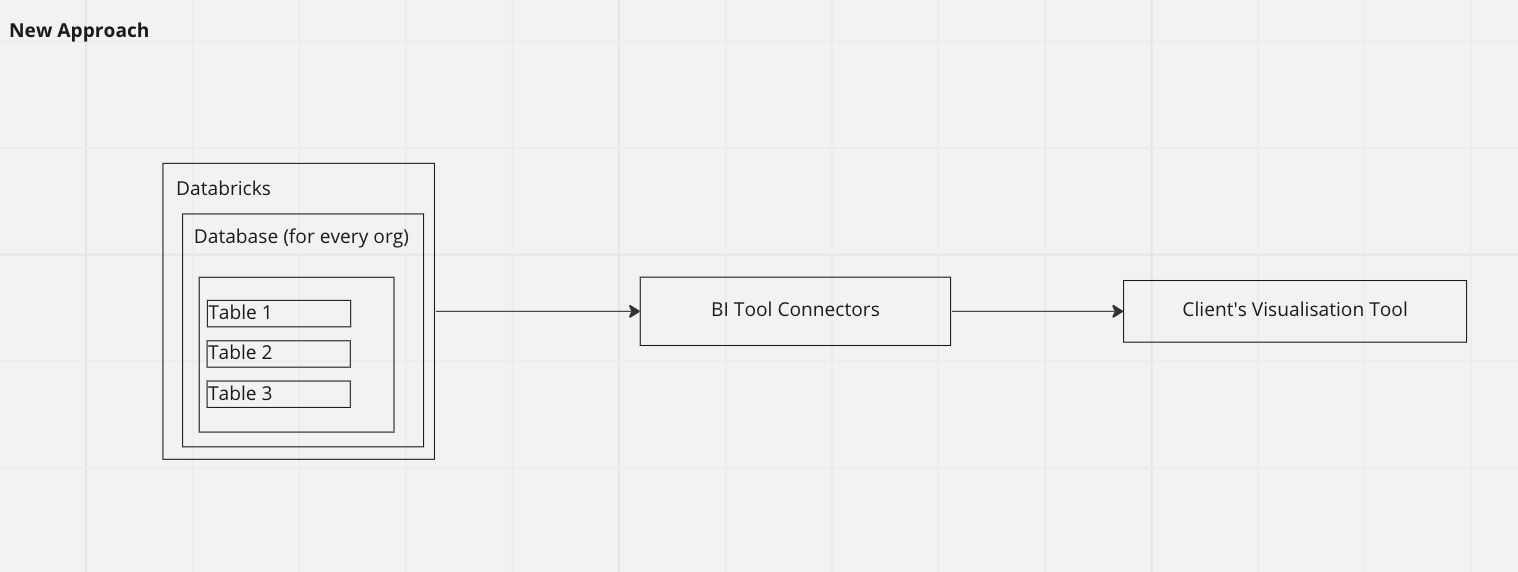
How to enable databricks connector -
For more details - Steps to Connect using Databricks Connector
We are now more vertical-ready in Insights+
As are moving towards onboarding more brands across verticals such as fuel retail, hospitality, CPG and so on in past years. With this, demands to make the reporting customization have also increased.
We have now introduced the conversion of UI labels in Insights+ for the airline industry. For eg - Currently, across an organization, an airline vertical may not want to see points mentioned anywhere in its reporting view. Instead, you can now enable custom namespace conversion under the organization settings and points will be replaced with miles across the organization in Insights+.
Below images show how the UI labels change once the custom namespace feature is enabled.
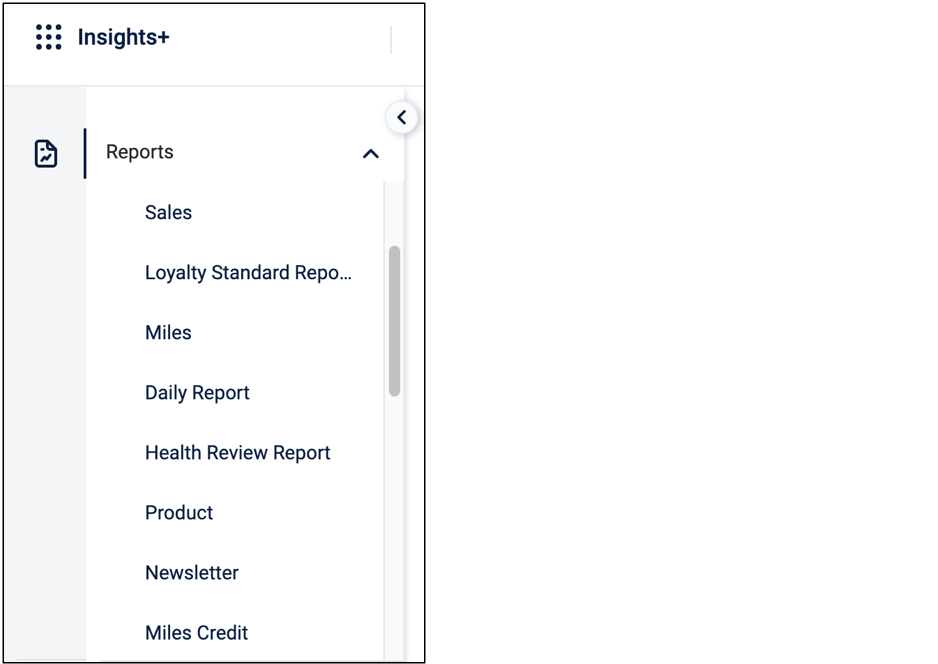
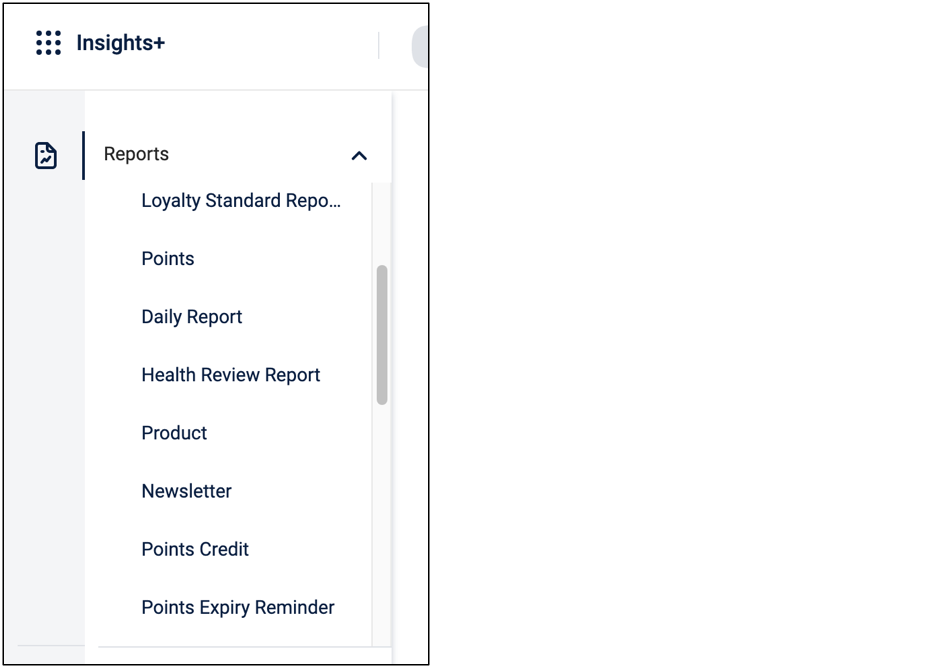
Please note: The feature is now enabled for aviation-focused organizations initially on a pilot basis. We will be rolling out soon for other verticals over the next quarters.
You can find the steps to enable this feature here:https://docs.capillarytech.com/docs/configure-custom-namespace-for-organisation
Capillary Data Platform
Data Erasure Requests
With the introduction of General Data Protection Regulation (GDPR) and the California Consumer Privacy Act (CCPA) acts and the general increase in awareness on data privacy, platforms/businesses that capture sensitive customer data are now expected to allow customers to do the following.
- Request any data collected from the customers be deleted
- Request access to the data saved concerning them
As a first step towards becoming Customer-First Data Guardians, Capillary’s data platform is now equipped to handle Personally Identifiable Information(PII) deletion requests. Organizations on the Capillary platform that want to empower its customers to delete PII collected can now use Capillary’s deletion request API for this purpose. Brands can integrate the deletion API on their loyalty apps or web properties and allow customers to raise account/PII deletion requests directly.
How does the deletion process work?
The process will be as follows, assuming the request is raised from an app:

There are a few configurations to note here
- Enable PII deletion - This configuration (CONF_ENABLE_PII_DELETION) needs to be enabled first for the deletion feature to work. The configuration can be found in Organization Settings -> Organization Setup -> PII configurations in Intouch platform.
- Waiting period - This is an org-level configuration (CONF_PII_DATA_DELETE_AFTER_DAYS) and refers to the number of days up to which the request will be in pending state. After the waiting period lapses, deletion will proceed. Note that the deletion request can be canceled as long as the waiting period has not lapsed.
- Customer status - The deletion feature will work only in orgs where Customer Status feature is enabled and at least one status label has been set up against each status.
What gets deleted?
The following will be deleted once deletion process is complete.
- Mobile, E-mail and External ID
- Cards linked to the customer
- Custom fields and extended fields (unless organization chooses to retain them - there is a config for this at field level on Intouch)
- Profiles (including WebEngage)
- Communication channel
- Credentials in Auth Engine
- Any logs that have PII - Audit logs, identifier change logs and so on
- Payment modes and attributes (against transactions)
- Identifiers (used for transactions)
Note that events data such as transactions, points/points-related data, behavioral events, coupon issual/redemptions and so on will not be deleted. These will continue to remain on our platform along with the user identifier of the customer.
Member Care Implications
Deleted customer profiles cannot be viewed on Member Care as of now as profiles will not be searchable. Even if you view a profile using a URL that points to a deleted customer profile (via user ID), Member Care will say that the customer is not found.
Also, as of now, there is no front end yet on Member Care to view/approve deletion requests. This front end will be built in JFM '23.
Transaction Approval Workflow
A new type of request entity - transaction request - was built last quarter to support Customer Service Representative (CSR) workflows for receipt scan-based loyalty programs. In receipt scanning loyalty programs, which are typically run by Consumer Packaged Goods(CPG) companies, customers make a purchase at a store, scan the purchase receipt and upload it to an app or web portal of the company running a loyalty program to earn points.
In this workflow, the interpretation of the uploaded receipt is typically done by a receipt scanning service that is able to identify the line items (specific to the company), quantity, amount and other relevant details and then make a transaction add call to the CDP for earning rewards. This interpretation of receipts by the scanning service might be inaccurate at times and the receipt will have to go through a manual review process by CSRs of the brand.
CSRs can now review the content via Member Care of the transaction and images of receipts uploaded by the customer, modify it if needed and then approve it so that the transaction is captured and points are issued to the customer.
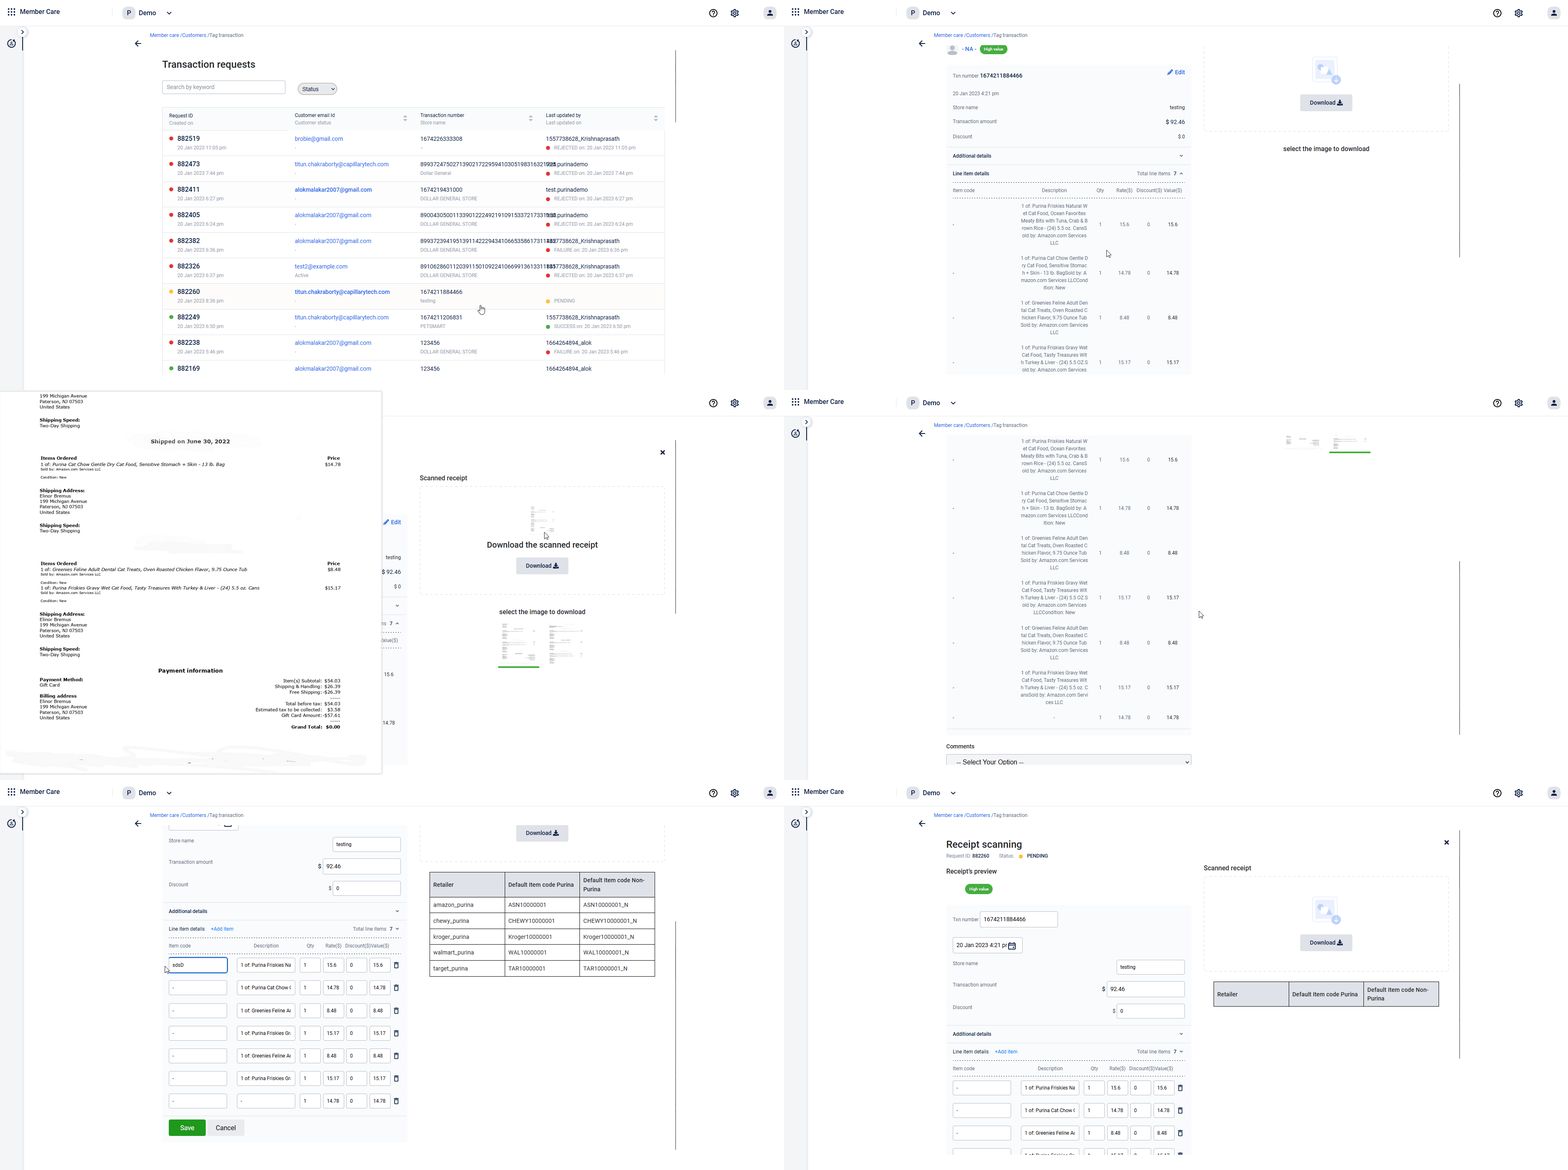
Note that the frontend that is shown above is not natively built on Member Care. It has been built on Sharingan, Capillary’s micro site builder, and integrated into Member Care. This is part of our initiative to transform Member Care into an extensible platform where brands can add their own pages and customer profile actions.
User Groups on Member Care
User group view is now available on Member Care new UI. Think of this as something similar to the customer view but for groups. Similar to the customer view, you will now be able search for a group - using group external ID or primary member identifiers and view information such as
- Group details - Name, identifier, status, attributes, primary member details and associated company details (if available)
- List of members and points contribution (downloadable in Excel as of now)
- Loyalty details - Group slab, points summary and tracker details
- Group transactions - Along with details on members who made the transactions
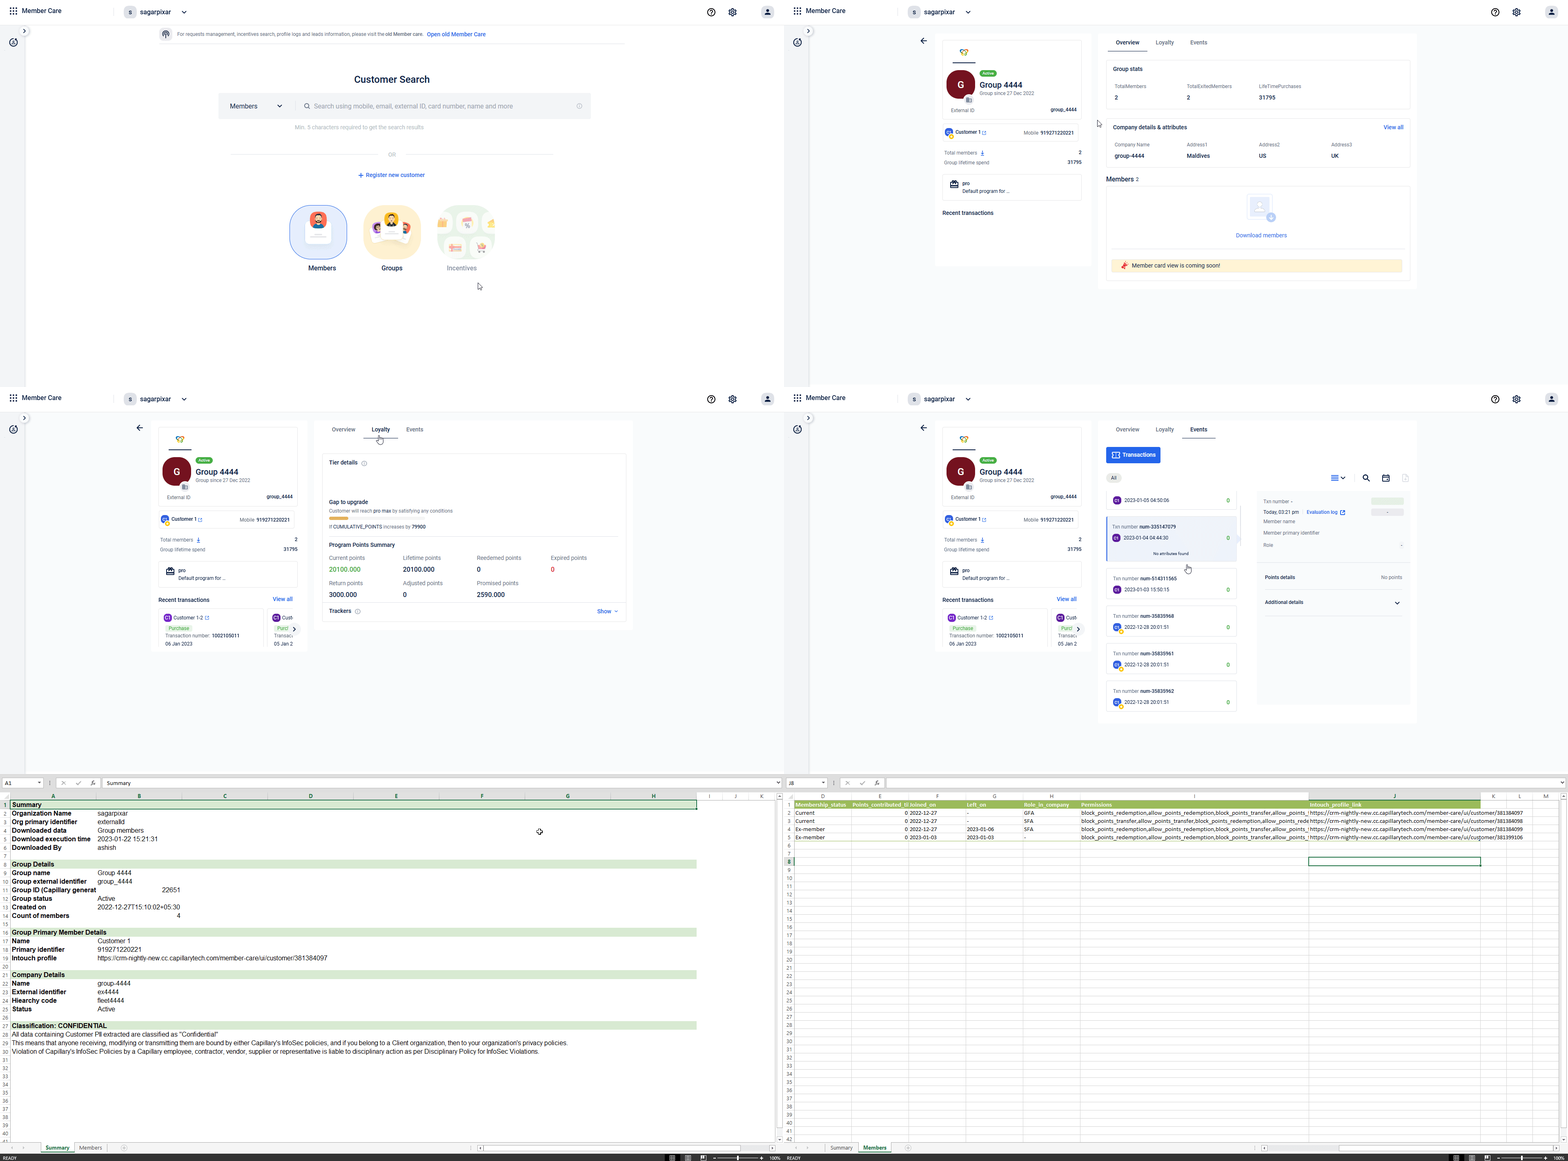
That apart, if user group feature is enabled for the organization, the customer view will also have some additions including
- List of groups the customer being viewed is part of (downloadable in Excel as of now)
- Company hierarchy including parent and child details (if available)
Upcoming Enhancements
Note that this feature is in beta and under active development. The following details are expected to be added soon:
Group View
- Widget to view list of members and member details
- Points ledger screen in group view to see loyalty events
- Goodwill points issual action
- Group transfer action
Customer View
- Widget to view list of groups and group details
- Hierarchy screen to navigate across/view company hierarchy
Updated 16 days ago
