
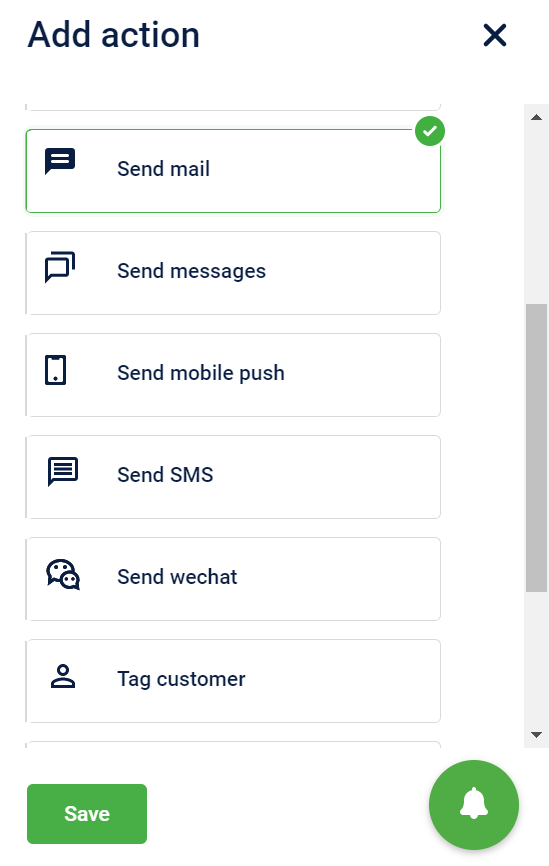
Actions
Here's a look at all the actions available in Workflows:
Award Points to Referee
A referrer is an actor who refers other customers to transact with the brand. A referee is an actor referred by a referrer. Brands can configure to incentivize either a referee or referrer or both.
To award points to the referee, you need to have points earned condition, points expiry condition (if required), and channels through which you want to communicate or notify the customers when points are awarded.
You need to configure earn condition, expiry condition, and channels through which you want to communicate on the points earned by the referee.
NoteThe Award Points to Referee action is available only for workflows within the default loyalty program.
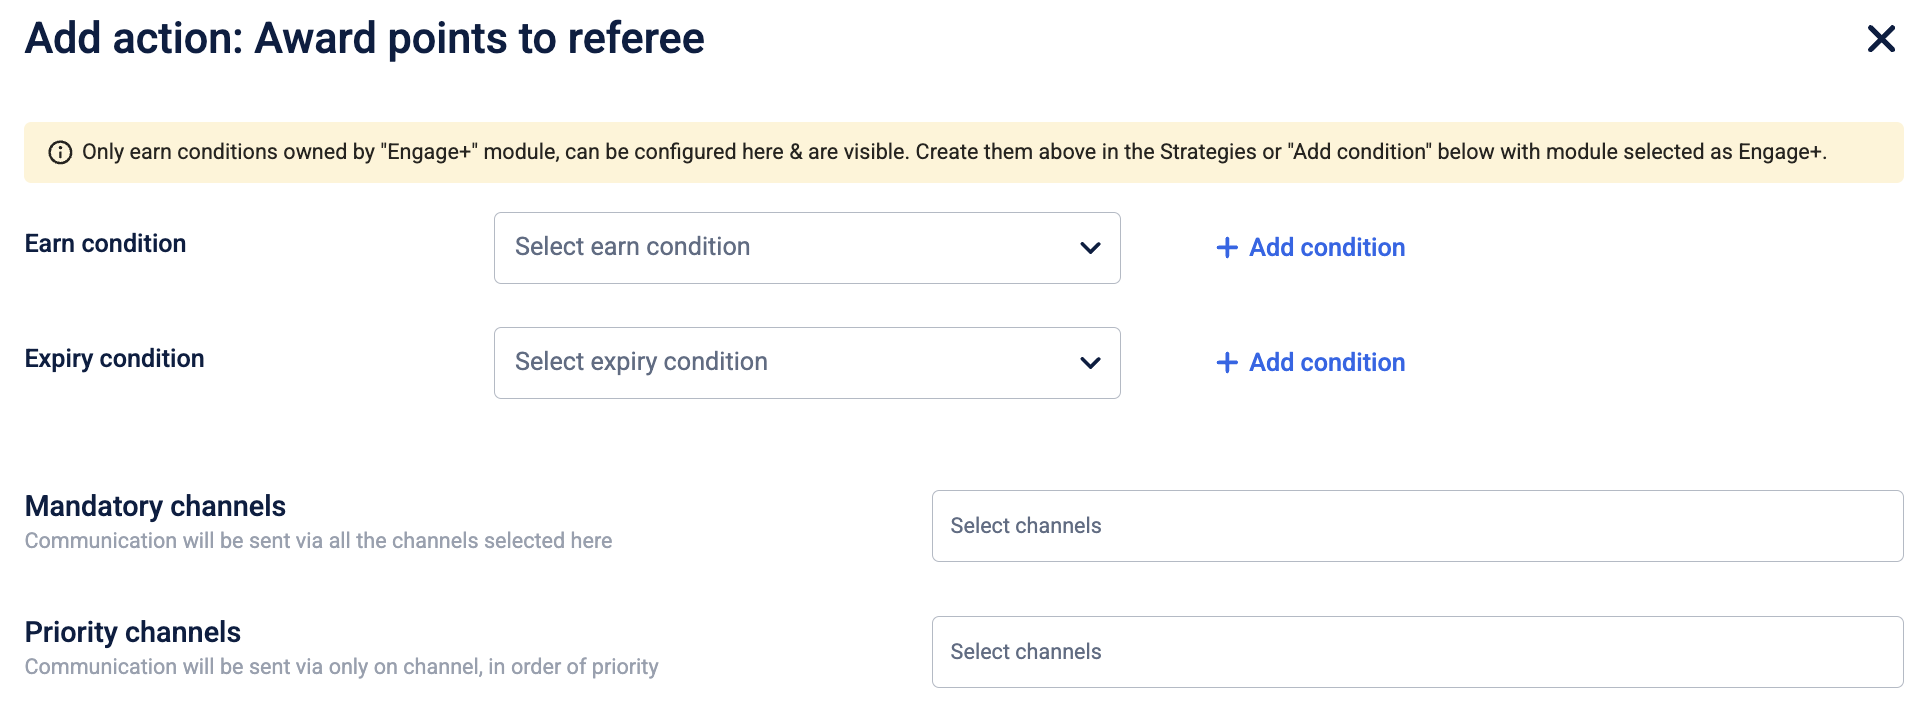
Earn condition
Click on the Earn Condition drop-down to choose the desired points earning condition for the referee.
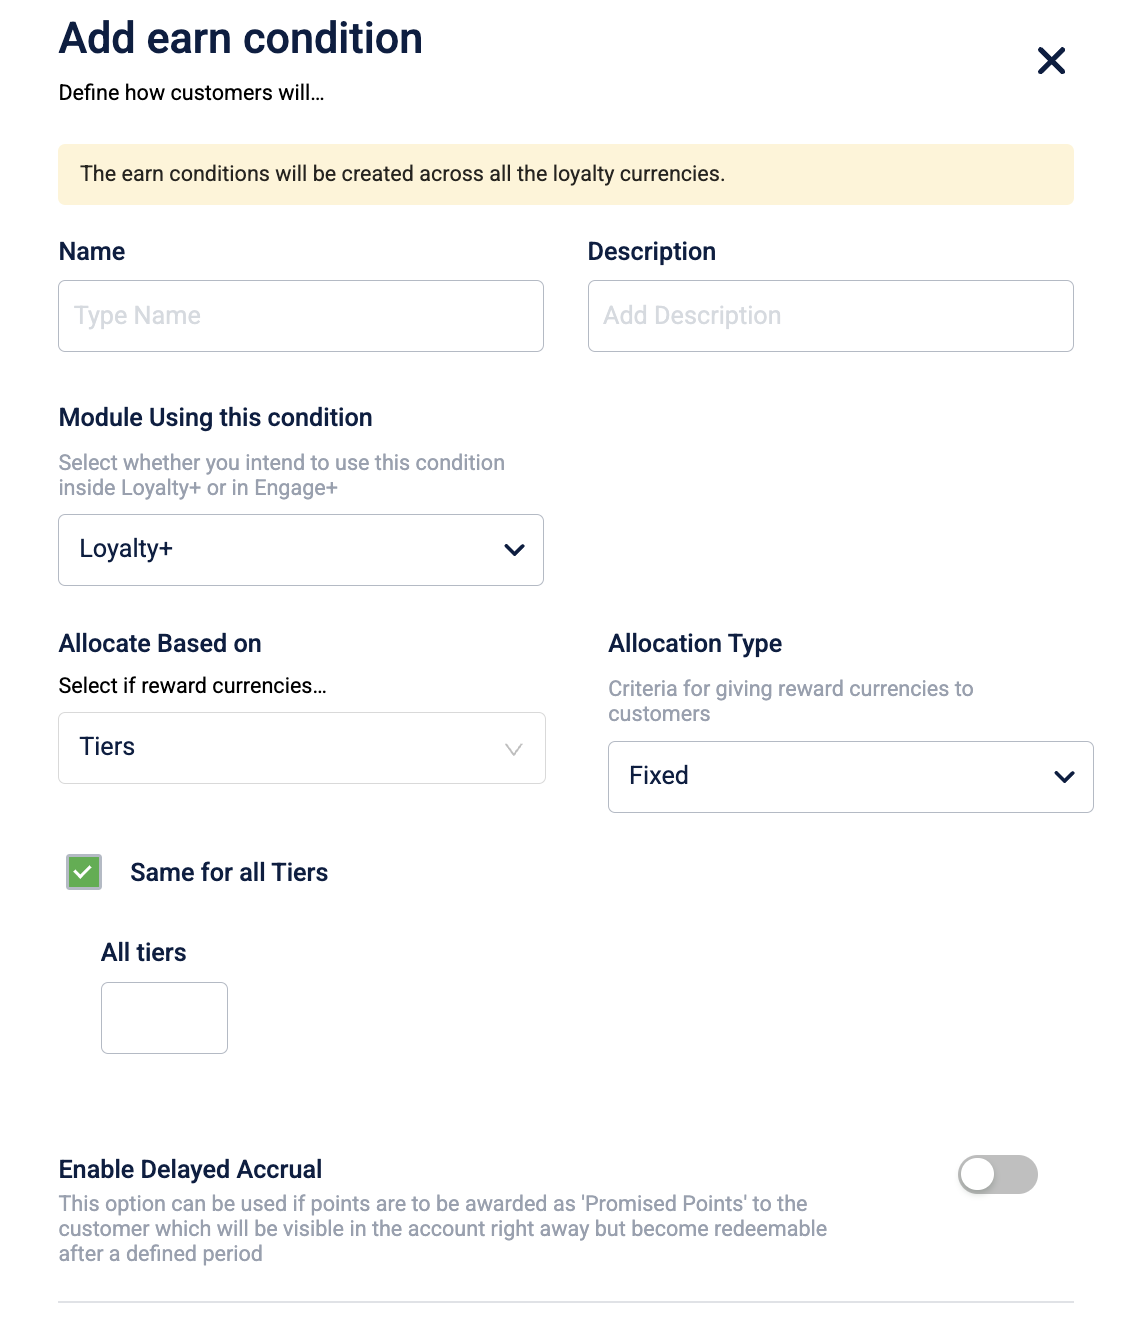
To create a new earning condition and use it:
- Click + Add condition.
-
In Name, enter a relevant condition name.
-
In Description, enter a short description of the condition.
-
In Module using this condition, choose the module where you want to use the condition. In this case, it is Engage+.
-
In Allocation type, select the criteria for issuing points to the user. The options are as follows:
Type Description Fixed Reward a fixed number of points (irrespective of the transaction amount).
For example, issue 10 points per transactionRound up Define a points range and reward customers with points and round their balance to the nearest multiple.
For example, if the points range is from 0-1000 and the round upto value is 10 units, a customer with 643 points will receive 7 points, bringing their total balance to 650, irrespective of their transaction amount.
Prorate - In terms of step function Reward a fixed number of points based on a fixed transaction range. Points issued are multiplied based on the transaction range.
For example: Issue 5 points on every transaction of $150. This way, a transaction amount between $0-150 receives 5 points, and transactions between 151-300 receive 10 points and so on.
-
To have a common allocation to all tiers, check the Same for all Tiers.
To allocate points differently for each tier, uncheck Same for all tiers. You will see an option to configure for each tier. Set your preferred values for each tier based on the Allocation type chosen.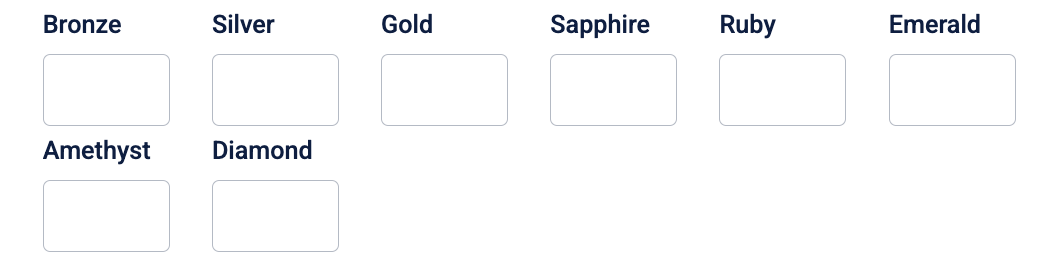
-
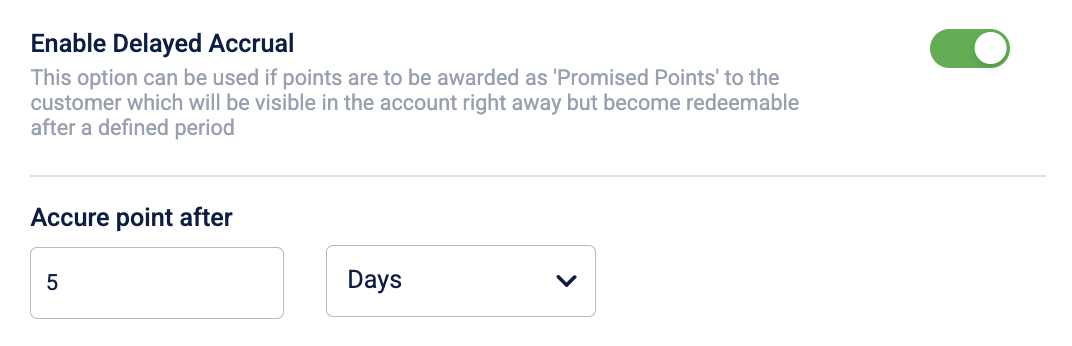
Set Enable delayed accrual to green to allocate points to the current account after a certain period. This is usually the transaction return period that is configured for the org. So, customers can redeem points only if the transaction is not returned. Use this especially in cases where transaction return is allowed.
-
You need to set the number of days after which points are accrued in Accrue points after. An example is shown in the following screenshot.
-
In delayed accrual, points for a transaction are added as promised points immediately. When the specified period (usually the allowed return period) is completed, these points will be credited to the current account.
Expiry condition
For the points that will be issued for referee, you need to set the expiry condition - when the awarded points should lapse.
Click on the Expiry Condition drop-down to choose the desired expiry condition for the points earned by the referee.
To create a new expiry condition and add it, click on the respective + Add condition.
In the drop-down box, choose the expiry condition (if created already).
To create a new expiry condition and add it, follow these steps.
- Click + Add condition
- In Name, enter a relevant condition name.
- In Description, enter a short description about the condition.
- In Module using this condition, choose the module where you want to use the condition. In this case, it is Loyalty+.
- In Expire points based on, choose the criteria for point expiry. You have three options, Event date, Rolling expiry from event date, and Membership event date. For more information, see here.
- Event date: Points expire on the configured date based on the last activity (transaction/registration) done by the customer.
- Rolling expiry from event date: The current date of points expiry is reset to a new date based on the recent transaction date.
- Membership event date: Points expire automatically when the membership expires.
- Enable Same for all Tiers and the condition becomes relevant for all tiers. If disabled, you have to configure conditions for each tier. For more information, see here.
- Click Done to save the condition.
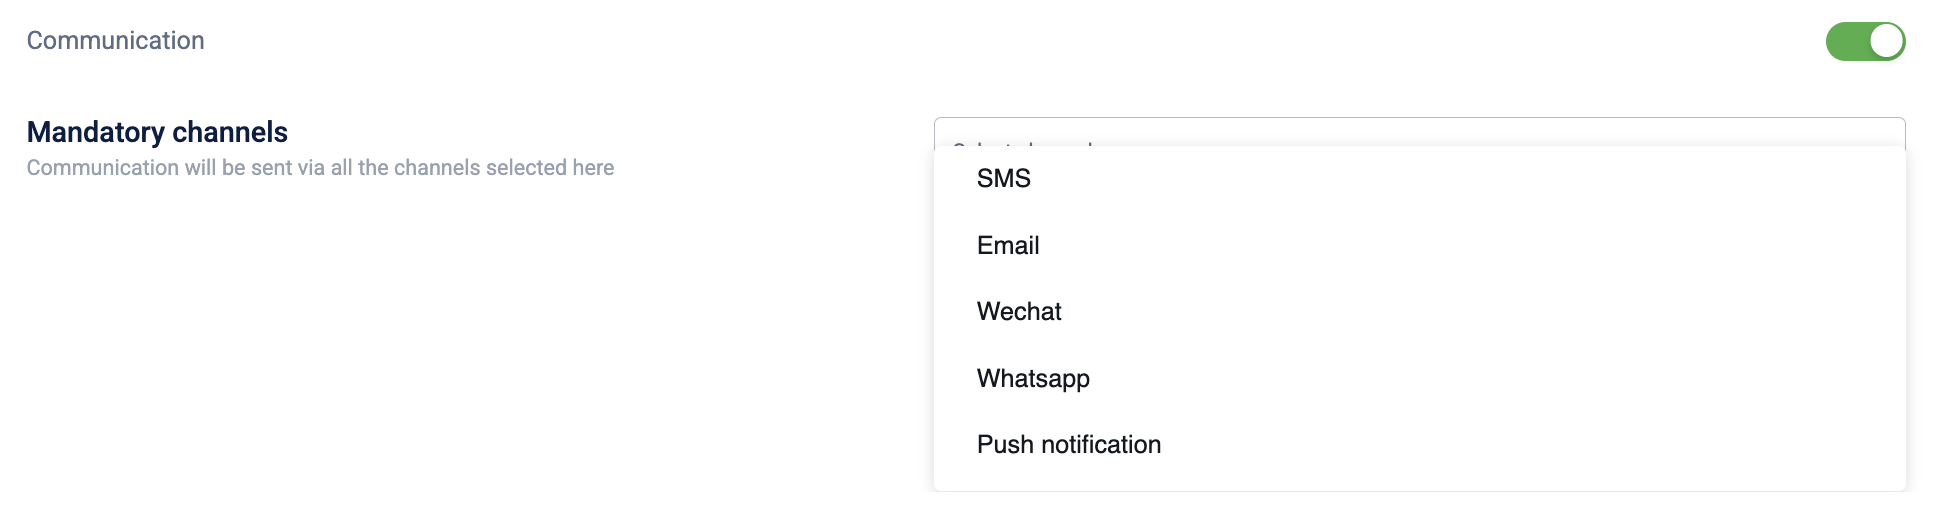
Configure communication channel(s)
Once you set the points earning and expiry conditions, it is important to communicate the points earned by the referee.
Loyalty+ supports two different configurations for communications.
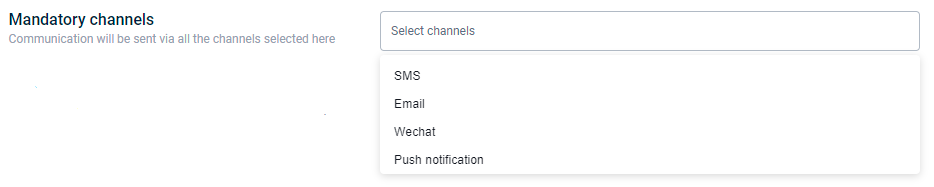
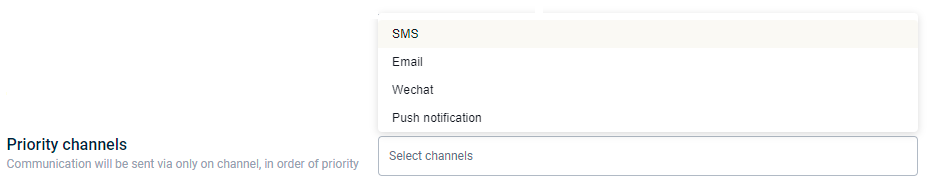
Mandatory channels
Here you can select the channels through which the communication has to be sent out for sure. Then, configure the message for each channel you select.
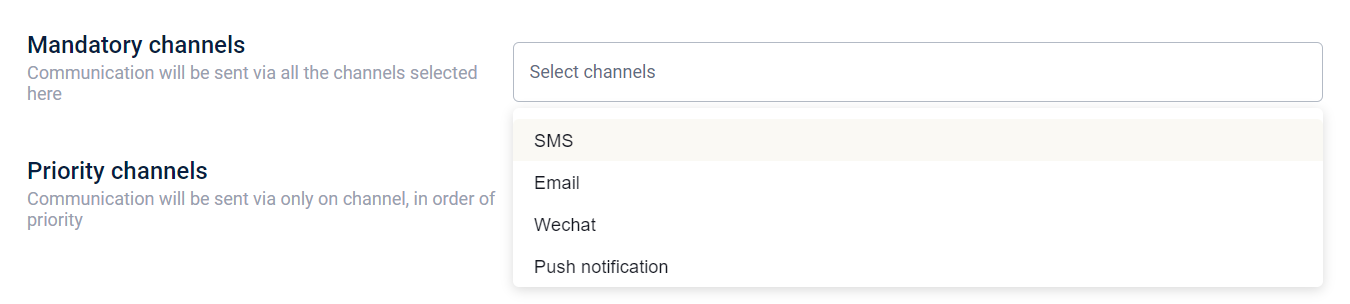
Priority channels
Here, you can set the channels through which the communication needs to be sent out based on the priority and availability. For example, if you set the priority in the order SMS, email, and mobile push, the system will first check if the customer's mobile number is available,
-
If available, it will send an SMS communication and ignores the rest.
-
If not available, it will check whether the customer has email ID
-
If email ID is available, it sends out an email notification to the customer.
-
If not, it will check if the customer is active through mobile push and process the message accordingly.
Once the priority channels are set, configure the message for each channel.
For more information on communication channels, see here.
Award Points to Referrer
A referrer is an actor who refers other customers to transact with the brand. A referee is an actor referred by a referrer. Brands can configure to incentivize either a referee or referrer or both.
To award points to the referrer, you need to have points earn condition, points expiry condition (if required), and channels through which you want to communicate or notify the customers when points are awarded.
NoteThe Award Points to Referrer action is available only for workflows within the default loyalty program.
The following are the options available for the Award points to referrer action.
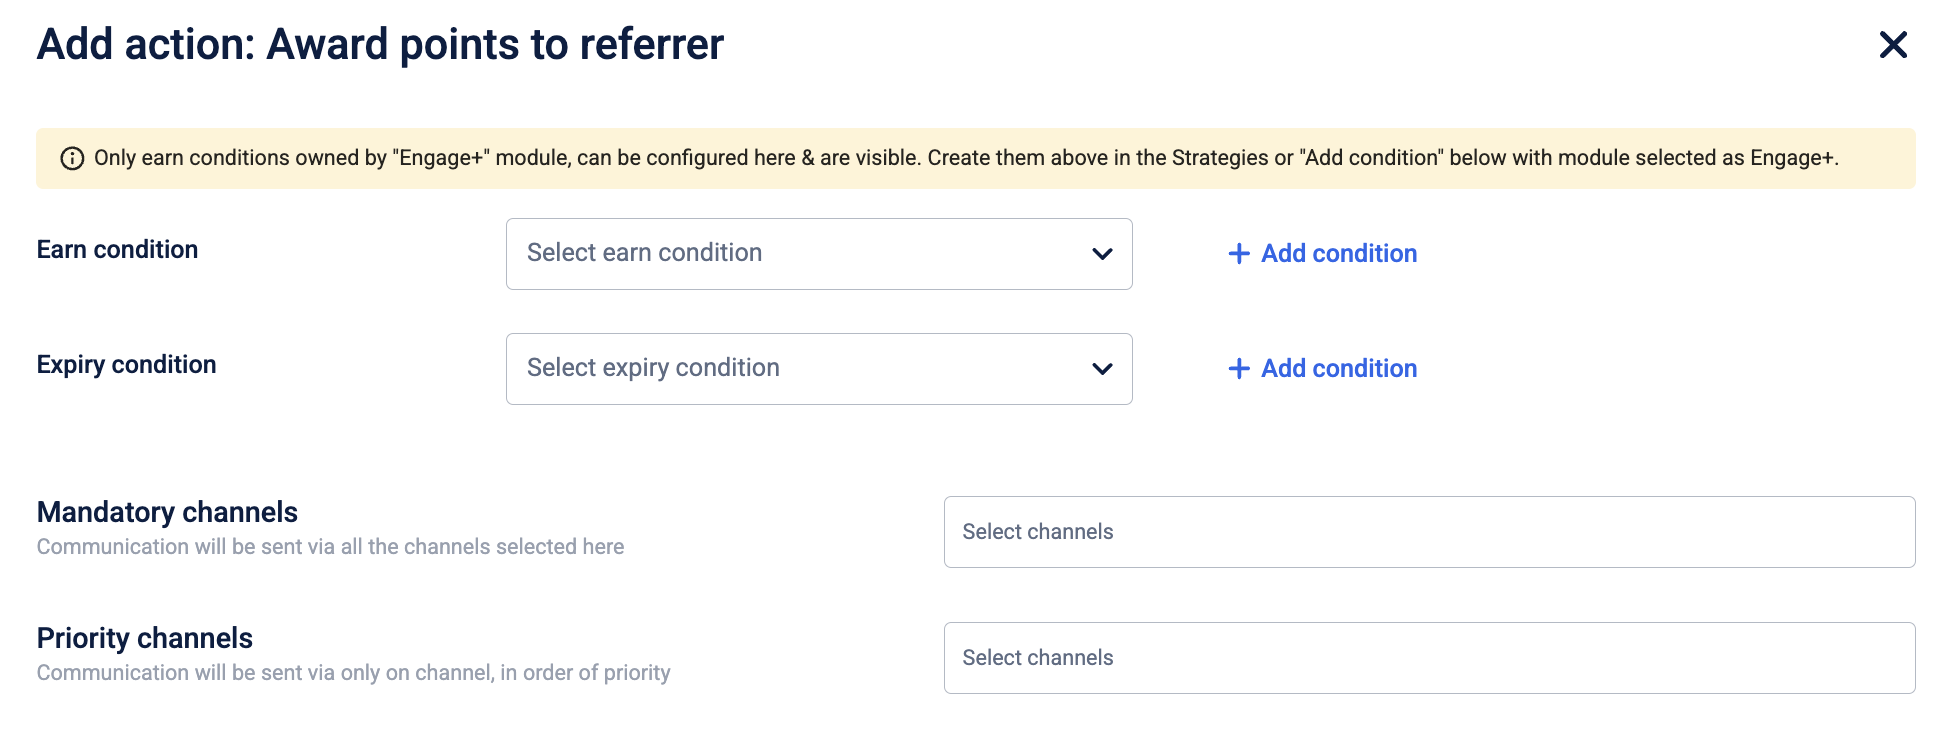
Earn condition
Click on the Earn Condition drop-down to choose the desired points earning condition for the referrer.
To create a new earning condition and add it, follow these steps.
- Click + Add condition.
-
In Name, enter a relevant condition name.
-
In Description, enter a short description of the condition.
-
In Module using this condition, choose the module where you want to use the condition. In this case, it is Engage+.
-
In Allocation type, select the criteria for issuing points to the user. The options are as follows:
Type Description Fixed Reward a fixed number of points (irrespective of the transaction amount).
For example: 10 to issue 10 points per transactionRound up Reward customers with points to round their balance up to the nearest multiple of a defined value within a specified range.
For example, if the points range is from 0-1000 and the round upto value is 10, a customer with 643 points will recieve 7 points, bringing their total balance to 650.
Prorate - In terms of step function Reward a fixed number of points for equal transaction intervals or steps.
For example: Allocate 5 points on every transaction of $150. This way, a transaction amount between $0-150 receives 5 points, and transactions between 151-300 receive 10 points and so on.
-
To have a common allocation to all tiers, check Same for all Tiers.
To allocate points differently for each tier, uncheck Same for all tiers. You will see an option to configure for each tier. Set your preferred values for each tier based on the Allocation type chosen. -
Set Enable delayed accrual to green to allocate points to the current account after a certain period. This is usually the transaction return period that is configured for the org. So, customers can redeem points only if the transaction is not returned. Use this especially in cases where transaction return is allowed.
- You need to set the number of days after which points are accrued in Accrue points after. An example is shown in the following screenshot.
-
- In Delayed accrual, points for a transaction are added as promised points immediately. When the specified period (usually the allowed return period) is completed, these points will be credited to the current account.
- Click Done to save the condition.
Expiry condition
Points that will be awarded for referrer need to have an expiry condition which indicates when the award will expire.
Click on the Expiry Condition drop-down to choose the desired expiry condition for the points earned by the referee.
In the drop-down box, choose the expiry condition (if created already).
To create a new expiry condition and add it, follow these steps.
- Click + Add condition
- In Name, enter a relevant condition name.
- In Description, enter a short description of the condition.
- In Module using this condition, choose the module where you want to use the condition. In this case, it is Loyalty+.
- In Expire points based on, choose the criteria for point expiry. You have three options, Event date, Rolling expiry from event date, and Membership event date. For more information, see here.
-
Event date: Points expire on the configured date based on the last activity (transaction/registration) done by the customer.
-
Rolling expiry from event date: The current date of points expiry is reset to a new date based on the recent transaction date.
-
Membership event date: Points expire automatically when the membership expires.
- Enable Same for all Tiers and the condition becomes relevant for all tiers. If disabled, you have to configure conditions for each tier. For more information, see here.
- Click Done to save the condition.
Configure communication channel(s)
Mandatory channels: From here, you can choose the communication channels that will invariably be used and through which the communication will definitely be sent out.
Priority channels: According to priority and availability, you can specify how to send the communication. For example, if you set the priority in the order of SMS, email, and mobile push, the system will first check if the customer's cell phone number is available,
- If available, it will send an SMS communication and ignore the rest.
- If not available, it will check whether the customer has an email ID
- If an email ID is available, it sends out an email notification to the customer.
- If not, it will check if the customer is active through mobile push and process the message accordingly.
Finally, configure the message for each communication channel you have chosen.
For more information on communication channels, see here.
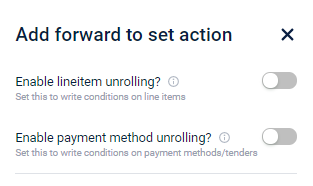
Forward to Set
Standard loyalty expressions operate at the transaction level, evaluating the entire purchase. However, the Forward to Set action enables granular evaluation of the following: individual line items (products/services) and payment methods used.
The following options are available for the Forward to Set action:

| Field | Description |
|---|---|
| Enable lineitem unrolling | Enable this to write conditions for line-items. |
| Enable payment method unrolling | Enable this to write conditions for payment methods or tenders. Notes:
|
Evaluate rules at the line-item level (Enable line-item unrolling)
Enable the Evaluate rules at the line-item level toggle. When enabled, Loyalty+ evaluates the defined rules for each line item of the transaction.
Note:When you enable line item unrolling, all actions in the ruleset—including actions like Send mail, Send messages, or Send communication—are executed once for each line item in the transaction. This means that if a transaction contains multiple line items, the system will send a separate communication for each item. As a result, customers may receive multiple emails, messages, or notifications for a single transaction if not configured carefully.
The following options are available:

| Field | Description |
|---|---|
| Use line item proportions? | Enable this option if line item amounts might not total the transaction amount. Use this option to distribute a bill-level discount to the transaction's line items. |
| Maximise points allocation? | Enable this option to maximize points for eligible payment methods, which are enabled under Advanced Settings. |
Evaluate payment modes (Enable payment method unrolling)
This option allows you to run rules on individual payment methods. When you enable payment method unrolling, the rules defined in the forwarded set are evaluated multiple times—once for each payment method in the transaction. If you want to apply rules or limits based on payment methods, you must enable payment method unrolling.
The Forward to set is also used for trackers.
- When line item unrolling is enabled, the rules in the forwarded set are evaluated once per line item. Tracker evaluation is not supported in a forwarded set where line item unrolling is enabled — the tracker requires the original transaction-level context, which is no longer available after unrolling. Configuring a tracker evaluation action in this setup causes the transaction to end in a partial success and the tracker will not update. To use a tracker in this flow, disable line item unrolling in the tracker ruleset.
- You don't need to turn on Line item unrolling in the tracker set to validate line items. The tracker evaluates line items automatically without using the Forward to set action. Select Line item unrolling only if you want to evaluate conditions that aren't part of the standard tracker evaluation.
- When you choose Forward to set action, you can either use line item unrolling or payment method unrolling, or both of them. If you just need to evaluate more expressions, you can disable both and click Save to proceed to configure the new sub-set. In the following screenshot, Set3 is the new subset created.

Evaluate multiple conditions (at the event level)
If you just need to evaluate more expressions before executing an action:
- Disable both Enable line item unrolling and Enable payment method unrolling
- Click Save to proceed to configure the new subset. You will see a new sub-set.
Issue Points
This action allows you to issue loyalty points to a customer based on the completion of a milestone / target.
Example: A fitness app rewards users with 100 loyalty points for completing a daily 10 km run milestone. When a user's tracked activity hits 10 km, the earn 100 points.
To enable this action for your loyalty program follow these steps,
- In Loyalty+, go to the promotions tab and select the loyalty promotion where you want the action to apply.
To create a new loyalty promotion, refer to the documentation on Loyalty Promotions.
NoteThe Issue Points action is available only for the TargetCompleted (Milestone or Streak is updated) customer activity type. Refer to the customer activities section in the loyalty promotions documentation for more information on the types of customer activities available for loyalty promotions.
- Go to the Promotion workflows section in the loyalty promotion.
- Select the Condition where you want the action to apply. To create a new Condition, select + Condition
- Select +When to define a new condition.
- Define the conditions in the Expression field if required.
- Select + Add action to add a new action.
- Select the Issue points action.
- Select Save to save the selection.
- Select the user entity, earn and expiry conditions and the milestone for the action.
The fields are as follows:
| Fields | Description |
|---|---|
| User entity | Select the user entity to apply the action. . |
| Earn condition | Select the earn conditions for the points using the drop down menu. To create a new earn condition select + Add condition For more information, refer to the section on . |
| Expiry condition | Select the expiry conditions for the points using the drop down menu. To create a new expiry condition select + Add condition. For more information, refer to the section on . |
| Points rounding strategy | Select the points rounding strategy using the drop down menu. The strategies are as follows: Actual: Awards the exact calculated points, including decimals. Example: If a customer earns 19.9 points (e.g., 10% of a ₹199 transaction), they receive Floor: Rounds points down to the nearest whole number, ignoring decimals. Example: 19.9 points become 19 points. Round: Rounds up points to the nearest whole number. Example: 19.9 points become 20 points. |
| Milestones/Streaks | Select the milestone or streak group to track using the drop down menu. The drop down menu lists all the milestones and streaks selected when creating the loyalty promotion. |
| Target(s) | Select the individual target name or select Unified target. If Unified target is selected, the points will be pro-rated based on the unified target. Note: Always ensure the target type in your action matches the target type (individual or unified)defined in your rule logic for successful point issuance. |
| Prorate on | Select the points prorate strategy using the drop down menu. The strategies are as follows: 2. All Targets (No Overall) 3. Any (n-1) Targets (No Overall) |
| Mandatory channels | Select the mandatory channels for the loyalty promotion if required. For more information, refer to the section on . |
| Priority channels | Select the mandatory channels for the loyalty promotion if required. For more information, refer to the section on . |
- Select Save to save the changes made to the action.
- Select Publish Promotion to publish the changes.
Renew Tier
Tier renew is retaining the current tier that the customer is enrolled in and providing all the privileges of the tier.
To configure the Renew Tier action, follow these steps.
- Select Renew Tier and click Save.

- After you select Renew Tier, you will see the following screen. Click on the Save option.
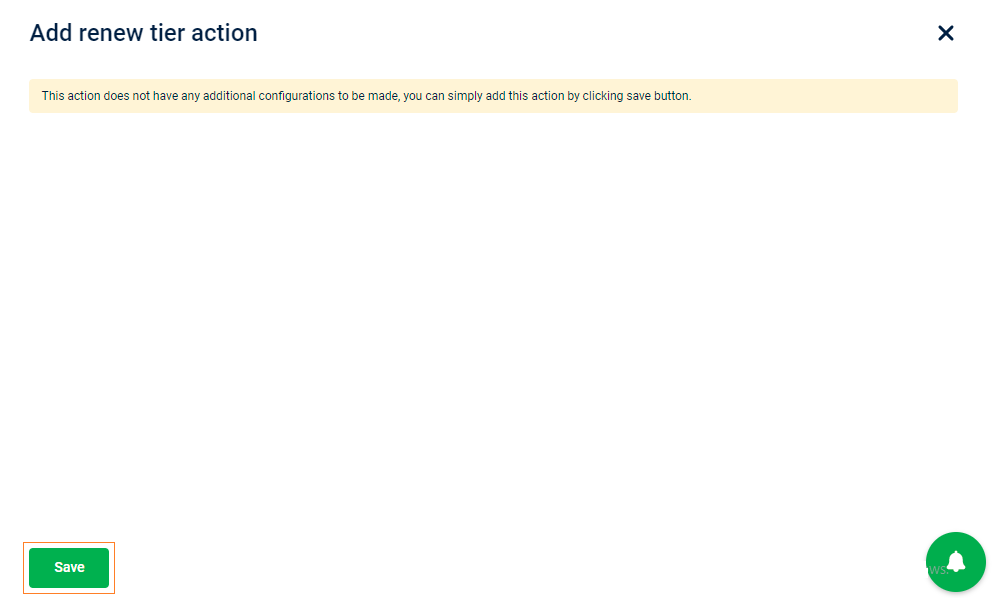
NoteThere are no specific options to be set in Renew tier action.
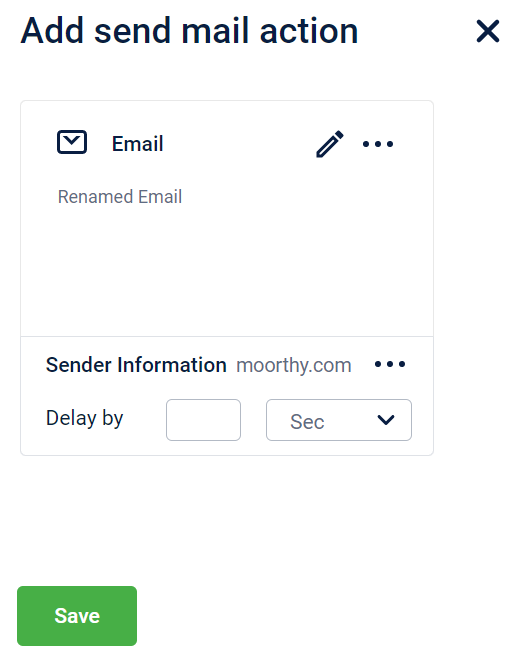
Send mail
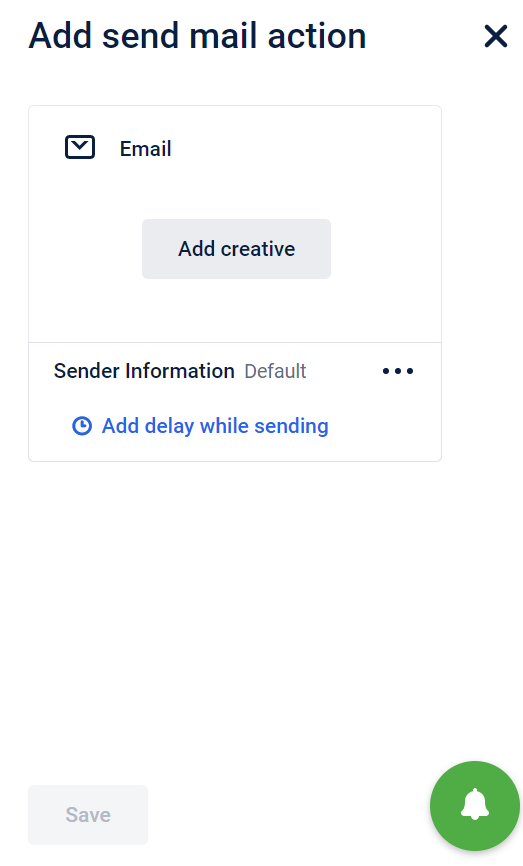
You can send an email to your customers when they satisfy a certain condition. It could be regarding the rewards they earned or just a general notification. You can design the email from the scratch or use an existing template from creatives library.
To configure the Send mail action, follow these steps.
- In When, select Send mail and click Save.
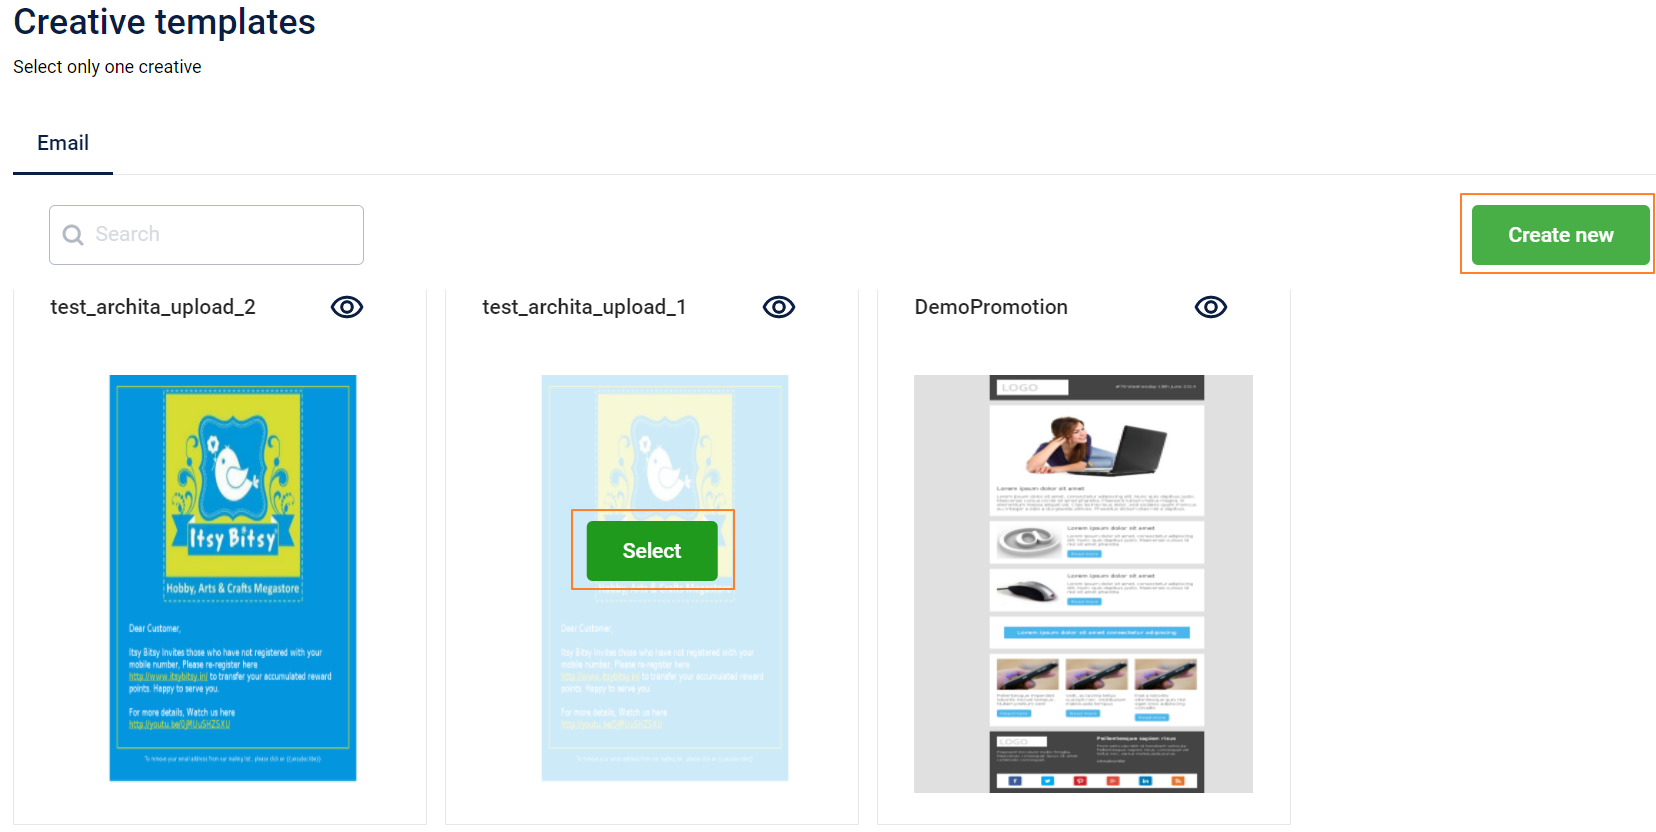
- Click on Add creative to configure the email message.
- To create the message from the scratch, click Create new.
To use an existing template, hover on the desired template and click Select.
- Enter Subject, design email body, and click Done. You can Preview the email before saving and use the respective icons to see how the email renders in laptop/desktop, mobile phone, and tablet.
- Configure Sender information. By default, the the default sender ID will be selected. If you wish to send from a different sender ID:
i. Click on the more options icon and select Edit.
ii. Uncheck Use default sender ID. You will see options to choose a sender ID.
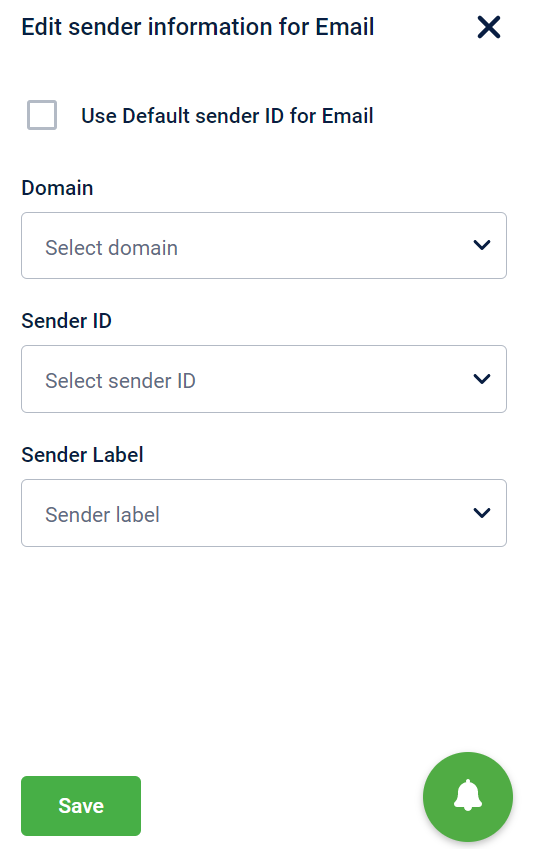
iii. Choose your preferred sender Domain, Sender ID, and Sender Label.
iv. Click Save to continue.
- You can also set the delay in sending email from the event time. For example, you want to communicate something to the customer two days post a transaction.
i. Click on Add delay while sending.
ii. Choose your preferred period in the drop-down - Sec, Mins, Hours, or Days.
iii. In Delay by enter the duration.
iv. Click Save to continue
NoteDelay time should be greater than 120 seconds or 2 minutes.
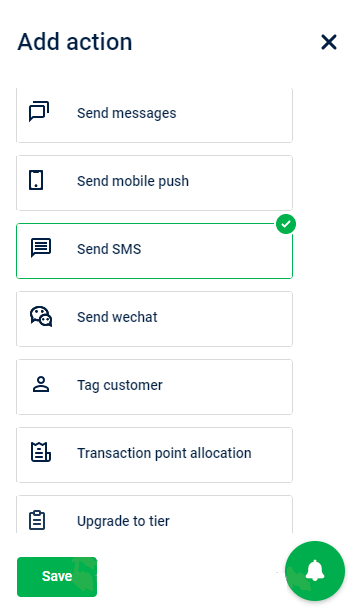
Send messages
You can notify customers when an action is executed successfully. Notifications can be sent through different channels such as SMS, email, WeChat, and Mobile Push.
Notification channels are of two types:
- Mandatory Channels: Channels that are mandatory for sending the notifications
- Priority Channels: Channels that need to be triggered based on the priority and availability. For example, if SMS is set as priority 1, Mobile Push as priority 2 and email as priority 3, the system first checks whether SMS is configured and then checks if the mobile number is available for the customer. If one fails, then it will try to send the notification through mobile push and so on.
Channels that are selected in Mandatory Channels will not appear in Priority Channels and vice versa.
To send a message once an action is executed successfully, follow these steps:
-
In Workflows, select + Add action and then Send messages
-
In the Mandatory channels dropdown, select the required channels.
-
In the Priority channels dropdown, select the required channels.
-
Select Add creative to create a new template or select an existing template. For more information on creating templates, refer to the respective channel in Engagement Channels.
-
Select Add delay while sending to delay the message. This ensures the action is complete before sending the message. For example, delay sending a “points earned” communication message by one hour to ensure that the points have been successfully issued to the customer.
-
Enter the time period in the box and select the time units from the dropdown.
-
Select Save.
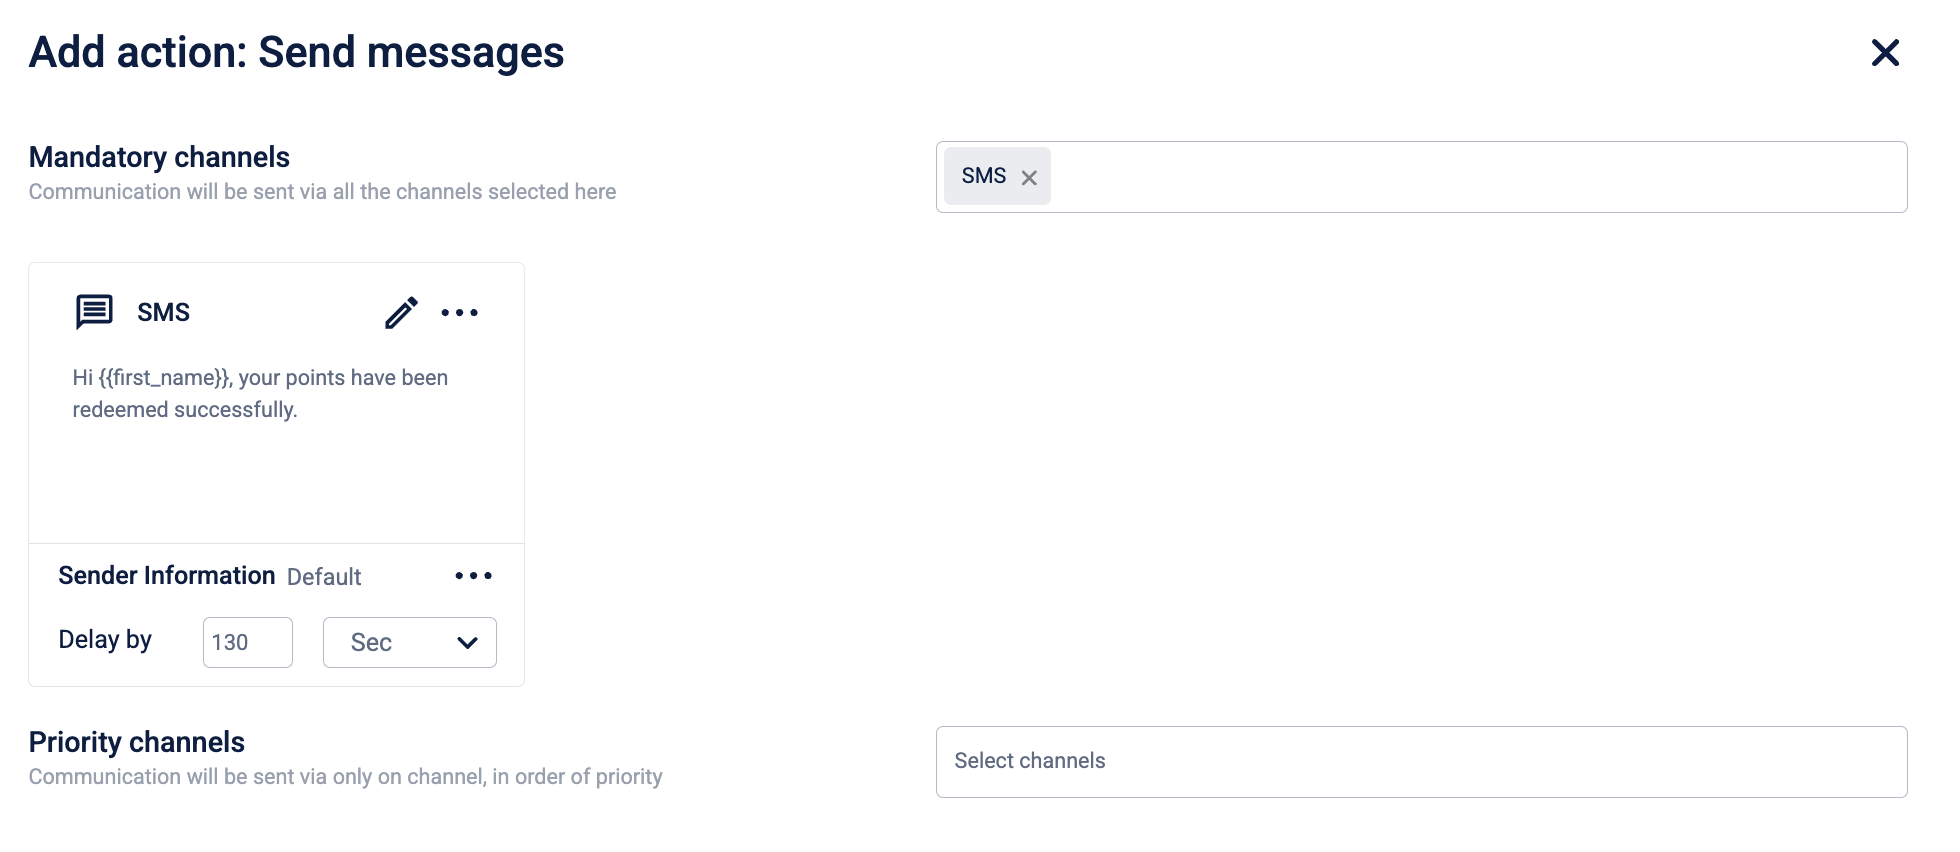
NoteThis action is similar to the send communication action but does not include reporting through Databricks.
Send communication
Loyalty+ integrates the Central Communications Engine, enabling brands to send loyalty-related communications through supported channels like WhatsApp, Zalo and LINE directly from loyalty workflows. All communication channels available on Engage+ are automatically accessible when using the Send communication action, allowing seamless integration of channels for loyalty program messaging. Brands can use the Send communication action in workflows to deliver updates through a communication channel.
Reporting is available through databricks to track communications sent through loyalty programs and promotions, providing visibility into message delivery and customer engagement only when using the Send communication action.
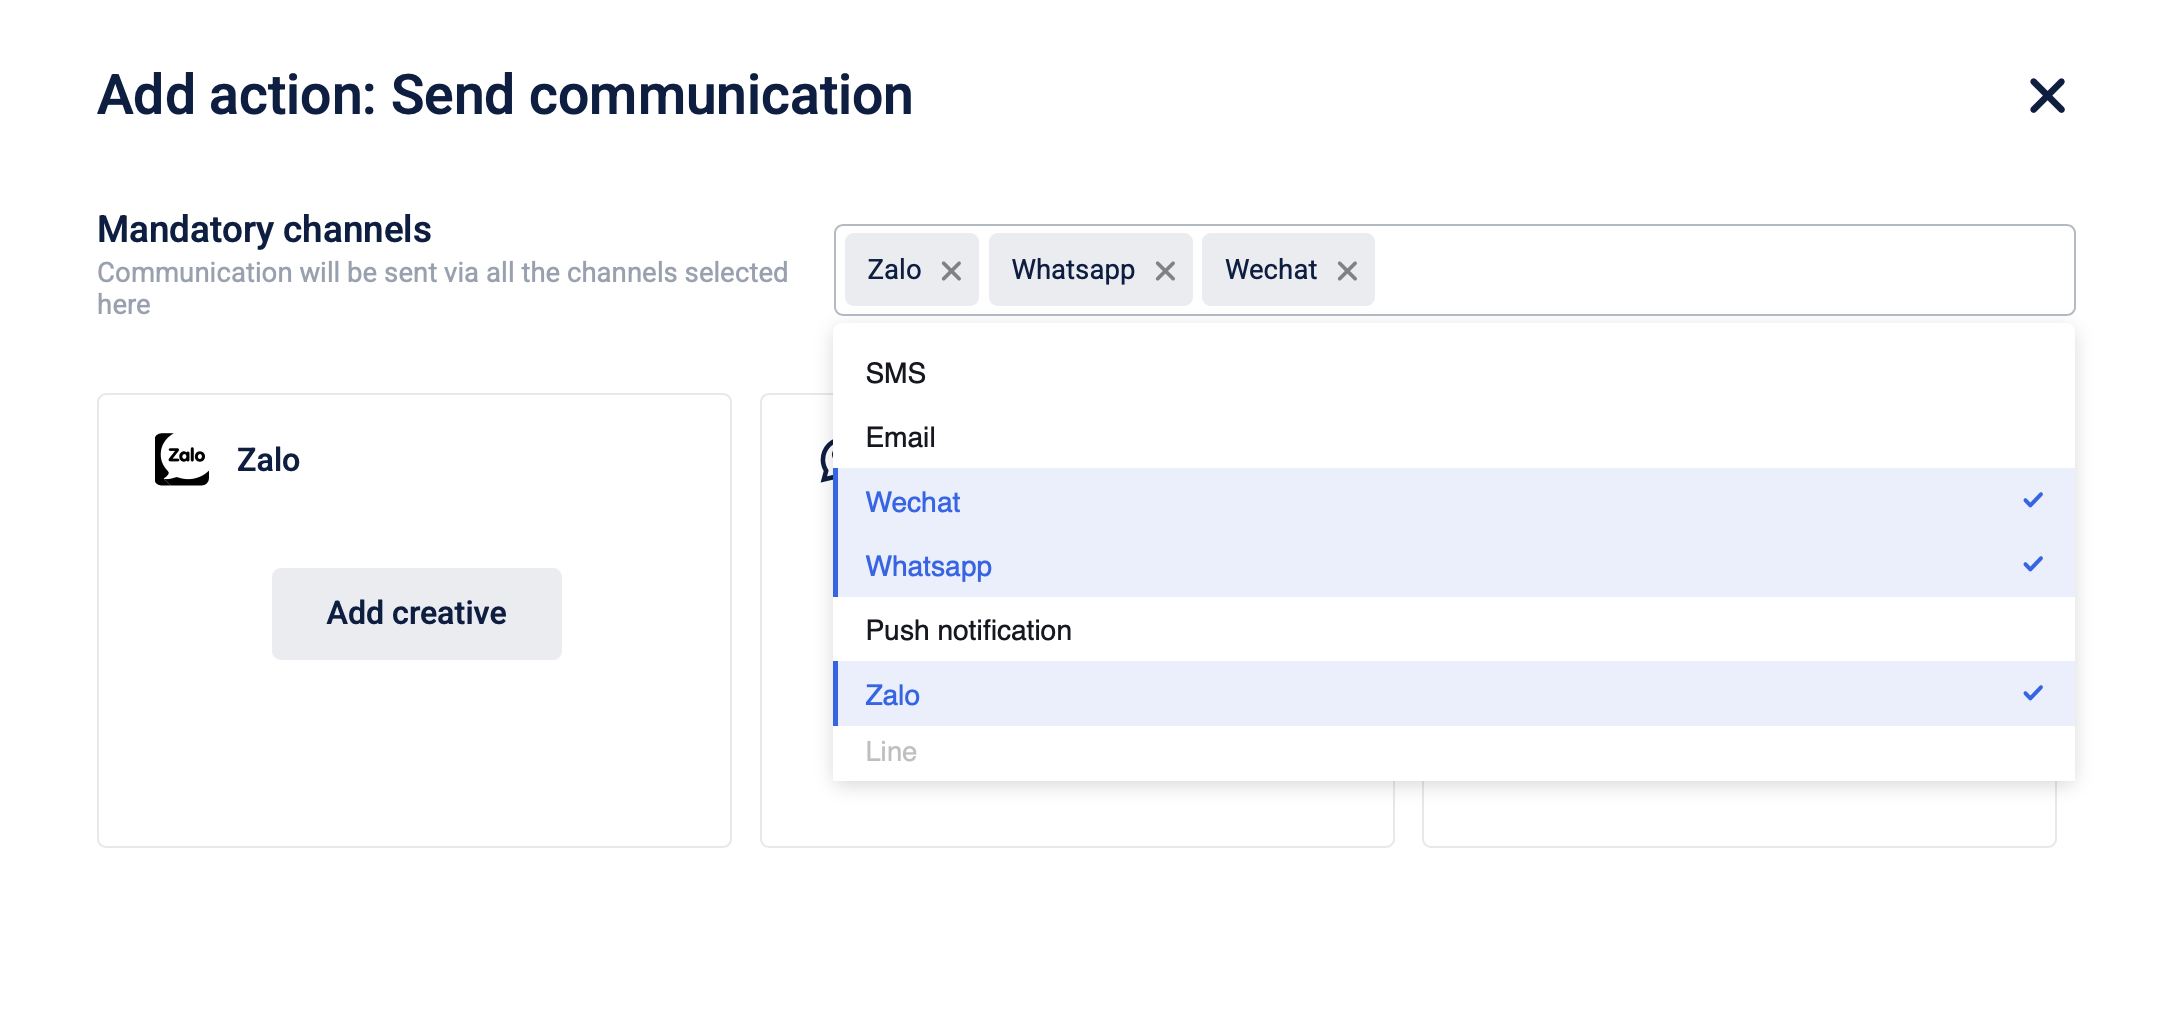
Note
- If an organization has WhatsApp, Zalo and LINE sender IDs configured on Engage+, the same will be available on Loyalty+. To configure a new sender ID, refer to Configuring WhatsApp Sender Details or raise a JIRA ticket to the gateways team.
- Refer to the Creatives documentation to create templates for WhatsApp and Zalo.
Send mobile push
You can send push notifications to your customers by customizing the notifications with creatives. You can design the notification from the scratch or use an existing template from the creatives library.
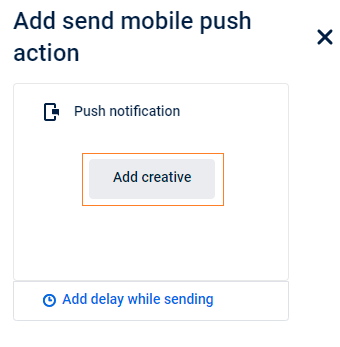
To configure the Send mobile push action, follow these steps.
- Select Send mobile push and click Save.
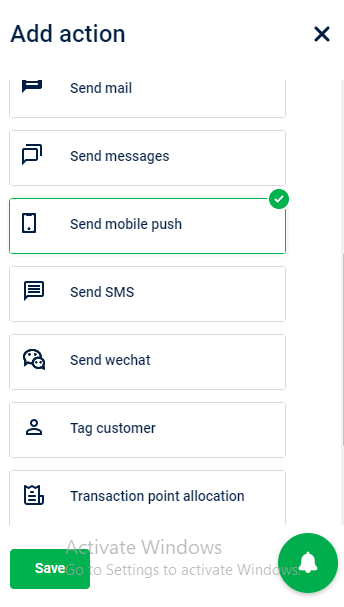
- Click on Add creative to configure the mobile push message.
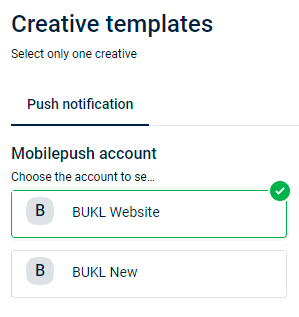
- Choose one account for which you want to configure the mobile push message
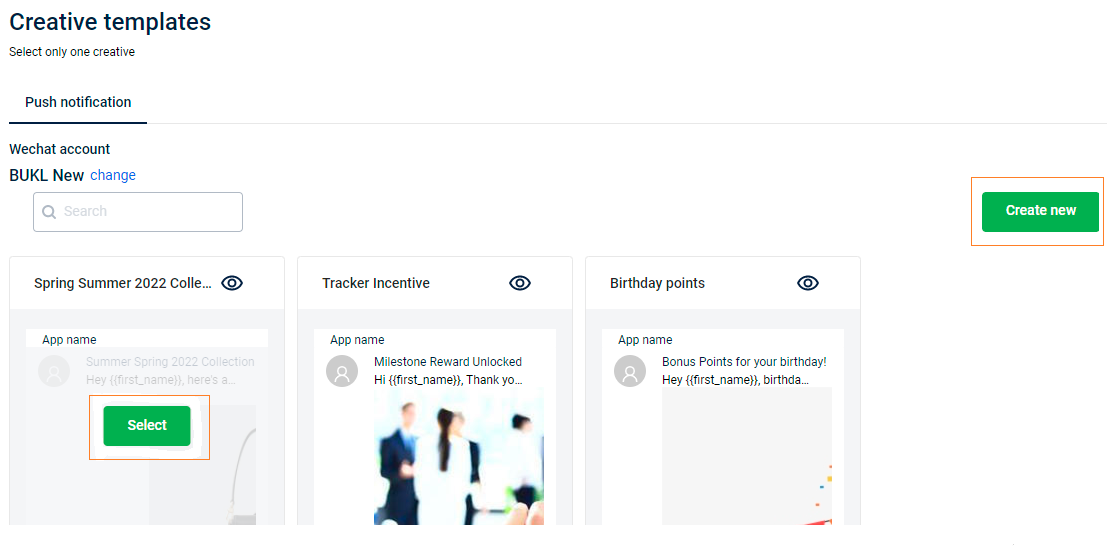
- To create the message from scratch, click Create new.
To use an existing template, hover on the desired template and click Select.
- Enter Title, and the message body. You can Preview the message before saving it and use the respective icons to see how the message renders mobile phone.
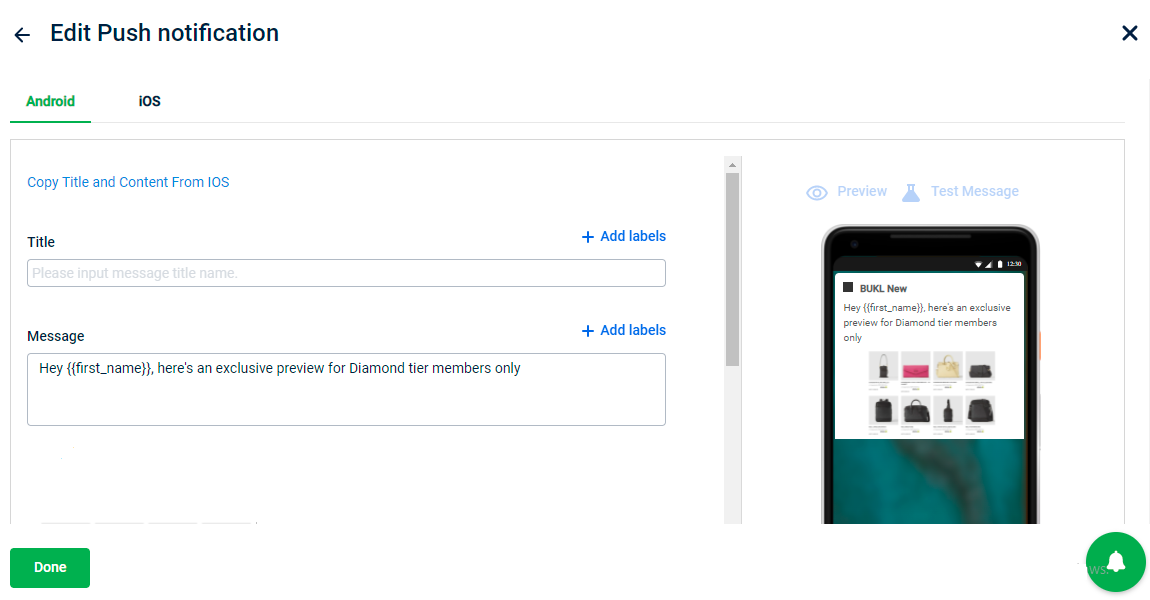
NoteAndroid and iOS platforms are both supported, so you can set up push notifications for both.
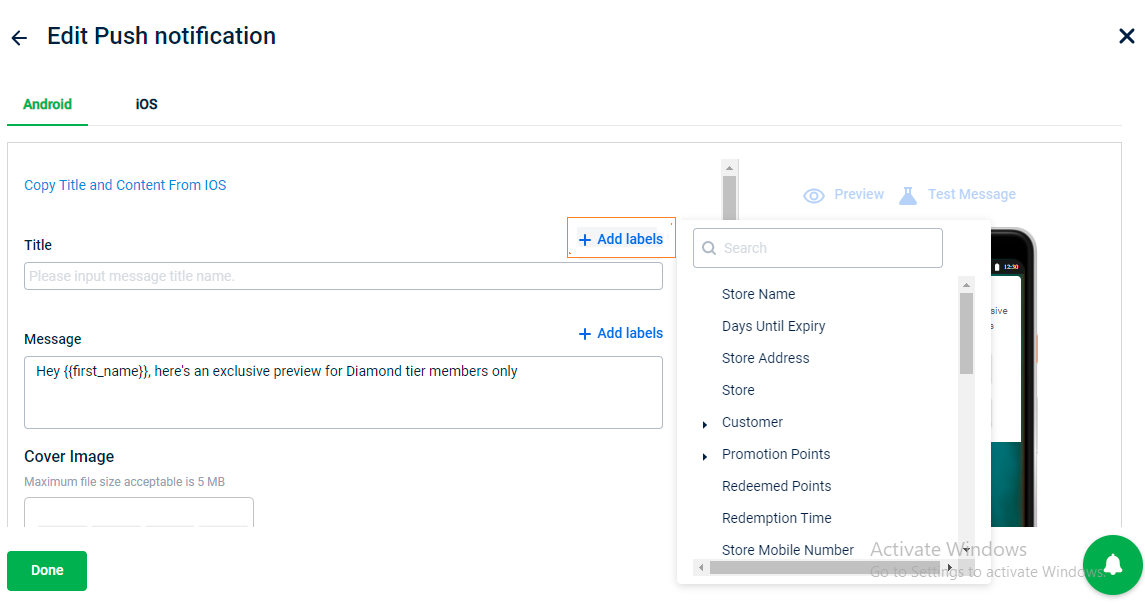
i. Select + Add Label to use the dynamic tags to personalize the text for the customer-rich experience.
ii. Select Upload Image to set the cover image of the push notification message.
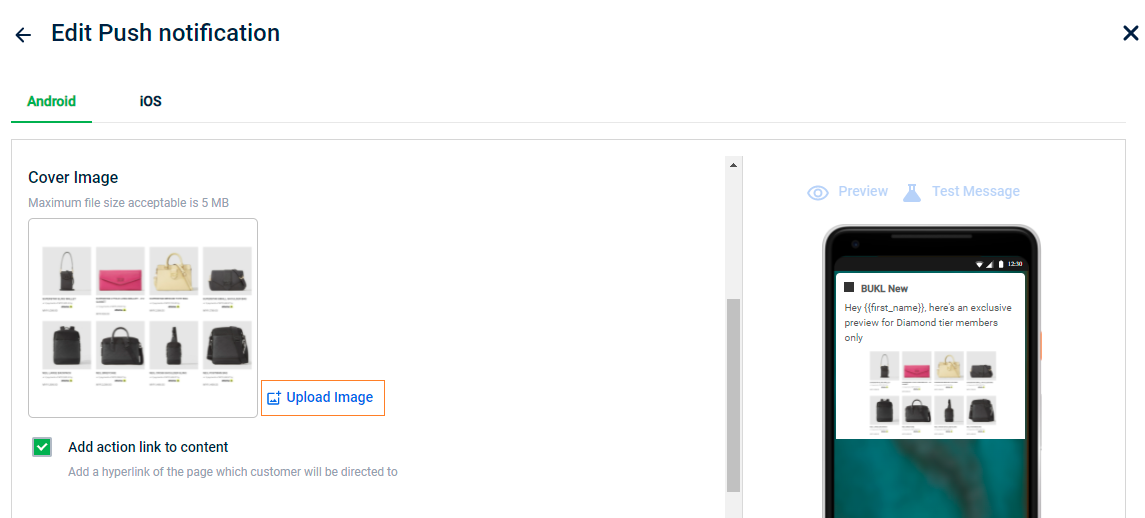
NoteThe maximum file size acceptable is 5 MB
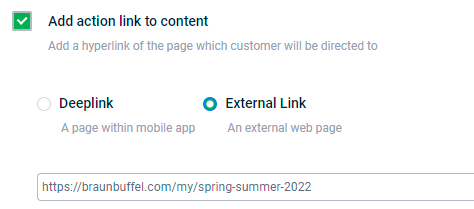
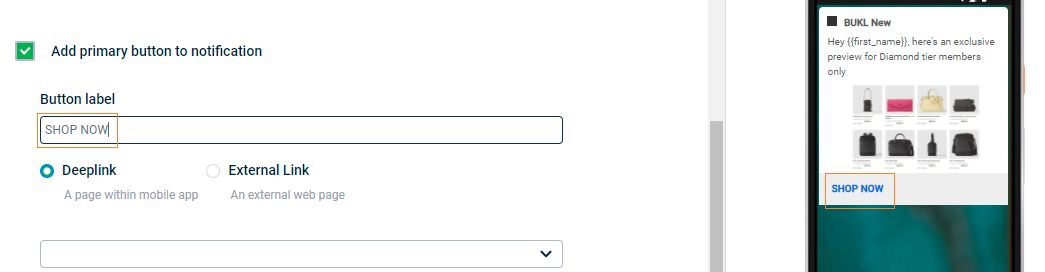
iii. Check Add action link to content to add a hyperlink of the page where the customer will be directed to.
- Deeplink: Link use to direct the customer within the mobile application on a specific page.
- External Link: Link used to direct the customer to the external web page
iv. Check Add primary button to notification to enter a CTA (Call to action) label.
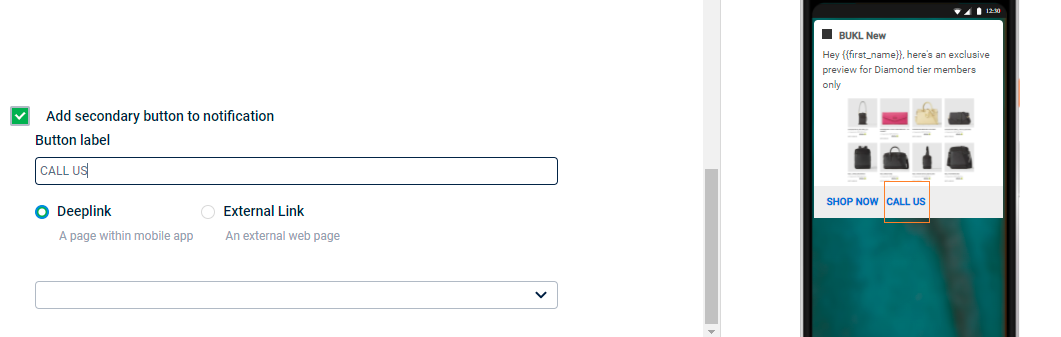
v. Check Add secondary button to notification to enter a secondary CTA (Call to action) label.
- You can also set the delay in sending mobile push from the event time. For example, you want to communicate something to the customer after a specific interval of time.
i. Click on Add delay while sending.
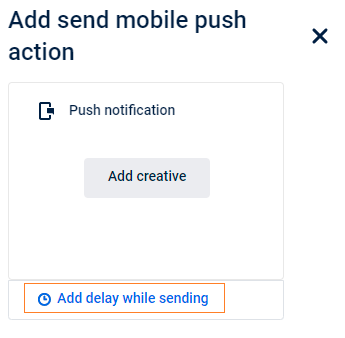
ii. Choose your preferred period in the drop-down - Sec, Mins, Hours, or Days.
iii. In Delay by entering the duration.
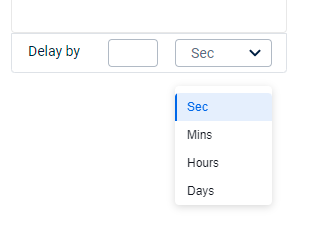
NoteDelay by value should be greater than 120 Seconds or 2 minutes.
- Click Save to continue.
Send SMS
You can send an SMS to your customers when they satisfy a certain condition. It could be regarding the rewards they earned or just a general notification. You can create an SMS from the scratch or use an existing template from the creatives library.
NoteThe message configuration varies for customers in India. You can use only DLT complaint message templates.
To configure the Send SMS action, follow these steps.
- Select Send SMS and click Save.
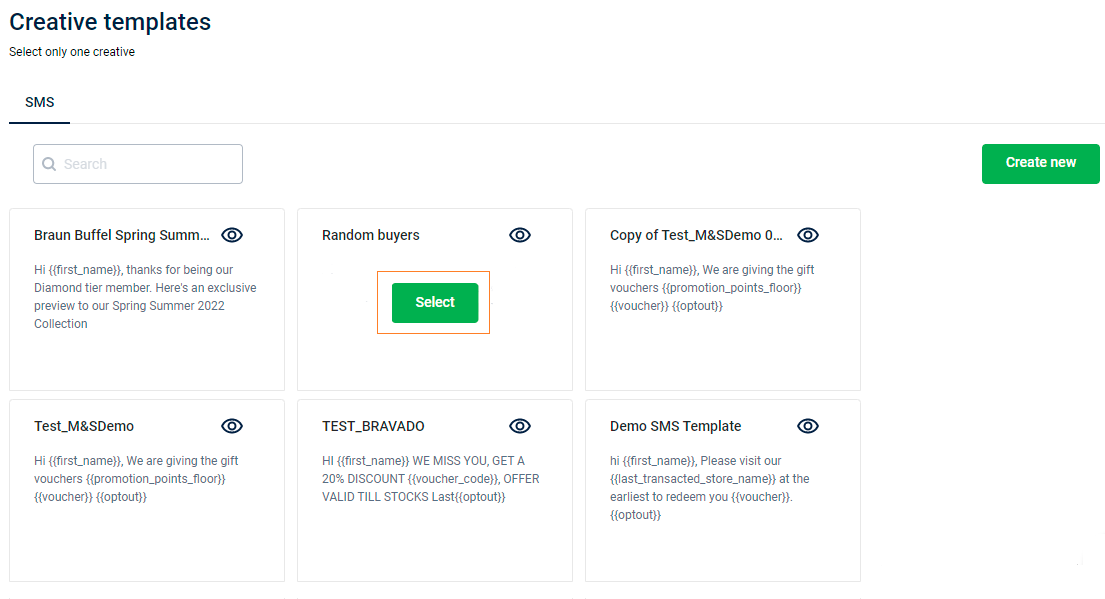
- Click on Add creative to configure the SMS.

- To create the message from scratch, click Create new.
To use an existing template, hover on the desired template and click Select.
- Configure SMS text, and click Done. You can preview the SMS before saving it to see how the SMS renders on a mobile phone.
i. Select + Add Label to use the dynamic tags to personalize the text for the customer-rich experience.
ii. Select Allow Unicode characters to allow the support of a much wider character set, and includes pretty much every character in the world, including Indian languages, some of the stranger European characters (like í), all the Cyrillic alphabet (e.g. Arabic, Russia, Punjabi, and Greek), all the Asian ones (Chinese, Japanese, etc), and also some of the emoticons out there!

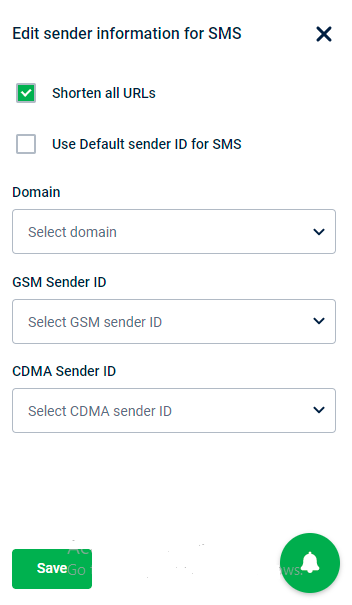
- Configure Sender information. By default, the default sender ID will be selected. If you wish to send from a different sender ID:
i. Click on the more options icon and select Edit.
ii. Uncheck Use default sender ID. You will see options to choose a sender ID.
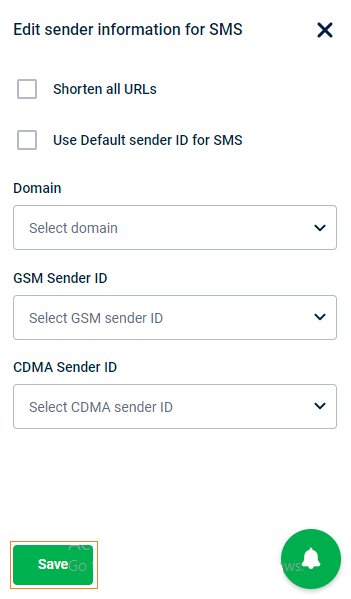
- Select Shorten all URLs to shorten links used in SMS,
Note
- As an SMS has a character limit, it is usual that the links that you use in SMS could occupy lot of characters. Hence, we highly recommended using shorten links or tiny URLs in such instances.
-
You can also set the delay in sending SMS from the event time. For example, you want to communicate something to the customer two days post a transaction.
i. Click on Add delay while sending.
ii. Choose your preferred period in the drop-down - Sec, Mins, Hours, or Days.
iii. In Delay by entering the duration. -
Click Save to continue.
NoteDelay time should be greater than 120 seconds or 2 minutes.

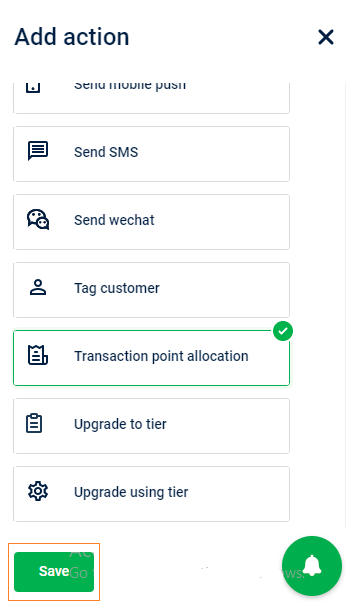
Transaction point allocation & Allocate Points action
Transaction points allocation lets you create various allocation strategies and use the desired one when configuring rule sets. You can allocate points on the transaction amount. You can also have common points allocation across tiers or different allocations for each tier.
To configure the Transaction point allocation action, follow these steps.
- Select Transaction point allocation and click Save.
- In the Earn condition, choose the desired condition from the drop-down list.
To create a new condition, click on + Add Condition.

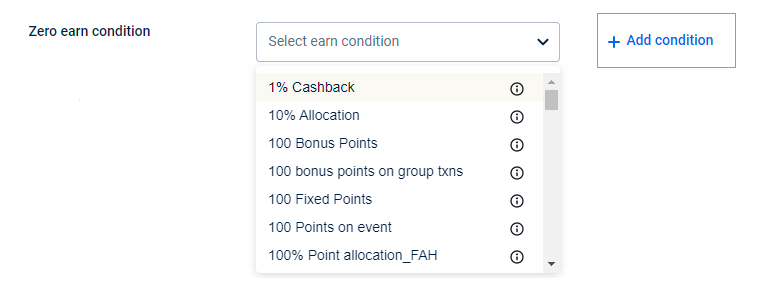
- In the Zero earn condition, choose an appropriate condition from the drop-down.
Note: The configuration for the zero earn condition is not determined by these options and depends on the other configurations explained here.
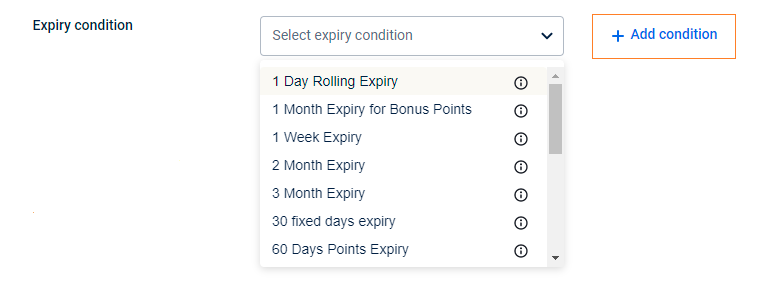
- Select the Expiry condition from the drop-down menu.
To create a new Expiry earn condition from scratch, click + Add condition.
- In Prorate on, choose on what basis you want to issue a percentage of points - transaction amount or event value. This is applicable only for prorated points allocation. If bill amount, choose a current event, if tracker, choose current aggregate or previous aggregate
- Amount : Choose this to allocate prorated points on the transaction amount.
- Current aggregate: Choose this to allocate prorated points on the value of the tracker post the current transaction. This is disabled in Evaluations start and Evaluation end sets.
- Previous aggregate: Choose this to allocate prorated points on the value of the tracker before the current transaction. This is disabled in Evaluations start and Evaluation end sets.
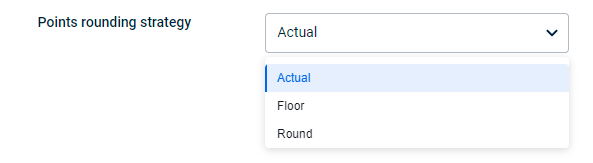
- In the Points rounding strategy, you can choose which points rounding strategy you prefer using from the drop-down list. Points rounding strategy informs how many decimal points to use when allocating points to customers.
-
Actual: Issues the actual number of points as configured in the prorated condition. For example, the customer will receive 19.9 points for the transaction amount of 199, if the points allocation condition is set as 10%.
-
Floor: Evaluate and assign the values without considering the decimal value. For example, assume customers should receive 10% of points for transactions. If a customer has purchased for $199, instead of 19.9 points, the customer will receive 19 points.
-
Round: Determine the number of decimal points you want to support for decimal points. Zero is for no decimal, one is for one, two is for two, and three is for three decimal points.
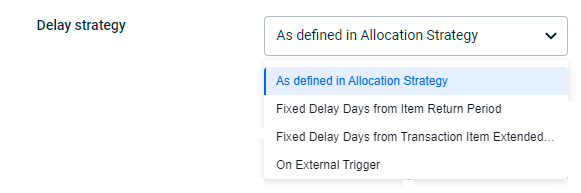
- Select Delay strategy: Following are the different delayed-accrual (or point conversion strategies) that are currently available for the brands to use.
As defined in the allocation strategy: Points are assigned based on the conditions defined in the allocation strategy. If no conditions are defined, points will be directly issued as current points.
Fixed delay days from item return period: Based on the return period configured against the product, issue the promised points as current points once the return period expires. For example, assume for a transaction with a return period of 7 days, the customer is promised to get 1000 points. These promised points will be converted into current points after 7 days i.e. after the return period is over.
- Available only for transaction-based customer activities.
Fixed delay days from the line-item extended field: Based on the value of the line-item extended field that is selected in the drop-down. Say, there is a line-item extended field called "ABC" & this is selected in the drop-down of "delay strategy" during the point allocation action after selecting this delay strategy. Now, say a user made a transaction & the value of this field is arrived as 10. Then the points that are being allocated from that action will have a delayed accrual of 10 days.
- Available only for transaction-based customer activities, and the line-item extended field should mandatorily come from the transaction payload.
On external trigger: Issue points at the event of "transaction add" as promised points and convert them at the event of "transaction update". For example: In hospitals, promised points will be issued immediately when you make a booking and will be converted into current points when the bill is settled.
- Available only for transaction-based customer activities.
Based on the behavioral event attribute : Based on the date that is coming via the attribute of the behavioral event. Assume, there is a behavioral "ABC" that has 3 attributes (X, a date type attribute; Y, a customer identifier attribute; Z, a numerical attribute). During the point allocation from a promotion (that is created based on this behavioral event), if the delay strategy is selected as "Based on the event attribute", then there will be a drop-down where the attribute should be selected. The following are vital points:
- In the drop-down of "delay strategy", only the date type of the attribute of the behavioral event will appear.
- Under the prorate drop-down, only the double-type attributes of the behavioral event will appear.
- If the date coming is a past date as per the event processing date, the conversion will happen on the same day.
- This option will be available only for promotions based on behavioral events.
Following are the accrual strategies available for transaction-based activities:
Following are the accrual strategies available for behavioral event-based activities:
Zero earn condition
In the Zero-earn condition, points are not allocated in the following cases:
-
Bill Number Prefix: When the bill number starts with a prefix defined in the
IGNORE_POINTS_FOR_BILL_NUMBER_STARTS_WITHconfiguration.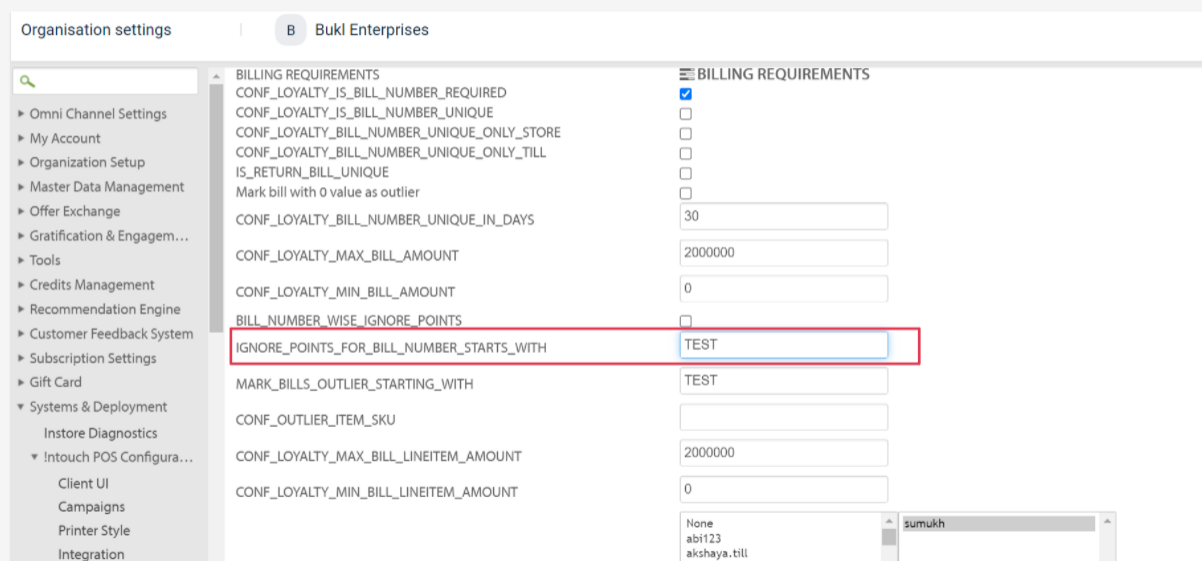
-
Customer Label: When the
BLOCK_POINTS_ALLOCATIONlabel is set for a customer. You can configure this from Organisation settings > Miscellaneous > Customer Status Configuration.
NoteIn these cases, the customer tier will be upgraded if eligible, despite no points being allocated.
Configure communication channel(s)
Mandatory channels
Here you can select the channels through which the communication has to be sent out for sure. Then, configure the message for each channel you select.
NoteLoyalty+ integrates the Central Communications (CCS) Engine. When using actions that support communication, you can send notifications through supported channels like WhatsApp, Zalo, and LINE, in addition to standard SMS and Email.
The following actions support sending communication through the CCS engine:
Issue Currency Action, Issue Coupon Action, Issue Badge Action, Manage Tier Action, Upgrade/Renew Tier Based on Partner Program, Initiate Supplementary Membership, Send Communication Action, Issue Reward Action, Renew Tier Action, Update Customer Status Action, Tag Customer Action, Enrol Member in Loyalty Promotion, Optin Member in Loyalty Promotion
Priority channels
Here, you can set the channels through which the communication needs to be sent out based on the priority and availability. For example, if you set the priority in the order SMS, email, and mobile push, the system will first check if the customer's mobile number is available,
- If available, it will send an SMS communication and ignore the rest.
- If not available, it will check whether the customer has an email ID
- If an email ID is available, it sends out an email notification to the customer.
- If not, it will check if the customer is active through mobile push and process the message accordingly.

Once the priority channels are set, configure the message for each channel.
Upgrade to tier
You can upgrade the tier for the customer based on a tracker value or any specific event value and provide all the privileges of the tier.
To configure the Upgrade to tier action, follow these steps.
- Select Upgrade to tier and click Save.
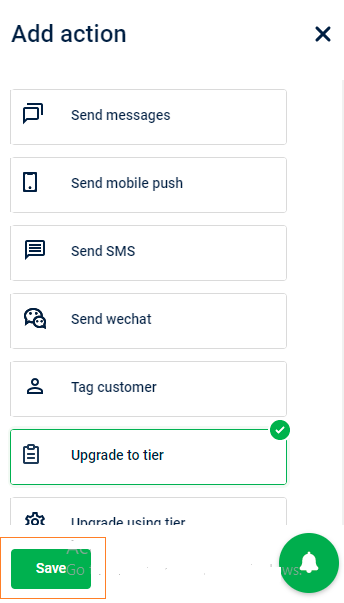
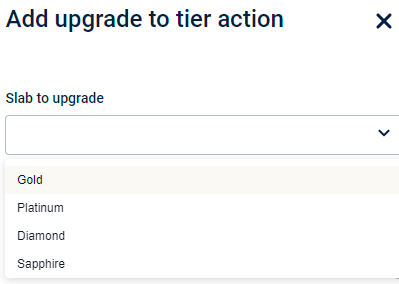
- After you select Upgrade to tier, you will see the following screen.
Hover to Slab to upgrade and choose the desired option from the drop-down.
- Enable Advanced options to define the Upgrade tier validity for the action. This defines the duration for the tier upgrade. Once the validity expires, the customer reverts to their previous tier.
- Select the validity type from the Upgrade tier validity drop down.
The validity types available are as follows:
| Validity Type | Description |
|---|---|
| Specific date | Define a fixed calendar date when the upgraded tier will expire. After this date, the customer reverts to their previous tier. Example: All upgraded tiers will expire on December 31, 2025. Every customer's tier will downgrade automatically on this exact date, no matter when they were upgraded. A customer's upgraded tier expires 30 days after their upgrade date. If they upgrade on June 1, 2025, their tier will end on July 1, 2025. |
| Specific duration | Define the duration after which the upgraded tier will expire. After this duration, the customer reverts to their previous tier. |

- Based on the selected validity type, select the specific date or duration from the Specific duration or Specific date drop down.
The specific date or duration available are as follows:
| Specific date / duration | Description |
|---|---|
| Manually | Define a fixed date or duration when the upgraded tier will expire. Example: All upgraded tiers are set to expire on December 31, 2025. Every customer's tier will automatically downgrade on this date, no matter when they were upgraded. |
| As per transaction extended field | Define a transaction extended field based on which the upgraded tier will expire. The expiry is dynamic and unique to each customer. Example: A customer's tier expires 30 days after their purchase (e.g., if their purchase is on June 1, 2025, their tier expires July 1, 2025). The system retrieves the purchase date from the transaction data to calculate the expiry. |
- Based on the options selected define the tier expiry:
- Specific date and Manually: Select the specific date date for tier expiry in under Select specific date manually
- Specific duration and Manually: Enter the number of days after which the tier will expire under Add specific duration manually.
- Specific date or Specific duration and As per transaction extended field: Select the transaction extended field under the Select transaction extended field drop down. Refer to the documentation for more information on extended fields.
WarningNote
If you set a tier expiry date that is already in the past , the upgraded tier will expire immediately. The customer will not receive the tier upgrade at all, as the expiry date has already passed.
- Enable Award points to enable the criteria to award the points to the customer.

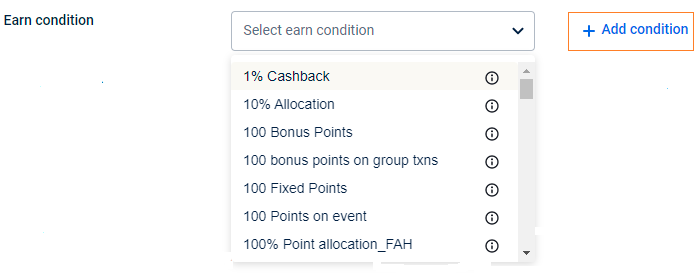
- In the Earn condition, choose the desired condition from the drop-down list.
To create a new condition, click on + Add Condition.
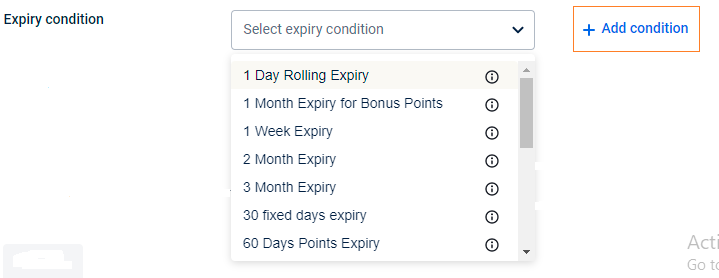
- Select the Expiry condition from the drop-down menu.
To create a new expiry earn condition from scratch, click + Add condition.
- In Prorate on, choose on what basis you want to issue a percentage of points - transaction amount or event value. This is applicable only for prorated points allocation. If bill amount, choose a current event, if tracker, choose current aggregate or previous aggregate.
- Event default value: Choose this to allocate prorated points on the transaction amount.
- Current aggregate: Choose this to allocate prorated points on the value of the tracker post the current transaction.
- Previous aggregate: Choose this to allocate prorated points on the value of the tracker before the current transaction.

- Select the channels through which the communication has to be sent out for sure.
i. Mandatory channels: You can select the channels through which the communication has to be sent out for sure. Then, configure the message for each channel you select.
ii. Priority channels: Here, you can set the channels through which the communication needs to be sent out based on the priority and availability. For example, if you set the priority in the order SMS, email, and mobile push, the system will first check if the customer's mobile number is available,
- If available, it will send an SMS communication and ignore the rest.
- If not available, it will check whether the customer has an email ID
- If an email ID is available, it sends out an email notification to the customer.
- If not, it will check if the customer is active through mobile push and process the message accordingly.
- Click on Save.
Upgrade using tier
You can upgrade customers using the tier conditions when they satisfy a certain condition. It could be regarding the rewards they earned or just a general notification.
To configure the Upgrade using tier action, follow these steps:
- In Action, select Upgrade using tier.

- In User entity, choose Individual to issue points to customers who met the condition.
OR
Choose Group to issue points to the group (Deprecated). - To issue points, enable Award points.
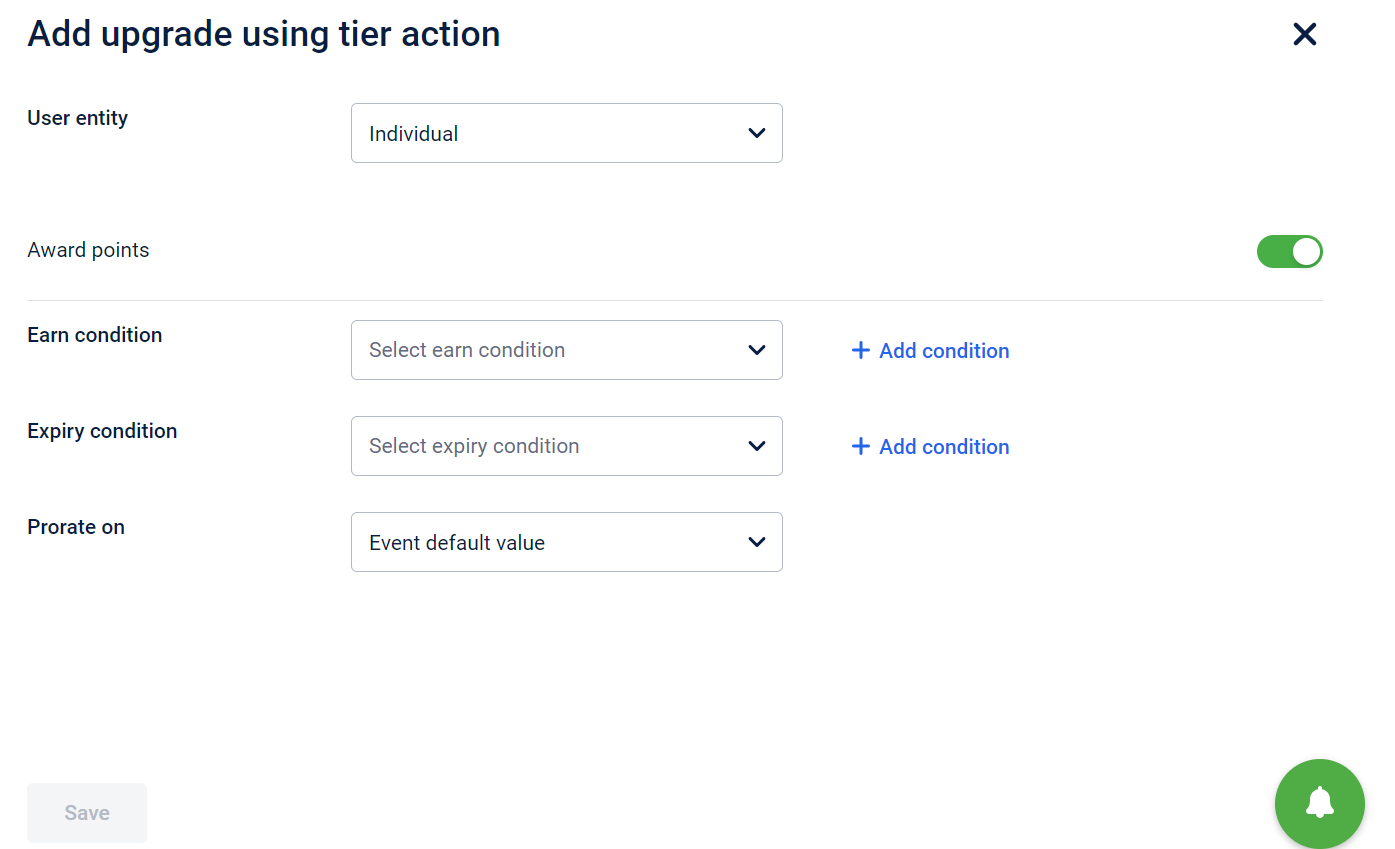
- In the Earn condition, choose the earning condition that you want to associate using the drop-down list.
To create a new condition, click on + Add Condition. - In Expiry condition, choose the expiry for the points using the drop-down list.
To create a new expiry earn condition, click + Add condition. - In Prorate on, choose on what basis you want to issue percentage of points - transaction amount or event value. This is applicable only for prorated points allocation. For bill amount, you can choose the Current event, for tracker, you can choose Current aggregate or Previous aggregate.
- Event default value: Choose this to allocate prorated points on the transaction amount.
- Current aggregate: Choose this to allocate prorated points on the value of the tracker post the current transaction.
- Previous aggregate: Choose this to allocate prorated points on the value of the tracker before the current transaction.
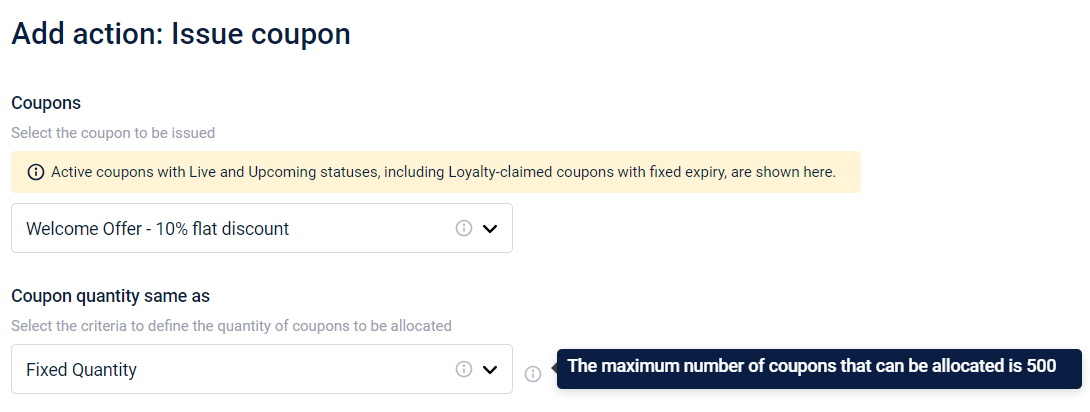
Issue Coupon
This action allows you to issue coupons based on a specific activity.
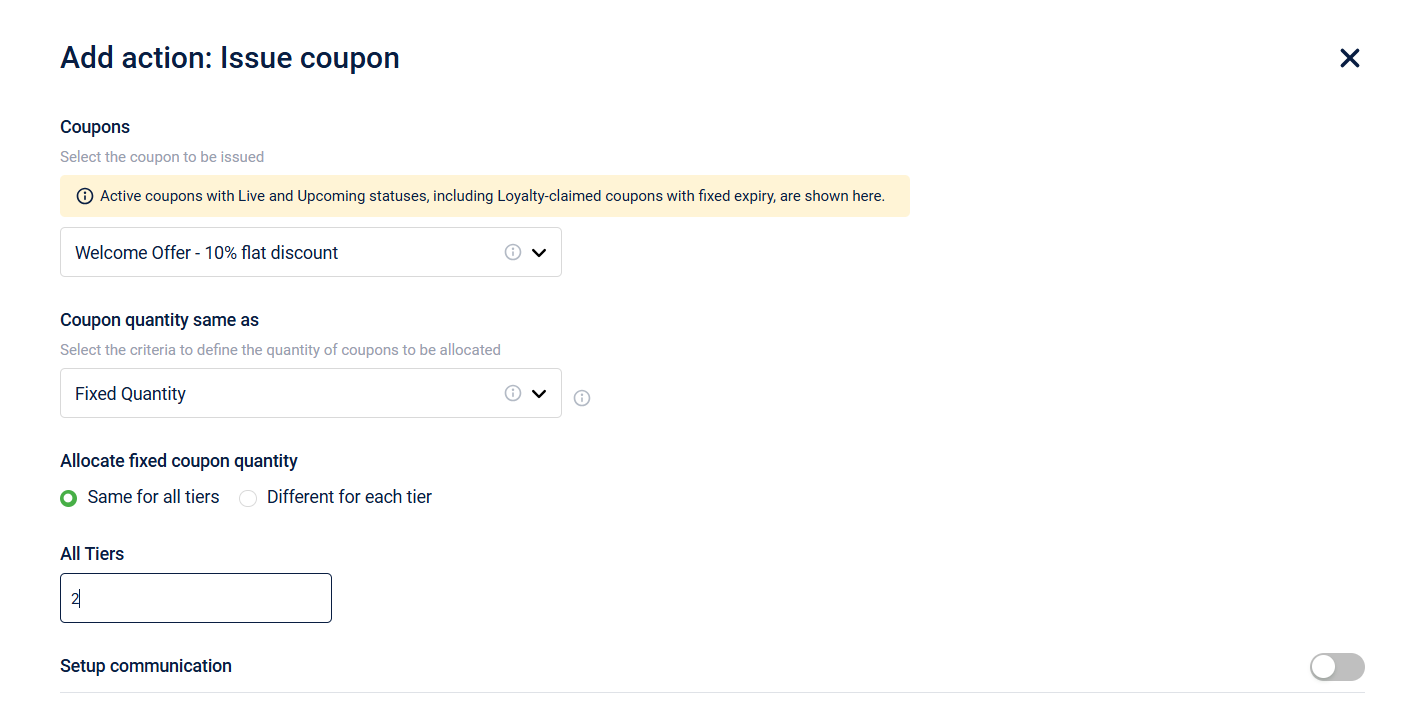
The coupons used here are the ones which are claimed by loyalty in strategies.
Notes
- All quantity values, whether initially provided as integers or decimals, will always be converted to integers. Decimal values will be rounded accordingly. For example, 4.7 will be rounded to 5, while 3.2 will be rounded to 3.
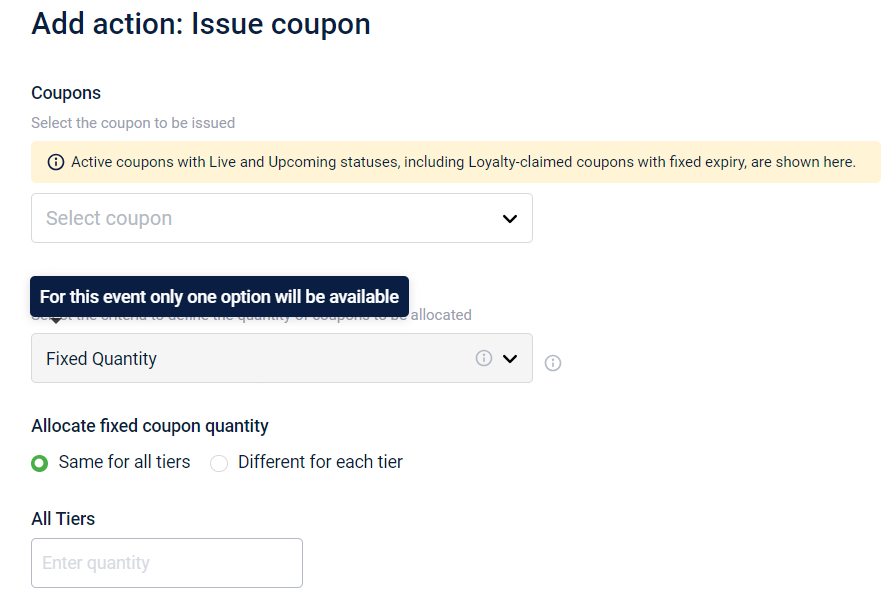
Coupon issue types
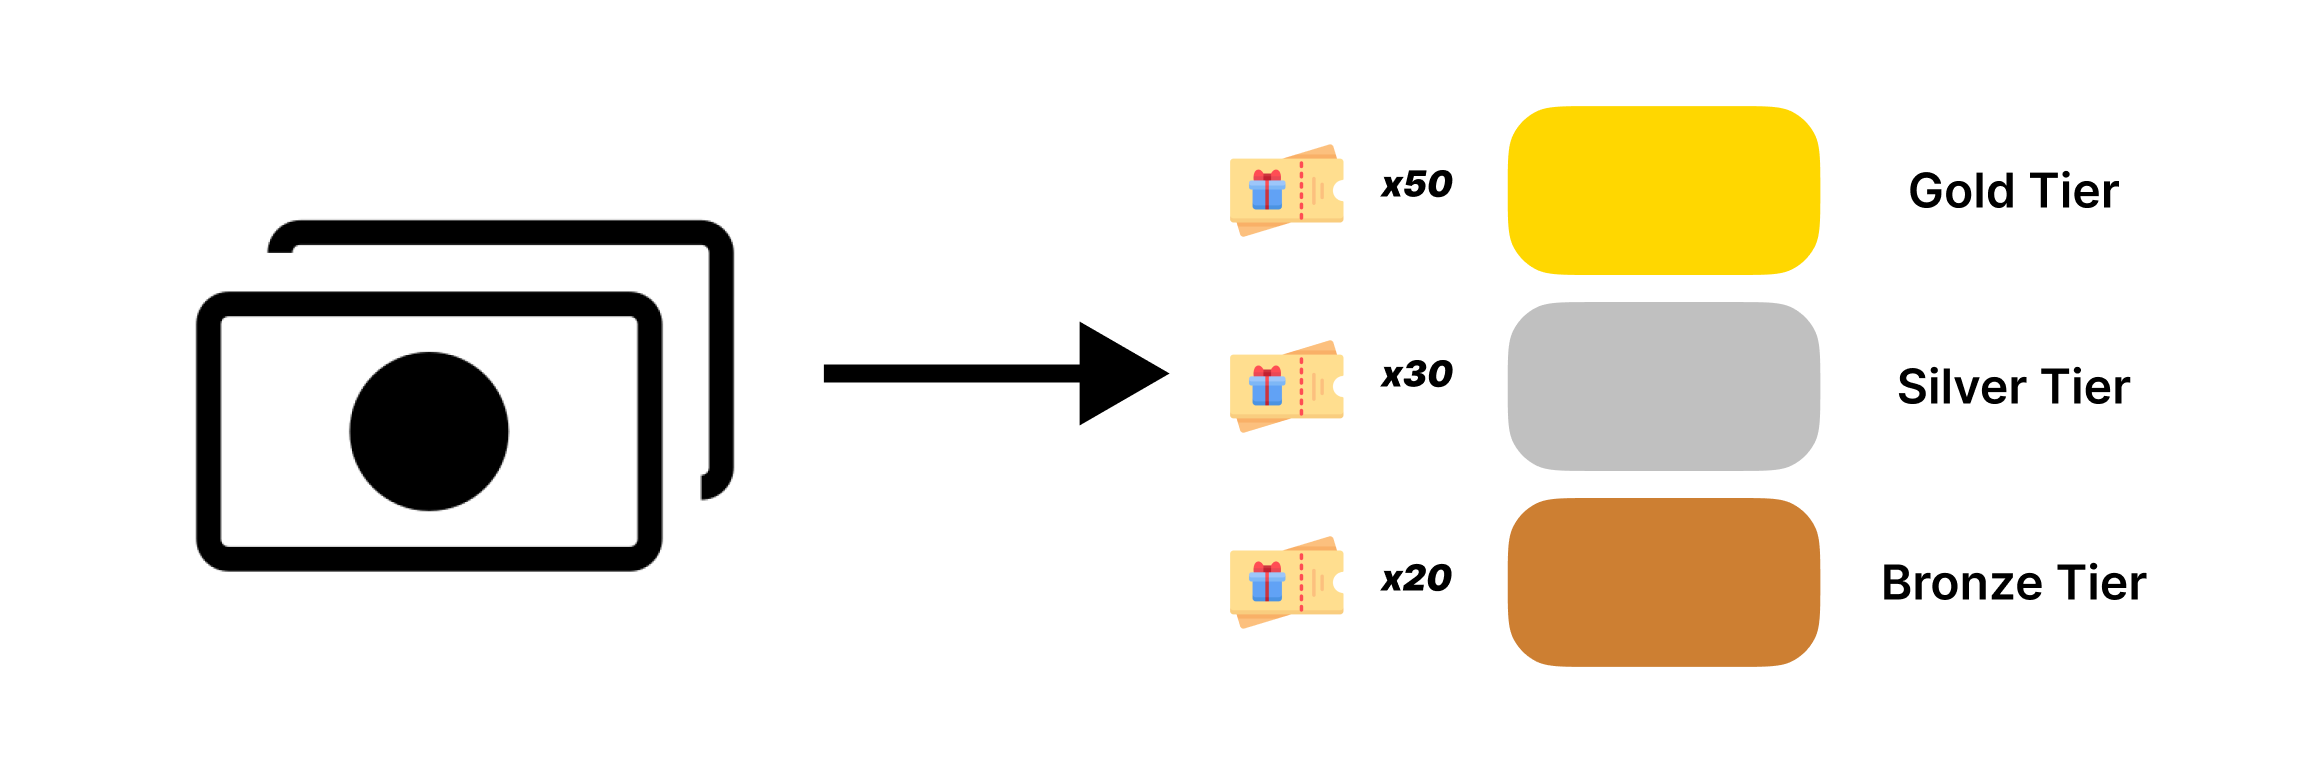
1. Fixed Quantity:
Fixed quantity lets you allocate a predetermined number of coupons either uniformly across all tiers or uniquely for each tier.
Same for all tiers:
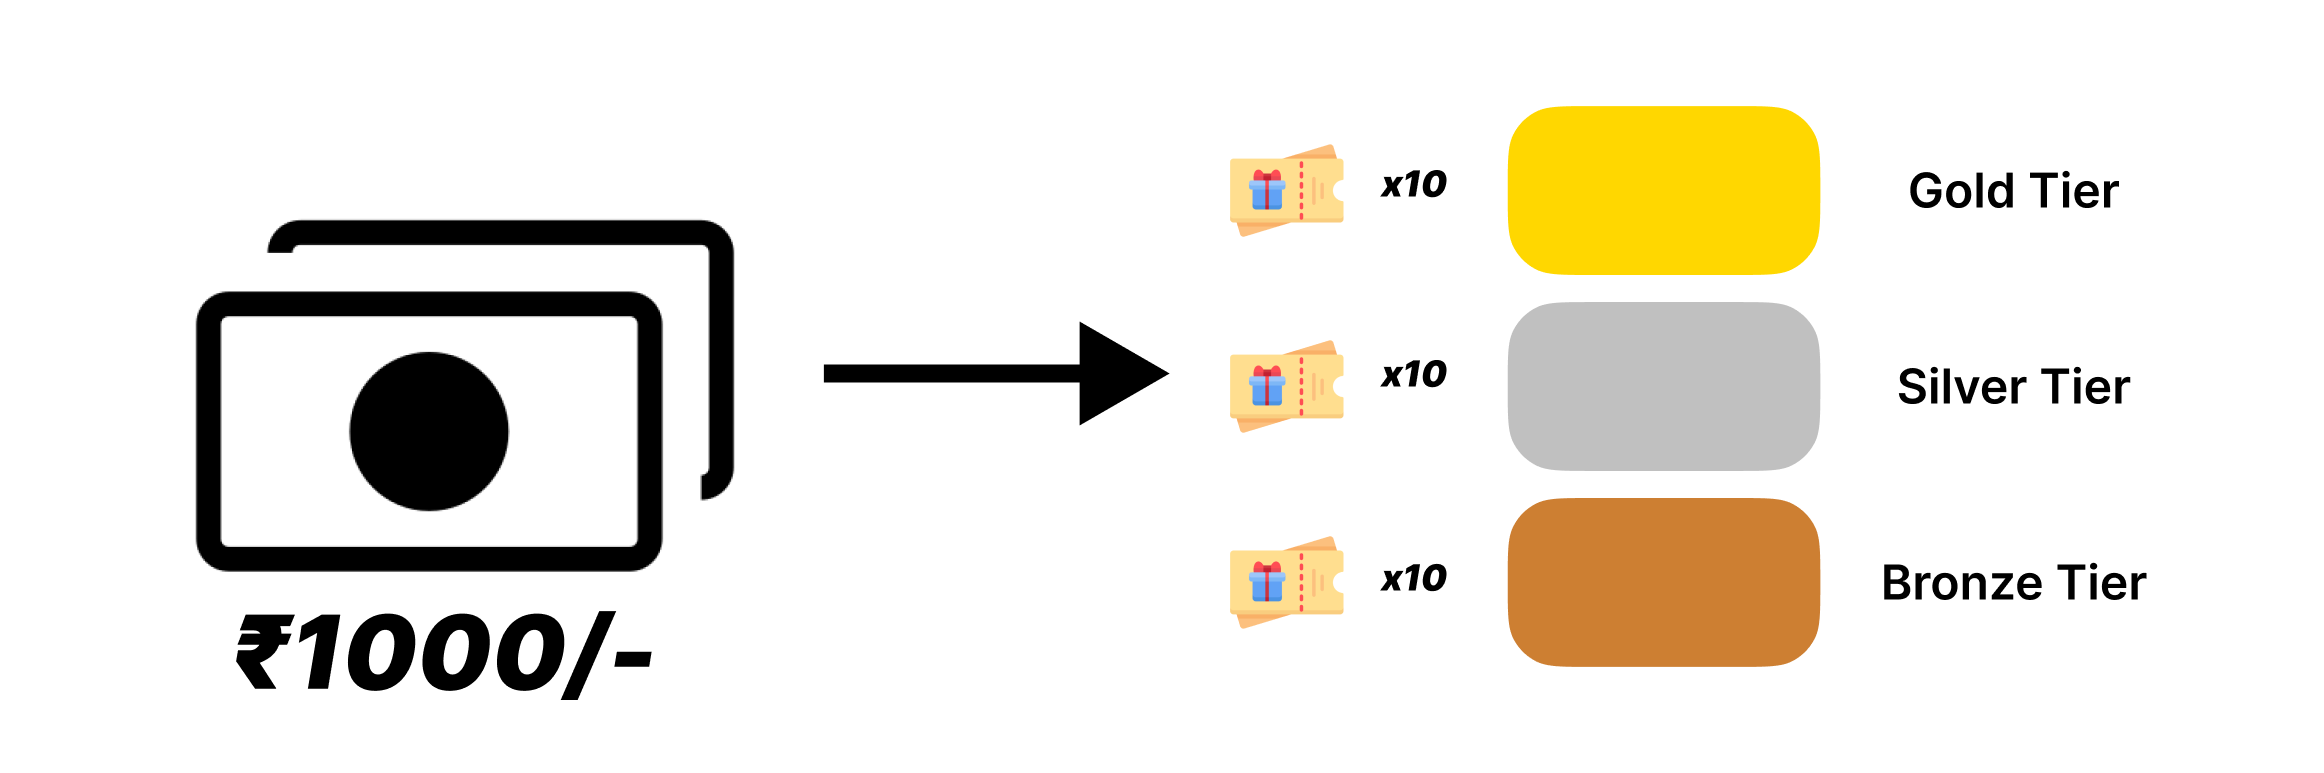
Set a single, fixed quantity of coupons to be issued across all tiers.
For example, if you allocate 10 coupons, each customer, regardless of tier, receives 10 coupons for completing an action.

Different for each tier:
Set a different quantity of coupons for each tier.
For example, Tier 1 customers are issued 20 coupons, Tier 2 are issued 30 coupons, and Tier 3 are issued 50 coupons for completing an action.
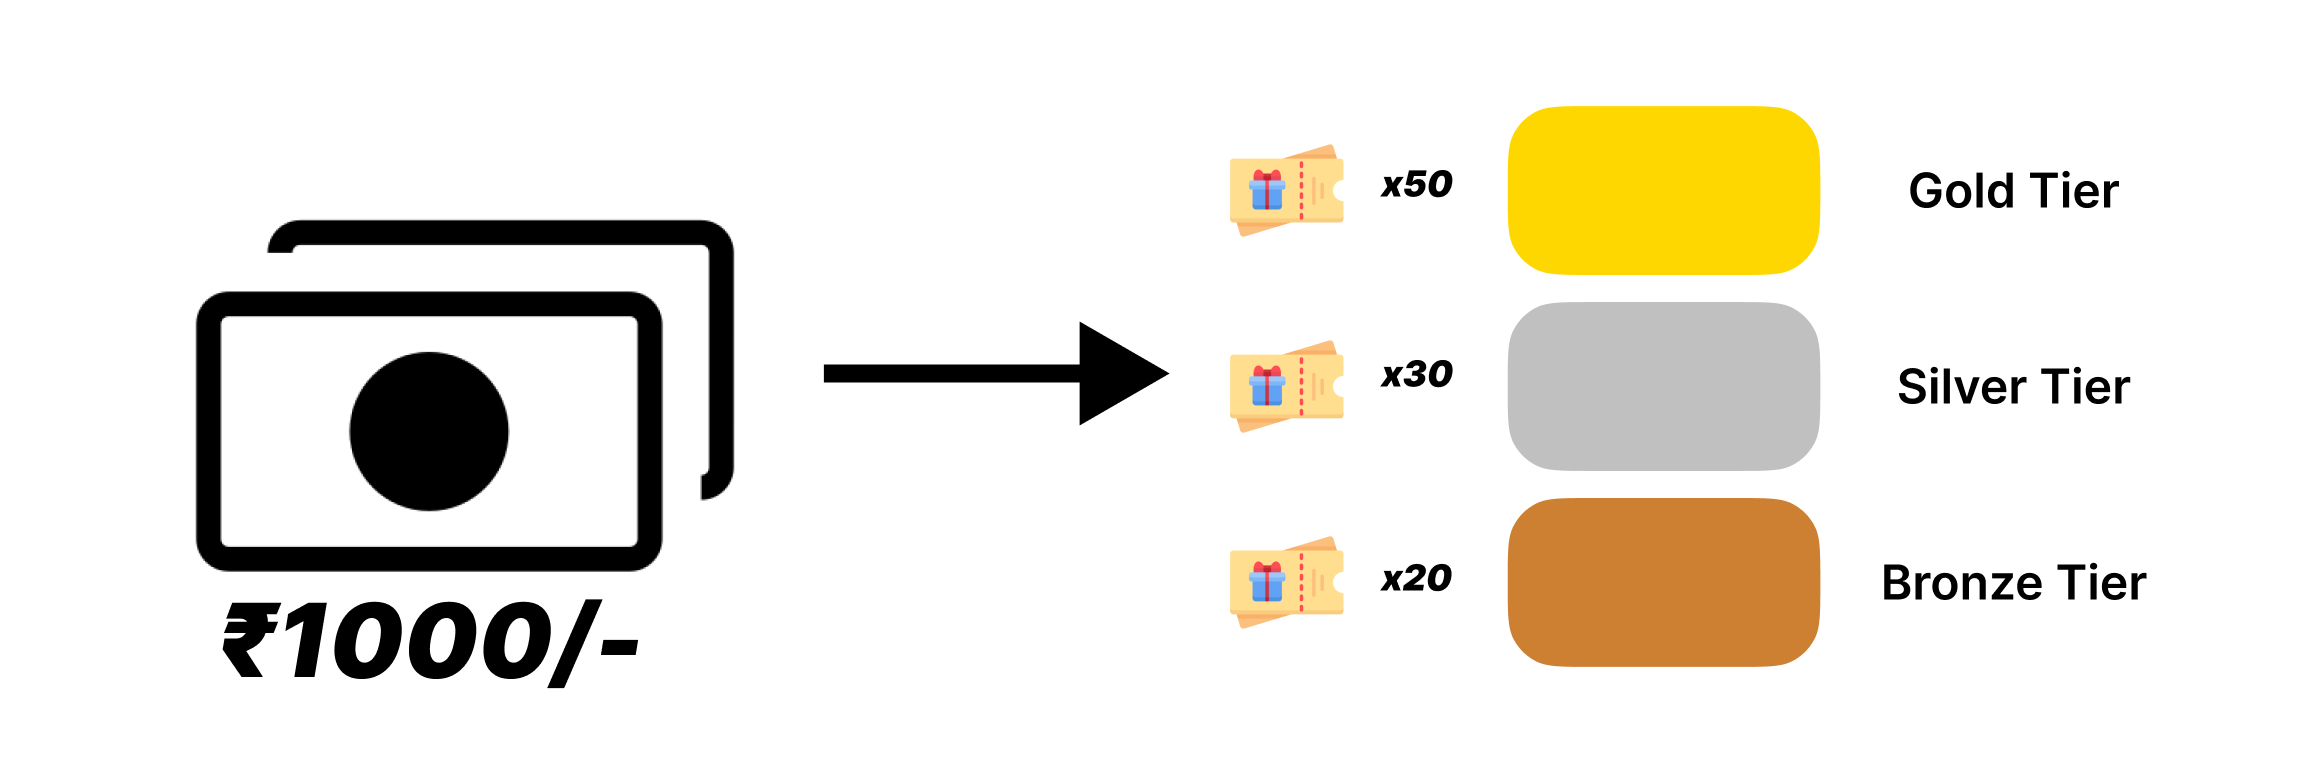
2. Transaction Step Function
The transaction step function dynamically allocates coupons based on transaction amounts, either uniformly across all tiers or uniquely for each tier.
NoteNote:
The Transaction Step Function is triggered only when a Transactional Event is performed by the customer. For all other events Fixed Quantity is supported.
Same for All Tiers:
Set a specific transaction amount and fixed quantity of coupons to issue across all tiers.
For example, for every transaction worth ₹1000, each customer, regardless of their tier, will be issued 10 coupons for completing the transaction.
Different for Each Tier:
Set a specific transaction amount and different quantity of coupons for each tier.
For example, for every transaction worth ₹1000, Tier 1 customers receive 20 coupons, Tier 2 receive 30 coupons, and Tier 3 receive 50 coupons for completing the transaction.
The maximum number of coupon that can be allocated to the customer is 500.
Issue Catalog Reward
You can use the Issue Catalog Reward option to reward customers for specific events. For example, you can issue rewards to customers who register for your loyalty program or, in a health and fitness app, to those who burn 500 kilocalories in a day.
Once you create a reward in Marvel Reward UI, you can issue it based on different events. Rewards can be triggered by:
- Promotions: Customers automatically receive rewards when they join promotional campaigns.
- Milestones: Rewards are issued when customers reach specific milestones, like spending a certain amount or completing a set number of purchases.
- Events: Customers earn rewards by initiating transaction, customer, or measurable behavioral events (with the datatype integer or double).
You can issue rewards through Issue Catalog Reward using the following:
- For milestones, streaks, and behavioural events, use Loyalty Promotions flow.
- For other events, use Loyalty Program workflows.
Follow these steps to issue a catalog reward:
- From the Add Action window, click on Issue Catalog Reward.
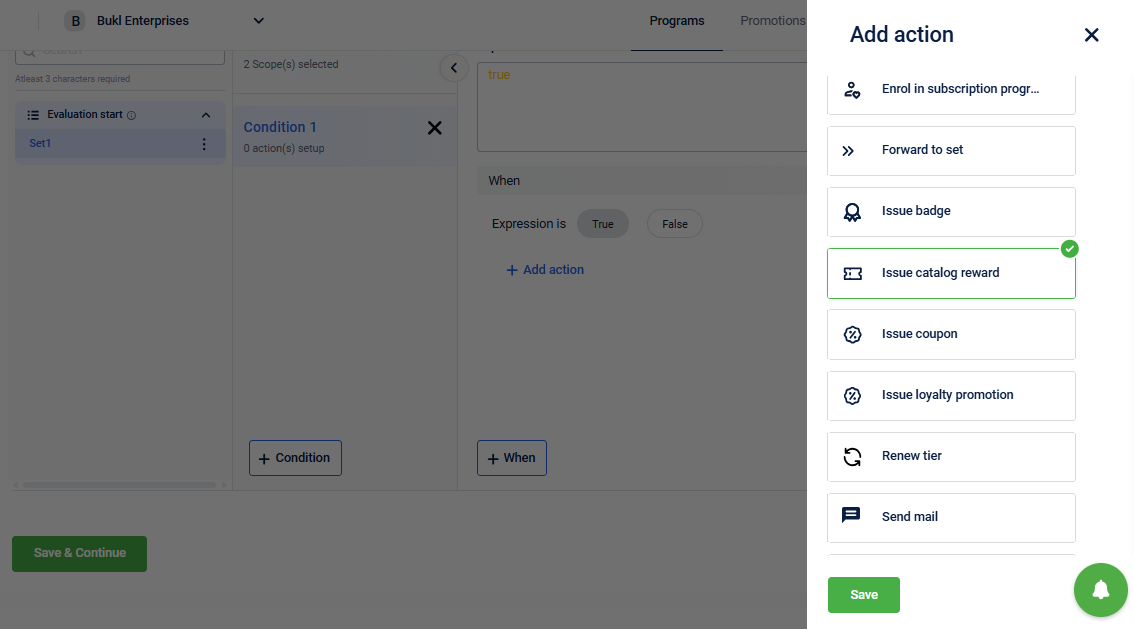
-
Click Save.
The Add action: Issue catalog reward window opens.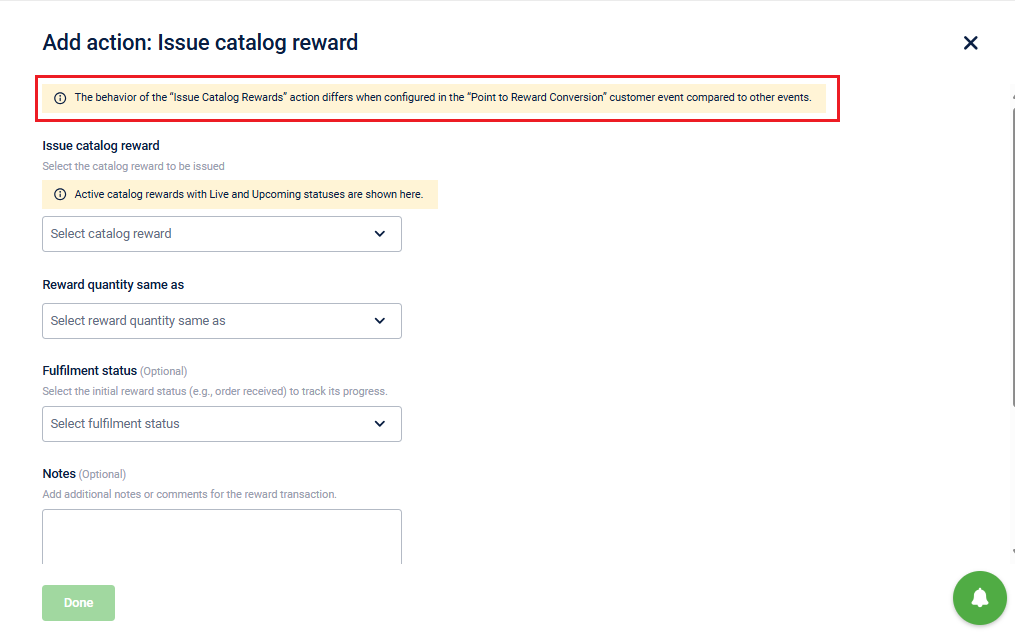
A note appears in the window stating: The behavior of the "Issue Catalog Rewards" action differs when configured in the "Point to Reward Conversion" customer event compared to other events. This means the behaviour of Issue Catalog Rewards differs between the Point to Reward Conversion and other events such as the Customer Registration Transaction Add, Points Redemption etc.
The table below shows the difference in the behaviour of Issue Catalog Rewards action for Customer Registration and Point to Reward Conversion events.
| Aspect | Customer Registration | Point to Reward Conversion |
|---|---|---|
| Reward Quantity | Quantity is defined manually or based on the event. | Quantity is automatically calculated based on the points earned in the event. |
| Reward Calculation | You define how many rewards to issue. Example: 1 reward for registration | The system calculates the reward quantity by dividing the total points by the reward value. |
| Points Requirement | Points may or may not be required for issuing the reward. | Points are required, and rewards are issued based on accumulated points. Example: 1,000 points = 10 rewards if each reward is worth 100 points. |
| Flexibility | You can control the number of rewards issued manually. | The system automatically adjusts the number of rewards based on points earned. |
- Choose the Reward you want to issue from the dropdown.
The active catalog rewards with Live and Upcoming statuses appear here. - Choose one of the following from the Reward quantity same as dropdown:
a. Add Manually
i. Select Add Manually to specify the number of rewards you want to issue to a customer.
ii. In Add manually field, enter the number of rewards.

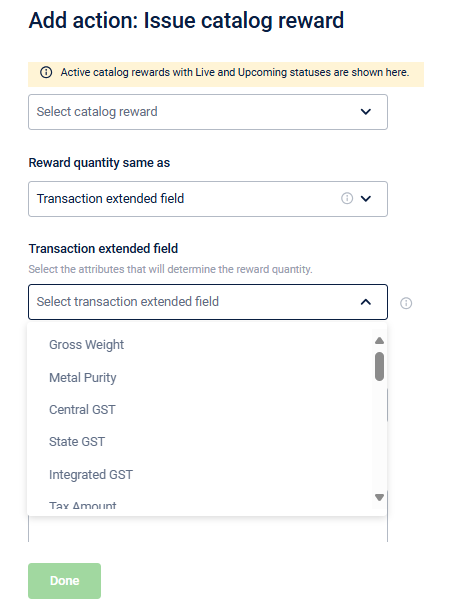
b. Transaction Extended Field
i. Select Transaction Extended Field to set the number of rewards a customer receives based on the value captured by the transaction extended field.
ii. Select the transaction attribute or value that determines the reward quantity using the Select transaction extended field drop-down.
For example, if the transaction extended field Gross Weight value is 50, the system issues 50 rewards.
c. Points Issued on Event
i. Select Points Issued on Event to give rewards based on the points a customer earns during an event.
For example, if a customer earns 10 points during an event, they get 10 rewards. The system uses the points earned to decide the number of rewards.
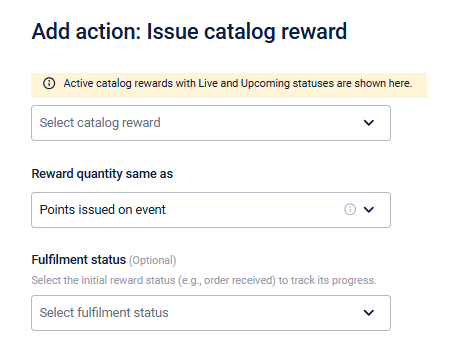
-
(Optional) Choose the Fulfilment status from the drop-down. Fulfilment status allows you to track and assign a specific status to a reward when it is given to a customer. By setting a fulfilment status, you can let the customer know the reward status whether it is
been shipped,is on the way, orbeing processed. -
(Optional) Add additional information about the issuance of the reward under Notes. This information is shared with the vendor responsible for fulfilling the reward.
-
Click on +Reward transaction custom fields. A list of custom fields available for the organisation is displayed. These are the customer fields created for the Reward (using scope ISSUE_REWARD when using API) and allow you to send extra information, such as customer details or specific requirements when issuing a catalog reward. This feature is useful when passing data to a vendor who will fulfil the reward.
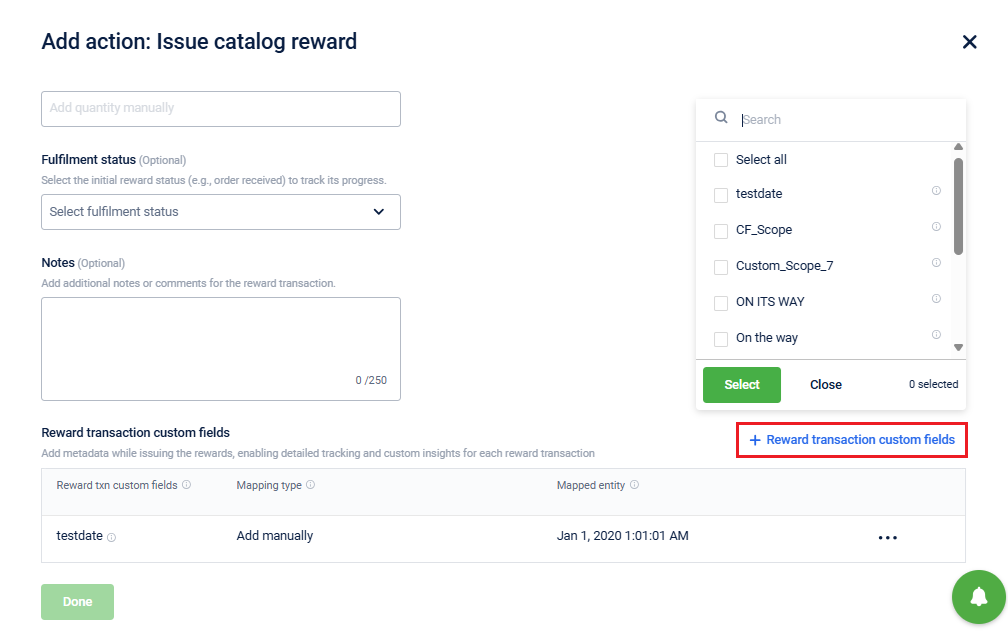
-
Select the required custom fields by checking the box or use the Search option to find it, then click Select. The selected custom fields are displayed.
-
Select a mapping type from the Mapping type drop down.
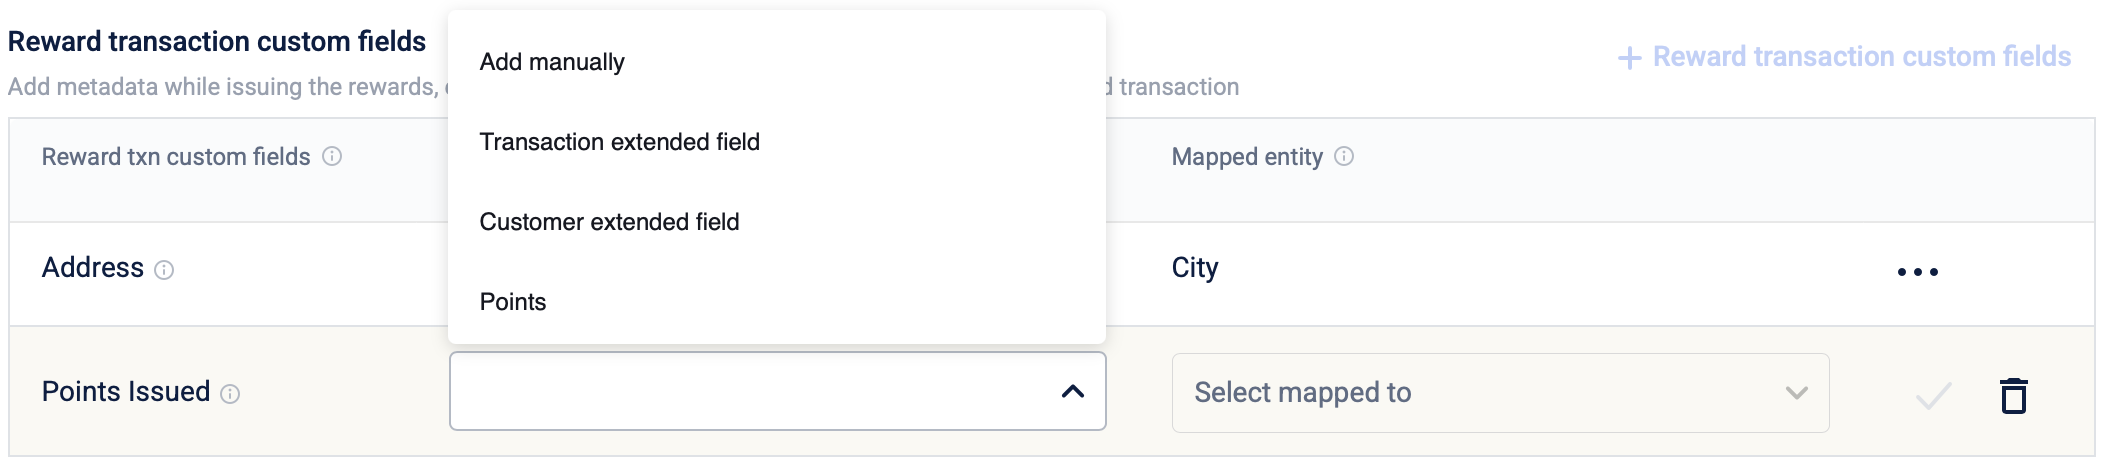
| Mapping type | Description | Example |
|---|---|---|
| Add manually | Manually include extra information in a reward transaction by entering it directly into the Mapped entity field. | A brand wants to tell the vendor to issue a reward 10 days after the customer qualifies. To do this, the brand selects a custom field such as Reward Instructions and manually enters the message, "Issue reward after 10 days." This message is then shared with the vendor as part of the reward request. |
| Transaction extended field | Include transaction-specific information in a reward transaction through the corresponding transaction extended field. | A brand wants to share the GST number from a customer's transaction with the vendor. To achieve this, the brand selects a custom field like Transaction Details and maps it to the GST Number transaction extended field. The system automatically pulls the correct GST number for each transaction and includes it in the information sent to the vendor. |
| Customer extended field | Include customer-specific information in a reward transaction through the corresponding customer extended field. | A brand wants the vendor to send the reward to the customer's communication address. To enable this, the brand selects a custom field such as Shipping Address and maps it to the Address customer extended field. The system then retrieves the correct address for each customer and includes it in the reward request sent to the vendor. |
| Points | Include information on points issued to the customer so far. Notes: • The points mapping type is specific to custom fields of type integer. • The points mapping type is mapped to the points issued on the event so far and not the total number of points issued for the entire event. | A brand wants to issue cashback equal to the number of points a customer has earned so far in a campaign. To do this, the brand selects a custom field like Cashback Amount and maps it to the Points Issued on Events So Far event field. The system then retrieves the correct points total (for example, 300 points) and makes that value available to downstream systems, which convert it into a $3.00 cashback payment and send it to the customer along with their reward. |
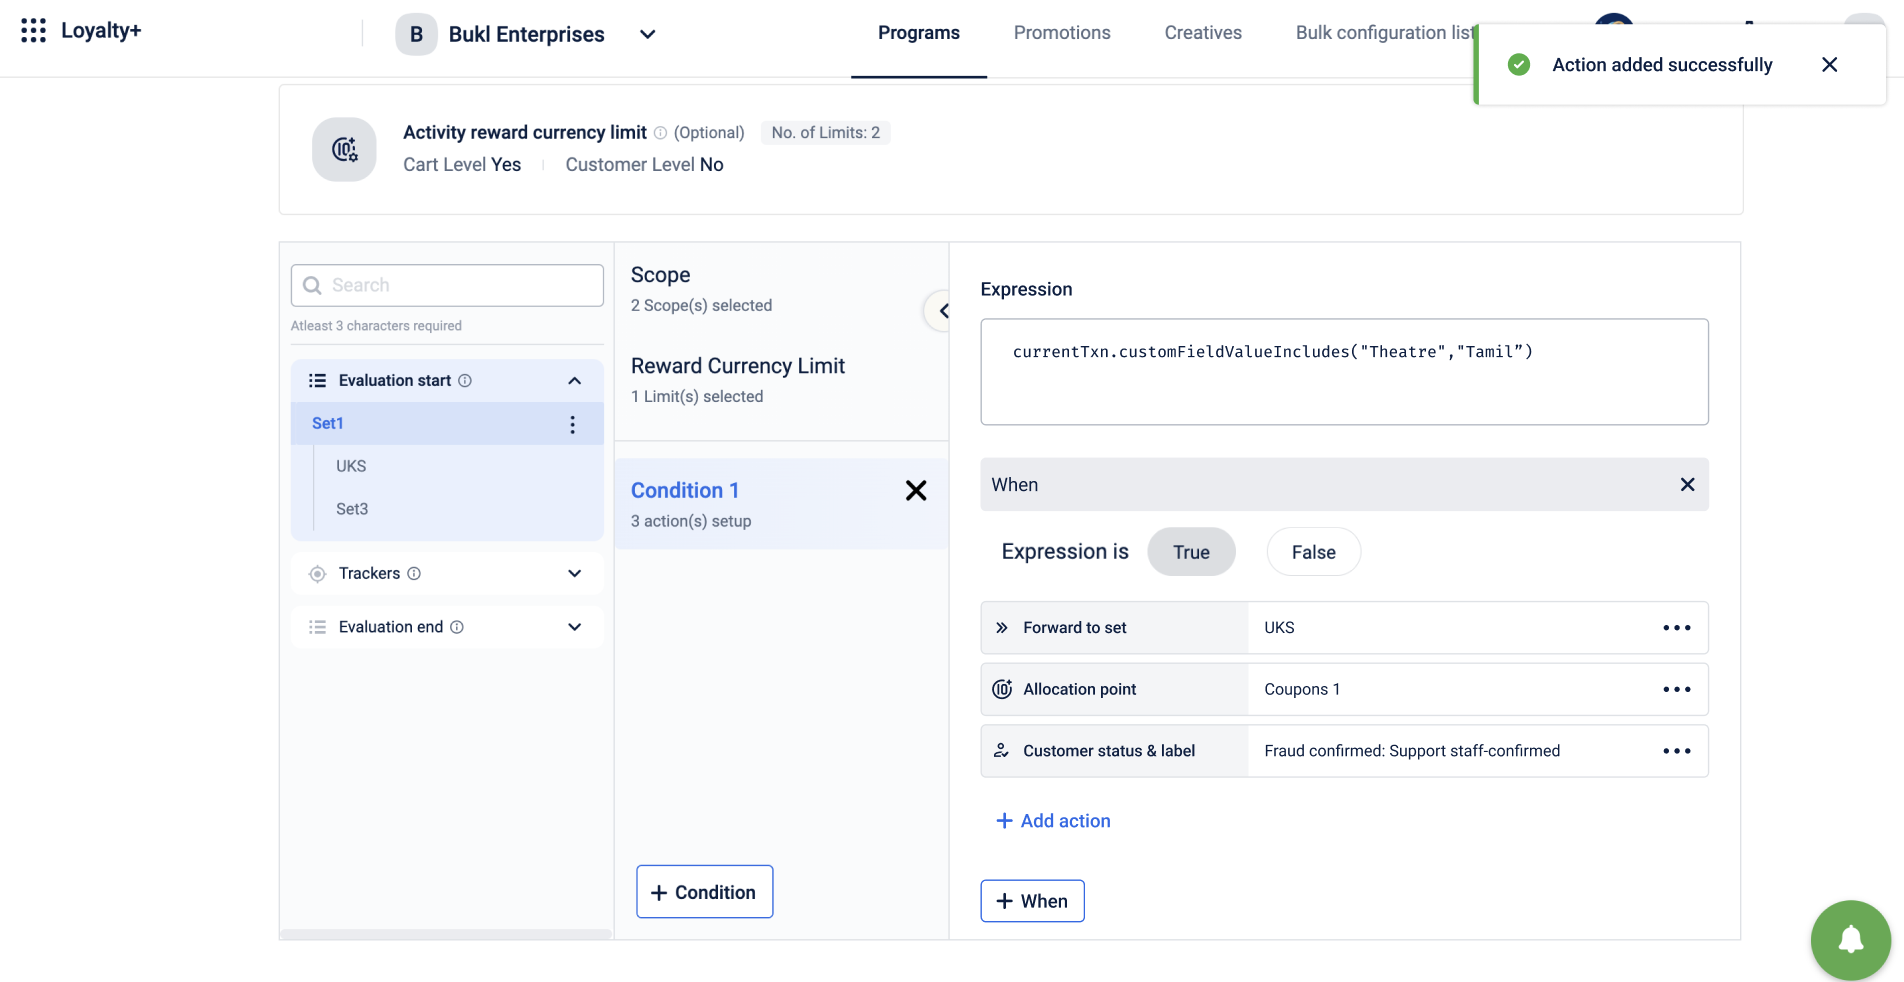
Customer status & label
This action lets you configure the "customer status & label" for your customers directly from the workflows. This action will be available in both the loyalty programs & loyalty promotions.
For example:
- If you want to change the "label" of all the customers who made transactions worth more than 10,000 as "high-value", it can be done with this action directly from workflows.
- If you want to change the "label" of all the customers who made more than 5 returns to "suspecting", it can be simply done with this action.
To use this action, do the following steps. Go to workflow -> action, and there you'll find:
An action "change customer status & label"
Now select the status & label you want to configure. Note that, the label is unique across status. This means that, when you are selecting the label, you are selecting the status also.
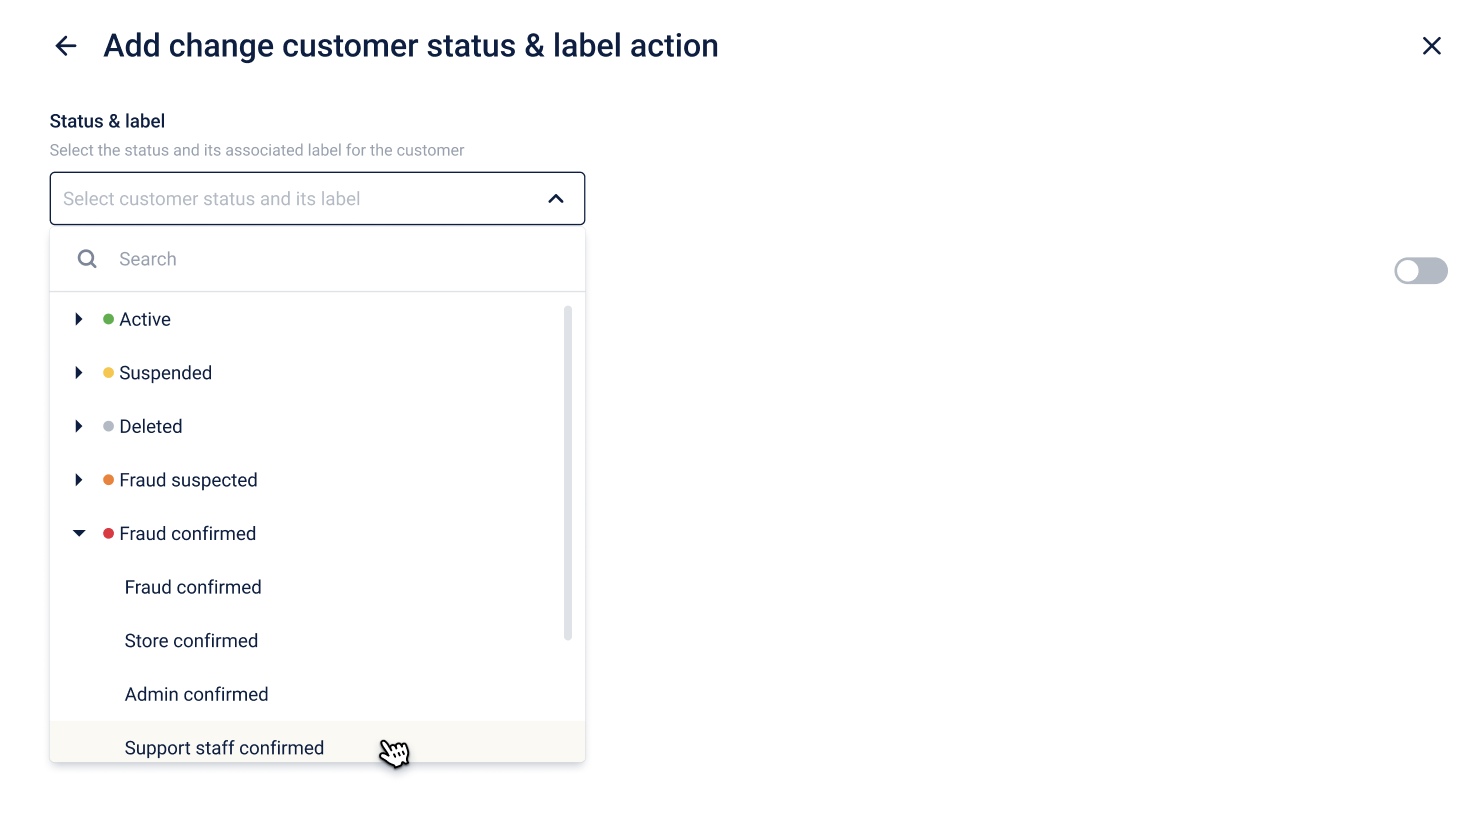
You'll find that configured action in the display once it is done.
In this way, you can change the status & label of your customers directly from workflows.
Promised alternate currency conversion
This action allows you to allocate promised points in alternate currencies (e.g., "Gold Coins," "Travel Miles") to customers during specific transactional events. These points are "promised" (not immediately usable) and convert to the actual alternate currency after a delay or based on configured rules. This action is supported only for the TransactionUpdate customer activity.
Example: Reward customers with 50 promised "Travel Miles" after a flight booking update, which convert to actual miles 30 days later if there are no cancellations.
To enable this action for your loyalty program follow these steps,
- Select the loyalty program where you want the action to apply.
- Select Edit Program.
- Go to the Workflows section in the loyalty program.
- Change the Customer Activity to Updates a transaction.
- Select the Condition where you want the action to apply. To create a new Condition, select + Condition
- Select +When to define a new condition.
- Define the conditions in the Expression field if required.
- Select + Add action to add a new action.
- Select the Promised <alternate currency name> Conversion action.
- Select the User entity and Date of conversion to regular points for the action.
The fields are as follows:
| Fields | Description |
|---|---|
| User entity | Select the user entity to apply the action. <br> • Individual: The action is triggered when transactions are updated for an individual customer. <br> • User Group: The action is triggered when transactions are updated for a user group. |
| Date of <Alternate Currency Name> conversion to regular points | Select when the promised alternate currencies are converted to redeemable alternate currencies. <br> • Immediately: The promised alternate currencies are converted to redeemable alternate currencies immediately on issuance. <br> • Date defined by item return period: The promised alternate currencies are converted to redeemable alternate currencies after the return period for the purchased items has expired. |
- Select Save to save the changes made to the action.
- Select Save and Continue to save the changes made to the workflow.
- Select Publish changes to publish the changes.
Tier upgrade and downgrade when converting promised alternate currencies
If a loyalty program is set up to upgrade or downgrade a customer based on the number of alternate currencies they currently possess, then the promised alternate currency conversion action will influence the tier upgrade or downgrade for that customer.
For example:
A brand has configured their loyalty program tiers that track two alternate currencies (gold coins and silver coins) as:
Tier 1: The customer has less than 50 gold coins and less than 50 silver coins.
Tier 2: The customer has more than 50 gold coins or more than 50 silver coins.
Tier 3: The customer has more than 50 gold coins and more than 50 silver coins.
Scenario 1: Gradual Upgrade
Day 0 – Transaction with Promised Coins:
The customer earns 60 promised gold coins and 30 promised silver coins.
Tier Status: Remains Tier 1 as promised coins don’t count immediately.
Day 7 – Conversion:
Promised coins convert to regular coins.
Now, the customer has 60 regular gold coins and 30 regular silver coins.
Tier Status: Upgraded to Tier 2 because at least one coin type (gold) is over 50.
Day 8 – New Transaction (Mixed Rewards):
The customer earns 60 regular gold coins and 30 additional promised silver coins.
Tier Status: Still Tier 2, because while the gold remains above 50, the new silver coins are still promised.
Day 15 – Full Conversion:
All coins are now regular.
The customer has 60 regular gold coins and 60 regular silver coins.
Tier Status: Upgraded to Tier 3 since both gold and silver are above 50.
Scenario 2: Cancellation Impact
Day 0 – Transaction with Promised Coins:
The customer earns 60 promised gold coins and 30 promised silver coins.
Tier Status: Remains Tier 1 as promised coins don’t count immediately.
Day 5 – Cancellation:
The silver transaction is canceled.
Now, the customer has 60 promised gold coins and 0 promised silver coins.
Tier Status: Stays in Tier 1 because the cancellation leaves the customer with no silver coins.
Day 7 – Conversion:
The 60 promised gold coins convert to 60 regular gold coins.
The customer now has 60 regular gold coins and 0 regular silver coins.
Tier Status: Remains Tier 1 since the silver is still below 50.
Points redemption reversal
This action returns previously redeemed points to the customer’s account if they choose not to use them for a transaction, or if the transaction is returned or canceled. It is only applicable for the Redeemed points get reversed customer activity.
Example: A customer spends 20 points to get a discount voucher but later changes their mind and wants to cancel it. The Points Redemption Reversal action lets the 20 points be returned to the customer in this case.
To enable this action for your loyalty program follow these steps,
- Select the loyalty program where you want the action to apply.
- Select Edit Program.
- Go to the Workflows section in the loyalty program.
- Change the Customer Activity to Redeemed points get reversed.
- Select the Condition where you want the action to apply. To create a new Condition, select + Condition
- Select +When to define a new condition.
- Define the conditions in the Expression field if required.
- Select + Add action to add a new action.
- Select the Points redemption reversal action.
- Select the User entity and Expiry condition for the action.
The fields are as follows:
| Fields | Description |
|---|---|
| User entity | Select the user entity to apply the action. <br> • Individual: The action is triggered when transactions are updated for an individual customer. <br> • User Group: The action is triggered when transactions are updated for a user group. |
| Expiry condition | Defines the conditions in which the reversed points will expire. For more information on this feature, click here. |
- Select Save to save the changes made to the action.
- Select Save and Continue to save the changes made to the workflow.
- Select Publish changes to publish the changes.
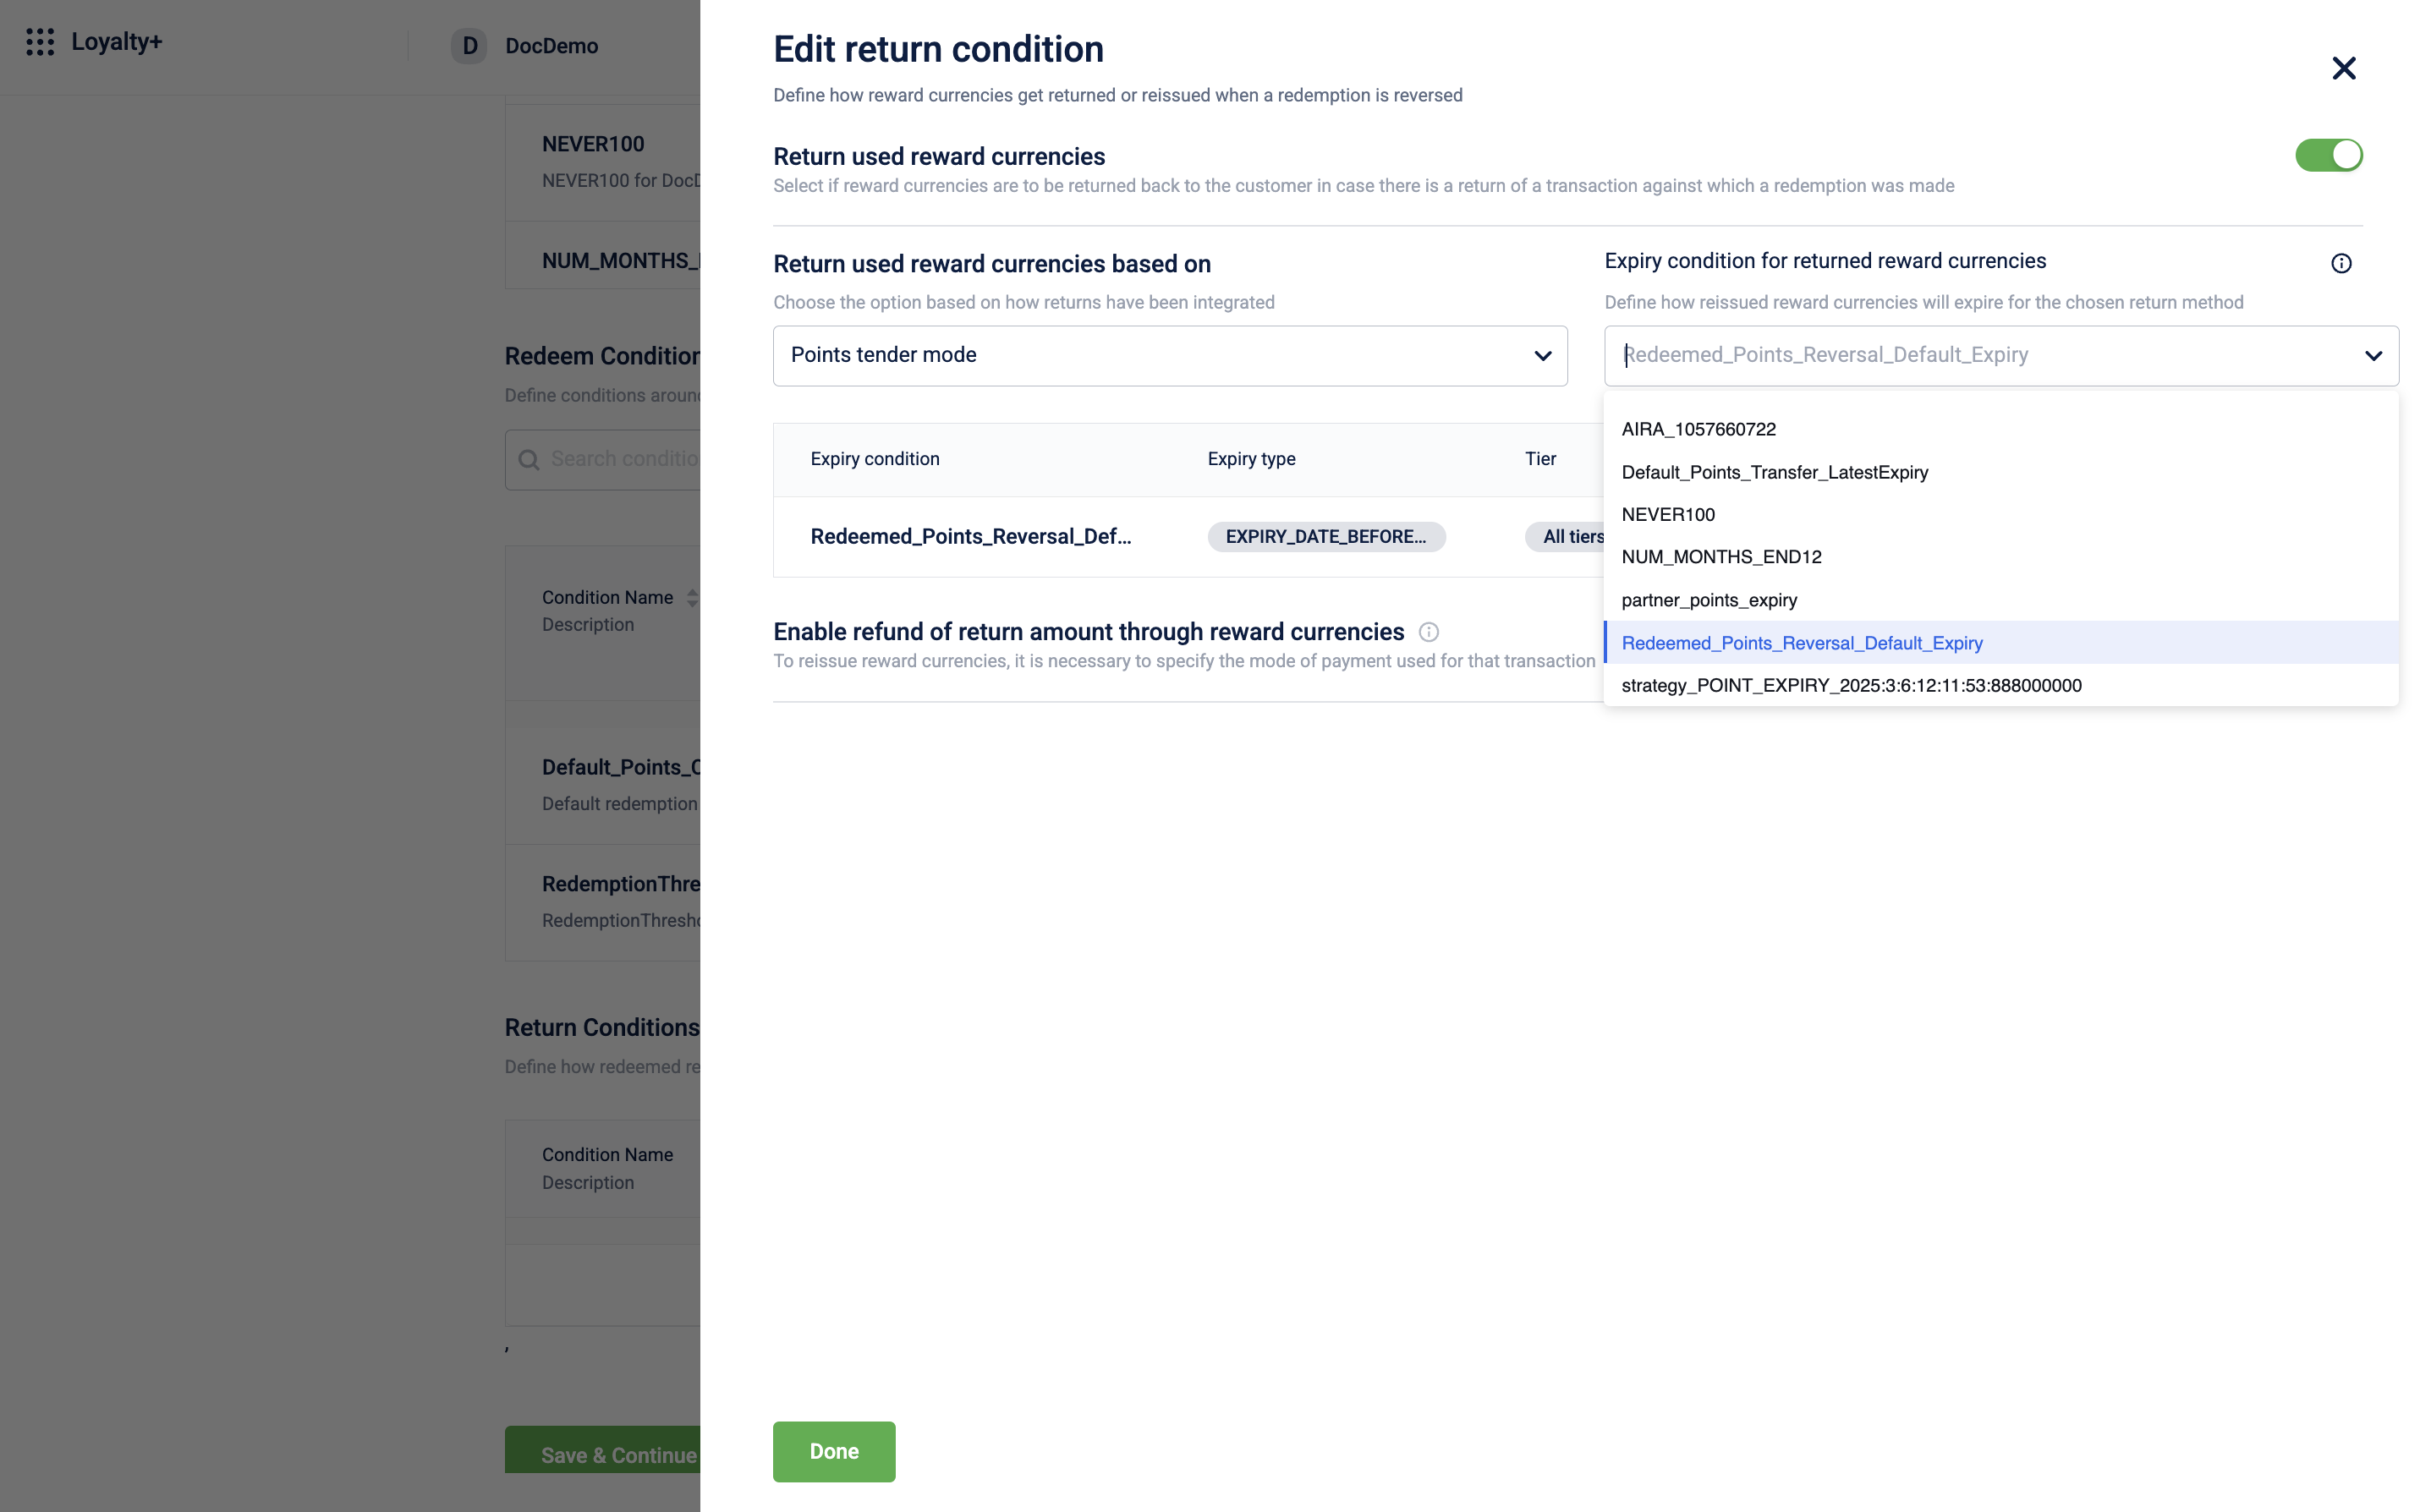
Reversal of expired redeemed points
The system does not return points that have already expired when you reverse a redemption using the Redeemed_Points_Reversal_Default_Expiry return condition. If the original expiry date has passed, those expired points are not credited back to the customer.
For example, a customer redeems 1,000 points on April 28. Of these points, 300 expire on April 30. If the customer reverses the transaction on May 5, the system returns only 700 points because the other 300 have expired.
To have all expired points returned, choose a different return condition.
Updated about 2 months ago