
Configure Streaks
Accessing streaks
AttentionBy default, Streaks is not enabled for the orgs. To enable, contact your CSR.
- Login into the homepage of the org where you want to create streaks
- Click on the "profile" icon on the top-right corner.
- Click on the "Organization settings".
- Search for "Streaks", that's it. You'll be taken to the home page of the streaks.
Streaks home page
This is how the Streak home page appears.
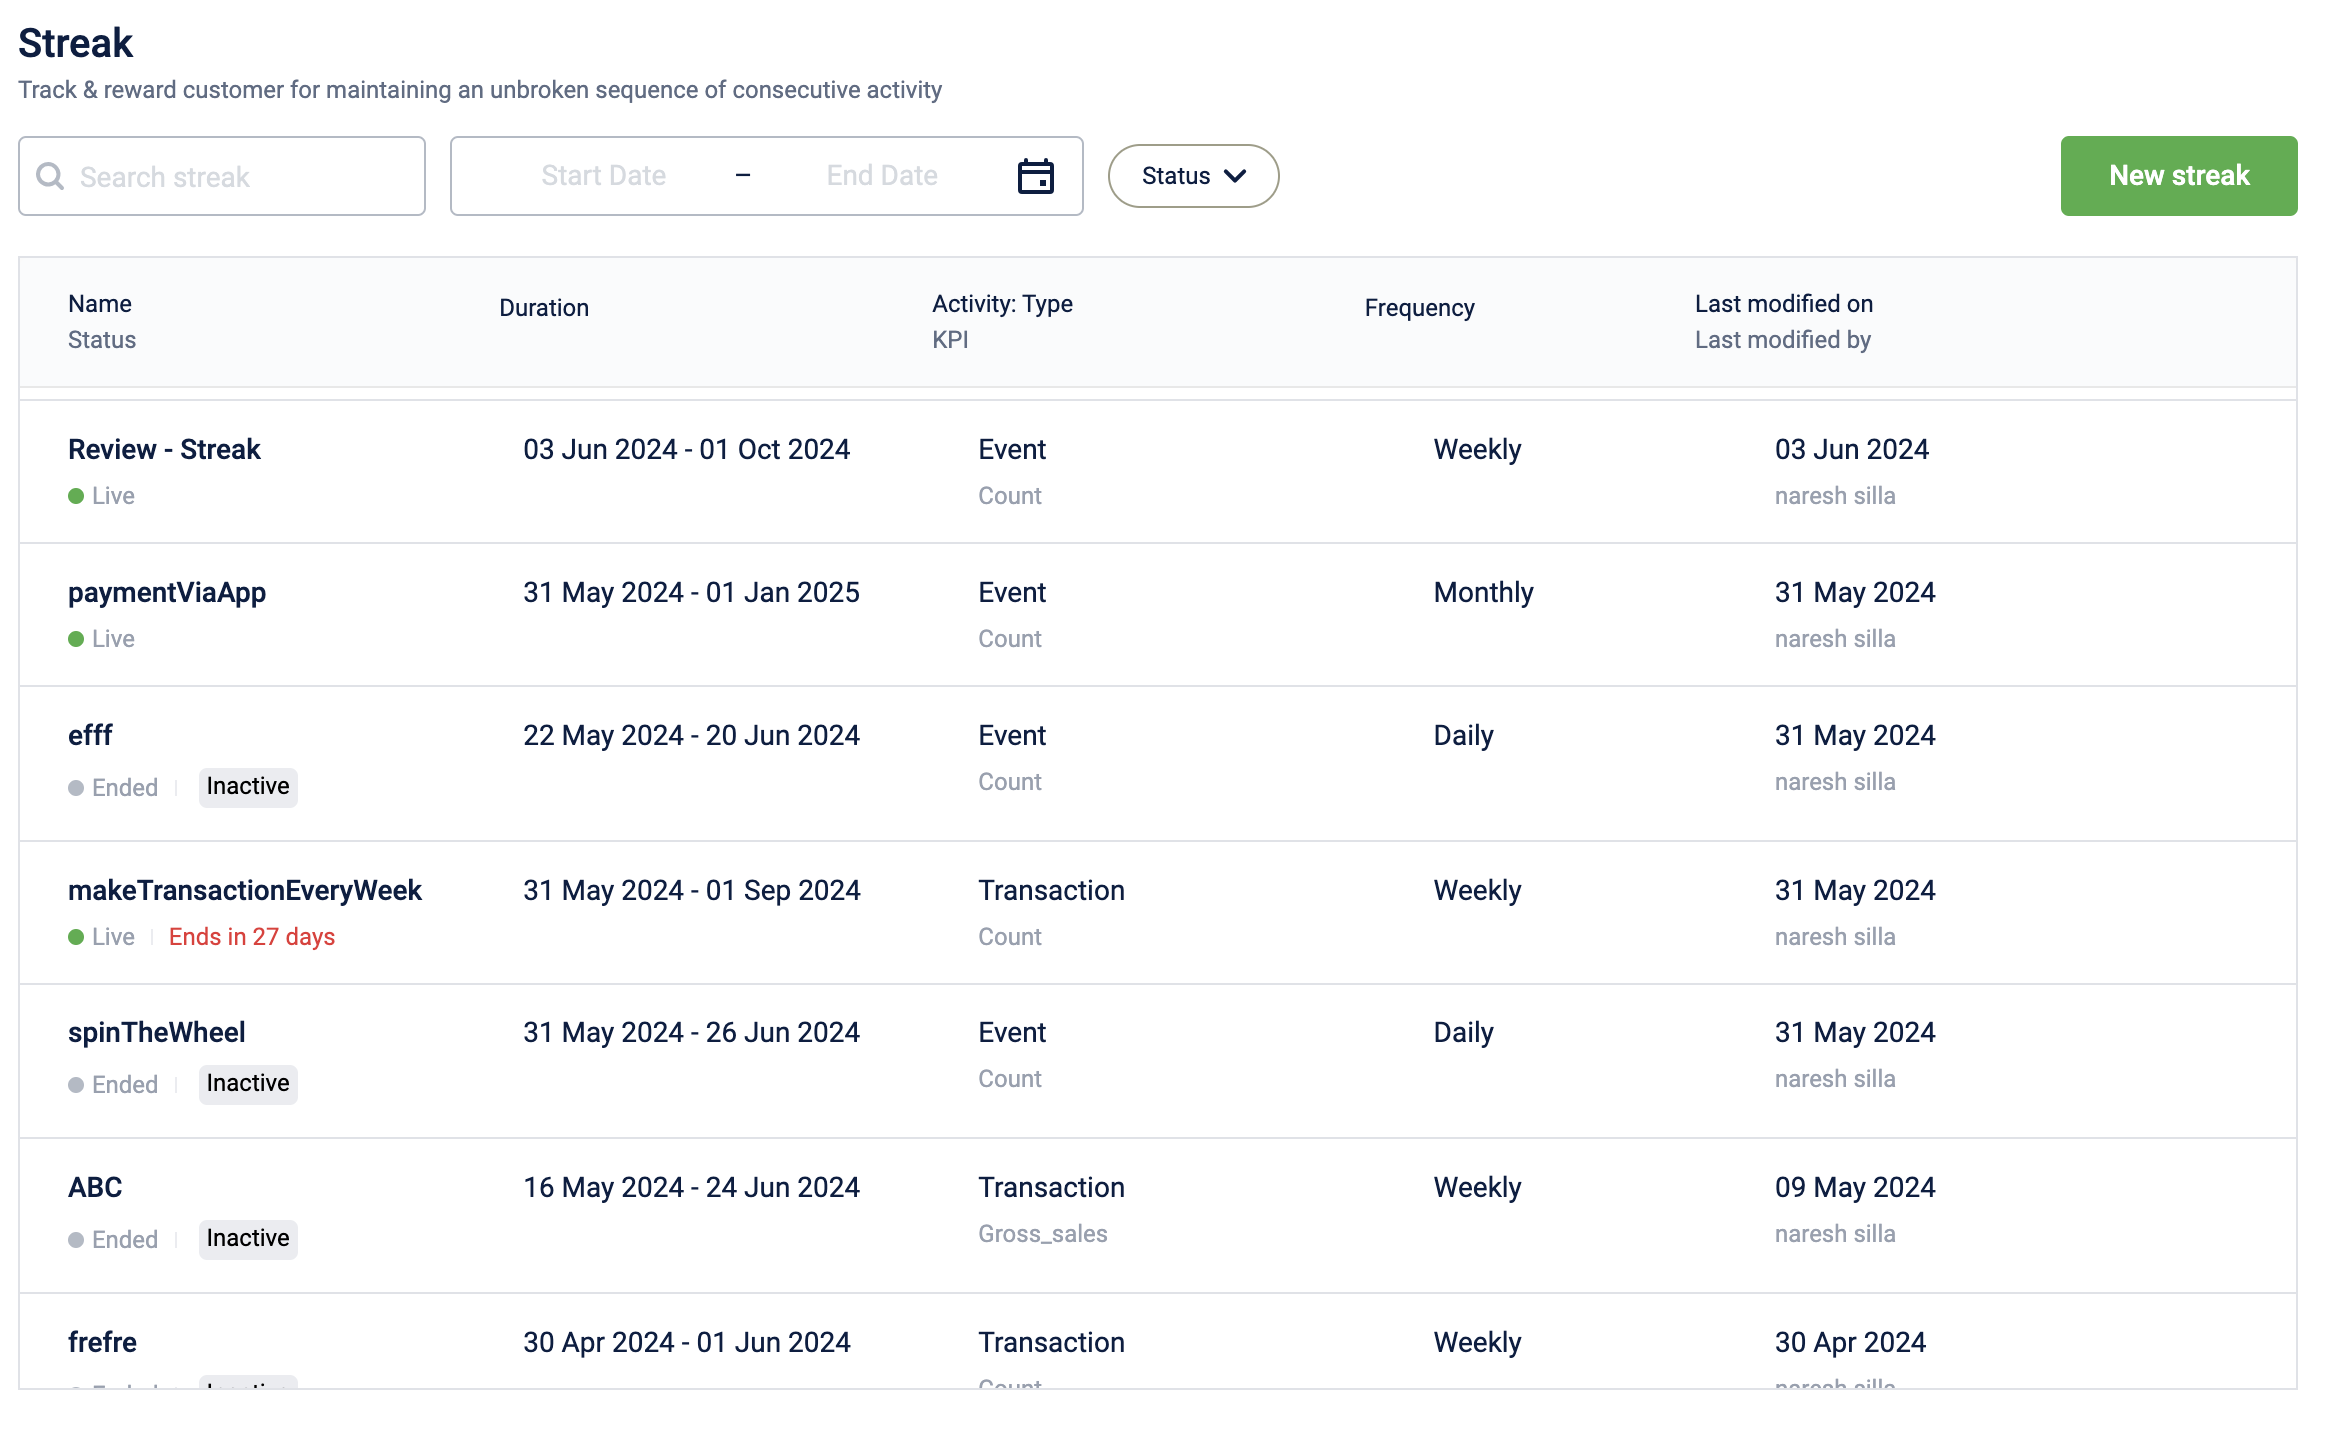
This is the Streaks landing page, where all existing streaks are visible. Brands can search for a specific streak using the following criteria:
- Name of the streak
- Duration of the streak: Brings all the streaks that are falling in the given start & end date.
- Status of the streak: There can be 2 types of status
- Timeline based: Live, Upcoming, Ended
- Activity-based: Active, Inactive
This landing page also provides the following capabilities against each streak:
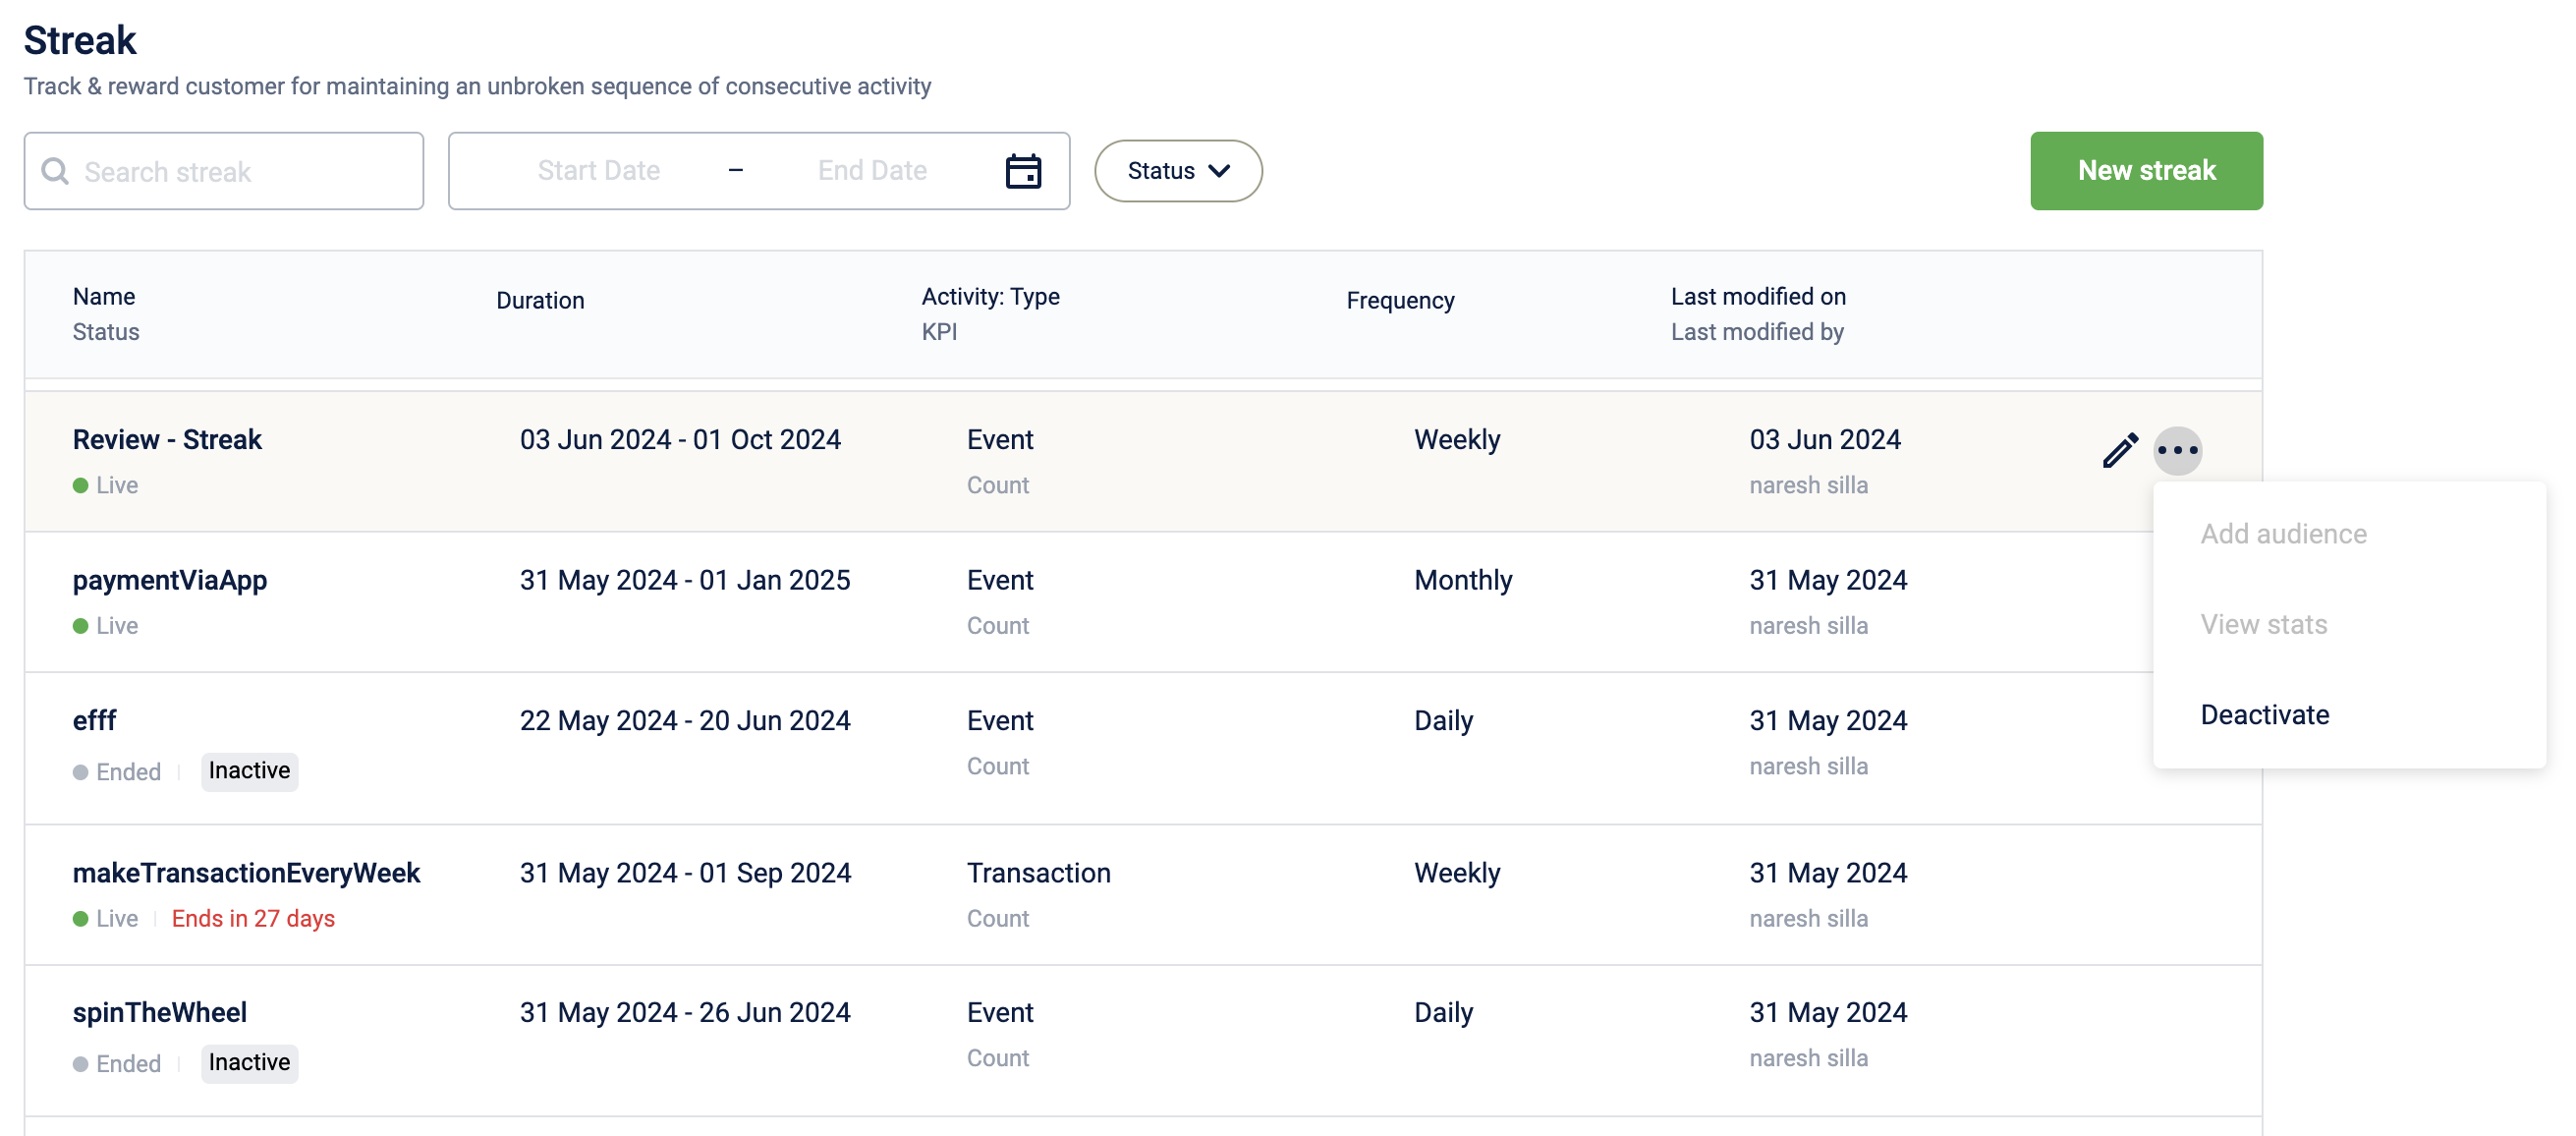
- Activate/Deactivate: A streak can be activated/deactivated depending on the use case by clicking on the 3-dot symbol at the end of each row.
-
- Edit flow of the flow: Once a streak is created, certain components of the streak (like scope, rule, etc...) can be edited by clicking on the "pencil" icon at the end of the row.
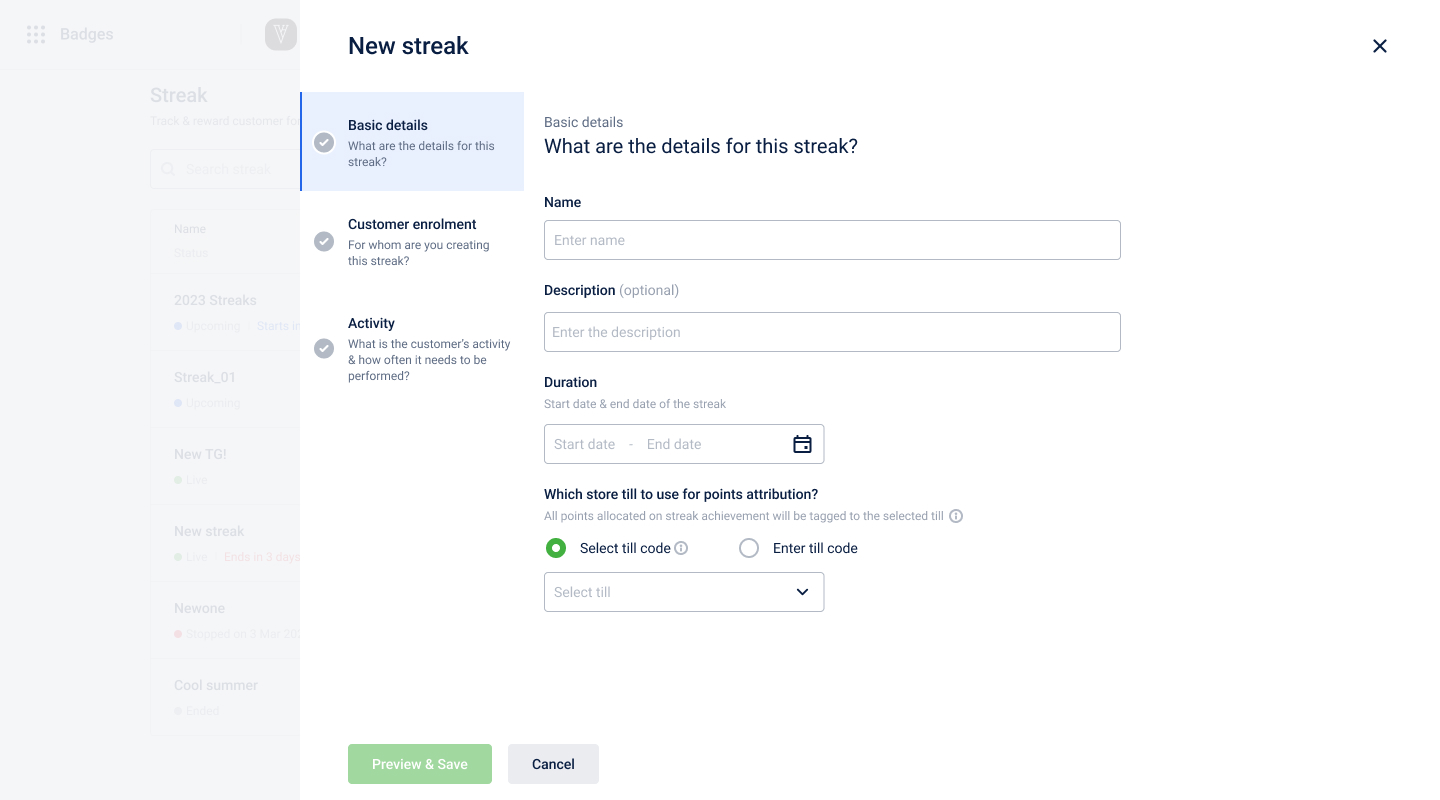
Creating streak
To create a new streak, on the home page, click New streak and enter the below details:
- Basic details
- Customer enrolment details
- Activity details
Basic details
In the Basic details section, define the following:
Name - Name of the streak. Always provide a suitable name (related to your use case) as it helps in searching for the streaks easily in the future.
Description - A short description of the streak. Always provide a suitable description as it helps in understanding the purpose of the streak in the future.
Duration: Duration for which the Streaks need to be active & running.
For example, a brand wants to run a weekly streak, requiring its users to make three weekly transactions. If a user accomplishes this for five, ten, and fifteen consecutive weeks, they will receive 10, 20, and 30 points respectively.
If the brand intends to start this streak on January 10th, 2023, the start date is defined as January 10th, 2023, and the end date is 15 weeks from January 10th, 2023.
A streak can be created with both start & end date in the past. This helps in creating backdated streak type of promotions as when required.For example, assume current date is 15th May 2024. On this current date:
Case 1: User could create a streak whose start date is 1st Jan 2024, and end date is 1st June 2024. In this case, start date is in the past.
Case 2: User could create a streak whose start date is 1st Jan 2024, and end date is 31st march 2024. In this case, both the start & end date are in the past.
Points to remember:
- Past transactions/events as per the date of creation of the streak has to be re-processes again to consider that past date in the tracking of the streak.
- In the case of 1st case, all the past data as per streak's created date (1st Jan 2024 to 14th May 2024) has to be re-processed again for that data to be tracked. Transactions from 15th May 2024 to the end will be tracked automatically.
- In the case of 2nd case, all the past data as per streak's created date (1st Jan 2024 to 31st March 2024) has to be re-processed again for that data to be tracked. As the streak is ending on 31st March, there is nothing that will be tracked automatically here.
- User can create a past streak upto 6 months in the past. For any use cases where higher limit is needed, reach out to product team.
- When APIs are being used to create past streak, it may not throw the 6 months validation but be careful when using the APIs directly for compatibility issues.
Till code: Select the till code. This till code is used to attribute all the points that are going out from the streaks module. If you are a brand where there is no concept of till-code present, please create a dummy till-code from the org settings. The same till can be used in milestones as well.
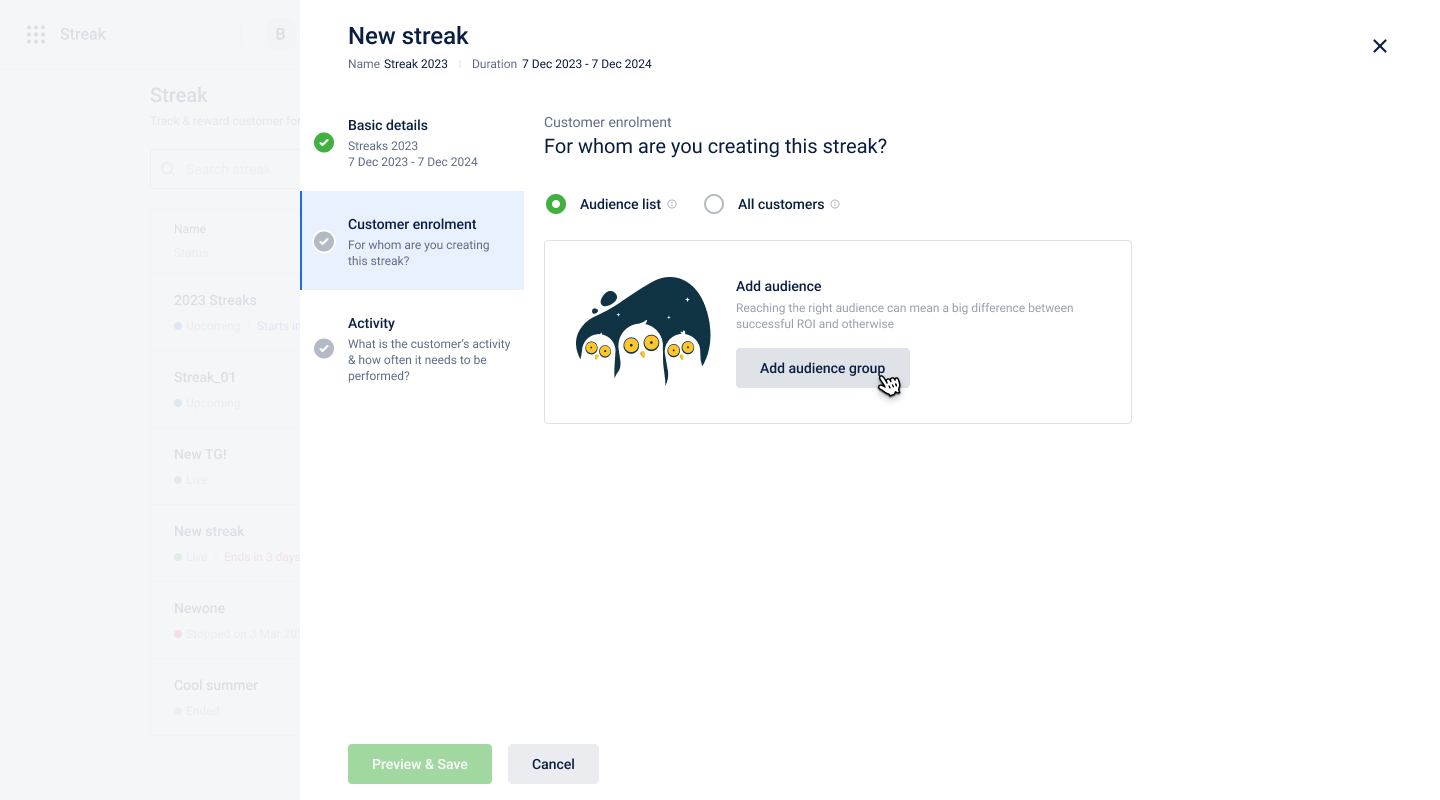
Customer enrollment
In the Customer enrolment section, define the audience to whom you want to enroll in the Streaks program.
- All customers: All customers in the organization who have registered for loyalty will become part of the streak.
- Audience list: This helps enroll the users into the streaks based on filters, existing user groups, or via CSV upload. This is similar to the audience capability in Engage+.
Note: This step is the same as the "customer enrollment" step in Milestones. For detailed information on this step, please visit the following page: here.
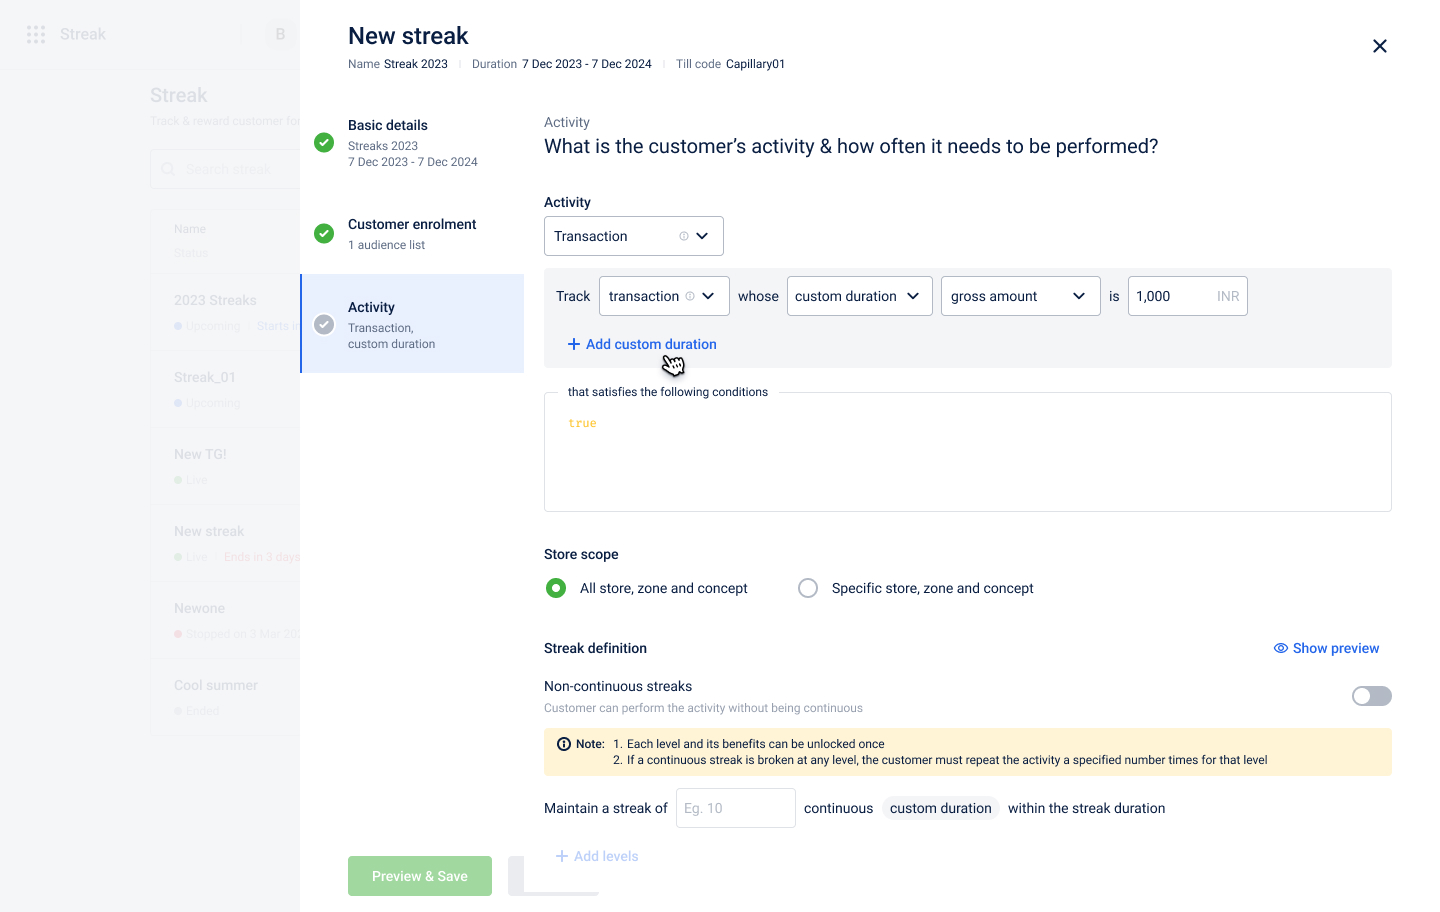
Activity
This is the core section of the streak where the brand has to configure the below components of the streak:
- Activity on which the streak will run, and the associated KPI.
- Target value for each cycle
- Frequency of the streak
- Scope filter & rule filters
- Levels of the streak also known as streak definitions
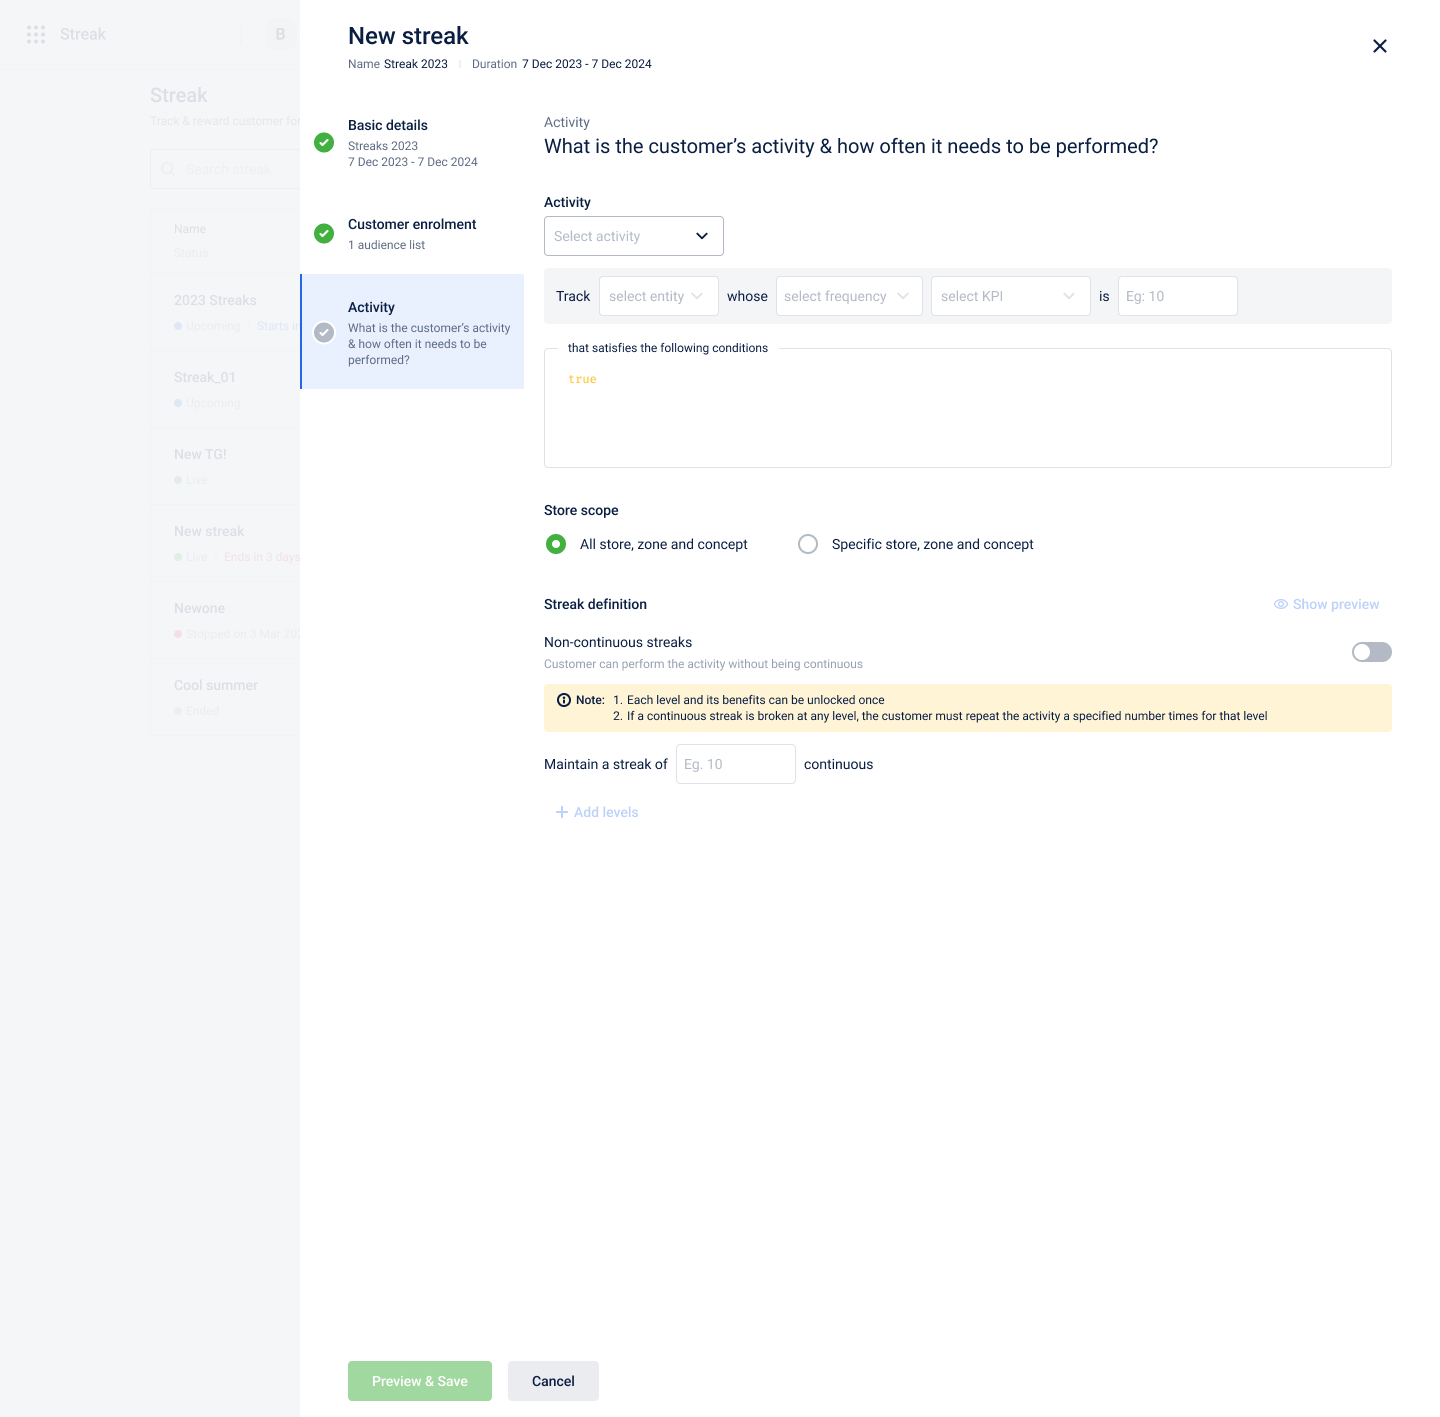
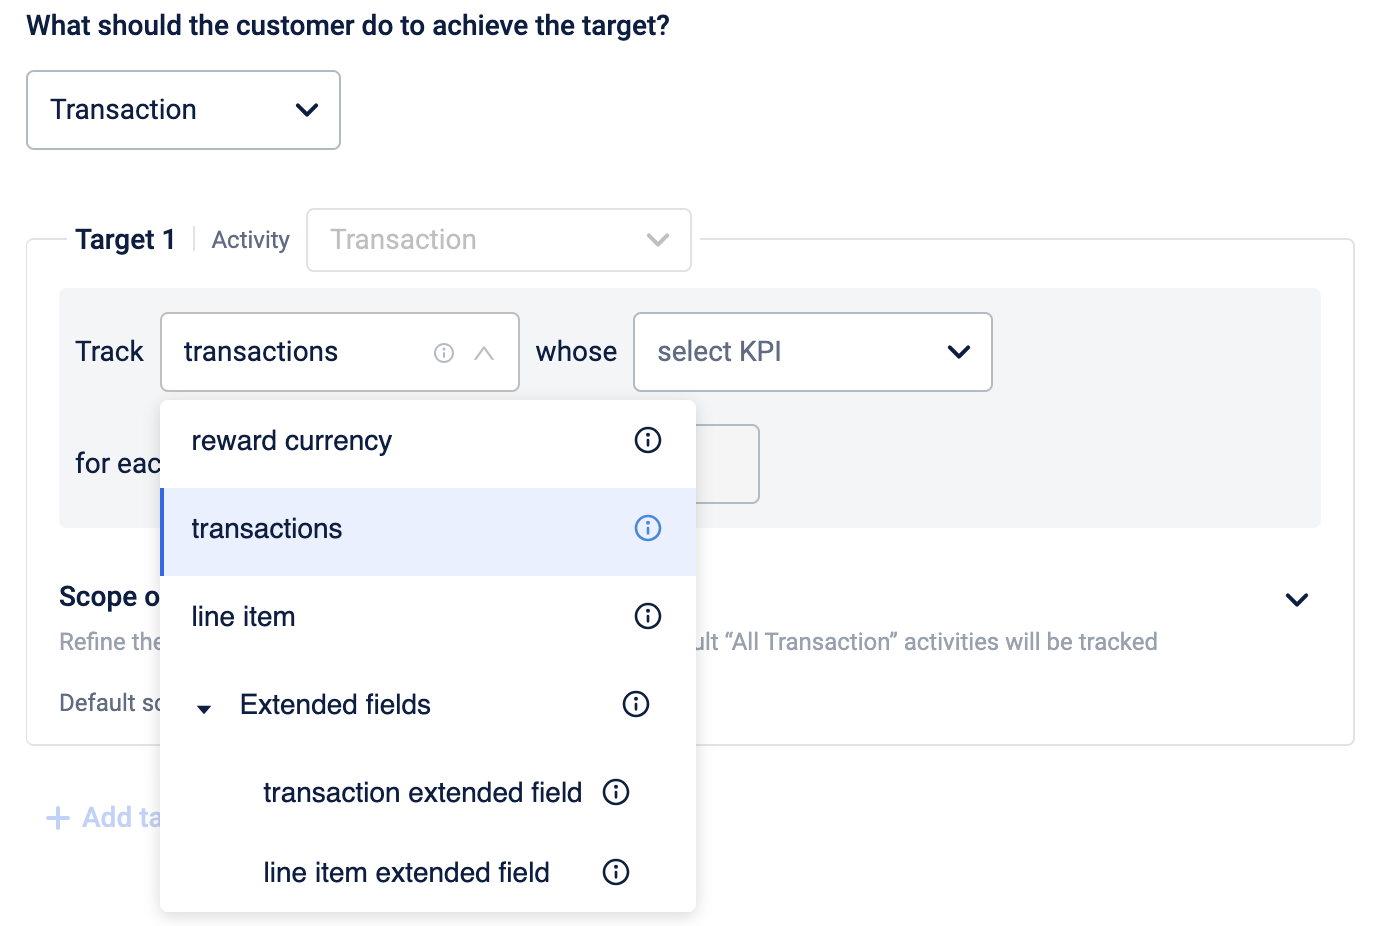
Defining the type of activity on which Streaks need to be created.
Customer Activities
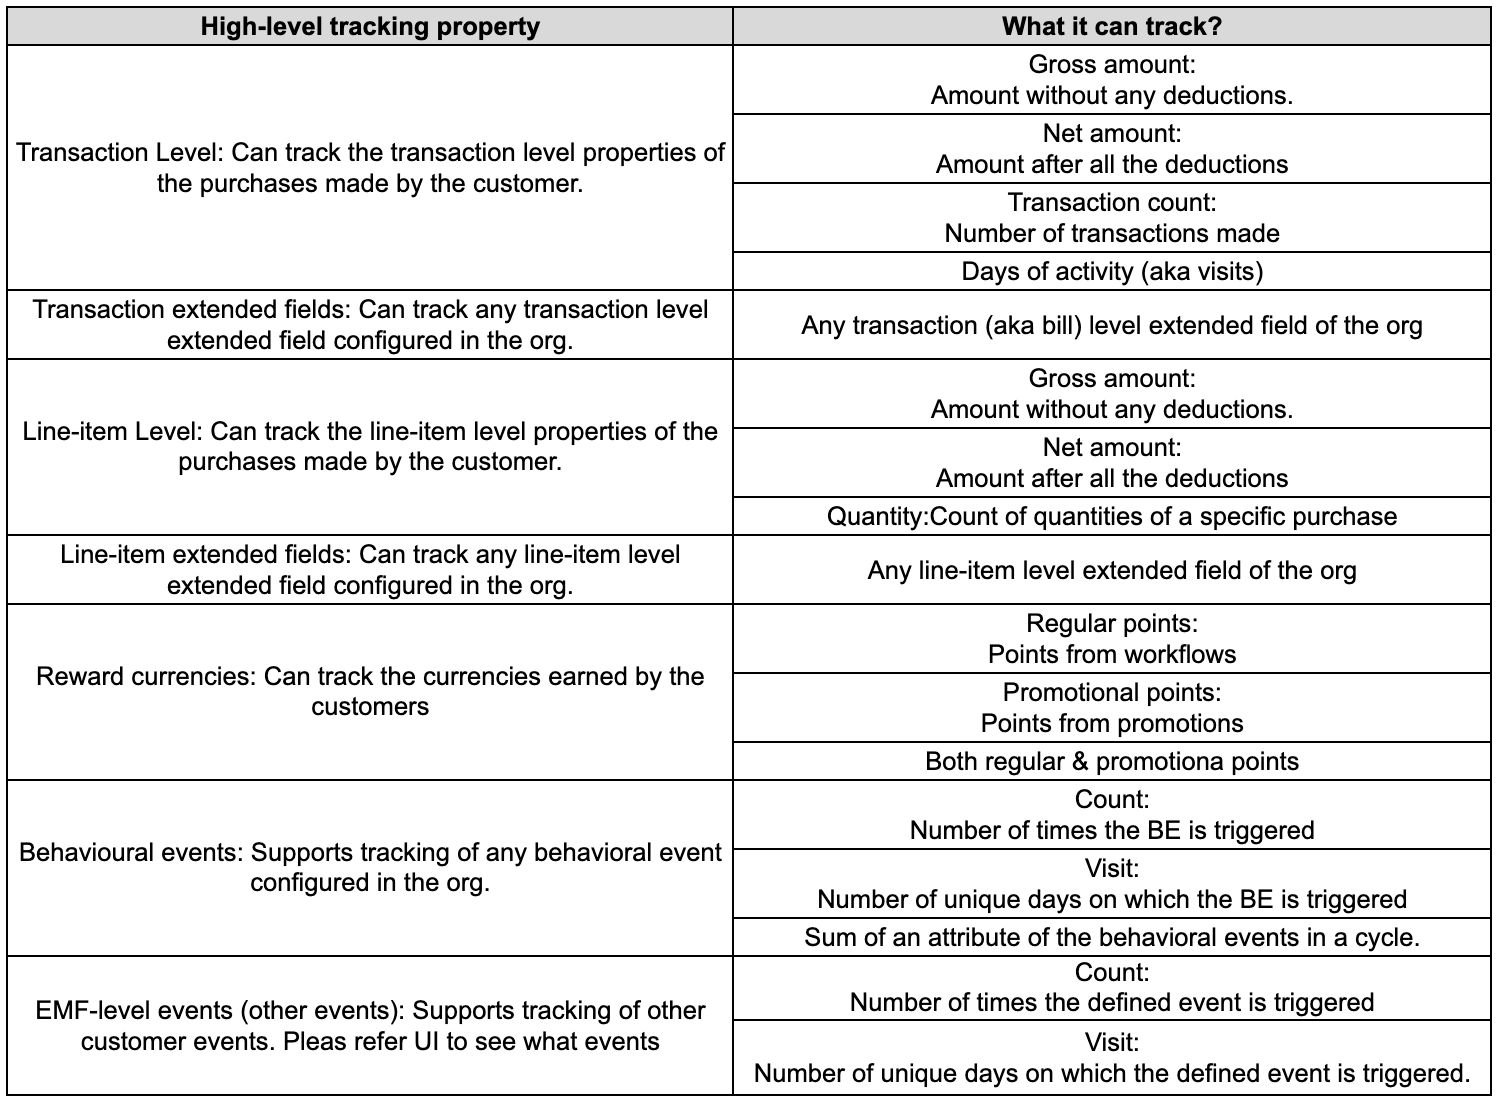
Customer activity refers to the various interactions a customer has with a brand. The table below lists the customer activities that can be tracked for a milestone.
| Activity | Description | Example |
|---|---|---|
| Transaction | Track customer purchases, in-store, online, or at a point-of-sale (POS) system. | A customer purchases a pair of sneakers online or at a store. |
| Behavioural event | Track customer activities like signing up, changing their profile picture, or adding items to their wish list. | A customer adds items to their wish list on the app or website. |
| Earn reward currency | Track the reward currencies (points or alternate currencies) that a customer has earned during a certain period. The configuration for points and alternate currencies are the same. You can select only one reward currency per target. To track both points and alternate currencies within the same target / milestone, create a unified milestone with two or more targets and select points or alternate currencies as the reward currencies for each target. | A customer earns 500 reward points for purchasing a ₹5000 jacket during a promotional event. |
| Referrals | Track the number of times a customer has successfully referred another person. | A customer refers a friend using a unique link, and the friend makes the first purchase, earning the customer rewards. |
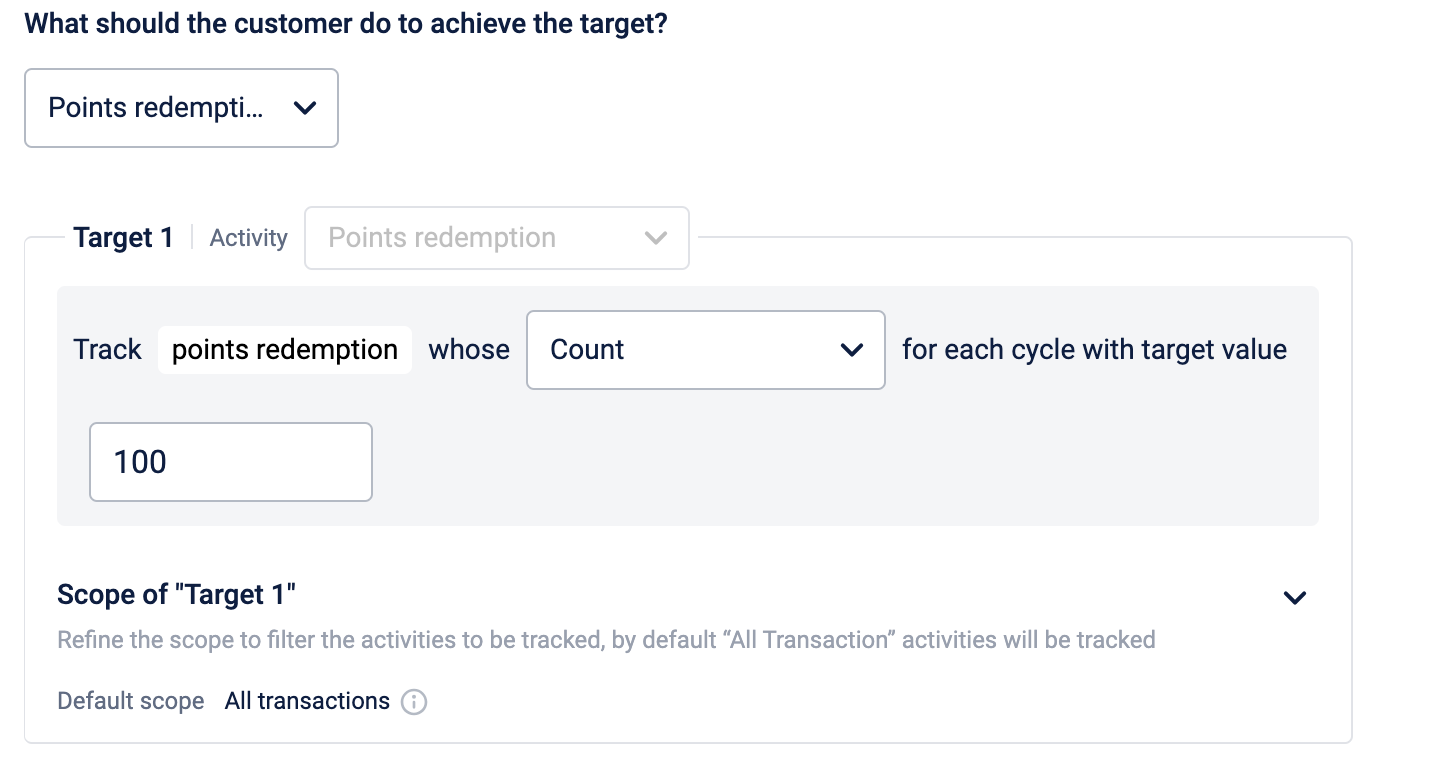
| Points redemption | Track how often customers use their points to redeem rewards, provided redemption is available. | A customer uses 500 points to redeem a ₹500 discount while purchasing groceries |
| Coupon redemption | Track the number of times a customer uses coupons to get discounts or benefits. | A customer applies a 20% discount coupon during checkout in an online store. |
| Returning a transaction | Track the number of transactions a customer returns, whether a full return or part of the purchase. | A customer returns a t-shirt purchased online as it did not fit properly. |
| Updating a transaction | Track how many times a customer changes details about their previous purchases. | A customer orders 1kg bananas and 1kg mangoes but later adjusts the order, reducing the mangoes to 500gms after receiving a partial refund. |
| Updating customer profile | Track how often a customer updates their personal information on their profile. | A customer updates their phone number on the app. |
| Promised points conversion | Track how many times promised points (temporary or pending rewards) are turned into regular points for the customer. | |
| Transfer points | Track how many times points are transferred between customers or user groups. | A customer transfers their loyalty points to another customer. |
| Milestone achieved | Track how many times a customer completes a target, such as spending a specific amount or completing a behavioral event such as drinking eight litres of water. Notes: The following conditions are required to select a milestone/target to track:
| A customer achieves a milestone by walking 10,000 steps daily for five consecutive days, as part of a fitness challenge. |
| Points redemption reversal | Track how many times redeemed points are reversed to the customer due to cancellations or errors. | A customer cancels a flight ticket they booked using points, and the points are returned to their account. |
- Transactional activities: Helps in tracking transactional properties
- Gross sales (both bill level & line item level)
- The total gross sales made by the user in the cycle. The gross amount is the amount on the bill before the user avails any kind of discount.
- Net sales (both bill level & line item level)
- The total net sales made by the user in the cycle. The net amount is the final amount that the user has paid. This means the discounts will be excluded from the tracking.
- Quantity (line item level)
- The number of quantities purchased by the user in the cycle. When used with a specific line item rule, the brand can track the number of specific line items bought by the user in the cycle.
- Transactions count (bill level)
- The total number of transactions made by the user in the cycle.
- Days of activity (bill level)
- The total number of unique days on which the user has made at least 1 transaction.
- Transactional extended fields
- The following KPIs are supported:
- COUNT: The number of times a transactional extended field came with a specific value. This specific value needs to be configured in the rule box.
- E.g.: The number of transactions that came with extended field value as "Gold".
- SUM: The sum of the selected transactional extended field in the cycle.
- COUNT: The number of times a transactional extended field came with a specific value. This specific value needs to be configured in the rule box.
- The following KPIs are supported:
- Lineitem extended fields
- The following KPIs are supported:
- COUNT: The number of times a line-item extended field came with a specific value. This specific value needs to be configured in the rule box.
- E.g.: The number of line items that came with the extended field value as "edible food".
- SUM: The sum of the selected line-item extended field in the cycle.
- COUNT: The number of times a line-item extended field came with a specific value. This specific value needs to be configured in the rule box.
- The following KPIs are supported:
- Reward currencies (aka points):
- Regular points: Number of regular points earned by the user in the cycle
- Promotional points: Number of promotional points earned by the user in the cycle
- Both: Number of total regular & promotional points earned by the user in the cycle
- Gross sales (both bill level & line item level)
The following image shows the screen when "transaction" is selected:
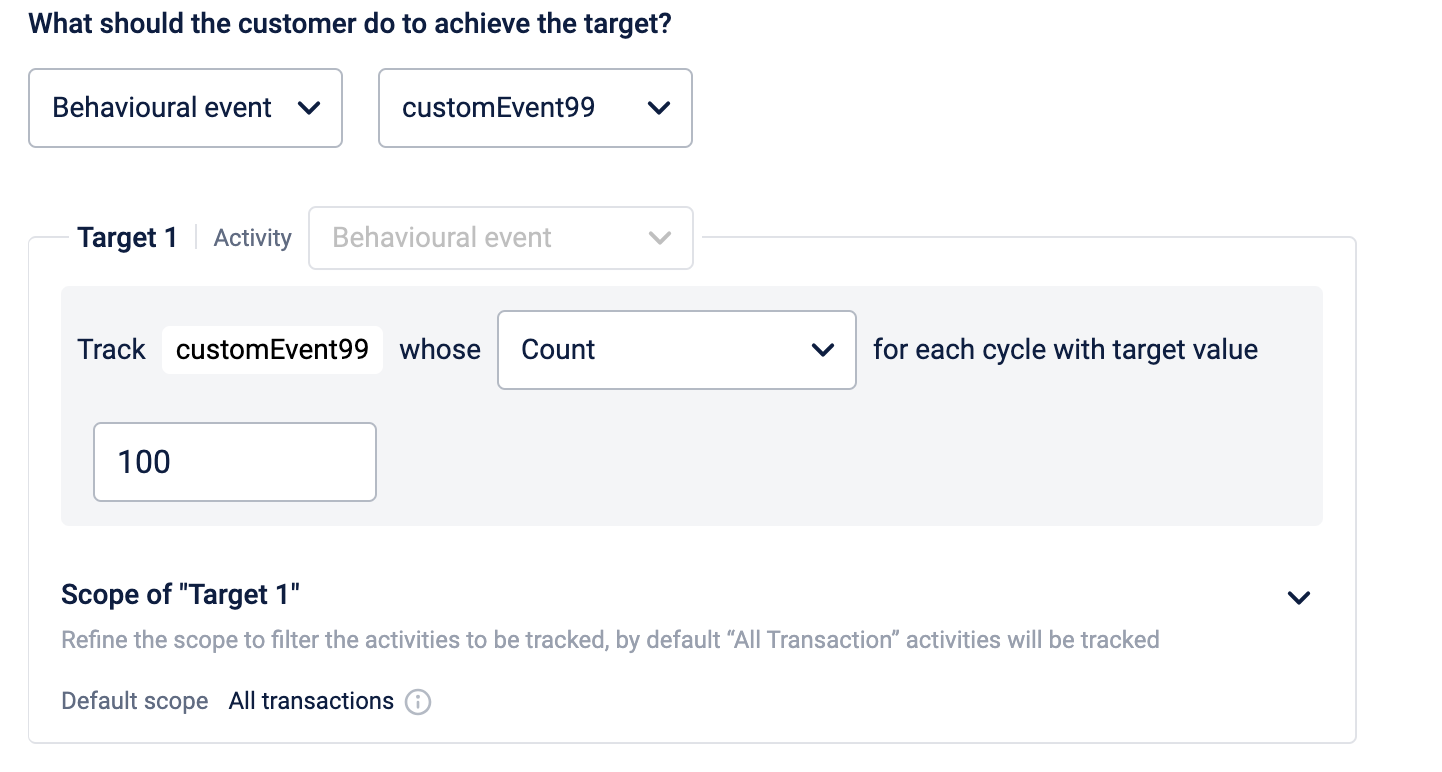
- Behavioral activities:Helps in tracking behavioral events
- All the Behavioural events configured for the org will be available here.
- The following KPIs are supported in behavioral events tracking:
- COUNT: The number of times the event has been triggered in a cycle.
- VISIT: The number of unique days on which the event has been triggered in a cycle.
- SUM: Summing the attribute value of the behavioral event in a cycle.
- E.g.: Assume there is a behavioral event called "walking" with an attribute called "steps walked". Now, this attribute value can be summed in a period & based on that rewards can be assigned.
The following image shows the screen when the "behavioral event" is selected:
-
All other customer level activities: Helps in tracking how many times the various customer level activities/events (aka different customer level events present in the workflow in the loyalty) are triggered for a user in the defined period as per the configuration. The following are the supported customer activities:
-
-
Points redemptions
-
Coupon redemptions
-
Return transaction
-
Points transfer
-
Transaction updates
-
Customer profile updates
-
Promised points conversions
-
Points redemption-reversal
-
Referrals
-
Milestones achieved: This type of tracking is available only during the creation of a fixed-calendar window (aka where a specific start date is selected) type of milestones and helps in tracking how many times a user has achieved a specific target group.
-
Once this tracking is selected, a new drop-down asking to select the target group will appear.
-
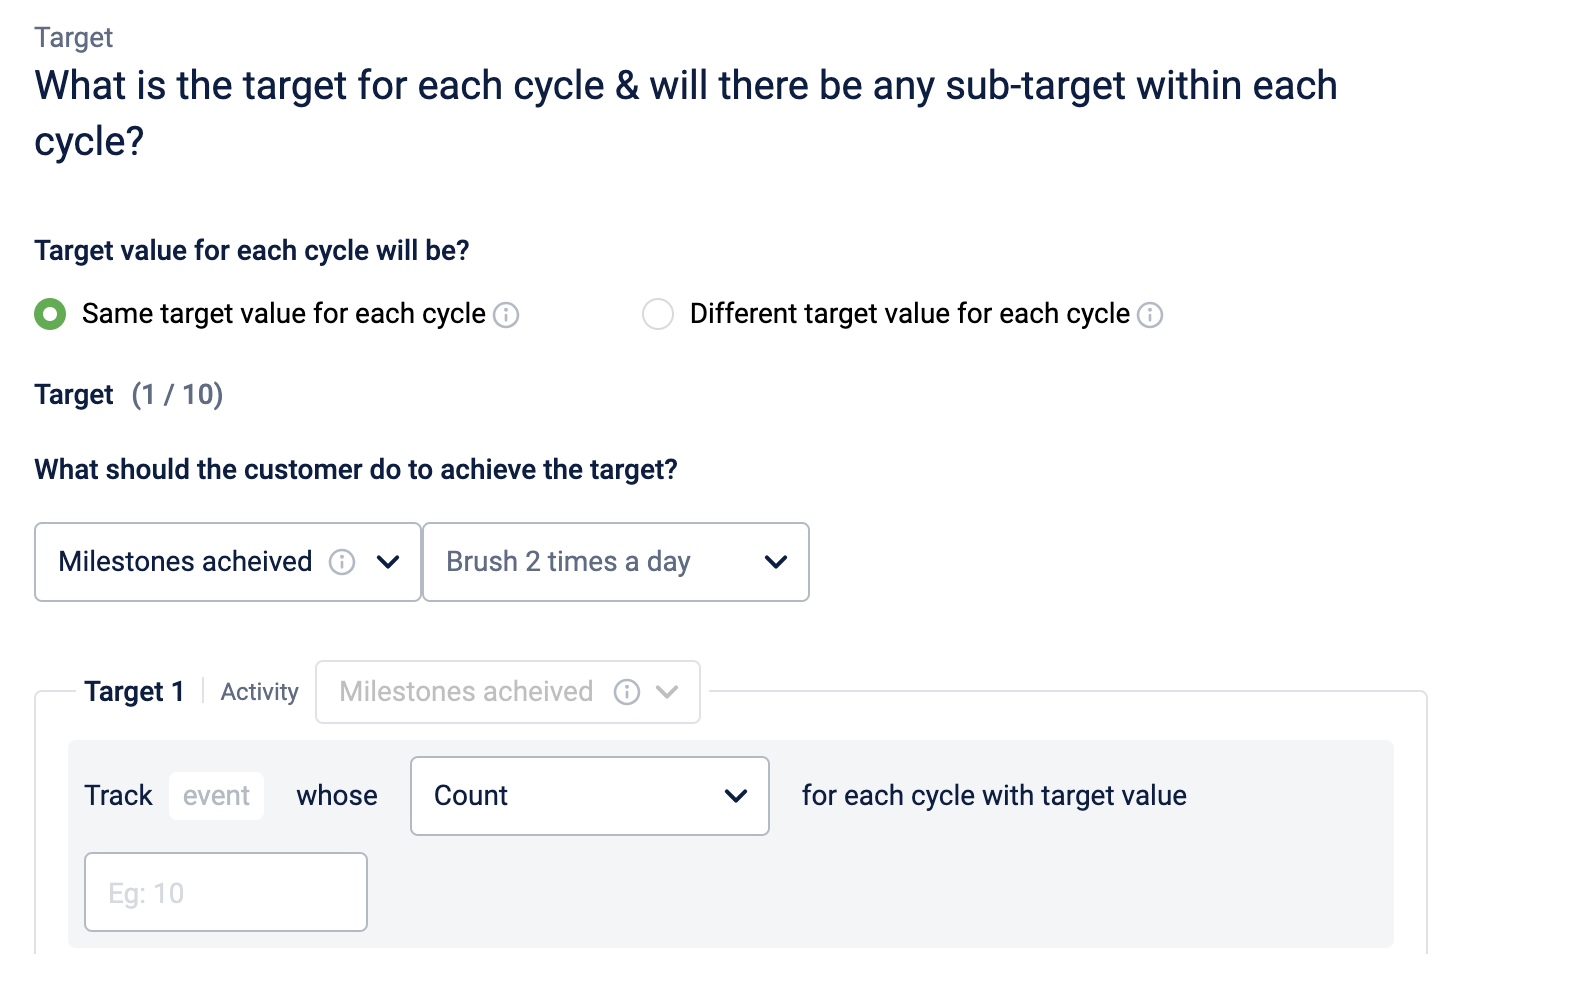
A target group will be shown in this drop-down only when it satisfies the following conditions:
- Fixed-calendar window (aka where a specific start date is selected) type
- Frequency is inferior to the current milestone's frequency
- Duration should fit within the current milestone's duration
- Should be active
- The tracking type should be either "default" or "unified".
-
This type of tracking helps in unlocking "3rd level tracking use cases" which are extremely difficult to implement. Some of the sample use cases that will be possible are:
- Brush 2 times a day, 6 times a week, 10 weeks in a quarter
- Walk 5000 steps a day, 5 times a week, 3 weeks in a month.
- Refer to this confluence page to understand more about these "3rd level tracking" use cases, and how they work with the help of simulations.
-
-
The following KPIs are supported for all the above events:
- COUNT: The number of times the specific event selected is triggered in a cycle
- VISIT: The number of unique days on which the specific event has been triggered in a cycle.
Note: Tracking for all the other events also will be available soon
-
The following example shows the screen when one of the EMF events (points redemption is selected):
-
An eagle-eye view of the above looks like this:
note: In the above table, EMF-level events are nothing but all other customer-level events/activities described in the previous paragraphs.
Frequency of each cycle
After selecting the tracking configurations based on the use case, the frequency for each cycle in which the user must achieve the defined value by the streak needs to be selected.
You can select a frequency from the available options or define a duration (custom duration).
- Custom duration
This option can be used when the user has to perform the specified activity within a custom duration, which is not available in the above options. For example, every 5 days, every 13 days, every 2 months, etc. Refer to the below images to learn more about custom duration.
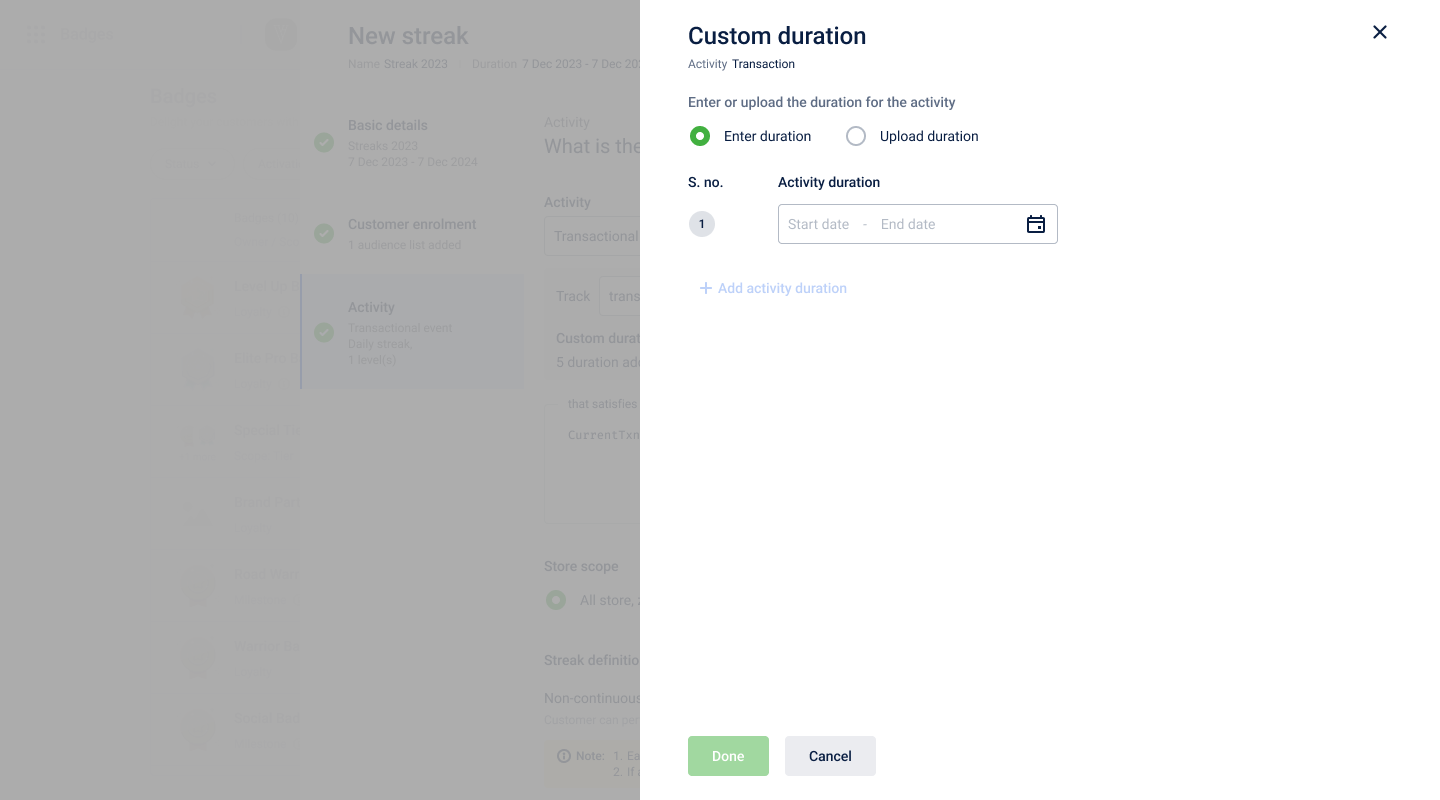

Upload duration
You can click Upload duration and add the duration details in the sample template format provided.

- Selecting predefined duration
The below options are available:
- Daily
- Weekly
- Monthly
- Yearly
Depending on the chosen frequency, this option will present two choices for Weekly/Monthly/Yearly types. In the "Any day" scenario, users can perform their activity on any day of the cycle, while in the "Specific days" scenario, users are required to perform the activity on designated days.
- Weekly:
- Any day of the week
- Specific days of the week**
- Monthly:
- Any day of the month
- Specific days of the month**
- Yearly
- Any day of the year
- Specific days of the month**
- Target value needed to be achieved in selected each frequency:
- When the "Any day of the week/month/year" is selected for the duration, then the target value that needs to be achieved has to be entered manually.
- When the "Specific day of the week/month/year" is selected for the duration, then the target value for the frequency will be calculated automatically.
- For example, say frequency is selected "weekly" and "specific days of the week" are selected as Monday, Wednesday & Friday, then the target value will be interpreted as 3 automatically.
Filters: scope-based & rule-based
The filters available are scope-based & rule-based filters.
Scope based filtering:
- Stores: Limit the streak to specific retail locations.
- Zones: Apply the streak to defined geographical areas.
- Concepts: Limits the streak to specific OUs
To define the streaks for complete stores, zones, and concepts, select All store, zone, and concept.

To define the Milestones for a specific store, zone, and concept, select Specific store, zone, and concept and select the stores/zones/concept.
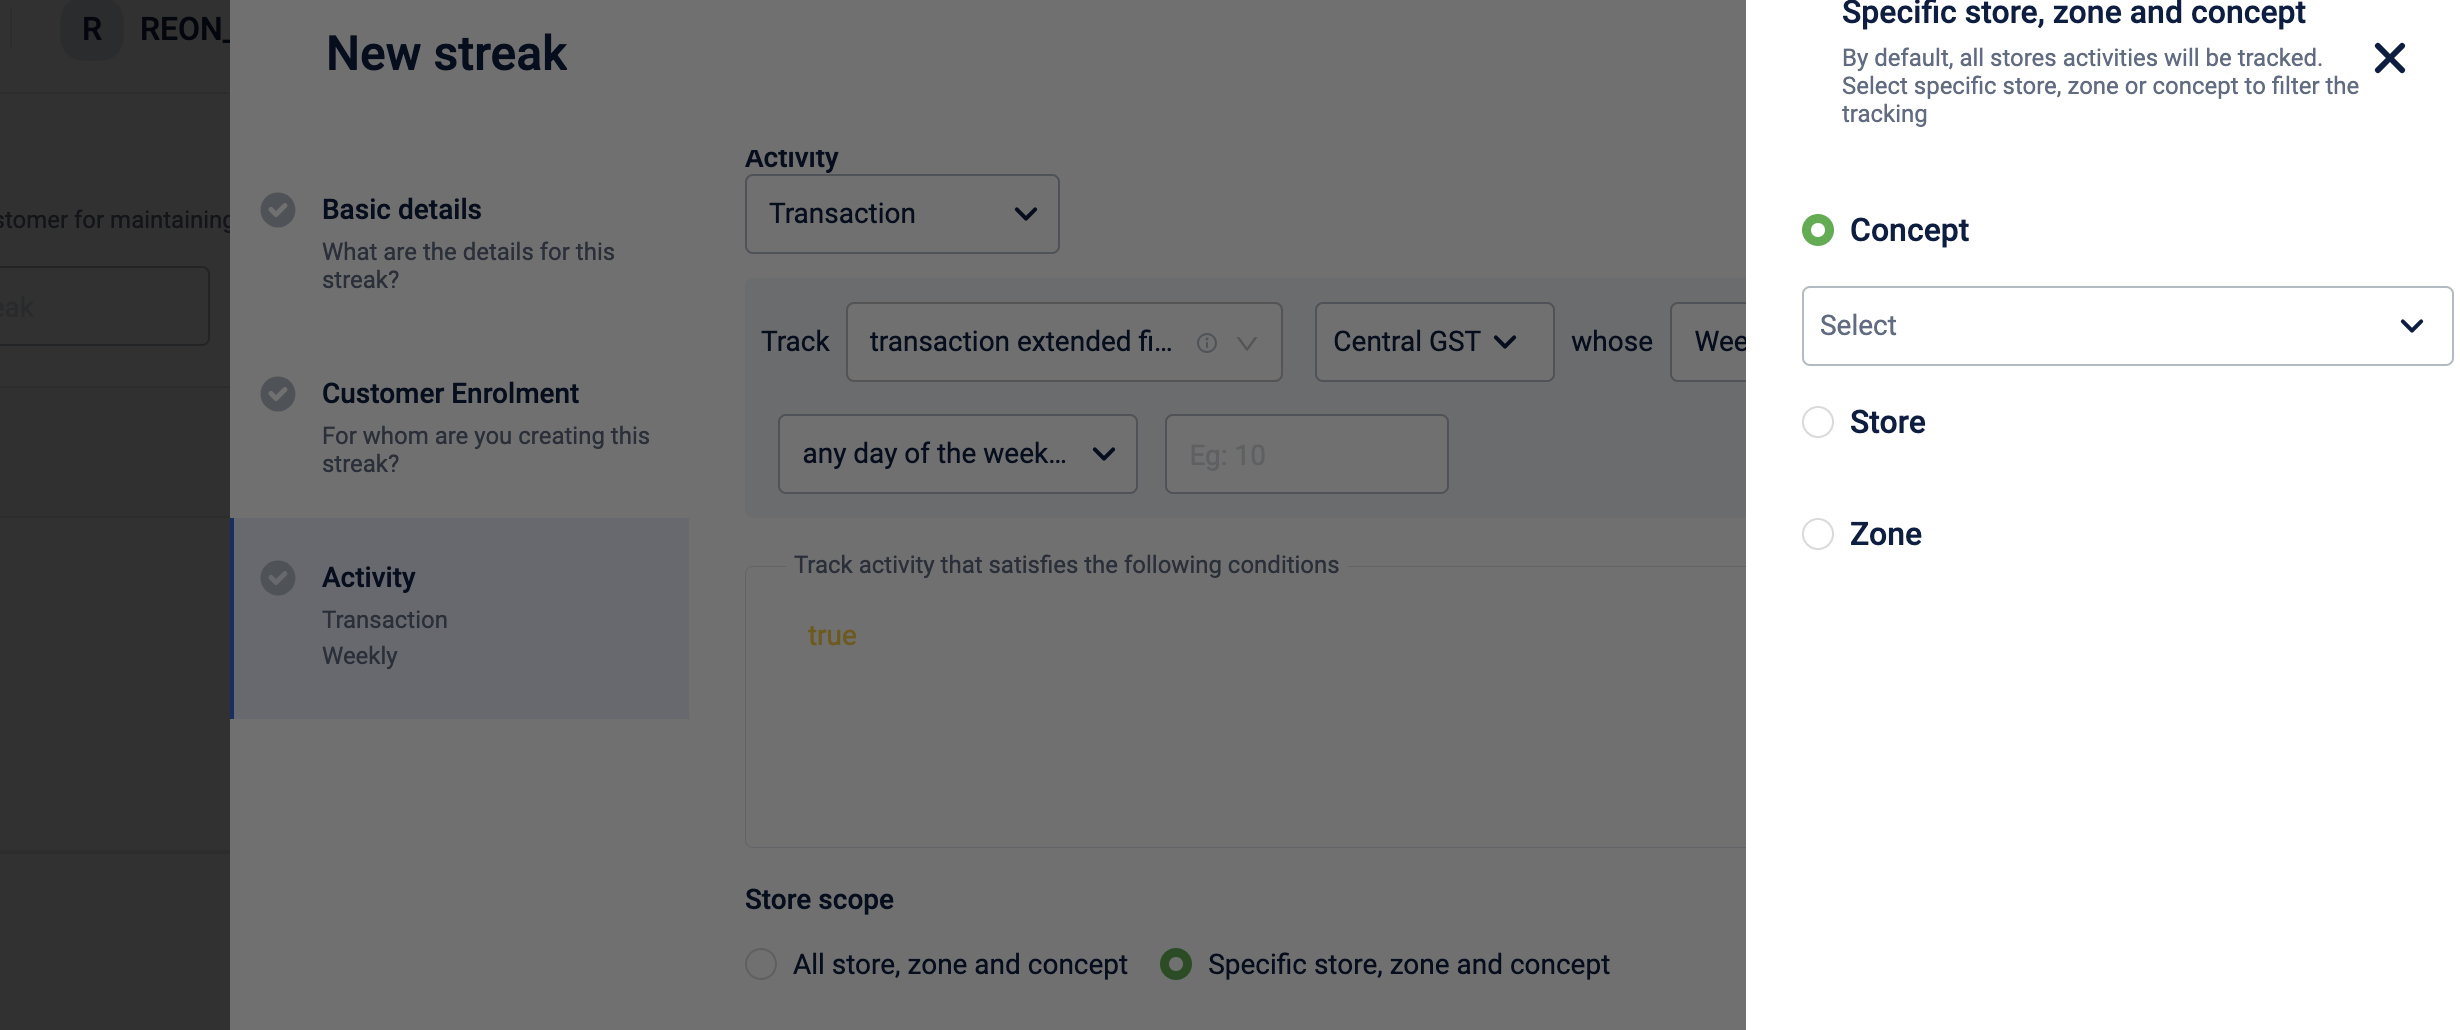
Rule-based filtering:
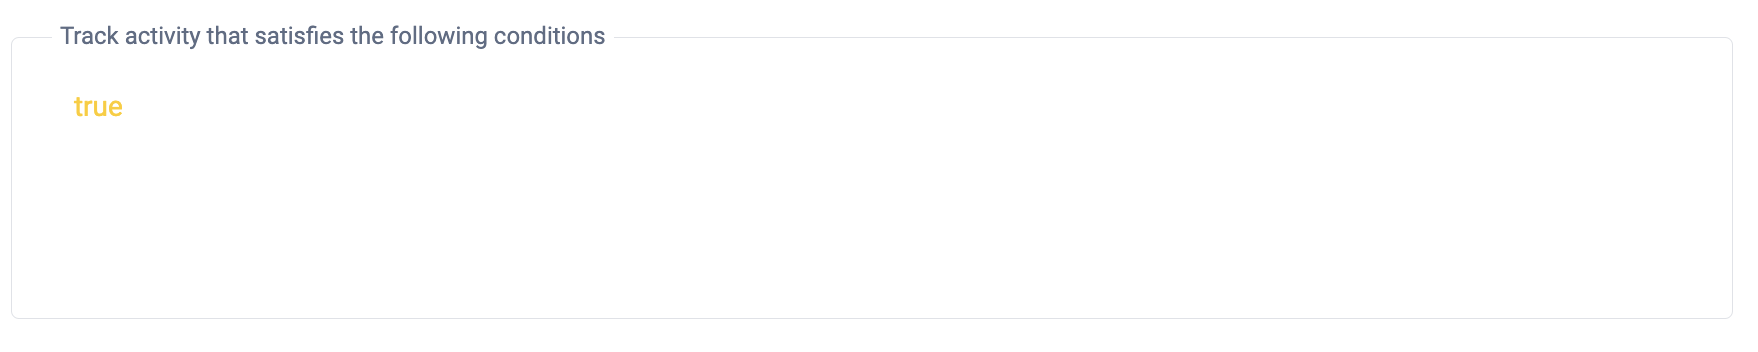
For further refinement, you can define the rules in the rule box. For example, rules can be written to target specific line items, categories, minimum transaction amounts, etc.
- Categories: Target specific product categories within the Milestone.
- Line items: Apply the Milestone to specific products or SKUs.
- Transaction amount: Set minimum or maximum purchase amounts for Milestone progress.
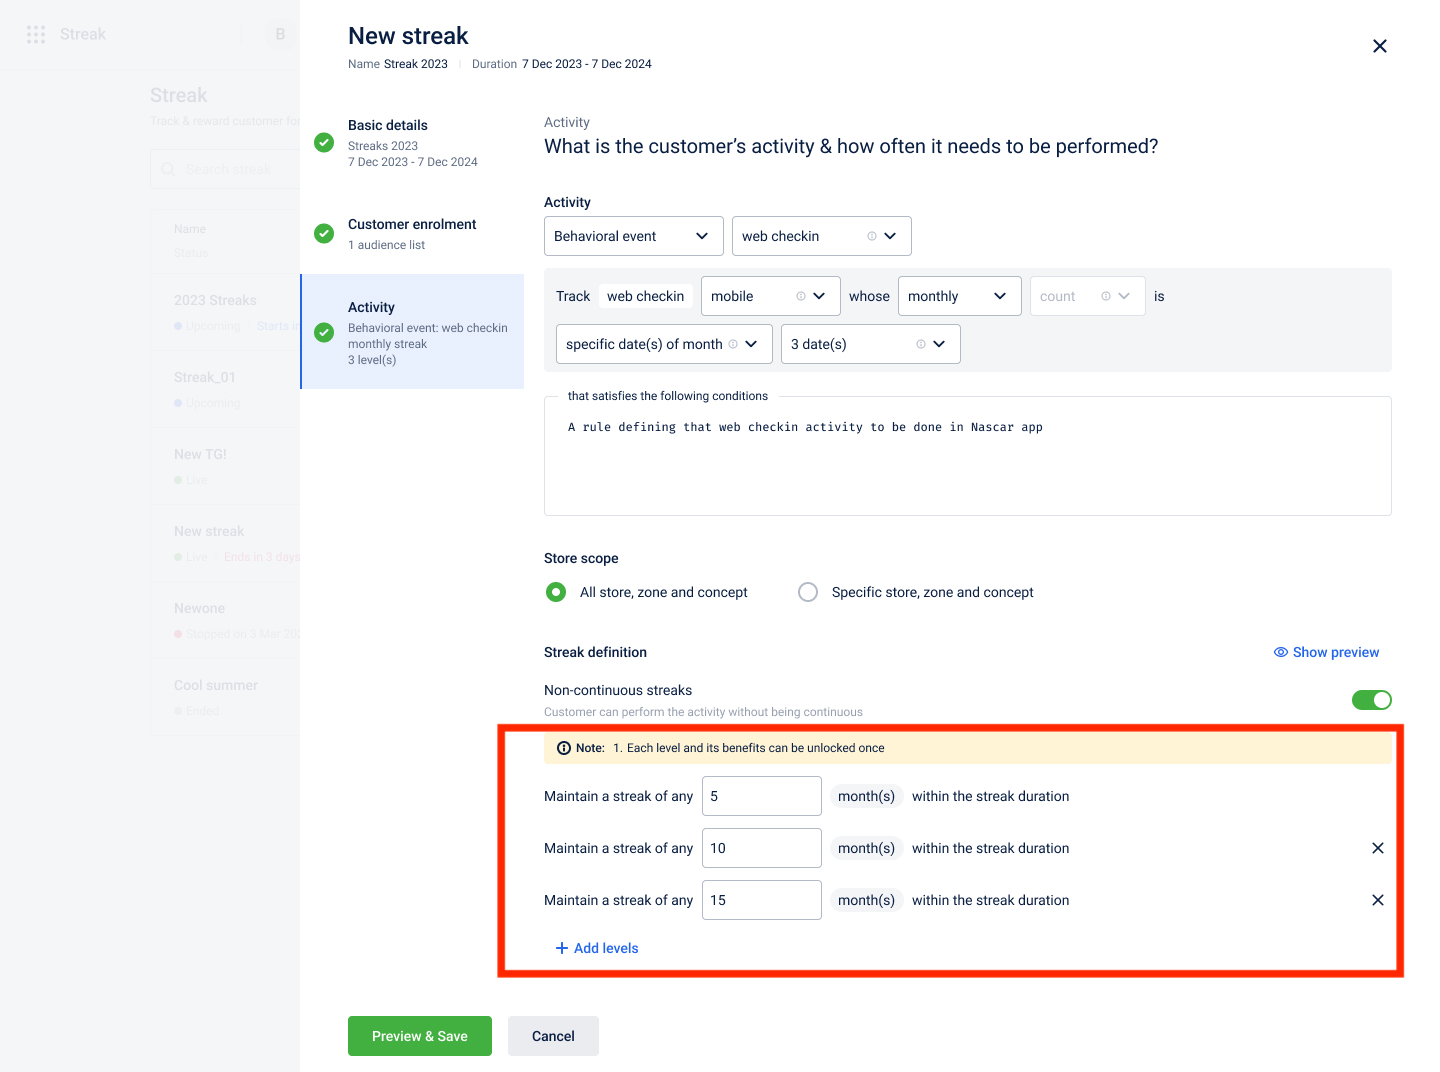
Streak levels also known as definitions
In the text box, you can enter the duration for which the streak should be maintained.
You can use the toggle switch to disable or enable a non-continuous streak.
Consider a scenario for your coffee brand's loyalty program:
- Requirement: Customers must enjoy a cup of your brand's coffee every day.
- Streak level/definition: Maintain a streak of 5 months within the streak duration.
- Streak Duration: one year
How it works:
- Achievement: Customers achieve the streak by drinking the brand's coffee every single day for a continuous period of 5 months.
- Break Reset: If a customer misses a day, the streak counter resets to zero, and they must start building the streak again from scratch.
Notes:
- A user can add 10 different streak definitions in a single streak
- Streak levels need to be entered in ascending order.
- A user can achieve the streak level "X+1", only when the user has already achieved the "X" level.
- The maximum streak value should always be "<=" number of cycles. For example, say the duration is given as 2 months & frequency is given as weekly, then the maximum number of possible cycles is 8.
Non-continuous streaks
Non-continuous streaks, allow users to maintain a streak without performing the associated activity continuously. In this type of streak, breaks or gaps between performing the activity are permitted, as long as the user completes the activity a specified number of times within a defined timeframe. This feature is particularly useful when users may not be able to consistently engage in an activity every day or on a regular schedule but still want to achieve a goal over a period of time.
In the example above, if you set it as a non-continuous streak, customers achieve the streak if they drink the brand's coffee for any of the 5 months in the streak duration.
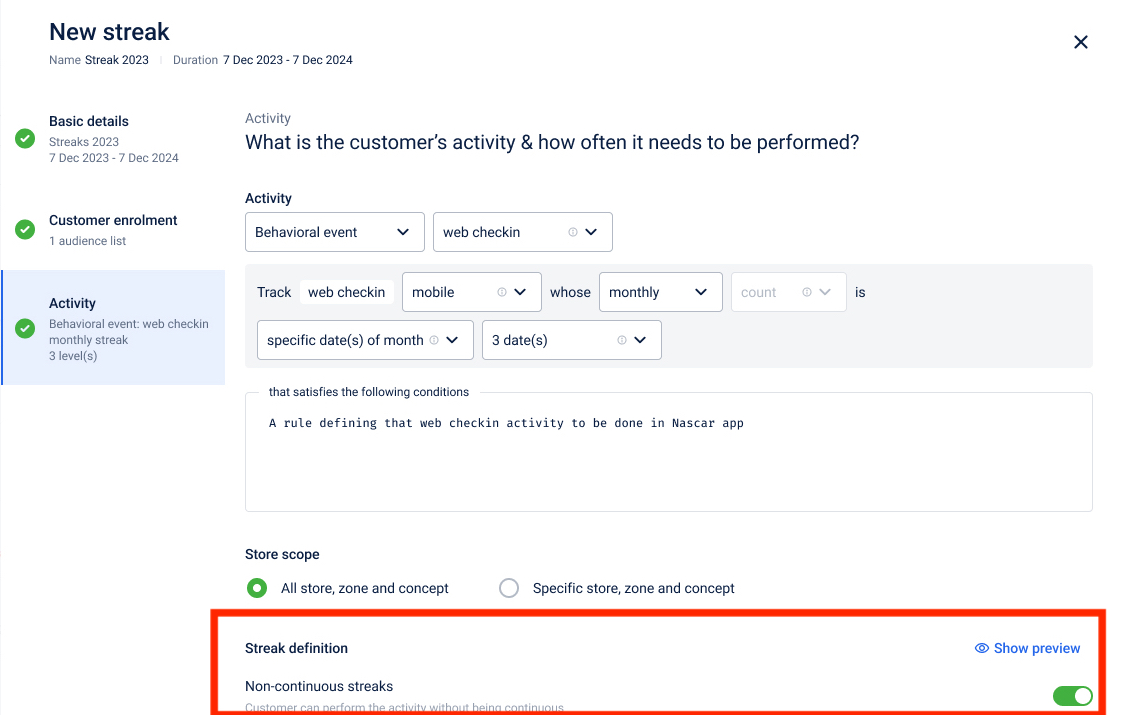
Click Show preview to view a preview of the streak definition.
Once all these configurations are successfully configured, click Preview & Save to save the streaks.
As of today, event notifications are not available for streaks. Please be mindful about this, we will bring this soon.
Sub-targets in streaks
Sub-targets are a powerful capability that brands can use to interact with their customers mid-day the customer's journey towards the full target.
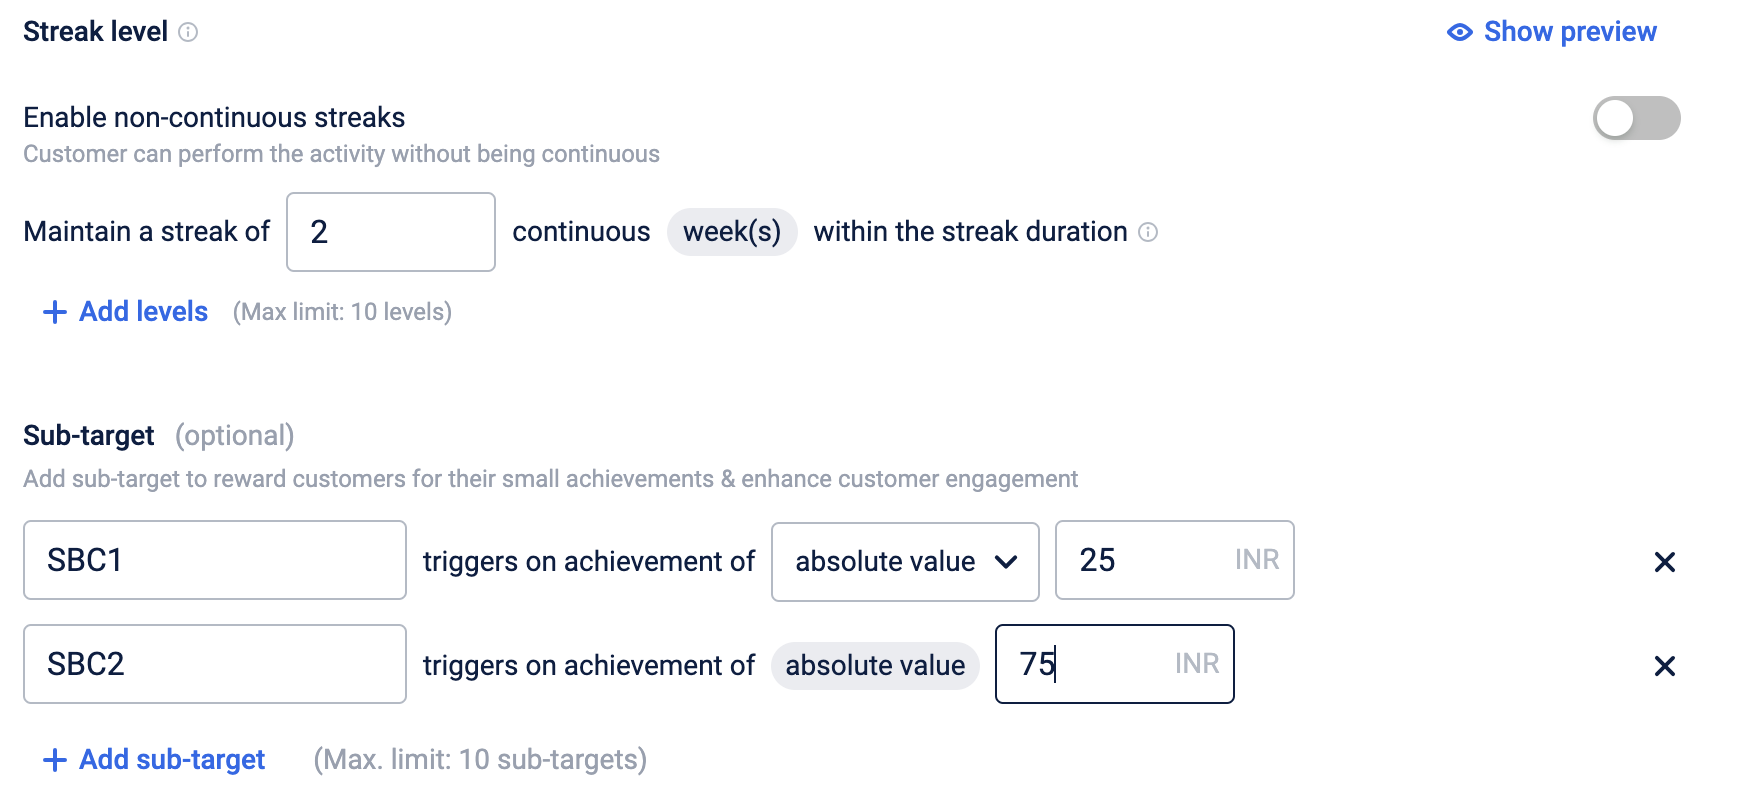
The behavior of sub-targets in streaks is the same as the behavior of sub-targets in milestones.
- They work across each cycle of the entire streak duration
- The sub-target rules that need to be written in promotions are the same as the milestones
- Sub-targets can be created based on absolute/percentage value based on the KPI
Refer to the following section for more details: here
Updated 4 months ago