Reallocate mobile numbers
Reallocate Mobile Number (to a New Customer)
Telecom companies usually reallocate old disconnected numbers (after it has remained unused for some time) to new customers. In such scenarios where a new customer has a mobile number of the already registered customer (but inactive), you can reallocate the number to the new customer.
For example, consider this case where Tom registers in your loyalty program with the mobile number: 123456789 and is not active for a very long time. Hence, the number is deactivated by the telecom company. Suppose the same number is allocated to another person named John who wants to register in the loyalty program. As Tom is no longer active on the registered mobile number, you can reallocate the number to John and register him.
To reallocate the mobile number, do the following.
- On the navigation pane, click ID Change Requests > Mobile Reallocation.
The Mobile Number Re-Allocation Requests page displays the requests for reallocating the old mobile numbers to new customers.

- In the Pending tab, click the Approve button of the desired request.
To decline a request, click Decline. In the Decline Coupon Request box, provide the reason for declining the request and click Proceed.
You can see approved and declined requests in their respective tabs (Approved, Declined).
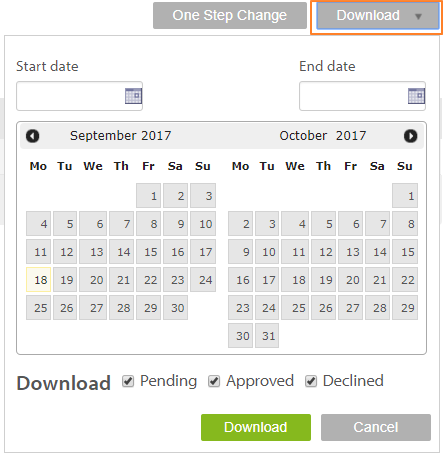
To download mobile reallocation requests, click the Download drop-down, set the duration of the requests you want to download in Start Date and End Date, and click Proceed.
Settings to Auto-approve Mobile Reallocation Requests
You can configure to automatically approve mobile reallocation requests without back-end team's approval.
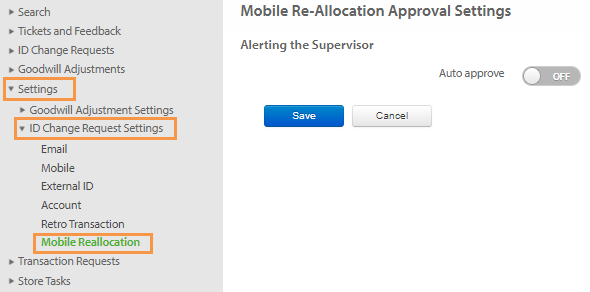
- Click Settings, expand ID Change Request Settings, and click Mobile Re-Allocation.
- Set Auto Approve to On.
- Click Save.

Download Mobile Reallocation Requests
To download the history of mobile reallocation requests, do the following.

- On the Mobile Reallocation page, click the Download drop-down that appears on the top-right
- Set the duration of the requests that you want to download in Start Date and End Date
- In Download, select the statuses that you want to download - Pending, Approved and Declined.
- Click Proceed
- The list gets downloaded to your computer as a CSV file.
Updated 8 months ago
