
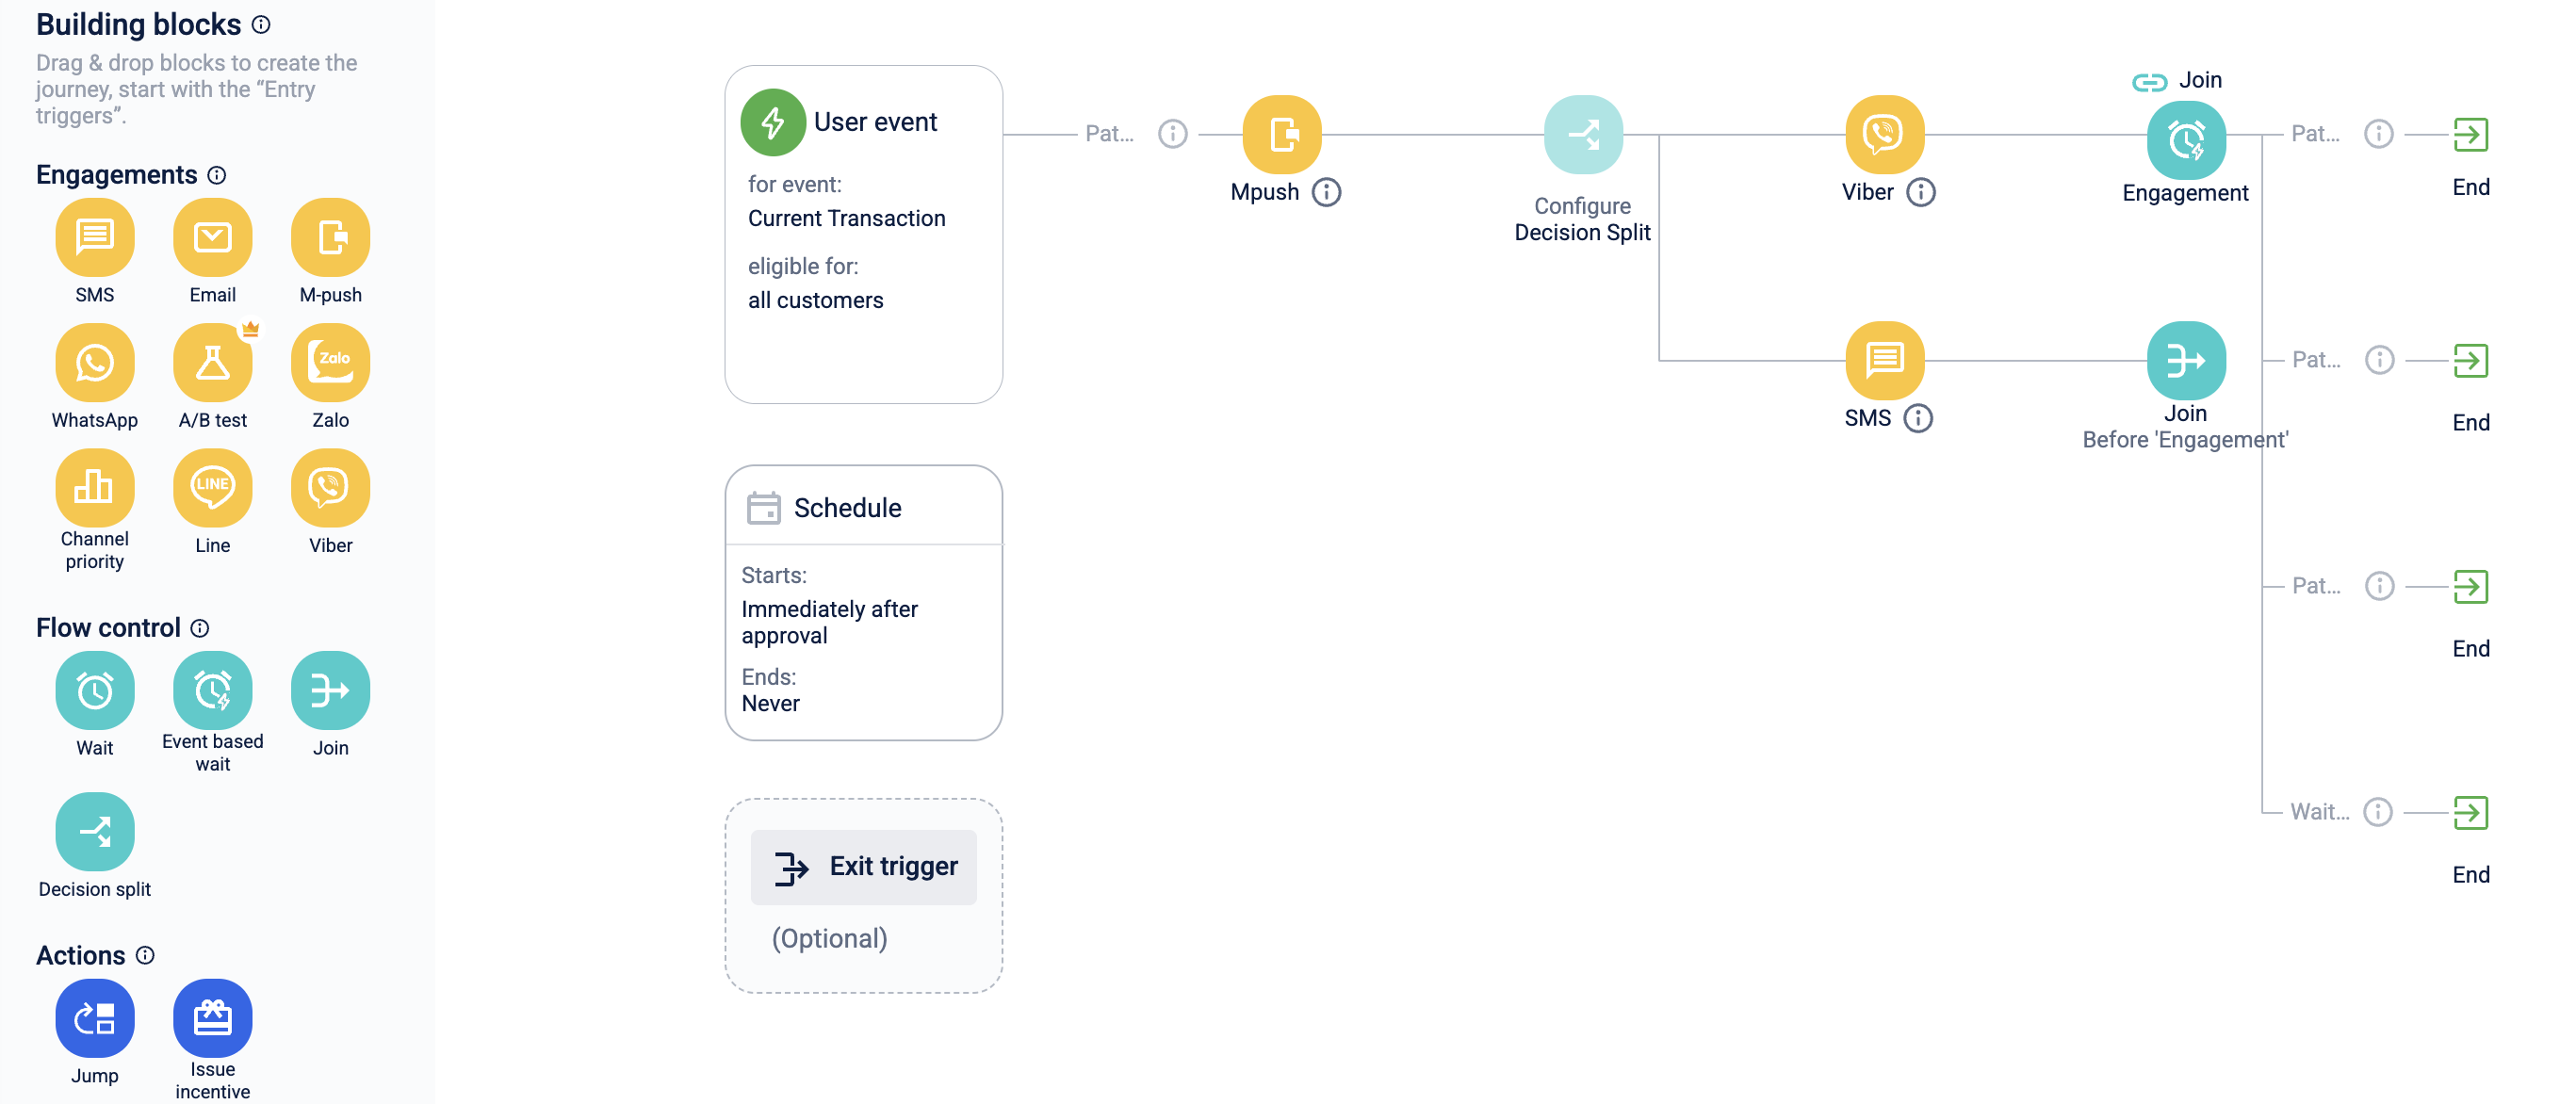
Flow Control Building Block
Flow control helps you control the flow of the journey by applying conditions to user events or user preferences.
Marketers can define different conditions in a customer journey to guide users through different flows based on specific criteria such as time or event-based preferences. These conditions serve as additional decision points that determine whether the user will continue on the same path or be directed to a different flow.
The various flow control blocks available are:
- Time-based wait
- Event-based wait
- Join
- Decision split
Time-based wait
The time-based wait is used by brands to engage customers at a particular time/date or after a specified period. This is preferred after analyzing user behaviour and targeting users at a crucial time to improve engagement.
This feature allows brands to target their customers at the right time to increase engagement and can avoid spamming the customer. This can increase click-through rates and would motivate the target customer to perform a desired behaviour.
Use Cases
- A brand has analyzed that their customers have high activity rates mostly on the weekends and they want to send out communication messages during that period.
- Certain countries have rules that engagements with customers should go out on particular days of the week/date of the month and rates for some days of the week are lower than the other. This would allow brands to comply with government rules and also save engagement costs
Configuring time-based wait
- Drag and drop the Wait block on the journey canvas.
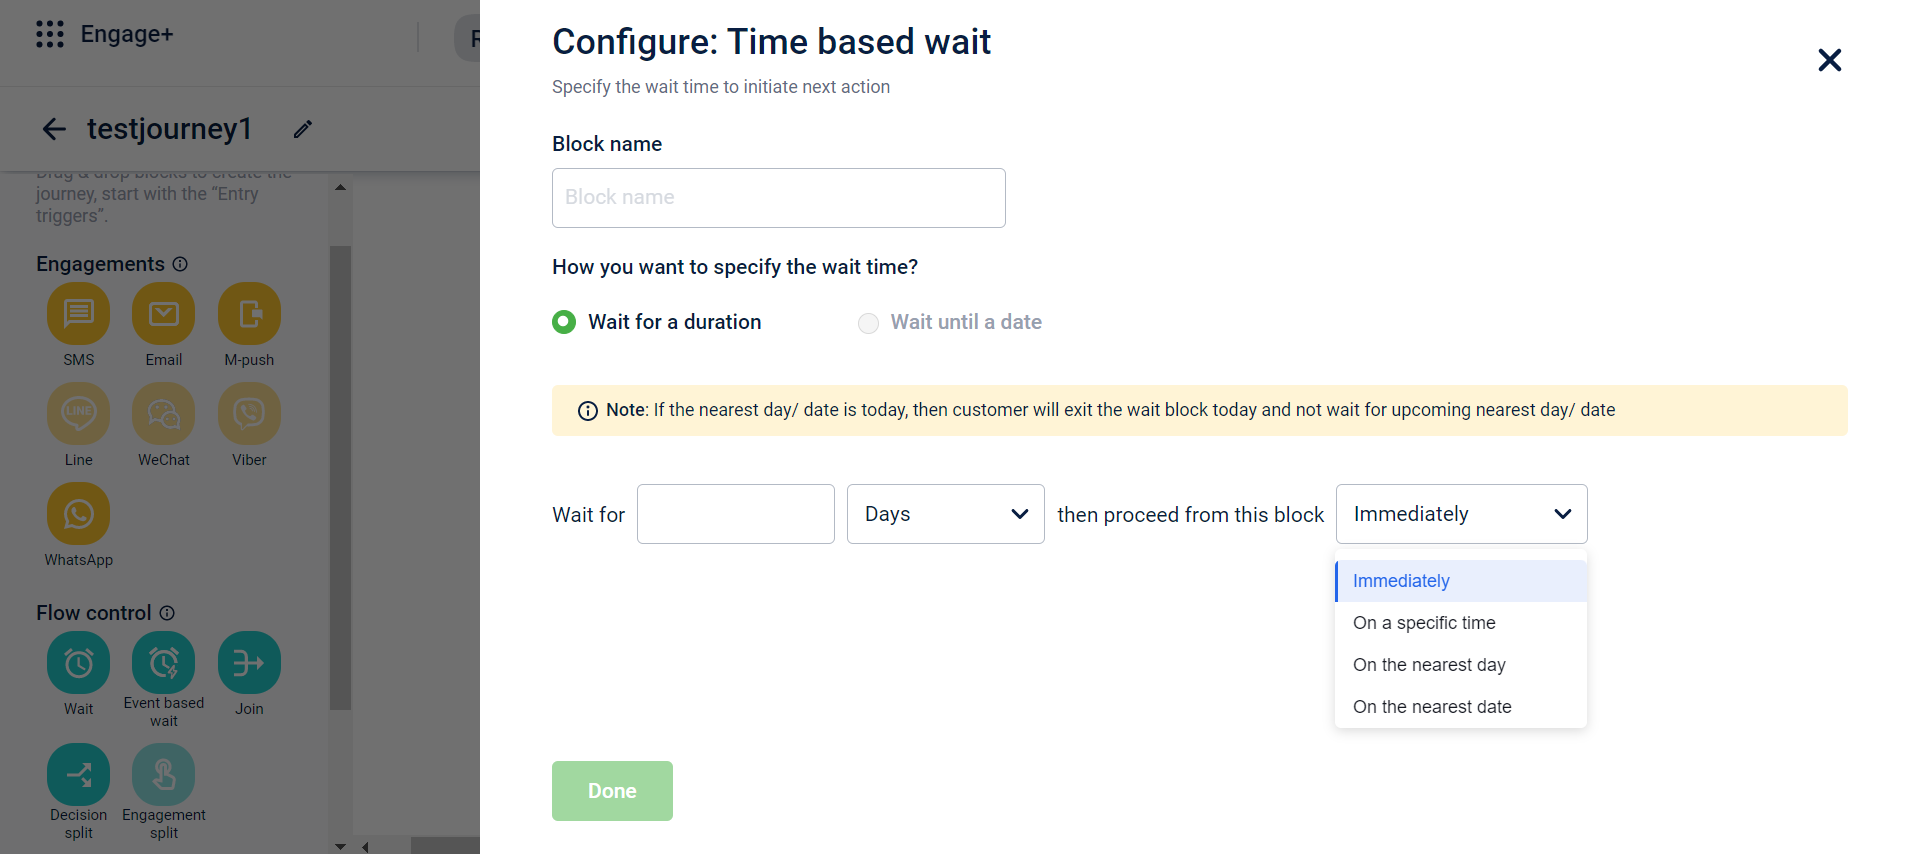
- On the journey canvas, click Time based wait.
- In the Block name, enter a name for the wait block.
- Define the wait duration. Note: At present only, Wait for a duration is supported.
- Wait for - Enter the wait time in hours/ day/week/month/year.
- Then proceed from this block Immediately - From the drop-down, select when the customer should proceed to the next block. The available options are:
- Immediately
- On a specific time - Select the desired time
- On the nearest day - Select the desired day and time
- On the nearest date - Select the desired date and time

- Once the wait block is added to the canvas, click on the delete icon to remove the block or click on the setting icon to edit the block.
Notes
Time-based Wait blocks are not executed in real time. Instead, they are processed at fixed intervals, currently every 15 minutes.
This means that once a customer completes the wait duration, the messages may not be sent at the exact configured time and can be delayed by up to 15 minutes.
Example:
A brand wants to send messages to customers on weekends when engagement is highest, and configures the journey to send a message at 10:00 AM on Saturday.In this case, customers may not receive the message exactly at 10:00 AM. Instead, the message will be sent when the next processing cycle runs for example, at 10:15 AM.
If you need messages to be delivered closer to a specific time, configure the wait to end slightly earlier than the intended time (for example, a few minutes before 10:00 AM). This increases the chances of the message being sent within the desired time window.
If a customer's wait time in v1 is 2 days, and they are moved to v2, the wait time will not reset. It will continue from the remaining duration.
Event-based wait
This feature allows brands to configure user journeys based on the behaviour of the customer. Brands can configure separate paths for customers based on an event-based wait time. The wait can be configured in two ways - wait since event and wait till event.
This allows brands to personalize journeys for users who perform a desired action and for new users that are yet to act. This also reduces the redundancy of messages and eliminates sending irrelevant messages to users.
Use Cases
- The brand wants to give the customers a 10% off coupon if they make a purchase of 5000 within 30 days and if they do not make a purchase, the brand wants to share an upcoming offer message.
- The brand wants to give customers a 10% off coupon after they have completed 90 days since the last purchase date.
Configuring event-based wait block
To configure the event-based wait block, follow these steps
-
Drag and drop the Event based wait to the Journey canvas.
-
Select the Event based wait block on the canvas to open the configuration menu.
-
In the Block name text box, enter a name for the block.
-
Select the wait conditions from the Wait Type drop-down. The available wait types are listed in the table below with their descriptions.
Wait type Description Wait for future event Checks for the completion of a specified user action before proceeding. Wait since a past event Checks for the prior completion of a specified user action before proceeding. Wait for engagement event Checks for user engagement with a message, such as an open or a click, before proceeding. Wait on entry event attribute Checks if a user's attributes match the conditions of the entry trigger before proceeding. -
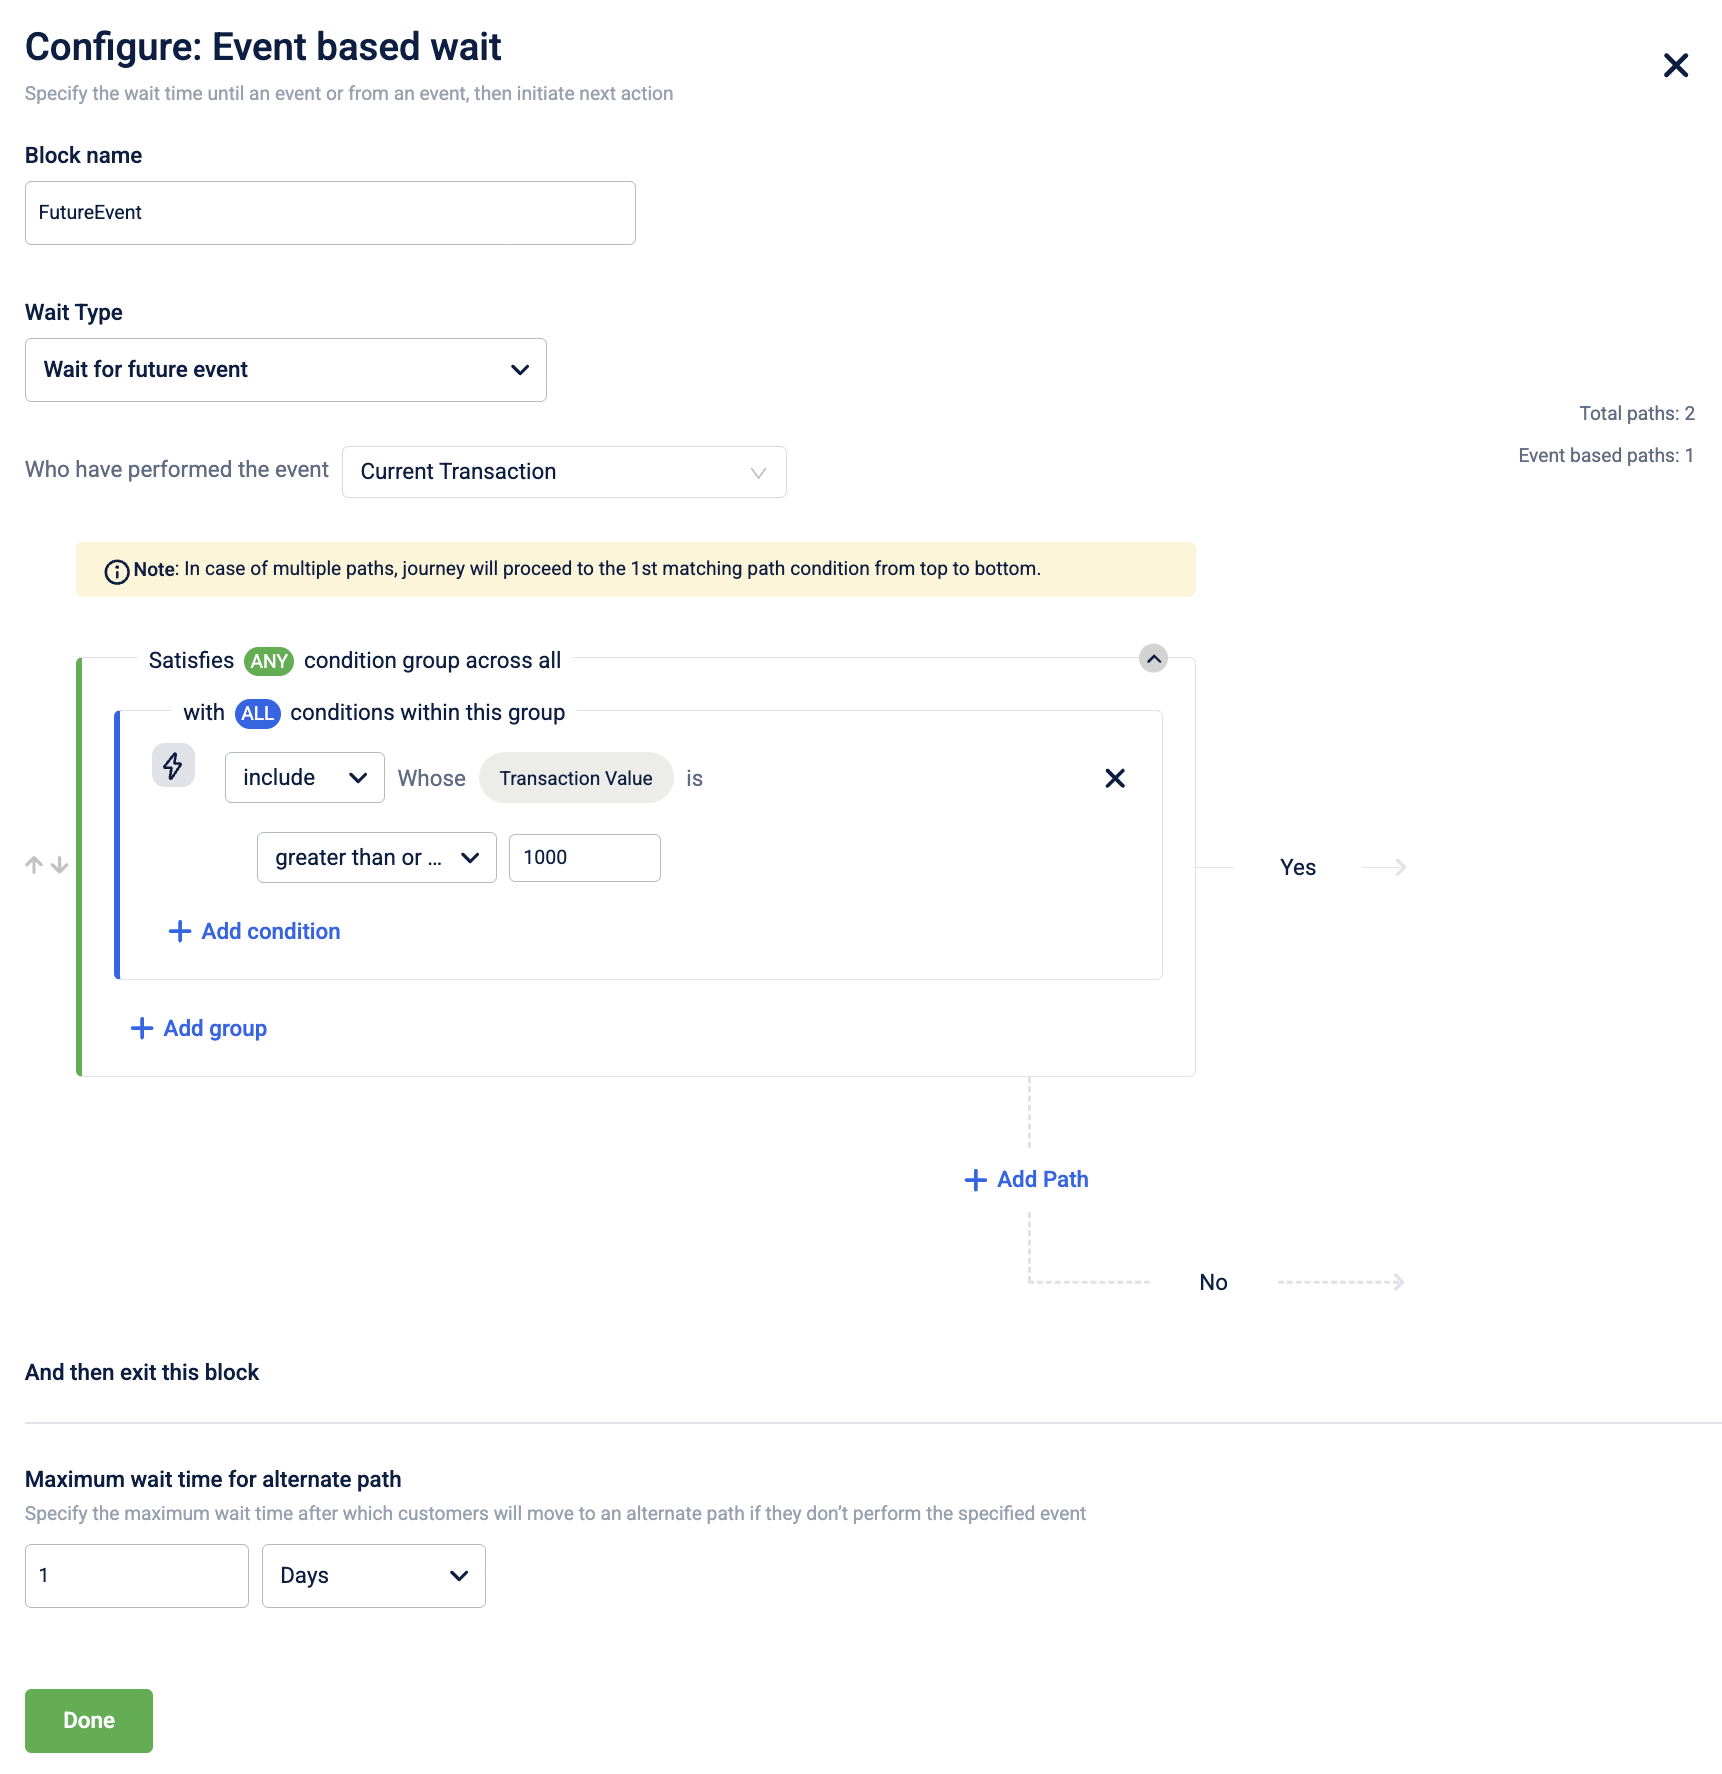
For the Wait for future event wait type, configure the event conditions and additional criteria for the event.
-
Select the event conditions under the Select event drop-down. For more information, refer to the section on Customer events.
-
Select + Add entry paths to add additional criteria a customer must satisfy before proceeding to the next block.
-
Select + Add condition to add a condition. For more information, refer to the section on Conditions
-
Configure the condition.
-
Under Maximum wait time for alternate path, enter the duration to wait for the specified event before using an alternate path
-
-
For the Wait since a past event wait type, configure the number of days and the time criterion.
-
Under Wait, enter the duration to wait for the event.
-
Under the since drop-down, select the criterion. The available options are listed in the table below along with their descriptions.
Criteria Description Registration date Date when the customer registered with the brand First purchase date Date when the customer made their first purchase with the brand Last purchase date Date when the customer made their latest purchase with the brand¡ 
-
-
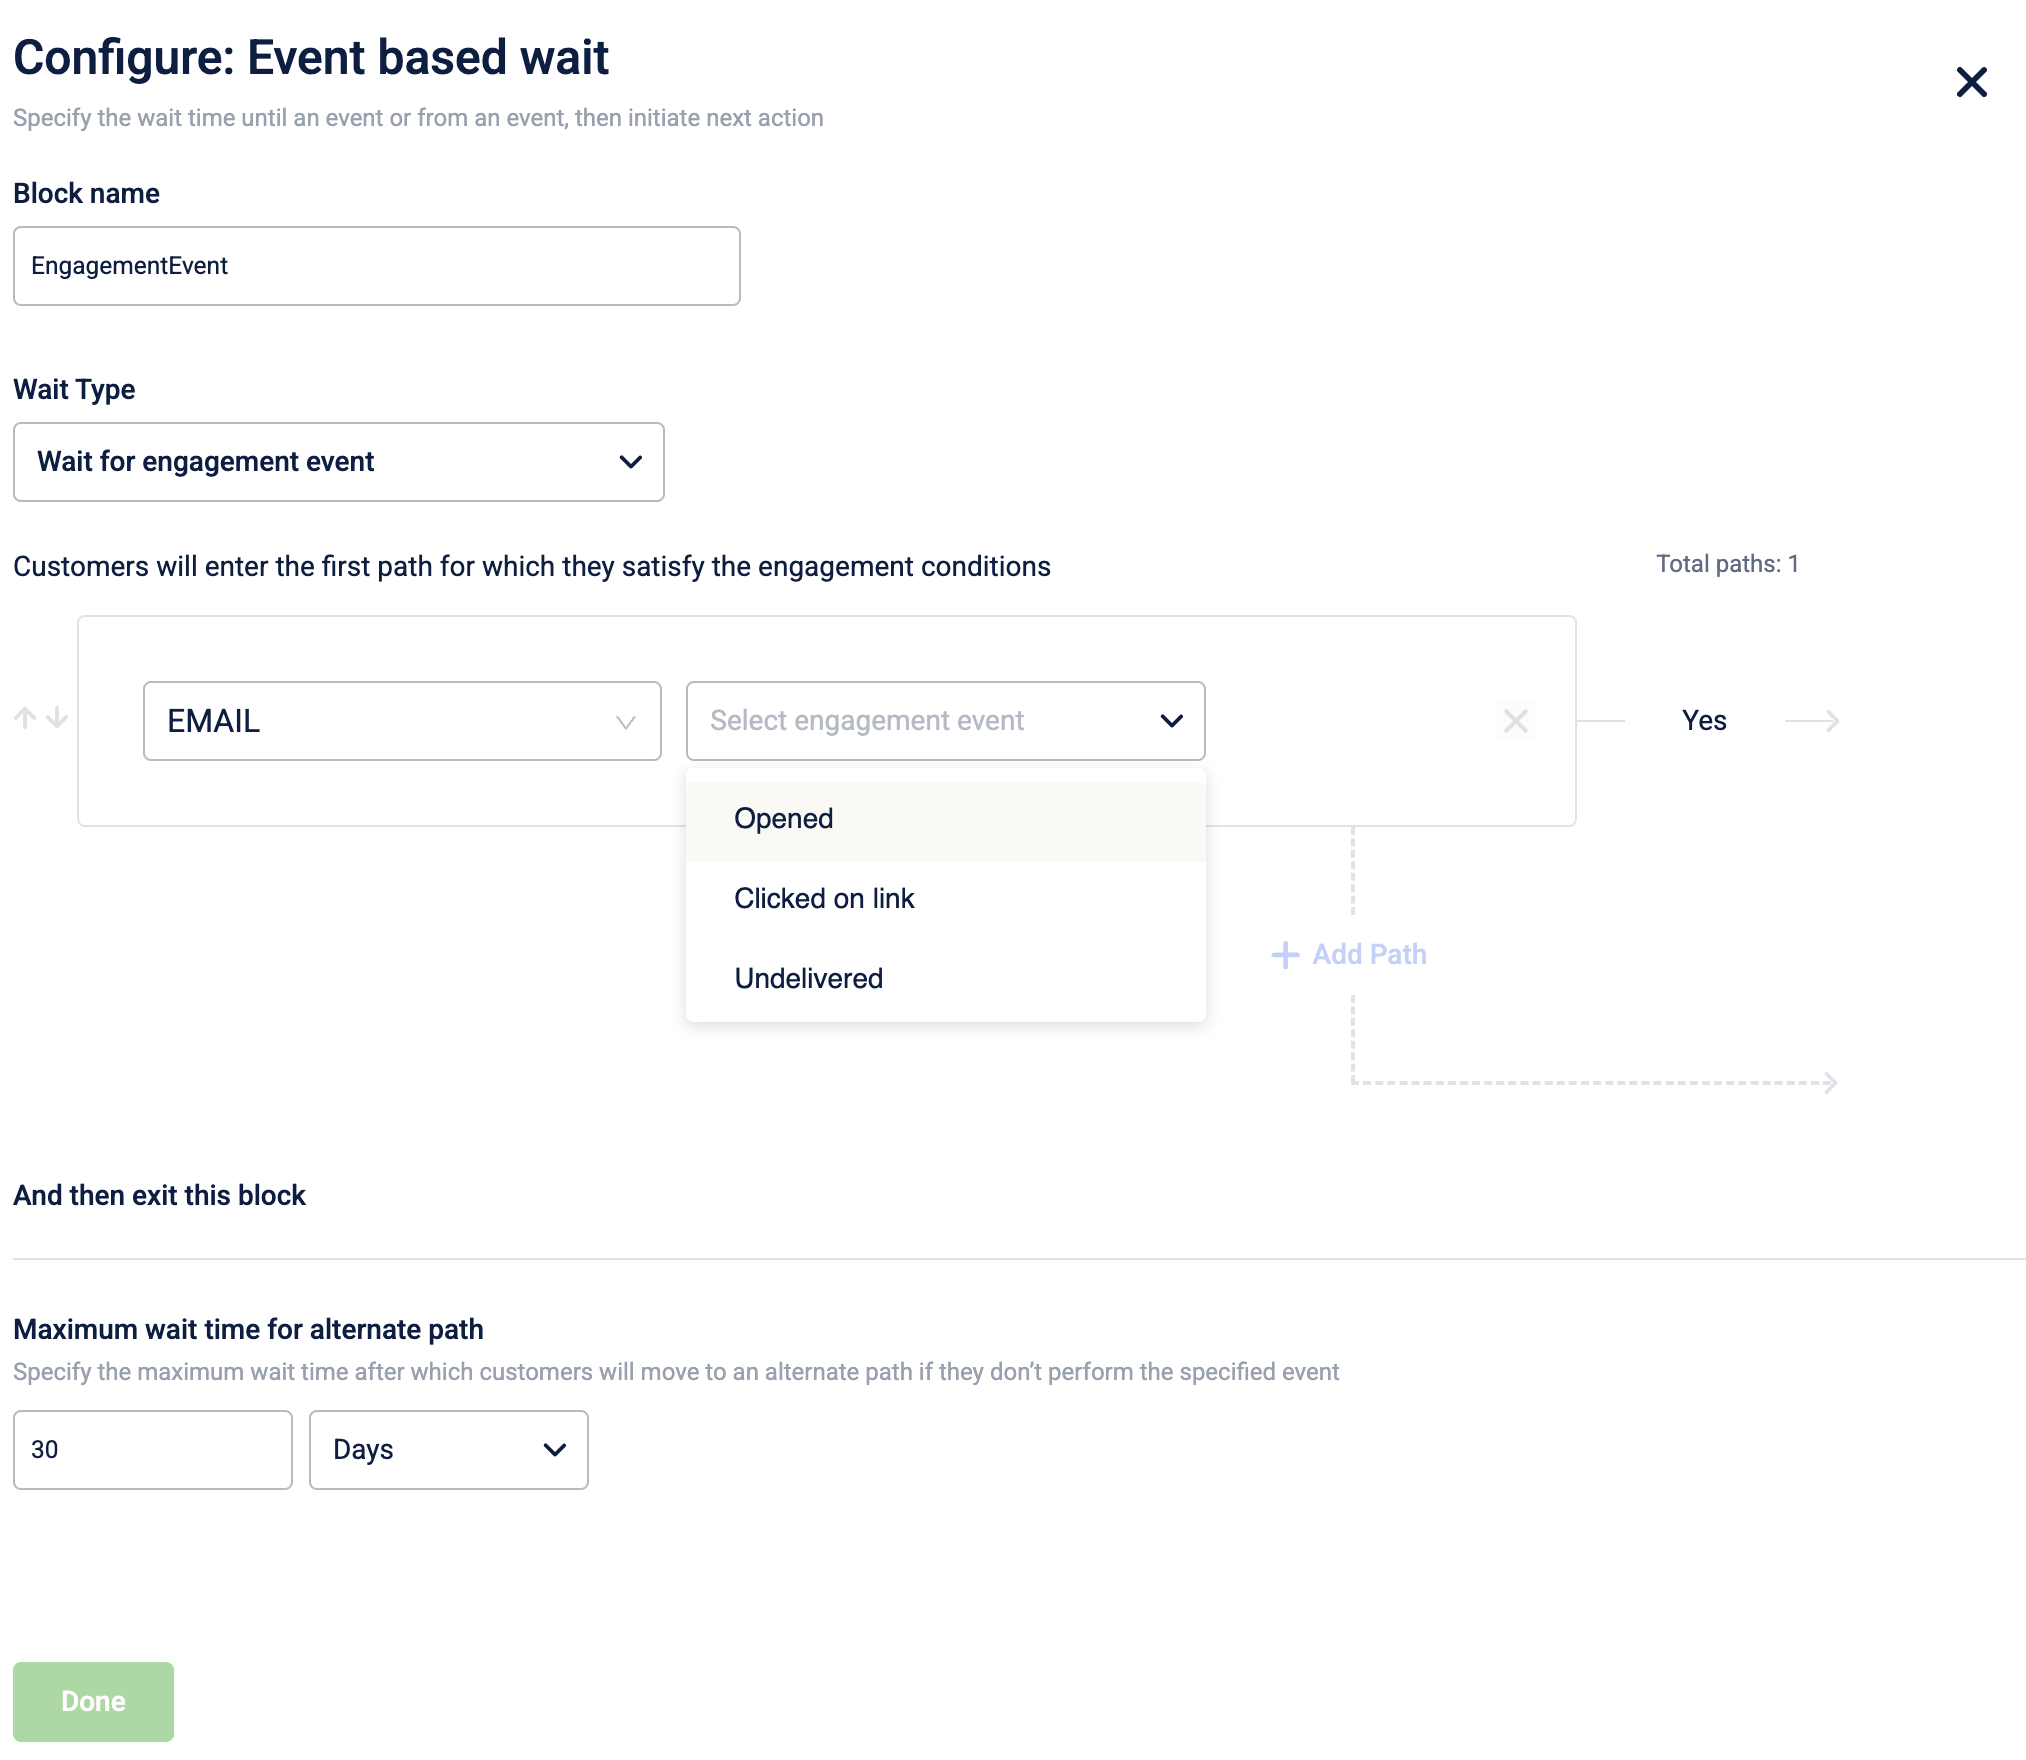
For the Wait for engagement event wait type, configure the engagement block and event.
-
Under the Engagement Block drop-down, select the engagement block you want to track (for example, SMS, Email, M-push, WhatsApp, Zalo, Line, Viber). The list will display only those engagement blocks that exist before the current wait block in the journey path.
-
Under the Select engagement event drop-down, select the type of engagement event - Opened, Clicked on link and Undelivered. Refer to the table below for detailed descriptions of each engagement event type.
Condition Description Opened Checks if a user has opened the message or clicked any link within it before proceeding. An open is treated as a weaker signal of engagement compared to a click. Clicked on link Checks if a user has clicked any link within the message before proceeding. You can select from the following options: - Exact link: Select specific links from the engagement block to track. You can also choose to track all links within the message. The links displayed in the drop-down are those included in the message template of the selected engagement block.
- Link contains: Enter a partial segment of the URL, such as a hostname, to track any links that contain the specified text. For example, entering
offers.brand.comwill track clicks on any link that includes this hostname. This match is based on the hostname, not the full URL.
Undelivered Checks if a message from a previous engagement block in the journey has failed to deliver. You can then create a fallback path for these users, such as attempting communication on a different channel. You can configure this based on the following options: - Any reason: Triggers the path if the message was undelivered for any reason. This is the default for all non-delivery events.
- Specific reason: Allows you to select one or more specific reasons for non-delivery to create more targeted fallback paths. To create a new reason for non-delivery, raise a JIRA ticket to the Capillary product support team.
-
Under Maximum wait time for alternate path, enter the duration to wait for the specified event before using an alternate path.
-
-
For the Wait on entry event attribute wait type, configure the wait until time and date attribute.
- Under the Wait until drop-down, select the date and time period to wait until.
- Enter the time period before or after the transaction date.
- Under the Select date attribute drop-down, select the date attribute.
- Select the path a customer will follow if they reach the block after the defined time has passed using the radio buttons. The following options are available:
- Will skip this wait block directly
- Will enter an alternate path
-
Select Done the save the changes.
Notes
- You can preview the selected events in the journey flow by hovering over the icon. For links with more than one, it will show the user about additional links (e.g., "three more links along with this links").
- If a Decision Split block is used to configure a join block, engagement channels from the joined path will also be available for selection.
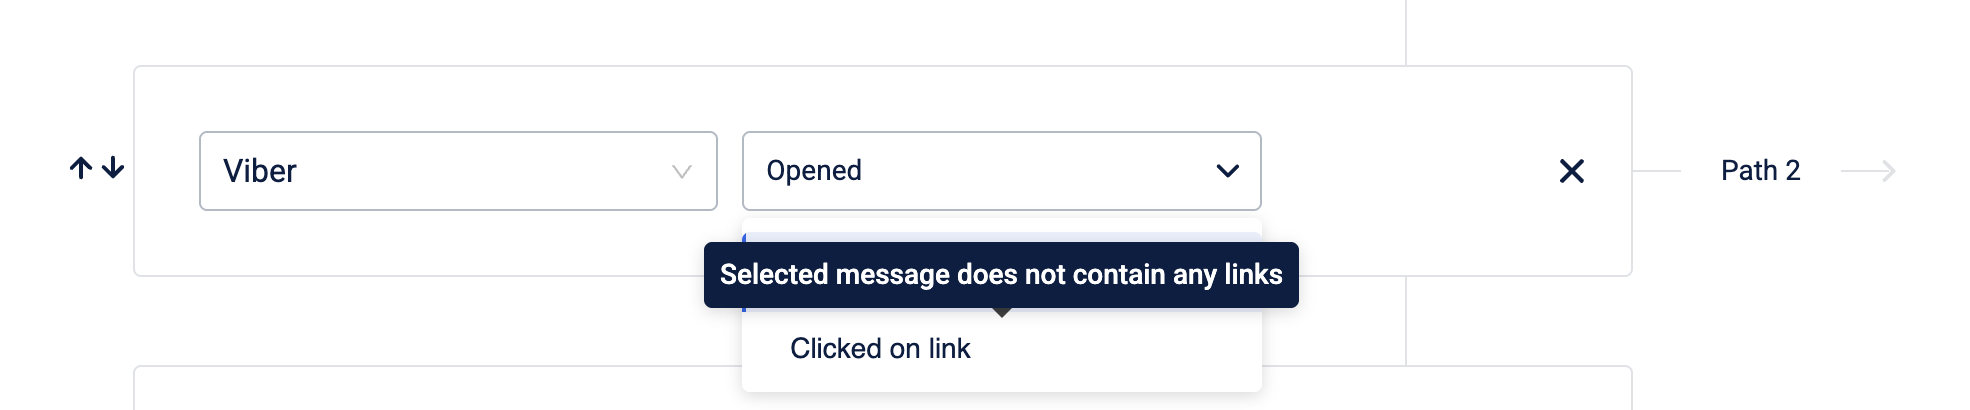
- If the selected engagement block (e.g., a Viber message) does not contain any links, the click event option will not be available, and a message will inform you accordingly.
- If a particular combination of engagement block and event (e.g., Viber + open) is already used in a path, it cannot be selected again for the same block within the same journey.
Join
This feature is used to connect multiple paths within a journey onto a single common path. It reduces the time and effort of the brand to configure similar paths within a single journey. This feature saves the time of the marketer by disabling the hassle of creating multiple journeys/paths to send customers on a common path. It also maintains continuity and familiarity of engagements sent to customers
Use Cases
Brands want to nudge their customers to purchase their seasonal collections. They share an SMS as well as a coupon code with the customer. They want to wait for 10 days for the user to act and if not performed, they want to re-send the message to customers.
Configuring a join block
- Drag and drop the Join block on the journey canvas. Whenever a user reaches this block, they will be redirected to a common path as configured.
- Click on the Join block in the canvas.
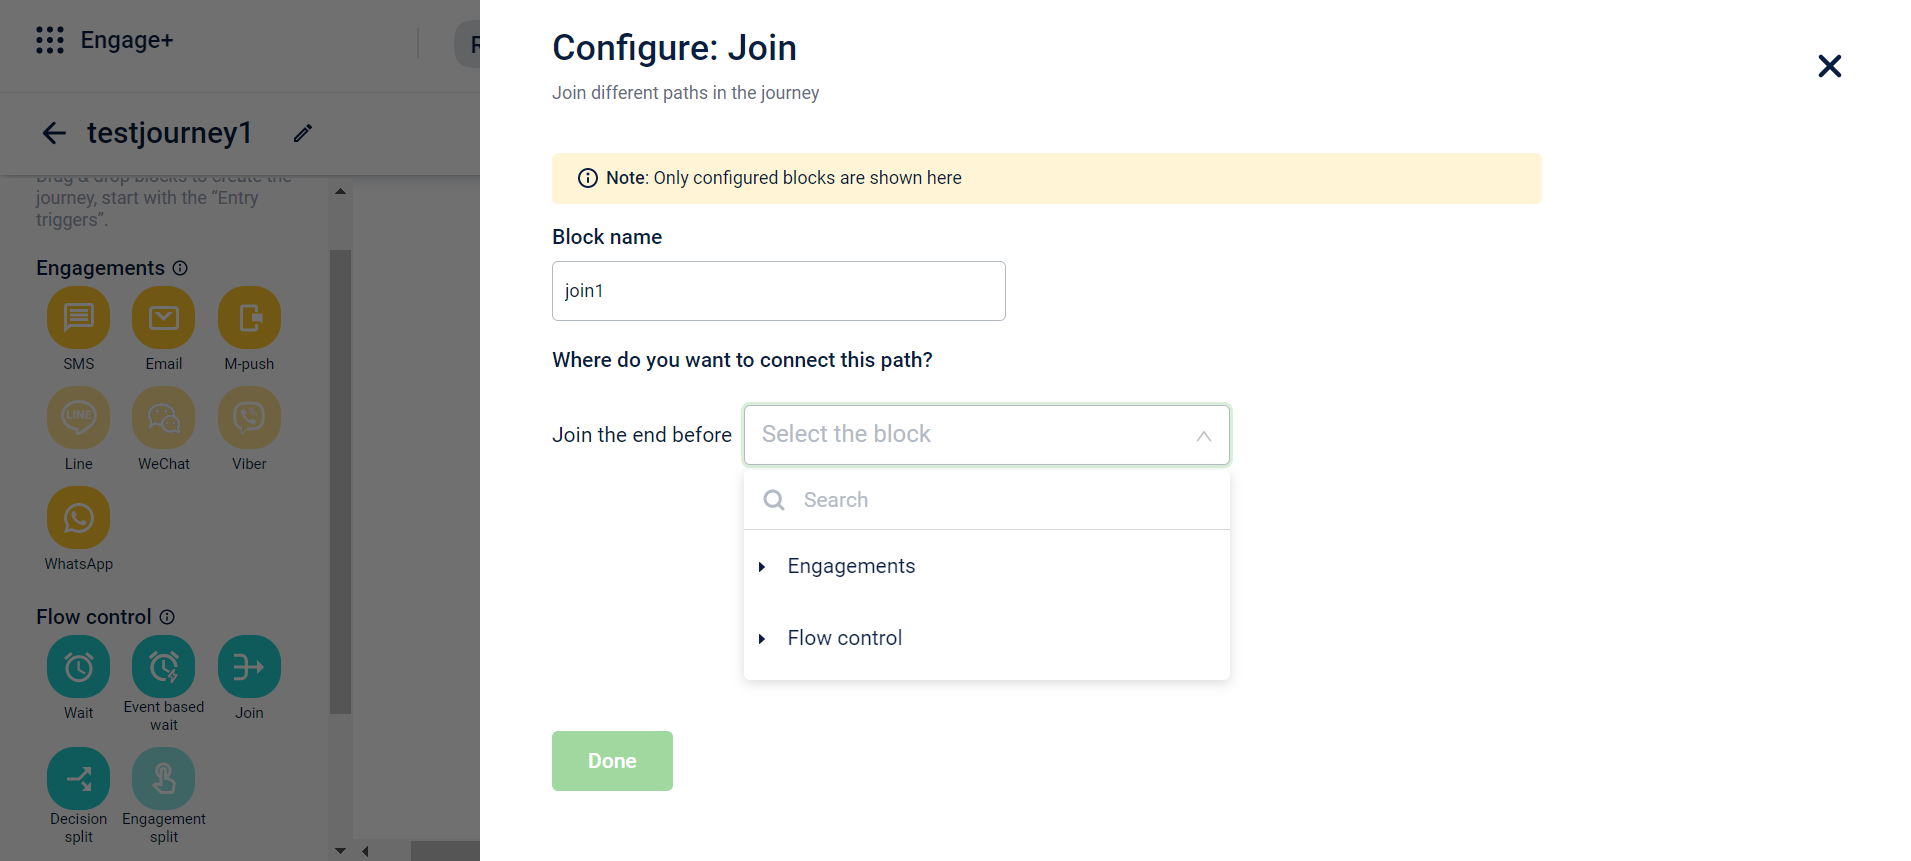
- In the Block name text box, enter a name for the block.
- From the Join the end before drop-down, select the block the customer should join. A list of block names previously configured within the journey is displayed in the drop-down as either engagement or flow control depending on the components included. You can use the search button to search the block names.
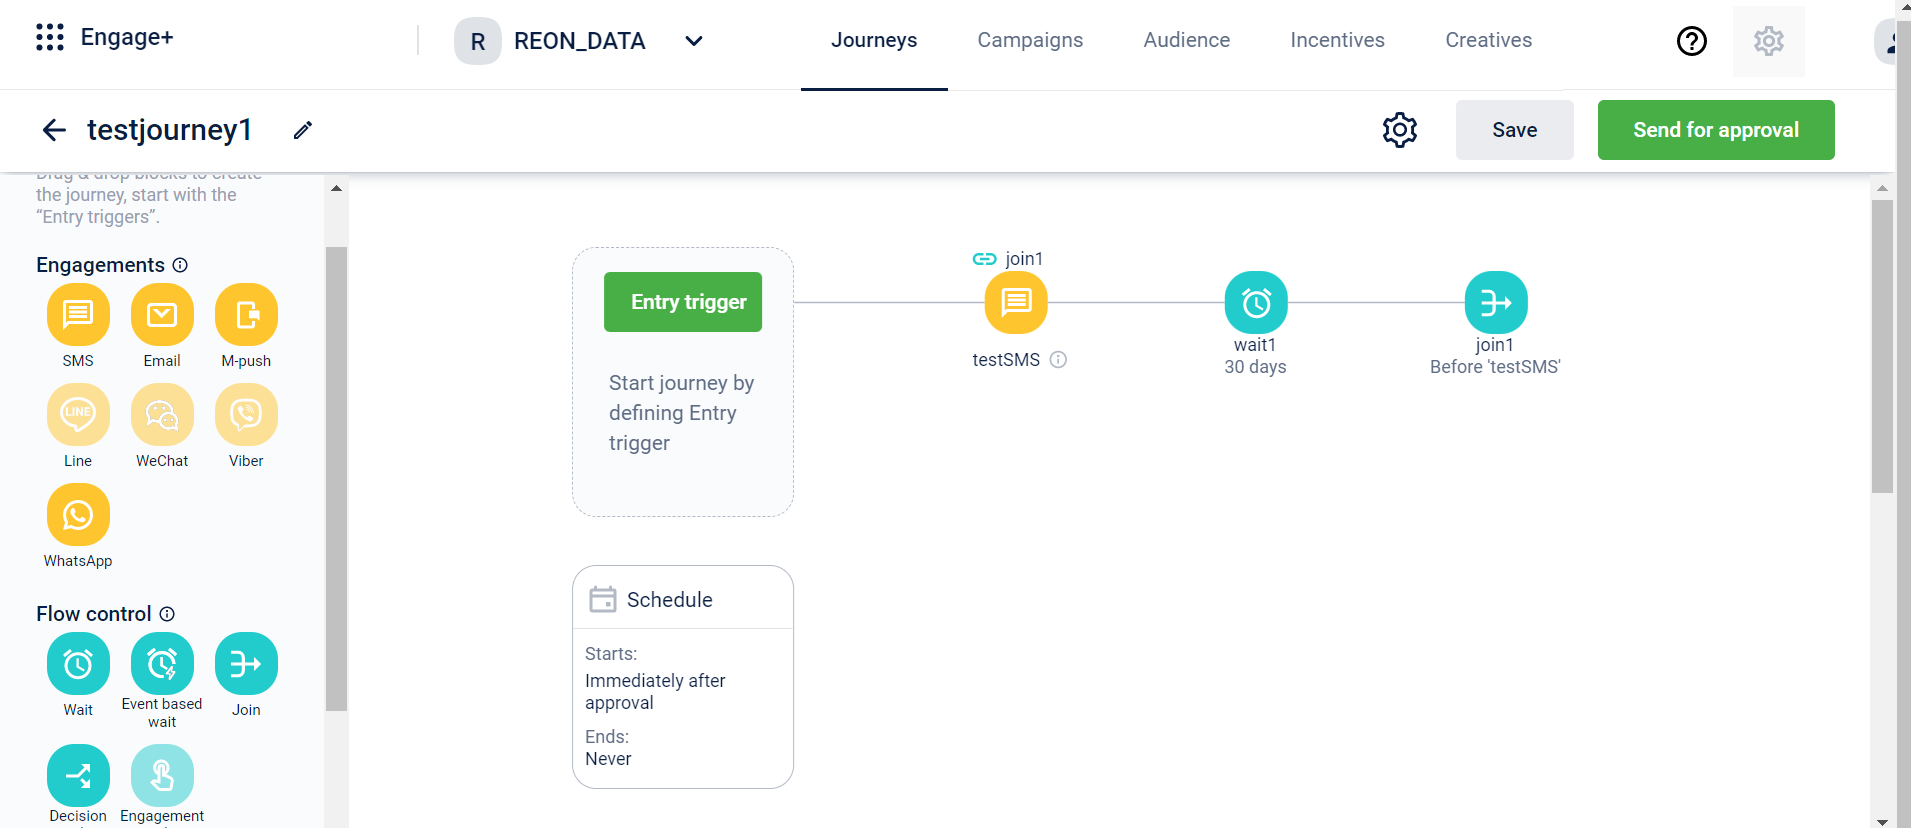
- Click Done to finish configuring the block. Post configuration, you can view where the join block merges the journey.
- Once the wait block is added to the canvas, click on the delete icon to remove the block or click on the setting icon to edit the block
Decision Split
This feature helps brands to define different paths for multiple kinds of users. Brands can define multiple criteria and the customers will move in a path as per the criteria they fit in. This enables brands to target customers based on their past purchases and behavioural patterns which leads to extremely personalized journeys for users. It allows brands to create multiple paths for customers matching various criteria and to send out relevant engagement messages and nudges.
Note
Decision Split evaluates conditions based on processed data (D+1) and not on real-time event data. This means that attributes such as transaction time, purchase details, or behavioral events may not be immediately available at the time the user enters the journey.
For example, if you configure a condition to split users based on transaction time, such as sending an email immediately for transactions between 7:00 AM–9:00 PM, and delaying otherwise, the system will have the required data at that moment. As a result, the condition may not evaluate as expected, and users can be routed to the fallback path.
This happens because event data is processed and made available for evaluation only after the daily processing cycle (D+1), and not in real time.
Recommendation:
For use cases that require real-time evaluation of event attributes, consider using the Event based wait block. However, note that time-range based conditions (for example, evaluating if an event occurred within specific hours of the day) are currently not supported in real time.
Use Cases
- Incentive customers based on their previous behaviour which will result in an increase in coupon redemption and increase transaction frequency. Brands will be able to send relevant messages to users based on their behavioural patterns and can increase personalisation.
- Incentivise customers on special days such as birthdays/anniversaries to make them feel special and increase loyalty towards the brand.
- Send customers wishes and offers based on the festivals celebrated in their respective regions. This will increase personalisation.
Configuring a decision split block
-
Drag and drop the Decision Split block on the journey canvas. Whenever a user reaches this block, they will be directed on the path according to which condition they match
-
Click on the Decision split block in the canvas.
-
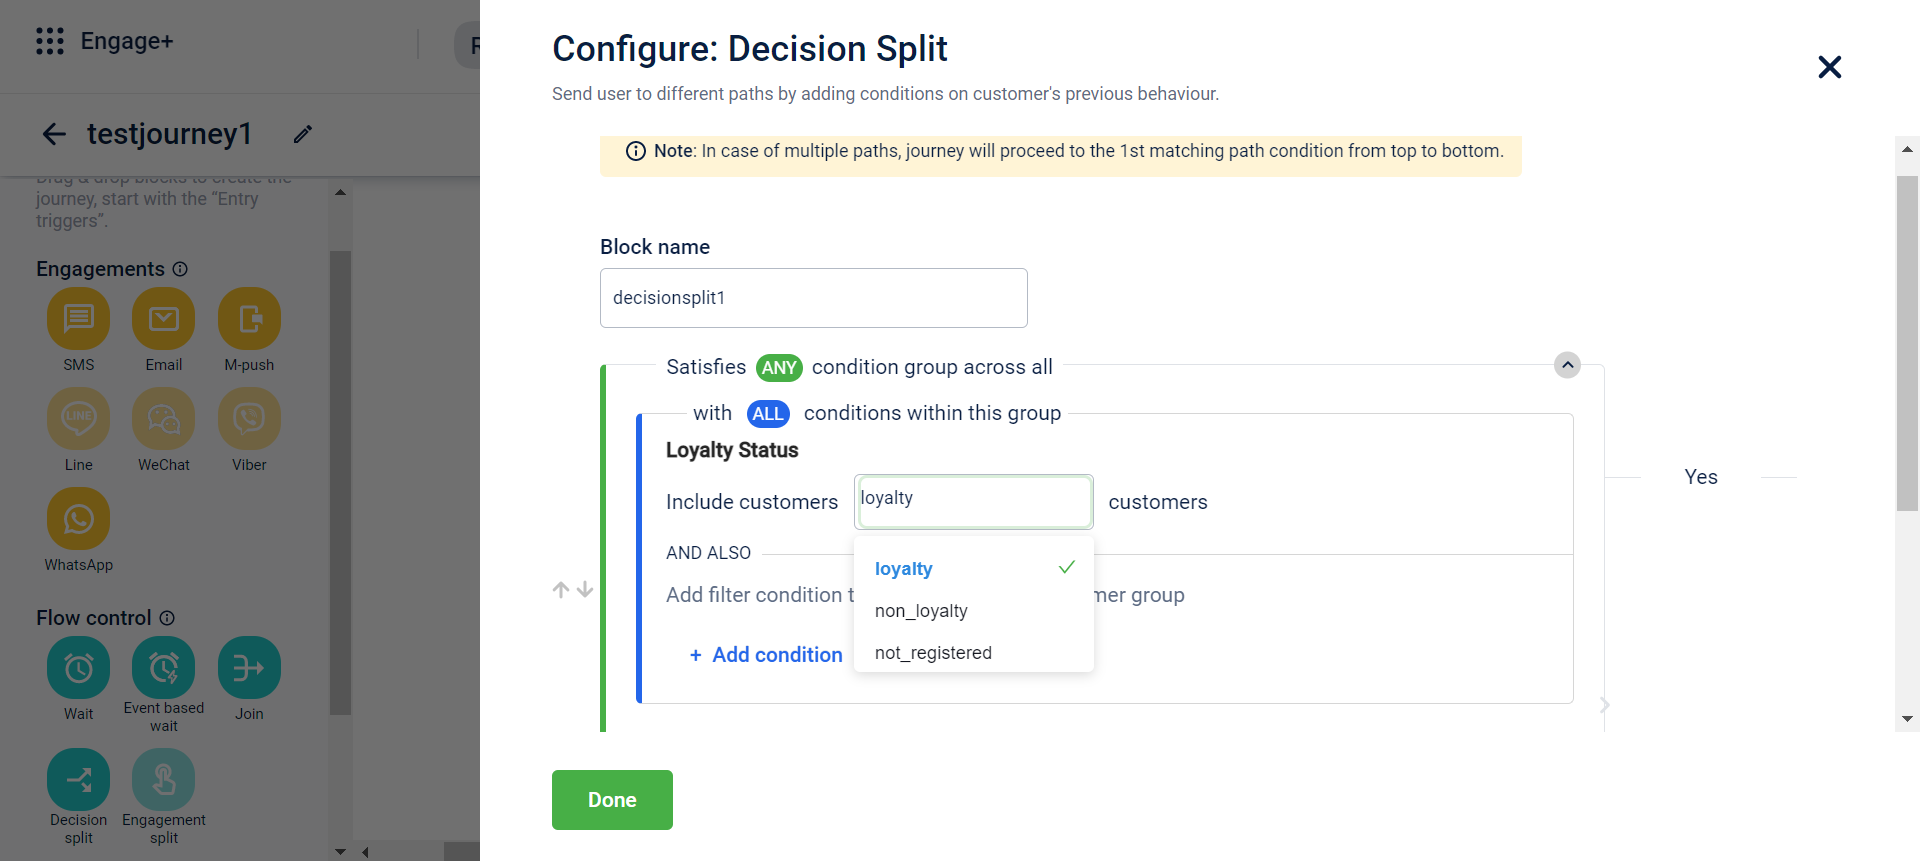
In the Block name text box, enter a name for the block.
-
Configure the loyalty status and add filter conditions.
- Within loyalty status, choose the category of customers you want to select.
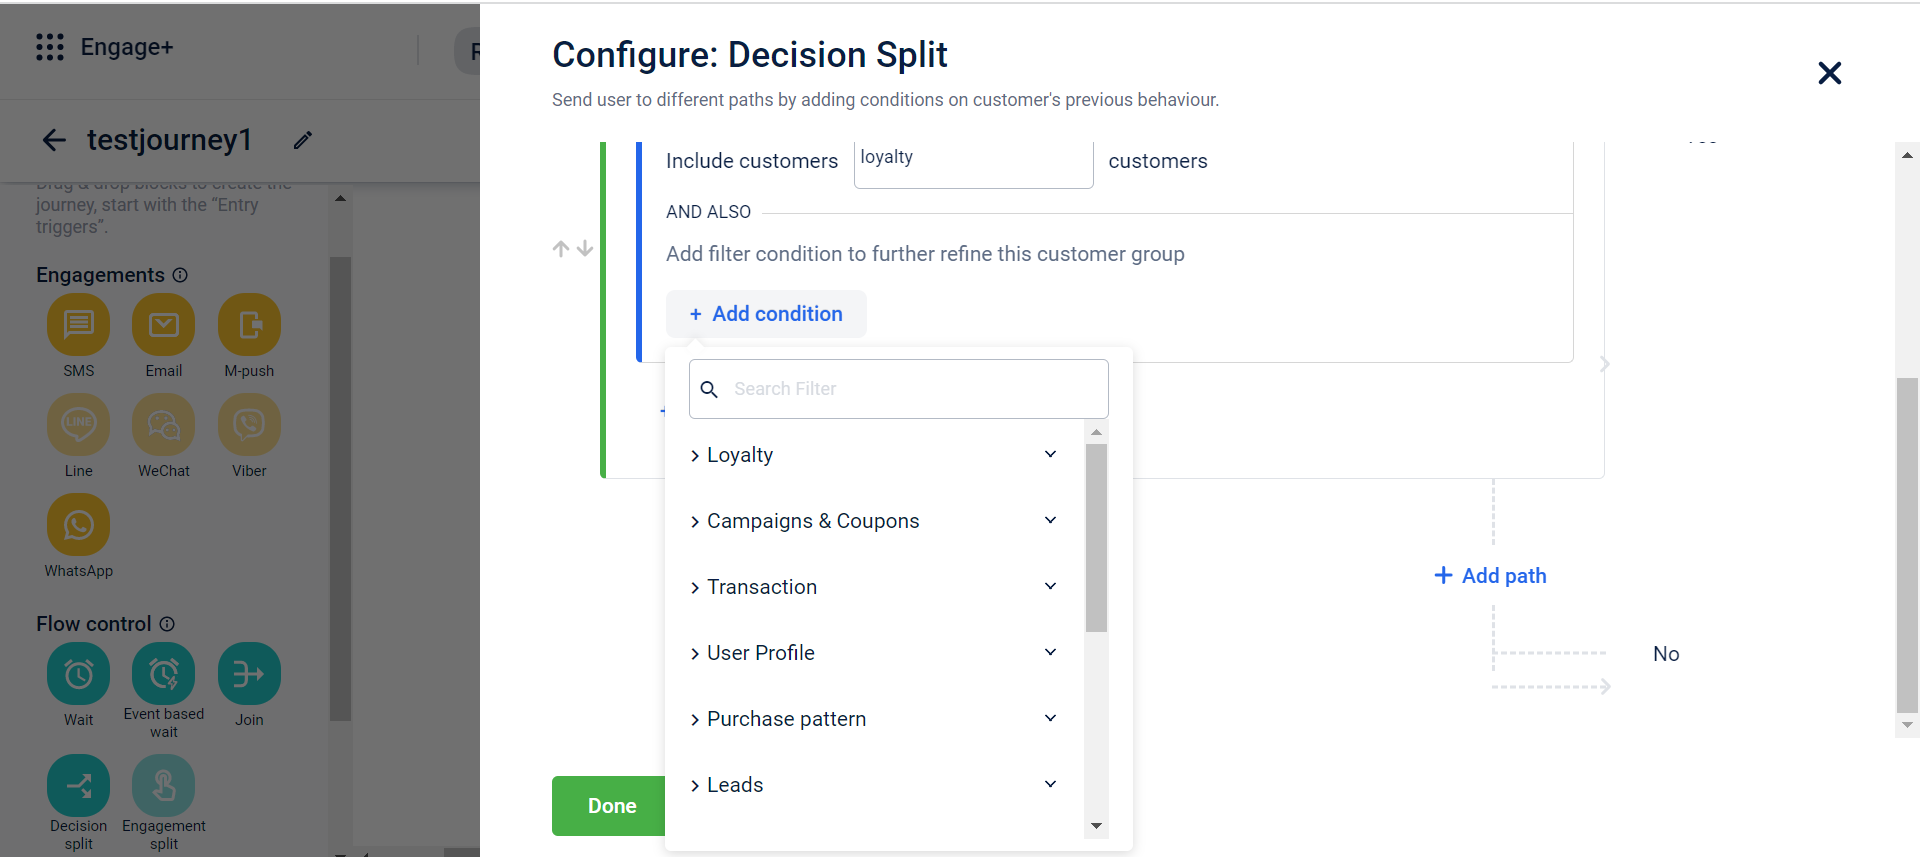
- Click +Add condition to add conditions and further refine the customer group. You can click +Add condition to add further conditions and combine them with the AND operator. Click Add group to add conditions and combine them with the OR operator.
- Along with multiple conditions, brands can also define multiple paths within the same block.
- Once a filter is selected within a condition, further define which group of customers will be included in the condition. This is populated based on the filter chosen.

- Within loyalty status, choose the category of customers you want to select.
-
Once the conditions have been configured, click Done. The journey will get divided into two paths- for customers who satisfy the condition within the decision split block and for customers who do not.
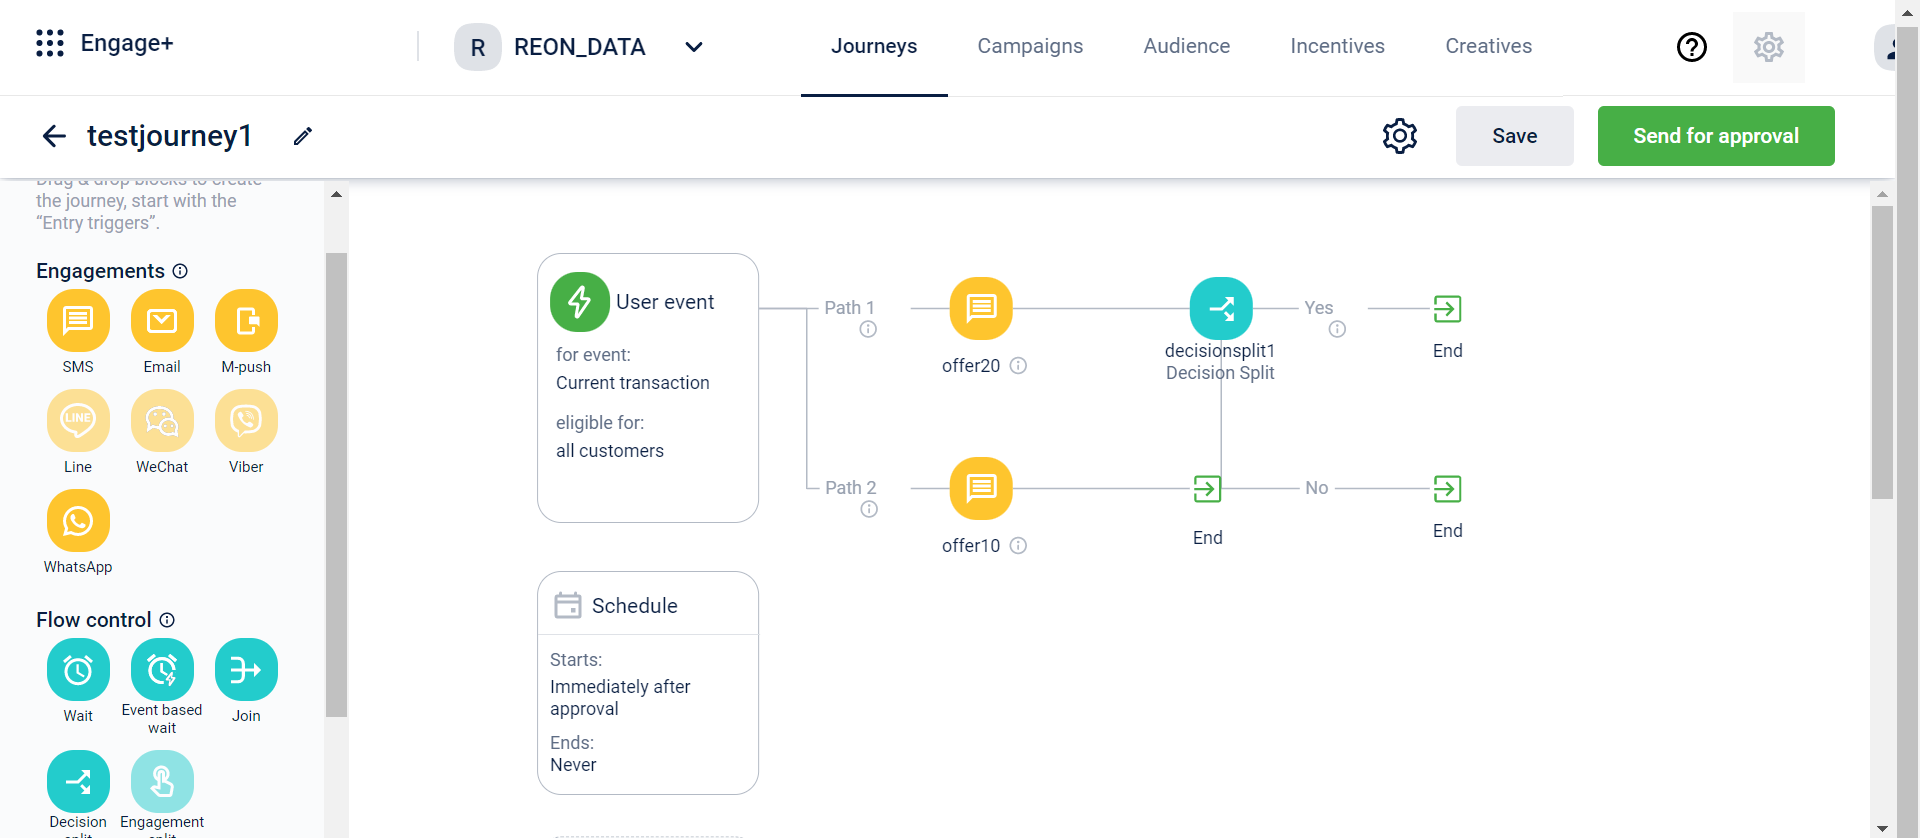
- Further blocks can be added within the separate paths of the decision blocks. Once the wait block is added to the canvas, click on the delete icon to remove the block or click on the setting icon to edit the block.
Random split block
The Random Split block enables you to divide customers into random groups to test different strategies, personalise engagement, or compare results to determine what works best. You have the flexibility to configure any type of block within each path, giving you complete control to design unique customer experiences for every group.
Use case: Testing Promotional Messages
Requirement:
A brand wants to test different versions of its promotional messages to identify which one performs better in terms of engagement and conversions.
Solution:
The brand uses the Random Split block to create two paths in the journey. One group receives a message with a discount offer, while the other receives a message highlighting product benefits. After the journey is live, the brand compares engagement and conversion metrics across both paths to identify the more effective message.
Use case: Reward-Based Engagement
Requirement:
A brand wants to improve customer engagement by offering rewards and understanding which type of incentive -coupons or loyalty points, drives better participation and repeat purchases. It targets customers whose transaction value is more than ₹1000.
Solution:
The brand uses the Random Splitblock to create two paths in the journey. One group receives a coupon reward, while the other receives loyalty points. After the journey is live, the brand compares redemption rates and purchase behavior to determine which reward type is more effective in driving engagement.
You can configure up to five paths, each with a custom distribution percentage. Customers are assigned randomly based on the defined distribution, ensuring that over time, the split aligns closely with your configuration.
When only a few customers enter the journey, the split may not appear exact. As more customers join, the actual distribution will gradually align with the percentages you configured.
Example
Let’s say you set up a Random Split block with two paths:
- Path A: 70%
- Path B: 30%
This means you want about 70% of your customers to go to Path A and 30% to Path B.
Now, if only 10 customers enter your journey, randomness might make it look like this:
- Path A: 6 customers
- Path B: 4 customers
That’s a 60/40 split — not exactly 70/30.
However, as more customers enter (for example, 1,000 or 10,000), the distribution will start getting closer to your setup:
- Path A: around 700 customers
- Path B: around 300 customers
So, the more customers that enter the journey, the more accurate the split becomes.
Note
When only a few customers enter the journey, the split may not appear exact. As more customers join, the actual distribution will gradually align with the percentages you configured.
When an odd number of customers enter the journey, the additional customer is automatically assigned to one of the paths to maintain a near-equal distribution.
Example:
If there are seven customers with a 50/50 split:
- Four customers go to Path A.
- Three customers go to Path B.
Configuring a Random split block
To configure a Random split block, follow these steps:
- Drag the Random Split block onto the journey canvas.
- Select the Settings icon on the block. A configuration modal appears.
- Enter a Block name.
- To add paths, click the + icon.
- You can create up to five paths.
- By default, two paths are available with a 50/50 split.
- The minimum number of paths is two.
- (Optional)Adjust the distribution percentages using the slider. The values automatically adjust to ensure the total equals 100%.
- (Optional) Select Split equally to divide the customers equally across all paths.
- Select Done to save the configuration.
Once configured, you can add activities to each path. When the journey starts, customers are randomly assigned to paths based on the defined distribution.
Updated 3 months ago