
Milestones (also known as Target loyalty)
This page provides you with information on Milestones, including details on what they are, how to configure them, where to configure them, and how to connect a loyalty promotion to a milestone.
The Milestones feature enables brands to set targets for their customers and reward them upon achieving the defined target. A pure gamification mechanism to increase user retention.
NoteBenefits (aka rewards) needs to be configured seperately (in loyalty promotions) and cannot be configured along with the Milestone.
In a Milestone, the target value represents the specific objective or goal that users are required to achieve. This capability empowers brands to gamify their customers' user journey, aiding in user retention, enhancing regular sales, promoting cross-selling, and fostering enriched customer interactions.
With the help of Milestones, tracking can be done on almost any aspect of the user. The following examples help in understanding what variant type of tracking can be done using milestones:
Transactional type of milestones:
- The user must achieve 10,000 gross sales in a month to receive 100 points.
- The user has to make 5 transactions in a week to get a premium customer badge.
- The user has to purchase 5L of petrol of a specific type in a month to get a $5 coupon.
Behavioral type of milestones:
- The user must update their profile picture 3 times within a quarter to receive a $10 coupon.
- The user has to walk 5000 steps in a week to get the fitness-freak badge.
- The user has to give 3 product reviews in a quarter to get 10k points & exteem user badge.
Extended fields type of milestones:
- The user has to purchase $100k as a tax in a year to get the ultra-rich-high-value user badge, which gives exclusive access to company events, and sessions for free.
- The user has to purchase 13 grams of gold from a specific store in 6 months to get 15k points.
Other customer activities type of milestones:
- The user has to redeem the points 5 times in a quarter to get a $2 coupon.
- The user will be marked with the "fraud" label whenever a user does 10 returns in a quarter.
- The user has to refer 7 new users in a year to get the elite badge and 5k points.
Unified targets examples:
With the help of these, you'll not only be able to track any property of the customer using targets but also will be able to track multiple targets together which has many use cases.
Refer to this to learn more about the unified targets.
In all the above examples, each user is assigned a specific "target" to achieve to receive corresponding benefits. This process mirrors the structure of a game, where teams or players must meet predefined targets or goals to achieve rewards and others. Thus, milestones help in implementing gamification for your brand.
Accessing the Milestone configuration page
To configure a milestone, use the following direct links to access the Milestones product page:
Method 1: Clicking on the below appropriate links
- EU cluster: click on this link to open the EU cluster.
- India cluster: click on this link to open the India cluster.
- APAC2/SG cluster: click on this link to open the APAC2/SG cluster.
- USA cluster: click on this link to open the USA cluster.
Note: On the homepage, make sure to change the "org" to your org.
Method 2: Search from org settings
- Login into the homepage of the org where you want to create your milestones
- On the top-right corner, click on the "profile" symbol.
- Click on the "Organization settings"
- Search for "milestones", and that's it. You'll be taken to the home page of milestones.
Home page
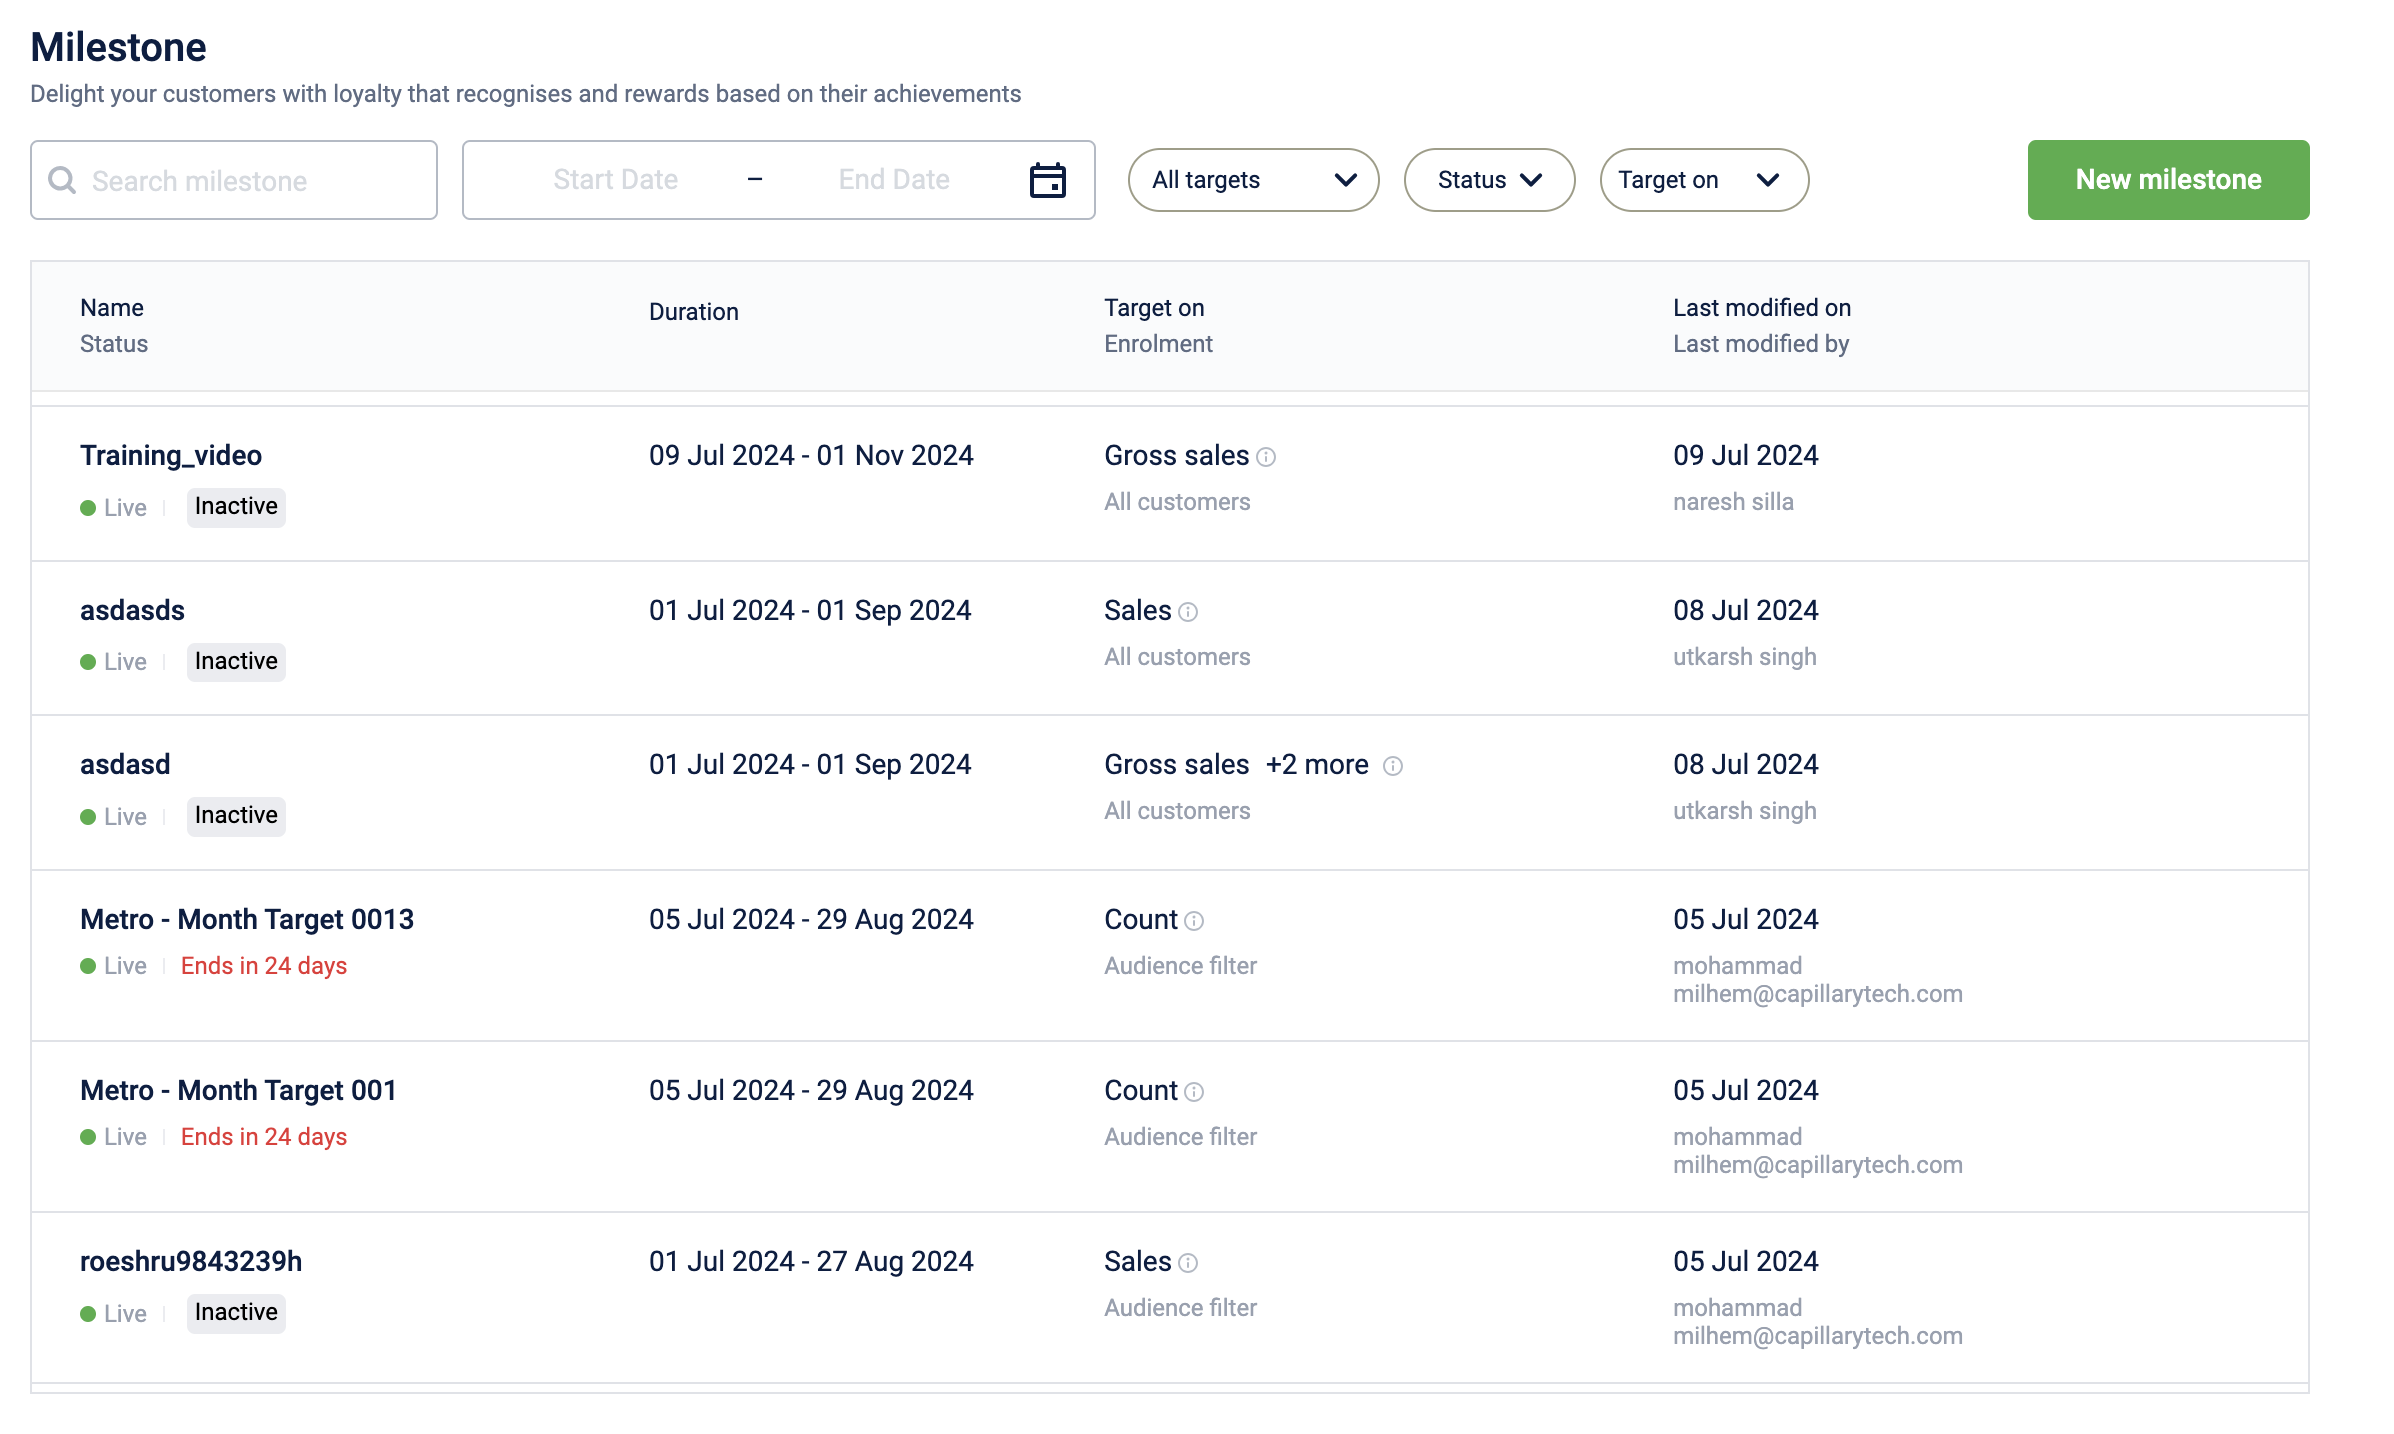
After clicking on any of the above URLs depending on your cluster, you'll see the home of Milestones. On the homepage, from the drop-down at the top-left, select your organization to view existing Milestones and configure new Milestones for your organization.
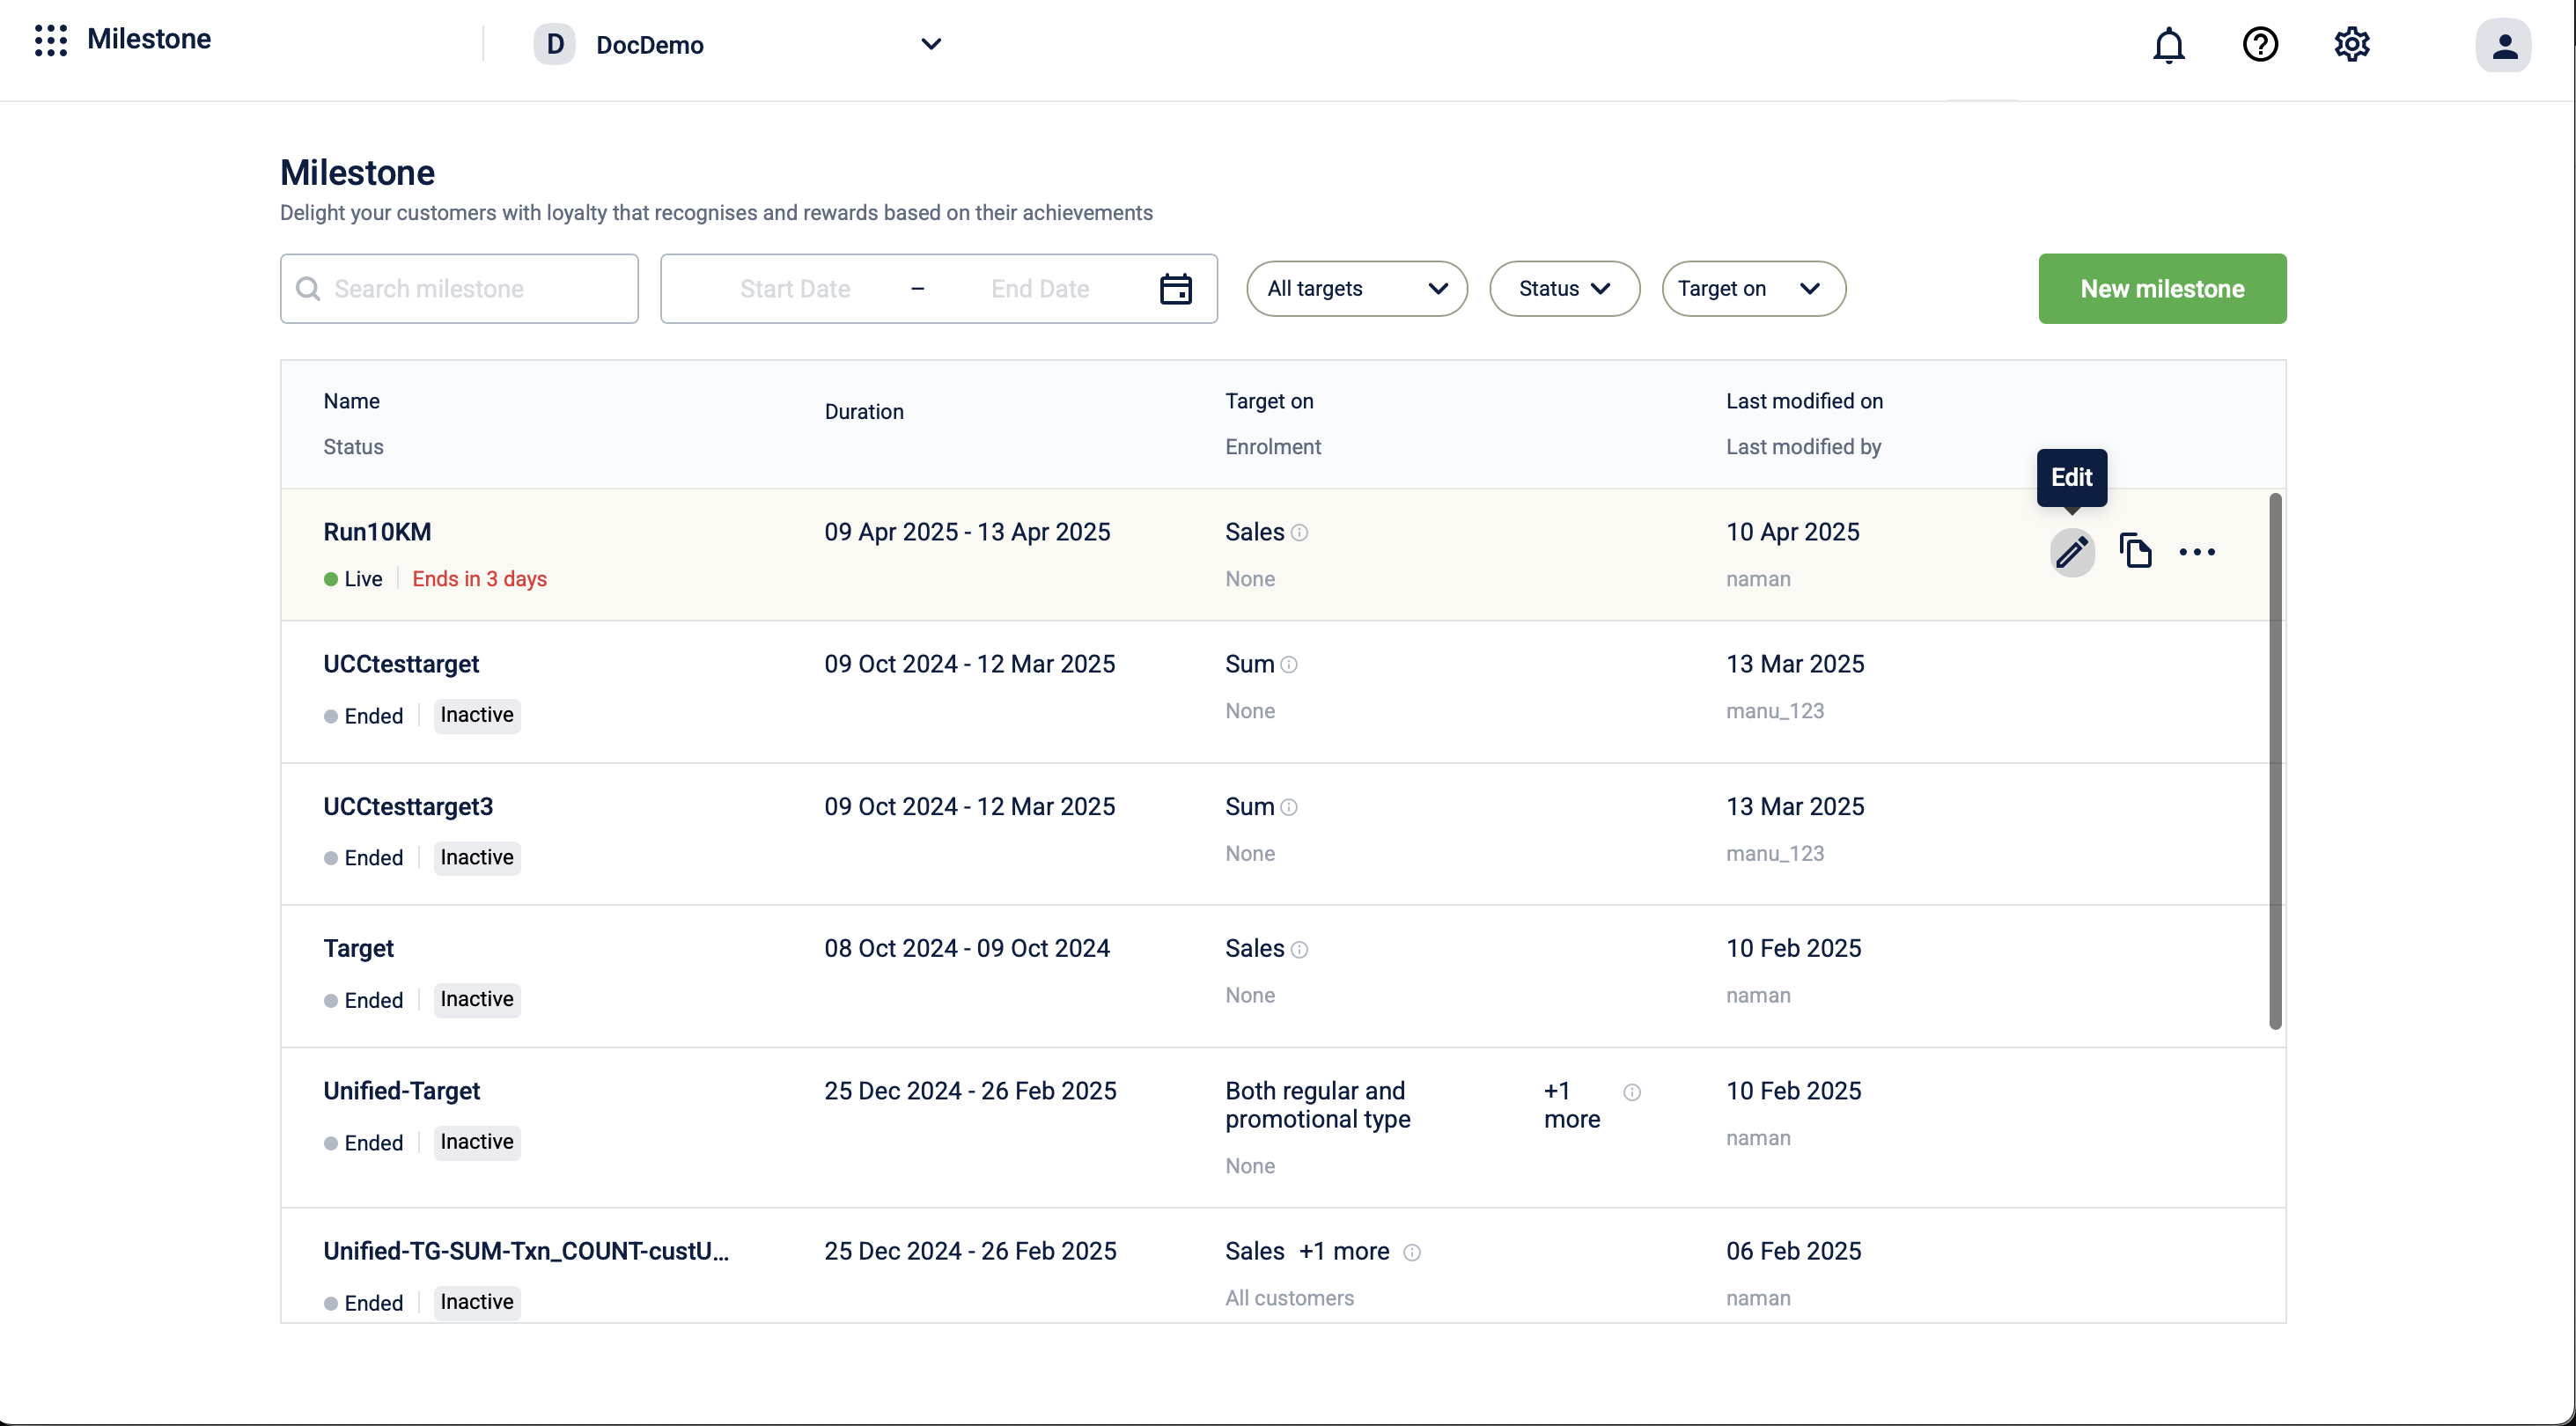
The homepage displays a list of all the Milestones already configured for the brand. You can use the search option to search for a Milestone and can also filter the Milestone list based on:
- The name of the milestone
- Single targets or multiple targets (aka unified targets)
- Dual status of the milestone
- Timeline based: Live, Upcoming, Ended
- Activity-based: Active, Inactive
- Duration of the milestone (between the start date X - and end date Y)
- KPI on which the milestone is created (Net sales, Gross sales, Quantity, Transactions, etc..)
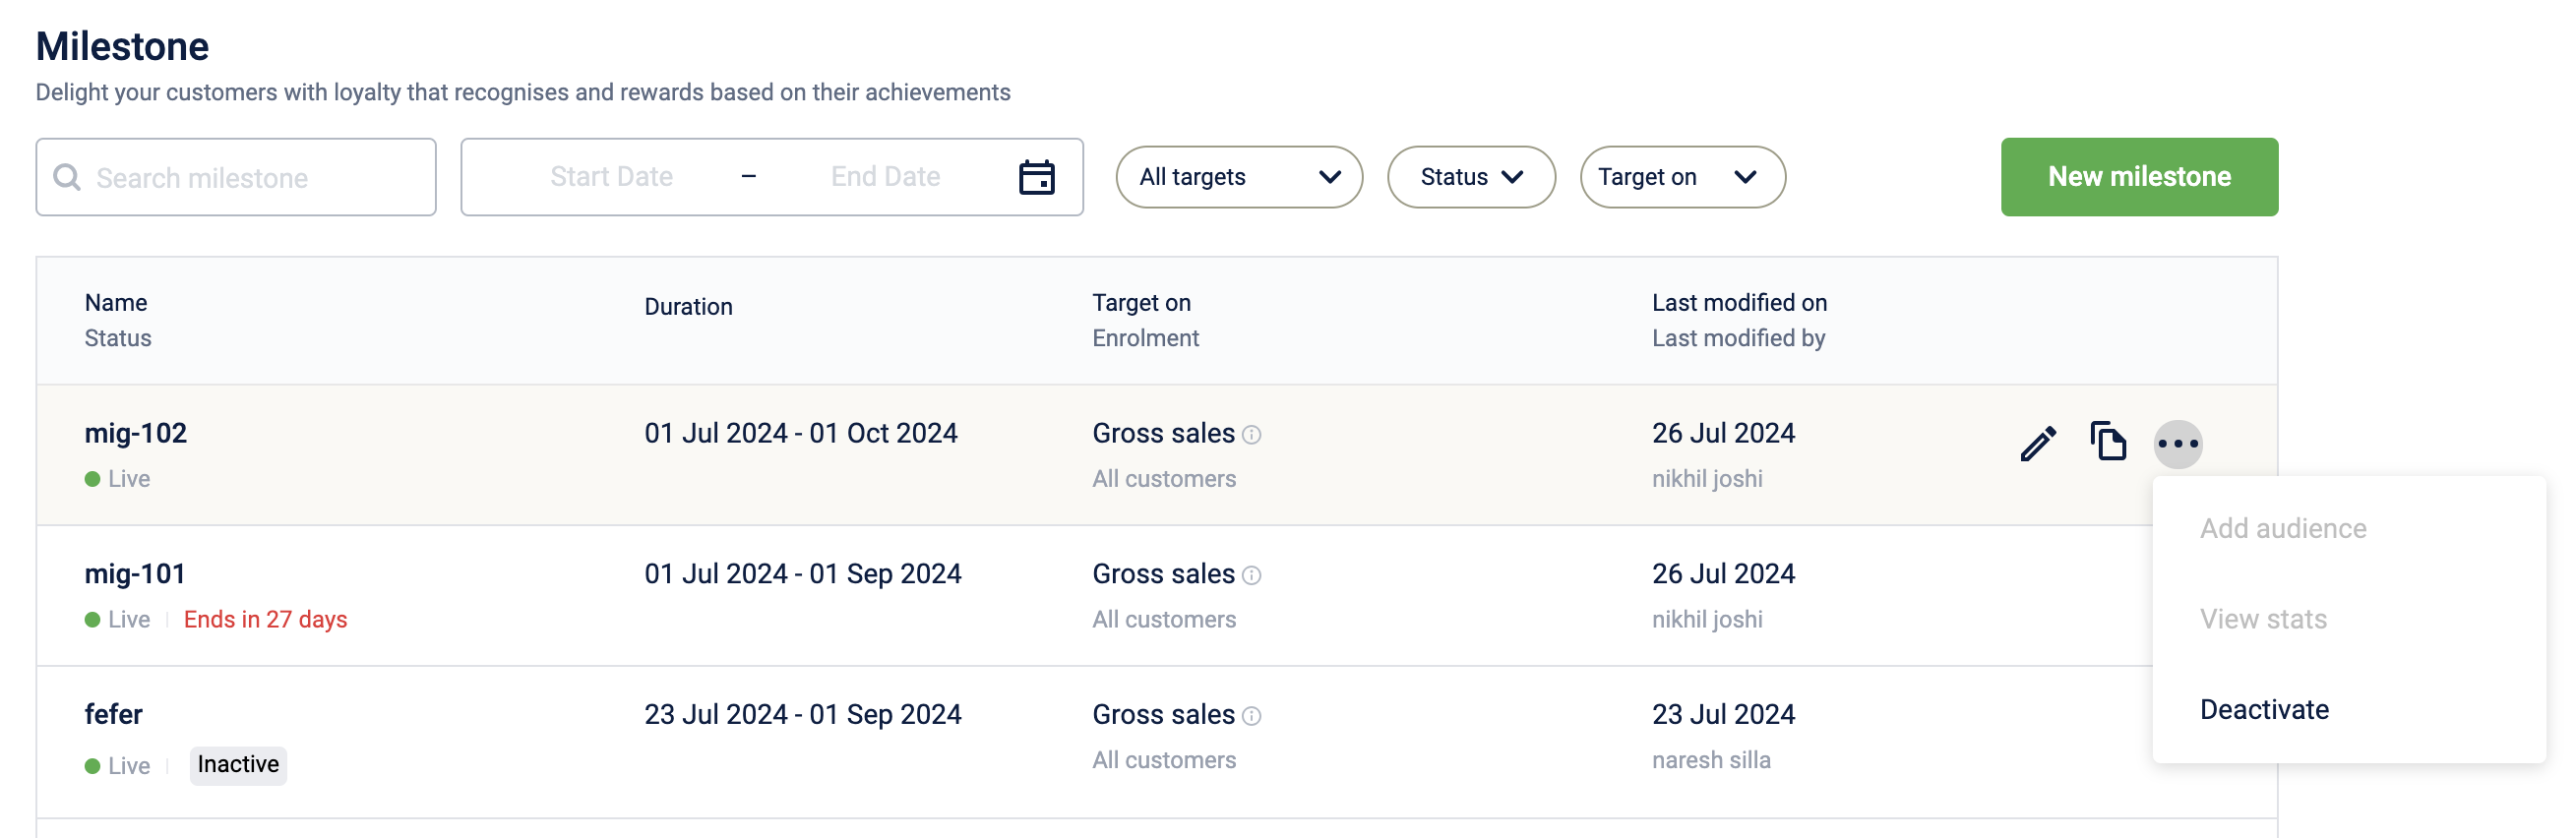
This landing page also provides the following abilities for the user to perform:
-
Activate/Deactivate a milestone
-
Once a milestone is deactivated, it will have the "inactive" chip & no longer the milestone can track the customers as per its configurations.
-
A deactivated milestone can be re-activated again as long as the milestone is not yet over.
-
-
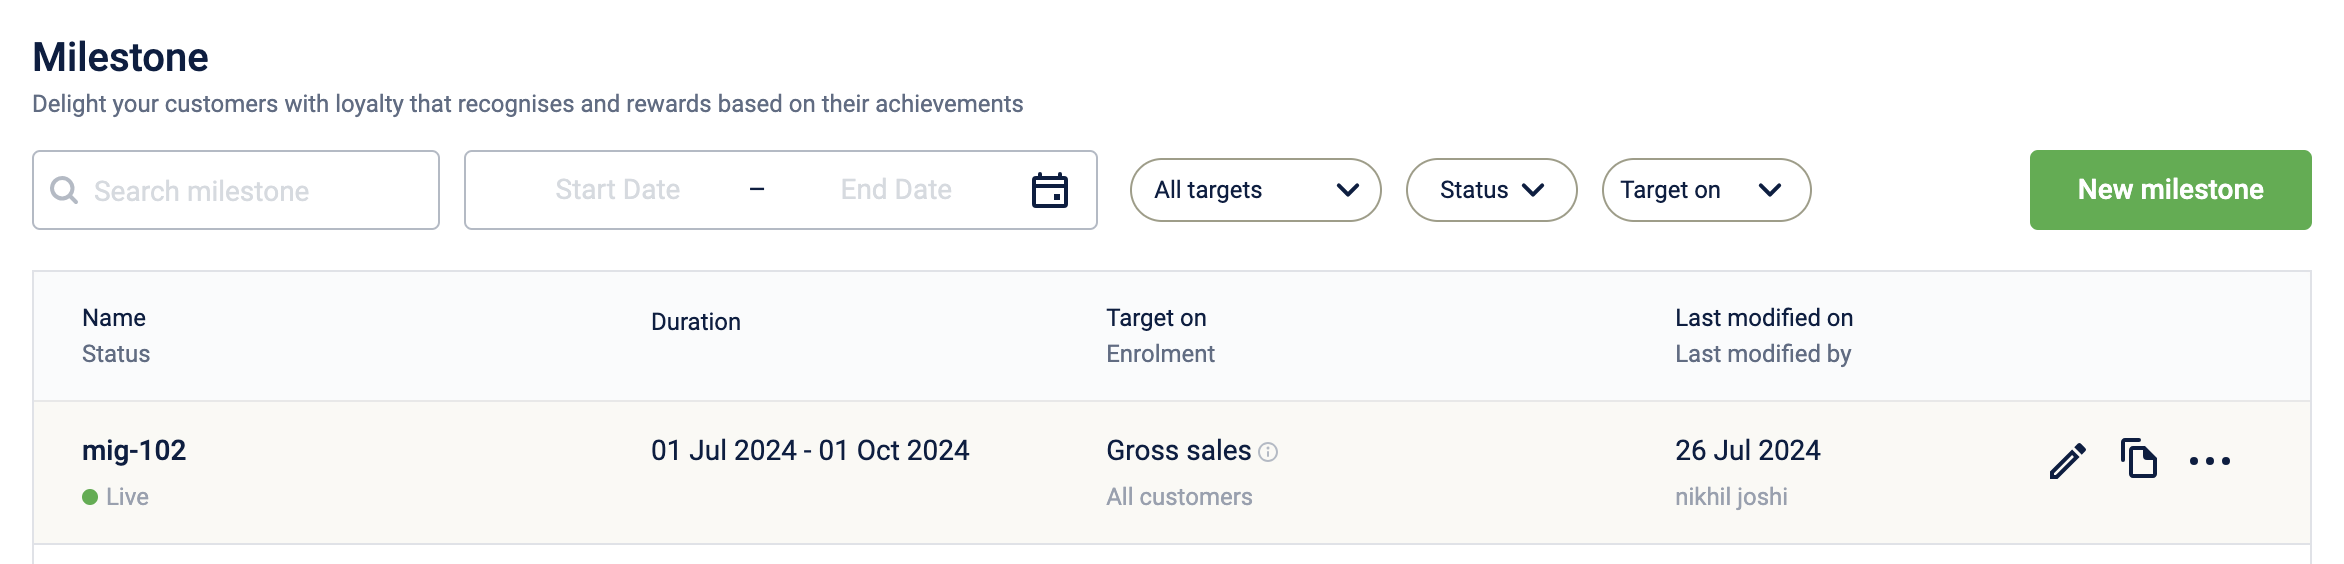
Edit flow of the milestone
- Once a milestone is created, some aspects of the milestone (rules, scope, target value, etc...)can be edited but not all the items are editable. Click on the pencil icon to enter the edit flow.
1.
- Once a milestone is created, some aspects of the milestone (rules, scope, target value, etc...)can be edited but not all the items are editable. Click on the pencil icon to enter the edit flow.
Creating a milestone
You can build the milestone from the beginning (build from scratch) or use existing templates.
Build from scratch
This option can be used if you cannot find a template that suits your requirements. To build a milestone from the beginning, perform the following:
- On the homepage, click New milestone.
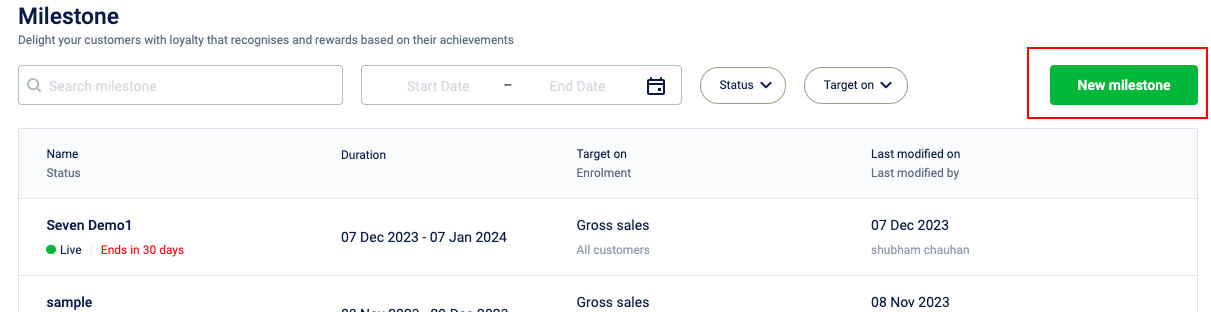
- Select Build from scratch and click Next.
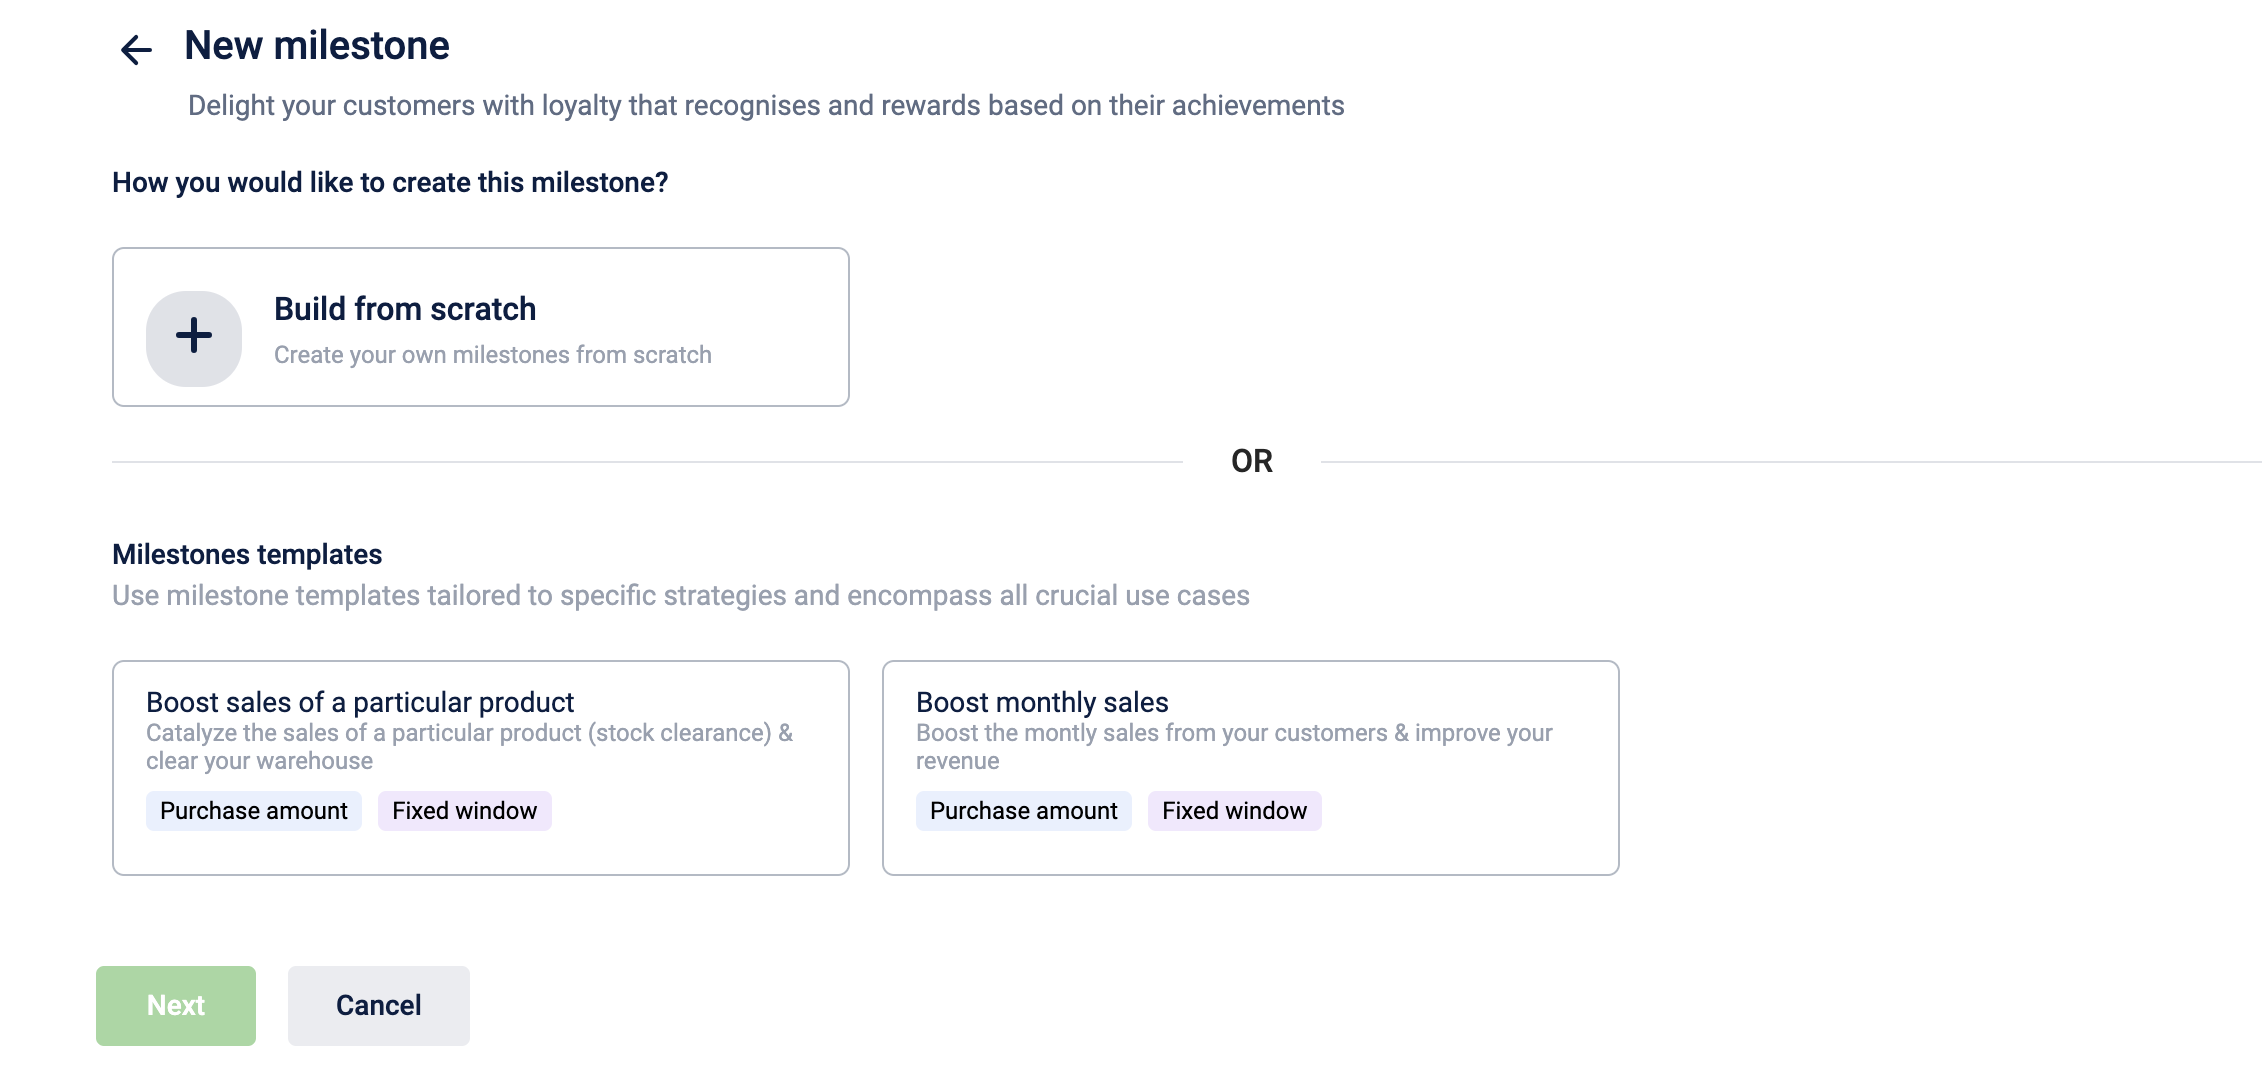
- Enter the following details:
- Click Done.
Milestone details
Enter the following details:
Name: A unique name for the Milestone. Milestones cannot have the same names. Always, try to provide a suitable name depending on your use case. This helps later in easily recognizing your milestone. Remember, the name of the milestone is not editable & so always think twice before providing the name for a milestone. Do not include any spaces at the beginning or end of the name.
Description: A brief description of your use case. This helps to understand the purpose of Milestone in the future, and this can be edited later.
Duration: Start date & end date for the entire milestone. All the cycles of the milestone should present in this duration, and there could be a buffer between the milestone start date & 1st cycle's start date. Similarly, there could be a buffer between the milestone end date & last cycle's end date.
This will be helpful when you want your 1st cycle to start from some future date, but you want to create your milestone today itself. In that case, the milestone start date can be created today & 1st cycle's start date could be some future date. Tracking will only happen during the cycle's duration.
A milestone can be created with both start & end date in the past. This helps in creating backdated milestone type of promotions as when required.For example, assume current date is 15th May 2024. On this current date:
Case 1: User could create a milestone whose start date is 1st Jan 2024, and end date is 1st June 2024. In this case, start date is in the past.
Case 2: User could create a milestone whose start date is 1st Jan 2024, and end date is 31st march 2024. In this case, both the start & end date are in the past.
Points to remember:
- Past transactions/events as per the date of creation of the milestone has to be re-processes again to consider that past date in the tracking of the milestone.
- In the case of 1st case, all the past data as per milestone's created date (1st Jan 2024 to 14th May 2024) has to be re-processed again for that data to be tracked. Transactions from 15th May 2024 to the end will be tracked automatically.
- In the case of 2nd case, all the past data as per milestone's created date (1st Jan 2024 to 31st March 2024) has to be re-processed again for that data to be tracked. As the milestone is ending on 31st March, there is nothing that will be tracked automatically here.
- User can create a past milestone upto 6 months in the past. For any use cases where higher limit is needed, reach out to product team.
- When APIs are being used to create past milestones, it may not throw the 6 months validation but be careful when using the APIs directly for compatibility issues.
- This past type of milestone will work only for the "immediate benefit rewarding" type of milestones and won't work for the "period end rewarding" cases.
Till code: This till code is used to attribute all the points that are being given from this milestone to a specific store. If you are a brand that doesn't have the till concept, please create a dummy till and select that here.
The target value for the customer: You can either configure it to be the same target for all the customers or a different target for each customer.
- Same target for all customers: Select this option to set the same target value for all the customers. This is generally the most used case.
- The different targets for each customer: Select this option to assign unique target values to different customers. If selected, a CSV file containing information on target values for each customer needs to be uploaded in the subsequent steps
Note: The target values are set in the subsequent steps.

Milestone cycle details
In this section, enter the details of the Milestone's cycles. A cycle in the context of milestones represents a recurring period during which users are expected to achieve a specific goal. For example, if you want your user to achieve $100 gross sales in a month, then the duration of that cycle will be a "month".
Fixed period cycle
In the fixed period cycle, each cycle runs for a defined period from the selected start date. A maximum of 100 different cycles can be configured. You can either define the same duration for each cycle or define a different duration for each cycle.
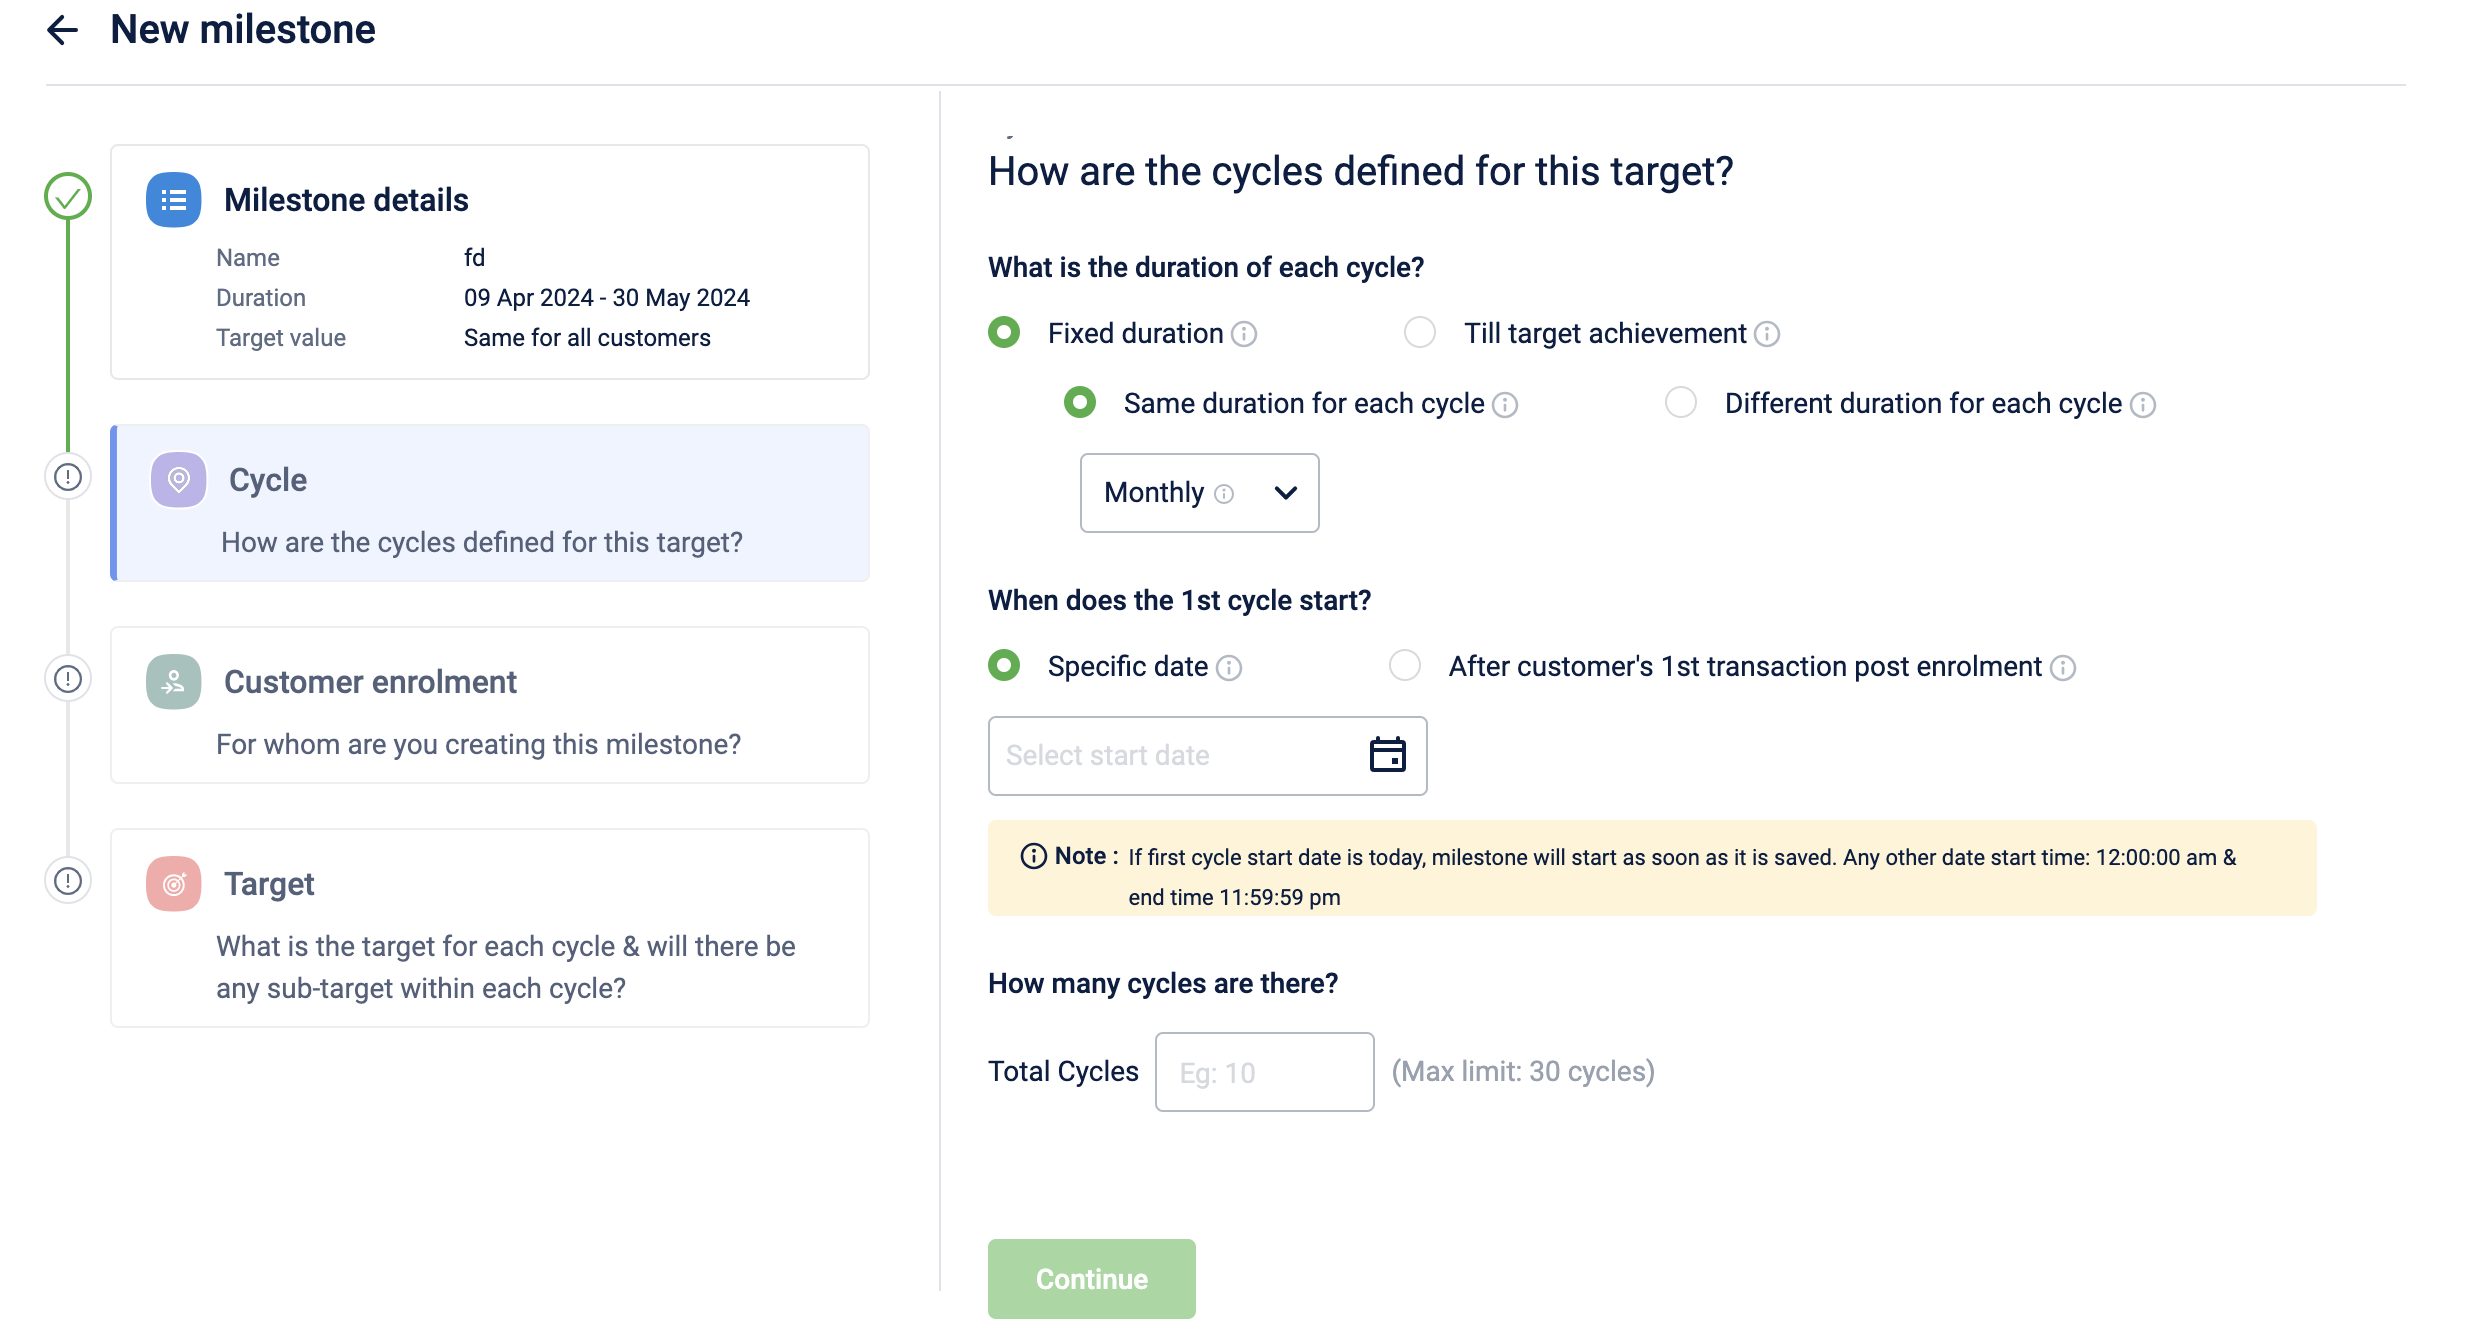
Same duration for each cycle
In this, each cycle of the Milestone will have the same duration. The supported cycle durations are Monthly, Quarterly, Half-Yearly, Yearly, Weekly & Daily. Also, all these cycle durations will be in continuous nature without any gap between them.
To define the same duration for each cycle, perform the following
- Select the option Same duration for each cycle
- From the drop-down, select the duration. The available options are Monthly, Quarterly, Half-yearly, Yearly, Weekly & Daily.
- Select Specific date to select and start the cycle from a specific date. If you select today's date, the cycle starts immediately. This is also called a "fixed calendar window"
- The fixed calendar window works exactly as per the calendar. The day will start at 00:00:000 & end at 23:59:599. For example, if a user created a milestone of fixed calendar window type (with frequency as daily) at 11:00:000, then the 1st cycle will only have 13 hrs for the user as the day ends sharply.
- Select the option After customer's 1st transaction post enrolment to start the cycle after the customer's first transaction/event within the milestone duration. This is also called a “cyclic calendar window”.
- The cyclic calendar window works on a "24 hours" basis. For the same example as above, if the user made 1st transaction at 11:00:000 (aka milestone starts), then the 1st cycle will extend exactly to 24 hours.
- In the Total cycles text box, define the number of cycles. The maximum number of cycles supported is 100.
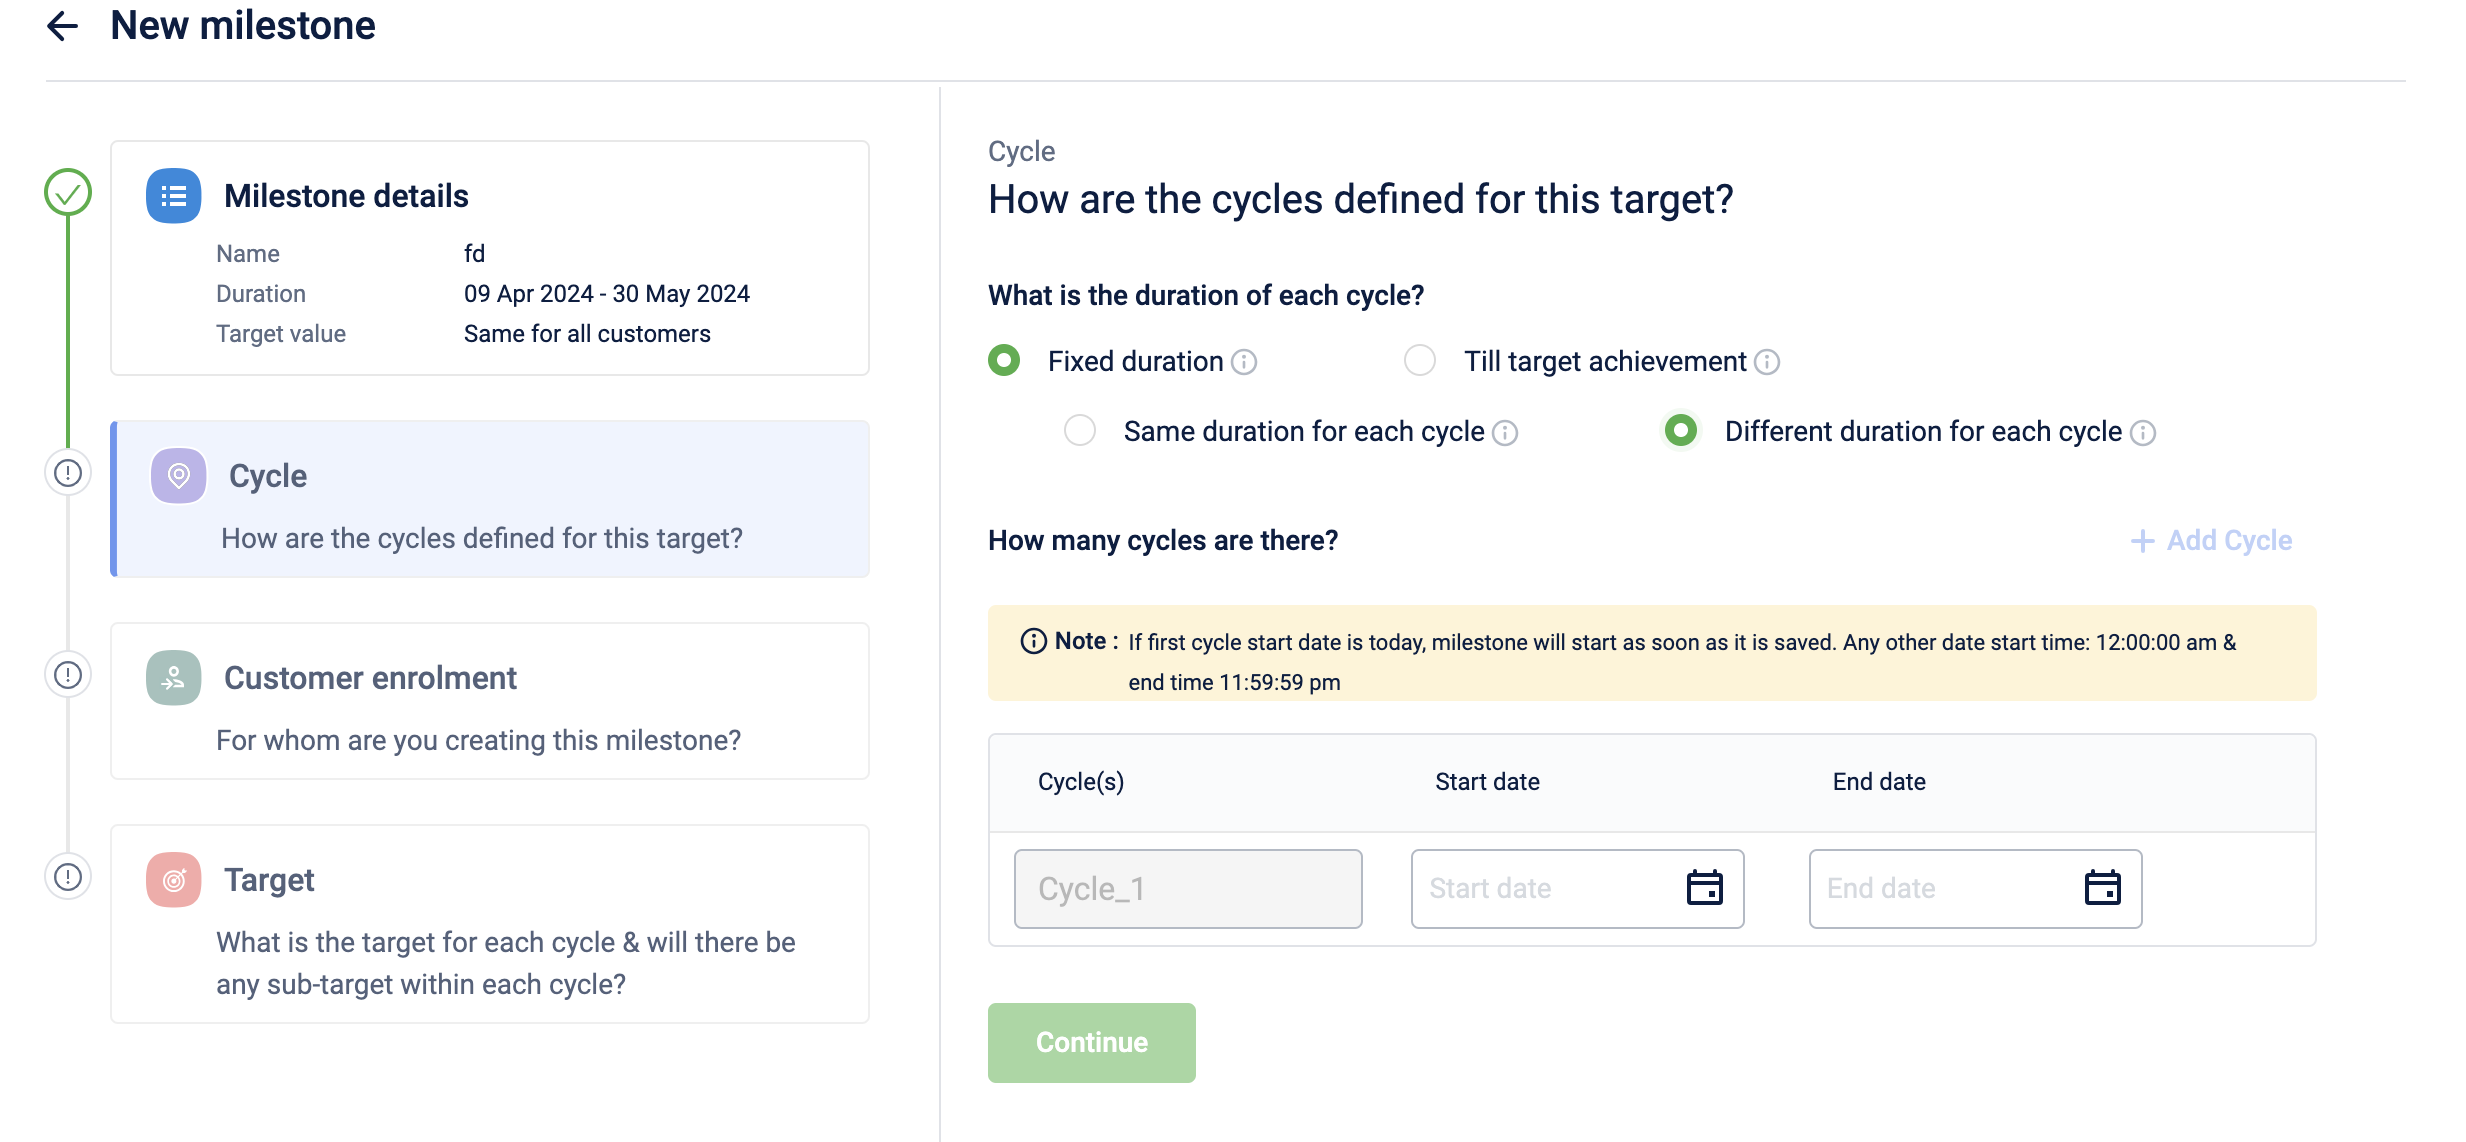
Different duration for each cycle
This cycle type is suitable when the predefined cycle durations, such as Monthly or Quarterly, don't align with the brand's campaign strategy. Brands opt for customized cycle durations like weekly or every 10 days. This is supported only for the "fixed window" type of milestones, requiring users to manually provide the start and end dates for each cycle as per their use case.
To define different durations for each cycle, perform the following
- Select the option Different duration for each cycle.
- Enter the Start date and End date.
- To add more cycles, click +Add cycle.
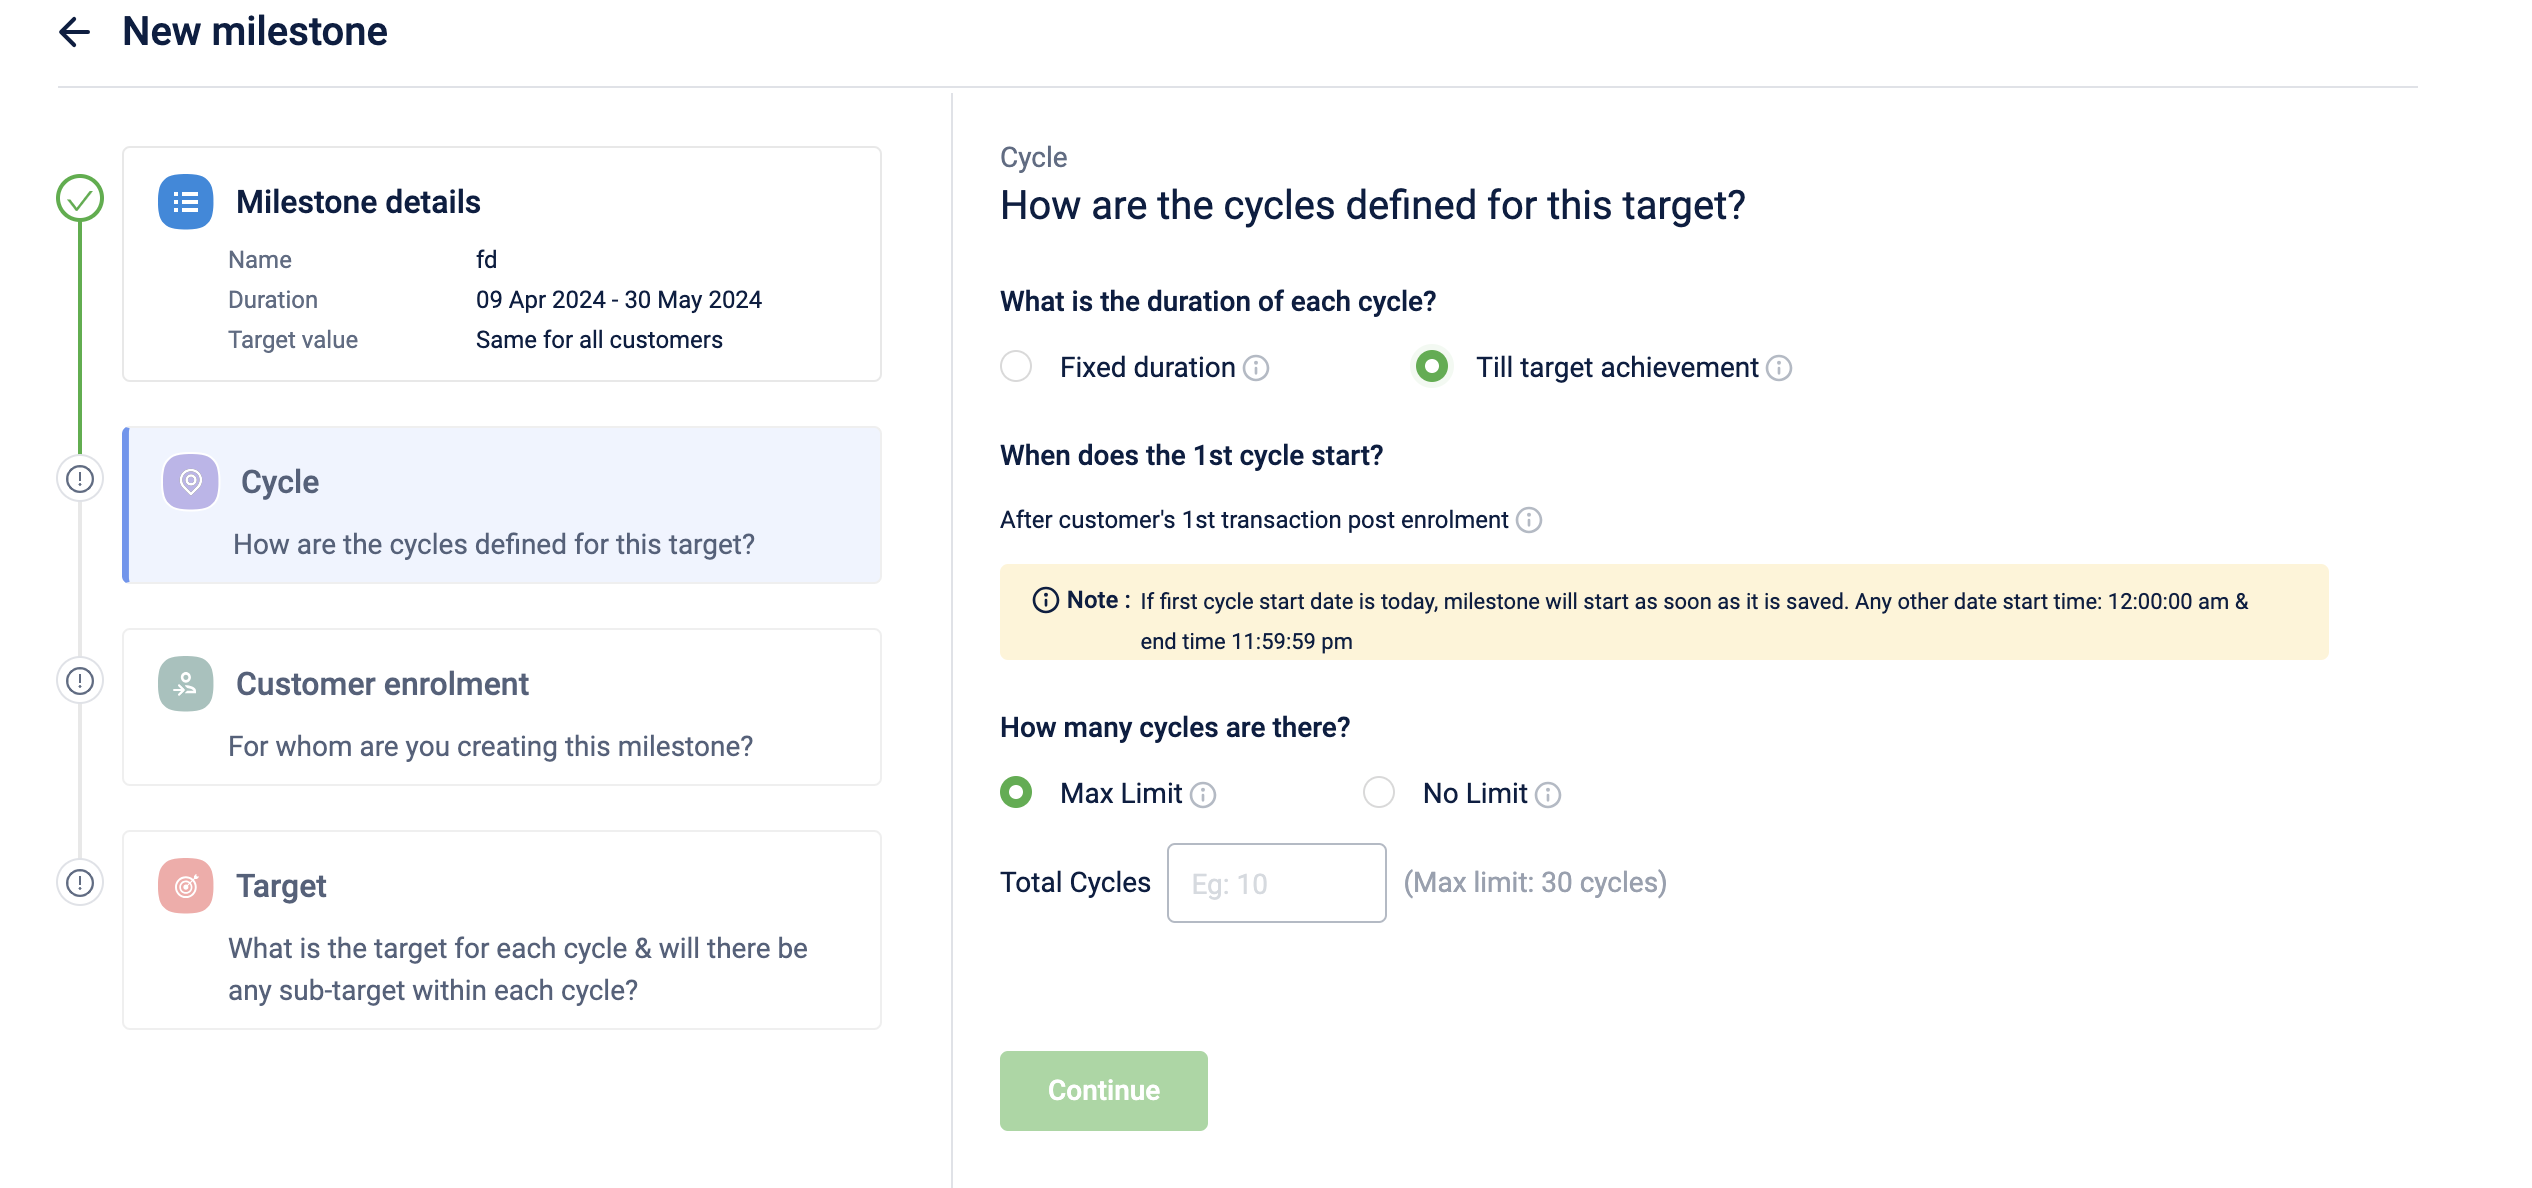
Till target achievement cycle (Period agnostic cycle)
NoteThis is applicable only if the target is set as "same for all customers" in the Milestone details (aka, the config in the previous step).
Till target achievement also called a "period agnostic cycle" is a type of Milestone cycle where the cycle continues until the user achieves the specified target, and resets again immediately. In this configuration:
- The Milestone cycle doesn't have a predefined duration. Instead, the cycle runs until the user reaches the specified target or goal. You can also define a maximum number of cycles.
- The cycle starts after the customer's first transaction within the milestone duration.
- There is no fixed end date for each cycle; it dynamically adjusts based on individual user achievements.
- This type of Milestone cycle is particularly useful when the focus is on individual user progress toward a target rather than adhering to fixed time intervals.
To define a Till target achievement cycle, perform the following
- Select Till target achievement.
- Select Max limit, and in the Total Cycles text field, enter the maximum limit of cycle numbers to define the maximum number of cycles. The maximum number of cycles that you can set is 100.
Milestone window mapping - fixed window, cyclic window, and period agnostic windowThese are the terminologies used in the legacy Milestone workflow and this information is provided for familiarisation purposes only.
- For configuring a fixed calendar window:
Select the combination: (Fixed duration - On a specific date) in this new flow.- For configuring a cyclic calendar window:
Select the combination: (Fixed duration - On the customer's first transaction) in this new flow.- For configuring a period agnostic window:
Select the combination: (Till target achievement) in this new flow.
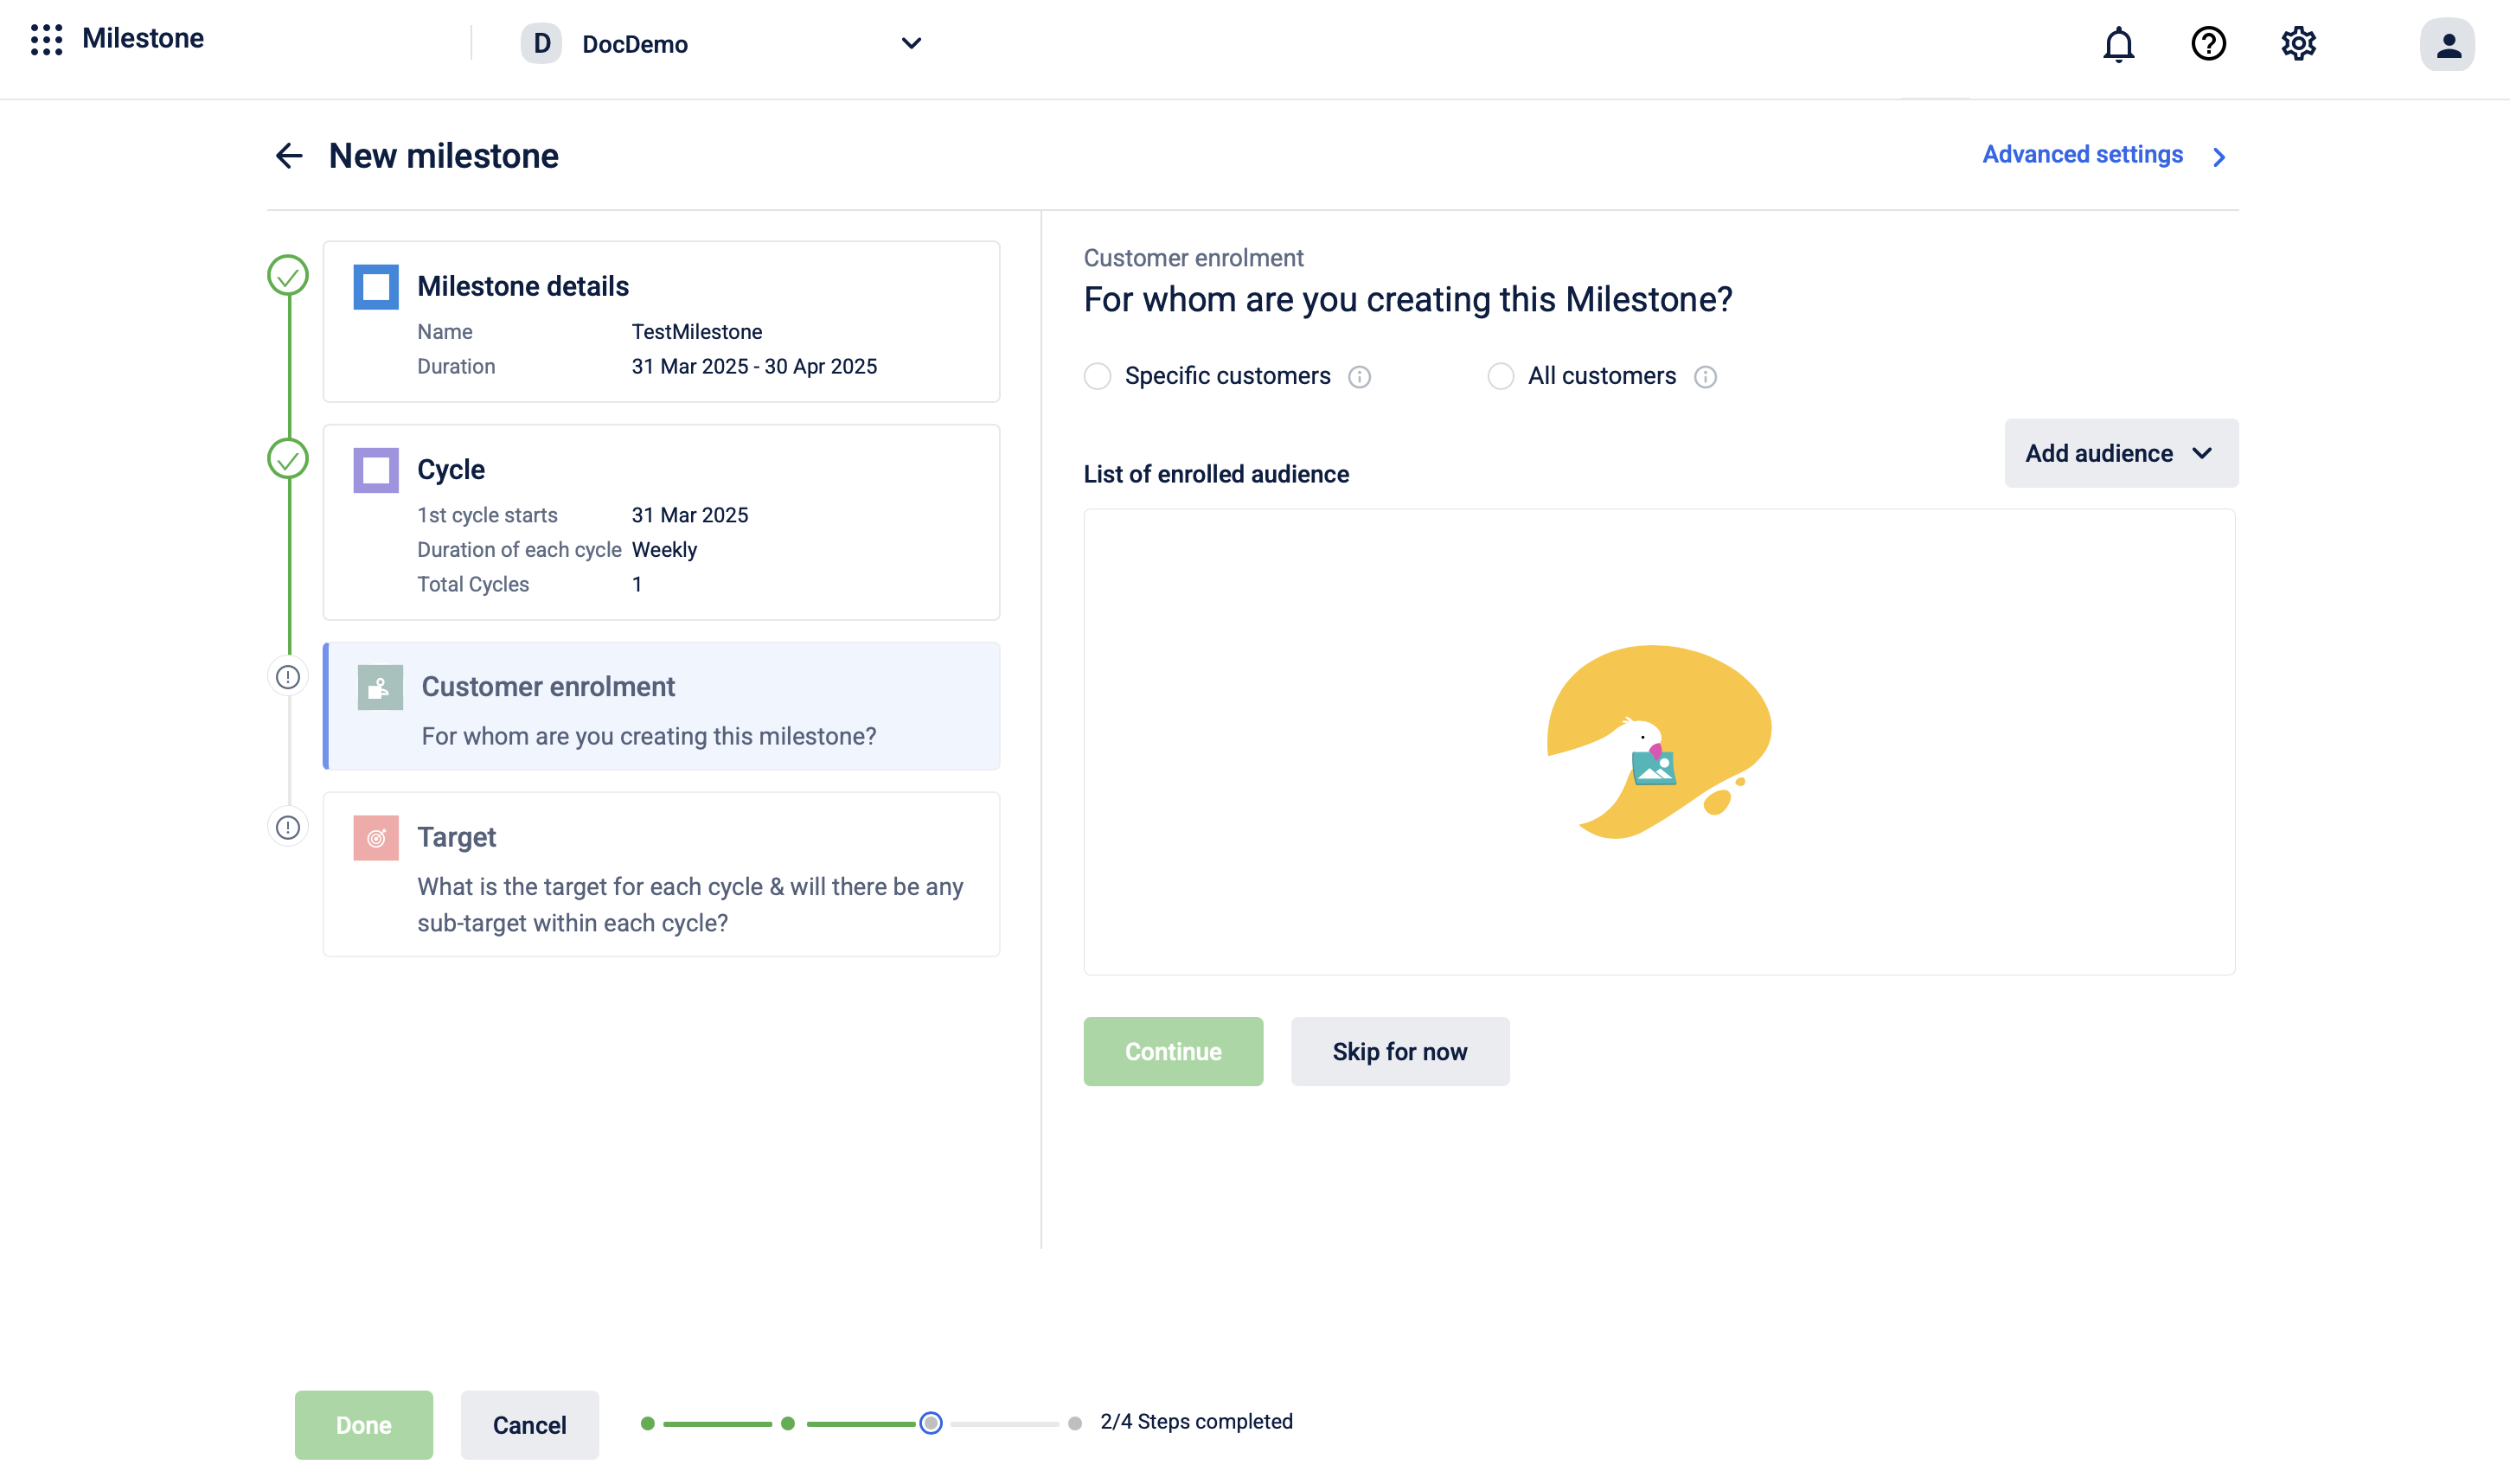
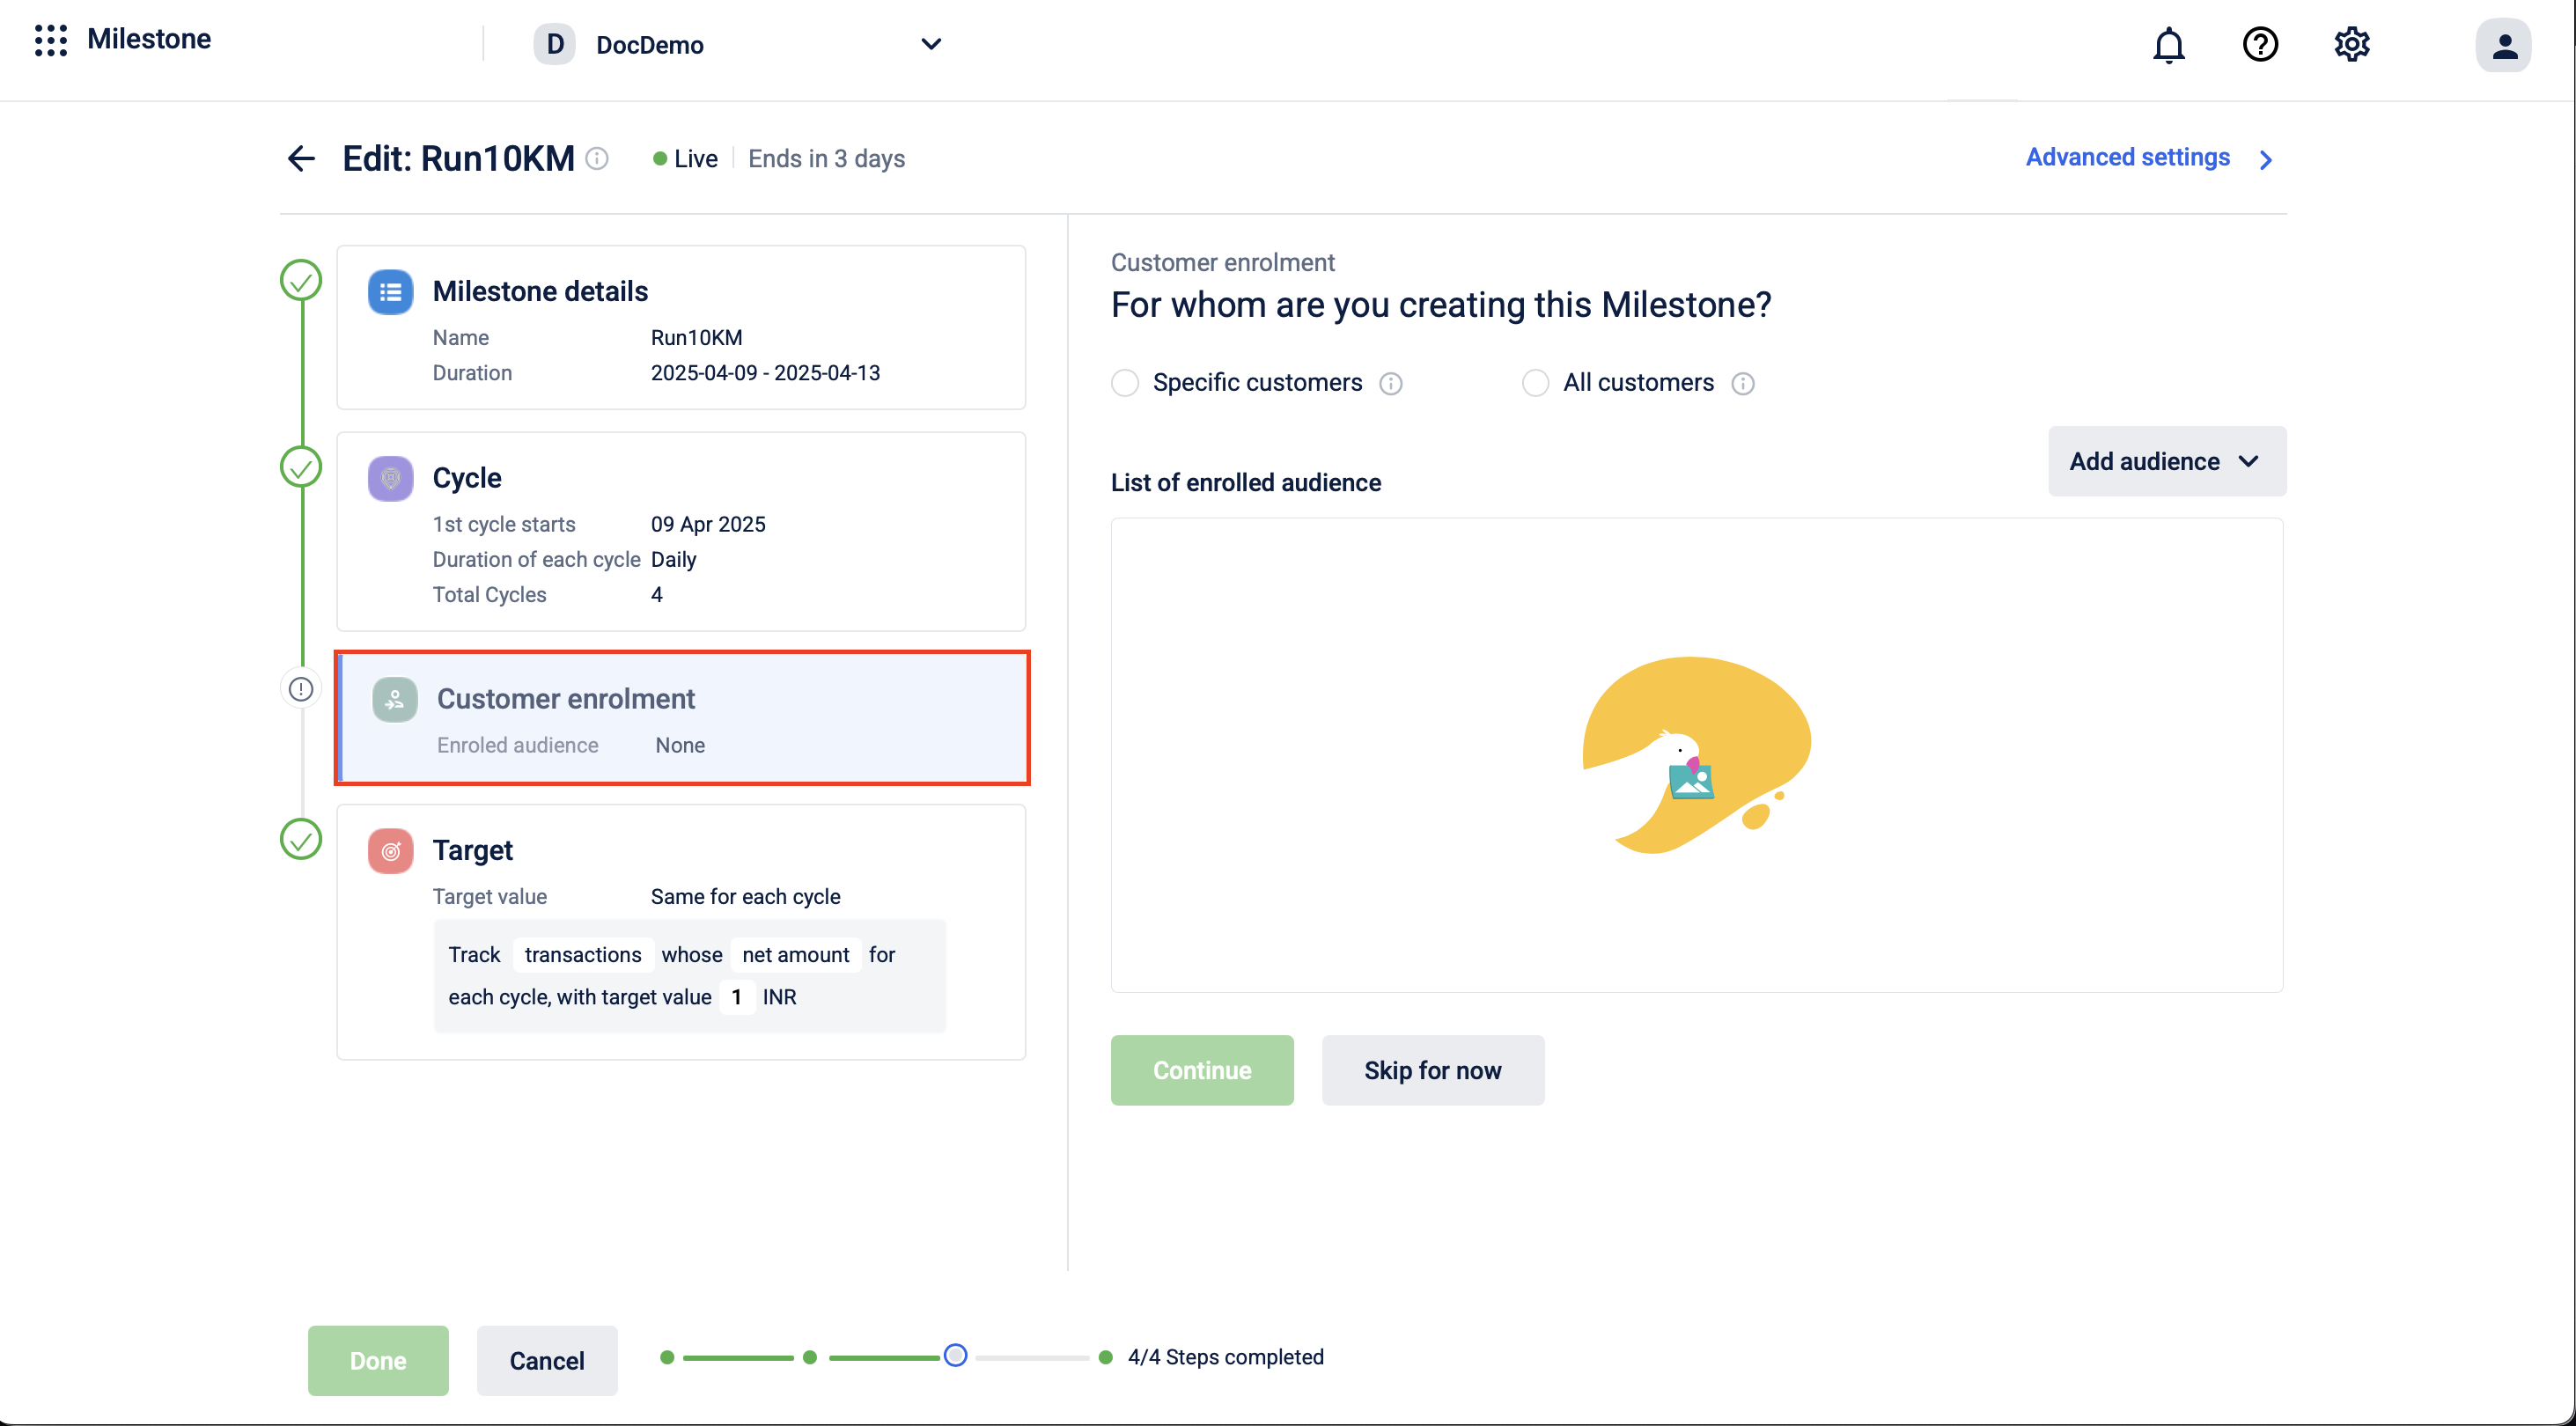
Customer enrolment
The customer enrolment section lets you select an audience group for the target or milestone. You can choose all registered customers, specific customers using audience groups or skip adding customers.
To apply different target values for each customer, upload a .csv file with customer identifiers, cycles, and target values, then map the fields in the UI.
To configure the audience group for a target, follow these steps:
-
Go to the Customer enrolment section on the New milestone page.
-
Select a customer range for the target.
The details are as follows:
| Customer Range | Description |
|---|---|
| Specific customers | Include specific customers by selecting one or more audience groups or uploading a .csv with their details. |
| All customers | Include all registered customers. Newly registered customers will be automatically enroled into the milestone. |
- If you select Specific customers, choose an audience type (such as Audience group or Audience with target values) from the Add audience dropdown menu.
The details are as follows:
| Audience Type | Description |
|---|---|
| Audience group | Create a new audience group or select one or more existing audience groups. |
| Audience with target values | Upload a .csv file containing the target and sub-target values for each customer. You can download a sample .csv file from here. This is applicable if you select Different target value for each cycle in the Target value for each cycle will be? section when creating a target . |
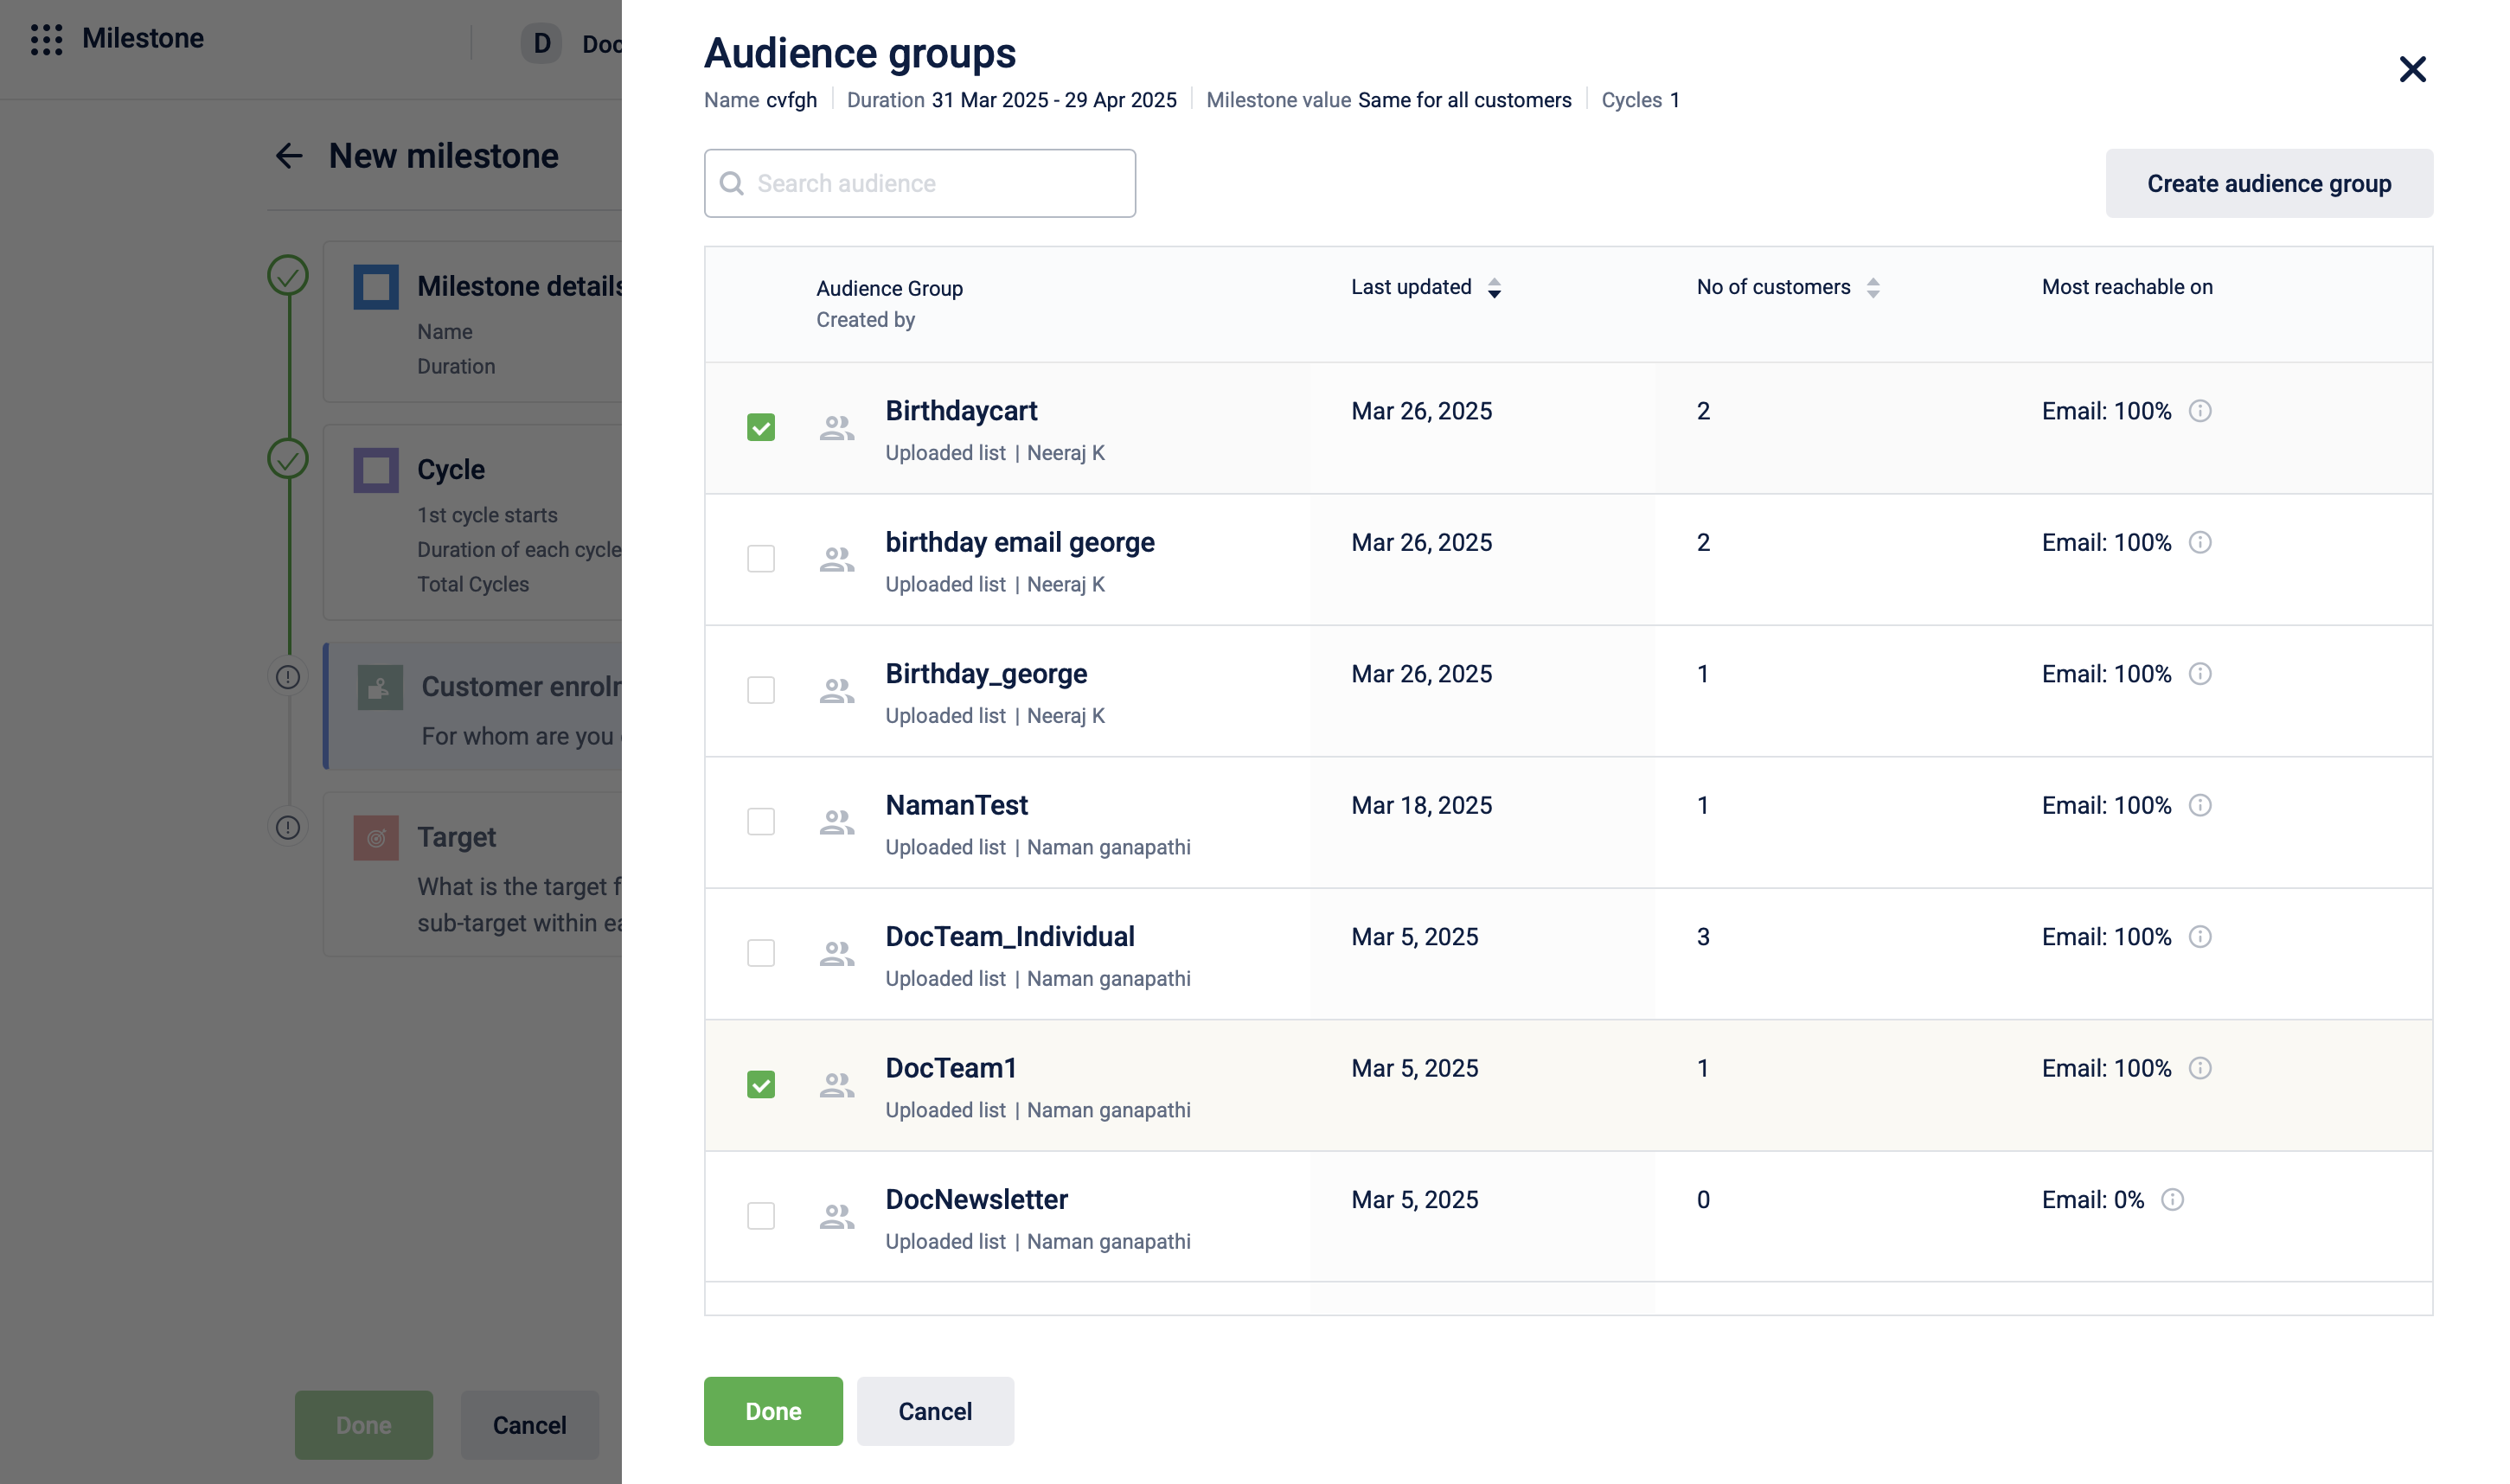
Selecting an audience group
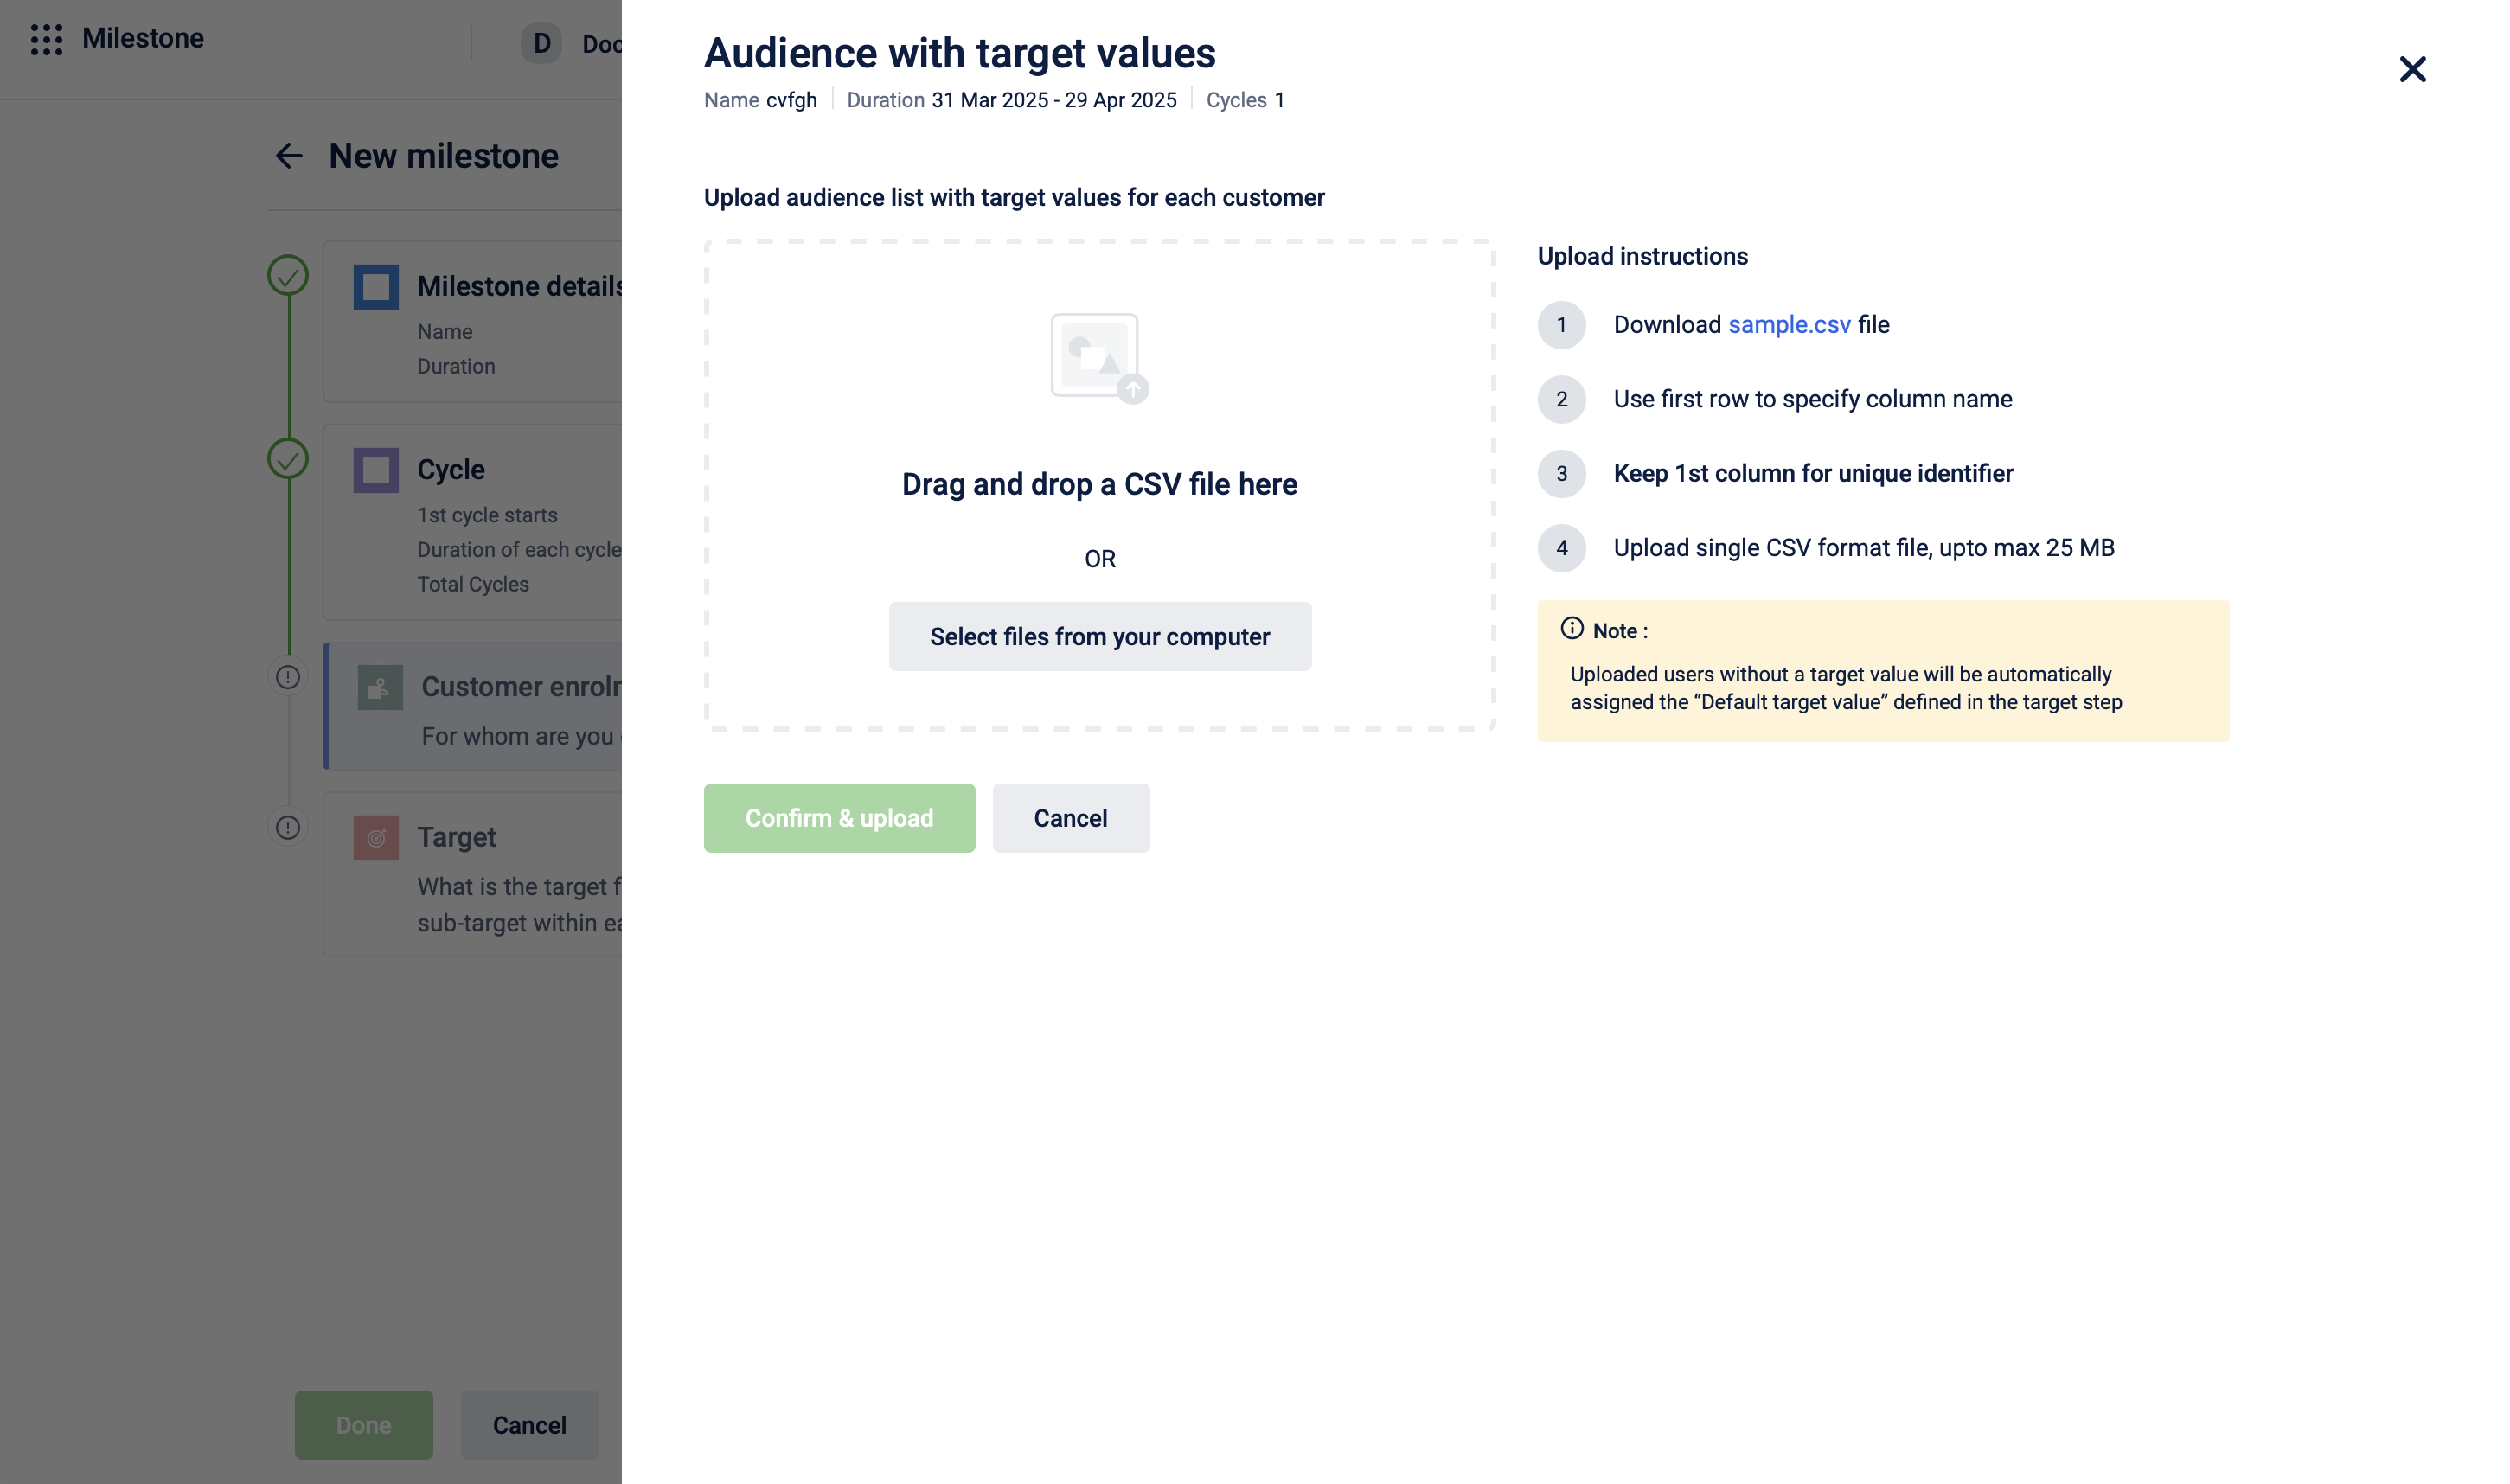
Uploading a CSV of audience with target values
- Select Skip for now to skip audience selection if required. This creates a target group with no enroled customers. To enrol customers later, use the Enrol a customer to a milestone API.
Customers are now added and enroled in the milestone.
The table below explains the supported enrolment methods based on the duration and cycles selected:
| Selected Option | Specific Customers | All Customers | Skip |
|---|---|---|---|
| Fixed duration, Same duration for each cycle, Specific date | ✓ | ✓ | ✓ |
| Fixed duration, Different duration for each cycle | ✓ | ✓ | ✗ |
| Till target achievement | ✗ | ✓ | ✗ |
| Fixed duration, Same duration for each cycle, After customer's 1st transaction post enrolment | ✗ | ✓ | ✓ |
Example of an advanced audience enrolment:
A fuel brand wants to create three different targets. However, they want to enrol their customers into targets depending on the user's performance in some other target.
- Target 1: The customer must purchase a total of 100L of petrol.
- Target 2: The customer must purchase a total of 200L of petrol.
- Target 3: The customer must purchase a total of 300L of petrol.
The brand wants to enrol customers in each target as follows:
-
Target 1: All customers
-
Target 2: Only customers those who achieved Target 1.
-
Target 3: Only those customers who achieved Target 2.
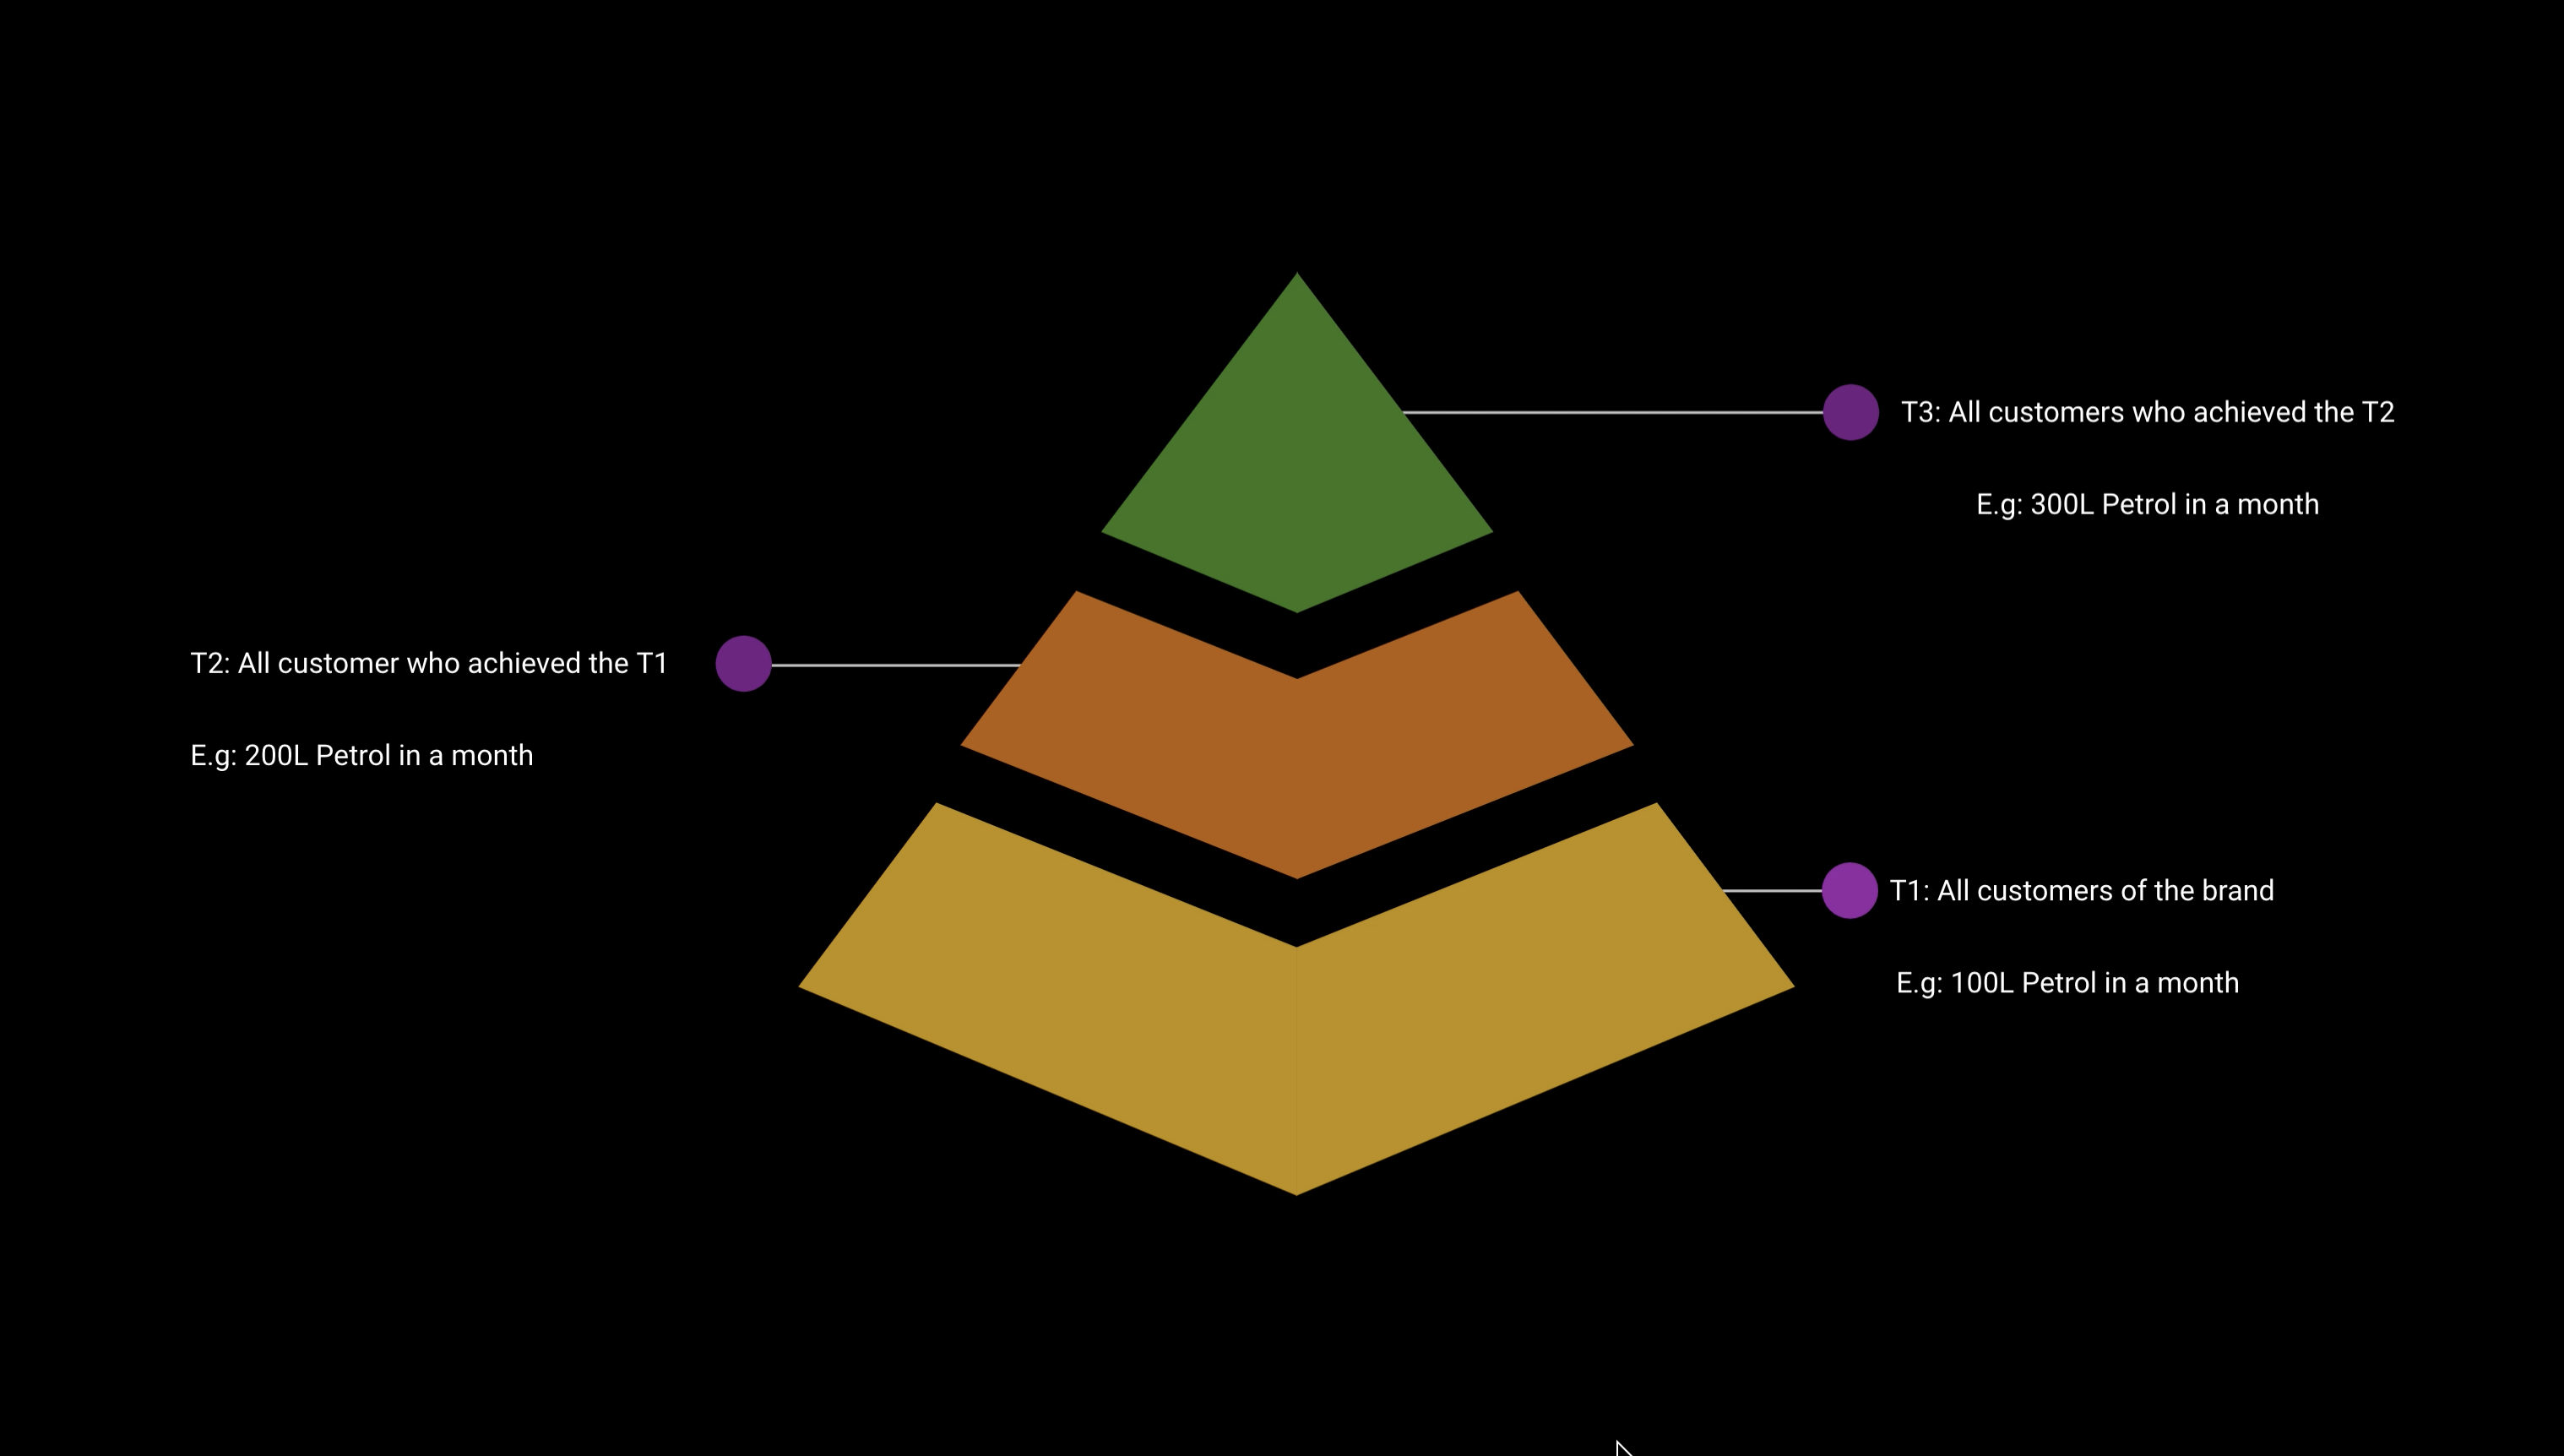
In the Audience filter (search for "target" in the filter search box to use filters based on targets), provide values such as the minimum target value that needs to be achieved, time factor, target name, and cycle name (optional). Based on those values, customers are automatically filtered. See below image:
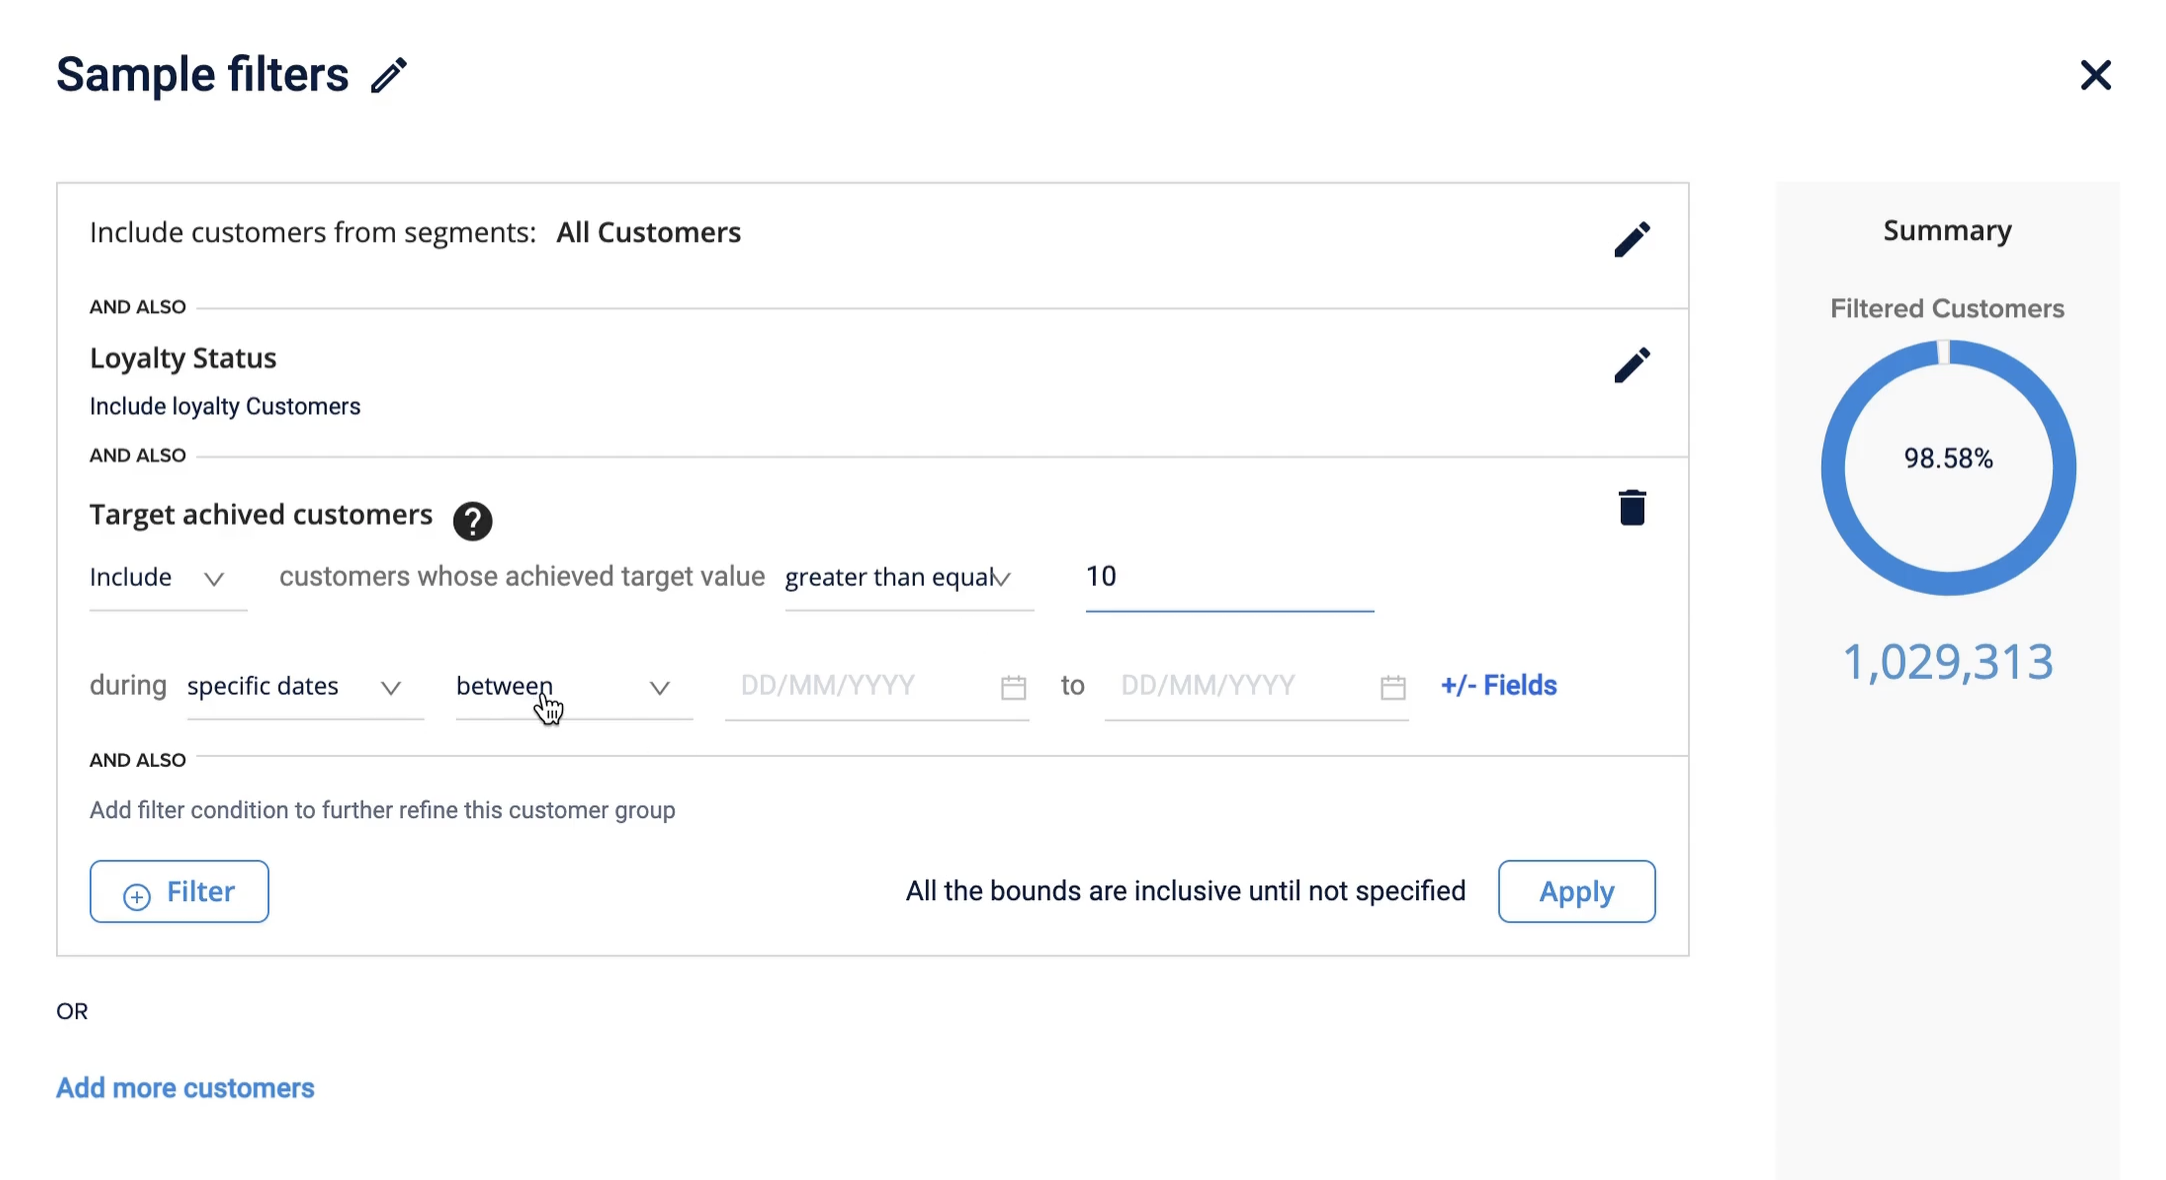
For more information, refer to the documentation on Audience group.
Editing customers
You can edit how customers are enroled into a target/milestone once it is active. For example, when creating the target if you have selected All customers as the enrolment method, you can change it to Specific customers.
To edit the enrolment method for a target / milestone, follow these steps:
-
Navigate to the Milestone listing page and select the Edit icon for the target.
-
Select Customer enrolment from the left menu to edit the customer enrolment for the milestone.
-
Edit the customer enrolment method. Refer to the section on customer enrolment for more information on the types of enrolment.
-
Select Done to save the changes.
The enrolment method for the milestone has been updated.
NoteWhen changing the enrolment method from All customers to Specific customers, customers enrolled via All customers method will remain enrolled in the milestone.
Target details
A target is a set goal or objective a customer has to achieve within a certain time period to receive benefits.
The target value determines the value that a customer needs to achieve within a cycle or set end date, to receive the associated benefits. For example, if a brand sets a $100 monthly purchase goal to qualify for benefits, $100 is the target value.
To configure a target, follow these steps:
-
Navigate to the target section on the New milestone page.
-
Select the target value behaviour for each cycle using the radio buttons under the Target value for each cycle will be? section. The options available are Same target value for each cycle and Different target value for each cycle
The details are as follows:
| Target value | Description |
|---|---|
| Same target value for each cycle | Target value is consistent across all cycles of the milestone. For example, if the number of cycles configured is three and the target value is ₹5000, the target value of ₹5000 applies to all three cycles. |
| Different target value for each cycle | Different target values can be configured for different cycles of the milestone. For example, if the number of cycles configured is three, multiple target values can be configured for each cycle. 1st cycle: target value of ₹5000. 2nd cycle: target value of ₹10,000. 3rd cycle: target value of ₹15,000. |

Notes
- The Different target value for each cycle target value is supported for targets that have a fixed-calendar window.
- The Target section indicates the number of targets created for the target group. You can add up to 50 targets under a target group.
-
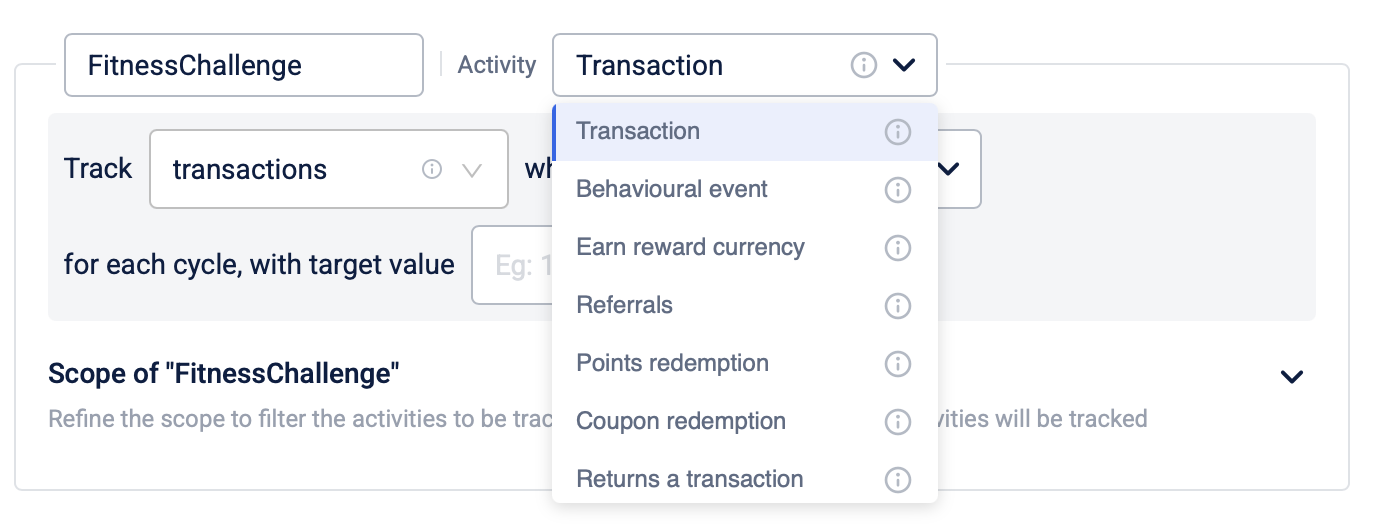
Select the customer activity to achieve the target using the drop down under the What should the customer do to achieve the target? section. Refer to the section on Customer Activities for more information on the configurations for each type of customer activity.
- Select a behavioral event if needed by using the select event drop down to choose an event to track. This is applicable for the Behavioral event activity.
- Select a target / milestone if needed by using the Select milestone drop down to choose a milestone to track. This is applicable for the Milestone achieved activity. Enter a name for the target. The target name is automatically entered from the name assigned to the target group.
-
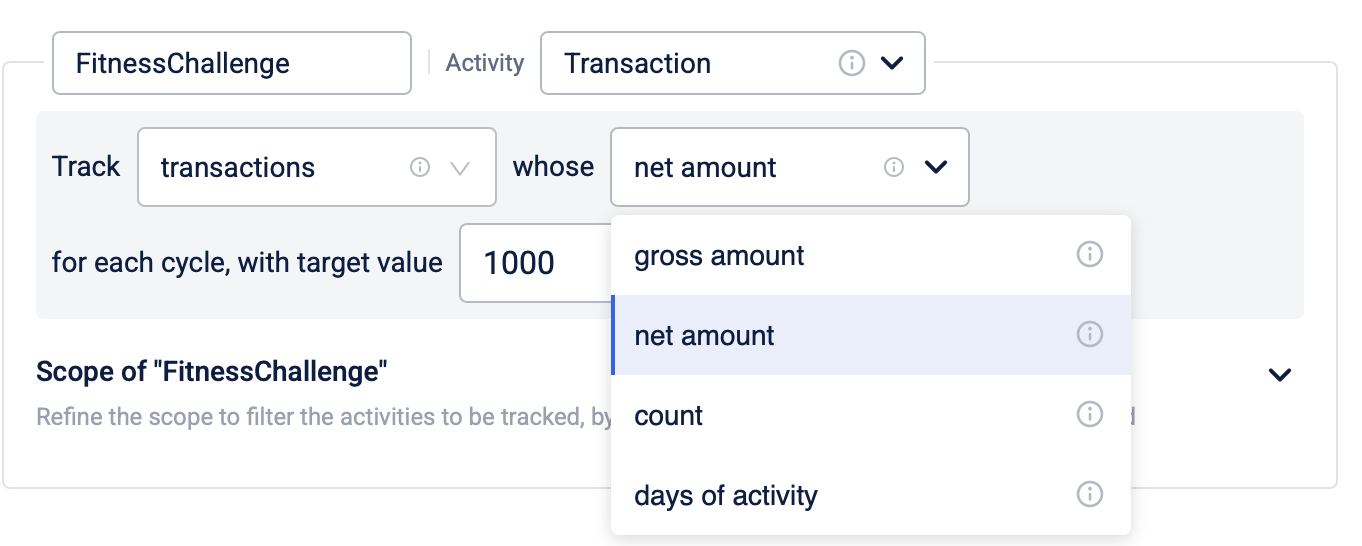
Configure the target activity KPI and target values under the What should the customer do to achieve the target? section. Refer to the section on Tracking Configurations for more information on the configurations for each type of customer activity.
- Select +Add target values to configure the target values for each cycle. This is applicable when selecting Different target value for each cycle as the target value behaviour.
- Enter the target values for each cycle.
- Select Save to save the values for each cycle.
-
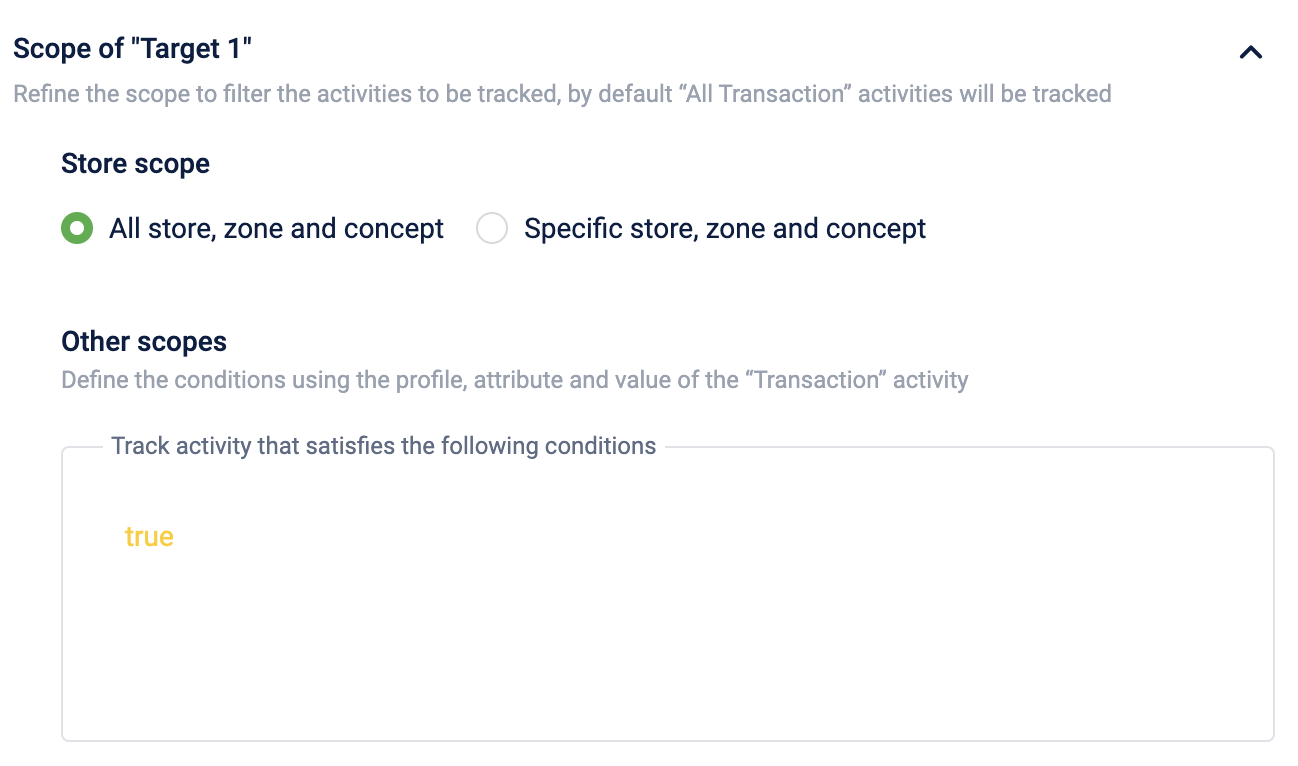
Configure the scope for the target under the Scope of<target name> section. Refer to the documentation on filter activity for more information on configuring the scope.
-
Select +Add target to add a new target.
- From the Adding targets window, select the activity type for the new target under the What should the customer do to achieve the target? section.
The details are as follows:
- From the Adding targets window, select the activity type for the new target under the What should the customer do to achieve the target? section.
| Activity type | Description |
|---|---|
| Same activity for each target | Target activity type is consistent across targets. For example, all target activities are transactional events. |
| Different activity for each target | Different target activity types can be configured for different targets. For example, if the number of targets configured is three, multiple target activities can be configured for each target. 1st target: Transactional. 2nd target: Behavioral event. 3rd target: Earn reward currency. |
- Select the conditions for achieving the target from the drop down.
All: All the targets must be completed to qualify for a reward.
Any: Any of the targets must be completed to qualify for a reward. Select the minimum number of targets to complete under the Select drop down. - Enable Overall target to define a primary target other than the achievable targets that the user must achieve. This is supported for all customer activities and when the condition is All. You can also create multiple targets with different customer activities and enable Overall target.
Refer to the section on Examples for overall targets for examples on using overall targets. - Select the customer activity to achieve the target using the drop down under the What should the customer do to achieve the target? section. Refer to the section on Customer Activities for more information on the configurations for each type of customer activity.
- Enter a name for the target.
NoteDo not include any spaces at the beginning or end of the name. This will result in the error "EMF Ruleset Creation Failed". To fix, remove all spaces before and after a target name.
- If Different activity for each target is selected as the activity type, select the customer activity from the Activity drop down
- Configure the target activity KPI and target values. Refer to the section on Tracking Configurations for more information on the configurations for each type of customer activity.
- Configure a sub-target for the milestone if applicable. Refer to the section on Creating a sub-target for more information on configuring a sub-target.
- Select Continue to confirm the changes.
- Select Done to save the changes and create a new target group with one or more targets.
The target is now created under the target group.
Customer Activities
Customer activity refers to the various interactions a customer has with a brand. The table below lists the customer activities that can be tracked for a milestone.
| Activity | Description | Example |
|---|---|---|
| Transaction | Track customer purchases, in-store, online, or at a point-of-sale (POS) system. | A customer purchases a pair of sneakers online or at a store. |
| Behavioural event | Track customer activities like signing up, changing their profile picture, or adding items to their wish list. | A customer adds items to their wish list on the app or website. |
| Earn reward currency | Track the reward currencies (points or alternate currencies) that a customer has earned during a certain period. The configuration for points and alternate currencies are the same. You can select only one reward currency per target. To track both points and alternate currencies within the same target/milestone, create a unified milestone with two or more targets and select points and/or alternate currencies as the reward currencies for each target. | A brand creates the following yearly unified targets to reward loyal customers: Customers who meet all three targets earn the “Super Customer” badge for the year. |
| Referrals | Track the number of times a customer has successfully referred another person. | A customer refers a friend using a unique link, and the friend makes the first purchase, earning the customer rewards. |
| Points redemption | Track how often customers use their points to redeem rewards, provided redemption is available. | A customer uses 500 points to redeem a ₹500 discount while purchasing groceries |
| Coupon redemption | Track the number of times a customer uses coupons to get discounts or benefits. | A customer applies a 20% discount coupon during checkout in an online store. |
| Returning a transaction | Track the number of transactions a customer returns, whether a full return or part of the purchase. | A customer returns a t-shirt purchased online as it did not fit properly. |
| Updating a transaction | Track how many times a customer changes details about their previous purchases. | A customer orders 1kg bananas and 1kg mangoes but later adjusts the order, reducing the mangoes to 500gms after receiving a partial refund. |
| Updating customer profile | Track how often a customer updates their personal information on their profile. | A customer updates their phone number on the app. |
| Promised points conversion | Track how many times promised points (temporary or pending rewards) are turned into regular points for the customer. | |
| Milestone achieved | Track how many times a customer completes a target, such as spending a specific amount or completing a behavioral event such as drinking eight litres of water. Notes: The following conditions are required to select a milestone/target to track:
| A customer achieves a milestone by walking 10,000 steps daily for five consecutive days, as part of a fitness challenge. |
| Points redemption reversal | Track how many times redeemed points are reversed to the customer due to cancellations or errors. | A customer cancels a flight ticket they booked using points, and the points are returned to their account. |
Tracking Configurations
You can configure the target criteria and value based on selected customer activity. The types of customer activities are:
Transactional Activities
Track customer purchases, in-store, online, or at a point-of-sale (POS) system. When a customer makes a transaction that satisfies the conditions set by the target, the customer is rewarded. The KPIs for transactional activities are as follows:
| Key Performance Indicator | Activity Level | Description | Example | Supports Entering Decimal Value |
|---|---|---|---|---|
| Gross Amount | Bill (Transactions) and Line Items | Track the total gross sales made by the user during the cycle. Gross sales refer to the total amount before any discounts or offers are applied. | A customer purchases a product worth ₹2000 without any offers or discounts applied. | Yes |
| Net Amount | Bill (Transactions) and Line Items | Track the total net sales made by the user during the cycle. Net sales are the final amount paid by the user after discounts or offers. | A customer purchases a product worth ₹5000 but pays only ₹3000 after a discount is applied. | Yes |
| Count | Bill (Transactions) | Track the total number of transactions made by the user within a time period. | A customer makes five separate purchases at an online store during the week. | No |
| Days of Activity | Bill (Transactions) | Track the total number of unique days on which the user made at least one transaction within a time period. | A customer makes a purchase on three different days in a month. | No |
| Product Quantity | Line Item | Track the number of items purchased by the user within a time period. This can be configured to track specific line-items/products. | A customer buys 12 cans of soda at a store. | No |
| Count | Line Items Extended Fields | Track how many times a transactional or line-item extended field appears in a transaction. | A customer purchases three products with the extended-field labeled “Winter Sale”. | No |
| Sum | Line Items Extended Fields | Track the sum of a selected transactional or line-item extended field within a time period. | A customer purchases products worth ₹5000 with the extended-field labeled "Summer Sale." | Yes |
| Sum of highest value | Line Items Extended Fields | Track the highest value of a selected transactional or line-item extended field for each day. The highest value is counted and added to the highest values from other days in the tracking period. | A customer makes three different purchases worth ₹1000, ₹650 and ₹6000. In this case, only the transaction worth ₹6000 is tracked. | Yes |
Behavioral Events
A behavioural event can be configured as a target when creating a milestone. All the behavioural events configured for the organisation will be available for selection as a target. You can configure how the behavioural event is tracked and evaluated based on certain KPIs. A behavioural event can include an attribute. The attribute of a behavioural event are specific details or entries of the event. For example, the behavioural event "Added to Cart" can have the attributes "price”, "quantity", “SKU” etc.
Refer to the documentation for more information on Behavioral Events.
The following KPIs are supported for tracking behavioural events:
| Key Performance Indicator | Description | Example | Supports Entering Decimal Value |
|---|---|---|---|
| Count | Track the number of times a behavioural event has been triggered within a time period. | If the behavioural event is "Product Purchased", the count KPI tracks how many times customers made a purchase within a given time period. | No |
| Days of activity | Track the number of unique days the behavioural event has been triggered within a time period. | If the behavioural event is "Store Visit", the visit KPI tracks the number of unique days customers visited the store. | No |
| Sum | Track the total sum of a specific attribute value within the behavioural event. | If the behavioural event is "Added to Cart" with the attribute "price”, the sum KPI tracks the total price of all items added to the cart. | Yes |
| Sum of highest value | Tracks the highest value of an attribute for each day. The highest value is counted and added to the highest values from other days in the tracking period. | If the behavioural event is "Added to Cart" with the attribute "price", the sum of highest value KPI tracks the highest price of an item added to the cart each day. If a customer adds items priced at ₹1000, ₹4000, and ₹2500 on the same day, only the highest price (₹4000) is counted for that day. This value is then summed with the highest prices from other days during the tracking period. | Yes |
Earn reward currency
Track the reward currencies (points or alternate currencies) that a customer has earned during a certain period. For example: An airline tracks the miles (alternate currencies) earned by customers through its loyalty program. Customers can earn miles from both regular flights and special promotional events. A customer flying from India to Singapore can earn 1,000 miles for the flight, while a special promotion offering 2x miles during a holiday sale would allow the customer to earn 2,000 promotional miles. These alternate currencies earned by the customer are tracked by the target.
The following KPIs are supported for tracking reward currencies:
| Key Performance Indicator | Description |
|---|---|
| regular | Number of regular points or alternate currencies earned. Regular points or alternate currencies are those earned from a loyalty program. |
| promotional | Number of promotional points or alternate currencies earned. Promotional points or alternate currencies are those earned within a loyalty promotion. |
| both regular and promotional points | Total number of regular and promotional points or alternate currencies earned. |
Other Customer-Level Activities
Track the frequency of customer-level activities and events (referred to as customer-level events in the loyalty workflow) that are triggered by the user. These include: referral, points redemption, coupon redemption, return transaction, update transaction, update customer profile, promised points converted, milestone achieved, points redemption reversal.
The following KPIs are supported for tracking customer-level activities:
| Key Performance Indicator | Description |
|---|---|
| Count | Track the number of times an event has been triggered within a time period. |
| Days of activity | Track the number of unique days the behavioural event has been triggered within a time period. |
Filter Activity
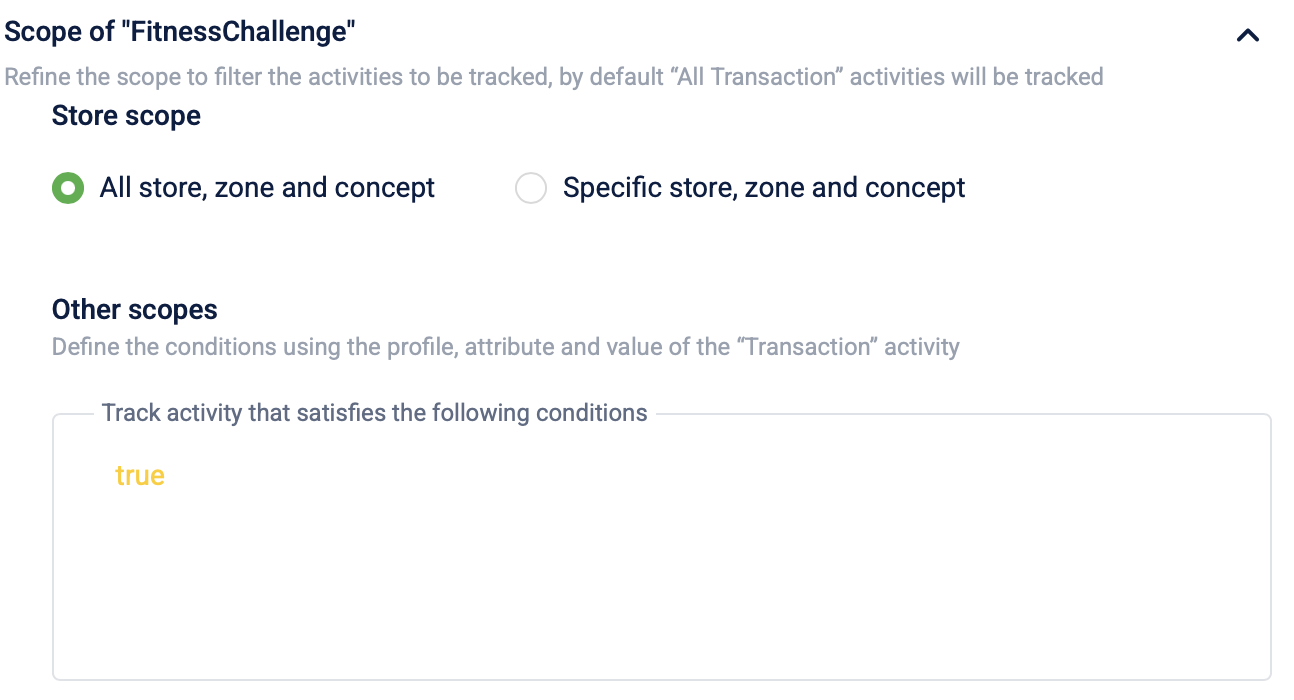
This section allows you to tailor the Milestones to meet specific needs and use cases for the brand. You can define the scope and filter criteria for the Milestone, ensuring it applies to the desired customer segments and activities.
-
Scope-Based Filtering:
- Stores: Limit the Milestone to specific retail locations.
- Zones: Apply the Milestone to defined geographical areas.
- Concepts: Limit the milestones to specific Organizational Units (OUs).
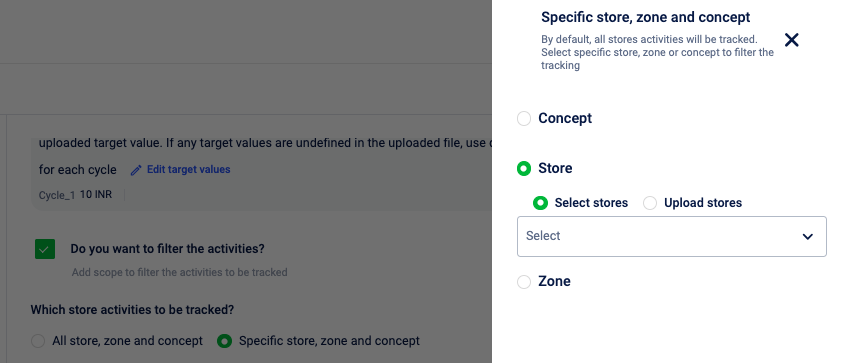
To define the Milestones for all stores, zones, and concepts, select All stores, zones, and concepts.

To define the Milestones for a specific store, zone, or concept, select Specific store, zone, and concept and then choose the relevant options.
-
Rule-Based Filtering:
For further refinement, you can define specific rules in the rule box. These rules can target particular line items, categories, minimum transaction amounts, etc.
- Categories: Target specific product categories within the Milestone.
- Line Items: Apply the Milestone to specific products or SKUs.
- Transaction Amount: Set minimum or maximum purchase amounts for Milestone progress.
Note
- For line item-related rules, ensure that "lineitem" is selected as the target entity. Writing line item-related rules when "transaction" is selected as the target entity will lead to errors.
- Creating or editing lineitem milestones in quick succession may cause 'EMF Unrolled Ruleset Creation Failed' errors due to ruleset name conflicts.
- Tender-based rules are not supported in the rule box of milestones. For use cases related to tender-based rules, please reach out to a member of the product team.
For more information on writing rules, refer to the Profiles documentation.
Creating a sub-target
Sub-targets are smaller goals configured within a larger target. This enables brands to nudge and motivate customers and reward them at smaller intervals during the target journey.
To create a sub-target, follow these steps:
-
Navigate to the target section of a milestone.
-
Click Add sub-target.
-
Enter a name for the sub-target.
-
Select the achievement criteria from the drop-down menu
The achievement criteria are as follows:
| Achievement criteria | Description |
|---|---|
| Percentage value | Define a percentage of the main target required to achieve the sub-target. This is applicable only for the following transactional activities: gross amount (total transaction amount excluding discounts) and net amount (total transaction amount with discounts applied).
|
| Absolute value | Define a specific achievement value required to achieve the sub-target.
|
- Select Continue to confirm the changes.
- Select Done to save the changes.
NoteWhen editing a milestone, the sub-target achievement criteria type cannot be modified, and only the amount can be updated.
Use case:
Consider a scenario where a brand wants to incentivise customers for purchasing specific accessories at a store. A milestone with a target value of ₹10,000 is set and includes the following sub-targets:
- 20% Achievement (₹2000): Send a message acknowledging progress and encouraging further effort.
- 50% Achievement (₹5000): Incentivise the customer with a small reward, such as a discount or coupon code, to encourage continued progress.
- 100% Achievement (₹10,000): When the full target is reached, grant a substantial reward, such as a free accessory or an exclusive offer.
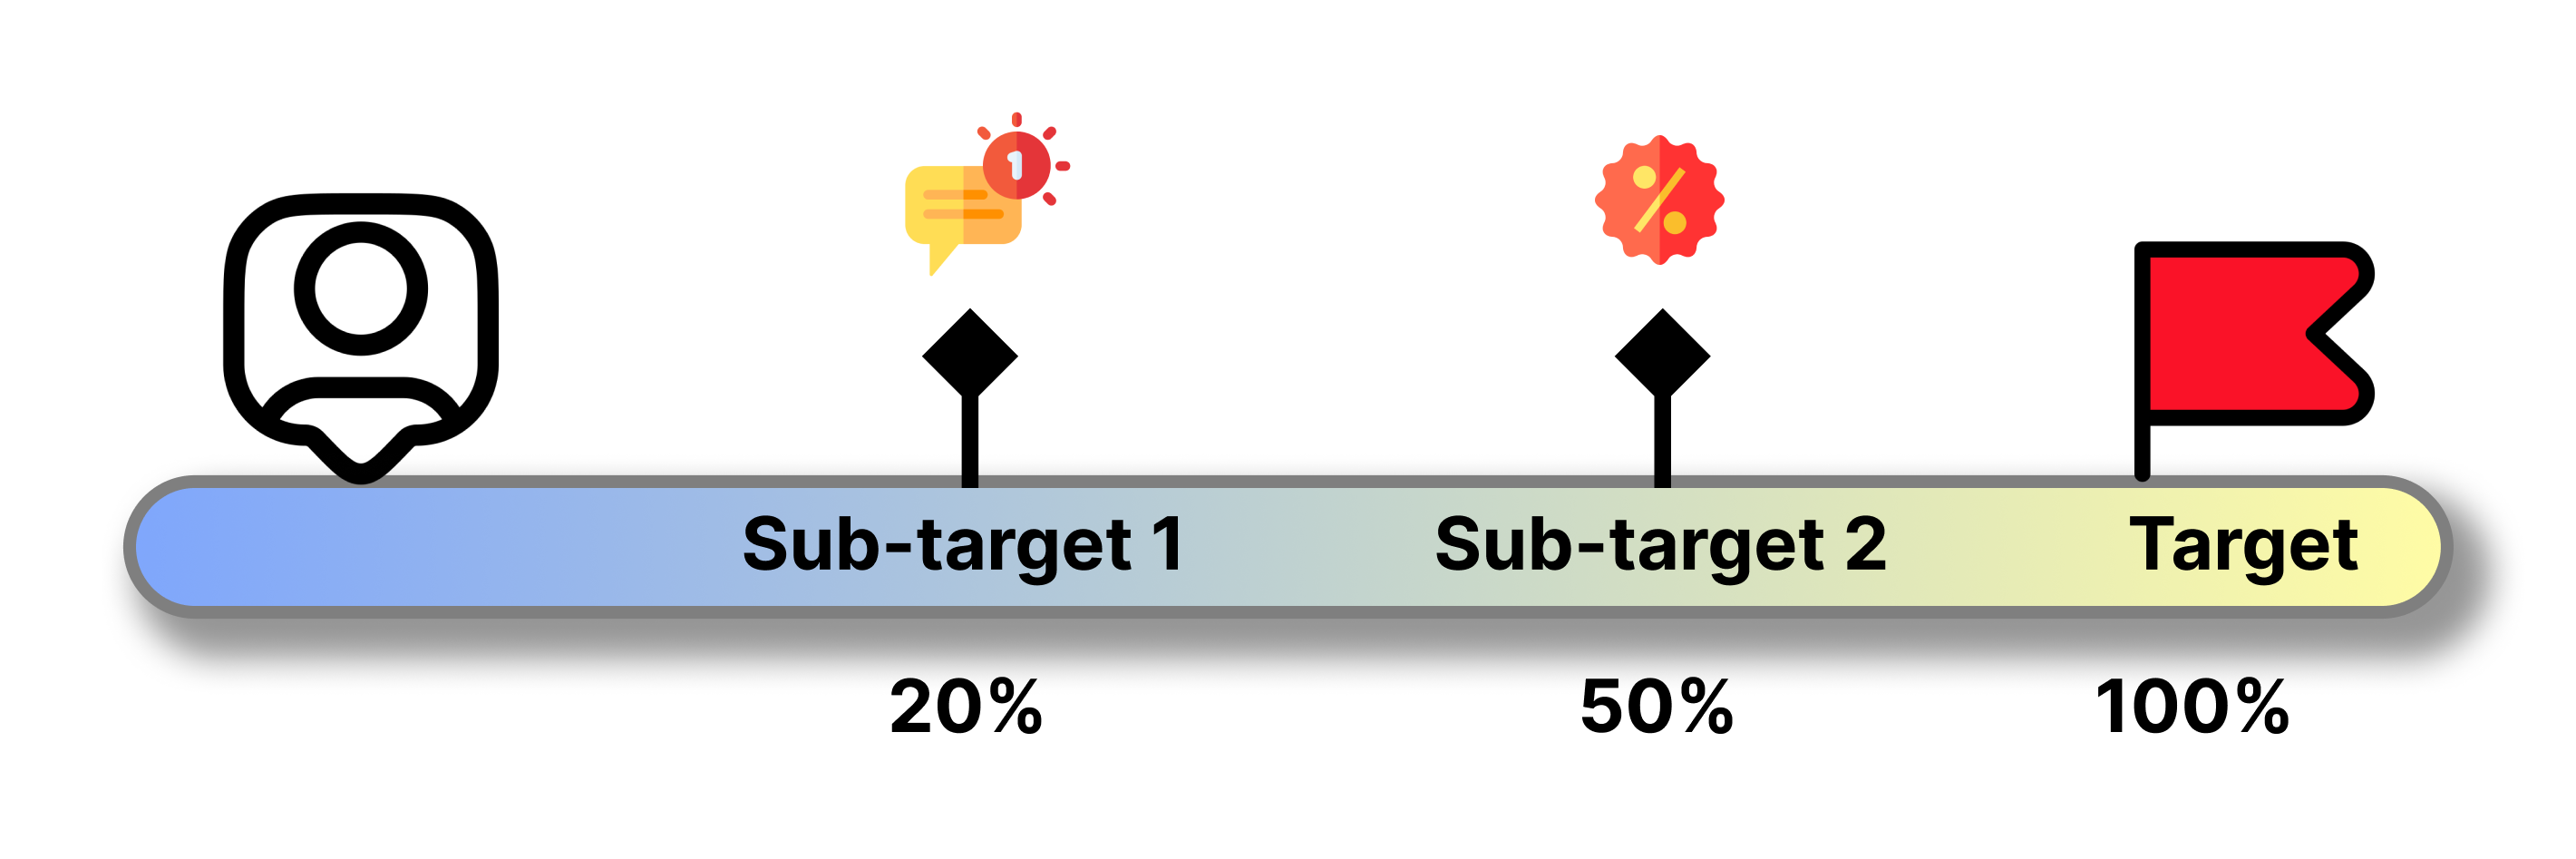
These sub-targets enable the brand to actively engage with customers throughout their journey, providing personalized communication and motivating them with timely rewards.
Creating milestones using templates
Templates are pre-configured milestones based on a pre-defined use case. These templates expedite the milestone creation process by automatically populating essential values for various use cases. As a user, you only need to provide the remaining information.
Note: Templates for all kinds of use cases might not be available.
For example, the following are some of the templates available:
Template on "Catalyze product sales
Whenever a brand wants to boost the sales of a particular product using the Milestone, they can choose this milestone template. This template comes pre-filled with all the essential information required to configure and achieve the intended use case. As a brand, your responsibility is to complete the remaining details, such as the number of cycles, dates, etc.
Template on "Boost customer spend
This template is tailor-made to increase customer spending and comes pre-filled with all the necessary information, including rules, filters, etc. As a brand, your task is to fill in the remaining details.
Note: Upon selecting a template, you can also edit the pre-filled data. As a brand, if you wish to change the pre-filled values to other specific values, that option is also available.
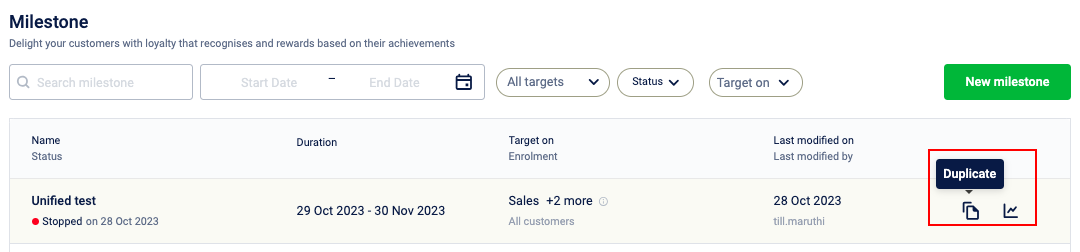
Cloning/Duplicating a Milestone
Once a Milestone is created, it can be cloned to create another Milestones. This helps the brands in saving time when they are creating similar milestones.
To clone a Milestone, hover over the Milestone that you want to clone and click the Duplicate icon.
For example:
A brand 'Jaffna' has created a milestone that a user has to achieve $100 gross sales in a month to get 100 points. For this milestone, they have configured 5 cycles. However, they also want to create another Milestone and the only difference is, this time the brand wants the KPI as $100 net sales.
Here, as the entire information is the same, now brand can clone the previous milestone and change the KPI from gross sales to net sales.
Notes
- Cloning can be done only from a Live/Upcoming Milestone.
- When the cloning is completed, the "customer enrollment" step won't be cloned. Customer enrollment details needs to be entered before saving the clone.
Advanced settings of milestones
The advanced settings is a page that contains advanced options for the milestone which brands can use to improve their gamification, enable default options, etc... This is how to go to advanced settings:

When the configurer clicks on the "advanced settings" on the top-right corner, the following page opens up:
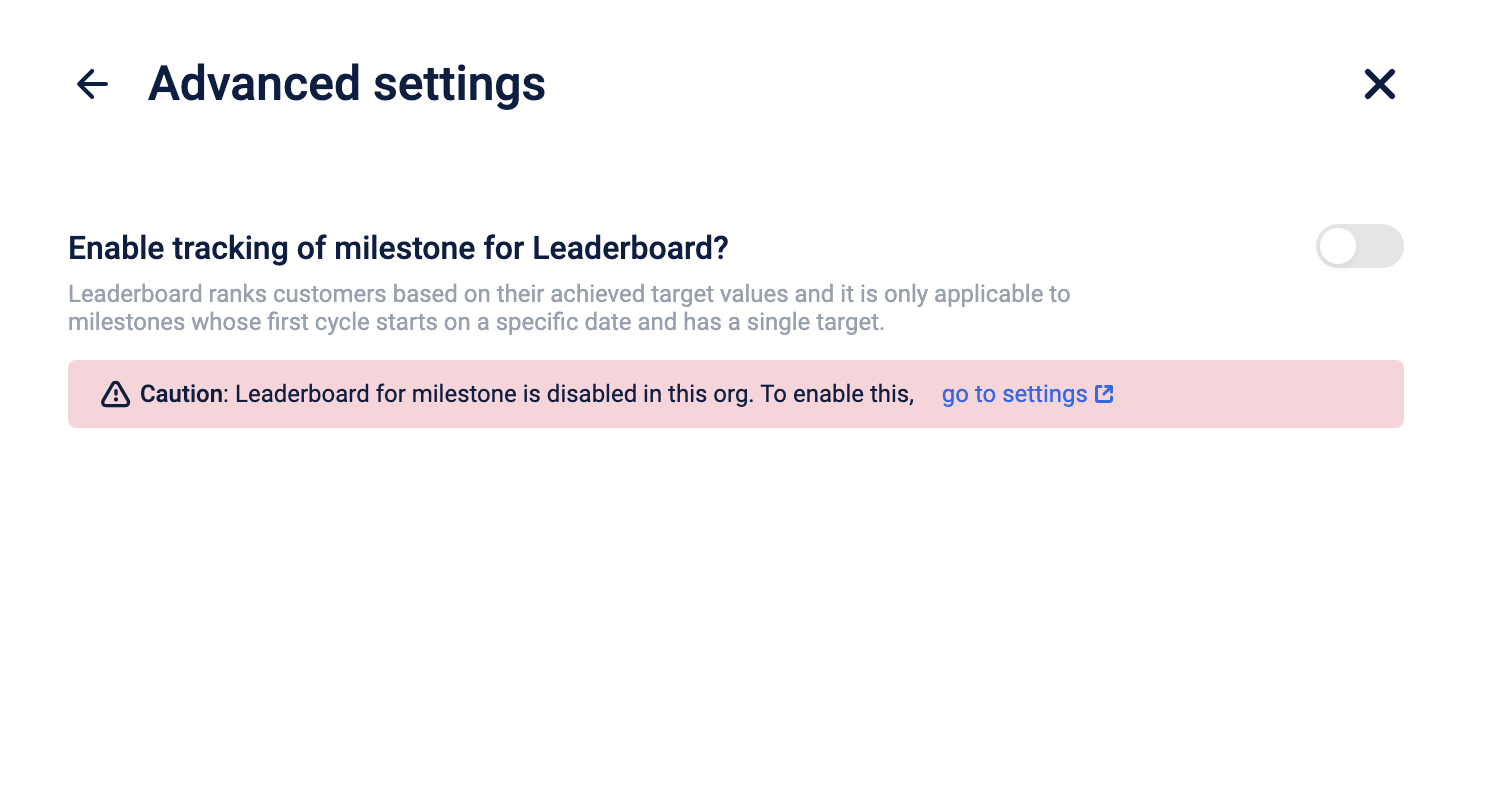
Currently, this page contains the following advanced options:
- Enabling leaderboard on each milestone level
- Leaderboard is a concept that brands can use to improve their gamification by creating competition among the users for additional users.
- More information on the leaderboard can be found here
- Currently, the following are the 2 APIs that are supported for the leaderboard
- Fetching top-N customers
- Fetching the rank of a customer across target groups
- Currently, the following are the 2 APIs that are supported for the leaderboard
Examples for overall targets
Example 1:
A fitness brand creates the following targets to encourage customer engagement and activity:
- Dance for 15 minutes daily
- Jog for 30 minutes daily
- Do yoga for 30 minutes daily.
Customers who complete all three activities daily receive the “Fit Today” badge.
To motivate customers to exceed their goals, the brand includes an Overall Target: stay active for at least 120 minutes per day. Customers who meet the Overall Target receive the “Superfit Today” badge.
By creating a unified target that tracks three behavioral events and including an overall target lets the brand incentivise their customers for their consistent engagement, encourages brand loyalty, and aligns customer goals with the brand’s mission to promote active lifestyles.
Example 2:
A brand creates the following targets to encourage customer participation in its loyalty program:
- Redeem 10 coupons monthly
- Earn 100 loyalty points per transaction
- Redeem 50 loyalty points weekly
Customers who complete all three targets receive a 15% discount coupon.
To encourage consistent engagement, the brand adds an Overall Target: accumulate 500 loyalty points monthly. Customers who meet this target receive an Additional 20% Discount Coupon.
By creating a unified target that tracks coupon redemptions, points earned, and points redeemed and including an overall monthly goal, the brand incentivises repeat purchases, boosts sales volume, and aligns customer behaviour with its loyalty program objectives.
Example 3:
A fashion brand creates the following targets to boost sales across different categories:
- Purchase at least ₹1,000 from the Men’s category
- Purchase at least ₹1,000 from the Women’s category
- Purchase at least ₹500 from the Children’s category
To incentivise larger purchases, the brand adds an Overall Target: spend at least ₹5,000 in total to earn a 20% Discount Coupon.
By creating a unified target that tracks purchases across three categories and including an overall spending goal, the brand incentivises cross-category sales, drives higher revenue, and aligns customer spending habits with its goal of boosting category-wide performance.
Viewing a milestone
The details of a milestone can be viewed by clicking on the milestone from the list.
Configuration
The configuration tab displays configuration information of the milestone in view.
| Field | Description |
|---|---|
| Milestone details | View the name, duration, attributed store till and customer target value |
| Cycle | View the cycle start, duration and number of cycles for the milestone. Refer to the milestone cyclessection for more information. |
| Customer enrolment | View details on enroled customers. |
| Target | View details of the target attached to the milestone. |
Information
The information tab displays information of the milestone in view.
| Field | Description |
|---|---|
| Target group ID | The ID of the target group attributed to the milestone. |
| Target ID | The ID of the targets attributed to the milestone. |
| Created on | Date the milestone was created. |
| Created by (Role) | Name of the person who created the milestone. |
Configuring benefits
This step involves defining benefits for end-users upon achieving the configured milestone. The configuration is performed by setting upLoyalty promotions.
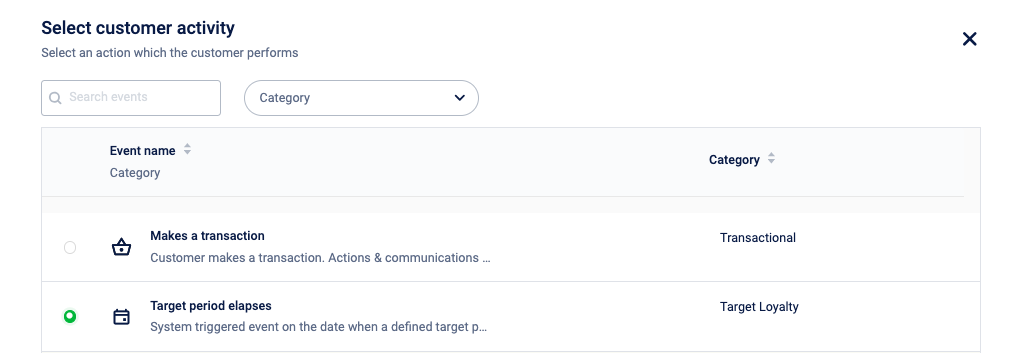
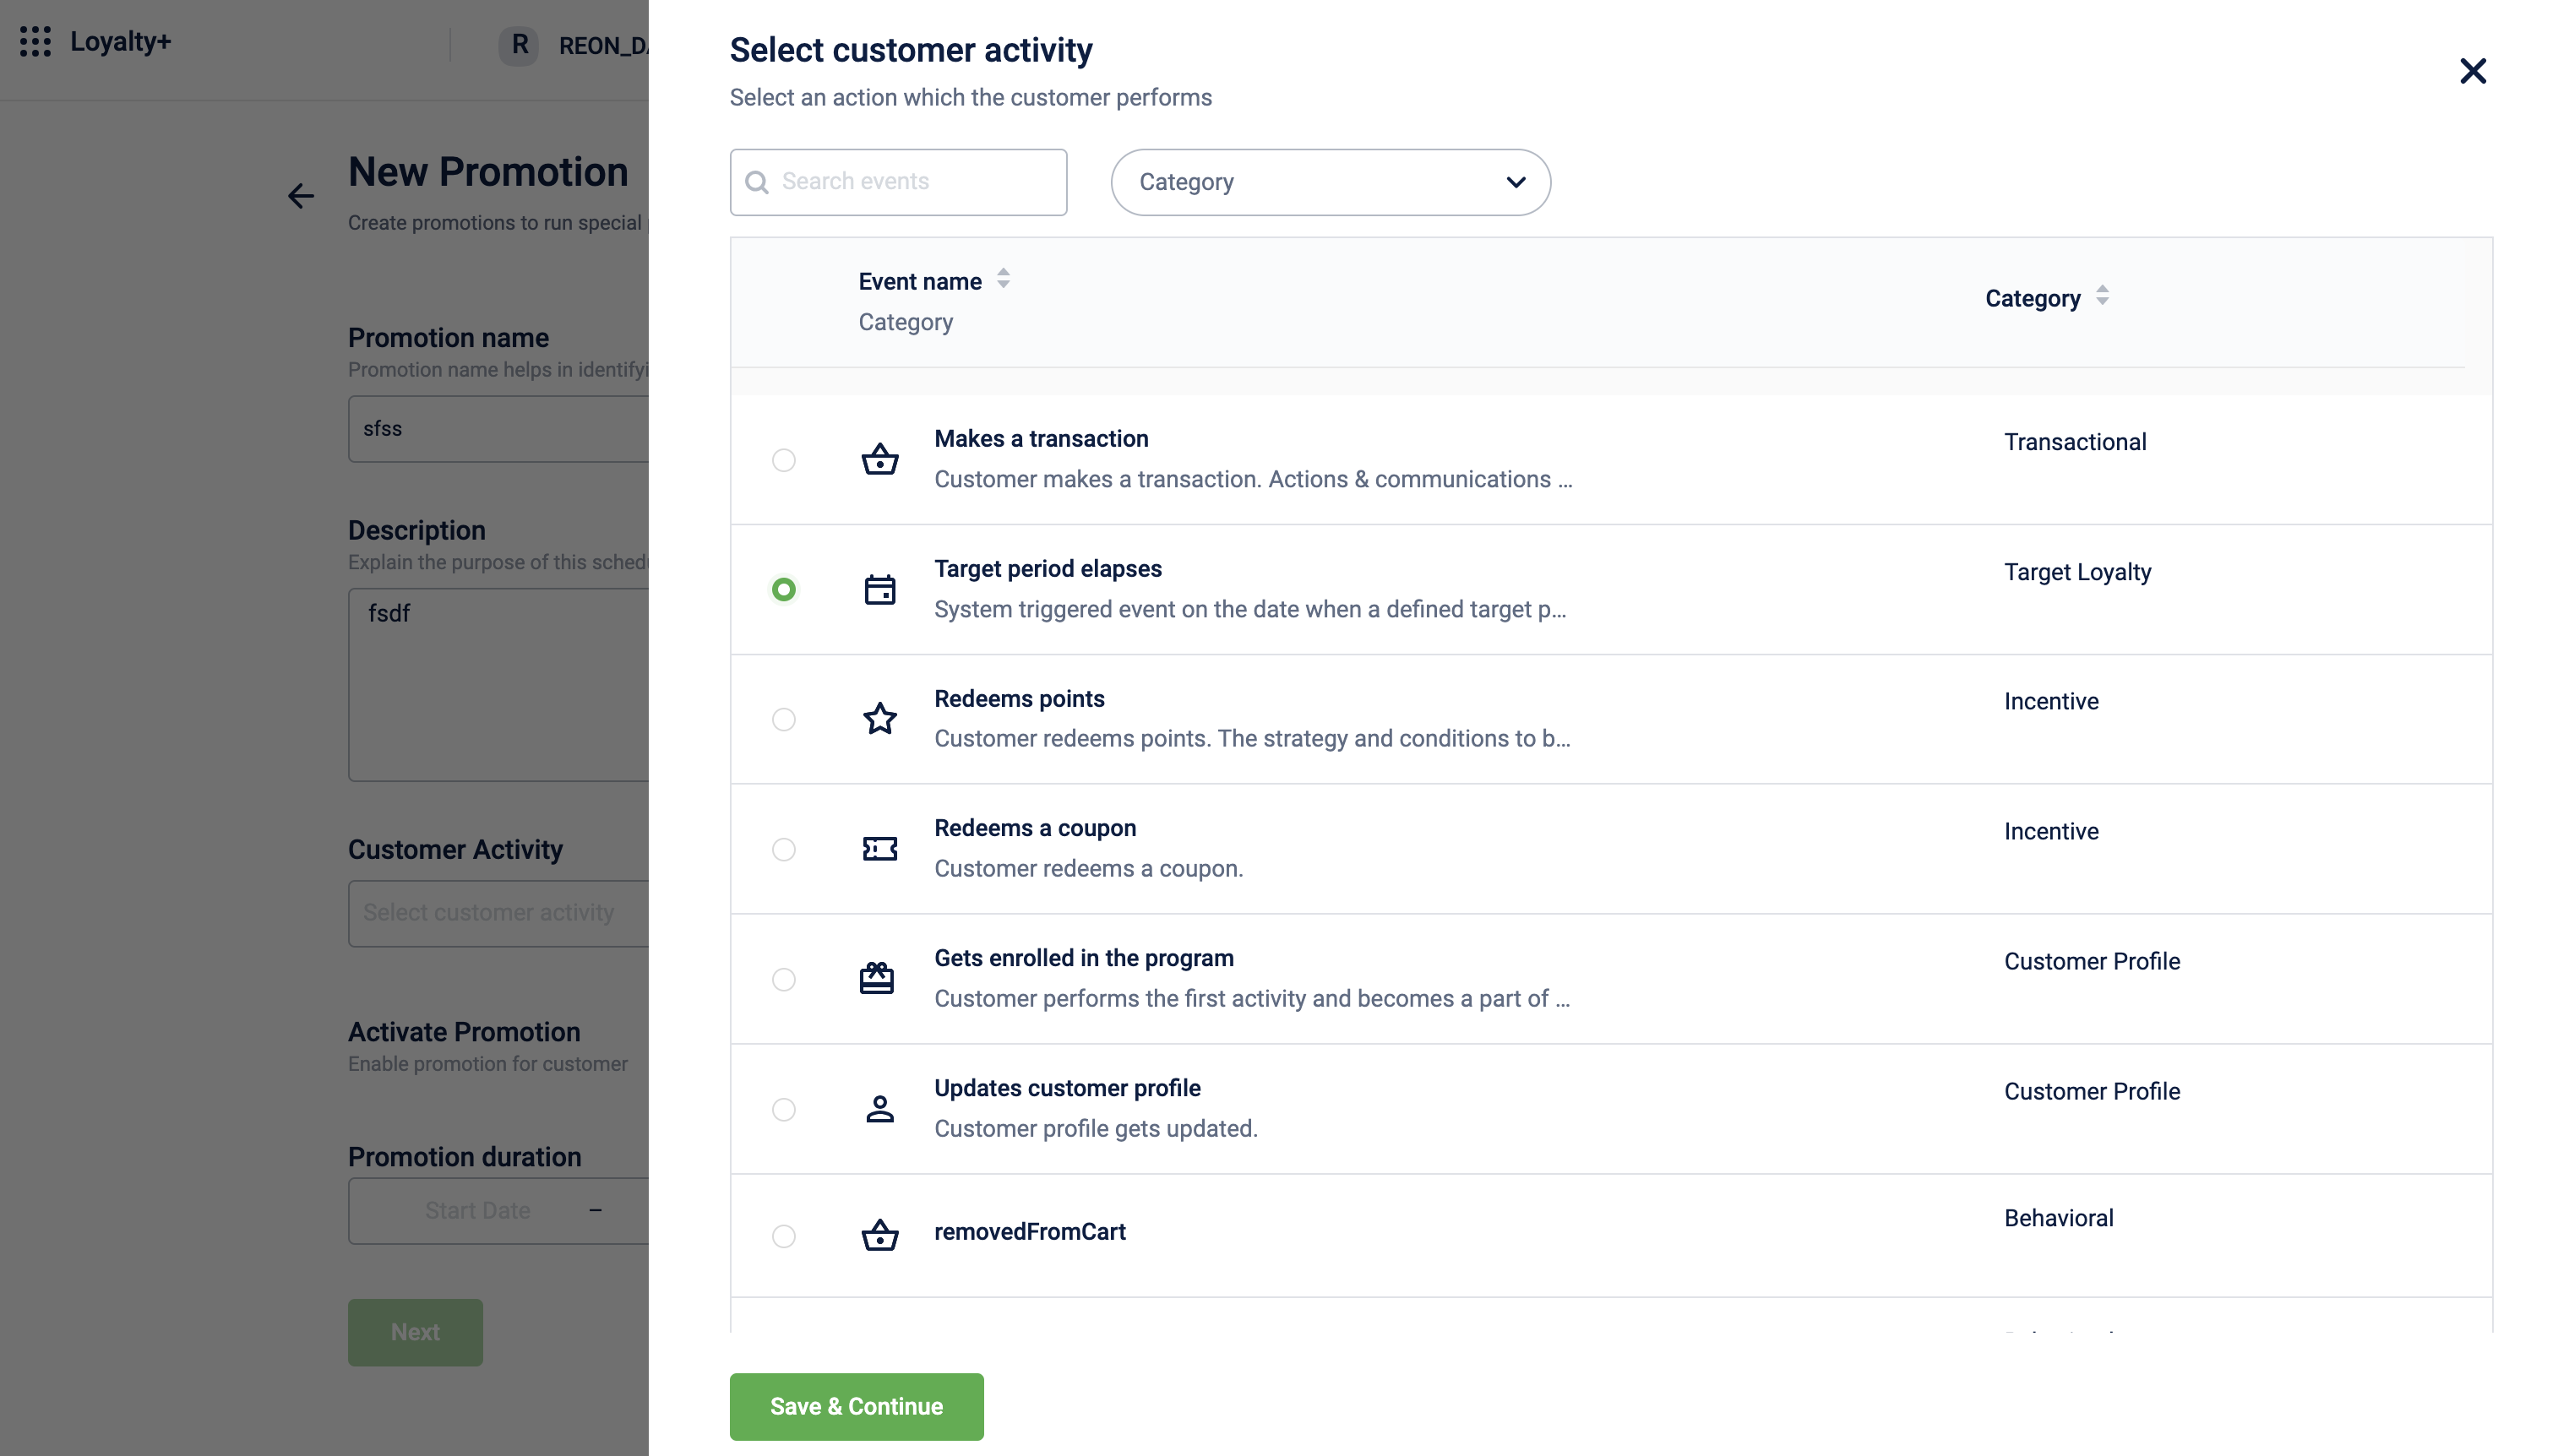
To create Milestone-related promotions, you need to use the "target period elapses" customer activity and define rules based on your Milestones to configure actions such as benefits, communication, etc.
How the EMF behaves b/w Milestones & Loyalty promotions
The below flow chart provides you with an overview of EMF (Engagement Metric Factor) flow in Capillary and how Milestones and loyalty promotions are connected via EMF.
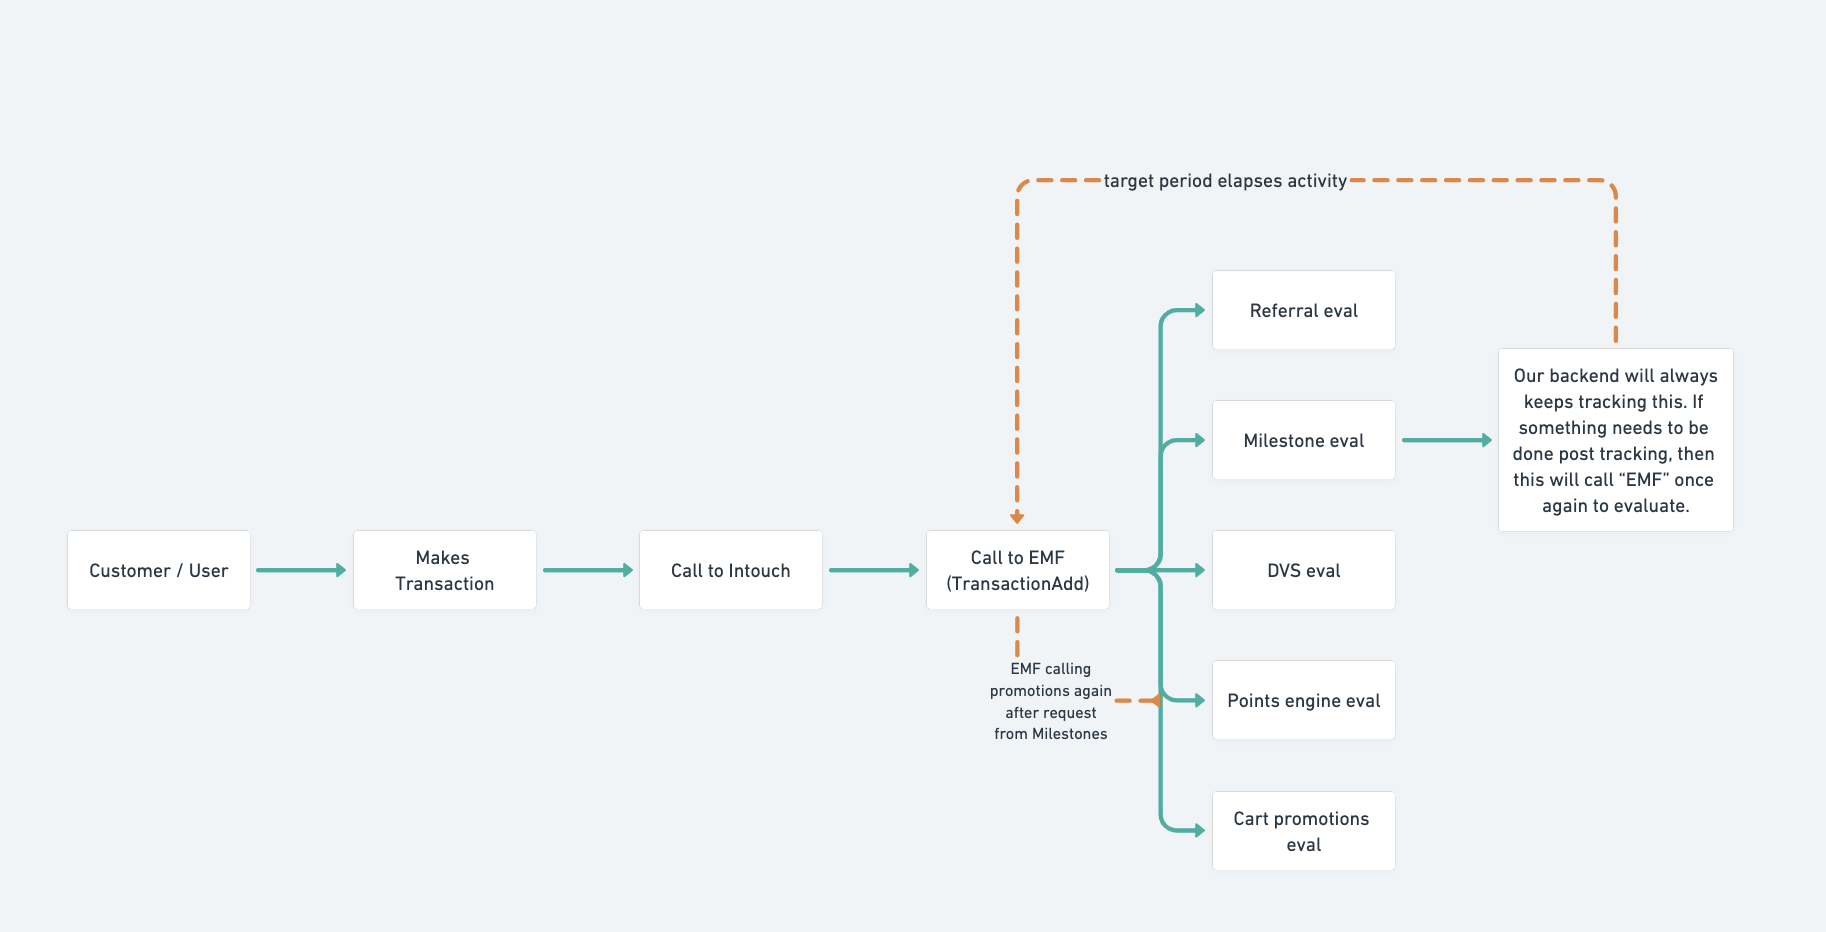
In this flow, the orange line indicates that after milestone evaluation, if necessary, an event will be sent to promotions via EMF.
This happens in two ways:
Immediate effect - When a customer's "target achieved" surpasses the "target defined," the brand aims to provide benefits immediately. Therefore, an immediate event request will be sent only when "targetAchieved > targetDefined" is in this process.
End of the cycle - The milestone evaluation for all customers occurs only at the end of the cycle (and point allocation will also happen after the period ends aka the next day). This is similar to a scheduled task that runs after each cycle, triggering an event request. In this approach, an event request is sent even if "targetAchieved < targetDefined," enabling a broader range of use cases with the assistance of rules.
Generally, the B2C use cases follow method (1) where instant gratification is required and B2B use cases follow method (2) where instant gratification has no role & the brand wants to wait till the end of the cycle to let their customers achieve as high as possible so that they can be awarded accordingly.
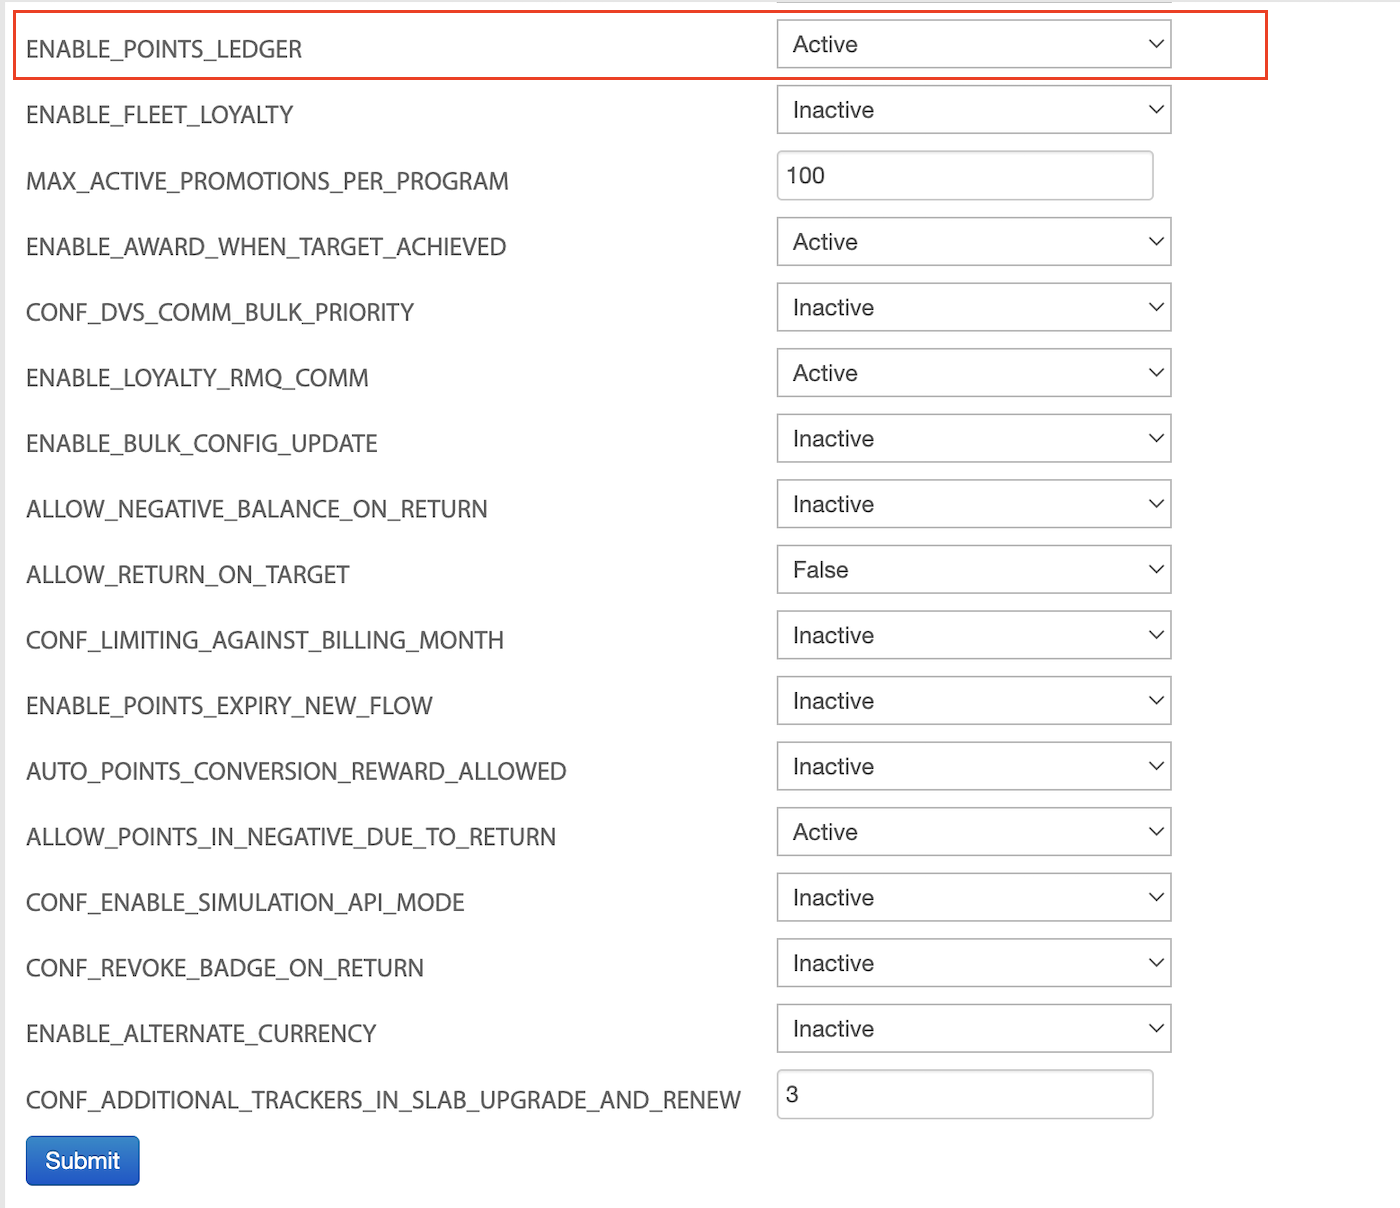
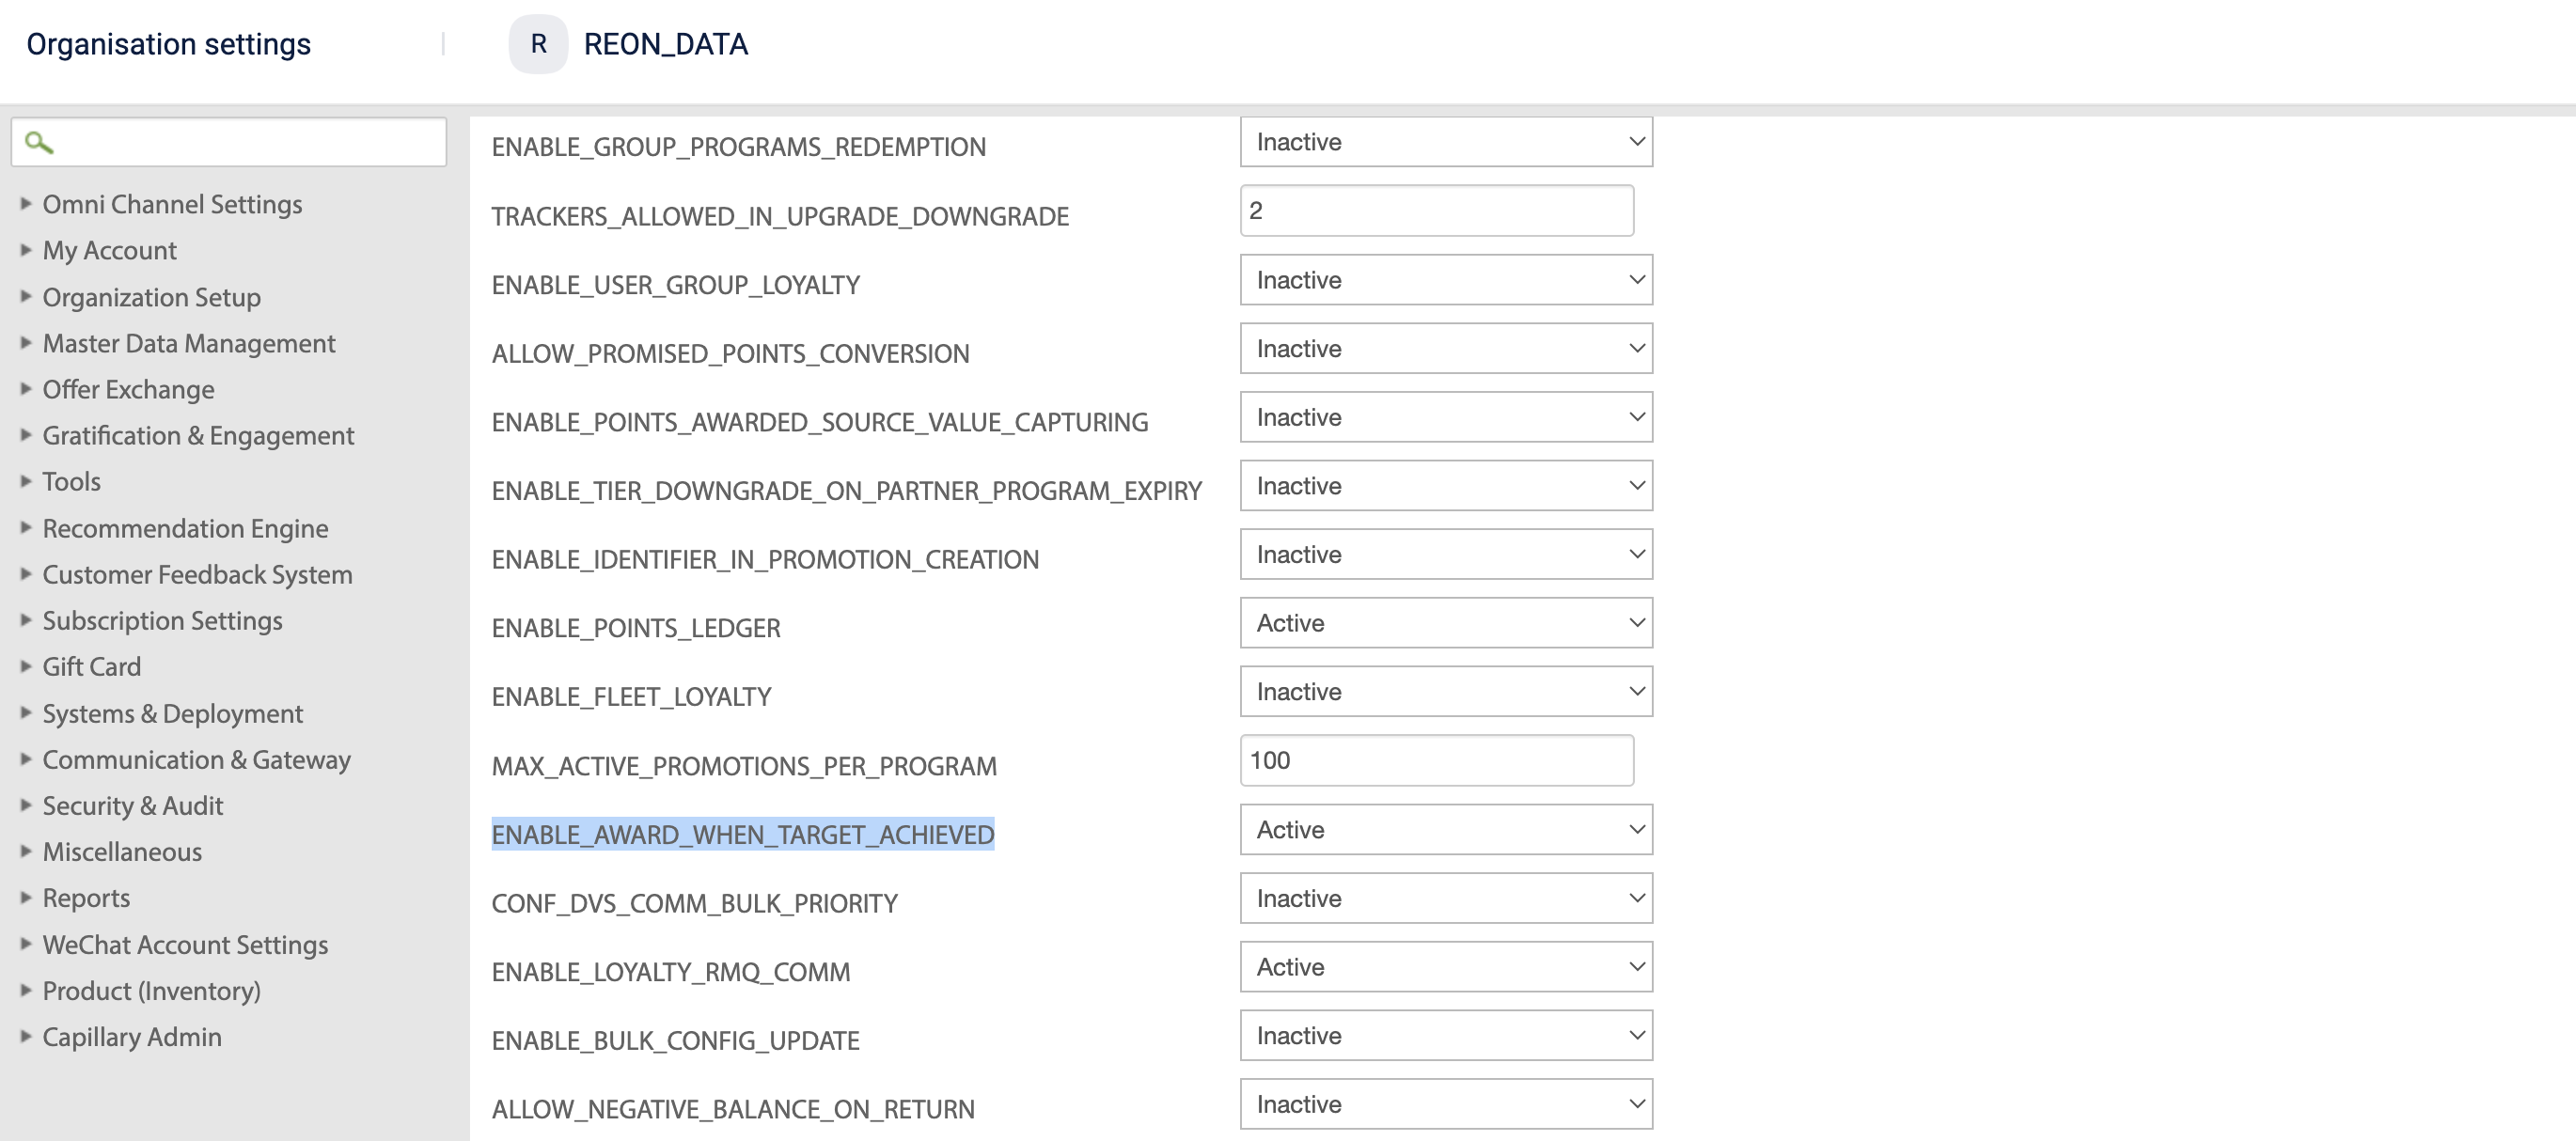
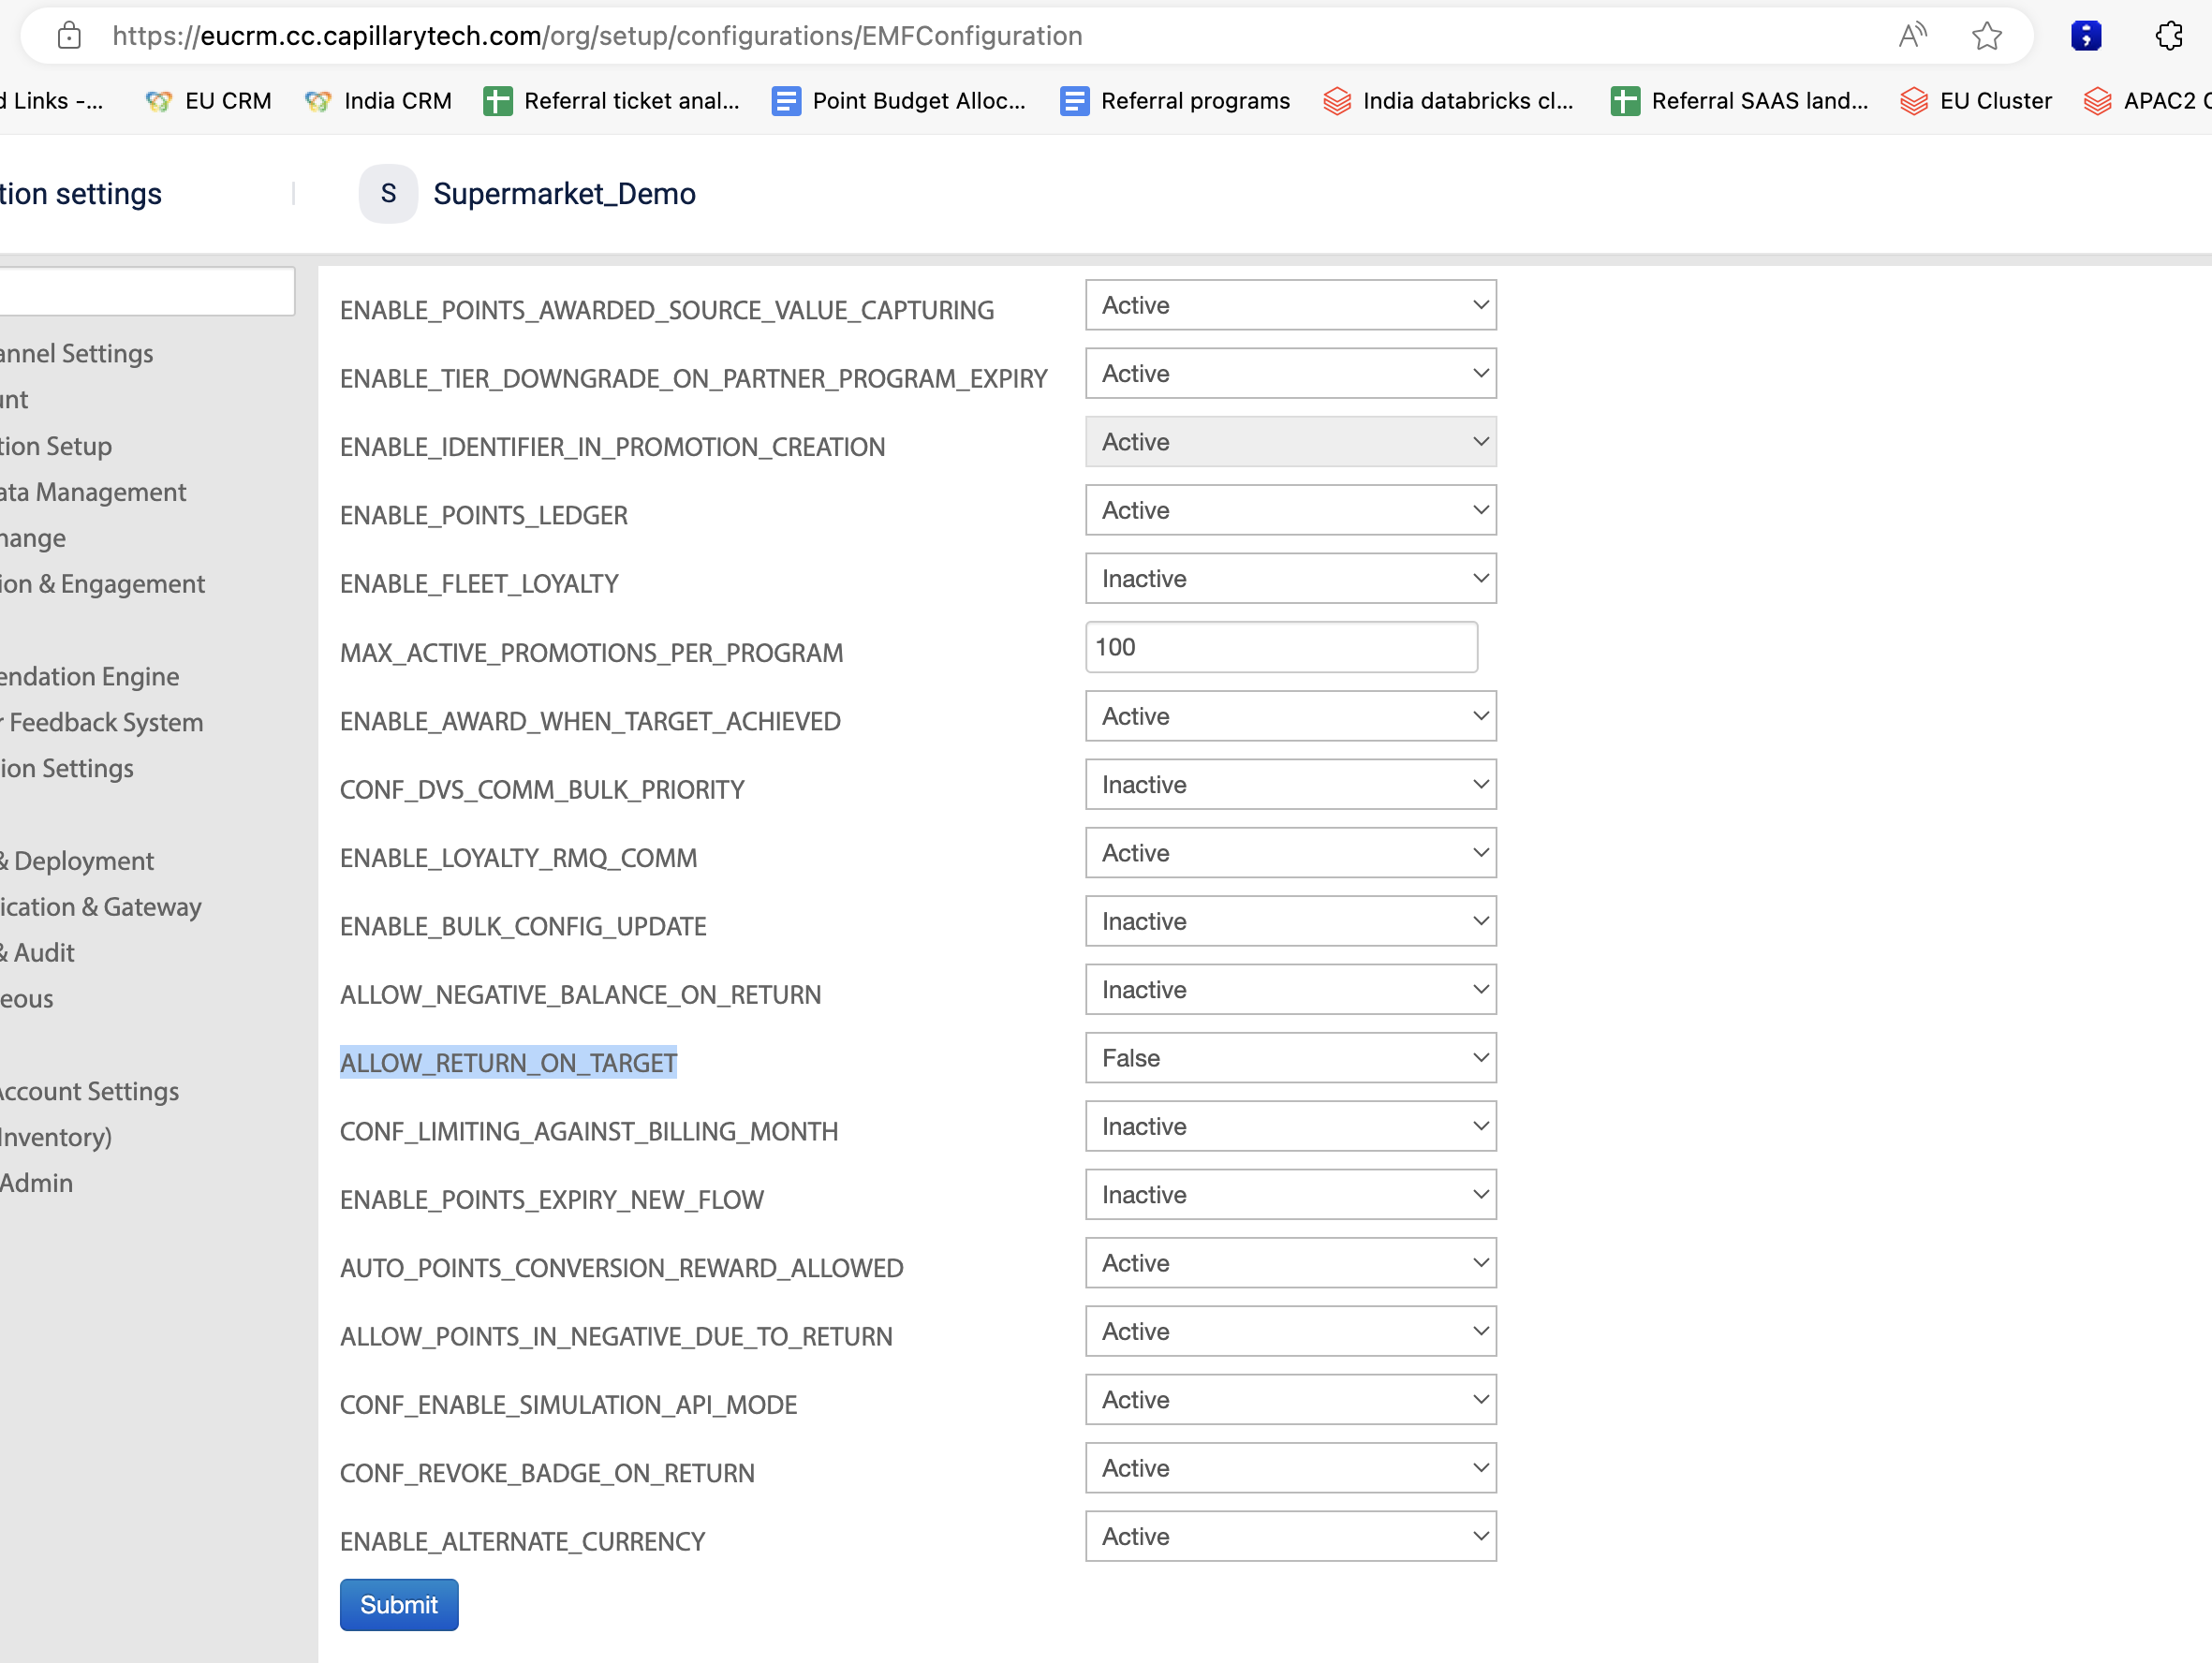
As a brand, if you want to enable immediate effect (Immediate effect), make sure the following config is enabled (mark as "Active") in your org settings. When this config is enabled, only then, Milestone will send an event request to EMF as soon as a customer's "target achieved" is greater than "target defined".
When this config is "Inactive", no event request will be sent to EMF on immediate basis. By default, this will be in "Active" phase.
Once the event reaches loyalty promotions through either of the two methods mentioned above, the promotion undergoes evaluation based on the rules, scope, etc., specified in that promotion. After all evaluations are complete, the associated actions, such as awarding points, distributing coupons, communication, etc., will be triggered.
Rules for the Loyalty promotions about Milestones
This applies only to targets for which the benefits are not immediately provided.
Prerequisite
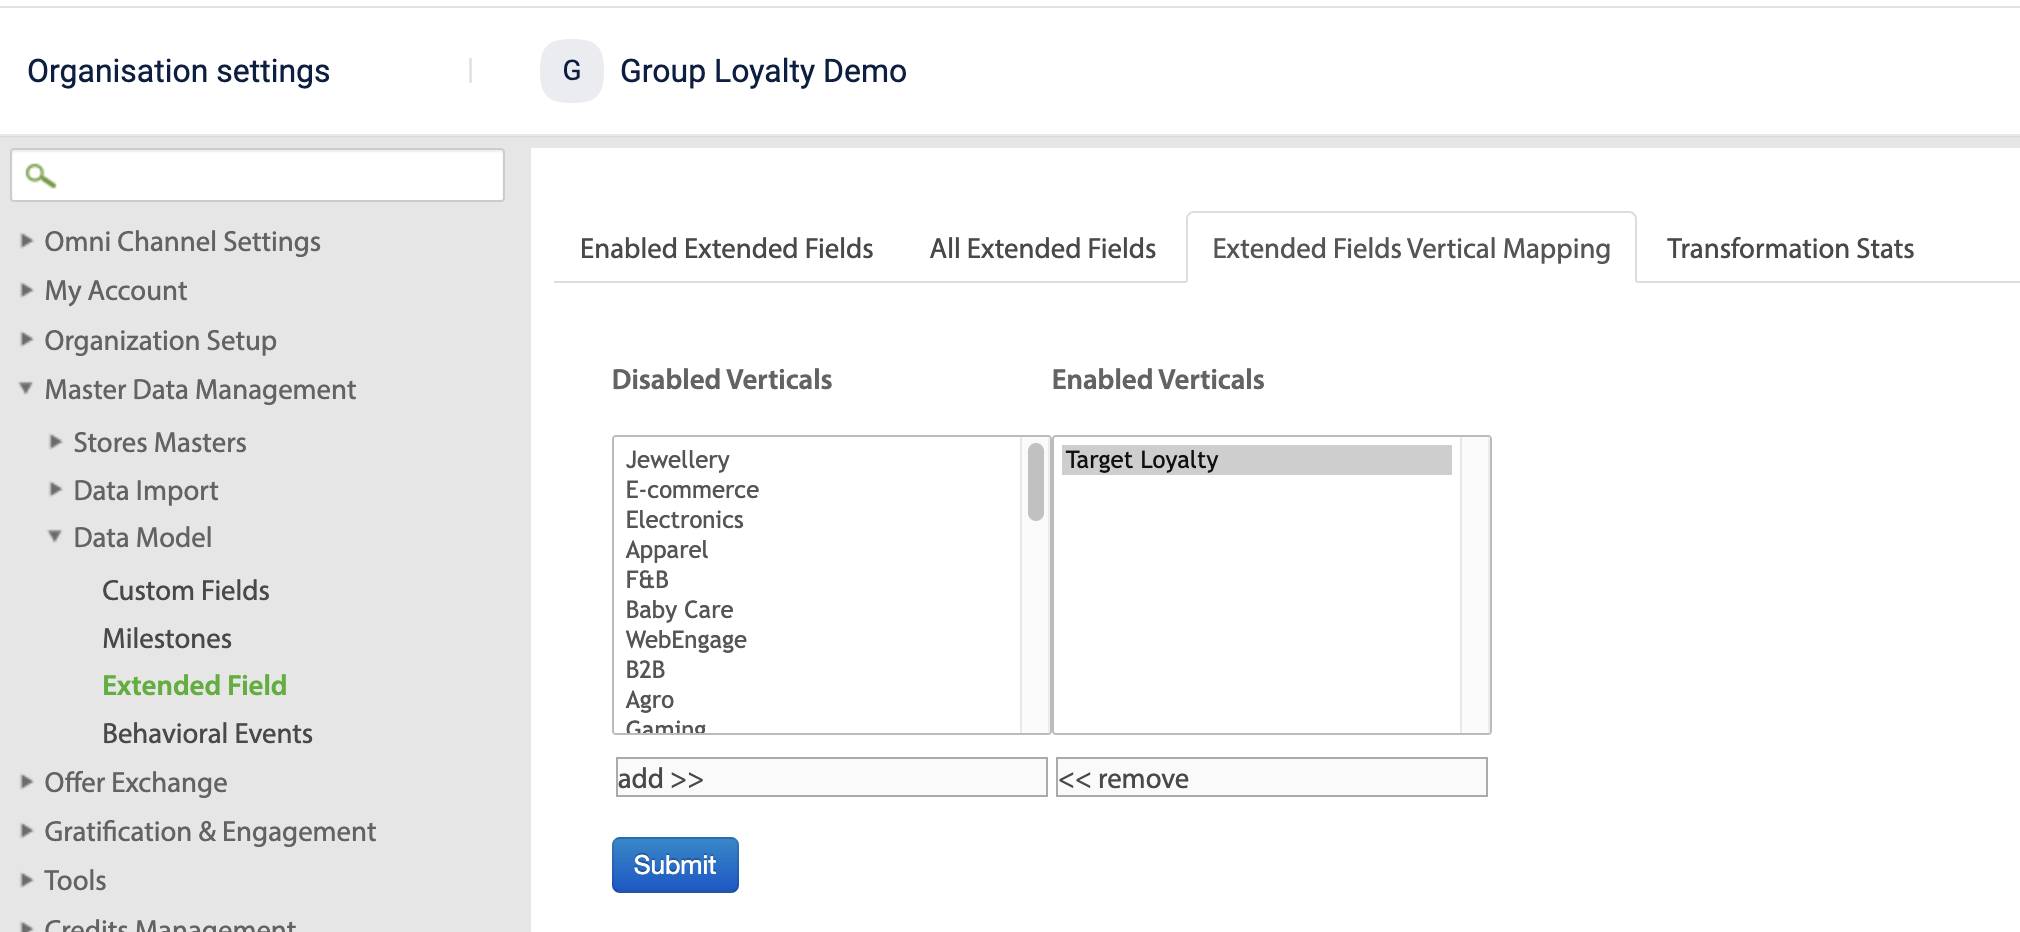
- Make sure that the vertical 'Target Loyalty' is enabled. To add the vertical to enabled verticals, perform the following:
- Navigate to Organisation settings > Master Data Management> Extended Field > Extended Fields Vertical Mapping.
- Select Target Loyalty from Disabled Verticals.
- Click add to add it to the Enabled Verticals.
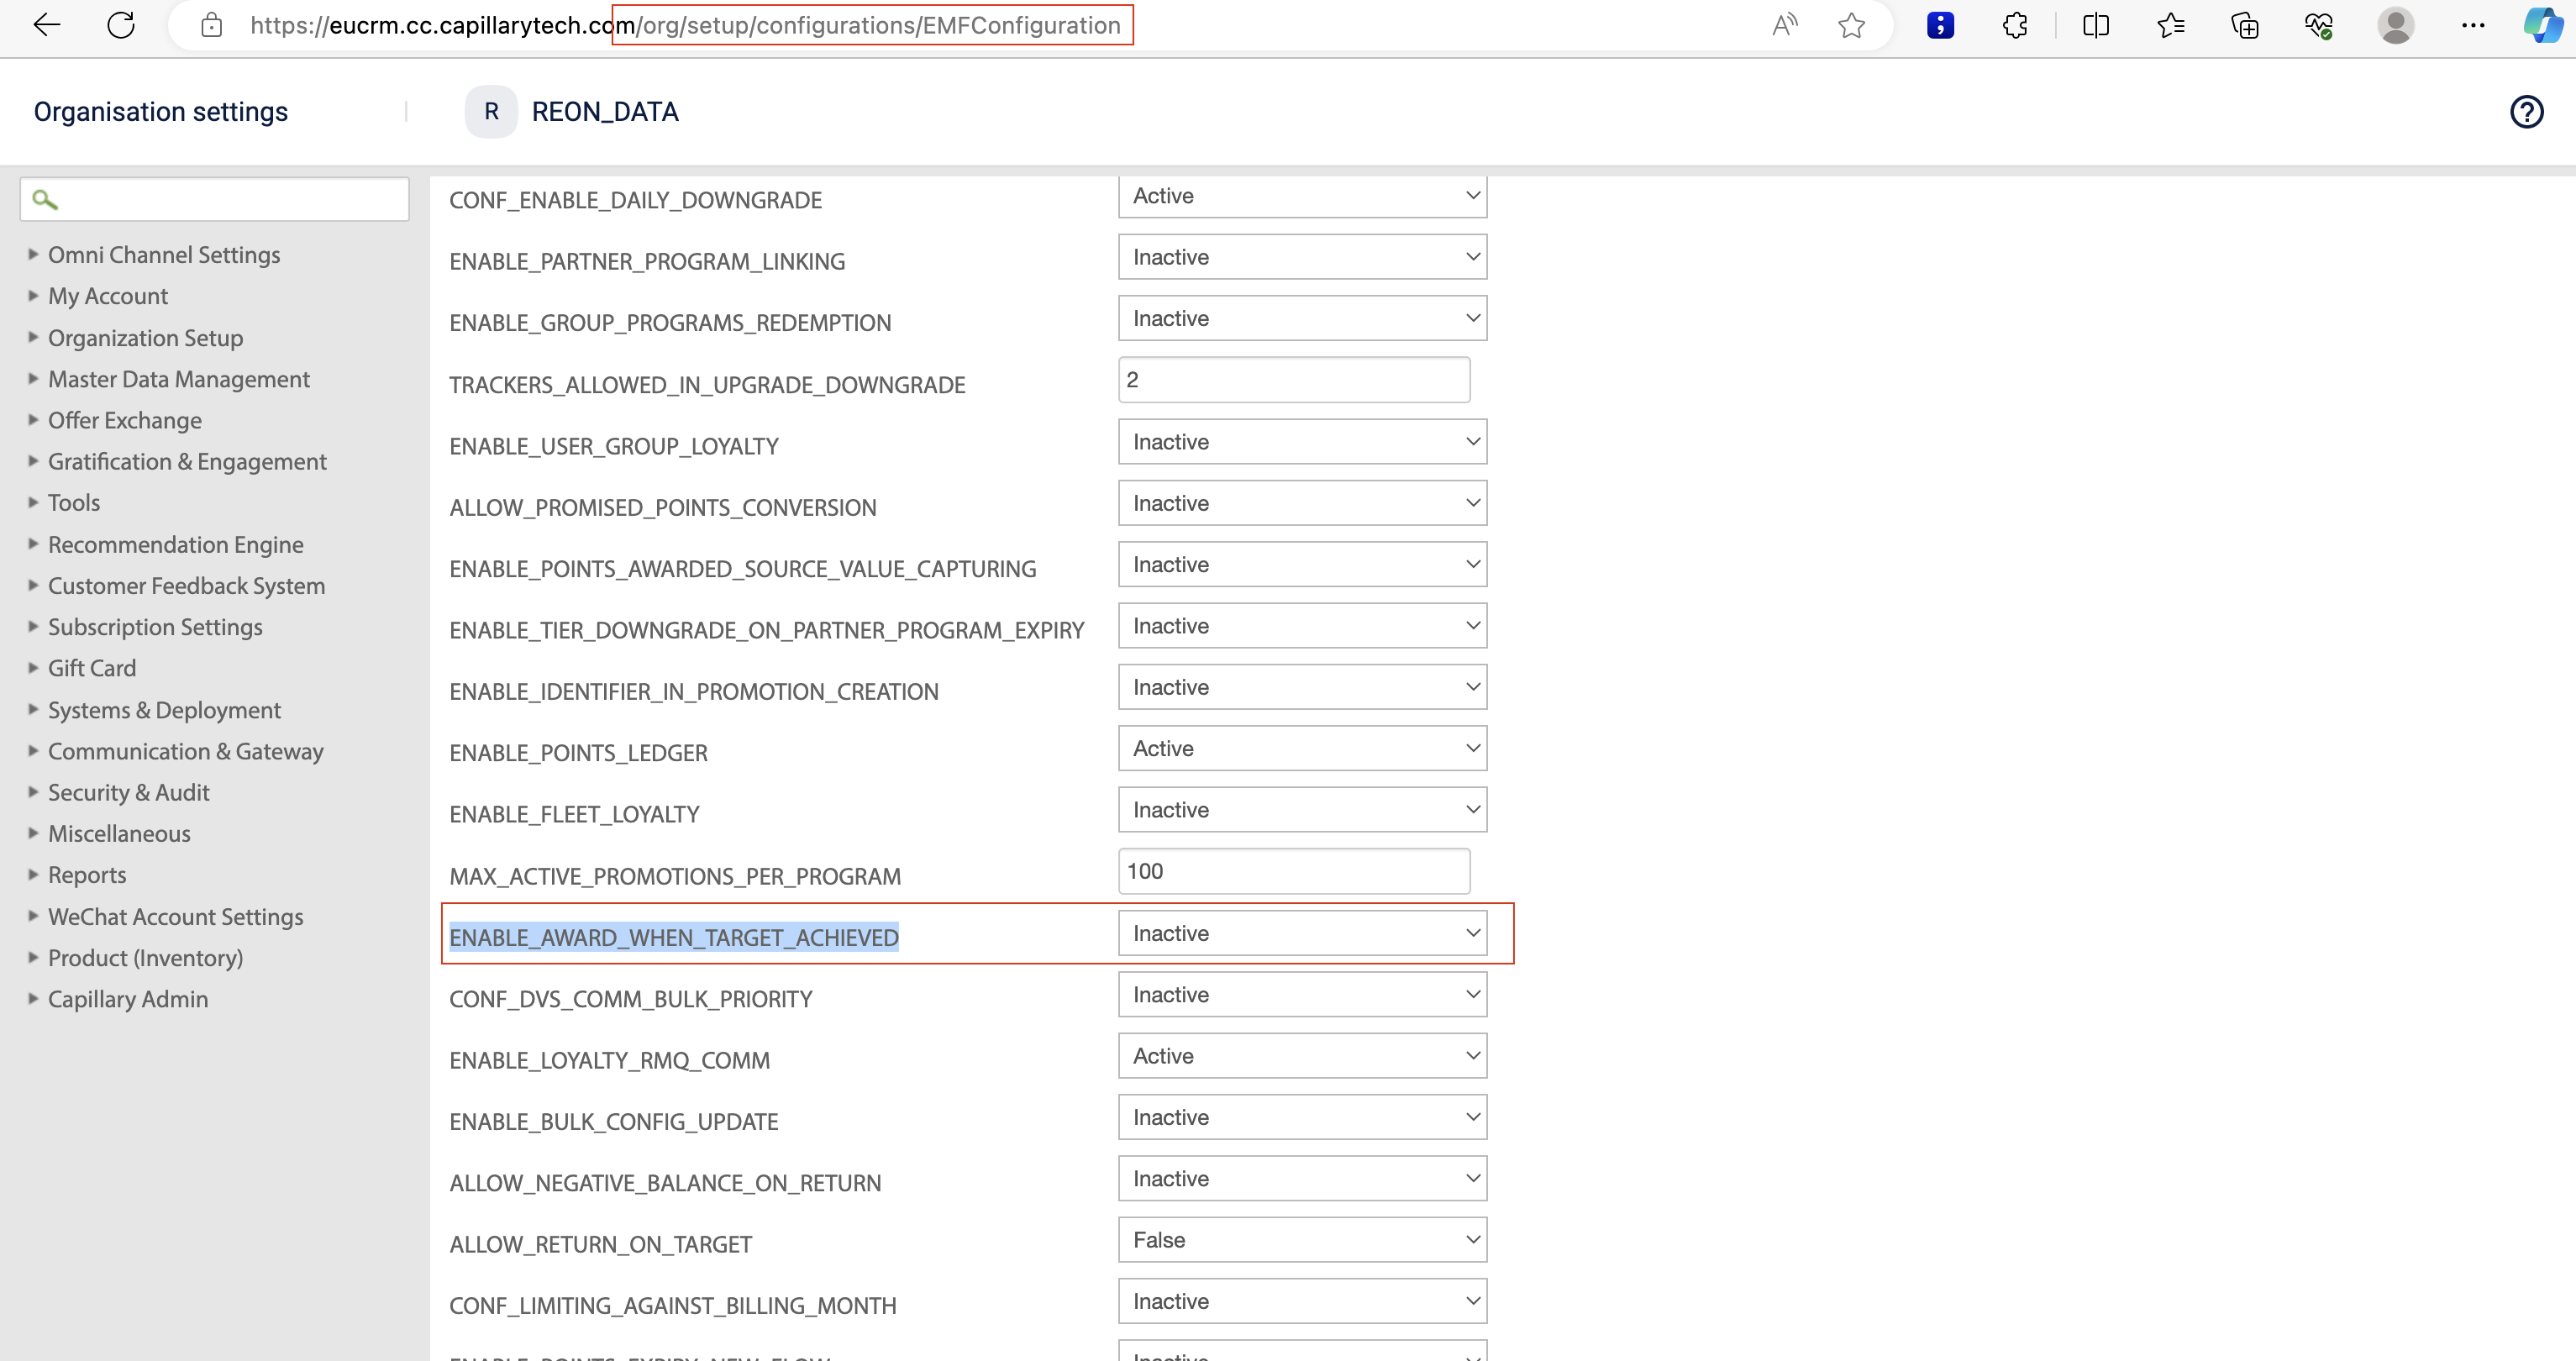
- Make sure the "ENABLE_AWARD_WHEN_TARGET_ACHIEVED" config is set as "active" in the EMF org settings page. Awards will be given to the user (for milestones/streaks) only when this config is set as "active". To enable this, visit the "EMF Configuration" page of org settings. If the access to the page is not given, write an email to the sustenance team.
Rules
All the rules related to milestones come under the "currentEvent" profile. This means that the "currentEvent" profile has many attributes about Milestones. They are:
- currentEvent.targetAchieved
- currentEvent.targetDefined
- currentEvent.isTargetAchievedEvent
- currentEvent.milestoneValueDefined
- currentEvent.targetGaps
- currentEvent.targetMilestoneTrigger
- currentEvent.targetName
- currentEvent.targetPeriod
currentEvent.targetAchieved
This rule helps in getting the current target achieved value of the customer. Make sure that, you are entering the name of the milestone inside the parenthesis.
E.g: currentEvent.targetAchieved("ABC")
currentEvent.targetDefined
This rule helps in getting the target defined value by the brand for that Milestone. Similar to the above, make sure you are entering the name of the milestone in the parenthesis.
E.g: currentEvent.targetDefined("ABC")
For example, if you write a rule: currentEvent.targetAchieved("ABC")>currentEvent.targetDefined("ABC"), this rule will become true only when the customer's achieved value is more than the defined value.
currentEvent.isTargetAchievedEvent
This rule verifies whether the event that came to loyalty promotions (out of 100s of type of events that are possible) is the event that arrives whenever a user achieves the milestone (aka target).
For instance, if you've set up a Milestone where a user needs to achieve $1000 in sales from Jan 1st to Jan 20th. If the user reaches this target by Jan 5th, brands have two options:
- Instant Gratification: Provide benefits right away to the customer, which is common in B2C industries.
- End-of-Cycle Evaluation: Delays the evaluation until the end of the cycle, allowing customers to achieve more. This approach is common in B2B industries.
By including the "ENABLE_AWARDS_WHEN_TARGET_ACHIEVED" rule in the rule box (assuming it's marked as "Active" as shown above), benefits will be immediately given to customers when the target is achieved.
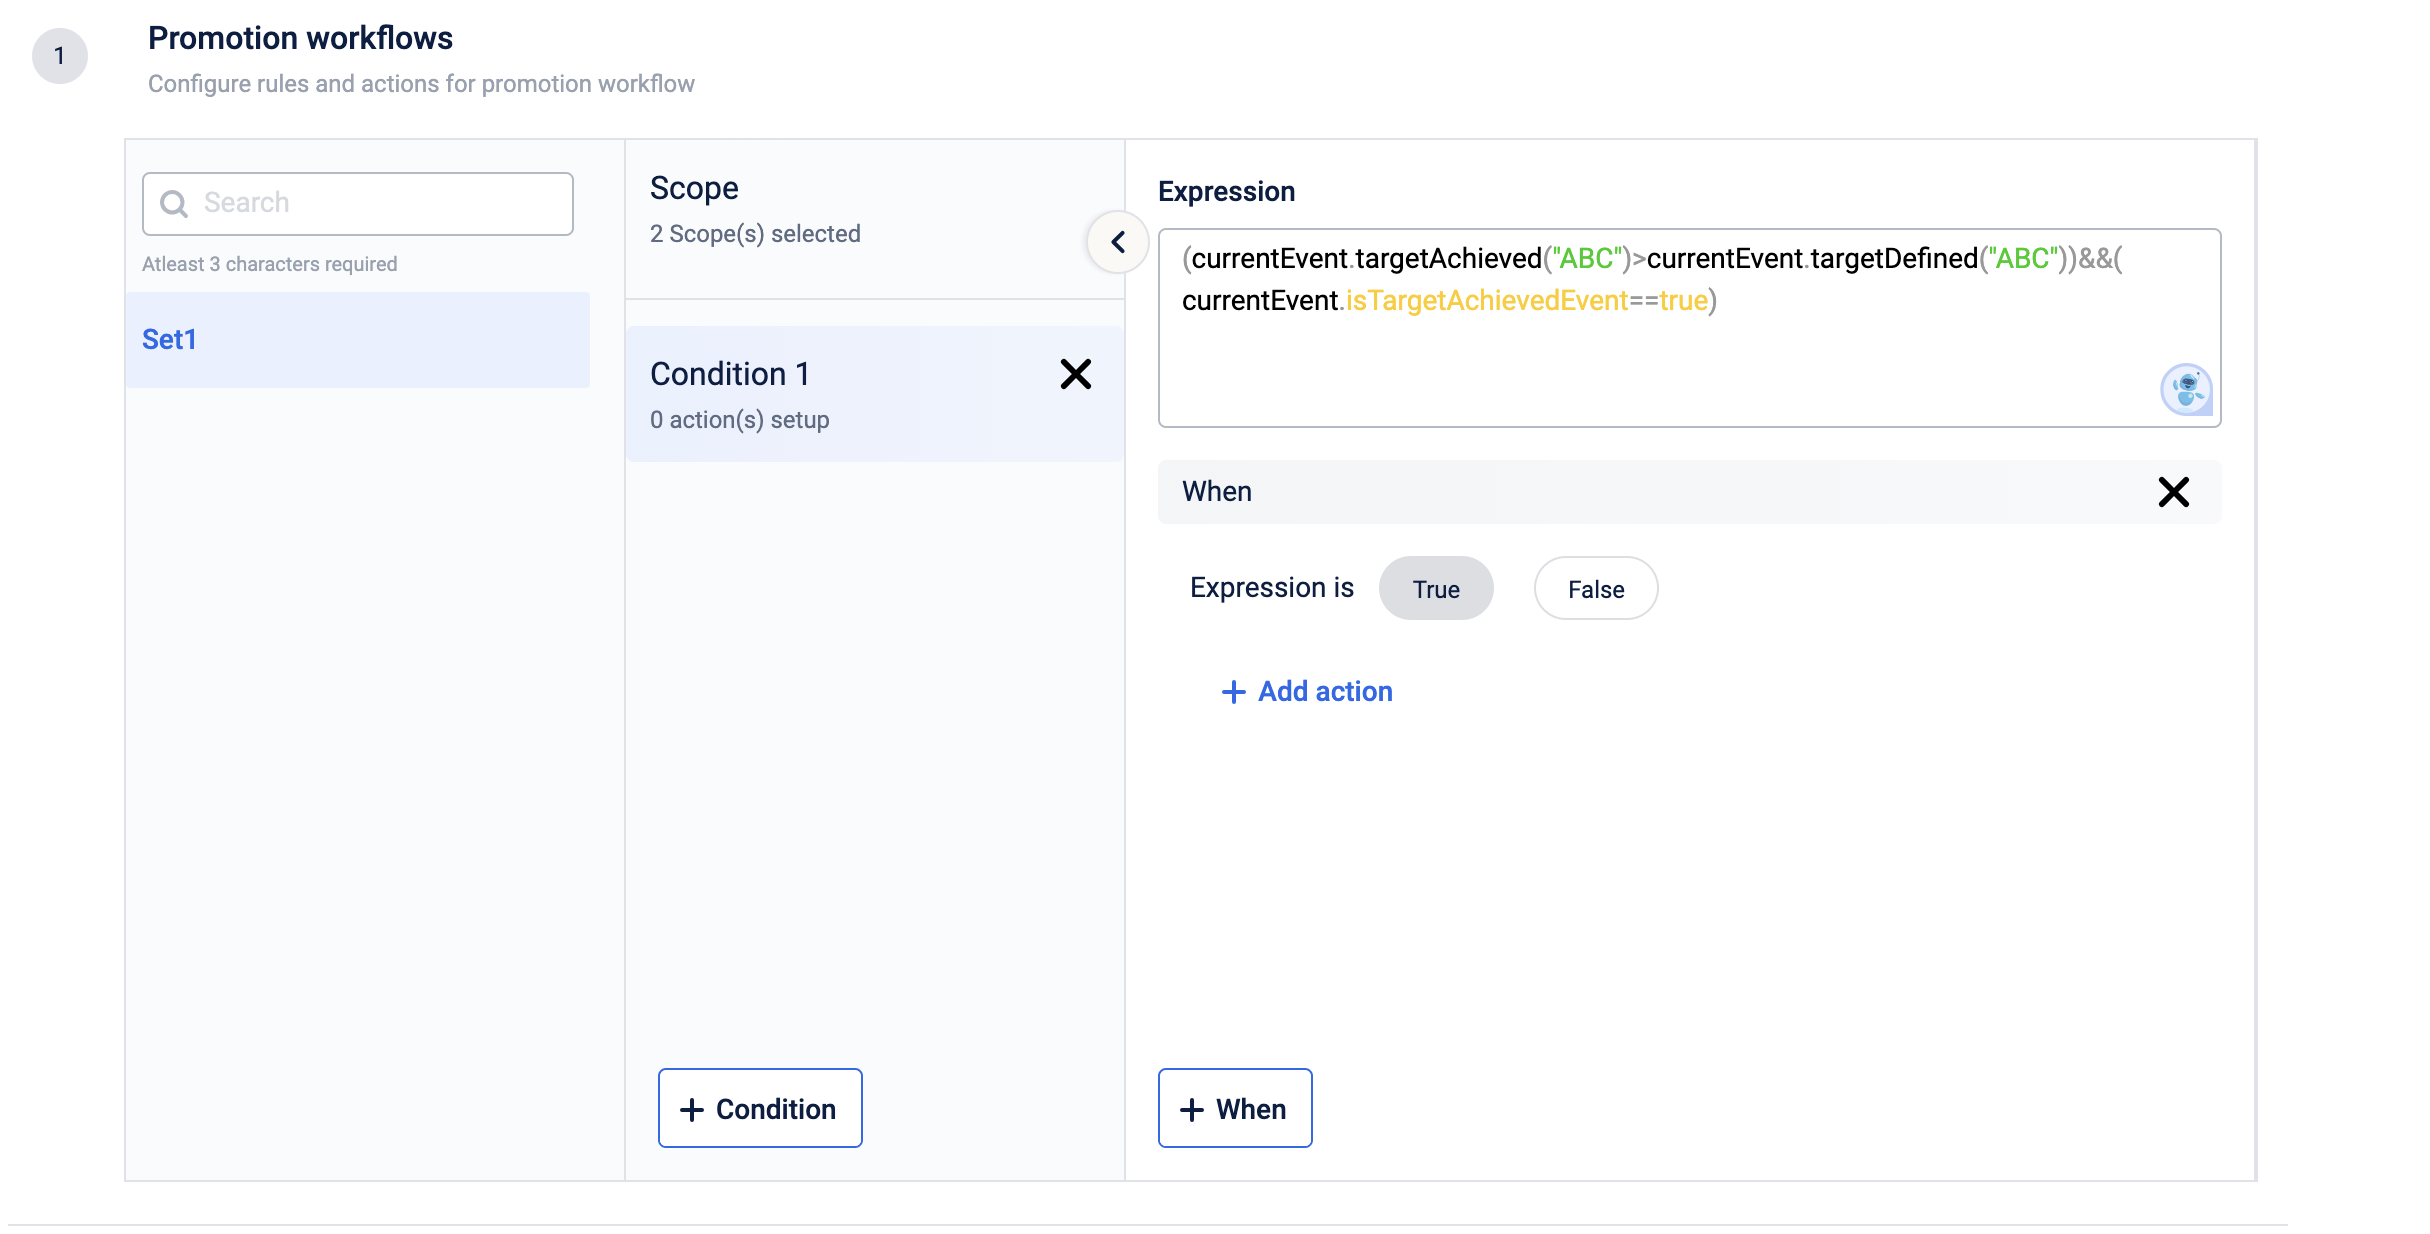
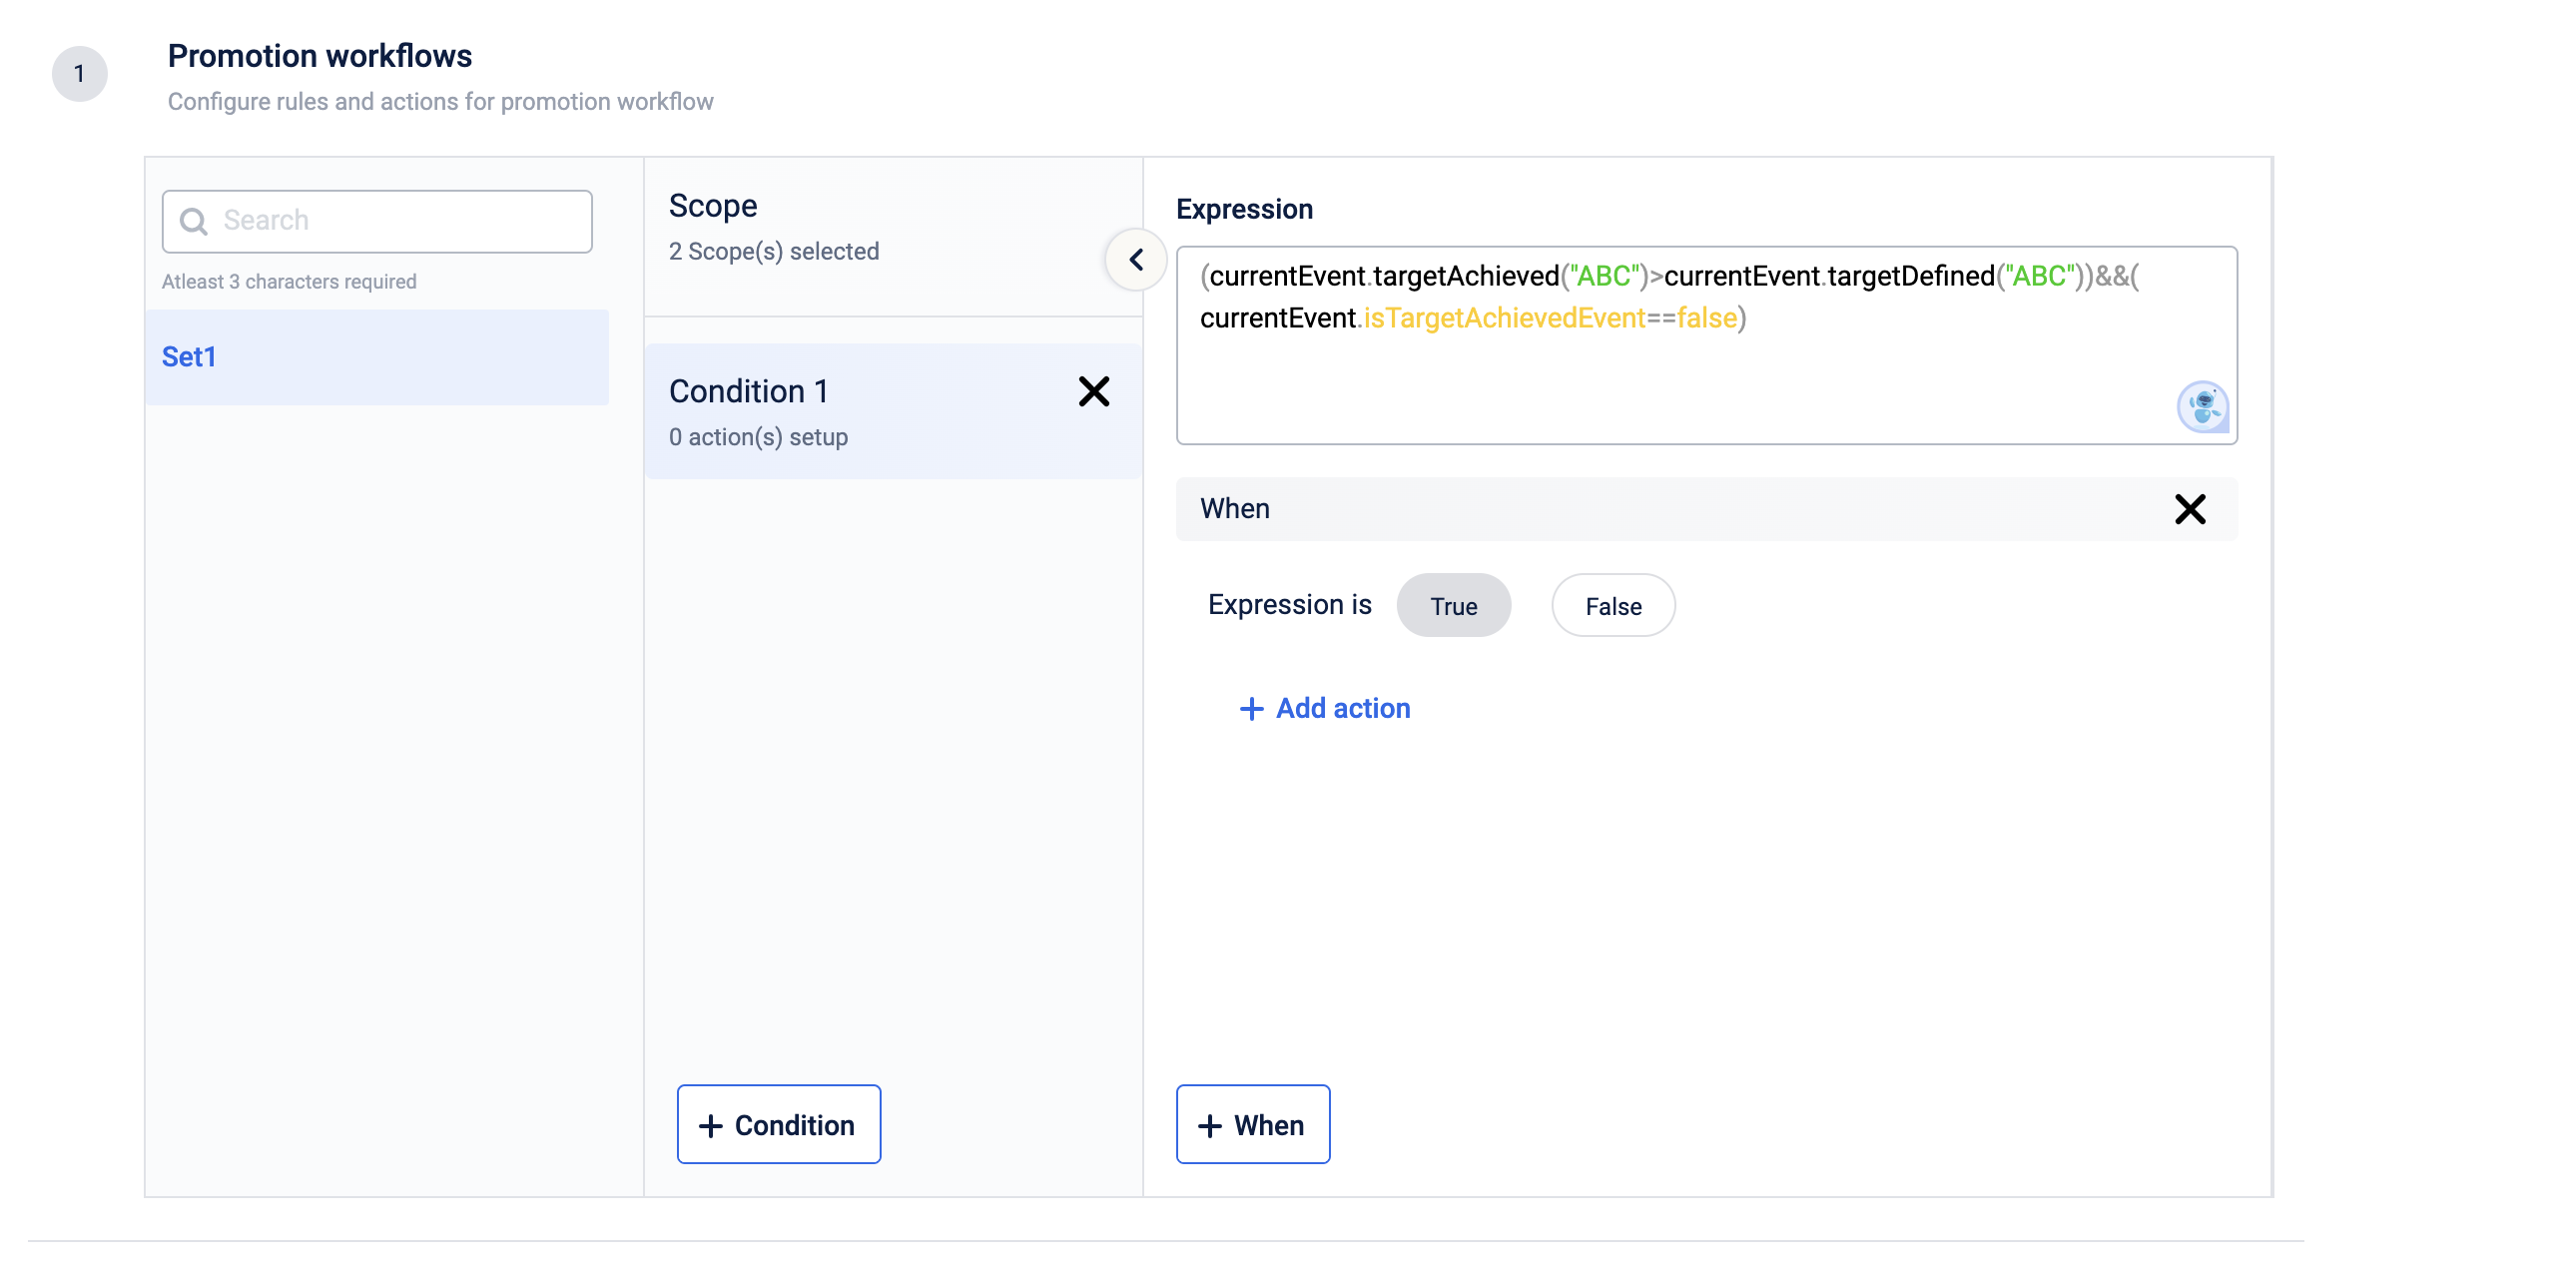
For example, if you write a rule: (currentEvent.targetAchieved("ABC") > currentEvent.targetDefined("ABC")) && (currentEvent.isTargetAchievedEvent == true), then the benefits will be given immediatley.
Please note that, if you want to do the evaluation ONLY at the end of the cycle, you have to make the "ENABLE_AWARD_WHEN_TARGET_ACHIEVED" as "Inactive" in the EMF configuration page of org settings.
ENABLE_AWARD_WHEN_TARGET_ACHIEVED (config) | isTargetAchievedEvent (rule expression) | The behavior of the EMF |
|---|---|---|
| Active | true | The event will come to promotions twice. Once when the targetAchieved > target Defined. Again, at the end of the cycle/period. This means point allocation will happen after the period ends (aka the next day). The rule expression becomes true when the targetAchieved > target Defined. |
| Active | false | The event will come to promotions twice. Once when the targetAchieved > target Defined. Again, at the end of the cycle. This means point allocation will happen after the period ends (aka the next day). The rule expression becomes true at the end of the cycle/period. |
| Active | This rule is not written. | The event will come to promotions twice. Once when the targetAchieved > targetDefined. Again, at the end of the cycle. This means point allocation will happen after the period ends (aka the next day). However, because of not writing the rule in the promotions, the evaluation also happens twice. Once when achieved > defined, and again at the end of the cycle. So, a customer will get benefits twice. |
| Inactive | true | The event will come to loyalty at the end of the cycle or period as the config is "Inactive". This means point allocation will happen after the period ends (aka the next day). |
| Inactive | false | The event will come to loyalty at the end of the cycle or period as the config is "Inactive". This means point allocation will happen after the period ends (aka the next day). |
currentEvent.targetMilestoneTrigger
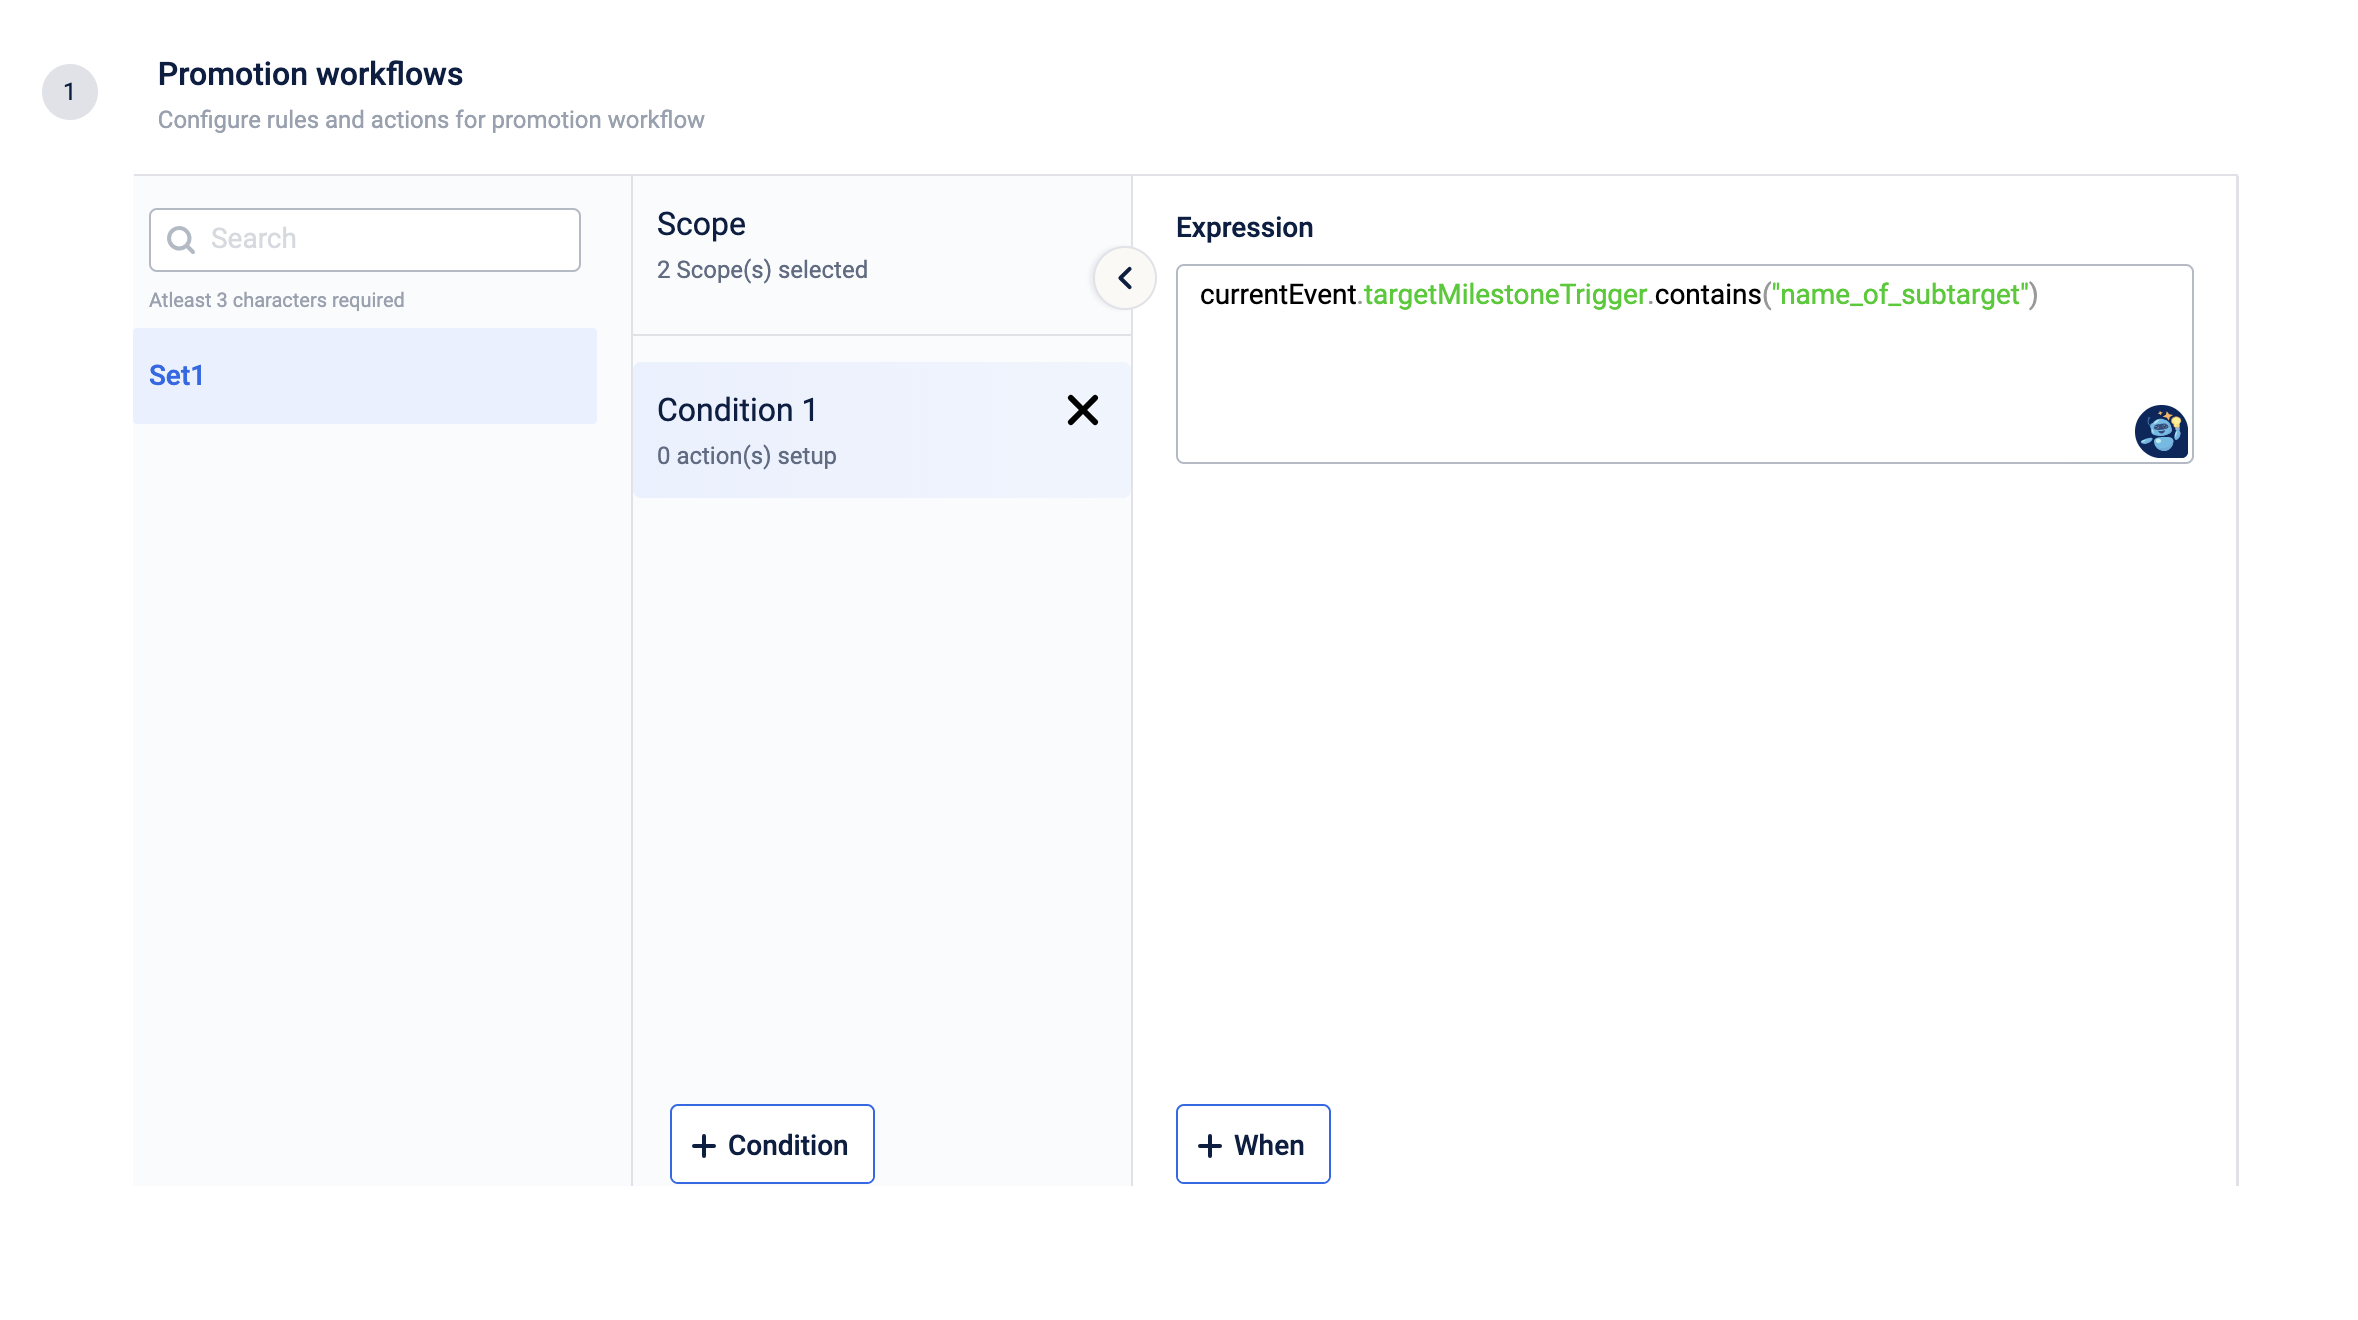
This rule configures actions for various triggers of the Milestone, such as "sub-targets."
For example, if you set a condition that "a user has to make 1000 gross sales in a month to get 100 points," and you also want to send a message when 70% of the target is achieved, you can use sub-targets.
If you have created one sub-target named "ABC1" at 30% & another sub-target named "ABC2" at 60%, the rule currentEvent.targetMilestoneTrigger.contains("ABC1") will be triggered when 30% is achieved and the rule currentEvent.targetMilestoneTrigger.contains("ABC2") will be triggered when 60% is achieved.
currentEvent.milestoneValueDefined
This rule provides the value of the sub-target configured on the total target. For instance, if you set a milestone that "a user has to make 20 transactions in a quarter to get 100 points" and configure a sub-target at 80% of the total target, this rule can be useful. Suppose a user has made 18 transactions in that quarter. A sub-target event will be sent to loyalty promotions from the milestones as the sub-target has been achieved.
In the event evaluation, the rule currentEvent.milestoneValueDefined will return the value as 16 (80% of 20 is 16, the sub-target value). Brands can use this rule to achieve various use cases where the sub-target value is needed in their strategy.
currentEvent.targetGaps
This rule returns the difference between the "targetDefined" and "targetAchieved" values of the customer. Use this rule to address use cases where strategic decisions need to be made based on gaps.
For example, writing the rule currentEvent.targetGaps("ABC") where "ABC" is the name of the milestone will return the difference between these values. If user 'X' has achieved a target value of 700 while the defined value is 500, this rule will return the gap between those values.
currentEvent.targetName
This rule enables the creation of rules based on the names of milestones. For instance, as a brand, if you want to execute specific actions for a particular milestone, you can use this rule.
For example, if you have a milestone named "ABC" and you wish to perform specific actions exclusively for this milestone, you can utilize the rule currentEvent.targetName.contains("ABC").
currentEvent.targetPeriod
This rule enables you to execute specific actions or implement particular strategies based on the name of the period. For instance, if you have a milestone named "ABC" with three periods—'X', 'Y', 'Z'—you may want to perform certain actions when the event for the period 'X' is sent to loyalty promotions. This rule, currentEvent.targetPeriod.contains("X"), helps you achieve that.
Note: The target names and period names are unique across the entire organization, eliminating any duplication issues.
Sample use cases & their configuration
Use case 1: Instant benefit delivery
Step 1: Set the "ENABLE_AWARD_WHEN_TARGET_ACHIEVED" config to "Active".

**Step 2:**Configure the rules in the loyalty promotions.

Result: When a customer's "targetAchieved" exceeds "targetDefined," an event is sent to loyalty promotions, triggering configured actions.
Use Case 2: Delayed benefits at the end of the cycle
**Step 1:**Set the "ENABLE_AWARD_WHEN_TARGET_ACHIEVED" config to "Inactive".

Step 2: Configure the rules in the loyalty promotions.
Result: At the end of each cycle, an automated process will run, sending an event to the loyalty promotions for all customers associated with the milestones. Subsequently, the loyalty promotions module will assess the rules and activate the pre-configured actions.
Use Case 3: Sending a message at the end of a cycle
Step 1: Set the "ENABLE_AWARD_WHEN_TARGET_ACHIEVED" config to "Inactive".

Step 2: Configure the rules in the loyalty promotions.

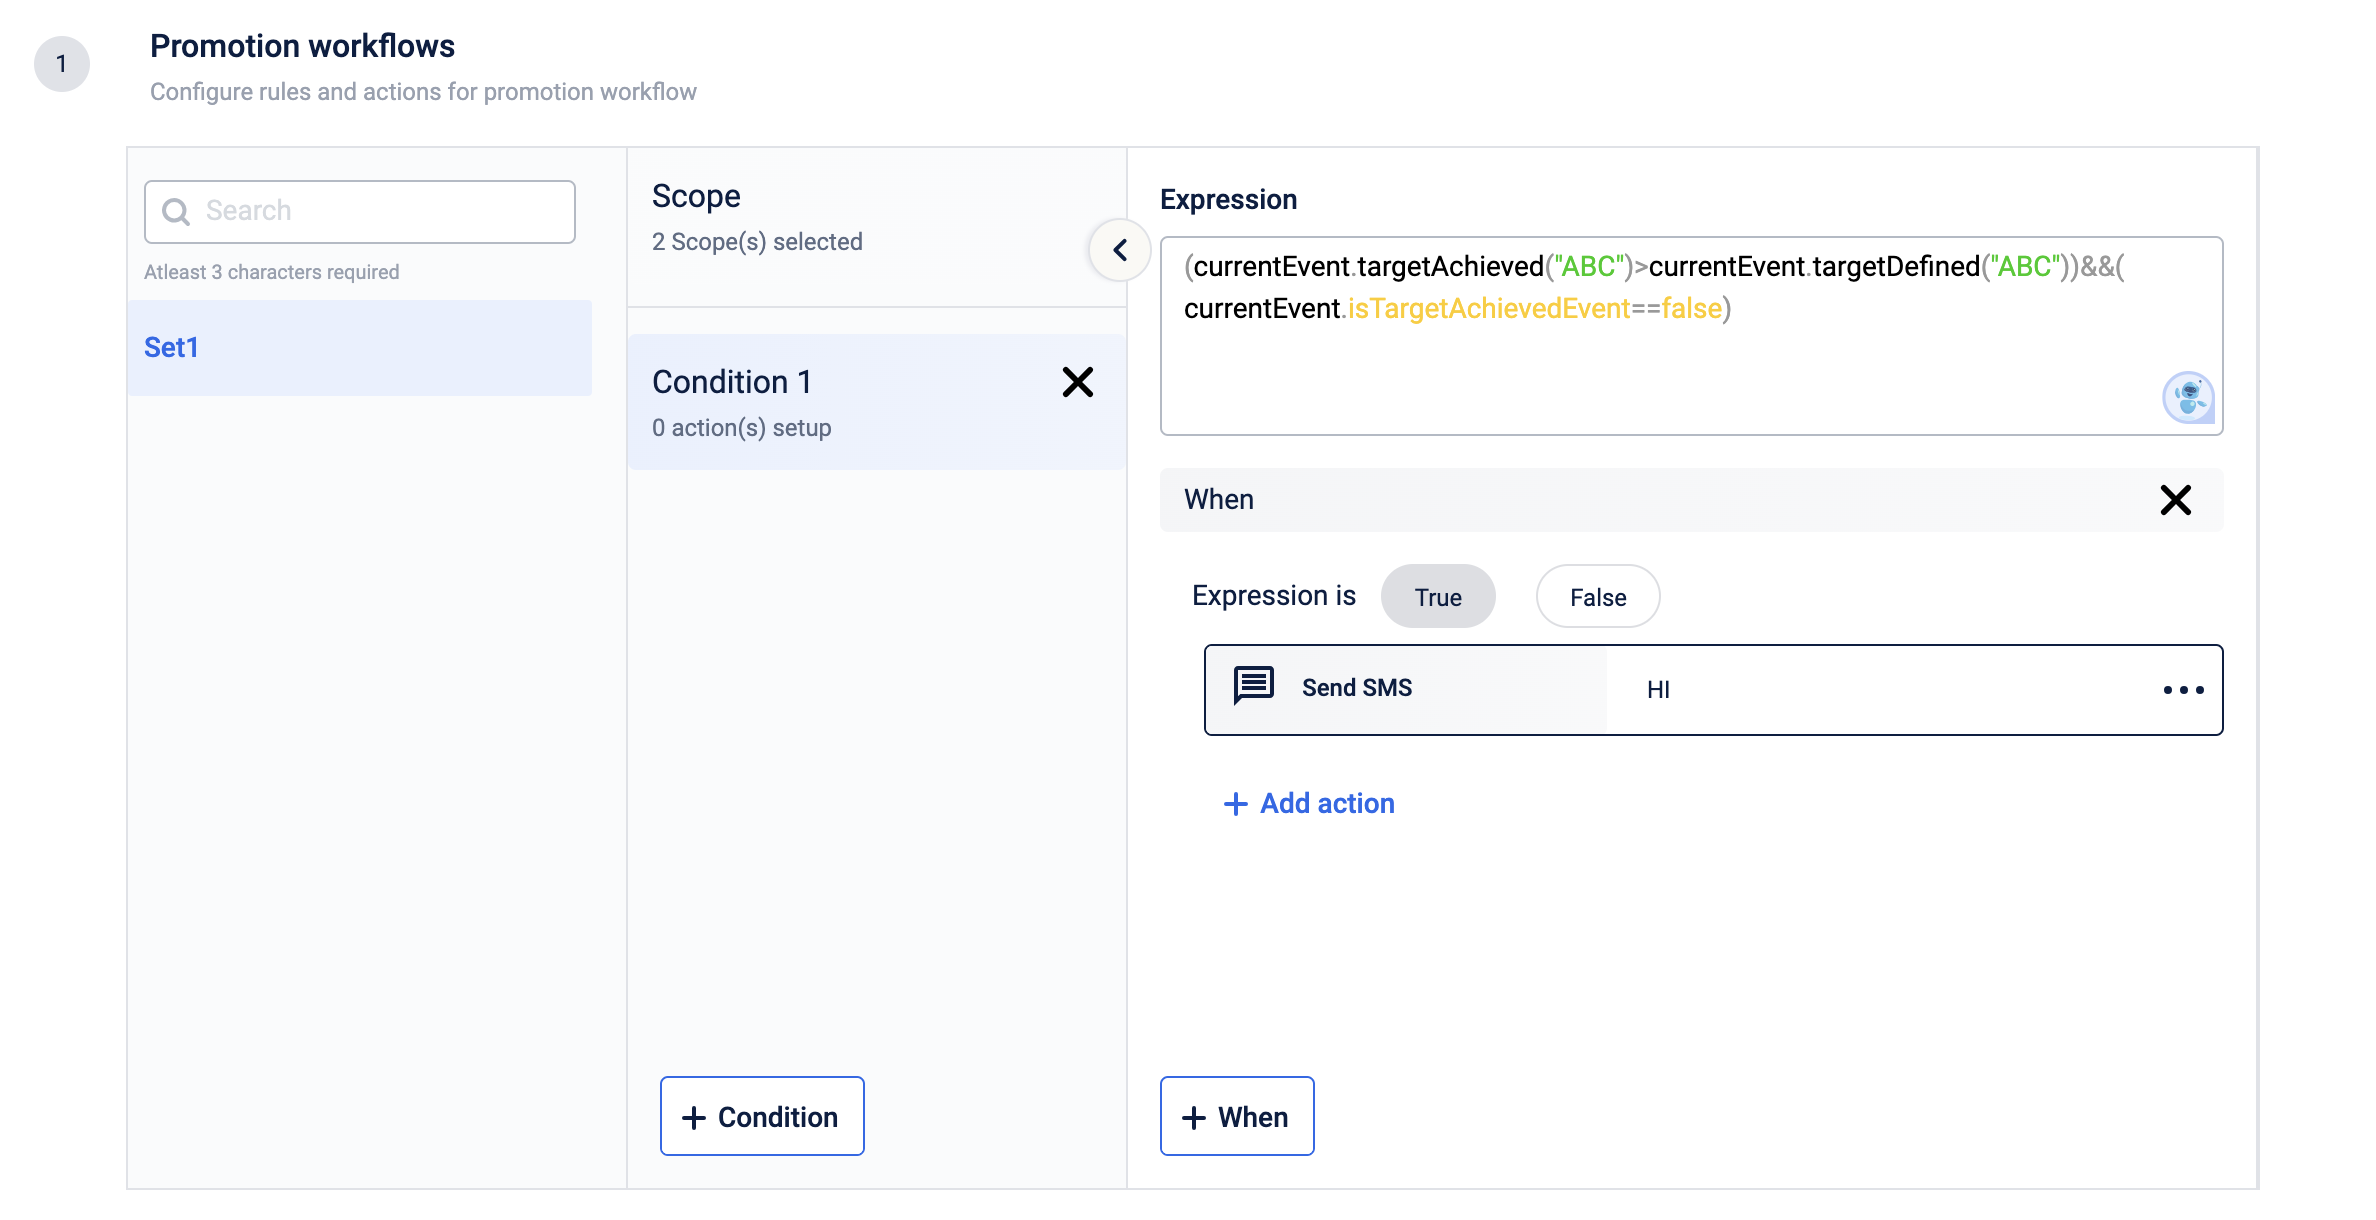
Result: At the end of each cycle, a message will be sent to all the customers.
Use Case 4: Sending message immediately on achieving the target
Step 1: Set the "ENABLE_AWARD_WHEN_TARGET_ACHIEVED" config to "Active".
Step 2: Configure the rules in the loyalty promotions.


Result: A message will be sent immediately once the achieved value is more than the defined target value.
Use Case 5: Configuring two targets in a single promotion
The "immediate effect" method is used here. Make the necessary config & rule change for the "end of cycle" method, keeping the targetName rule intact.
Step 1: Set the "ENABLE_AWARD_WHEN_TARGET_ACHIEVED" config to "Active".

Step 2: Configure the rules in the loyalty promotions.

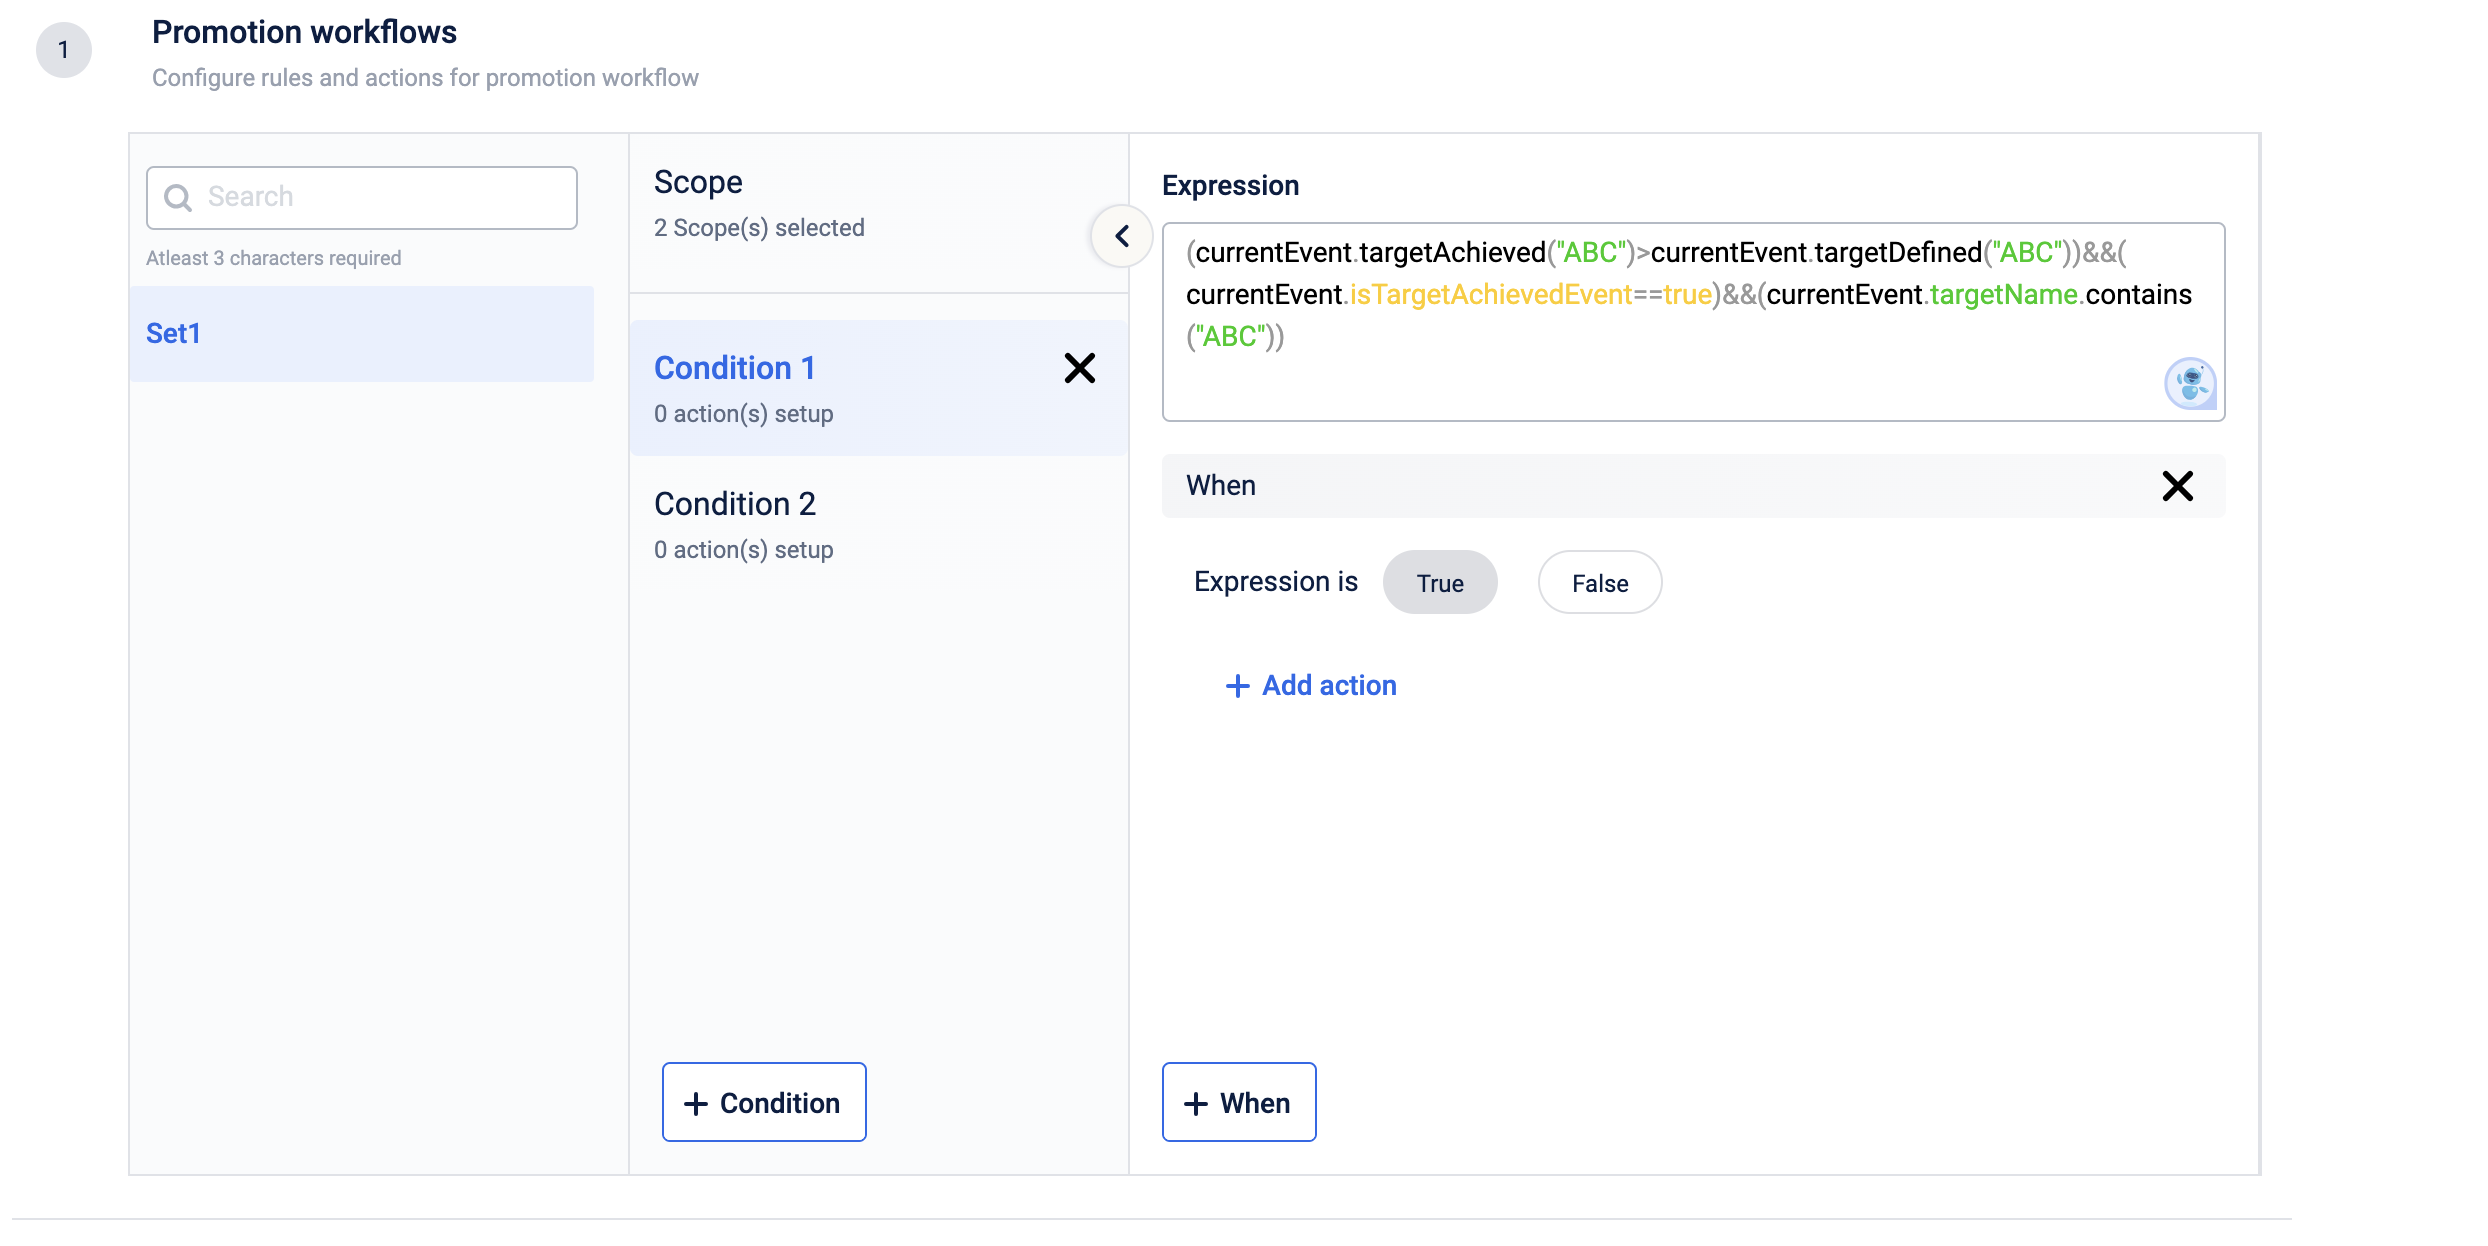
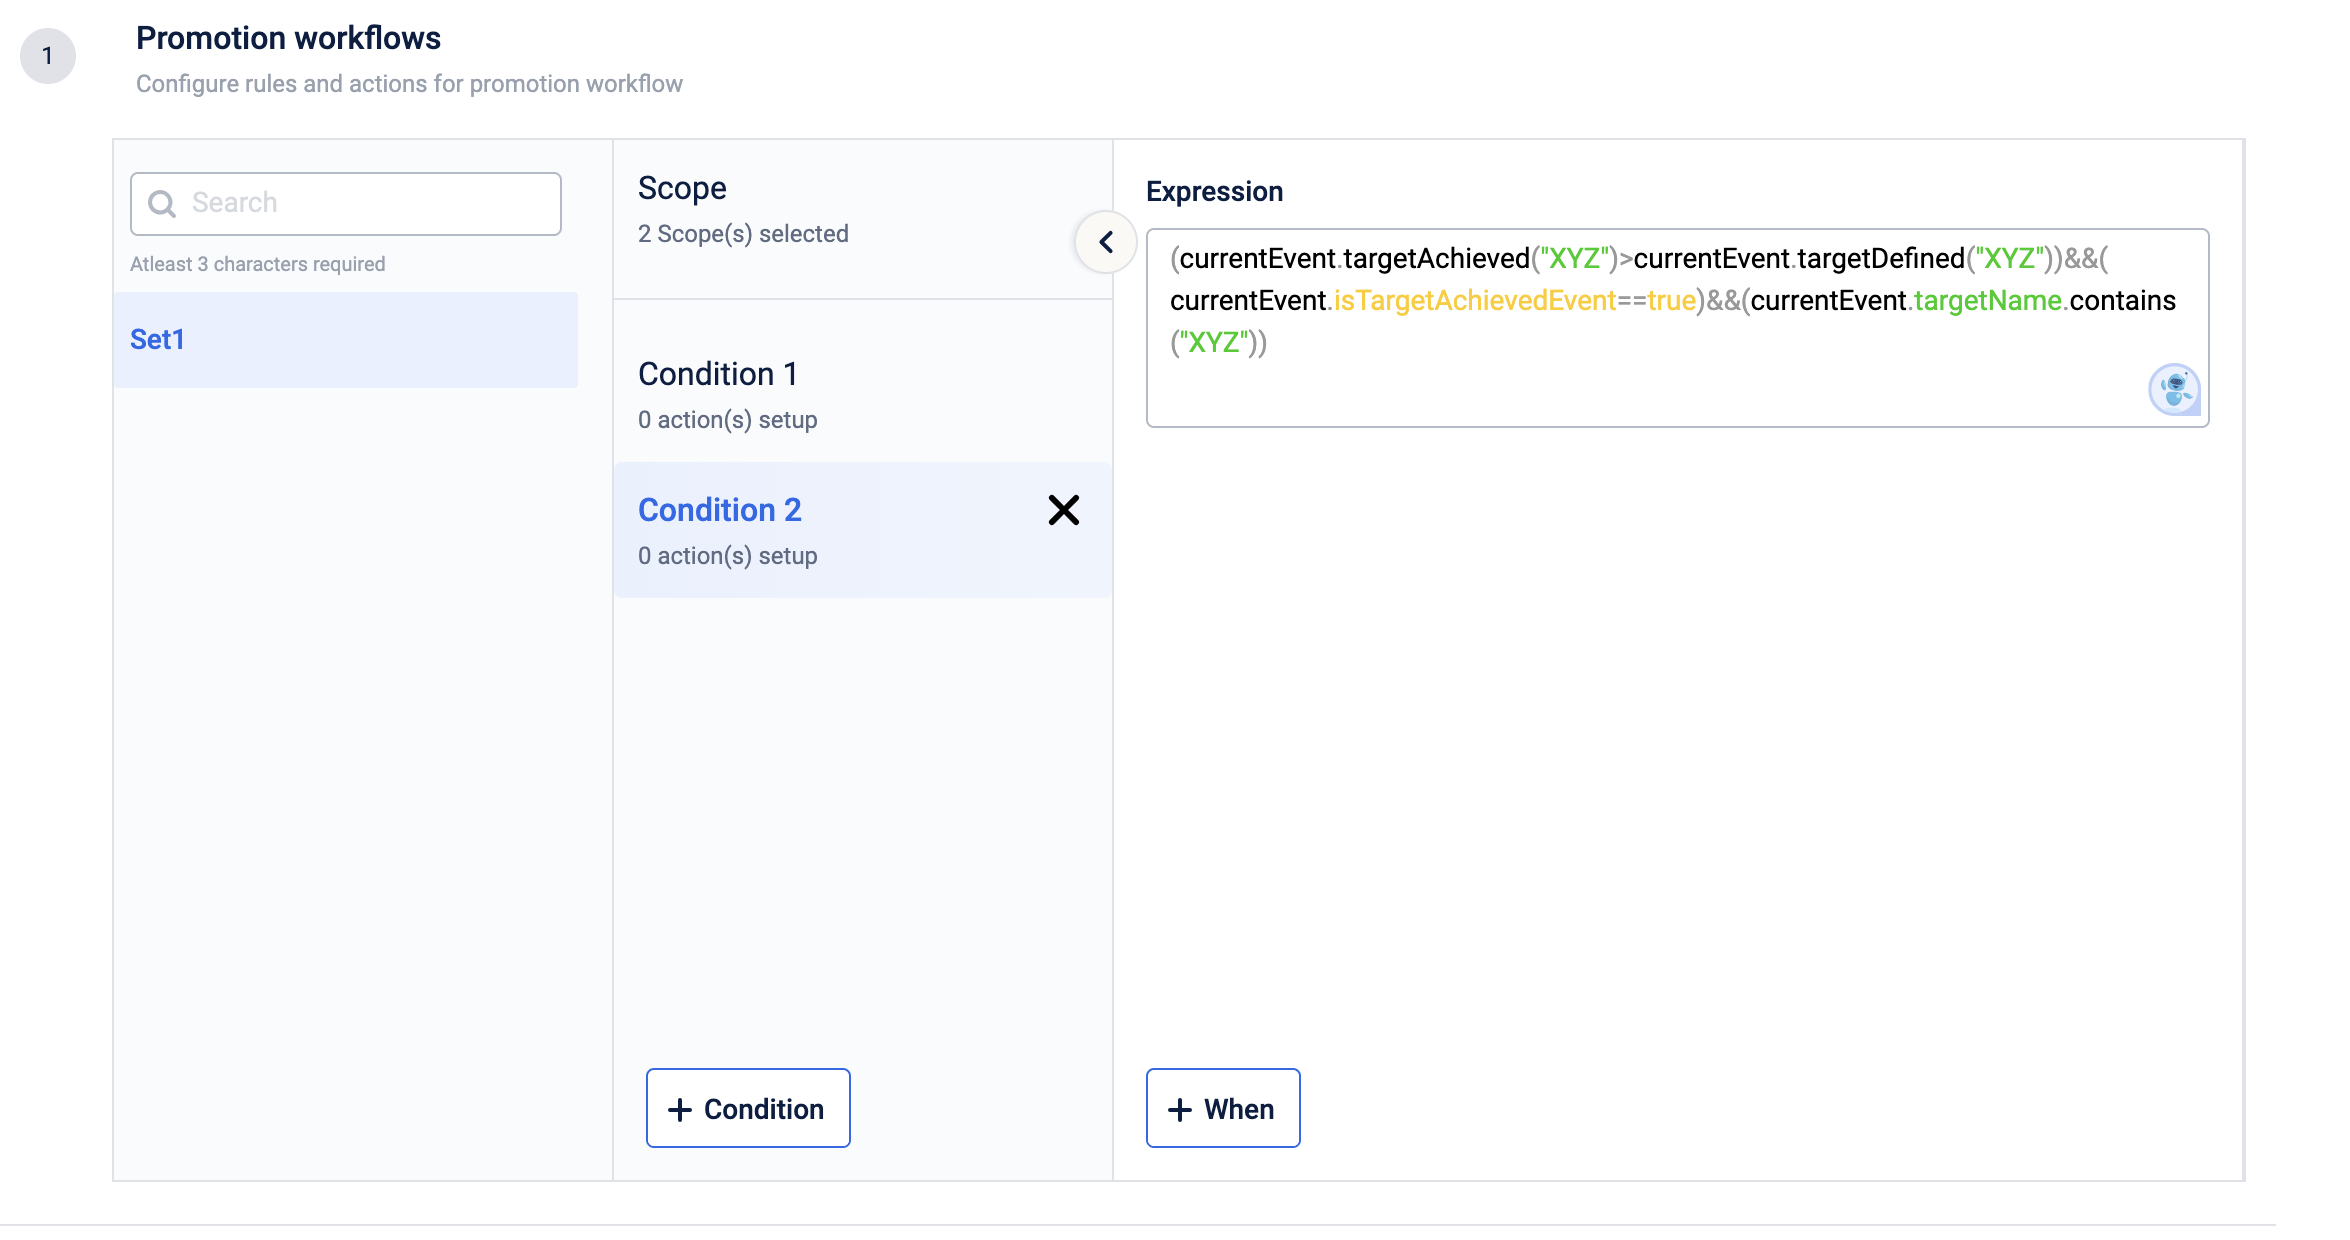
Result: Two milestones (ABC & XYZ) are defined and both of them are configured in a single promotion.
WarningHaving two milestones (ABC & XYZ) configured in a single promotion creates a challenge for auditing. It becomes difficult to determine the points allocated to each milestone as a liability.
Use Case 6: Configuring sub-Target actions
A brand configured a sub-target, that at 70% of the target achievement, they want to send a communication to their users.
A sub-target at 70% should be created first in the Milestone to achieve this use case.
Step 1: Set the "ENABLE_AWARD_WHEN_TARGET_ACHIEVED" config to "Active" or "Inactive' as required.
Step 2: Configure the rules in the loyalty promotions as follows:

In this case, the rule becomes "true" when the customer achieves 70% of the target, indicating the fulfillment of the sub-target. The configuration settings determine whether sub-target actions take effect immediately or at the end of the period.
NoteThe above usecases are some of the examples only. You can configure and achieve more usecases using these rules. Read the document and use cases properly before configuring the Mielstones.
Also, note that the adjustment of target-value upon return transaction work only when the "ALLOW_RETURN_ON_TARGET" config is enabled as true in the EMF configurations.
Configuring Milestone Settings
You can configure how customers’ progress toward a milestone or streak is tracked and adjusted in scenarios such as returns, cancellations, or mid-cycle enrolment. These configurations ensure fairness and accuracy in reward eligibility.
Accessing the Milestone settings page
To access the Milestones settings page, follow these steps:
-
Select the
 icon in the upper-right corner.
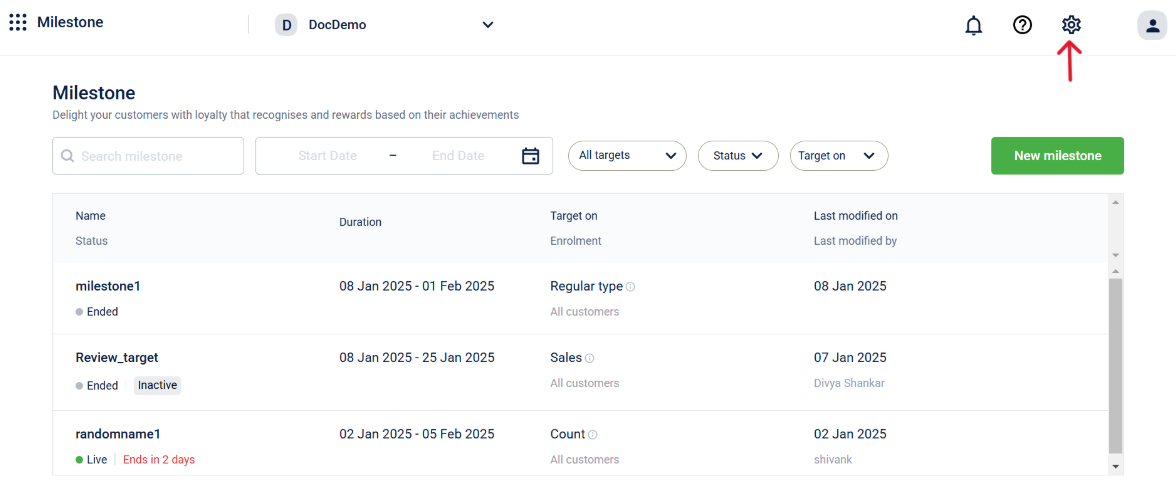
You can configure the following settings:
- Adjust milestone values in subsequent cycles due to returned transactions:
- Set buffer periods for retro transactions
- Include past transactions and behavioural events when a customer enrols in a milestone mid-cycle
- Enable leaderboards for all milestones
Adjust milestone values in subsequent cycles due to returned transactions
Adjust milestone values when the entire bill is returned
You can define how the system adjusts milestone values and progress after a customer returns or cancels an entire purchase.
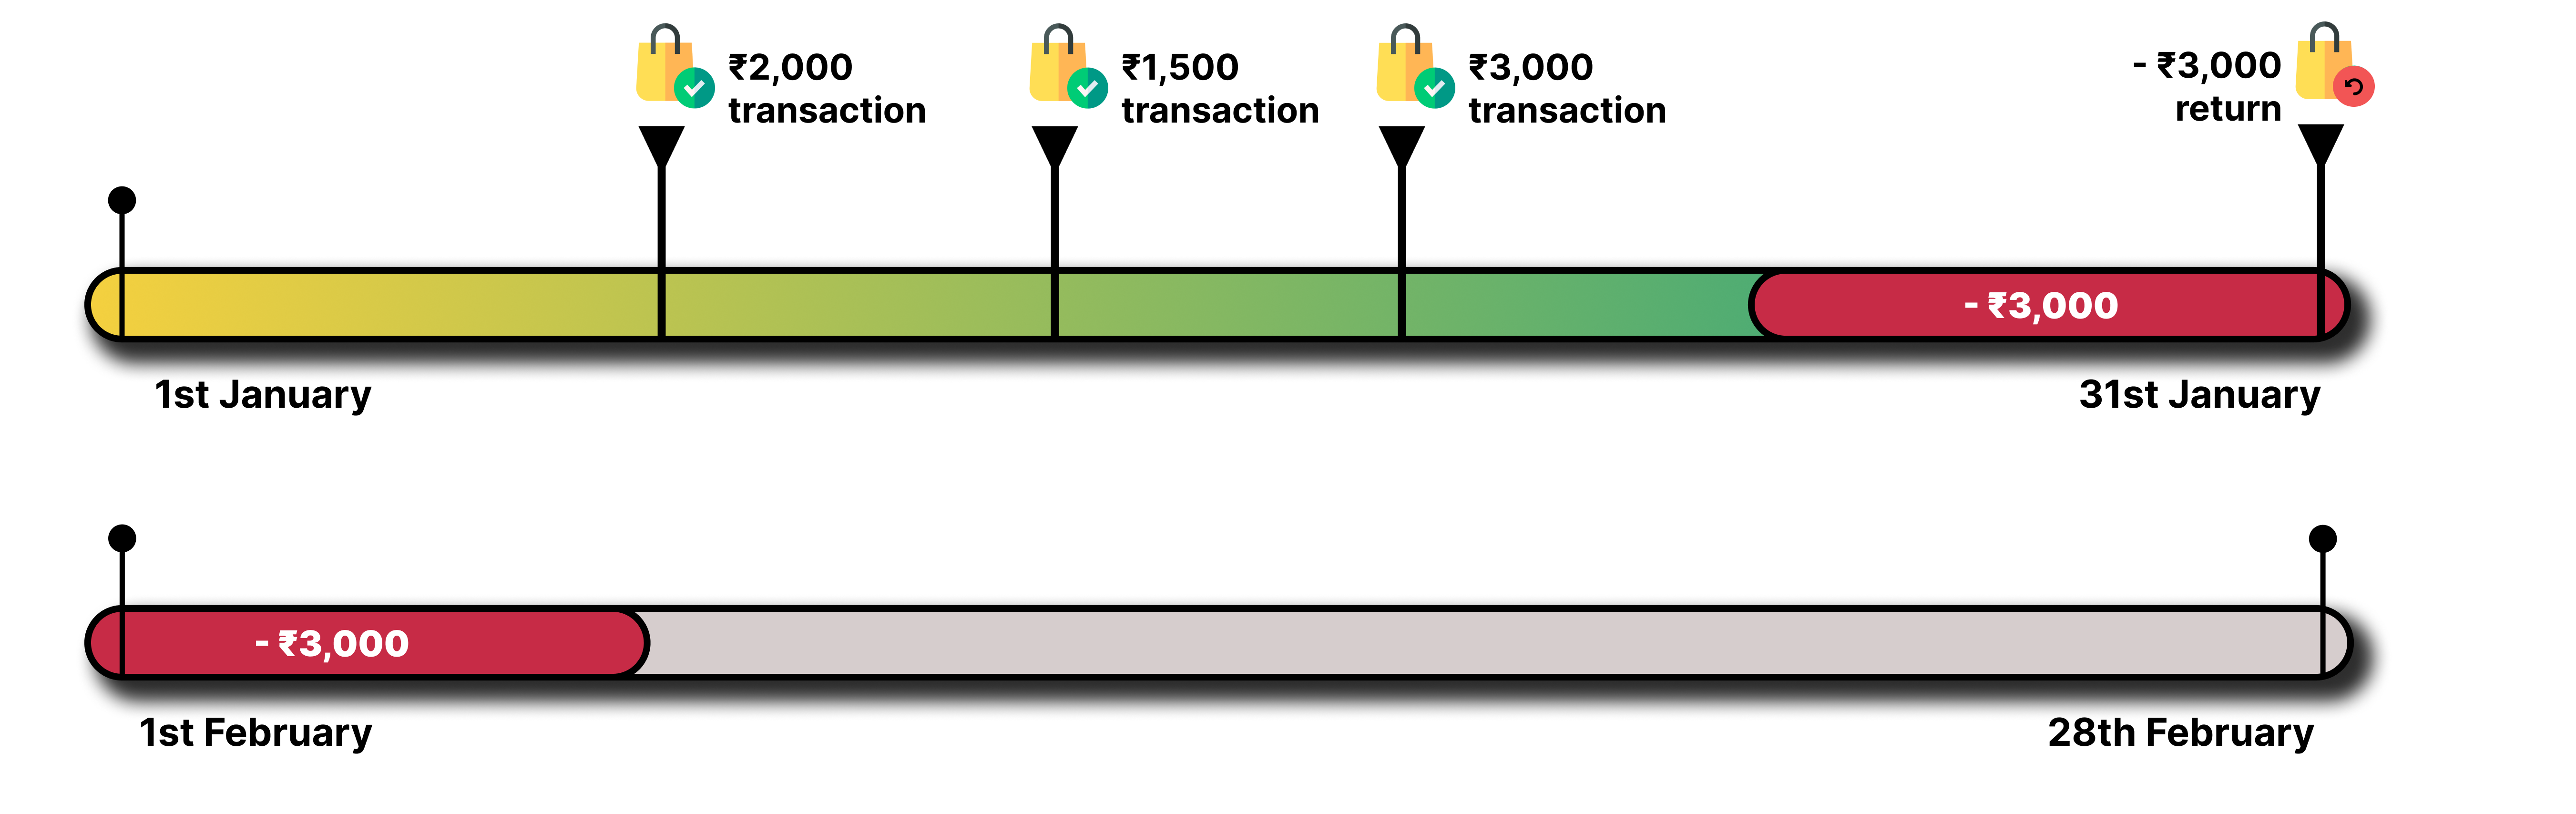
For example, a milestone is configured as follows:
- Earn 100 points for a monthly spend of ₹5,000.
- The milestone has a monthly cycle, meaning the progress resets on the 1st of every month.
A customer does the following:
- Makes three purchases in January: ₹2,000, ₹1,500, and ₹3,000. They become eligible to earn 100 points after the third purchase.
- Returns the product worth ₹3,000 on 31st of January.
The following happens based on the settings configured:
-
When the setting is disabled, the milestone values and earned points are not adjusted for returns in any cycle.
-
When the setting is enabled, the earned points are not deducted in the current cycle (January). In the subsequent cycle (February), the milestone starts at a negative (-) ₹3,000 for the customer. The customer must spend ₹8,000 (₹5,000 + ₹3,000) to be eligible to earn points in February.
When “Adjust milestone values in subsequent period/cycle within milestone” is enabled
To enable adjusting milestone values in subsequent cycles due to returned transactions, follow these steps:
- Access the milestones settings page.
- Enable the toggle under Adjust milestone values in subsequent period/cycle within milestone group

- Select Save to save the changes.
The setting now applies for all milestones in the organisation.
Adjust milestone values when line items are returned
For line-item-based milestones, you can choose how the system adjusts the milestone value when a customer returns a single or multiple line items (not the entire bill).
For example, a milestone is configured as follows:
- Earn 100 points for a monthly spend of ₹5,000.
- The milestone has a monthly cycle, meaning the progress resets on the 1st of every month.
A customer does the following:
- Purchases the following items in January:
- 2 yoga mats: ₹2,000 (₹1,000 each)
- 2 water bottles: ₹1,500 (₹750 each)
- 1 pair of shoes: ₹3,000
- Returns the following items on 31st of January:
- 1 yoga mat (₹1,000)
- 1 water bottle (₹750)
Total Returned: ₹1,750
The following happens based on the settings configured:
Prorate as per line item amount and adjust milestone value:
The value is proportionally adjusted based on the total bill amount.
- The returned amount (₹1,750) represents 26.9% of the original purchase total (₹6,500).
- The system prorates this ratio against the ₹5,000 milestone target:
- ₹5,000 × 26.9% = ₹1,346.15 adjustment.
In February, the customer’s milestone progress starts at -₹1,346.15, requiring them to spend ₹6,346.15 (₹5,000 + ₹1,346.15) to earn points.
Do not adjust milestone value: The return is ignored, and the milestone value is not adjusted.
To configure adjusting milestone values in subsequent cycles due to returned transactions for line items, follow these steps:
-
Select the appropriate radio button under For line item based milestones, if return is on transaction amount.

-
Select Save to save the changes.
The setting now applies for all milestones in the organisation.
Set buffer periods for retro transactions
You can define a buffer period for including past customer purchases in milestone calculations. To ensure fair awarding of points, the system considers transactions from the previous cycle based on the buffer time configured.
For example, a milestone is configured as follows:
- Earn 100 points for a monthly spend of ₹5,000.
- The milestone has a monthly cycle, meaning the progress resets on the 1st of every month.
A customer does the following:
- Makes a purchase on 31st January worth ₹5,000 and is eligible to earn points on the purchase.
- The system has a three-day delay in recording transactions.
- The transaction is recorded on February 3rd.
The following happens based on the settings configured:
If the value is set to 5 days, the system will consider transactions made in the previous cycle, up to 5 days.

When “Offset days for sales calculation” is > 0
To configure the buffer period, follow these steps:
-
Enter the number of days under What is the delay in sync between Sales data and Capillary platform?.

-
Select Save to save the changes.
The setting now applies for all milestones in the organisation.
Include past transactions and behavioural events when a customer enrols in a milestone mid-cycle
You can choose whether to include a customer’s past activity when they enrol mid-cycle. By default, when the setting is disabled, past activities for a customer are included when the enrol into a milestone in-between a cycle due to various reasons.
For example, a milestone is configured as follows:
- Earn 100 points for a monthly spend of ₹5,000.
- The milestone has a monthly cycle, meaning the progress resets on the 1st of every month.
A customer does the following:
- Makes a purchase on the 1st of February worth ₹2,000.
- Enroled into a milestone on the 10th of February.
The following happens based on the settings configured:
-
When the setting is disabled, the previous transactional and behavioural events are considered, and the progress is added to the milestone. This is the default behaviour.
-
When the setting is enabled, the previous transactional and behavioural events are not considered, and the progress is not added. Customer activities (transactional and behavioural events) will begin tracking from the enrolment date.

When “Track customer activity from their enrolment date” is disabled
To enable excluding past transactions and behavioural events when a customer enrols in a milestone mid-cycle, follow these steps:
-
Enable the toggle under Track customer activity from their enrolment date

-
Select Save to save the changes.
The setting now applies for all milestones in the organisation.
Enable leaderboards for all milestones
You can enable leaderboards tracking for all configured milestones.
To enable leaderboards for milestones, follow these steps:
-
Enable the toggle under Leaderboard for milestone

-
Select Save to save the changes.
The setting now applies for all milestones in the organisation.
Refer to the document on leaderboards for more information on leaderboards for milestones.
Updated 29 days ago