Broadcast Campaign
ImportantBroadcast Campaign can be created from the new UI only.
Broadcast campaigns are campaigns that are implemented to target a bulk audience. These campaigns' functioning depends on customers' historical data and behaviors. So we can actually launch the campaign by specifying the audience which we want to target for the specific campaign. You can create broadcast campaigns on different channels based on how you want to reach your audience. The available engagement channels are: Email, SMS, Call Task , WhatsApp , WeChat , Viber , Push Notification , RCS, Zalo , In-App, and Line .
Create Campaign
Engage+ new UI consists of a single campaign creation flow with different content strategies. You can create a campaign either for the org or an org unit. There are three different user roles for org unit access.
- Access to parent org and its org units.
- Access to multiple org units but not org.
- Access only to a specific org unit.
Campaigns created on Engage+ can be used to reach out to customers through Omnichannel mediums like Line, Viber, SMS, Email etc.
Notes
- To create a campaign for an org unit or org, ensure that you have the necessary permissions
- .Once a campaign is executed, it cannot be stopped. For support, raise a ticket to the Capillary Sustenance team.
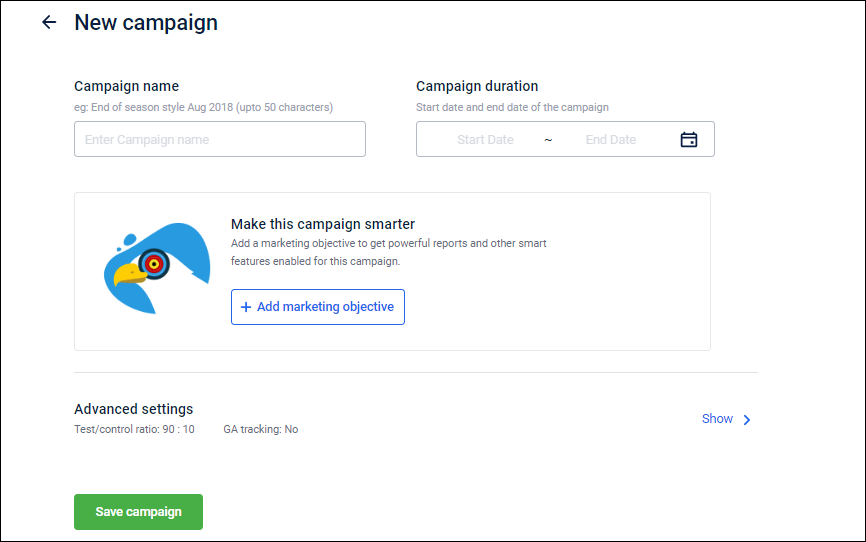
Set Campaign name, duration, and strategy
- Log on to InTouch of your cluster and navigate to Engage+ from the menu.
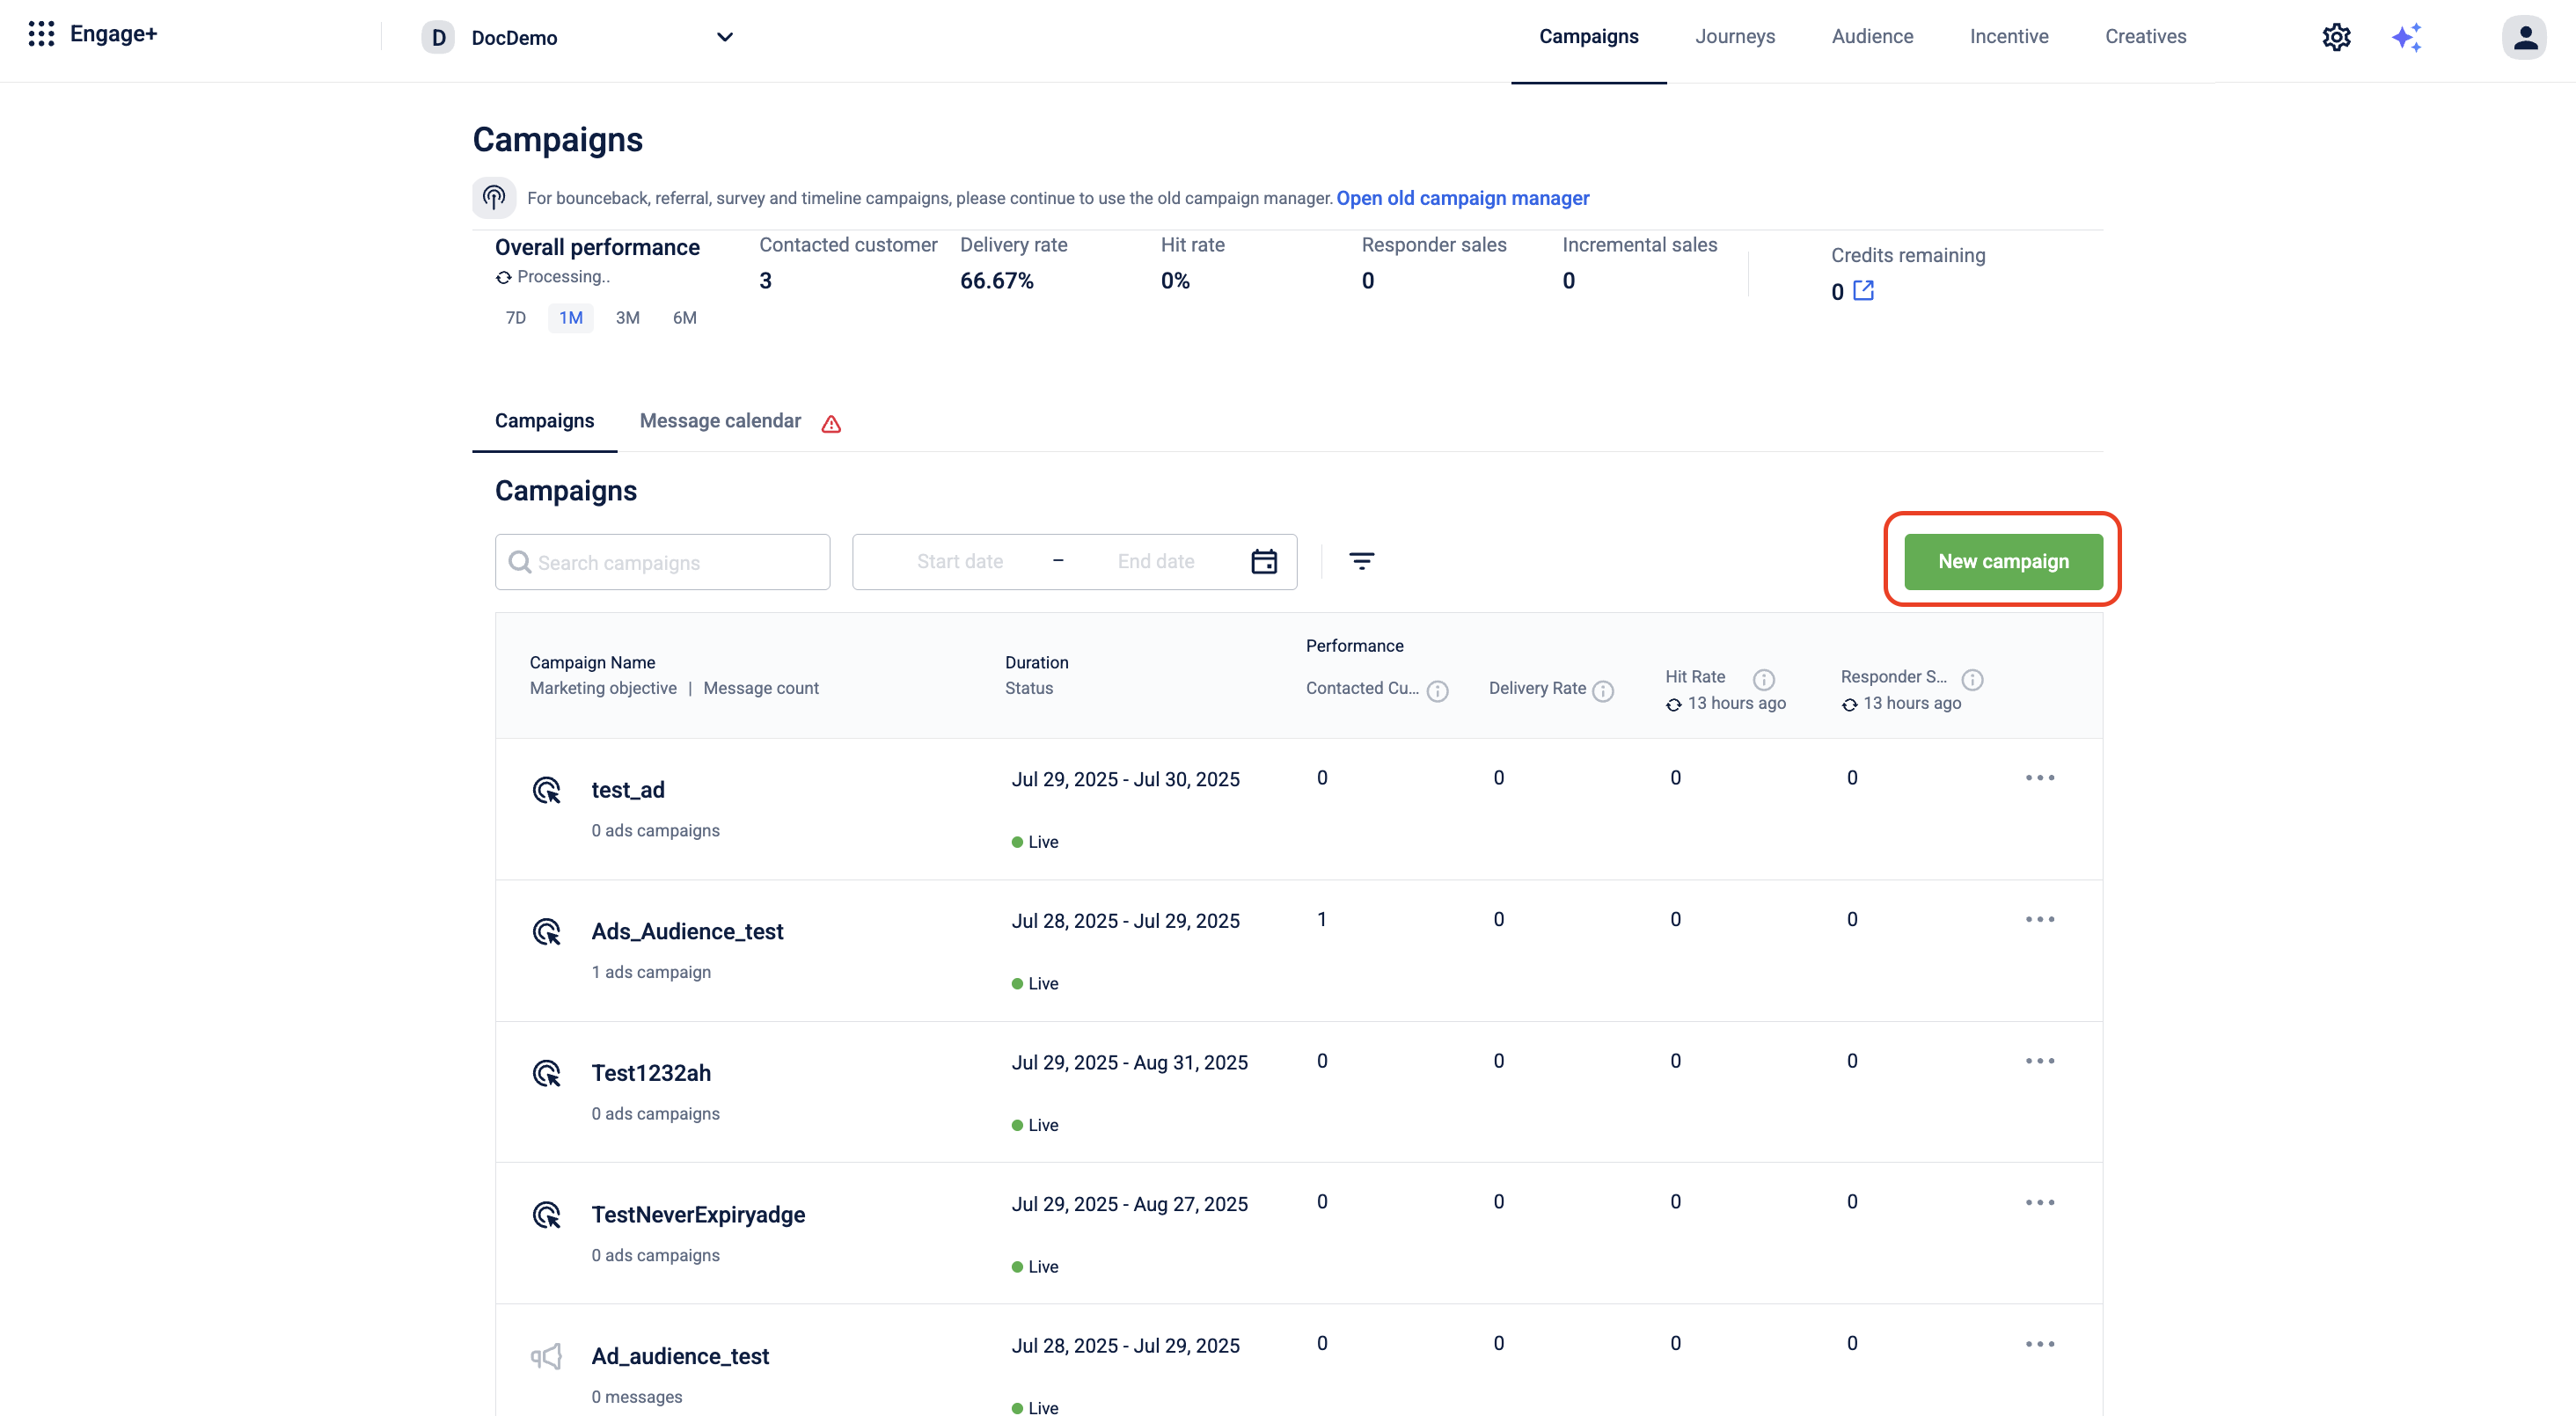
- Click New campaign.
- Enter a Campaign name and select a Campaign duration using the calendar boxes.
- Start date: The date from which the campaign and all other associated coupons/offers will be valid.
- End date: The date after which the campaign and all other associated coupons/offers will not be valid.
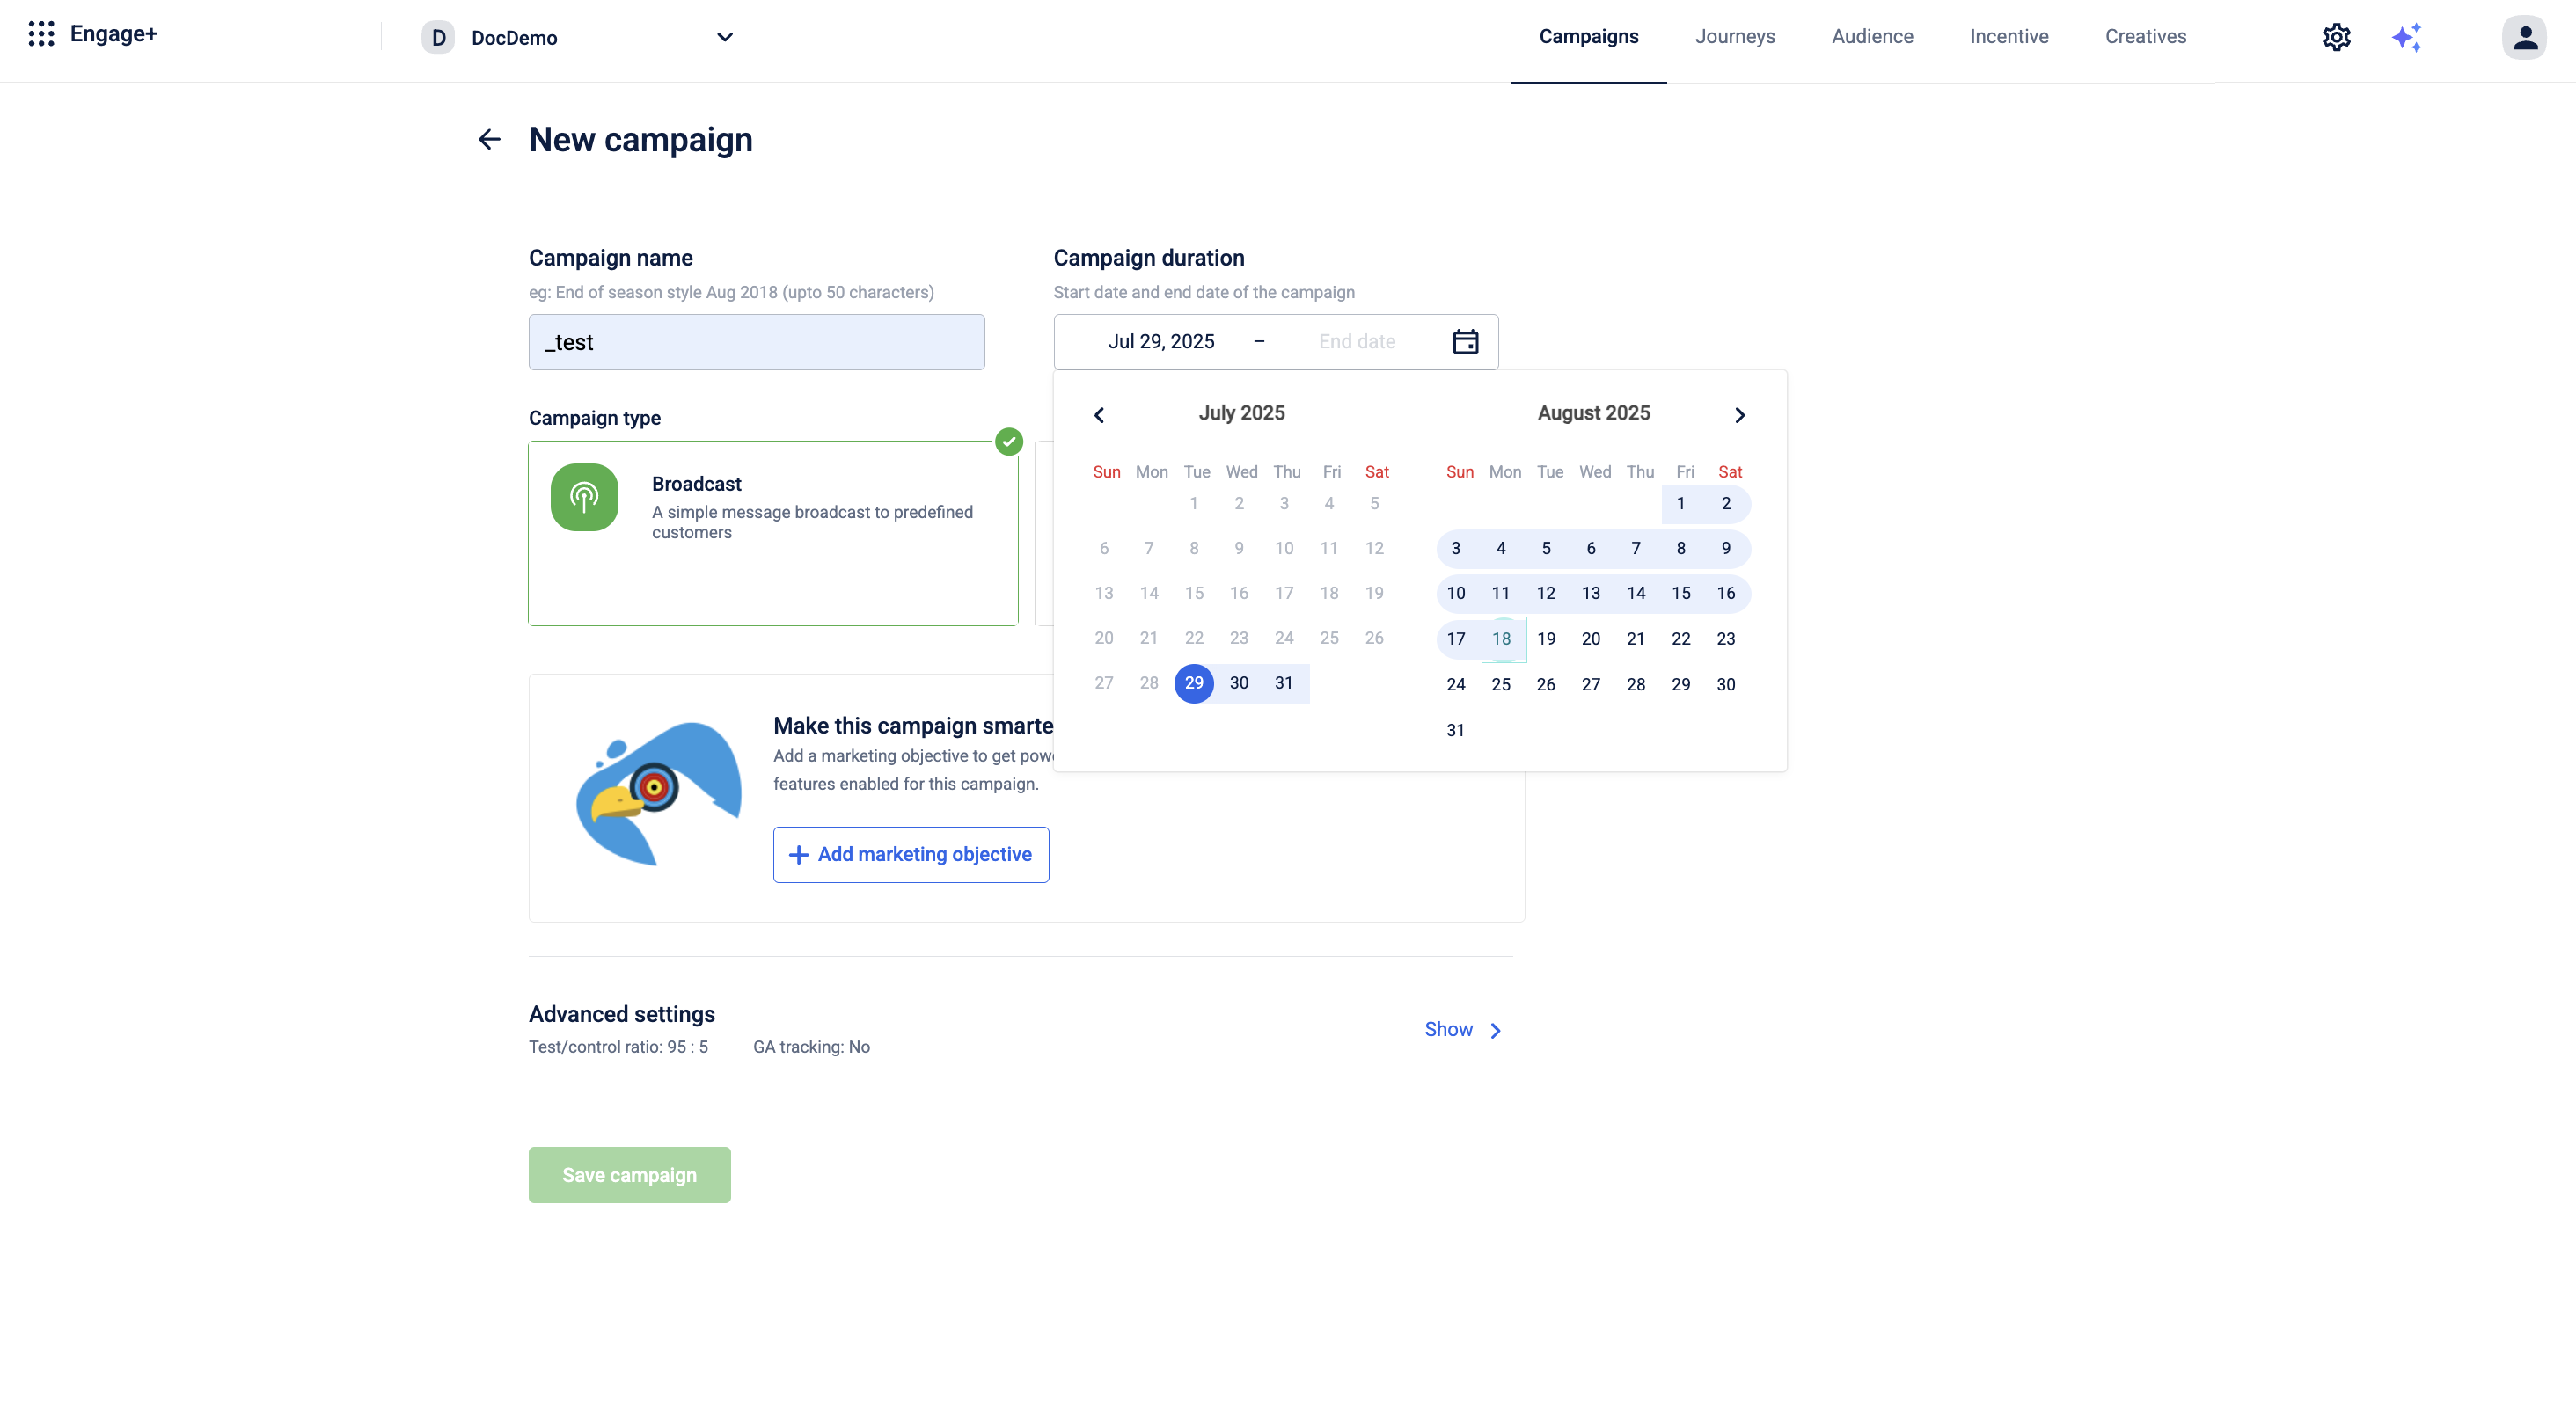
- Under Campaign Type, select Broadcast.
- Click +Add marketing objective to tag a marketing objective to the campaign. This helps classify the campaign to achieve better automation and reporting.
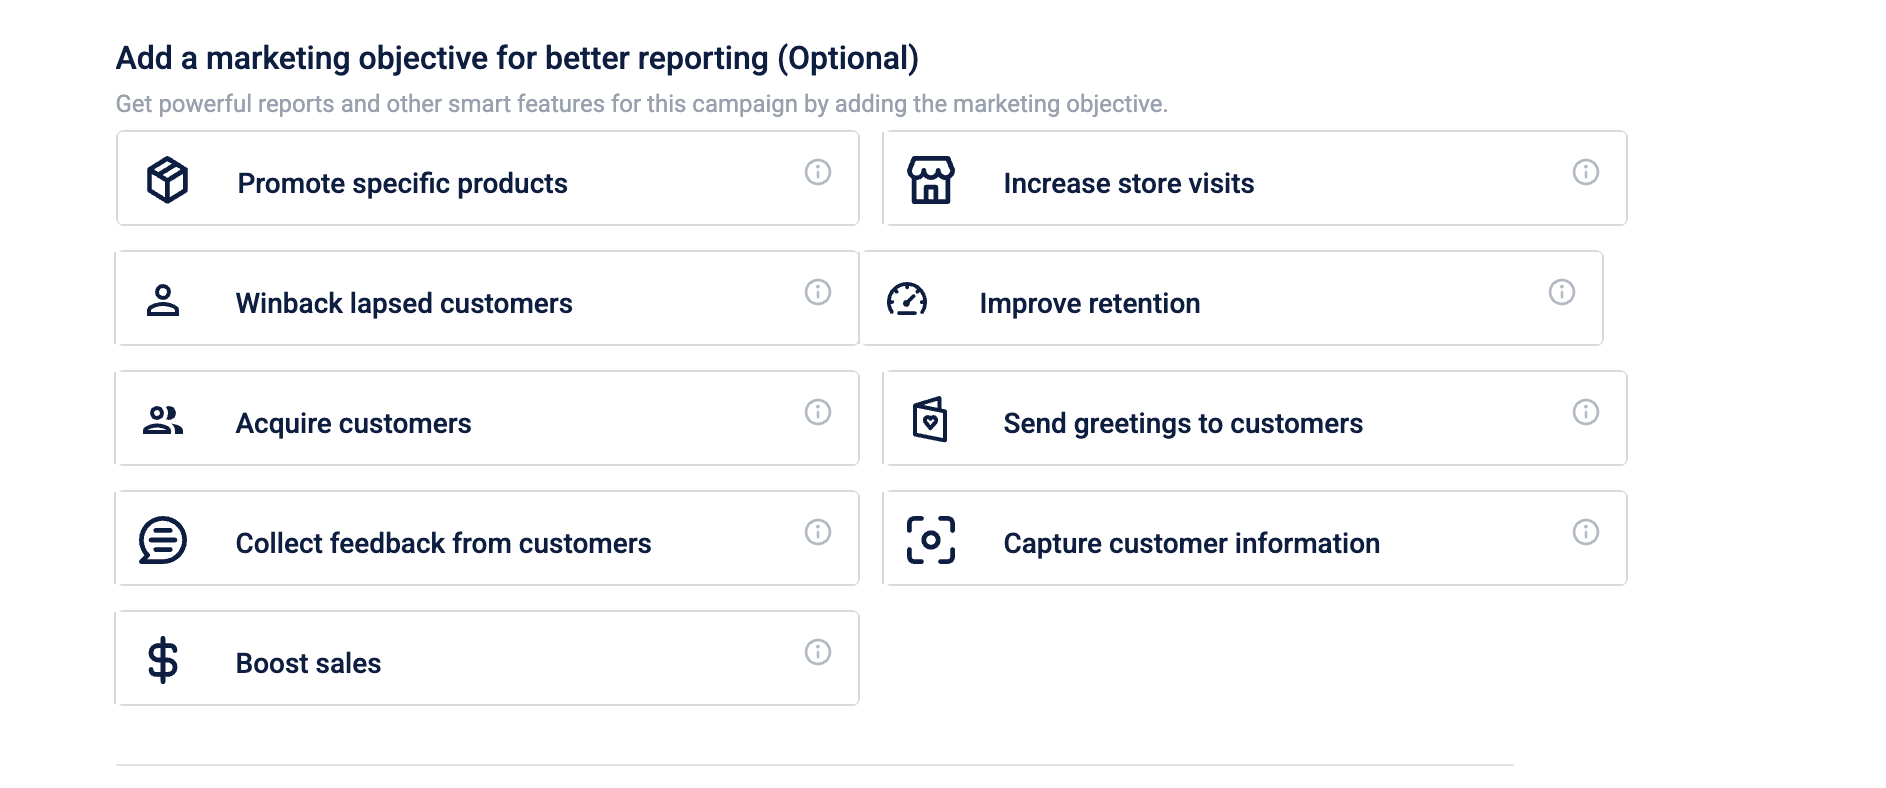
| Marketing objective | Description |
|---|---|
| Boost Sales | To increase overall sales. Campaigns like - EOSS, Deep discounts are an example of this |
| Acquire customers | Acquire new customers for your brand. Eg. Any acquisition campaign, referral, etc |
| Promote specific products | Promote a specific product, brand, or category eg. new shoes collection, winter launch, etc |
| Collect feedback from customers | Collect feedback from customers to analyze their experience |
| Improve retention | Send offers, and coupons to retain existing customers like ATV, ABV booster, and RFM campaigns |
| Winback lapsed customers | Send promotional offers to lapsed customers |
| Capture customer information | For data collection like - Date of birth, gender, interest, anniversary, etc |
| Send greetings to customers | Festival greetings such as Festivals, Birthdays, Anniversary |
| Increase store visits | Promote a specific store, city, or zone to increase the footfall |
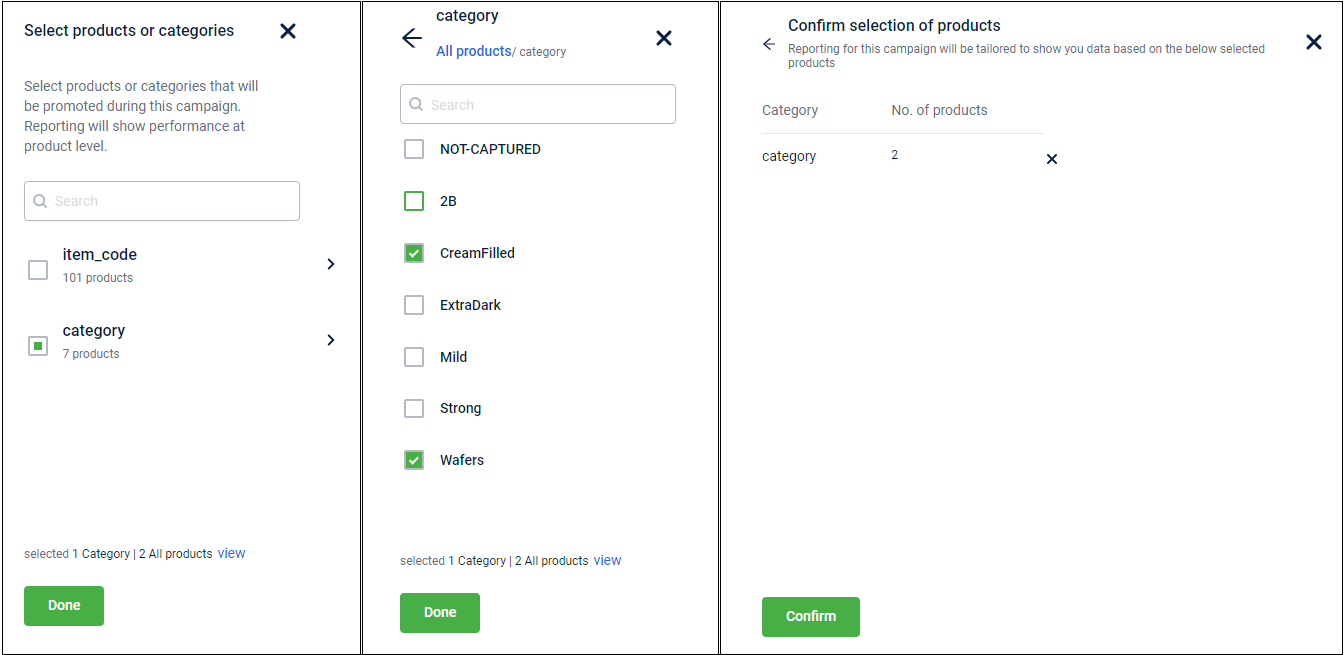
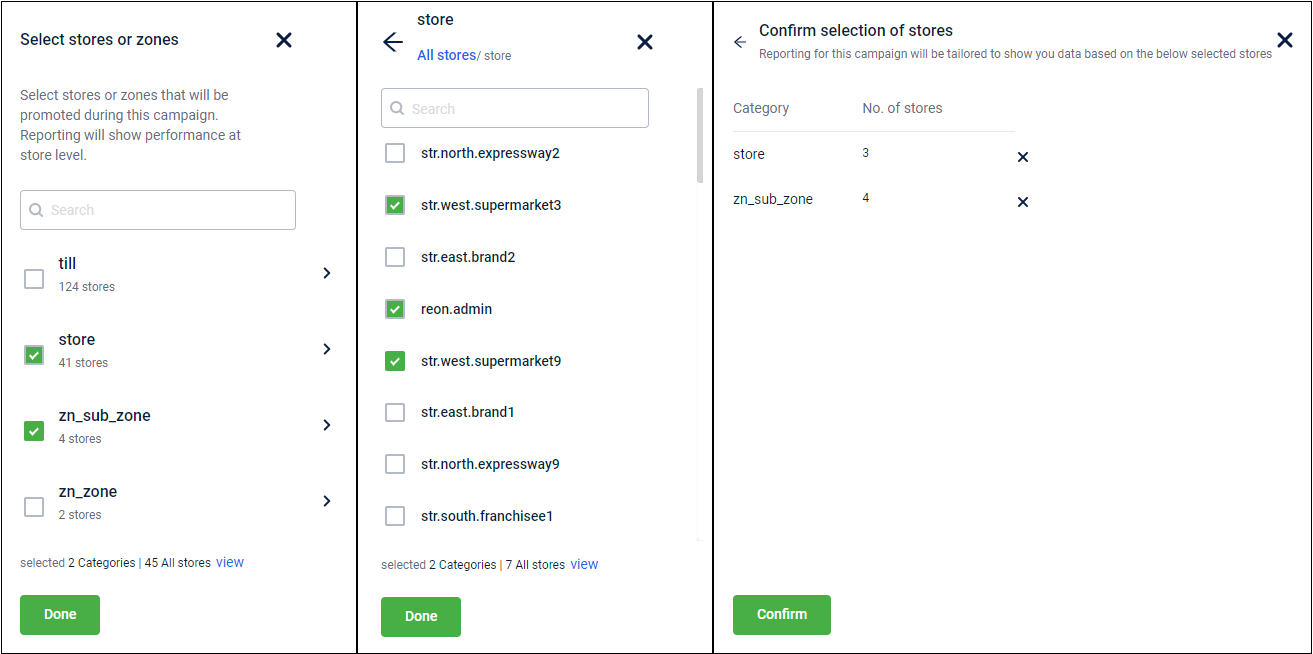
If you are selecting "Promote specific products" or "Increase store visits" as a marketing objective, then refer to the following steps:
- Promote specific products
To promote a specific product, follow the given steps:
- Click Promote specific products.
- Select a category and/or item code, and then click on the menu expand icon '>'.
- Select one or more products, which you want to promote through your campaign, and then click Done.
- Review the selected product and/or item code, and then click Confirm.
- Increase store visits
To increase the store visits follow the given steps:
- Click Increase store visits.
- Select one or more options from the list, and then click on the menu expand icon '>'. Ex: Select store, and/or zn_sub_zone.
- Select the store, and/or zone, which you want to promote through your campaign, and then click Done.
- Review the selected store and/or zones, and then click Confirm
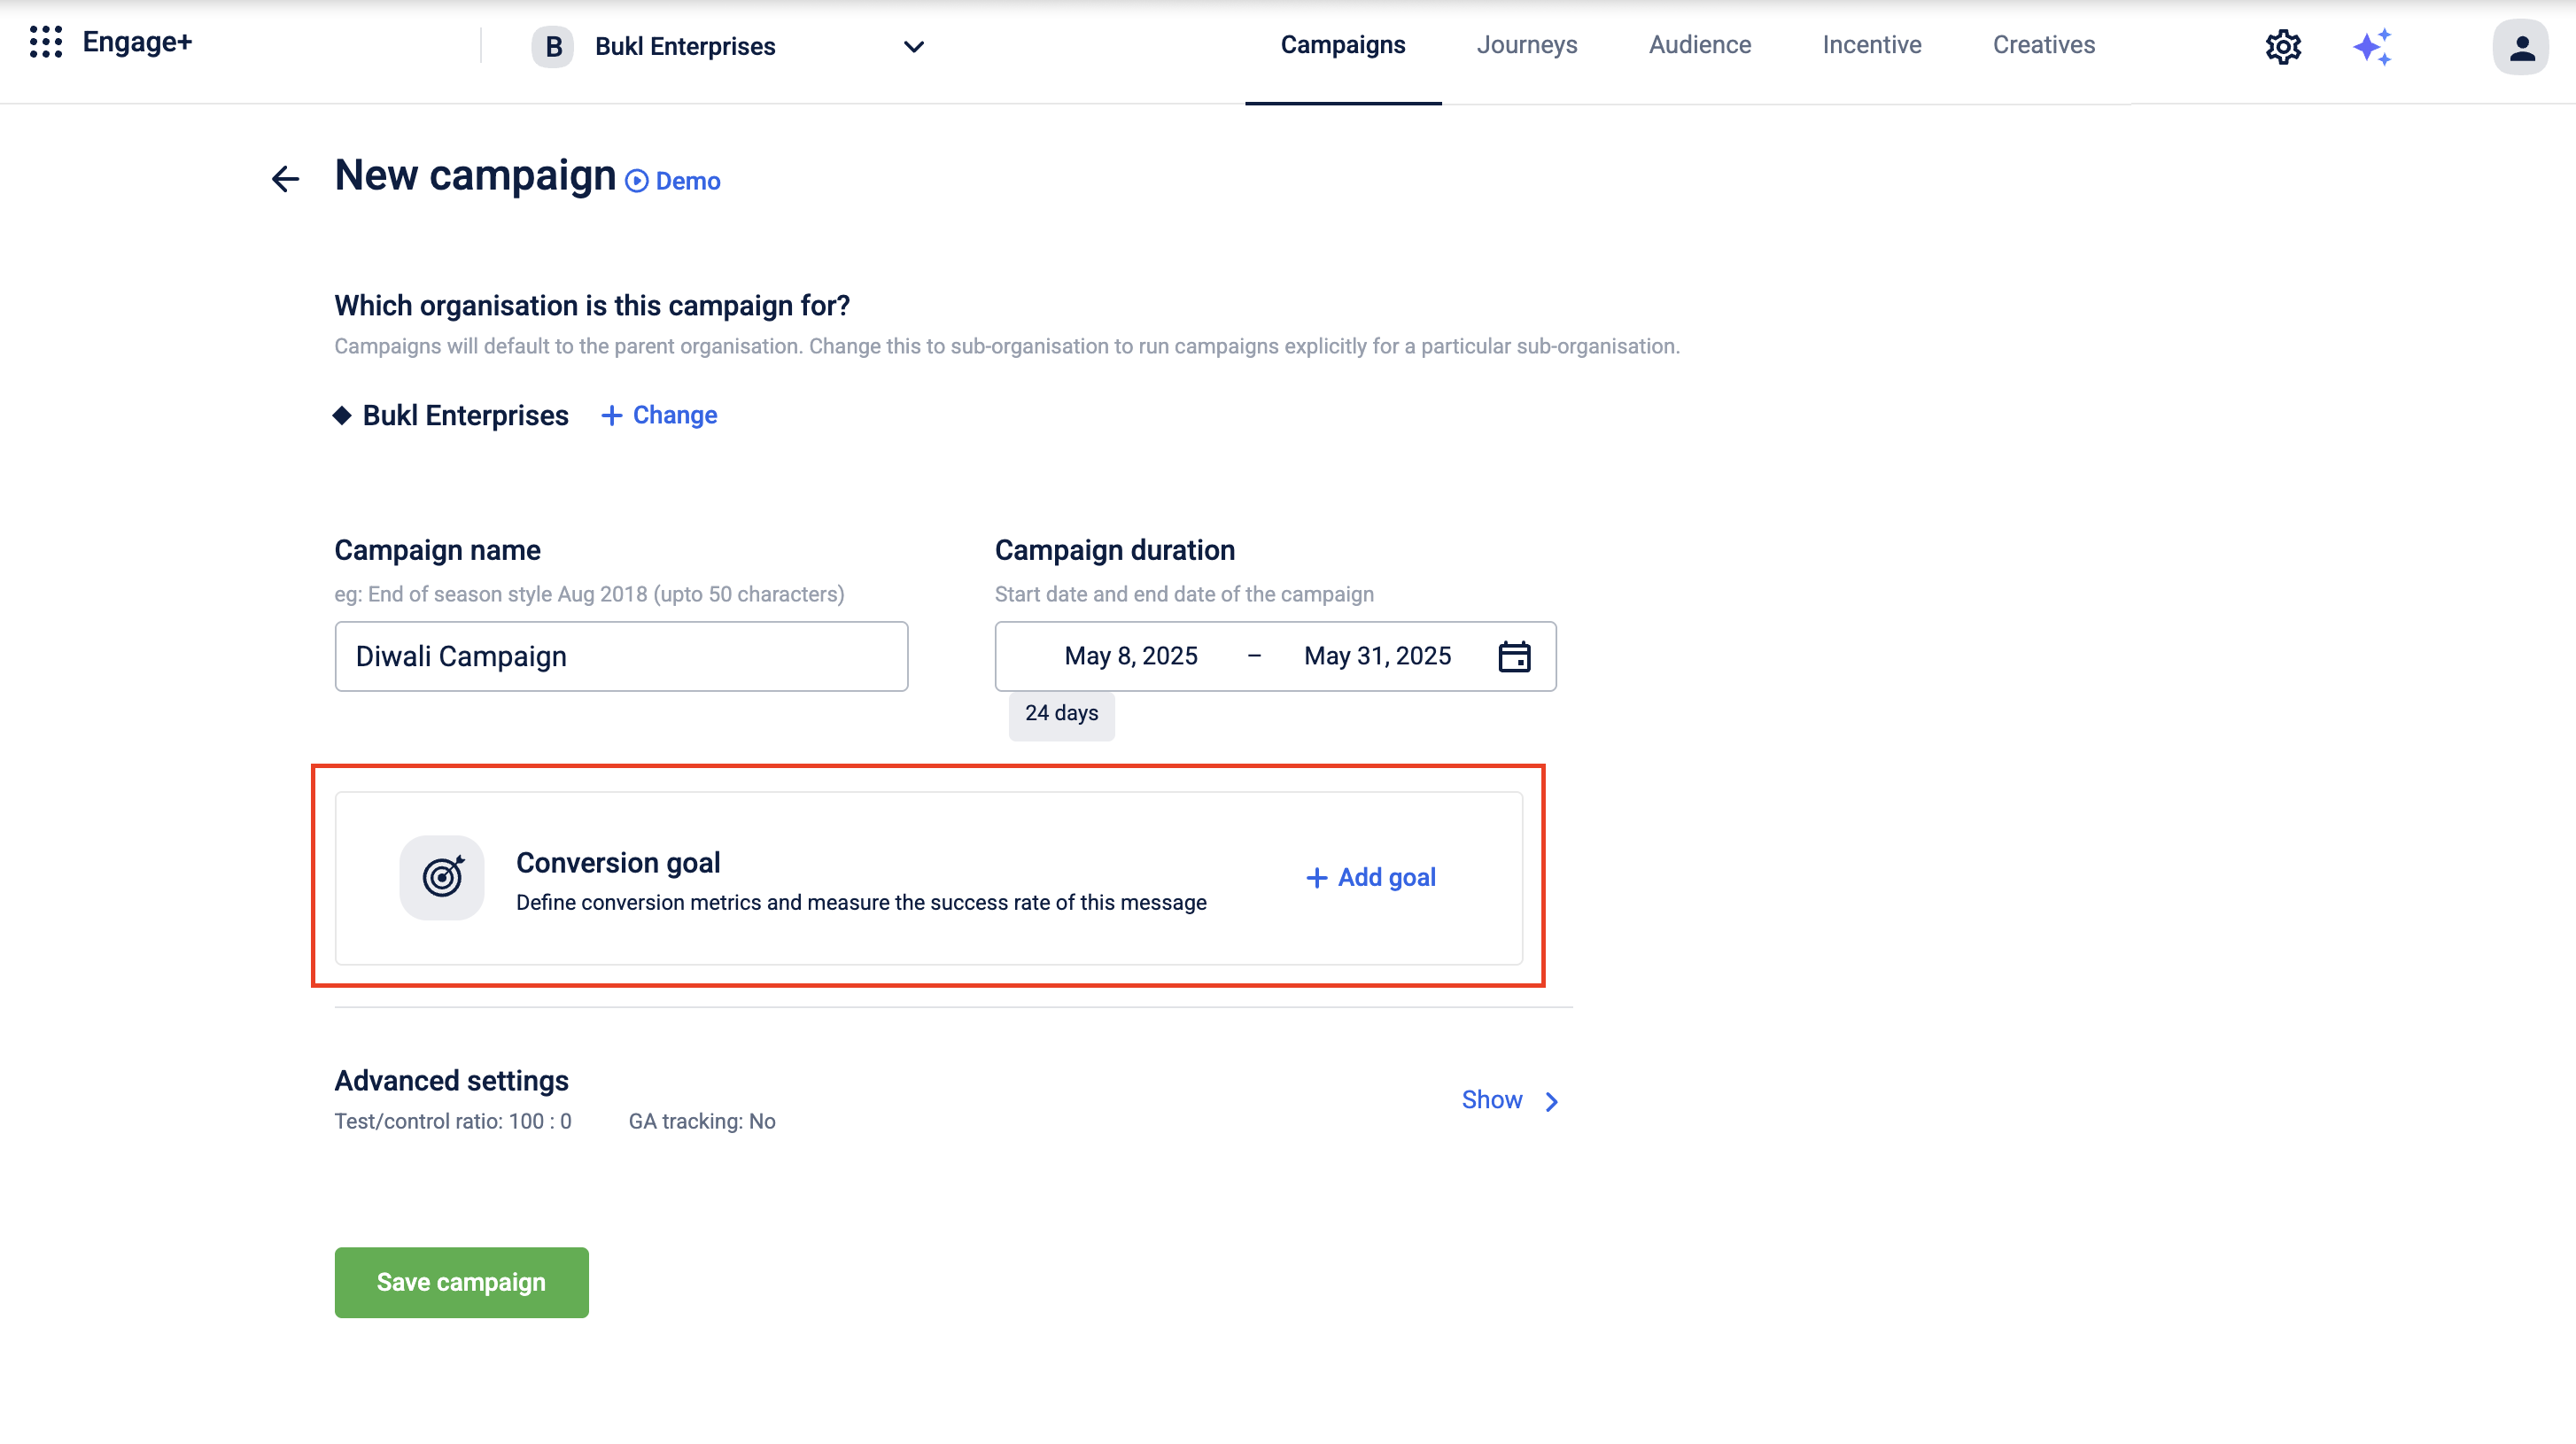
NoteYou can add a Conversion Goal to a campaign. However, this feature must be enabled for your organization. To enable it, please raise a JIRA ticket to the Capillary Product Support team. For more details, refer to the Conversion Goal documentation.
-
To modify the campaign level test-control ratio and add a Google Analytics account, click Show of Advanced settings. See Advanced Settings to know how to configure it.
-
Click Save campaign.
Create message
ImportantAvoid using parentheses
( )in destination URLs when adding links to your campaign messages. URLs containing parentheses may not shorten correctly and could appear as broken links for your recipients. If your URL contains parentheses, remove or replace them before adding the link to your message.When designing email creatives, keep in mind that not all email clients fully support responsive email features. Content or images intended to appear only on specific device types may not display as expected. To ensure a consistent experience, test your email creatives across multiple email clients before sending them.
- Click New Message to set up other things such as audience, content, delivery settings, and schedule the campaign.
- Enter Message name, select the Type of messages, and Optimization strategy and click Next to continue. For more details, see Create a message
- Click Add audience group to add recipients for the campaign. You can create an audience list in the following ways - Create Segments using Filters , Create audience group by uploading csv , and using Audience combined list .
- Add Campaign content for different channels like SMS, Email, Facebook, WeChat, and more and edit as required For more details, refer Engagement Channels. For Email, unsubscribe tag is mandatory. You can also customize the unsubscribe landing page.
- To issue points or offers (coupons) through the campaign, click +Add incentives, and select your preferred offer or points strategy. To create a new offer (coupon) see Create Offer and to create a new points strategy, see Points strategy . Note: To issue coupons or points, ensure that customers meet the defined eligibility criteria. If a customer does not meet the required conditions, coupons or points will not be issued to that customer.
- Schedule the campaign on your preferred date. You can also set to run the campaign repeatedly at equal intervals. For more information, see Schedule Message .
- After setting up all the required parameters, in Delivery settings, click Send for approval. An email is sent to the admins of the org with the subject
Alert! Campaign approval needed.
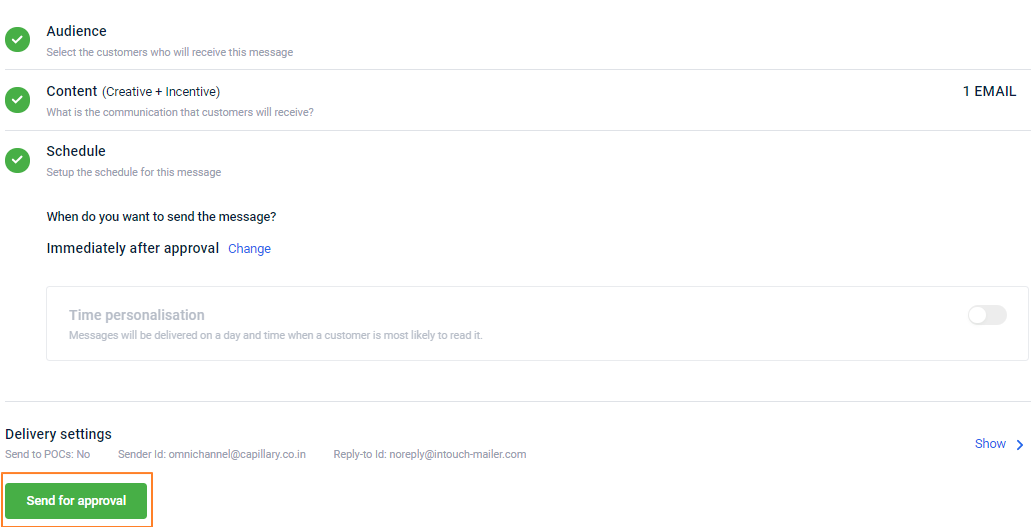
Once the admin approves the campaign, the campaign will go live as per the schedule. You will also receive a notification over email stating the Campaign message is approved.
Approve message
Only authentic users of the org can validate and approve campaigns that are created.
To approve the campaign, follow the steps below:
- Click on the campaign that you want to approve.

- Verify the campaign details. Click Edit to modify the campaign details if required and click Approve to approve all the campaign messages. For a detailed help guide, see Approve a message
- If you want to make any changes to the campaign, click Edit to modify the campaign and send it for approval again.
Note
- You must approve the campaign at least 2 hours before the scheduled execution time. If you approve the campaign less than 2 hours before the scheduled time, the campaign will not trigger as scheduled.
- You can add more messages to a campaign using the New message button.
- You can also Reject a campaign that you wish to ignore.
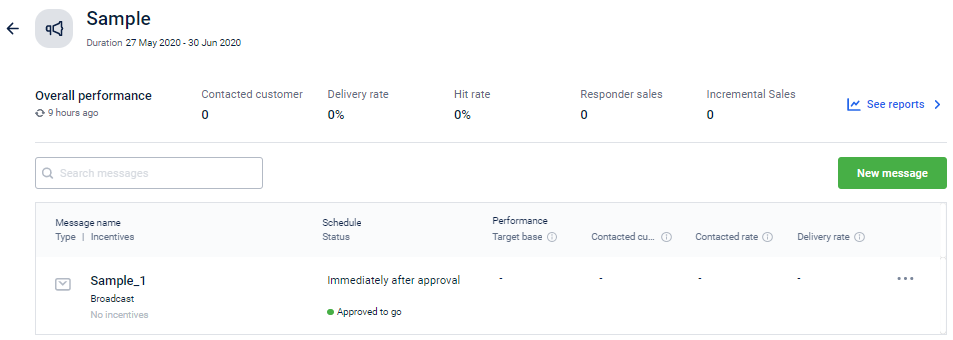
Check message delivery status
To check the status, do the following.
- On Capillary InTouch, navigate to Engage+
- Select a campaign.
- Navigate to the Delivery Rate.
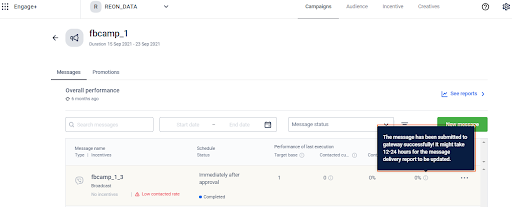
NoteIt may take approximately 12 to 24 hours for the Message Delivery Status to update on the Campaign Listings page. The tooltip provides an estimated time for when the delivery status will be available.
Tracking Campaign Performance based on Conversion Goals
The Conversion Goal feature in Engage+ helps you understand how well your campaigns are working. It shows whether your messages are encouraging customers to take desired actions such as making a purchase. This helps you understand the effectiveness of a campaign.
This feature tracks the number of customers who took action because of your campaign. You can define a conversion goal for each campaign. Once set, it monitors how many customers completed that goal after receiving your campaign message. This allows you to measure the true impact of your campaign on customer behavior.
What is a Conversion Goal?
A Conversion Goal helps measure the effectiveness of a campaign by tracking the number of customers who complete desired actions, such as making a qualifying purchase, after receiving a campaign message. By setting up conversion goals, you can gain insights into campaign performance, allowing you to improve messaging and targeting for better future outcomes. You can create custom conversion goals and measure campaign success based on real customer behaviour.
Key Features
The feature includes several key capabilities:
- Org-Level Default Conversion Goal Setting: Allows users to set a default conversion goal for all campaigns in the organization to keep tracking consistent. Users with access, should have the ability to view, edit, or remove this default goal.
- Campaign-Level Conversion Goal Setting: Allows users to customize conversion goals for individual campaigns. This can be done if there's no org-level default Conversion Goal is set up. Campaign-level goals are specific to that campaign and do not affect org-level settings or other campaigns.
- Tracking and Reporting: Provides capabilities to analyze campaign performance through detailed metrics and reports.
Notes
- This feature needs to be enabled for your organization by creating a JIRA ticket to the Capillary Product Support team.
- You can edit the conversion goal at any time before the first message in the campaign is approved. Once the first message is approved, the option to edit the conversion goal will no longer be available.
Configuring a Conversion Goal
When configuring a conversion goal, you define several parameters:
- Conversion Events: The events you want to track to measure campaign success.
NoteThe supported customer events for the Conversion Goal currently focus on Transactional Events (customer makes a transaction).
-
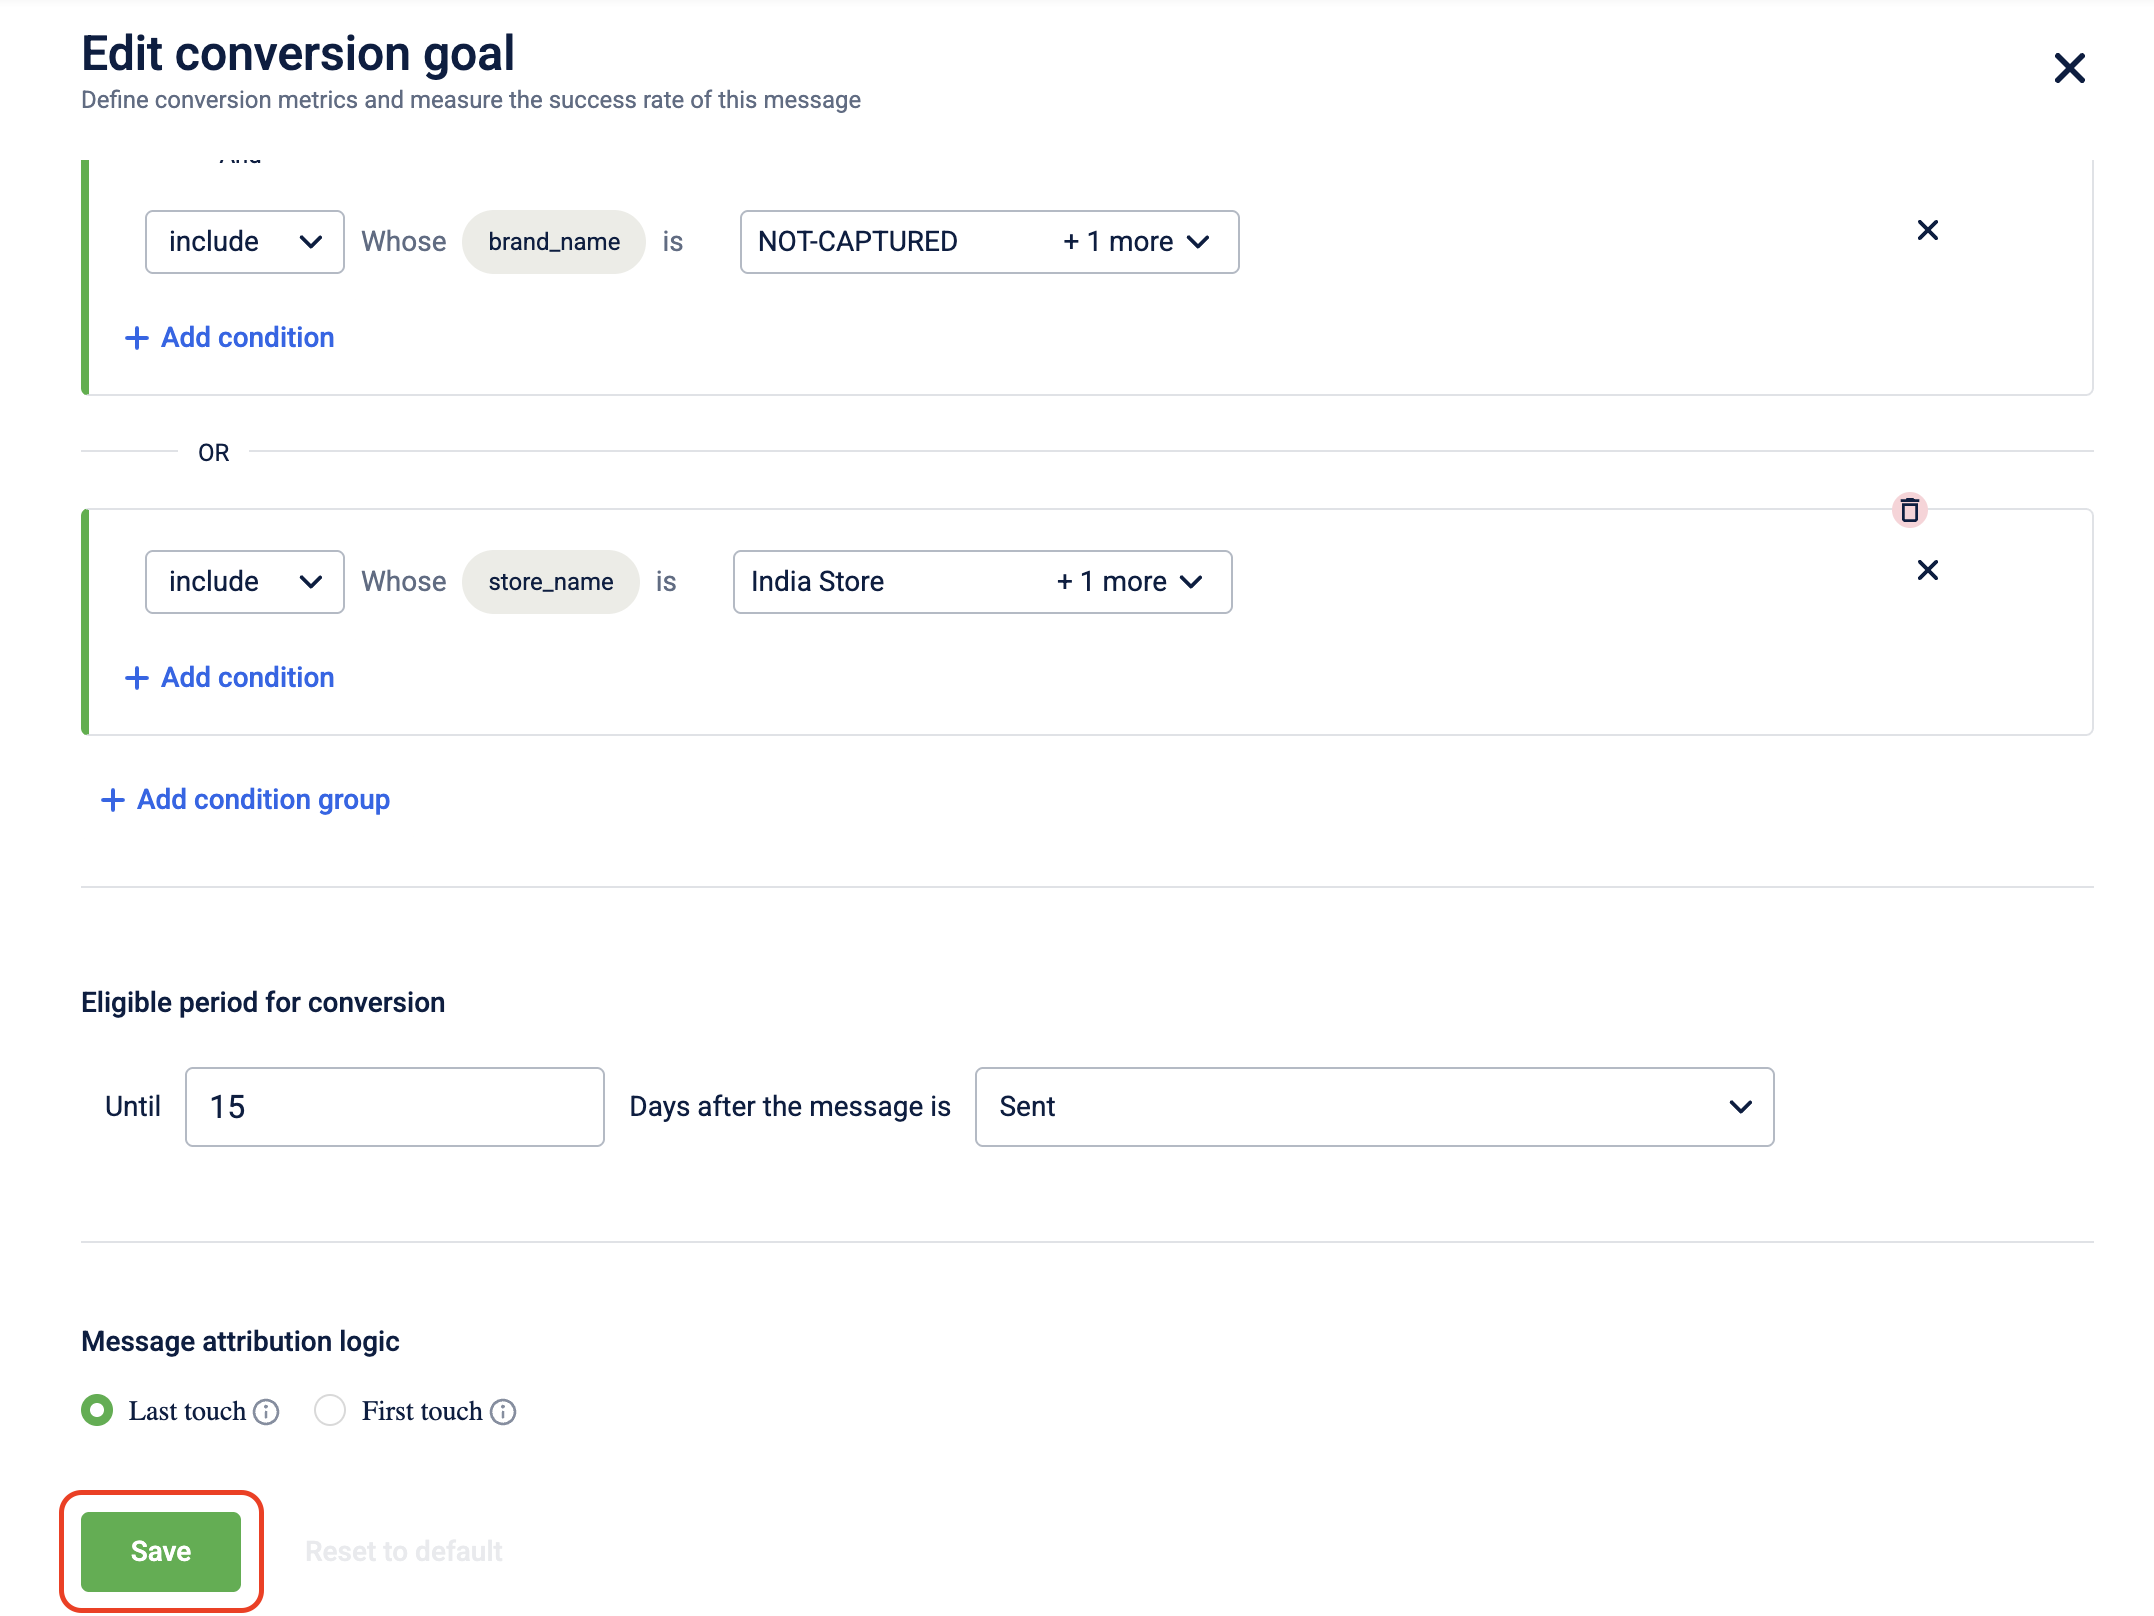
Conditions: Based on the selected event, you can add conditions to decide which actions should be counted for campaign tracking. Multiple conditions can be added and combined using AND/OR operators.
-
Configuration Parameters: These settings decide how a customer’s action is linked to a campaign message:
- Event Tracking Period: This is the time period in which an event can be counted after a message is sent. You can choose a period like 15, 30, or 45 days, and decide if tracking starts when the message is sent, delivered, opened, or clicked.
- Message Interaction Status: Choose when to start tracking conversions after the message is sent, delivered, opened, or clicked. This helps filter events based on how users interacted with the message.
- Attribution Strategy: This decides which message is counted for the conversion. You can choose First Touch (first user interaction) or Last Touch (most recent interaction).
How to Configure a Default Conversion Goal (Org-Level)You can set a default conversion goal for your organization. This sets a default goal for all campaigns unless you create a custom goal for a specific campaign.
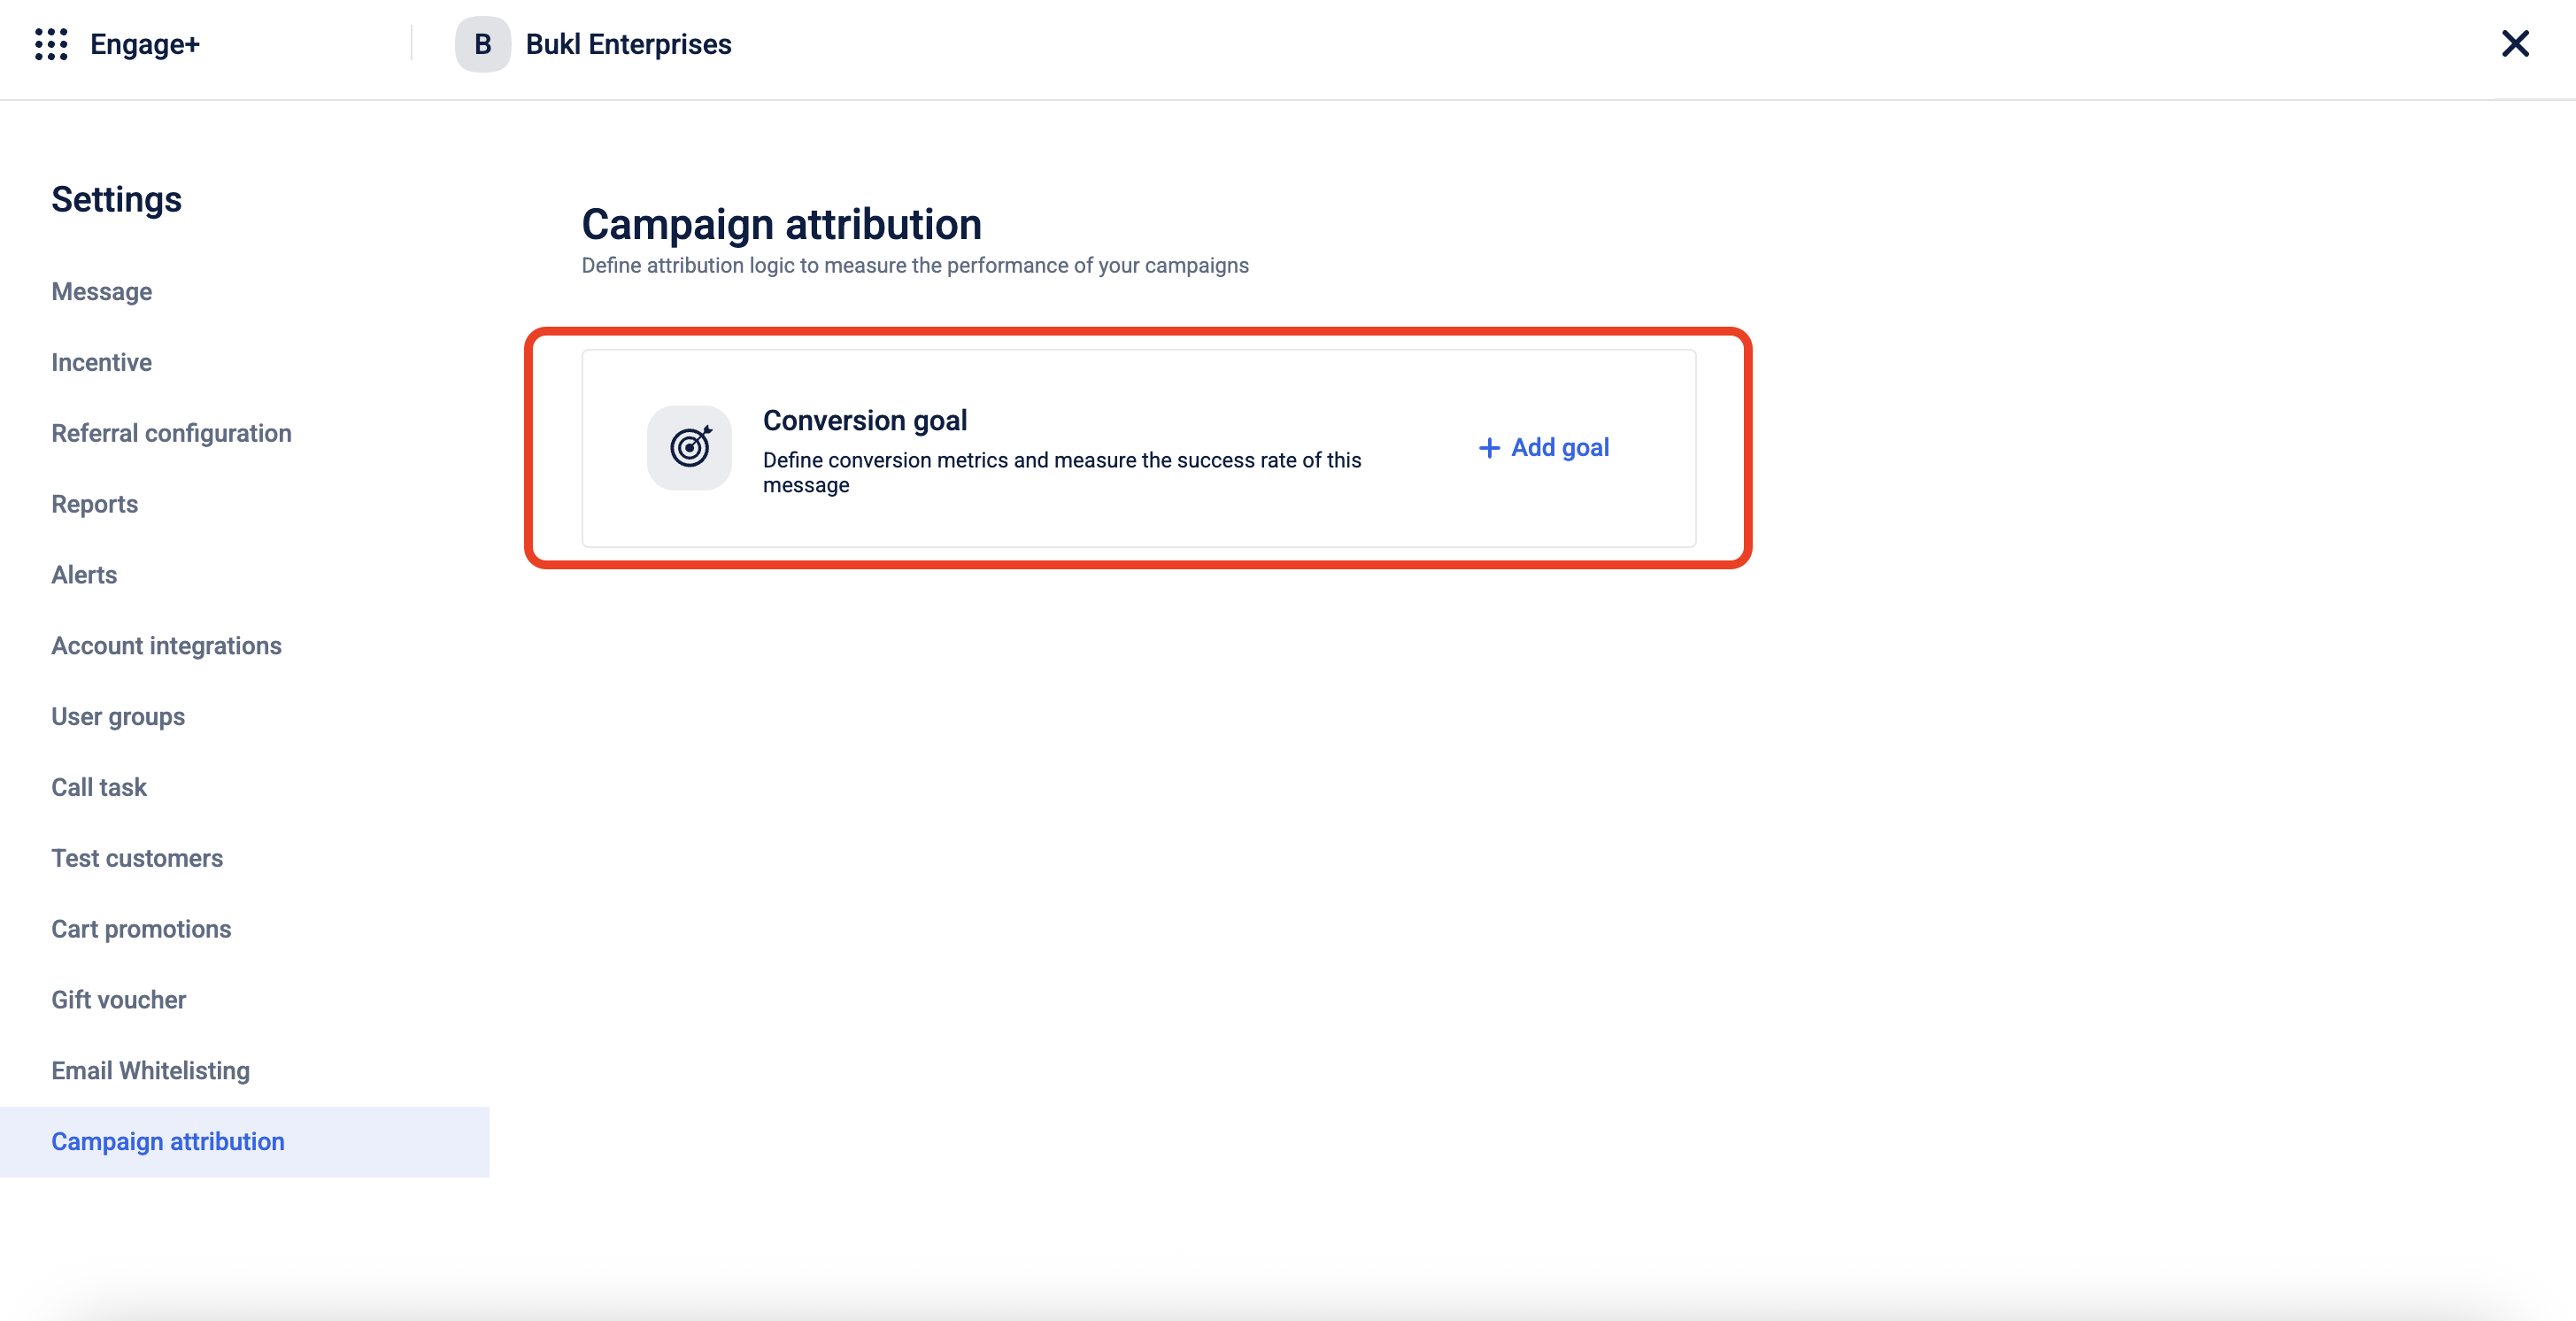
- Navigate to Engage+ and click on the settings icon.
- Click on Campaign Attribution. Only users with org-level access can view this section.
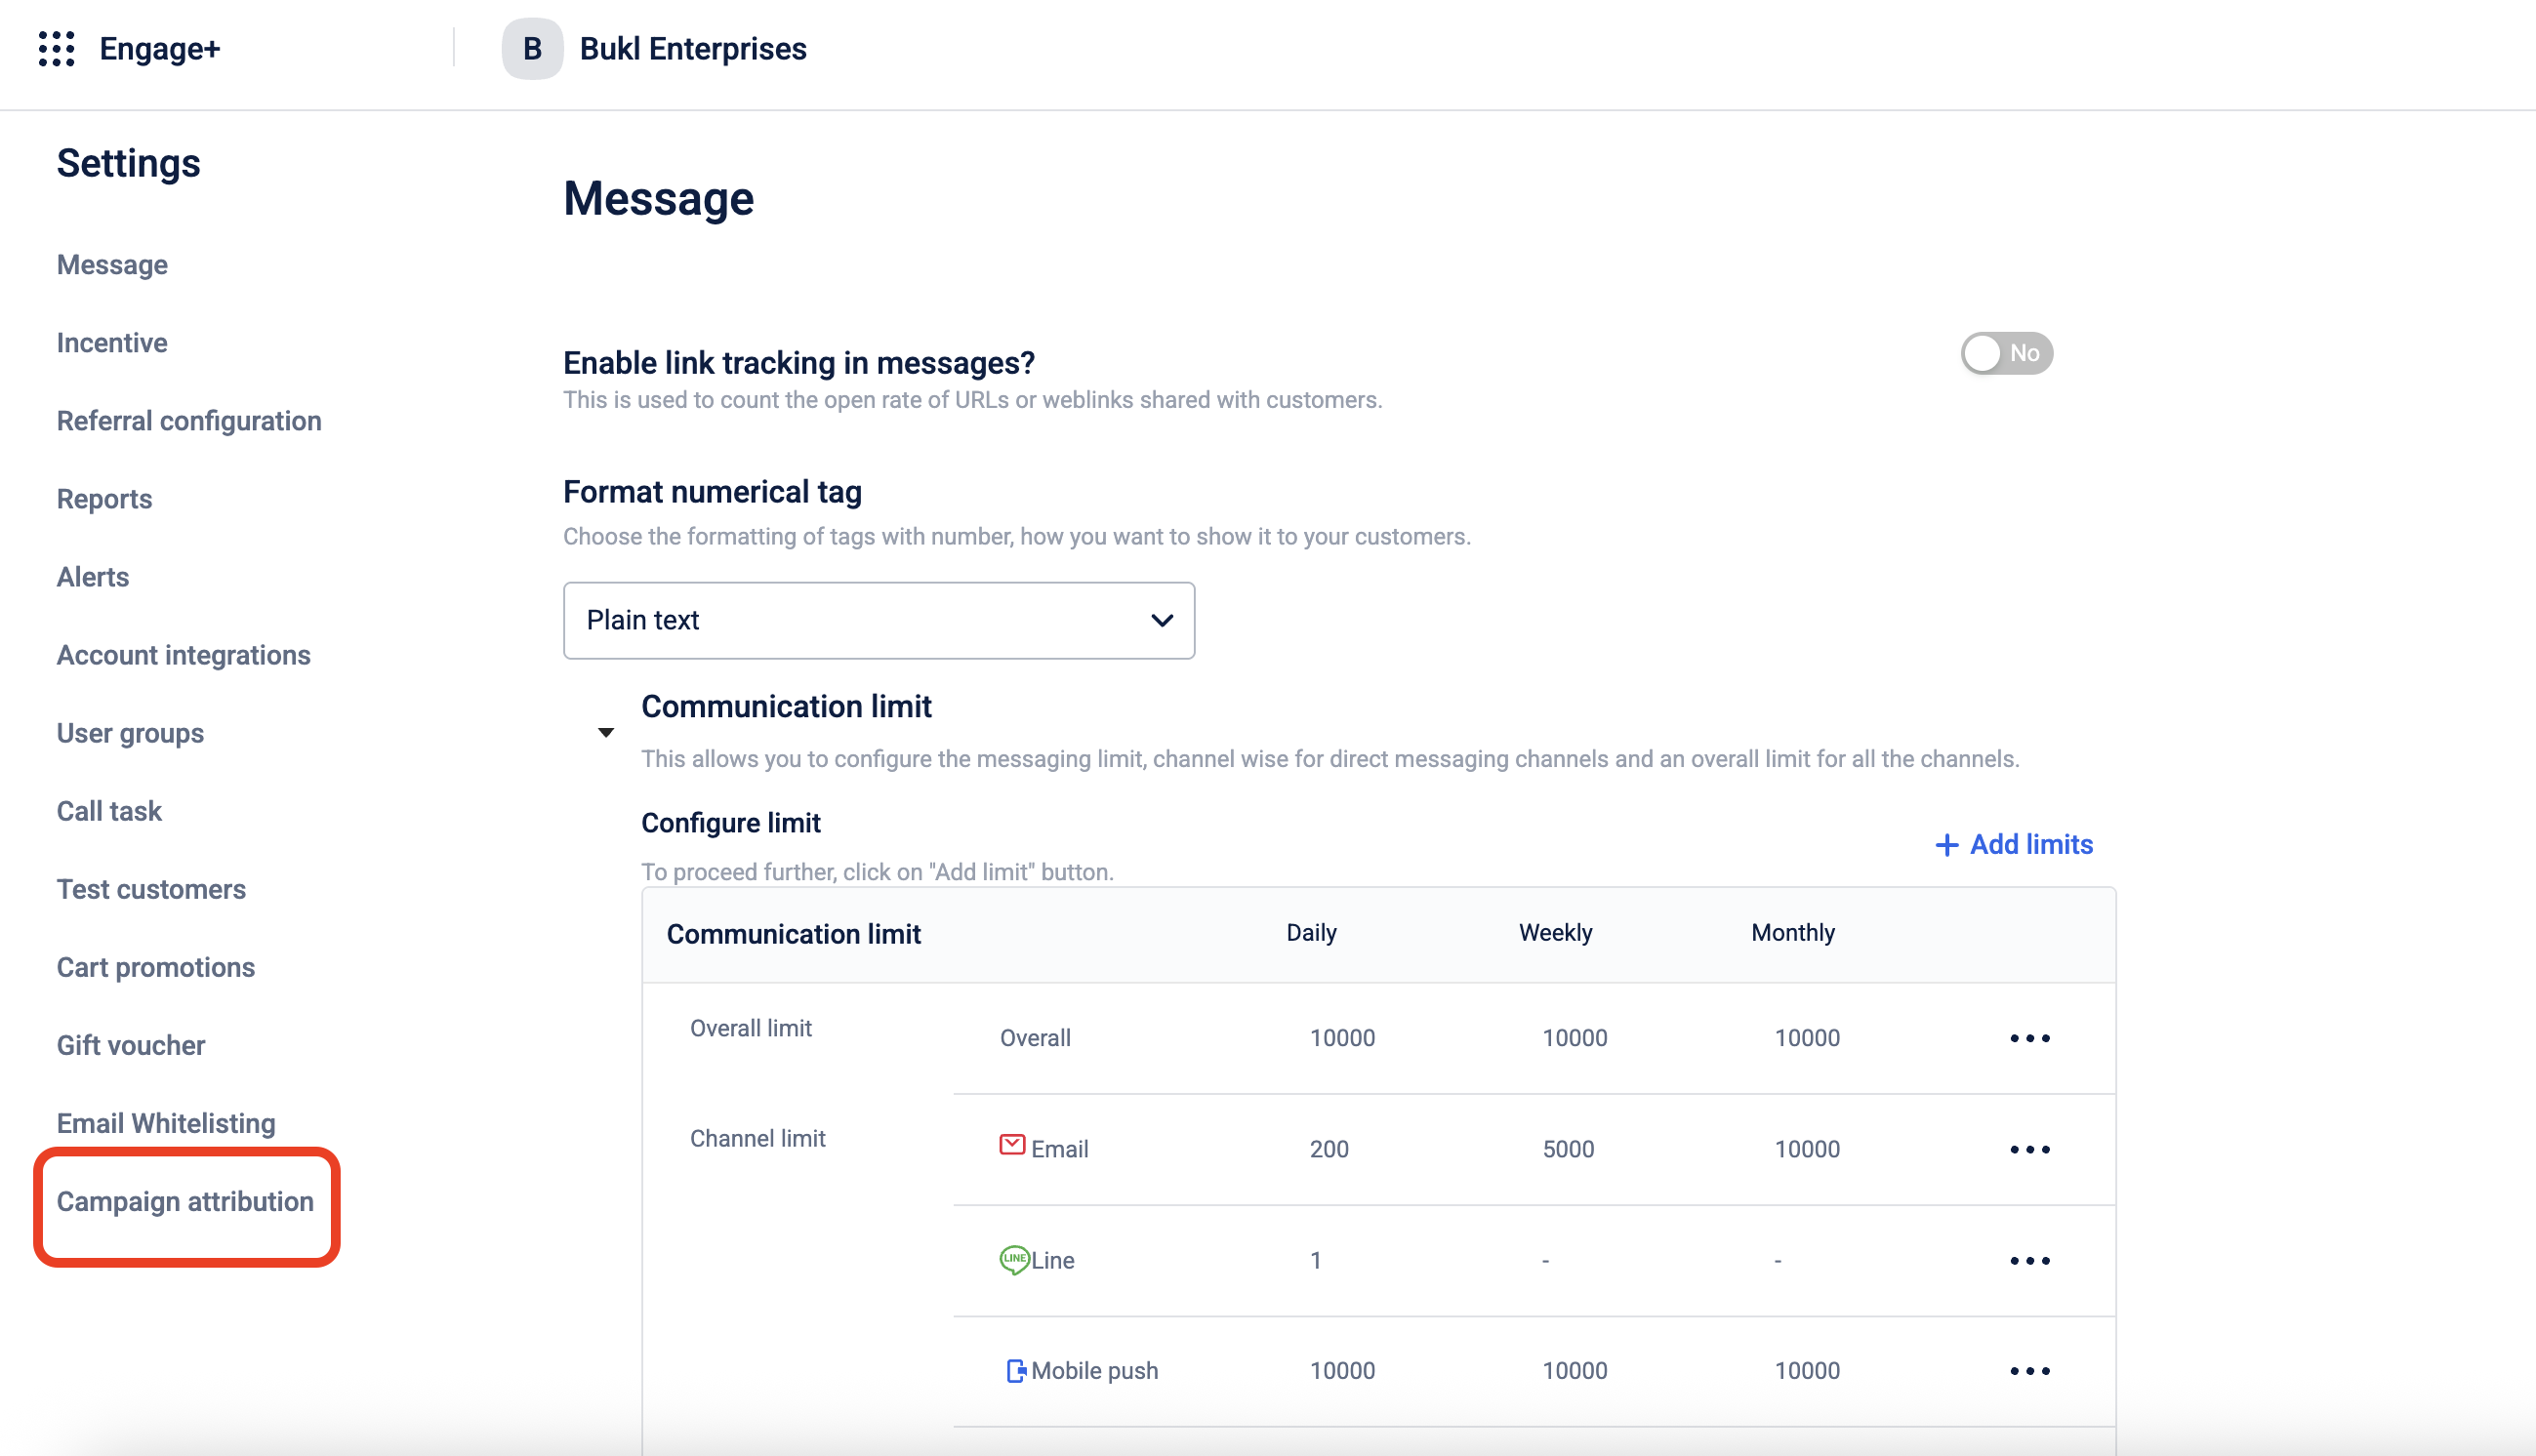
- If no default goal is set, you will be allowed to add a new goal. If a default goal is already set, you will see it.
- Click Add Goal to set up the default conversion goal.
- Set up the Conversion Goal. To set it up , you can refer to the documentation How to Configure a Conversion Goal.
Once a default org-level conversion goal is set, it appears automatically when you create a campaign. You can edit or remove it before the first message is sent. You can either Save your changes or Reset to Default to bring back the original goal. Removing it will show the “Add Goal” option again
NoteYou can edit the org-level conversion goal at any time. All campaigns created after the change will reflect the updated goal.
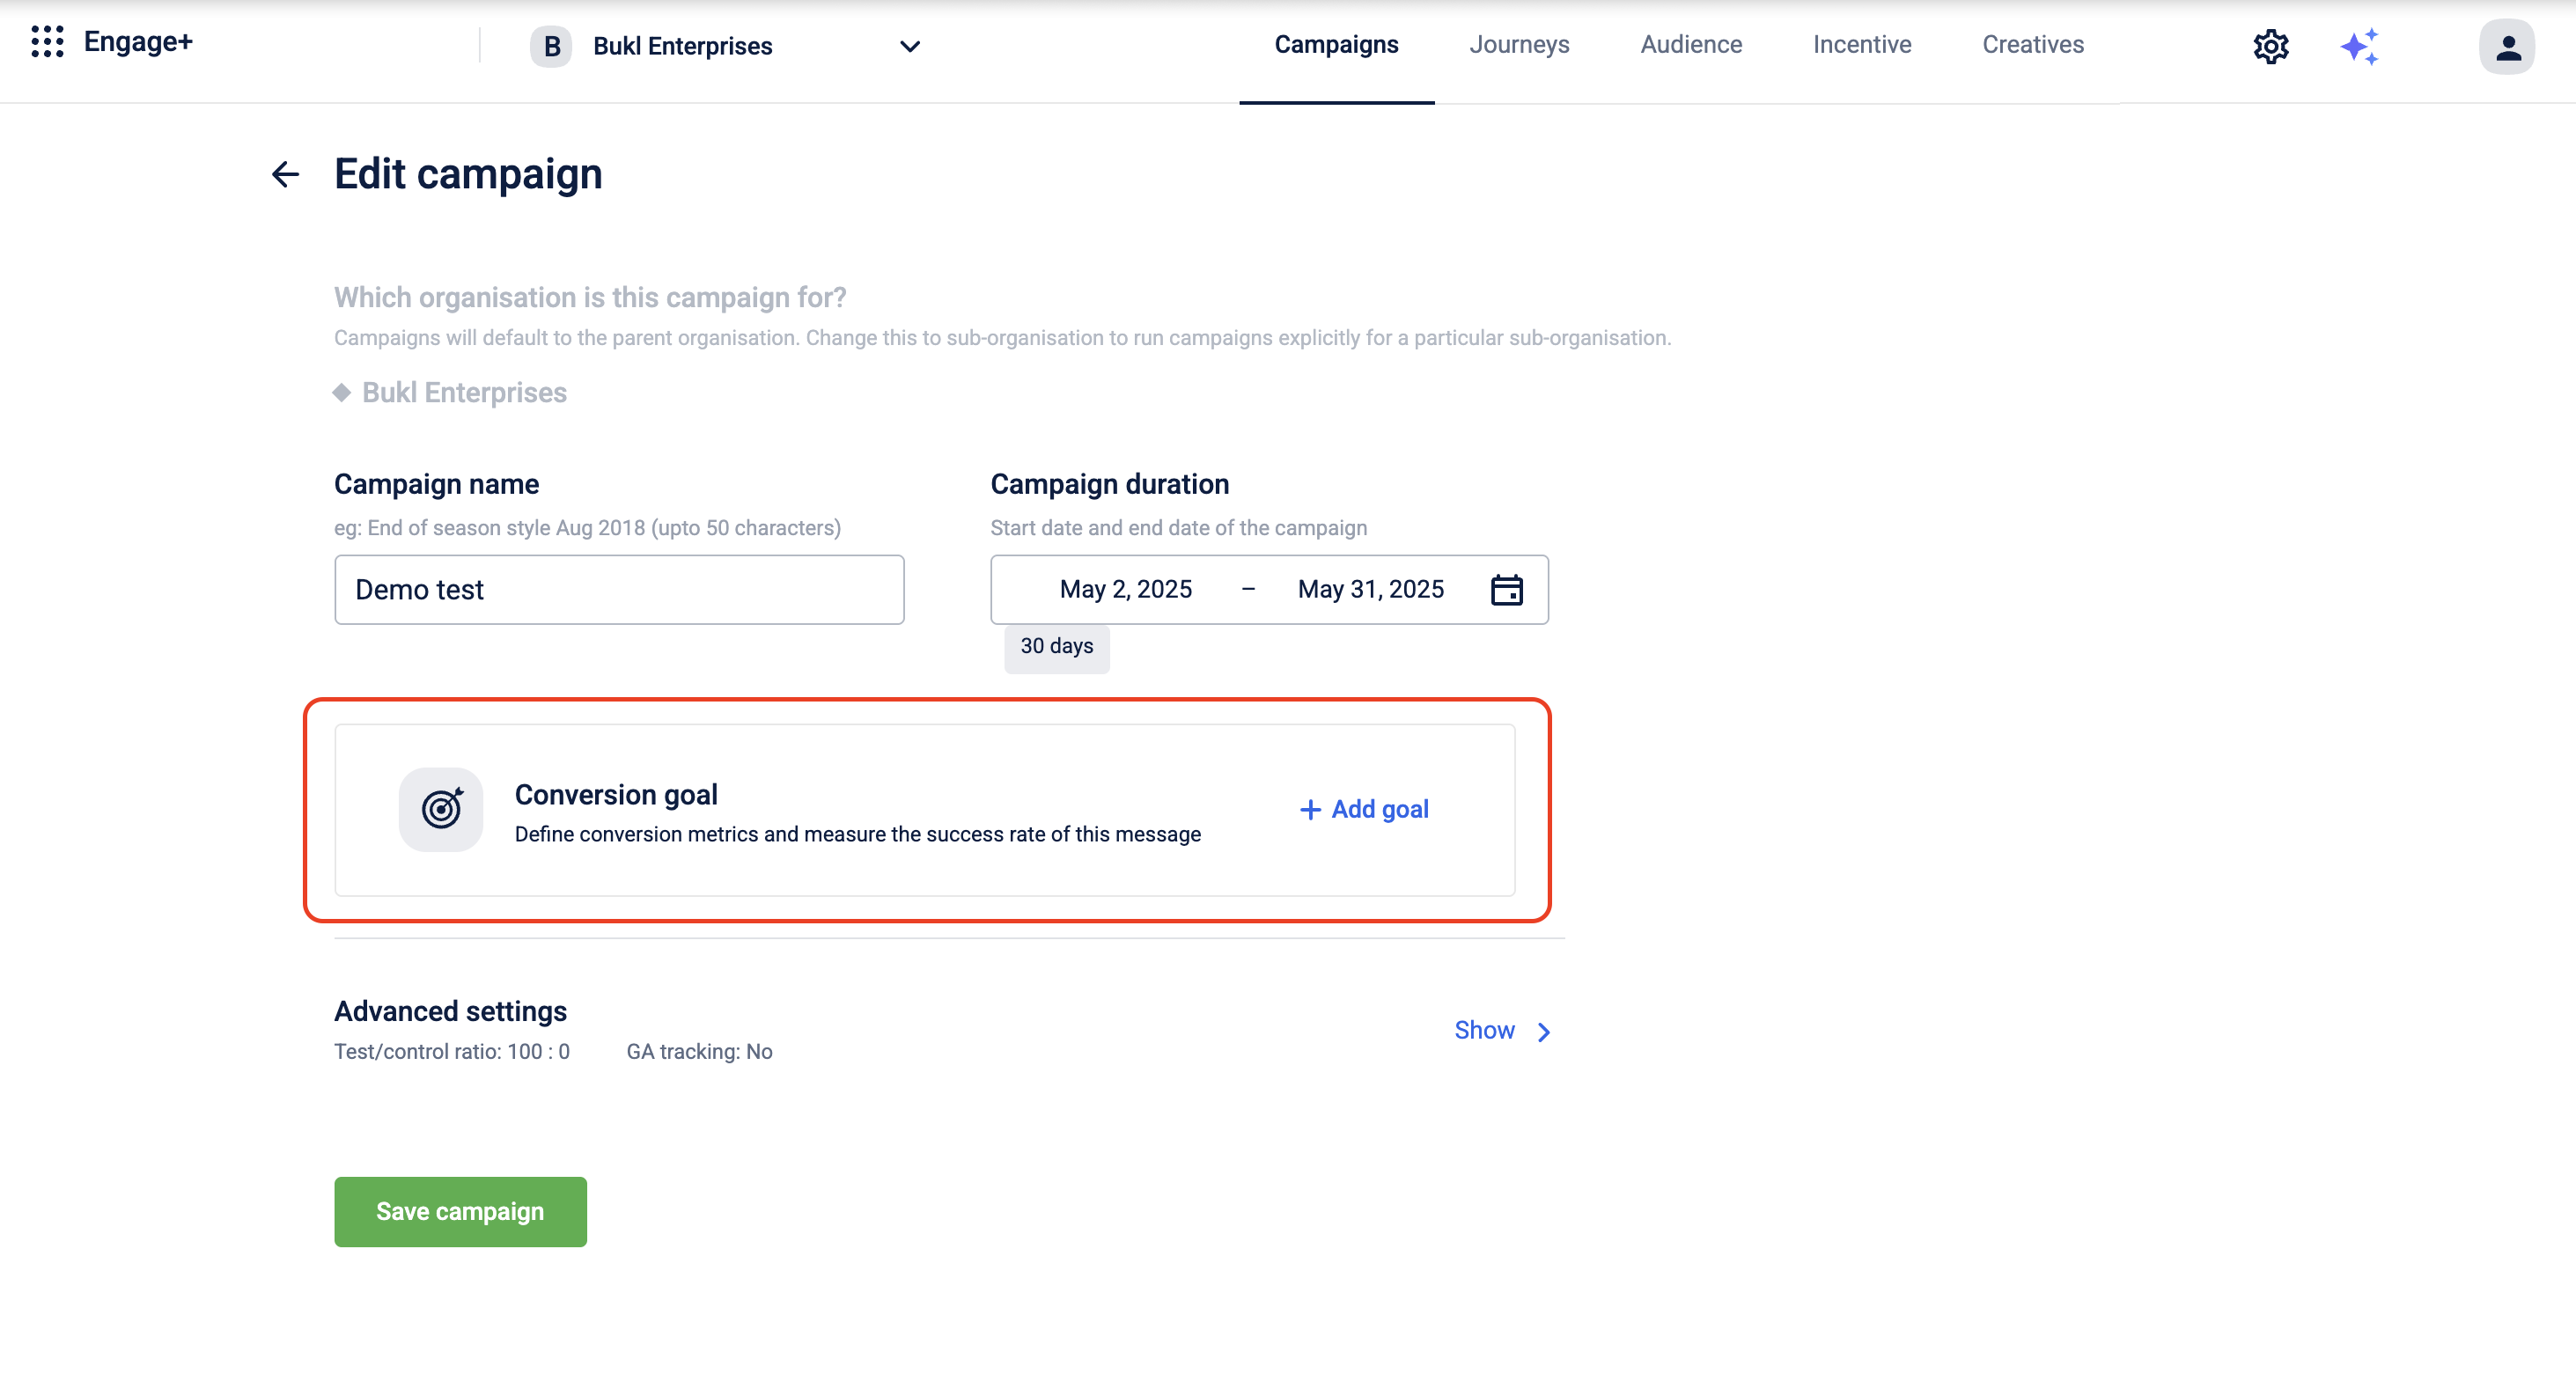
How to Configure a Conversion Goal (Campaign Level)
- Log in to InTouch and navigate to Engage+ from the menu.
- Click on New campaign to start creating a new campaign.
- Enter a Campaign name and select the Campaign duration.
- Click Add goal to set up the conversion goal.
- Choose the conversion event you want to track.
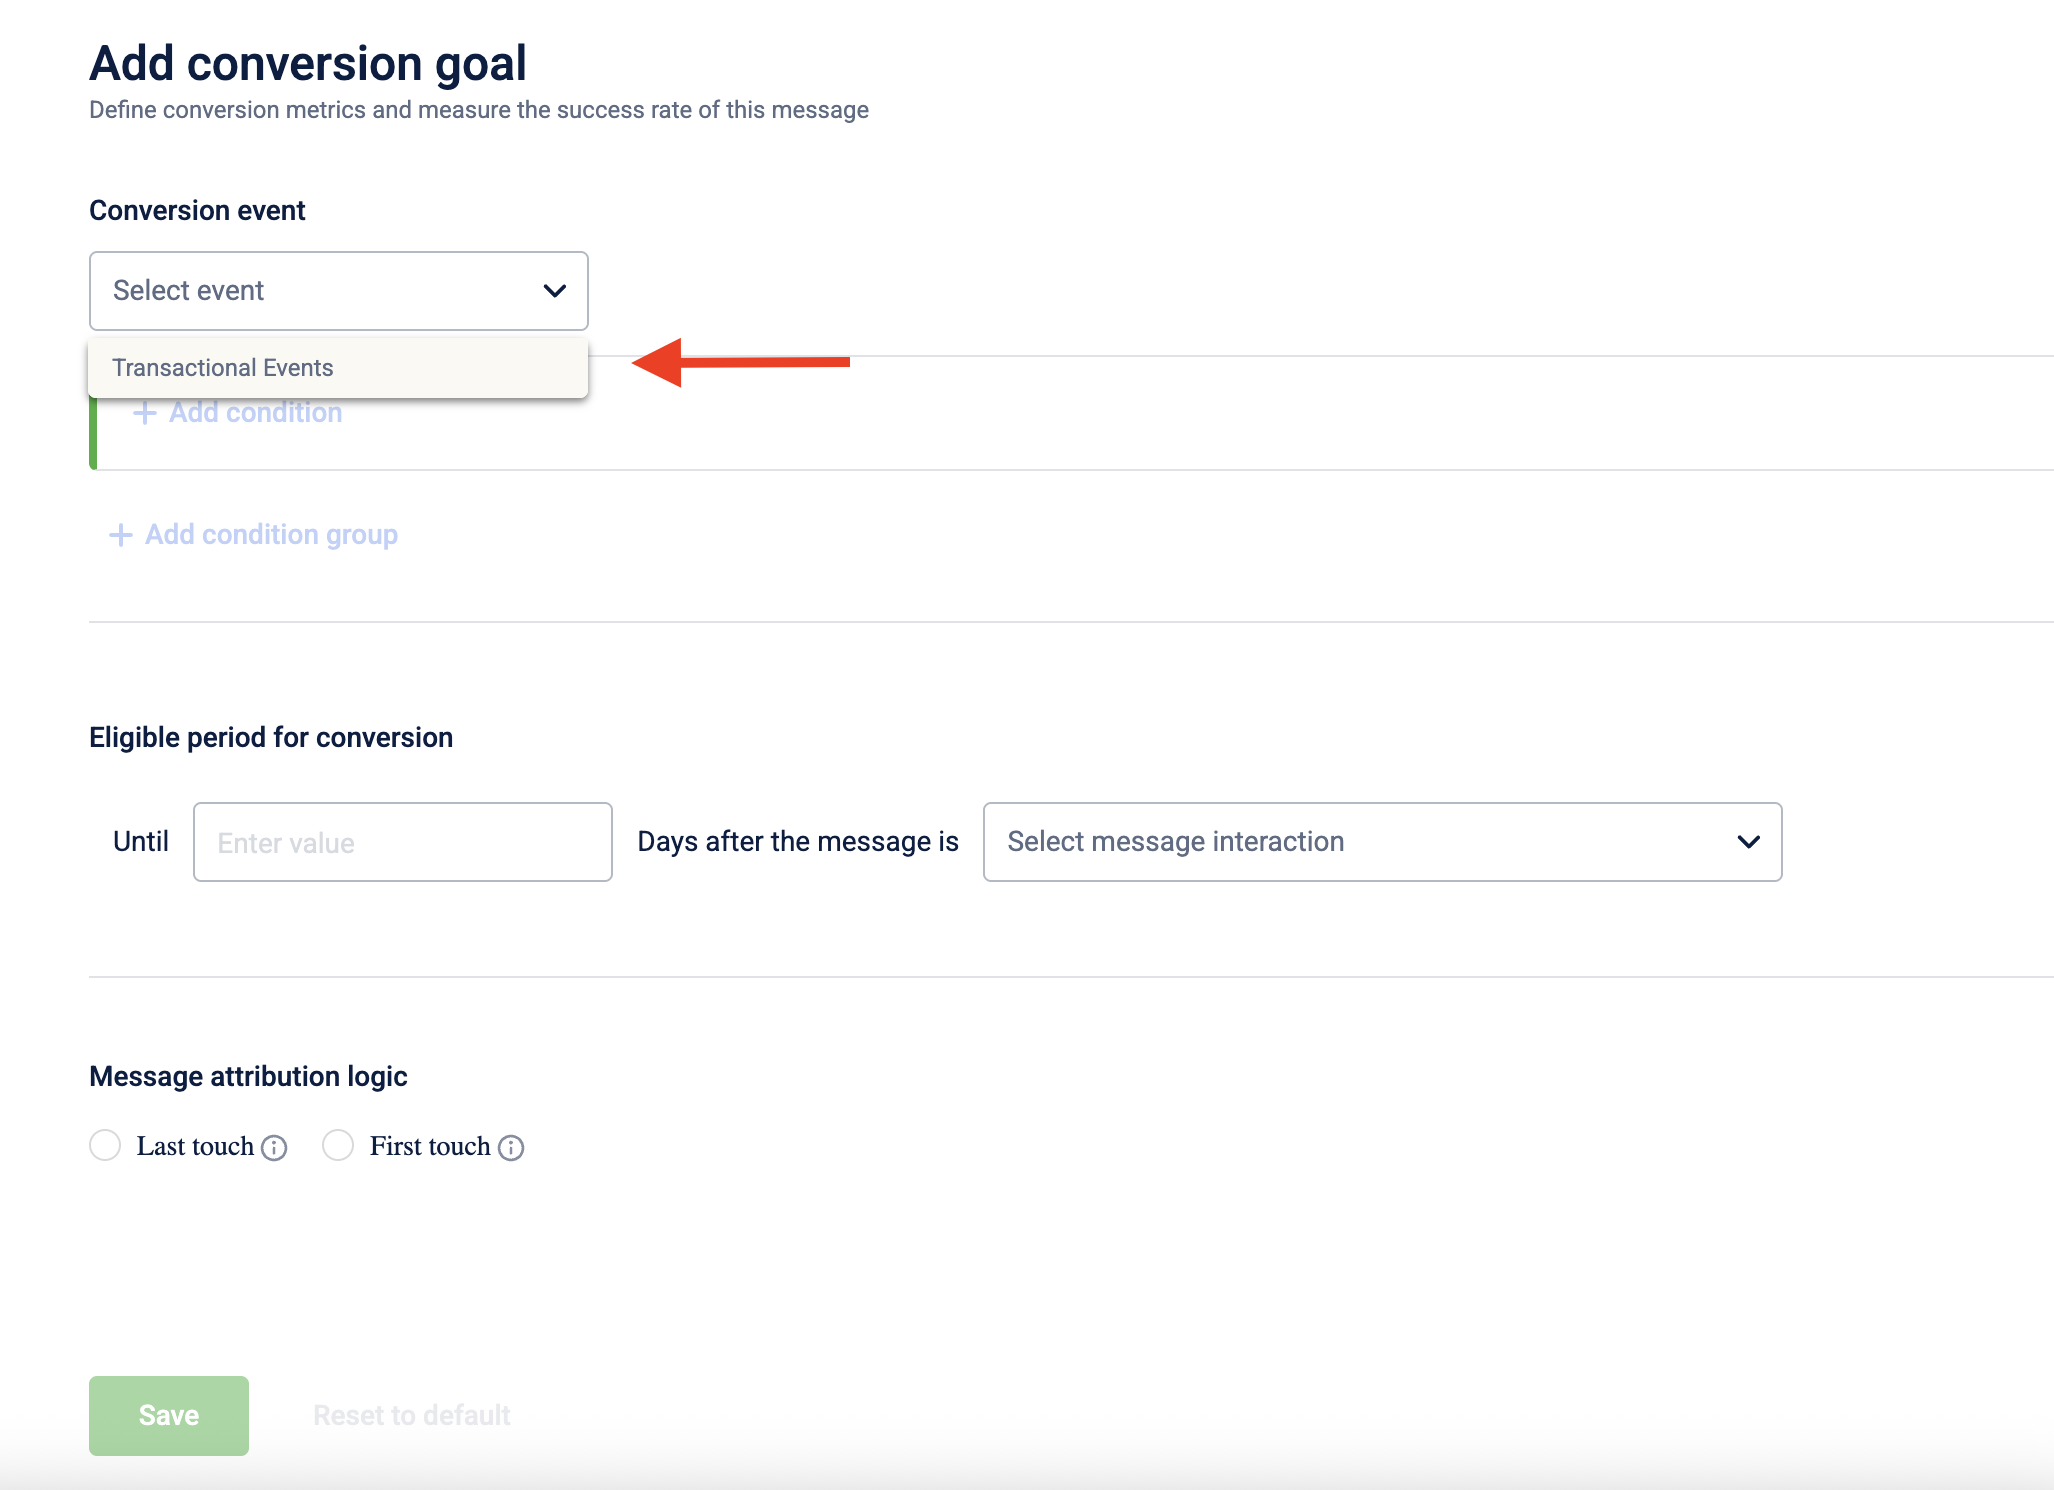
- Click +Add conditions and fill in the required details based on what you want to track. You’ll see relevant fields based on the event you select in the condition section. You can specify whether to include or exclude the condition and add an operator and value.
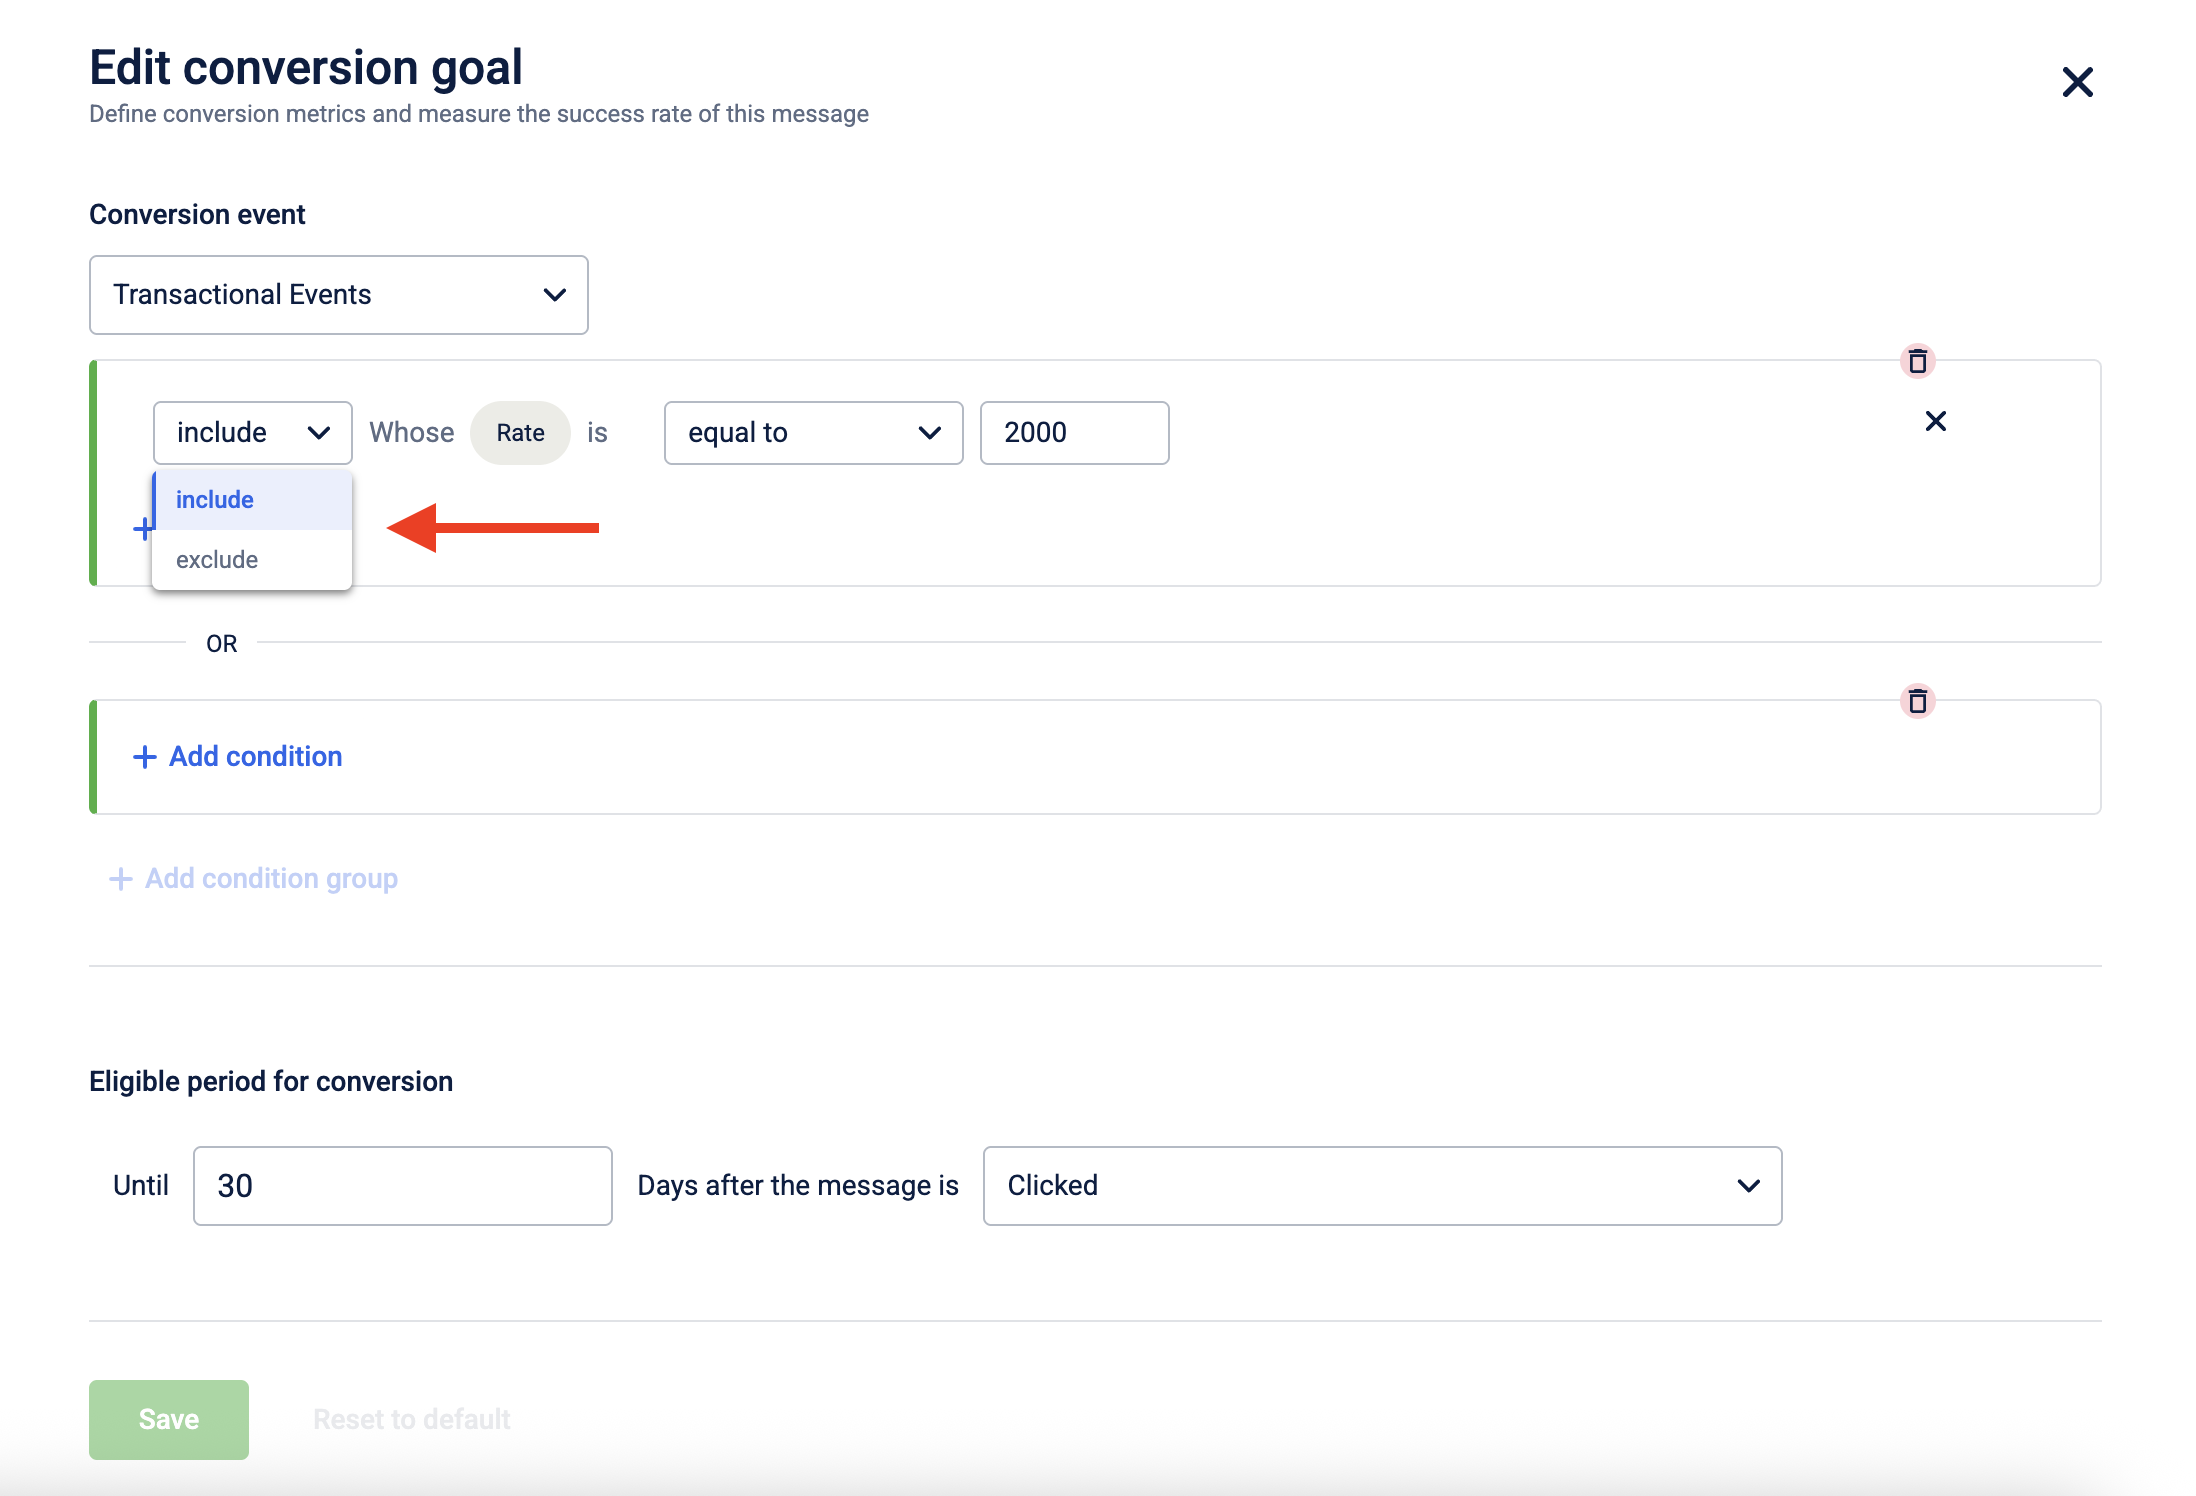
NoteThe operators
IN RANGE,CONTAINS,STARTS WITH, andENDS WITHare currently not supported.
- You can click +Add condition to add further conditions and combine them with the AND operator. Click Add group to add conditions and combine them with the OR operator. Note: The "Add Condition" button may be disabled if all input fields are not completed.
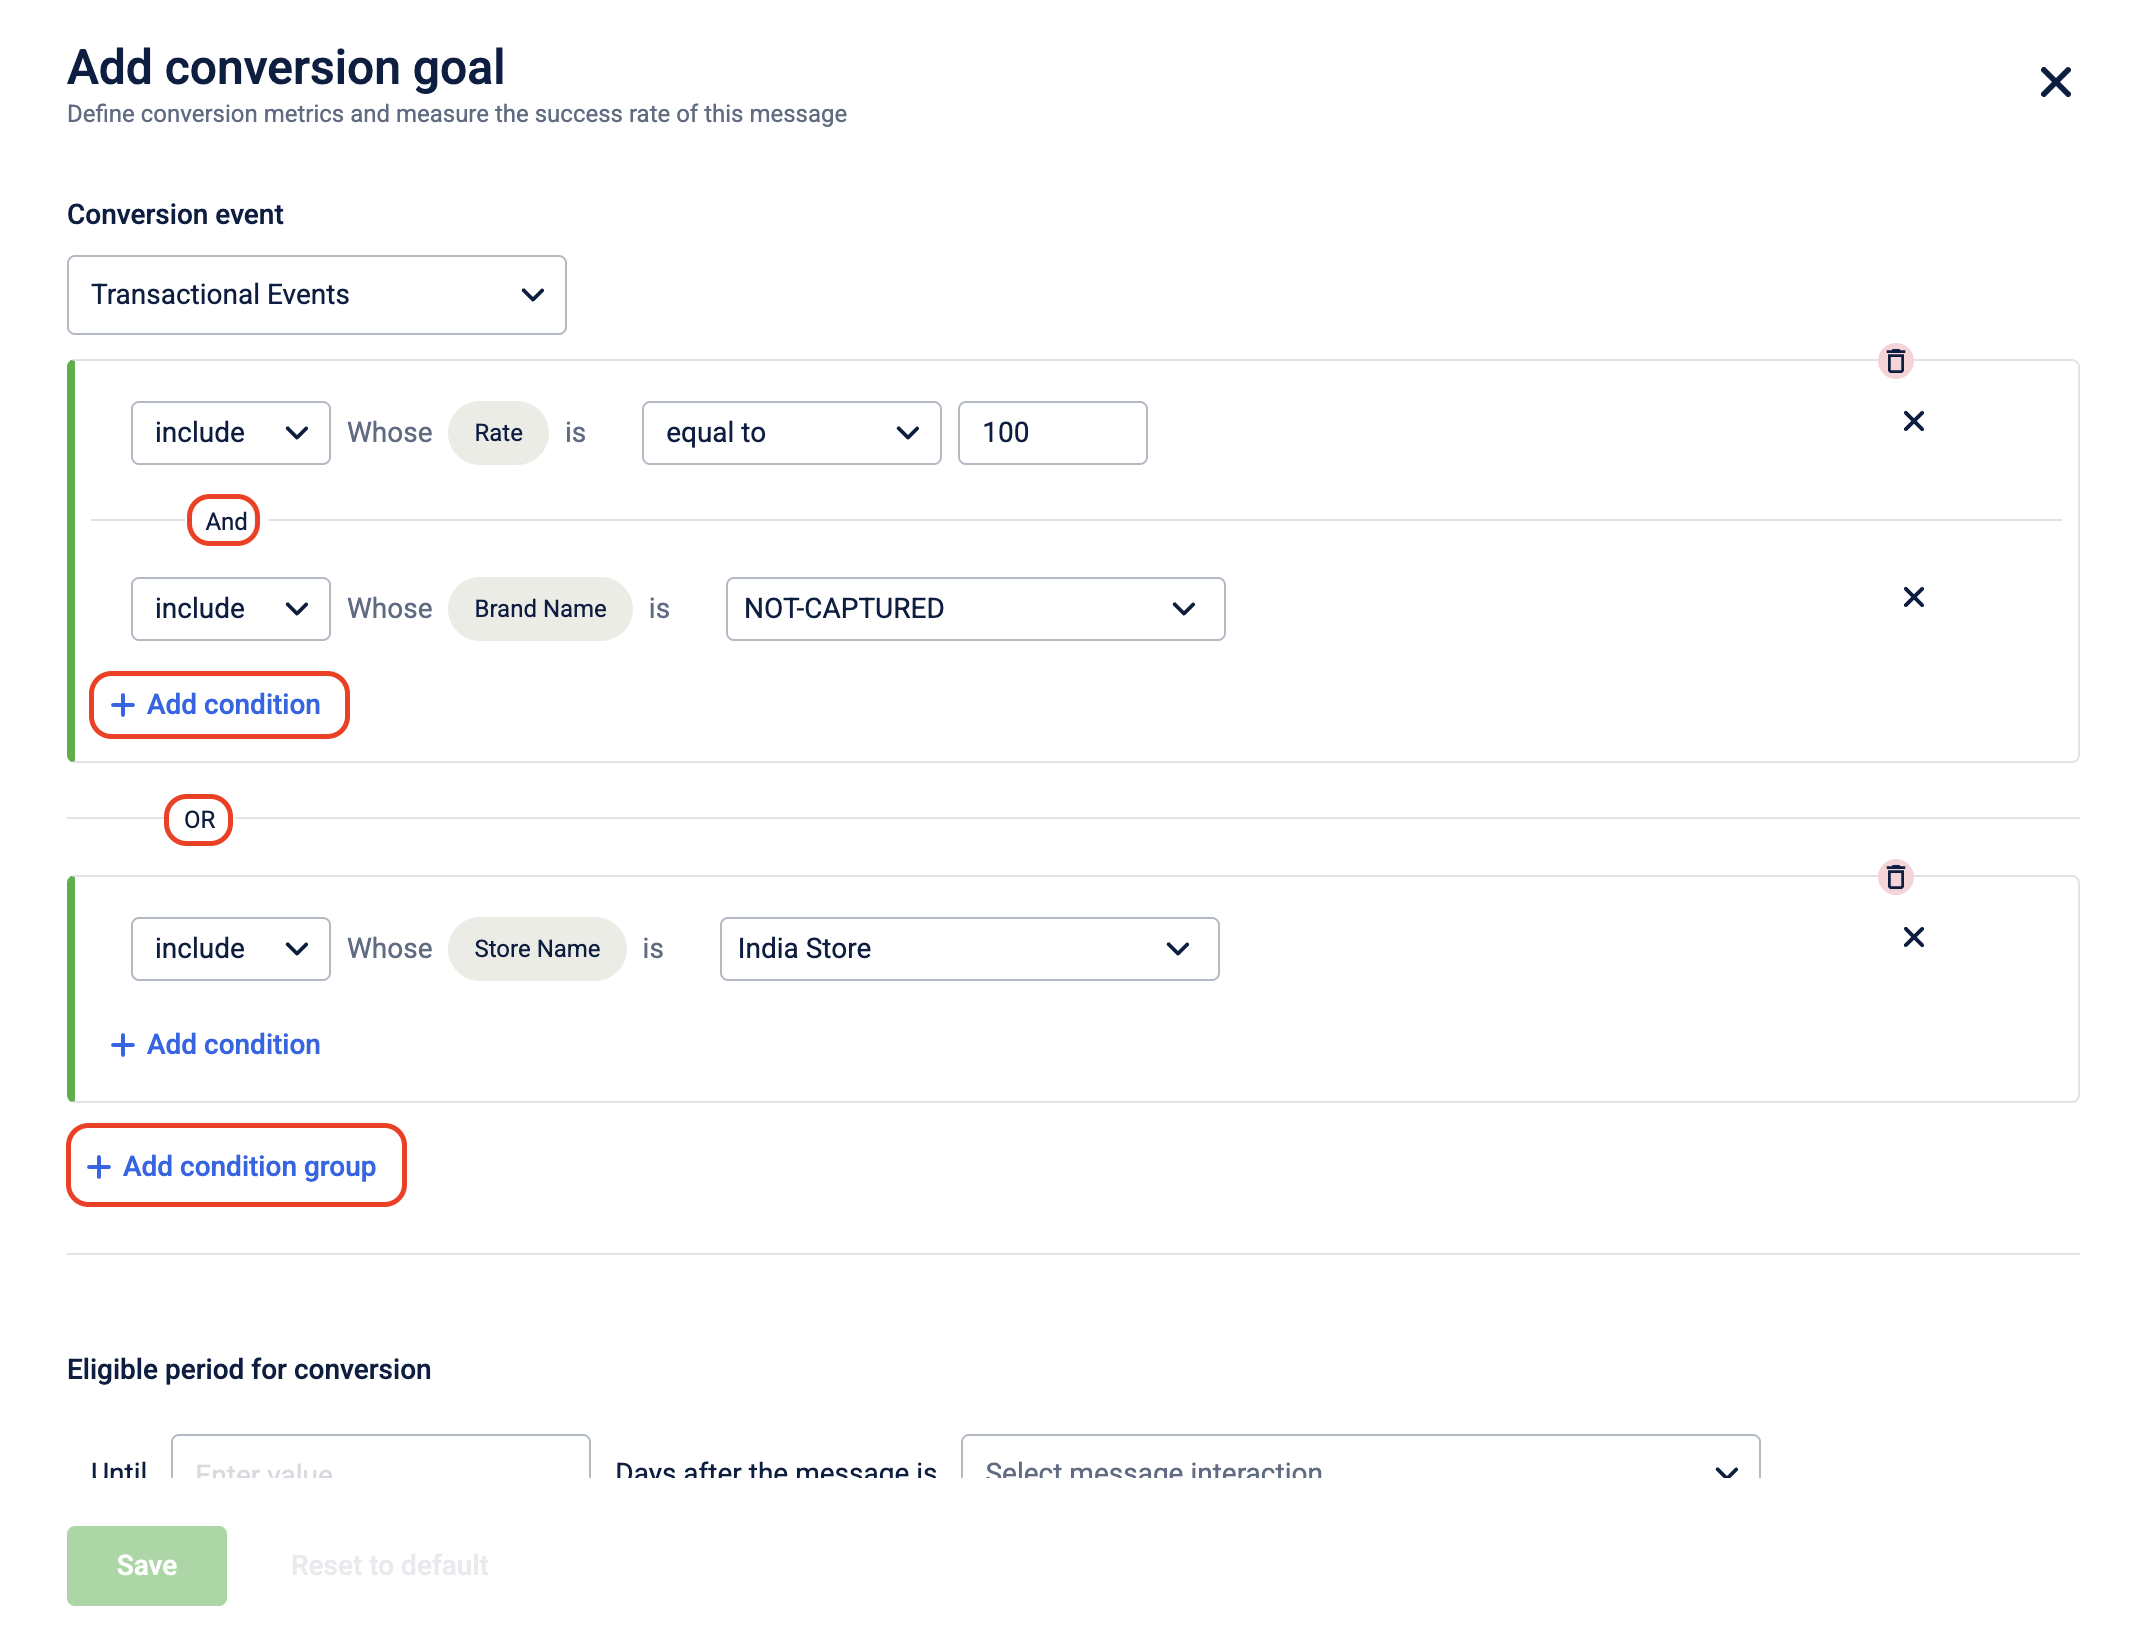
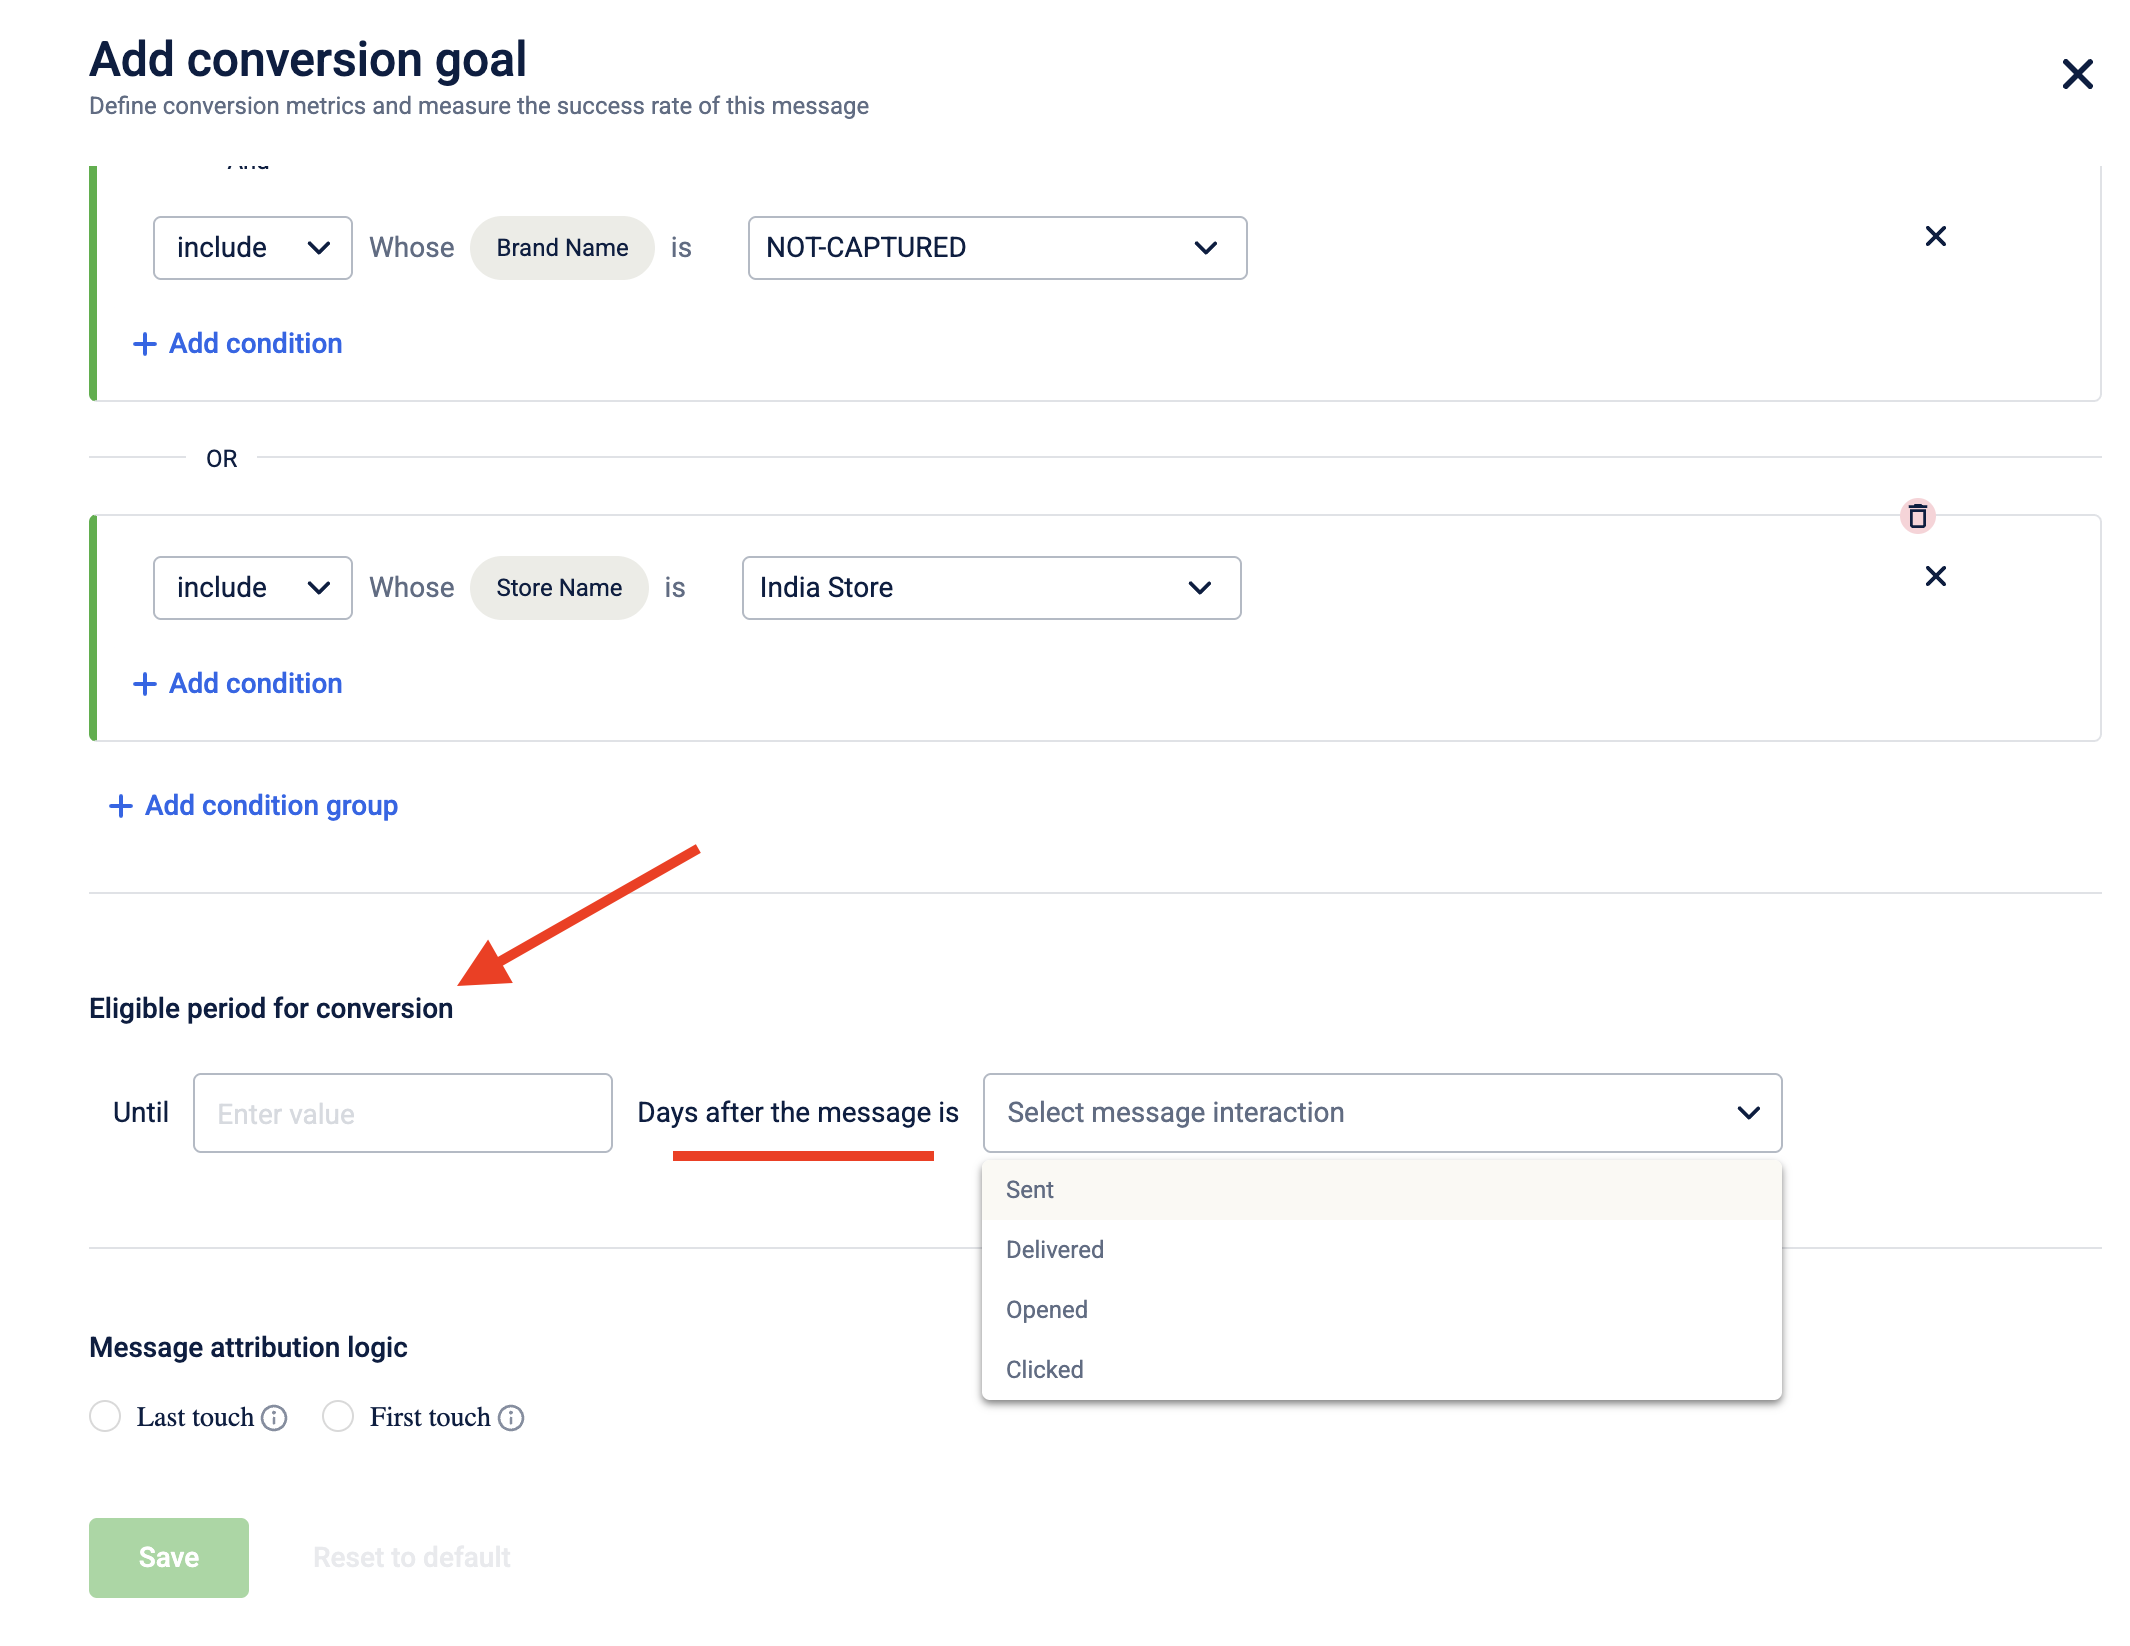
- Under Eligible period for conversion, set the tracking period to track conversions and choose whether tracking should start after the message is sent, delivered, clicked, or opened.
The table below lists available options-
| Status | Description |
|---|---|
| Sent | Tracking for conversion begins after the message is sent. |
| Delivered | Tracking for conversion begins once it is delivered to the customer. |
| Clicked | Tracking starts from the moment the customer clicks on a link or call-to-action within the message. |
| Opened | Tracking for conversion begins when the message is opened by the customer. |
-
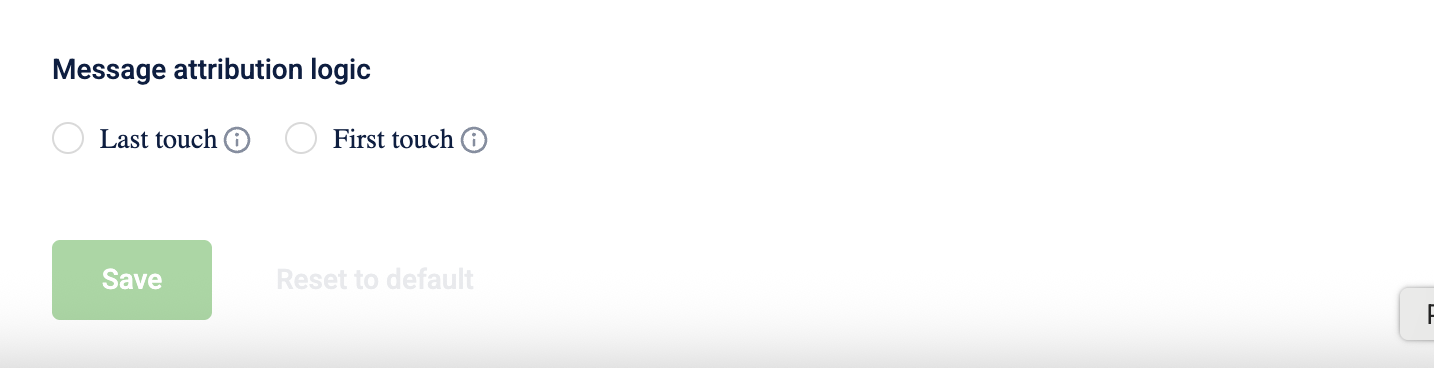
Choose the Message attribution logic to decide which message in the campaign should be counted for the customer’s engagement.
- Last touch: The user's last engagement with the campaign will be counted as the conversion.
- First touch: The user's first engagement with the campaign will be counted as the conversion.
-
Click Save to save the conversion goal configuration.
-
Click Save campaign to save all your campaign changes.
Editing a Conversion Goal
Editing a Conversion Goal (Org-Level)
- Navigate to Engage+ and click on the settings icon.
- Click on Campaign Attribution. A default goal is already set, it will be displayed automatically.
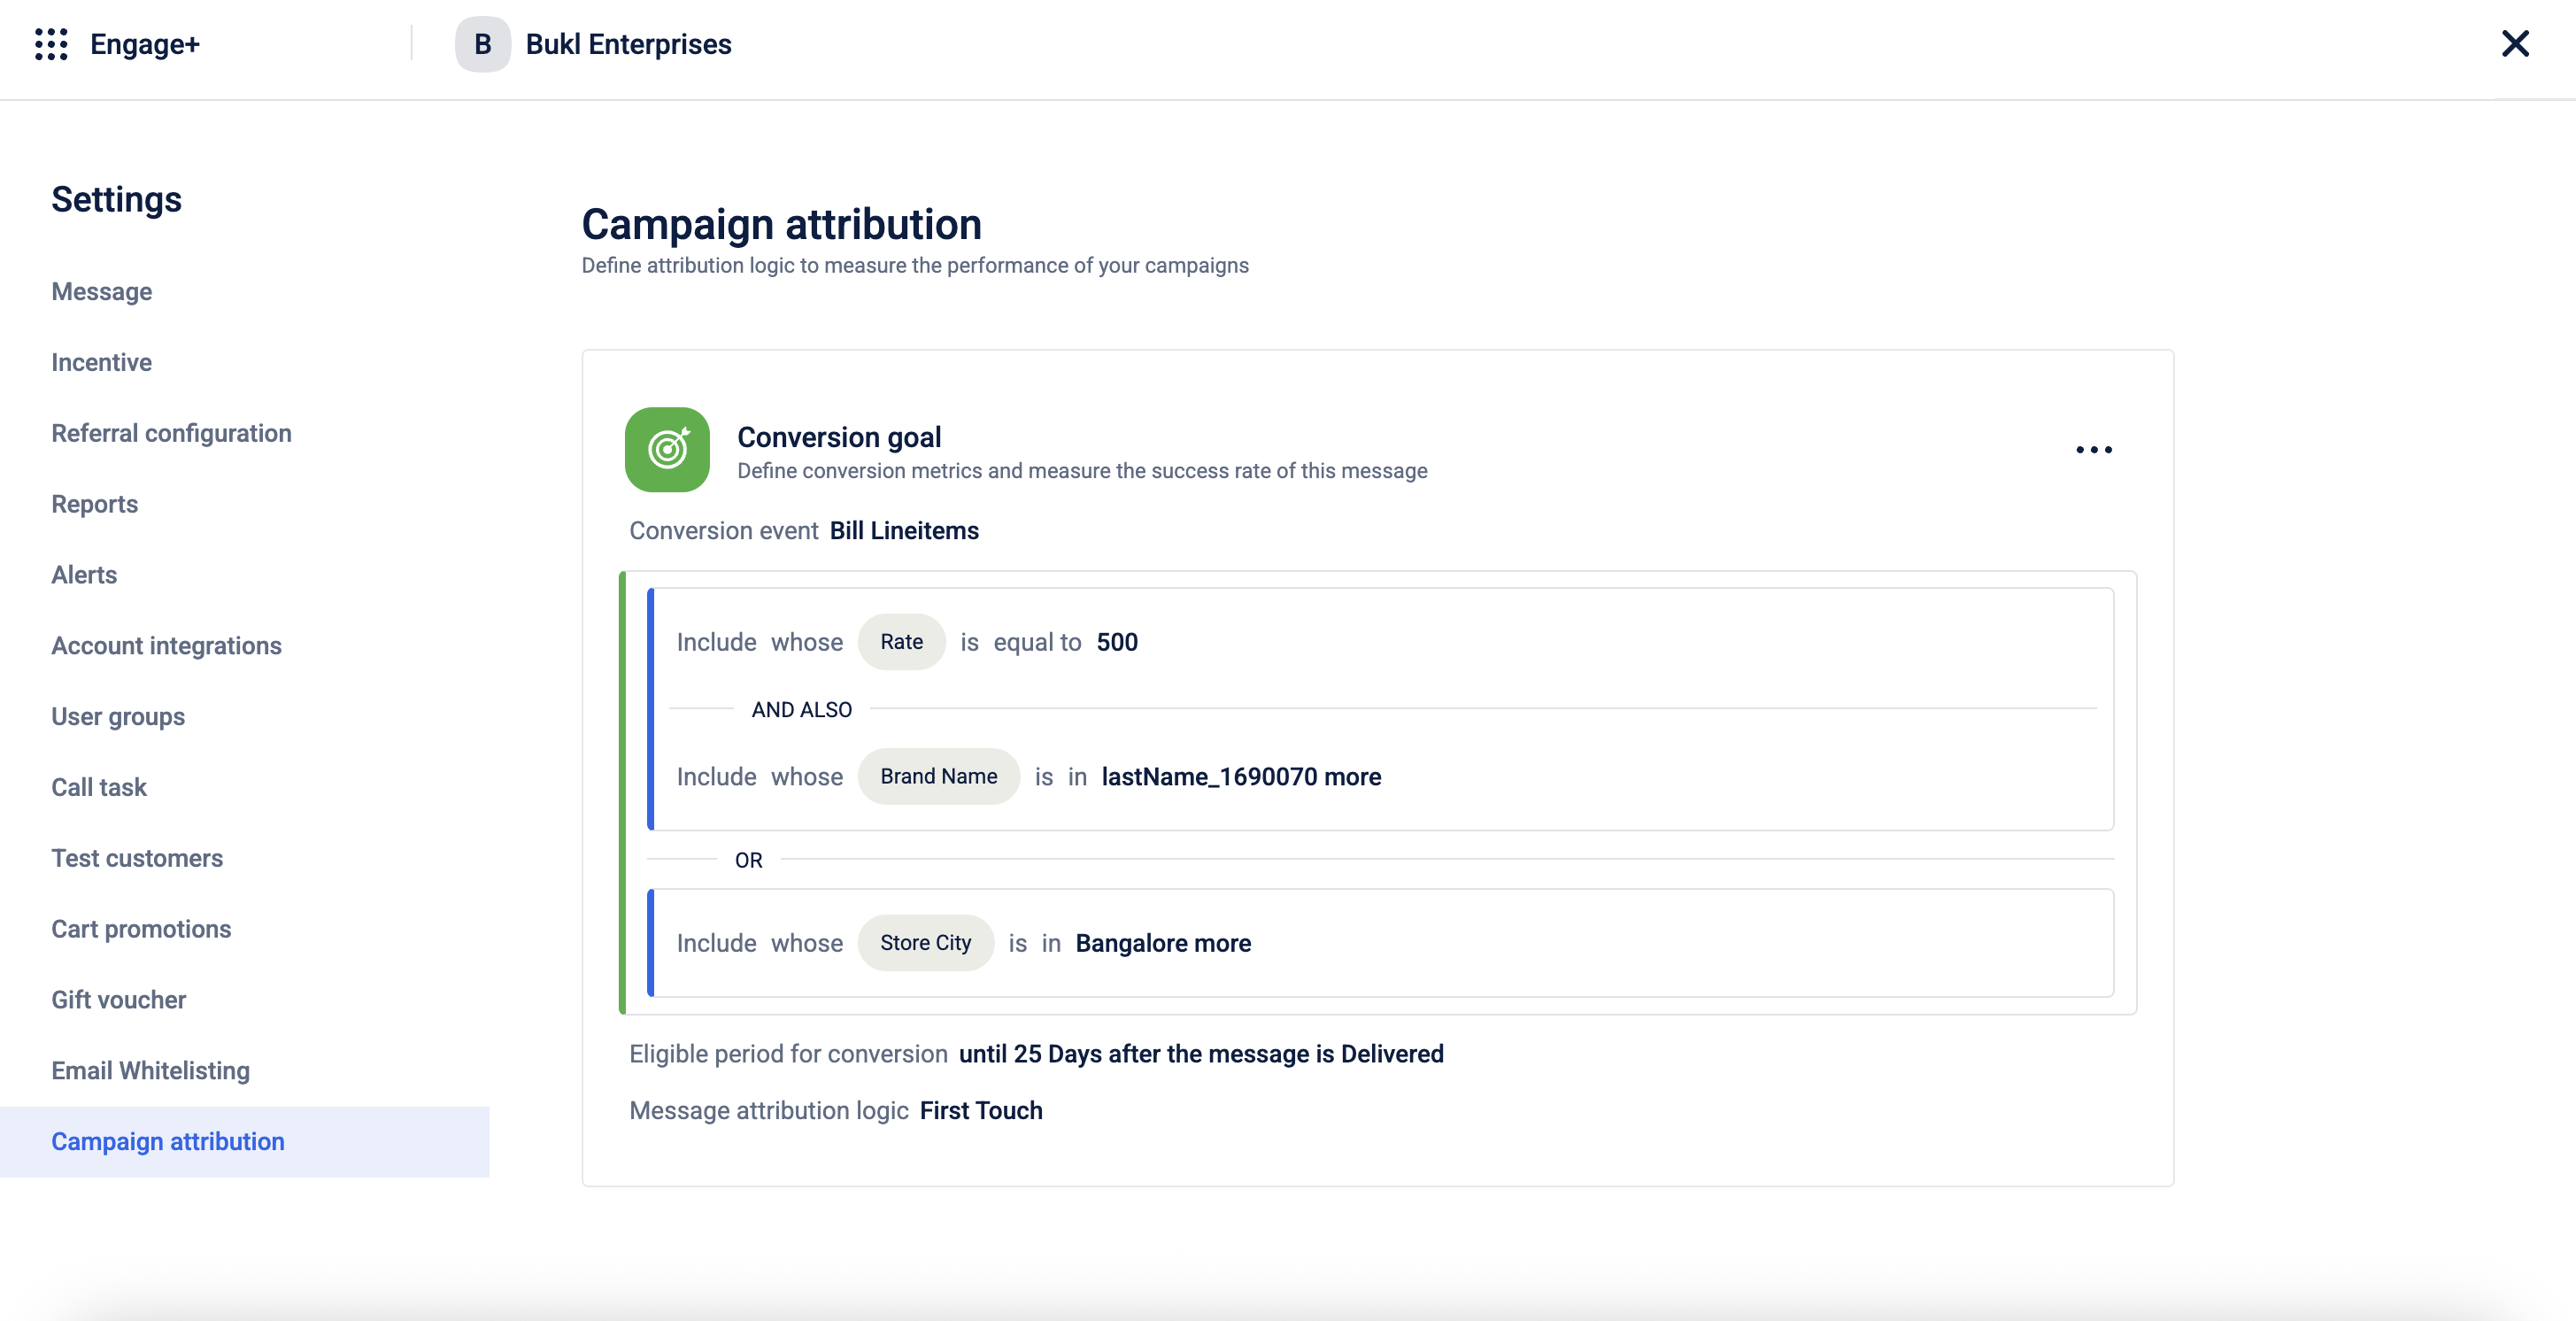
- Click the three-dot menu in the top-right corner, and select Edit Goal.
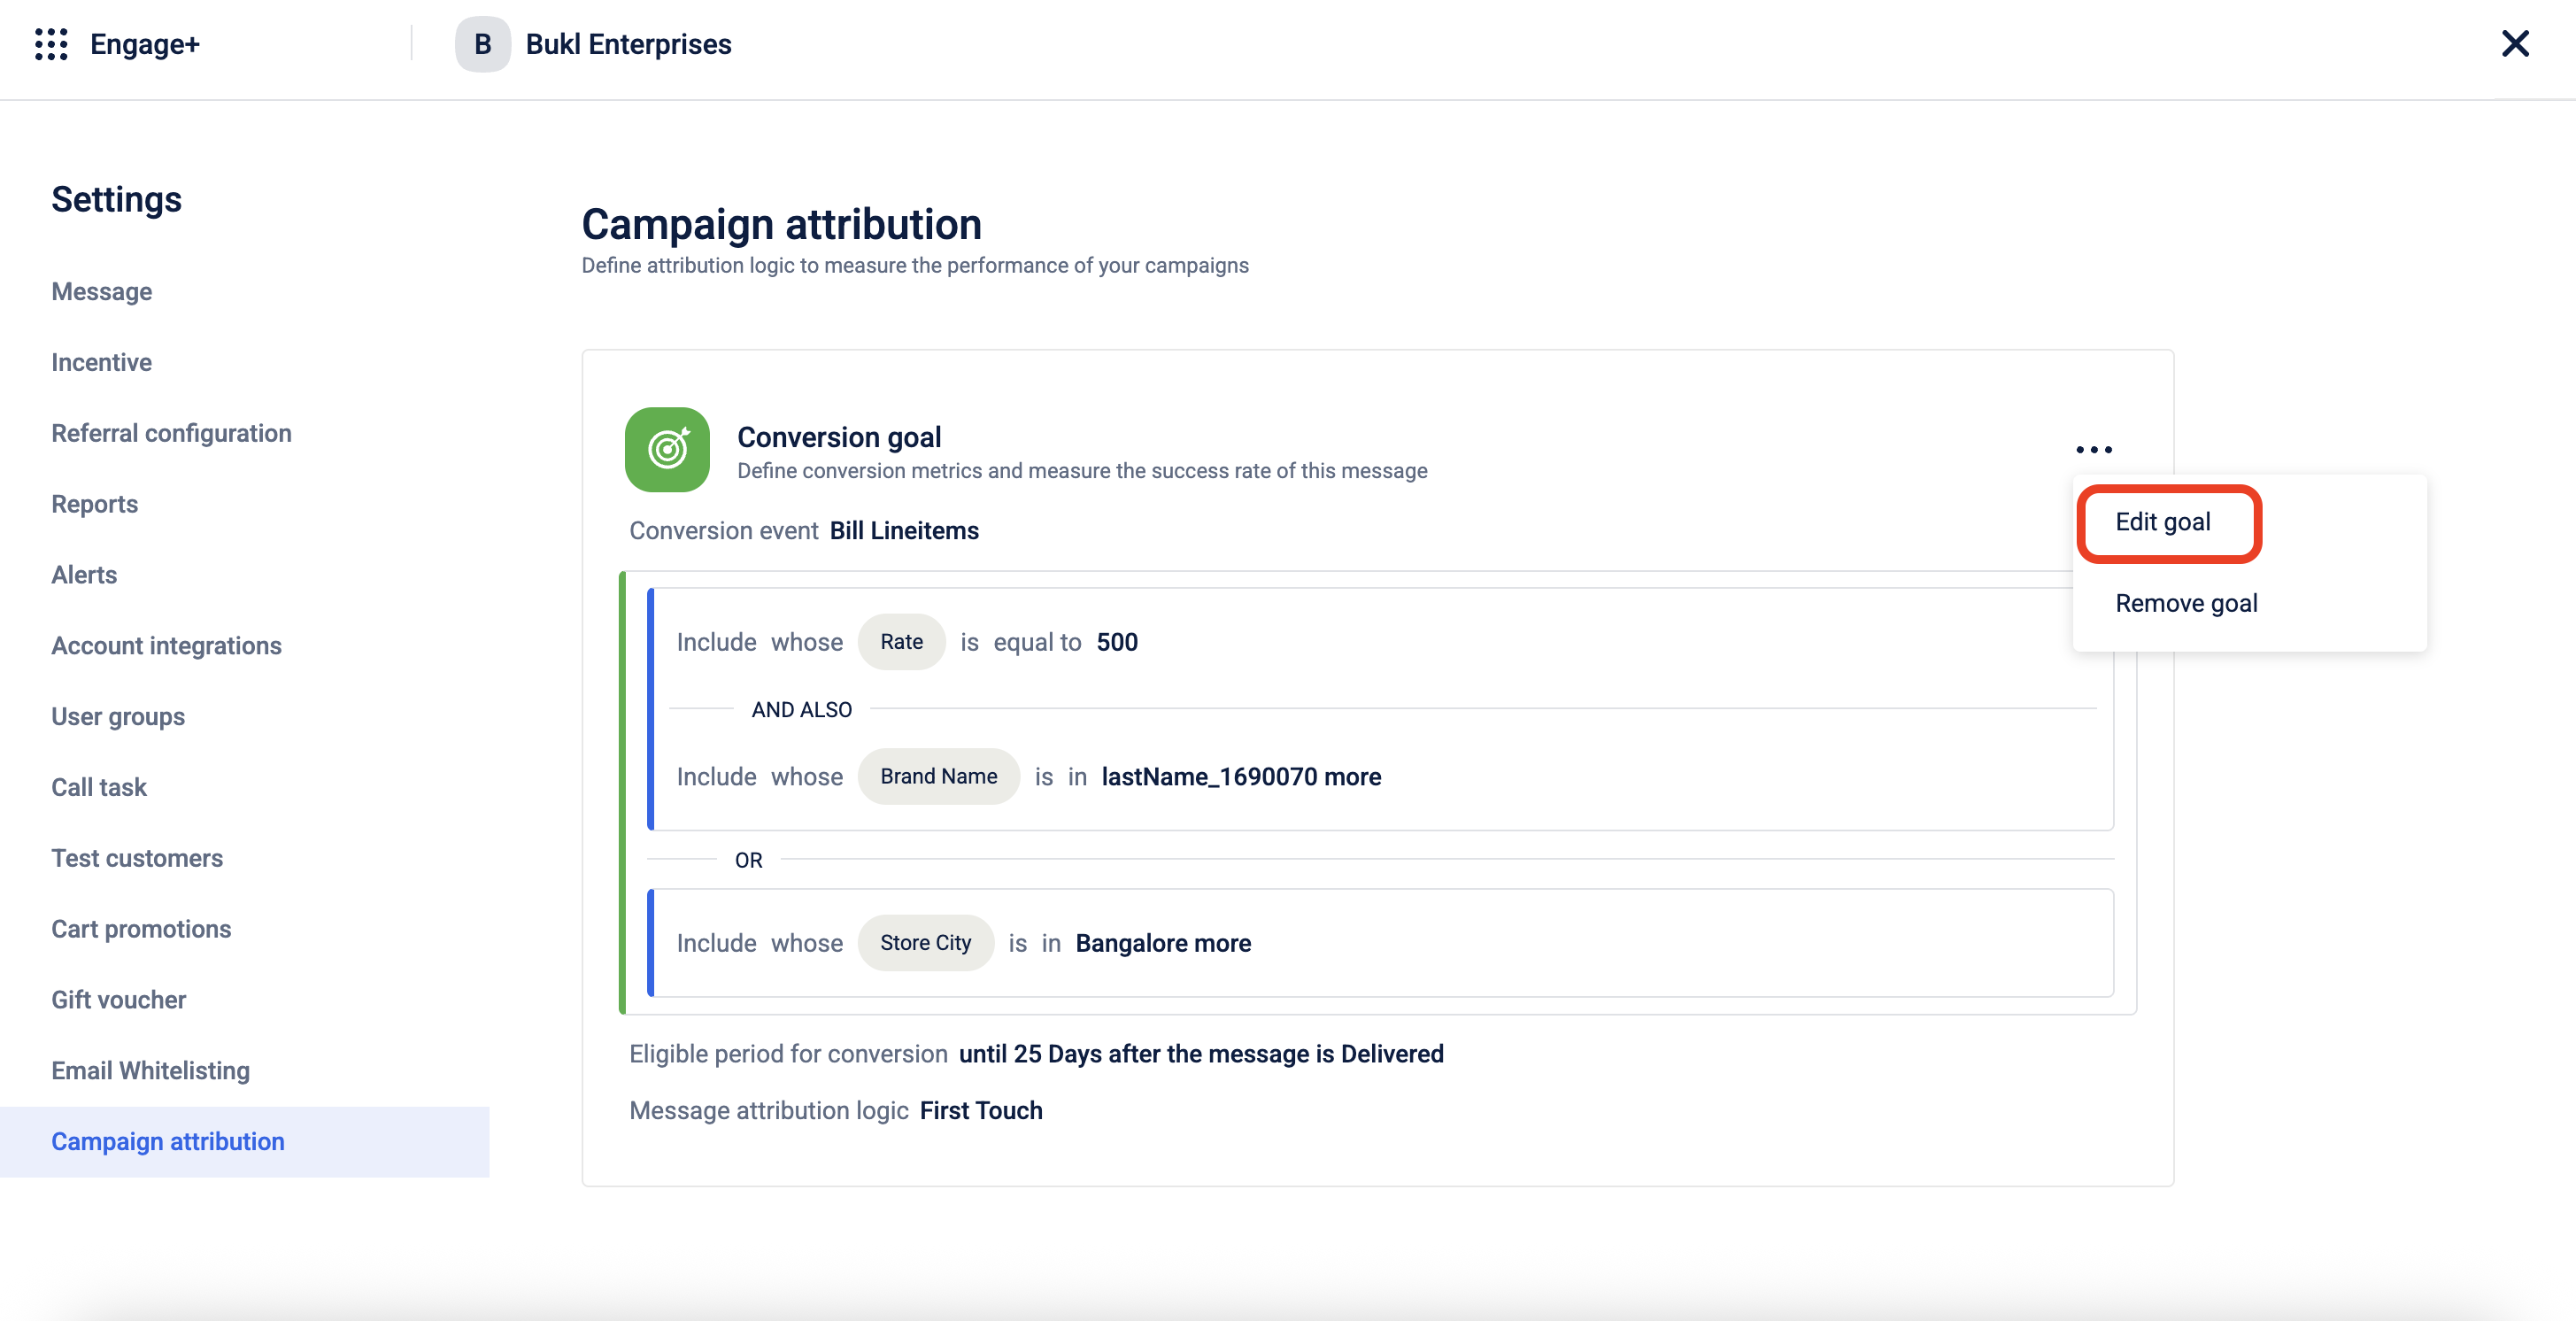
- After making the changes, click Save to update the conversion goal. Saving Changes will replace the existing goal with the new one.
NoteYou can edit the org-level conversion goal at any time. All campaigns created after the change will reflect the updated goal.
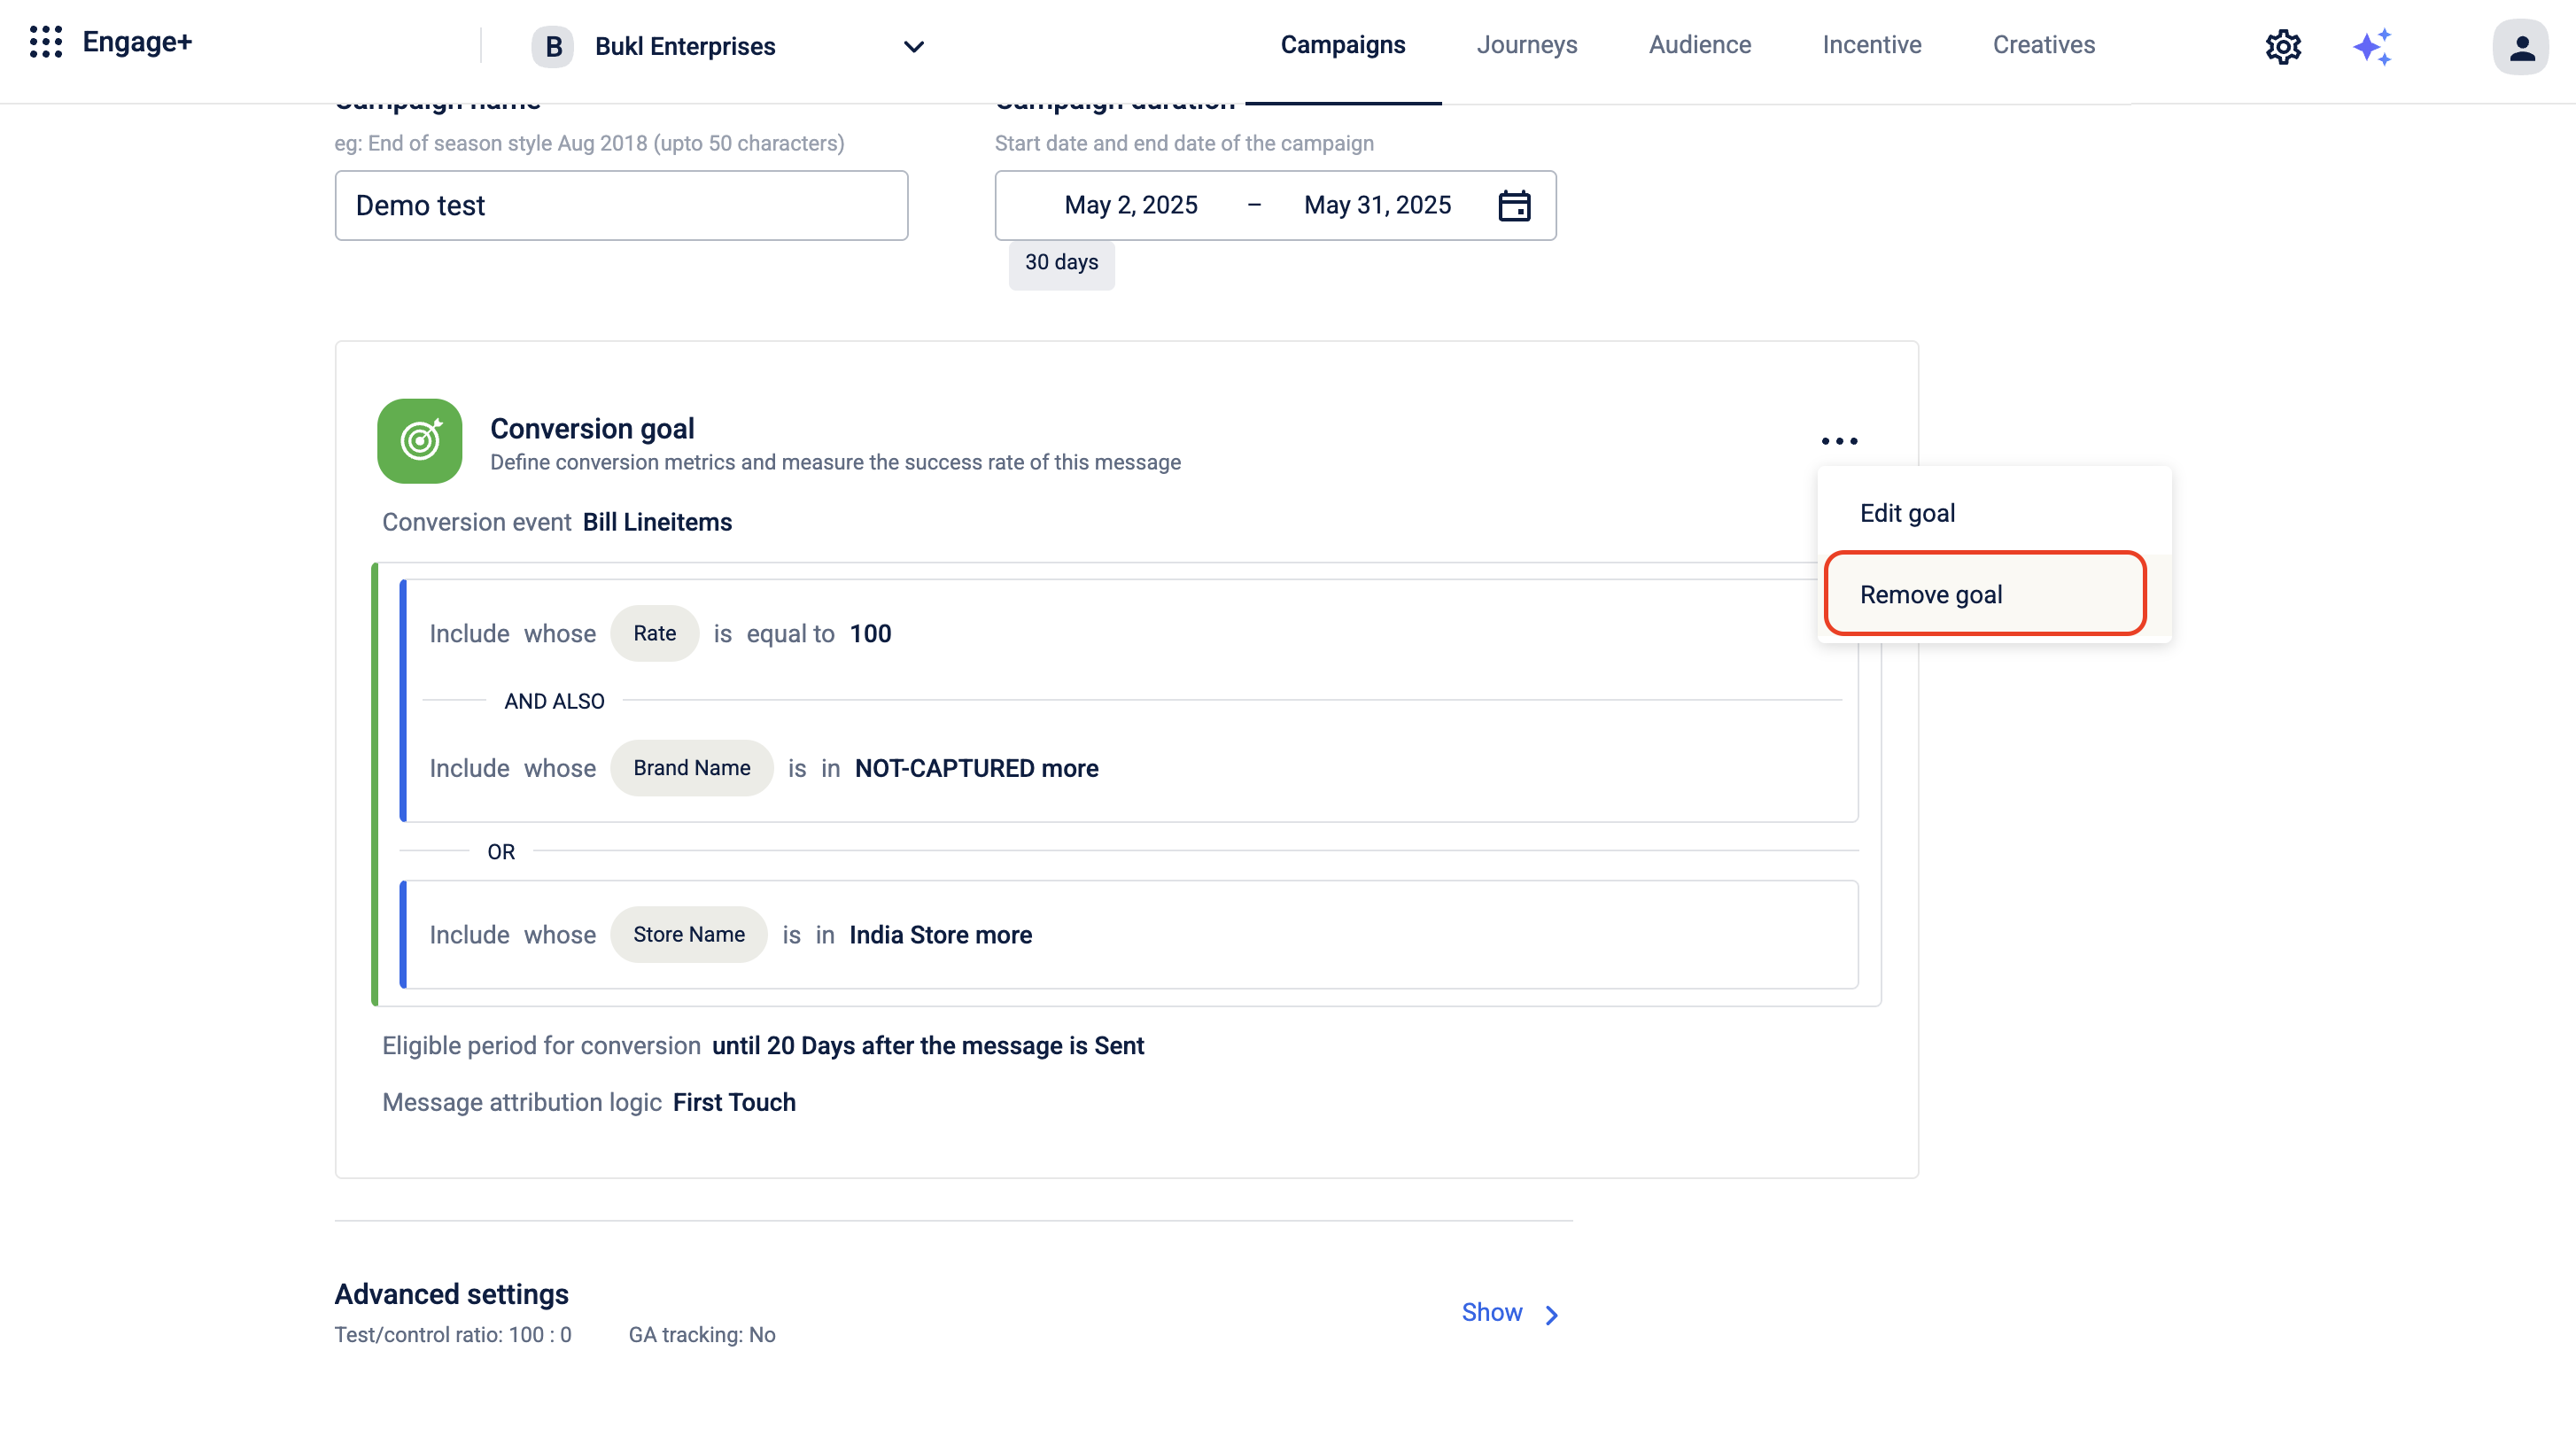
Editing a Conversion Goal (Campaign Level)
- Log on to InTouch of your cluster and navigate to Engage+ from the menu.
- Select the campaign you want to edit.

- Navigate to the Conversion Goal block, click the three-dot menu in the top-right corner, and select Edit Goal.

- After making the changes, click Save to update the conversion goal.
- Click Save campaign to save all your changes.
NoteYou can edit a campaign-level conversion goal anytime before the first message is sent or approved. Once the first message is approved, editing is no longer allowed.
Removing a Conversion Goal
Removing a Conversion Goal (Org-Level)
- Navigate to Engage+ and click on the settings icon.
- Click on Campaign Attribution. A default goal is already set, it will be displayed automatically.
- Click the three-dot menu in the top-right corner, and select Remove Goal.
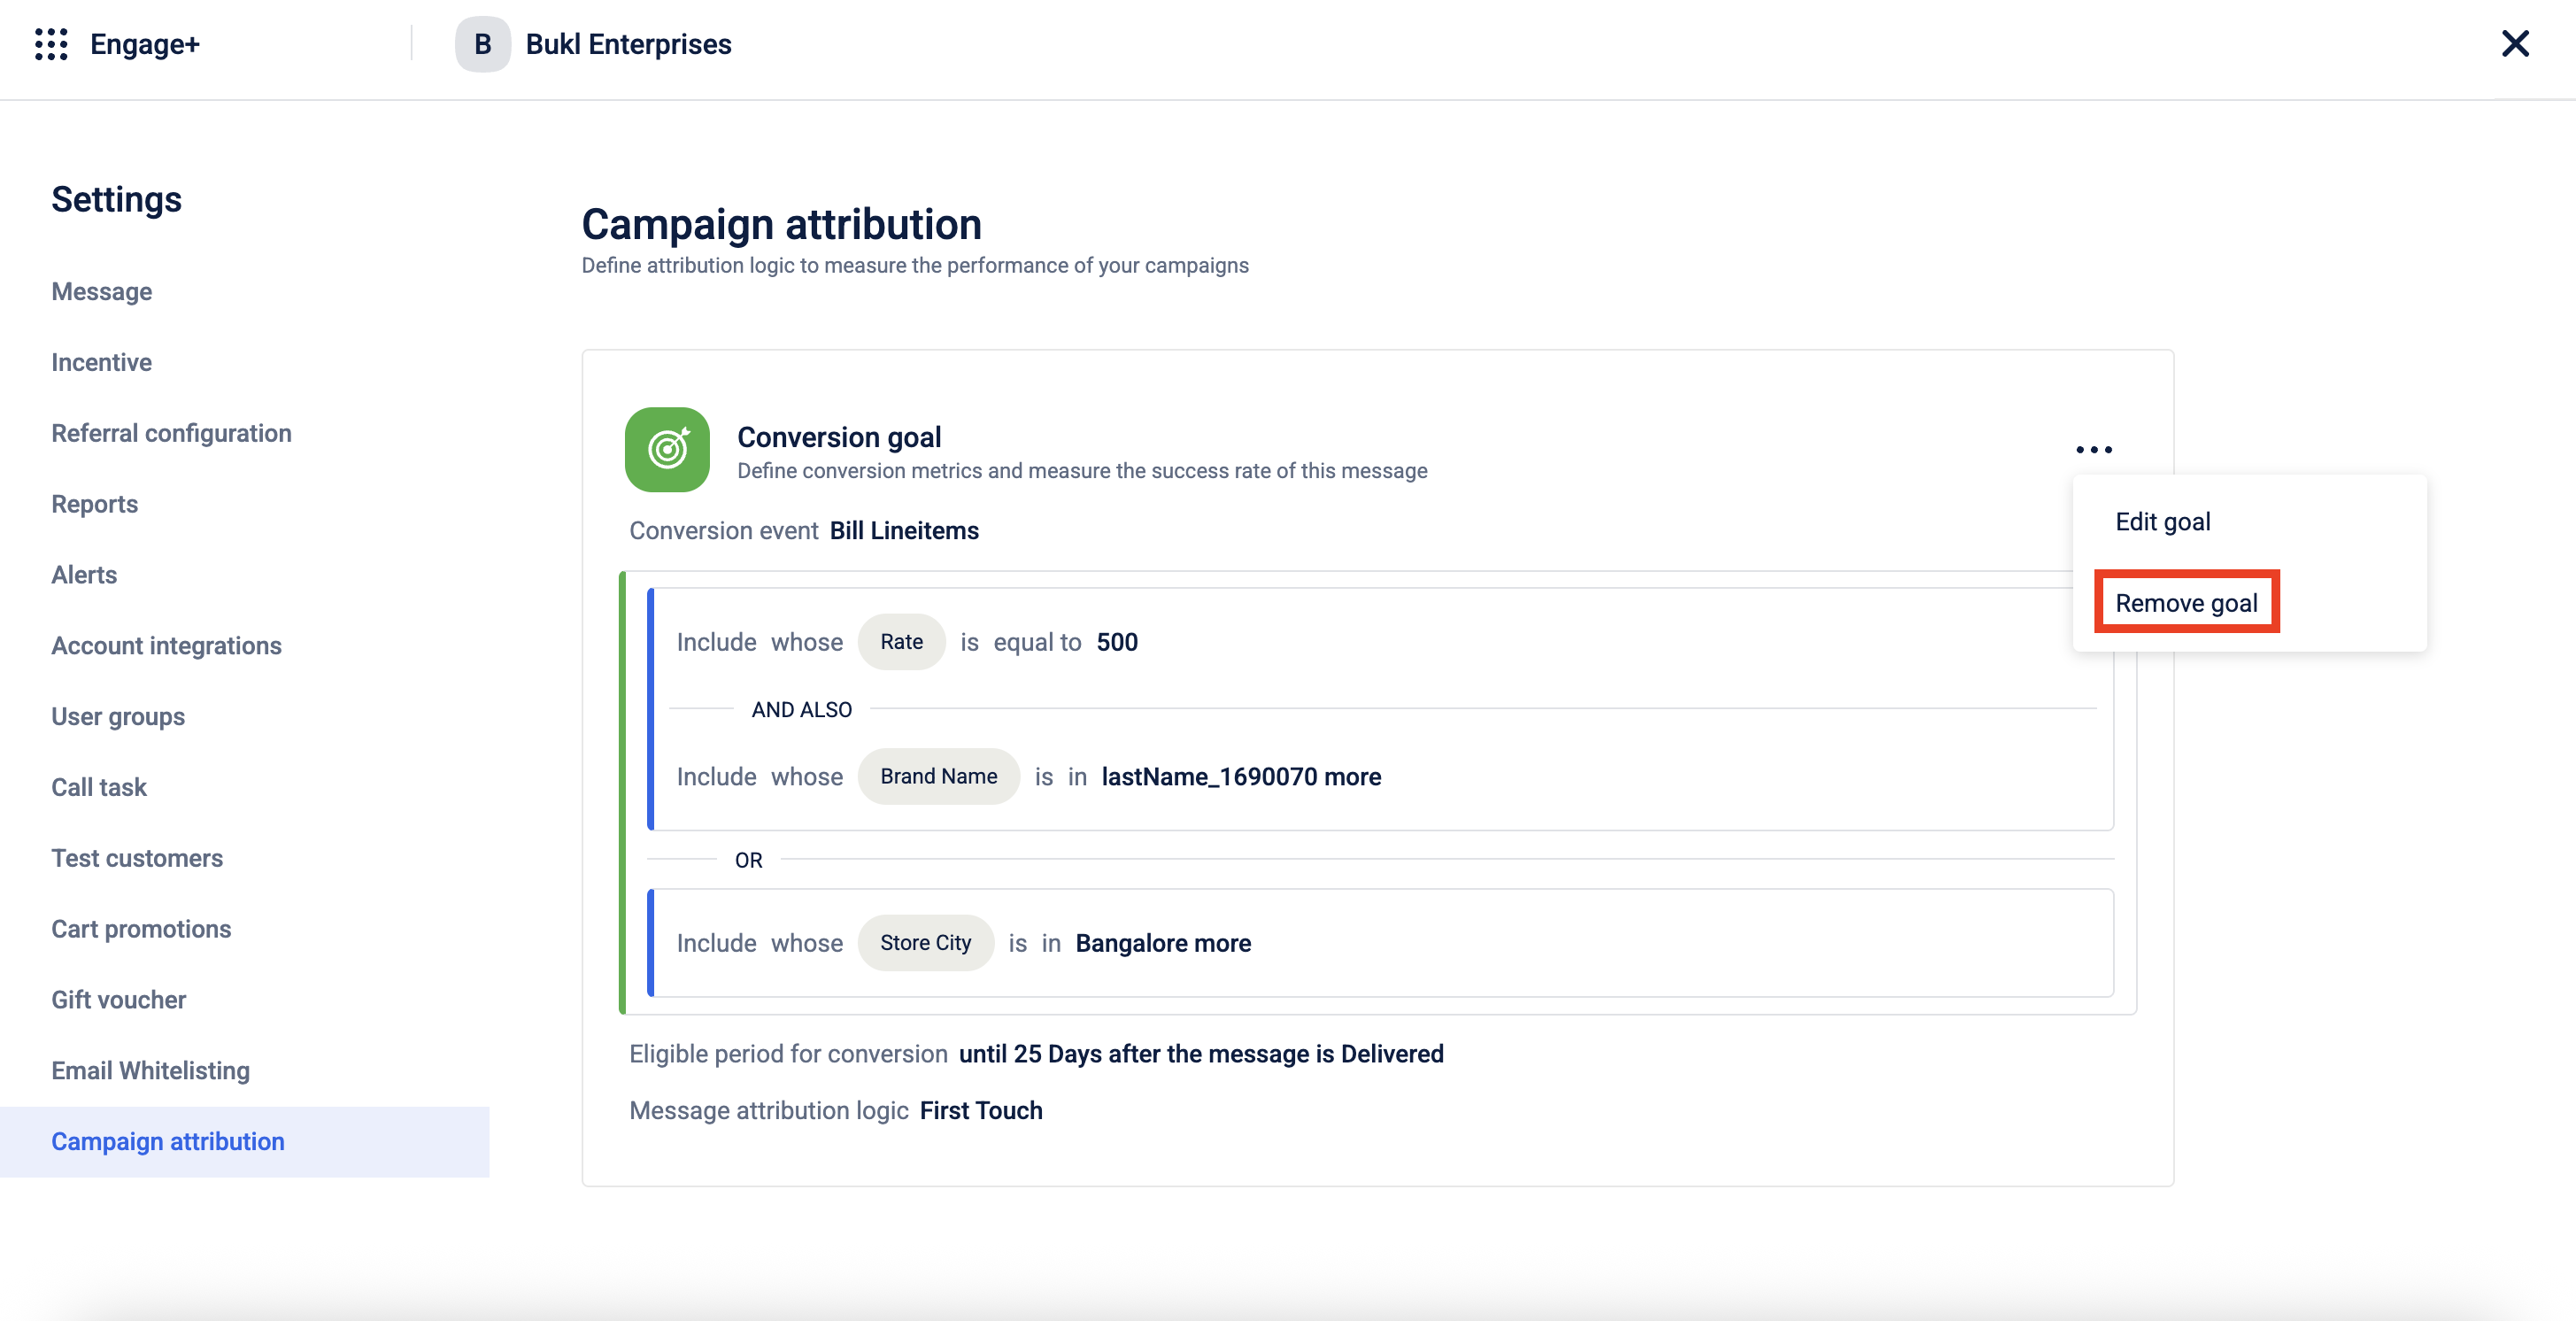
Confirming will remove the goal and take you back to the screen where no goal is set, allowing you to add a new one.
NoteOnce the Org Level conversion goal is removed, any campaigns created after the removal of the Org Level conversion goal will not have a conversion goal set by default.
Removing a Conversion Goal (Campaign Level)
- Navigate to Engage+ from the menu.
- Select the campaign you want to edit.
- Navigate to the Conversion Goal block, click the three-dot menu in the top-right corner, and select Remove Goal.
- The conversion goal has been successfully removed from the campaign. Click Save Campaign to save the changes.
NoteOnce the first message is sent or approved, the option to remove the conversion goal will no longer be available.
Tracking and Reporting
The Conversion Goal feature helps track and report campaign performance.
Tracking and Reporting (Org Level)
- Navigate to Engage+ from the menu.
- On the campaign listing page, you can see a summary or a overall performance of how all campaigns are performing. It Shows the overall performance of campaigns for the last 7 days, 1 month, 3 months, and 6 months.
For detailed information refer to the documentation view campaign reports.
| Metrics | Description |
|---|---|
| Contacted Customer | The number of customers who were reached out to during the campaign. |
| Delivery Rate | The percentage of sent messages that have been delivered (received by the customers) successfully. |
| Hit Rate | The percentage of customers to whom the communication has been sent out and has transacted in the campaign duration. Hit Rate = 100* (Responding Customers) / (Contacted Customers). |
| Responder Sales | Total sales value generated from customers who engaged with the campaign message. |
| Incremental Sales | Additional generated because of the campaign, above normal sales. Incremental Sales = (Test Hit Rate - Control Hit Rate) Test Contacted Test Responders Spend Per Customer. |
| Credits Remaining | The number of campaign credits left in the billing account. A negative value indicates that the credit limit has been exceeded due to campaign activity. |
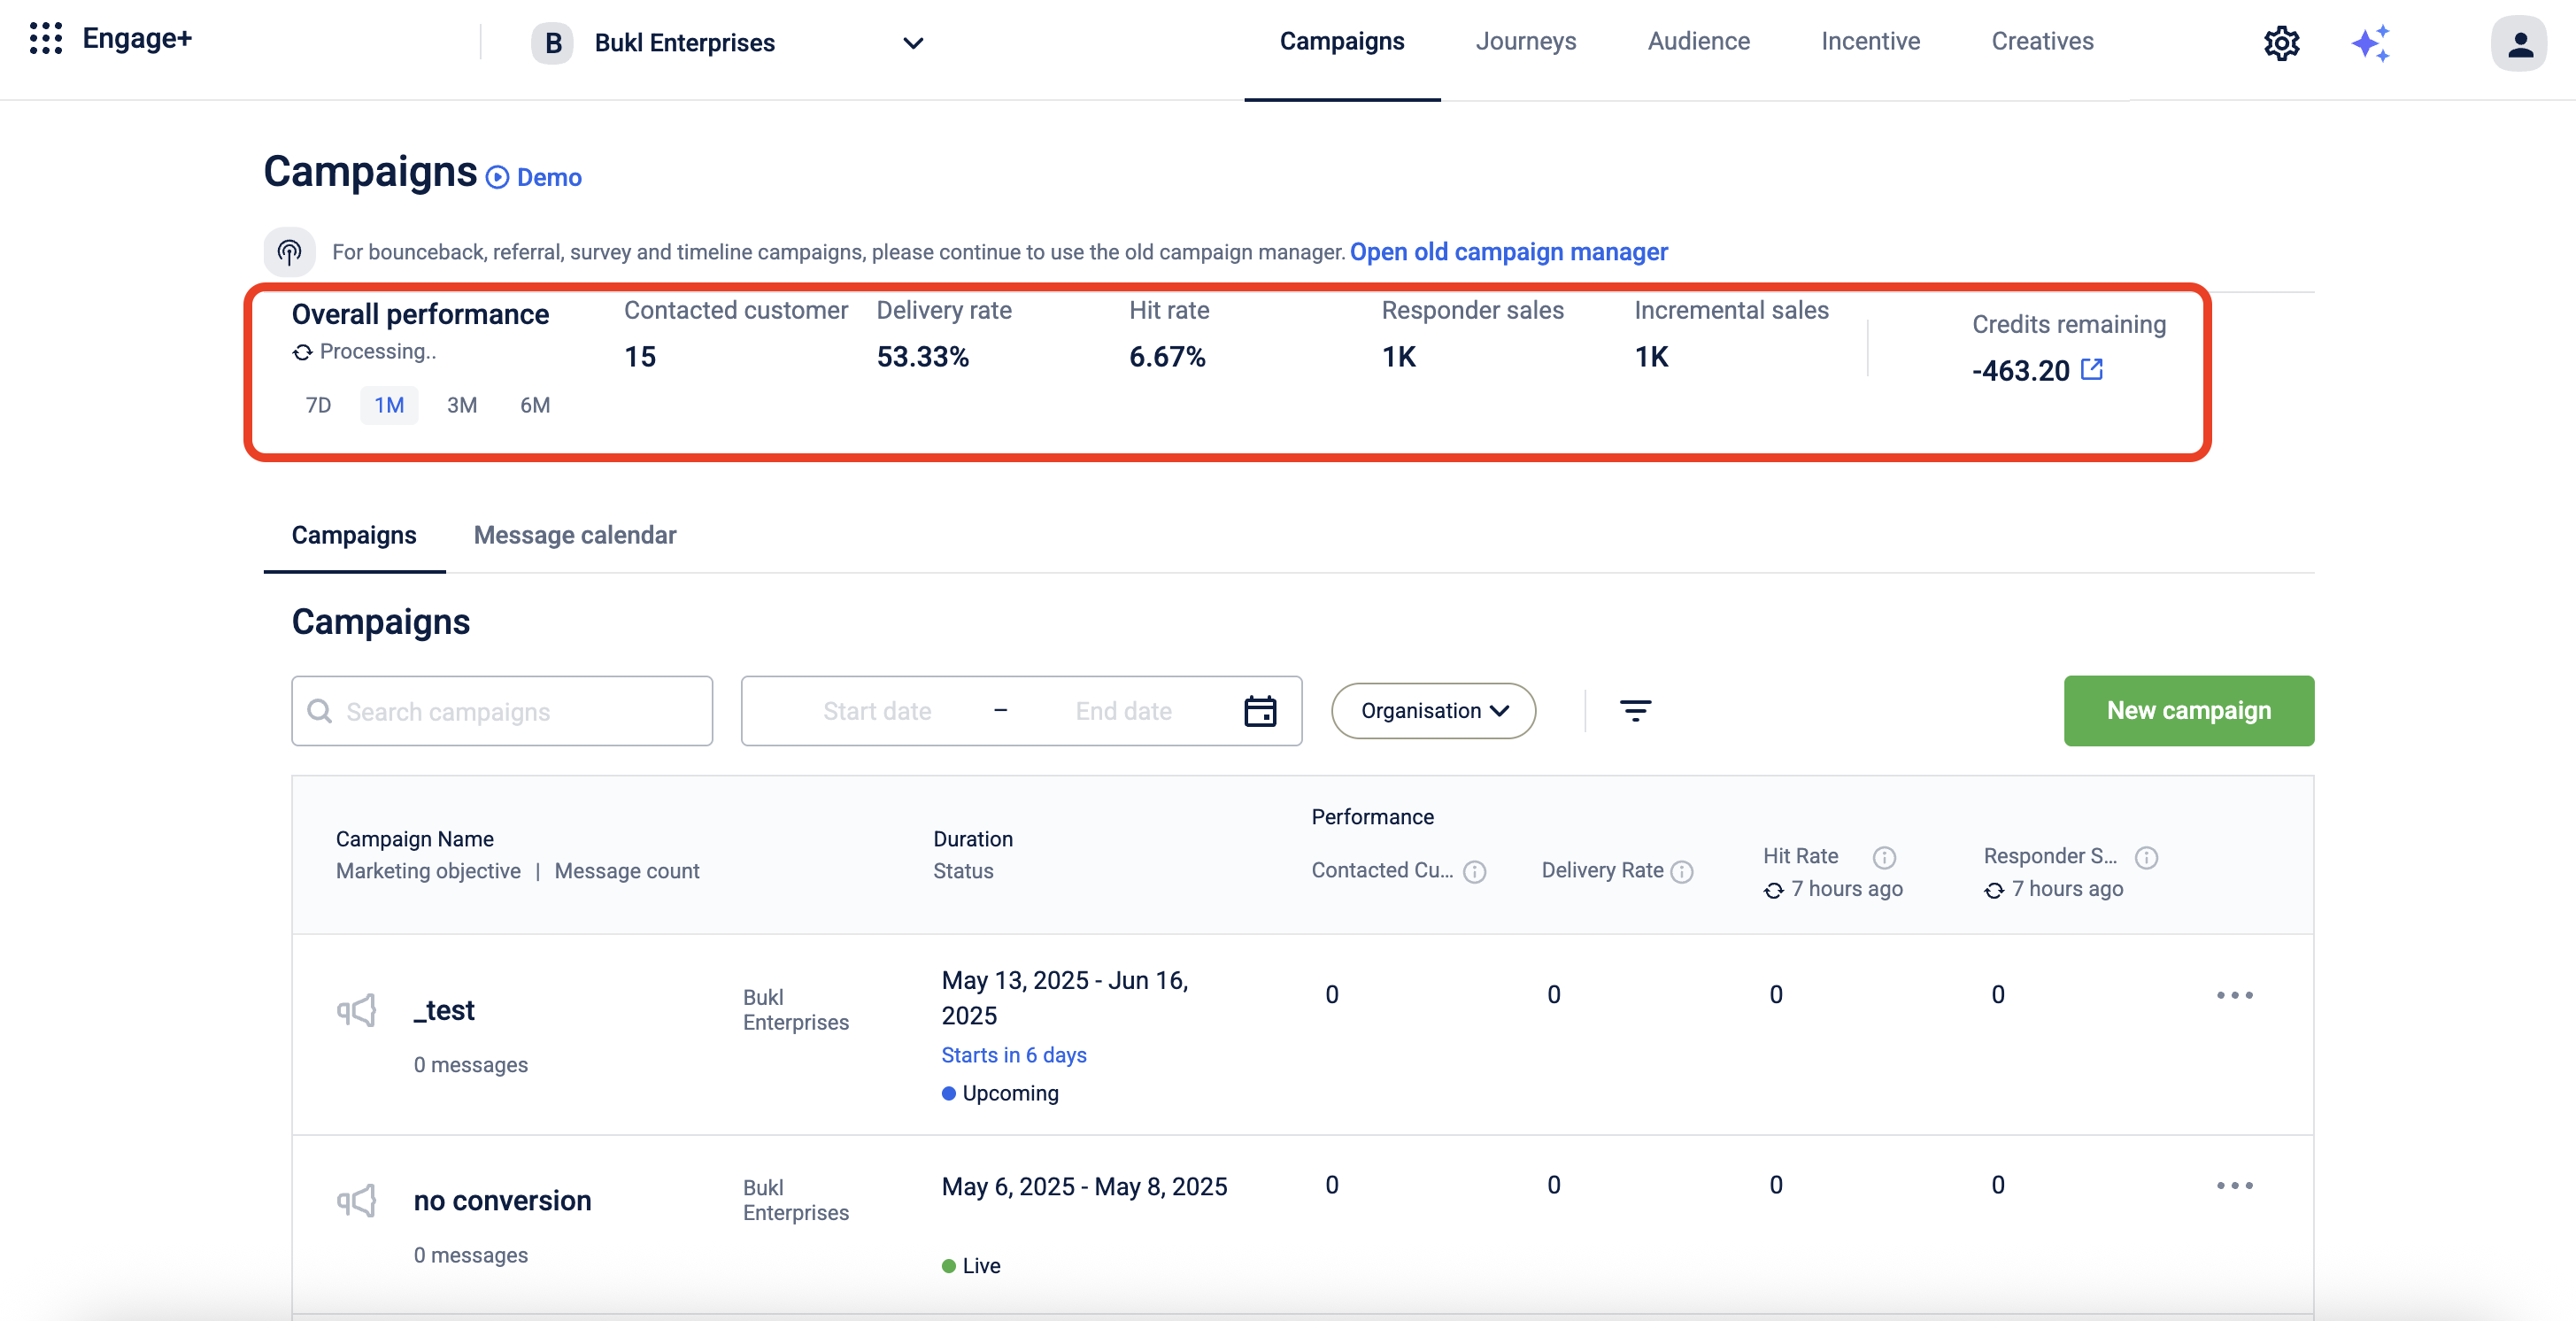
- Select the credits remaining icon to view reports. This will open a new window on Insights+. For more information refer the Insight+documentation.
NoteThe data gets reflected with 24hours in the overall performance dashboard.
Tracking and Reporting (Campaign Level)
- Navigate to Engage+ from the menu.
- On the campaign listing page select the campaign you want to track.
- Select See Reports to view a summary of campaign performance.
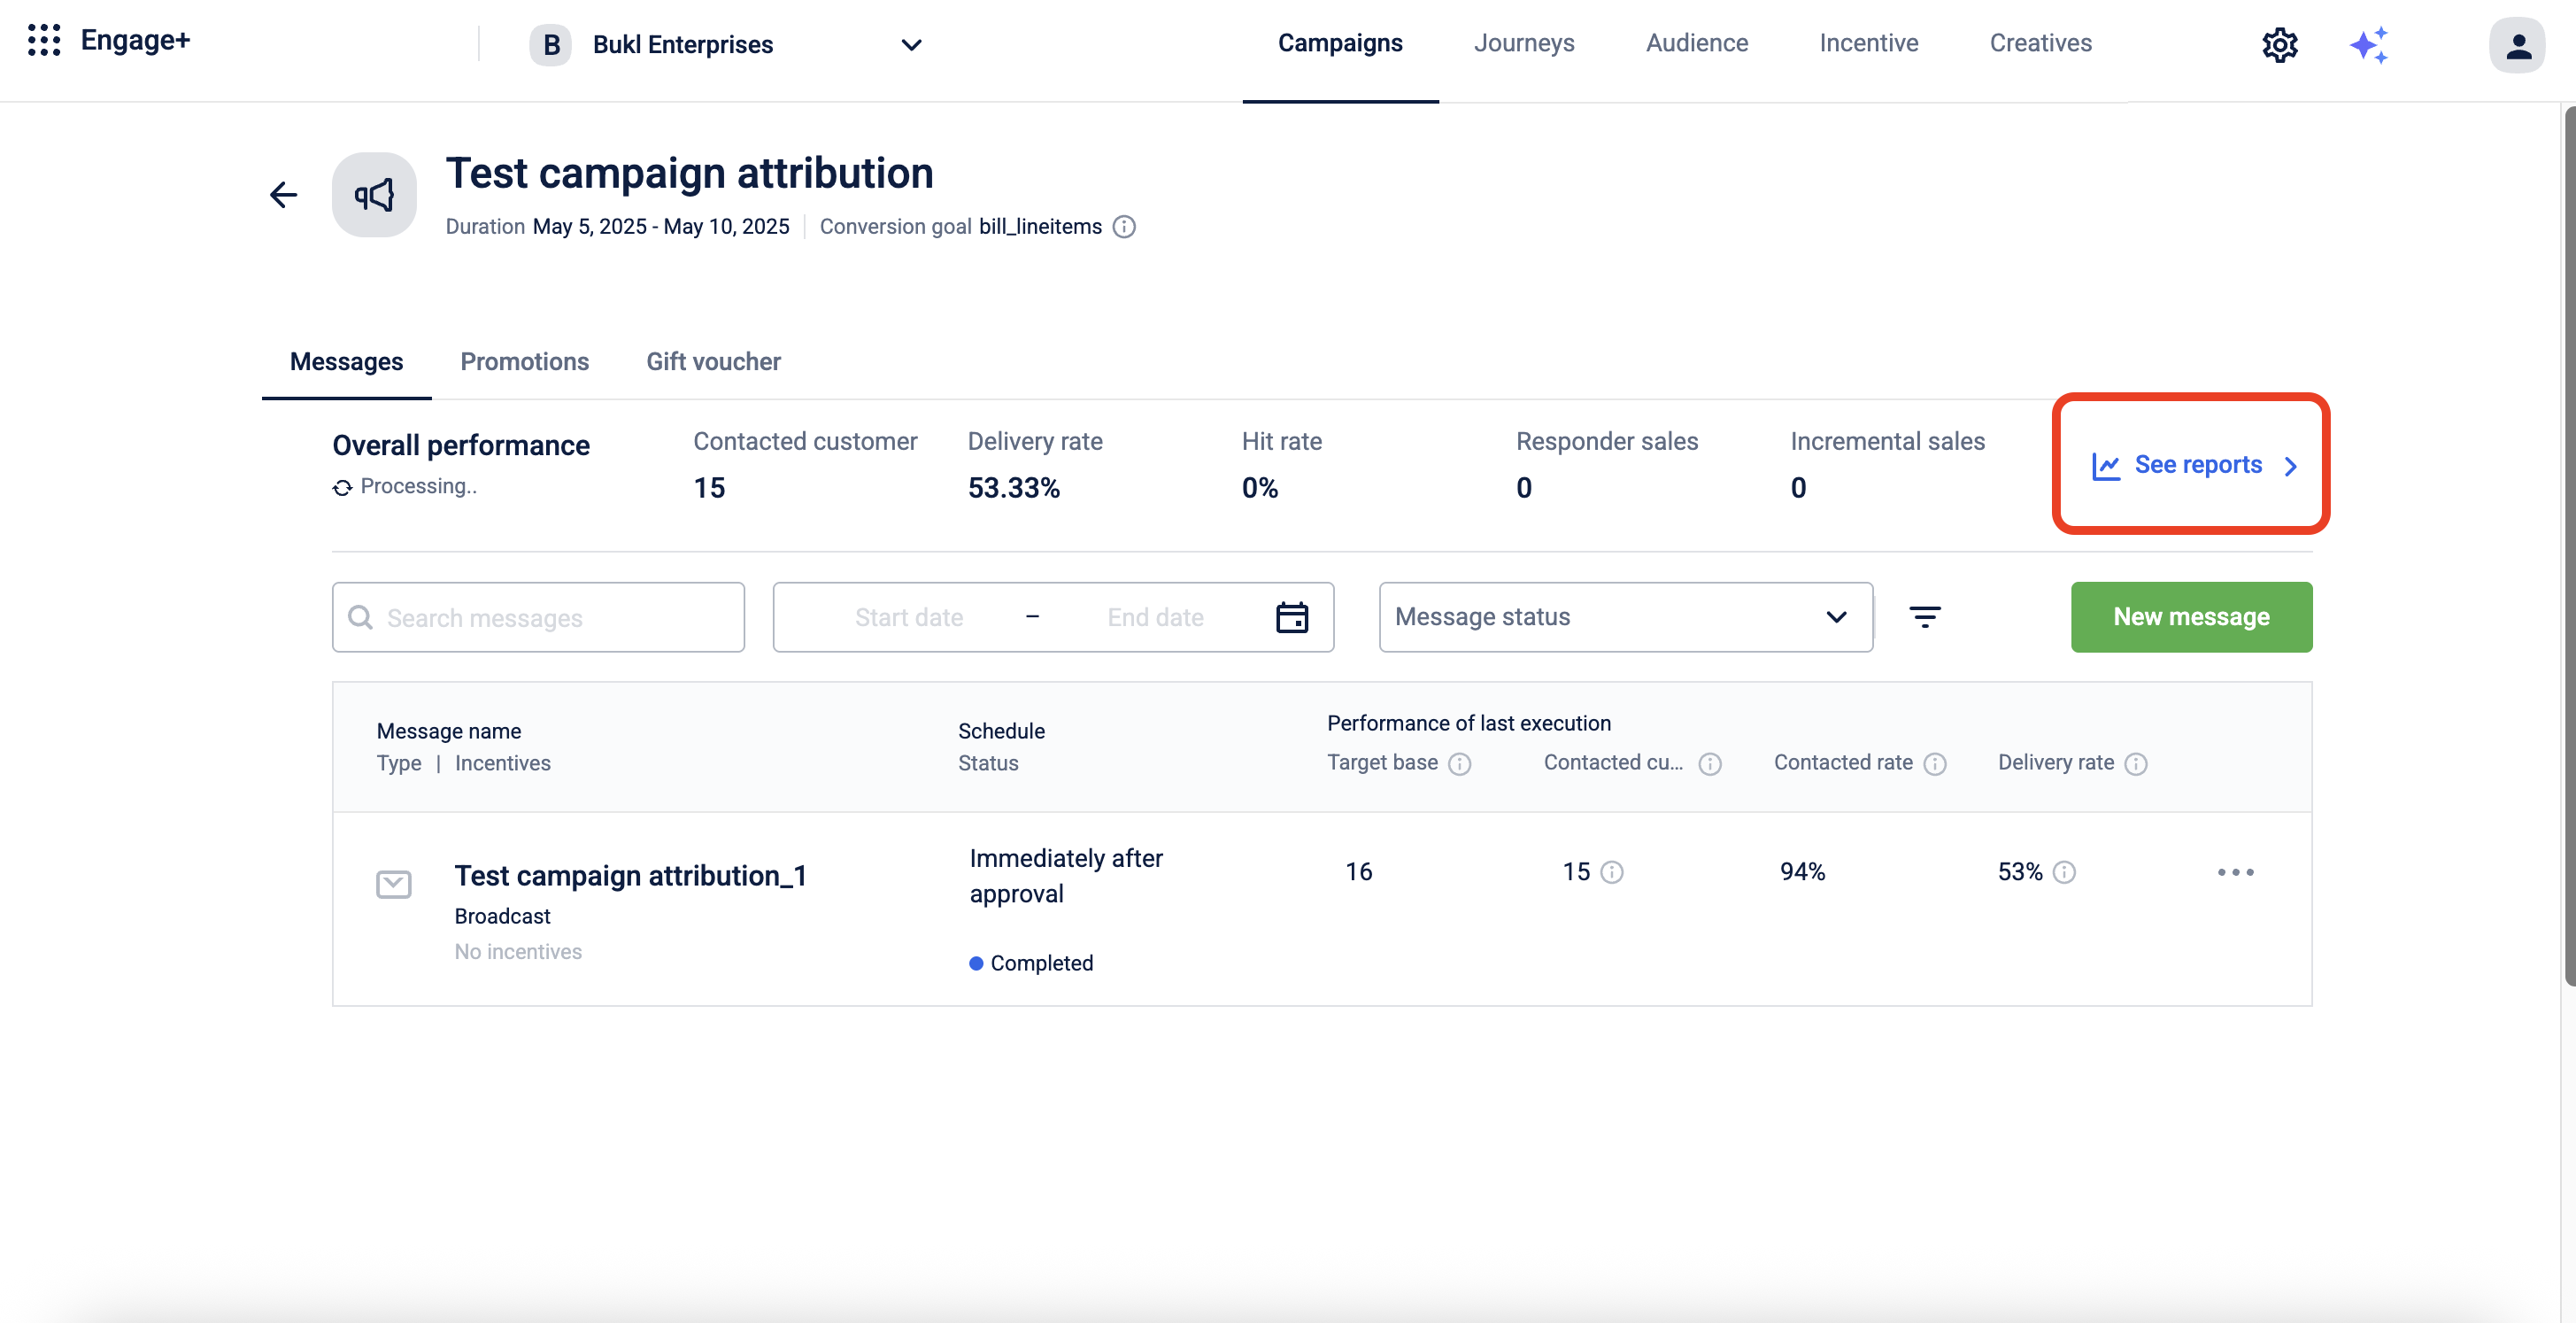
It includes key campaign metrics such as Contacted customer, Message Sent, Message Delivered, Message not Delivered, Unsubscribed.
| Metrics | Description |
|---|---|
| Contacted customer | Total number of customers the campaign message was sent to. |
| Message Sent | Total number of messages sent during the campaign. This count doesn’t include message credits used. |
| Message Delivered | Total number of messages delivered to customers during the campaign. Credit usage is not included. |
| Message not Delivered | Total number of messages that failed to reach customers during the campaign. |
| Unsubscribed | Total number of customers who have unsubscribed from the channel. |
Use Case
Scenario – Festival Campaign Conversion Tracking
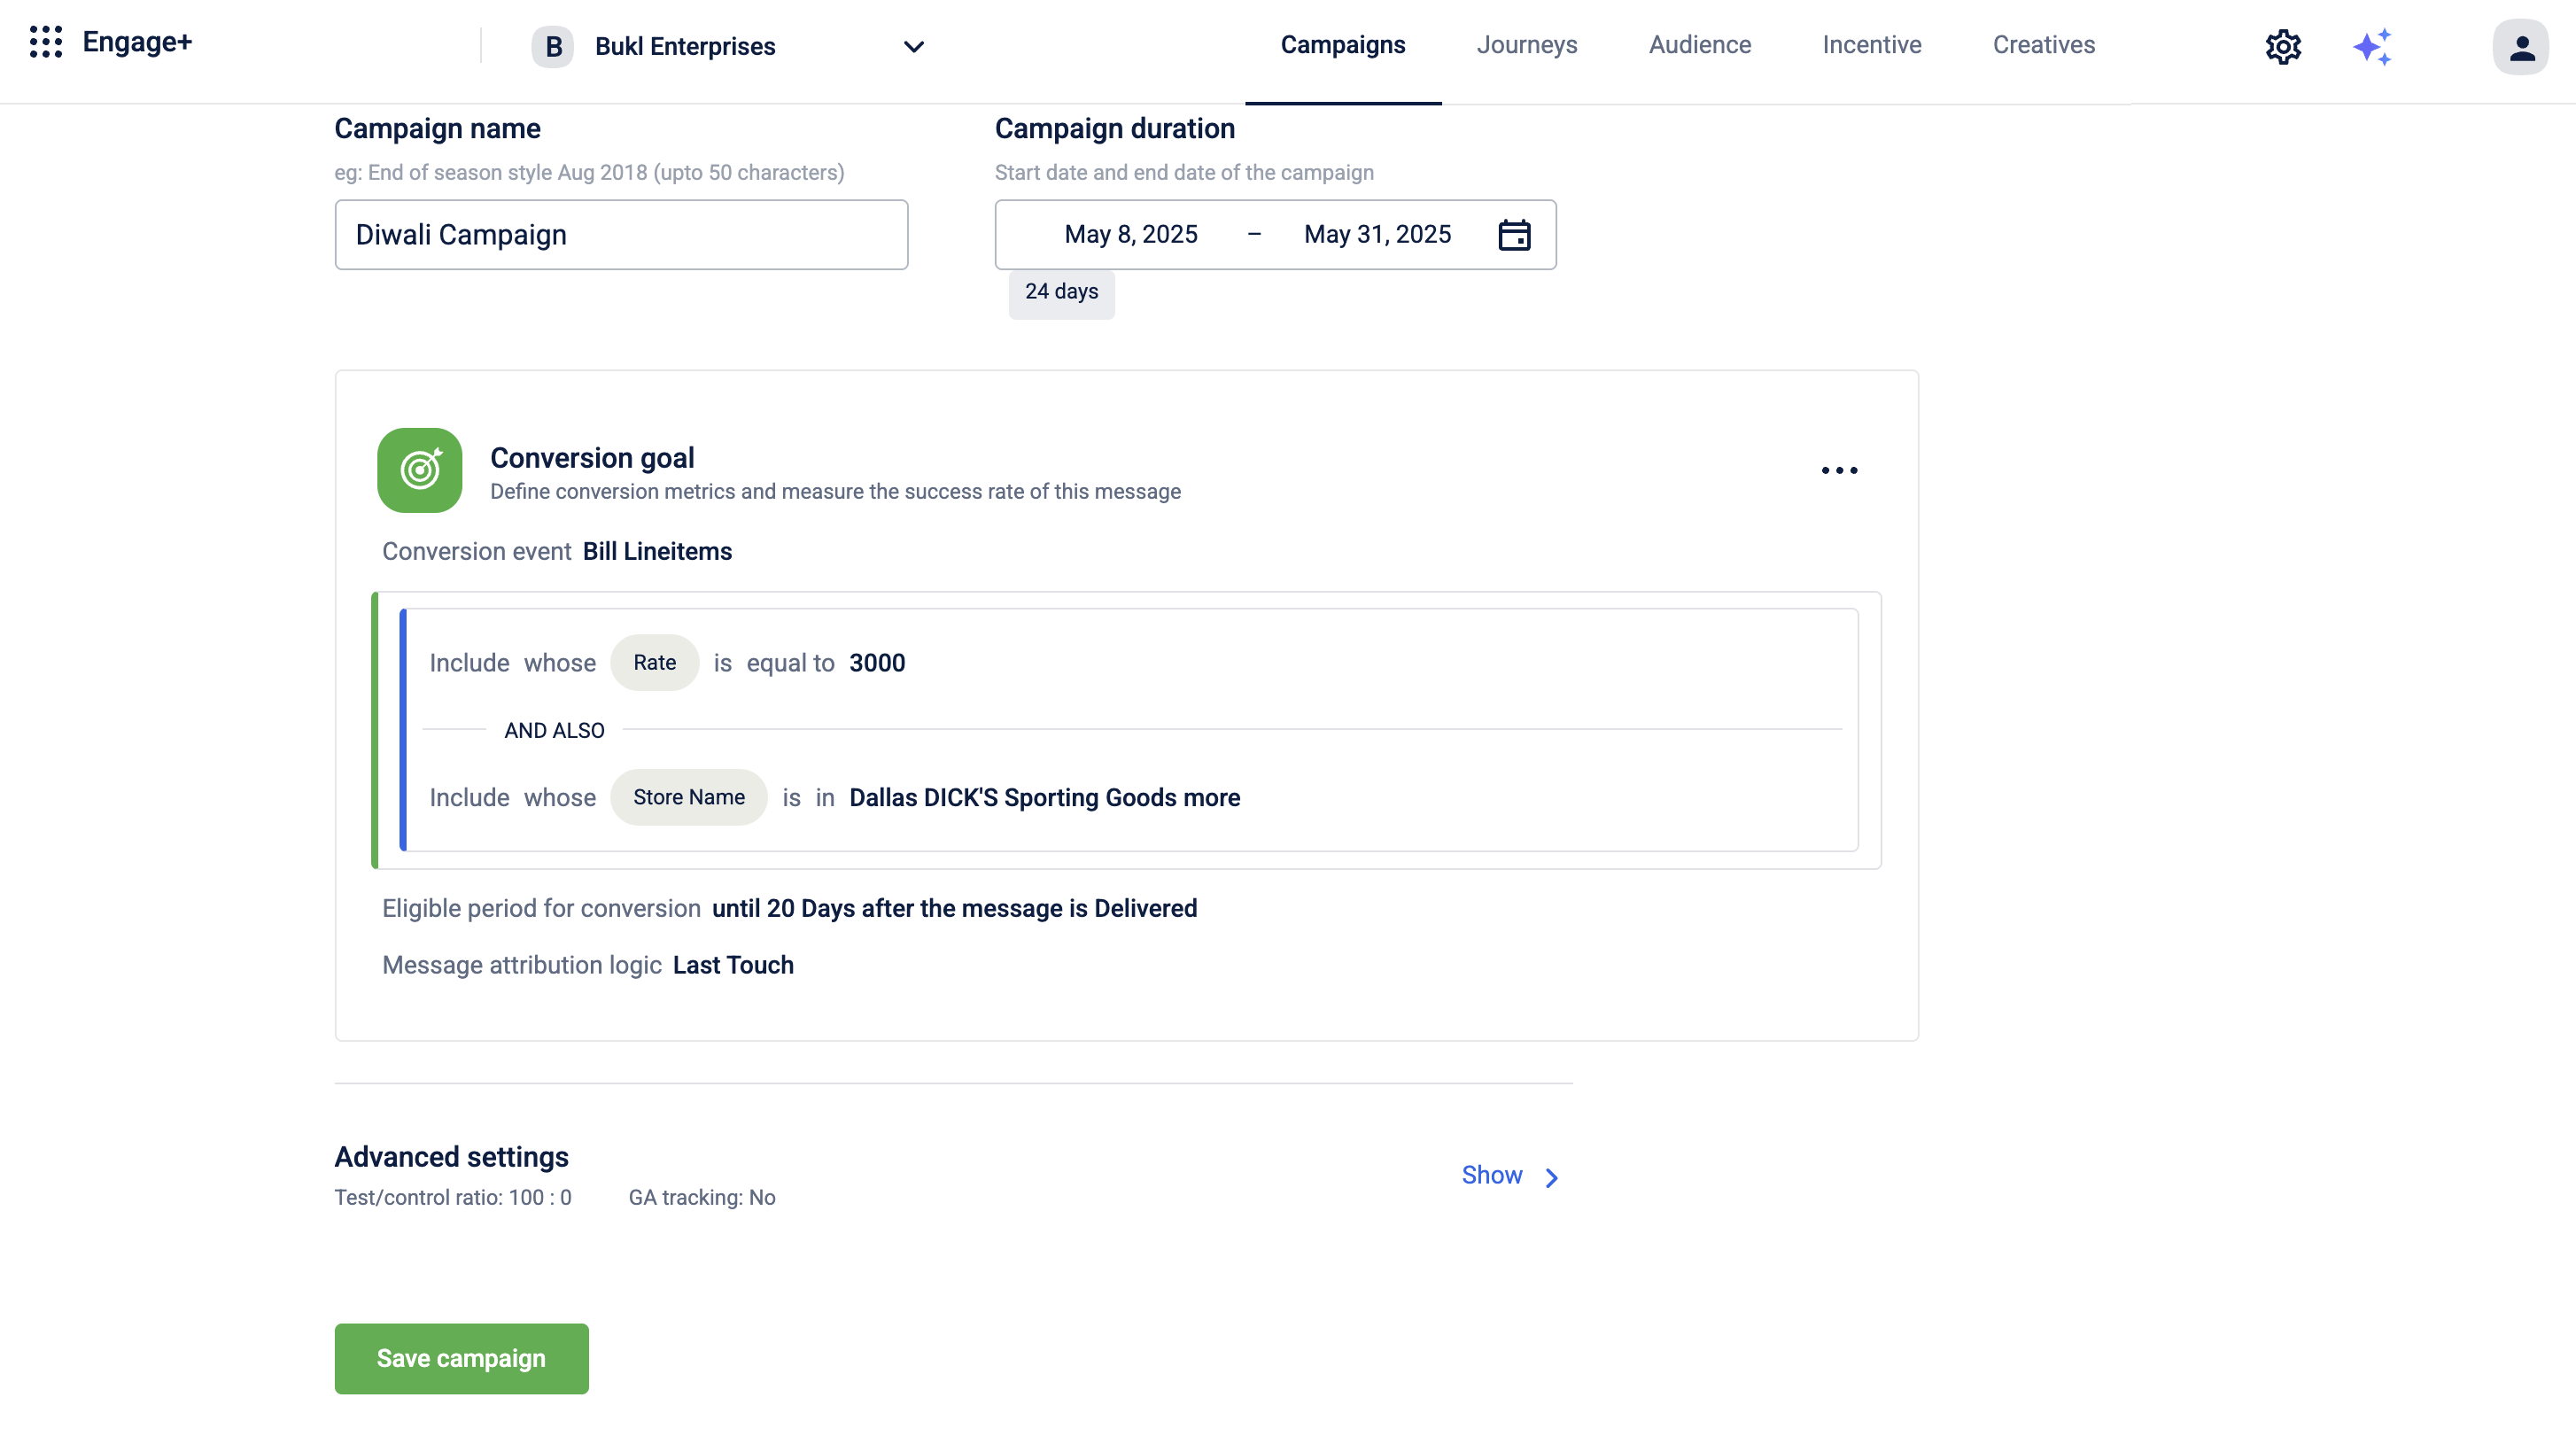
A retail brand launches a Diwali campaign offering 20% off on purchases above ₹3000 at select stores. The goal is to track how well the campaign drives customer purchases using a Conversion Goal.
Requirement
- Track how many customers make a transaction above ₹3000 at participating stores after receiving the campaign message.
- Start tracking conversions up to 20 days after the message is delivered.
- Count the last message interaction as the conversion source.
To set this up, follow the steps below.
- Log on to InTouch of your cluster and navigate to Engage+ from the menu.
- Click on New campaign to start creating a new campaign.
- Enter a Campaign name and select the Campaign durationusing the calendar.
- Click Add goal to set up the conversion goal.
- Choose the Conversion Event.
- Click +Add conditions and fill in the required details.

- Click Save to save the conversion goal.
- Click Save campaign to save all your changes.