
Campaign settings
Campaign setting lets you play with all the details of your campaign. You can check delivery, integrate different platforms, track messages, create custom labels and much more. It helps you make your campaign more effective and effecient. To know more, explore following detailed sections.
Delivery settings
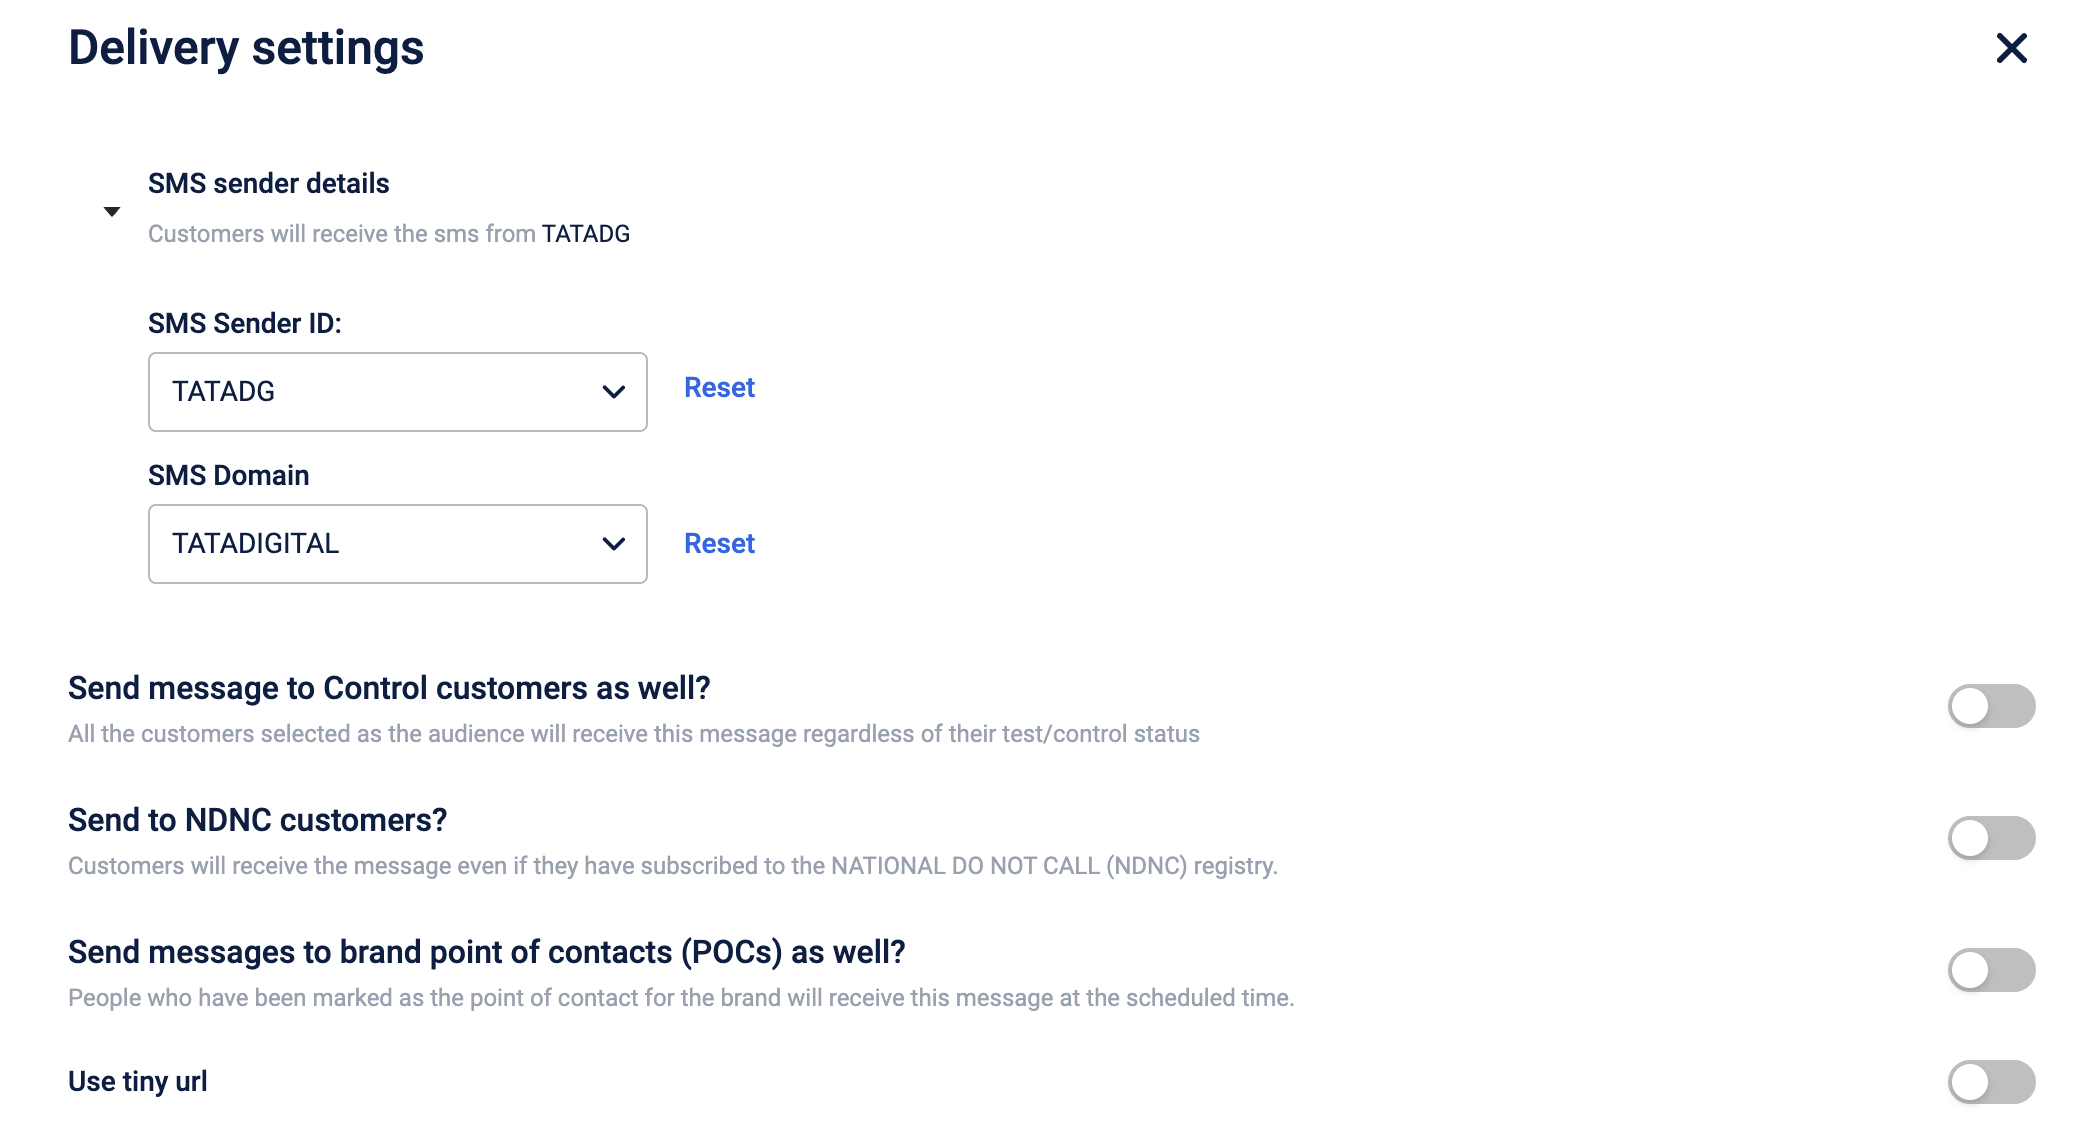
The delivery setting allows you to set the sender ID, enable POC, and use a tiny URL.
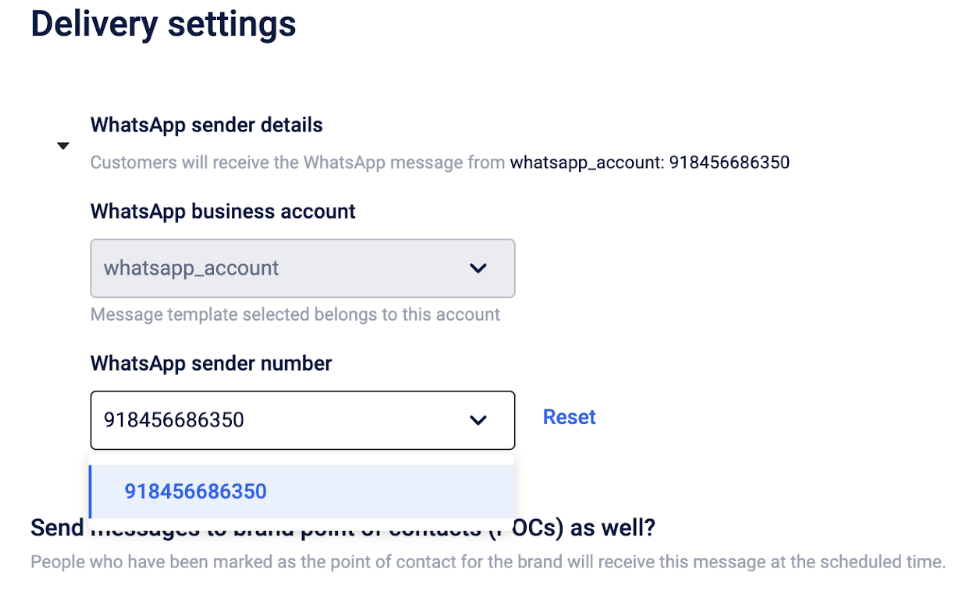
Configuring WhatsApp sender details
To configure WhatsApp sender details, from the WhatsApp sender number drop-down select the number from which you want to send the messages.
WhatsApp Support for Multiple Numbers under One (WABA) Account
You can link multiple numbers under the same WhatsApp Business Account. This enables brands to maintain separate WhatsApp numbers for transactional/utility and promotional communication.
Adding a new WhatsApp number to the source account
To add a new number under the source account, the CS/gateway team needs to raise a request to the tech/PST team, who can assist with the process. Once the numbers are added, you can select the desired number in the Delivery Settings when configuring a campaign message. This allows you to choose the specific number from which you want to trigger the campaign message.
Multiple WhatsApp sender number use cases
- To prevent users from blocking or archiving your chat on WhatsApp: A common scenario where having different numbers for transactional and marketing communications is beneficial is when you aim to prevent users from blocking or archiving your chat on WhatsApp, thereby avoiding the loss of both promotional and useful information sent via the same number.
- On the occasion of the suspension of a number Platforms like Meta have the authority to take them down if customers consistently block or report the chat in large numbers. Brands, therefore, opt not to rely on a single number for any communication to mitigate such risks.
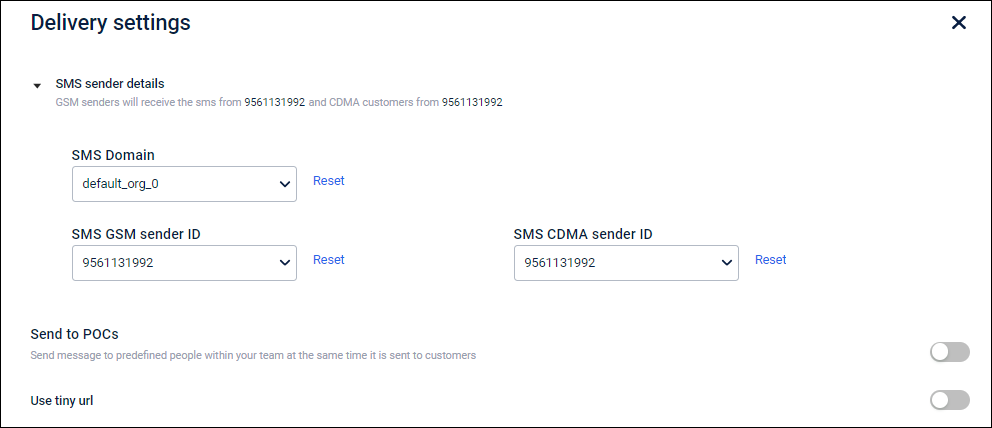
Delivery settings for messages except for call tasks
Configure SMS Sender IDs
On the dashboard, click the Settings icon.
- SMS sender detail
- SMS Domain: Select an SMS domain from the drop-down list. The SMS will be sent from the selected domain.
- SMS GSM sender ID: Select an SMS gsm sender ID.
- SMS CDMA sender ID: Select an SMS CDMA sender ID.
Email Notifications to POCs
- Send to POCs: POCs (Point of Contacts) are the brand user group. Enable this option to send messages to the POCs as well. The messages will be sent based on the delivery schedule
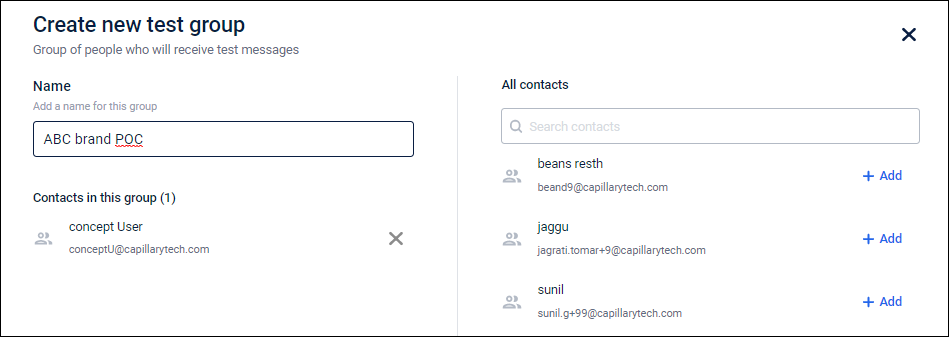
To create a POCs group, follow these steps.
- On the dashboard, click the settings icon.
- Click Users groups, and then click Create user group.
- In Name, enter a group name for POCs users.
- In the All contacts tab, select users by clicking +Add next to it, and then click Done.
Enable Tiny URL
- Use tiny URL: Enabling this option will reduce the URL's length, whereas, the URL destination will not be affected.
Delivery settings (Call Tasks)
The delivery setting allows you to set the call task expiry period, enable target DND, store to perform call task, track specific status for the call task, enable POC, and use a tiny URL.
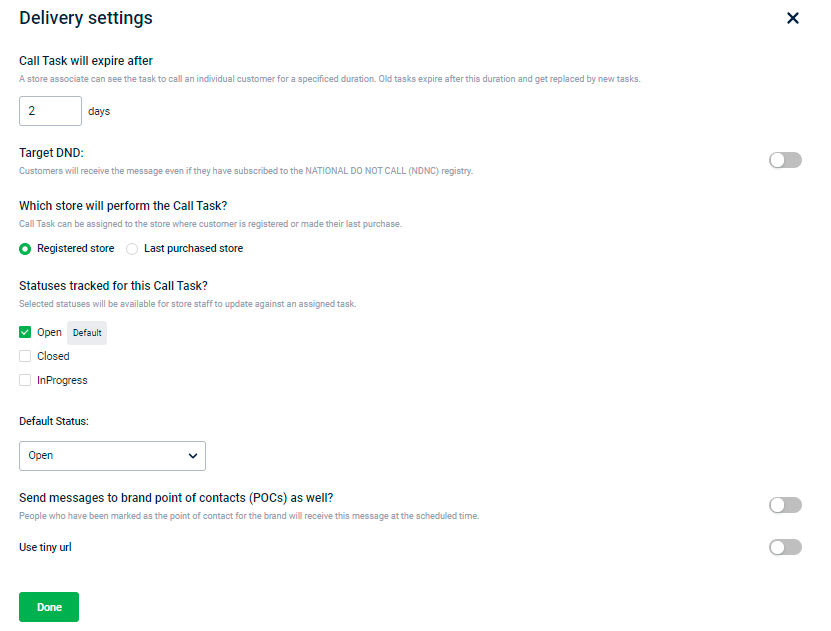
Configure call task expiry period
A store associate can see the task notification for the specified duration(days) from the message triggered to date. After the expiry period, the call task content will disappear from the destination app (InStore/Store2Door). You cannot have call task expiry beyond the campaign expiry date.
For example, Consider a call task campaign with a start date and execution date is April 20, 2021, and an end date is April 25, 2021.
For one time campaign
- If the call task expiry is set to 3 days, the message will disappear on InStore/Store2Door after 3 days from the execution date - April 23, 2021.
- If the call task expiry is set to 7 days, the message will disappear along with the campaign expiry - April 25, 2021.
For recurring campaign (assume daily with the campaign expiry as 3 days
- The message that triggers on April 20, will be available until Apr 23 (end).
- The message that triggers on April 21, will be available on Apr 24 (end).
- The message that triggers on April 22, will be available on Apr 25 (end).
- The message that triggers on April 23, 24, and 25 will also disappear on Apr 25 (end).
Target DND Users
Mobile SMS messages are blocked for users who have marked themselves as DND (Do Not Disturb). By default, messages are not sent to DND users, but you can manually enable messaging for them if required. This is useful for checking reachability if those DND users have opted out of DND.
To allow messages to be sent to DND users:
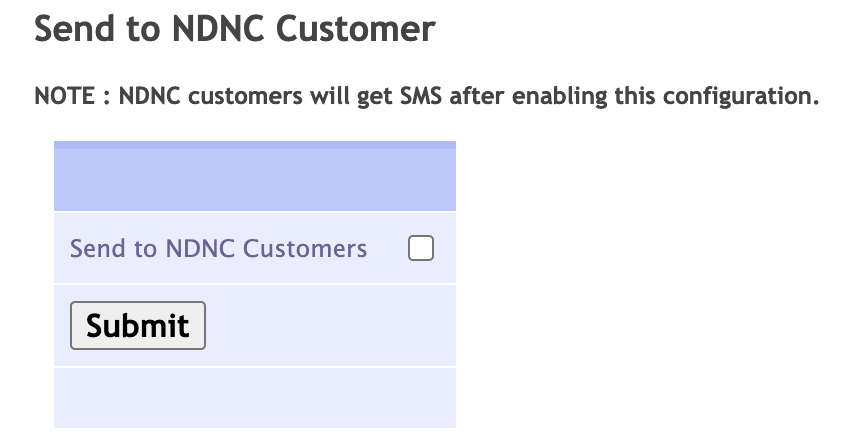
- Enable the NDNC toggle to send messages to customers subscribed to DND.
By default, this option is not available for all organisations. To enable it, navigate to {hostURL}orgadmin/administer{orgID} and enable the Send to NDNC Customer option.
Store to perform call task
You can assign call tasks to the store where the customer is registered or last purchased.
Call task status
To configure the call task status, follow these steps.
- Enable the task status(Open, Closed, and InProgress) using the checkbox. Enabled options will appear to store staff for updating the task progress.
- Select the default status using the drop-down option.
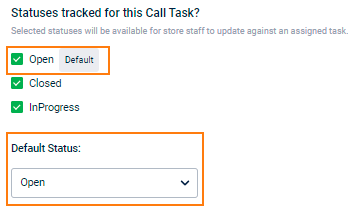
Note
- Only enabled status can appear in the Default Status drop-down option.
- To configure the custom label name for each status, navigate to Engage+ > Settings > Call Task.
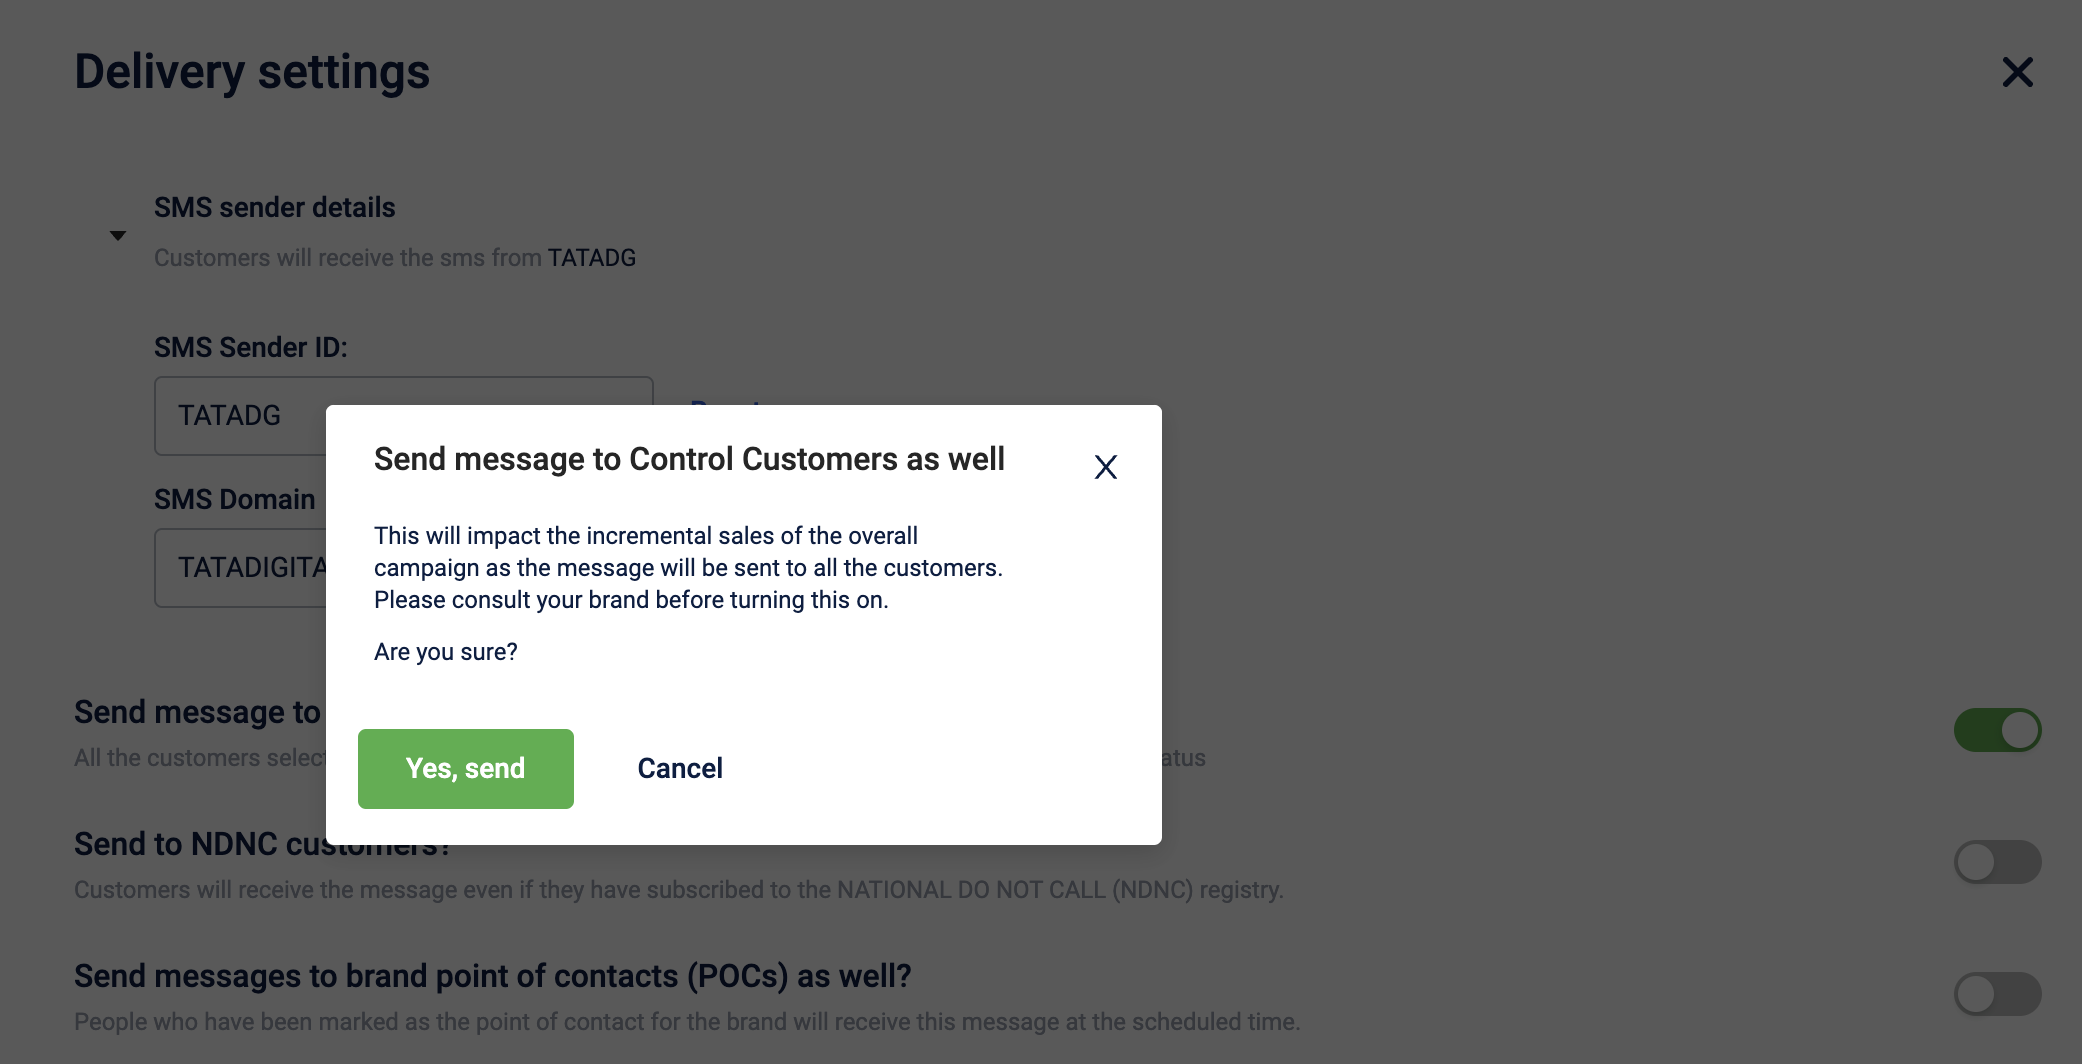
Send communication to control customers
In general, Test Audience/Customers are the selected group of customers or audience to whom all communication messages are sent. Control Audience/Customers are the selected group of customers or audience for whom messages are not sent. The brand decides the ratio and group of the Test-Control audience.
By default, the campaign communication messages are not sent to the Control customers but only to the Test customers. You can turn on the toggle switch to enable sending communications to Control customers.
A confirmation message is displayed on enabling the option. Select **Yes, send ** to proceed.
Use case
You can enable this option in scenarios such as:
- sending communication about a brand's promotional program to all customers
- sending feedback form and collect feedback from all the customers
- sending any emergency communication
- event invitation to all customers
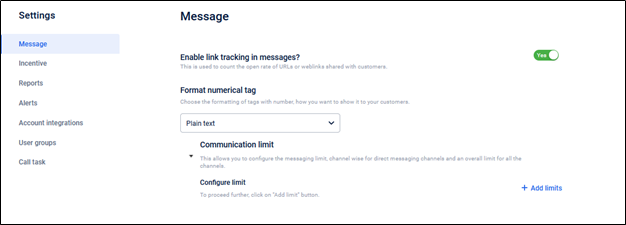
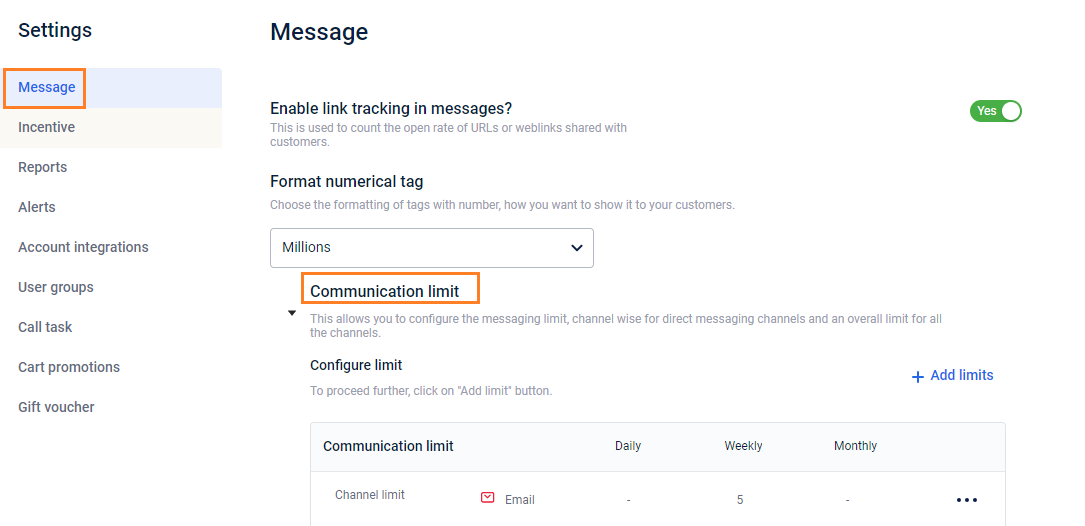
Enable tracking of clicked links
To track the link (URLs or web links) clicks sent through messages, you need to do the following.
- On the Engage+ home page, click the setting icon and navigate to the Messages page.
- Enable the Enable link tracking in messages toggle button.
- Choose the formatting of tags from the Format numerical tag drop-down menu.
- To set the communication limit, click +Add limits.
Note
- The communication limit allows you to configure the messaging limit, channel-wise for direct messaging channels, and an overall limit for all the channels.
- This is also applicable for all communications sent using Journeys.
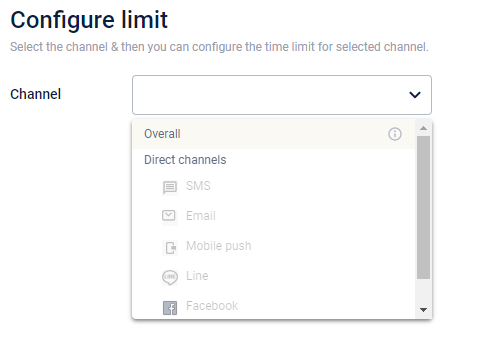
Setting up communication limits for each channel
To limit the number of messages to be sent through Engage+, follow these steps.
- Click +Add limits.
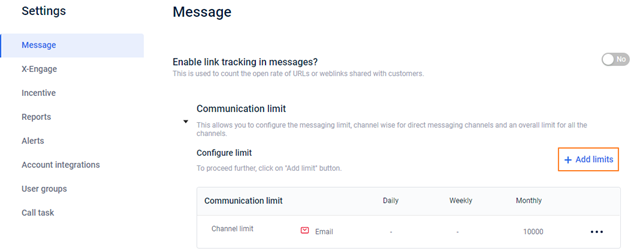
- In-Channel, select the channel for which you want to set the limit.
NoteTo set a limit on overall messages (across channels), choose Overall.
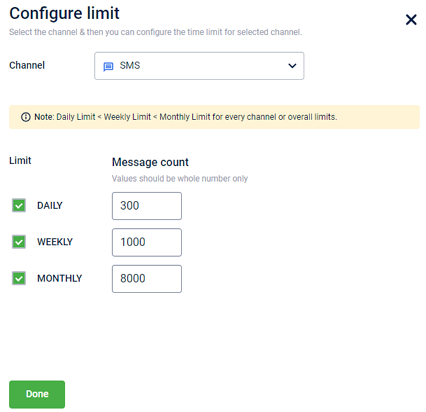
- Select the desired option by which you want to set a limit.
- Daily: Check to set a daily limit and enter the limit value in the respective box. For example, 100 messages per day.
- Weekly: Check this to set a weekly limit and enter the respective box's limit value. For example, 500 messages per week.
- Monthly: Check this to set a monthly limit and enter the respective box's limit value — for example, 2500 messages per month.
Note
- To edit the channel limit, hover the pointer over the more options (…) symbol, and then click Edit.
- To delete the channel limit, hover the pointer over the more options (…) symbol, and then click Delete.
Incentive related settings
This article helps you with the complete information on Incentive related settings.
To navigate to the Incentive settings page -
- On the Engage+ page, click the **Setting **icon and navigate to the Incentives page.
- Navigate to the setting that you need to modify. For detailed information on each setting, refer to the following articles.
See the following sections to know about each options of Incentive settings.
Default resend message
Configure the default message to be sent to customers when a coupon is reissued. You can also Preview the message to confirm whether the message is looking as desired and make necessary changes if required.
Sync offers with InStore
To sync offers or incentives that are created or added on Engage+, enable Sync offers to Capillary InStore client toggle button.
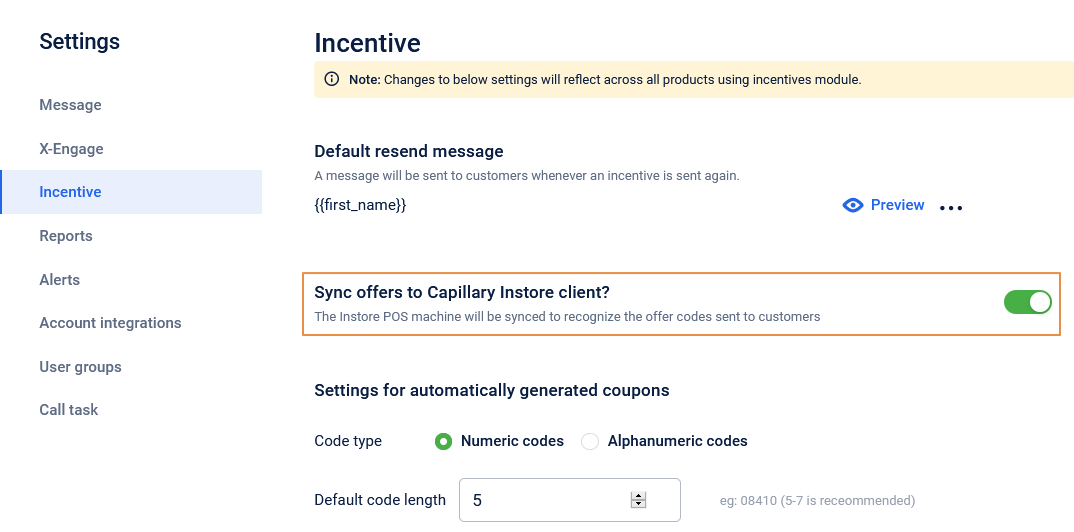
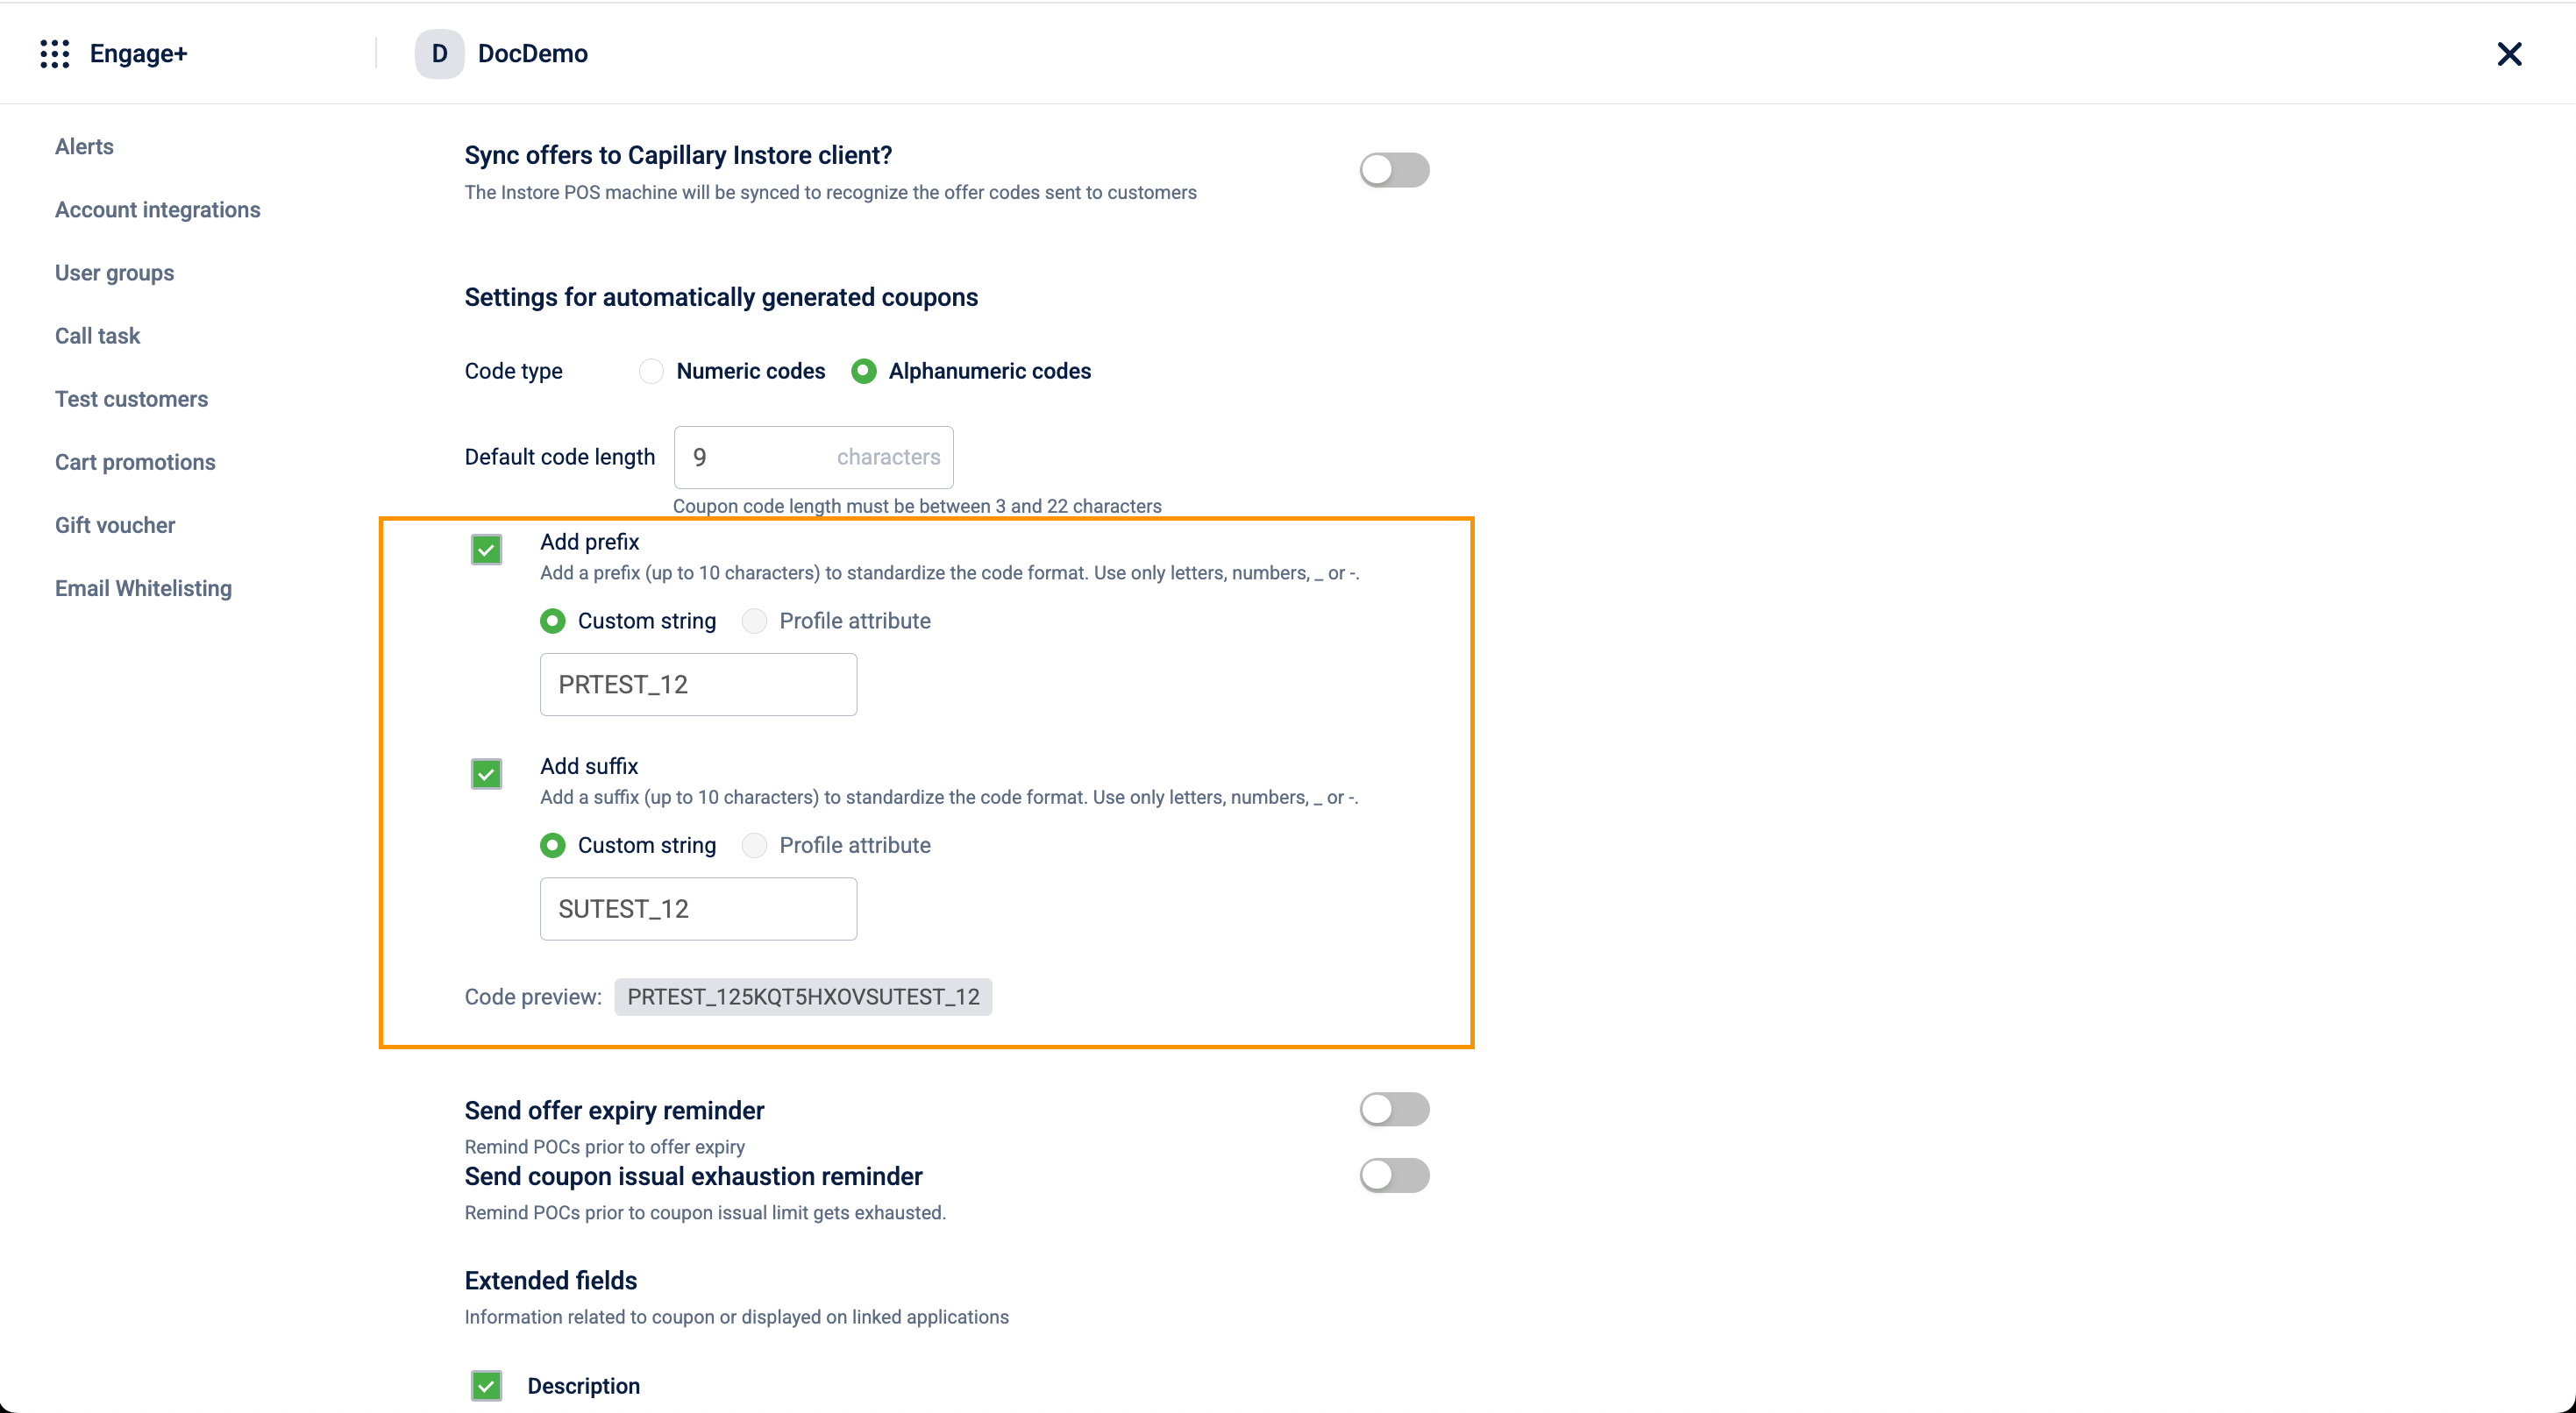
Auto-generated coupon settings
For auto-generated coupon codes, you can set the coupon code length, type, and the information regarding the offer.
On the Incentives page, click Settings for automatically generated coupons.
| OPTION | DESCRIPTION |
|---|---|
| Code type | Select your preferred character type in the coupon code. * Numeric Codes: Select this to have coupon codes only in numeric characters. For example, 12345678. * Alphanumeric Codes: Select this to have coupon codes in alpha-numeric characters. For example, ABCD1234. |
| Default code length | Set the length of the coupon code. Recommended length: 5-7 characters |
| Add prefix | Enable this to add a fixed string to the beginning of the coupon code to standardize the format. Custom string: Enter the text you want to use as the Organization Default prefix. Constraints: Max 10 characters. Supports alphanumeric values, hyphens (-), and underscores (*) only. No spaces. |
| Add suffix | Enable this to add a fixed string to the end of the coupon code to standardize the format. Custom string: Enter the text you want to use as the Organization Default suffix. Constraints: Max 10 characters. Supports alphanumeric values, hyphens (-), and underscores (*) only. No spaces. |
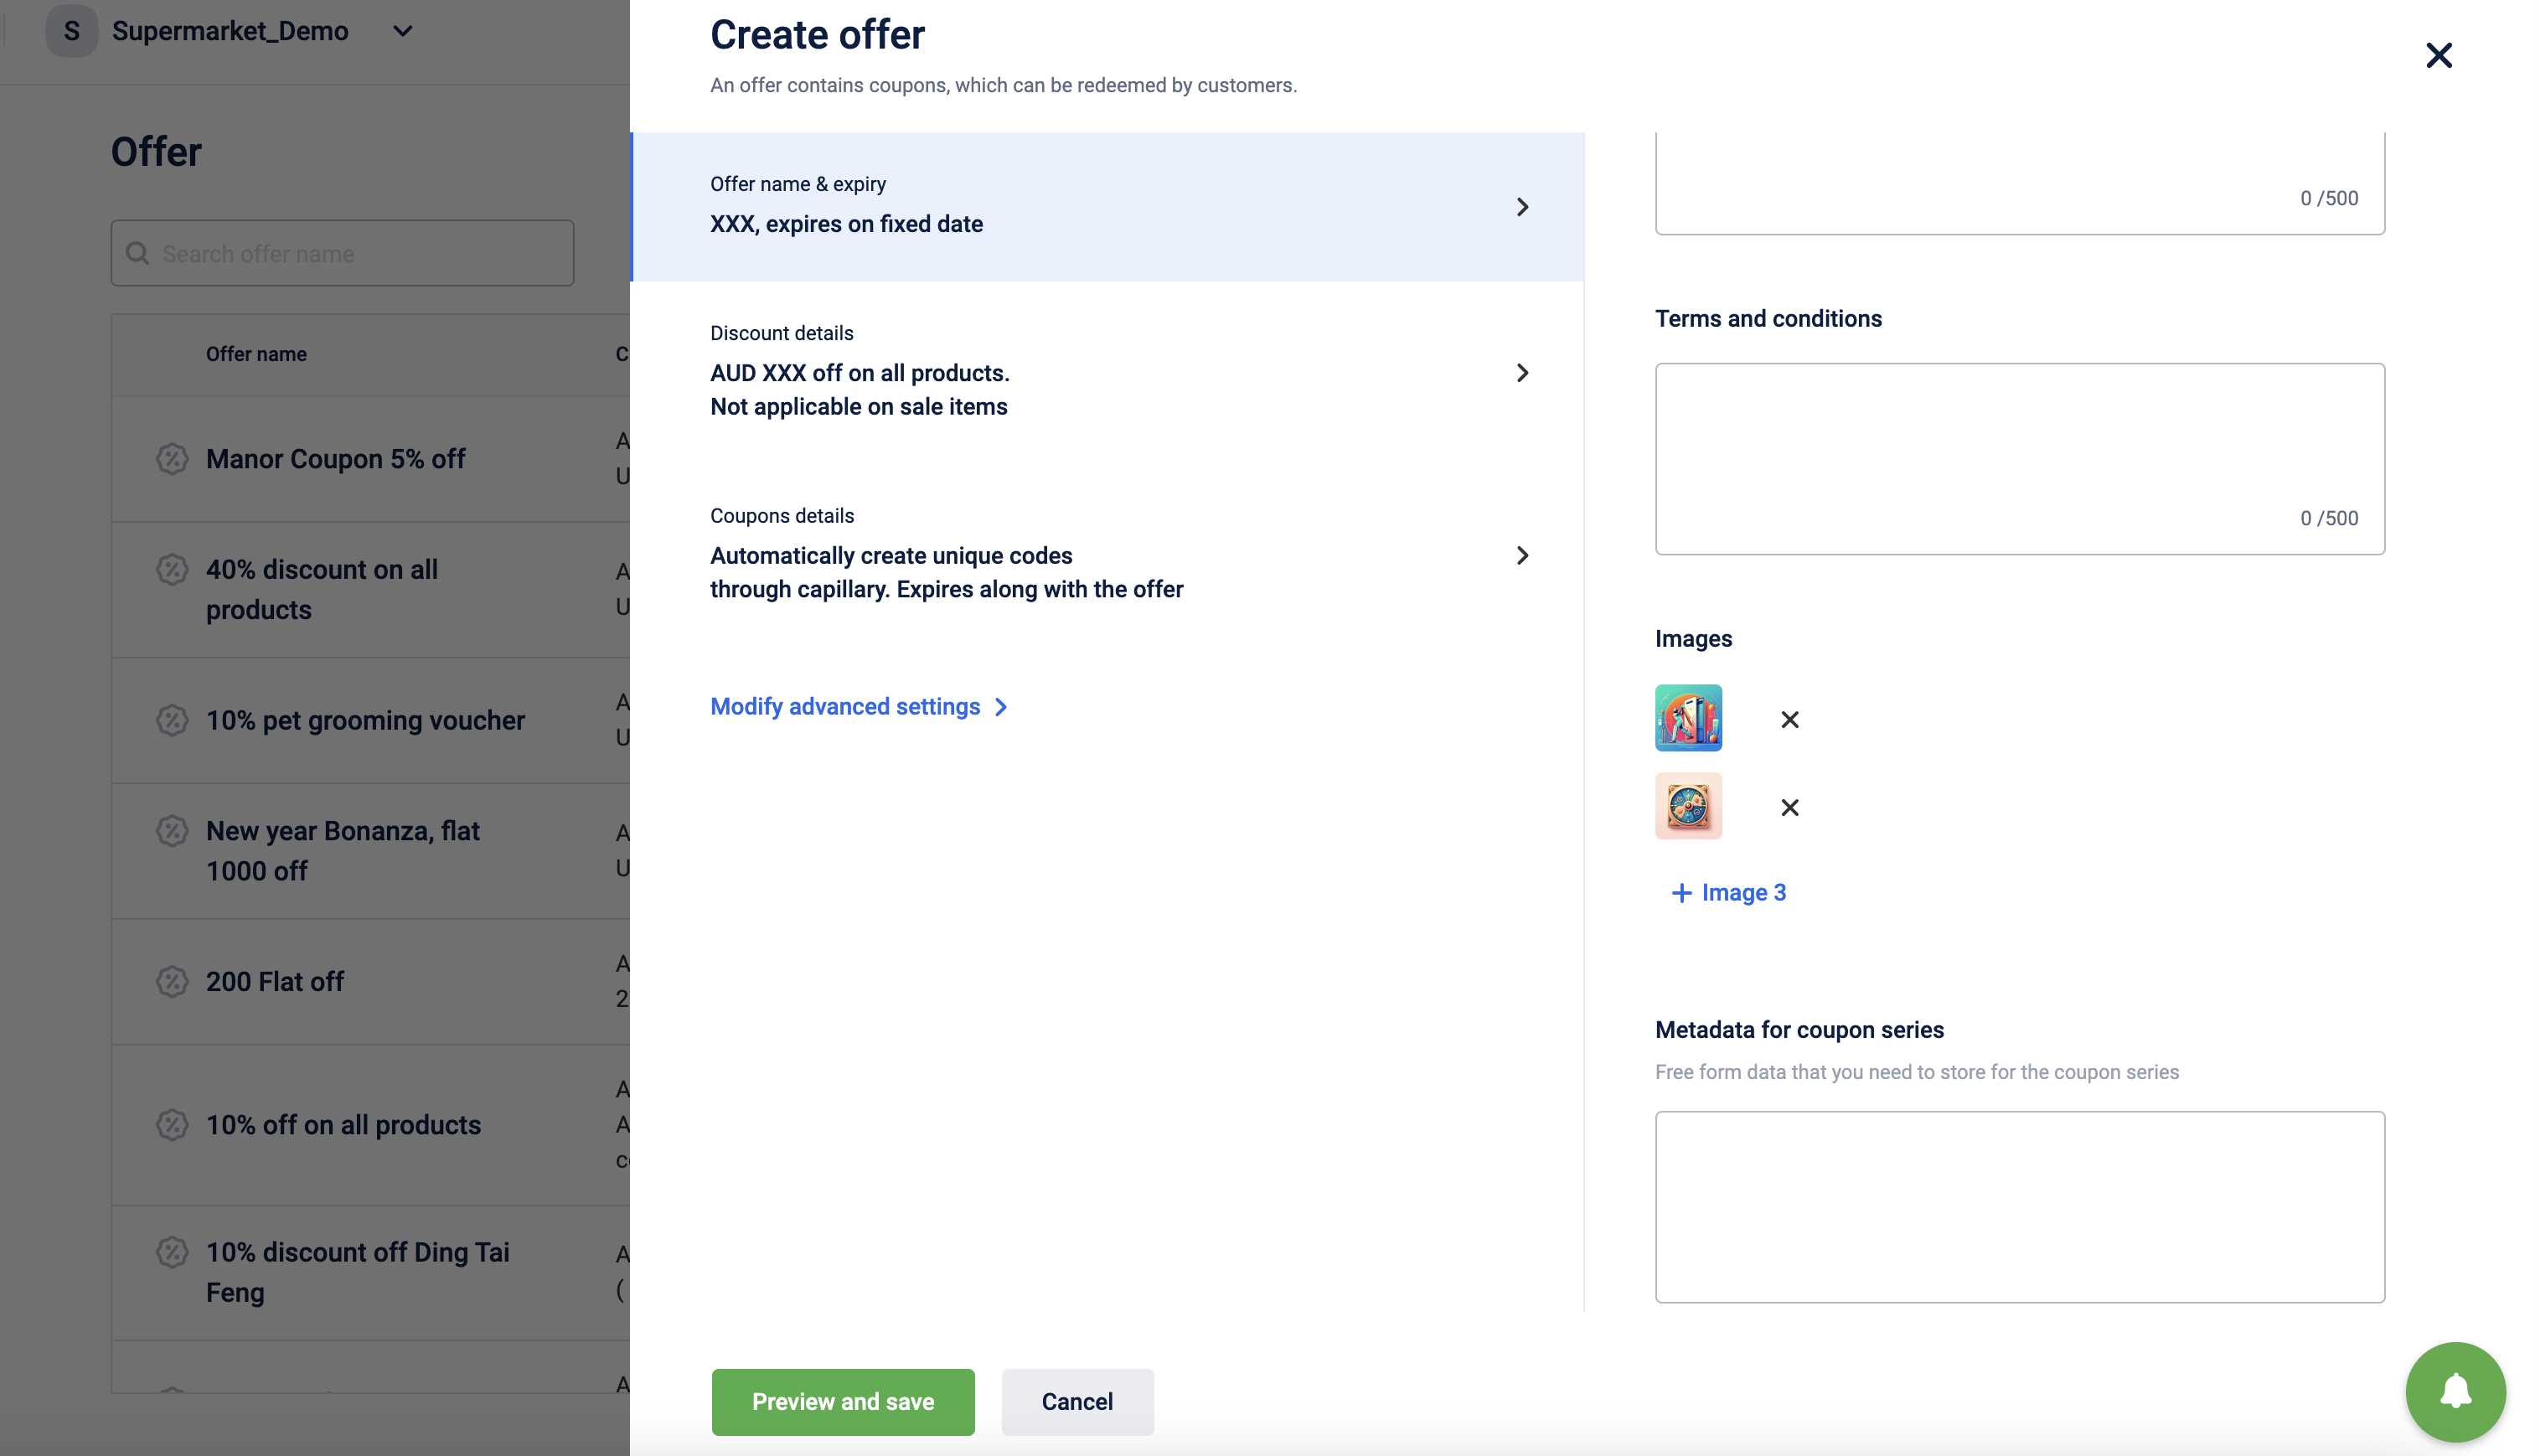
| Extended fields | Select the fields that you want to include with the incentive. You need to have each field that you want to include as a coupon level extended field (metadata fields enabled on Incentives section of Product Settings). * Description: Includes the offer description in incentives. * Terms and conditions: Includes terms and conditions of the offer in incentives. The maximum number of characters accepted in terms and conditions is 500 characters. * Images: Includes images in incentives. You can add images from the creative gallery or upload from your local system. You can add up to three images. |
| Add custom metadata | To add any custom metadata, click +Add custom metadata, enter metadata name, and click Save. You can add up to five custom metadata. You can add up to a maximum of 20 custom fields. |
| Comma separated list of purpose for which you need to create coupons | Possible purposes (comma-separated values) for coupon creation. These values appear on the coupon creation UI as a drop-down list for Purpose |
Add suffix and prefix in incentives settings
Extended fields in incentives settings

Limit messages to send through campaigns
Note
- By default, a user does not have access to enable the communication limit feature for an org. If authenticated users need access to it, log a JIRA ticket assigning it to the Engage+ Developer team.
When broadcasting multiple marketing campaigns there are chances of sending a campaign message to the same customer multiple times, resulting in customer dissatisfaction and ire. Engage+ allows you to limit the number of messages to be sent for each communication channel and overall messages. For each channel, you can set daily, weekly, and monthly limit.
Note
- Day: 12:00 AM until 11:59 PM
- Week: Sunday 12:00 AM until the next Saturday 11:59 PM
- Month: 12:00 AM on the first of a month until 11:59 PM on the last day of the same month To know more about message limits, see Setting up communication limits for each channel.
Report notification and failure alert settings
You can set notifications of daily campaign summary reports, weekly SMS and email credit report, and campaign execution update.
Report Notifications
To notify users on the campaign level report, do the following.
- On the Engage+ home page, click on the setting icon, and navigate to the Reports page.
| OPTION | DESCRIPTION |
|---|---|
| Daily campaign summary report | Enter the email IDs of users (comma separated values) that you want to send daily notifications on the Campaign Summary Report. |
| SMS Email credit report | Enter the email IDs of users (comma separated values) that you want to send the available SMS and email credits on a weekly basis. |
| Email notification on message execution status | Enter the email IDs of users (comma separated values) that you want to notify whenever a campaign message is executed with the execution status. |
Approval, failure or low credit alerts
To alert users on message approval requests, and when there is a low message delivery rate, message execution failure, do the following.
- On the Engage+ home page, click on the setting icon, and navigate to the Alerts page.
| OPTION | DESCRIPTION |
|---|---|
| Message execution failure alert | Enter email IDs (comma separated values) to notify whenever a message execution fails |
| Low message delivery alert | Enter email IDs (comma separated values) to notify when the message delivery rate of a campaign is less than 60%. |
| Message approval request | Enter email IDs (comma separated values) to notify when a new campaign message is sent for approval. |
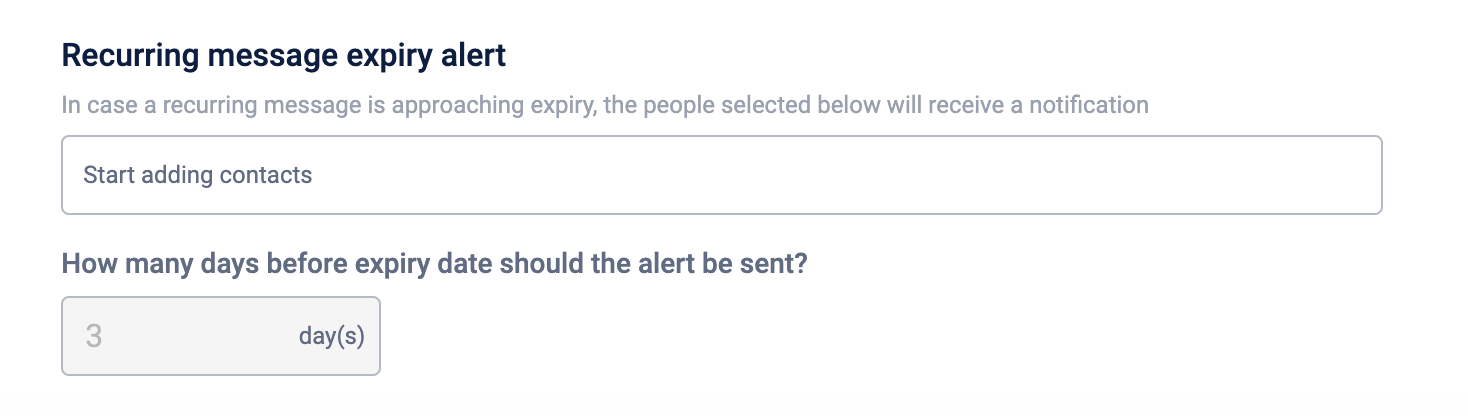
Recurring message expiry alert
The recurring message expiry alert feature allows you to configure reminders when recurring campaigns approach their end dates. You can add the contacts and configure the alert settings, specifying the days before the end date you wish to send an alert.
For example, if you have set the alert as 7 days, the alert will be triggered on a date that is seven days before the message's end date.
NoteUsers will receive an alert for every recurring message configured in the organization. There are no specific users assigned alerts at the message level.
Create test user group
User groups are special users that you can use to test campaign messages or share the campaign reports and alerts.
To create a test user group, follow these steps.
- On the Engage+ home page, click on the setting icon and navigate to the User Groups page.
- Click Create user group.
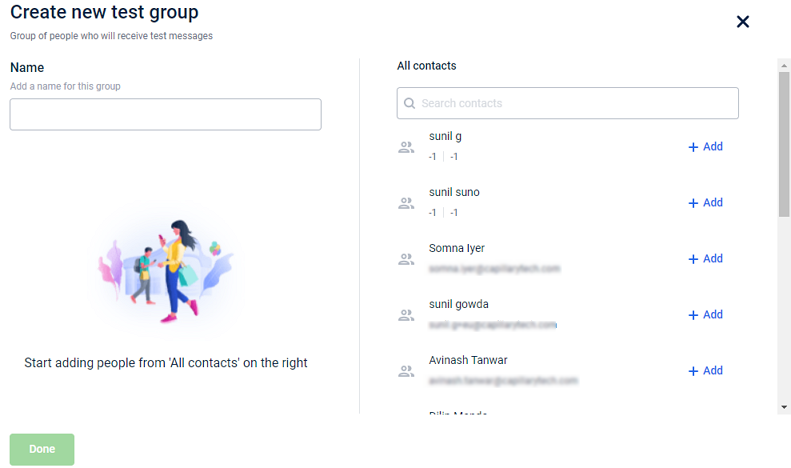
- In Name, enter the name of the test group.
- On the All contacts page, add each user using +Add. You can use the search box to find a specific user.
- Click Done to save the group. Similarly, you can create multiple user groups.
NoteIf the users you add have invalid email addresses. the group will not save.
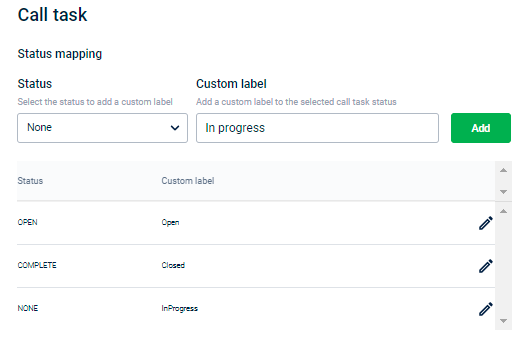
Create custom labels for call tasks
You can create custom labels for each call task status. These labels will show up as statuses in Call Task campaigns.
To create a custom label for a call task status, follow these steps.
- On the Engage+ home page, click on the setting icon and navigate to the Call task page.
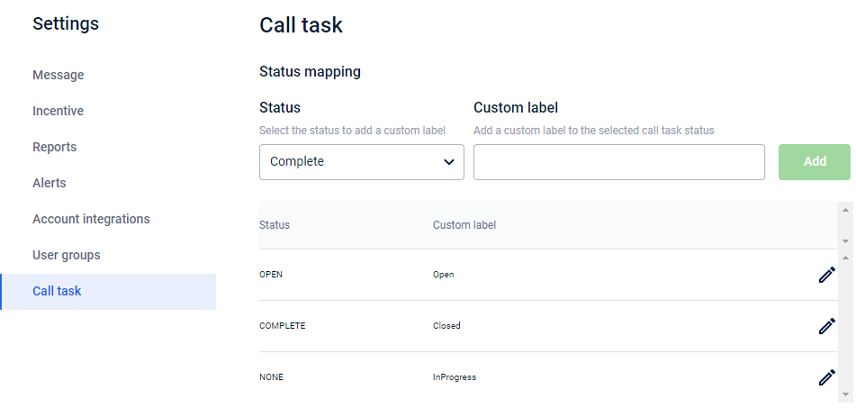
- In Status, choose the status for which you want to create a custom label.
- In the Custom label, enter your preferred name for the chosen status.
- Click Add to save the status mapping.
Communication Limit
Some users may fall into multiple segments while creating campaigns and thus receive more than one marketing message within a short time frame. Communication Limit allows you to limit the number of messages users will get during a particular period from a specific channel or all channels.
Steps to configure communication Limit
- Click on the settings button in the top right corner to head towards the Campaign Settings section.

- Now select the message settings section. Scroll down to find Communication limits section.
- Now here to add a new Limit click on the +add Limits button.
- Now Configure the Limit.
- Select the channel on which you want to put up the limit or else can also select the option of overall to put the limit over all the channels.
- Select the channel on which you want to put up the limit or else can also select the option of overall to put the limit over all the channels.
- Now when you will select the channel you will be able to see the options of selecting time limit whether you want the limit to be on a daily basis or weekly basis or monthly basis.
- Also, you have to add the count of messages you want to send.
- Now click on done.
WhatsApp setup
WhatsApp Client Onboarding
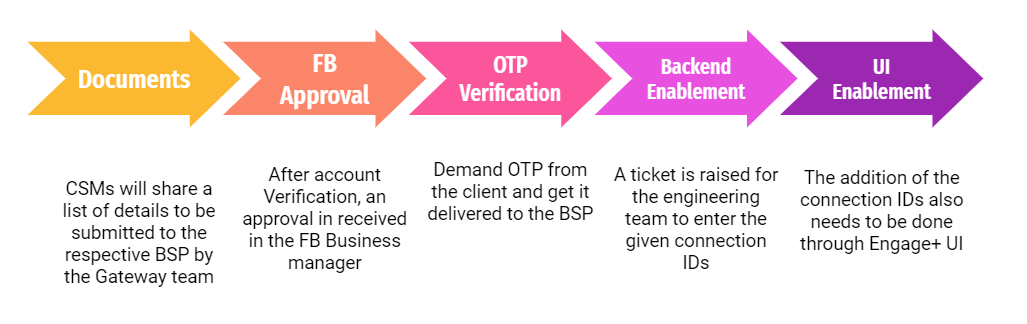
Above mentioned is a 5 step process in which a client is onboarded on WhatsApp and is required before even being able to send the first message through this channel.
**Step 1:**Requirement of documents to be shared with the client to capture the required information from them and share it with the BSP. Here is the link to a folder containing all the required documents, pricing and checklists to be asked from your brand.
Step 2:Configuration through Meta account.
Step 3:OTP confirmation.
Step 4:Raise a ticket with the backend or sustenance team to enable the integration and provide them with the following three parameters:
- WABA ID or Account SID
- Auth token or API Key
- WhatsApp Sender ID or Messaging Service ID
1. WABA ID ACCOUNT SID: To be requested from and shared by the BSP's (Tanla/Twilio/other) POC to the CSMs, mostly on a mail.
2. Auth token API Key: Following are the steps to retrieve auth token for Karix/Tanla:
- Visit the Karix lounge
- Input the username, which is the Account name as received from the BSP's mail.
- Click on Forgot Password. Enter your Capillary mail and brand phone number to generate the password.
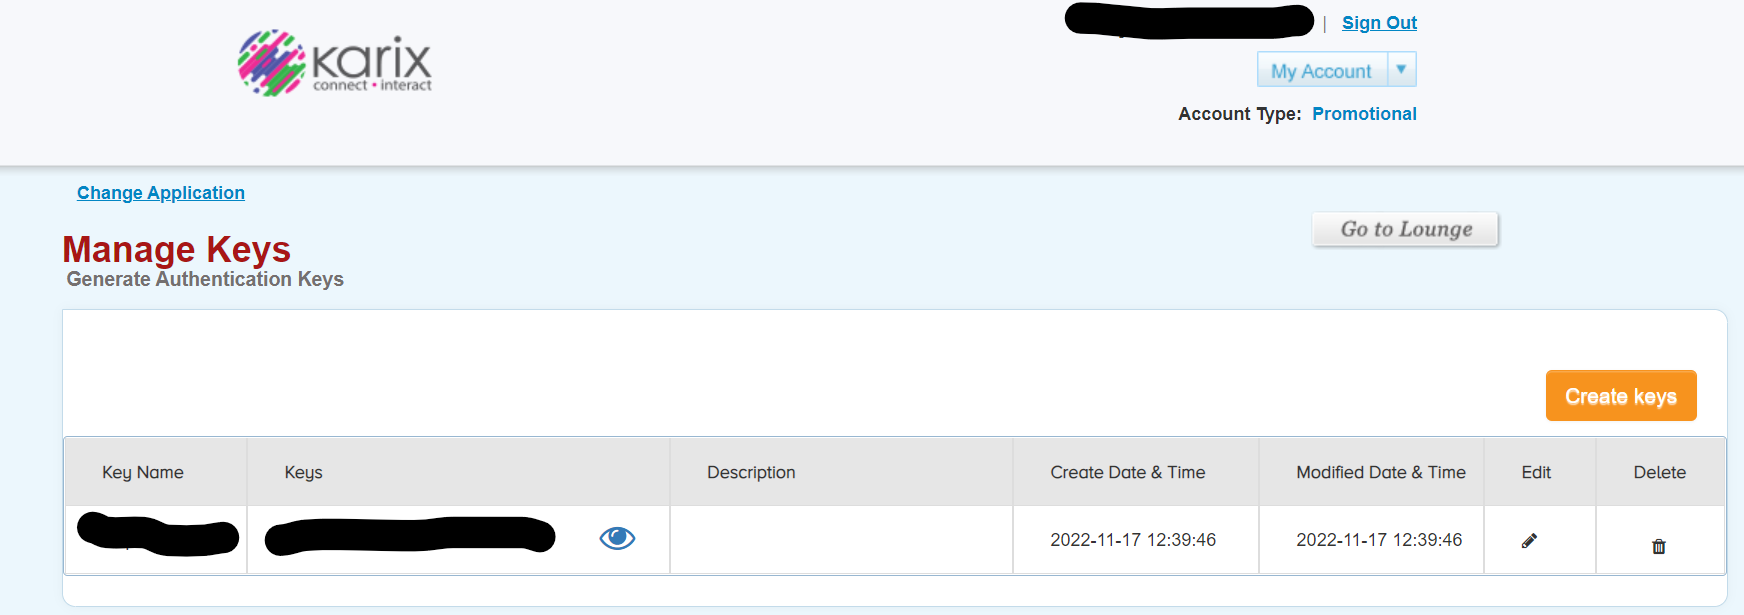
- Thereafter, generating the password login into the Karix Lounge and click on API Keys as shown below,
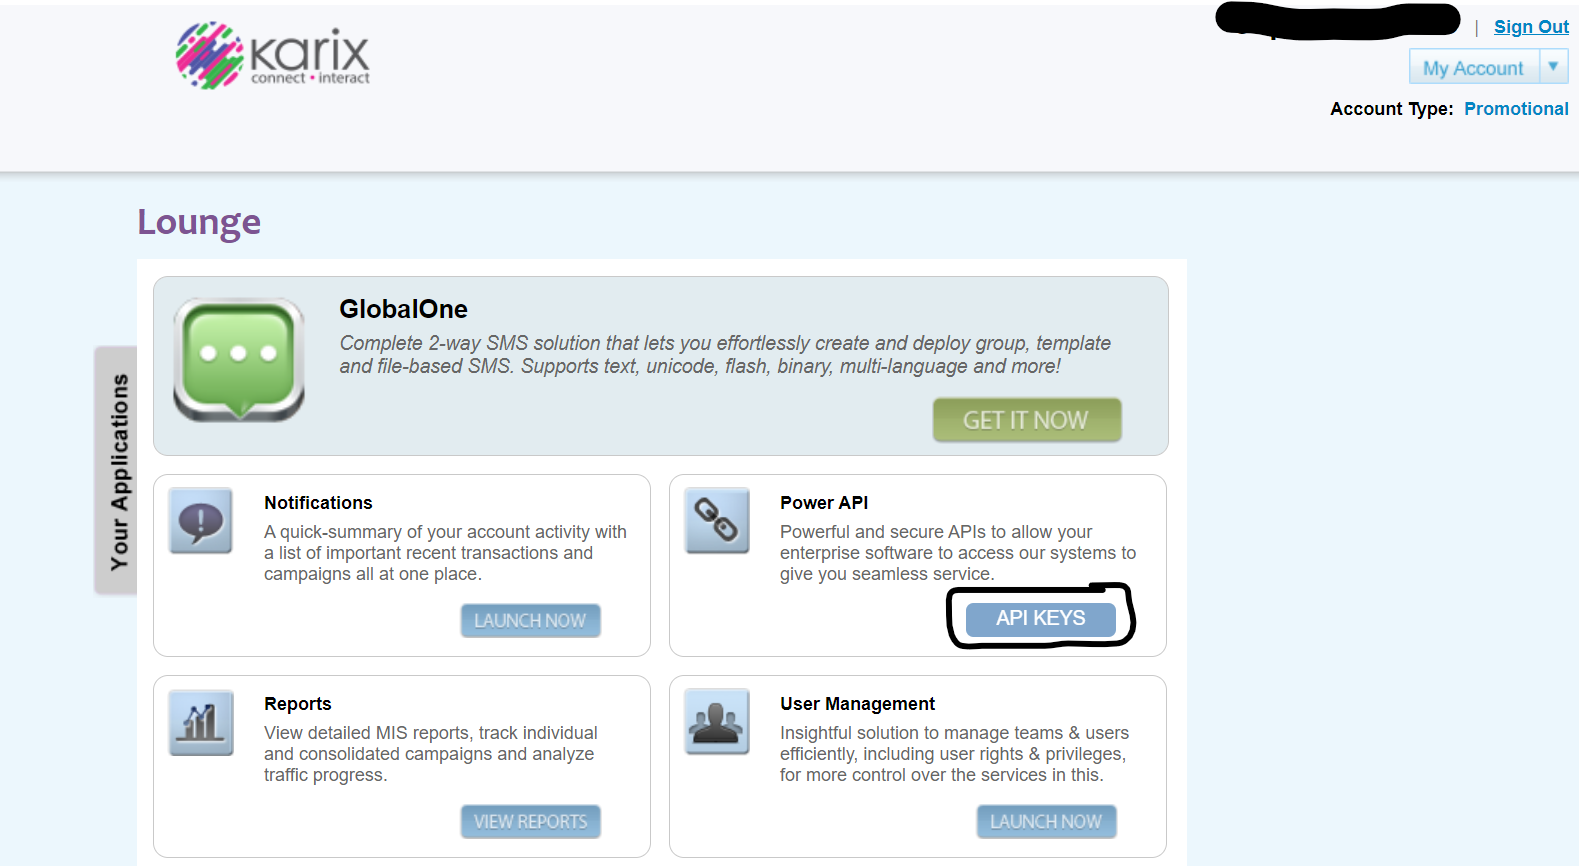
- The Alphanumeric mentioned under Keys is the Auth Token/API Key, while the Key Name should be saved for later use (For adding DLT Endpoint).
3. WhatsApp Sender ID Messaging SID: This is the WhatsApp phone number of the client's official account and it is the same shared to the BSP's (Tanla/Twilio/other) POC when filling in the onboarding details.
Step 5: Add the Connection IDs
Org settings -> Channel configurations -> Search for Whatsapp -> Add relevant Connection IDs as provided by BSP
- Access token
- Source Account ID
Complete the account setup through the organisation settings in the product UI.
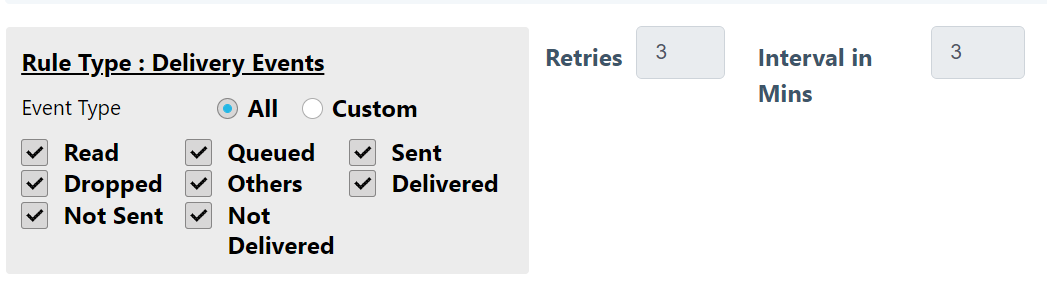
Adding the DLT Endpoint in the Karix UI
- Go to the Karix Portal.
- Use the same credentials for login as used above for the Karix Lounge.
- On the left-hand side choose WhatsApp Campaigns > Webhook Config > Delivery Rule > Create New.
- Click on Create New and add the DLT end point URL in the first space bar. URL to add: ""
- Under Header, add the Key retrieved above from the Karix Lounge and Value would be the Auth Token/API Key.
- Next choose the following settings and save them,
NoteFor a better understanding of WhatsApp, watch the easy-to-learn training on our academy.
Gupshup integration for Whatsapp communication
You can use integrate and use Gupshup > to send communications through Whatsapp from Capillary platform.
To integrate, perform the following:
Onboarding
- Enter the below details in the onboarding details form.
- Business name and FB manager ID
- Country Details and Use cases
- WhatsApp Phone numbers ( UAT and PROD )
- WhatsApp Business profile setup - Display name, Type of company, Industry etc.
- Callback URLs
- Business Contact Details
- If the Live Agent Dashboard feature is required, enter the following details in the Live Agent Dashboard form:
- Primary use cases and WhatsApp number
- URL Preference
- Email id of the admin
- Whether the Gupshup bot is enabled on the clients number. If yes, API key and bot name should be mentioned
- CRM used by the business
- If the Instant Bot Enablement feature is required, enter the required details in the Keyword based Responses form. This feature allows businesses to interact with their clients via WhatsApp 2-way messaging. This feature is intended to reduce the time for a business to configure a bot to interact with its customers.
Email setup
Onboarding Email Client and Setting
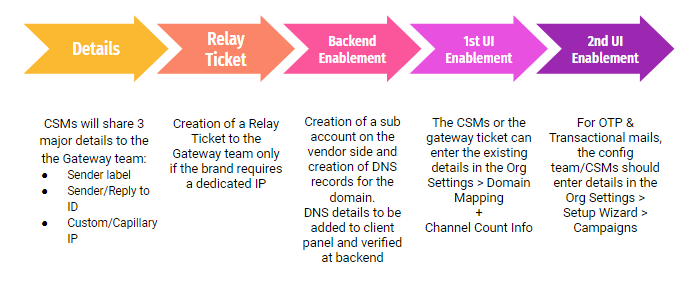
Step 1: The Gateway team requires the following prerequired details from the CSM team about the client to proceed with the onboarding process.
- Sender label/sender name: This represents the name by which the clients want to send the email to their customers. eg. Like capillary tech. wants to communicate regarding Capillary academy programs this will be the label for them -

- Sender/Reply to ID: Here Sender ID refers to the email id that the org wants to use to send the email. e.g. in the above image "[email protected]" is the sender id. The org chooses one of the two options, either they choose the sender id itself to receive the reply mail or they use the "Reply to" Email ID for getting the reply mail separately.
- Custom/Capillary IP: The IP address that we use while sending the email can be of two types, either Custom IP(dedicated to the brand) or Capillary's IP. Generally, well-established brands use a custom IP address. Whereas the brands new in the journey use the Capillary IP address. This is done to avoid sending emails to the Spam mail section. This all depends on the IP ranking based on the authenticity that is done by the Email providers(e.g. Gmail & Yahoo)
Step 2: Now if the client opts for Custom IP then a relay ticket is generated to the gateways team. Here Gateway team follows a convention for naming these domains. Intouch(our system)--> Send Grid(vendor)
Step 3: Here we have to create the sub-account on the vendor side. Creation of the DNS records for the domains. DNS details are to be added to the client panel and verified at the backend.
Step 4: The CSMs or the gateway team can enter the existing details in -
Org Settings > Domain Mapping+Channel Count Info
** Step 5**: For OTP & Transactional mails, the config team/CSMs should enter details in - Org Settings > Setup Wizard > Campaigns
There can be scenarios wherein emails get soft/hard bounced which eventually starts to impact the delivery. In this case, all you need to do is whitelist such emails (which are unable to receive messages triggered from Capillary), on the Capillary Engage+ setting. We now give the option to upload and whitelist a bigger chunk of emails at once. You can find this option under Engage+ settings.
Go to Engage+ settings > Email whitelisting > Upload the csv > Done!
Subscription Update Language
You can control the language of the success or failure messages sent when a user clicks the Subscribe or Unsubscribe link in an email by using the CONF_ORG_SUBSCRIPTION_UPDATE_MSG config. For details, refer to Subscription Message Language Configuration
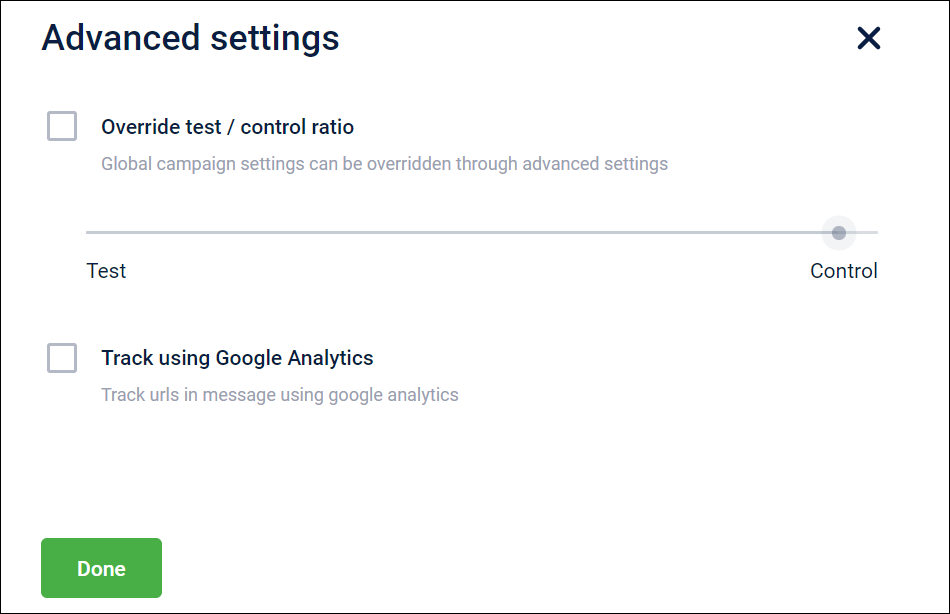
Advanced settings
Advanced settings allow you to modify the campaign level test and control ratio and add a Google Analytics account.
Test and control ratio
Test and Control is the audience group ratio between who receives the campaign communication and who does not. The test and Control ratio determines the effectiveness of a campaign by comparing the sales generated through the test audience and the control audience.
- Test audience: This audience group receives campaign communication.
- Control audience: This audience group does not receive the campaign communication.
Type of Test & Control:
- Organization level: Test and control audience remains the same for all the campaigns. Recommended for a long duration, to track the performance of all the campaigns.
- Campaign level: Different campaigns will have different test & control audiences. Recommended for short (campaign) duration, to track the performance of a particular campaign.
NoteWe recommended you use either campaign level test & control or org level test & control. If you use both methods, the result data will not be effective.
Configure Test & control ratio
Organization level Test & control ratio
To change the Test and control ratio at the Organization level, follow these steps:
- On the InTouch portal, go to **Home > Engage+ **> Open old campaign manager.
- Click on the settings icon from the right hand corner and select Test and control.
- Move the indicator dot on the sliding bar to change the ratio.
- Tick the checkbox to confirm: I understand that changing the ratio will reassign test-control status to all customers.
- Click Submit.
The Org level test & control settings is configured successfully.

Campaign level Test and Control ratio
To change the Test and control ratio at the campaign level, follow these steps:
- Open an existing campaign or create a new campaign.
- Click on the Advanced Settings option.
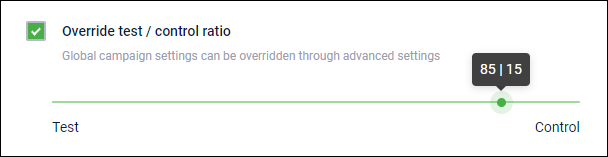
- Select the Override test control ratio checkbox.
- Move the indicator dot on the sliding bar to change the ratio.
- Click Done
Google Analytics
Google Analytics provides you with a detailed report of your campaign performance and all the different source data for it. You can link your Google Analytics account to our product to get the insight information about your campaign and source data.
Adding your Google Analytics account to a campaign
To add your Google Analytics account to a campaign, follow these steps.
- Open an existing campaign or create a new campaign.
- Click Show on the Advanced Settings option.
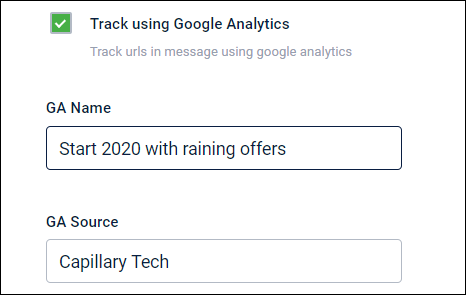
- Select the Track using Google Analytics checkbox.
- In the GA Name, enter your Google Analytics campaign name.
- In the GA Source, enter your Google Analytics source name. Ex: Capillary Tech
- Click Done.
Cart promotions
This page lets you configure some key org-level promotion settings.
To configure promotion settings, on Engage+, navigate to Settings > Cart Promotions. Click on the section that you want to configure.
- Select cart & line item evaluation mechanism
- Enable multiple promotions for a single line item
- Select promotion ranking strategy
- Enable ranking based on promotion type
- Custom fields
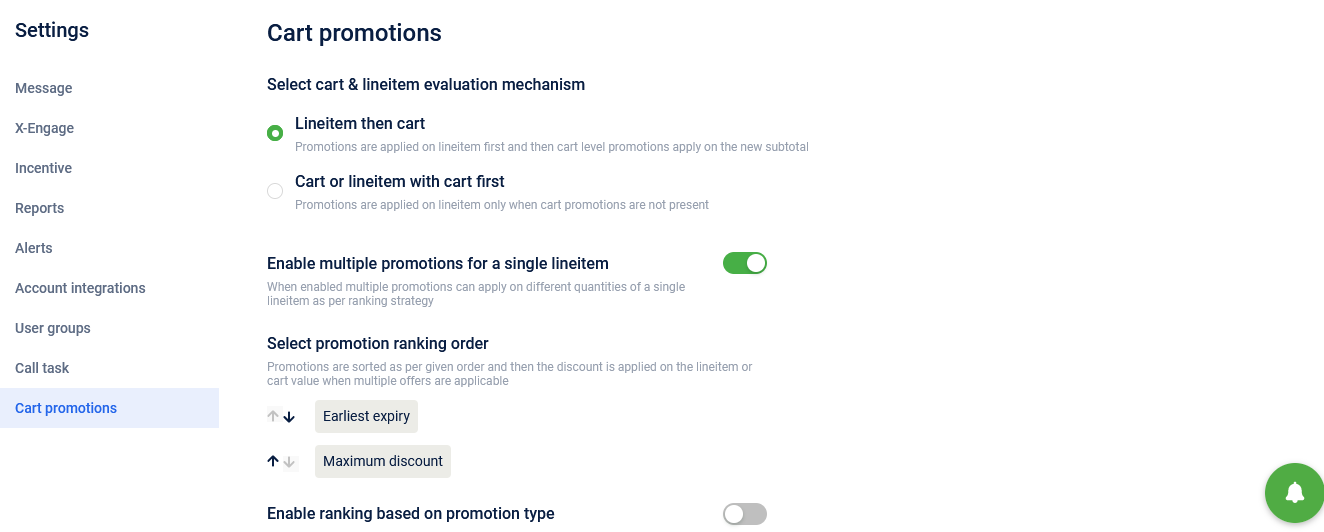
Select cart & line item evaluation mechanism
This lets you set the order of evaluation on the entity level.
- Line-item with cart: Select this option to first apply for promotions on line-item and then the cart level promotion on the new amount (sub-total). For example: Assume the cart items mentioned in the table and their prices along. Promotions are applied as per the following ranking.
- 10% off on shoes
- Buy 1 towel & get 1 free
- 10% off on cart for purchases above 99
| Lineitem | Quantity | Value | Amount | After promotion discount (#1, #2) |
|---|---|---|---|---|
| Shoes | 1 (pair) | $100 | $100 | $90 |
| Towel | 2 | $10 | $20 | $10 |
| Total | 3 | $ 110 | $120 | $100 |
Now as per the option, promotion #3 is applied on the cart subtotal (after the line-item promotion is applied) -$100.
- Cart or line-item with cart first: Select this option to apply for cart promotions first. If cart promotions are not available, then apply for line-item promotions. Considering the previous example, only Promotion #3 (cart promotion) will be applied. No line item promotions are applied.
Enable multiple promotions for a single lineitem
Enable this option to allow multiple promotions on different quantities of a line item or SKU.
For example, consider the following items in the cart.
- 2 coke
- 3 biscuits
- 1 chai
If this is enabled, then multiple promotions are applied (see the below example)
- 10 off on one coke
- 10% off on coke
Select promotion ranking strategy
When there are multiple promotions applicable for cart items (cart or catalog discount), you can define the ranking of promotions before applying them.
The promotion is either based on the maximum discount or earliest expiry. However, there could be instances where more than one promotion could be applicable to the cart or product. The secondary parameter is auto-applied in such cases.
- Earliest expiry: Select this to associate the promotion that has the earliest expiry date compared to other promotions that are applicable. For example, assume the following promotions are applicable for Cart items - 2 shirts,3 Jeans, and 1 t-shirt - the following promotions are applicable.
- 100 off on T-shirts expiring in 3 days.
- 20% off on jeans expiring in 7 days.
- 10% off on jeans expiring in 5 days.
- 100 off on shirt each shirt expiring in 1 day.
- 10% off shirts expiring in 10 days.
- Buy 1 shirt get 1 shirt expiring in 1 day
In this, the promotions are sorted by the expiry date and applied as follows.
- Buy 1 shirt get 1 shirt expiring in 1 day - Applied
- 100 off on shirt each shirt expiring in 1 day
- 100 off on T-shirt expiring in 3 days - Applied
- 10% off on jeans expiring in 5 days- Applied
- 20% off on jeans expiring in 7 days
- 10% off shirts expiring in 10 days
In this example, you could observe that two promotions 1 and 2 (applicable on shirts) have the same expiry. In such cases, the system applies the one that was created earlier (say the first promotion was created earlier).
- Maximum discount: The promotion with the maximum discount value is considered. However, if there is more than one promotion with the same maximum discount value, among these promotions, the one that expires earlier is considered.
NoteIf the conflict still persists, then the system would choose a promotion randomly.
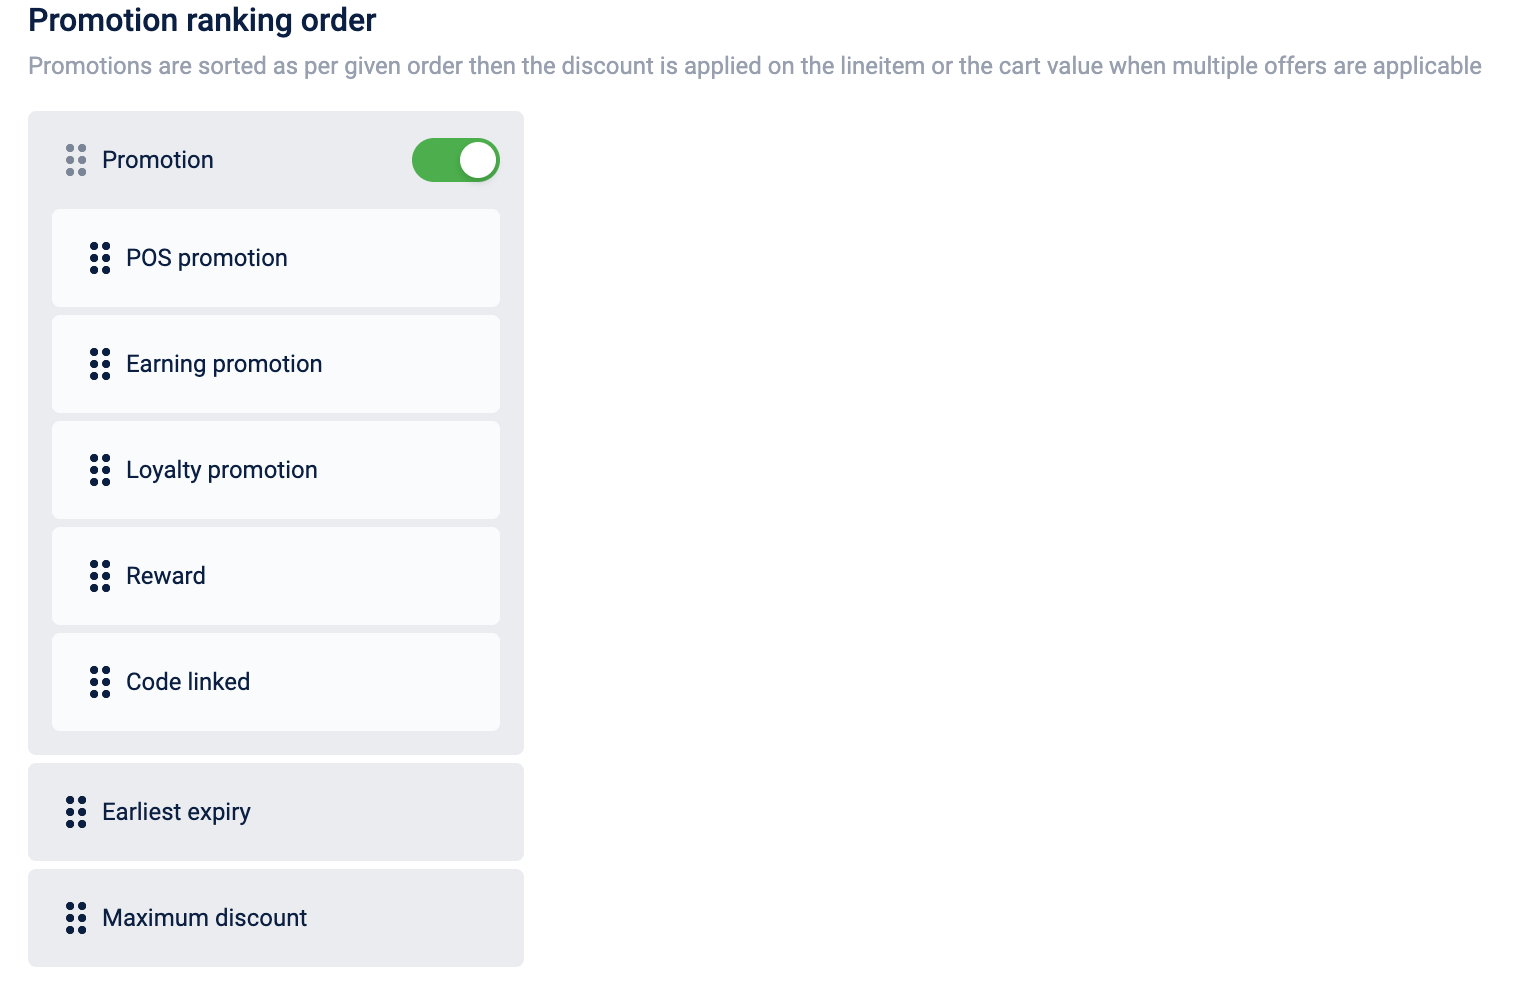
Enable ranking based on promotion type
Enable this option to prioritize the promotions.
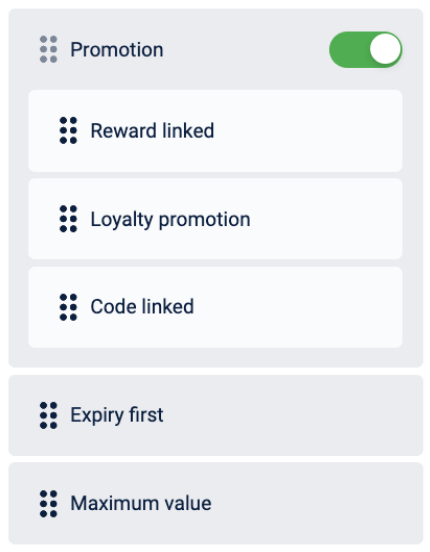
- Promotion first: Select this to prioritize normal promotion programs such as Loyalty, Loyalty earning, and POS promotions when normal, reward promotions and code-based promotions are applicable.
- Rewards first: Select this to apply all promotions purchased from the rewards catalog (Marvel rewards) irrespective of any other settings. If the org has multiple promotions per line item disabled, the setting is bypassed and multiple rewards will apply. Rewards are essentially considered pre-bought gift items.
- Code first: Select this to prioritize code-based promotions over customer or reward-linked promotions.
Cart promotions module previously offered three options for ranking strategies in cart promotions, including reward-based promotions, code-linked promotions, and customer promotions. However, within customer promotions, which include loyalty, loyalty earning, and POS promotions, there was no option for internal ranking.
To address this, we have made enhancements to the promotion ranking strategy in cart promotions to include the ability to rank between loyalty, loyalty earning, and POS promotions.
Ex: a POS promotion can be ranked above loyalty or loyalty earning promotion. This ranking applies to both gift voucher (payment voucher) and cart promotions (discount).
For the orgs already using cart promotions stacking order, a confirmation message is added, post accepting, all types of promotions will be listed and this action can't be reversed
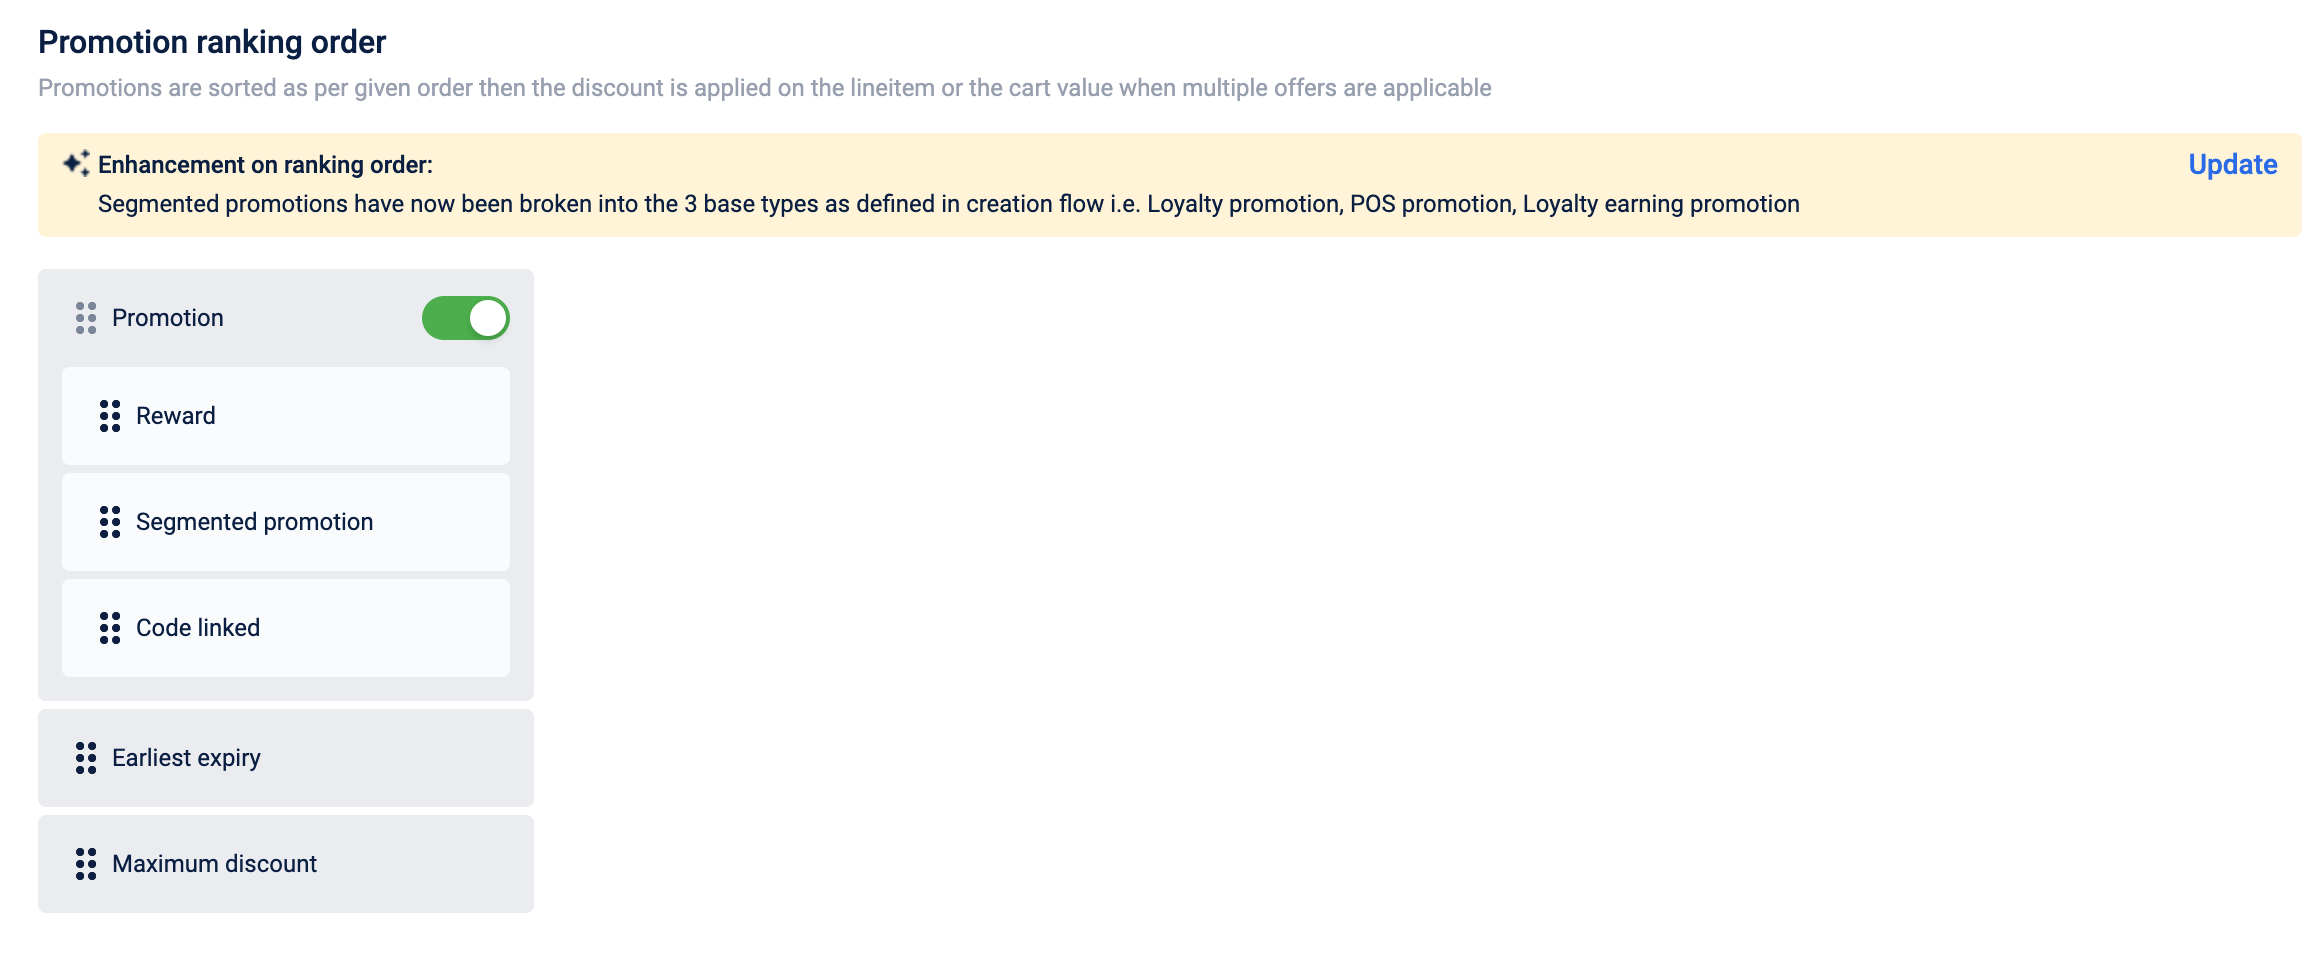

For orgs that are not using promotion stacking order, all types of promotions will be available for stacking.
API Changes:
/v1/promotion-management/promotions/settings
- New parameter issuanceTypePromotionRanking is added with default false. This ensures backward compatibility and flexibility that the new elements are optional.
- New parameters are added to Reward Ranking Strategy: POS_PROMOTION_FIRST REWARDS_FIRST CODE_FIRST
To get started, When issuanceTypePromotionRanking is set to true, 3 new types are added as follows:
- POS Promotion
- Loyalty Promotion (Translates to customer promotion in backend)
- Earning Promotion
PROMOTION_FIRST will not be added in request, instead PROMOTION_FIRST will be replaced with the new types mentioned above.
For eg if your ranking strategy is as per below,
- POS promotion
- Loyalty promotion
- Loyalty earning promotion
- Reward-linked promotion
- Code-based promotion
Below sample shows the payload that needs to be passed as request
{
"rewardRankingStrategies": [
    "POS_PROMOTION_FIRST",
    "LOYALTY_PROMOTION_FIRST",
    "EARNING_PROMOTION_FIRST",
    "REWARDS_FIRST",
    "CODE_FIRST"
    ],
    "issuanceTypePromotionRanking": true
  }
When issuanceTypePromotionRanking is set to false, all the other promotions other than reward and code based (i.e POS, Earning and Customer based) are treated as one unit. These changes will be applicable to all modes such as discount, payment vouchers and tenders.
Example 1
Requirement: Brands want to apply POS promotion first, then code-based promotions, and then rest of the promotions.
Based on the old feature, brands could rank code-based promotion first or loyalty promotion first (where the default ranking is loyalty, loyalty earning and POS)
Existing strategy: loyalty, reward-linked, code-based
| Promo Type | Type | Ranking |
|---|---|---|
| 10% discount to customers who purchase more than $50 worth of goods at a time. | POS | 3 |
| 5% discount on all items in the store for customers who enter the code "SAVE20" at checkout | Code-based | 4 |
| Payment mode discounts :10% always off on HDFC bank cards | Loyalty Promotions (tender based) | 1 |
| Get a flat 15% off on your purchase when you sign-up for email updates. The offer applies to the first 250 customers and each customer can avail the offer only once. | Loyalty Earned Promotions | 2 |
Based on the enhancement, brands can now rank any promotion first i.e POS can come before code-based promotion and loyalty earned promotion can come after code-based promotion.
New strategy: POS, code-based, loyalty, loyalty earned
| Promo Type | Type | Ranking |
|---|---|---|
| 10% discount to customers who purchase more than $50 worth of goods at a time. | POS | 1 |
| 5% discount on all items in the store for customers who enter the code "SAVE20" at checkout | Code-based | 2 |
| Payment mode discounts :10% always off on HDFC bank cards | Loyalty Promotions (tender based) | 3 |
| Get a flat 15% off on your purchase when you sign-up for email updates. The offer applies to the first 250 customers and each customer can avail the offer only once. | Loyalty Earned Promotions | 4 |
Example 2 - Fuel vertical
Brands want to apply POS promotions first (both for loyalty and non-loyalty customers) and then apply the rest of the promotions based on the selected strategy i.e. POS can be ranked higher than loyalty & loyalty earning. However if there is another POS promotion that gives a better discount, then it will be ranked higher and will apply.
| Promo Type | Type | Ranking | Calculated on |
|---|---|---|---|
| Fuel Discount | |||
| Eg. 5% off for all customers on Fuel | POS | 1 | Net Amount of the line item received from POS i.e SaleItems.Amount |
| Fuel Discount | |||
| Eg. National Day Offer: 2% off on all grades of Fuel | POS | 2 | Net Amount of the line item received from POS i.e SaleItems.Amount |
| Payment mode discounts | |||
| 10% always off on CITI bank cards | Loyalty Promotions (tender based) | 3 | Tender Value allocated to the line item SKU |
POS discounts along with MOP discounts
| Amount | Ranking | |
|---|---|---|
| Fuel | 100 | |
| Canopy-5% | 5 | 1 |
| National day-2% | 2 | 2 |
| CITI bank -10% | 10 | 3 |
Tender based promotions are always applied after regular promotions. After processing promotions for a customer, MOP discounts are processed and are applied separately.
Cautionary Note: Until UI is available
if issuanceTypePromotionRanking is false, then there are no issues in the UI and setup of ranking. if issuanceTypePromotionRanking is true, then brands can use the API to define the ranking of promotions and it will work but later, if they use the UI to make any changes and save it then it will reverse to the original state.
API endpoint and request body here
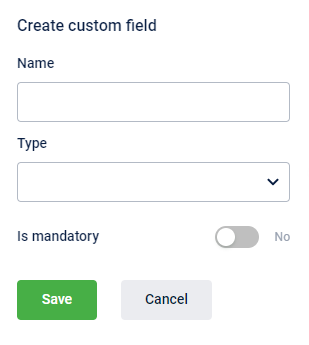
Custom fields
You can add promotion level custom fields (meta-information) that are required for your promotion. For example, you can include Terms & Conditions, Disclaimer, and so on.
To add promotion custom fields:
- In Custom Fields, click Add custom field
- In Name, enter the name of the custom field.
- In Datatype, choose the input value supported for the custom field - Date (for date fields), Number (to input numeric values), String (to input alpha-numeric values).
- If the field is required to create a promotion, check Mandatory.
- Click Save. You can see the fields you added here in the Additional Information section of the promotion configuration page.
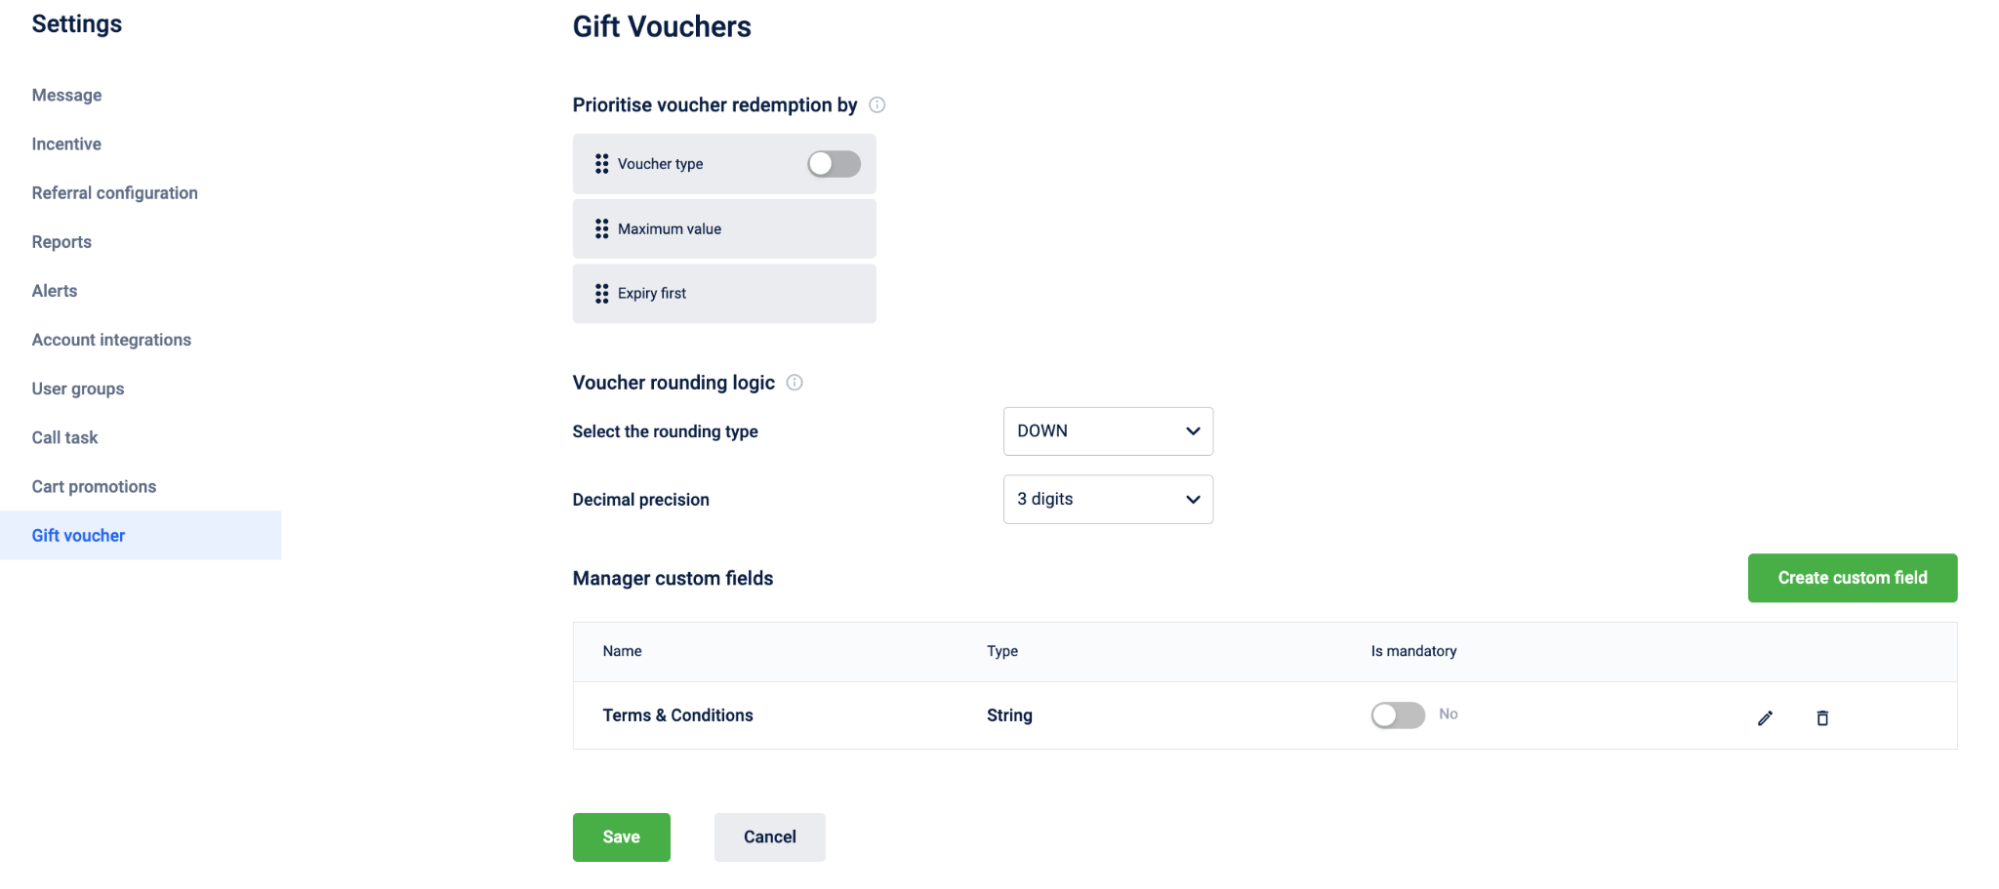
Gift Vouchers
This page lets you configure some key org level gift voucher settings.
To configure gift voucher settings, on Engage+, navigate to Settings > Gift Voucher. Click on the section that you want to configure.
- Prioritize voucher redemption by
- Voucher rounding logic
- Manager custom fields
Prioritize voucher redemption by
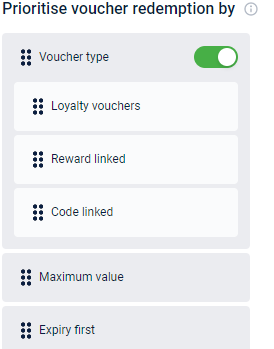
1. Voucher Type
Under this section, you will see a toggle button for voucher type. It is non movable and will always remain at the top priority. So, while redemption, the first priority will always be given to the type of voucher to be redeemed if this is enabled. When there are multiple promotions in the org, you can enable the toggle button and the drop down shows 3 kinds of promotions:
- Loyalty Vouchers - Drag this up to prioritize normal promotion programs such as Loyalty, Loyalty earning and POS promotions.
- Reward Linked - Drag this up to apply all promotions purchased from the rewards catalog (Marvel rewards) irrespective of any other settings. If the org has multiple promotions per lineitem disabled, the setting is bypassed and multiple rewards will apply. Rewards are essentially considered as pre-bought gift items.
- Code Linked - Drag this up to prioritize code linked promotions configured in the cart and catalog promotions.
2. Maximum Value & Expiry First
In case of multiple vouchers, we can define the ranking for the vouchers, that which will get redeemed first. The vouchers are based on either maximum discount or earliest expiry.
- Maximum Value - Drag this up to associate the voucher with maximum discount value compared to other vouchers that are applicable.So, the vouchers with more discount values will apply first. However, if there is more than one voucher with the same maximum discount value, among these vouchers, the one that expires earlier is considered.
- Expiry First - Drag this up to associate the voucher that has the earliest expiry date compared to other vouchers that are applicable.
For example, assume the following vouchers are applicable.
- Riders -VCHR 9% expiring in 3 days
- Riders - VCHR 5% expiring in 7 days
- Riders - VCHR 8% expiring in 1 day
So, the vouchers will get sorted by expiry date and are applied as follows :
- Riders - VCHR 8% expiring in 1 day
- Riders -VCHR 9% expiring in 3 days
- Riders - VCHR 5% expiring in 7 days
If two vouchers have same expiry dates, then the voucher created first would be applied first.
NOTE - If the conflict still persists, then the system would choose a promotion randomly.
Voucher Rounding Logic

Select the rounding mode and the decimal precision required as per your billings.
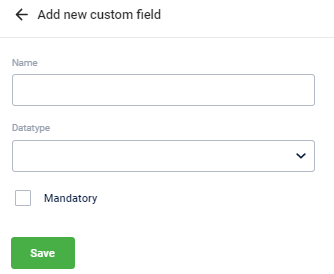
Custom Fields

You can add voucher level custom fields (meta-information) that are required for your gift vouchers. For example, you can include Terms & Conditions, Disclaimer and so on.
To add voucher custom fields :
- Click on Create custom field under the Manager custom fields.
- In Name, enter the name of the custom field.
- In Datatype, choose the input value supported for the custom field - Date (for date fields), Number (to input numeric values), String (to input alpha-numeric values).
- If the field is required to create a promotion, enable the toggle is Mandatory from No to Yes.
- Click Save.
You can see the fields you added here on the same page below the Manage custom fields with the name, datatype and mandatory option. You can edit the custom field by clicking on the pen option against each row.
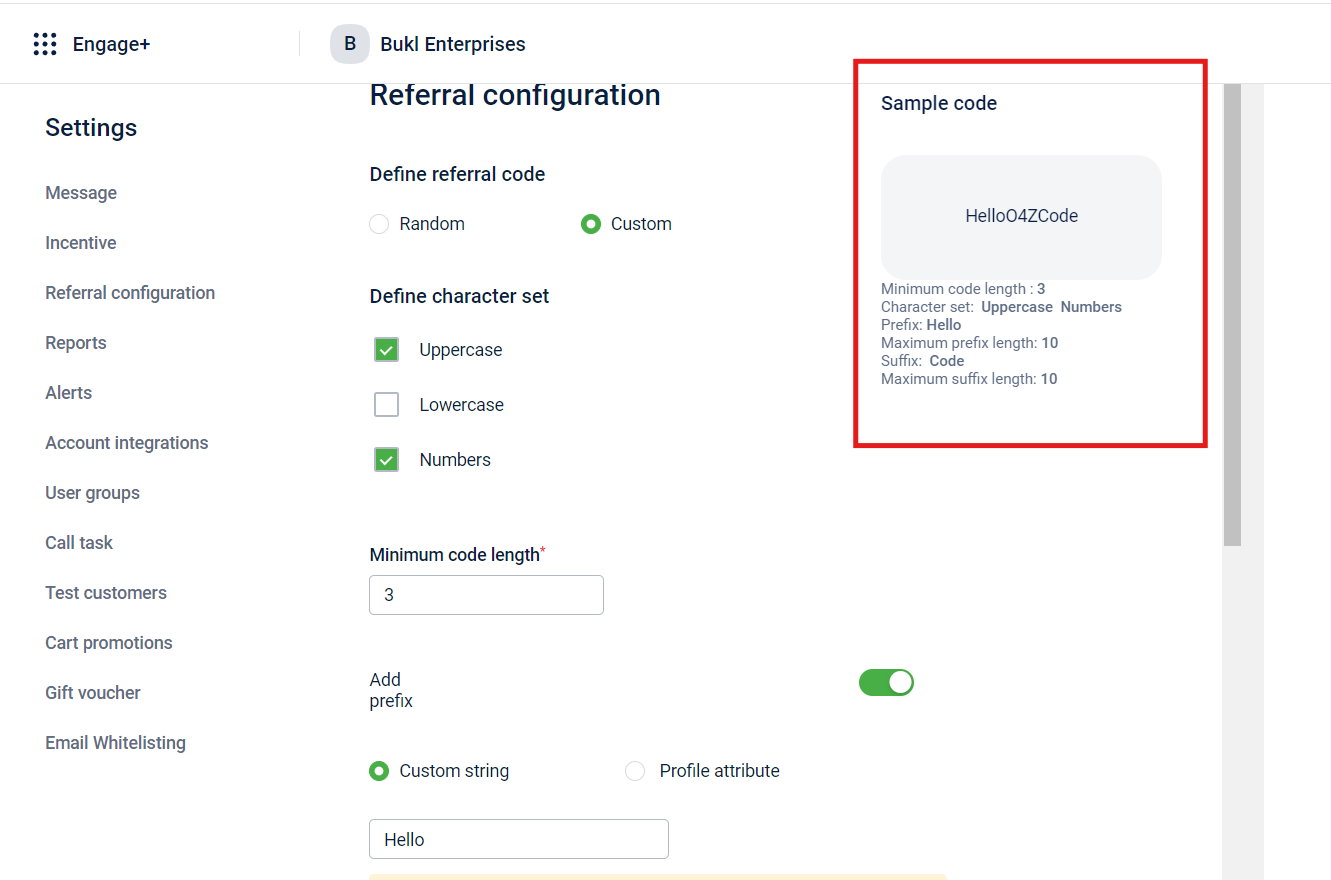
Referral Configuration
This page lets you configure referral codes.
To configure,
- Navigate to Engage+ > Campaigns > Settings.
- On the settings page, select Referral configuration.
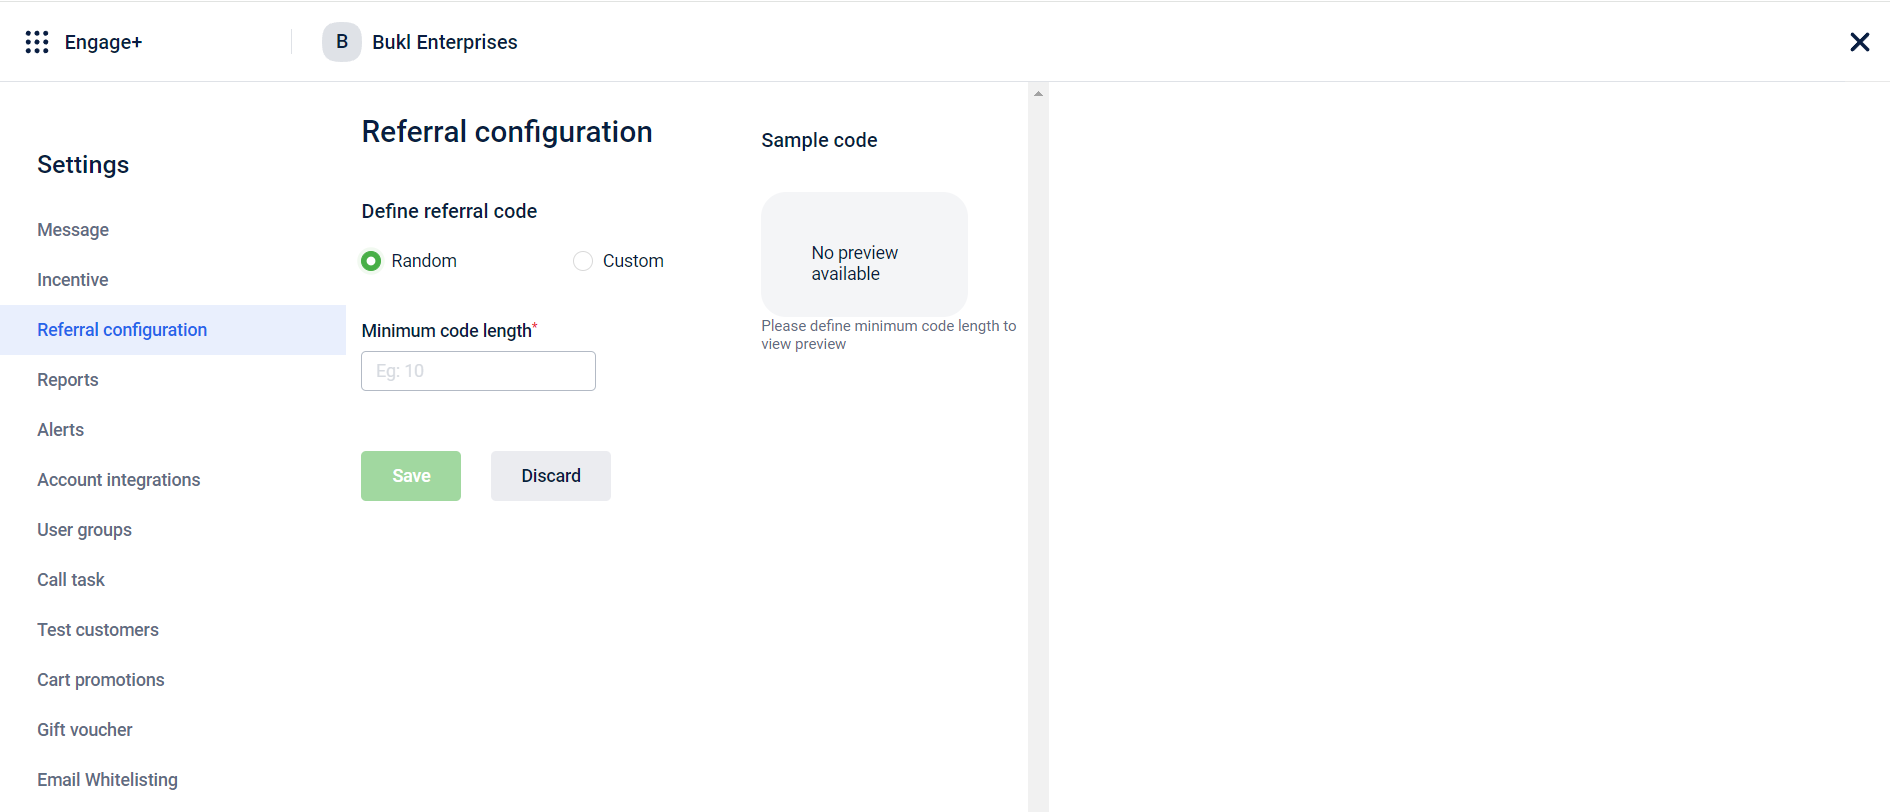
- On Define referral code, you can select one of the following options:
- Random: The system will generate random referral codes.
- Custom: You can customise the referral codes.
- On selecting Random, perform the following options: a. In the Minimum code length field, you can enter the number that sets the minimum number of characters that you want for your referral code. b. Select Save.
- On selecting Custom, perform the following options:
a. On the Define character set section, you can select the following options:
- Uppercase: This option will make the characters in your referral code uppercase.
- Lowercase: This option will make the characters in your referral code lowercase.
- Numbers: This option will add numbers to your referral code.
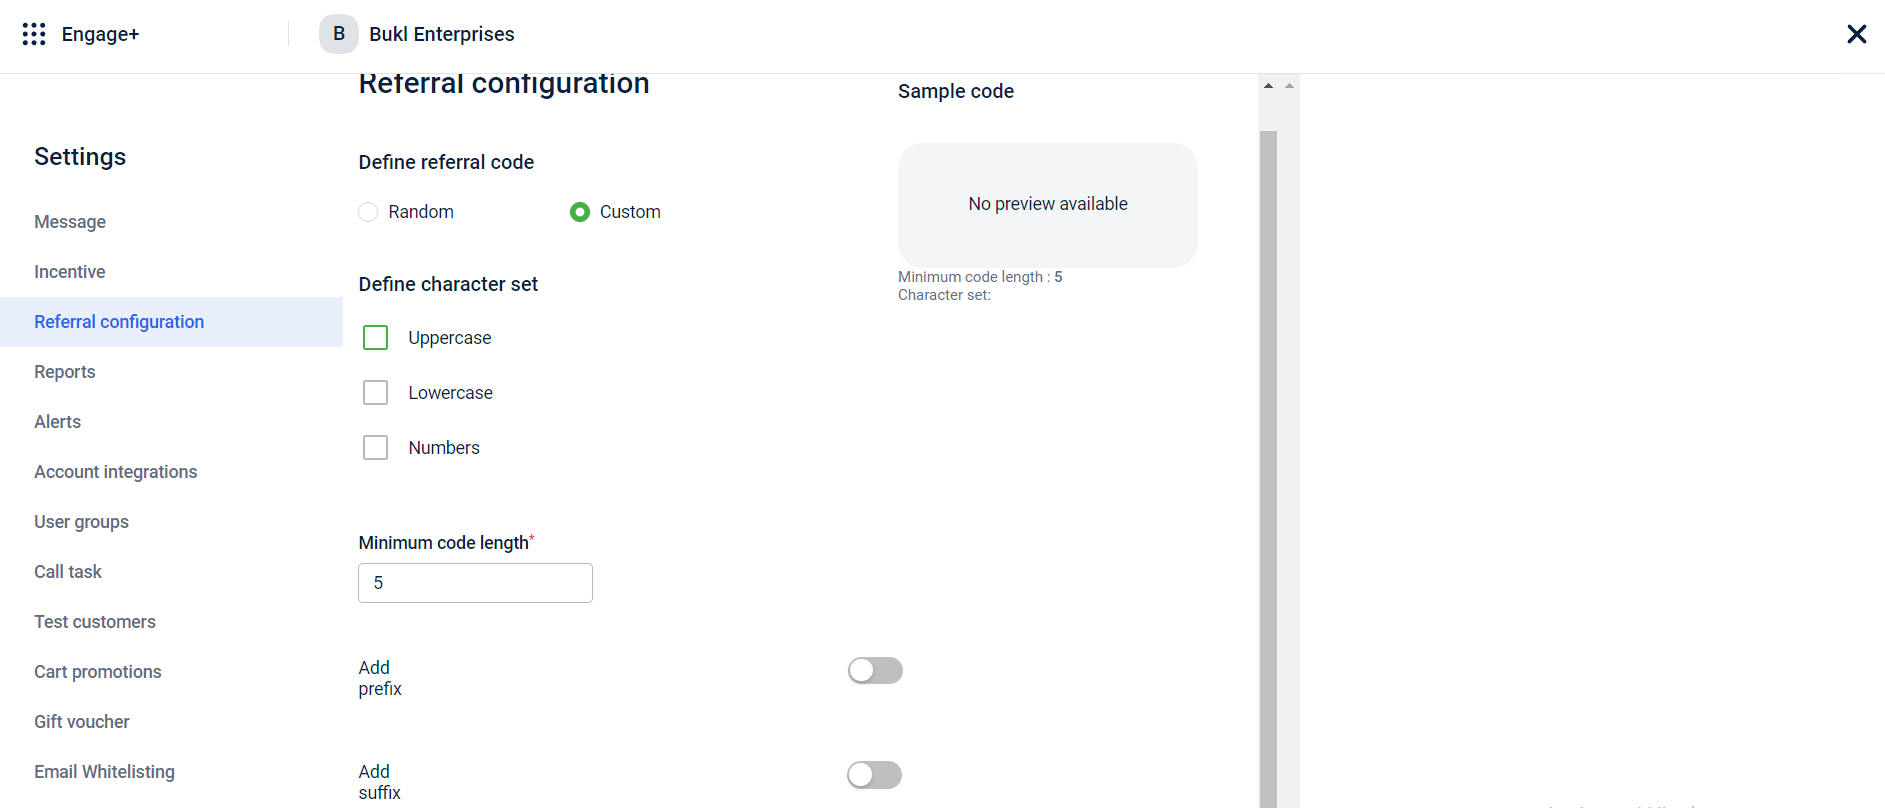
b. In the Minimum code length field, you can enter the number that sets the minimum number of characters that you want for your referral code.
c. On the Add prefix section, enable the button to add characters at the beginning of your referral code.
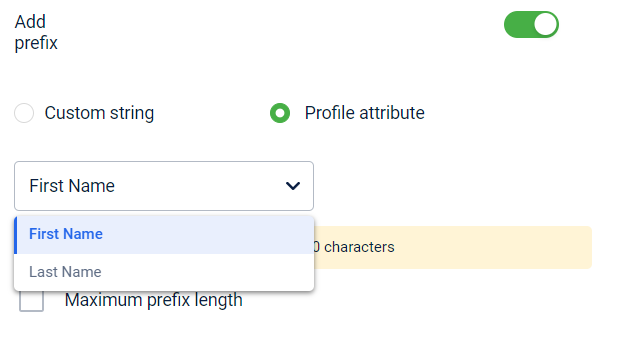
d. On enabling Add prefix, select one of the following options:
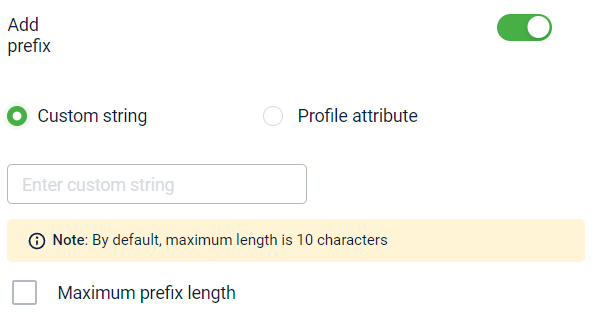
- When you select Custom string, you can enter the desired characters that you want as a beginning for your referral code in the provided field.
- When you select Profile attribute, You can choose First Name or Last Name of the referrer from the drop-down menu to use as the beginning of your referral code.
e. To configure the maximum length for your prefix, check the Maximum prefix length box and enter the desired length number in the provided field.
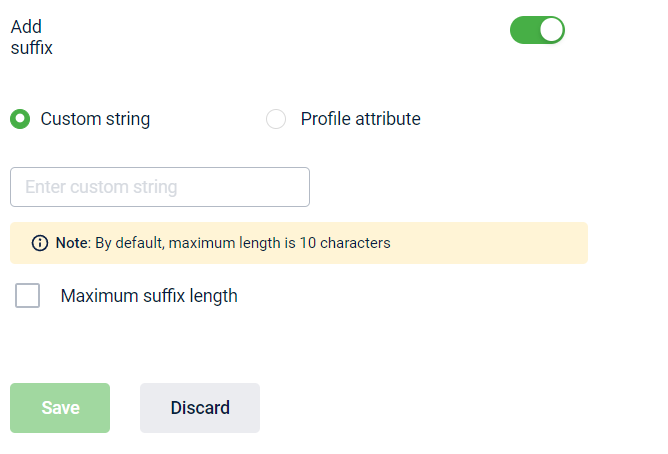
f. On Add suffix, enable the button to add characters at the end of your referral code.
g. On enabling Add suffix, select one of the following options:
-
When you select Custom string, you can enter the characters that you want as an ending for your referral code in the provided field.
-
When you select Profile attribute, you can choose First Name or Last Name from the drop-down menu to use as the ending for your referral code.
h. To configure the maximum length for your prefix, check the Maximum prefix length box and enter the desired length number in the provided field.
- Select Save.
Use case
Consider that we are configuring a referral code with a length of 3 characters with the prefix "Hello" and suffix "code".
To configure,
- Navigate to Engage+ > Campaigns > Settings.
- On the settings page, select Referral configuration.
- On the Define Referral code section, select Custom.
- On the Define character set section, select Uppercase and Numbers.
- In the Minimum code length field, enter ”3”.
- On the Add prefix section, enable the button and perform the following: a. Select Custom string. b. In the Custom string field, enter “Hello”.
- On the Add suffix section, enable the button and perform the following: a. Select Custom string. b. In the Custom string field, enter “code”.
- Select Save.
You can see your configured referral code in the Sample code section.
Updated 19 days ago