
Customer overview
In Member Care, you can view profile information, customer status, subscription details, interactions, transactions, and other loyalty details of a customer. This section provides information on how to access customer details and update specific information from Member Care.
To view the overview of customer details:
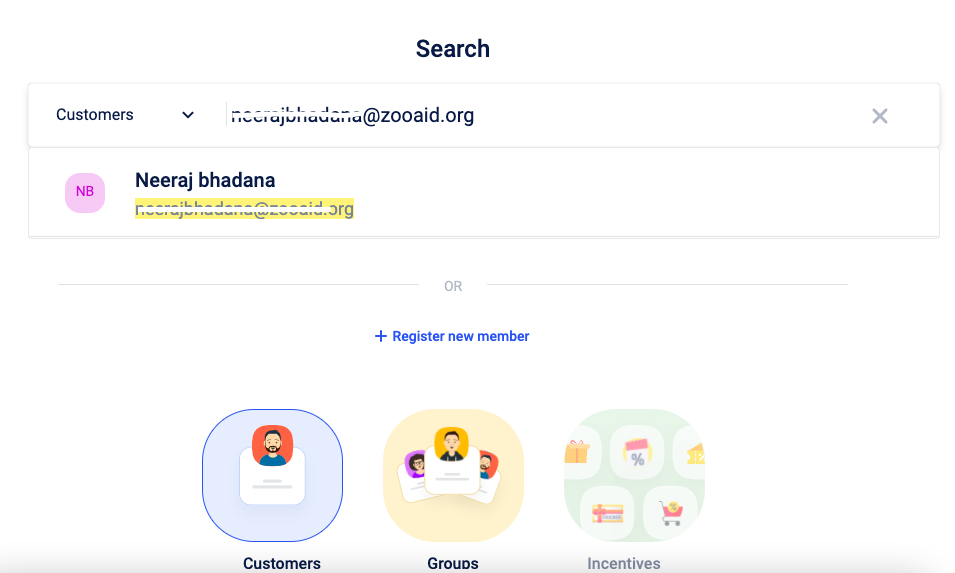
- Log on to InTouch and navigate to Member Care.
- From the drop-down in Search, select Customers.
- In the search box, enter the complete customer identifier such as registered mobile number, email ID, external ID, card number, card external ID, or name, and from the search result list select the customer profile.
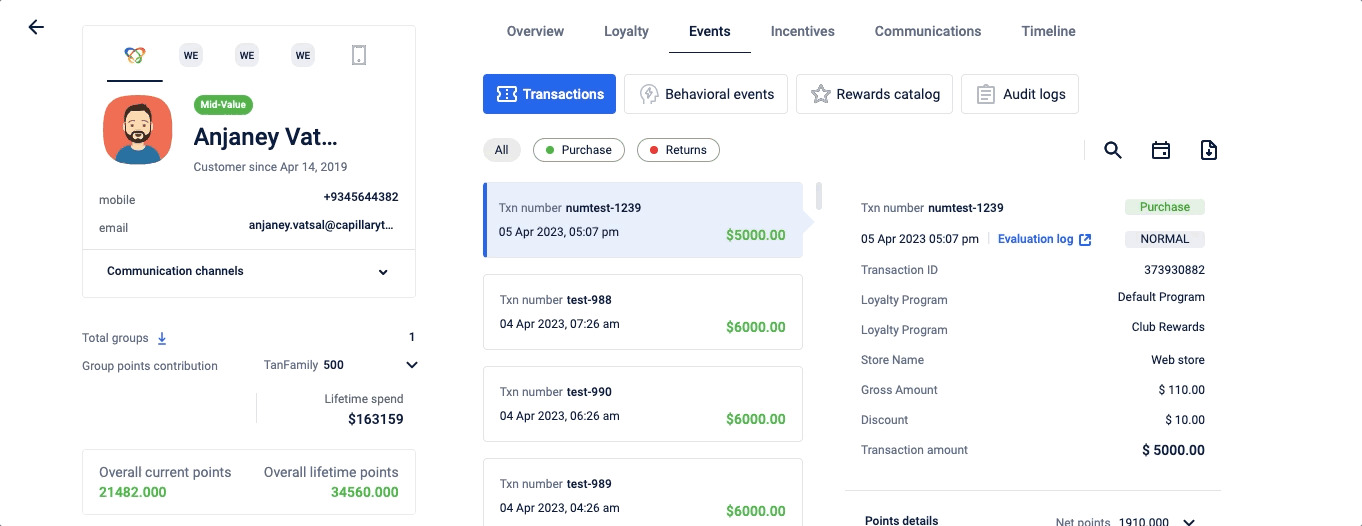
By default, the application displays the Overview tab. The Overview tab displays the basic details of the customer. This page is also called Customer Single View (CSV).
To know more details about the customer click the Loyalty, Events, Incentives, and Communications tabs.
Note
If a user does not have permission set, PSI values are masked and displayed as
XXXXX. For more information, refer to the data masking documentation.
Overview
The overview tab contains below details:
Source profiles
This page shows the customer registration sources in multiple tabs. Capillary supports different sources such as InStore, Facebook, Webengage, WeChat (China-specific), mobile app websites, Line, TMALL, E-commerce sites, WhatsApp, and more.
By default, InStore is set as the default source. There are also sources such as Mobile Push, Facebook, and WeChat that can have multiple accounts within the org. You can see the customer details from each account of the source.
For example, in the above image, you can see numbers on top of the profile icons. The number 3 on the Whatsapp icon means that the customer has profiles from three WhatsApp accounts of the org. You can click on the Whatsapp icon and choose between one of the three profiles that you want to see.
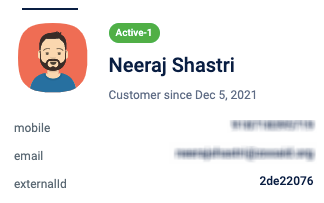
Customer status and name
This section shows the current status (custom status label or fraud status) of the customer, the name, and the date when the customer registered. The customer status setting is not by default enabled for an org, its enabled only on a request from the Success team.

All orgs might not have Customer Status enabled. Hence, you would see Fraud Status (default enabled) for orgs that have not enabled Customer Status. The Fraud Status is the legacy version of Customer Status.
Fraud status contains predefined values (MARKED, CONFIRMED, NOT_FRAUD, RECONFIRMED, INTERNAL), unlike Customer label which contains user-defined values (called custom labels).
This remains blank when Both Customer Status and Fraud Status are not set for the customer.
You can also see the Status card available in the overview tab.
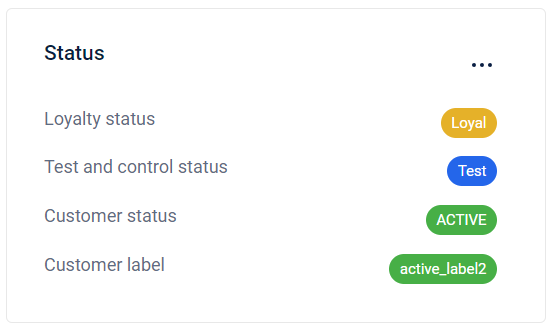
Here you can see the following statuses of the customer:
- Loyalty status: Displays the loyalty status. For example, Loyal.
- Test & control status: You can also change the current group of customers from test to control or vice versa. Click on the more options icon > Change test and control status > In Change to, set the new status.
- Customer status code: Defines the current customer status in the Capillary system.
- Customer status label: Defines the customer status. To change the customer status label, click on the more options icon > Change customer status label > Change to, choose the new status > Reason , type the reason or notes for updating the status label > Click Save.
NoteFrom June 2024, the customer status feature will be enabled by default for new organizations.
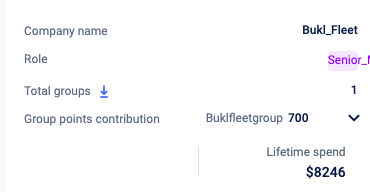
Group details
This is applicable only to customers who are part of a hierarchy. See Member hierarchy for more details.
The section shows below details:
- The number of groups the customer belongs to
- Customer's contribution towards the group
- Group lifetime spend
- Company name and role of the member in the group
You can click the download icon and download the total list of groups the customer belongs to.
Company group
Customer identifiers
This section shows the registered identifiers of the customer. The first identifier is the primary identifier of the org and the remaining are the supported secondary identifiers. Member Care supports mobile numbers, email ID, external ID, card number, card external ID, WeChat union ID, and more. However, you will see only org-supported identifiers
By default, it shows up to three identifiers. To view more identifiers, click Show more.
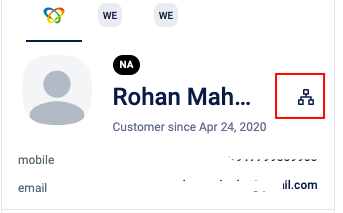
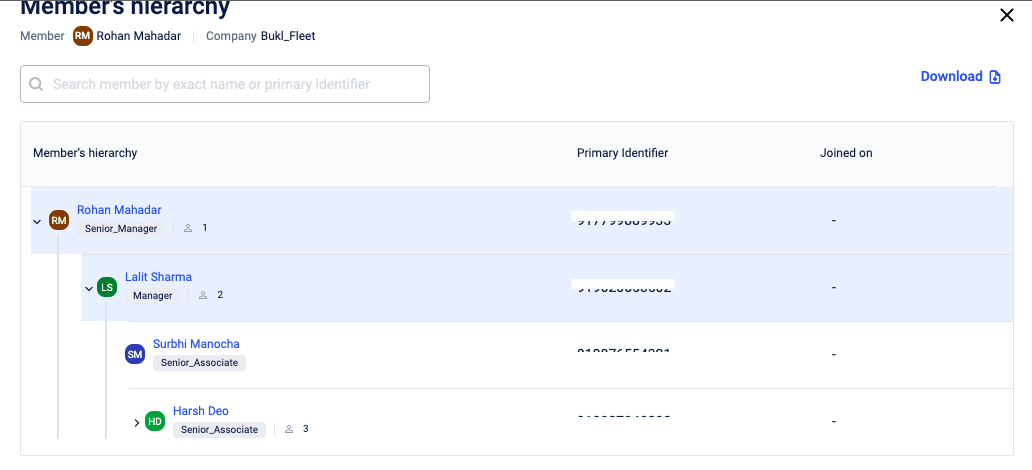
Member hierarchy
This is applicable only for customers who are part of a company group.
For members who are part of a company/non-family & friends group, you can click the hierarchy icon and view the member hierarchy. For more information on hierarchy, see Member hierarchy.
The member hierarchy page displays the member hierarchy with their primary identifier. You can search for a member and also click on the Download option to download the member list.
Communication channels
This shows the communication channels associated with each source profile. Click on the drop-down to expand. Each source can have multiple communication channels. A customer can have different identifiers for a channel across sources.
The section Reachable on shows the communication channels that are available for the customer. For example, if a customer has logged in to the org's app, we capture the Android or iOS device ID. A mobile push icon will be shown. Similarly, if a user has shared his/her email address, we will show the e-mail icon.
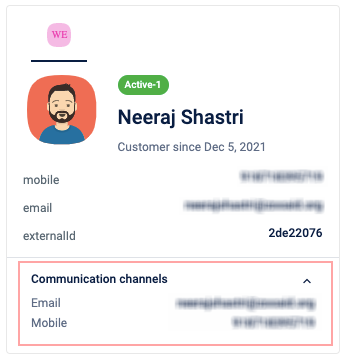
The Communication channels section shows blank when no information is available. This happens especially when customer has registered using card number or external ID without providing any communication details.
Active coupons
This section shows the list of active coupons available for the customer. Only coupon redemptions with the 'active' flag set to true are displayed. Reversed redemptions are not shown. Use the horizontal scroll options to toggle between different coupons. You will see the code and the applicable discount for each coupon.
Note
The 'active' field is not present in the read_api.coupons table. This may cause differences in coupon redemption visibility and reconciliation between Databricks and Member Care.

Recent transactions
This section shows up to the latest 5 transactions of the customer, sorted by billing date in descending order. You will see the transaction date, transaction number, points issued, points redeemed, and the type of transaction—Regular, Return, or Mixed. Use the horizontal scroll options to toggle between different transactions available.
To view complete details of each transaction or access recent transactions, click View all.
Note
Member Care displays only the 200 most recent transactions for a customer by default. To view transactions older than the most recent 200, apply a date filter. This limit may cause differences between the full transaction dataset and what is visible in Member Care unless you use filters.
Customer attributes
This shows the custom field and extended field details captured for the customer. The names shown in the screenshot may differ for each org depending on what was created or enabled for your org.
Custom fields are denoted with a blue dot.

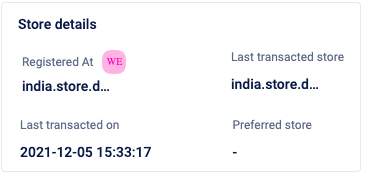
Store details
This shows the store-related information of the customer such as registered TILL, recently transacted store, date and time of the recent transaction, and preferred store (store code).
You can also change the preferred store of the customer. To change click the more options icon > Change preferred store. You will see the current store and an option to change the store.
Note: The Last Transacted On field uses the billing date of the most recent transaction from the latest 5 transactions.
In Change to, choose the new preferred store and click Save.
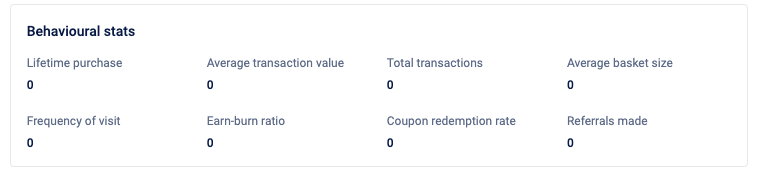
Behavioural stats
This shows the key metrics of the customer transactions such as:
- Lifetime purchase
- Average transaction value
- Total transactions
- Average basket size
- Frequency of visit
- Earn-burn ratio
- Coupon redemption rate
- Referrals made
Segments
Customer Segmentation is a logical grouping of audiences based on shared characteristics. Segments are used to tailor the marketing efforts of brands effectively. Segmentation is usually done based on demographics or customer behavior. Member Care shows the list of segments that the customer is in. These segments were created on Insights+. You can see the segment value of the customer in each segment.
To view segment details, click View all. You can search for a specific segment using the Search box.

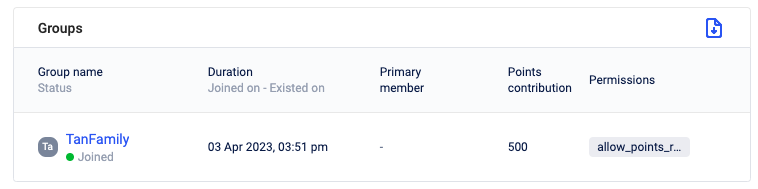
Groups
This is only applicable if customer is part of any group.
Displays the details of groups the customer belongs to. You can also click the download icon and download the group details.
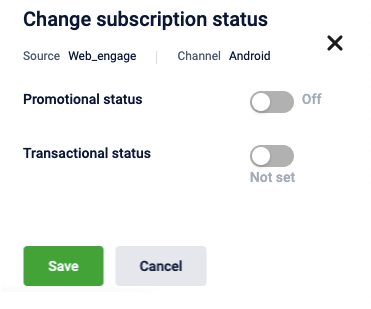
Subscription status
This section allows you to view and set the subscription status of a customer.
To view the subscription status, click on the desired source profile > select the org from the drop-down > select the channel.
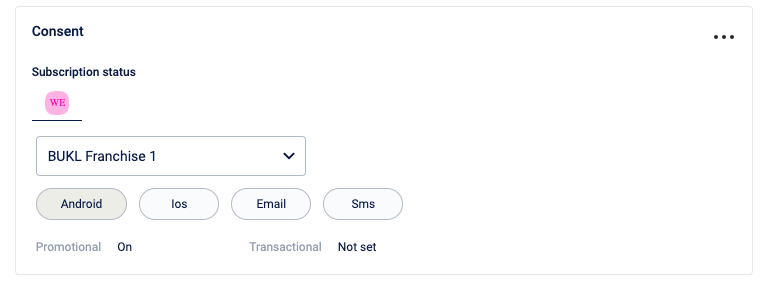
To set the subscription status,
- Select the source > org and click on the three dots.
- Select the channel.
- To enable or disable the promotional subscription status, click the Promotional status toggle switch.
- To enable or disable the transactional subscription status, click the Transactional status toggle switch.
- Click Save.
Cards
You can view the details of each active card of the customer. To toggle between different cards, either use the horizontal scroll options or the drop-down box.
To view the loyalty details of a specific card, click on the card or select the card from the drop-down.
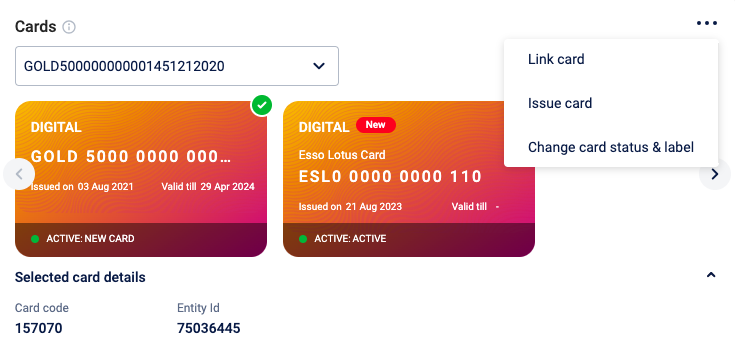
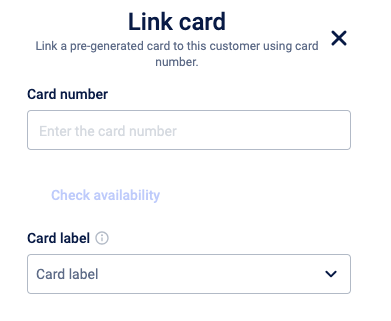
Link card
To link a card,
- On the Cards section, click the three dots menu.
- In the Card number field, enter the card number that you want to link.
- Click Check availability to check the availability of the card.
- From the Card label drop-down, select ACTIVE. Only ACTIVE labels can be assigned to the cards issued from here.
- Click Save.
To configure card issual settings and OTP validation, refer Card issual settings.
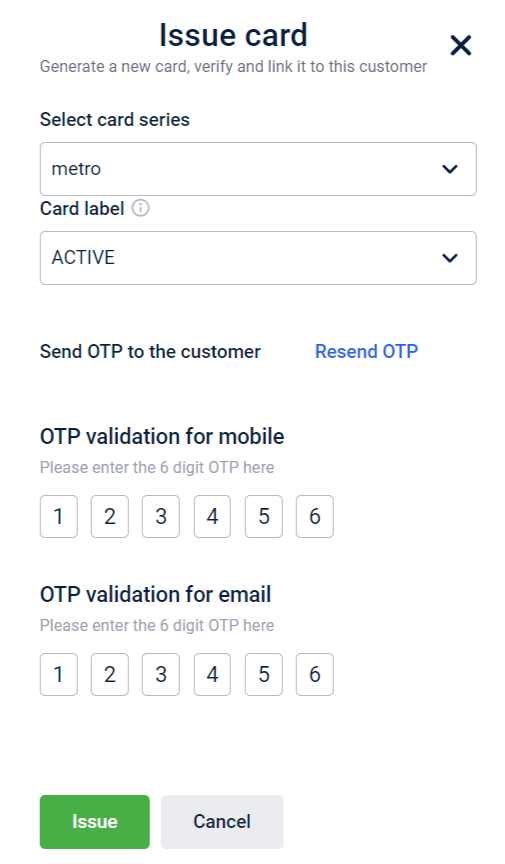
Issue card
To issue a card,
- From the Select card series drop-down, select the card series.
- From the Card label drop-down, select ACTIVE. Only ACTIVE labels can be assigned to the cards issued from here.
- If OTP validation is enabled for the org, enter the OTP received.
- Click Issue.
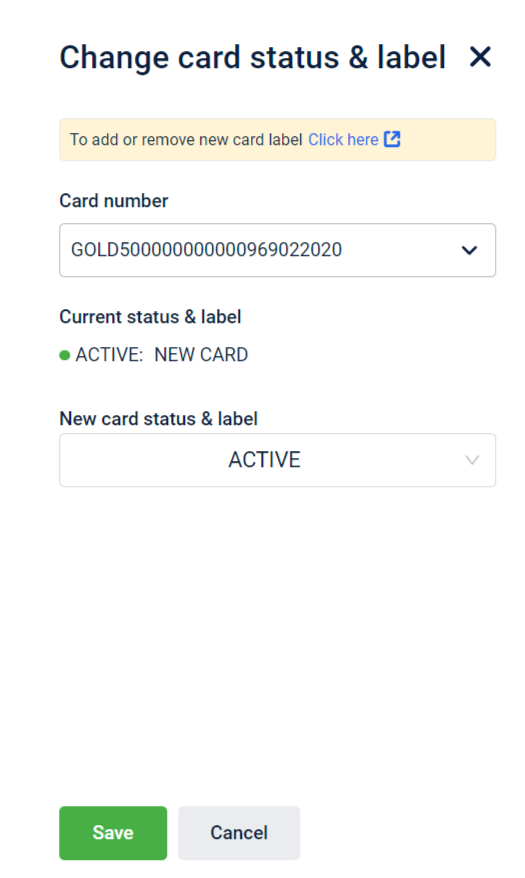
Change card status & label
To change the status and label of a card,
- On the Cards section, click the three dots menu.
- From the Card number drop-down, select the card number for which you want to change the status and label.
- From the New card status & label, select the card status and label.
- Click Save.
NoteYou cannot configure any restrictions/blocking actions for customers based on the card status.
Updated 20 days ago