Setup Store hierarchy
Setup organization hierarchy
An Admin of the organization account can define org hierarchy, register stores, store tills, configure a local server for each store (Store Server), add users to the organization’s InTouch and provide role-based access for each user.
Note
- For multi-brand orgs, you need to create each Org Unit as a concept as mentioned in the Setup Org Hierarchy section below. Then, assign a ticket to the Platform team requesting to enable Org Units for the org.
- Once the Org Unit (OU) is enabled for the org, you can have a user role management, loyalty program, audience filters, and reporting at the OU level.
This article covers the following topics.
- Define Organization structure: This includes zones, concepts, store-servers, stores, and store-tills.
- Organization Users: This includes registering admin users for your organization, creating user roles, and assigning user roles to define the scope of accessibility for each user to your organization's data.
Before starting with the organization setup, you need to understand the basic terminologies used in the hierarchy.
- Concept: These are a logical grouping of stores for a single brand org. For example, groceries, electronics, apparel, and home appliances; and logical separation of brands in case of multi-brand org. For example, if an org ABC is into different verticals (say a supermarket, retail, and electronics as brands), each brand can have its own account through concept hierarchy.
The following are the features of the Org Unit (OU).
- Users and access management at the OU level.
- Campaign and loyalty program creation at OU level.
- Reports (Insights+) at OU level.
- View customer information at the OU level.
Note
- Customer registration remains the same across org. For example, a customer registered in an org unit will be registered automatically in all other org units. Hence, the registration date remains the same across org units.
- Zones: These are a geographical grouping of stores. For example, north, south, east, and south-east.
- Store Server: It is a local server for a store. The data captured by InStore is first saved in the store-server and from there the data will sync to the main server. Tills are associated to Store Server. However, Store Server is not required for Tills with an internet connection.
- Stores: These are usually the branches or outlets of an organization or you can say a physical store.
- Till/Store Till: A Till is a POS machine where the billings happen. A store can have one or more Tills. All the tills should be connected to the store-server through LAN and hence no internet is required at the till level to sync data to the store-server. However, store-server communicates with the main server over the internet.
The hierarchy of an organization is as follows -
Zones > Stores (Stores can be grouped independently by zones and concepts) > Store Servers > Store Tills.
Stores are geographically grouped using zones and can also be logically grouped using the concept. Hence, a store can be for a zone or for a combination of a zone and a concept.
Org hierarchy
An org hierarchy can have up to 5 levels including Tills. In the hierarchy, Till is the lowest level and you can create other levels depending on the org structure.
Login to InTouch of your cluster and follow these steps.
- Create Concept
- Create Zone
- Create Store
- Add Store Server
- Add Till
Create concept
You can use concepts for logical grouping for single-brand orgs, and as org units for multi-brand orgs. The creation process remains the same for both.
If you need to have concepts as org units, after creating concepts, log a ticket to enable org units for your org and assign it to the Platforms team.
NoteOnce the Org Unit (OU) is enabled for the org, you can have user role management, loyalty program, audience filters, and reporting at the OU level.
To create a concept, follow these steps.
- Navigate to Profile > Organization Settings > Master Data Management > Store Masters > Concepts.
- Click Add New Concept.
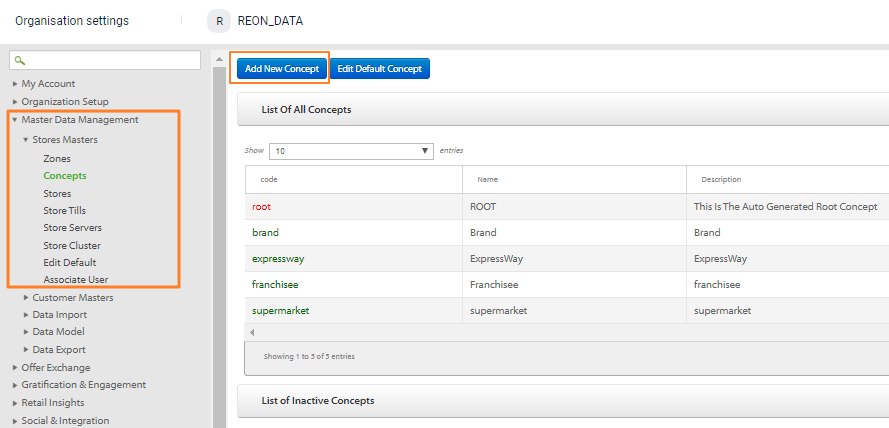
- Fill in the details based on the description provided in the following table and click Submit.
- Code: A unique code for the zone.
- Name: Name of the zone.
- Description: Short description of the zone.
- Parent Concept: Choose the parent concept for the concept if any. For example, if you are creating a concept Apparel, you can have sub-concepts as men apparel, kids’ apparel women apparel and so on.
*Default Language : The default language used for the concept. - Default Currency: The default currency used across the concept.
- Default Time Zone: The default time zone of the concept.
Similarly, you can create any number of concepts required for the org.
Create zone
The following procedure guides you in creating zone hierarchy
- Navigate to Profile > Organization Settings > Master Data Management > Store Masters > Zones.
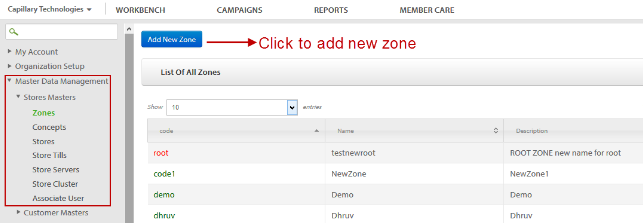
- Click Add New Zone.
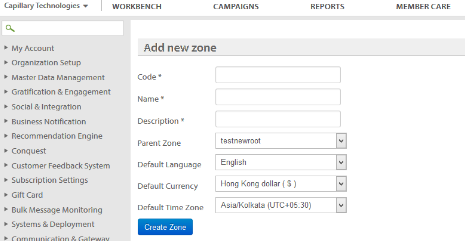
- Fill in the fields based on the description provided in the following table and click Create Zone.
- Code: Enter a unique zone code in apha-numeric.
- Name: Enter a name for the zone. For example, North
- Description: Enter a short description of the zone.
- Parent Zone: Tag a parent zone for child zones. For example, if you want to create the India-east zone under the India zone. Then the parent zone for India-east will be India.
- Default Language: Default language that you want to associate with the zone (regional language).
- Default Country: Country of the zone.
- Default Time Zone: Preferred time zone.
Similarly, create the entire zone hierarchy for your organization.
Create Store
Stores are the second level from the bottom in the hierarchy. A store can be associated with a zone and concept.
To create a store, follow these steps.
ImportantWhen importing stores using the Data Import Framework, do not map the 'store id' field for new records. The 'store id' is a unique identifier generated by the system and should only be mapped when updating existing stores. Mapping 'store id' during new store creation causes a data conflict error. For new store imports, leave the 'store id' field blank or unmapped. Only use 'store id' when performing updates to existing store records.
- Navigate to Profile > Organization Settings > Master Data Management > Store Masters > Stores.

- Click Add New Store.
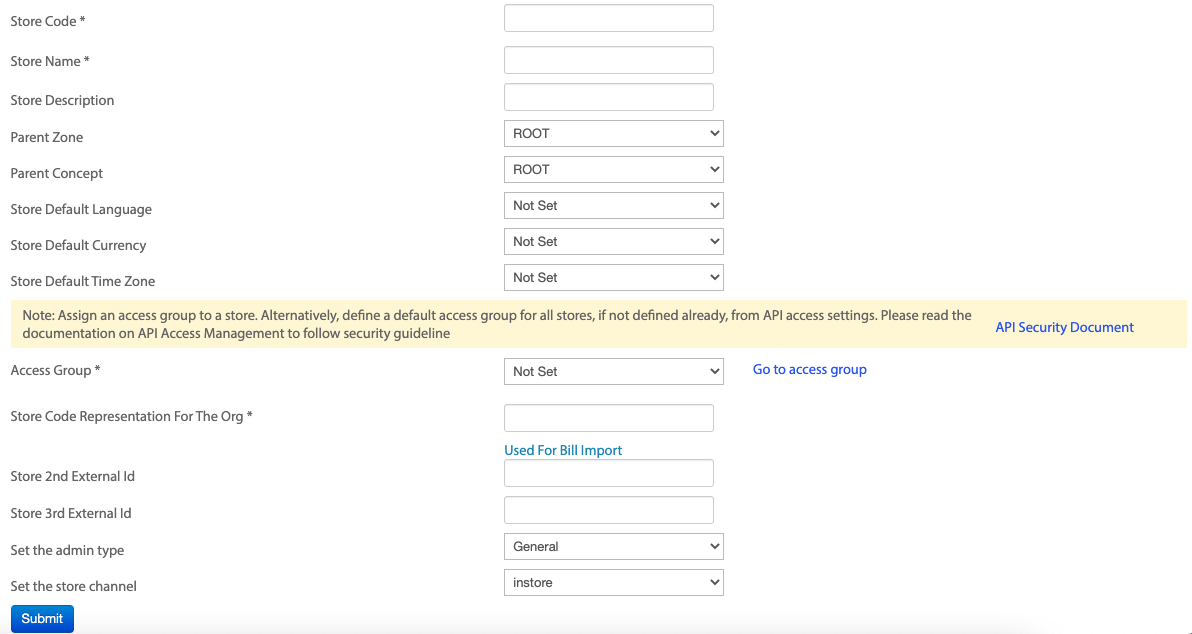
- Fill in the fields based on the description provided in the following table and click Submit.
- Store Code: The store code to be identified in Capillary Cloud. It is recommended to use the following format for store code.
.... - Store Name: Name of the store you want to register. The store name must be unique within the cluster. You cannot use the same name across organisations in the same cluster.
NoteNote:
The UI does not support the addition of special characters in the store name. Special characters in the store name can only be added when adding stores using the data import option.
- Store Description: Short description of your store.
- Parent Store: The parent store for the store. You can create child stores for a parent store. This option displays the list of all the stores you have registered for your organization.
- Parent Concept: The logical group (Concept) of the store.
- Store Default Language: The language used at the store.
- Store Default Currency: The base currency at the store location (currency of the country where the store is located).
- Store Default Time Zone: The geographical location of the store. All the zones created for your organization is displayed in the drop-down.
- Access Group: Access group to which the store has access. All the tills under the store inherit the access group of the store and will have access to the APIs accordingly. You can also assign a default access group for all the stores under your organisation. For information on access groups, see Access group.
- Store Code Representation for the Org: The external id of your brand. External ids.This should be unique and should not be a used external code.
- Set the Admin Type: Set this as General for a live store. If you would like to test the store before making it live, choose Admin.
- Similarly, you can create all the required stores for your org.
Add Store Server
In stores where PoS machines do not have access to the internet, you will have a store server that has an internet connection. All POS machines (or TILLs) are connected to the store server through LAN.
A store will usually have one store server.
To add a store server, follow these steps.
- Navigate to Profile > Organization Settings > Master Data Management > Store Masters > Store Servers.
- Click Add New Store Server.
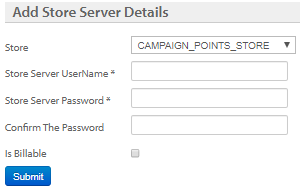
- Enter the store server details based on the description provided in the following table and click Submit.
- Store: The store to which store-server needs to be configured.
- Store Server Username: Enter the username of the store-server provided by Capillary for that particular store.
- Store Server Password: Enter the password of the store server provided by the Capillary for that specific store.
- Confirm Password: Reenter the password of the store server.
- Similarly, you can add all the necessary store servers required for your brand.
Add Till
TILL is a PoS machine and is the last entry in the org hierarchy. Each TILL needs to be mapped to a store. You also need to map to a store server, for models where TILLs have no internet access.
To add a new TILL, follow these steps.
-
Navigate to Profile > Organization Settings > Master Data Management > Store Masters > Store Tills.
-
Click Add New Till.
-
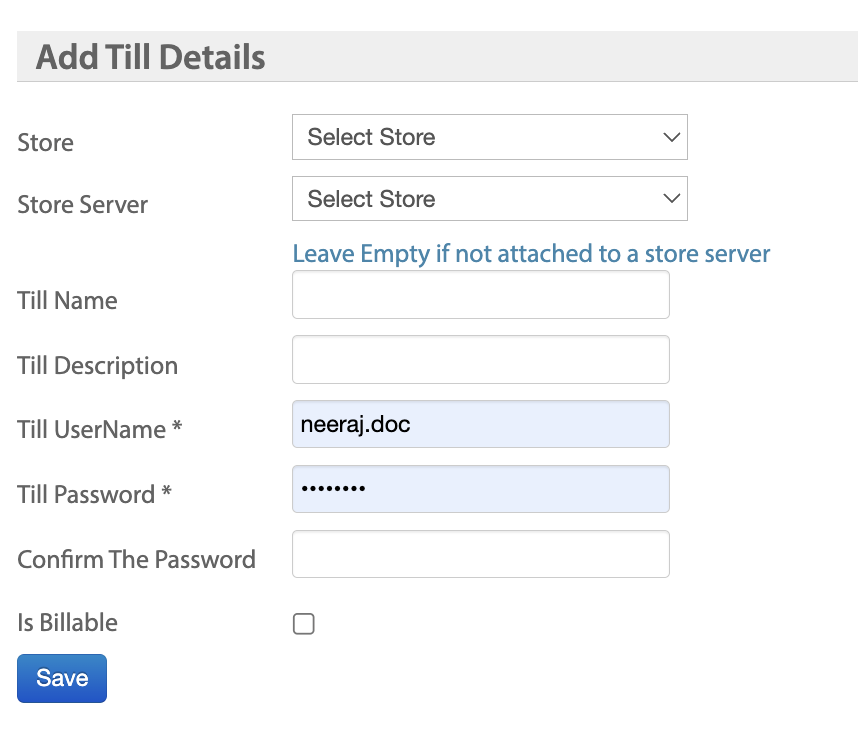
Enter TILL details based on the description provided in the following. Click Submit to save your changes and create the Till.
- Store: The store to which store-till needs to be assigned.
- Store Server: Store Server for the till. This acts as a local server for the POS machine (Store Till).
- Till Name: Username of the In-Store application for that till. The name must start with a lowercase letter (
a–z). The rest can include lowercase letters, digits, dot (.), underscore (_), or hyphen (-). Uppercase letters and other special characters are not allowed. The name must be at least 3 characters long. The Till name specified will also be copied to Till code in the backend. - Till Description: Description for the till, if any.
- Till Password: The password of the In-Store application for that till.
- Confirm Password: Reenter the password of the In-Store.
- Similarly, you can add all the TILLs required for the org.
Updated 6 days ago
