
Milestone Loyalty (Old flow)
Pretext: You can find the documentation of the new milestone loyalty here.
Introduction
Brands can reward their loyal customers, distributors, and sales channel partners with incentives based on their performance to keep them motivated and engaged. With target loyalty, you can create campaigns for customizable periods and targets. Target loyalty allows an org to categorize customers into separate audience groups and target them on the basis of certain KPIs and reward them accordingly.
For example, an XYZ company can target and reward customers with 1000 points who transacted for $10,000 between July 1, 2021, and July 31, 2021. You can set sales or product-specific targets for users such as retailers, wholesalers, dealers, and distributors. To know how to configure a target loyalty program, see Create Target Loyalty Program.
You can achieve the following with Target Loyalty
- Gamify loyalty experience for customers by rewarding them after completion of milestones.
- Increase sales with target-achievement-based loyalty programs and trade promotions.
- Configure personalized targets and rewards with behavioral segmentation and campaign automation.
- Use target APIs to trigger incentives with coalition brands.
- Leverage target APIs to run stamps and badge-based incentives.
Key components of Target Loyalty
- Evaluation period or cycle: Duration for which the KPI is tracked. The KPI resets for each period or cycle.
- KPI: Track customers based on different KPIs. For example - total number of transactions, transaction amount, number of visits to the store.
- Target: The expected KPI value for the audience list.
- Incentive: Rewards target customers get if they fulfill the desired KPI target.
- Offset days: The delay between the sales data and the data that appears in Capillary’s system.
Use Cases
- Get 1000 points once you complete 5 visits in 6 months with a minimum purchase value of $10.
- Get 10% off on the next 2 visits after you fill 300 liters of petrol in 90 days with a minimum purchase of 10 liters per transaction.
- Get 1000 points and free sneakers of $20 after you purchase products from three different categories.
- Get free insurance on completing 10 transactions worth $1000 in a year.
- Get a discount of 10% for the next 2 transactions after customers complete 12000 purchases and award them with an extra 1000 points if they visit the store 5 times. See video here.
Create Target Loyalty Program
You can configure target loyalty for a generic loyalty program or cart-based promotion (Engage+) by following these four steps.
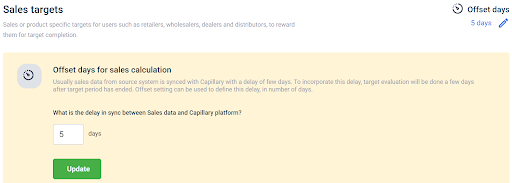
Set Offset Days
Set the delay between sales data and the data that appears in Capillary’s system. This helps in recording data properly, even if customers return products.
For example, if a customer transacts on July 20, 2021, and the Offset days are set as 5 days, the transaction data will appear on Capillary’s system on July 25, 2021.
To set offset days, do the following:
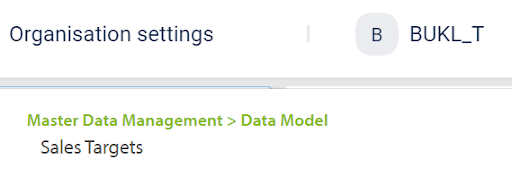
- Navigate to Organization settings and search Sales Targets.
- In Offset days, choose days for the delay in sync between sales data and Capillary’s system.
Add Target Group
A target group is a collection of targets that you can evaluate together for a common evaluation period. You can view and edit target groups displayed in the List of target groups.
Active shows target groups that are currently functioning, Archives show all the deactivated target groups.
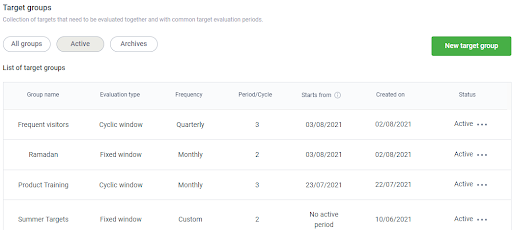
To add a new target group, do the following.
- In Target groups, click New target group.
- Name the target group
The target group name is unique, you cannot use the same target group name twice.
- In Select the store till to be used for points attribution, select the till code.
Till is a mandatory parameter for point allocation in Loyalty. All points allocated on target achievement are tagged to the till you select. If this is not applicable for the org, create at least one till.
- In Target Evaluation Type, select your preferred frequency and duration for the target.
a. Fixed calendar window: Tracks customers’ activities for a fixed time period irrespective of the customer’s joining date. For example, if the evaluation period is set from July 1, 2021, to July 31, 2021, and a customer enrolls on July 25, 2021, the customer’s activity is evaluated only for the seven days and is rewarded at the end date. (July 25 - July 31).
To configure a fixed calendar window, do the following.
- In Target Frequency, select the interval in which targets are evaluated.
| Option | Description |
|---|---|
| Monthly | Target is evaluated on a monthly basis. |
| Quarter | Target is evaluated on a quarterly basis. |
| Half-yearly | Target is evaluated after six months. |
| Yearly | Target is evaluated on a yearly basis. |
| Custom | Target is evaluated for the entered number of days. |
- In Evaluation Cycle, determine the period for which a customer’s activity is monitored.
| Option | Description |
|---|---|
| Period Name | Enter a valid period name. For example, you can name the first period P1. |
| Start Date | Enter the beginning date for the evaluation period. |
| End Date | Enter the ending date for the evaluation period. |
Note: You can add more periods in the evaluation cycle by clicking Add period.
- Click Save.
b. Cyclic window: Tracks customers’ activities starting from the first transaction date till the cycle window ends.
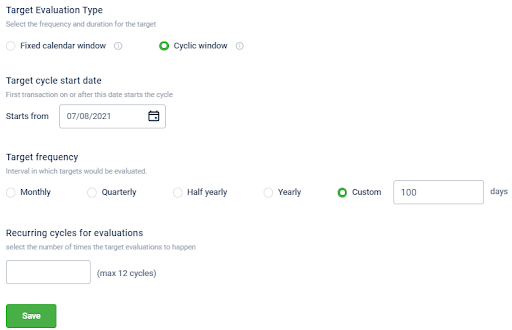
To configure a cyclic window, do the following.
- In the Target cycle start date, select the starting date of the cyclic window.
The first transaction by the customer on or after this date starts the cycle.
- In Target Frequency, select the interval in which targets are evaluated.
| Option | Description |
|---|---|
| Monthly | Target is evaluated on a monthly basis. |
| Quarter | Target is evaluated on a quarterly basis. |
| Half-yearly | Target is evaluated after six months. |
| Yearly | Target is evaluated on a yearly basis. |
| Custom | Target is evaluated for the entered number of days. |
- In Recurring cycles for evaluations, select the number of times a customer’s activities are evaluated.
12 is the maximum number of times a cycle is evaluated.
- Click Save.
Example of cyclic window
| Cycle start date | Cycle duration | Cycles |
|---|---|---|
| September 1, 2021 | 30 days | 3 |
Customer A
| First transaction date | Cycle 1 | Cycle 2 | Cycle 3 |
|---|---|---|---|
| September 4, 2021 | Sep 4 - Oct 3 | Oct 4 - Nov 2 | Nov 3 - Dec 2 |
Customer B
| First transaction date | Cycle 1 | Cycle 2 | Cycle 3 |
|---|---|---|---|
| October 1, 2021 | Oct 1 - Oct 30 | Oct 30 - Nov 29 | Nov 30 - Dec 29 |
If org imports, a retro bill dated September 2, 2021, for a customer, then ideally the first cycle should start from September 2, 2021, to October 1, 2021. However, depending on the date of import the impact can vary and scenarios, where reward has already been given, might occur. Hence retro transactions do not impact the cycles.
Set Target for your preferred audience group
To add a new target, do the following.
- In Target groups, select your preferred target group.
- Click Add target

- In Target name, name the target.
The target name is unique, you cannot use the same target name twice.
- In Applicable stores, select stores for which the target is valid.
- In Select target KPI, choose the transaction parameter you want to measure for the target.
| Option | Description |
|---|---|
| Sales | It is the sum of line-items amount in the bill. |
| Quantity | It is the sum of line-items quantity in the bill. |
| Transactions | It is the number of transactions made by a customer. |
| Visits | It is the number of unique transactions made per visit by a customer. |
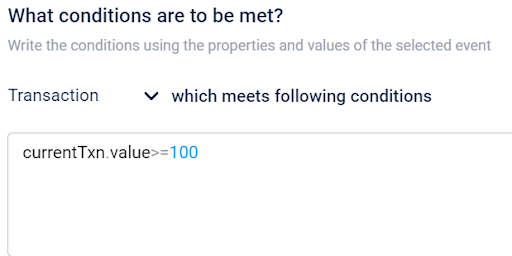
- In What conditions are to be met, write conditions using the properties and values of the selected event.
For example, if the condition to be met is currentTxn.value>=100, then customers who transact for 100 or more are targeted.
You can choose whether the condition is valid for the transaction or line items.
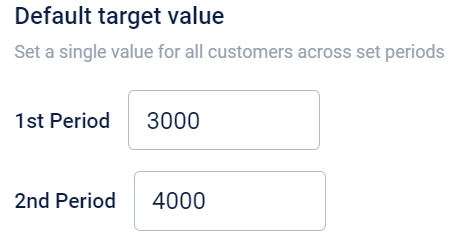
- In the Default target value, define the target value that customers should meet for each period.
- In the Customer enrollment method, select the method to enroll the target audience.
- Auto-enroll: Loyalty users are added and tracked automatically
You can override the default value for certain customers by importing custom values.
- Custom list: Target audience is created manually via Data Import. To know more, see user target loyalty. import
If the value is not configured, the default value is considered.
- Click Next.
Configure Communications
You can notify customers when the evaluation period starts and ends, or if there is a change in the target value. To configure communications, do the following.
- Enable Start of evaluation period to send a message when the evaluation period starts and click Add Creatives. To know more about adding creatives, see Creative Management.
- Enable End of evaluation period to send a message when the evaluation period ends and click Add Creatives.
- Enable Change of target value to send a message when there are changes in target value and click Add Creatives.
- In Delivery settings, click Modify to change delivery settings.
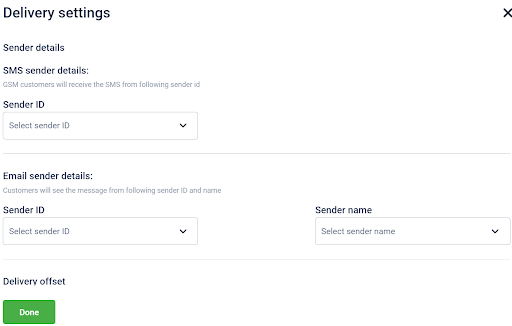
a. SMS sender details: In Sender ID, choose a relevant sender ID.
b. Email sender details.
- In Sender ID, choose a relevant sender ID.
- In Sender name, choose a relevant sender name.
c. Configure Delivery Offset.
- Click Done.
Tracking target completed and target achieved
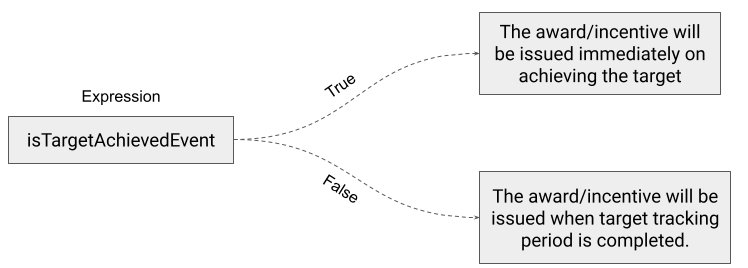
Target Loyalty lets you, incentive customers, immediately when they achieve the target or incentivize when the target period is completed.
- Target Completion: Incentivize customers at the end of the target period on achieving the target.
- Target Achieved: Incentivize customers immediately when they achieve a target.
Configure incentive on target period completion
You can incentivize/award customers when the target is achieved by the customer after the tracking period is completed. In this, the brand issues reward to the customer when the target period is over and not between the target period. You can reward customers with points/coupons after they achieve the target.
To incentivize achievers (who completed the target) at the end of the target period, do the following:
- Set Offset Days
- Add Target Group
- Set Target.
- Configure Communications.
- On InTouch, navigate to Loyalty+.
- In Programs For Points Engine, click Configure.
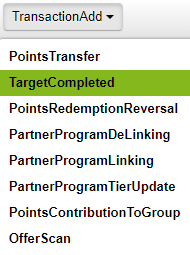
- Click EventView.
- In Customer Activities, select TargetCompleted.
- In Promotion, click Promotion+.
- In Create Promotion, configure the following
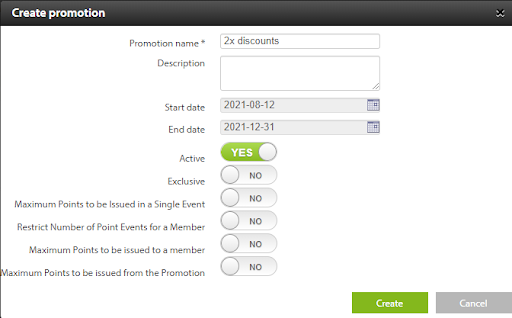
a. In Promotion name, name the promotion.
b. In Start date, choose the starting date of the promotion.
c. In End date, choose the ending date of the promotion
The duration of the promotion should not be less than the target duration.
d. Enable Active.
e. Click Create.
- In Conditions, define the condition that the customer has to meet to receive points or coupons. For example, to check if the customer has a target set for them and that they have achieved a value greater than what was set, you can write the rule
currentEvent.targetExists("Target Name")&&(currentEvent.targetAchieved("Target Name")>currentEvent.targetDefined("Target Name"))- In When, click + and select Issue Coupon or Target Points Allocation.
a. Issue Coupons: Issue coupons to customers after they fulfill the set target.
To configure the coupon issual, do the following.
- In Offers, select the coupon you want to issue to customers.
- In Channels, select channels through which the customer is notified.
- Configure the delay period after which the customer is notified.
Applicable only for mobile and email. To know how to configure SMS and email, see Creative Management.
- Click Save.
b. Target Points Allocation: Issue points to customers after they fulfill the desired target.
To configure points allocation, do the following.
i. In Points allocation, select your desired points allocation strategy.
ii In Points expiry, select the duration after which points will expire.
iii. In Prorate on, select the option on the basis of which points are issued.
iv. In Target Group, select your desired Target Group
v. In Target name, select the target that the customer has to fulfill.
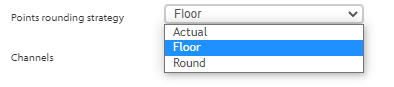
vi. In the Points rounding strategy, select the option on the basis of which points’ value is determined.
- Actual: Total points allocated for an activity.
- Floor: Decimal values are not considered when points are allocated.
- Round: Points are allocated based on the rounding strategy.
vii. In Channels, select the channels through which the coupon is issued to customers.
viii. Click Save.

- Click Save.
Configure incentives on target achievement
You can also incentivize/award customers immediately when the target is achieved by the customer anytime during the tracking period. So if the brand wants to issue rewards to its customers immediately when they have achieved the target they can do that.
Target during the tracking period, you can trigger the incentive on a fixed date, at the end of the tracking period.
To incentivize on target achievement, follow these steps.
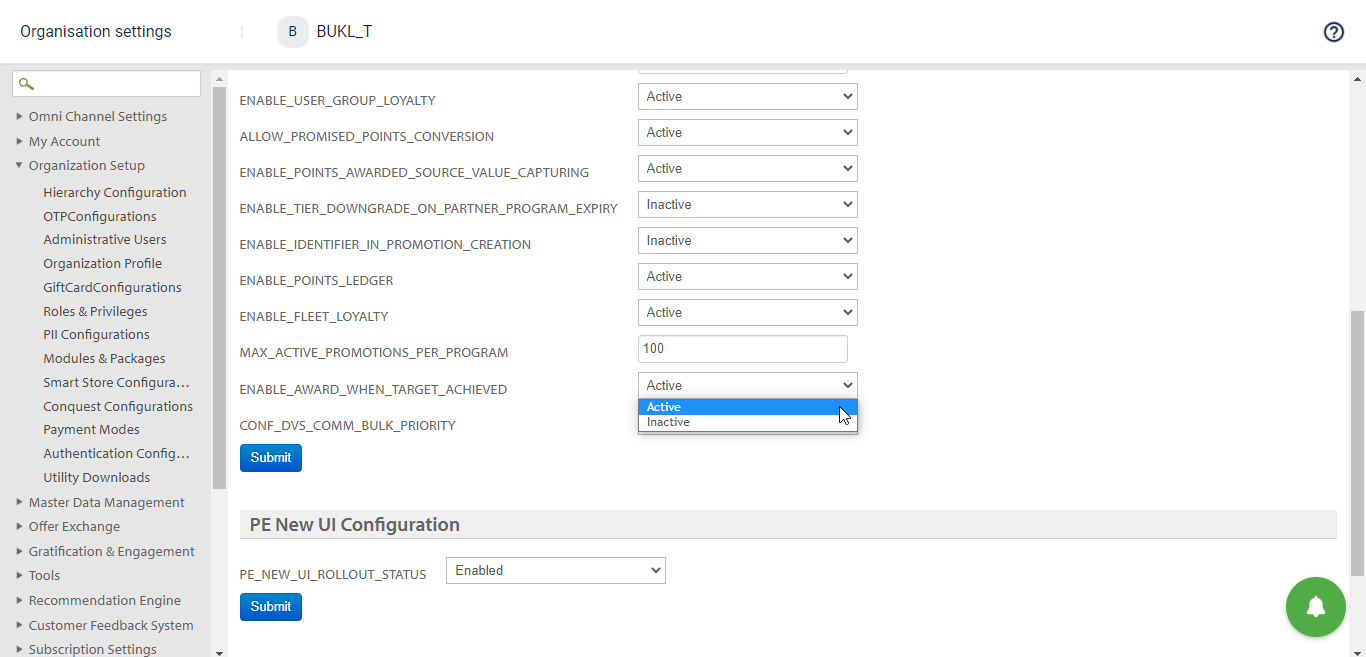
- Set ENABLE_AWARD_WHEN_TARGET_ACHIEVED to Active On Intouch > Profile Icon > Organization Settings > EMF Configurations page.
- Navigate to the Loyalty Promotions to configure actions.
- In the ruleset specify the Expression as currentEvent.isTargetAchievedEvent.
- Set the Expression equals to True.
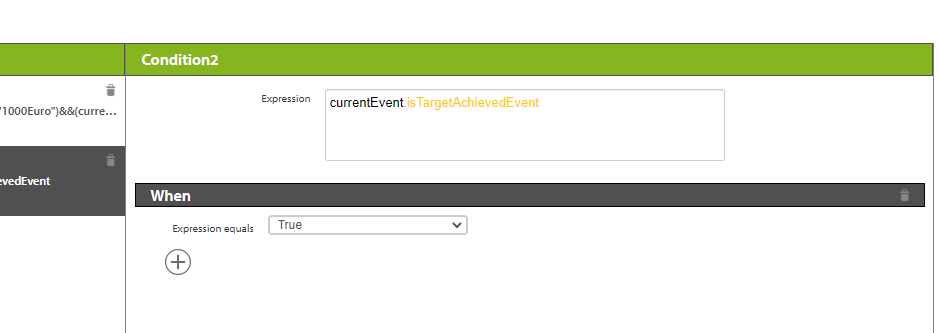
- Click the +symbol and set the desired action.
To allocate points/coupons to customers when they complete a target, do the following.
- Set Offset Days.
- Add Target Group.
- Set Target.
- Configure Communications.
Targets for B2B Programs
Using Target loyalty, you can incentivise accounts based on their purchases made in a calendar month, with each account having a different target. If they exceed their target, they get 5% points on their achieved value, along with a 5% bonus on the over-achieved value above the target
Step 1 - Navigate to Org Settings > Sales Targets (You can search for this option)
Step 2 - Create a new “New target group”
Be sure to review the “Offset days” setting - it increases the end date for all periods by that value
This simply delays the event at the end of the period, and allows for past-dated transactions during the target period to reach the system
Step 3 - Select the Fixed Calendar Window option and create the different time periods (In this example, we would choose ‘monthly’ and create a few months with appropriate names)
Step 4 - Select the newly created Target Group and choose “+ Add Target”
Step 5 - Select the tracked entity (in this example, we would choose “Sales”) along with the applicable store scope and define the condition (We can simply set this as ‘true’)
Step 6 - Choose the customer enrollment method as ‘Custom List’, and provide the default values
Step 7 - Navigate to org settings > Data Import
Step 8 - Upload your csv with the target details (file format provided in an upcoming slide)
Step 9 - Navigate back to Loyalty+ > Promotions Tab
You can only create promotions for Target Loyalty at the moment and they cannot be part of the core program
Most “Tracker Promotion” use cases might get fulfilled through Targets
Step 8 - Create a new Promotion for the “Target period elapses” customer activity
Step 9 - Write the appropriate rules - (currentEvent.targetAchieved("Target Name")>currentEvent.targetDefined("Target Name"))&&(currentEvent.isTargetAchievedEvent==false)
Step 10 - Create 2 points allocation actions - one for the regular 5% and another for the bonus 5% on over-achieved value
Targets for Milestone Based Loyalty
You can use target loyalty to give points based on milestones also. A simple example would be that you give 500 bonus points to all customers who make 5 transactions or more (of at least $50) in every year of membership as soon as they make their 5th transaction.
Step 1 - Navigate to Org Settings > Sales Targets (You can search for this option)
Step 2 - Create a new “New target group”
Be sure to review the “Offset days” setting - it increases the end date for all periods by that value
This simply delays the event at the end of the period, and allows for past-dated transactions during the target period to reach the system
Step 3 - Select the Cyclic Window option and create the different time periods (In this example, we would choose ‘yearly’ and create a few periods with appropriate names)
Step 4 - Select the newly created Target Group and choose “+ Add Target”
Step 5 - Select the tracked entity (in this example, we would choose “Transactions”) along with the applicable store scope and define the condition (We can set this as currentTxn.value>=50)
Step 6 - Choose the customer enrollment method as ‘Auto-enroll’, and provide the default values (We would set this as 5)
Step 7 - Navigate back to Loyalty+ > Promotions Tab
You can only create promotions for Target Loyalty at the moment and they cannot be part of the core program
Most “Tracker Promotion” use cases might get fulfilled through Targets
Step 8 - Create a new Promotion for the “Target period elapses” customer activity
Step 9 - Write the appropriate rules - (currentEvent.targetAchieved("Target Name")>currentEvent.targetDefined("Target Name"))&&(currentEvent.isTargetAchievedEvent==true)
Step 10 - Create a points allocation action to give 500 fixed points
Configure cart promotions as an incentive on target completion
You can give cart-based promotions to customers after they fulfill the required target. To award cart-based promotion to customers after target completion, do the following.
- Set Offset Days.
- Add Target Group.
- Set Target.
- Configure Communications.
- On InTouch, navigate to Engage+.
- Select the campaign you want to configure.
- Click Promotions > Create promotion. To know how to create a promotion, see Create Promotion.
- In Promotion Type, select Loyalty earning promotion.
- In Promotion earning, select Activity milestone.
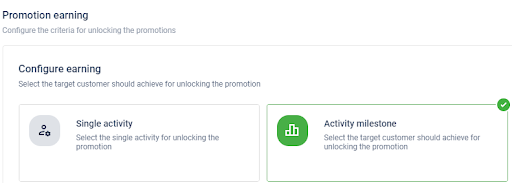
- Award milestone-based promotion to customers after they achieve the configured target. To know more, see milestone-based earning.
Trackers vs Targets
- Target enables promotional points based on aggregate KPIs. This currently on possible via trackers
Brands don’t need to hack their way to use trackers for promotional points allocation. - Targets are an independent entity and can be used across modules i.e. Loyalty+ or Engage+
You can allocate points (loyalty) as rewards or cart promotions (Engage+). - Target values can be different for every customer or set of customers across periods
For eg. Customer A can have X target for period 1, Y target for period 2, Customer B can have X1 and Y1 values. - Award points based on overachievement
For eg if the target is 1000 and customer archives 1500 you can allocated points based on (1500-1000) the over achieved value. - Write rules based on combination of multiple targets
For eg. A customer can be part of sales, quantity, visits based targets and you can differentially reward them for any combination of achievements.
Get 2x points on completing $1000 and get 1000 bonus points when you complete 5 visits in a year
Targets for System Integrators
- We have a full suite of POST, PUT and GET APIs for Target loyalty - this will allow you to seamlessly create and manage targets using other 3rd party systems and connect with 3rd party PRM systems.
- You can also create import file schedules to simply dump the flat file in a predesignated location and set target values easily.
- Target Loyalty needs to be enabled for your org - so please raise a task request on JIRA to enable it.
- Since it may be difficult to test target (particularly since the event is triggered at the end of the period) - please create a smaller test period to make sure everything is working fine (you can even set just 1 day).
- Always ensure that the offset period is setup correctly - the offset causes the event to be triggered X days after the period end date (only transactions with date inside the window will be considered however).
New workflow to upload custom milestones for B2B businesses
Earlier, in the milestone creation flow, when a milestone is to be created on the basis of “custom enrol” i.e the list of the customers to be enrolled in the milestone has to be manually uploaded in the form of a csv - this list upload was done through the "data import" functionality.
This was a bit challenging, as data import requires too many steps to go through and is present on a whole different UI. Also in this process, if there was an invalid entry in the csv file, it would be recognized and nudged at the end of the entire import flow.
This also didn’t support the milestone enrolment trigger( milestone enrol event notification) to the customers on being enrolled into a milestone.
However, now all the above issues are addressed.
Users can now upload the csv file for the custom enrolled milestones then and there without switching to the data import UI and that too in a much simpler way. On the same lines, as soon as the customer list is uploaded and saved, a trigger would be sent to the customers present in the list, who have been enrolled in the milestone.
Getting started
- Create a Milestone group in the same manner like before (no change here).
- Within the milestone group, create a milestone, and enter the required information to create the milestone. This will include Milestone name, Applicable stores etc. exactly like the earlier flow (no change here).
- In the same flow, in the last step, you will see the option to “Custom enroll” customers in the milestone.
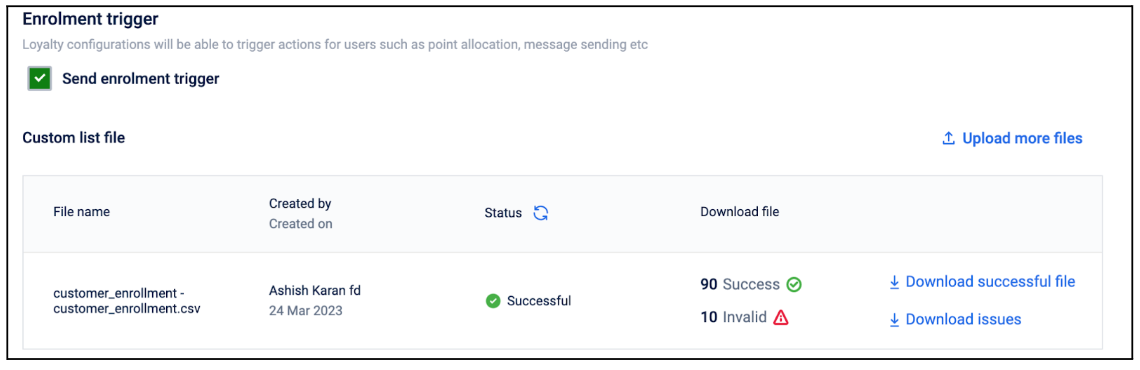
- Click on “custom enroll”. As soon as you select this, the upload window will open for you on the same screen. On the top, you will also see a by default checked box saying “Send enrolment trigger”. This option being enabled, will send the trigger to the customers on being enrolled in the milestone. Refer the screenshot below:
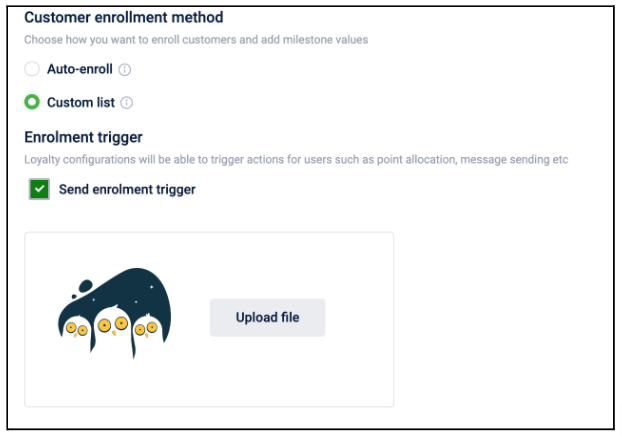
- Click on “Upload file” → “Save & Continue”. The screen to upload the csv file will open.
- In case you choose “Upload file” → “Skip for now”, you can proceed without list upload, and can later revisit and upload the customer list.
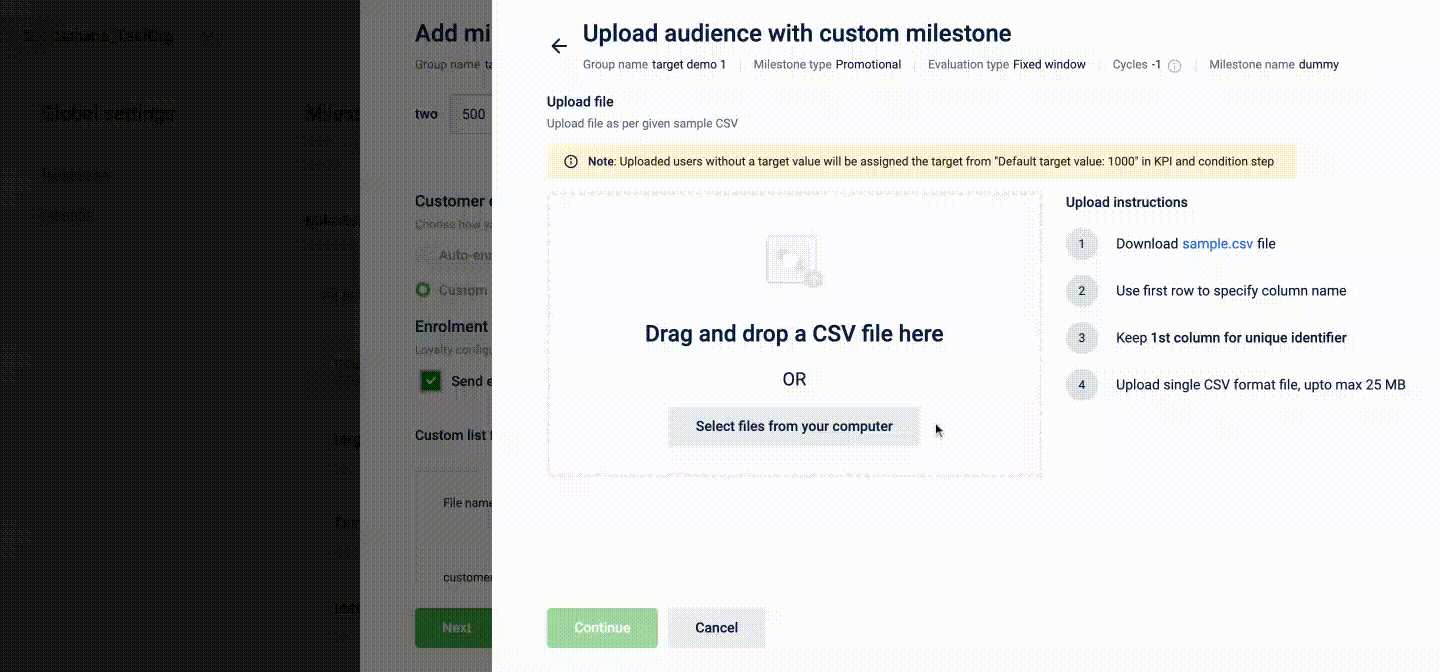
- Upload the csv file and select the “Unique Identifier” field from the drop down to identify your customers.
- Then map the csv file columns with the configured milestone parameters, similar to the data import functionality.
Note - Please ensure that the field mappings and the Unique identifier selected are correct.
Limitation: Please note that there is a limitation on the size of the csv file that can be uploaded in this process. This is done to make sure performance is intact, and the size limit is derived from careful observation of sizes of the most used csv files in this process.
Remember, the limit on the size of the csv is 25 MB.
- Once done, click “Next”. As soon as you click “Next”, the trigger would be sent to the customers.
Refer to the gif below:
- Upload More Files
Users have the option to add more customers in the existing milestone. Once a milestone is created, with a csv already existing, there will always be an option saying “Upload more files” in the same section on the top right where you uploaded the customer list. Upload another list using the same upload flow as mentioned above. Refer to the screenshot below below: - Please note - If a customer is mapped to a milestone in the uploaded csv file, and the same customer is again mapped to a different milestone, when you upload another csv file, the milestone value will be updated for the customer.
Please find the payload for the milestone enrolment event notification below :
{
  "allOf": [
    {
      "$ref": "commonEvent.json"
    }
  ],
  "javaInterfaces": [
    "com.capillary.eventNotification.bo.BaseEvent"
  ],
  "$schema": "http://json-schema.org/draft-06/schema#",
  "extends": {
    "$ref": "commonEvent.json"
  },
  "name": "targetLoyaltyCustomerEnrollment",
  "description": "Schema for Target Loyalty Customer Enrollment",
  "type": "object",
  "properties": {
    "eventName": {
      "type": "string",
      "default": "targetLoyaltyCustomerEnrollment"
    },
    "data": {
      "javaType": "com.capillary.eventNotification.bo.TargetLoyaltyCustomerEnrollmentAttributes",
      "type": "object",
      "properties": {
        "targetGroupId": {
          "type": "integer"
        },
        "customerIdentifiers": {
          "$ref": "internal/customer.json"
        },
        "targetId": {
          "type": "integer"
        },
        "targetPeriodId": {
          "type": "integer"
        },
        "milestoneDetails": {
          "type": "array",
          "items": {
            "$ref": "internal/milestoneDetails.json"
          }
        },
        "eventId": {
          "type": "integer"
        },
        "targetGroupName": {
          "type": "string"
        },
        "source": {
          "type": "string"
        },
        "targetCycleStartDate": {
          "type": "string"
        },
        "targetName": {
          "type": "string"
        },
        "targetPeriodName": {
          "type": "string"
        },
        "targetPeriodStartDate": {
          "type": "string"
        },
        "defaultTargetValue": {
          "type": "string"
        }
      }
    }
  }
}
Updated 7 months ago