
Lead management system
Lead Management System (LMS) is a set of procedures and practices that are designed by organizations to generate new potential business clientele. LMS is commonly operated through a variety of marketing campaigns or programs.
Following are the key benefits of using LMS:
-
Tracks the customer throughout the purchase life cycle
-
Track leads by different statuses hot, warm, cold and takes appropriate action
-
Get reminders to follow-ups with leads
-
Reassign leads to other store associates
-
Capture leads at the product variant level
-
Retarget leads via campaigns depending on the status
-
Detailed dashboard to check the performance of Stores and Store associates
-
Lead tracking at different levels ( area, store, zone, CA)
-
Open APIs to add leads into the system from anywhere eg. websites, campaigns
-
Configurable User and Role Management
-
LMS is managed with five(5) User Levels:
Super Admin>Organization>Area Manager>Store Manager>Store Associate -
Add a new user or deactivate a user easily
-
Assign and restrict roles ( eg. download lead, reassign lead) to use level
On logging in, the LMS dashboard appears:
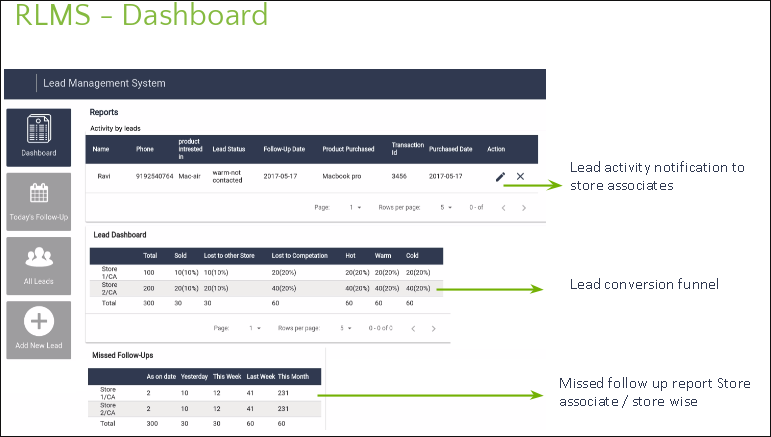
The LMS Dashboard gives an overview of the following:
- It provides Lead activity notification to store associates
- It helps to see Lead Conversion Funnel
- It provides missed follow up report to Store associates at store levels
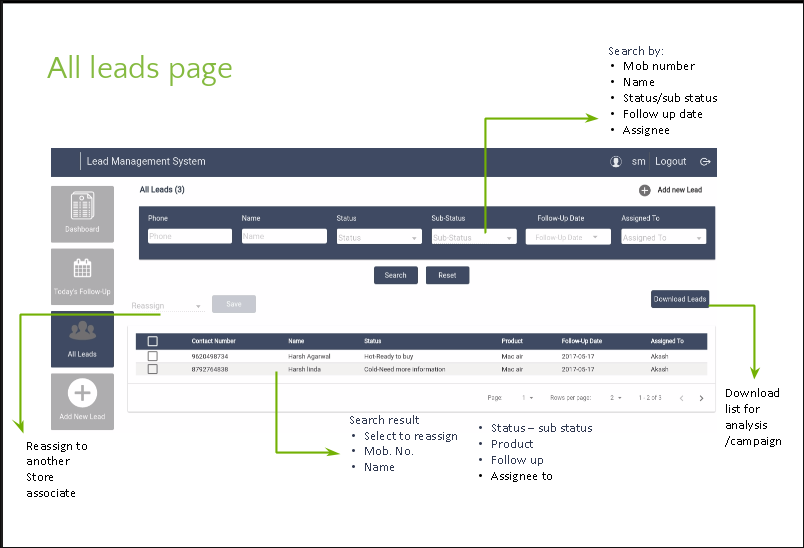
On the left panel, if you click on All Leads, the above page appears.
In this page, you can do the following:
- Download list for analysis/campaign
- Pending leads can be reassigned to another Customer Associate
- Leads can be searched using mobile number and name
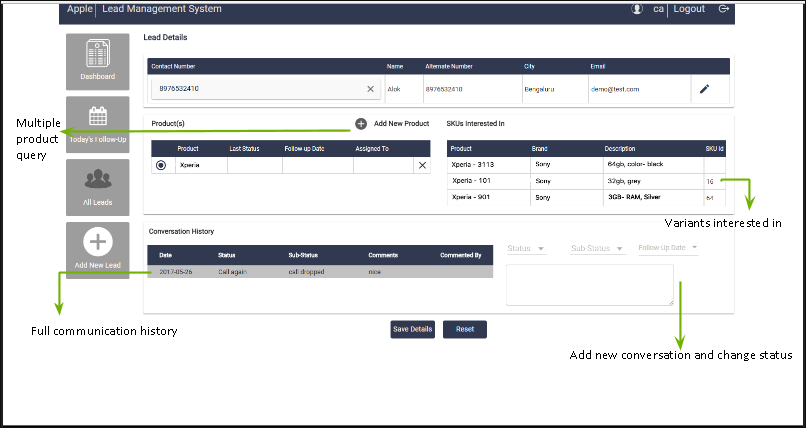
- Creating a New Lead
On the left panel, click on Add New Lead.
The following page appears:
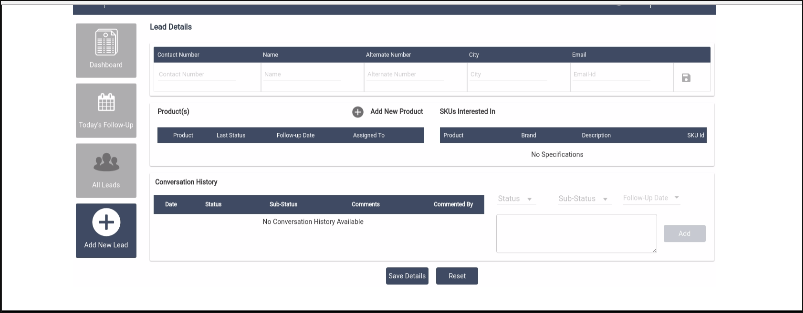
Find below the following steps to Create a Lead:
- Create a lead when a potential customer walks into the store
- A lead is automatically assigned to the person creating the lead
- Store Managers can reassign lead to another Customer Associate
- Store/Area Managers can download leads for analysis
- Dedicated API to add a new lead in any store from any source(website, campaigns, forums)
Today's Follow Up
On the left panel, click on Today's Follow Up, following screen appears:
In the Today's Follow Up page, you can do/see the following:
- Section to show all follow ups for given date
- Makes it easy for the customer and store associates to plan
Detailed User Management

Find below step by step guide that will explain the process of creation of users and entities for the LMS application.
Super Admin Tasks
-
Create another Super Admin (optional): Login to LMS application with Super Admin credential>Click on Username>Select Manage Users>Add User>Enter details and create a Super Admin
-
Create a Partner: Login to LMS application with Super Admin credential>Click on Username>Select Manage Users>Add User>Enter details and create a Partner
-
Create a Partner Admin: Login to LMS application with Super Admin credential>Click on Username>Select Manage Users>Add User>Enter details and create a Partner Admin
For further Partner related entity creation, you need to log in as the Partner Admin for the particular partner and proceed.
Partner Configuration(Manual Process)
If you need to apply a specific configuration to a Partner, this can be achieved by creating a Partner folder under the Configuration Directory. Each of these folders will hold configuration for a particular partner in the LMS config.properties file. By default, two(2) files are present in the configuration directory.
LMSConfig.properties: Contains the default SMTP configuration and default demo status. If you would like to provide specific configuration values for a given partner, you will have to create a folder under the config directory and enter the mapping in the LMS partners.properties file.
LMSPartners.properties: Contains the mapping of partner id with the folder name that contains the configuration for that partner. For example:
partner.id.name.1=Apple
partner.id.name.2=Croma
Here, the Partner ID of 1 (this can be obtained from the ‘Manage Partners’ listing page of LMS) is mapped to Apple folder that contains the configuration information for the configuration directory.
Partner Admin Tasks
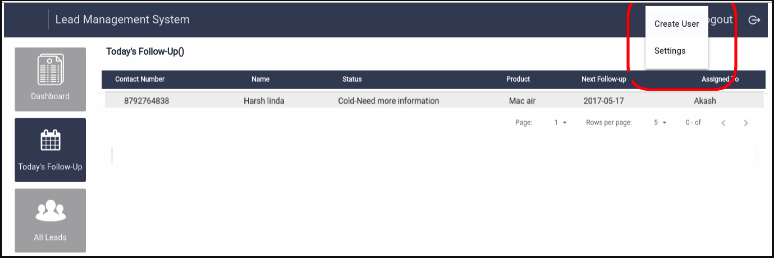
The Partner Admin can login to the LMS application with partner admin credential. After login, click on Settings on the right-hand side of the panel.
On clicking, the following page appears:
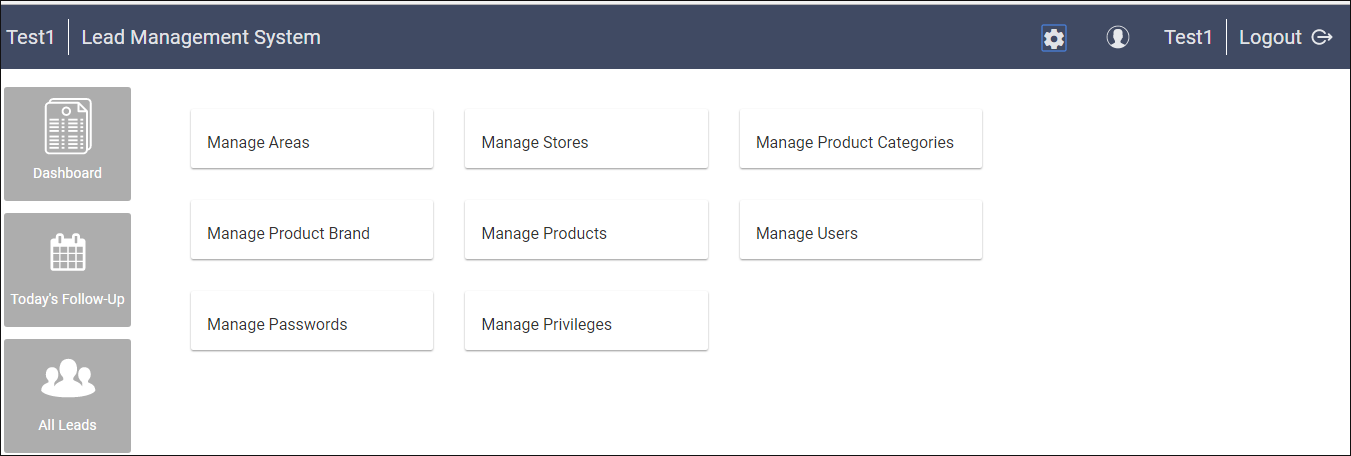
The Partner Admin can now create the following:
Create an Area: Select Manage Areas>Add New Area>Enter details and Create an Area
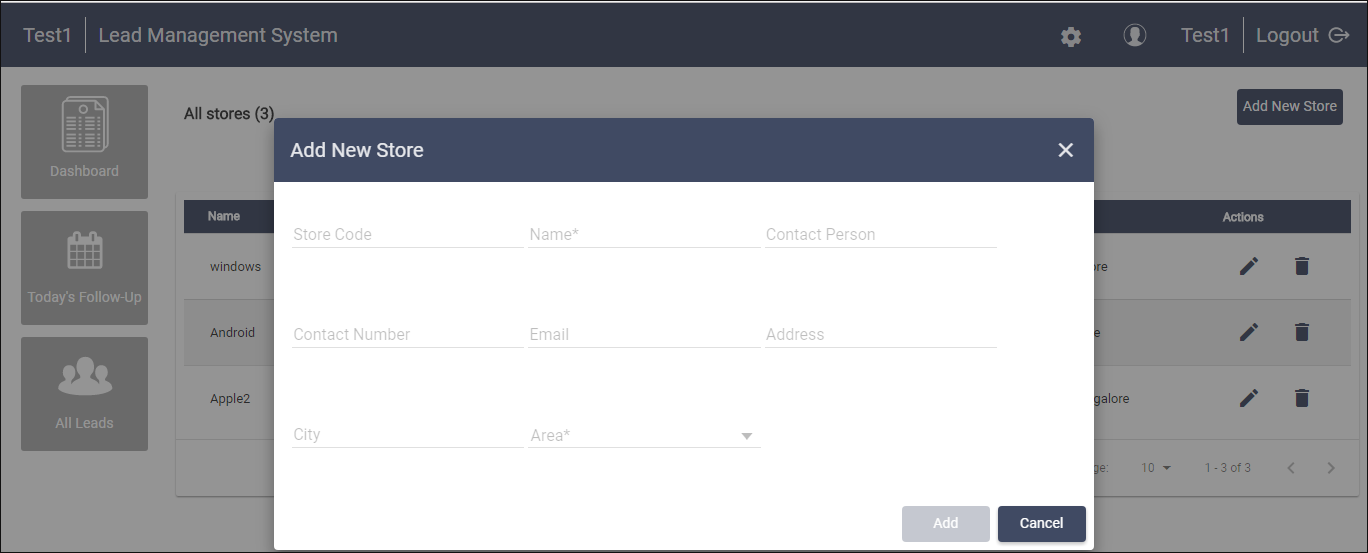
Create Store(s): Select on Manage Stores>Add New Store>Enter details and Create a Store. While adding a new store, fields marked in * needs to be filled.
See figure below for clarity:
Create Product Categories Specific to the Partner: Select Manage Product Categories >Add New Product Category>Enter details and Create a Product Category
Add Brand: Select Manage Product Brands>Add New Product Brand>Enter details and Create a Product Brand
Add Product(s) based on Product Category and Brand: Select Manage Products>Add New Product>Select a Category>Enter details and Create Products.
See figure below for more clarity:

Create/Manage/Add Users: The partner admin can create an Area Manager, Store Managers, and Customer Associate.
- Create an Area Manager: Select Manage Users>Add New User>enter details and Create an Area Manager
- Create Store Manager(s): Select Manage User>Add User>enter details and Create a Store Manager
- Create a Customer Associate: Select Manage User>Add User>enter details and Create a Customer Associate
Manage Privileges: Select Manage Privileges>Select User and Manage Privileges.
See figures below:

Role of Area Admin
- Partner Admin can delegate his set of tasks to Area Admin by assigning the right privileges to the Area Admin.
- Area Admin cannot create a Partner or Areas but can create entities under him.
Role of Store Managers
- Store Manager can create Customer Associates
- Store Manager can also create and view his leads.
- He does not hold any other administration rights by default.
Role of Customer Associates
- Customer Associate can create and view his leads.
- He does not hold any other administration rights by default.
Once, task/role is created by the Partner Admin, they can view Dashboards & Reports on the Home page. They can also see there as well as others Lead depending on the hierarchy. Leads can also be downloaded.


Changing Password
All users can change the password. Login to application with your Credential>Click on Username>Select Manage Password>Change the Password

Current LMS Limitations
Currently, LMS has the following limitations:
-
Mobile Version of LMS is not available
-
Cannot send SMS/Email to leads from LMS
-
Not yet integrated with CRM
-
Cannot reassign leads across stores-limited within store
-
Lead follow up alert as an SMS/email notification to customer associates
-
Lead scoring based on lead's response
-
Automatic Closure of lead upon sale-currently CA(Customer Associate) gets a sale notification and he can decide whether to close the lead or not
Updated 6 months ago