
Customising the Member Care UI
Overview
A brand may need to customise Member Care to fit their specific requirements. Vulcan enables the building of UI customisations and enable these apps as Member Care overrides specific to the organization.
Customising the UI allows brands to see their version instead of the standard Capillary application.
Prerequisites
To get started ensure that you have the following prerequisites:
- VULCAN SUPERADMIN access
- Node.js 14.21.3 (preferrably using nvm).
You can install the specific node.js version using the following command:nvm install 14.21.3 - Member Care UI replica template . For access, raise a JIRA request to the Capillary UI team.
- Pre-built Vulcan application
- Application configuration file
The following procedure outlines how to set up the Vulcan application and create a Member Care UI replica :
-
- Access the Vulcan UI.
- Create the application on Vulcan UI.
- Enter the basic details and internationalization details (if required) for the application.
Important:For customised member care overrides, create your app name in the given format:
member-care-ui-<orgID>.Example:
If your Organization ID is "1231", the application name should be in the following format:
member-care-ui-1231
-
Download the App Configuration
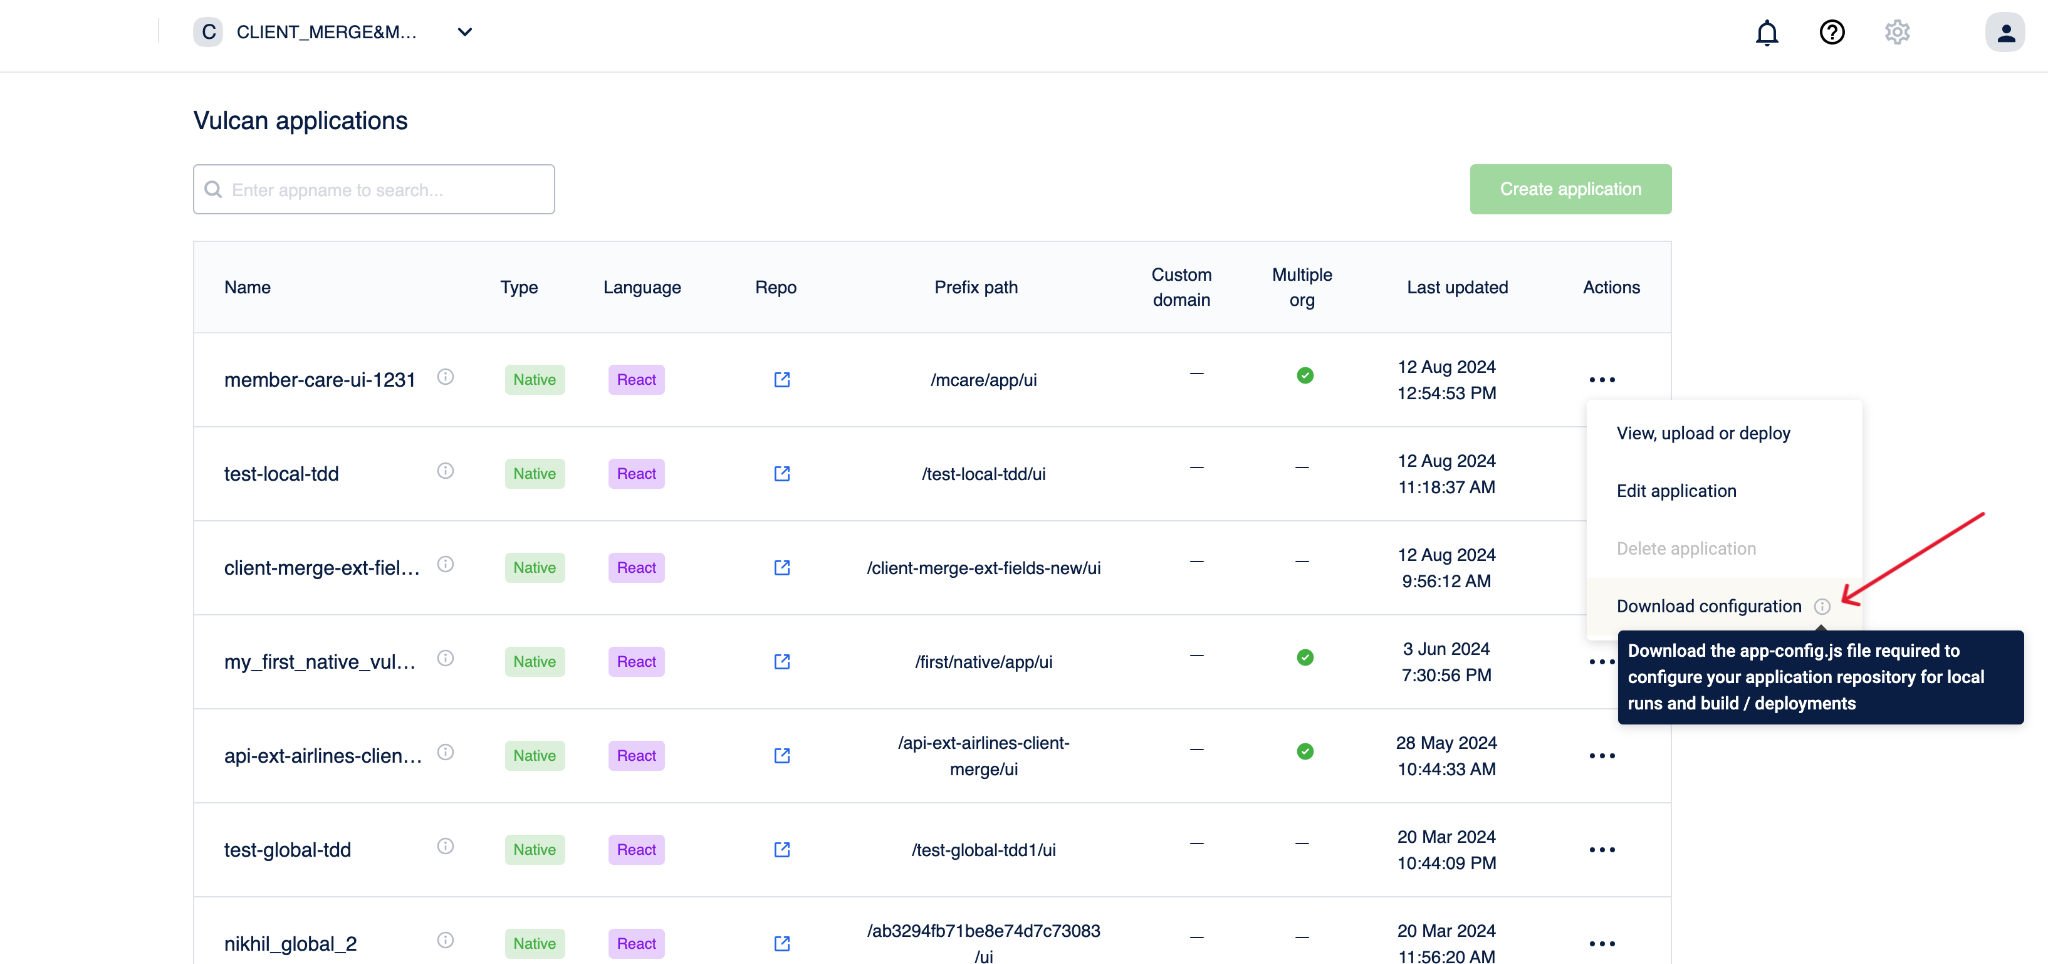
- Navigate to the Vulcan UI and click the three dots under Actions.
- Click Download Configuration to download the
app-config.jsfile.
-
Move the downloaded file to the downloaded template repository folder.

-
- Run
create-vulcan-appon a new terminal. - Provide the required details as prompted by the system.
- Open the generated folder on your code editor.\
- Run
-
- Run the command following command to update your project's
index.htmlandglobal-styles.jsfiles with the app-specific details. This command fetches app info fromapp-configand updates the index files for your React app.npm run init - Build the application following the React app development process. Use the Member Care UI replica template as the base code to begin customising.
- Run the command following command to update your project's
-
- Navigate to your project directory and open a terminal interface.
- Run the following command to build the application for deployment and hosting:
npm run build - Identify the
build.zipfile under your project folder.\
-
- Access the Vulcan UI and open the application.
- Click Deployments and Upload Build.
- Enter the build description for your application.
- Click Select Zip and choose the
build.zipfile from your device. - Click Confirm upload to upload the build and save changes.
- Enable UAT or Prod mode for your build.
- Identify the UAT/Prod URL generated and displayed in the Application Details section. This URL can be used for testing or accessing your application.
-
Override the Member Care UI
-
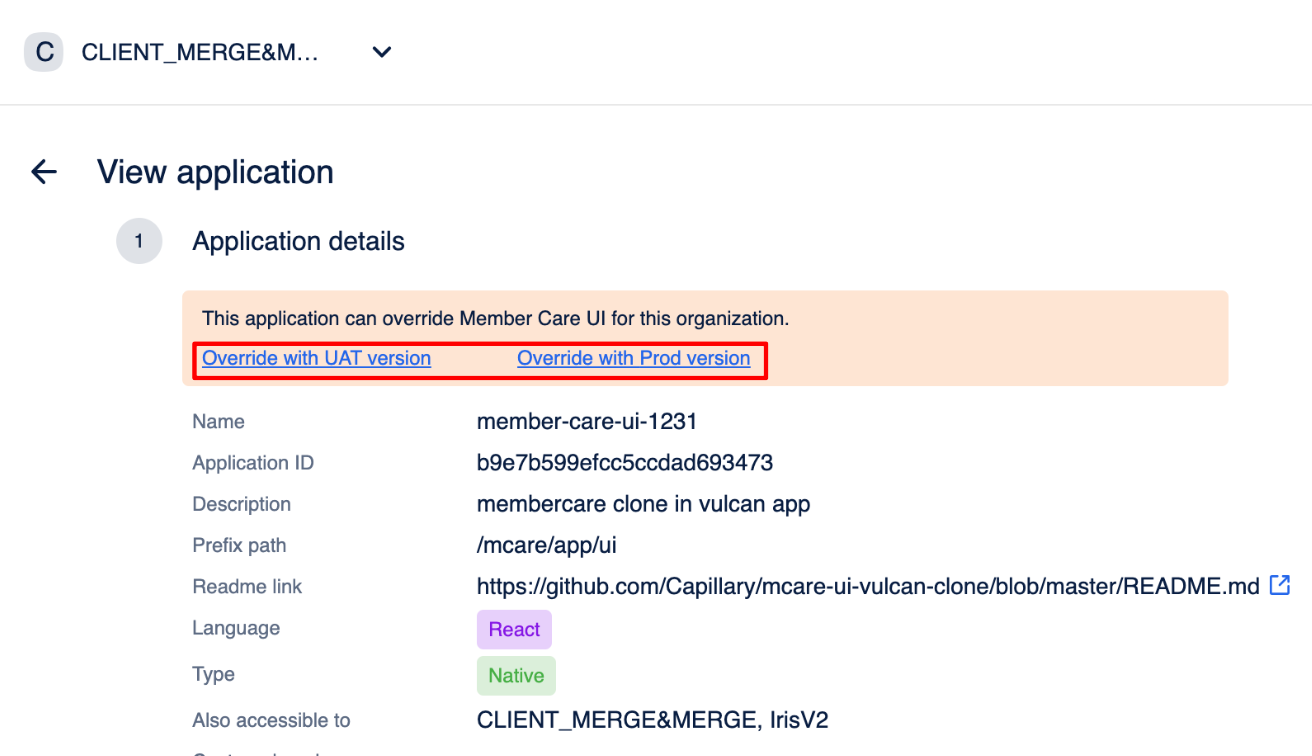
Access the Vulcan UI and open the application.
-
Click on Override with UAT version or Override with Prod version depending on your development stage. The custom Member Care UI is now active.
 Note:
Note:If another app is already overriding Member Care for your organization, the following message will appear:
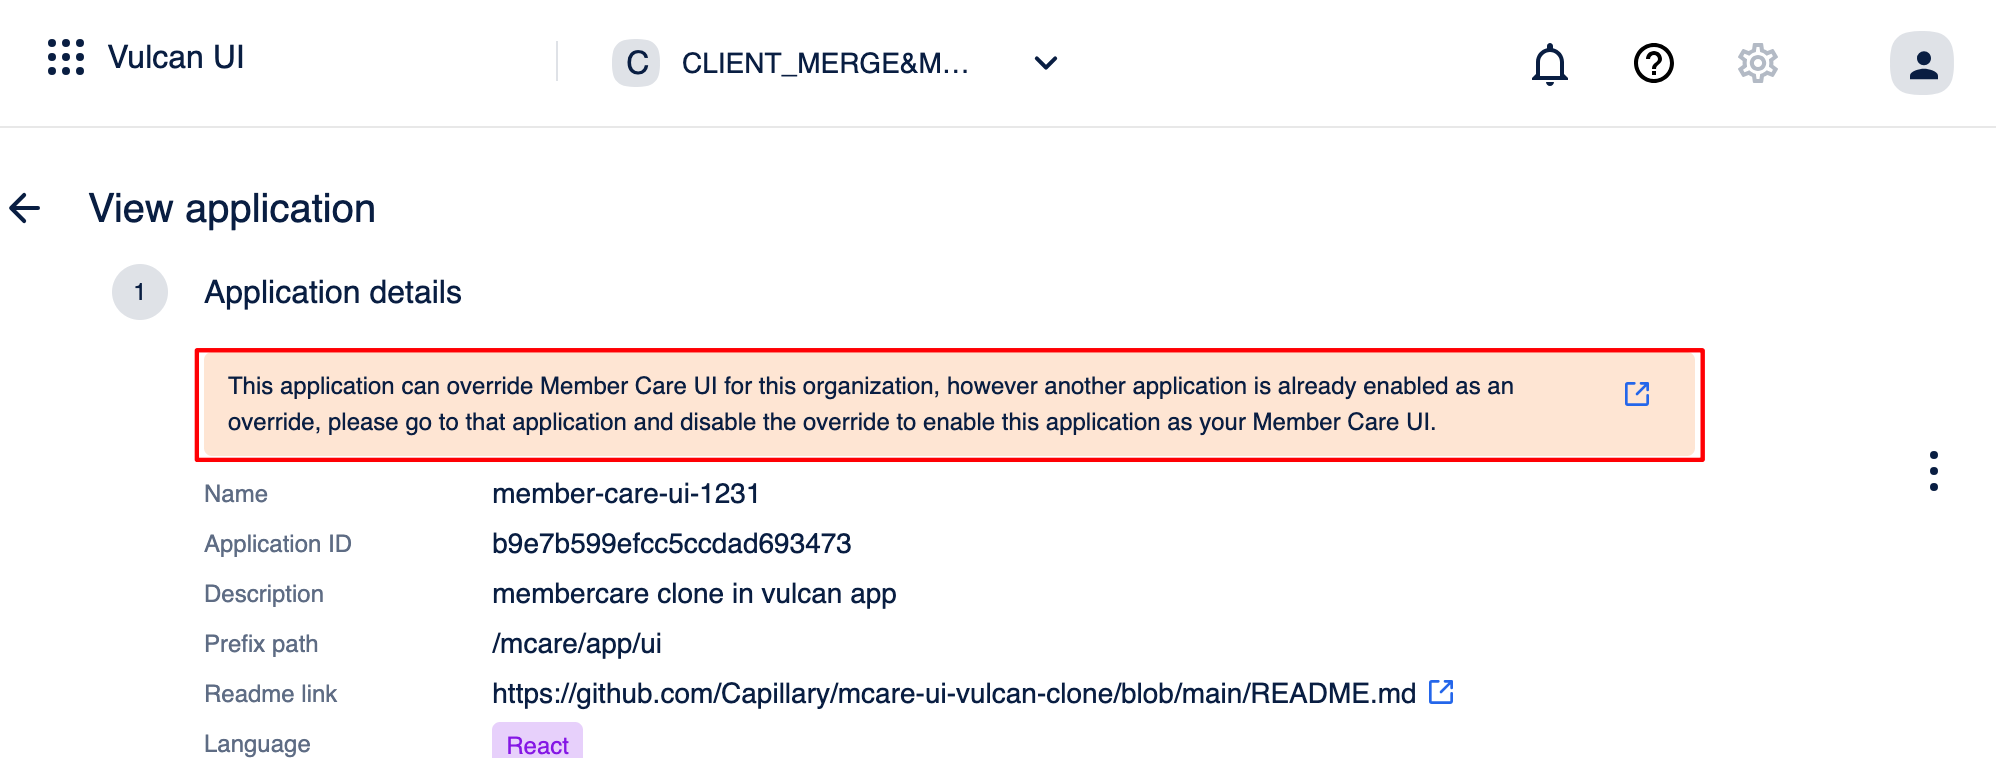
-
Updating the project
Updates to the Member Care UI replica templateare notified on the Slack group for Vulcan users.
To pull the latest changes to your project, follow these steps:
- Run the following command on a terminal, in the directory your repository is stored at to add the template to your repo as remote:
git remote add template https://github.com/Capillary/cap-member-care-vulcan-replica - Run the following command to fetch all branches from the remote repository:
git fetch --all - Run the following command to merge:
git merge template/<branch to merge> --allow-unrelated-histories
Note:Carefully resolve conflicts and merge code to ensure proper updating.
Sharing Member Care Replica Apps Across Organizations
Member Care replica apps can be shared across multiple organisations. Once shared the organisation must enable the Member Care override from the Vulcan UI.
To share a Member Care replica app across multiple organizations, follow these steps:
-
In the Vulcan UI, go to the Vulcan application you want to share.
-
In edit mode, navigate to the basic details section and select the organizations to share to.
-
Select Update application to apply the changes. The application is shared in view-only mode with the recipient organisation.
-
Override the Member Care UI with the shared application in the recipient organisation.
Note
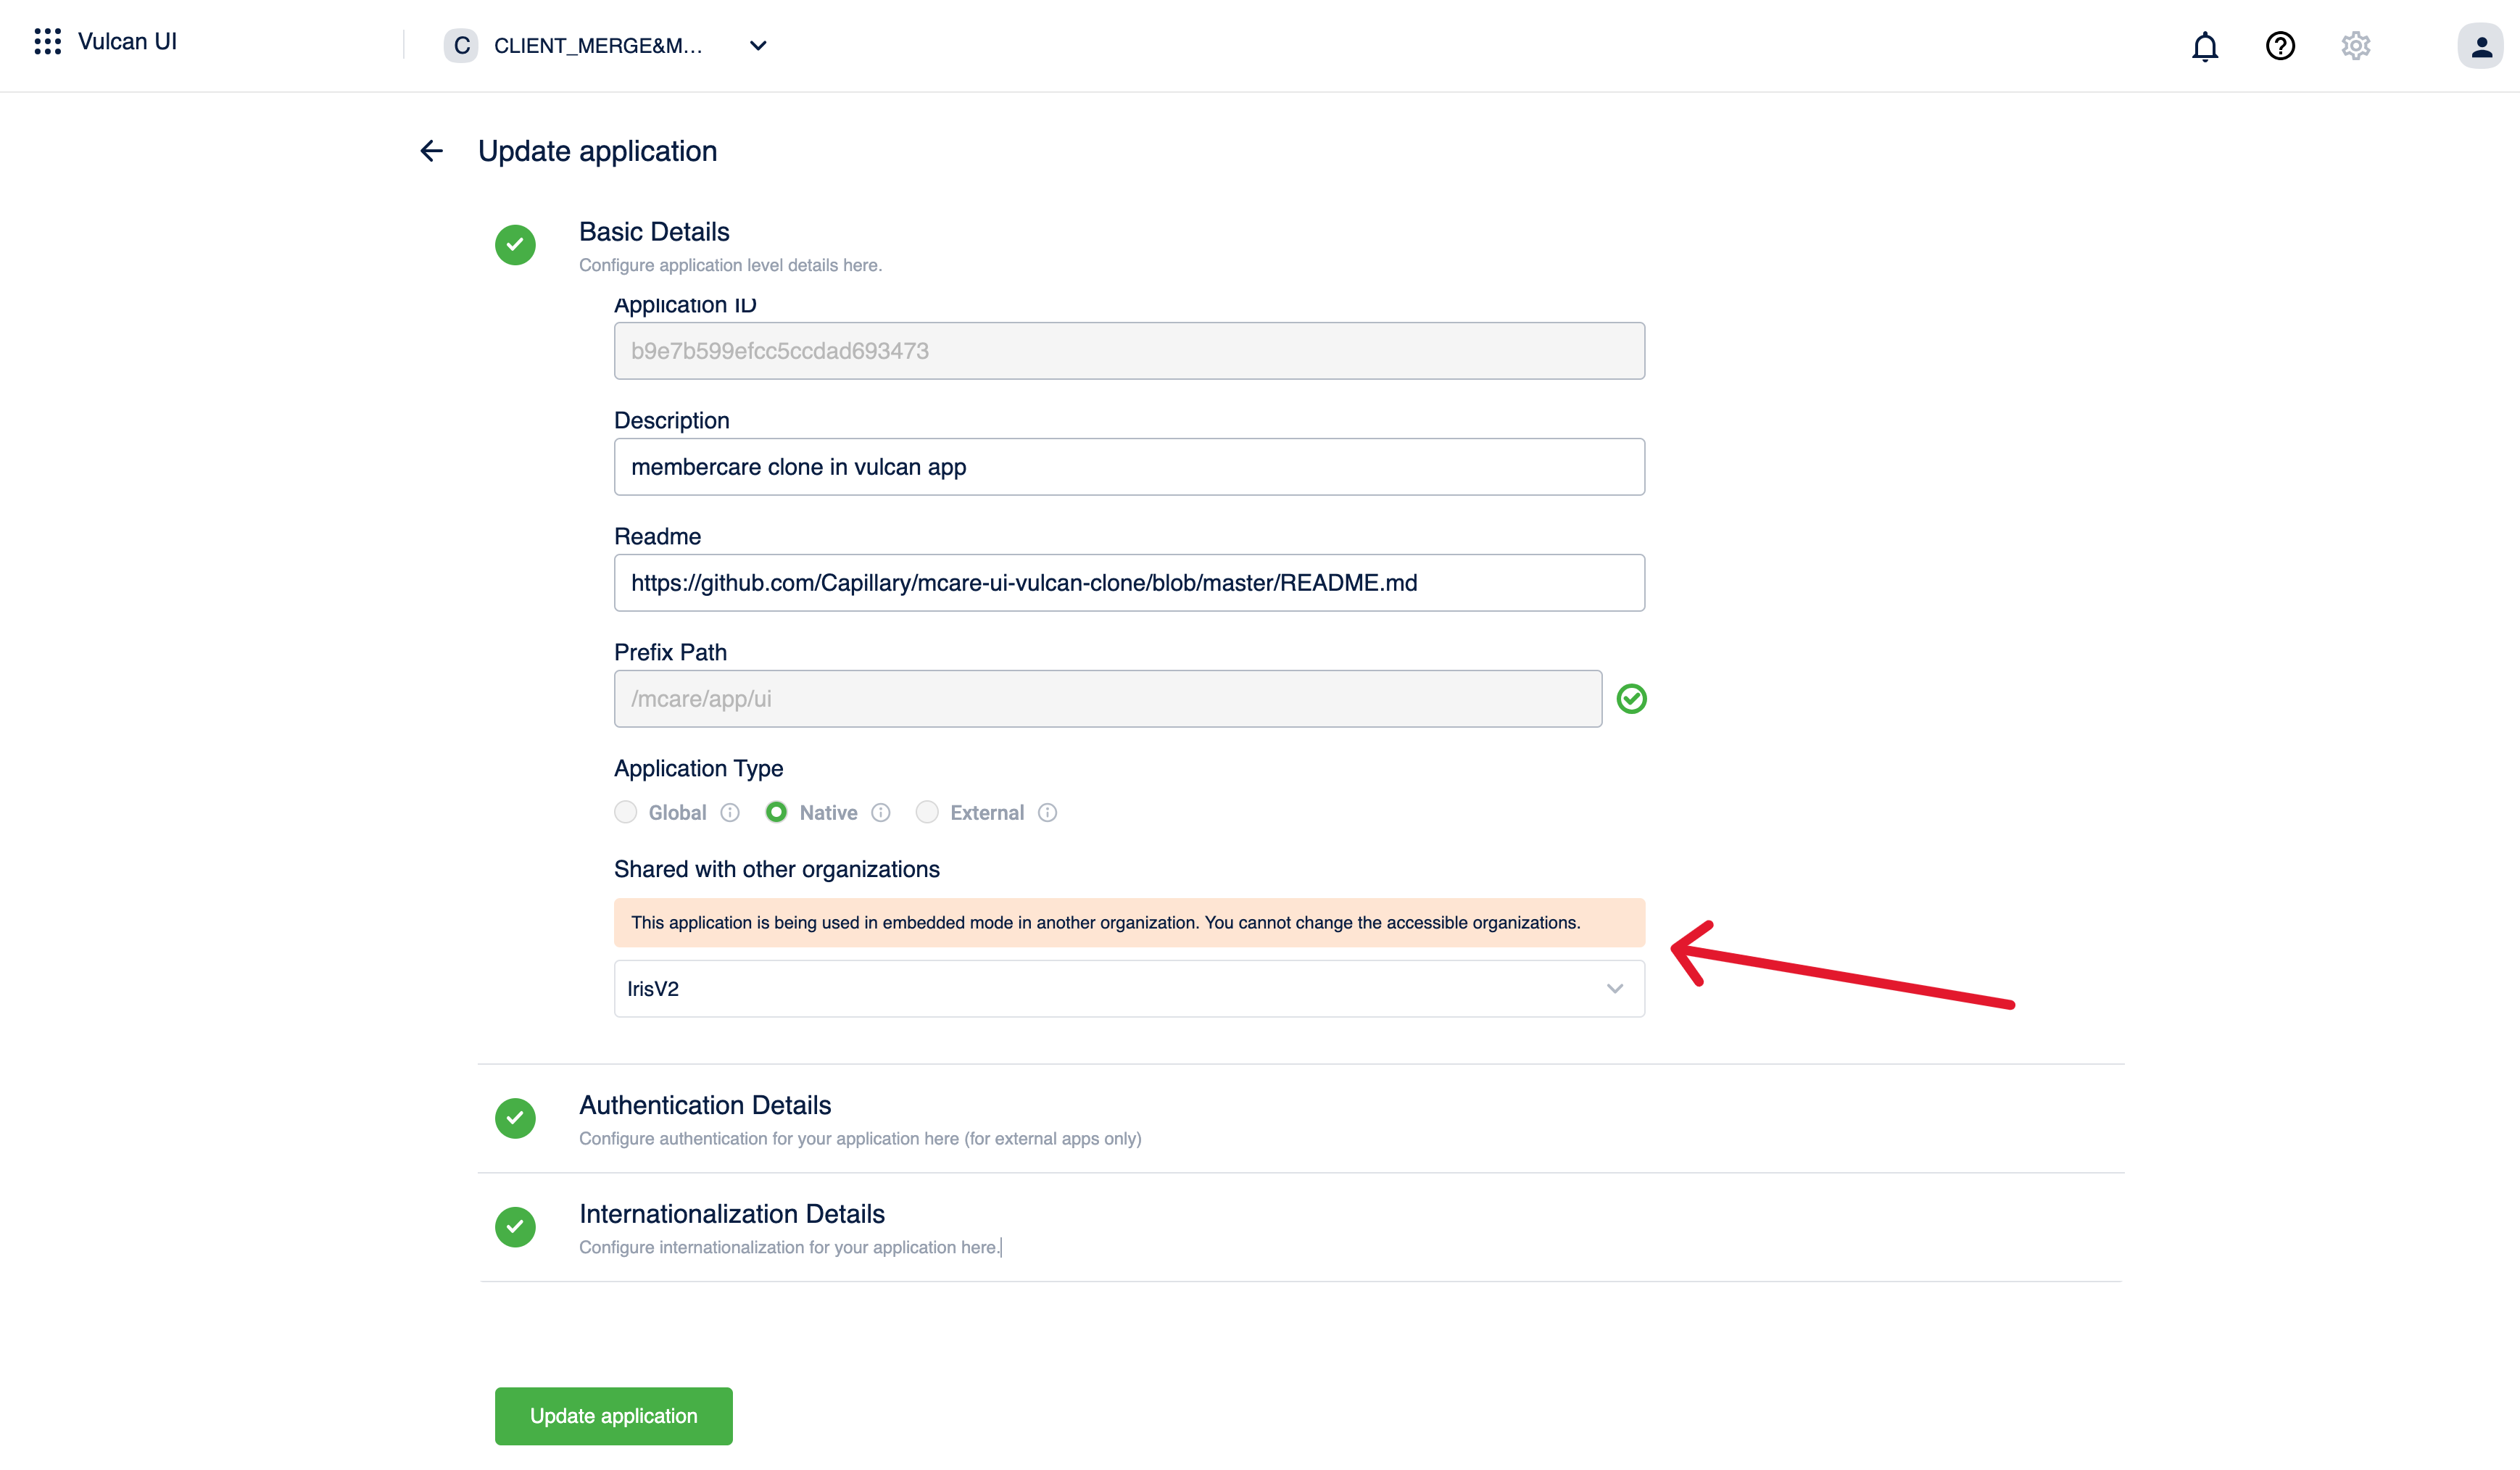
- Shared Vulcan apps are view-only for recipient organisations and can’t be edited, deleted, or disabled. If Member Care override is enabled, recipient organisations cannot change which organizations have access to the original app.
- Vulcan applications can be shared with organisations that the user has access to.
Additional UI Customisations
Adding a new route in the left navigation menu
The replica template comes preconfigured with the default Member Care navigation options. Using Vulcan, you can customise these options and add custom navigations links.
To enable the collapsible left navigation, ensure that useLatestLeftNavigation is set to false is set in the app-config file on your project.
The navigation.js file includes the customisation for the collapsible left navigation bar on Member Care.
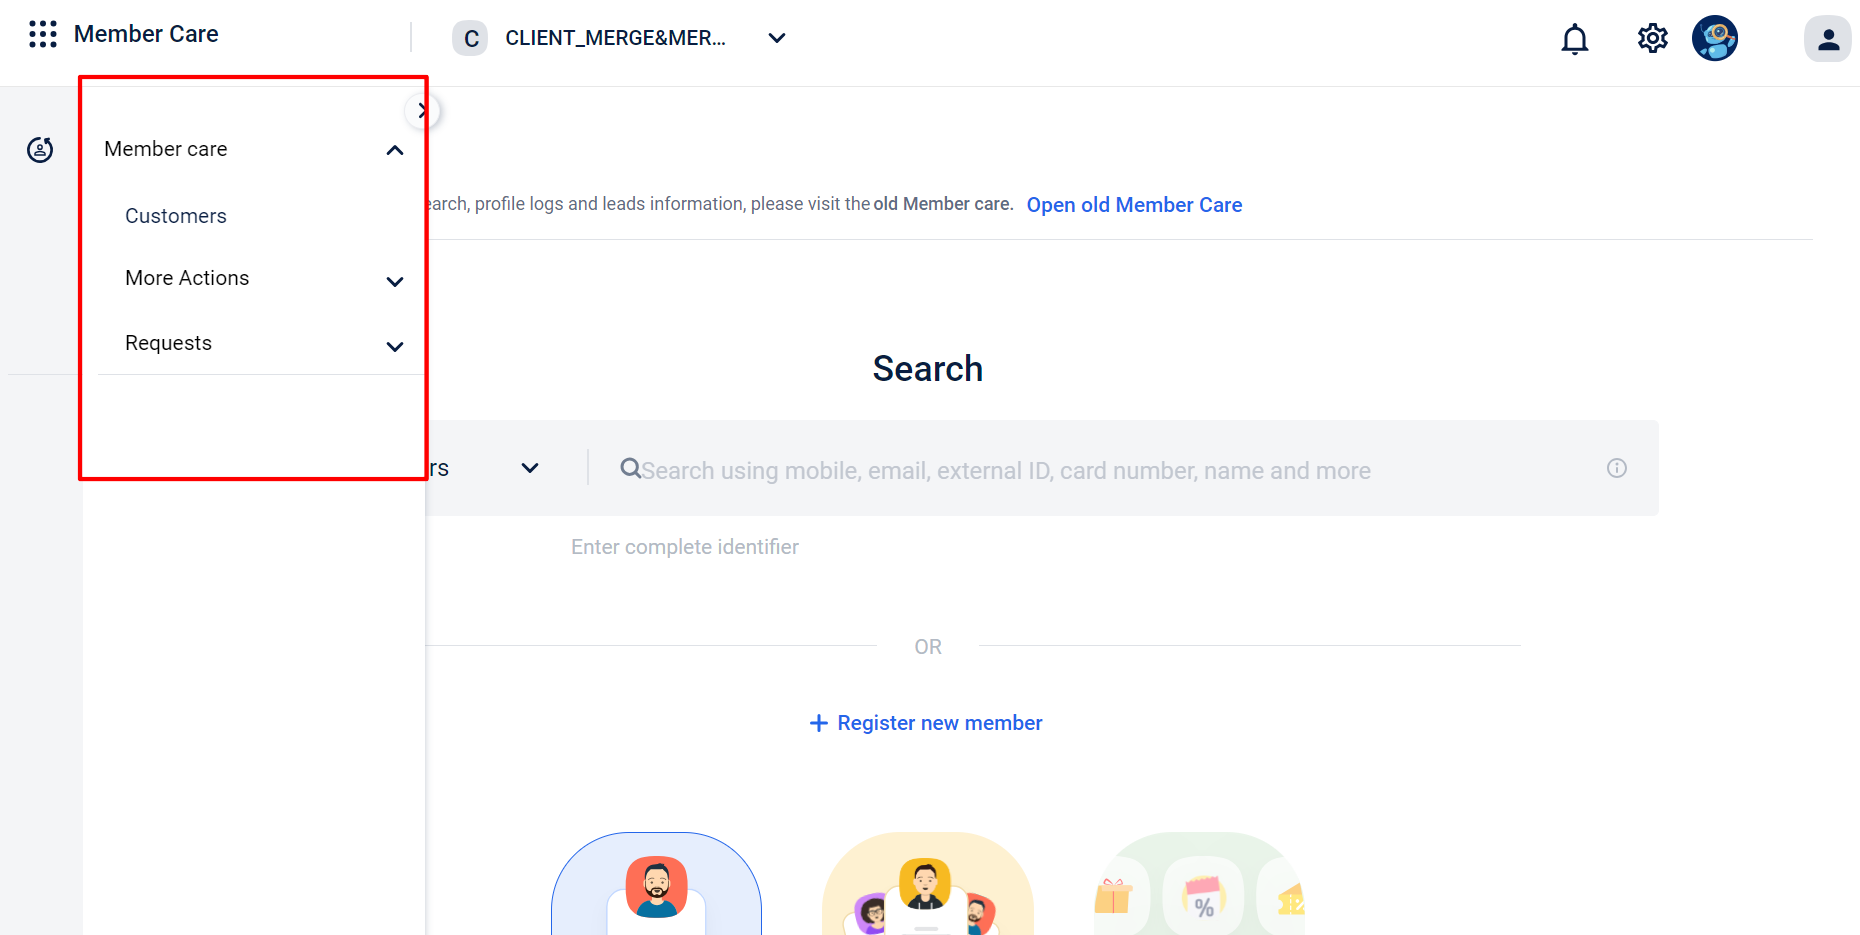
To add a new route in the left navigation menu, follow these steps:
-
Navigate to your project directory and open a terminal interface.
-
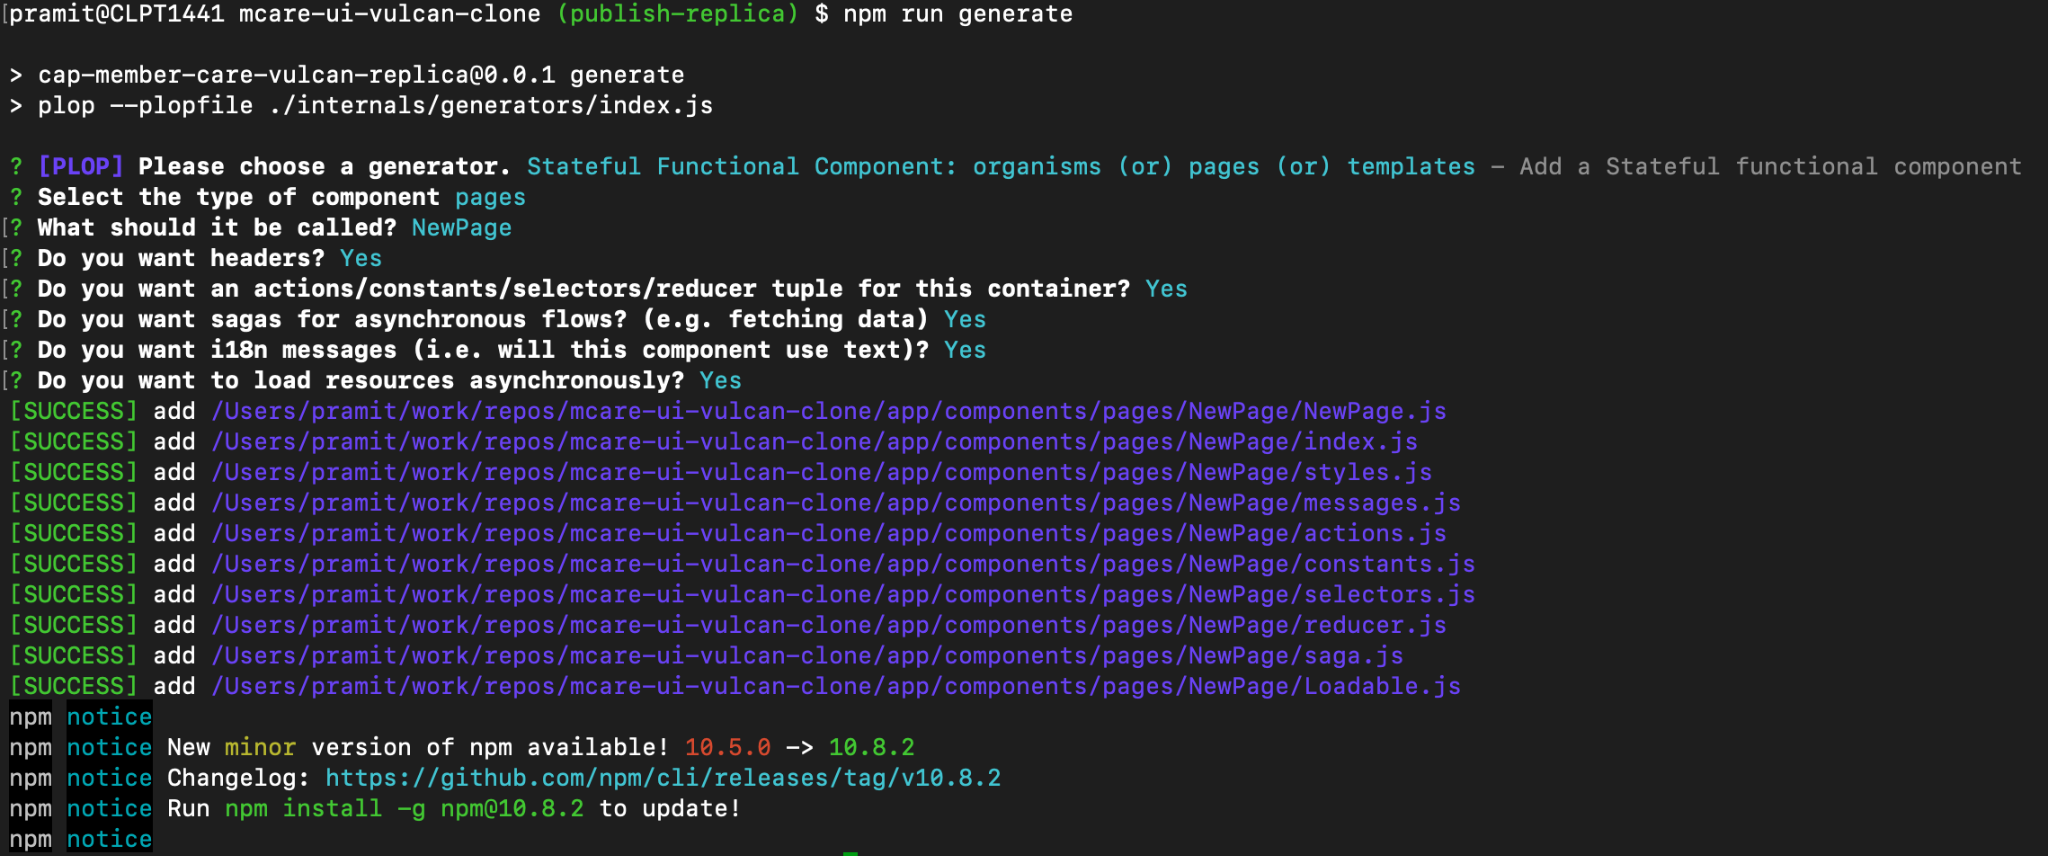
Generate a new page using the following command:
npm run generate -
Choose pages as the type of component when prompted.
-
Give an appropriate name for the page when prompted.
-
Follow the remaining setup procedure as prompted by the system.
-
Start the page development by following the react development process.
-
Add the following code to the
routes.jsfile to test your changes as a page:{ exact: true, path: `/loadWhateverYouWant`, type: 'newRoute', component: NewPage, },
Note:The details of the fields are as follows:
Field Description path The route path URL. component Name of the component use during the generation process.
- Add the new route to the
navigation.jsfile to view it as a left navigation link.
 {
    label: 'Your OWN route',
    value: 'newRoute',
    route: '/loadWhateverYouWant',
    icon: '',
    defaultExpanded: false,
    children: [],
},
Note:The details of the fields are as follows:
Field Description label The name of the route path. route The route path URL. icon Custom icon that is displayed on the left navigation menu. defaultExpanded The default state of the navigation menu. children The properties related to child pages of the menu.
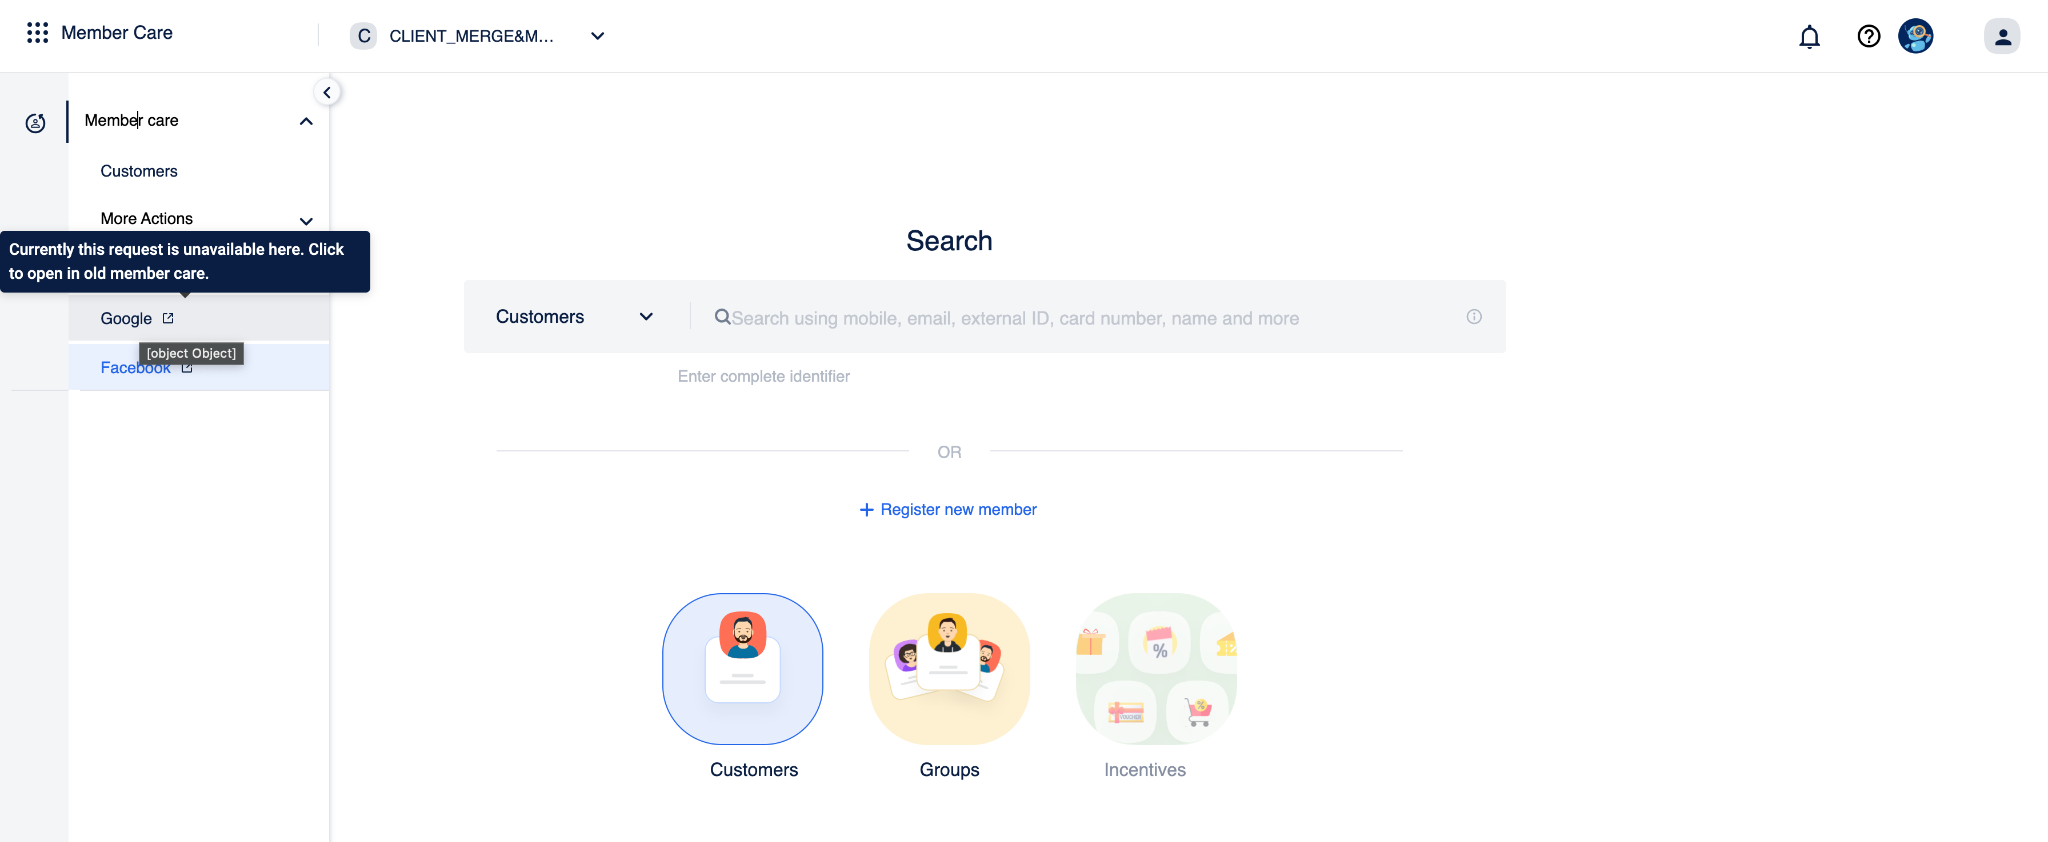
Adding a custom link in the left navigation menu
To enable the collapsible left navigation, ensure that useLatestLeftNavigation is set to false is set in the app-config file on your project.
The navigation.js file includes the customisation for the collapsible left navigation bar on Member Care.
Add the following to the navigation.js file along with the custom URL:
{
  label: ( // define custom markup and label for your left nav item here
   <>
     <CapTooltip
       title={
         <FormattedMessage
           {...messages.requestTooltip}
         />
       }
     >
       Google Link
       <CapImage src={OpenInIcon} alt="Open In Icon" />
     </CapTooltip>
   </>
 ),
 value: 'google_customUrlLink', // this value should always be of pattern <sometext>_customUrlLink in order for this feature to work
 route: '', // this will be empty always
 url: 'https://www.google.com/' // specify the custom URL to open on click
}
Note:Replace the
urlfield with your custom URL.
Embed a pre-developed Vulcan application component
You can embed a pre-developed Vulcan application component from the Vulcan platform into another Vulcan application. This allows you to import and add multiple Vulcan application components to a new Vulcan application in development.
To embed a Vulcan application component onto another Vulcan application, follow these steps:
-
On the Vulcan UI, navigate to the Vulcan application that contains the components to be embedded.
-
Host and enable UAT or Prod mode for the application if it is not already done.
-
Select the
 icon next to the UAT or Prod URL. This action lists the exported components for the application for the particular build (UAT or PROD).
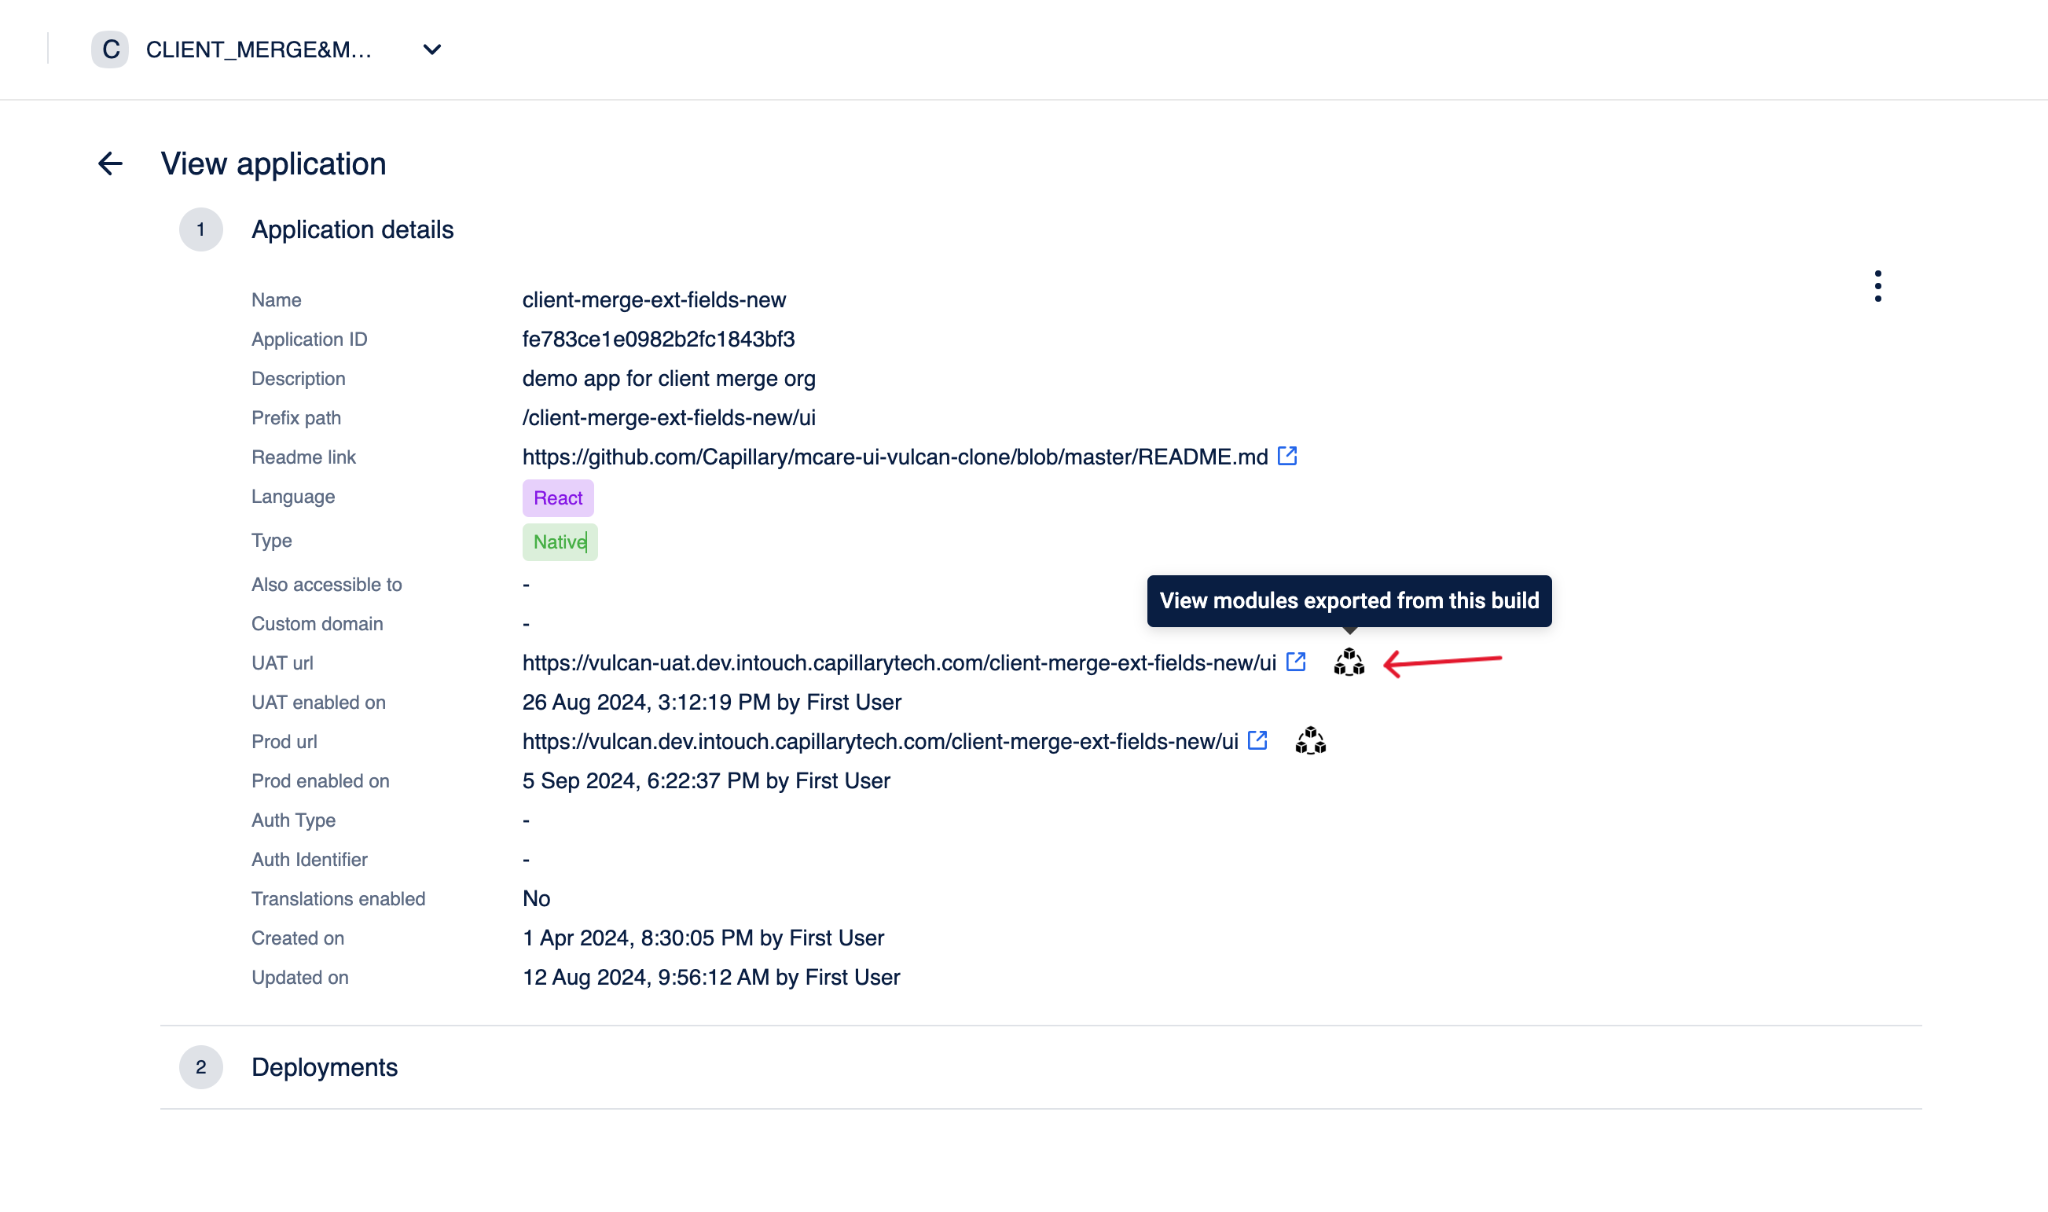
-
Select the
 icon next to the component to copy the component configuration code to the clipboard.
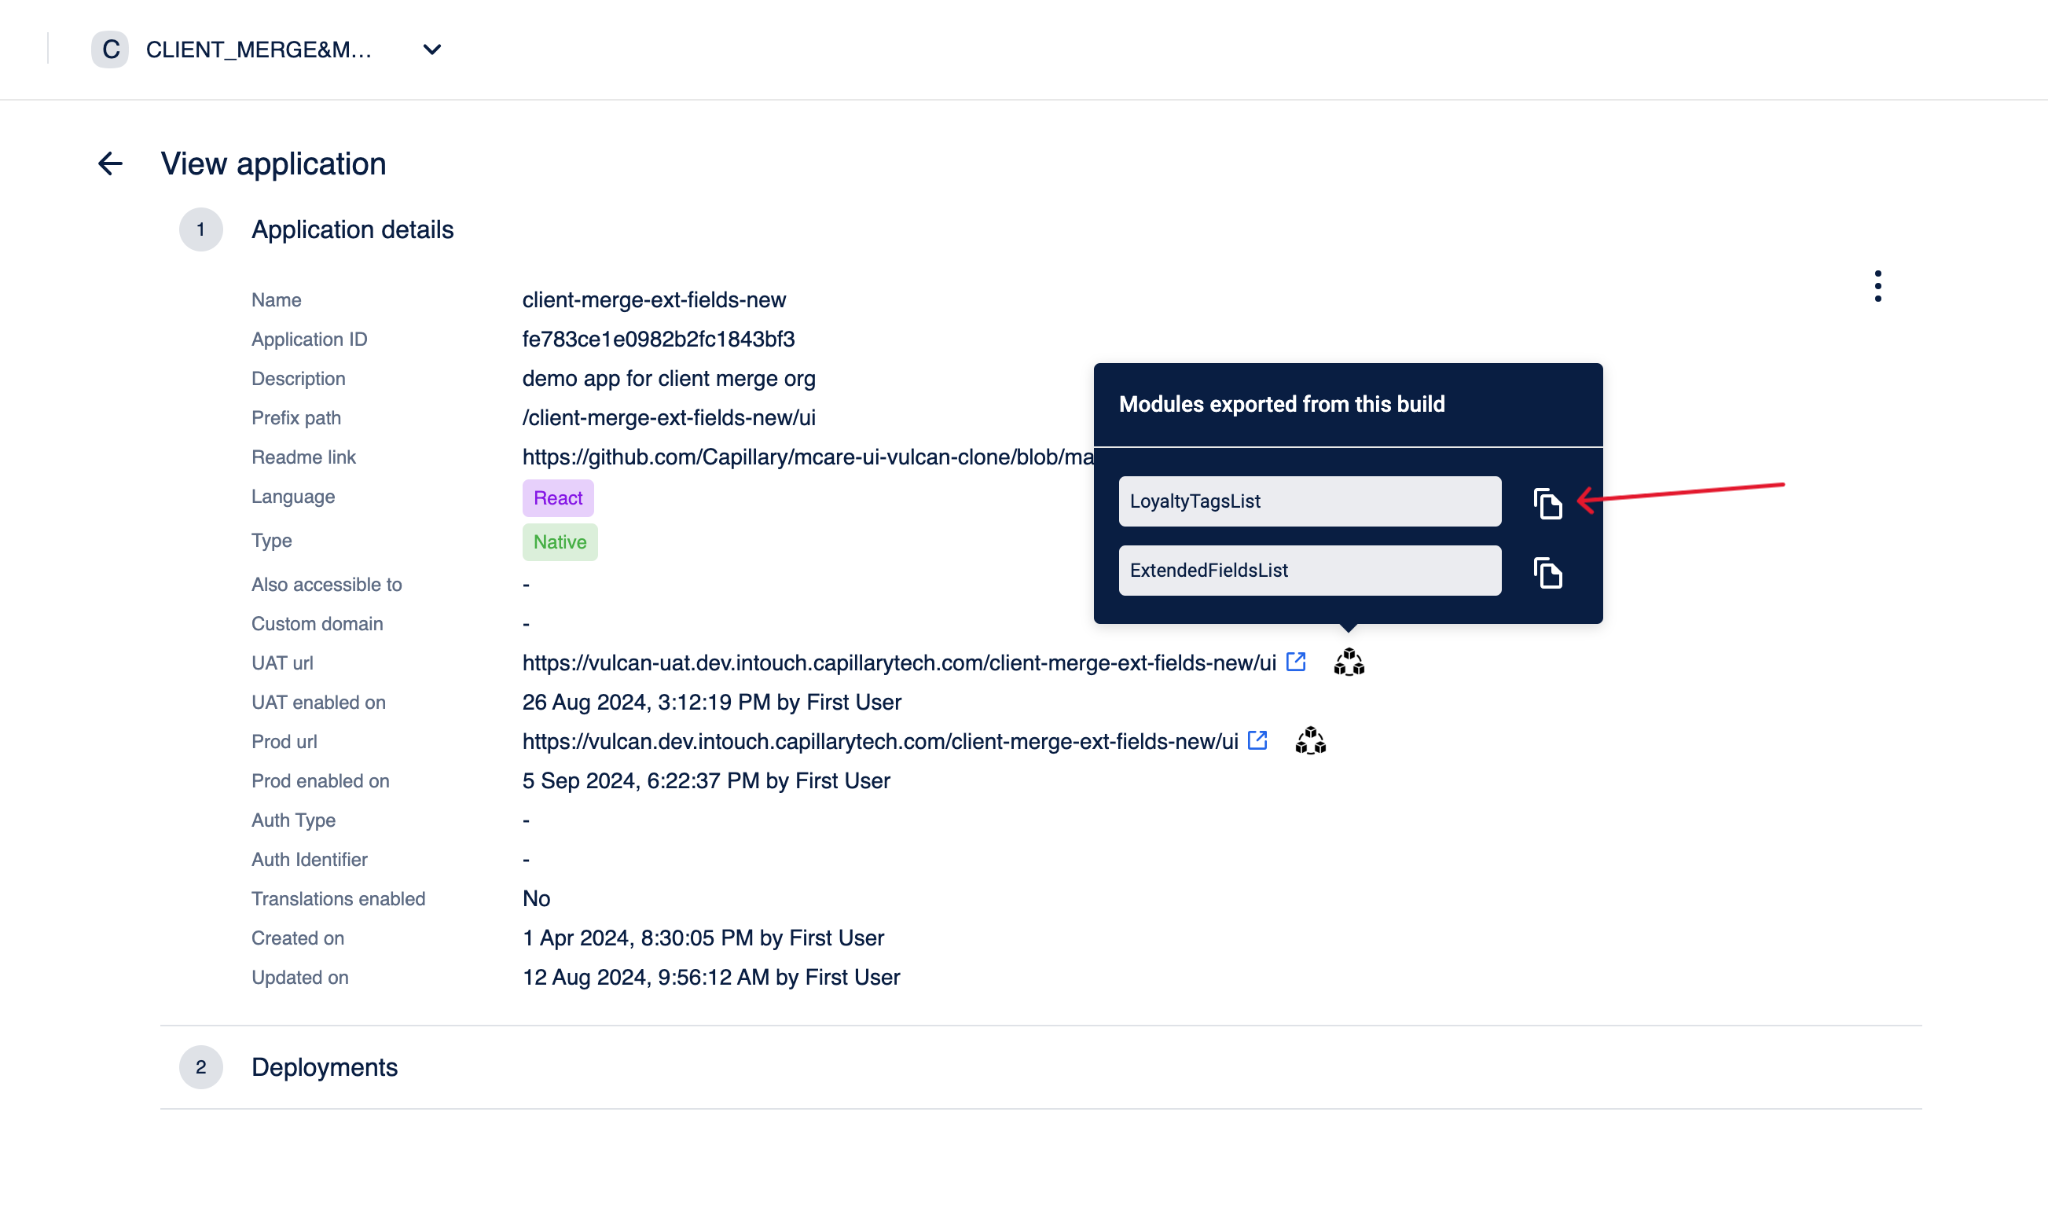
-
Navigate to the local project folder of the Vulcan application in development, and paste the code into the required section. For example, if you want to import a component to customer search, paste the copied code under the respective
CustomerSearch.jssection.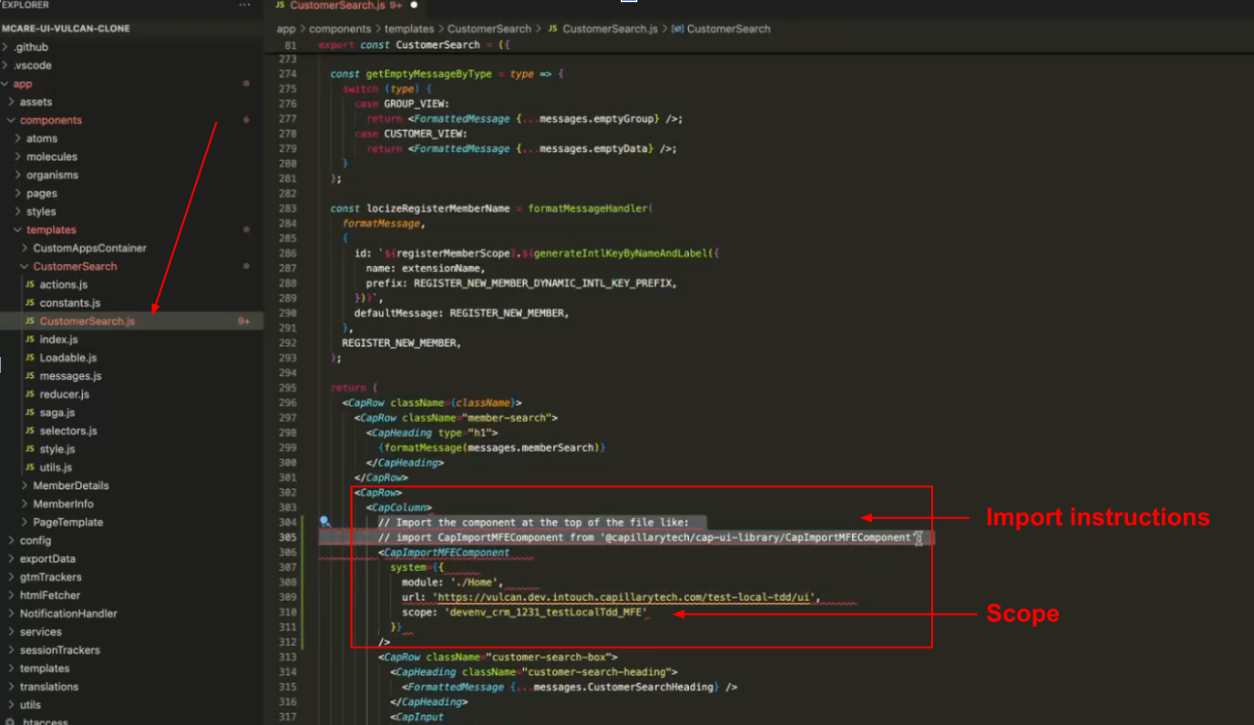
-
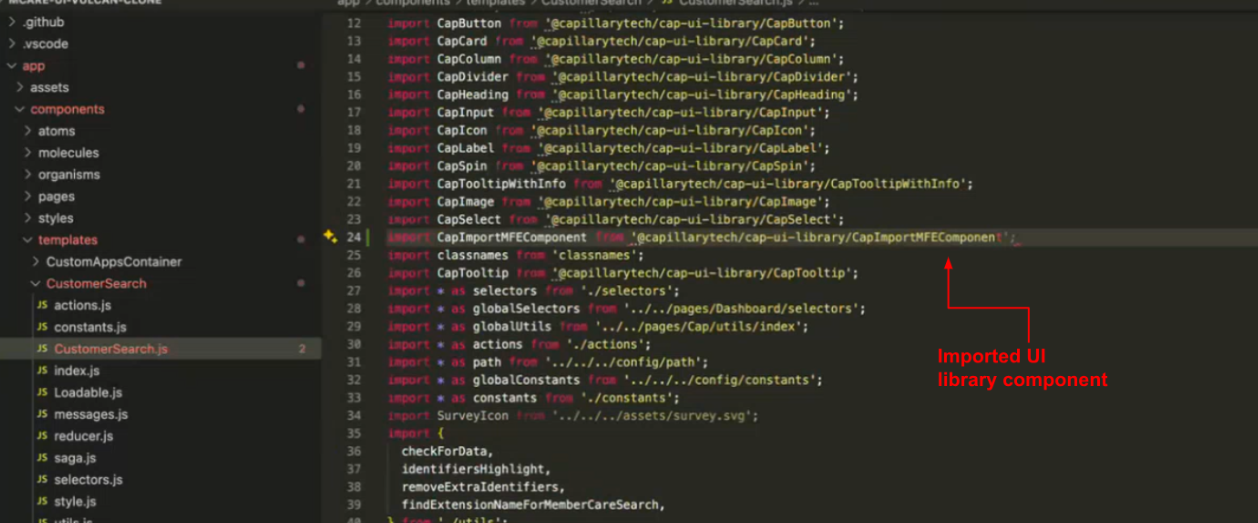
Import the required components according to the instructions provided in the comments.
-
Navigate to
app.jsin the project directory and paste the scope underVulcanSDKSetup>importedScopes. This ensures that the required flags are set to the local storage during app load up on the browser.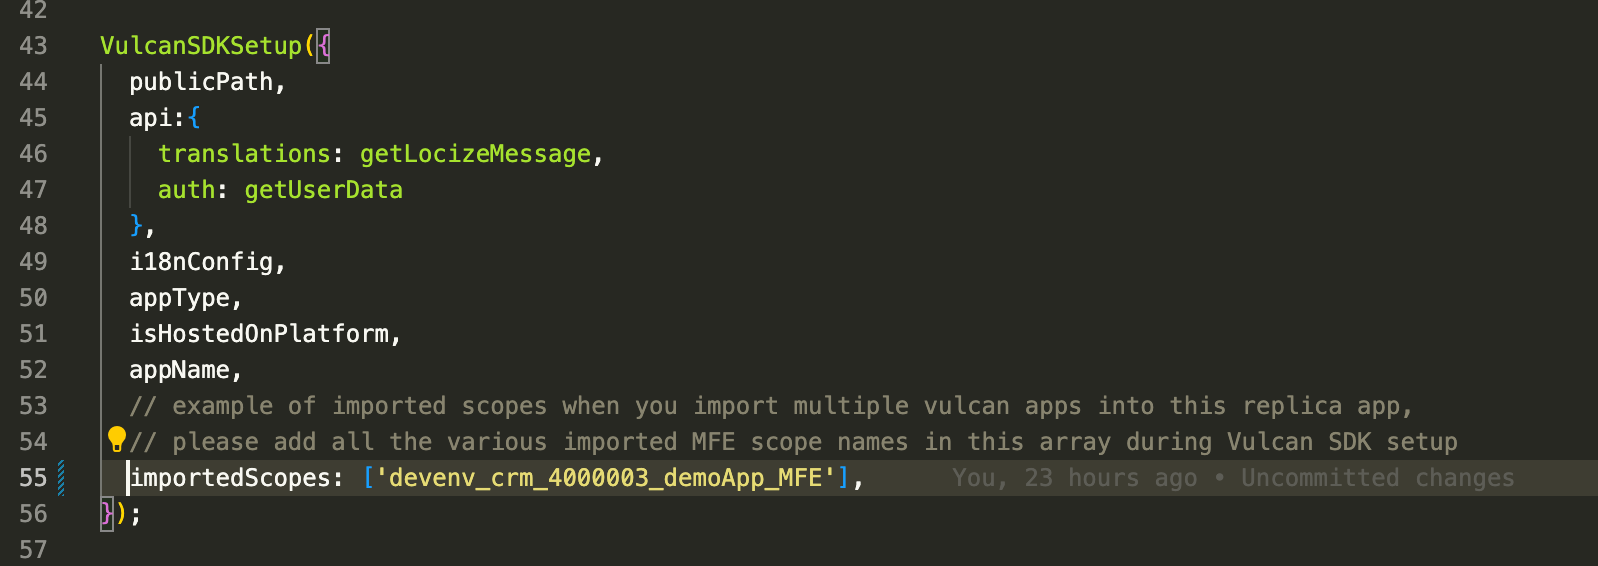
Note:The copied code can be used for any React 18-based project using the Vulcan SDK (Vulcan application or product UI) provided by the Capillary tech team.
- Host the new application and enable UAT or Prod mode to view the changes.
Note:Enabling UAT or Prod for the application is necessary to prevent errors and to view and copy modules that are exported from the components.
Enabling Sharingan functionality
To enable Sharingan functionality on a Member Care replica, follow these steps:
-
Open the project folder on your local machine.
-
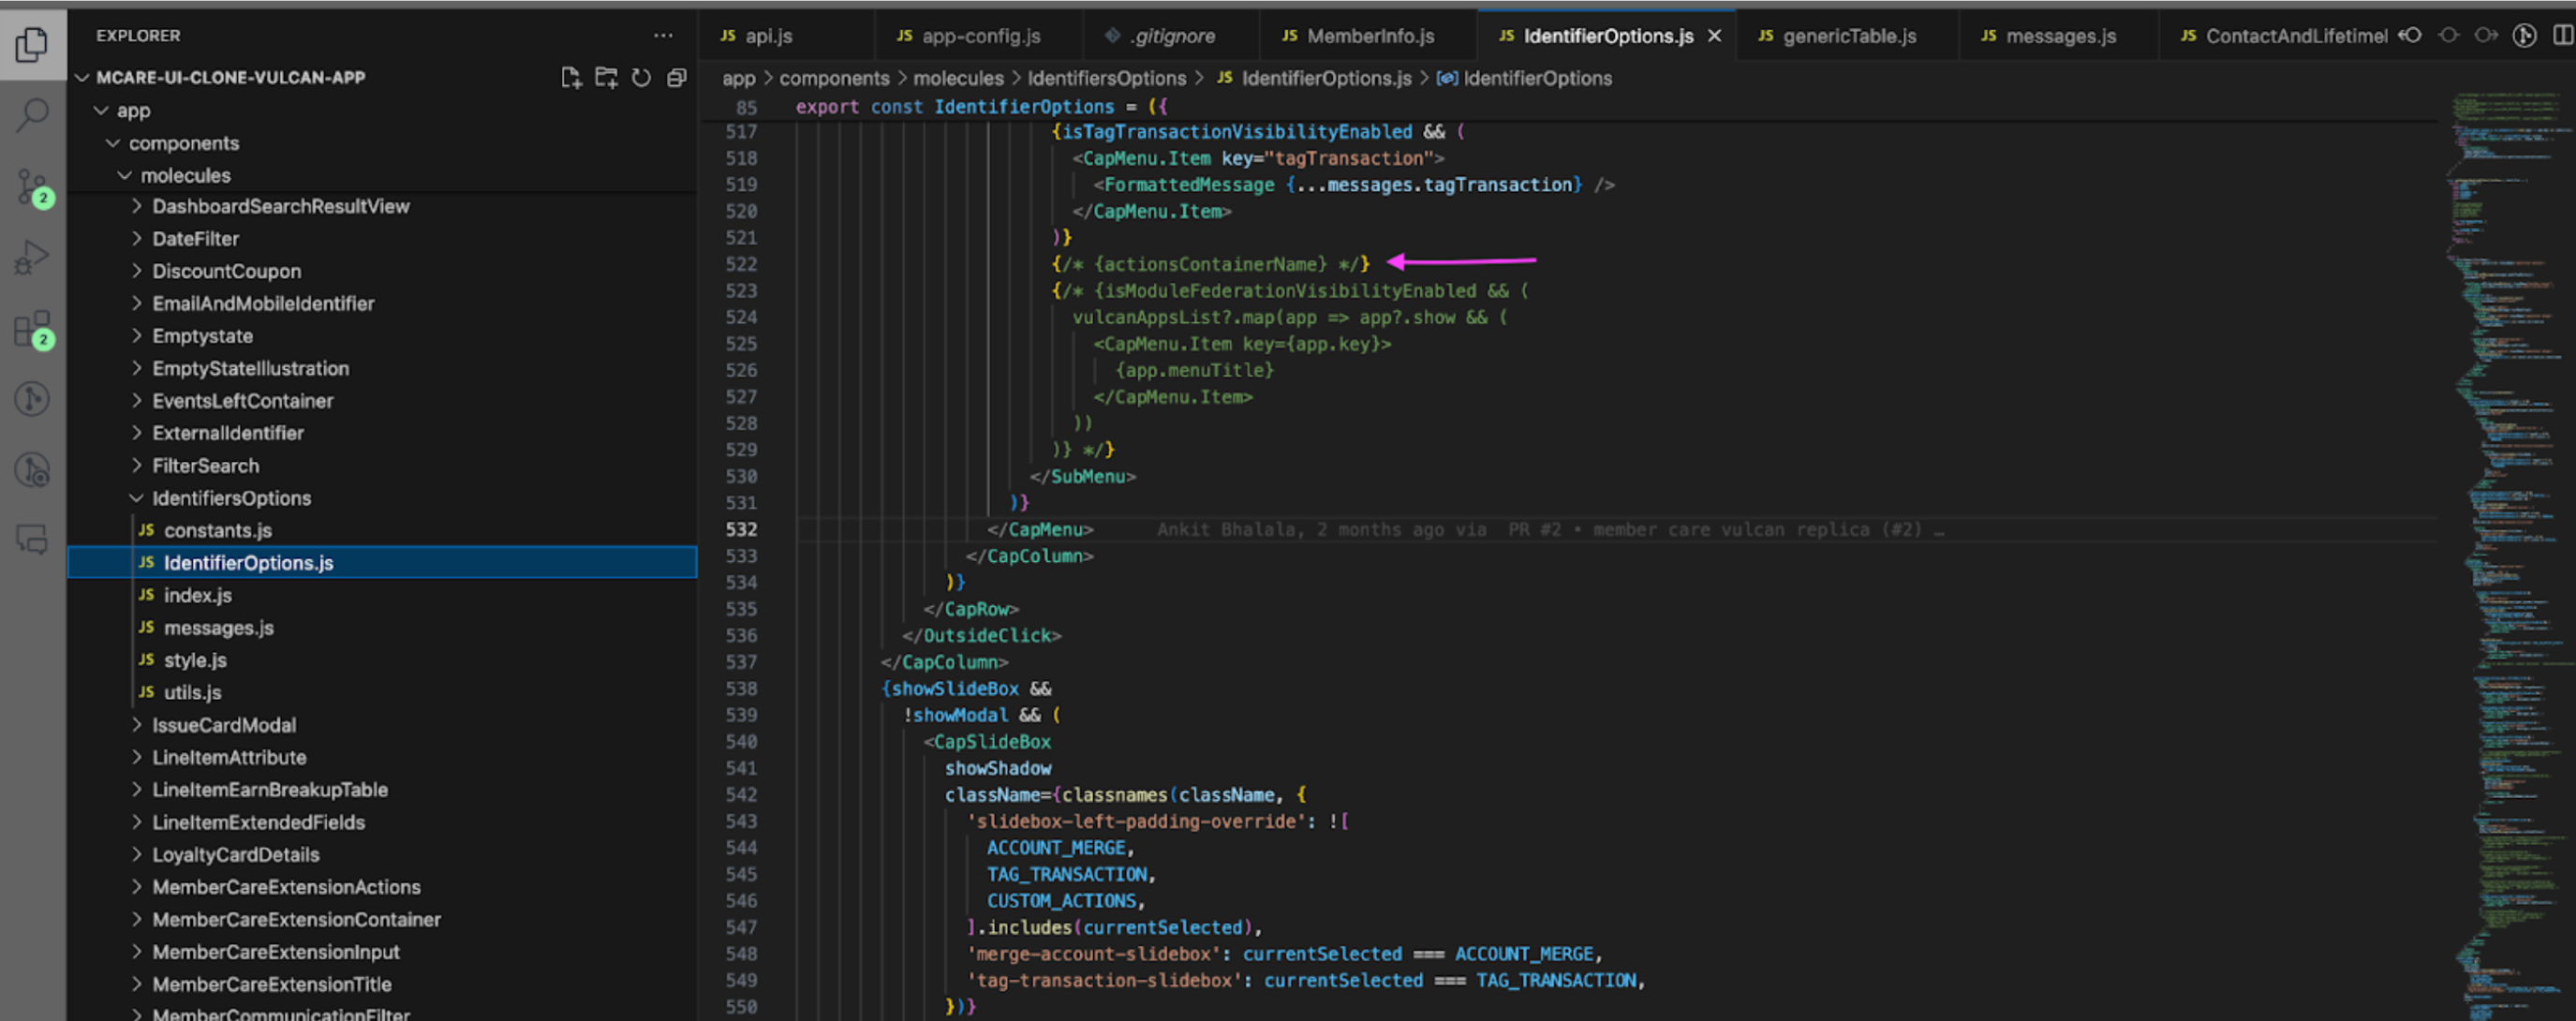
Navigate to the file webapp/app/components/molecules/IdentifiersOptions/IdentifierOptions.js.
-
Find the section of the code that contains {actionsContainerName} and uncomment the line.
-
Build and host the application on the Vulcan platform. Once hosted, the Sharingan app is visible on the UI if configured for the organization.
NoteThe rendering of the Sharingan app in the UI is managed within the code.
Updated 5 months ago