
Creating and Customising APIs
The Neo extension is a tool for creating and managing APIs with minimal coding effort. It allows you to perform necessary validations, transformations, and request creation using predefined blocks and executors.
This functionality enables easy creation of new APIs and customisation of existing ones, to meet brand-specific needs without requiring new API versions.
Create new APIs
The Neo extension simplifies the process of creating new APIs with minimal coding. When creating an API, you perform validations, transform data, construct the API request, and validate the API response. The Neo extension uses predefined blocks or executors in Neo to simplify this process.
Neo extension comes in handy when there is a brand-specific requirement to provide additional data over the existing information. You'll need to meet the requirement without affecting other brands using the existing APIs. Creating a new API version is not an option because the requirement is brand-specific.
Neo extension allows you to create an API response using multiple existing APIs, ensuring the new requirements are met without disrupting others.
Creating a GET API - accountSummary
Consider that there is a requirement to create a new GET API that fetches a detailed account summary of a customer using the card number. The procedure below guides you through creating the accountSummary API using the Neo extension.
-
Create new dataflow
- Navigate to the Neo extension UI and click Create new dataflow.
- Enter a name for the dataflow.
- (Optional) Create a tag.
- Click on the new dataflow and select the default version v1 to modify.
-
Define API Trigger
Edit the Trigger block on the workflow canvas to define the API.
API URL: AccountSummary
API Method: GET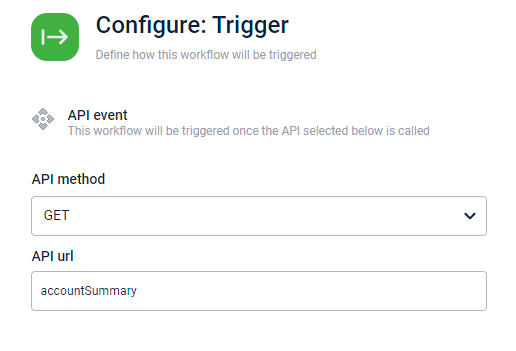
-
Configure the validation rules and define code paths
For this API, the card number is a mandatory query parameter and the following validations are performed:
- The query parameter field is not empty.
- The query parameter is the card number.
- The data type of cardNumber is a string.
To define the validation,
-
Click on the connector of the Trigger block and select the Schema block.
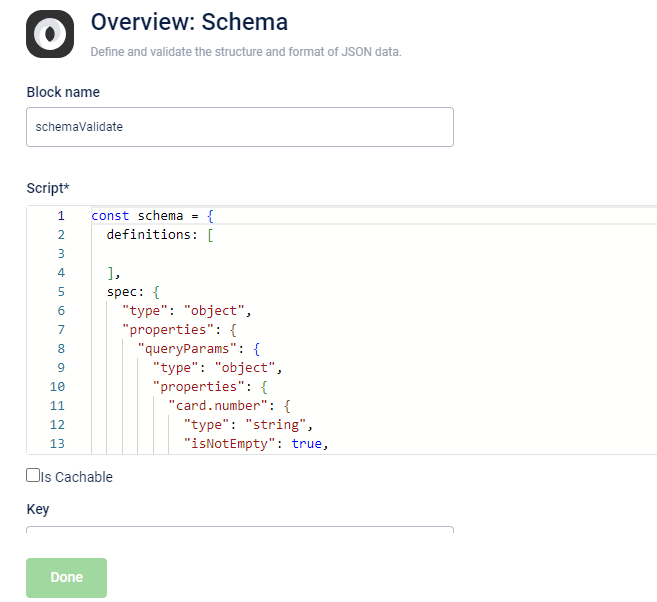
-
In the Block name section, enter the name of the block.
-
In the Script section, create a schema under the
specobject to validate the request payload.
Complete Script section of the Schema block
const schema = { definitions: [ ], spec: { "type": "object", "properties": { "queryParams": { "type": "object", "properties": { "card.number": { "type": "string", "isNotEmpty": true, "errorMessage": { isNotEmpty: "Invalid member or card search criteria provided." } } }, "required": ["card.number"] } }, "required": ["queryParams"] } } export { schema as default } -
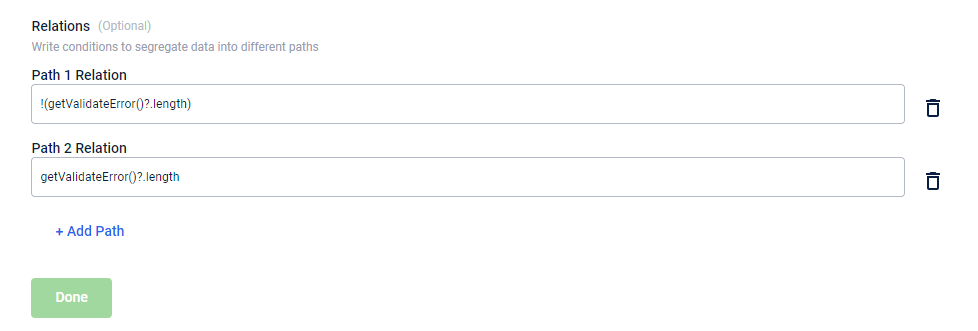
In the Relations section, use the JavaScript expressions and set the code flow path for successful and failure validation.
- !(getValidateError()?.length) to define the code flow path when the validation is successful and there are no errors.
- (getValidateError()?.length) to define the code flow path when the validation is failed.
If required, you can click Add Path and add more code flow paths.
-
Create a Script block and execute the transformation and functions for the validation success and failure scenarios
-
For a validation failure scenario, configure an error response for the API by adding a Script block and failure response with the status code in the Script section of the Script block.
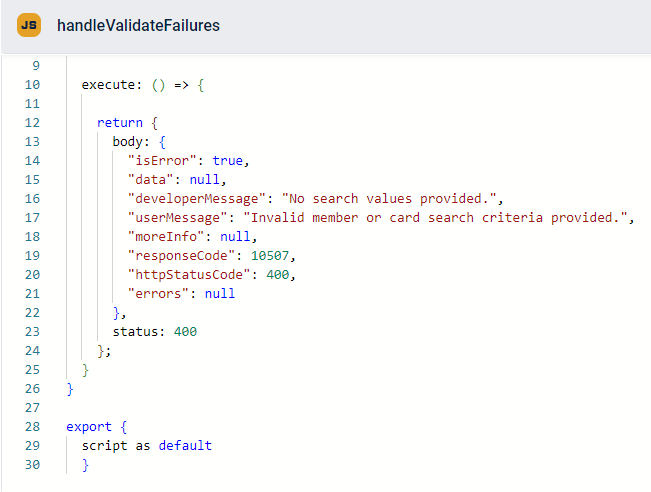
Complete Script section for validation failure
import dao from "neo/dao"; import logger from "neo/logger"; const { getIn } = dao; const script = { execute: () => { return { body: { "isError": true, "data": null, "developerMessage": "No search values provided.", "userMessage": "Invalid member or card search criteria provided.", "moreInfo": null, "responseCode": 10507, "httpStatusCode": 400, "errors": null }, status: 400 }; } } export { script as default }
-
For a validation success scenario, use the Script block and add the code to fetch the headers and set parameters in the configuration section. This is required before configuring the API request block.
- In the
returncode block under the execute method, fetch the effective headers using the Data Access Object (DAO) function,getEffectiveHeaders. - Set the query parameters fetched from the request using the function, getOut().
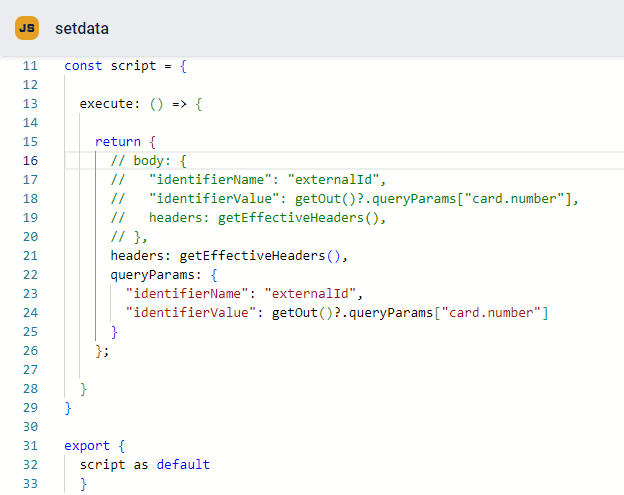
Complete Script section to set the data for validation success scenario
import dao from "neo/dao"; import logger from "neo/logger"; const { getBody, getEffectiveHeaders, getIn, getOut } = dao; const script = { execute: () => { return { headers: getEffectiveHeaders(), queryParams: { "identifierName": "externalId", "identifierValue": getOut()?.queryParams["card.number"] } }; } } export { script as default } -
-
Create API request and post API validation
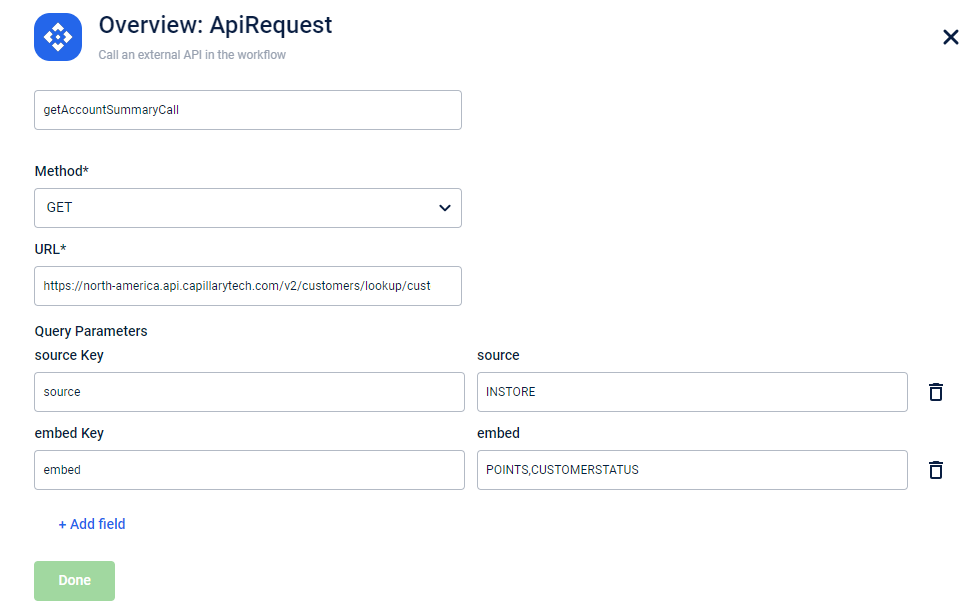
After configuring the headers and parameters for a validation success scenario, use the API request block to create the API request. Specify the method, URL, query parameters, body, and path parameters within the API block.
To configure the API request, enter the parameters in key-value pair.
Method -GET
URL-https\://{host}/v2/customers/lookup/custom
Query parameter -- Source:
INSTORE - Embed:
POINTS, CUSTOMERSTATUS
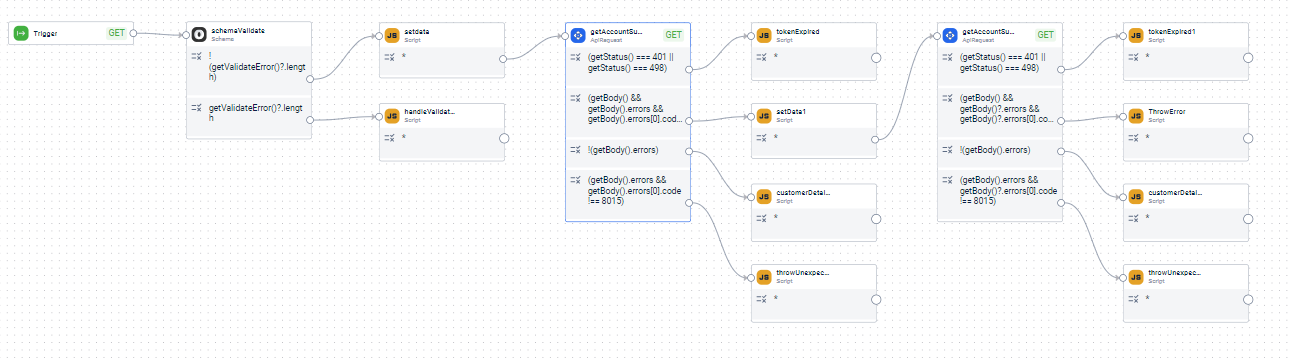
If required, you can use expressions in the Relations section and further set the code path for different error and success conditions using script blocks. For instance, you can add error codes for the
getAccountSummaryAPI call: 401, 498, 8015. - Source:
-
Save the workflow
To save the workflow, click Save. -
Test API
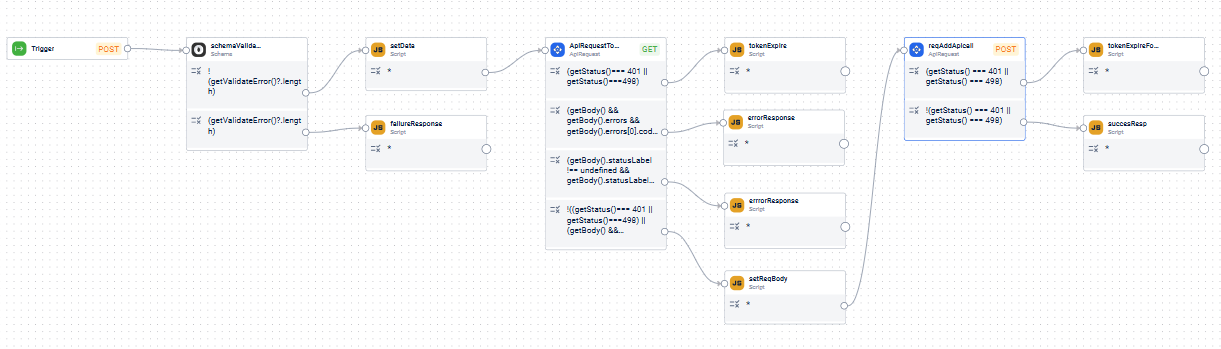
To test the API, execute the API from an API platform and check the response.Below is the screenshot showing the complete flow.
Creating a POST API
Consider a requirement to insert data into the CMS collection in Mongo DB. This dataflow is triggered using the POST method. The procedure below guides you through creating the addcontent API using the Neo extension.
-
Create dataflow
- On the Neo extensions UI, click Create new dataflow.
- Enter Name and Tags(optional).
- Click Done.
-
Define API Trigger
- Open the version of the dataflow that needs editing.
Note: A new dataflow will have only v1 version. - Edit the Trigger block present on the canvas to define the API.
- In the API method drop-down, select POST.
- Enter API url as
addcontent.
- Open the version of the dataflow that needs editing.
-
Create a Script block to extract data from the request and set the headers and body
-
In the Scripts section, write the
executemethod and extract the body from the API request using the DAO functiongetApiRequest. -
Extract the
promotionIdandmetaDatafrom the request body. -
Construct a Mongo query based on the fields
promotionIdandmetaData. -
Fetch the headers using the DAO function
getEffectiveHeaders.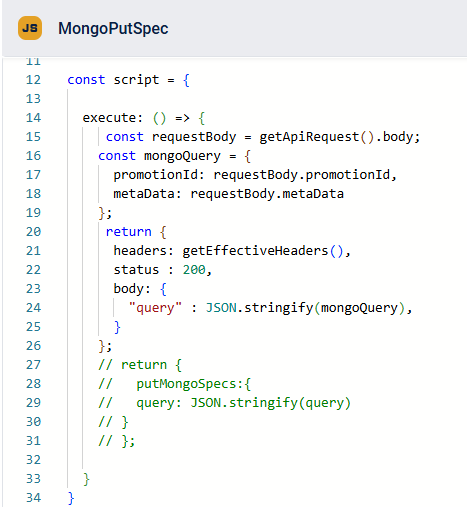
Complete Script section extract data from the request and set the headers and body
import dao from "neo/dao"; import logger from "neo/logger"; const { getBody, getEffectiveHeaders, getIn, getOut, getApiRequest } = dao; const script = { execute: () => { const requestBody = getApiRequest().body; const mongoQuery = { promotionId: requestBody.promotionId, metaData: requestBody.metaData }; return { headers: getEffectiveHeaders(), status : 200, body: { "query" : JSON.stringify(mongoQuery), } }; } } export { script as default }
-
-
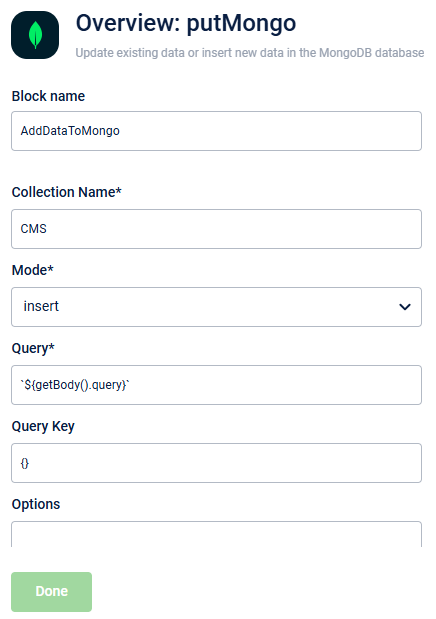
Insert data into the Mongo DB using the Put Mongo block
After configuring the headers and constructing the Mongo query, use the Put Mongo block to insert the data. Enter the following details in the fields:
Mode: Insert
Query:${getBody().query}
Query Key: {}
- Save the workflow
To save the workflow, click Save. - Test API
To test the API, execute the API from an API platform and check the response.
Below is the screenshot of the complete dataflow.

Customise existing APIs
You can enhance existing APIs to add new functionalities using Neo extensions. These extensions allow you to modify or extend an API’s capabilities, enabling you to achieve new functions without building a new API from scratch.
Customising API or wrapping multiple APIs
Consider that there is a requirement to add loyalty points to a customer. Two API calls are required to update the loyalty points. The first is a GET call on /lookup/customerDetails API to retrieve customer data; the second is a POST on /addRequest API.
The procedure below guides you through creating the request using the Neo extension.
-
Create dataflow
- On the Neo extensions UI, click Create new dataflow.
- Enter a Name and Tags(optional).
- Click Done.
-
Define API Trigger
- Open the version of the dataflow that needs editing.
- Open the Trigger block present on the canvas to define the API.
- Enter API method as POST.
- Enter API url as
awardLoyaltyCurrency.
-
Configure the validation rules and define code paths
For this API, thecard numberandCurrencyAmountare mandatory query parameters and the following validations are performed:- The query parameter fields are not empty.
- The query parameters are
cardNumberandCurrencyAmount. - The data type of
cardNumberandCurrencyAmountis a string.
To define the validation,
-
Click on the output of the Trigger block and select Schema in the popup window.
-
Click on edit to open the Schema block.
-
In the Block name section, enter the name of the block.
-
In the Script section, create a schema to validate the request payload.
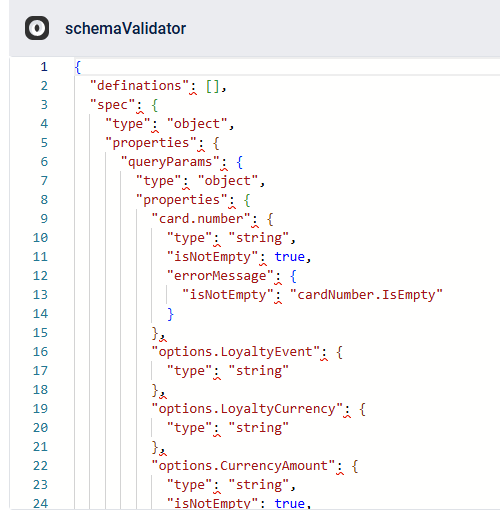
Complete Script section to create a schema to validate the request payload
{ "definations": [], "spec": { "type": "object", "properties": { "queryParams": { "type": "object", "properties": { "card.number": { "type": "string", "isNotEmpty": true, "errorMessage": { "isNotEmpty": "cardNumber.IsEmpty" } }, "options.LoyaltyEvent": { "type": "string" }, "options.LoyaltyCurrency": { "type": "string" }, "options.CurrencyAmount": { "type": "string", "isNotEmpty": true, "errorMessage": { "isNotEmpty": "currencyAmount.IsEmpty" } }, "options.TransactionDate": { "type": "Date" }, "options.ExpirationDate": { "type": "Date" }, "options.ChangedBy": { "type": "string" } }, "required": ["card.number", "options.CurrencyAmount"], "errorMessage": { "minProperties": "param.minProperties" } } }, "required": ["queryParams"] } }
-
In the Relations section, use JavaScript expressions and set the code flow path for the successful and failure validation.
- !(getValidateError()?.length) to define the code flow path when the validation is successful and there are no errors.
- (getValidateError()?.length) to define the code flow path when the validation is failed.
If required, you can click Add Path and add more code flow paths.
-
Create a Script block and execute the transformation and functions for the validation success and failure scenarios
-
For a validation failure scenario, add a Script block and failure response with the status code in the Script section of the Script block.
Complete Script block for handling validation failureimport dao from "neo/dao"; import logger from "neo/logger"; const { getIn, getOut } = dao; const randString = () => { return `${genRand(8)}-${genRand(4)}-${genRand(4)}-${genRand(4)}-${genRand(4)}${genRand(4)}${genRand(4)}` }; const genRand = (len) => { return Math.random().toString(36).substring(2, len + 2); }; const failedResponse = (developerMessage, userMessage, responseCode, httpStatusCode, error, requestId) => { return { "isError": true, "data": null, "developerMessage": developerMessage, "userMessage": userMessage, "moreInfo": null, "responseCode": responseCode, "httpStatusCode": httpStatusCode, "errors": error, "requestId": requestId } }; const script = { execute: () => { const resp = getIn(); const message = resp?.error?.validate[0]?.message; let validation = { isError: false }; if (message === "cardNumber.IsEmpty") { validation = failedResponse("No card id provided for member lookup.", "The application has encountered an error. Please try again later.", 10400, 400, null, randString()) } if (message === "currencyAmount.IsEmpty") { validation = failedResponse("0 points were requested. Loyalty currency cannot be 0", "0 points were requested. Loyalty currency cannot be 0", 3313, 400, null, randString()) } if (message === "param.minProperties") { validation = failedResponse("query param card number/ currency amount is required", "", 10400, 400, null, randString()) } return { body: validation, status: 400 } } } export { script as default }
-
For a validation success scenario, use the script block and add the code to fetch the headers and set parameters in the configuration section. This is required before configuring the API request block.
-
In the Scripts section, write a
returncode block under theexecutemethod, and fetch the effective headers using the Data Access Object (DAO) function,getEffectiveHeaders. -
Set the query parameters fetched from the request payload using the function,
getOut(). -
Use the
iibCoupenReqRestucture()for data restructuring.
Complete Script block for validation success scenarioimport dao from "neo/dao"; import logger from "neo/logger"; const { getBody, getEffectiveHeaders, getIn, getOut } = dao; const script = { execute: () => { return { headers: getEffectiveHeaders(), queryParams: { "identifierName": "externalId", "identifierValue": getOut()?.queryParams["card.number"] } }; } } export { script as default }
-
-
-
Create API request and post API validation
After configuring the headers and parameters for a validation success scenario, use the API request block to create the API request. Specify the method, URL, query, body, and path parameters within the API block.
To configure the API request, in the Script section, set the following:
Method - GET
URL-https:/{host}/v2/customers/lookup/customerDetails
Query parameter -- Source: INSTORE
- Embed: POINTS, CUSTOMERSTATUS.
This API extracts the customer details. The fields from the API response are used to create the payload for the addRequest API.
You can use the JavaScript and API Request block to make subsequent calls and handle errors.
In the Relations section, you can use expressions and set the code path for different error and success conditions using Script blocks. For instance, you can add error codes for the getcustomerDetails API call: 401, 498, 8015.
- Save the workflow
To save the workflow, click Save. - Test API
To test the API, execute the API from an API platform and check the response.
The screenshot below shows the complete configuration of the API.
Updated 28 days ago