
Create a Campaign (Old UI)
Type of Campaigns
You can create a campaign for different marketing objectives, such as Sales promotion, New Store openings, Brand anniversaries, Birthdays, and many others.
So basically there are 6 types of campaigns.
- Broadcast campaign
- Journey campaign
- Timeline campaign
- Survey campaign
- Referral campaign
- Bounceback or DVS Campaign
Broadcast campaign
Broadcast campaigns are campaigns that are implemented to target a bulk audience. These campaigns' functioning depends on customers' historical data and behaviours. So we can actually launch the campaign by specifying the audience which we want to target for the specific campaign.
Create campaign
Engage+ new UI consists of a single campaign creation flow with different content strategies. You can create a campaign either for the org or an org unit. There are three different user roles for org unit access.
- Access to parent org and its org units.
- Access to multiple org units but not org.
- Access only to a specific org unit.
Campaigns created on Engage+ can be used to reach out to customers through Omnichannel mediums like Line, Viber, SMS, Email etc.
- To create a campaign for an org unit or org, ensure that you have the necessary permissions.
Set campaign name, duration, and strategy
- Log on to InTouch of your cluster and navigate to Engage+ from the menu.
- Click New campaign.

- To create a campaign for an org unit, click +Change, and select your preferred org unit. By default, the the campaign is associated to the org.


You can see the selected org unit throughout the campaign creation process.
- Enter a Campaign name and select a Campaign duration using the calendar boxes.

- Start date: The date from which the campaign and all other associated coupons/offers will be valid.
- End date: The date after which the campaign and all other associated coupons/offers will not be valid.
- Click +Add marketing objective to tag a marketing objective to the campaign. This helps classify the campaign to achieve better automation and reporting.
| Marketing objective | Description |
|---|---|
| Boost Sales | To increase overall sales. Campaigns like - EOSS, Deep discounts are an example of this |
| Acquire customers | Acquire new customers for your brand. Eg. Any acquisition campaign, referral, etc |
| Promote specific products | Promote a specific product, brand, or category eg. new shoes collection, winter launch, etc |
| Collect feedback from customers | Collect feedback from customers to analyze their experience |
| Improve retention | Send offers, and coupons to retain existing customers like ATV, ABV booster, and RFM campaigns |
| Winback lapsed customers | Send promotional offers to lapsed customers |
| Capture customer information | For data collection like - Date of birth, gender, interest, anniversary, etc |
| Send greetings to customers | Festival greetings such as Festivals, Birthdays, Anniversary |
| Increase store visits | Promote a specific store, city, or zone to increase the footfall |
-
To modify the campaign level test-control ratio and add a Google Analytics account, click Show of Advanced settings. See Advanced Settings to know how to configure it.
-
Click Save campaign.

Create message
- Click New Message to set up other things such as audience, content, delivery settings, and schedule the campaign.
- Enter Message name, select the Type of messages, and Optimization strategy and click Next to continue. For more details, see Create a message
- Click Add audience group to add recipients for the campaign. You can create an audience list in the following ways - Create Segments using Filters , Create audience group by uploading csv , and using Audience combined list .
- Add Campaign content for different channels like SMS, Email, Facebook, WeChat, and more. You can also use existing templates. For more details, see Creative Management.
- To issue points or coupons through the campaign, click +Add incentives, and select your preferred offer or points strategy. To create a new offer see Create Offer and to create a new points strategy, see Points strategy .
- Schedule the campaign on your preferred date. You can also set to run the campaign repeatedly at equal intervals. For more information, see Schedule Message .
- After setting up all the required parameters, in Delivery settings, click Send for approval. An email is sent to the admins of the org with the subject
Alert! Campaign approval needed.

- See the following section to know how to approve a campaign.
*Once the admin approves the campaign, the campaign will go live as per the schedule. You will also receive a notification over email stating the Campaign message is approved.
Approve message
Only authentic users of the org can validate and approve campaigns that are created.
To approve the campaign:
- Click on the campaign that you want to approve.

- Verify the campaign details. Click Edit to modify the campaign details if required and Click Approve to approve all the campaign messages. For a detailed help guide, see Approve a message

- If you want to make any changes to the campaign, click Edit to modify the campaign and send it for approval again.
- You can add more messages to a campaign using New message button.
- You can also Reject a campaign that you wish to ignore.
Check message delivery status
It might take around 12 - 24 hours to update the Message Delivery Status on the Campaign Listings page. The tooltip shows the approximate time it would take to show the delivery status.
To check the status, do the following.
- On Capillary InTouch, navigate to Engage+
- Select a campaign.
- Navigate to the Delivery Rate.

Journey Campaign
Journey campaigns are the campaigns that enable you to create scenario-based flows to nurture your customers throughout their lifecycles. It helps marketers identify the right course of action by creating multi-campaign flows, incentivizing customers, and engaging them via multi-channel personalized communication, all in one place.
To read more click here
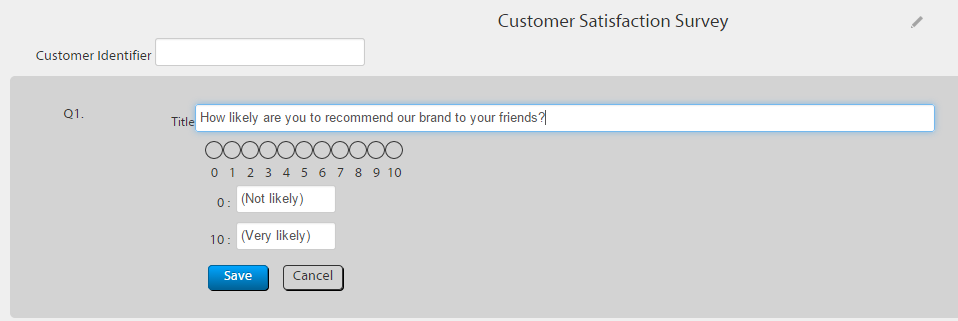
Survey Campaign
You can survey your customers by creating a set of questions and sending the link through SMS or Email. Survey Campaigns help you identify the promoters (who are happy with the service and products offered by your organization and likely to refer your brand to their friends) and detractors (those who are not likely to refer your brand) in your customer base.
Creating a New Survey Campaign###
-
When you click the +New Campaign button on the Dashboard page, the following screen appears.
-
In the New Campaigns screen, do the following:
1.From the Campaign Type list, select Survey.
2.In the Campaign Name box, type a name for the new campaign.
3.In the Description box, type a short description about the current campaign.
4.In the Valid Between box, using the Calendar option, enter the start date and end date of the campaign.
5.In the Campaign Objective box, select the objective from the list of drop down provided. See figure below:The table below describes each category:
Categories Values Help Text Acquisition General Acquire new transacting customers from a given acquisition channel Referral Acquire new transacting customers through referrals by existing customer Delight Birthday/Anniversary Delight customers with incentives around life events to encourage them to transact by redeeming points or coupons Feedback/Survey Delight customers with incentives and encourage them to take a survey or provide feedback Informational Customer Joinee Program Encourage new loyalty customers to know more about the program benefits and the brand. Increase in repeat purchase frequency and LTV Store Opening (Awareness) Inform customers nearby about a new store opening to boost transactions at the store Product Launch Inform potentially interested customers about a new product launch to boost sales for the newly launched product Season/Arrivals Inform potentially interested customers about new collections/stock in the stores to boost sales Brand awareness, Infomercial Brand building exercise and information sharing with customers to increase overall customer engagement with the brand Promotional Up sell Promotional campaign to encourage people to buy higher volumes of the same SKUs - higher count per SKUs Cross-Sell Promotional campaign to encourage people to buy different SKUs - higher count of unique SKUs Sales Booster Promotional campaign to encourage people to buy more - higher ABS and ABV Miscellaneous Heavy Discount Sale (includes EOSS) Boost sales during any heavy discount periods including festivals and EOSS Frequency Enhancer Encourage lower frequency visitors to transact more frequently Lapsation Reactivate lapsed customers and encourage them to transact" 6.From the Survey Type, select the type (this is used for reporting purpose).
7.Provide a name for the Brand Logo to be used in the survey form. -
Click Create Campaign
Adding Questions to the Survey
- In the Forms tab, a default question 1 is available. Click the Edit icon to re-write the question and click Save.
- Click Add Question and select the question type. The following screen appears (The Scale type was chosen in this case).
- Add the question, select the Required option to make the question mandatory, and click Save.
- Select the Color theme.
- Add the confirmation response that would appear after the customer submits the survey.
- Click Create Form to create the form.
- Click Publish to roll out the survey.
Referral Campaign
The Referral Campaigns help you to acquire new customers by utilizing your existing customers' network. Existing customers can refer their friends and contacts to visit your store. You can configure your referral campaigns to reward both the referrer (the existing customers who had provided the email IDs or phone numbers of their friends) and the referrals (the friends of existing customers to whom the invitation to visit the store had been sent) when the referrals enrol into your loyalty program or make transactions.
TOPICS ON THIS PAGE
- Creating Referral Campaigns
- Configure SMS and E-Mail messages
- Configure reward settings
Creating Referral Campaigns
To create referral campaigns, do the following:
- On the Campaigns Dashboard, click the + New Campaign button.
- On the New Campaigns screen, do the following:
- In Campaign Type, choose Referral.
- In Campaign Name, type a name for the new campaign.
- In Description, type a short description of the campaign.
In Valid Between, using the Calendar option, set the campaign duration - start date and end date of the campaign. - In Campaign Objective, select the objective from the drop-down list. See figure below.
The table below provides descriptions of each category of Campaign Objective.
| Categories | Values | Help Text |
|---|---|---|
| Acquisition | General | Acquire new transacting customers from a given acquisition channel |
| Referral | Acquire new transacting customers through referrals by existing customer | |
| Delight | Birthday/Anniversary | Delight customers with incentives around life events to encourage them to transact by redeeming points or coupons |
| Feedback/Survey | Delight customers with incentives and encourage them to take a survey or provide feedback | |
| Informational | Customer Joinee Program | Encourage new loyalty customers to know more about the program benefits and the brand. Increase in repeat purchase frequency and LTV |
| Store Opening (Awareness) | Inform customers nearby about a new store opening to boost transactions at the store | |
| Product Launch | Inform potentially interested customers about a new product launch to boost sales for the newly launched product | |
| Season/Arrivals | Inform potentially interested customers about new collections/stock in the stores to boost sales | |
| Brand awareness, Infomercial | Brand building exercise and information sharing with customers to increase overall customer engagement with the brand | |
| Promotional | Up sell | Promotional campaign to encourage people to buy higher volumes of the same SKUs - higher count per SKUs |
| Cross-Sell | Promotional campaign to encourage people to buy different SKUs - higher count of unique SKUs | |
| Sales Booster | Promotional campaign to encourage people to buy more - higher ABS and ABV | |
| Miscellaneous | Heavy Discount Sale (includes EOSS) | Boost sales during any heavy discount periods including festivals and EOSS |
| Frequency Enhancer | Encourage lower frequency visitors to transact more frequently | |
| Lapsation | Reactivate lapsed customers and encourage them to transact" |
- In Incentivize Referrer, choose when to incentivize the referrer:
- Dynamically as he reached the criteria: To issue incentives dynamically as and when the configured criterion is met.
- At the end of the campaign: To issue incentives at the end of the campaign period.
- Select other additional options:
- Select Disable Test-Control to include all the customers eligible for this campaign. (Normally every campaign will have a control group (for example 10% of the eligible members who are randomly selected) to whom the marketing communication is not sent. The control group is essential to measure profits.)
- Select to make campaign default in PoS. When you enable this option, also choose how to send the referrals (by email or SMS).
- Select Invite Registered Customer to invite referrals who had already registered.
- Select Register Customer Online** to enable registering customers online using the Social App and provide the registration link in Link to Microsite.
4 . Click Create Campaign. After saving the Campaign, you need to configure the SMS or Email message.
Configure SMS & Email Messages
Configure Email Message
- In Messages, navigate to the Email tab.
- Select a template from the available template list.
- Click Edit Message to customize the content of the message.
- Click Review and Save.
A Review screen appears. - Click Save after reviewing the message.
Configure SMS
- In Messages, navigate to the SMS tab.
- Create the text message using the available tags.
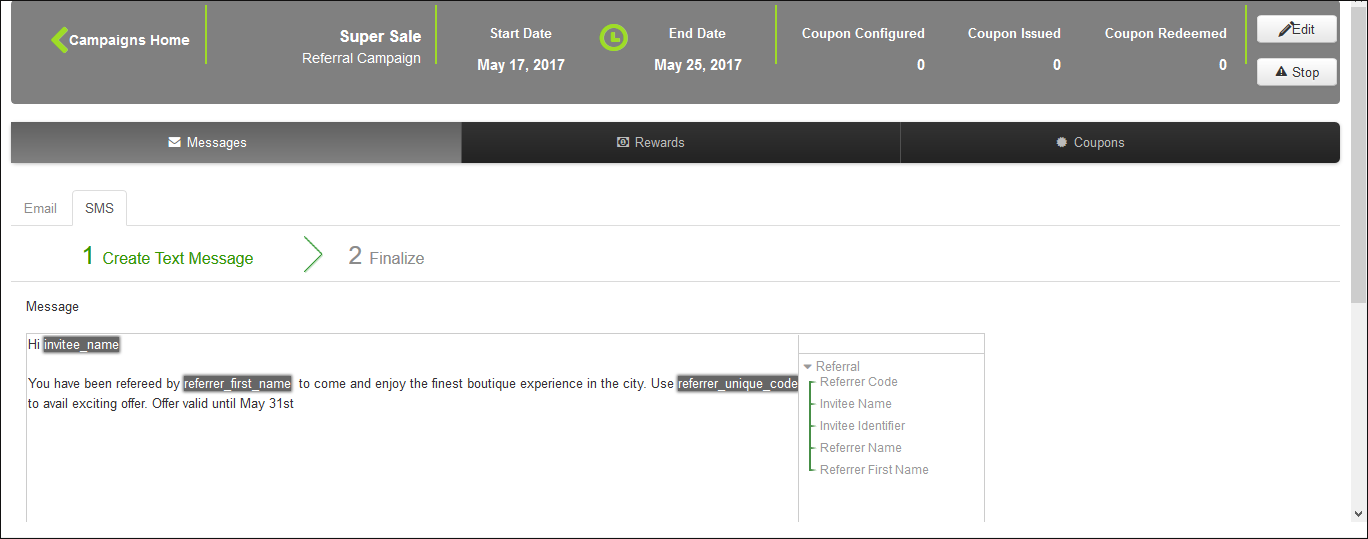
- After creating the message, click Review and Save.
A Review screen appears. - Click Save after reviewing the message.
Proceed to the Rewards section.
Configure Reward Settings
Coupon Rewards
In the Rewards Settings page, define the rewards for both the referrers and the referrals. Click Incentives to Referrer to define the rewards for the referrer - the existing customers who had provided the referrals (the email IDs or phone numbers of their friends). Click Incentives to Referee to define the rewards for the referees - the friends of existing customers to whom the referral had been sent.
Incentives to Referee
_Referees are the friends of existing customers to whom the referral had been sent. In Actions, define whether you want to reward the referee for registering to the loyalty program or on completing a transaction in the store.
Incentives to Referrer
Referrers are the existing customers who had provided the referrals (the email IDs or phone numbers of their friends). In Actions, define when to reward the referrer (when their friends register or complete a transaction). You can also choose the number of registrations or transactions that have to be done before you reward the referrer.
Configuring Coupons
After configuring reward settings, attach the coupons to the referral campaign. See Configure Coupon for more information.
Points Rewards
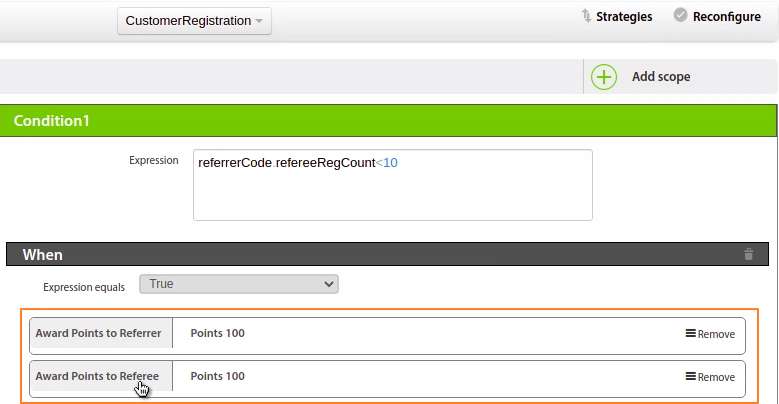
You need to configure Points Rewards using Loyalty. First, create a points allocation strategy, with Module using the strategy as a Campaign. For more details, see Create points allocation strategies.
Then configure loyalty rules (EventsView) as explained in the following.
- Events supported: CustomerRegistration, TransactionAdd, and points allocation.
In rulesets, navigate to the settings to configure the rule expression and define your rule expression and action. - Condition (Rule Expression)
To incentivize on referee registration count:
referrerCode.refereeRegCount
To incentivize on referee transaction count
referrerCode.refereeTxnCount
- Actions:
-
Award points to referrer: Choose to issue points to the referrer on satisfying the configured condition. Then, choose the points allocation and expiry strategy accordingly.
-
Award points to referee: Choose to issue points to the referee on satisfying the configured condition. Then, choose the points allocation and expiry strategy accordingly.
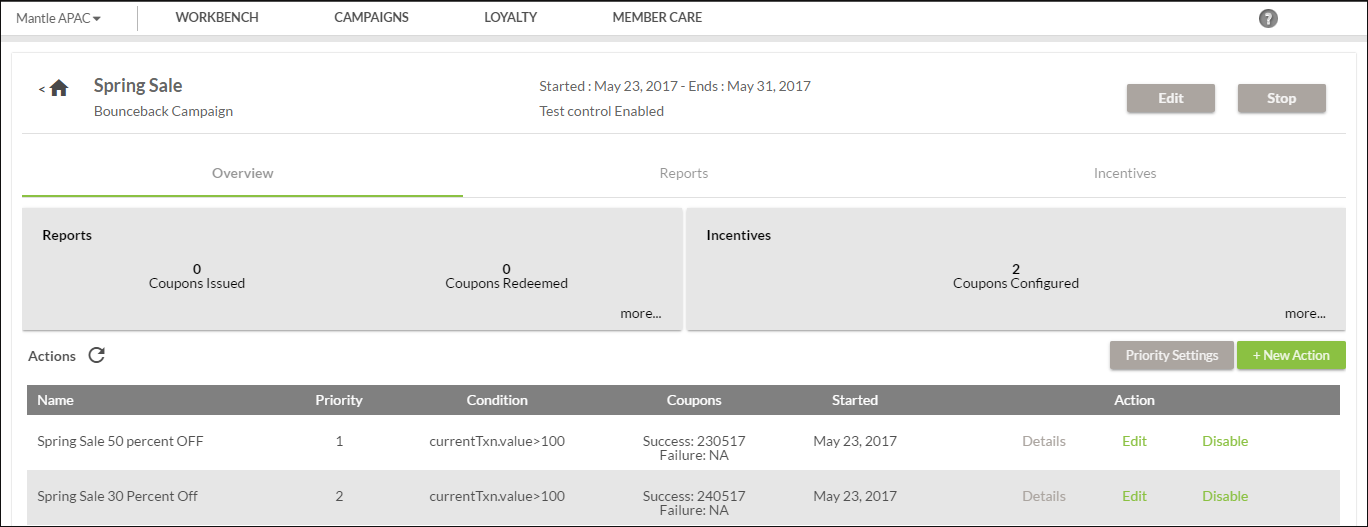
Bounceback or DVS campaign
Bounceback campaigns help issue coupons instantly to customers based on the current purchase or a barcode scan. Hence, you can write rules on either of the two events:
- New Bill DVS: Lets you create rules on a new transaction
- Scan (New Feature): Lets you create rules on a new scan event. This supports SKU/product code, promotion code, and customer included in the ‘feed’ API input. You can create conditions on product code, product brand, and product category
Note: As only the New Transaction event was supported earlier, all the existing DVS actions will be marked with the NewBillDVS event and there won’t be any impact on the existing DVS actions.
Scope Limitation
-
The scan event works only for registered customers
-
Loyalty actions such as points allocation couldn’t be triggered for a scan event
-
Reporting on Essential Insights is not covered for the scan event
-
A customer can redeem these coupons either for the same transaction or on the next transaction by the customer.
This article covers the following:
- Use Cases of DVS or Bounceback Campaign
- Create Bounceback or DVS Campaign
- Creating SMS Template for Bounceback Campaign
- Creating Email Template for Bounceback Campaign
- Creating WeChat Template for Bounceback Campaign
- Campaign Priority Settings
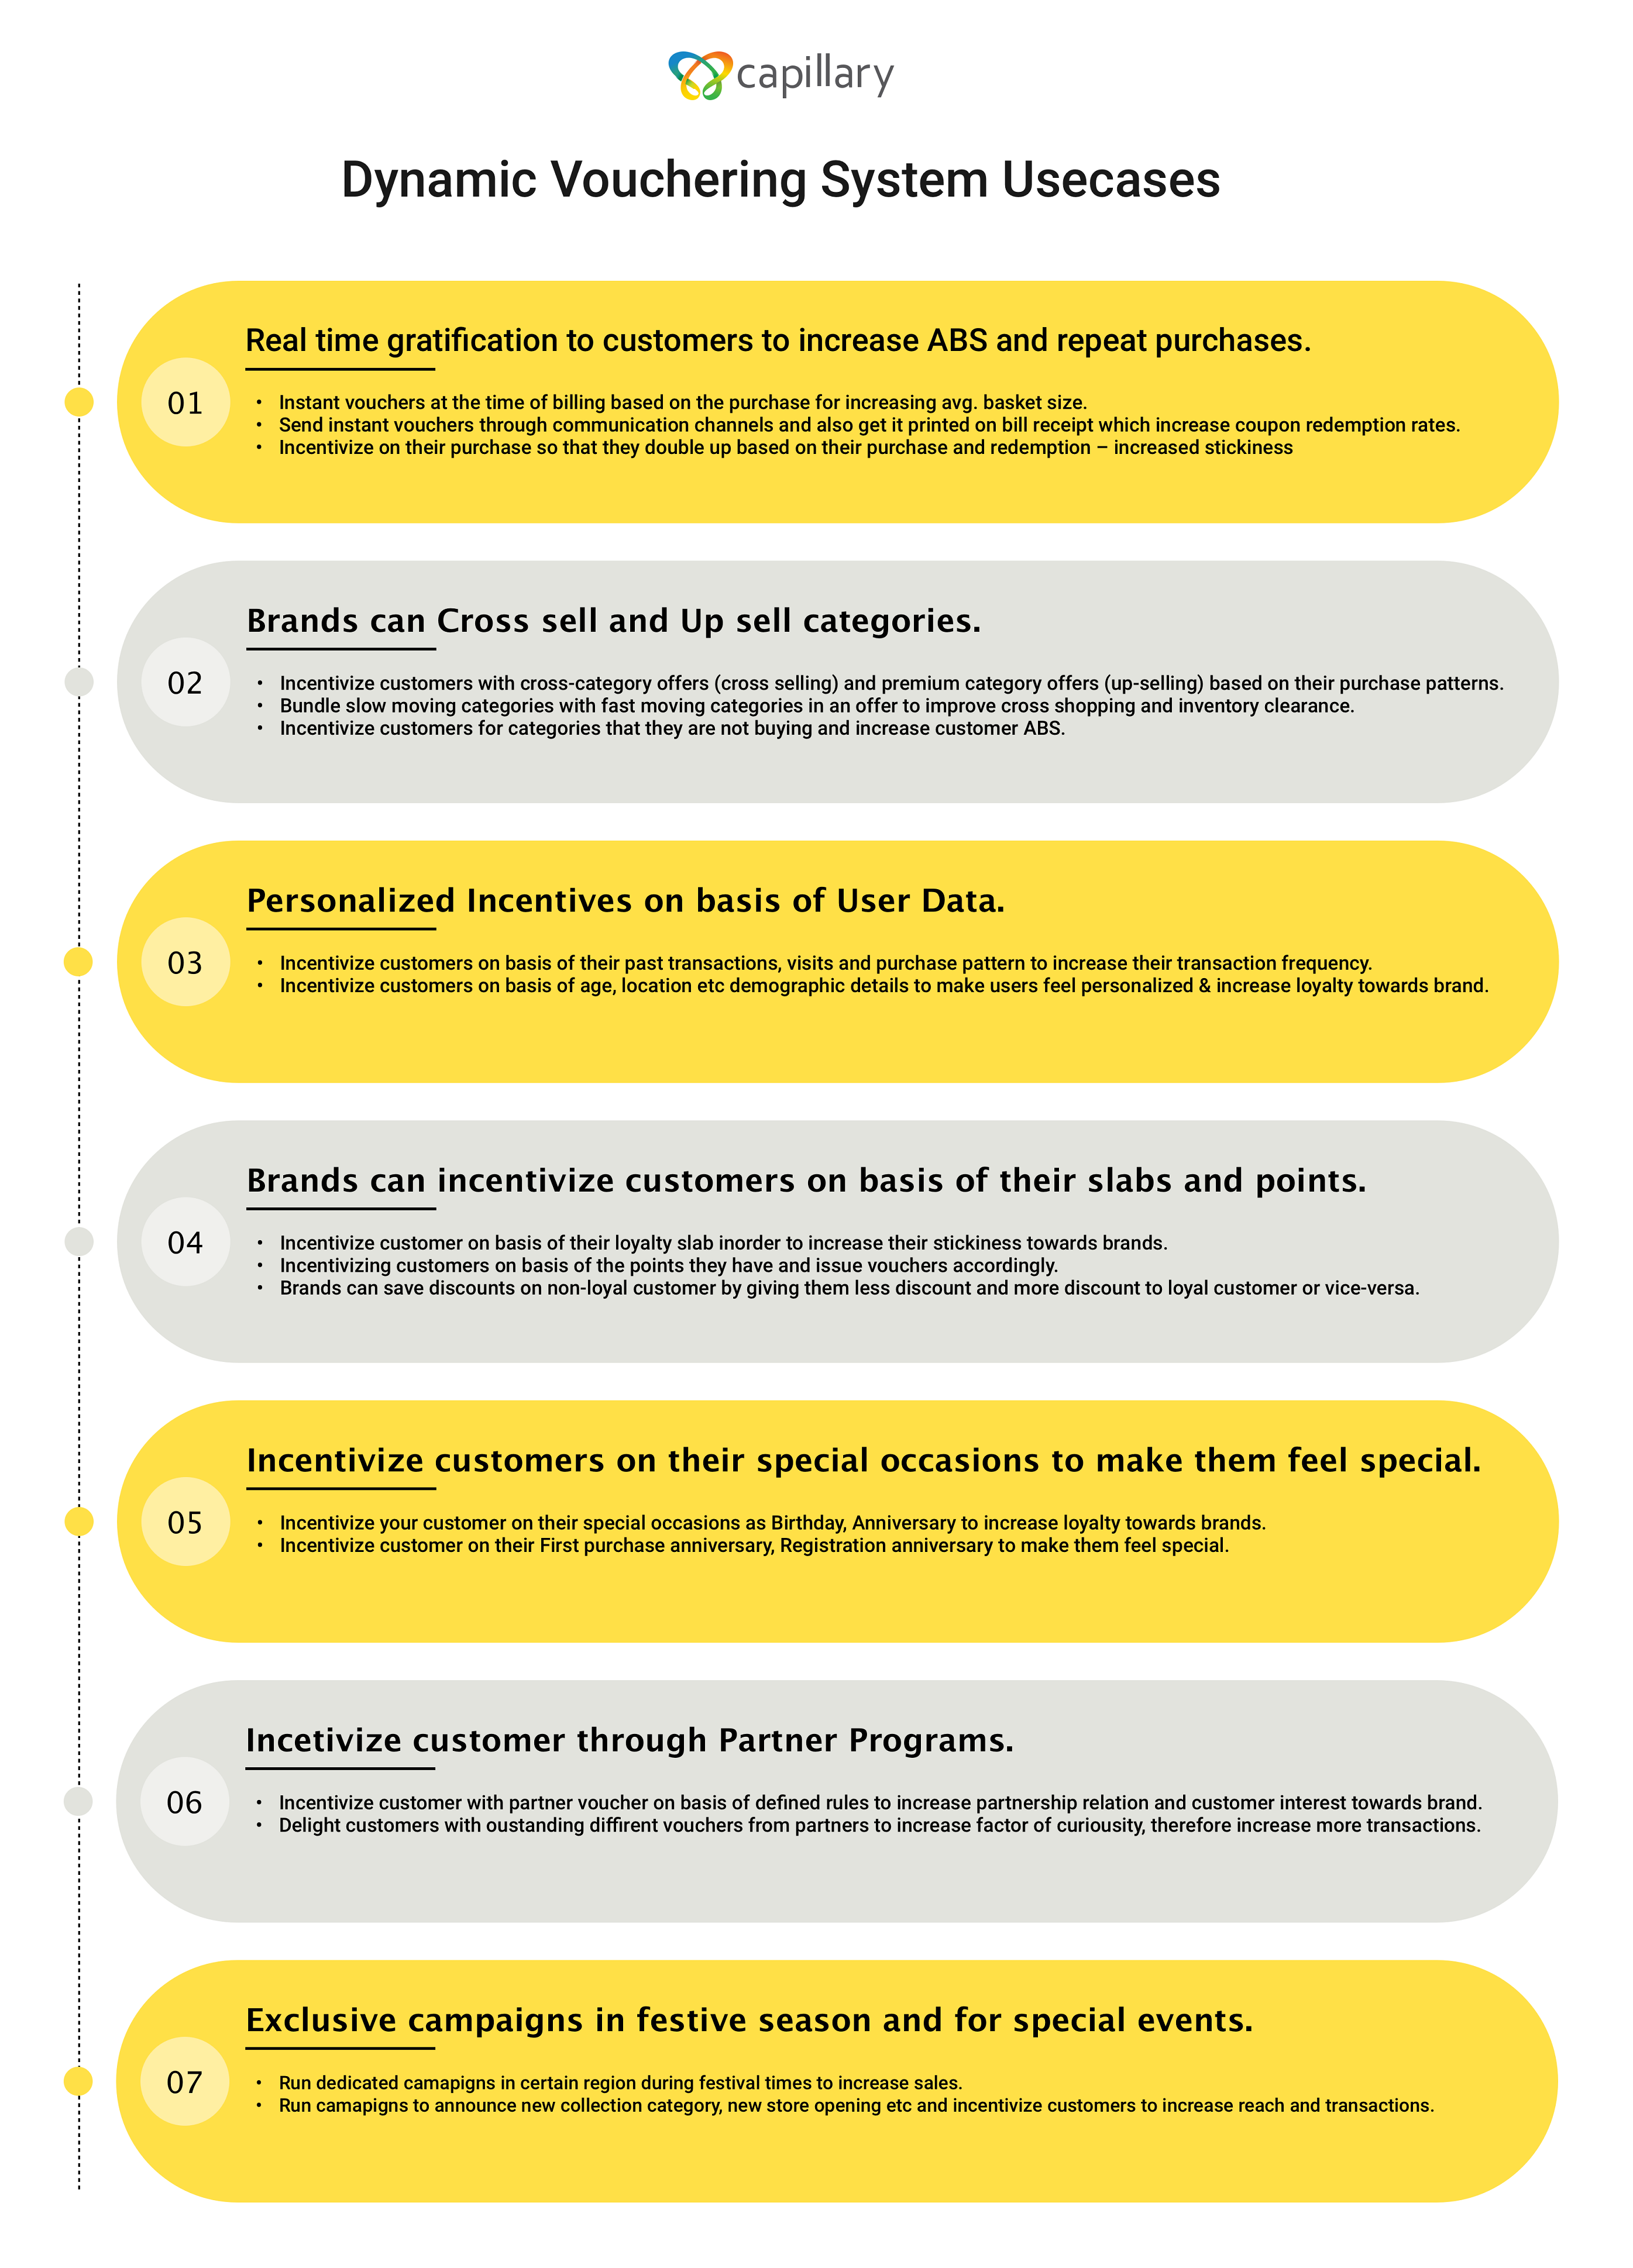
Usecases of Bounceback Campaign
Create Bounceback or DVS campaign
To create a new Bounceback campaign
-
On the Campaigns dashboard page, click +New Campaign
-
On the New Campaign page, fill in the fields based on the description provided below:
-
From the Campaign Type list, select Bounceback
-
In the Campaign Name box, type a name for the new campaign.
-
In the Description box, type a short description of the current campaign.
-
In the Valid Between box, using the Calendar option, enter the start date and end date of the campaign.
-
In the Campaign Objective box, choose the desired campaign objective based on the descriptions provided in the table below. The Campaign Objective also helps analyze campaigns performance based on communicated content or personalized incentive.
The table below describes each category:
Categories Values Help Text Acquisition General Acquire new transacting customers from a given acquisition channel Referral Acquire new transacting customers through referrals by existing customer Delight Birthday/Anniversary Delight customers with incentives around life events to encourage them to transact by redeeming points or coupons Feedback/Survey Delight customers with incentives and encourage them to take a survey or provide feedback Informational Customer Joinee Program Encourage new loyalty customers to know more about the program benefits and the brand. Increase in repeat purchase frequency and LTV Store Opening (Awareness) Inform customers nearby about a new store opening to boost transactions at the store Product Launch Inform potentially interested customers about a new product launch to boost sales for the newly launched product Season/Arrivals Inform potentially interested customers about new collections/stock in the stores to boost sales Brand awareness, Infomercial Brand building exercise and information sharing with customers to increase overall customer engagement with the brand Promotional Up sell Promotional campaign to encourage people to buy higher volumes of the same SKUs - higher count per SKUs Cross-Sell Promotional campaign to encourage people to buy different SKUs - higher count of unique SKUs Sales Booster Promotional campaign to encourage people to buy more - higher ABS and ABV Miscellaneous Heavy Discount Sale (includes EOSS) Boost sales during any heavy discount periods including festivals and EOSS Frequency Enhancer Encourage lower frequency visitors to transact more frequently Lapsation Reactivate lapsed customers and encourage them to transact -
Select Disable Test-Control to include all the customers eligible for this campaign. (Normally every campaign will have a control group (for example 10% of the eligible members who are randomly selected) to whom the marketing communication is not sent. The control group is essential to measure profits.)
-
-
Click Create Campaign. You will see the following screen:
-
Click on +New Action to create a rule for the Bounceback campaign. You need to create at least one action for a campaign
-
Configure the rule based on the descriptions provided below and click Submit to save the configurations
-
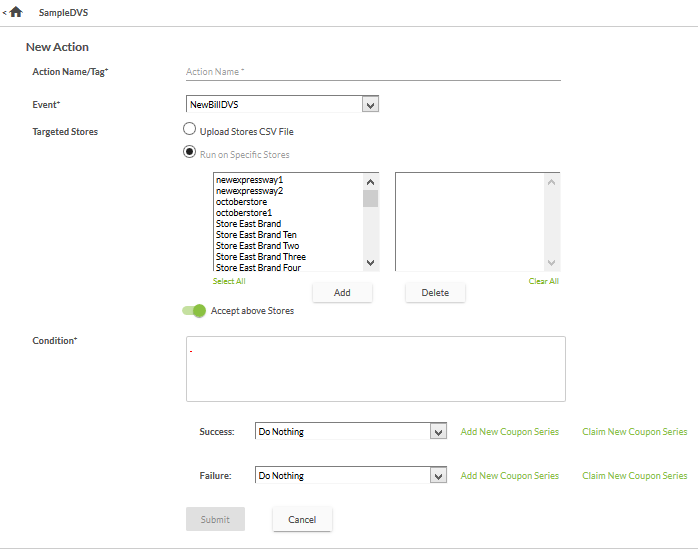
In the Action Name/Tag, enter a name for the rule. It is recommended to specify a unique action name. It can be paired with the Campaign's name
-
In Event specify the event for the rule - NewBillDVS or Scan Event
-
NewBillDVS: Choose this to create rules on new transaction event
-
Scan Event: Choose this to create rules on the scan event
- In the Targeted Stores, select either Upload Stores CSV File or Run on Specific Stores.
- If you select Upload Stores CSV File, the following screen appears
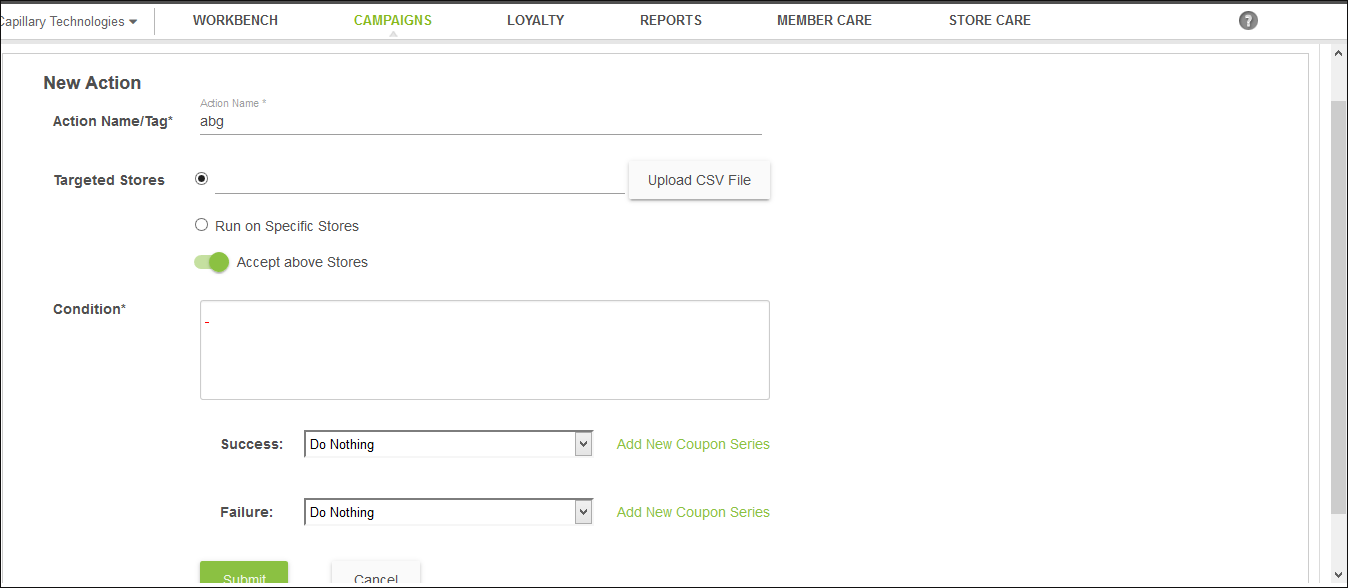
- For CSV upload, stores name should be uploaded via CSV.
- In Run on specific stores list, select the stores that you want to include or exclude for this campaign. To select stores, highlight the stores you want to select and click Add
- By default, the Accept above Stores option is enabled. Keep the option on if you want the selected stores to be included for the campaign.
- To exclude stores that you have selected from running this campaign, click the button to enable the Reject above stores option.
- If you do not select any stores, then all the stores will run this campaign by default
- In the Conditions box, set the conditions for this campaign to take effect
As you type conditions, auto-suggests tags appear which you can select. For example, if you want to create a condition for transactions greater than 100 dollars, type currentTxn.value>100.
New conditions supported for Scan event: SKU Code (currentProduct.code), SKU Brand (currentProduct.doesBrandRegexMatch), SKU Category (currentProduct.doesCategoryRegexMatch), Promotion Code (currentEvent.promotion), Customer (currentCustomer.) - all the conditions of transactionAdd are supported for customer. - Create rules either on the condition Success or Failure or both in the respective fields
- Click on Add New Coupon Series to create a new coupon series or click Claim New Coupon Series to claim an existing offer.
Once you see the offer(s) created or claimed for the campaign in the drop-down. Choose the offer that you want to claim for the condition Success or Failure case. You will see the supported communication channels

-
Click Add of a specific channel to create the message template, and create the template accordingly. Refer to the sections to know how to create a template for each channel.
-
For SMS and email, you can choose your preferred sender IDs from the ones configured for the org to send DVS messages.
-
Check Use default sender to send messages from the default sender ID configured for the communication type.
-
Uncheck Use default sender to your preferred sender ID. You will see options to select sender domain and sender IDs. Use the drop-down to choose your preferred options.
Select the Domain select domain , GSM sender id, and CDMA sender id.
-
-
Click Submit to save the campaign
-
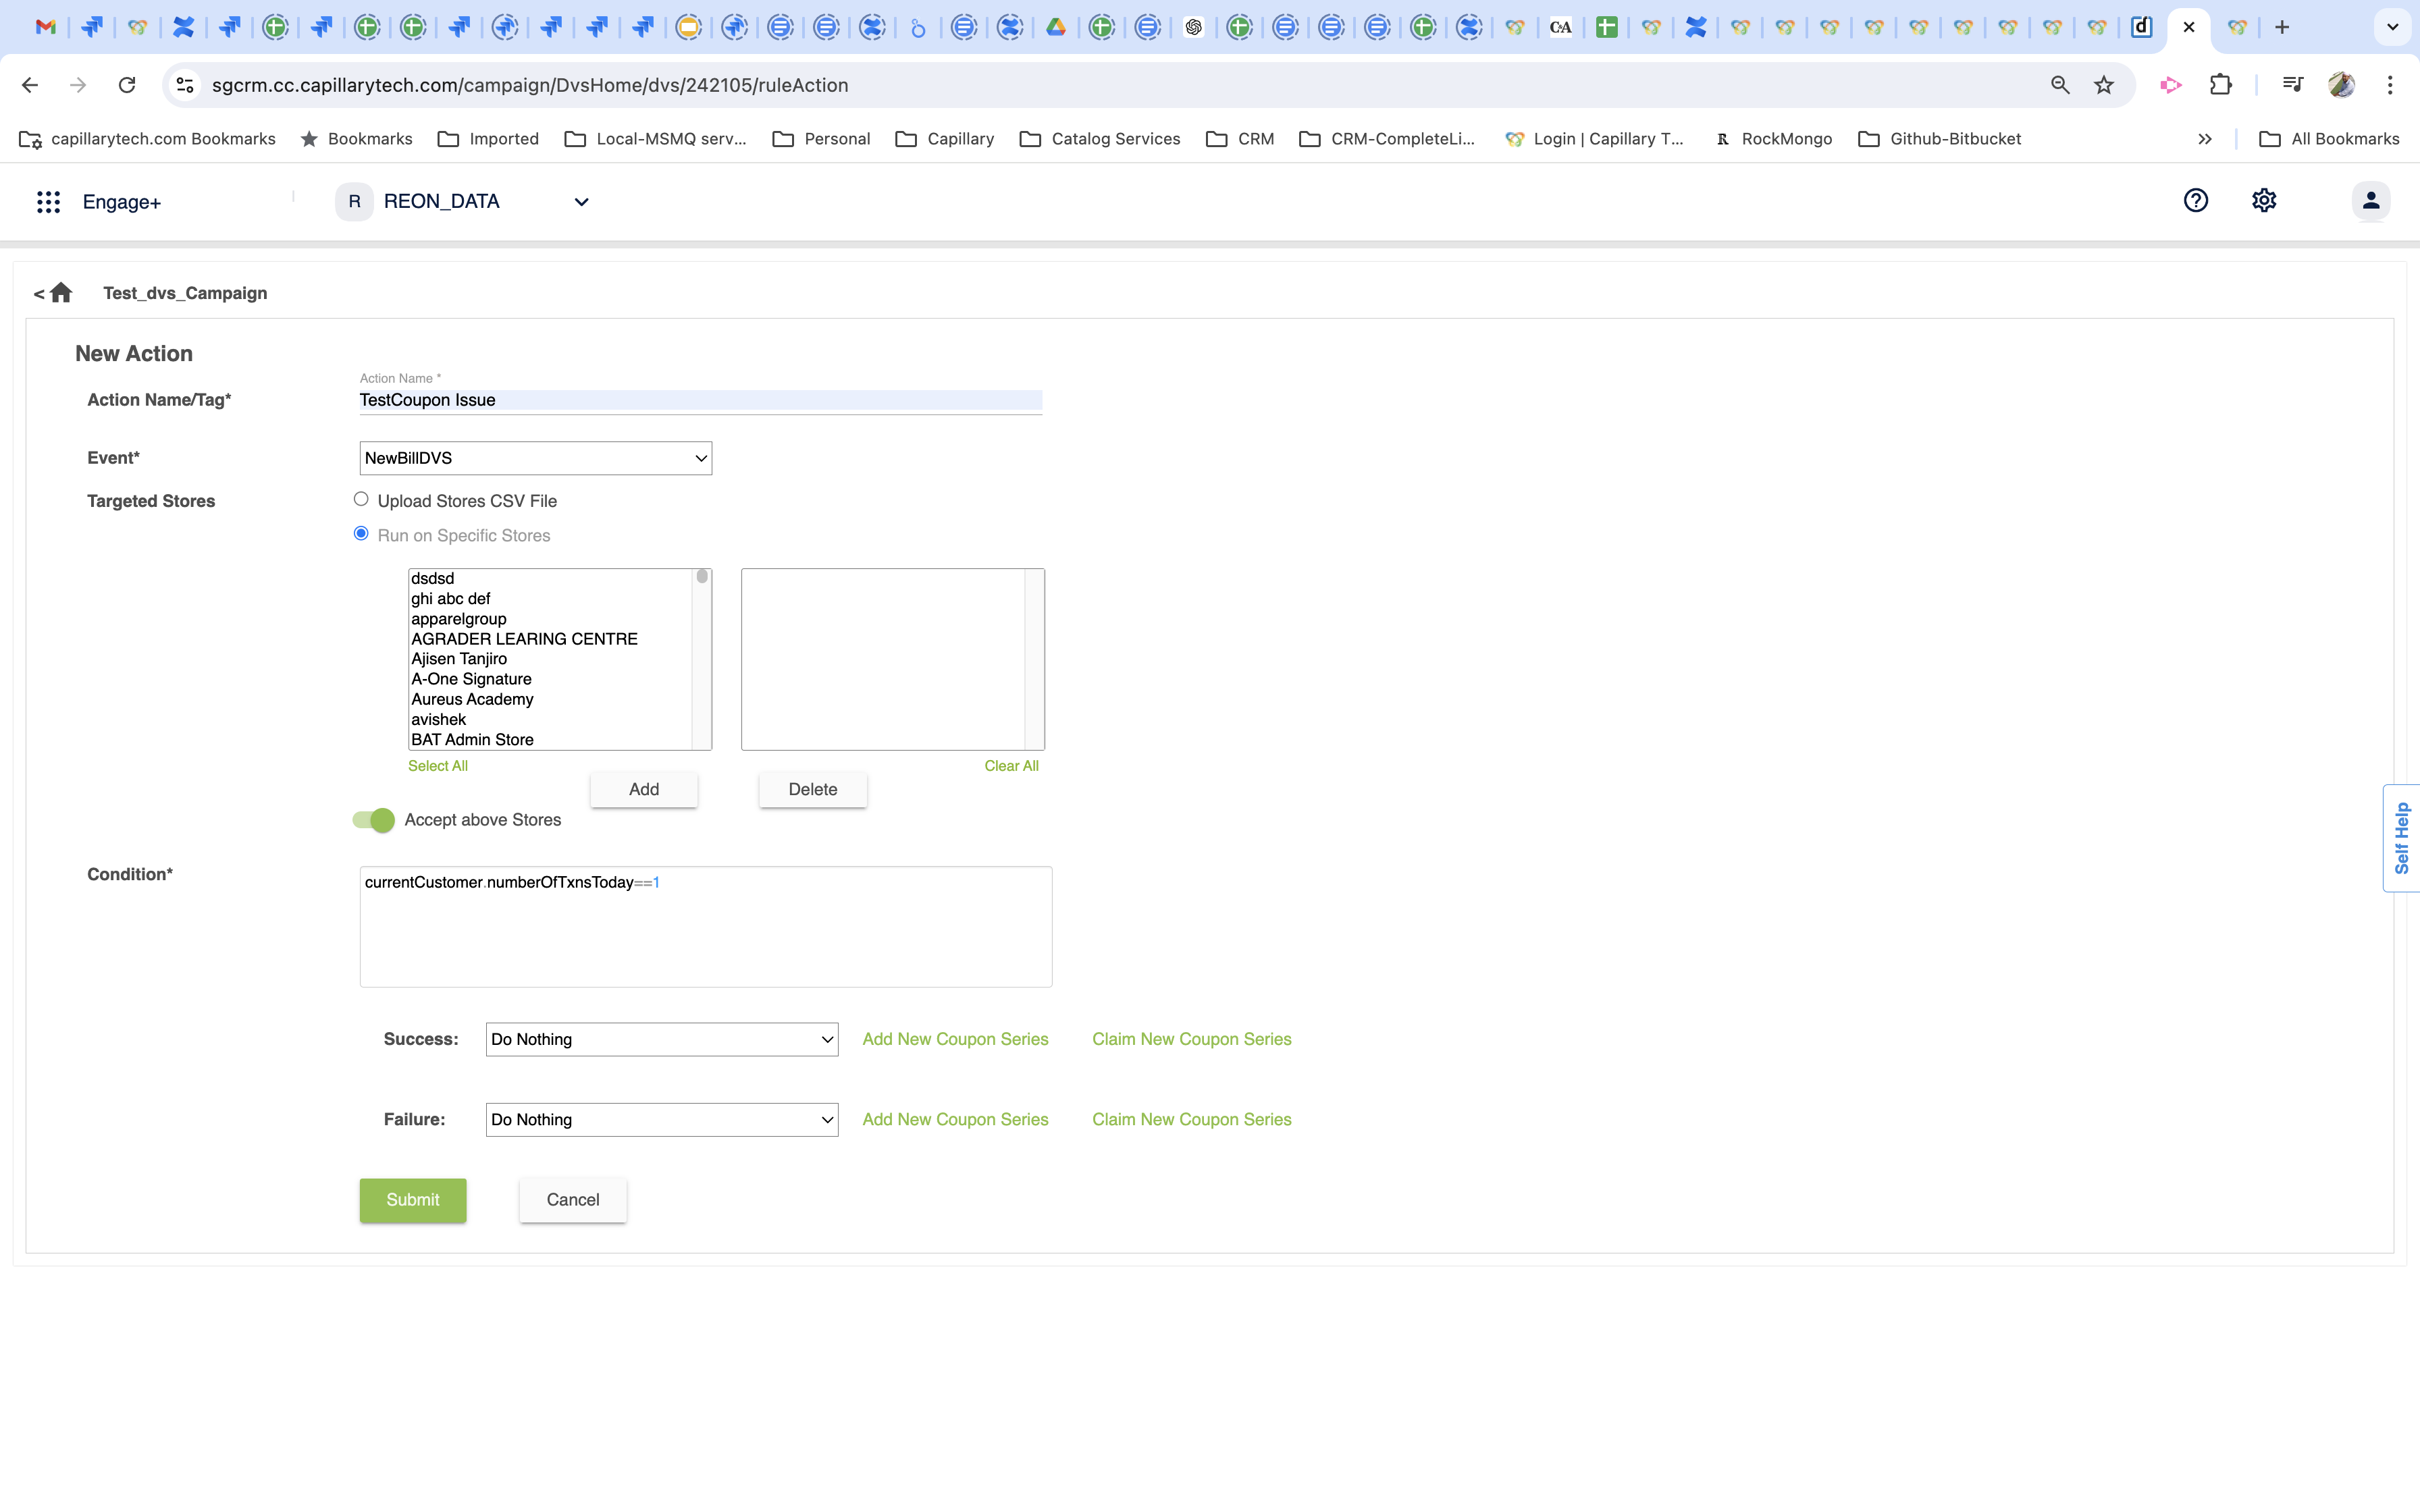
We can write a rule in DVS in which customer can receive multiple coupons on the first transaction of the day.
- Create the first action under the DVS campaign with the rule
currentCustomer.numberOfTxnsToday == 1. Set the maximum coupon issuances as per your requirement. If you want to issue coupons after the first transaction, create a second action.
- Create the first action under the DVS campaign with the rule
Creating SMS templates for bounceback Campaign
Click Add against SMS. The SMS screen setting screen appears:
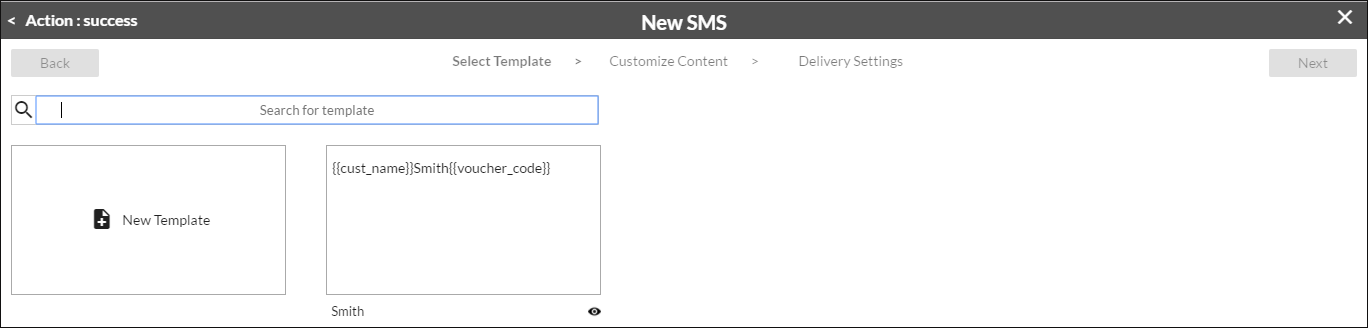
- Click on either New Template or select an existing one.
- To create a New Template for the SMS, click New Template
- In the Message box, type a new message with the tags of Customer Name, Voucher Code, and Voucher Expiry Date as shown below:
- Click Next, a pop-up message appears as shown below. Either save the template by giving a name or skip
- In the Delay in sec(s) box, add the number of seconds/minutes by which you want to delay the message from the transaction time.
- Click Save
- You will be navigated to the Overview page where actions are listed as shown below. Actions can be edited and deleted.
Creating Email Template for Bounceback Campaign
- Once you click Add, you will see options to create a new template or select an existing template
- Click New Template to create a template from the scratch or select one from an existing list
- To create a New Template for an Email, click New Template. The Email screen setting screen appears:
- In the Subject box, type the email subject
- In the Message body, type the content and use insert tags to include dynamic tags in the email
- Click on Preview to view, click Next. The following screen appears:
- In the Delay in sec(s) box, add the number of seconds/minutes by which you want to delay the message after the transaction.
- Click save
- The Finalize Settings screen appears. In the Finalize Settings section, you can see a preview of the coupon configurations.
- If you are satisfied with the settings, click on submit to save the coupon configurations. You return to the overview tab.
- Click +New Action to add the rule for the campaign. You can add as many rules as you want. The Actions List section displays all the rules created in the bounceback campaigns.
Creating WeChat Template for Bounceback Campaign
Once you click on Add, do the following in the new pop-up that appears:
- Click the available drop-down and choose a template from the existing list. New template cannot be created
- In the Delay in sec(s) box, add the number of seconds/minutes by which you want to delay the message after the transaction.
- Click Save
Campaign Priority Settings
If a campaign has more than one rule and a transaction satisfies multiple rules, you can define which rule to be executed among two or more on the Priority settings page.
-
On the Campaign details page, click Priority Settings
-
Set the maximum number of coupons that you want to allow per transaction in Maximum coupons issued to a customer in a single transaction
-
Enable Set Priority to configure rule-based priority. If you disable this, the system randomly chooses a rule and issues a coupon if multiple rules are satisfied
-
In Priority set the priority of each rule using the up or down arrow. The priorities will be set based on the alignment. The least number (1) will have highest priority. Alternatively, you can also drag and drop the element to the desired position.
Updated about 1 month ago