
Data import
Introduction
What is Data Import Framework?
The Data Import Framework is a web application that helps to upload offline data generated at the stores to the Capillary Database.
When InStore is operated online, it continuously syncs the data generated at the PoS to the Capillary Database. However, in cases where data is not captured through InStore but saved in the PoS machines, you can use the Data Import Framework to upload such data to the Capillary Database.
How can I import data to the Capillary Database?
Based on the size of the data, you can import data in two ways:
- Import directly: If the number of entries in the CSV file are less than 700,000, you can directly upload the data (.csv) file in Data Import Framework.
- Import through an FTP server: If the number of entries in the csv file are from 700,000 to 1,000,000, you need to import data from an FTP server. For this, you need to provide read/write access to a specific directory of the FTP Server and schedule the import job on a daily, weekly or monthly basis.
What all data can I import through Data Import Framework?
The data corresponding to each activity type will be grouped as a category called profiles. Data Import Framework lets you import the data of activities provided in the following section.
Can I restrict the number of entries in an import job?
Data Import Framework lets you limit the entries to import for each profile through templates. Create a template for the profile and set the limit. When configuring an import job, choose the desired profile template.
How can I check the status of a data import job?
You can check the detailed status of an import job on the Import File Details page.
Can I import multiple profiles data at a time?
Through direct import, you can choose only one file at a time. However, you can import multiple files at a time through FTP.
CSV files for different profiles
Before importing data, keep the CSV files ready for each profile that you want to import. Each file should contain entries of the corresponding profile. There are mandatory and optional fields for each profile. Fields that are marked by * are mandatory.
- A customer identifier can be a mobile number, email ID, or external ID.
- In addition to the profile fields, you can also have custom fields for your organization.
- The organization could have additional mandatory fields excluding the ones mentioned herein. For example, mandatory custom fields.
- For direct import, the number of entries in a CSV file should not exceed 7L entries and for import through FTP, the number of entries should be between 7L-10L.
- The maximum size allowed for an FTP import is 200MB.
The following table provides the reference links for each entity type available in import type (profiles)
| Entity | Supported Profiles | Reference links |
|---|---|---|
| Customer | Identifier Cleanup Loyalty Customers User Subscription Coupon Redemption Card Import Card Series Import Card Status Update & Linking Import Customer Status Import Entity lifecycle Fraud Status Migration to customer status Historical points import Loyalty Customers Subscription service new Update fraud statusV2 profile identifier (Add/Update) | Customer Profile |
| Inventory | Inventory Inventory Updates for Line-items Brands Category Org colors import Attributes | Inventory Profile |
| Org Entities | Admin Users Attribution Lookup Import Concepts Org currency ratio import Org entity status update Store add ons Zones Stores Store Server Store TILLs | Org Entities |
| Points & Slabs | Bill Points promotion (Accrual) Redeem Points Slab | Points & Slabs |
| Points Deduction | Bill Promotion Expiry Customer Promotion Expiry Transactions Bills Deduction | Points deductions |
| Transactions | Loyalty Transactions Transactions (Not-Interested) Extended Fields Import Transaction Dump Loyalty Transaction Line Items Update Outlier Status (Loyalty Transactions) Update Outlier Status (Not-Interested Transactions) Not-Interested Transaction Line items Transaction (Returns) | Transactions |
| Trackers and Promotional Rewards | Trackers Promotional Rewards | Trackers Promotional Rewards |
| Data Cleanup | Identifier Cleanup Lifetime Purchases Recalculation | Data cleanup |
Configuring for directly uploading an import file
Once you create the data file required for the current import job, you can import it to the Capillary database using the 6 steps provided in the following.
The following are the important points to consider before starting with import.
*The mentioned time period is in
- IST for APAC & APAC2 cluster
- CST for China cluster;
- GMT for EU cluster
| Category | Figures |
|---|---|
| Duration for data import in the day time (Peak hours) | *6 AM - 10 PM |
| Duration for data import in night time (FTP hours) | *10 PM - 6 AM |
| No of records allowed in the last 24 hours by direct import | 200,000 |
| No of records allowed in the last 24 hours in the day time (Peak hours) day FTP import | 200,000 |
| No of records allowed in last 24 hours in night time (FTP hours) by FTP import | 1,000,000 |
| Maximum size of a single file (in MB) | 200 MB |
Step 1: Create data file (.csv)
First, create a CSV file based on the purpose of the import. Each purpose is associated with a different profile. For example, register customers, add transactions, issue points, add inventory, and so on. You need to create CSV files according to profiles.
- Before uploading the file, ensure that no invalid entries are present in the file. To make this process easy, sort columns by mobile number and transaction date wherever applicable
To know more about different fields supported for each profile, see Profiles, Supported Fields, and Template Configuration.
Step 2: Upload the CSV file
Once you create a file, upload it via. Import Framework.
- On the Settings page, click Master Data Management > Data Import
- Click Data Import. You will see the following page

In the Direct Upload field, do the following
-
In Upload data csv, choose the CSV file that you want to import
-
In the No. of rows to be ignored from top, set the number of rows from the top that you want to exclude from importing.
For example, if number 2 is set in this field then while uploading data to the server the top two rows will not be considered. This can be used when there are field names, duplicate data or blank data in the top rows -
In No. of rows to be ignored from bottom, set the number of rows from the bottom that you want to exclude from importing
For example, if 15 is set, then while importing the last 15 rows will be ignored. You can set this option in case of duplicate/blank/invalid entries in the last rows of the CSV file. -
In File Delimiter, type in the character used to separate each value in the file
For example, a file can have either ',' separated or 'tab' separated or ';' separated values. If ',' is mentioned then values will be separated after every , found in the file. -
In Enclosure, type the special character used in the file for 'string' data types
-
In Escape Character, type in the special character that needs to be ignored from the file
-
Click Submit.
You will see the following page. Proceed with the configuration steps provided below.
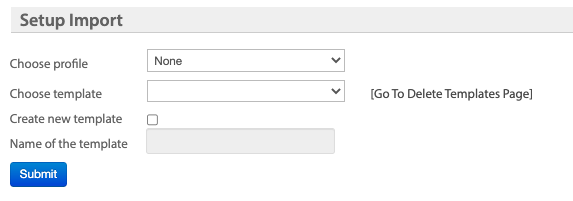
Step 3: Choose the respective profile and create a template
Based on the type of data, choose the profile name. create a new template for the profile or use an existing template. A profile template stores the Template Configurations set and lets you reuse it whenever required instead of creating a new template every time.
To choose from the existing templates,
- In Choose Profile, select the profile based on the data that you are uploading. For more information on profiles, see Profiles, Supported Fields, and Template Configuration
- In Choose Template, select the template that you want to use for the current import
- Click Submit
To create a new template
- Check Create new template box.
- In the Name of the template, type a name for the new template
- Click Submit.
Step 4: Configure the Profile Template
The options vary based on the profile chosen. Configure the profile template as explained in Profiles, Supported Fields, and Template Configuration and click Submit

Step 5: Map each field with the respective column of the CSV file (Field Mapping)
Map each field with the respective column names of the CSV file and click Submit. Fields that are marked with * are mandatory.

* Not Null
If you do not want to allow saving null values for a field, check this box. It will ignore the entries with null values for that specific field while importing.
- Data Transformer & Transformer Inputs
This option is used to modify the existing data in a column automatically by making use of the functions and other configurations.
There are four types of data transformers as mentioned in the following table.
| Data Transformers | Description |
|---|---|
| Merge | Merges the values of two or more columns to a single field. Write the merge function in the Transformer Inputs box. Columns=>x,y,z or Columns=>2,3,4;Separator=>[] where x, y and z are column numbers. For example, if Column=>1,2,3 is set then the text in the columns 1, 2, 3 will be merged to a single field separating each column with a comma (,), a default value. You can set any delimiter for merging two or more columns using the Separator=> function. For example, if Column=>1,2,3;Separator=>; is set in Transformer Inputs, the columns 1, 2 and 3 will be merged separating the value of each column with a semicolon. |
| Default Value | Replaces null values present in the column with a value specified in Transformer Inputs. Value=>[Any Value]. For example, if Value=>store.server is set in Transformer Inputs, all null values identified in the column will be replaced with 'store.server' |
| Convert to Date & Time | Changes the date and time format across the column. This is applicable only to the columns with date and time. Set the standard date and time format in the Transformer Inputs box. Date parameters d - Day of the month (1-31) m - Month (1-12) Y - Year in four digits (example: 2013) y: Year (13) Time Parameters H: Hours (24hr format) s: Seconds h: 12 hour format(1-12) i: Minutes (00 - 60) The parameters of date and time format can be used in any order. For example, date can be set as d/m/Y or m/d/Y or Y/m/d. However, it is recommended to use the standard date and time format of the organization. |
| Expression | This function lets you apply some mathematical calculations on two or more columns. Exp=>{Column no. of A} {+ or - or or /} {Column no. of B} For example, if the expression is set to Exp=>{1}{2}-10, All null values of that column will be replaced with - (value of that field will be (value of column 1) (value of column2) - 10). You can use this function only on columns with integer values but not for string data types. |
Note:
- If the date format in the file is in the form YYYY-MM-DD hh:ii:ss, then date formatting is not required.
- Select Not Null only for the fields that are not supposed to be empty. If any null values are identified for those particular fields, an error report will be generated with the entire list of null values.
- Options for each configuration varies based on the org and profile selected
- Apart from the standard fields, you can also import custom fields and map with the respective column of the CSV file. However, no validation is performed on custom fields.
Step 6: Import data to the local database
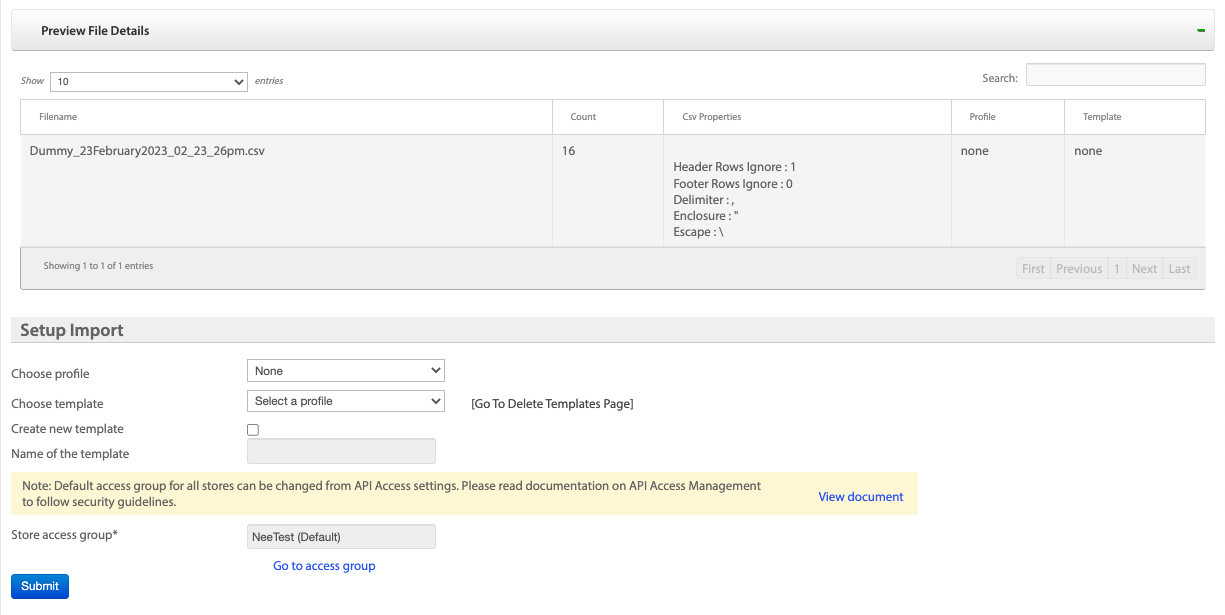
Once submitting the configurations and field mappings you will see the preview of the import jobs. Any errors identified in the import file will be highlighted in red.
To import data to the temporary database, scroll down to the Import to Temporary DB field and click Submit

Note:
- The import process consumes time depending on the size of the data
- To cancel an import job at any point, click Cancel File Import
Step 7: Import data to the main database
Once the data is imported into the local database, you will see an option to import it to the main database.

Once the data is imported to the temporary database, you will see an option to import data to the main database.
- Check Import to the Database checkbox
- Click *Submit
Note:
- The _Preview File _Details table shows the file name, number of entries, file properties, profile configured and template assigned
- The Error Summary table shows the error type and error count.
- The Auto Correction Summary table shows the corrections performed and the count
- The Download Reports table lets you download various reports such as auto-corrected data, error data, temp table dump, and new customers data. Click on the respective Download Report link to download the report
- At any point to cancel the data import, in the Cancel File Import field check the respective option and click *Submit
Configuring for importing from an FTP location
Whenever an import job is performed, only new records will be updated to the main database.
The following are the important points to consider before starting with import.
*The mentioned time period is in
- IST for APAC and APAC2 cluster
- CST for China cluster
- GMT for EU cluster
| Factors | Figures |
|---|---|
| Duration for data import in the day time (Peak hours) | * 6 AM - 10 PM |
| Duration for data import in night time (FTP hours) | * 10 PM - 6 AM |
| No of records allowed in the last 24 hours by direct import | 200,000 |
| No of records allowed in the last 24 hours in the day time (Peak hours) day FTP import | 200,000 |
| No of records allowed in last 24 hours in night time (FTP hours) by FTP import | 1,000,000 |
| Maximum size of a single file (in MB) | 200 MB |
The configuration of the Data Import job includes the following general steps:
- Identify the data that you want to import from the system
- Clean up the data in the system to reduce the idle processing time while importing. This involves deleting previous records and removing blank/invalid/duplicate records
- Create and configure templates for each profile that you want to import
- Create different folders for each profile type in the FTP server
- Copy data files of each profile to the respective folder of the FTP server. For example, registration data in Registration folder, points redemption data in the Points Redeem folder and so on
- Map the fields in the database to the respective column names of the CSV file
- Perform a trial import for each profile type
- Perform the actual import job
The following sections guide you on how to configure an import job for large data.
Step 1: Select the job type as FTP
- On the Settings page, click Master Data Management > Data Import.
- Click Configure Data Upload via. FTP .
Step 2: Configure the Source FTP Server
Provide read/write access to the FTP server from where the data needs to be imported. Select all profiles that you want to import through the current import job.

- Check Enable SFTP if your FTP server is a secure FTP server. Skip this step for a normal FTP Server
- In FTP Server Name, enter the URL of the source FTP server
- In the Username and Password boxes, type the login credentials of the FTP server
- In Folder Name, type the directory in the FTP server from where the data needs to be uploaded. For example, /import
- In Proceeded Folder Name, specify the name of the processed data folder
- Click Submit to save the configuration.
- It is recommended to save the data of each type (profile) in different folders.
- To create folders on the FTP server for each profile, check the respective checkboxes in Configure Folders for FTP Server field.
You will see the following screen.
Step 3: Set up for data processing

- In the No. of rows to be ignored from top, set the number of rows from the top that you want to exclude from importing. For example, if number 2 is set in this field then while uploading data to the server the top two rows will not be considered. This can be used when there are field names, duplicate data or blank data in the top rows
- In No. of rows to be ignored from bottom, set the number of rows from the bottom that you want to exclude from importing. For example, if 15 is set, then while importing the last 15 rows will be ignored. You can set this option in case of duplicate/blank/invalid entries in the last rows of the CSV file.
- In File Delimiter, type in the character used to separate each value in the file. For example, a file can have either ',' separated or 'tab' separated or ';' separated values. If ',' is mentioned then values will be separated after every ',' found in the file.
- In Enclosure, type the special character used in the file for 'string' data types
- In Escape Character, type in the special character that needs to be ignored from the file
- Click Submit
Step 4: Choose templates for each data model(Profile)

In the Configure Templates for Data Upload field, choose the desired template for each profile and click Submit.
Step 5: Schedule the import job
As the data size is large, it is recommended to schedule an import job in between 10 pm to 6 am to avoid inconvenience to your stores' operations.

- In Status, choose Running
- In Check for Files, choose the frequency of import - Daily, Weekly, Monthly or on a Fixed Date and set the respective time interval. For a fixed date schedule, set the date on which you want to schedule the import
- In Email ids to be notified, enter email ids separating each with a comma to notify about the status updates the import job. The selected recipients are notified through email when files are queued up for importing, data is imported into the temporary database, data is successfully imported to the main database, and when import failed due to some error.
Configure notifications for import jobs
The Data Import Framework lets you (InTouch users) subscribe your mobile number/email id for the status notifications related to import jobs. You can subscribe to receive profile level status notifications. You can also choose stages of an import job from which you wanted to receive notifications. For example, when data is imported into a temporary database, data import failed, data validation failed, data import job complete and so on.
The status updates of the data import can be subscribed to an email id or mobile number.
To subscribe for data exchange notifications
- In Data Import, click Notification Subscription
- In the Subscribe for the drop-down box, choose All Profiles to subscribe for status notifications of all profiles or choose Select Profiles to add selected profiles.

- In the Subscription Emails, enter email ids of recipients receive status notifications. To enter multiple recipients, separate each email id with a comma (,).
- In the Subscription Mobiles, enter mobile number of the recipients with country code. To enter multiple recipients, separate each number with a comma (,).
- Set the subscription duration for receiving notifications in Subscribed from and Subscribed upto boxes.
- In the For Stages selection box, select from the various available stages and click add>>. Recipients will be notified of status updates for these stages. All the selected stages will appear on the right-hand side box.
- Click Submit.
Note:
- To remove any added notification stage, select the stage on the right box and click <<remove.
- Mobile numbers should be entered with country code.
Field Validations for Customer/Transaction data
When you import data to the local database, you will see the list of errors, auto corrections, and download report option. You can download the entire report. The following table provides the list of errors that frequently occur during an import job for customer and transaction profiles.
Customer Profile
| Error | Explanation |
|---|---|
| When different users are linked with the email | Email is already present for some other registered user in the system |
| When an error on duplicate external id occurs | All records would be rejected |
| When an error on duplicate value for mobile in the file occurs | All records would be rejected |
| When an error on duplicate value for external_id in the file occurs | All records would be rejected |
| When an error on duplicate value for email in the file occurs | All records would be rejected |
| When different user is linked with the mobile | Mobile number is already registered for a different user in the system |
| When different mobile is linked with the users | Since mobile number is not allowed to update though import, trying to update an existing mobile for a user leads to such error |
| Invalid Mobile Number | Check the pre-configured mobile regex for brand |
| When different user gets linked with the external id, duplicate value for mobile in file, duplicate value for email in file occurs | External ID / Card number is already registered for a different user |
| Invalid email id | Deviation from standard Email regex |
| Deactivated user / Fraud User | The user is inactive or marked as fraud (as per brand requirement) |
| When customer name contains special characters | Customer Name should not contain any special characters other than alphabets/space |
| join_date is invalid/null/void/of future date | Invalid join date |
| join_store is invalid/null/void | The store(s) specified in the file are not present in the system |
Transaction Profile
| Error | Explanation |
|---|---|
| Bill_date is invalid/null/void/of future date | Invalid bill date |
| Bill_store is invalid/null/void | The stores linked are not present in the system |
| bill_number repeating within X days | X is a number between 0 and 365 (that is configurable). It decides how often a bill_number is repeatable on the same store. For eg, X=5, it means bill_number B1 cannot repeat on store S1 for at least 5 days. bill_discount > bill_gross_value |
| Bill Duplicate within File | This means same bill_no, bill_date, billing_store are repeating within the import file |
| Bill Duplicate within database | This means same bill_no, bill_date, billing_store are already present in system (Loyalty / Non-Loyalty) |
| User Not Registered | The user linked to bill is not registered in the system |
Updated 5 months ago