
Workflows
Introduction
Workflows is the orchestrator which allows you to combine different strategies and trackers that you created to complete the program. Several elements like earn conditions have to be used in Workflows for them to work in the program.
Steps to configuring Workflows
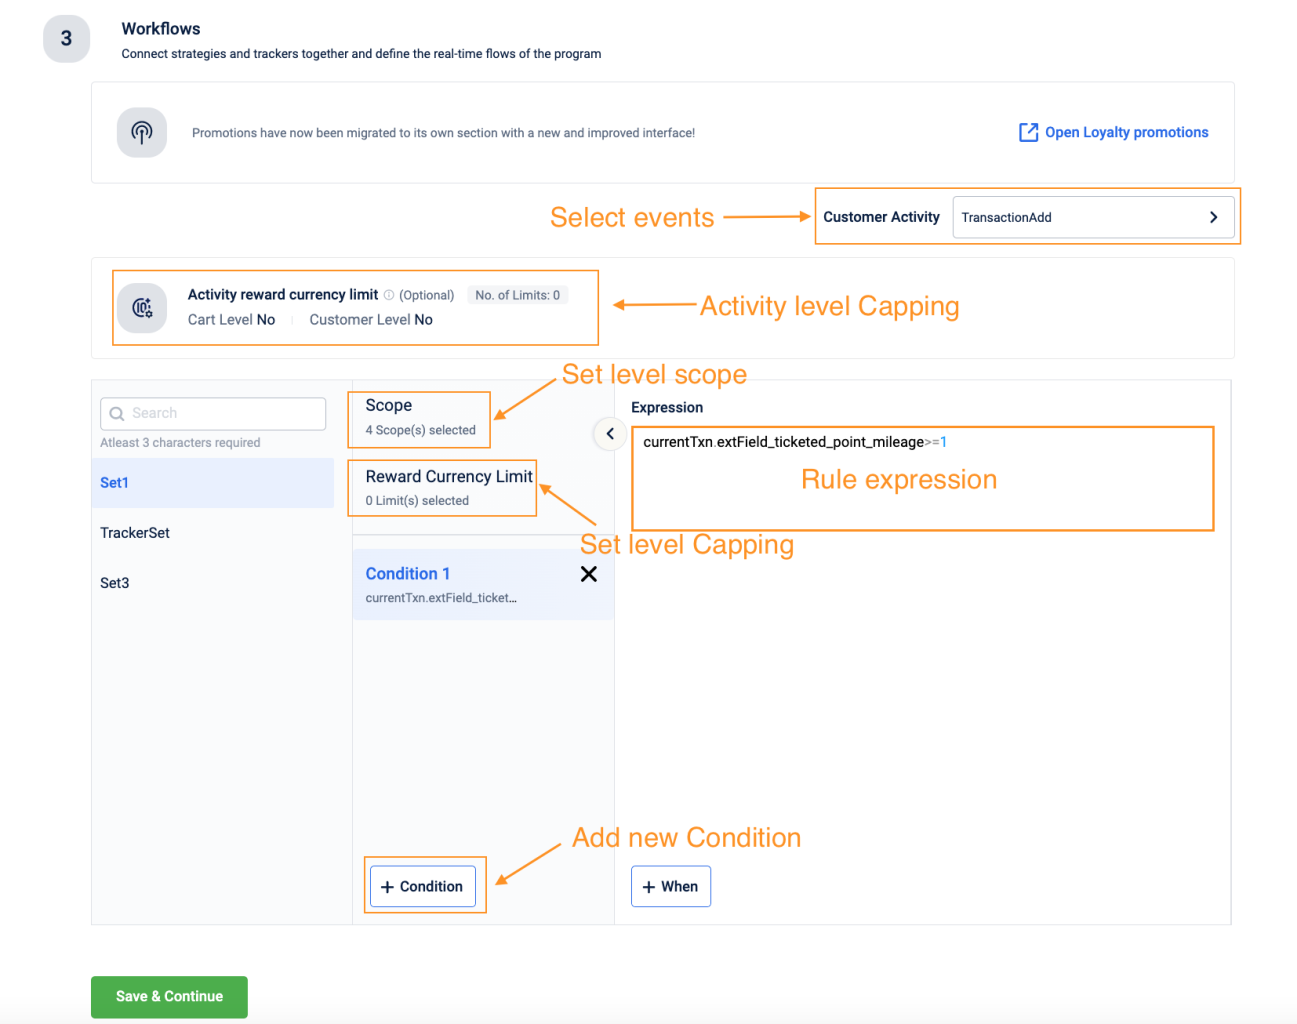
- Choose an activity using the customer activity list. Read more about Customer Activities here.
- Select Scope in each set to apply filters based on date range, event type, cluster, zone, and store.
- Select Reward currency limit to apply limit points issued to customers on transaction amount, line-item amount, and tracker value for each set and subset separately per customer.
- When the event scope is set, navigate to the condition pane to create rules and define actions to be executed.
- Click any selected Action to set up channel notifications. Read more about Actions here.
Read below to understand each of these steps in detail.
Choose customer activity
To configure rules for different customer activities, do the following.
- On Intouch, navigate to Loyalty+ > Programs. In Programs, select the program you want to reconfigure. Click Reconfigure Program and click Workflow.
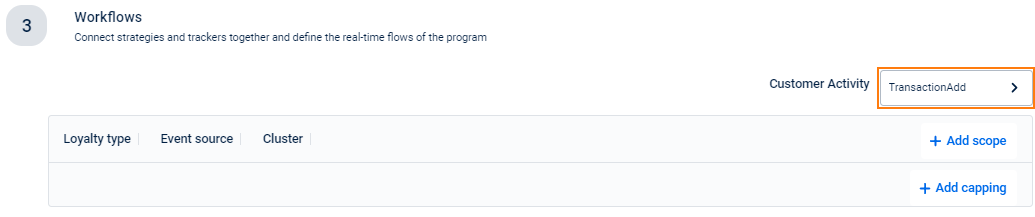
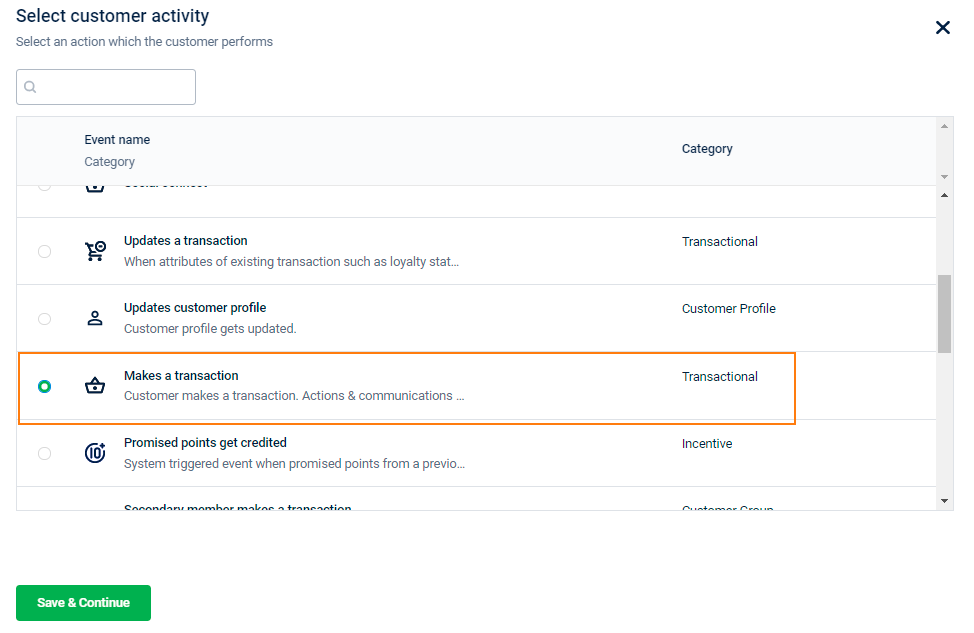
- In the Customer Activity click the event name, choose the event for which you want to configure rules. To know about different available events, see Understanding Events.
Add Scope to filter customer activity
To add scope, do the following.
- Click Scope to apply filters based on date range, event type, cluster, zone, and store. For example, if you select a store using the store scope, all the rules you create on that page will apply only to that particular store.
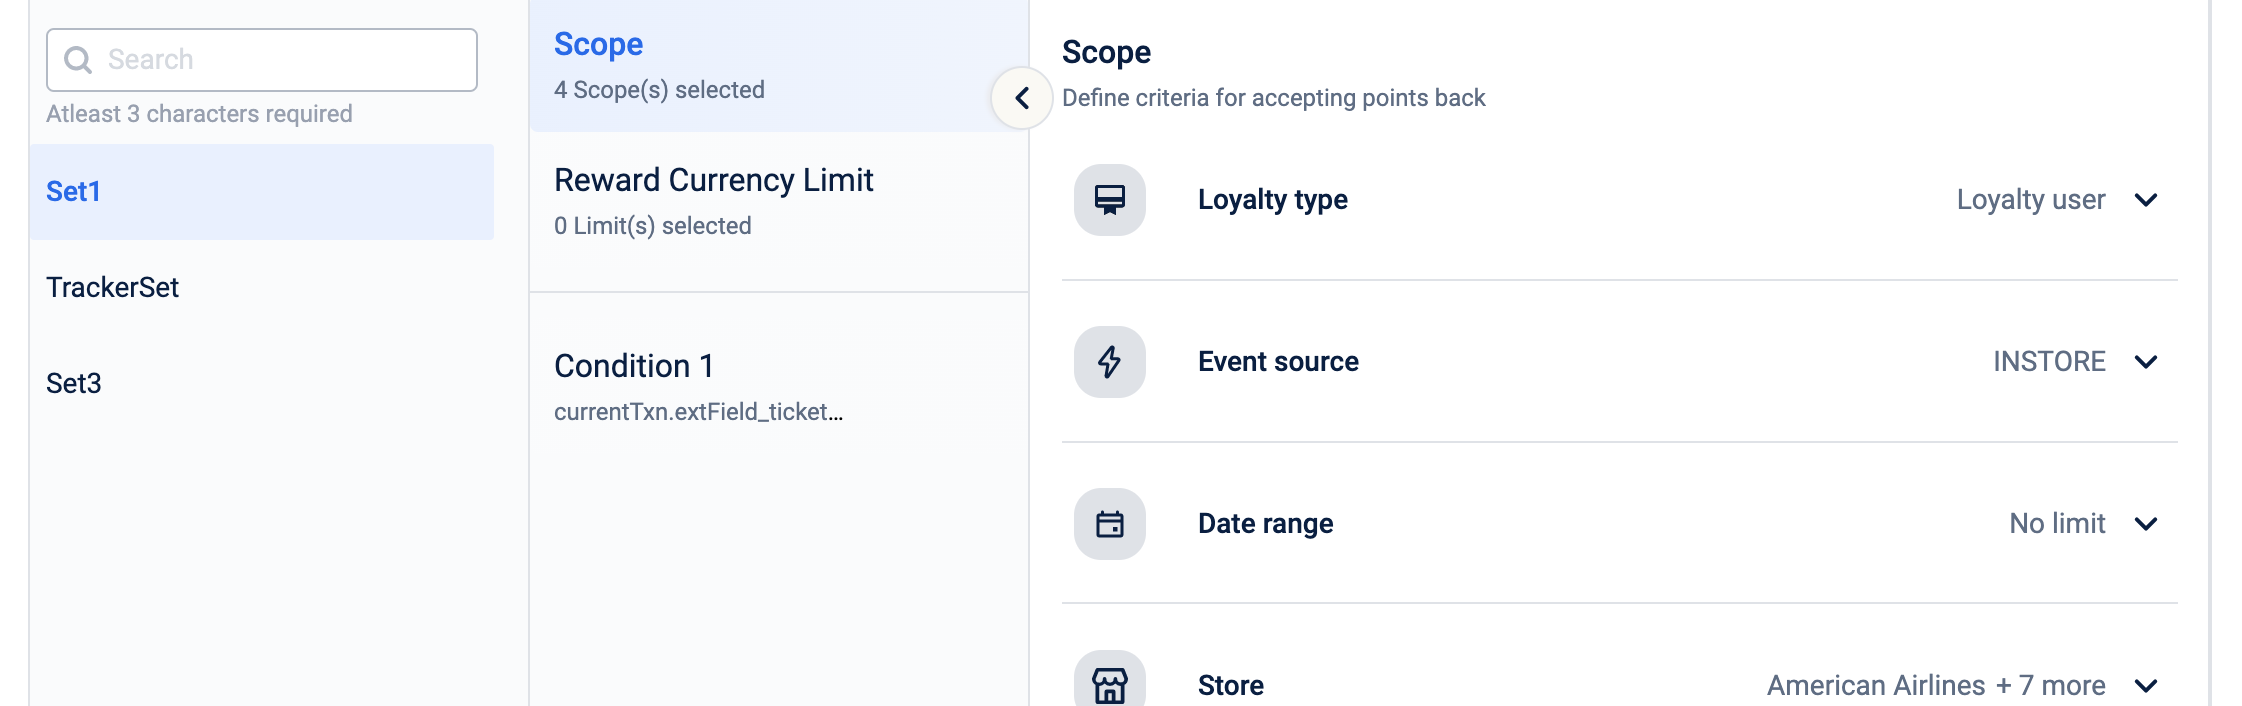
- Click the scope that you want to apply. You will see options to configure the selected scope. Refer to the following table to understand each scope. You can apply multiple scopes for an event and click Save.

To know the descriptions of each field, see the following table.
| OPTION | DESCRIPTION |
|---|---|
| Date Range | Restricts the event to a specific duration. Set the duration in the Start Date andEnd Date boxes. For example, if the Date Range is set from 01-01-2021 00:00:00 to 01-01-2022 23:59:59, then the rule event will run only during that period. |
| Stores | Restricts the event to the selected stores. Select the option "select specific stores" to Include or exclude specific stores and select the stores for which the event should be applicable. To include all stores, let the option stay on "All stores" button. |
| Zones | Restricts the event to the selected zones. To include all zones, let the option stay on "All zones" button. |
| Cluster | Restricts the event to the selected cluster. You can include or exclude a particular concept from the event. Select the option "select specific clusters" to Include or exclude specific cluster and select the cluster values. To include all clusters, let the option stay on "All clusters" button. |
| Concepts | Restricts the event to the selected concepts. You can include or exclude a specific concept from the event. Select the option "select specific concepts" to Include or exclude specific concepts and select the concepts for which the event should be applicable. To include all concepts, let the option stay on "All concepts" button. |
| Loyalty Type | Allows targeting loyalty or non-loyalty customers. If no option is selected, then both loyalty and non-loyalty customers are targeted for the event. You can issue only coupons to non-loyalty customers, whereas loyalty customers can get points, tiers, and coupons.Supported methods for rules: currentEvent.previousLoyaltyType, currentEvent.currentLoyaltyType |
| Event Source | Lets you evaluate conditions for events triggered from a specific source(s)/account(s) - InStore, WeChat, and Web Engage (mobile push). If no sources/accounts are selected, then the current rules will apply to all accounts. Supported methods for rules: currentCustomer.isLoyal, currentCustomer.hasInstoreProfile, currentCustomer.hasWeChatProfile |
Limit issual of points
You can set limits on the points issued per customer for each set or subset. The total points issued to a customer can be limited from based on the transaction value and payment method.
NoteThe limiting of points is only applicable for the
**TransactionAdd**customer activity.
To configure points capping, follow these steps:
- Navigate to a loyalty program and select Edit Program
- Navigate to the Workflows section.
- Select
TransactionAddunder the Customer Activity section. - Choose the ruleset and select Reward currency limit.
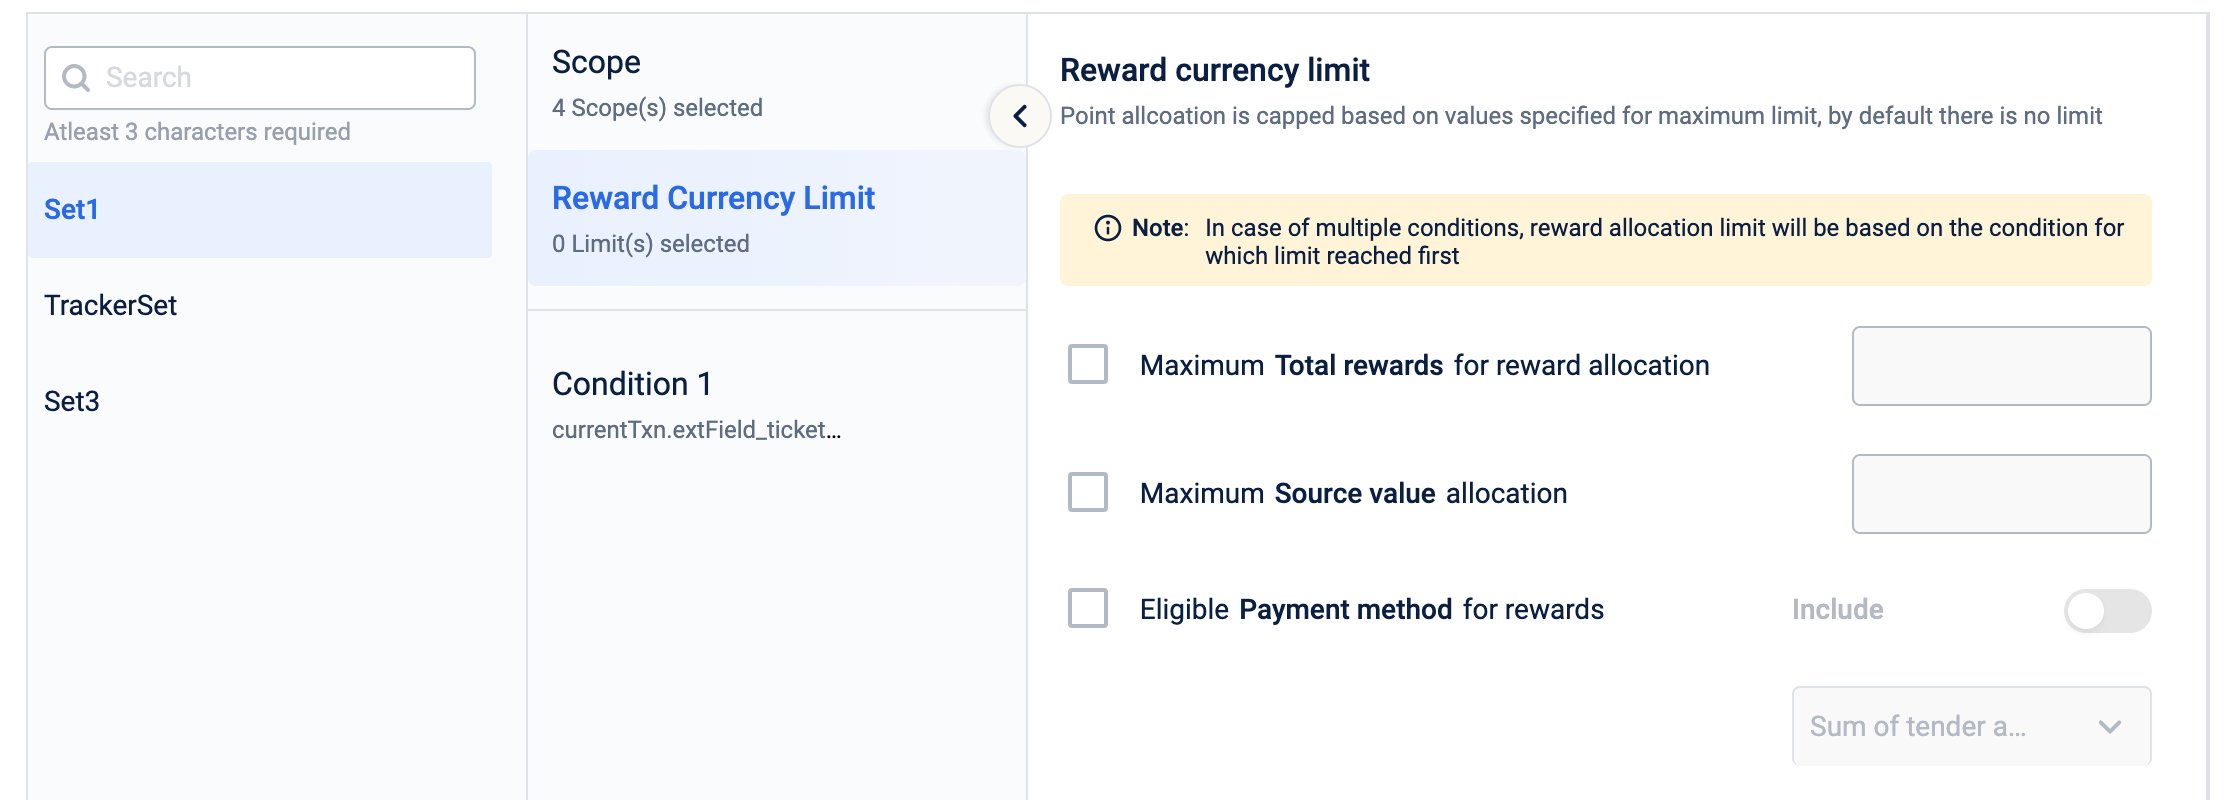
- Select the capping type and enter the capping values.
The types of capping are as follows:
| Type | Description |
|---|---|
| Maximum Total rewards for reward allocation | Limit the total number of points that can be issued. |
| Maximum Source value allocation | Limit the source value amount for a tracker. |
| Eligible Payment method for rewards | Limit the total number of points that can be issued for a specified payment method. |
-
Select Save to confirm the changes.
-
Select Save and Continue to save the changes.
Notes
- Limiting points based on the payment method is supported for the
Evaluation Startruleset.- For advanced capping configurations, refer to documentation on advanced capping.
Configure Rulesets
To configure rulesets, do the following.
- The sets are categorized for better understanding. There are four categories in the TransactionAdd event and one in remaining customer activities.
Evaluation Start : The evaluation of the event or activity will start from the sets within this category. This set processes each record or line item in the event and executes various actions such as points allocation, issuing a coupon to the customer, enrolling the customer in subscriptions, sending a message, or upgrading the tier of the customer.
Trackers : The trackers created in the program will be evaluated here. In this set, brands can award points or execute the mentioned actions by tracking the event and its attributes within a specific window To evaluate the trackers add “forward to set” actions and select the trackers to be evaluated.
Points trackers: Once a points tracker is created, it is always available for rule writing in the above sets. The linking of the points tracker here upgrades the customer based on defined points tracker values. All points of a customer are tracked irrespective of the rules written here.
Evaluation end: This set is designed to execute follow-up actions after the successful processing of the above events, such as sending SMS or email notifications since you want to send them once only. It allows for various additional actions to be performed. However, be mindful that points allocation and other related actions should be completed in the previous sets to ensure the accurate inclusion of tags in your messages. - When the event scope is set, navigate to the condition pane to create rules and define actions to be executed. You can create multiple conditions using + Condition in the All Conditions pane.
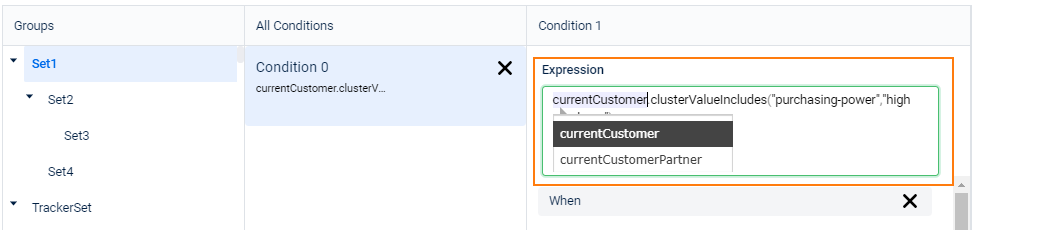
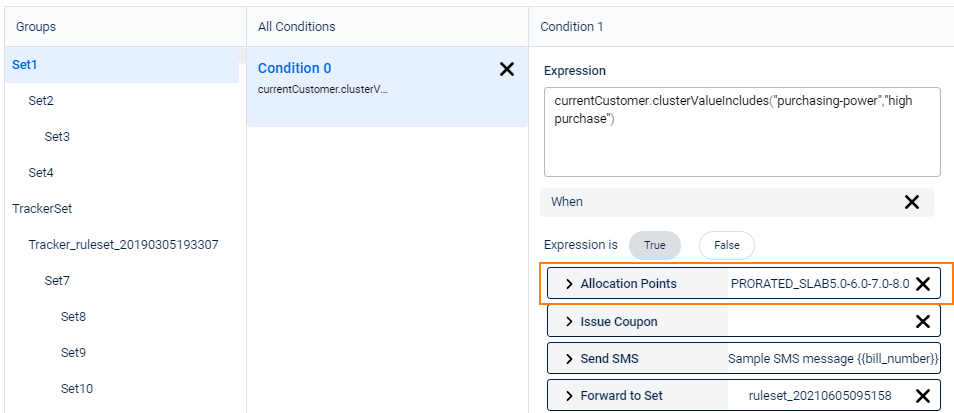
- Click on Condition to add a new condition to the rule. A condition is a combination of rule expression, expression validation (When), and action (executed based on the expression value). Refer to the following steps to define a condition.
- In the Expression box, write the condition to evaluate. See the supported Profiles for each event and the relevant profile attributes and operators used in rule expressions. Also, see the section below on writing rules to better understand how to do it.
- Click + When and choose the expression result (Expression is True or False) and set the action to be executed. You can set actions either for success case or for failure case, i.e., you can set actions to be executed either for expression result true or for false.
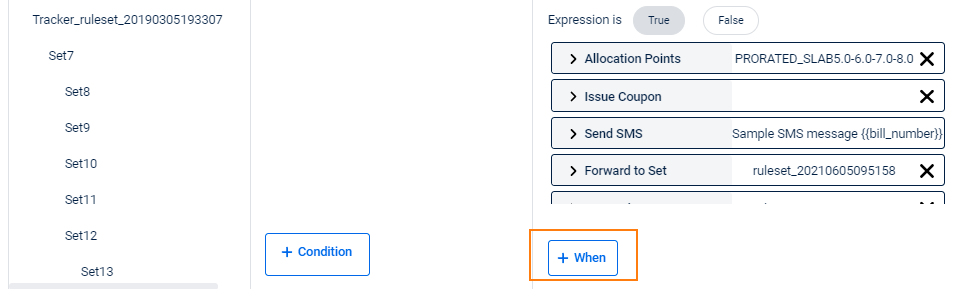
- Expression is: Set when to execute the action - when the result of the expression is satisfied (True) or not satisfied (False).
If you want to execute rules as per your loyalty program configuration, specify 'true' in the expression box and Expression equals box. Then, select the action to be performed.
- + Action: Click to show the supported actions and select the action to be performed for the given condition.
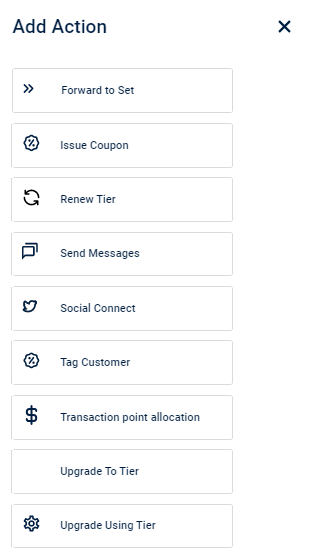
Based on the selected action, you will see some relevant options that need to be configured. Here, you can create a new strategy (by clicking New) or choose the existing strategies. for example, to choose the points allocation strategy you want to apply for the program.
- Click on any selected Action to set up channel notifications using different channels. For example, in the following example clicking Allocation Points allows you to configure mandatory or priority channels for the allocation points action.
Channels that are selected in Mandatory Channels will not appear in Priority Channels and vice versa.
- Click Save to save the changes made in the loyalty program.
- Click Publish Changes to apply changes to the loyalty program. If you do not reconfigure the loyalty program, the new changes will not reflect in the loyalty program.
Activity level Capping & Capping in a time period - In Transaction Add event
Restrict the Regular as well as promotional points at the entire transaction activity & in a specific time period. This works on top of all the set level points cappings.
Use Cases
- Max 1000 points in a transaction including promotional points OR
- Max 500 base points and 200 promotional points
- Max 10000 points in 30 days for a customer
- Max 500 points in a week
CAPPING ON A TRANSACTION :
Getting started
- Go to Loyalty → Workflows → Activity reward currency limit
- A tab on top of the workflows namely “Activity reward currency limit” will be visible. Users can define the limits for regular and promotional points for the transaction add customer activity.
- The capping value can be set for regular or promotional points or both.
Refer the below Gif to use Activity level capping.
CAPPING IN A SPECIFIC TIME PERIOD :
Getting started
- Go to Loyalty+ → Workflows → Activity reward currency limit → Select milestone
- If the milestone group and milestones within that group are already created, simply choose from them. If there are no milestone groups or milestones created, you can click on the “Go to ” and create a milestone group.
- While creating the milestone group, choose the “Limit benefit for customer activity” option under the milestone type, along with milestone evaluation type and frequency.
- Create the milestone periods and save. Within the milestone groups, create milestones and set the “reward currency limit” for regular or promotional points or both.
- These milestones will then appear in the new “Activity reward currency limit” tab and multiple milestones can be selected. At a time, at this customer level, only 3 capping criterions can be selected.
- To set the specific time period, in which points will be capped, you will have to create a milestone group for that time period. In the Milestone Loyalty module (Organization settings >> Sales milestone) a second type of milestone group can be created called “Limit benefit for customer activity”.
Refer to the GIFs below.
→ Selection of milestones in “Activity reward currency limit” tab in Loyalty workflows
→ Creation of Milestone Group
→ Creation of Milestones within a “limit currency type” milestone group:
Updated 4 months ago