Authorization Flows
Supported authentication & authorisation flows
-
oAuth2 Client Credentials flow: This auth flow is used when the API requests are made from a program or service running on a server. This flow uses access token to authenticate an API request. You can enable oAuth from InTouch as mentioned in the respective section below.
-
Basic authentication: This is used where POS terminals are directly integrated with Capillary server. This flow uses Till ID and MD5 hash encoded password to authenticate an API request. Find more details in the section below.
-
Auth for consumer apps: This is used for end-customer authentication where you want end-customers to login to a mobile or web application built on Capillary CDP. This is our legacy auth flow for consumer apps. We would be launching oAuth2 based authorization code flow soon.
-
Staff authentication: This auth flow is used for authentication staff users such as store staff or sales field staff, where you want to build a staff facing app.
Auth scenarios and recommended auth flows
Scenario | Description | Authentication and Authorization |
|---|---|---|
POS client-to-server integration | POS terminals are directly integrated with Capillary server. API requests come directly from POS terminal to the Capillary Server. | Basic authentication using till username and password No authorization required |
POS server-to-server integration | POS servers are directly integrated with Capillary Server. API requests come directly from POS server to the Capillary Server. | oAuth2 client credentials flow using API key and secret |
FTP server-to-server integration | Client systems are configured to Push files to an FTP and Capillary access the is and Capillary will access and process files from FTP. (process - Via connect+ or OOB solution). | oAuth2 client credentials flow using API key and secret |
Instore client-to-server integration | InStore application installed at POS machines is directly integrated with the Capillary Server. | Basic authentication using till username and password |
Server-to-server custom integration | Client server will consume capillary API via. wrapper service. Development and maintenance is subjective to the deal. | oAuth2 client credentials flow using API key and secret |
Prebuilt server-to-server integrations (Magento, Shopify, SFMC connectors) | In this, client-systems would consume Capillary Plugin to communicate with Capillary. | oAuth2 client credentials flow using API key and secret |
End customer apps integration | These are third-party apps and consumes Mobile APIs and Gateway APIs to communicate with Capillary. | Mobile APIs auth service,
Custom & non-standard (non oAuth2 or OIDC) authorization
|
Microsites and landing pages | These are mostly third-party-services and consume customer authentication APIs and Gateways APIs to communicate with Capillary | Sharingan auth service using
Custom & non-standard authorization (non oAuth2 or OIDC)
|
Staff app integration (via server) | Staff username & OTP No authorization |
1. OAuth2 client credentials flow
OAuth provides better security and helps you create secure passages to access your org's data through Capillary APIs. You can generate an API client credential (client key and secret) with read/write access to one or more resources. Once you get the credentials, you can generate an access token using step 1 mentioned on this page.
oAuth 2.0 API Client Flow provides the server-to-server authorization with a temporary access token. Examples of server-to-server integrations include custom integration service to update data in Capillary or to generate a report; integration with a 3rd party server such as an eCommerce, marketing, or survey platform; centralized POS integration where API requests come from an API gateway.
Steps involved in creating client API accounts and access tokens.
Step 1: Get Client Key and Secret
For any integration through OAuth, you need your Client Key and Client Secret. Capillary Admin can create these on the Admin page of InTouch.
- Log on to InTouch of your cluster
- Navigate to Profile icon > Organization Settings > Tools > Authentication.
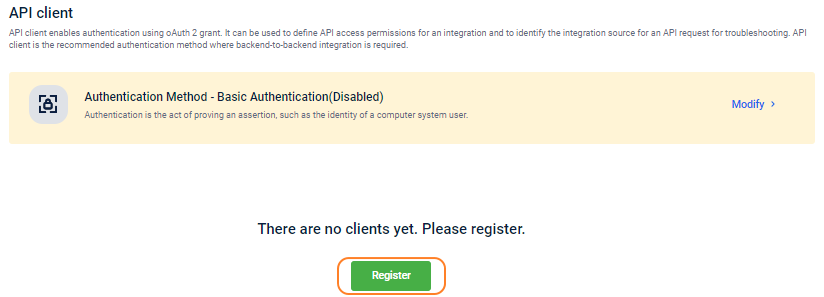
- Click Register to create a new client (token key and secret) for the org.

-
In Client name, enter a name for the client.
-
In Description, enter a short description of the client.
-
In Token expiry duration, set the default expiry for the tokens created for the client. By default, the maximum duration of an access token that you can set is configured as 60 minutes. An error message is displayed, if you try to set the token expiry duration for more than 60 minutes. This is for
/v3/oauth/token/generateonly.
[block:image]
{
"images": [
{
"image": [
"https://files.readme.io/06e18e0-60_min_limit.png",
null,
""
][ "https://files.readme.io/06e18e0-60_min_limit.png", null, "" ],
"align": "center",
"border": true
}
]
}
[/block]
If required, you can raise aticket and set the maximum token expiry duration that you can set to 30 days. You can set the duration in minutes, hours or days. An error message is displayed if you try to set the maximum duration for more than 30 days.
[block:image]
{
"images": [
{
"image": [
"https://files.readme.io/40e1b46-Token_30_days.png",
null,
""
][ "https://files.readme.io/40e1b46-Token_30_days.png", null, "" ],
"align": "center",
"border": true
}
]
}
[/block]For security reasons, Capillary does not recommend setting the token duration for more than 60 minutes. -
In Default till code, enter default till code for the API and click Validate. If a till code is not passed in the API header, the default till is used for API attribution.
-
Select the default till code check box to use this till code for API attribution, If an invalid till is passed in the API header.
-
From the Access group drop-down, select the appropriate access group for your API client. For information on access groups, see Access group. This access group restriction is applicable only for the API client and not the till.
[block:image]
{
"images": [
{
"image": [
"https://files.readme.io/ac9b19c-Select_access_group.png",
null,
""
][ "https://files.readme.io/ac9b19c-Select_access_group.png", null, "" ],
"align": "center",
"border": true
}
]
}
[/block] -
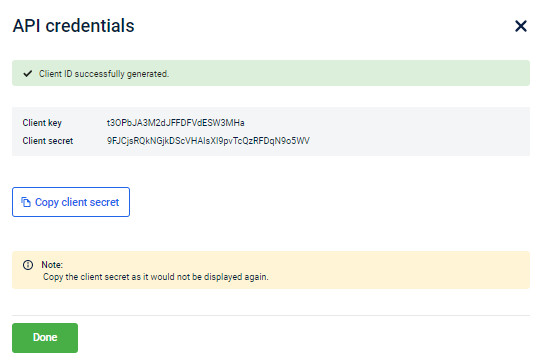
Click Next. You will see the Client key and Client secret generated for the client.

- Copy the Client key and client secret and use it for authentication (OAuth). Using these details, you can also generate access token through API as mentioned in the next section (Step 2: Generate Access Token).

- Click Done to close the screen.
- To create more API client accounts, use New API Client. You can create up to 15 accounts for an org.

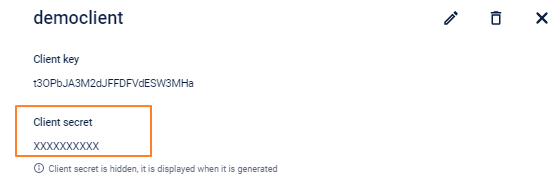
After the client key and secret are generated, if you exit the API Credentials page, you cannot access the client secret again for that client.

Step 2: Generate Access Token
Once you get key and secret, you can generate access token or JWT (JSON Web Token) using the token/generate API. JWT is a compact URL and JSON-based used to transfer data securely between two parties.
The token validity will be as per the value set for the client (Token expiry duration). If a token expires, you can regenerate it using the same API.
Resource Information
| URI | /oauth/token/generate |
|---|---|
| API version | v3 |
| HTTP method | POST |
| Authentication Required | No |
| Batch Support | No |
https://{host}/v3/oauth/token/generateRequest Body Parameters
| Parameter | Datatype | Description |
|---|---|---|
| key | string | Client key generated for the account. For more details, see step 10 in the previous section. |
| secret | string | Client secret generated for the account. For more details, see step 10 in the previous section. |
{
  "key": "",
  "secret": ""
}
Response Parameters
| Parameter | Description |
|---|---|
| accessToken | Generated access token for the given key and secret. This is unique and varies every time you make the call. |
| ttlSeconds | The validity of the token in seconds. |
Example
https://eu.api.capillarytech.com/v3/oauth/token/generate{
"key": "WnCygRI1Fmlf6YudKwTxQq1LI",
"secret": "hoqSBz6VwefECaZA8Q3oNx4V4H3pMDITksarZVES"
}{
"data": {
"accessToken": "eyJraWQiOiJrMSIsImFsZyI6IlJTMjU2In0.eyJpc3MiOiJDYXBpbGxhcnkiLCJleHAiOjE1NzUyNzAyNzAsImp0aSI6IjJaX2FqUjcwYzJABChVUjlDVTVpUlEiLCJpYXQiOjE1NzUyNjk5NzAsInN1YiI6Im5hbWVfODQzNjIwODIwMSIsImNsaWVudF9pZCI6MjEsIm9yZ19pZCI6MTExNSwidG9rZW5fdXNlIjoidG9rZW5fYWNjZXNzIn0.Ala1-XTDlPtrHFQfCtJKsXe3h_WVyq4QOGI3ZnLNJqOa-yJc1UPGbypUysWemzEaiQC_BJ0n9G68SYkVZGi4CSVOhHRNA_dILe8y1Sa90YZKwHVHogJmIKzLmksJrTbjn8s8hSMePBaaUcEdUZ1XssxdFrZhEHHN1fWVYtkdb74PB3sZ7OMDqKUysON8YTNQxLgKOJ3kq0o2QUUDQo1q3gxXFuswate6-jj3oBkcdd1ohhXkPIWZlAb_1lRcLr-ECaaBfh473gayeMVV_6khdKJ7cXrUQ3CXppkrPIzBb7rS6I93iWZw0IlmWbaGduTmPPOhLX6HZLOb84Y28st-cw",
"ttlSeconds": 300
},
"errors": null
}{
"data": null,
"errors": [
{
"code": 320001,
"message": "Invalid client key and secret"
}
]
}Step 3: Make API Call with Access Token
You can use JWT to make any API request. To make an API call, you need to include the following headers and the respective API details
Headers Required
| X-CAP-API-OAUTH-TOKEN* | The generated access token |
|---|---|
| Content-Type* | Media type of the request to send from client to server. It is usually application/json. |
| Accept* | Media type of the response content. It is usually application/json. |
| X-CAP-API-ATTRIBUTION-TILL-CODE | Till code from which you want to POST data. By default, the Till associated with the client key and secret is mapped if this is not passed. |
Example
https://eu.api.capillarytech.com/v1.1/customer/add?format=jsonSample Headers
“blr.koramangala.till001”"eyJraWQiOiJrMSIsImFsZyI6IlJTMjU2In0.eyJpc3MiOiJDYXBpbGxhcnkiLCJleHAiOjE1NzUyNzEwMjgsImp0aSI6Im9aczQyNUtUVF93SGFtYVFXdnZFQ1EiLCJpYXQiOjE1NzUyNzA3MjgsInN1YiI6Im5hbWVfODQzNjIwODIwMSIsImNsaWVudF9pZCI6MjEsIm9yZ19pZCI6MTExNSwidG9rZW5fdXNlIjoidG9rZW5fYWNjZXNzIn0.twzL9DRws-8C6XfBf3pzu5KpBtvIhoL1Wq2VbLHFYpT032s23QnN2oHGEtQ-rjYgEalpytMK-lsnAl0fqJTpHdbR0lAB_sqQT4EQWAlC1ysbZTEaL7JBMHYxVprZsWWsSDdizgglr35hSq6tKlkID2onDkkZyAgS2CpZUfCArsacXsPB4RhCNGW-dYTdQ2chiGczCU12yBkd0qNEeduSm7BgCHPcimmTqHy91DvQ8sGLluj0XkJ7dq2xfM5FPbnHQJivbW8ku1L5ow4yxiA6IxjLrgeUNwyydIBG4JPL3it3jDuHY_2_1129crlWtsMR1zztWNaT4eh1EMJnNMivdg"Sample Post Body
{
  "root": {
    "customer": [
      {
        "mobile": "91700000000",
        "email": "[email protected]",
        "external_id": "XYPZ001",
        "firstname": "Tom",
        "lastname": "Sawyer"
      }
    ]
  }
}
Sample Response
Case 1: In case of a valid token
If the call is made within the token expiry period, you will get a successful response.
{
  "response": {
    "status": {
      "success": "true",
      "code": "200",
      "message": "SUCCESS"
    },
    "customers": {
      "customer": [
        {
          "user_id": "XXXXXXXX",
          "mobile": "91700000000",
          "email": "[email protected]",
          "external_id": "XYPZ001",
          "registered_on": "2019-09-11 11:11:11",
          "item_status": {
            "success": "true",
            "code": "1000",
            "message": "Customer Registration Successful"
          }
        ]
     }
   }
}
Case 2: In case of an invalid token
If the token is invalid, you will get the following response. You need to pass a valid token.
{
  "response": {
    "status": {
      "success": "true",
      "code": "401",
      "message": "Unauthorized"
    },
    “customers” : null
}
Case 3: If the token has expired
If the token expires, the call fails with the message Token expired at {time}. In this case, you need to generate the token again and make an API call with the token expiry period.
{
  "response": {
    "status": {
      "success": "true",
      "code": "498",
      "message": "Token expired at 2019-12-02T12:31:15.000+0530""
    },
    “customers” : null
}If your token has expired (error code: 498), you need to regenerate it as explained in Step 2.
Case 4: if the token is valid but no access to the requested resource
You need to set the access scope for every client account you create as explained in Step 1. If you try to use the token for resources other than that configured, you will get the following error response.
{
    "response": {
        "status": {
            "code": 403,
            "message": "Client doesn't have access to the requested resource",
            "success": false,
            "warnings": {
                "warning": []
            }
        }
    }
}
2. Basic Authentication
You can either pass the Authorization Header or use Till ID and password for authentication through Basic Auth.
Authorization Header
Construct the authorization header as mentioned below - pass the Base64 decoded form of username and md5 formatted password.
Authorization: Basic <Base64 encoded (username:md5(password)>
For example, if the username or TILL ID is store.server123 and the password is 'server123', md5 of the password
For example, if the username is store.server and the password is 'server123',
- md5 encryption of the password (server123) is
8a16a6b70505eb1f1ff7cdc0cd5559a7. - Base 64 (store.server:8a16a6b70505eb1f1ff7cdc0cd5559a7) is
c3RvcmUuc2VydmVyOjhhMTZhNmI3MDUwNWViMWYxZmY3Y2RjMGNkNTU1OWE3.
So the Authentication Header is
Authorization: Basic c3RvcmUuc2VydmVyOjhhMTZhNmI3MDUwNWViMWYxZmY3Y2RjMGNkNTU1OWE3
Username & Password
To use username and password for authentication, pass TILL ID as username and md5 hash encrypted password.
Consider the preceding example:
username: store.server
Password: md5 hash (server123) which is 8a16a6b70505eb1f1ff7cdc0cd5559a7
Now, v2 API supports submitting requests on behalf of other TILLs (active TILLs). In the database the combination of attribution_lookup and lookup_code are mapped to TILL ids and org ids. When a new POST request is placed with the combination of a lookup name and lookup code, the data will be inserted in the db on behalf of the TILL that is mapped to the specified combination.
To submit requests on behalf of other TILLs, include the following code along with the HEADER:
X-CAP-API-ATTRIBUTION-LOOKUP-TYPE:<name>
X-CAP-API-ATTRIBUTION-LOOKUP:<value>(value is case sensitive)
API access control
An access group is a set of Data API and Config API resources with defined permissions. With the access group, you can create and set API endpoint access restrictions for stores. By default, some built-in access groups are created and assigned to the existing orgs. If you want additional access, you can change the access group or can create a new access group for your store. For more information, see section Access group.
All permissions set during API client creation are overridden by API access permissions of the respective access group assigned to the stores.
Access error
The application displays an error message if the store does not have access to the requested API and when the authorization status is not available.
- Error :
Reason: Not authorized to access the requested API.
HttpStatusCode=403
errorMessage=Not authorized. Access is denied!
errorCode=4000
Solution: Make sure that the endpoint is valid and appears under the selected Resource in the access group and that the assigned access group for the store has the appropriate permissions to perform the requested operation. - Error:
Reason: Authorization status unavailable
HttpStatusCode=503
errorMessage=Authorization status unavailable!
errorCode=4001
Solution: Try again after some time.
3. Auth for consumer or end-customer apps
Customer Authentication is a Auth Engine framework that manages end-user (customer) authentication to the organization’s mobile or web application. This resource provides APIs related to authenticating web and mobile applications.
The authentication completes only after validating the mobile number or email ID through OTP.
Before starting with the Auth Engine APIs, you need to know the following backend configurations.
Whether the password option is enabled for the org if you want to use password-based authentication.
Whether OTP is enabled for the org and the daily limit of OTPs a customer can generate. If you need to increase the daily limit of OTPs a customer can generate in a day, log a request and assign it to the Platforms team.
Here we have provided only the details of Auth Engine APIs.
See more details about Auth Engine or User Authentication in Customer Authentication (Web App) and Customer Authentication (Mobile App).
Updated 4 months ago
