
Setup Cards
Introduction
A card series represents different types of cards. For example, you can have card series for Digital and Physical Card. A card series contains information such as card series name, card type, card number configuration details, and expiry details. You can also extended fields for cards. You can either have auto-generated cards or manually generated cards.
Card linked loyalty program: Card-linked loyalty allows you to manage multiple card series within a single loyalty program. This is applicable only for MLP enabled orgs. If a loyalty program is created based on card series, you cannot create another program based on zone or concept.
Features
The following are the features of the Card Series module.
- Create physical and digital card series for an org.
- Create a card series with either auto-generated card numbers or manually generated card numbers.
- Auto-assign card numbers to customers during registration or first transaction after card-series creation.
- Manually issue cards to customers through member care and integration platform (APIs).
- Issue one or more cards to customers from a card series.
- Create a separate loyalty program for each card series.
Terminologies in card module
There are a few terminologies that you need to know before starting card configuration.
-
Card series: The card series represents different card types of an organization. For example. Value card, Premium card, Digital card, Physical card, and more. A card series stores information such as card series name, how to create card numbers for the card series, whether the card can expire and after how many days, and more. The following is the information stored in the card series.
- Card series name
- Card series code
- Card number generation configuration
- Card expiry configuration
-
Card: This represents a card from a card series issued to a customer. A card stores information such as when the card was issued, when will it expire, from which store or source account the card was issued, and more. A customer can have multiple cards of the same card series. The following information is stored at the card level.
- Card expiry date
- Card issue date
- Card status
- Store code (where the card is registered)
-
Card status: A card has a system-defined status code and a user-defined status label. Internal validations and out-of-box functionalities such as card-related KPIs use status codes and status labels. It also allows following different naming conventions to define card statuses. You can map multiple status labels to a status code. The system supports the following status codes.
-
NOT_ISSUED: This card is not issued to any customer
-
ACTIVE: The card is in an active status.
-
SUSPENDED: The card is temporarily blocked but you can reactivate it. If the card number is used as an identifier, you cannot make any transaction or redeem points and vouchers using the card in this status.
-
DELETED: You can modify nothing in a card with this status. You cannot use this card in transactions, points, or voucher redemption.
-
EXPIRED: You cannot use this card in transactions, points, or voucher redemption. You cannot change the status as well.
The following are examples of status labels.- Card Assigned status label mapped to ACTIVE status code
- Card Blocked status label mapped to SUSPENDED status code.
- New Card status label mapped to NOT_ISSUED status code.
- Card Generated Card Printed and Card Distributed to Store’ multiple status labels mapped to NOT_ISSUED status code.
- Card Permanently Deleted’ status label mapped to DELETED status code.
- Card Expired status label mapped to EXPIRED status code.
-
-
Card issue: Card issue means linking cards to customers. The following are the three possible scenarios that can happen during registration or post-registration. For details, see issue card to a customer
- A digital or virtual card is issued to the customer.
- A physical card generated in Capillary is issued to the customer.
- A physical card not generated in Capillary is issued to the customer.
Card configurations (Org level)
You need to configure the following card-related settings before creating the card series.
- Map standard status with preferred status labels.
- Create multiple status labels for each standard status.
- Set the maximum number of cards issued to a customer.
To configure the card at the org level, follow these steps.
- Navigate to Organization Settings > Miscellaneous > Card Configurations.
- Click Modify global settings

- In the Maximum no. of active cards per customer, enter the value to set the maximum number of cards (total number of card series) for a customer.
- In Status Mapping, tag standard statuses to your preferred statuses (custom status labels). There are five different standard statuses - Not issued, Active, Inactive, Deleted, and Expired.
To create and map a status label, follow these steps.
a. Navigate to a status for which you want to add a custom status label.
b. Click Create a new tag
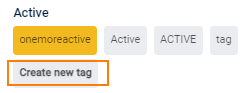
c. Enter a name for the status label.
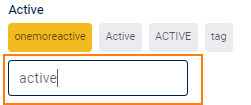
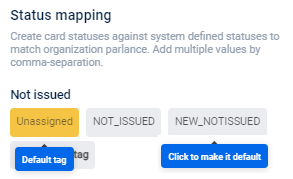
Once the tag(status label) is created and saved you cannot edit or delete the tag.
d. Click on the newly created tag to make it the default tag. If only one tag(status label) is created for a status code, the system considers this tag as the default status tag.
- Click Update.
After successfully configuring the card at the org level, create a card series, generate card numbers, and issue cards to customers.
Counting Only Active Cards for Customer Limits
To count only cards labeled as ACTIVE towards a customer's card limit, you can enable the configuration CONF_COUNT_ONLY_ACTIVE_LABEL_CARD. Once enabled, only cards marked as ACTIVE will count towards the limit, while cards with statuses such as SUSPENDED or ISSUED will be ignored.
By default this configuration is disabled.
To enable the Configuration, raise a JIRA request to the Product Support team requesting activation of CONF_COUNT_ONLY_ACTIVE_LABEL_CARDS.
Note
- Org Level: The system will count only cards labeled as ACTIVE when enforcing the maximum card limit for a customer.
- Card Series Level: Similarly, only ACTIVE cards will be counted when determining the limit within a card series.
- When merging two customer profiles, the system will count only ACTIVE cards from both profiles.
Use case - A customer’s card limit is set to 5.
When Configuration Disabled:
- The system counted ACTIVE, SUSPENDED, and ISSUED cards. If the customer had 3 ACTIVE, 1 SUSPENDED, and 1 ISSUED card, the system considered the total as 5, preventing additional card issuance.
When configuration Enabled
- Only ACTIVE cards are counted. The customer now has 3 ACTIVE cards, so they can receive 2 more ACTIVE cards.
Prerequisite
Before configuring the card series, you need to set an org-related card configuration.
Create card series
To create a card series, follow these steps.
- Navigate to Organization Settings > Miscellaneous > Card Configurations
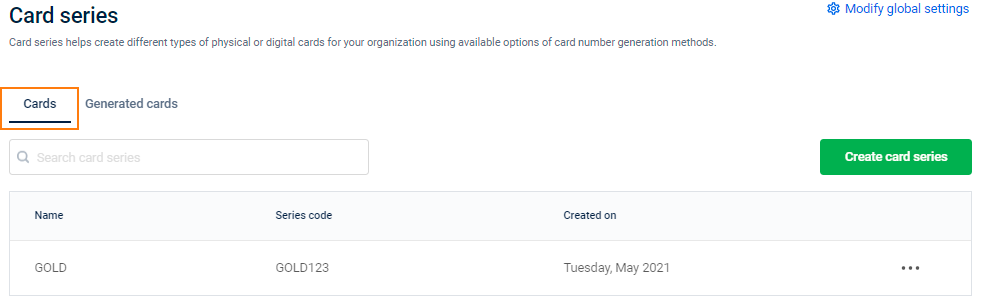
- Select the Cards tab.
- Click Create card series.
- In Name, enter the name of the card series.
- In Series code, enter a unique series code. It is recommended to use alphanumeric code. Once the card series is created, you cannot modify the series code.
- In Series type, choose the type of card series -
- Digital: A digital card is a modern version of the loyalty card. Customers can manage these loyalty cards through InTouch or mobile applications. You can generate and download card numbers for digital cards.
- Physical: A physical card is a traditional version of a loyalty card. You have to carry these cards to the store to redeem or issue points during or post-transaction.
- Configure the selected card series. If the Physical card is selected follow steps 7(a) and 7(b) else skip these steps.
- Select the Physical card type.
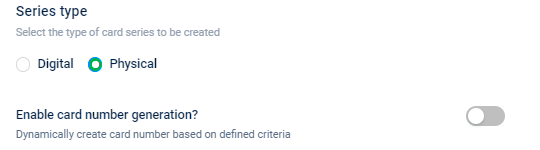
- In Enable card number generation, enable or disable the dynamic card number generation.
- Enable the option to dynamically generate card numbers. Usually, auto-generated card numbers are not suitable for physical cards. However, if you wish to have it for the org, you can enable it. For details on automated card generation, refer to step 8.
- Disable the option to manually generate card numbers.
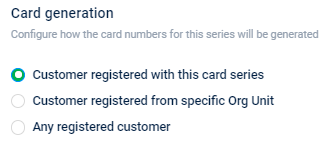
- In Card generation, choose the options - Customer registered with this card series, Customer registered from specific Org Unit, or Any registered customer to generate the card numbers dynamically. The card generation option does not appear for the physical card series type when the Enable card number generation is disabled.
-
Customer registered from this card series: Select this option to generate card numbers when this card series code is passed during customer registration. By default Customer registered with this card, the series is selected for card series creation.
-
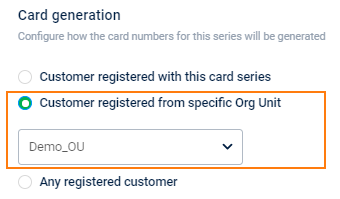
Customer registered from a specific Org Unit: Select this option to generate a card number using this card series where the customer registration request comes from a till code that is mapped to the selected org unit(concept). For the first time, cards will be generated when the customer transaction or update request comes from the selected org unit.
i. Select the preferred org unit name using the drop-down list.
ii. **Any registered customer**: Select this option to generate a card number and issue it to any registered customer in an org.- In the Card generation method, select the Basic option. By default, the basic option is selected. The card generation method does not appear for the physical card series type when the Enable card number generation is disabled.
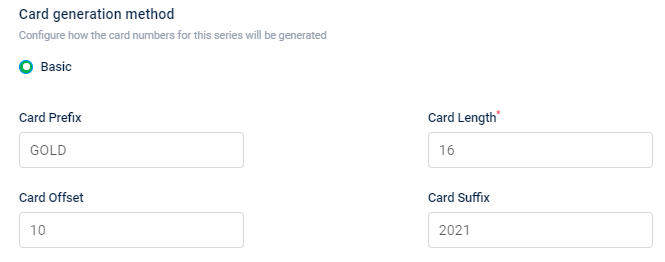
The following are the configuration options.
- Card Prefix: Starting character of the card number. Maximum 50 characters are allowed.
- Card Length: Length of the card excluding prefix and suffix. Maximum 150 characters are allowed. This option is mandatory.
- Card Offset: Starting index of the cards to be generated.
- Card Suffix: Ending character of the card number. Maximum 50 characters are allowed.
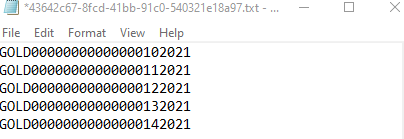
For example: Create a card series with prefix GOLD, suffix 2021, offset 10, and length 16, the first generated card number is ‘GOLD00000000000000102021’.
-
In a Maximum number of cards per active customer, set the value for the maximum number of active cards for a customer. Issue of new cards to the customer is not possible if the count of active cards (using this card series) exceeds the limit. The default value is 1.
-
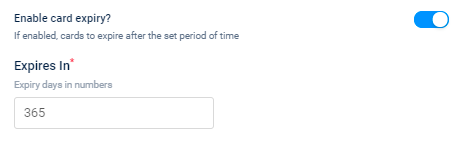
In Enable card expiry, enable the option to set card expiry duration. Disable the option if you do not want to set an expiry duration.
- Enter the value to set a card series expiry period in days. Based on this configuration, the card expiry date depends on the date of the card issue to a customer.
- Click Create series.
- After successfully creating a card series, generate card numbers and issue cards to customers.
- During data import, the system does not validate whether the uploaded card numbers already include the prefix or whether they exceed the configured card number length. Because of this, if the imported card numbers contain the full number with prefix, the system stores that full value directly in the system counter storage. During UI issuance, the platform increments this counter and adds the prefix again, which produces a card number longer than the configured length. This can results in an error.
Generate cards
You can generate the card numbers for a specific card series and download the list of card numbers in .txt format. At once the system can generate up to one lakh card numbers.
To generate and view card numbers, follow these steps.
- Navigate to Organization Settings > Miscellaneous > Card Configurations.
- Select Generated card tab.
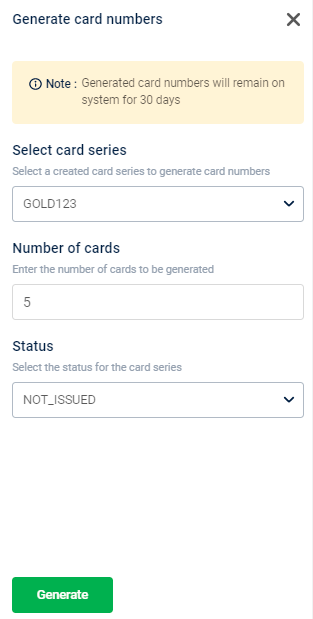
- Click Generate card number.
- In the Select card series, choose card series using the drop-down list. To see the options in the drop-down list configure the card series during card series creation. For details, see create card series.
- In the Number of cards, enter the number of cards that you want to generate.
- In Status, select the card status using the drop-down list. In the drop-down list, you can select only Not issued status options. To see the options in the drop-down list configure the global settings. For details, see card-related configurations (Org Level).
- Click Generate cards.
- In Generated cards, view the list of generated cards. The system generates the card number automatically based on card series configuration - Card Prefix, Card Suffix, and Card Length.
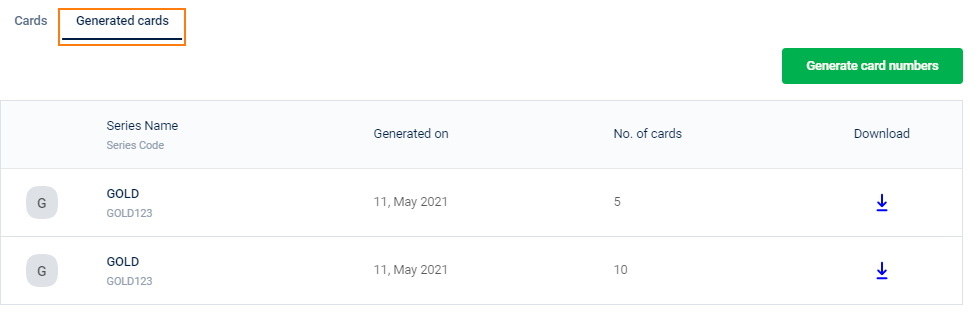
- Series Name and Series Code: This field shows the card series name and code.
- Generated on: Date or time when card numbers are generated.
- No. of cards: Total number of cards generated.
- Download: Download and check the generated card numbers in a text format.
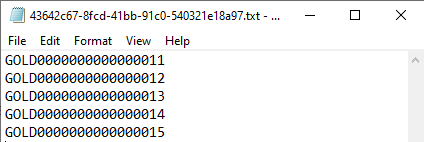
- Generated card numbers remain on the system for 30 days.
- After successfully generating card numbers, you can issue cards to customers either using Member Care or API integration.
Modify Card Series
To view and modify a card series, follow these steps.
- Navigate to Organization Settings > Miscellaneous > Card Configurations.
- Select the Cards tab.
- Navigate to the card series that you need to modify. You can use the Search option to get a specific card series.
- Click the more options (...) icon > Edit.

- You can modify all the card series details except Series code, Series type, and Card generation type.
- Click Update series.
Delete card series
To delete a card series, follow these steps
- Navigate to Organization Settings > Miscellaneous > Card Configurations.
- Click the Cards tab, navigate to the card series that you want to delete. You can use the Search option to get a specific card series.
- Click Delete. The card series is deactivated and removed from the system.
Best practices
- Decide the card generation algorithm before issuing cards.
- Avoid changing the algorithm for an active card series.
- When switching to check-digit–based algorithms, ensure enough digits are available for future growth.
- Card length must not be reduced after cards have been generated.
- Do not switch generation method (RANDOM ↔ SEQUENCE) after the card series are live.
- Prefix length reduces numeric space and can exhaust card numbers even when length looks valid.
- Sequence counters are not resettable and persist across config changes.
- When exhaustion occurs, only supported options are: Increase card length, or
Create a new card series.
Card-based program
Card status validation for point redemption and transactions
When you use cards for loyalty point redemption or transactions, the system handles card status validation differently depending on the process:
Point redemption
- The system does not validate the card status during point redemption at the loyalty end.
- You can redeem points using a card even if its status is SUSPENDED.
- This means customers with suspended cards can still complete point redemption actions.
Transactions (transactionAdd in InTouch)
- The system validates the card status when you perform a transaction using transactionAdd in InTouch.
- If you try to use a card with SUSPENDED status for a transaction, the system blocks the action.
- You will receive an error with code 8087, indicating that the card status does not allow the transaction.
Summary
- Point redemption does not block actions for suspended cards.
- Transactions using transactionAdd in InTouch block actions for suspended cards and return error code 8087.
Recommendation
Be aware of these differences when managing card statuses. If you want to prevent all actions for suspended cards, you must manage both transaction and redemption processes accordingly.
- A group company issues multiple loyalty cards of that org and a customer could have one or more loyalty cards that they could use across countries. The loyalty benefits such as points balance, earning rules, redemption rules, and tiers - are associated with a loyalty card (and not a country).
- Multi-Currency and Multi-Country Programs
| Fields | Description |
|---|---|
| Bill Amount | Captures in local currency and uses conversion ratio for local-to-base currency conversion. |
| Bill Amount in Loyalty | Captures only in base currency. |
| Points Earning | Points on a bill amount in on the base currency. |
| Upgrade on Amount | Earning of points/bill amount in base currency or based on the custom field of bill amount in local currency. |
| Points Redemption across Programs | Single redemption across programs with single points-to-currency conversion (upcoming) |
| Points Redemption Discount | Currency is not applicable for points discount. |
To configure and create loyalty programs for multi-brand orgs, follow these steps-
- Log on to InTouch and go to the Loyalty tab. You will see existing programs and an option to create a new program.
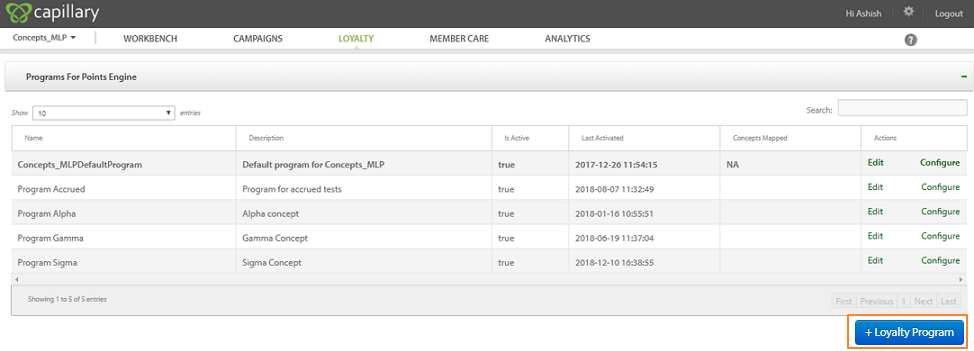
- Click +Loyalty Program. MLP workflow can be broadly categorized into the following three phases.
Step 1: MLP Configuration
Please note that there should be no overlap between any two programs.

You can define the boundaries of a loyalty program either by a zone or concept hierarchy. If a loyalty program is defined on a concept basis, then all events originating from all tills of that concept will pass through its configured program.
Default Program: A default program is created when we create an org in our system. All concepts and zones are mapped to the default program irrespective a separate program is running for that concept/zone.
Step 2: Events
For any event such as transaction and customer update, first, the relevant programs will be identified and then the configured rules and actions will be executed for that particular program.
- The default program will always be executed. If the event also matches with any other non-default program, that will also be executed
Step 3: Get Details (API Call)
Whenever any information such as Current points, tier, and a bulk call is required, either the calling module will pass the corresponding program or the system will identify the corresponding program from the configuration and pass the relevant value to the caller.
Use Cases
- Points Allocation Strategy: Each program has its own points allocation strategies. A point allocation strategy can be created and used within a program. The allocation strategy of one program cannot be used in any other program, not even within the Default Program. To know how to create Points Allocation Strategies, click here.
- Points Expiry strategy: Each program has its own points expiry strategy. A point expiry strategy can be created and used within a program. The expiry strategy of one point cannot be used in any other program, not even in the Default Program. To know how to create Point Expiry Strategy, click here.
- Points Redemption Strategy: Each program has its own points redemption strategy and points to currency conversion ratio. The redemption strategy of one program cannot be used in any other program, not even in the Default Program. Points redemption strategies can be created and used within a program. To know how to create point redemption strategies, click here.
- While making redemption, the caller has to specify from which program and how much point needs to be redeemed. Whenever a redemption call is made and the program id is not passed, the points will deduct from the program/till where the redemption call is made.
- Manage Trackers: Trackers created within a program can be used and evaluated within the program. It will work the same as in the case of a single loyalty program. Tracker of one program can not be used or evaluated in any other program, not even in the default program. To know more click here.
- Customer Registration: Customers once registered in any program by default will register across brands in the org but the enrollment will be done only for the program to which the till belongs. Enrollment in other brands will not happen till the customer makes a transaction in that program.
- Customer updates: Customer update events will pass through all the programs which as associated with the till from where the event is fired. So if the Org wants to allocate points to a brand loyalty program or a Default program, then they have to write rules on the brand loyalty program and Default program as well.
- Manage Tiers: Tiers for each program can be created within the program and they work within the program only. Click here to know more.
Configure for Transaction event
- New Transaction: Once a transaction is made, the corresponding programs will be identified, and accordingly “new transactions” rules will execute.
- Transaction Update: Any transaction update event will only pass through the corresponding program that is configured for the till from which the update event is initiated. In case the transaction creates and transaction update tills are different then rules will run for the program where the transaction has originated.
- Transaction Return: For the Transaction return event, the rules will be executed from the program where the purchase was made, not where the return is made. For eg, the Customer transacted at till 1(Program 1) but return the products at till 3 (Program 2), in this case, the return rules will be executed from Program 1, not for Program 2.
Configuring Rules/Sets
Rule and set configuration need to be configured at the program level depending on the requirement. The rules configured for lifetime purchases, current points, no. of transactions, etc are always in the context of the program. For example, lifetime purchases are the purchases made in that program.
For example, let's assume a customer has made 6 transactions across the organization in different tills/stores.
If one writes a rule within program 1 on currentcustomer.lifetimepurchase, it will be evaluated on 1200, and on program 2 it will be evaluated on 900. Moreover, each program will have over customer KPIs such as Lifetime purchase, current points, lifetime points, trackers Visit count, and a number of transactions.
One View of Customer
One will be able to see program-wise (including Default Program) details of a customer with program-level KPIs in Member care and Binary. See the figure below. For eg, if a concept/till is not mapped in the Default program then the corresponding transaction/point will not be available in customer KPIs in Default Program.


Limitations
- Currently, programs can run either at concept or zone but not both
- One concept/zone can only have one loyalty program (excluding the default program)
- Points can only be redeemed from one program at a time.
- Multiple Loyalty programs cannot run at the store level i.e. different programs at each store of the brand
- Product category/brand based loyalty program configurations are not available
- Multiple currencies are not supported across loyalty programs.
Updated 5 months ago