
OND 2022 | Engage+ Releases
Introducing Join Block in Journeys
Journeys is an engagement automation interface that enables you to create scenario based flows to nurture your customers throughout their lifecycle. It helps marketers identify the right course of action by creating multi-campaign flows, incentivizing customers, and engaging them via multi-channel personalized communication, all at one place. It helps businesses automate their Customer engagement flow.
Problem Description
At times, customers from different paths in a journey need to be redirected to a common path in the journey at a later stage.
Use case: Marketeer wants to give a 10& off coupon code to the customers who have registered on the mobile app and the customers who have registered on the website.
How are we solving this?
- We have introduced a Join block in Journeys which will help marketers to join or point the next path to any block in the entire journey.
- Essentially a marketeer will now be able to combine users from two or more paths into a single path.
- With Join block in place, marketeers need not replicate a flow in the journey again and again in different paths.

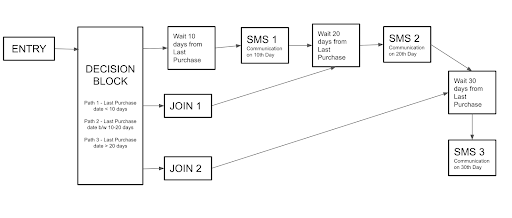
A journey workflow demonstrating the use of “Join” block
How to use a “Join” functionality?
Step 1: Wherever you want to join two paths, drag and drop the “Join” block available under “Flow control” building blocks
Step 2: Place this “Join” block after any of the paths you wish to join.
Step 3: Click on “Join” and configure the settings
Step 4: Select from the dropdown “Where do you want to join this path”
Step 5: After configuring the Join block, you can continue adding the required blocks as per the use case. Example: If you want to send 10% off to all users who registered on the app as well as those who have registered on the website, configure it in the following manner:

How to use “Join” block on Product UI
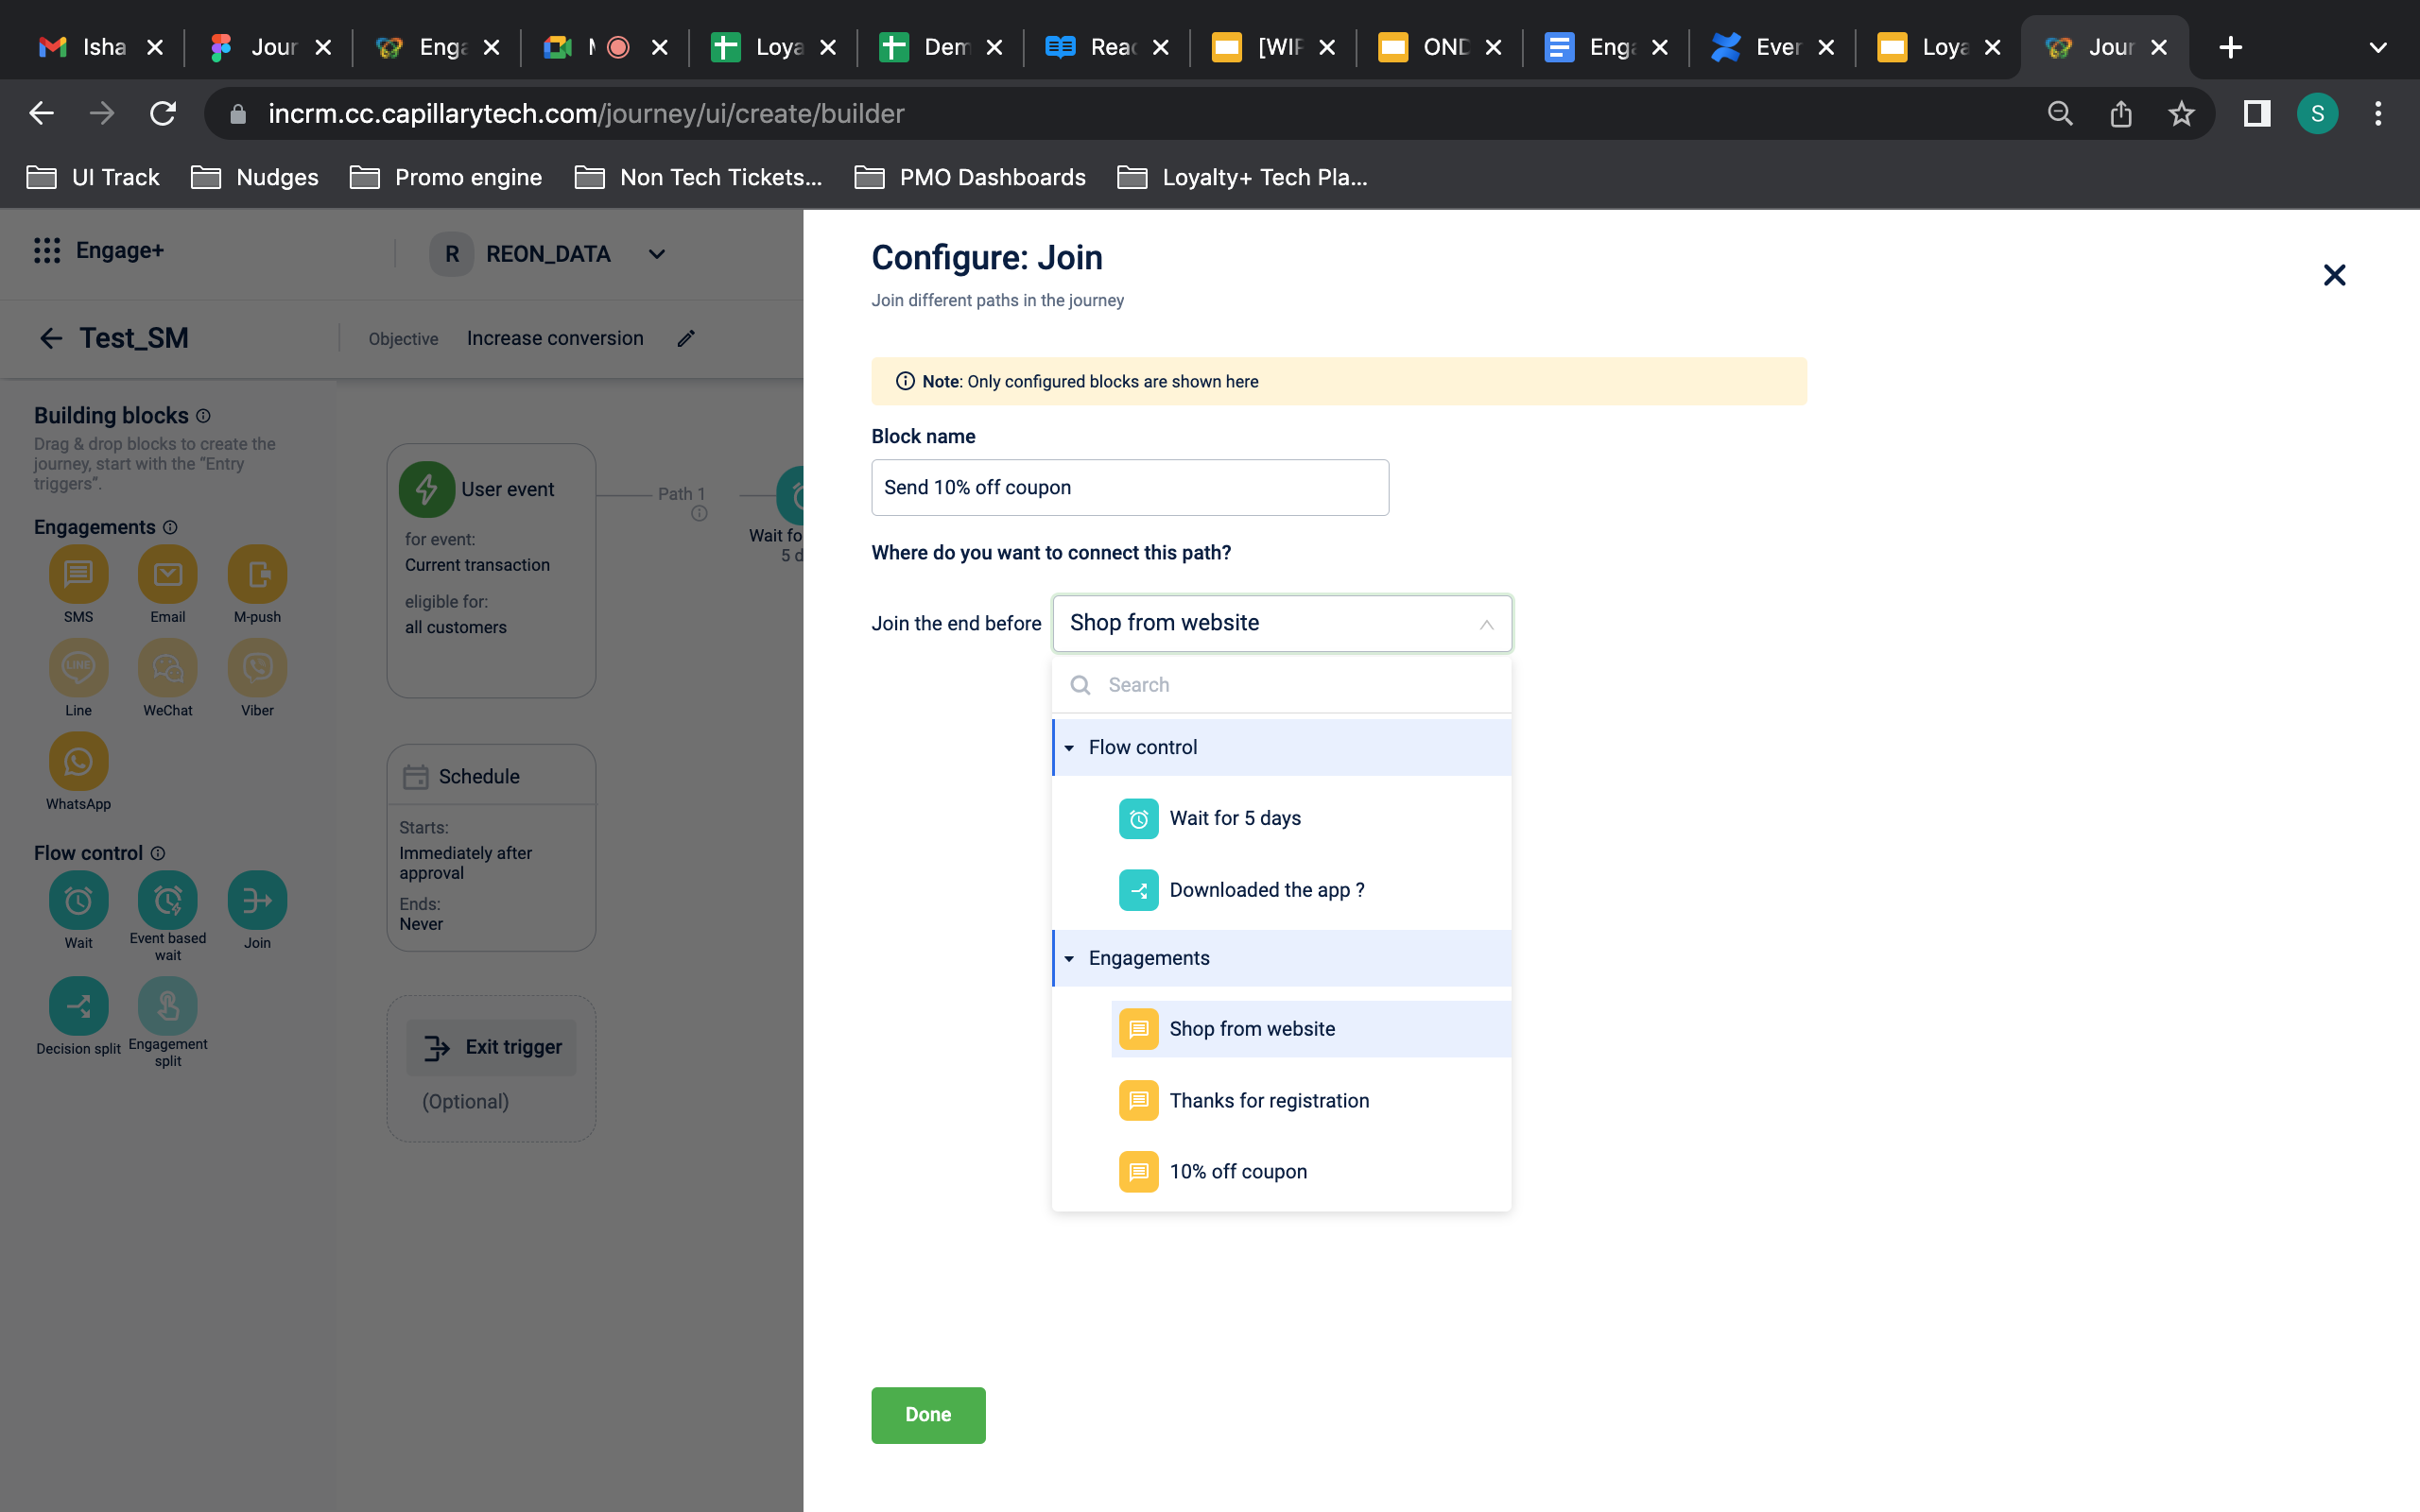
Configure “Join” block in a journey
Introduce "Wait since event" in Journeys
Problem Description
In some use cases, users want to take a desired action for the customer basis on their behavior in a point in time in past and not in future.
Use case 1: Marketeer wants to give a customer a 10% off coupon after the customer has completed 90 days since the last purchase date
Use case 2: Marketeer wants to give a customer a 10% off coupon after the customer has completed 5 days since the registration date
How are we solving this?
Wait Since Event block is a type of journey block which will help marketers to make a user wait in a specific block depending on the user’s past events.
User’s past events could be like - Registration, First or Last Purchase etc.
The Block will calculate the wait time dynamically for each user based user’s historical event date/time.
How to use the “Wait since” functionality?
Step 1: Whenever you want to enable a Wait time for any action based on the user’s past event, drag and drop the “Evant based wait” block from the “Flow control” building blocks
Step 2: Click on the block’s settings to configure the wait time
Step 3: Choose “Wait since event” under How do you want to specify the Wait time
Step 4: Specify the wait time and the event type from the dropdowns based on based on which you want to calculate the wait time
Example For Use Case 2: Wait for 5 days since Registration date from this block
A journey workflow demonstrating the use of “Wait Since” block
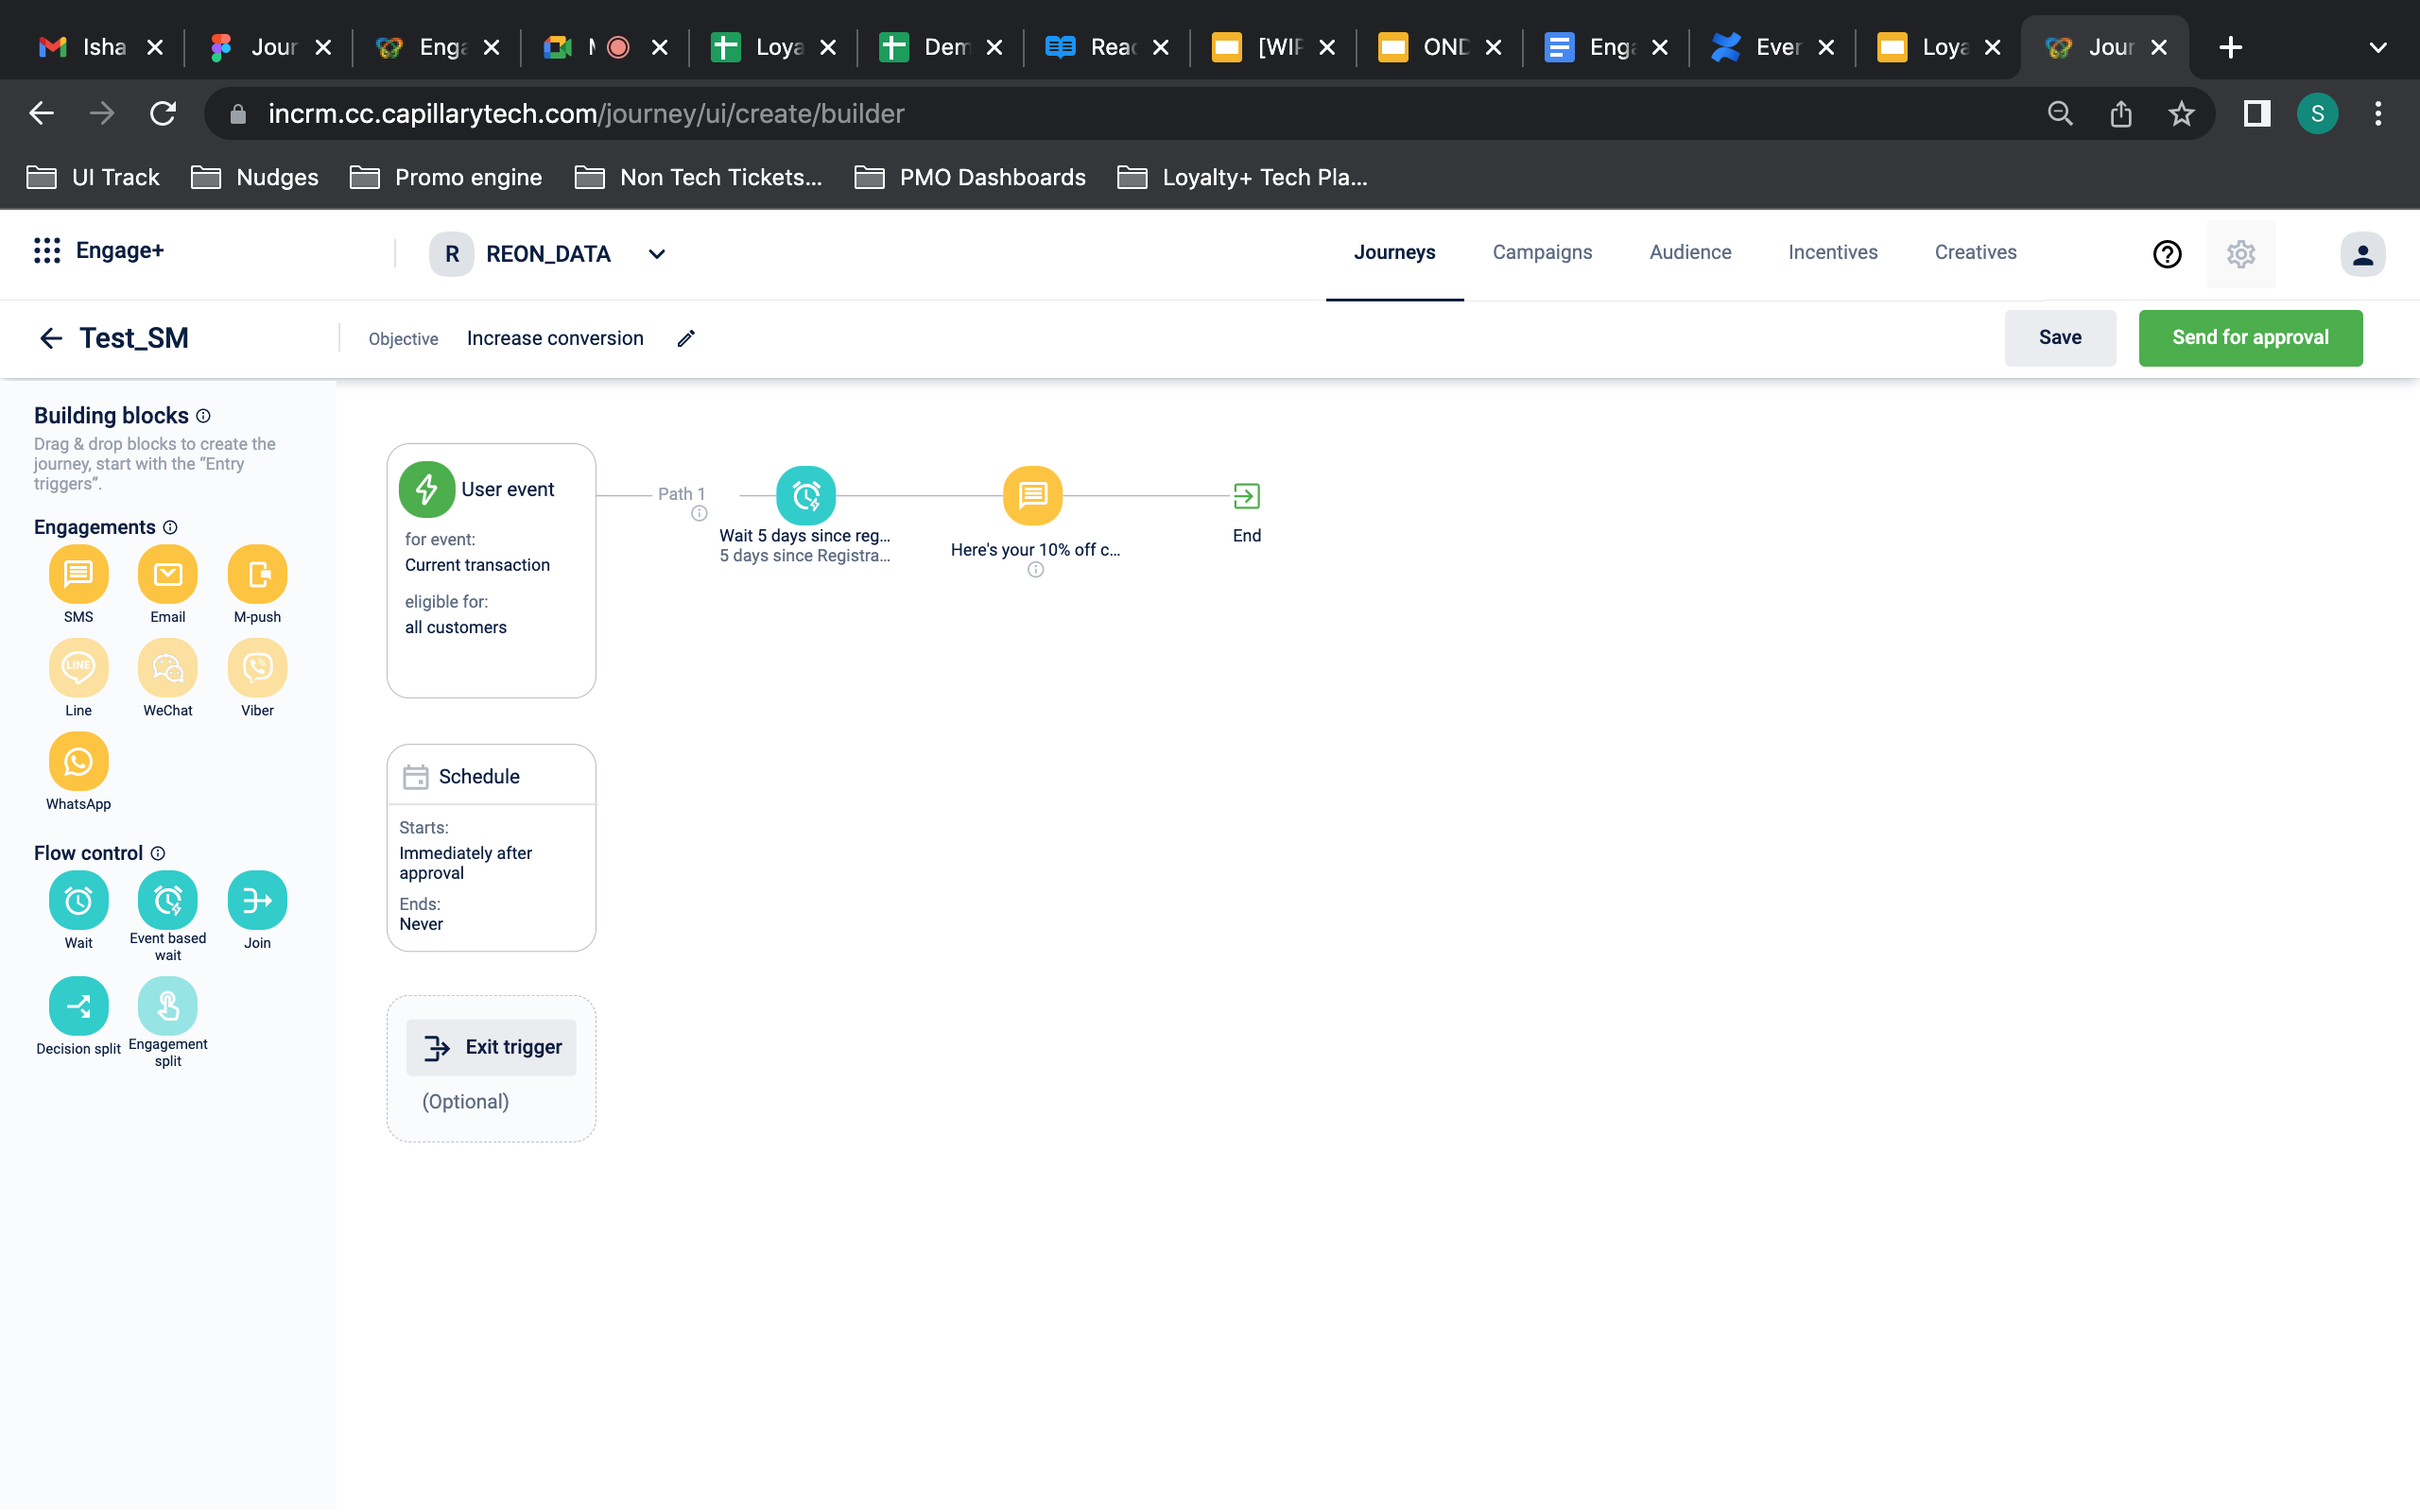
How to use “Event based wait” block on Product UI
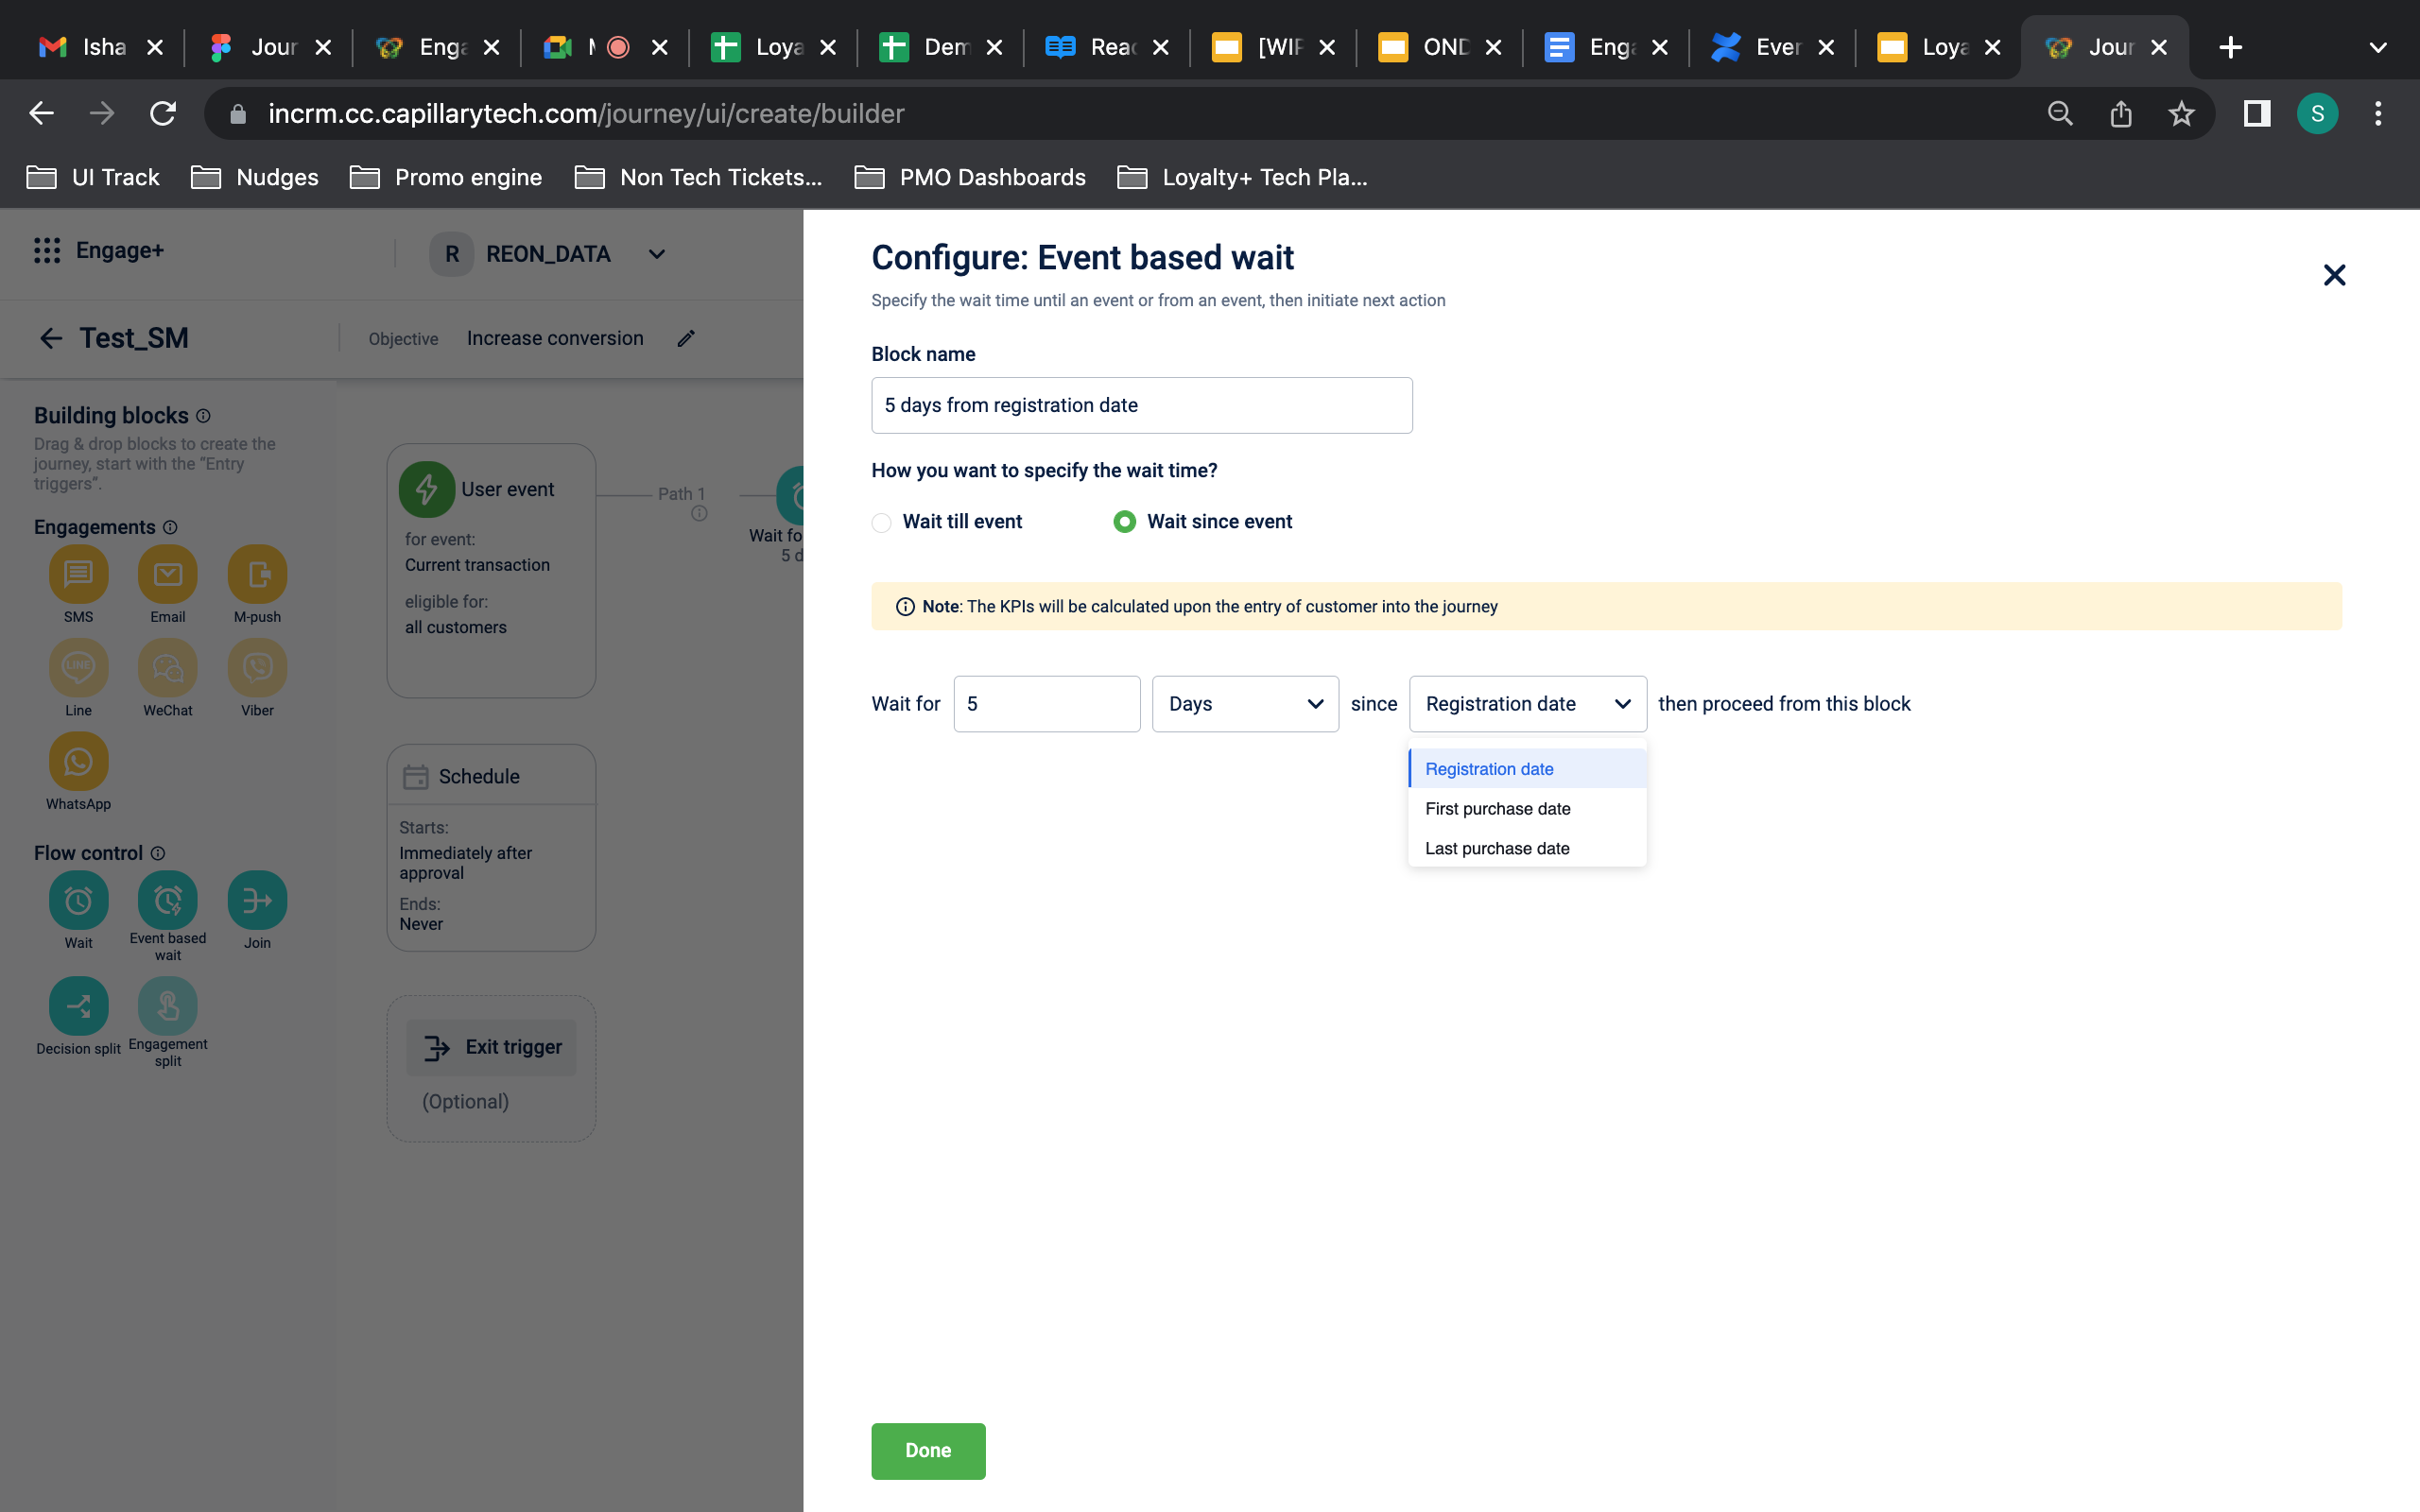
How to configure “Wait since” functionality on Product UI
Wait for Block Enhancement
Problem Description
In the “Wait” block, we only have an option to immediately send a message after waiting for a specific time.
But clients have additional requirements to reach out to the customer either after a specific time or to reach out to them on the nearest day and date.
Use Case 1:
After a user reaches a milestone, wait for 2 hours and send the communication on the nearest “Sunday”
Even if the nearest Sunday is 5 days away from the wait that user’s 2 hours wait post an event has been completed.
How are we solving this?
Wait block is enhanced to help marketers reach out to the customers at a specific time or on the Nearest date/ date.
We have dropdown options such as - immediately, At a specific time, on the nearest day & on the nearest date.
This enhancement will ensure that any communication to customers is going on preferred days such as weekends. Also ensures compliance with global mandates that customers should be reached only on certain days of the week/ date of the month.
How to configure this ?
Step 1: Wherever you want to define the Wait time, drag and drop the the “Wait” block from the Flow control building blocks.
Step 2: After dragging this Wait block, click on it to configure the settings.
Step 3: Select “Wait for a duration”
Step 4: Specify the wait time in Hours/Days/Week/Month/Years and then from the dropdown choose the desired options when you want a certain action to happen.
Step 5: From the dropdown, you can choose to trigger an action based on the specific time or day or a date. Within the day and date also, you may specify a fixed time for the action to take place.

How to configure “Wait for a duration” on Product UI
DVS Store support phase 1 Enhancements
- STRING data type (Customer External Id & Transaction number)
- Customer segment DST
Problem Description
Previously in Journeys, we used to support NUMBER and Product DST data type. However with new functionalities coming in, there was a requirement to support more data types.
Feature Description
-
Now we have added support for STRING (Customer external Id & Transaction number) & Customer segment DST data type in Entry trigger, Exit trigger, and Wait till event.
-
This is supported in entry trigger, exit trigger and wait till event of a journey.
-
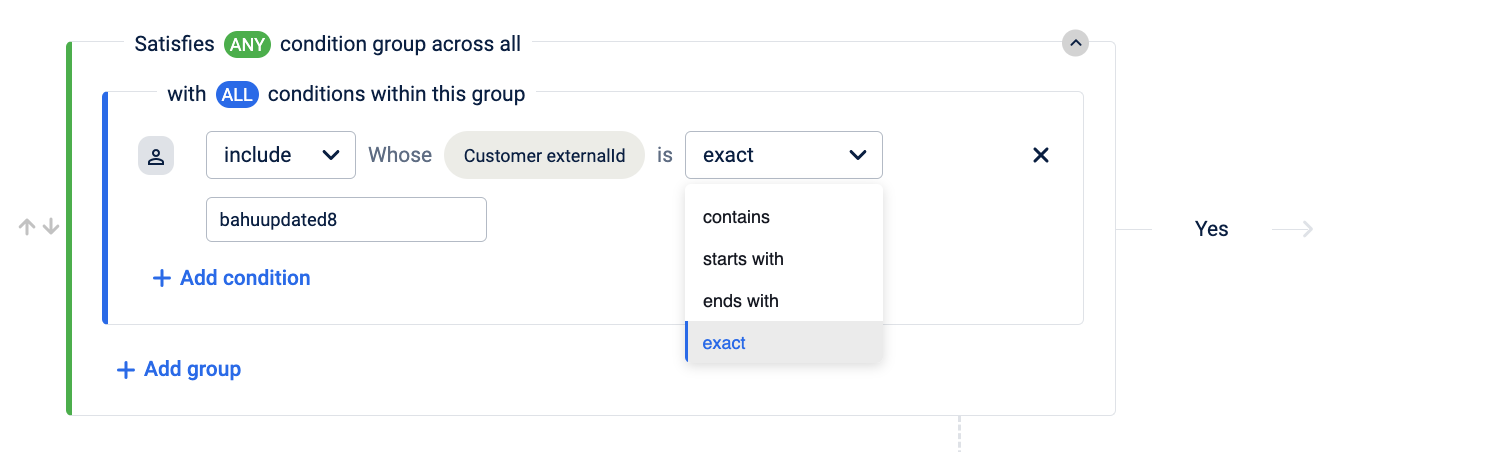
While selecting the entry path user will be able to select Customer external field, where one can include or exclude that particular external Id and we can also select the various matches such as - Contains, starts with, ends with and exact match.
There is a requirement to add a minimum of 3 characters here.
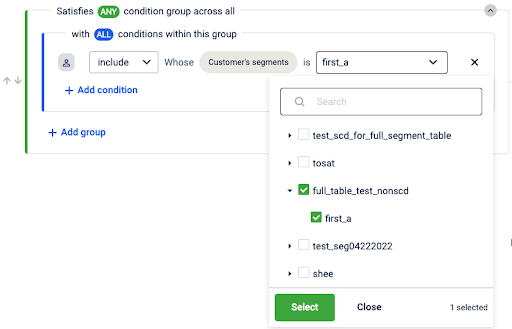
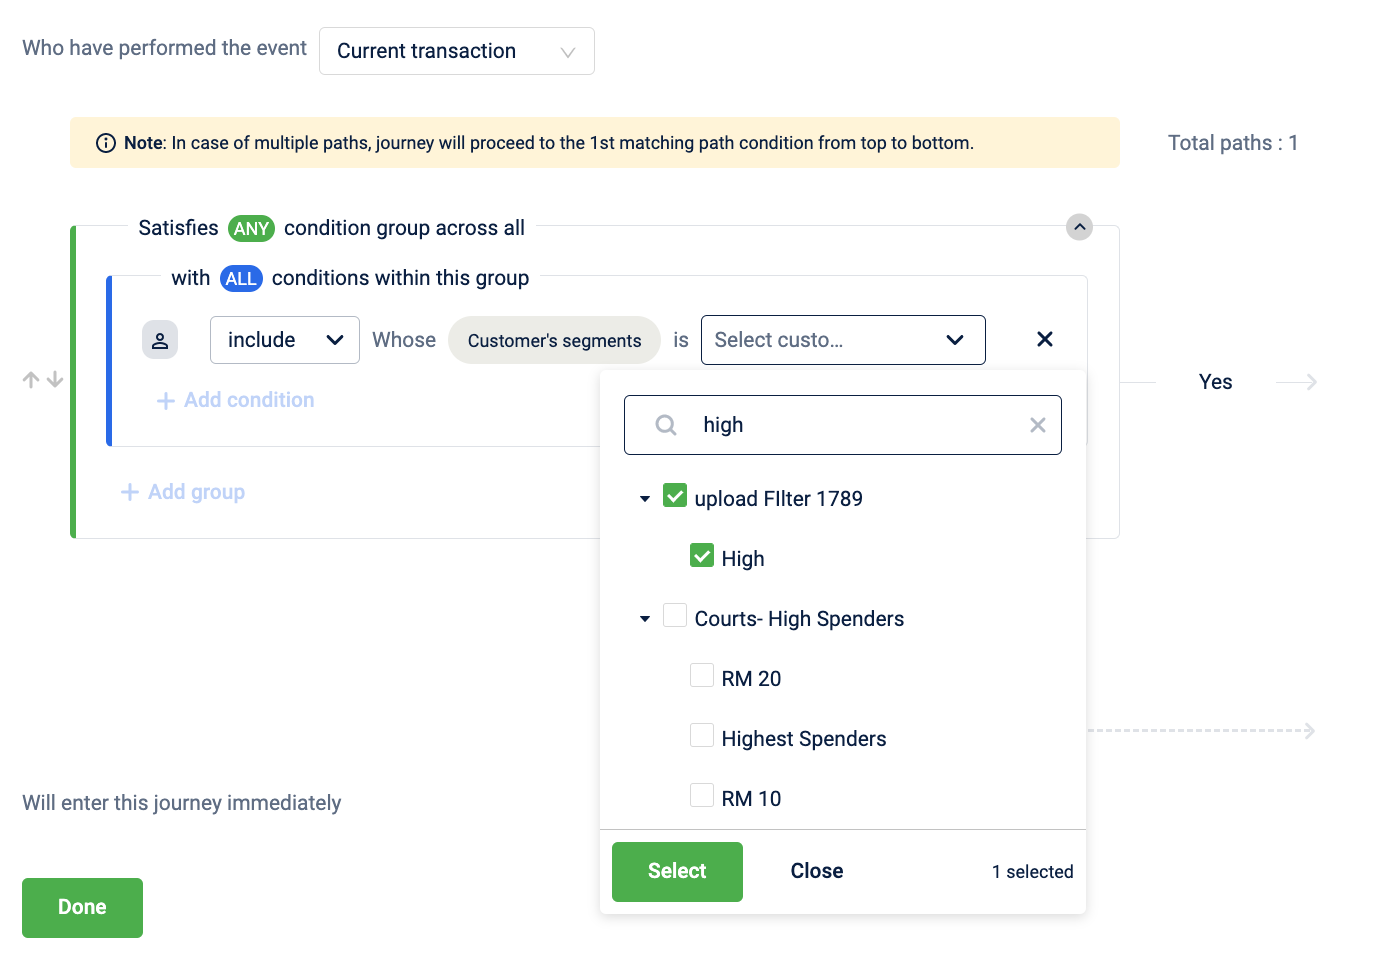
- While selecting the entry path, users will also be able to select the Customer segment where one will either be able to select multiple segments or a single segment.
Also, the search option is enabled to find the particular segment.
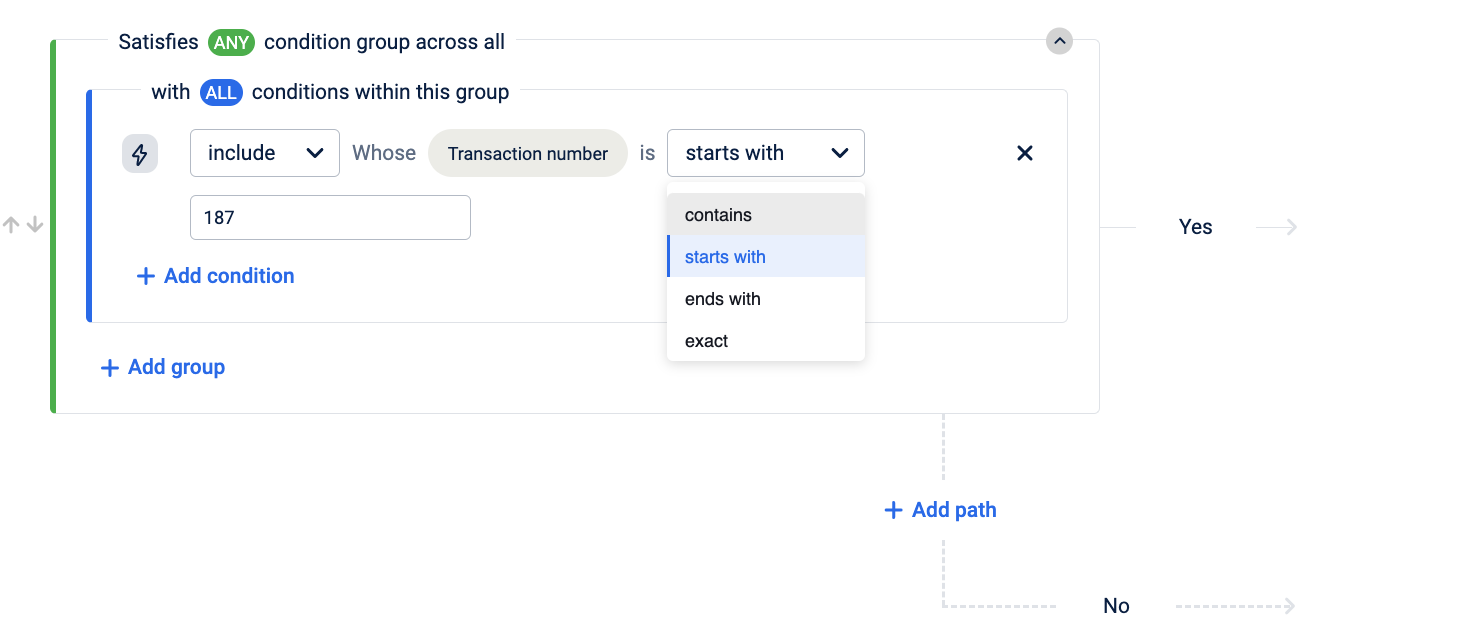
- Similarly user can also apply the condition for the Transaction number. Where one will be able to select the transaction no. with multiple conditions like start with, ends with, contain and exact transaction then let them enter the journey.
Link tracking support for dynamic link
Problem Description
Previously “SMS link tracking” option was not capable of handling the dynamic link generation.
Only the static part of the link was getting stored in the database i.e. the part without tags.
When the end user clicks to the url given in the SMS/Email, it redirects the user to the url which was stored in a database.
New Implementations
- The org which we are using should be present in the sms_link_track_org_status table and dynamic link tracking should be enabled for that org.
- The url that is passed by the client in the message body is stored in the email_links_redirection table.
- All the tags present in the url are extracted and added as a parameter to the url containing orgId, linkId(email_links_redirection table’s id) etc.
- This url is converted to tinyUrl if tinyUrl is enabled and is sent to the end user via the sms or email.
- When the users click on the url this goes to the internal-intouch-UI where using the link id the actual url is being extracted and the parameters are replaced by the actual value present in the url received
Before:
After:
Optimization Fixes
(I) Fairness in Tag Resolver Flow (Veneno)
Problem Description:
Previously while running large campaigns, the campaign execution queues used to pile up and the small campaign’s execution gets affected.
Solution:
After the optimization, the single queues were segregated into two queues and based on the number of users in the campaign the queue is being selected.
Impact of the fix:
Automation failures due to messages being stuck in the queue got resolved to post this optimization
(II) S3 cost optimization for the creatives email channel
Problem
Creatives email templates/other channels used to make S3 GET calls to fetch and load images, leading to high data transfer out to internet cost on S3 file service.
Solution
We have put all image links behind Cloudflare CDN coupled with image transformations to reduce S3 bandwidth usage.
Image size based quality applied to provide better balance between quality and compression.
Impact
S3 data-out cost reduction observed is ~$1100/month to ~$150/month
Cloudflare bandwidth consumed ~2.1TB/month (no extra cost over ACP package)
Cache-hit rate of ~97% on CDN and low latency during asset delivery since assets are served from nearest edge locations.
(III) Build time optimization
Problem Statement
As part of the Engineering Efficiency theme, we figured out the scope of build time improvements for our CRM React apps to boost developer efficiency and lower the waiting periods for dev builds.
Current webpack config based dev builds take 13-14 mins on average on Codebuild.
Build Time of React based UI apps were quite high
Campaigns UI and Reon UI build phase took upto ~700s and ~496s respectively.
Objective
To reduce the build time by ~50-60% thereby increasing developer productivity/efficiency.
Approaches considered:
- Webpack migration from v4 to v5
- Migrate to other build tools such as
esbuild - Improve upon the existing webpack v4 config for faster builds.
Finalizing the approach:
- Improve upon the existing webpack v4 config for faster builds
- Profile the build to identify the slowest steps and phases of the build process.
- Remove (and/or) replace redundant options and slowest parts of build process with better and faster alternatives.
Findings
Babel loader(transpilation), plugins and loaders for image and css pre-processing, terser plugin(optimization) were the main bottlenecks.
Considering the effort vs efficiency gains, we decided to take a mixed approach on webpack v4 while replacing bottlenecks with better alternatives including tools based on esbuild.
Major Changes:
- Removed Terser Plugin in Favour of Esbuild Minify Plugin. One of the fastest minifier.
- Hybrid combination of esbuild loader + babel loader. Babel loader is used for transpiling ui libraries where as all other transpilation is done by esbuild loader.
- Adopted thread-loader for speeding up transpilation done by babel-loader.
- Removal of image-webpack-loaders and brotli plugin that were doing some pre and post processing which didn’t have wider impact and benefit. Updation of css plugins to faster alternatives.
- Created separate cache groups for libraries and app code for better code splitting and chunk reuse.
- Minor CSS fixes and resolution of circular dependencies.
SDK
iOS
Version 0.1.0 (December 6, 2022)
Hydra core package release with Authentication flow
Updated 6 months ago