
Event notifications
Overview
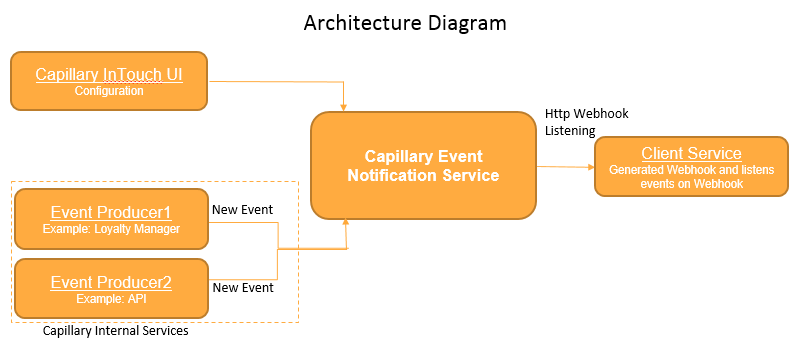
Event Notification allows building integrations with Capillary events that originate either through Capillary API (such as customerAdded and transactionAdded)requests or Capillary products such as Loyalty+ (such as pointsIssued and pointsRedeemed), Engage+ or others. Once an event notification is configured, brands can build custom solutions to trigger pre-configured actions.
Event Notifications are sent through Webhooks configured in Capillary Event Notifications. The following is the top-level diagram, of the Events Notification framework (ENS).
Use Cases
There are several use cases of event notifications. A couple of examples are provided in the following.
- Enable PII-less Communication
In some cases, brands prefer not to send customers' personally identifiable information (PII data) such as names, email IDs, and mobile numbers to Capillary and manage communication completely at their end. Event Notification can be used to get the events that require communication such as customer registration, transaction, points issual, points redemption, points transfer, etc. On receiving these events, clients can send communication to customers with their names and identifiers as needed.
- Integration with 3rd Party Applications
Event notification can be used to build integrations with 3rd party applications. For example, send a survey link to a customer post transaction event from a survey application such as Medallia; sync customer’s loyalty information to an e-commerce platform such as Magento. Integration can be built to receive real-time events, enrich information using Capillary APIs (if required), and sync it to the 3rd party application using the brand's APIs.
Steps involved in ENS set up
The following are the steps involved in the setup of the Event Notification Service (ENS) for a client.
- Webhook creation
Webhooks let you create an integration URL that is required to post events data from ENS to Webhook. Before starting with the configuration process, you need to create a Webhook account and generate a URL. The URL is further used to post events generated by the client (This can be done by creating an API proxy for API Gateway such as Apigee).
- Event Notification Configuration
Once you have the Webhook URL, you need to subscribe to the events that need to be notified. This can be done either through UI or API. For more details, see Add Event Notification
- Event Consumption
Once the setup is completed, the client can consume and process events data and use the data to configure actions to trigger. For more details see, Consuming event notification
Add Event Notification Account
Let you integrate a Webhook account into the Capillary system.
To create a new event notification, follow these steps.
- Log on to InTouch of your cluster and navigate to Profile icon > Organization Settings > Event Notifications.

- Click New notification.
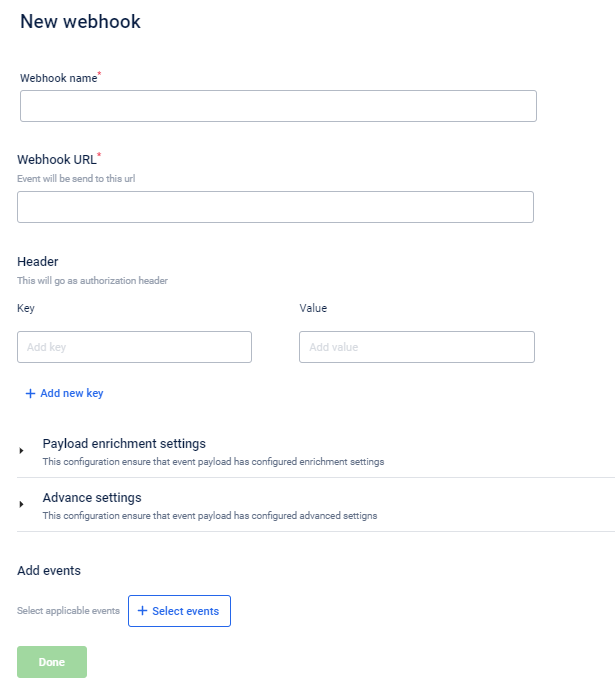
- In Webhook name, specify a name for the event notification.
- In Webhook URL, enter the Webhook URL that you want to associate with the event notification. To get a Webhook URL, you need to have a Webhook account. You can use the URL generated for the account to configure event notifications.
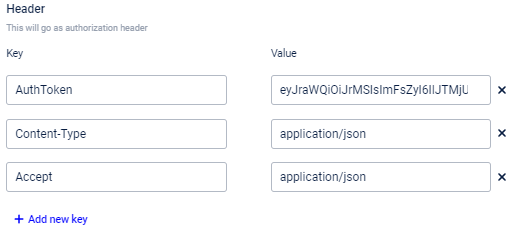
- In Header, enter the required headers (for integration authentication) as keys and values required to authenticate event notification.
- In Payload enrichment settings, select the entries that you want to capture in the current notification. This provides better data enrichment by including the selected entry parameters in the payload.
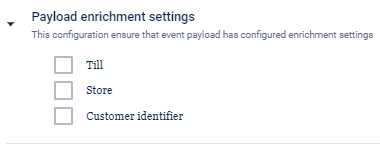
- Select Till to capture till details - till data enrichment. The payload will contain till details such as till code, till name, and till ID.
- Select Store to capture store details - store data enrichment. The payload will contain store details such as store name, store ID, store code, and store external ID.
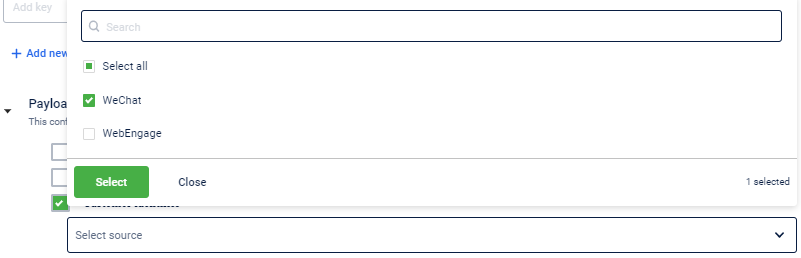
- Select Customer identifier to capture customer identifiers according to the selected source - customer data enrichment. You will see the Source drop-down as shown in the following screenshots. Select the source identifier that you want to capture.

- In Advanced Settings, you can configure the following.

- Maximum allowed connections: Set the maximum number of concurrent webhook calls that could be allowed.
- Delivery SLA (in seconds): Set the expected delivery time of the event notification in seconds. This is used to track notifications that took more time than the SLA set.
- In Add Events, click + Select events to add events to the notification and click Done. Use the Search box to easily find the event.
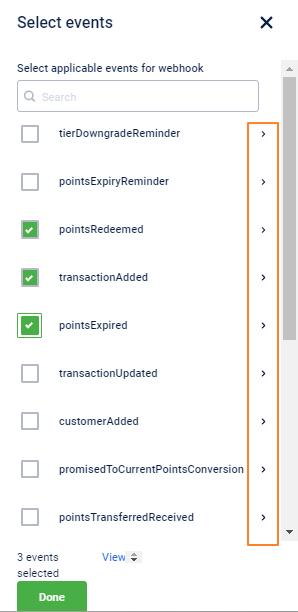
* To see the payload of a specific event click the respective > icon (highlighted in the preceding screenshot).{ "allOf": [ { "$ref": "commonEvent.json" } ], "javaInterfaces": [ "com.capillary.eventNotification.bo.BaseEvent" ], "$schema": "http://json-schema.org/draft-06/schema#", "extends": { "$ref": "commonEvent.json" }, "name": "pointsExpired", "description": "Schema for Points Expired", "type": "object", "properties": { "eventName": { "type": "string", "default": "pointsExpired" }, "data": { "javaType": "com.capillary.eventNotification.bo.PointsExpiredAttributes", "type": "object", "required": [ "customerIdentifiers" ], "properties": { "customerIdentifiers": { "$ref": "internal/customer.json" }, "triggeringActivity": { "$ref": "internal/triggerActivity.json" }, "loyaltyProgramId": { "type": "integer" }, "pointsExpired": { "type": "number" } } } }}Edit/Delete Event Notification
You can modify an existing event notification to change headers, Webhook URLs, and add or remove events.
Edit event notification
To modify an event notification, follow these steps.
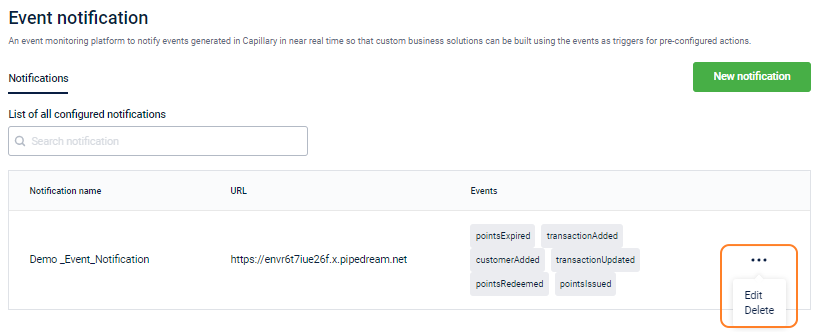
- On the Events Notification page, scroll to the event notification that you want to modify. You can use the Search box if the list is too long
- Hover on the ... icon and click Edit.
- Modify the required fields and click Save.
Option | Description |
|---|---|
Webhook URL | Enter the Webhook URL that you want to associate with the event notification. |
Header (Key, Value) | Enter the required headers as keys and values. |
Add Events | Select the events to notify. |
You cannot modify an event name.
Delete event notification
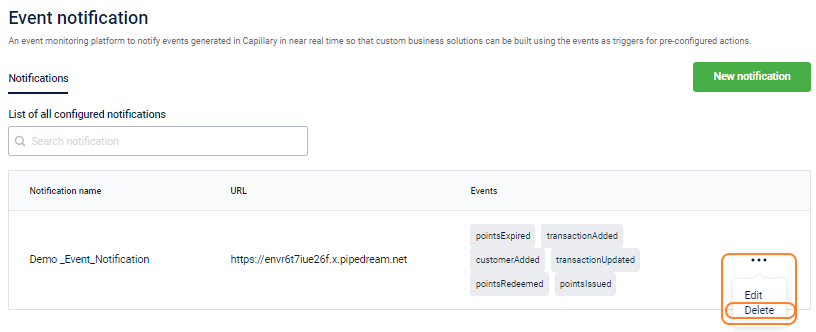
To delete an event notification, ... icon of the event notification that you want to delete.
Click Delete.
Consuming Event Notifications
Authentication
Every event is sent with the Webhook’s configured authentication header which can be used for integration to authenticate the Webhook.
Events Replay
To ensure events deliver to the Webhook’s configured URL, Event Notification waits for a successful response from the server for 30 seconds. If no response is received, the event is marked as timed-out. Timed-out events are replayed continuously until success for 24 hours.
Replay(s) is attempted when a 5xx error response is received from the server or integration backend.
Events are not replayed if a 4xx error response is received.
Idempotency Check
A timed-out event is an event that is received by the server, but a successful response is not sent back to Capillary. The event is again sent to the Webhook URL. Hence, Hence, the integration backend or server should be able to handle the same event multiple times.
A duplicate event can be identified by the “eventId” parameter in the event payload:
{
"eventName": “customerAdded”,
"eventId": “GSjhsJ87484SdghD4747”,
“orgId”: 1655
“refId”: “1655_684494987”,
“apiRequestId”: “sdjsj78378d3287”,
"createdAt": 156474848484,
}
If there is a duplicate eventId, the event should be ignored.
Data Enrichment
Event payload contains short and optimal information. It does not contain complete information about its entities. For example, a transaction event contains identifiers and basic transaction information but does not contain other information such as custom fields, extended fields, or line item level information. To get complete information about an entity, you need to use the respective APIs.
Refer to Event Payload to view the list of events and fields that are sent in the event notification.
Change Data Capture
Update events such as customerUpdated, and transactionUpdated only notify that some update has occurred in the associated entities, but does not contain information about the change in the entities. To identify the exact change, the integration service needs to call the respective APIs.
Updated 6 months ago