
Create a Cart Promotion
You can build a cart promotion by following this guided workflow. Define the metadata, conditions, and benefits of your promotion, then apply specific limits to ensure it reaches the right audience at the right time.
This guide provides a step-by-step walkthrough of the entire cart promotion lifecycle, from initial qualification triggers to redemption conditions and automated customer communication.
Step 1: Defining the promotion details
Start by defining the promotion's basic identification and the active window for your campaign.
-
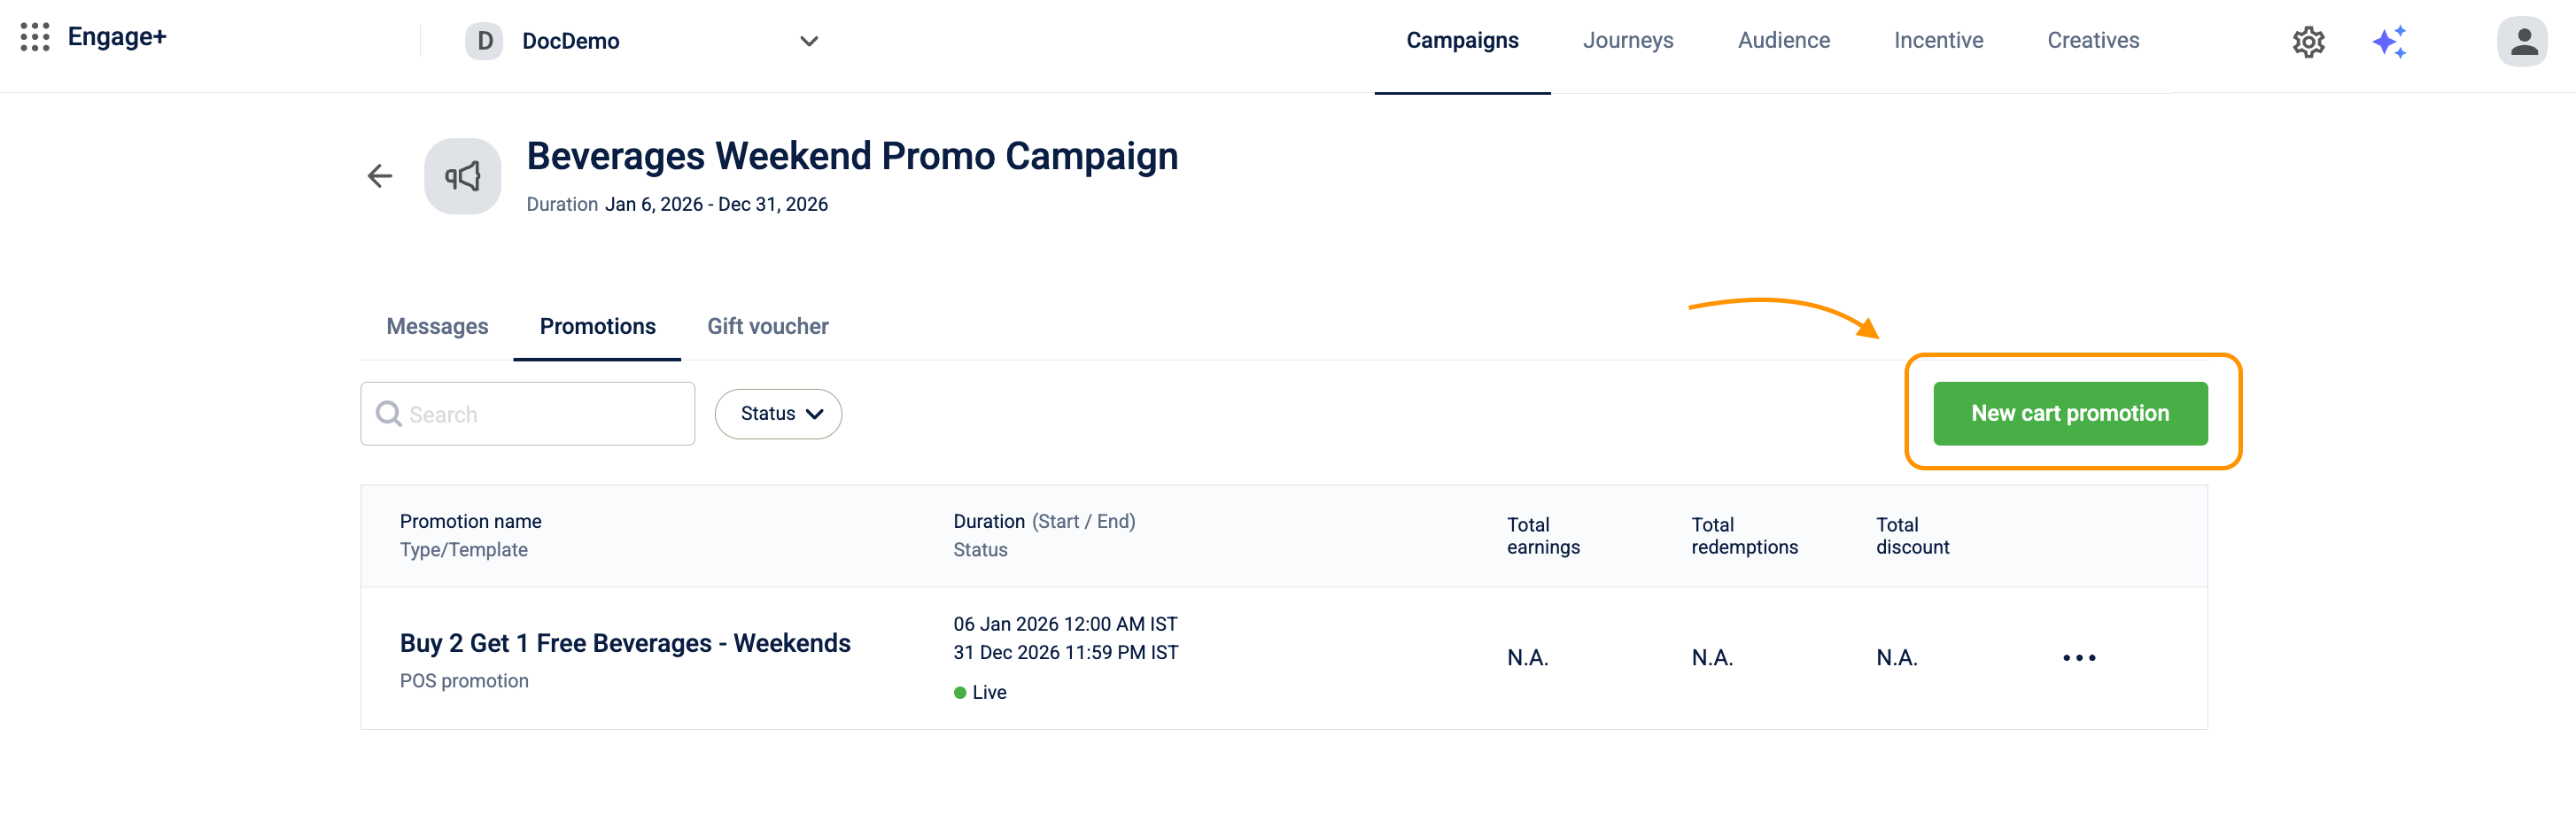
Go to Engage+, open the campaign where you want to create the promotion, and navigate to the Promotions tab.
-
Select New cart promotion.
-
In the Promotion Name box, enter a unique name. The name must be unique across your organisation and can be up to 50 characters.
-
In the Description box, outline the business case or key configuration details for internal reference. The description can be up to 200 characters and is for internal use only — it is not shown to customers.
-
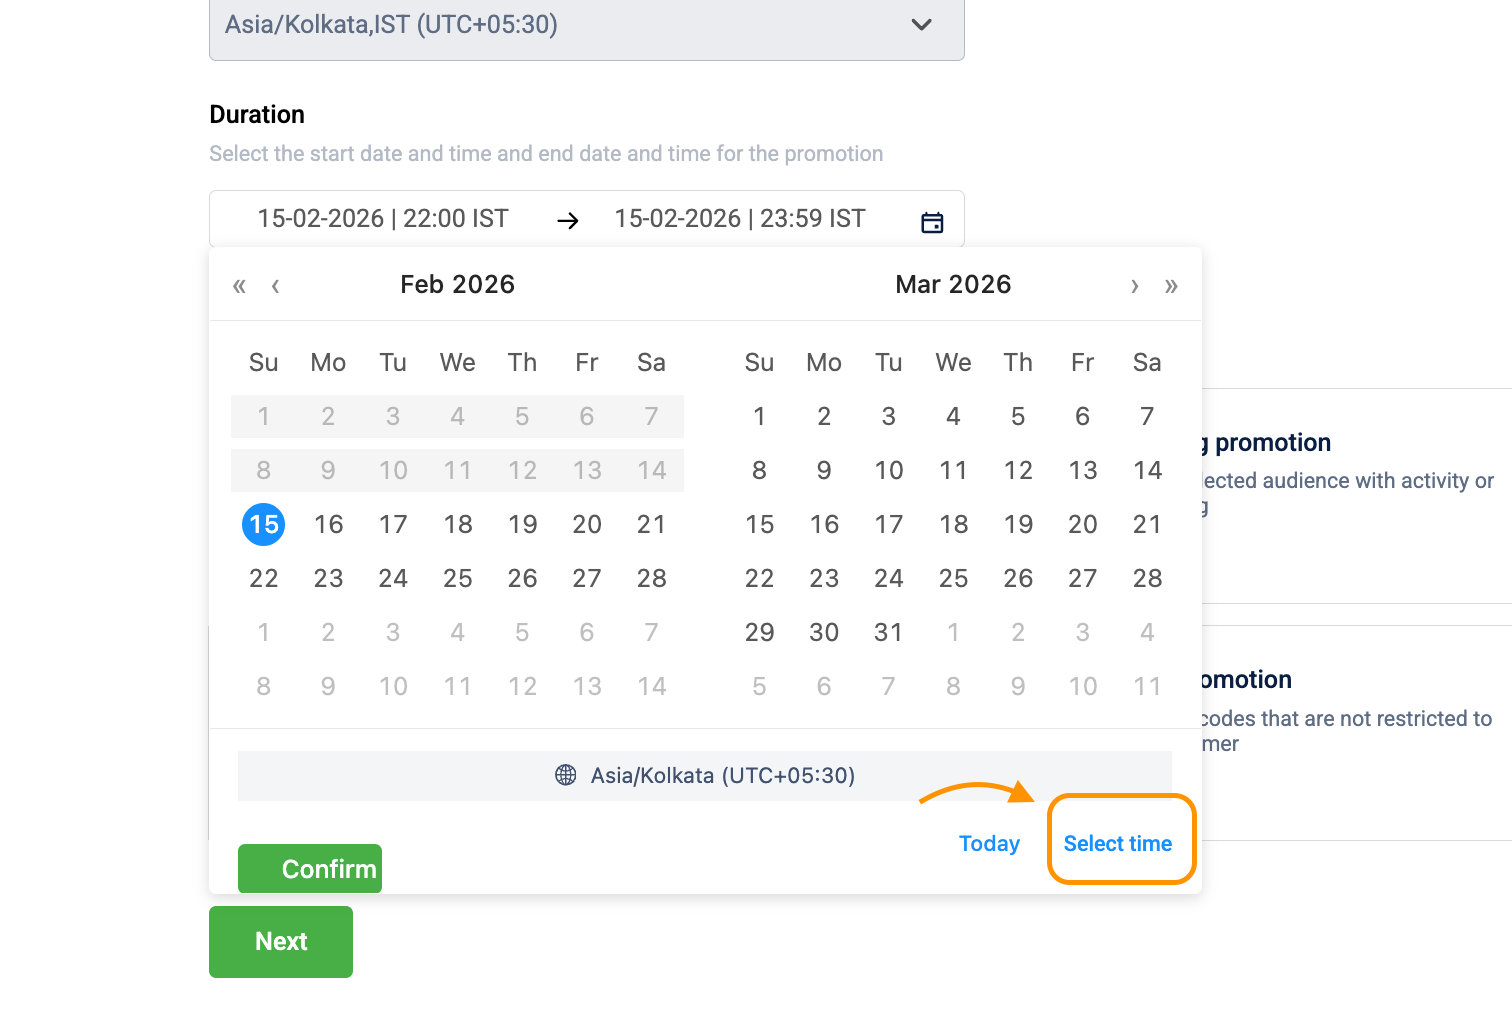
In the Duration box, select the start and end date
-
You can select specific hours for the promotion by selecting the Time box at the bottom of the date picker. The duration will be based on your organization's timezone.
- Under Promotion type, select a specific structure based on your goal:

- Toggle Customer Activation Required to Enabled to issue the promotion in a deactivated state. The customer must manually activate it via the app or website before it applies at checkout. This is available for Loyalty promotion, Loyalty earning promotion, and Rewards promotion only.
- Select Continue.
Not all steps appear for every promotion type. The steps that appear depend on how the promotion is issued and redeemed. Promotion types that apply automatically or via a code entry do not require an earning configuration, so the workflow skips Step 2. Promotion types that do not support communication triggers skip Step 7.
Promotion type Steps included Loyalty promotion 1, 3, 4, 5, 6, 7, 8 Loyalty earning promotion 1, 2, 3, 4, 5, 6, 7, 8 POS promotion 1, 3, 5, 6 Rewards promotion 1, 2, 3, 4, 5, 6, 7, 8 Code linked promotion 1, 3, 5, 6 Step 2 (Configuring promotion earning) only appears for Loyalty earning promotion and Rewards promotion because these are the only types where the customer must first complete an action or spend points before the promotion becomes available to them.
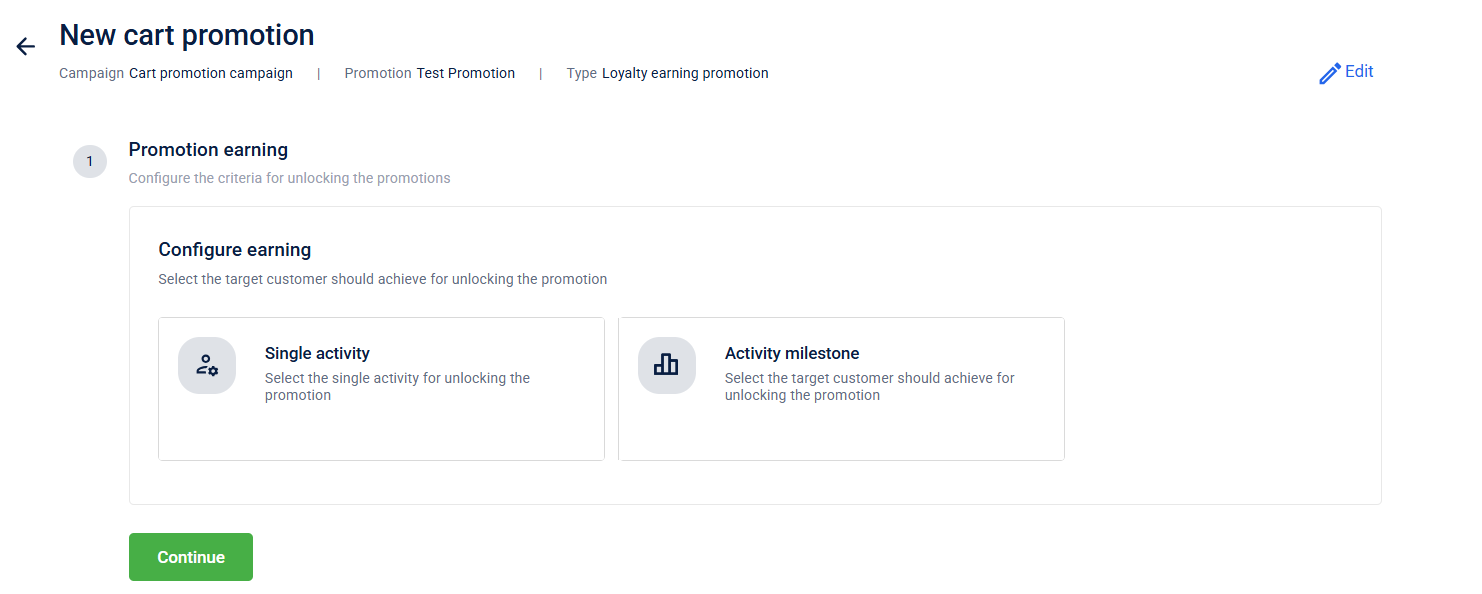
Step 2: Configuring promotion earning
Promotion Earning defines the specific triggers required for a customer to qualify for and "unlock" a promotion. While standard POS promotions apply automatically based on cart contents, earning-based promotions, such as Loyalty Earning and Rewards Promotions, require a specific set of actions before the benefit becomes available for redemption at the point of sale.
Loyalty earning cart promotion
Under Loyalty Earning Cart Promotion, there are two types of earning cart promotion: Single Activity and Activity Milestone.
Single activity-based promotion
A Single activity-based promotion allows you to reward customers for a one-time specific action, such as joining your program or completing a purchase.
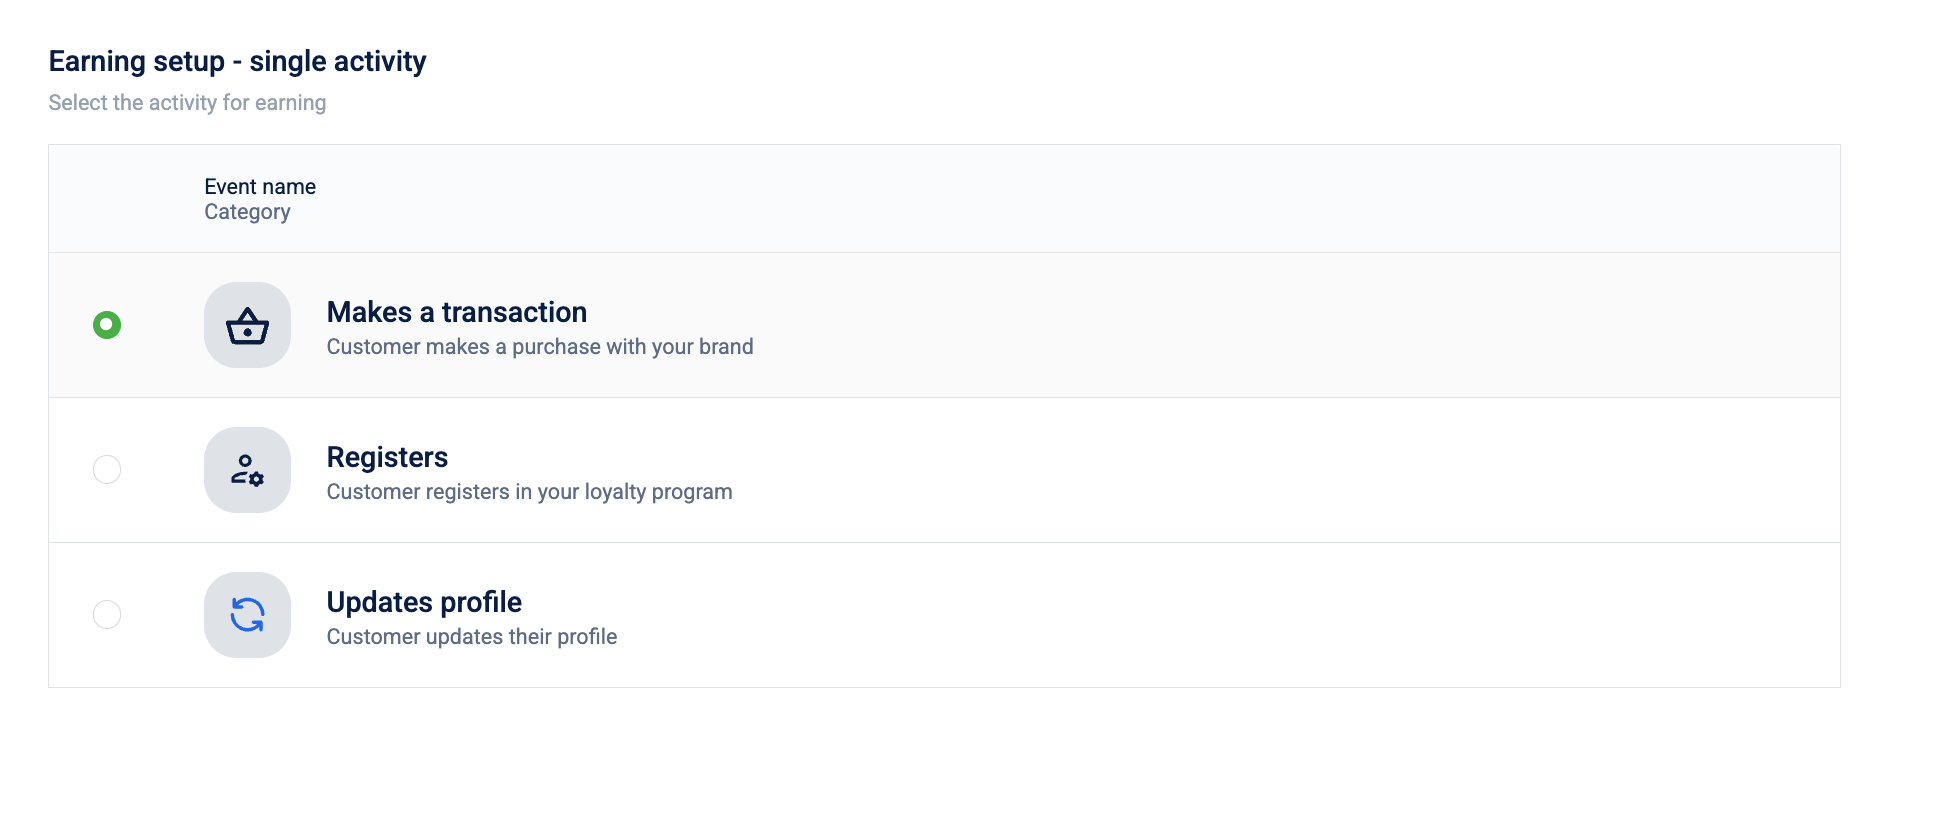
To configure promotion earning based on a Single activity, follow these steps:
- Select the activity that the target customer should achieve to earn promotion
| Option | Description |
|---|---|
| Makes a transaction | Customer makes a purchase with your brand |
| Registers | Customer registers in your loyalty program |
| Updates profile | Customer updates their profile |
- Define the scope of the promotion.
Specify where the promotion should run by limiting it to specific store entities: Concepts, Stores, or Zones. so only customers transacting in those selected entities are eligible for the offer.
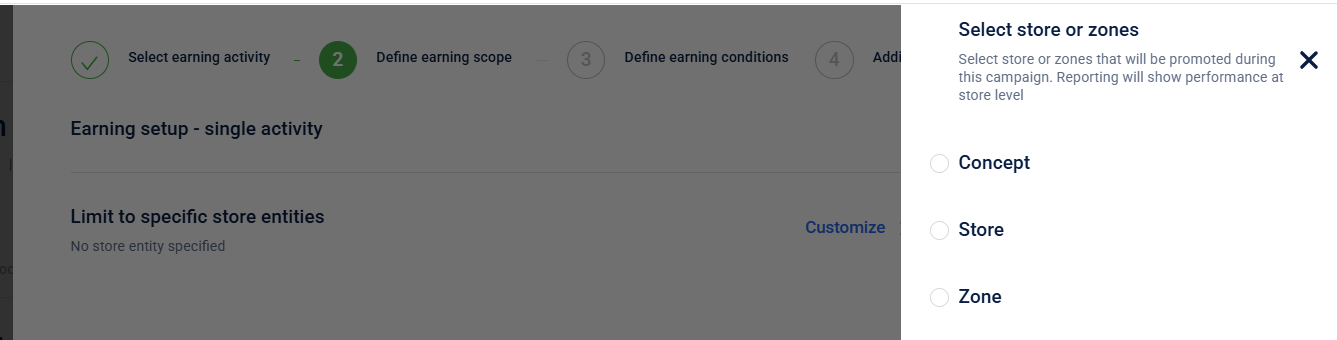
- Concept – A logical grouping of stores, typically by brand or business line, for example, groceries, electronics, apparel.
- Store – A physical or operational outlet (branch) that belongs to one concept and is mapped to one or more zones.
- Zone – A geographical grouping of stores used for regional structuring, categorization, and reporting, for example, India-North, Bangalore-East.
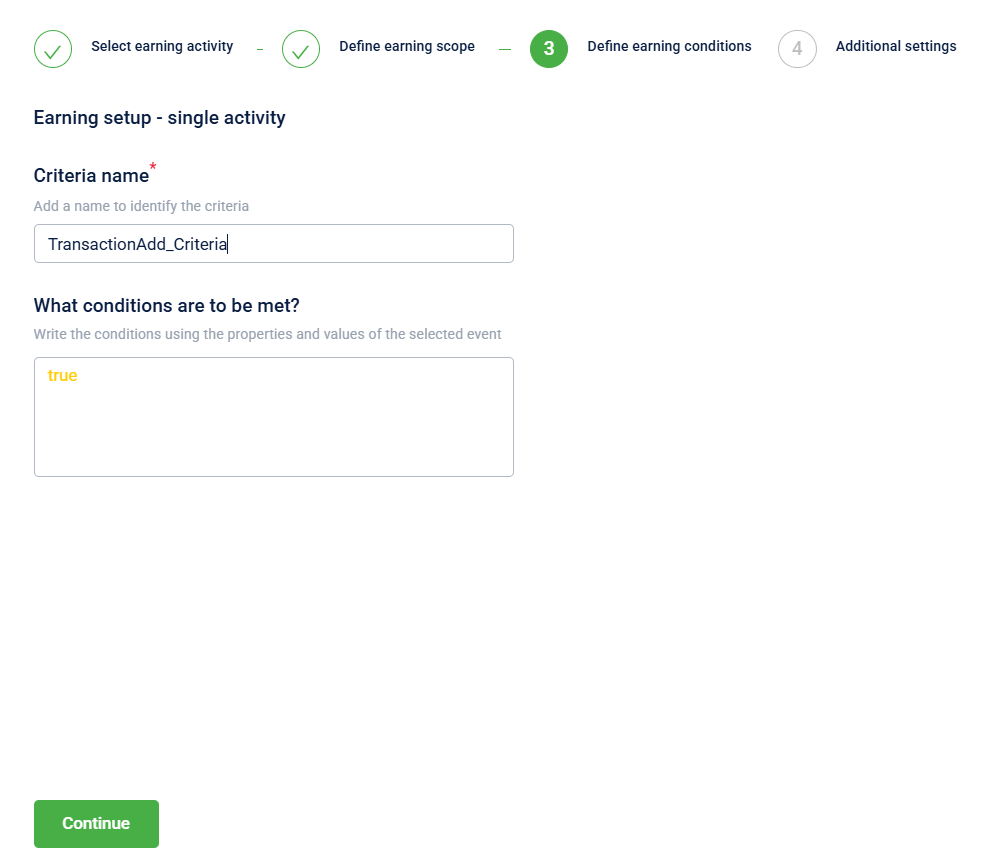
- Define the earning conditions for the cart promotion.
Specify the earning conditions for the cart promotion by specifying what conditions must be true, for example, attributes or behaviors, so that the customer becomes eligible to earn this promotion.
The fields are as follows:
| What conditions are to be met? | Condition to be evaluated. For more information, refer to the document on Profiles. |
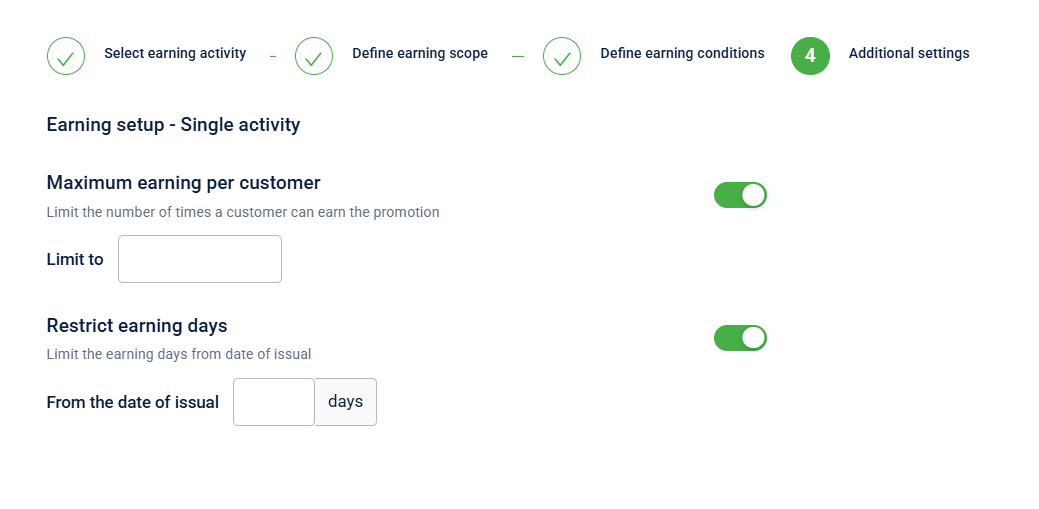
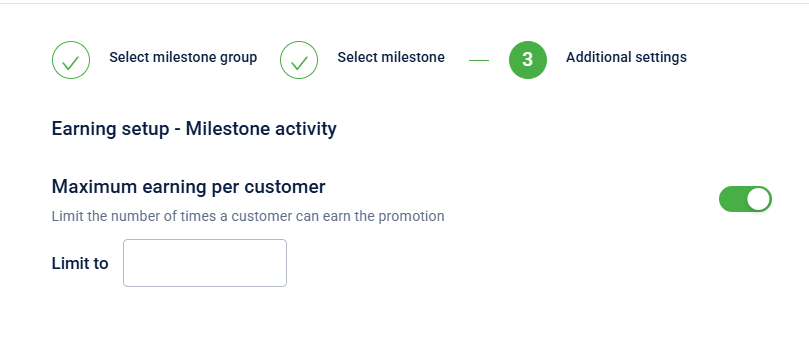
- Define the additional settings for the cart promotion.
| Field | Description |
|---|---|
| Maximum earning per customer | Limit the number of times a customer can earn this promotion. Enable the toggle and enter the maximum count in the Limit to field. |
| Restrict earning days | Limit the earning window from the date of issual. Enable the toggle and enter the number of days in the From the date of issual field. |
Activity milestone-based earning
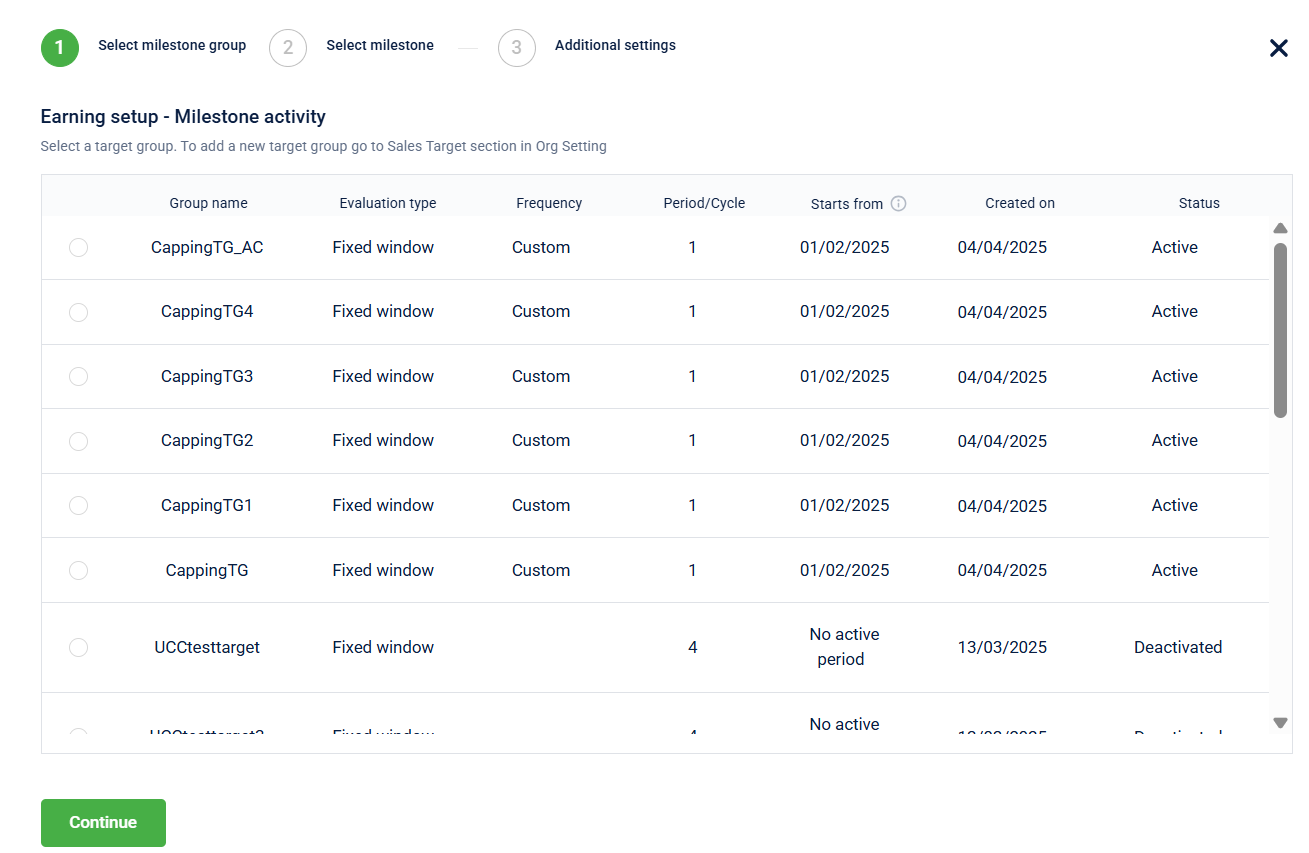
Activity milestone-based earning lets you reward customers only after they complete a predefined milestone. You can specify a milestone group or choose a specific target to be achieved, and also limit how many times each customer can earn the cart promotion.
To configure this: In the Configure Earning section, select Activity Milestone.
- Under Select Milestone Group, choose the milestone group. Refer to the documentation for more information on Milestones.
- Select the target that should be achieved by the audience group to earn promotion
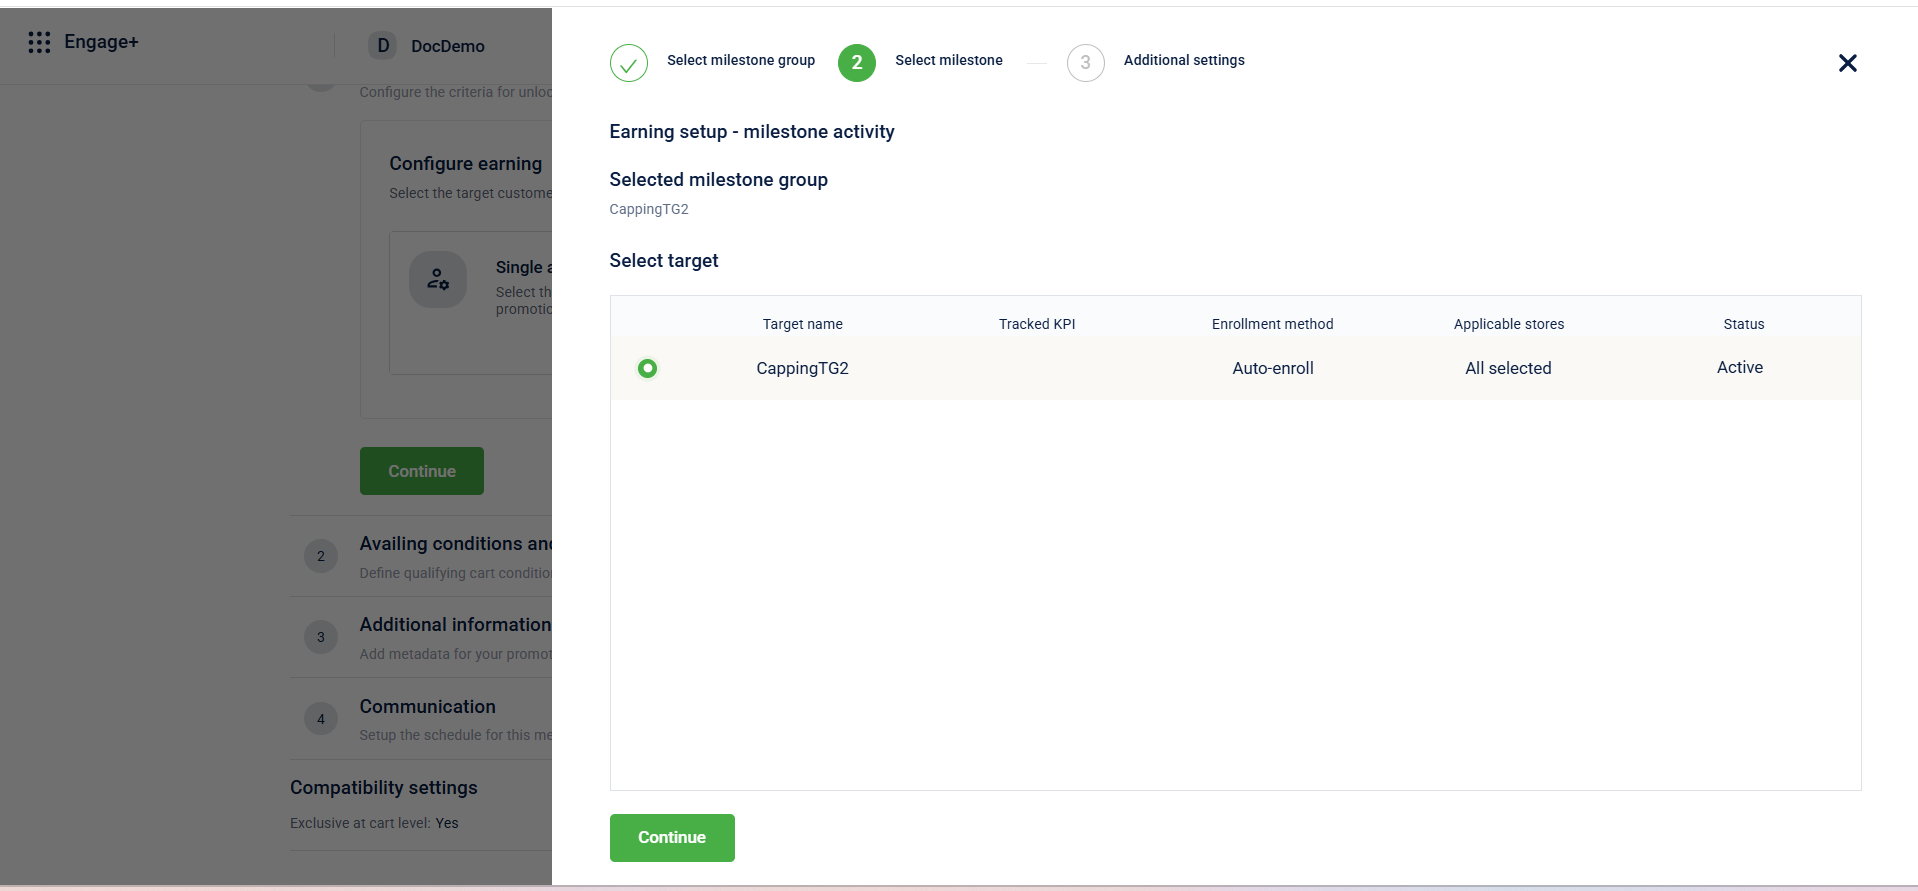
- Enable the toggle under Maximum earning per customer and add the maximum times a customer can earn the cart promotion.
Rewards cart promotion
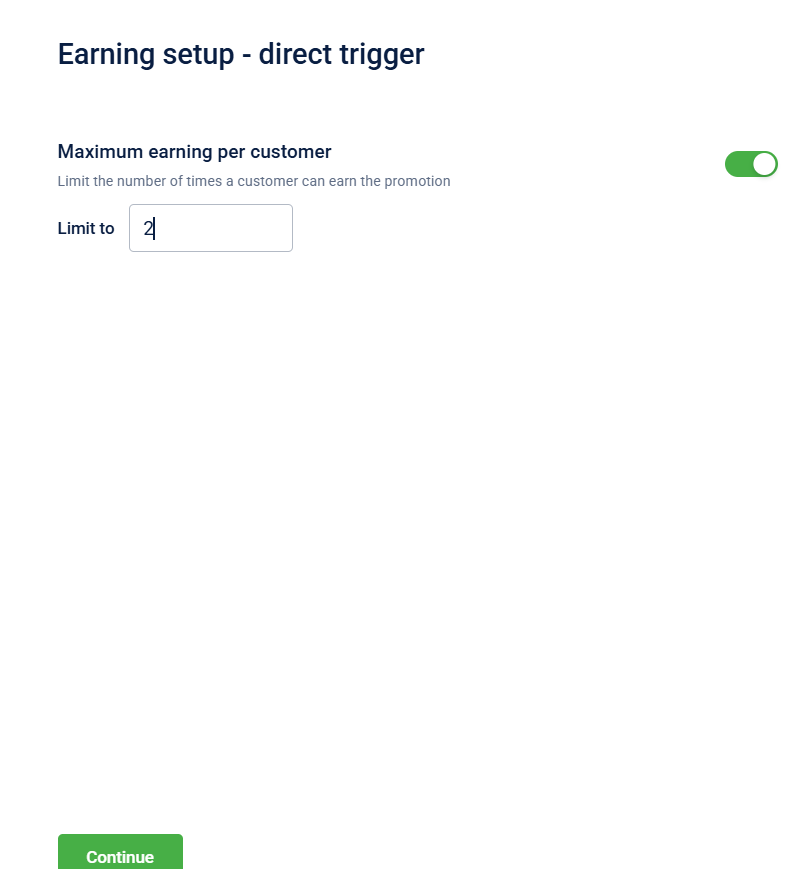
Rewards cart promotion lets you automatically issue benefit-based cart promotions when customers meet predefined behaviors or preferences, using a direct trigger and optional per-customer earning limits to control how many times the benefit can be earned.
- Select Direct trigger to automatically issue the promotion based on predefined customer behaviors or preferences—no manual action is required from the customer.
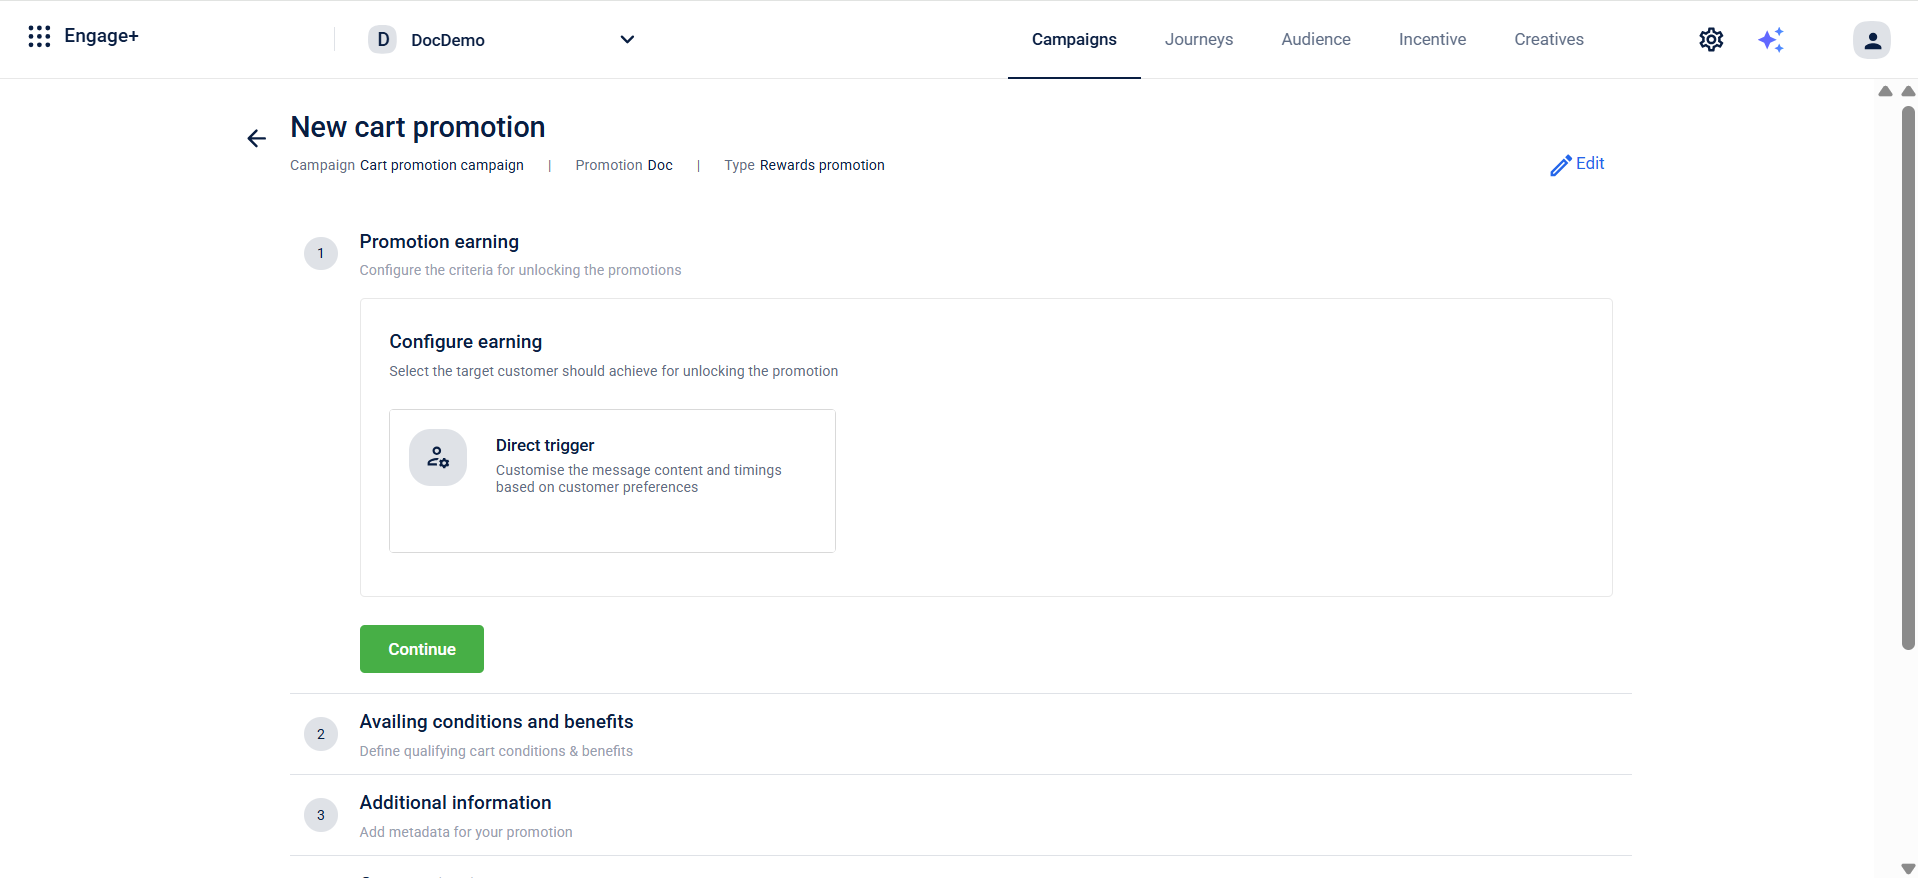
- You can define the maximum earnings per customer that will limit the number of times a customer can earn the promotion.
- Select Continue.
You have successfully configured the promotion earning; now proceed to Step 3 to define the cart conditions.
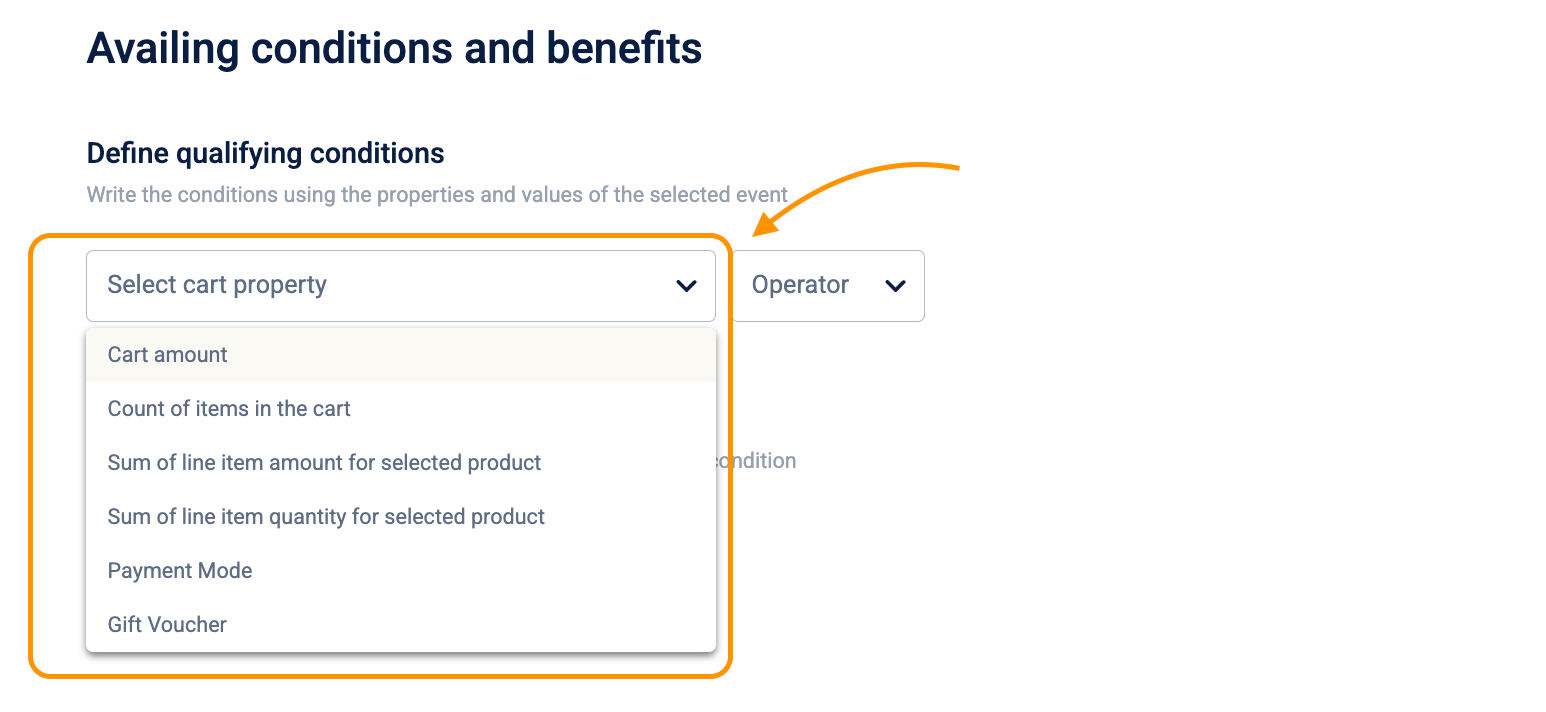
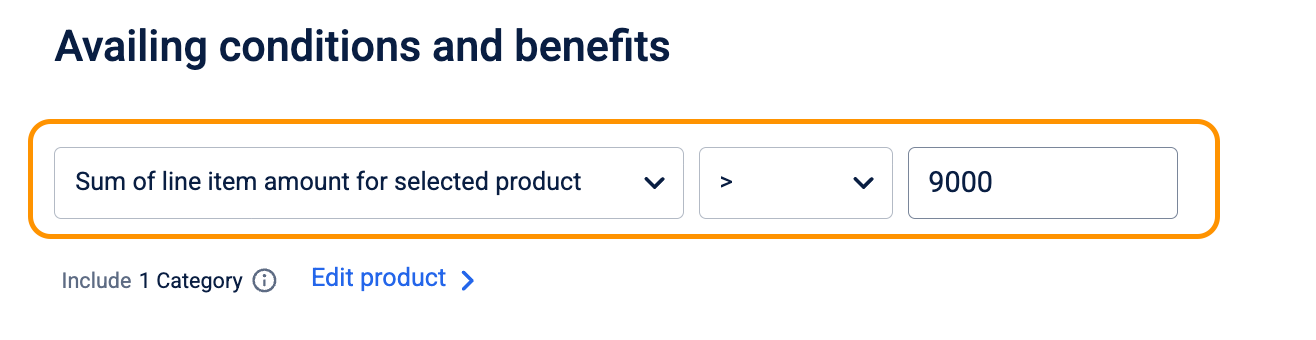
Here, you can specify the cart rules, such as cart amount, item counts, product-level sums, payment modes, or gift vouchers, that can be configured as earning criteria for the promotion's benefit to be applied.
| Cart Property | Detailed Description | Example |
|---|---|---|
| Cart Amount | Evaluates the Total Gross Value of the cart (before tax/discounts). | Spend More, Save More: "Shop for $500 or more to unlock a 10% discount." Operator: >= · Value: 500 |
| Count of Items | Counts the total number of distinct items (SKUs) in the cart. | Volume Driver: "Buy any 5 items and get the cheapest one free." Operator: >= · Value: 5 |
| Sum of Line Item Amount | Calculates the total price of only the selected products, ignoring others. | Category Target: "Spend $1000 on Denim to get a free belt." Scope: Category=Denim · Operator: >= · Value: 1000 |
| Sum of Line Item Quantity | Counts total units for only selected products. Ideal for bundles. | Bundle Offer: "Buy any 3 T-Shirts for a bundle price." Scope: Category=T-Shirts · Operator: >= · Value: 3 |
| Payment Mode | Triggers based on specific payment methods (Cash, Card, Points, etc.). | Loyalty Drive: "5% extra off if you pay using Loyalty Points." Identifier: Points · Value: Starts with "Loyalty" |
| Gift Voucher | Triggers only if a specific Gift Voucher Code is applied. | Employee Benefit: "Apply Employee Special Voucher for 20% off." Value: Employee_Special_Voucher |
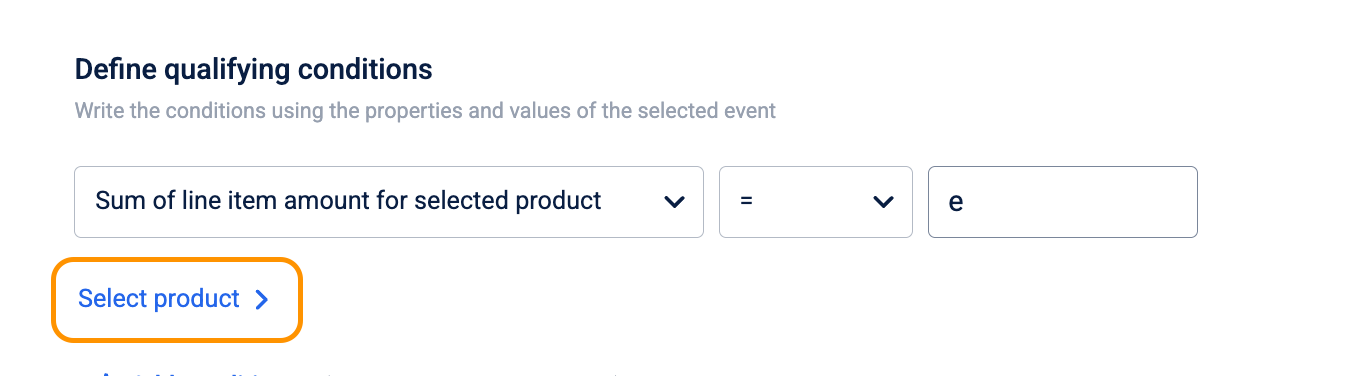
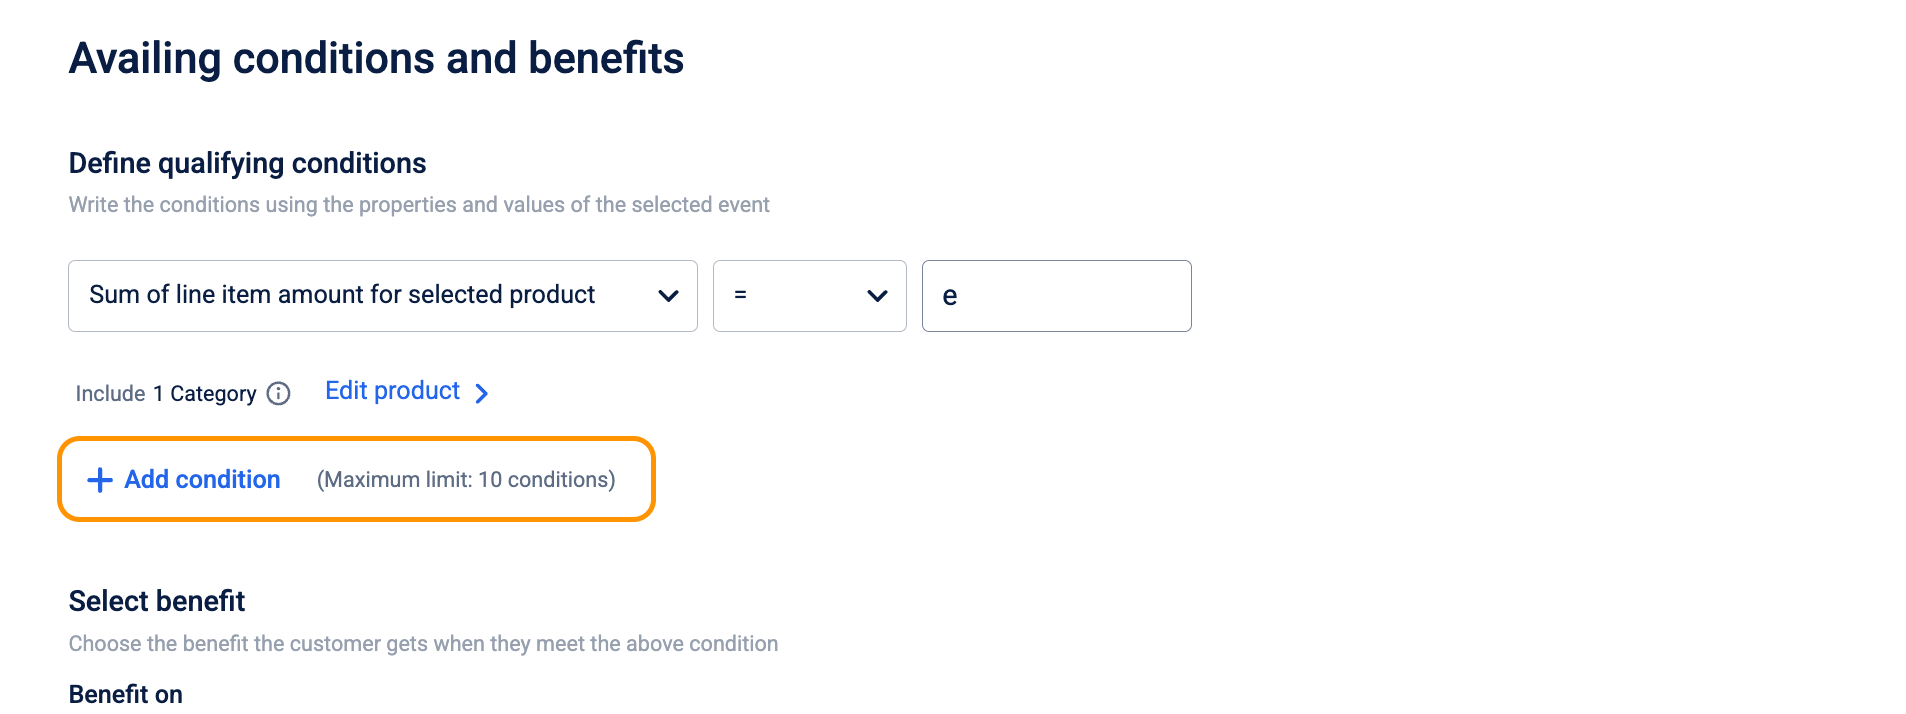
Understanding "product scope" & inclusions
For properties like Sum of line Item Amount for selected product or Sum of line Item Quantity for selected product, you must configure which products to count.
-
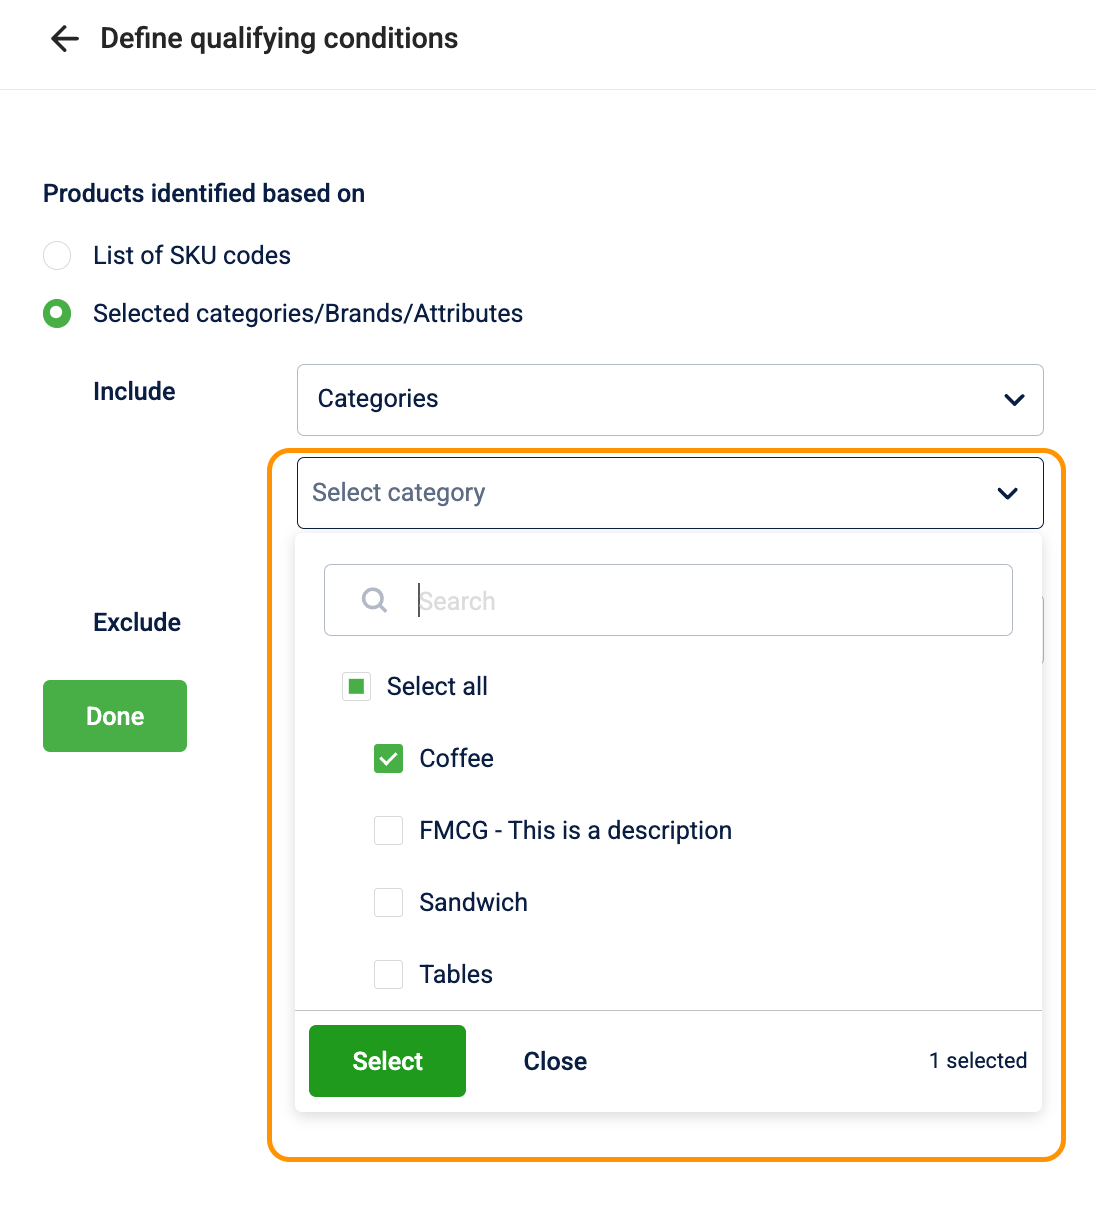
Navigate to Select product to open the Define qualifying conditions drawer.
-
Under Products identified based on, choose how to target your items:
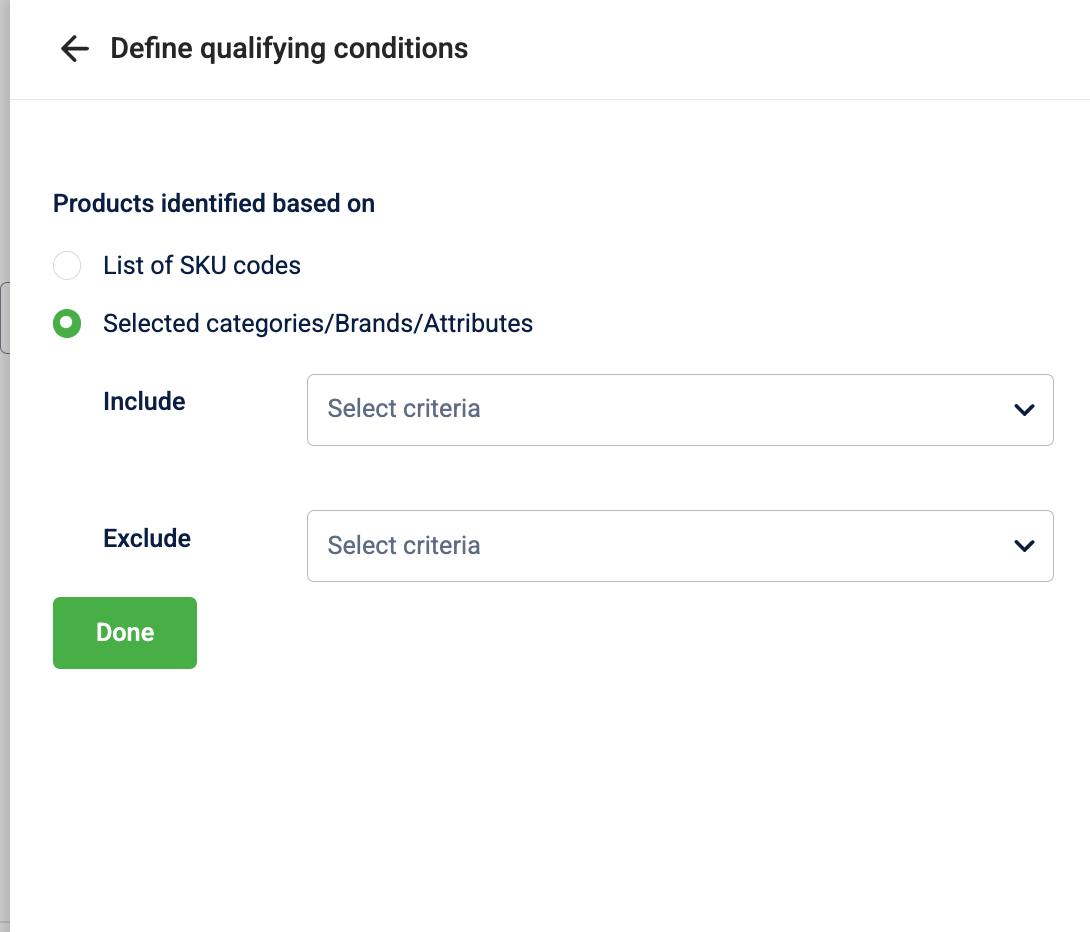
-
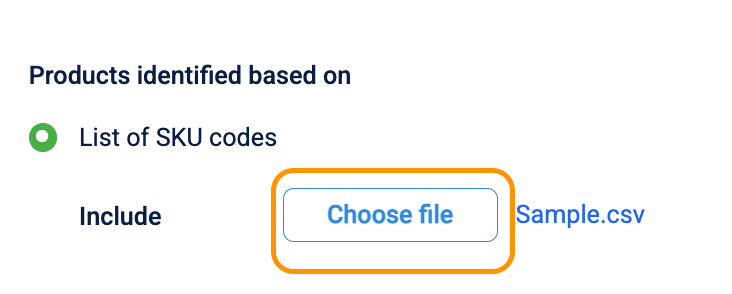
List of SKU codes: Select this to target specific items via a file upload. You can map up to 250 SKUs to a single cart promotion condition. This allows you to precisely target a large set of products when categories or brands are not specific enough.
- Select Choose file to upload your CSV. The system will validate that the total number of SKUs does not exceed 250.
-
Selected categories/Brands/Attributes: Select this to target products dynamically based on your catalog hierarchy.
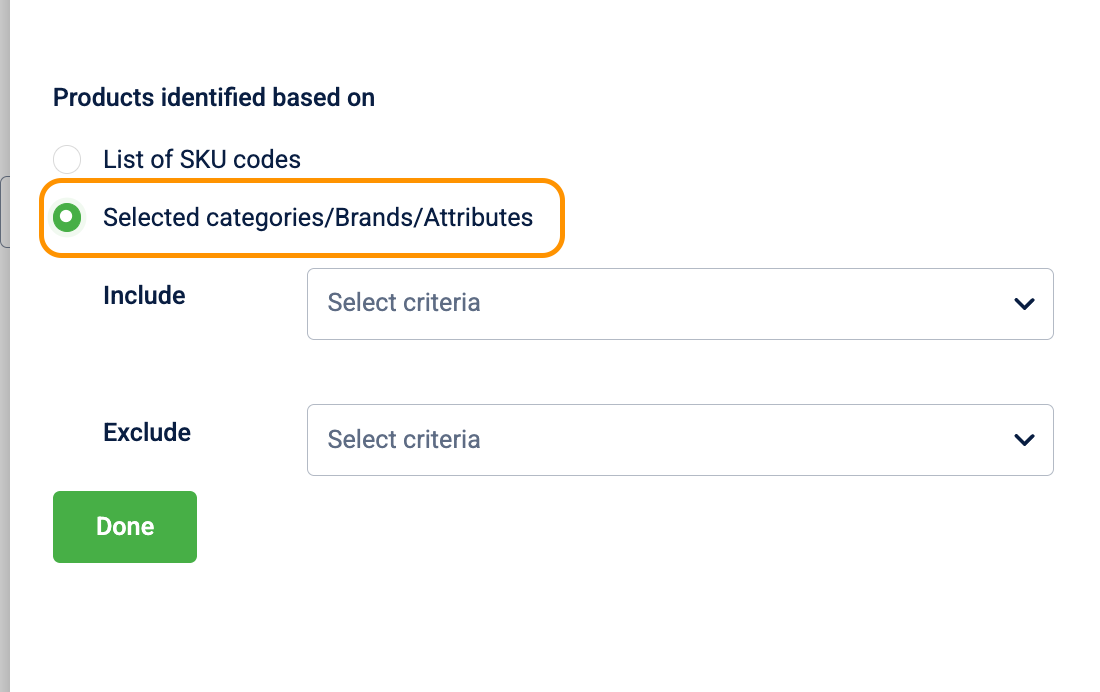
- Configure the Include and Exclude rules:
-
Include: Only count items that match these criteria.
- In the Select criteria dropdown, choose Categories, Brands, or Product attributes.
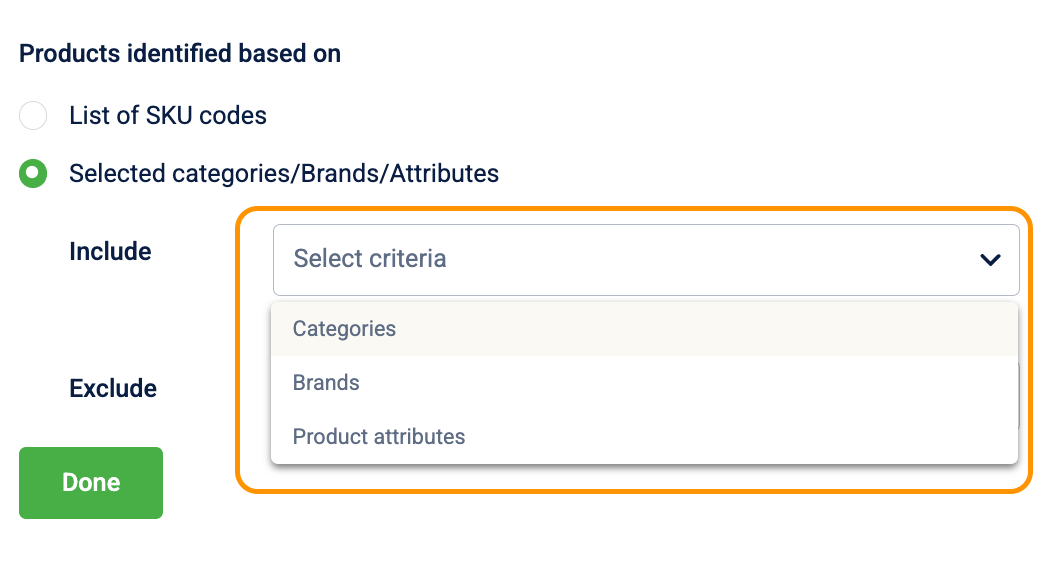
- Search for or select the specific values (e.g., "Sandwich" or "Style") and click Select.
-
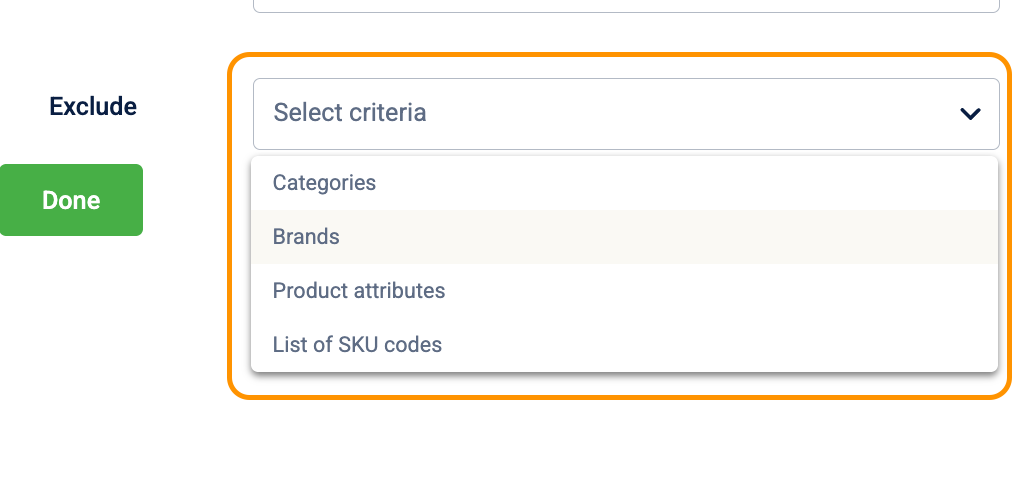
Exclude: Count everything except these items.
- You can exclude items based on Categories, Brands, Product attributes, or by uploading a specific List of SKU codes.
- Select Done to save your product scope.
Removing a condition resets all benefit settings configured in Step 4. Before removing a condition, note your current benefit configuration so you can re-enter it after saving.
Understanding "AND logic" (multiple conditions)
Multiple conditions can be layered together to create highly specific promotions — for example, requiring a specific combination of products to be purchased using a specific payment method. The promotion triggers only when every single condition is met simultaneously.
+ Add condition is available for Sum of line item amount for selected product, Sum of line item quantity for selected product, and Payment mode only. It is not available for Cart amount, Count of items in the cart, or Gift voucher — these function strictly as standalone conditions. Selecting any of them as your first condition disables the + Add condition button.
To configure multiple conditions, follow these steps:
- After defining your first eligible condition (for example, Payment mode or Sum of line item quantity for selected product), select + Add condition.
-
Choose the next Cart property from the dropdown, such as Sum of line item amount for selected product.
-
Select the Operator and enter the required Value.
-
Select + Add condition again to add more conditions.
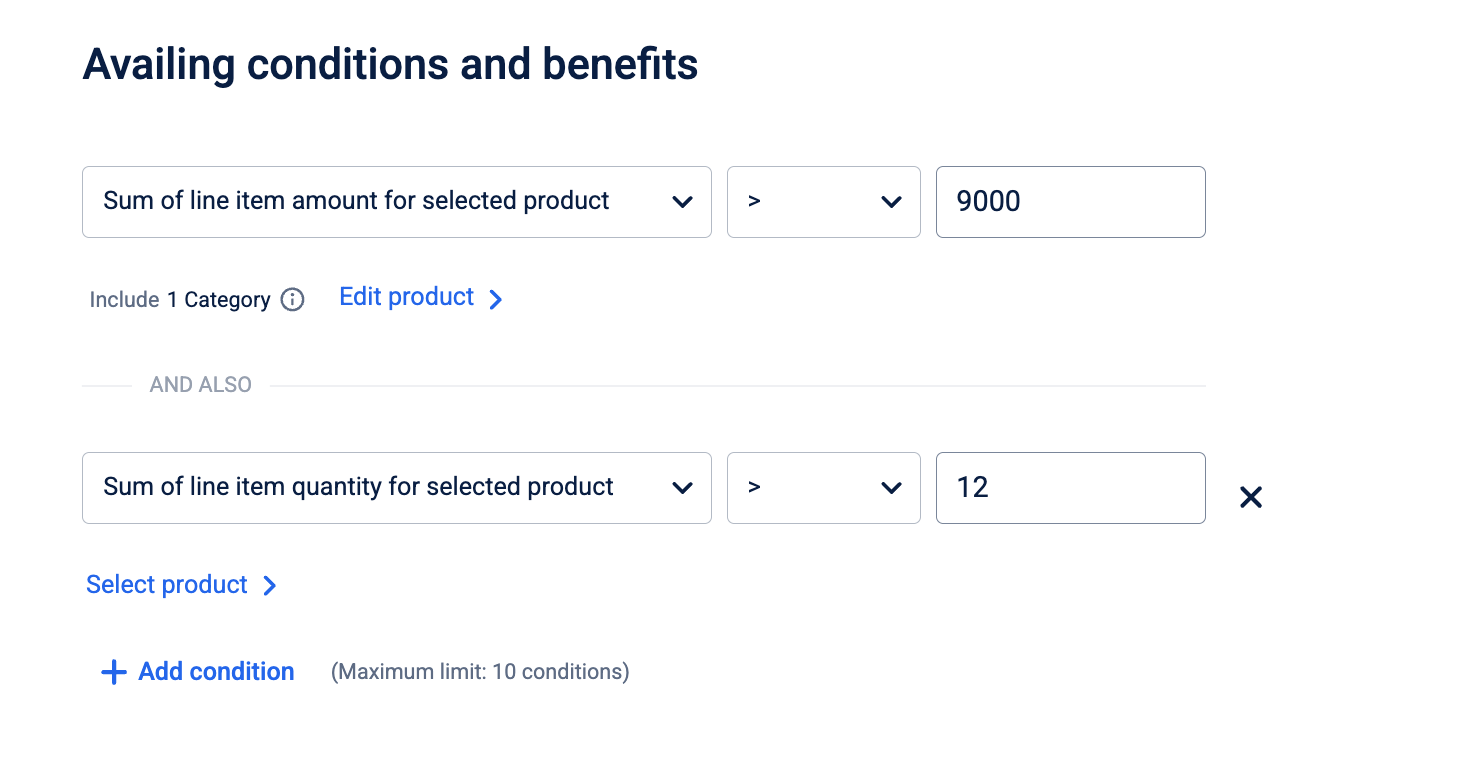
A maximum of 10 conditions can be added per promotion. All conditions are linked by AND logic — the promotion applies only when every rule is met simultaneously.
Example Scenario 1: "Premium combo logic"
- Condition 1: Sum of line item amount (Electronics)
>=$2000. - Condition 2: Sum of line item quantity (Accessories)
>=2.
Result: A customer buying a $2100 laptop and 2 chargers gets the benefit. A customer who buys the laptop with only 1 charger does not qualify because not all conditions were met.
Example Scenario 2: "Payment mode combo product"
- Condition 1: Payment mode
ISCapital One Card. - Condition 2: Sum of line item quantity (Coffee)
>=2. - Condition 3: Sum of line item quantity (Muffin)
>=1.
Result: An exclusive combo offer tied to a payment method. The customer must pay with the Capital One Card and have at least 2 coffees and 1 muffin in their cart. Missing any one of the three conditions means the benefit does not apply.
You have successfully defined the conditions; now proceed to Step 4 to configure the benefits.
Step 4: Defining where to apply benefits
Once the qualifying conditions are met, you must define the specific benefit the customer will receive. This involves determining whether the discount applies to the entire cart or specific items, and choosing the calculation method for the benefit.
1. Select benefit scope
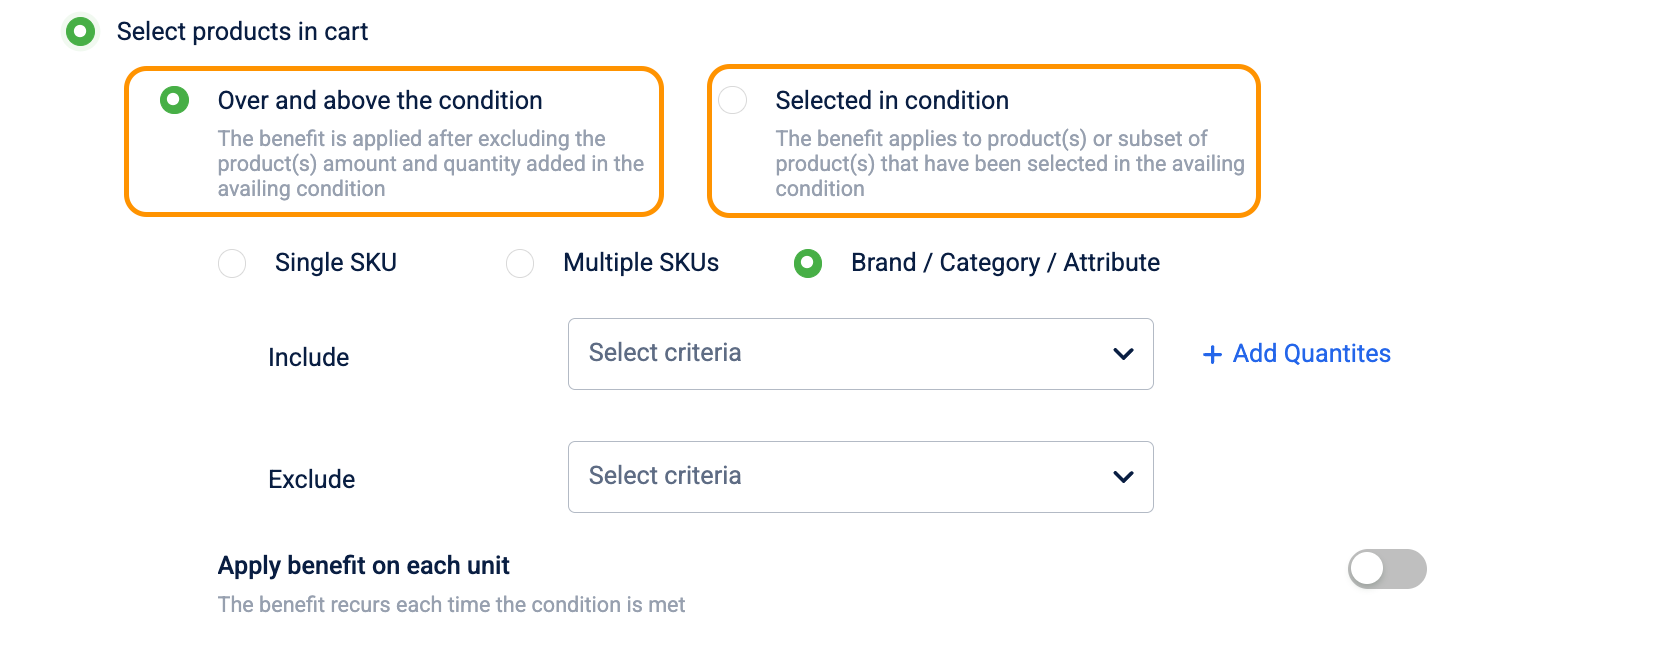
Choose where the discount should be applied:
- Cart: Applies the discount to the final bill subtotal.
- Select products in cart: Applies the discount only to specific items within the cart.
- Payment mode: Applies the discount based on the payment method used in the transaction. Selecting this option restricts the benefit to customers who pay using the method specified in the Payment mode qualifying condition in Step 3. If the customer pays using a different method, the promotion does not apply even if all other cart conditions are met. This option only appears when you have configured a Payment mode qualifying condition in Step 3.

2. Configure product logic
If you chose Select products in cart, you must define how the system identifies the items to be discounted:
| Logic Option | Description | Real-World Example |
|---|---|---|
| Over and above the condition | The discount applies to items excluding those that triggered the condition. | Buy X, Get Y: Buy a Laptop (Condition), get a Mouse (Benefit) for free. |
| Selected in condition | The discount applies to the same items that met the qualifying condition. | Buy X, Get % off X: Buy a T-shirt, get 20% off that same T-shirt. |
Selecting products for the benefit
When Over and above the condition is selected, choose how the system identifies the specific items to which the benefit applies:
- Single SKU: The benefit applies to one specific product, identified by uploading a CSV with the SKU code. Because the benefit is tied to a single SKU, there is no ambiguity about what the customer receives — use this for gifting a specific item or clearing a targeted product line.
- Multiple SKUs: The benefit applies only when all the specified products are present in the cart together. Use this to build combo and bundle promotions that drive customers to purchase complementary products they might not otherwise add. Because all products must be present simultaneously, the all-or-nothing rule increases average basket size rather than rewarding a single item purchase.
- Brand / Category / Attribute: The benefit applies to all products matching a catalog attribute, such as a specific brand, category, or product attribute. Use this for category-level promotions where you want the benefit to cover a wide range of products without maintaining a SKU list — any product added to the matched attribute automatically qualifies.
Configuring a Multiple SKUs (combo product) benefit
- The system displays two empty product blocks. Each block represents one product required in the combination. Starting with two enforces the minimum pairing needed for a bundle — the promotion cannot trigger on a single product alone.
- In each block, select Upload file to upload a CSV containing the target SKU codes.
- The system validates each uploaded SKU and displays a count of valid products (for example, "3 products uploaded"). Invalid SKUs are flagged and listed in a popover.
- To require a specific quantity of each product, select Add quantities within the block and configure:
- Operator: Set to = (equals).
- Value: Enter the required quantity. Specifying a quantity per product controls the exact basket composition — for example, requiring 2 coffees and 1 sandwich ensures the customer commits to the full combo before the discount applies, preventing partial redemptions.
- Type: Select Selected in condition to inherit the quantity already defined in the qualifying condition, keeping the condition and benefit in sync. Select Custom to set a different quantity for the benefit product, which is useful when the benefit item differs in quantity from the triggering item.
- To add more products to the combination, select + Add condition. A divider labelled And also separates each block. Each product added makes the combo more specific — use this when the promotion targets a curated bundle, but keep the total number of required products achievable for your target customer.
- To remove a product from the combination, select the X on its block.
A single combo benefit supports up to 10 products. The benefit triggers only when every listed product is present in the cart — if any one product is missing, the discount does not apply.
The Selected in condition option is not available when the benefit type is Free product. Configure free product benefits using Over and above the condition with a specific product target instead.
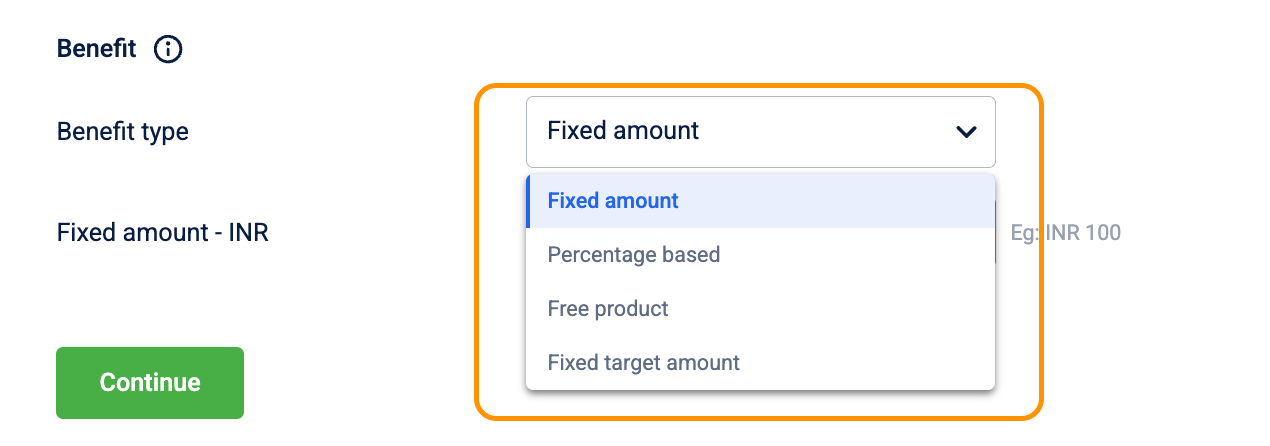
3. Choose benefit type
Select the format of the benefit:
-
Fixed amount: A specific currency value is deducted (e.g., ₹100 off).
-
Percentage based: A percentage is deducted from the price (e.g., 10% off).
-
Free product: A specific item is given at no cost. After selecting this type, configure the Quantity type to control how many free units the customer receives:
- None: No quantity constraint — the free product is added without a unit limit.
- Custom: Enter a specific number of units in the Value field. Use this when the free item quantity differs from the purchase condition, for example, buy 3 shirts and get 2 socks free.
- Selected in condition: The free product quantity matches the quantity defined in the qualifying condition in Step 3, keeping both values in sync.
-
Fixed target amount: Also known as a Bundle Price, where a group of items is sold for a set price (e.g., Buy 3 for ₹999).
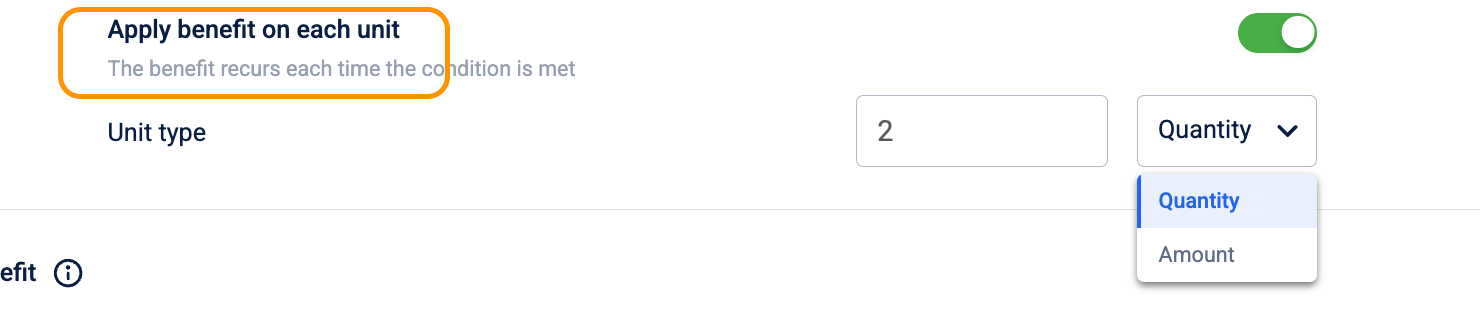
To allow a benefit to repeat within the same transaction, toggle Apply benefit on each unit to Enabled.
-
Example: For every 2 items bought, the customer gets ₹50 off. If they buy 4 items, they get ₹100 off.
-
Configuration:
- In the Divide benefit per field, enter the unit size that triggers one instance of the benefit. For example, enter
2to apply the benefit for every 2 qualifying units. - Under KPI, select whether to count by Quantity (number of items) or Amount (spend value).
- In the Divide benefit per field, enter the unit size that triggers one instance of the benefit. For example, enter
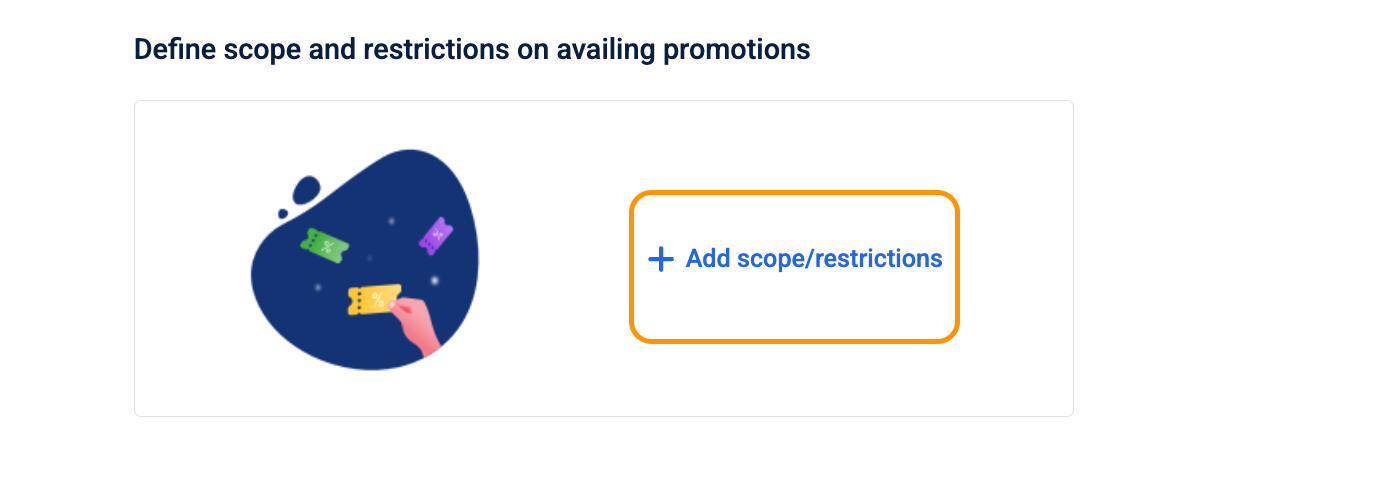
Step 5: Define scope and restriction
Defining the where, when, and who for your promotion ensures campaign integrity and budget control. This step allows you to set boundaries on eligibility and prevent over-redemption by establishing clear usage parameters.
-
Select + Add scope/restrictions under the Define scope and restrictions on availing promotions section.
5.1 Defining eligibility (Scope)
Configure the physical and demographic boundaries of your promotion to ensure it reaches the intended audience.
Location and time scope
-
Limit to specific store entities: Select Customize to restrict the promotion to specific physical or logical locations.
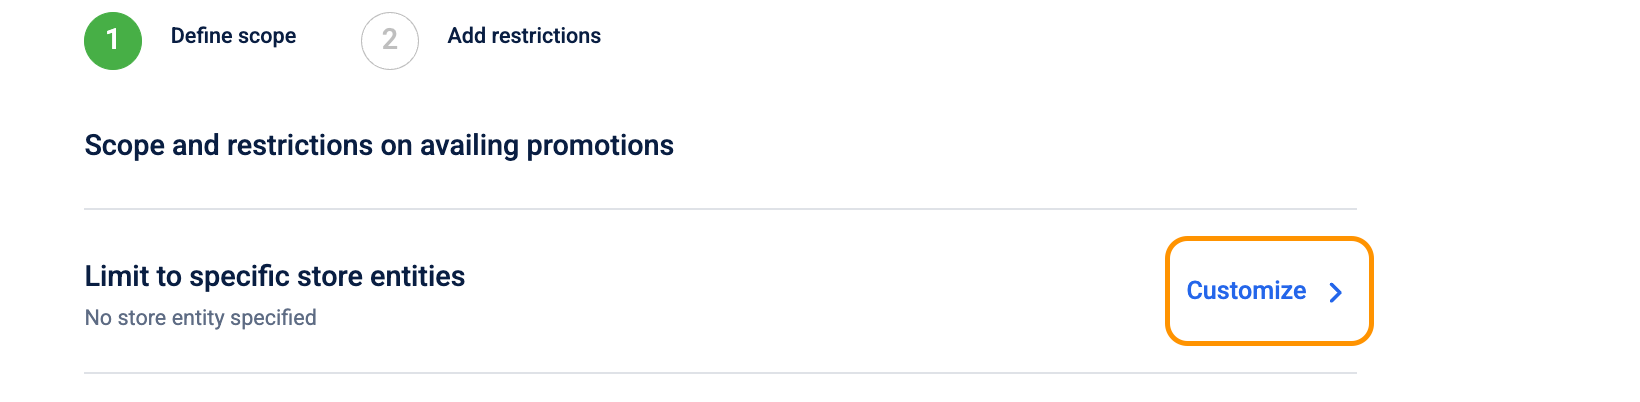
- Concept: Select specific brand concepts from the dropdown.
- Store: Choose individual stores or Upload stores via a file.
- Zone: Restrict by geographical zones.
Limit the cart promotion to a specific day/time scope
Select Customize to define the recurring active window.
Select the Recurrence Frequency: Use the Days/month scope dropdown to decide how often the window repeats.
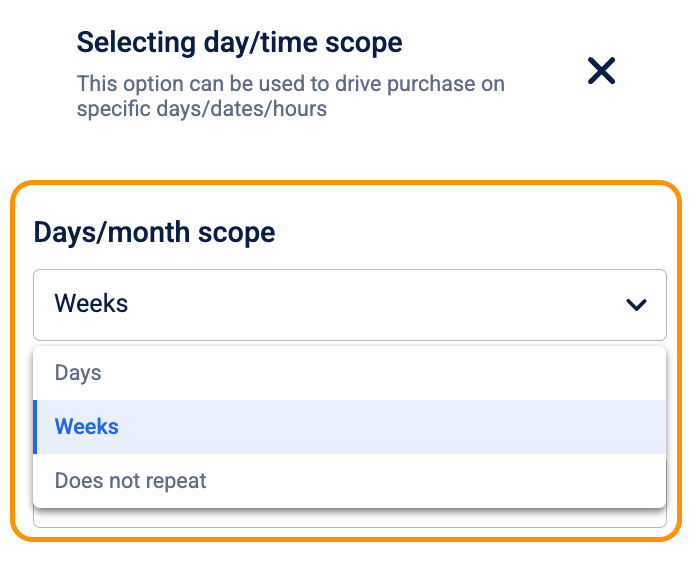
- Weeks: Choose this for weekly patterns, for example, every Tuesday.
- Days: Choose this for monthly patterns for example the 1st and 15th of every month).
- Does not repeat: Choose this if the promotion should run 24/7 during its active dates.
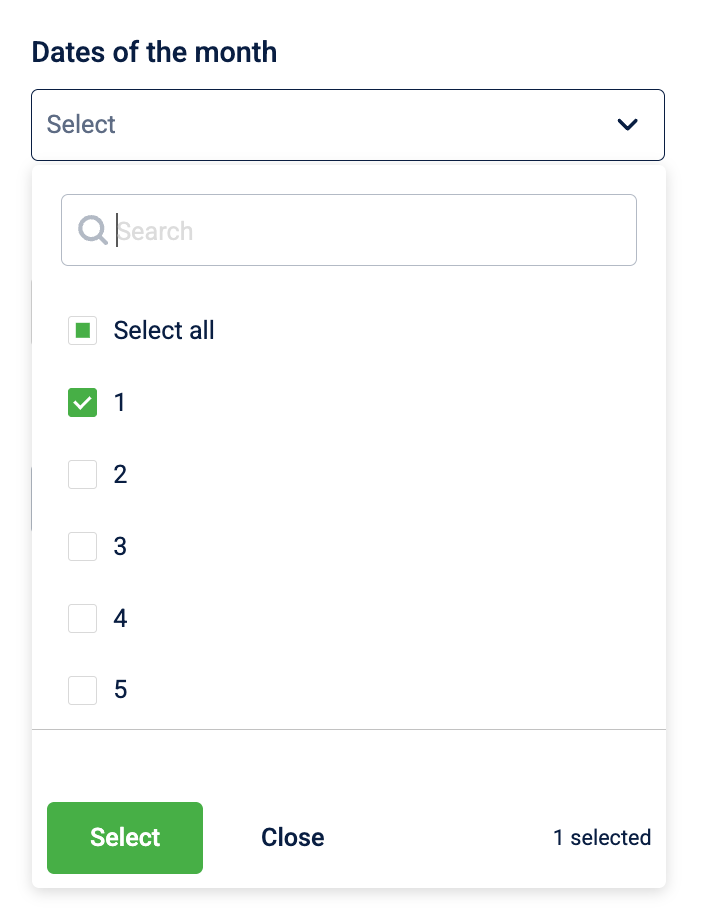
Define the days the promotion should be active
Based on your selection in Step 1, the system will enable or disable specific fields:
-
If you chose "Weeks": The Days of the week field becomes active. Select the specific days (e.g., Monday, Wednesday) the promotion should run. The Dates of the month field will be greyed out.
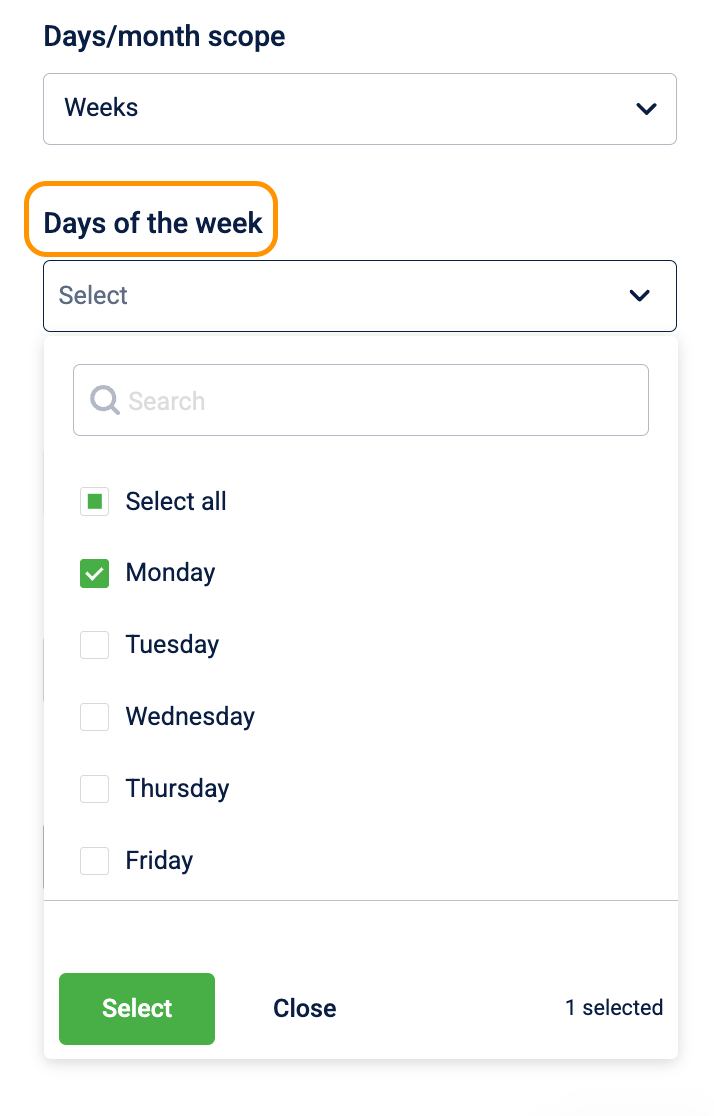
-
If you chose "Days": The Dates of the month field becomes active.
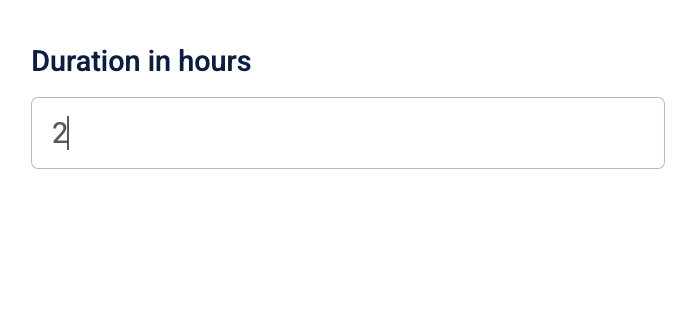
Set the Daily Active Window: Regardless of the recurrence, define the specific hours of the day:
-
Start time: The exact time the benefit goes "live" on the selected days.

-
Duration in hours: How long the benefit stays active from the start time.
Customer eligibility
Select Customize next to Limit to specific customers to define your target audience:

Customer eligibility settings allow you to narrow down your audience from the general public to specific loyalty tiers or subscription members.
Note: This option applies to POS cart promotions only. For other promotion types, customer targeting is handled differently: Loyalty and Loyalty Earning promotions target customers through campaign issuance; Rewards promotions are self-selected by customers from the Rewards Catalog; Code-linked promotions are accessible to any customer who holds the promo code.
- Select the primary Audience: Under the Customers who are eligible for this promotion section, choose the primary group.

- All customers: Select this to make the promotion available to every registered user in your database.
- Loyalty customers: Select this to restrict the offer specifically to members of your loyalty program.
- Define the Loyalty Scope: If you selected Loyalty customers, specify which members are eligible by making a selection under Who belongs to loyalty type.
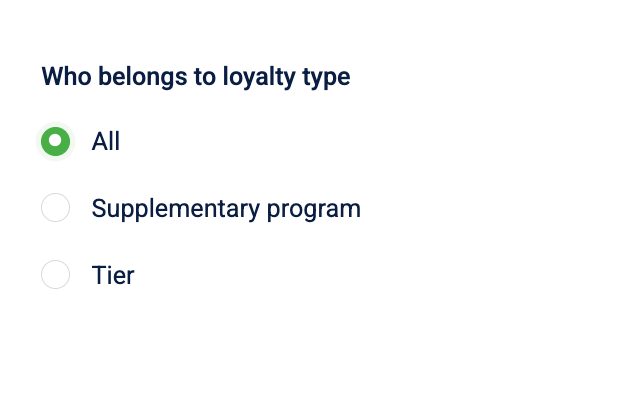
- All: The promotion is open to every member across all programs and tiers.
- Supplementary program: Choose this to target members of a specific sub-program, such as a paid subscription or a partner program.
- Tier: Select this to target specific status levels, for example, Gold or VIP tier.
Targeting by Tier
- Select Main program: Navigate to the Main program dropdown and select the primary loyalty program, for example, Group Loyalty Program.
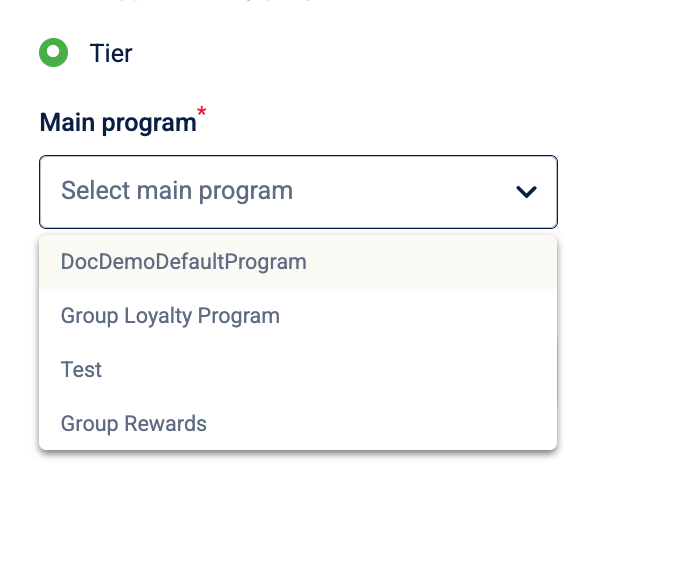
- Select Tier: Once the program is selected, the Tier dropdown becomes active. Select a specific tier, for example, the Gold tier, from the list.
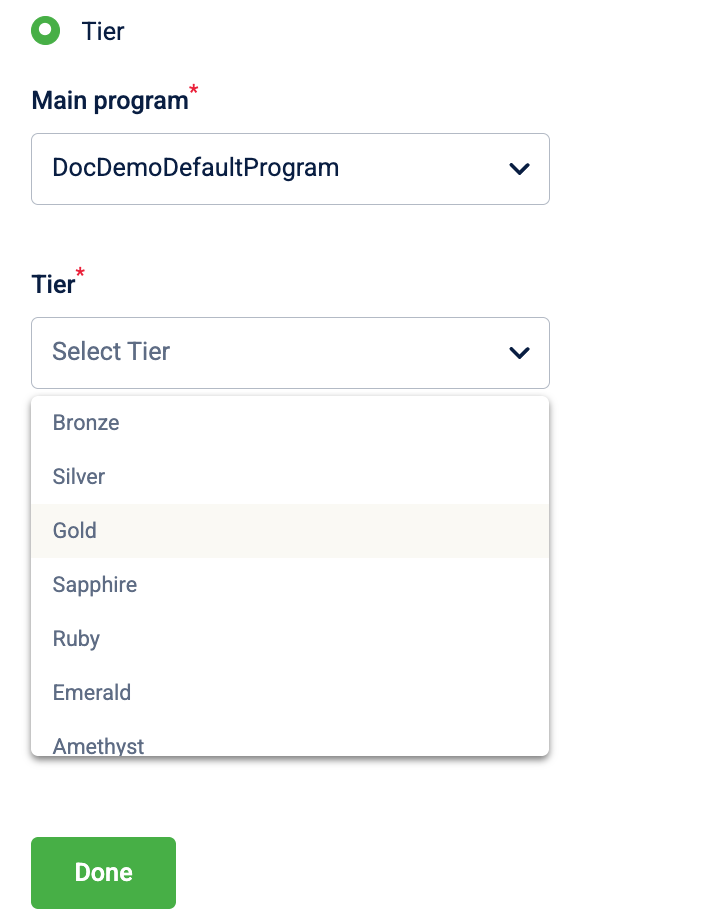
- Select Done.
Targeting by Supplementary Program
- Select Main program: Navigate to the Main program dropdown and select the primary loyalty program associated with the subscription.
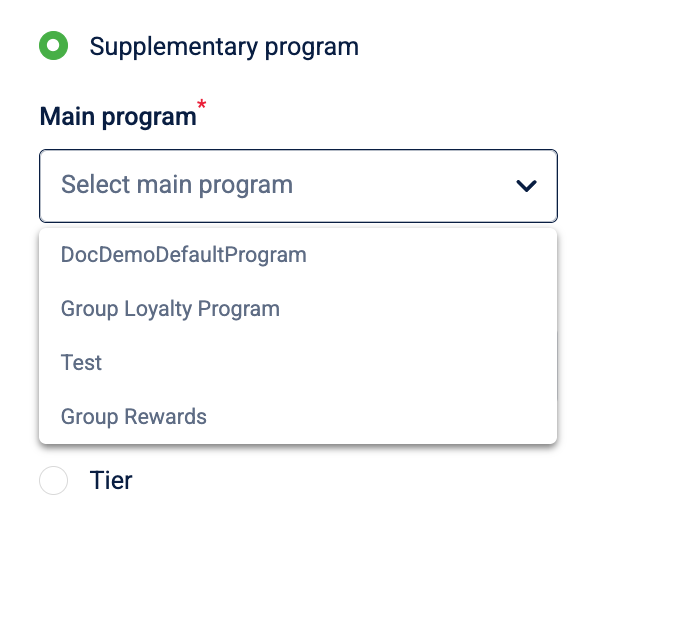
- Select Supplementary program: Once the program is selected, the Supplementary program dropdown becomes active.
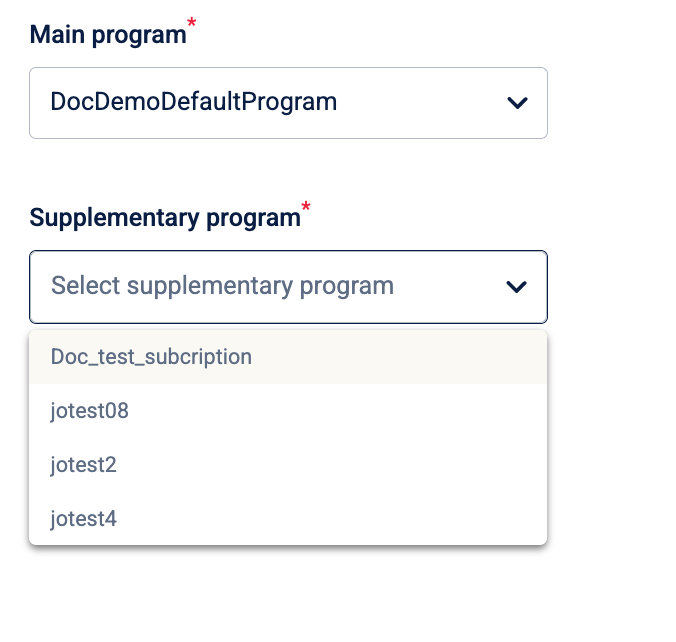
- Select Done .
To prevent configuration errors, the specific Tier or Supplementary program lists remain greyed out until a Main program is defined. If you change the Main program, the sub-selections reset to ensure the logic remains valid.
5.2 Understanding restrictions by promotion type
Different promotion goals require different levels of control; the fields available under Issual and Redemption restrictions vary by promotion type.
The following table shows what type of limits are supported by each promotion type.
| Restriction Feature | POS | Loyalty | Loyalty Earning | Rewards | Code-linked |
|---|---|---|---|---|---|
| Individual Issual Limit | ✕ | ✓ | ✓ | ✓ | ✕ |
| Individual Code Limits | ✕ | ✕ | ✕ | ✕ | ✓ |
| Earn Limits (Per Earn) | ✕ | ✕ | ✓ | ✓ | ✕ |
| Individual Cart Limits | ✓ | ✓ | ✓ | ✓ | ✓ |
| Individual Customer Limits | ✓ | ✓ | ✓ | ✓ | ✕ |
| Global Customer Limits | ✓ | ✓ | ✕ | ✕ | ✕ |
5.3 Managing issuance and access restrictions
The following settings define how a promotion is issued to a customer or how they access it via codes, and how many times it can be redeemed. By configuring issual, code-level, cart-level, customer-level, and cross-customer limits, you can prevent misuse and limit overall discounts provided based on your requirements.
1. Individual promotion issual limit
You can configure Individual promotion issual limit for Loyalty, Loyalty Earning, and Rewards promotions.
- Locate the Individual promotion issual limit field.
- Enter the numerical value for how many times a customer can be issued this promotion. The maximum value is 50.
2. Individual code limits
You can configure Individual code limits only for Code-linked promotions. A code-level limit is mandatory — the promotion cannot be saved without one.
- Click Add limit.
- In the scope of limit dropdown, select per code limit.
- In the action type dropdown, select what to limit:
- count of redemptions — limits the number of times a single promo code can be redeemed.
- count of transactions — limits the number of transactions in which a promo code can be applied.
- sum of discount — limits the total discount a single promo code can provide across redemptions.
- Enter the maximum value in the input field.
- To make the limit reset on a recurring cycle, select + Add reset period under the limit row and configure the cycle type. For details, see Section 5: Reset period.
5.4 Configuring redemption restrictions
You can specify restrictions to control how often a promotion can be used and how much discount it can give. Here you can set limits per earn, per cart, per customer, and across all customers, and these settings can’t be changed after the promotion goes live.
1. Earn limits
You can use earn limits to control how many times each earned benefit can be redeemed and how much discount a single earn can give.
You can configure earn limits for Loyalty Earning and Rewards promotions.
- Click Add limit.
- In the scope of limit dropdown, select per earn.
- In the action type dropdown, select what to limit:
- count of redemptions — limits the number of times a single earned benefit can be redeemed.
- count of transactions — limits the number of transactions in which a single earned benefit can be applied.
- sum of discount — limits the total discount a single earned benefit can provide.
- Enter the maximum value in the input field.
- To make the limit reset on a recurring cycle, select + Add reset period under the limit row and configure the cycle type. For details, see Section 5: Reset period.
2. Individual cart limits
You can configure Individual cart limits for all promotion types. Cart limits apply per transaction and do not support reset periods.
- Click Add limit.
- In the scope of limit dropdown, select per cart.
- In the action type dropdown, select what to limit:
- count of redemptions — limits the number of times the promotion can apply within a single cart.
- sum of discount — limits the total discount the promotion can give within a single cart.
- Enter the maximum value in the input field.
3. Individual customer limits
You can configure individual customer limits for POS, Loyalty, Earning, and Rewards. Code-linked promotions do not support per-customer limits — use the Individual code limits in section 2 above to control how often each code can be redeemed.
- Click Add limit.
- In the action type dropdown, select what to limit:
- count of redemptions — limits the number of times a customer can use the promotion.
- count of transactions — limits the number of transactions in which a customer can use the promotion.
- sum of discount — limits the total discount amount a customer can receive across redemptions.
- Enter the maximum value in the input field.
- In the scope of limit dropdown, select per customer.
- To make the limit reset on a recurring cycle, select + Add reset period under the limit row and configure the cycle type. For details, see Section 5: Reset period.
4. Promotion limits across customers
You can configure promotion limits across customers for POS and Loyalty promotions.
- Click Add limit.
- In the scope of limit dropdown, select per promotion.
- In the action type dropdown, select what to limit:
- count of redemptions — limits the total number of times the promotion can be redeemed across all customers.
- count of transactions — limits the total number of transactions in which the promotion can be applied across all customers.
- sum of discount — limits the total discount the promotion can give across all redemptions.
- Enter the maximum value in the input field.
- To make the limit reset on a recurring cycle, select + Add reset period under the limit row and configure the cycle type. For details, see Section 5: Reset period.
5. Reset period
You can select + Add reset under a configured limit row to make the limit refresh automatically after a specified interval. For more details, refer to Reset Period for limits.
For example, selecting every calendar month resets the customer's counter on the 1st of each month, allowing them to use the promotion again in the next cycle. Once a reset period is configured, a Preview cycle button appears next to the limit row. Select it to preview the upcoming cycle dates and verify the schedule before saving.
A no-cycle limit and a fixed-window limit can be set together on the same restriction level and KPI. Both are enforced independently; the customer is blocked when either is exhausted. For example, set a lifetime redemption limit of 50 and a monthly limit of 5 to control both the total and the monthly rate on the same promotion.
- every X days, every week, and every calendar month are fixed-window cycles and cannot be combined with for last X days or for last X weeks rolling-window cycles in the same promotion, since they use incompatible counting methods. Configure all limit rules using the same window type.
- When editing an existing cart promotion, a no-cycle limit and a fixed-window limit cannot be combined on the same KPI, which keeps a promotion customers are already redeeming against from being changed into a conflicting limit setup. This restriction applies only while editing an existing promotion; both limit types can be combined freely on the same KPI when creating a new promotion, and on different KPIs at any time. For example, if an existing promotion already has a lifetime limit on count of redemptions, you cannot add a monthly limit to the same KPI while editing that promotion, but you can still add it to a different KPI such as sum of discount.
Cycle start date
When you configure a fixed-window reset period (every X days, every week, or every calendar month), you can choose when each customer's cycle begins using the Cycle start date setting.
| Option | How it works | Available for |
|---|---|---|
| Promotion config date | All customers share the same cycle anchor — a specific reference date you set when creating the promotion. Every customer resets on the same schedule regardless of when they received the promotion. For example, if the reference date is 1 June and the cycle is monthly, all customers reset on 1 July, 1 August, and so on. | All promotion types |
| Customer's issuance date | Each customer's cycle begins on the date the promotion was issued to them. A customer who receives the promotion on 5 June resets on 5 July, while one who receives it on 20 June resets on 20 July. Use this to give every customer an equal window from the moment they receive the promotion. | Loyalty Earning and Code linked promotions only |
- Each limit row includes a copy icon on the right. Select it to duplicate the rule as a starting point for a second rule — useful for combining a lifetime cap with a recurring window cap on the same KPI.
- The maximum number of limit rules across all scopes is 10 for the promotion as a whole, not per scope.
- If duplicate limit rules are detected, a warning banner appears at the top of the limits section. Resolve all duplicates before proceeding.
- For Code linked promotions, a per-code limit is mandatory. The promotion cannot be saved without one — the system prompts you if it is missing.
5.5 Set the expiry of the earned promotion
For Loyalty Earning and Rewards promotions, define when the issued benefit becomes invalid.
Select one of the following options to define when the earned benefit expires. This setting controls how long a customer has to use the promotion after it's issued or earned, and directly affects whether customers lose access at the same time or on individual timelines.
- Along with the promotion: The earned benefit expires on the same date as the promotion end date. All customers lose access simultaneously, regardless of when they earned the promotion. Use this when you want a clean campaign cutoff.
- From the date of earning: Enter the number of Days the promotion remains valid after the customer earns it. Each customer gets a personal countdown from the moment they earn the benefit. A customer who earns on day one and one who earns on day 20 will have different expiry dates. Use this to give every customer equal time to redeem.
- From the date of issuance: Enter the number of Days the promotion remains valid after the system issues it to the customer. The clock starts at the moment the system issues the promotion, not when the customer earns or claims it. Use this when issuance and the earning event happen at different points in time.
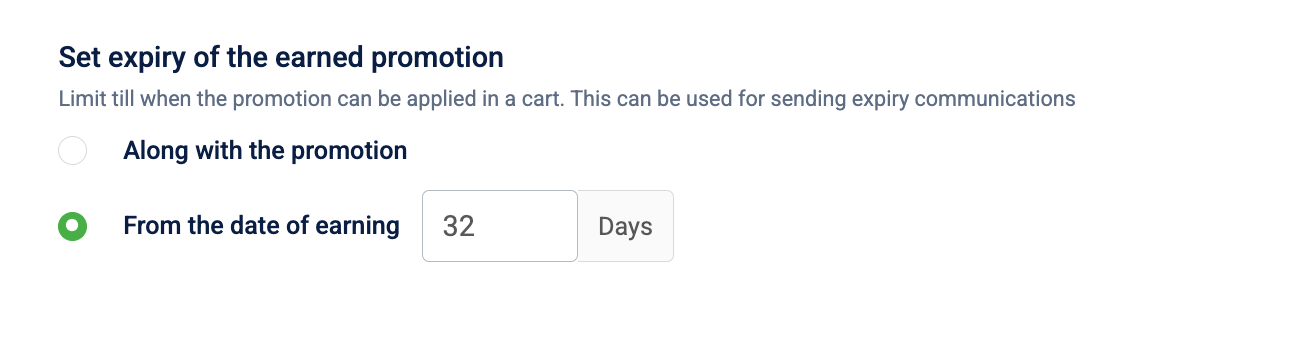
Changing the number of days after the promotion is live immediately affects all customers who have already received the promotion, activating or expiring their benefit without delay.
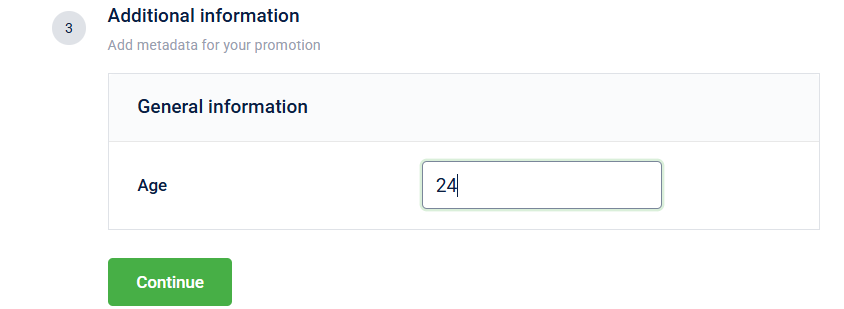
Step 6: Additional information
Enter values for custom fields your organisation has configured for this promotion. These fields don't affect how the promotion applies to customers at checkout — they're internal metadata that tags the promotion for reporting, financial tracking, or campaign management purposes. To learn how to set up custom fields, refer to Cart Promotion Settings.
If your organisation has not configured any custom fields, this step displays an empty state with a link to Cart Promotion Settings. Select the link to navigate there and create the fields you need, then return to the promotion to complete this step.
Custom fields use one of the following input types:
| Field type | Description |
|---|---|
| Number | Accepts a numerical value. |
| Text | Accepts free-form text input. |
| Date | Accepts a date via the date picker. |
Complete all required fields before proceeding. You can leave optional fields blank.
- Enter the value for each custom field displayed.
- Select Continue.
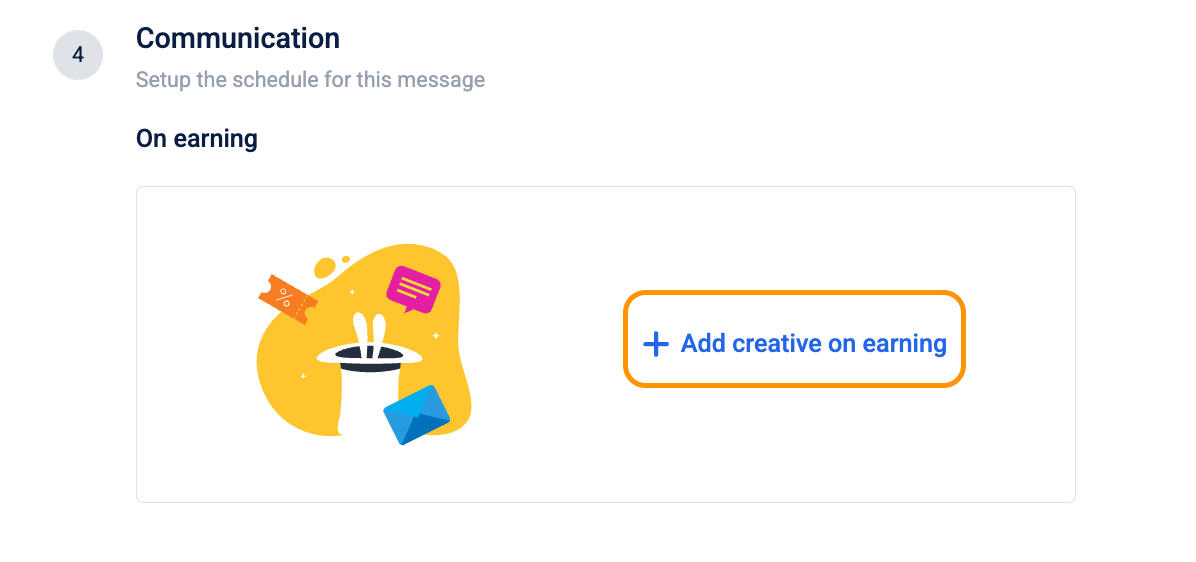
Step 7: Configuring communication triggers
This section defines how the system automatically communicates with your customers at key points in the promotion journey. Configuring communication helps drive awareness and timely redemption — customers who receive a notification when they earn a benefit are more likely to use it, and those who receive a reminder before it expires are less likely to let it lapse unused.
The On earning trigger is available for Loyalty earning promotion and Rewards promotion only. It does not appear for Loyalty promotion, POS promotion, or Code linked promotion, because those promotion types either apply automatically at checkout or use a code for access, and don't have a distinct earning moment.
On earning
This trigger fires at the moment the customer earns the promotion — for example, when they complete their third purchase or buy a reward with points. The message notifies the customer that a new benefit is now available for them to use at their next checkout.
-
Select + Add creative on earning.
-
From the Message strategy dropdown, select how messages are delivered when multiple channels are configured:
- Broadcast: The message is sent across all configured channels simultaneously. Use this when you want every customer to receive the notification on every channel they are reachable on.
- Channel priority: The message is delivered through the highest-priority channel that successfully reaches the customer. If the first channel fails or the customer is unreachable on it, the system tries the next channel in order. Use this to maximise delivery while avoiding duplicate messages.
- Personalisation: The message content adapts based on the customer's product or store affinity. When this strategy is selected, you must attach the relevant product or store category to the creative. The system will surface a validation warning if you save without attaching the required category.
-
Under Audience, select the customers who should receive this communication. By default, all customers eligible for the promotion are included. Select specific Audience groups to narrow the recipients to a defined segment — for example, send the earning notification only to customers in a specific tier or region.
-
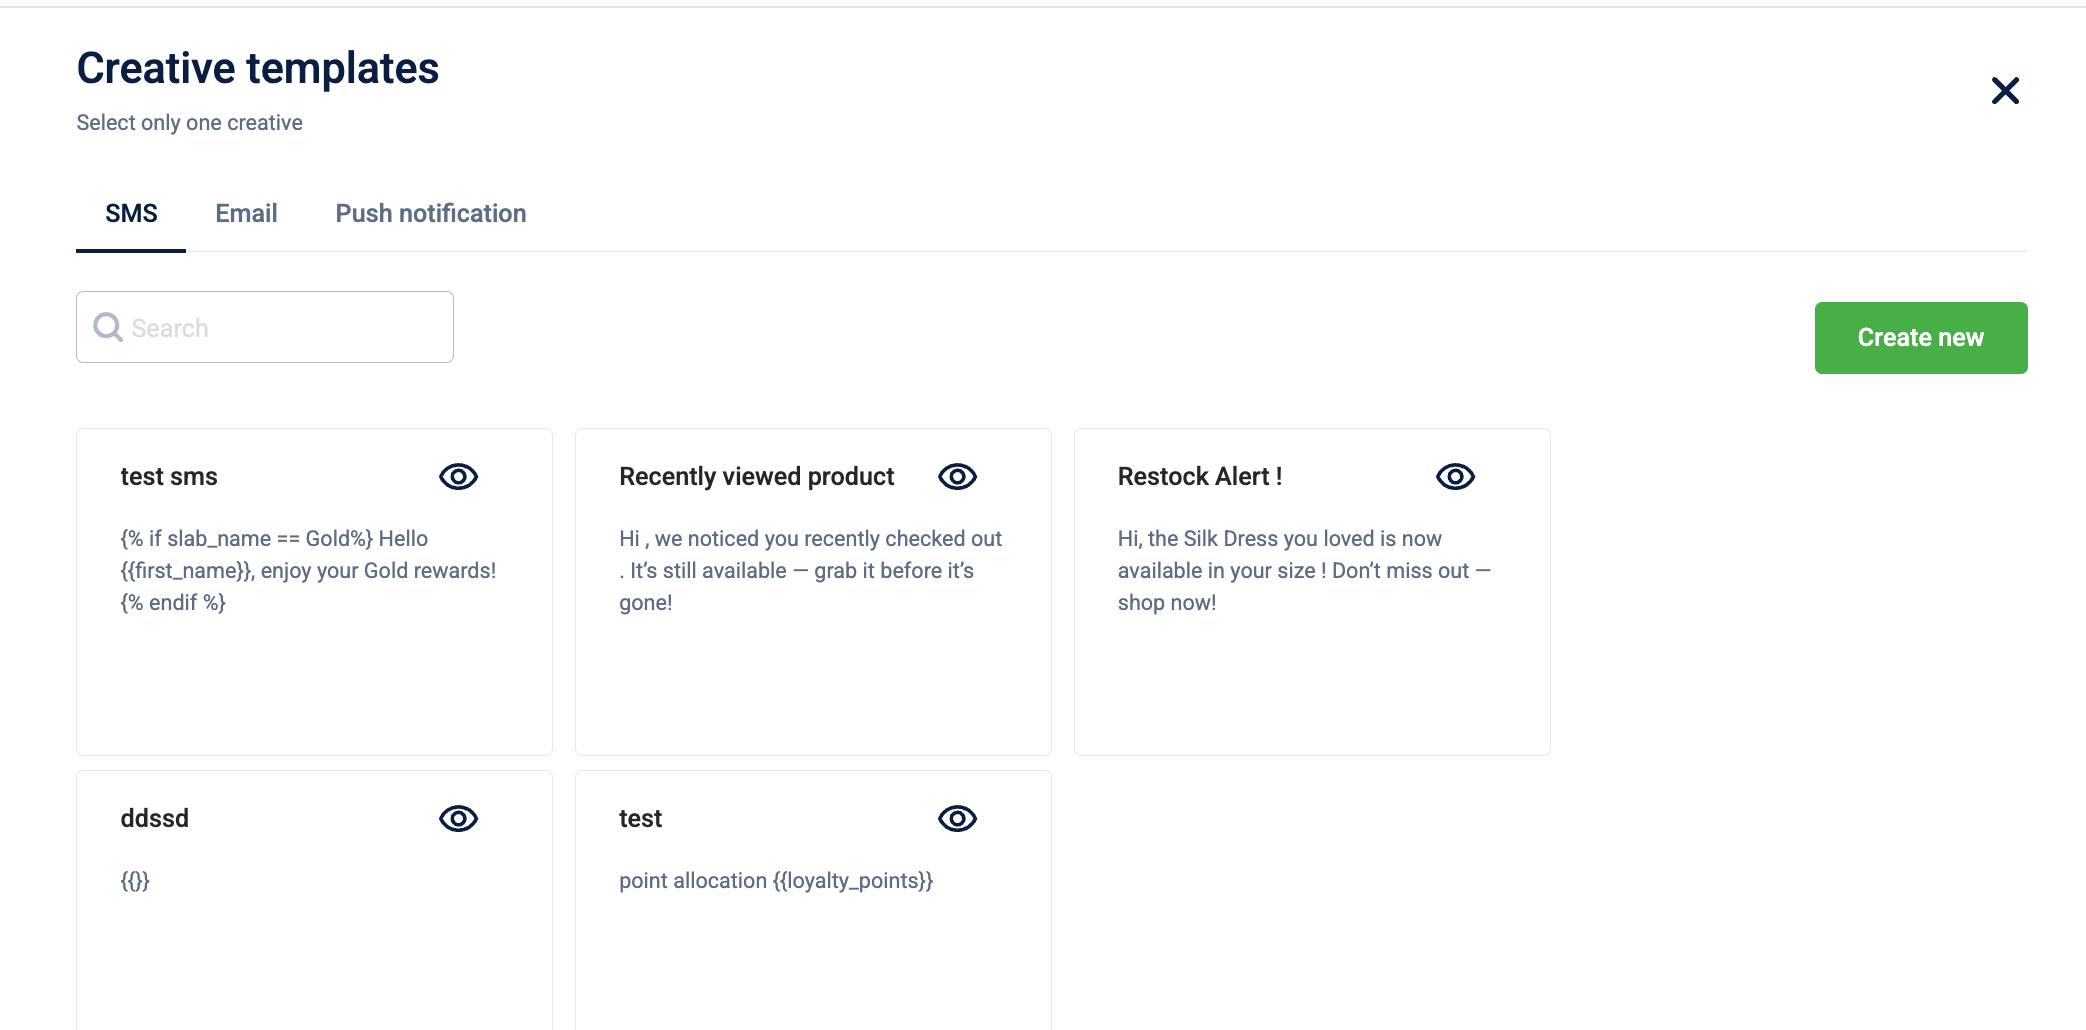
Select a channel tab — SMS, Email, WeChat, or Mobile push — and choose a pre-defined template.
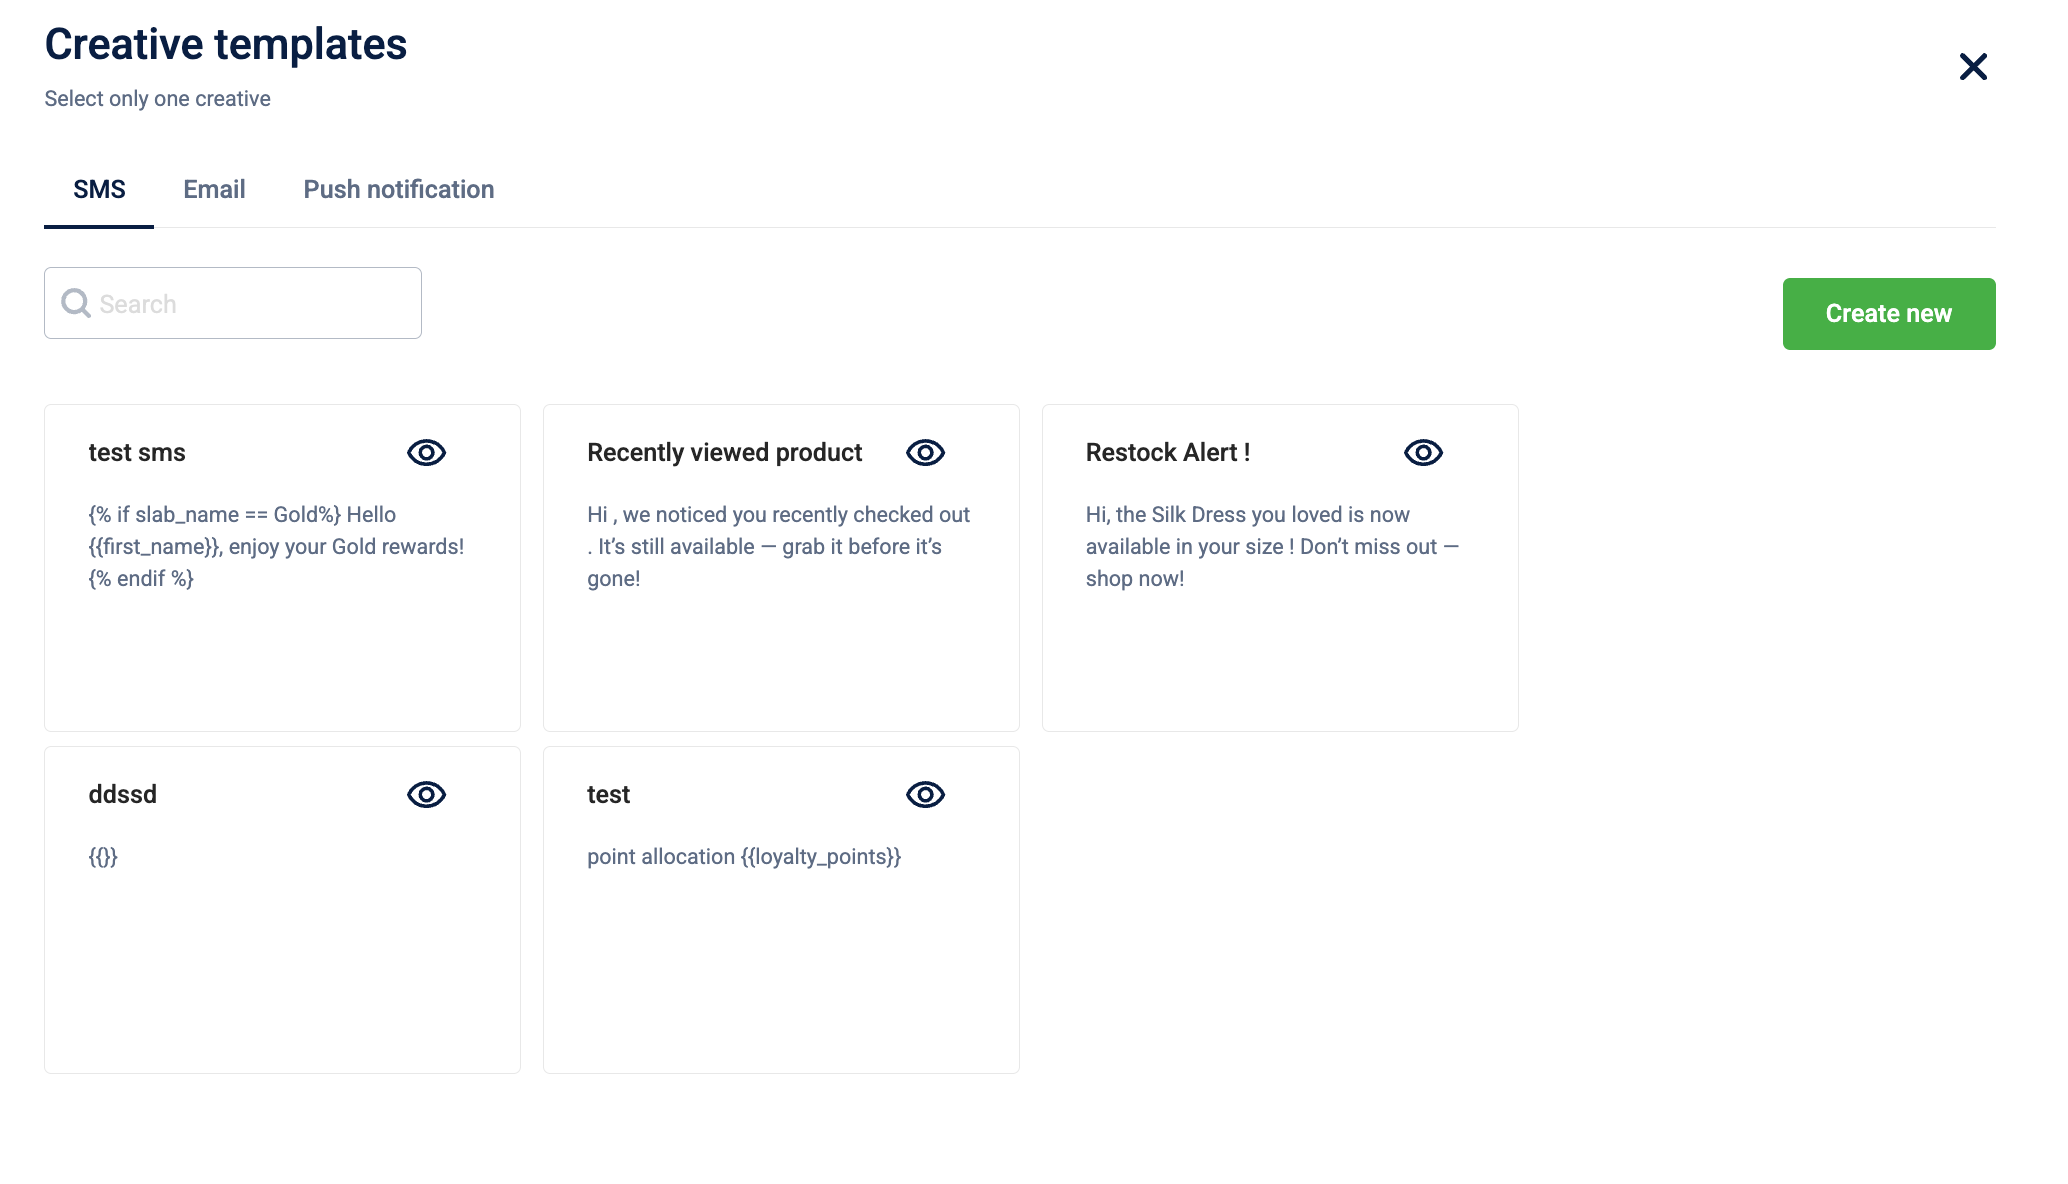
-
Configure the delivery settings for the selected channel.
If the template content includes offer-related tags, an offer must be attached to the creative before saving — otherwise the system displays: "Please add offer tags to the above content." If the content includes points-related tags, a loyalty program must be selected. Resolve all tag warnings before proceeding.
SMS
| Field | Description |
|---|---|
| GSM Sender ID | The sender ID used for GSM network messages. |
| CDMA Sender ID | The sender ID used for CDMA network messages. |
| SMS Domain | The domain through which the SMS is routed. |
| Send to DND customers | Toggle to Enabled to include customers who have registered on the Do Not Disturb list. By default, DND customers are excluded. |
| Use tiny URL | Toggle to Enabled to automatically shorten any links in the message content. Reduces message length and character count. |
| Send to brand POCs | Toggle to Enabled to route a copy of the message to configured brand Points of Contact. |
| Maximum messages per day | Enter a number to limit how many messages the system sends to a single customer per day. This prevents over-messaging if a customer earns the promotion multiple times in one day. |
Email
| Field | Description |
|---|---|
| Sender ID | The email address that appears as the sender. |
| Sender Name | The display name shown in the recipient's inbox. |
| Reply-to ID | The email address customers reply to. |
| Email Domain | The domain used for sending the email. |
| Send to NDNC customers | Toggle to Enabled to include customers on the National Do Not Call registry. By default, NDNC customers are excluded. |
| Use tiny URL | Toggle to Enabled to shorten links in the message content. |
| Send to brand POCs | Toggle to Enabled to route a copy to configured brand Points of Contact. |
| Maximum messages per day | Enter a number to cap how many emails the system sends to a single customer per day. |
WeChat
| Field | Description |
|---|---|
| WeChat account | Select the WeChat account to send the message from. |
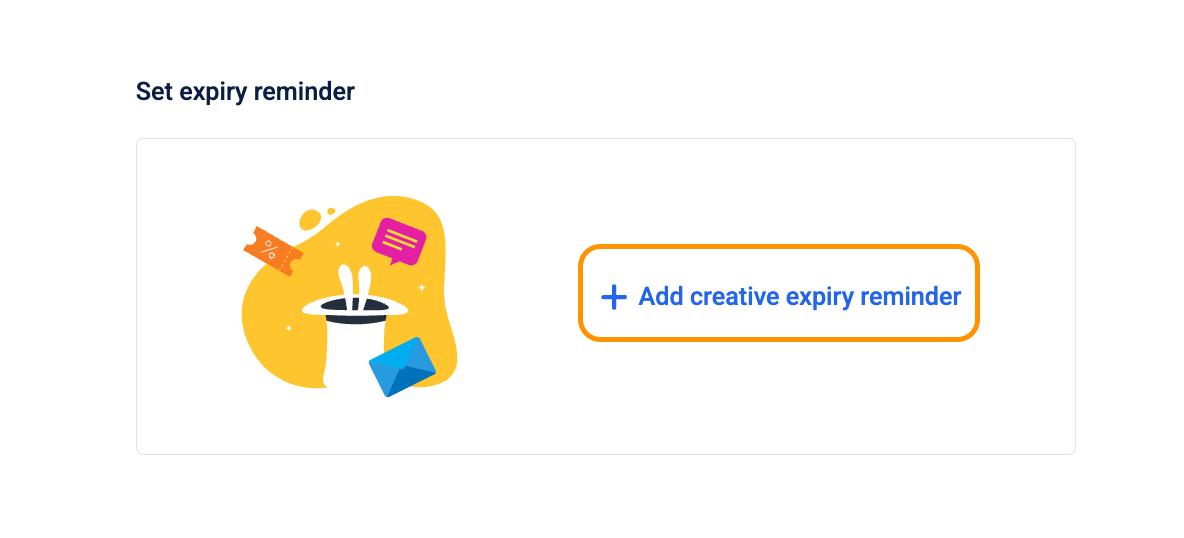
Set expiry reminder
This trigger fires a specified number of days before the customer's earned promotion expires. It nudges customers who have earned but not yet used the benefit, encouraging them to redeem before they lose access.
-
Select + Add creative expiry reminder.
-
In the Expiry before days field, enter the number of days before expiry that the system should send the reminder. For example, entering
3sends the reminder 3 days before the promotion expires for each customer. -
From the Message strategy dropdown, select the delivery strategy. See the On earning section above for the available options and when to use each.
-
Under Audience, select the customers who should receive the reminder. By default, all eligible customers are included.
-
Select a channel tab and choose a template.
-
Configure the delivery settings for the selected channel using the same options in On earning above.
Step 8: Managing promotion stacking
This step defines whether this promotion can apply alongside other active promotions or must apply in isolation. This directly affects how much total discount a customer can receive in a single cart — setting a promotion as exclusive protects your margins by ensuring only this promotion applies, while leaving it stackable lets customers benefit from multiple overlapping offers simultaneously.
The options available here depend on the stacking configuration set at the org level in Cart Promotion Settings.
Compatibility settings only appear if your organisation has enabled cart-level or product-level stacking in Cart Promotion Settings. If this section isn't visible, contact your system administrator.
- Select Show next to Compatibility settings at the bottom of the page.
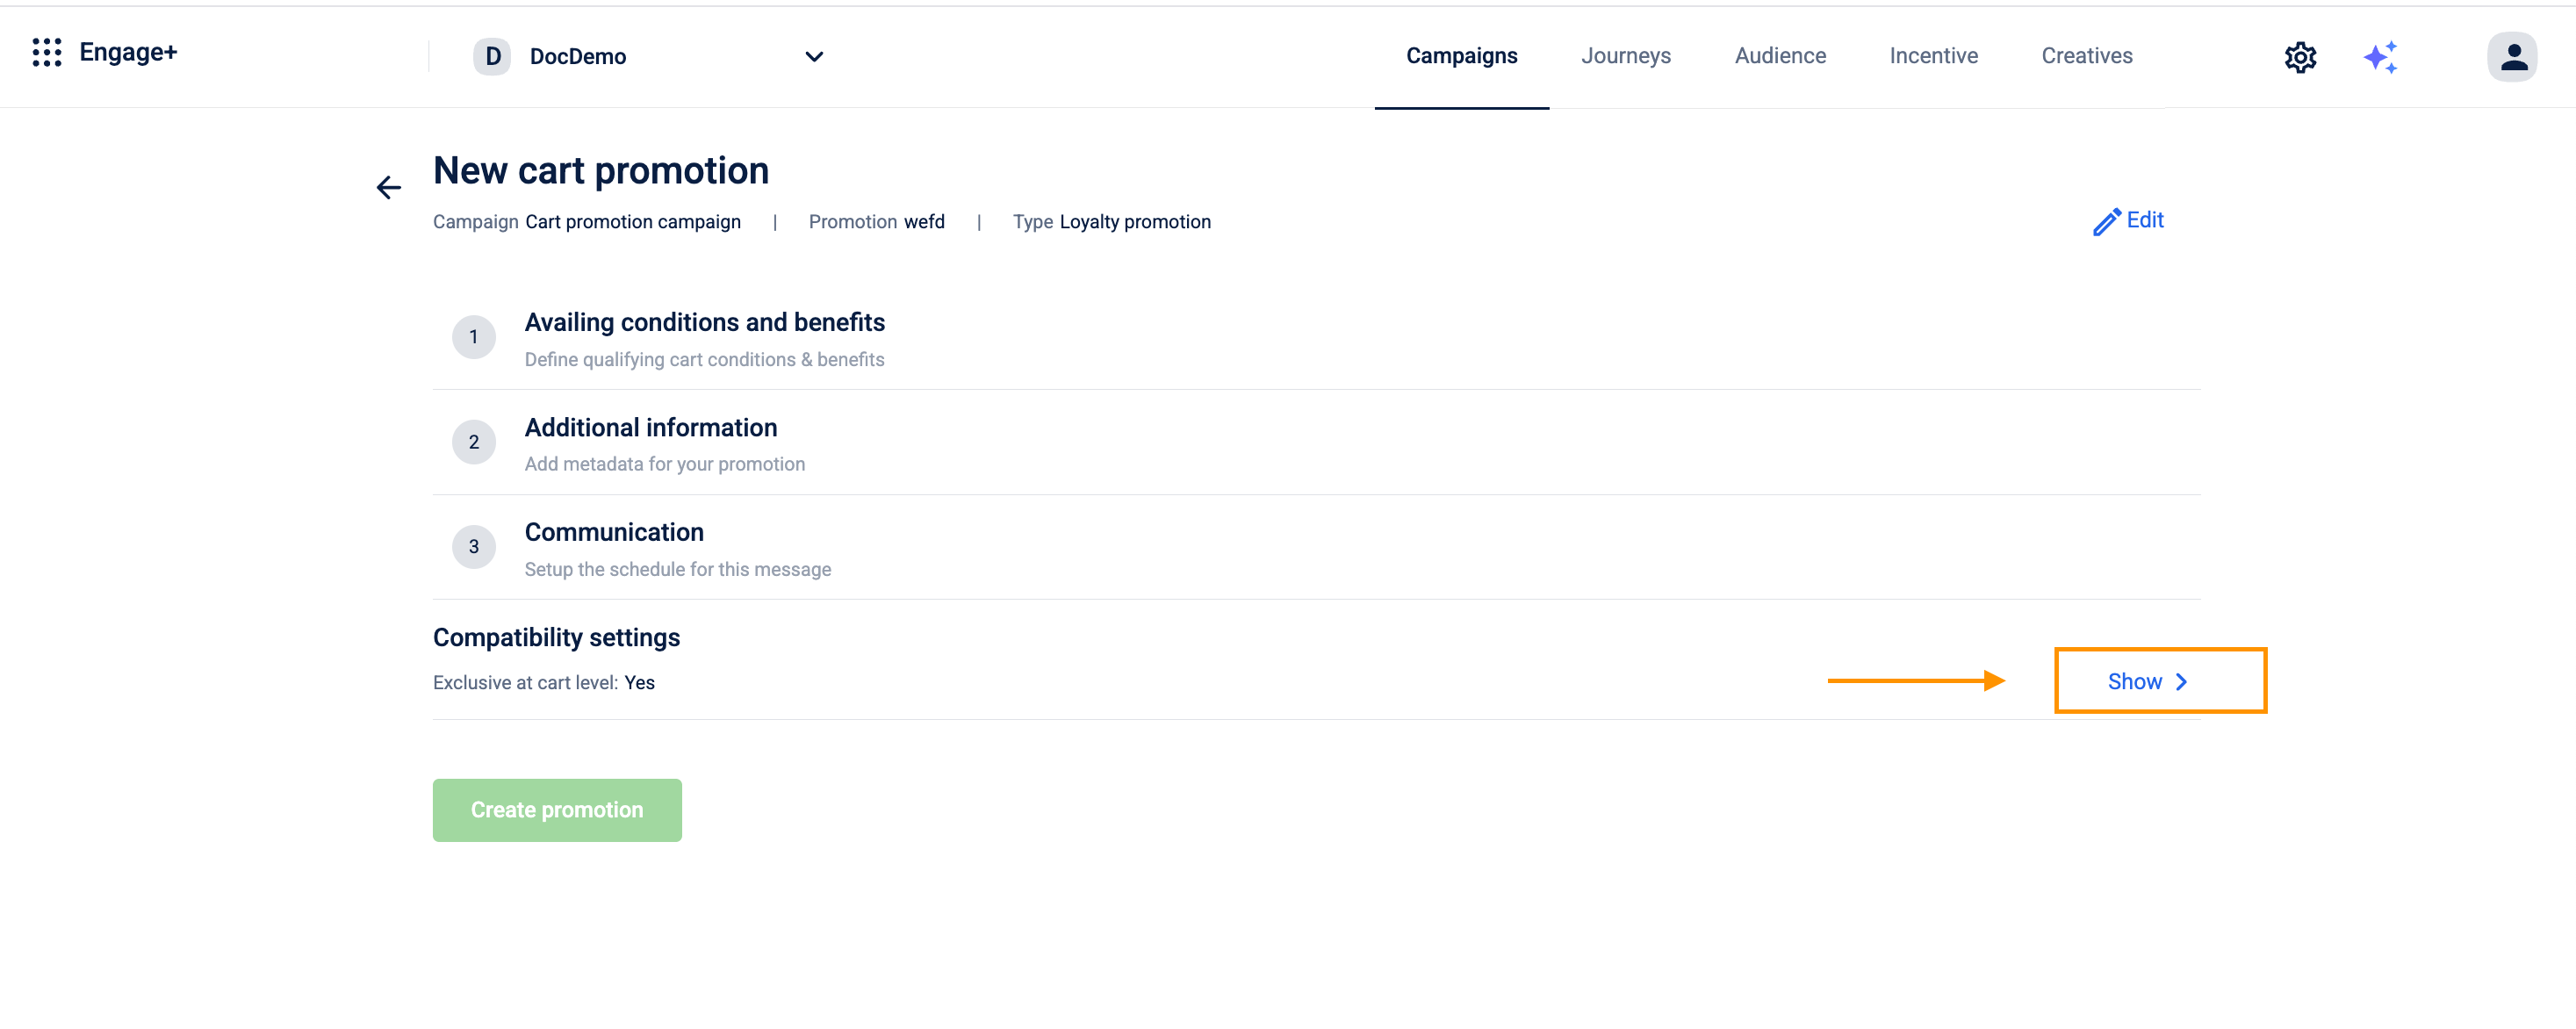
Exclusive at cart level
This option is available when the benefit scope in Step 4 is set to Cart.
- Toggle Mark this promotion as exclusive at cart level.
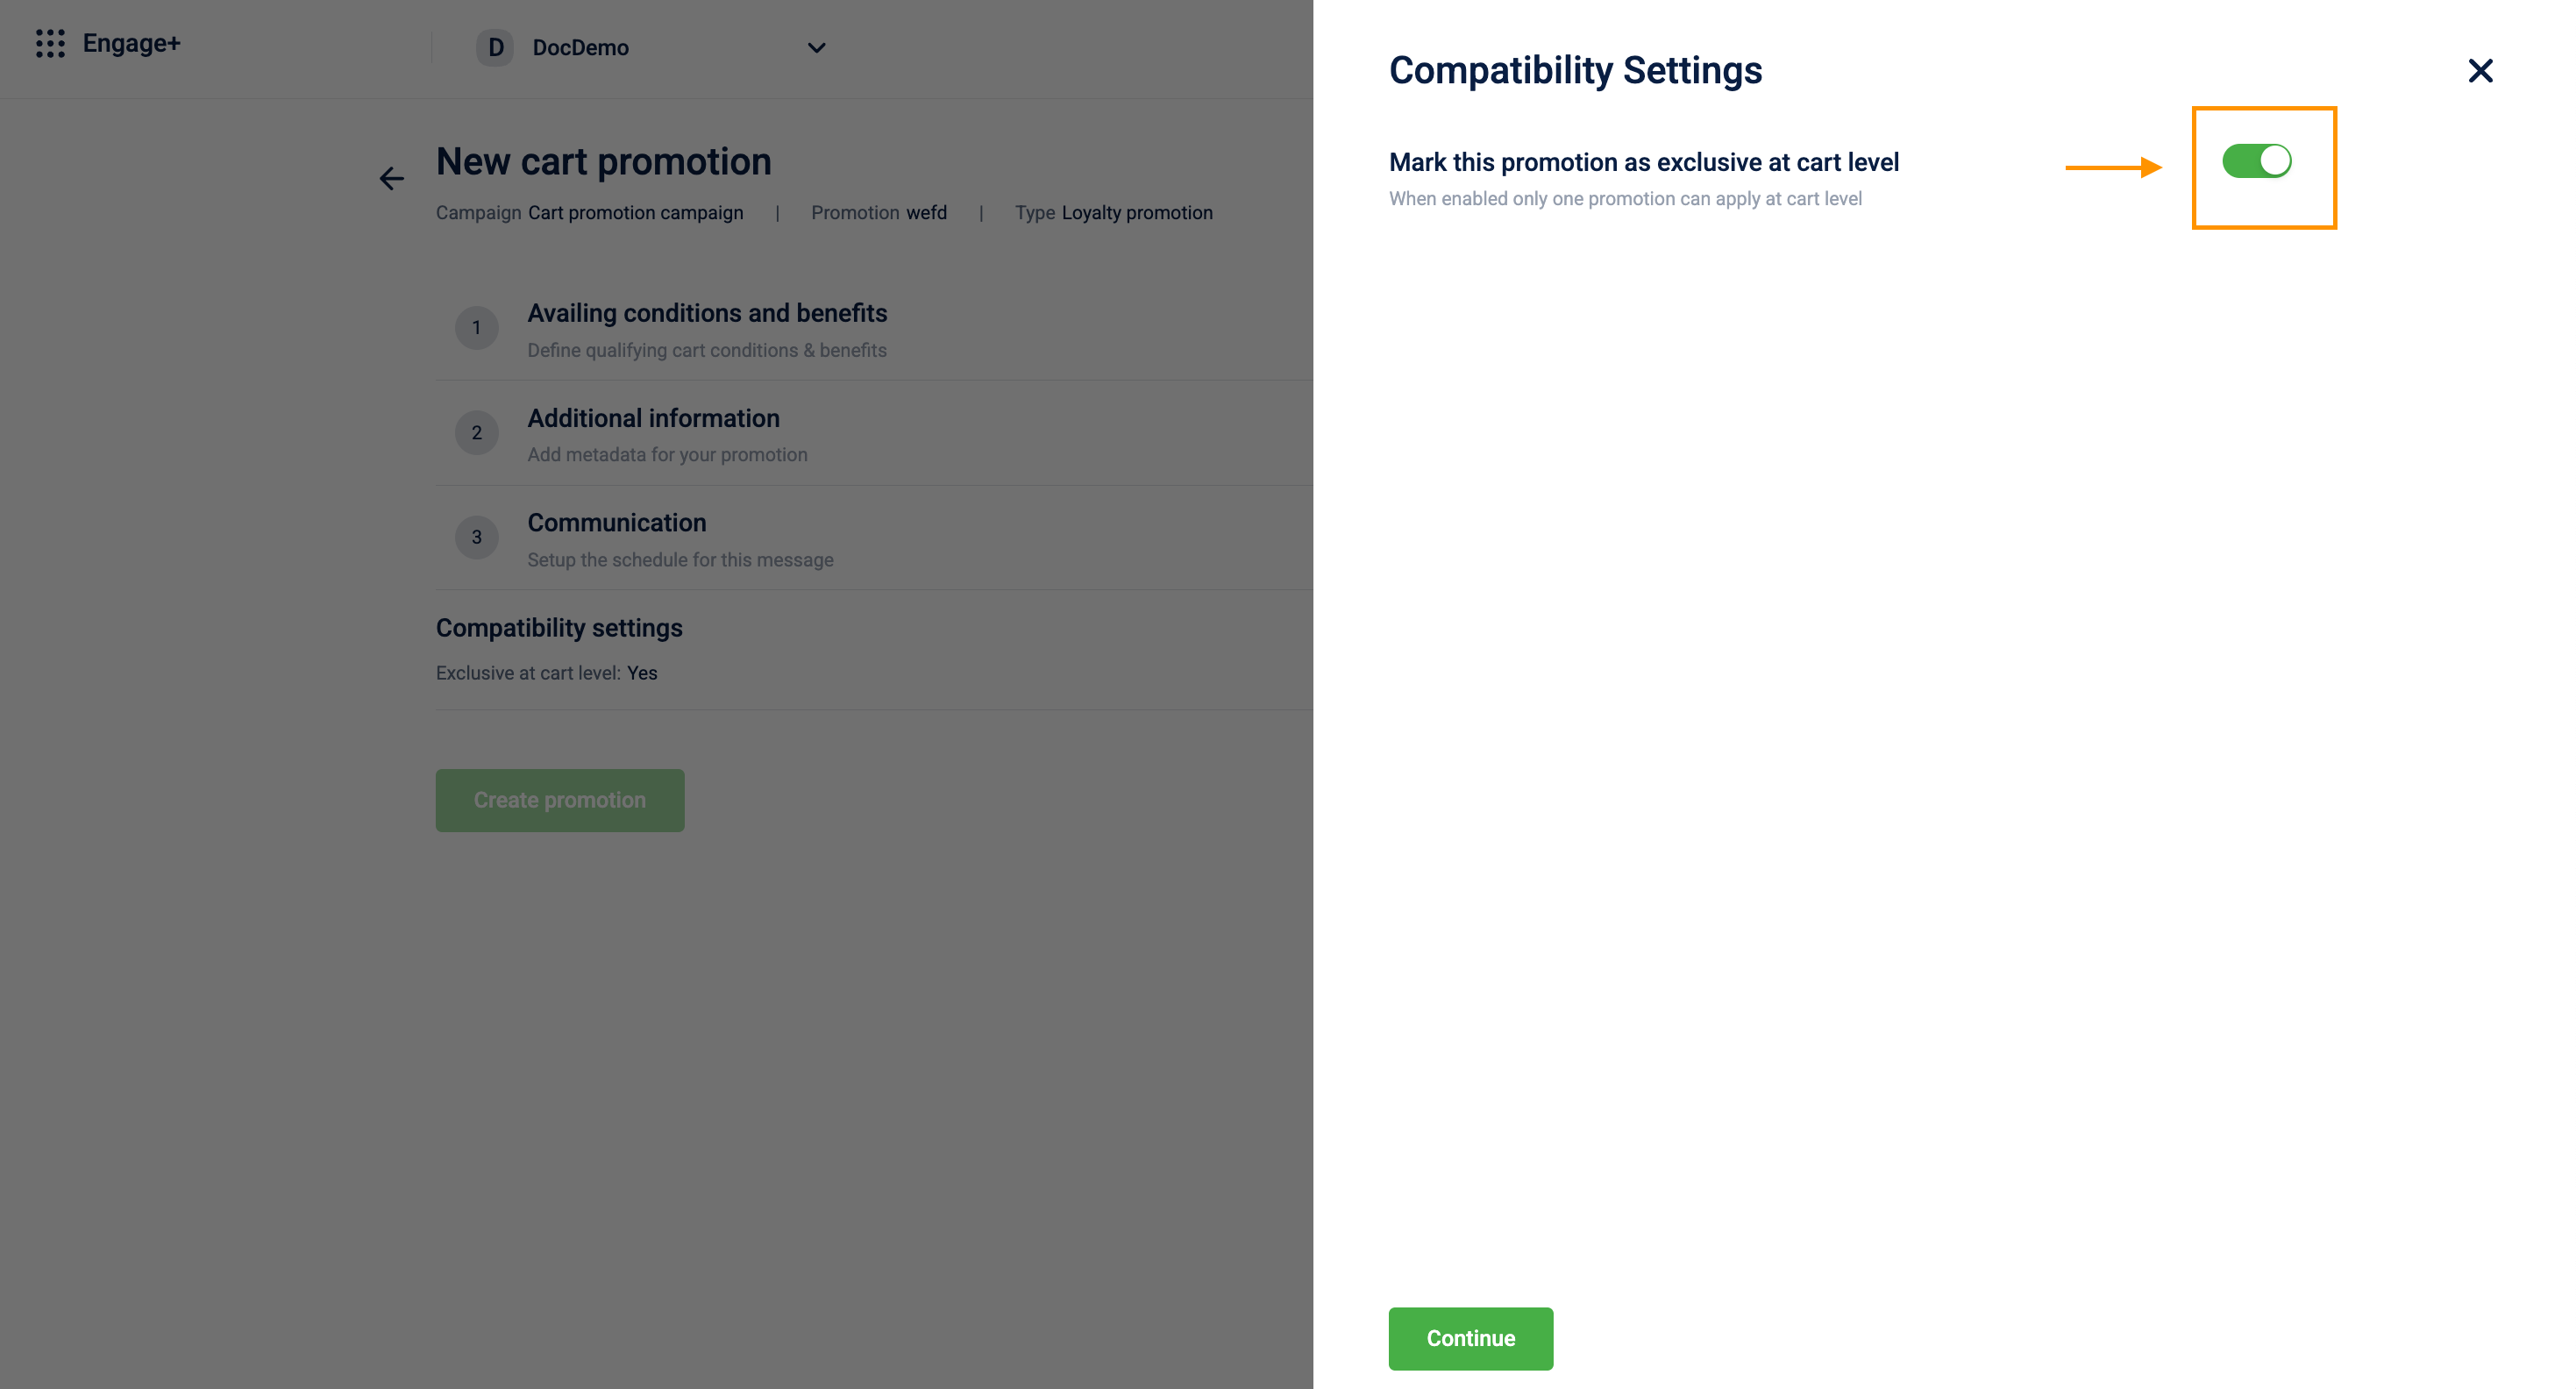
- Enabled: If this promotion is applied, no other promotions will be applied to the same cart. The customer receives the benefit of this promotion only, even if other valid promotions exist for the same cart.
- Disabled: Other applicable promotions can be applied to the cart alongside this one. The customer can benefit from multiple promotions in the same transaction.
Exclusive for selected products
This option is available when the benefit scope in Step 4 is set to Select products in cart.
- Toggle Mark this promotion as exclusive for selected products.
- Enabled: No other promotion can apply a discount to the same products in this cart. The selected products are locked to this promotion's benefit only.
- Disabled: Other promotions can also apply discounts to the same products, allowing a single product to receive multiple overlapping discounts.
- If you enabled Mark this promotion as exclusive for selected products, select the Exclusivity level:
- Quantity level: Exclusivity applies at the individual unit level. Each unit of a qualifying product can only receive a discount from one promotion at a time. If a customer has 3 units of a product and two promotions qualify, each unit is assigned to at most one promotion.
- Select Continue to save the settings.
You have successfully configured the benefits, scope, restrictions, and communication settings; now proceed to finalize the promotion.
Review your configuration and select Create promotion to activate the cart promotion
NoteBy default, an organization can have up to 250 active promotions across all types. If needed, this limit can be increased based on requirements.
Updated 17 days ago