
Create a Broadcast Promotion
A broadcast promotion directly issues rewards to a targeted group of members without requiring them to complete any qualifying activity. This makes it ideal for delivering one-time incentives, seasonal rewards, or appreciation gifts to a specific audience on a defined schedule.
For more information on broadcast promotions and how they differ from activity-based promotions, refer to Core Concepts.
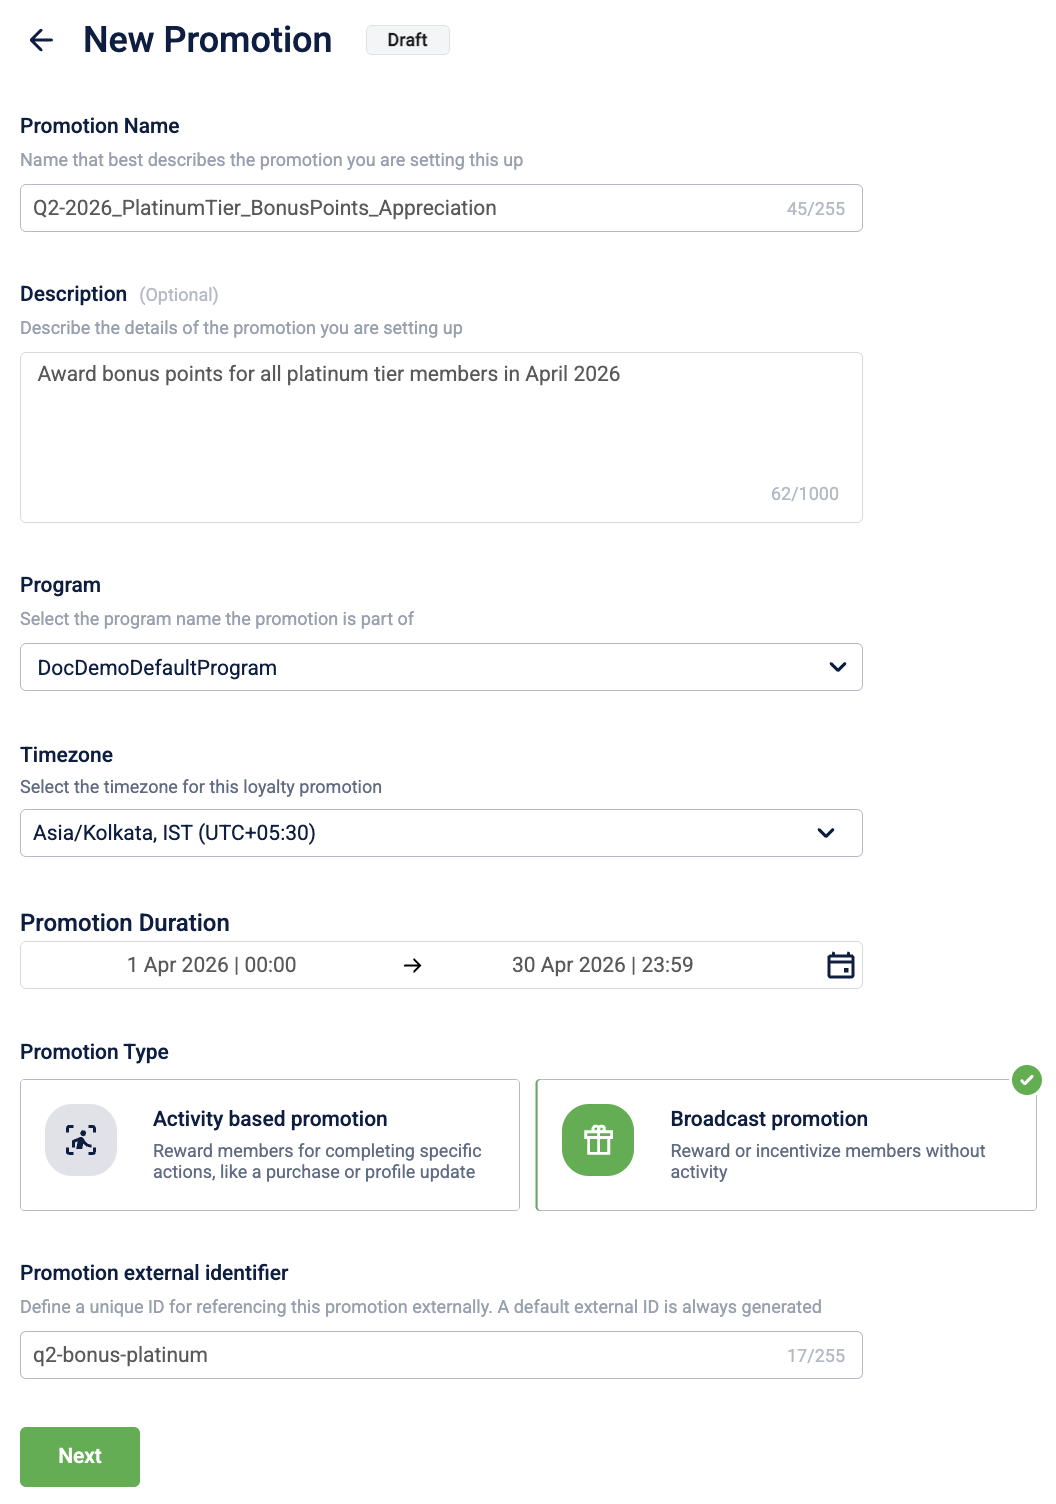
Step 1: Defining the promotion details
Start by defining the promotion's basic details, such as its name, description, duration, and the loyalty program it belongs to.
-
Go to the Promotions tab under Loyalty+.
-
Select Create Promotion and select New Promotions (v3) from the dropdown.
-
In the Promotion Name box, enter a unique name. The character limit for the promotion name is 255 characters.
TipUse a consistent naming convention for easier analysis. A recommended format is
[Timeframe]_[Audience]_[Offer]_[Objective], for example,Q4-2025_PlatinumTier_BonusPoints_Appreciation. -
(Optional) In the Description box, outline the business case or key configuration details. The character limit for the description is 1000 characters.
-
From the Program dropdown, select a loyalty program. This step is required for organisations with multiple loyalty programs (MLP).
-
From the Timezone dropdown, select a time zone. This is the time zone where the loyalty promotion was created.
NoteThis information is for reference only. The system always displays information in the organisation time zone.
-
In the Duration of the promotion box, select the start and end date and time. The promotion operates in your organisation's time zone.
NoteIf you do not provide a time along with the date, the times will default to 00:00 and 23:59 (start of the day to end of the day).
-
Under Promotion type, select Broadcast promotion.
-
In the Promotion external identifier box, enter a unique ID for tracking and reporting. The character limit is 255 characters.
-
Select Next.
You have now established the promotion's core identity and schedule, preparing you to define the target audience.
Step 2: Defining the target members
Specify which members will receive the broadcast promotion. You can target one or more predefined audience groups.
-
Select Add under the Add target members section.
-
In the Audience groups window, select the checkboxes for the groups you want to include.
-
Select Done and Next.
NoteThe audience groups available for selection are synced from your organisation's segments. Multiple groups can be selected and the system applies OR logic, meaning members belonging to any of the selected groups will receive the promotion.
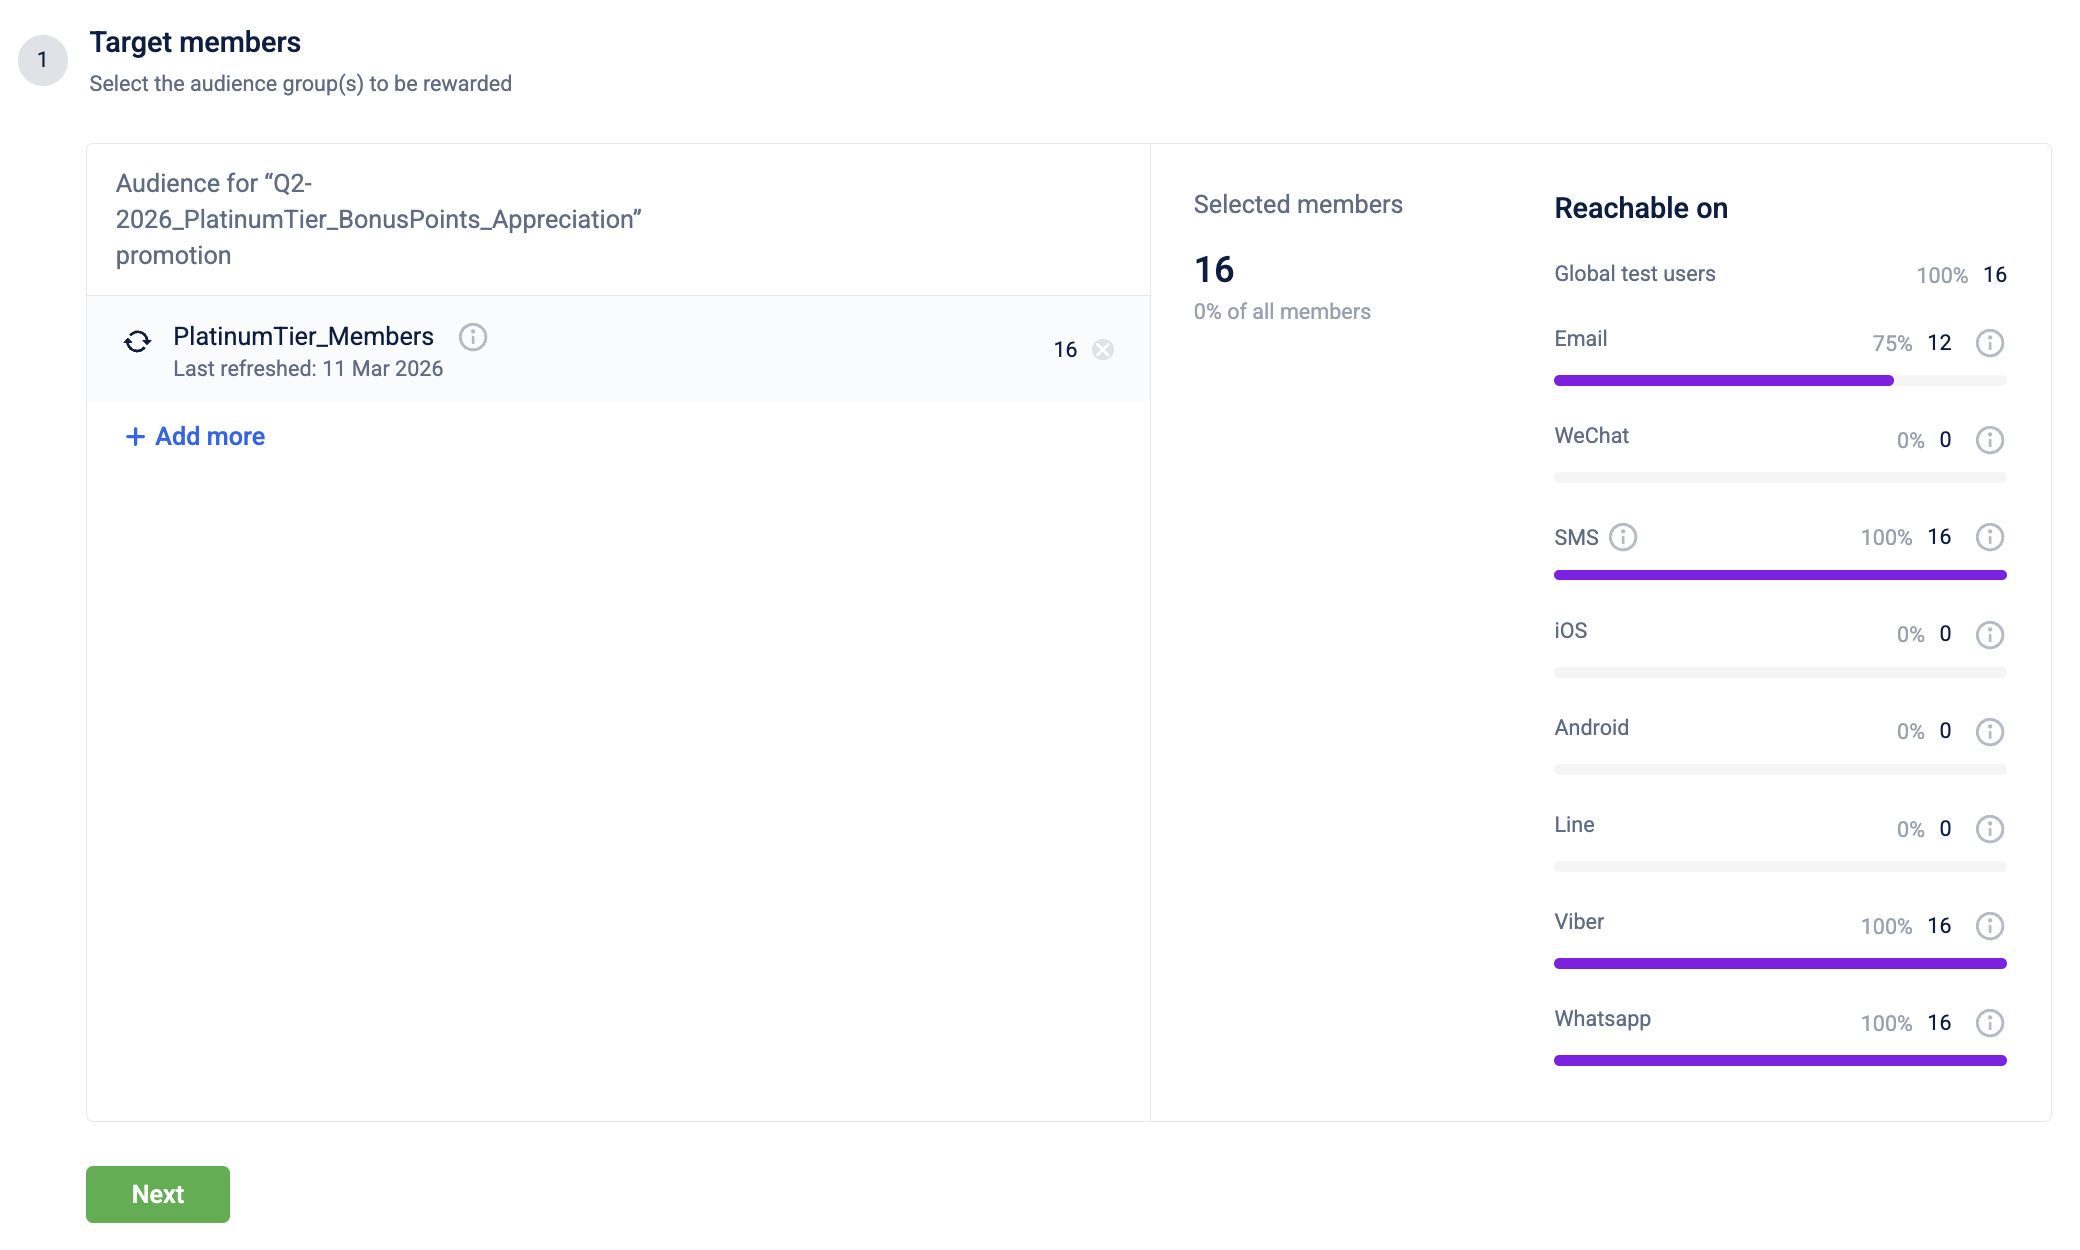
You have successfully defined the target audience, ensuring that only members of the selected groups will receive the promotion's rewards.
Step 3: Configuring brand actions
Define the reward that will be issued directly to the targeted members.
-
Select Add brand action and select the required action from the list. For more information on the available brand actions and how to configure them, refer to Brand Actions.
-
Configure the selected brand action.
-
Select Save.
-
(Optional) Select Add brand action again to add more actions.
-
Select Next.

You have configured the rewards to be issued to the target members when the broadcast promotion runs.
Step 4: Scheduling the promotion
Define when the broadcast promotion runs and how frequently it issues rewards to the targeted members.
- Select the schedule type. The following options are available:
| Schedule type | Description | Example |
|---|---|---|
| Immediately after approval | Issue the reward to all targeted members immediately after the broadcast promotion is approved. | A brand issues 500 bonus points to all Gold-tier members once a checker approves it. |
| Specific date & time | Issue the reward to all targeted members at a single, defined point in time. | A brand issues 500 bonus points to all Platinum-tier members at 10:00 AM on December 25th, 2025. |
-
(Optional) If you select Specific date & time, set the date and time for the promotion to run.
-
Under Frequency, select how often the promotion issues rewards to the targeted members. The following options are available:
| Frequency | Description |
|---|---|
| Once | The promotion issues rewards to the selected members only once, on the scheduled date and time. |
| Daily | Triggers the brand actions daily for newly added members in the selected audience groups. |
-
Select Next.
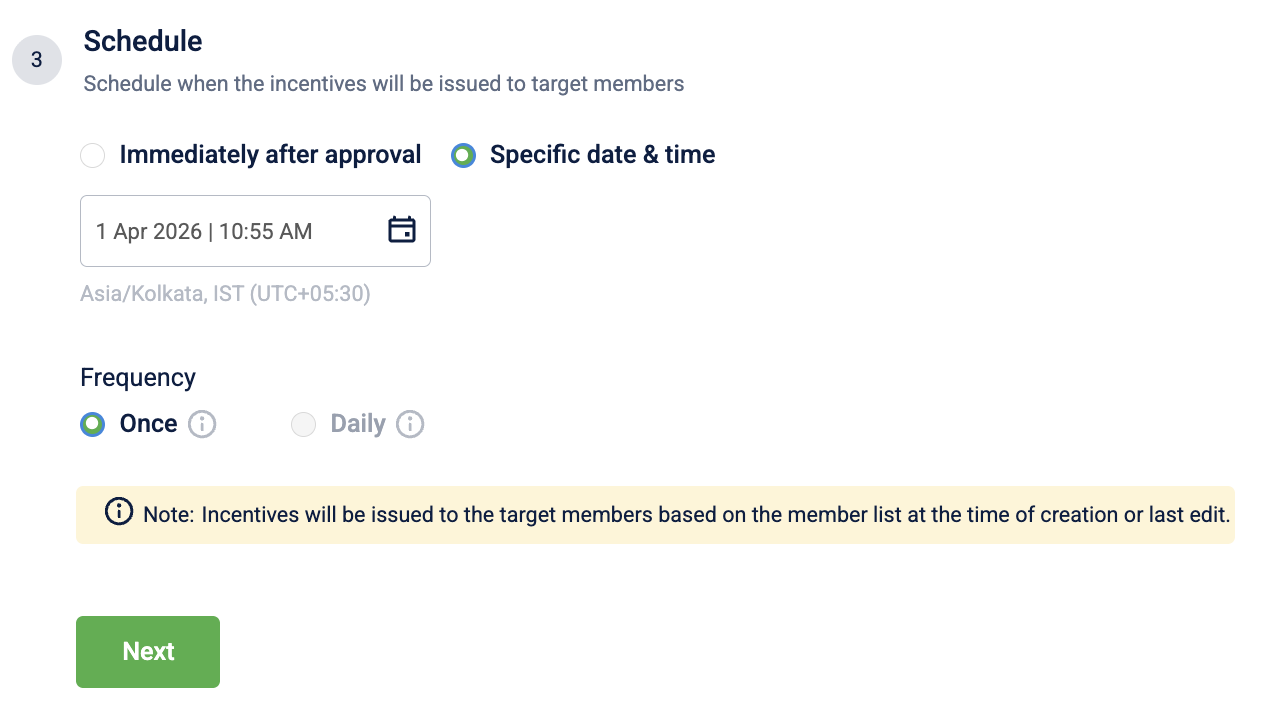
You have defined the broadcast promotion schedule, ensuring that rewards are issued to the targeted members at the configured time.
Step 5: Configuring additional settings (Optional)
You can configure settings for internal operations and reporting, such as associating a till code or defining the liability split for shared promotions.
-
(Optional) Select a till code from the dropdown or enter a till code to associate with the loyalty promotion. All points allocated on promotion achievement will be tagged to the selected till.
-
(Optional) Select Edit to define the liability split for the loyalty promotion, select Add liability owner, and select a new liability partner from the dropdown. This feature serves primarily as metadata for accounting purposes and does not affect the customer's experience or the logic of the promotion.
-
Select Done to save the changes.
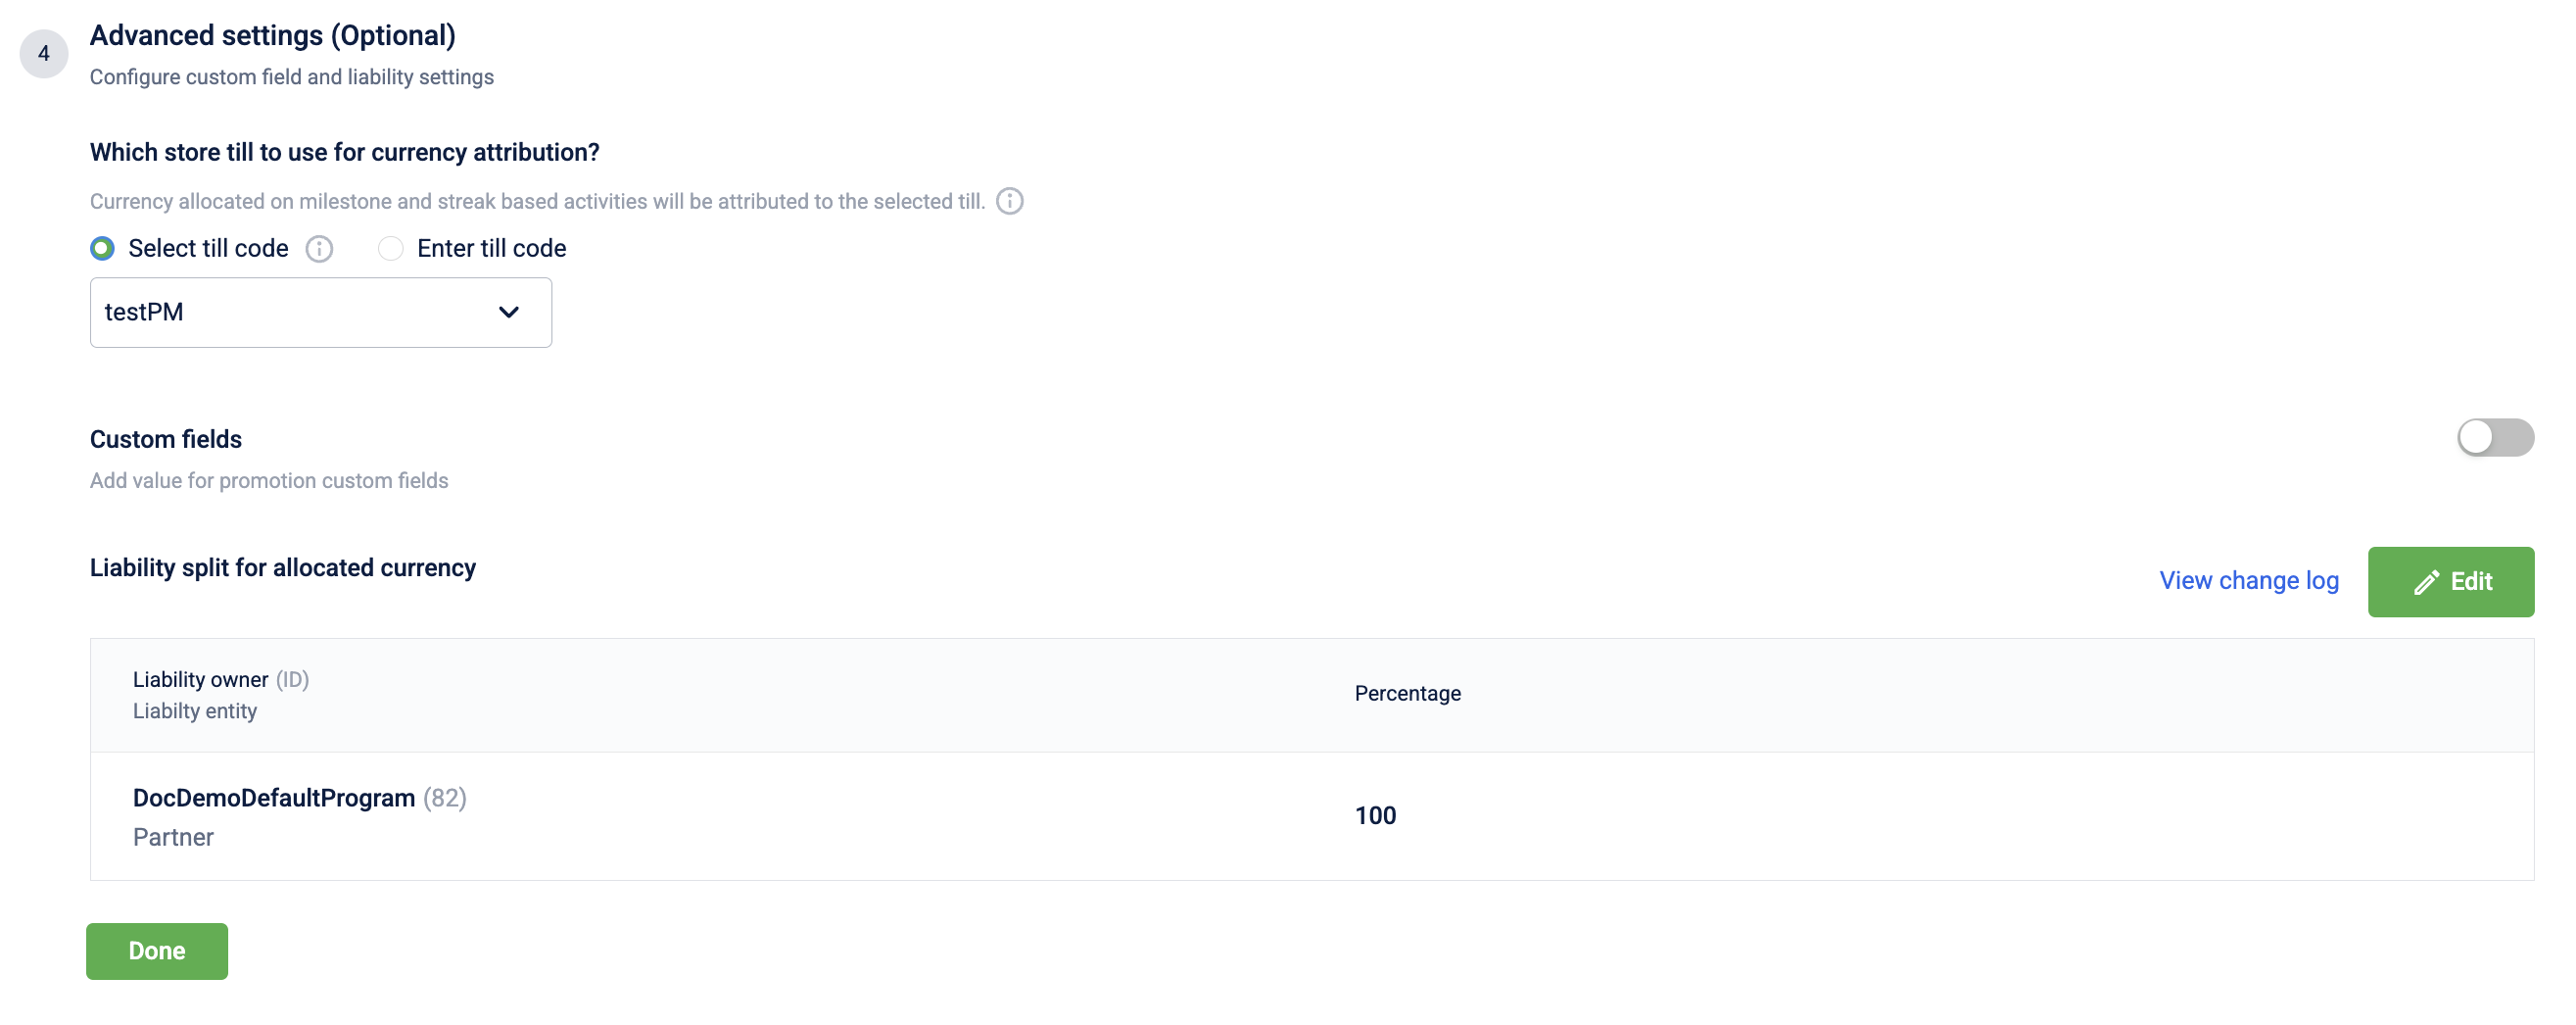
You have configured the advanced operational settings, ensuring the promotion is properly tagged for internal reporting and financial tracking.
Step 6: Finalising the promotion
Once you have completed all the configuration steps, you have two options:
-
Save and exit: Save the promotion as a draft to continue working on it later.
-
Send for approval: Submit the promotion to be reviewed and activated.

By following these steps, you have fully configured a new broadcast promotion, which is now saved as a draft or is awaiting approval from a checker.