
Create a Reward
Creating a reward is a structured process that defines what a customer can redeem, who can redeem it, how much it costs, and how many times it can be redeemed. The following steps guide you through the complete configuration.
Before you begin
Some fields in this flow, such as categories, groups, custom fields, and languages, are only available if they have been configured first. To set them up, go to Rewards+ and select the Settings icon in the top-right corner of the Rewards Catalog page. See Rewards Catalog settings for instructions. If you skip this step, those fields will be empty when you reach them.
Step 1: Basic details
Set the reward's core identity, such as its name, duration, type, and whether it publishes automatically on the start date.
-
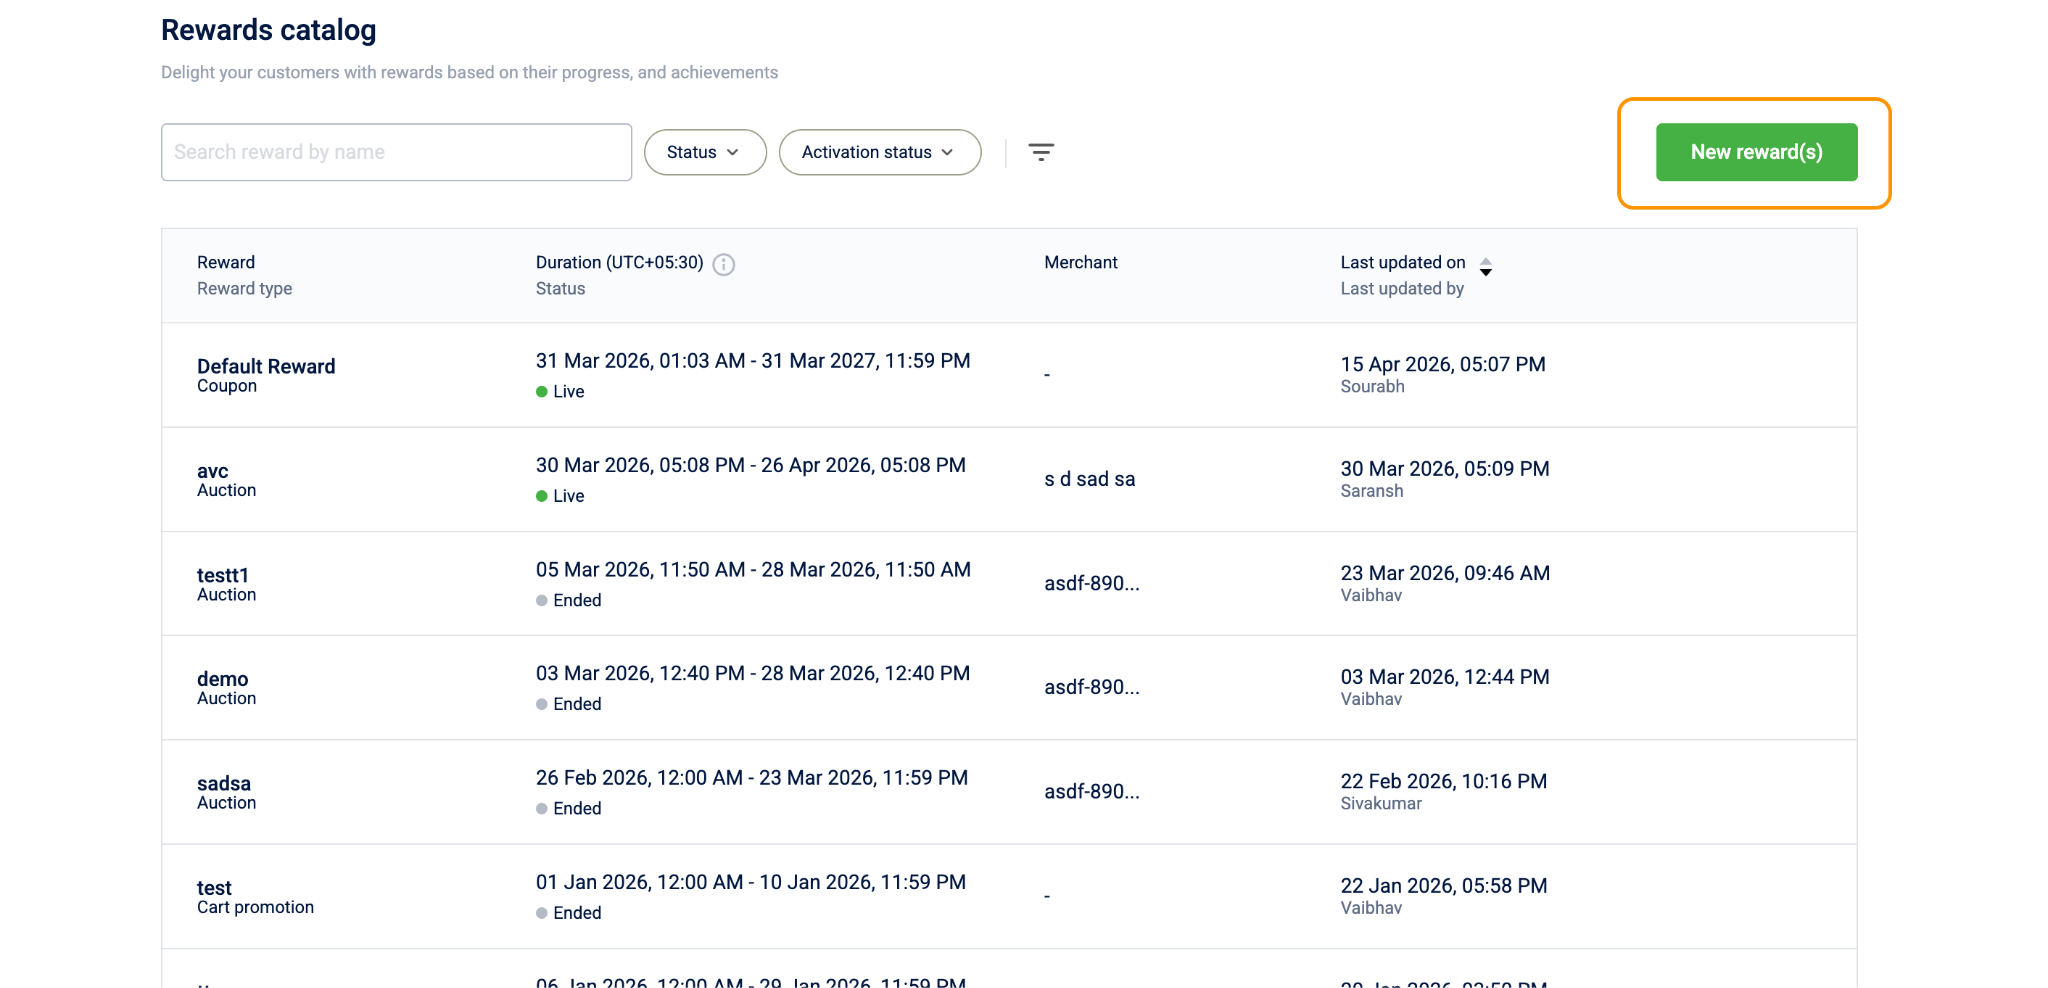
Go to Rewards+ > Rewards Catalog.
-
Select New Reward.
-
In the Name box, enter a name for the reward. The limit is 255 characters.
This name appears in the catalog list and in admin search results. Admins scanning the list for a reward search against this field.
-
(Optional) In the Description box, enter a description. You can add up to 4,000 characters.
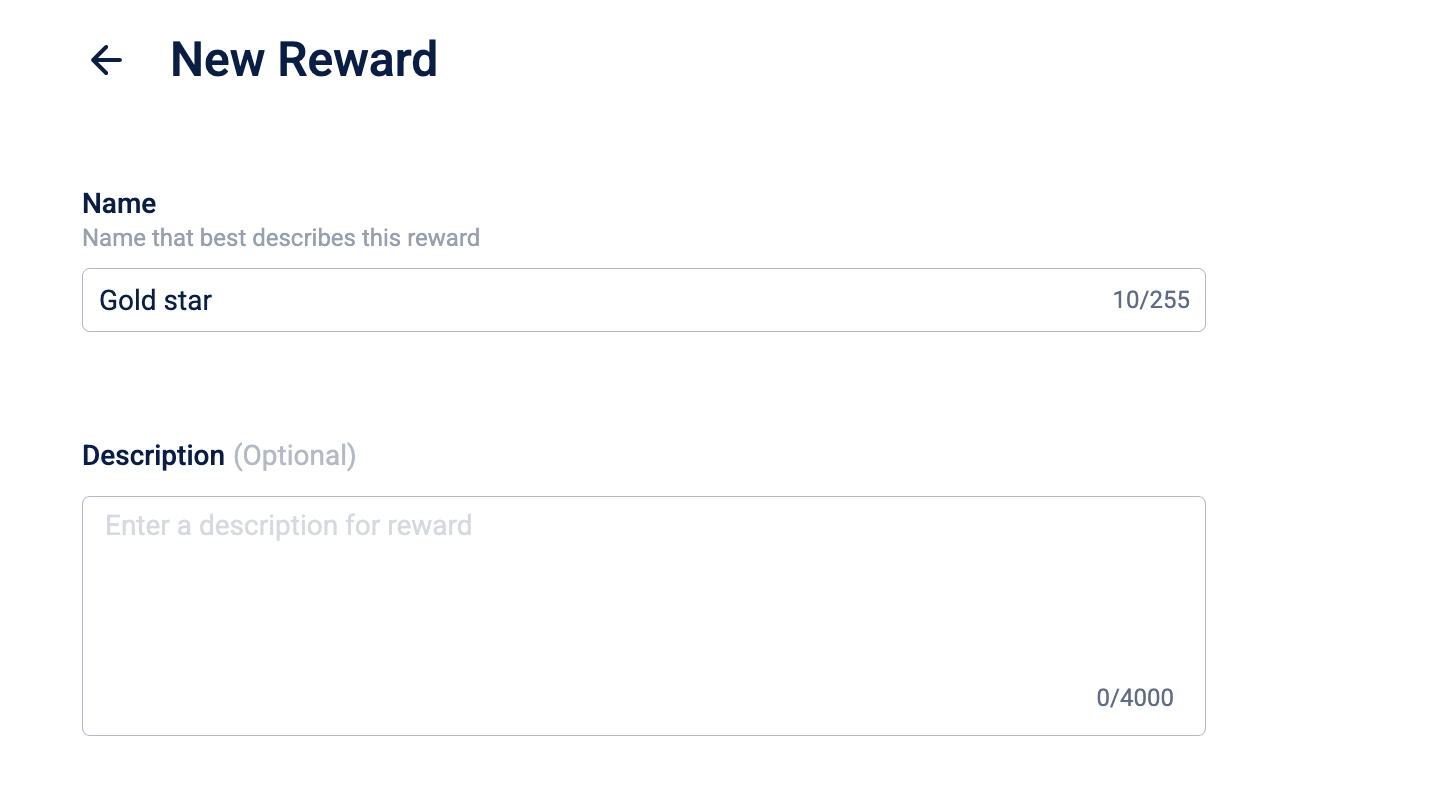
The description appears on the reward detail page that customers open when they select a reward. Use it to provide customers with context on what they're receiving and any redemption conditions.
- In the Duration field, set a start date and time and, optionally, an end date and time. The Rewards Catalog uses your organization's timezone.
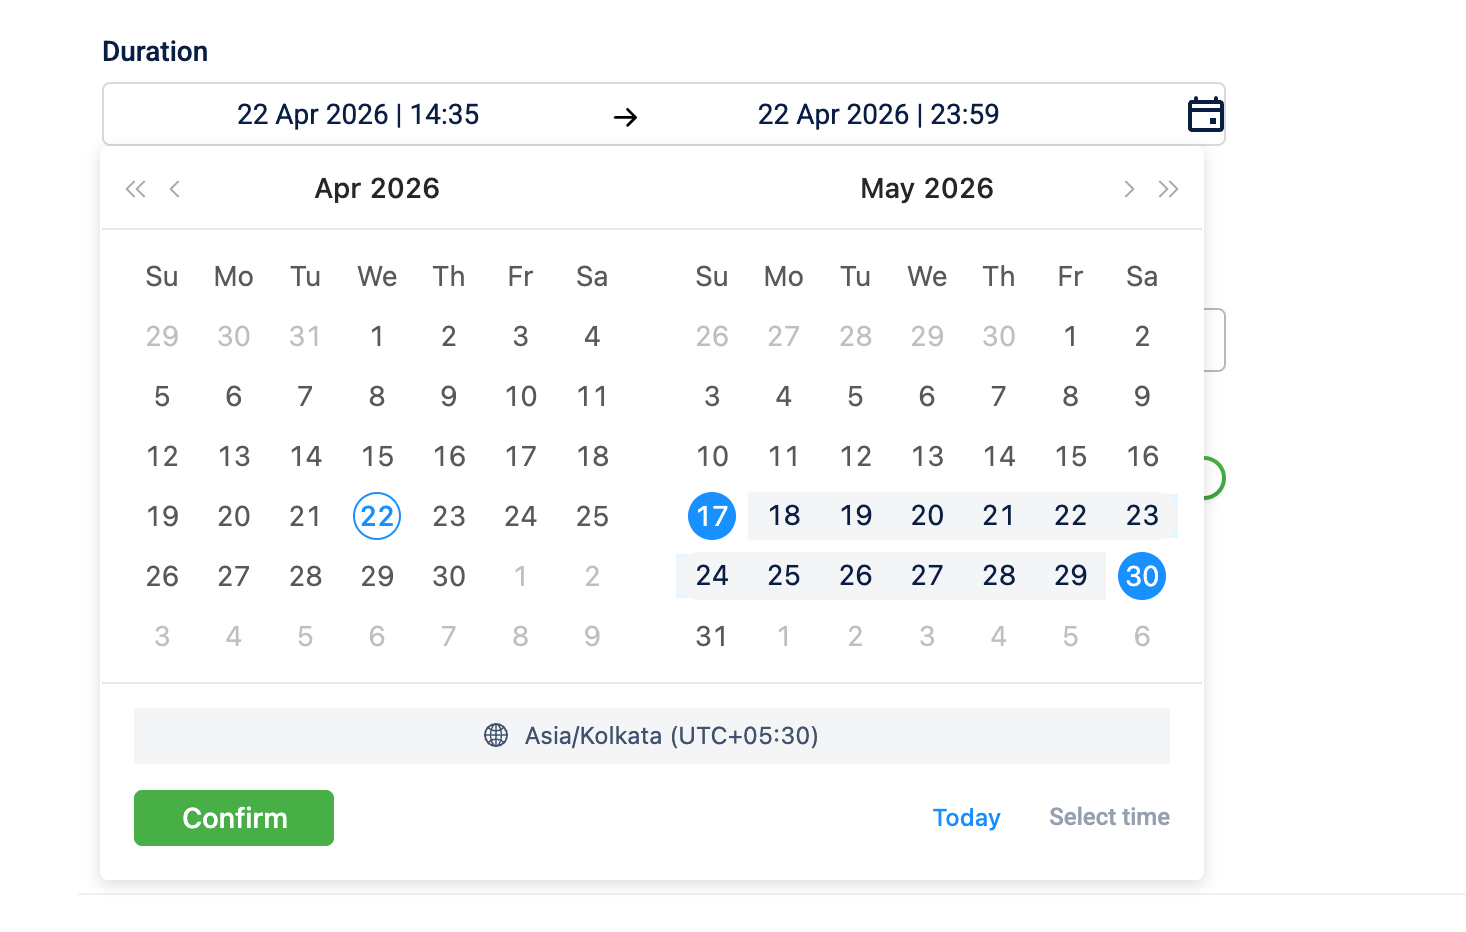
When the start date arrives, the reward status changes from Upcoming to Live and becomes redeemable by eligible customers. When the end date passes, the status changes to Ended, and redemptions stop automatically with no admin action required.
If you change the duration later, it may reset configured inventory limits. See Edit a reward for details.
-
From the Reward type dropdown, select a type.
The reward type determines two things: (1) which pre-configured incentives appear for you to link in Step 3. (2) what the customer actually receives when they redeem the reward. For a full description of each type, see Reward types.

Once the reward goes Live, these fields cannot be edited. Changing it once the reward goes live would invalidate any codes already issued to customers. You can change it while the reward is Upcoming, which will reset any incentive you've already linked.
Note
If you change the reward type after you have already linked an incentive, the system will show a "Your changes will modify dependent steps" warning. Confirming will remove the previously linked incentive, because the new reward type requires a different incentive format. You will need to link a new incentive in Step 3.
-
For the Coupon type only: The Reward issued by field appears. Select who issues the reward:
- [Your organization name], your organization issues the reward directly.
- Other merchant, a third-party merchant issues the reward.
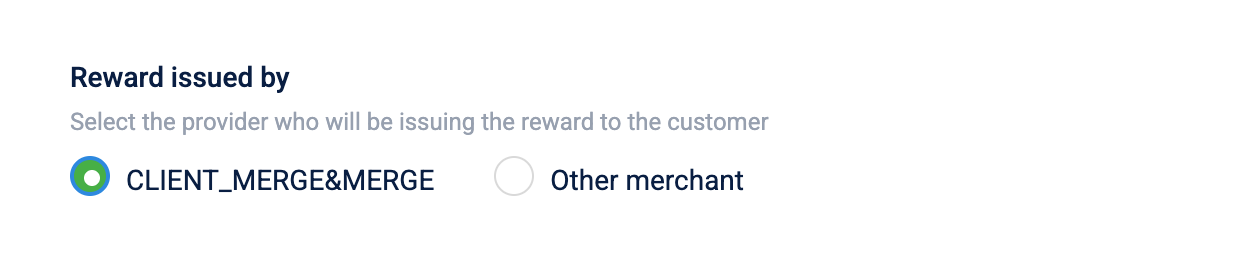
This determines which incentive records appear in Step 3 and is recorded against every issual for reconciliation. Changing it later resets the linked incentive.
- The Activate reward toggle is on by default. Here's what each state does:
| Toggle state | What it does |
|---|---|
| On | The reward becomes visible and redeemable to eligible customers exactly on the start date, with no further admin action needed. |
| Off | The reward exists in the system but is completely invisible to customers, regardless of the start date. It stays hidden until an admin manually turns it on. Use this when you want to stage a reward without publishing it yet. |

- Select Continue.
You've now established the reward's core identity and schedule. You can define the target audience next.
Step 2: Who can view the reward?
Define which customers can see and redeem the reward. The system runs this check before showing the reward to any customer.
All customers
Select All Customers to make the reward available to your entire customer base. No filtering runs for every customer who reaches the reward via the catalog, a promotion, or a direct issue where the customer needs to claim the reward and redeem it.

Specific customers
Select Specific Customers to restrict the reward to a targeted group. The Filter customers based on list appears.
| Filter option | What it does |
|---|---|
| Loyalty program, Tier and Supplementary program | Shows the reward only to customers in a specific loyalty program, tier, or supplementary program, for example, Gold tier members only. |
| Segment and Partition | Shows the reward only to customers in a predefined segment or partition. Use this for behavioral or demographic targeting. |
| Customer label | Shows the reward only to customers carrying a specific label on their profile, such as "VIP" or "At-risk." |
| Card Series | Shows the reward only to customers who hold a specific card type, such as a co-branded credit card. |
Customers who don't match the filters can't see the reward at all, it doesn't appear in their catalog view.
-
Within a filter category, OR logic
Selecting multiple values in the same category means the customer must match at least one. Selecting "Program A" and "Program B" qualifies a customer enrolled in either program. -
Across filter categories, AND logic
Combining different categories means the customer must satisfy all of them. Selecting Program A or B, plus Gold or Silver tier, requires the customer to be in one of the programs and one of the tiers.
You've now defined who can see and redeem the reward. You can configure the incentive and cost next.
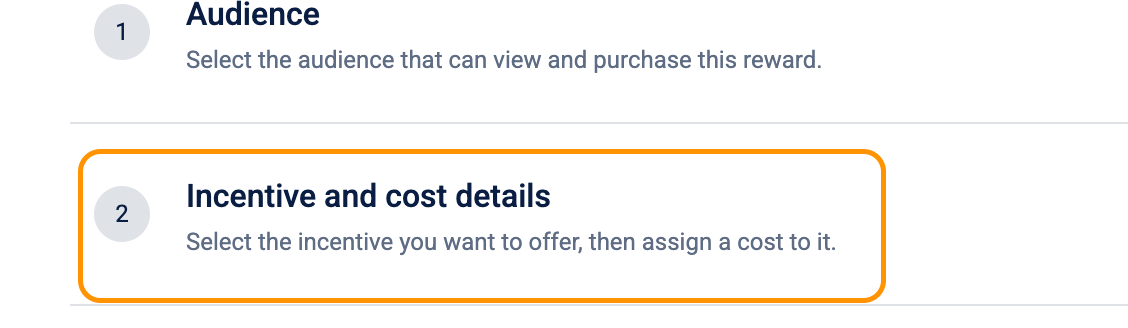
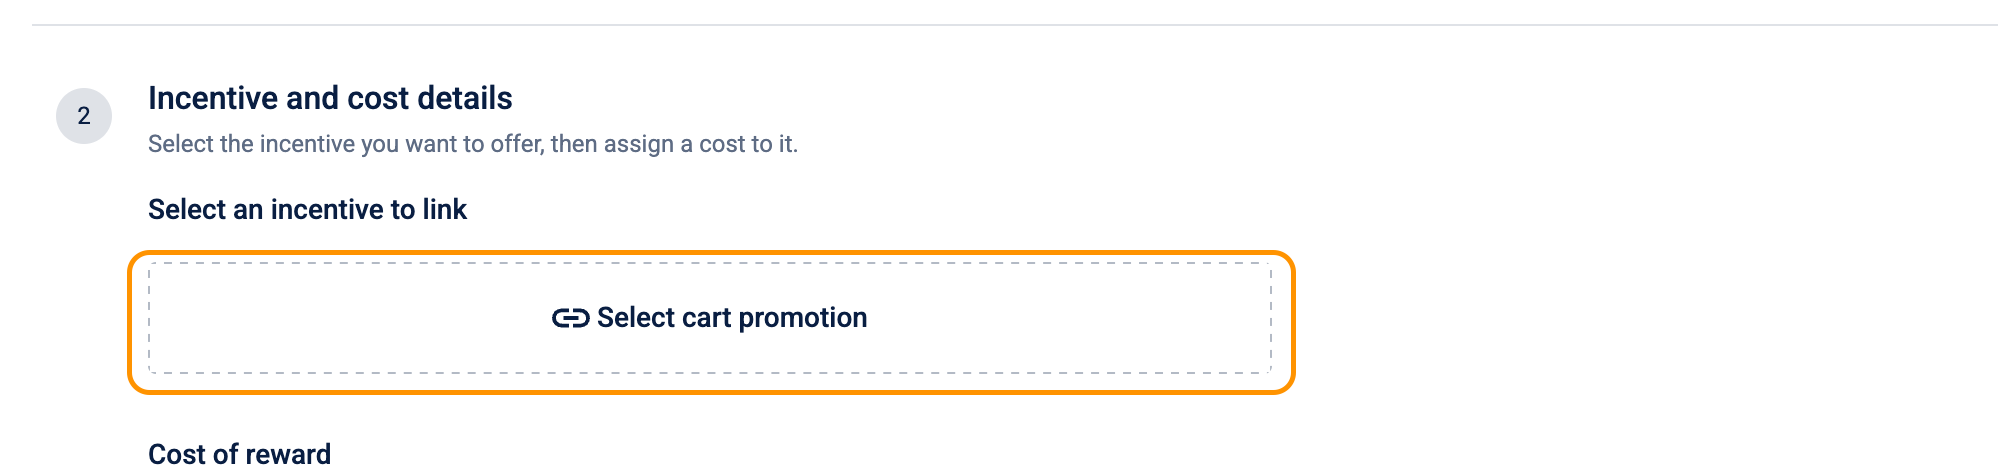
Step 3: Incentive and cost details
Determine the specific incentive a customer receives and configure how they pay for it.
Link an incentive
An incentive is a pre-configured benefit object built in another area of Rewards+. It defines the actual deliverable a customer receives, such as the specific coupon series with its discount value, the game with its prize pool configuration, the gift card with its denomination and issuing partner, and so on.
The reward wraps the incentive and adds the catalog rules on top: who can see it, what it costs, and how many times it can be redeemed. Without a linked incentive, the reward has no benefit to deliver.
What incentive type links to each reward type?
Each reward type is compatible with exactly one incentive type. The reward type you selected in Step 1 determines which incentives appear here; all other types are filtered out. Before linking, confirm that an active incentive of the correct type exists in your organization.
| Reward type | Links to this incentive type | Verify the incentive has these configured | Example |
|---|---|---|---|
| Auction | Auction | Minimum bid amount, auction start and end dates, and number of winners | Bid a minimum of 5,000 points for a limited-edition watch; the top 3 bidders each win one. |
| Card-linked offer | Card-linked offer | Participating card network or issuer, qualifying merchant scope, and benefit rate (cashback percentage or discount amount) | Link your Visa card and earn 5% cashback on all restaurant purchases. |
| Cart promotion | Cart promotion | Cart qualifying conditions (minimum order value, eligible SKUs or categories) and the discount to apply at checkout | Add two shirts to your cart and get 20% off automatically at checkout. |
| Cashback | Cashback | Cashback percentage or fixed return amount and the qualifying transaction criteria | Shop for ₹1,000 and get ₹100 credited back to your loyalty wallet. |
| Charity | Charity | Charity partner name and the points-to-donation conversion rate | Donate 500 points to provide meals for underprivileged children through a partnered NGO. |
| Coupon | Coupon | Coupon series ID, discount value, applicable products or categories, and code generation method, Capillary issues these codes | Receive a unique code for 20% off electronics, applied at checkout. |
| Games | Games | Game format (spin-the-wheel, scratch card, and so on), prize tier configuration, and win probability per prize | Spend 100 points to spin the wheel daily for a chance to win 50–500 bonus points. |
| Gift card | Gift card | Card denomination, issuing partner (such as Amazon or Flipkart), and delivery channel (email or SMS) | Redeem 2,000 points for a ₹1,000 Amazon gift card delivered to your registered email. |
| Gift voucher | Gift voucher | The product, service, or experience covered; the list of participating outlets; and the voucher's own validity period | Redeem 800 points for a free pizza voucher at participating outlets, valid for 30 days. |
| Miles | Miles | Conversion rate (how many loyalty points equal how many miles) and the partner airline or travel program | Convert 10,000 loyalty points into 5,000 airline miles with a partner carrier. |
| Physical reward | Physical reward | Product name, SKU, available inventory count, and fulfilment routing details | Redeem 3,000 points for branded wireless headphones delivered within 5–7 working days. |
| Sweepstakes | Sweepstake | Prize description, total number of entries available, draw date, and winner selection method (random draw or top entries) | Every 100 points spent earns one entry into the monthly draw to win a new smartphone. |
| Vendor only reward | Vendor only reward | Vendor's external reward definition and the API endpoint that receives the redemption request | Redeem 1,500 points for movie tickets via a BookMyShow integration; tickets arrive by SMS. |
| Wallet offer | Cash wallet | Wallet credit amount and the qualifying stores or transaction types where the credit applies | Redeem 1,000 points for ₹500 in wallet credits, usable on any in-store or in-app purchase. |
Steps to link different incentives in the reward catalog
The link experience differs by reward type.
Coupon (issued by your organization), Cart promotion, and Gift voucher
- Under Incentive and cost details step, select the Link Incentives section and select the link entry.
-
A slide panel opens, showing existing incentives of the compatible type. Each row shows the incentive name, offer ID, and validity dates.

-
Select the row of the incentive you want to link and click on Link to reward. The linked incentive's name, offer ID, and validity dates appear in the Link Incentives section.

Note
- If no incentives appear, no active incentives of the compatible type exist in your organization yet. Create the incentive first in the relevant Rewards+ module, then return to this step.
- For Coupon type only: After selecting a coupon, an Edit option appears that lets you edit the coupon's configuration directly within this panel without leaving the reward creation flow. The coupon edit form is the same as the one in Coupon Management. Refer to that page for a full description of each field.
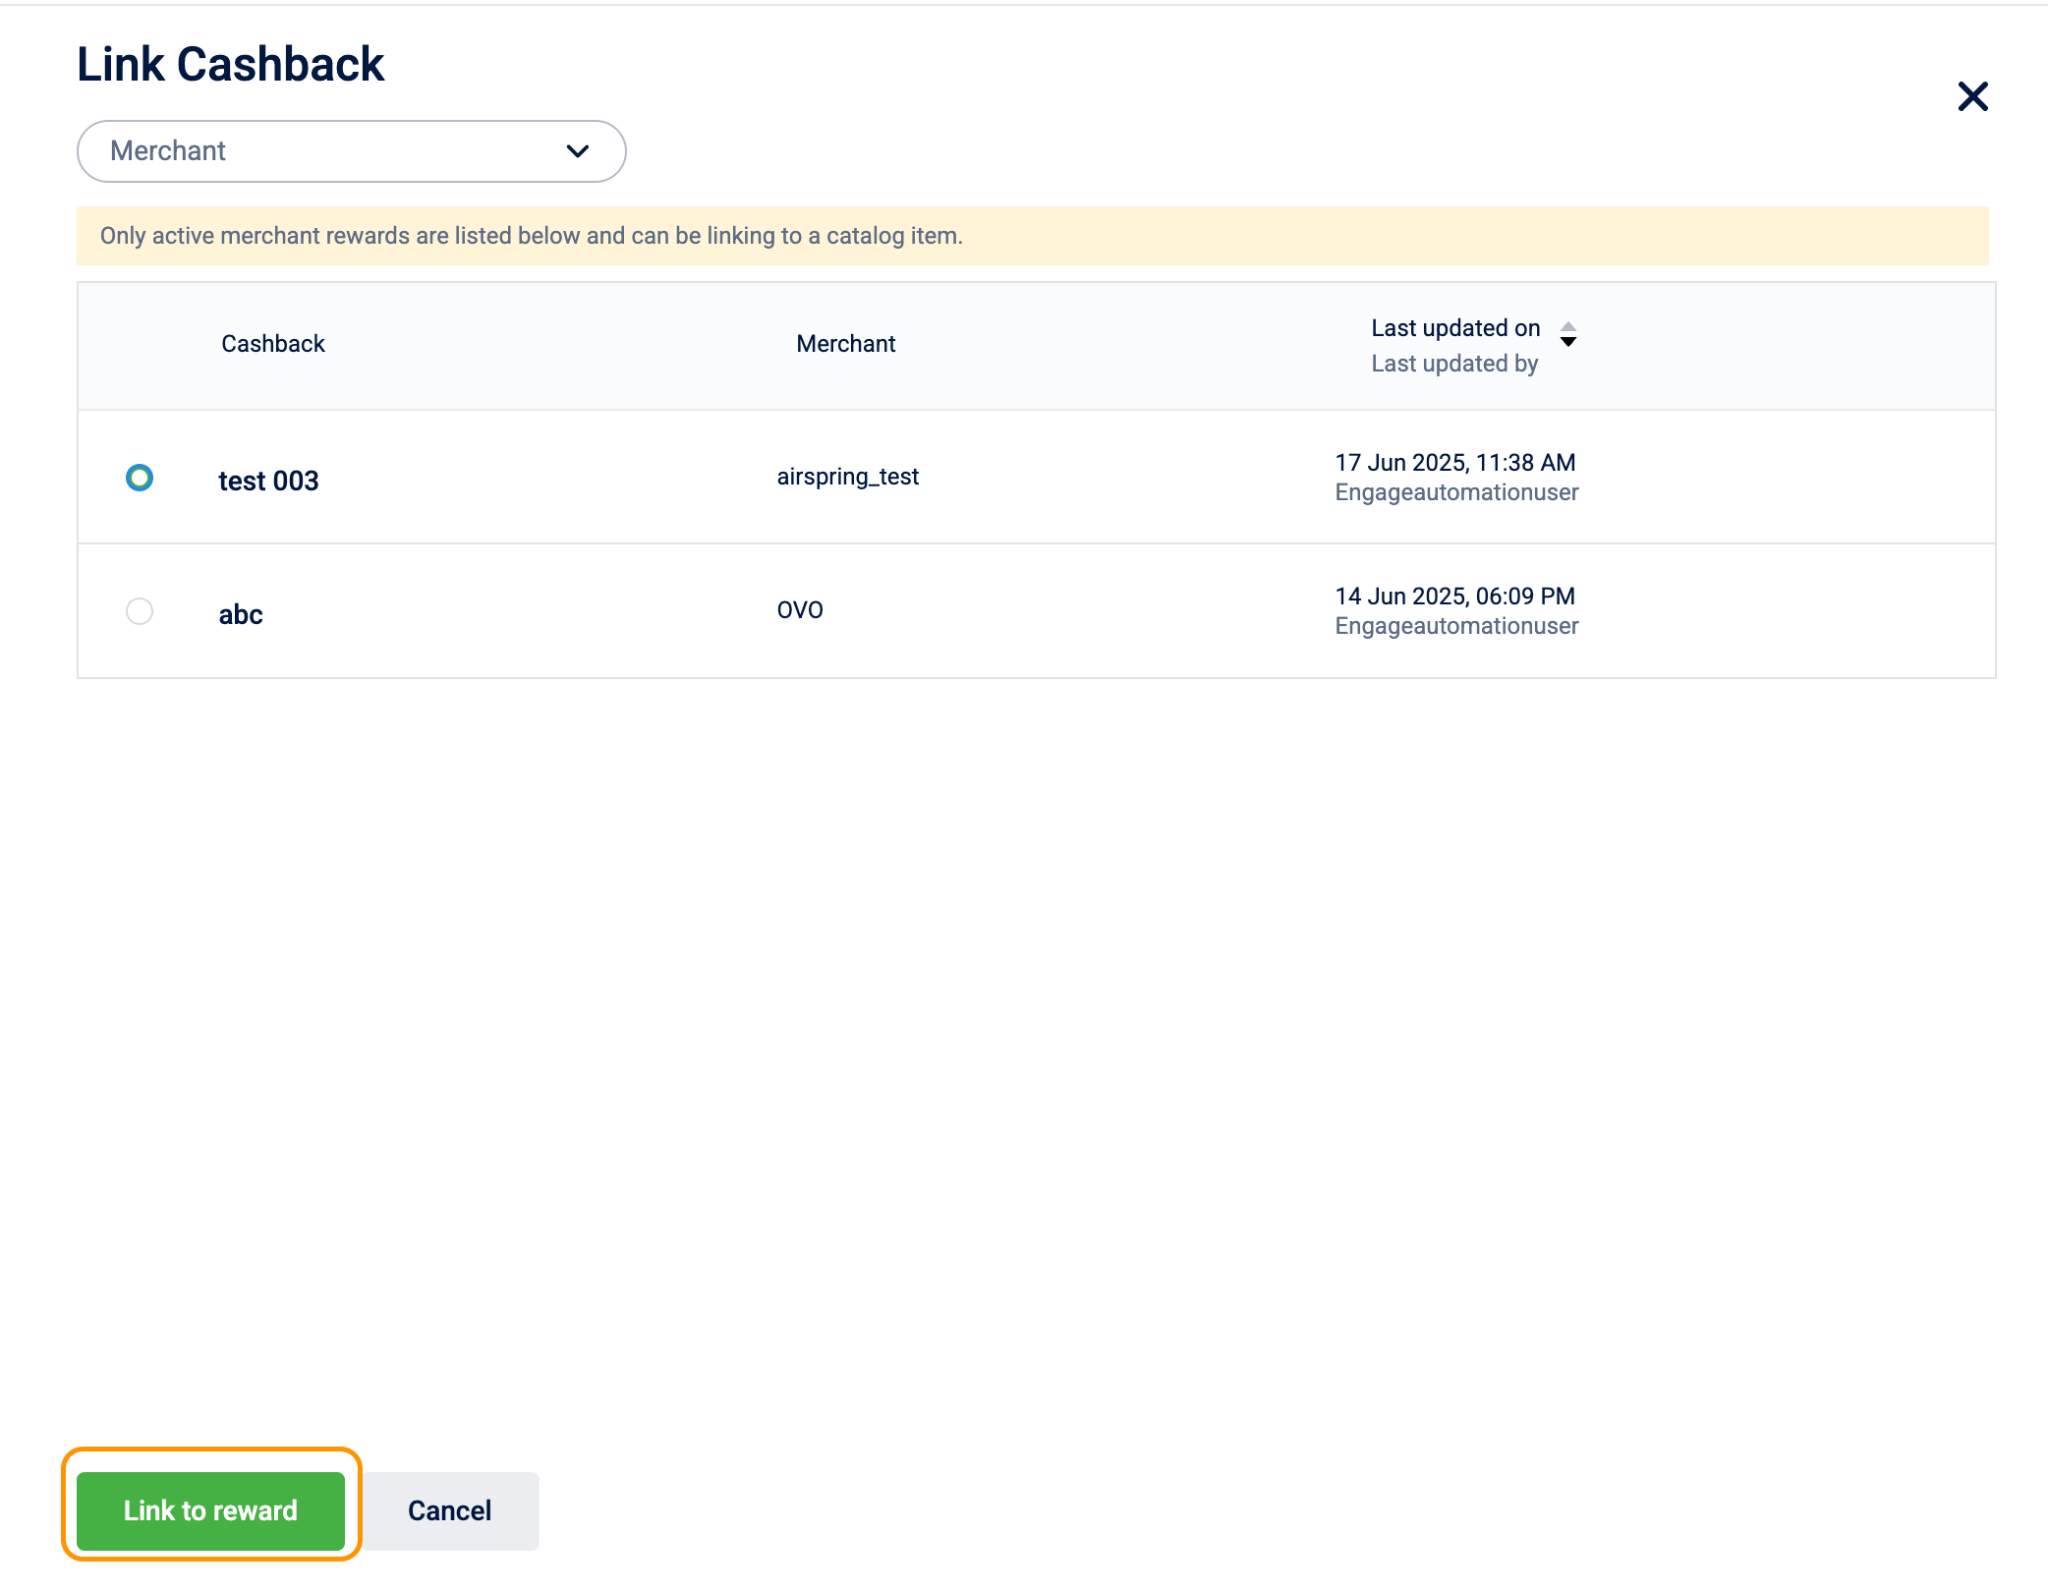
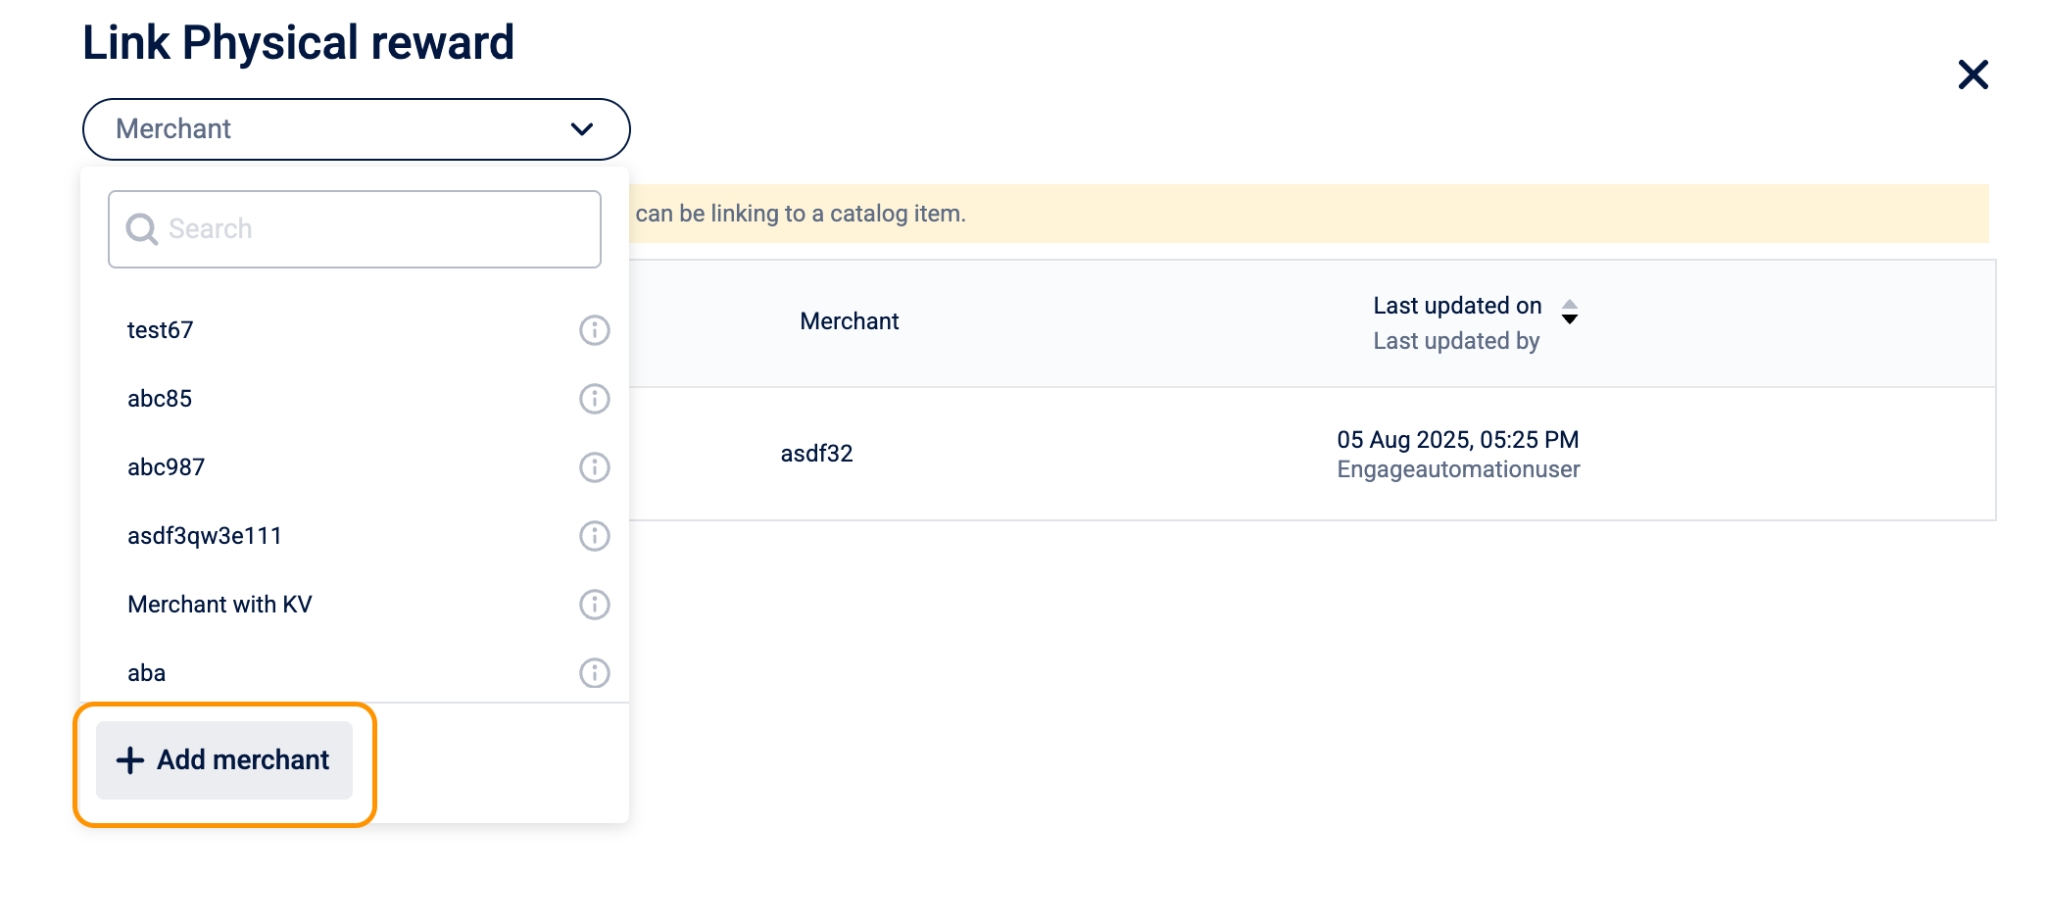
All other reward types
For all other types, the link panel shows a list of existing merchant rewards which are pre-configured vendor integrations for that reward type. Only active merchant rewards appear and can be linked.
To use an existing merchant reward:
- Select Link Incentives section and select the link entry.
- Find the merchant reward using the search bar or Merchant filter.
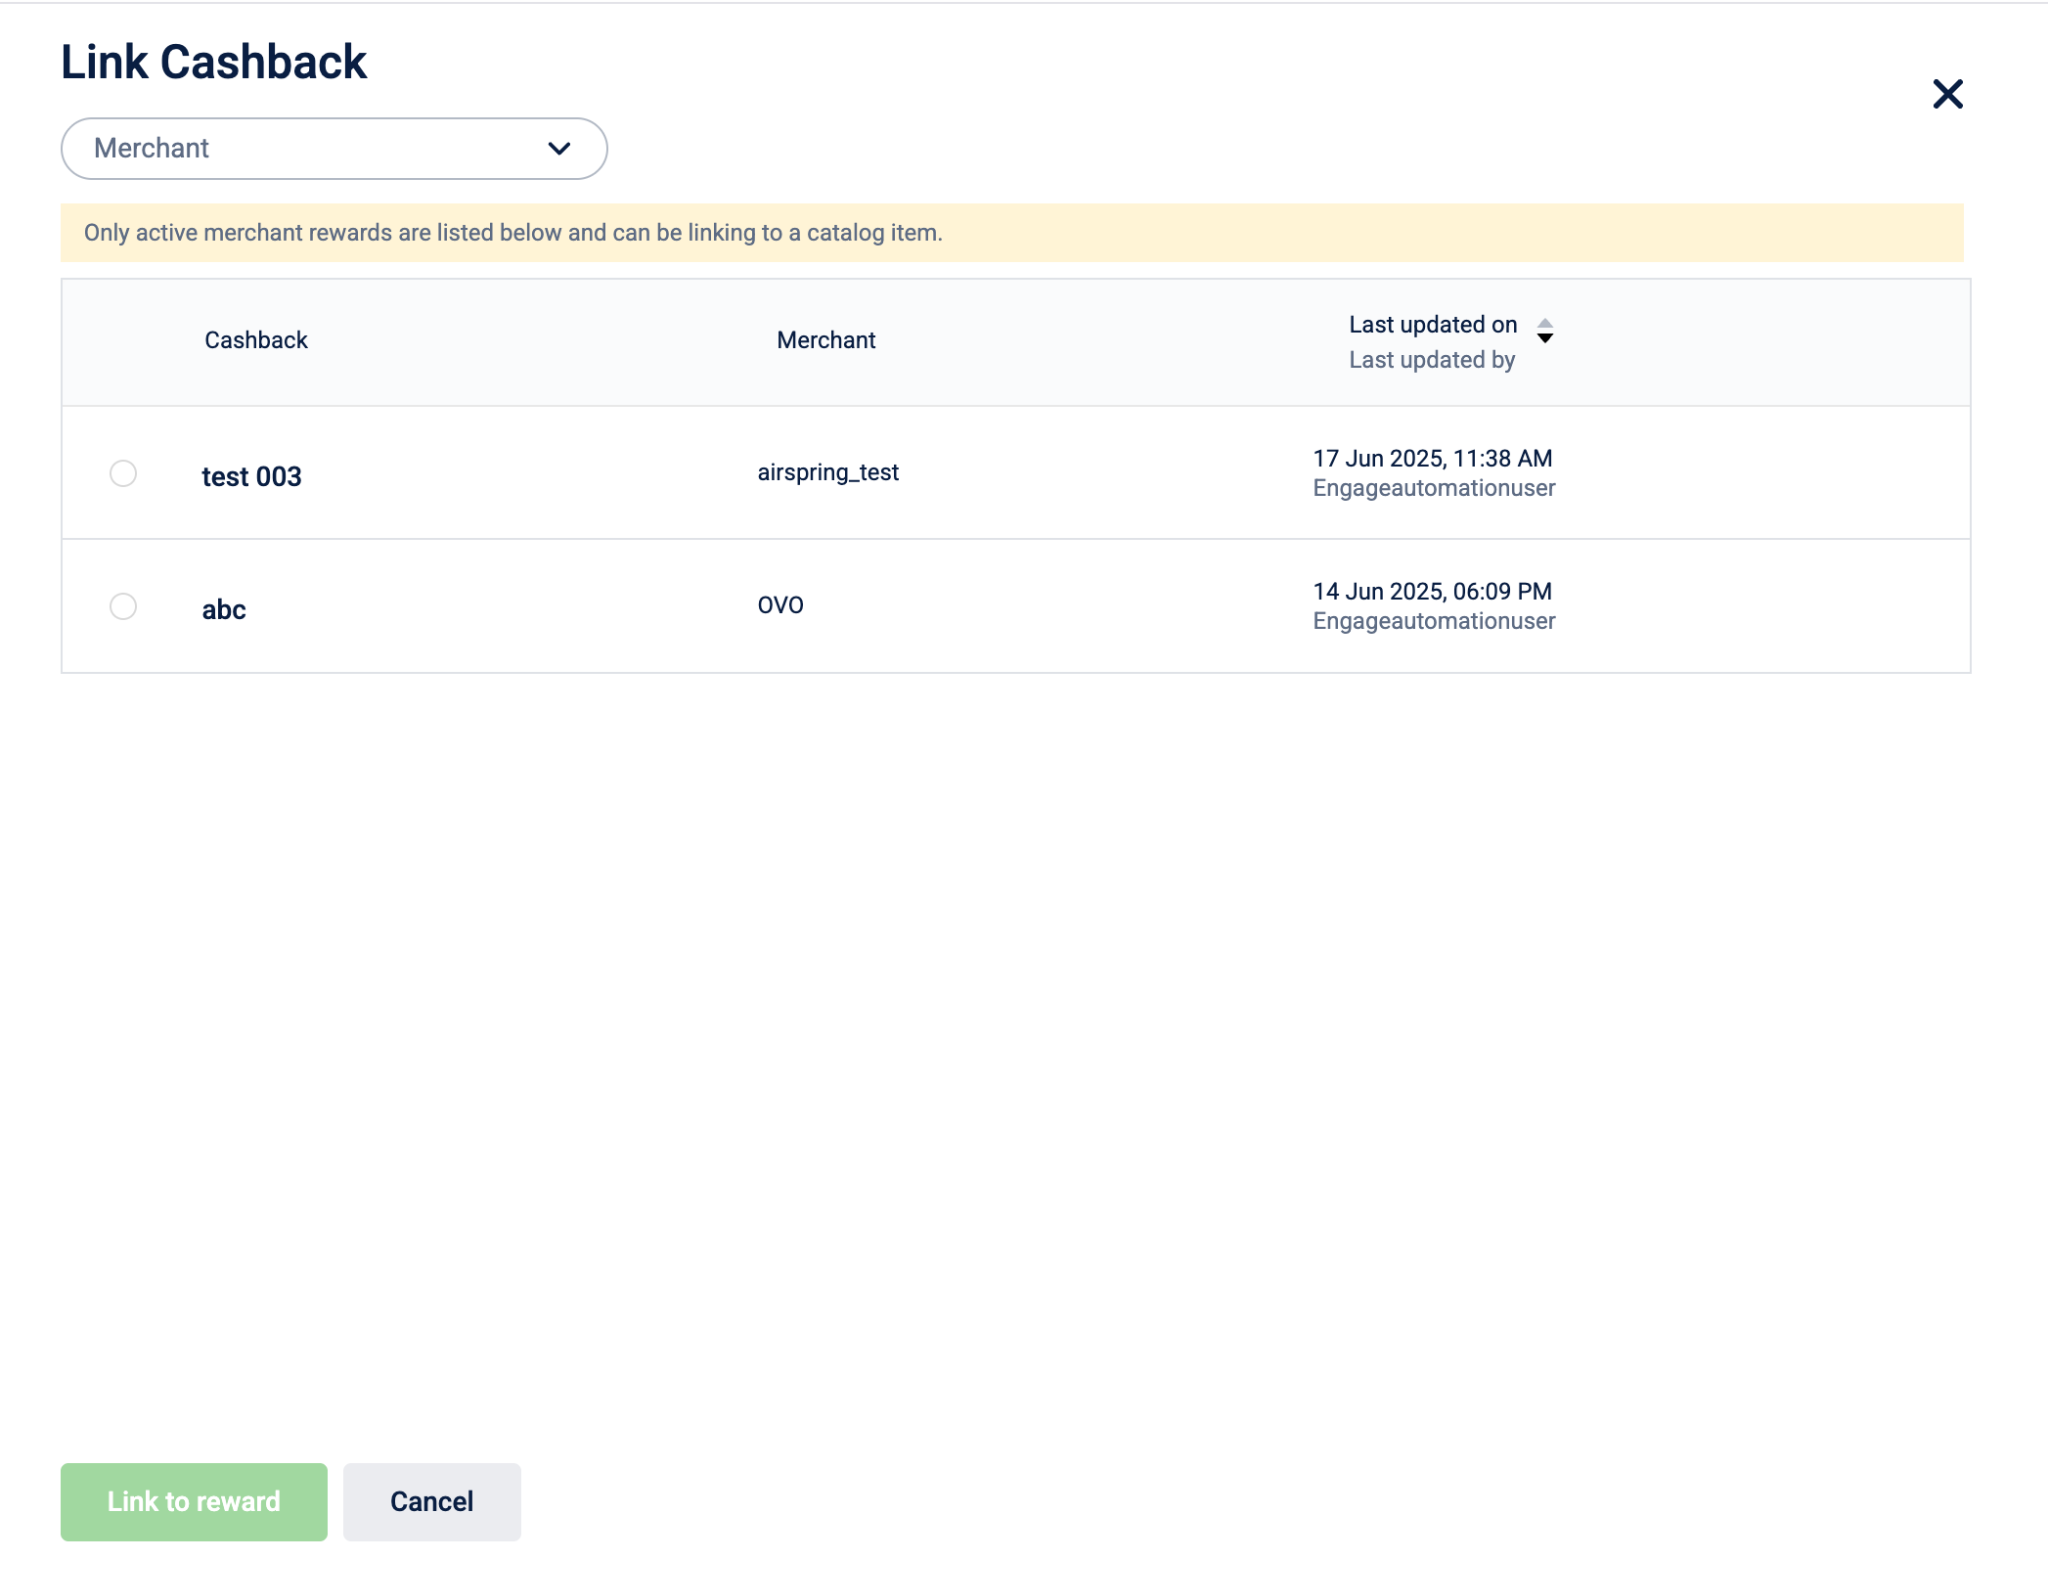
-
Select the row, then select Link to reward.
To create a new merchant reward:
-
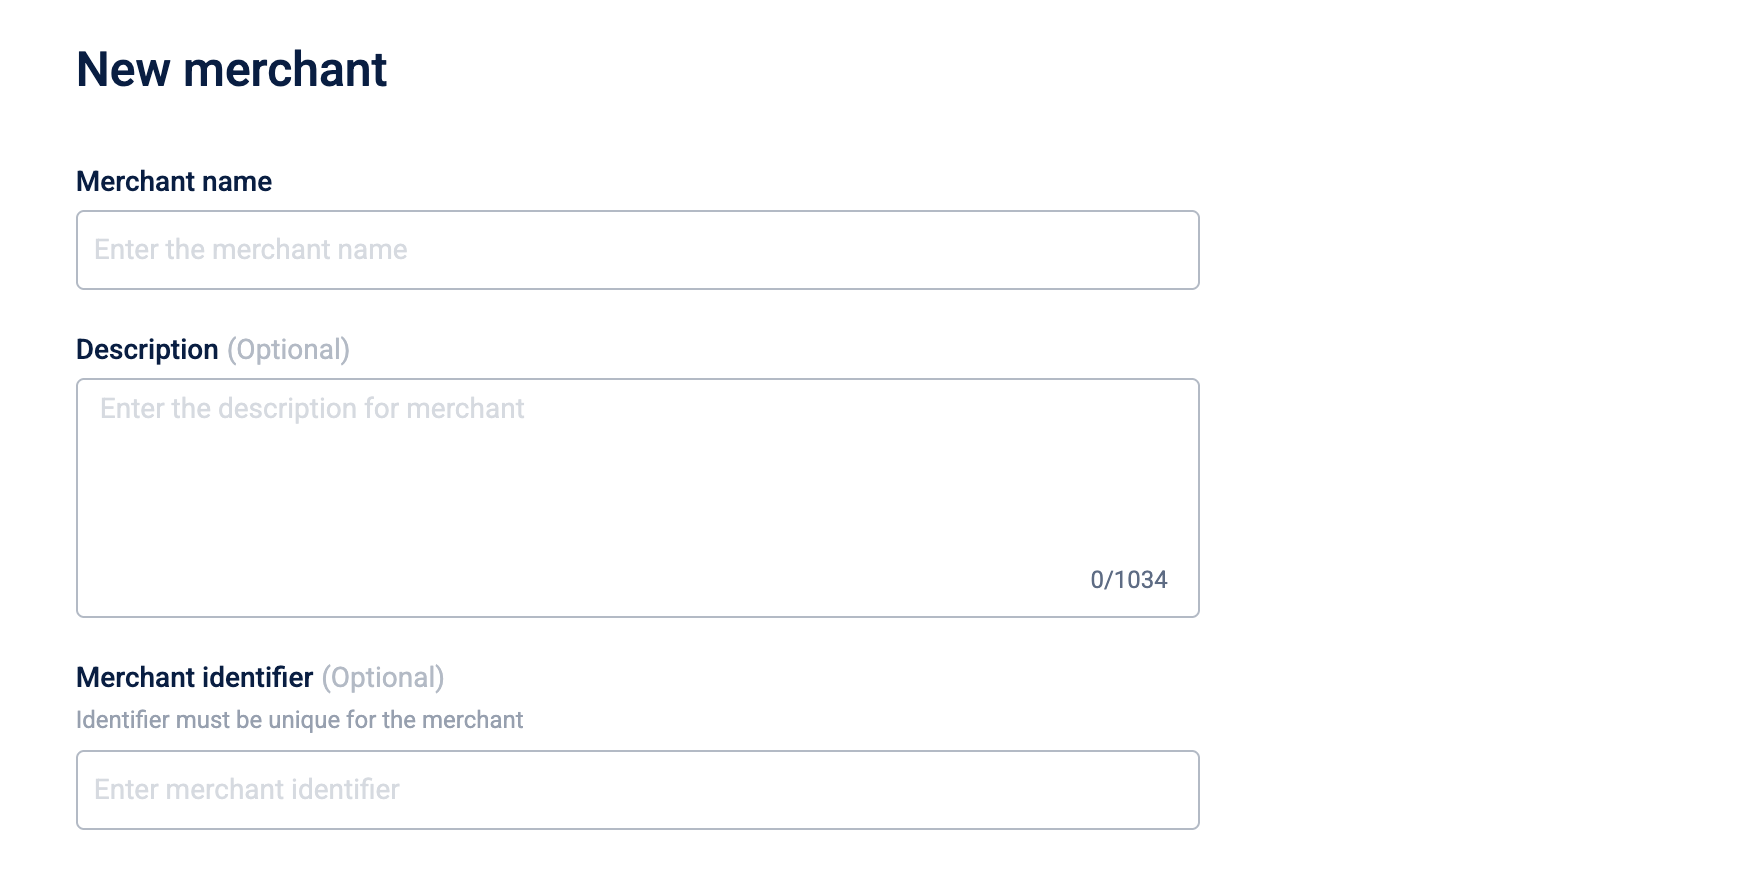
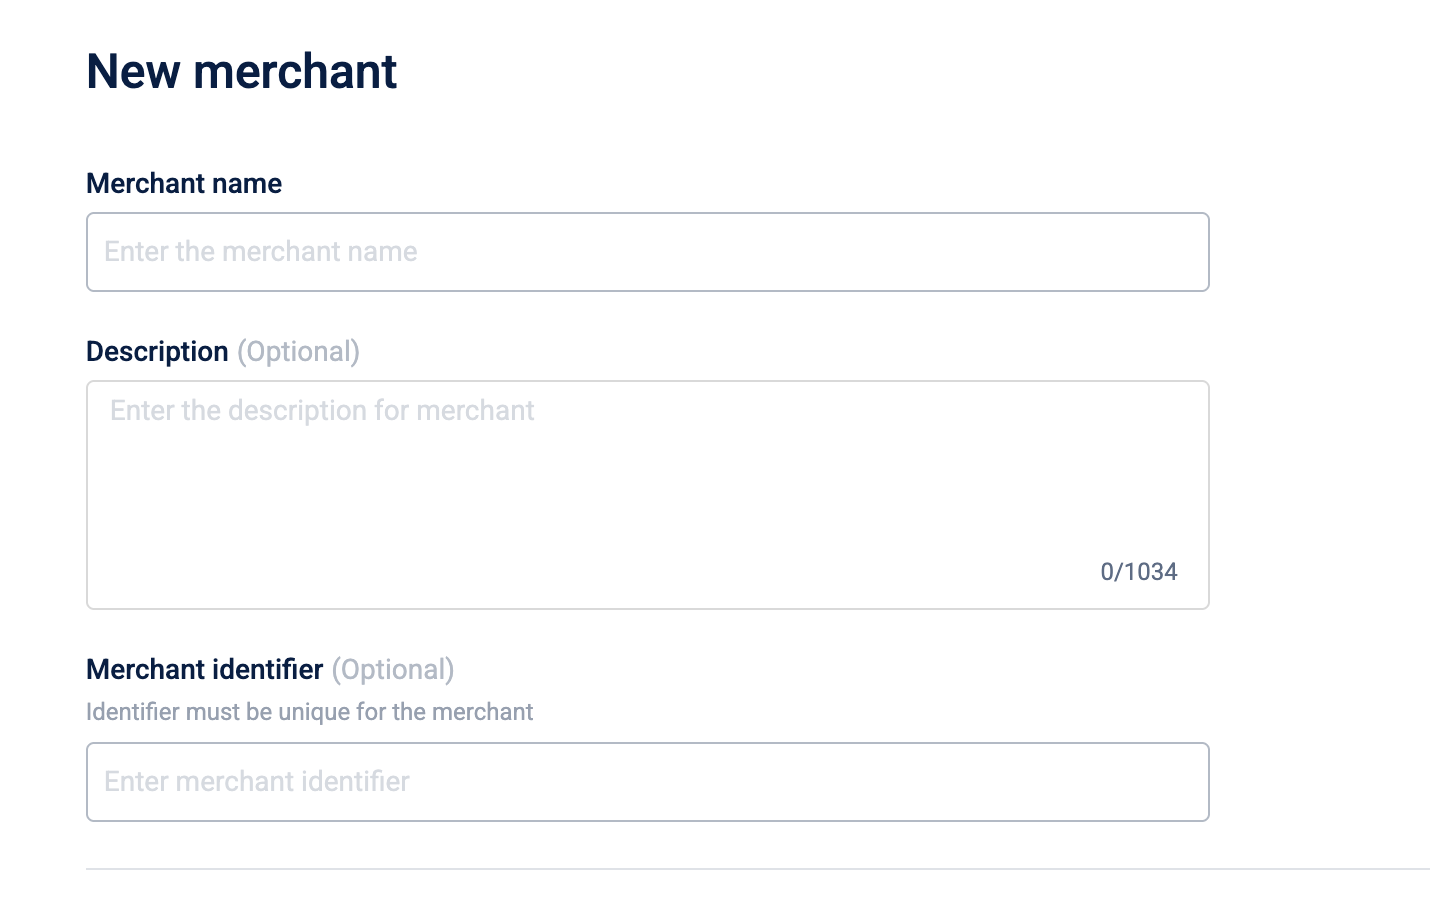
In the Merchant dropdown, select + Add merchant at the bottom of the list. The New merchant flow panel opens.
Fill in the following fields:
| Field | Description | Business impact |
|---|---|---|
| Merchant name | Required. The display name for the vendor. Maximum 255 characters. | Visible to reward administrators when selecting a merchant. A clear name prevents mismatched reward and vendor assignments. |
| Description | Optional. A short description of the merchant. Maximum 1,034 characters. | Helps administrators identify the right vendor at a glance, especially when multiple merchants of the same type exist. |
| Merchant identifier | Optional. A unique identifier for the merchant. Maximum 50 characters. Must be unique across all merchants. | Used to reference this merchant in integrations or external systems; avoids duplicate entries. |
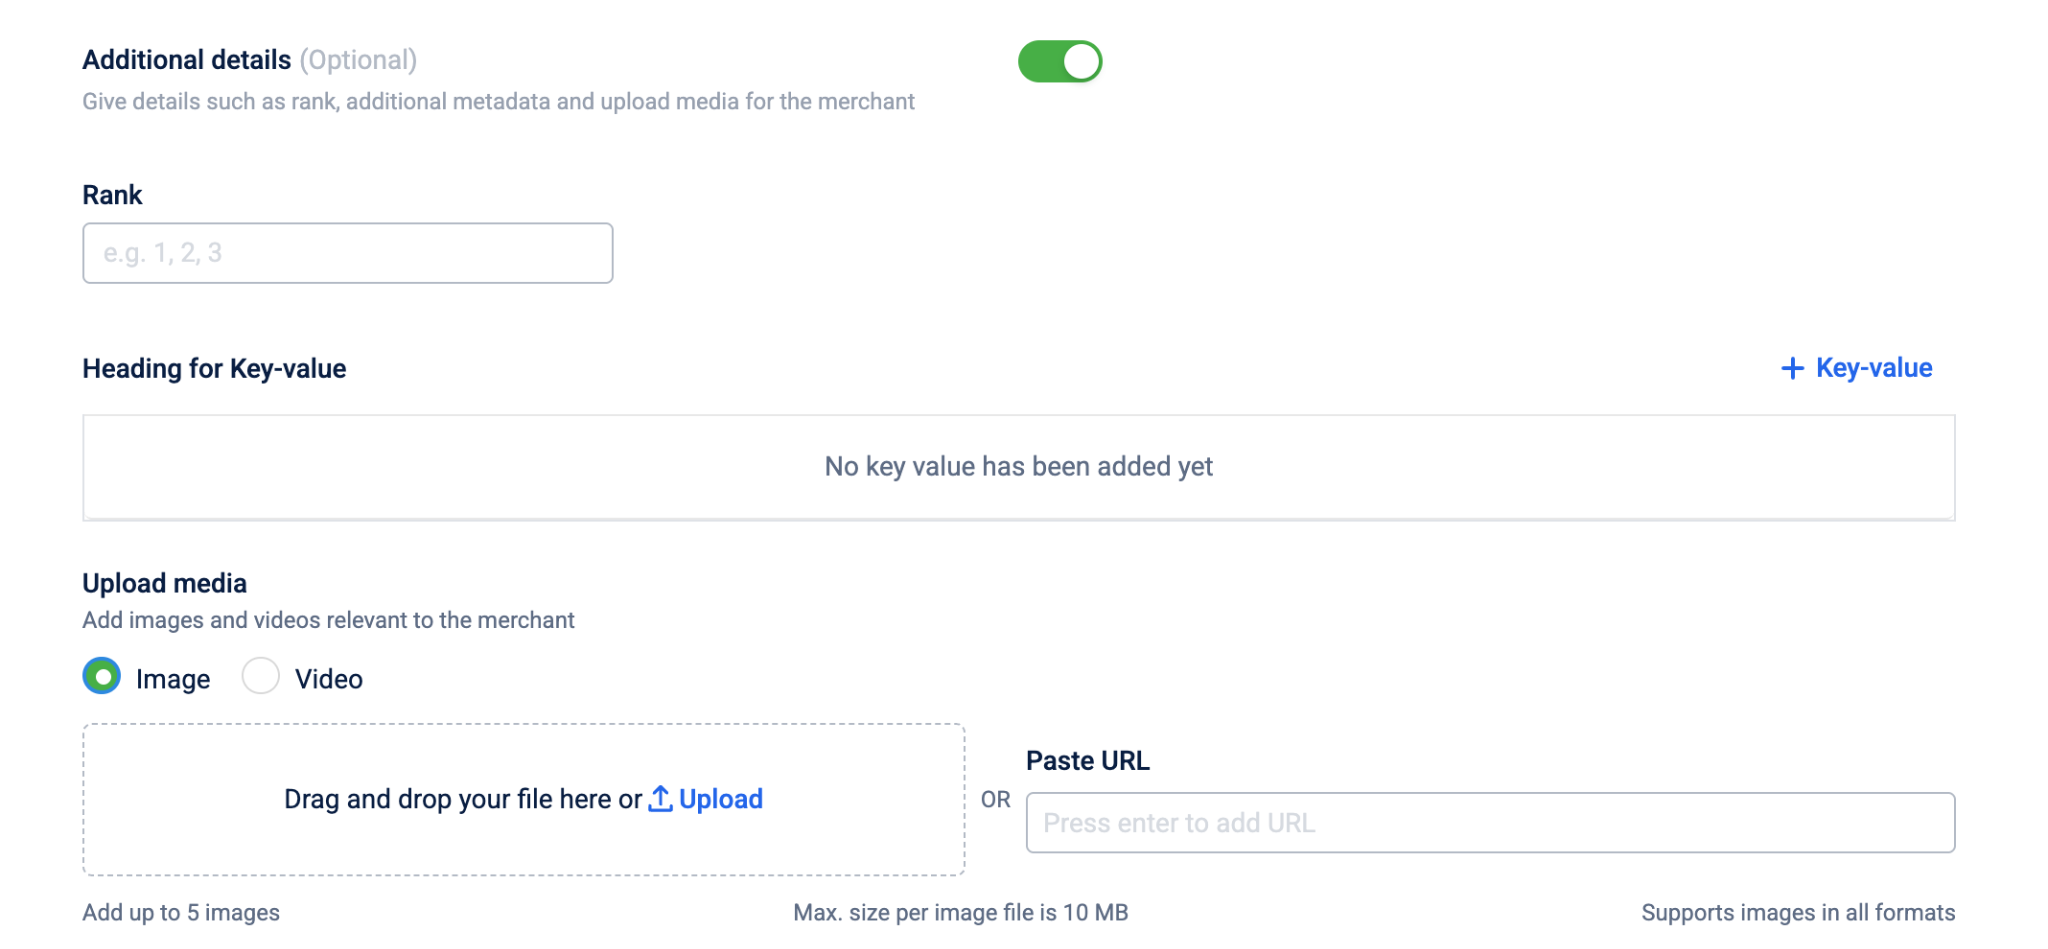
Adding additional details of the merchant
Turning on the Additional details toggle exposes the following:
| Sub-field | Description | Business impact |
|---|---|---|
| Rank | A positive integer that sets the merchant's display order in lists. | Lower numbers appear first; use this to surface preferred or high-priority vendors above others. |
| Key-value metadata | Custom attribute pairs attached to the merchant. Multiple pairs can be added. | Stores vendor-specific data (such as contract tier, region, or partner code) that Capillary does not capture in standard fields, making it available for downstream use. |
| Media | Images (up to 5) and videos (up to 2) associated with the merchant. Each file must be 25 MB or less. | Provides visual assets that can be displayed in reward-facing interfaces, for example, vendor logos or promotional content shown to customers at redemption. |
Select Next : New merchant reward to create New merchant reward panel.
- Fill in the following fields:
| Field | What it does |
|---|---|
| Merchant name | Required. Up to 255 characters. This name identifies the entry in the list. |
| Reward type | Pre-filled and locked to the reward type from Step 1. |
| Merchant | Select the vendor who fulfils this reward from the dropdown. |
- The Add API for merchant reward toggle is off by default. Turn it on if an API call is required. When on, the API is triggered, Capillary calls at the moment of redemption:
| Field | What it does |
|---|---|
| API Name | Label for this API call. Defaults to "API 1". |
| Execution order | Numeric order this API runs in when multiple APIs are configured. Lower numbers run first. Must be between 1 and 99. |
| Import cURL | Paste a cURL command to auto-fill the API type, URL, headers, and body. |
| API type | HTTP method: POST, GET, PUT, or DELETE. |
| API URL | The vendor endpoint that receives the redemption request. |
| Headers | Request headers as key-value pairs, for example, an authorization token. Select + Key-value to add. |
| Request body | JSON payload sent with the request. Must be valid JSON. |
| Context keys | Maps fields from the API response to named keys that Capillary stores for subsequent actions. A Voucher key is pre-added for types that return codes. Select + Key-value to add more mappings. |
Select + API to add another API call. You can add up to 20 API calls per merchant reward. Multiple APIs run in execution order.
-
Select Test API to verify the configuration.
-
Select Save merchant reward. The entry appears in the list, select it, then select Link to reward.
You've now linked the incentive. Configure the cost below.
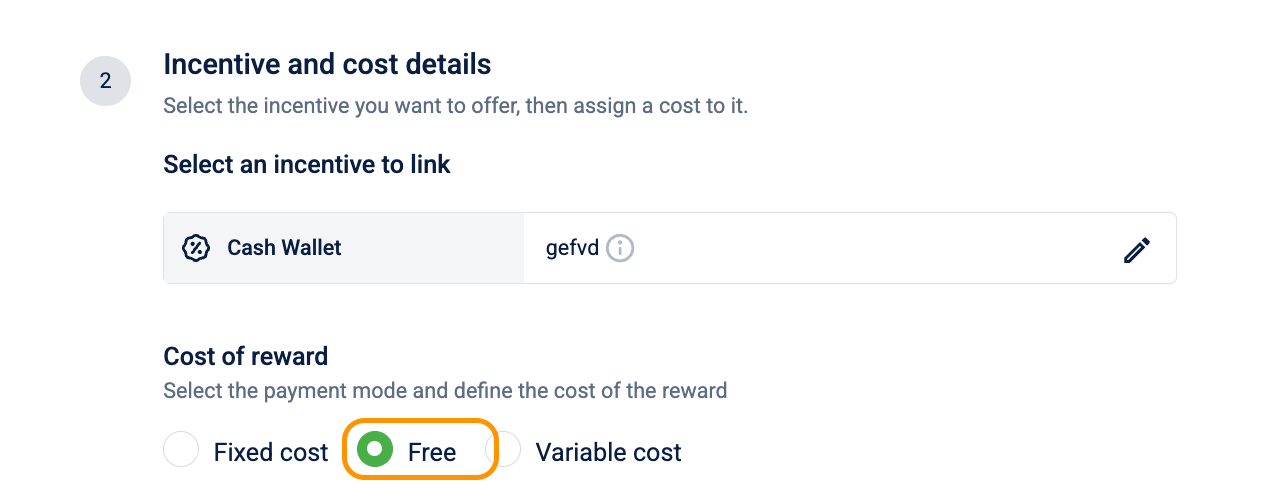
Cost of reward
Under Cost of reward, configure how customers pay for the reward. Add up to five payment modes to give customers flexible redemption options.
You can select one of the following cost types:
Free
The reward costs nothing, no points deducted, no cash charged. The only gates are the audience filter and any inventory limits you've set.
Select Free. The system sets the cost to zero.
Fixed cost
A set price that stays constant for every redemption. Each payment mode you configure appears as a separate redemption option on the reward detail page, adding more modes gives customers alternative ways to pay, not a higher price.
-
Select Fixed cost.

-
Under Payment mode 1, select a sub-type:
| Sub-type | What the customer pays | Validation |
|---|---|---|
| Fixed cash | A set cash amount. Enter it in the Cash Amount Required box. | Must be a positive integer greater than 0. |
| Fixed points | A set number of points. Enter it in the Points Required box. | Must be a positive number greater than 0. |
| Cash + Points | Both a cash amount and a points amount. Enter both values. | Both the cash amount and the points amount are required and must each be greater than 0. Neither can be left empty. |
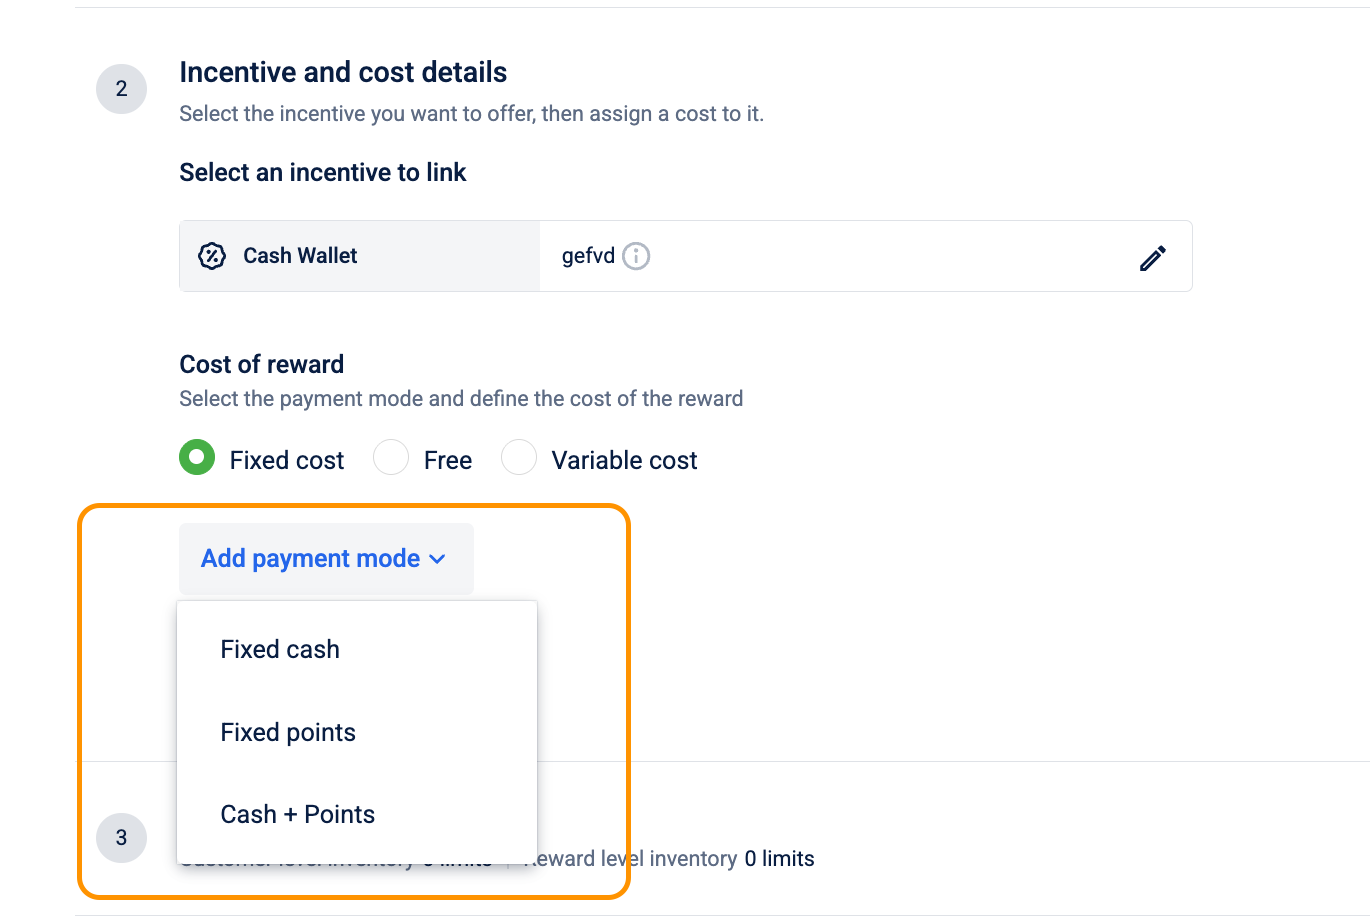
- (Optional) Select Add payment mode to add more options. You can add up to five payment modes per reward.
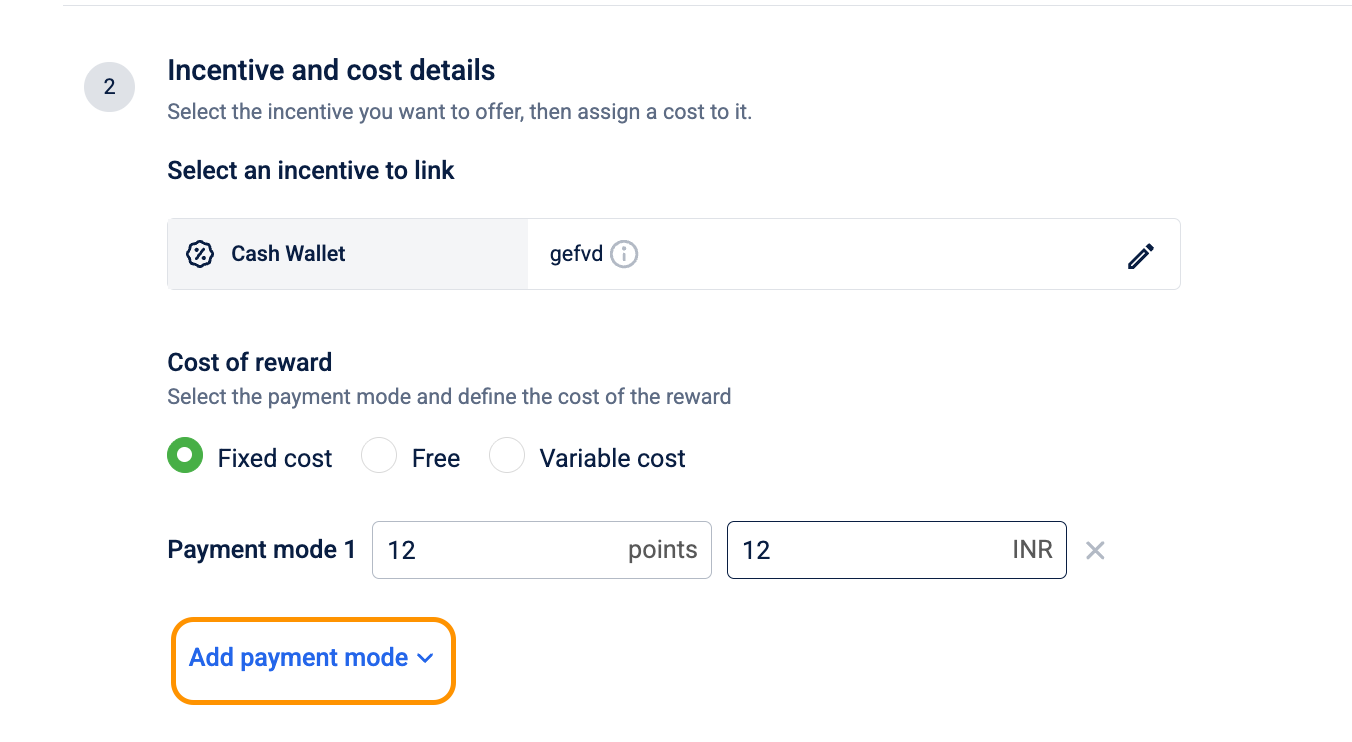
Combination rules:
- Fixed cash and Fixed points can each be added only once. If either is already configured, that option is disabled in the Add payment mode menu.
- Cash + Points can be added multiple times. Each entry is independent, with its own cash and points amounts.
- All three subtypes can be combined in a single reward. For example, you can configure Fixed cash + Fixed points + two Cash + Points entries (four payment modes total), giving customers four different ways to pay.
Variable cost
Use variable cost when the reward's value isn't fixed, for example, a wallet credit where the customer chooses the amount. The customer enters the amount they want, and the system calculates the points required using the rate you set. The reward's linked incentive determines the minimum and maximum amounts available.
Note
Variable cost is available only for the following reward types: Auction, Charity, Gift card, Miles, Sweepstakes, and Wallet offer. For all other reward types, this option does not appear.
- Select Variable cost.
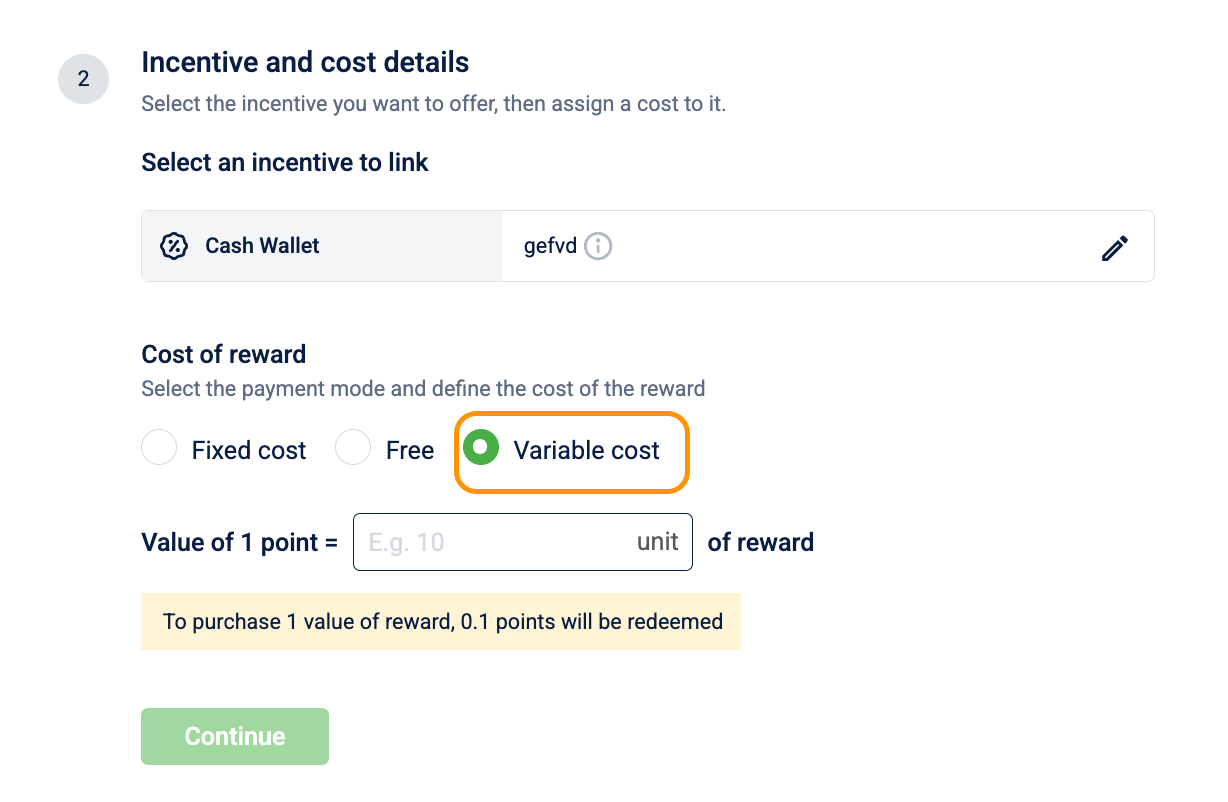
- In the Value of 1 point = box, enter the conversion rate. The value must be greater than 0. For example,
0.5means 1 point = $0.50, so a $500 reward costs 1,000 points.
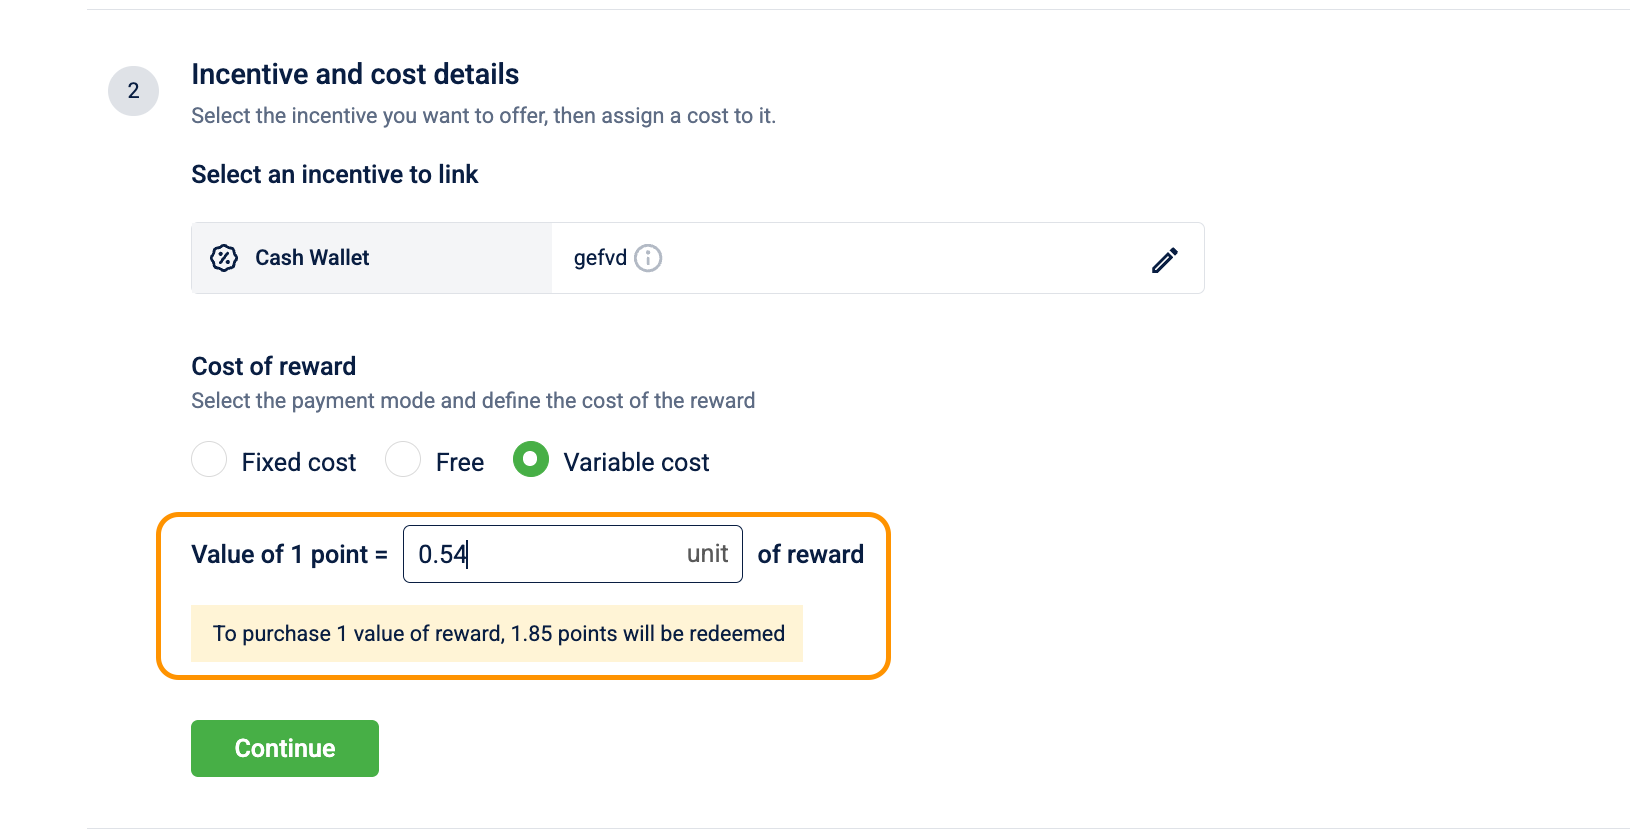
The system shows a real-time confirmation: "To purchase 1 value of reward, [X] points will be redeemed."
Loyalty program prerequisite for decimal redemptions
When the Value of 1 point is set to a decimal number, the points a customer needs to redeem a reward may not always be a whole number. If your Loyalty program is not configured to handle decimal points, these redemptions will fail. To prevent this, set Allow redemption in multiples of to 0.001 in your Loyalty program's redeem conditions.
For example, if a customer wants to redeem a reward worth $5 and the value of 1 point is set to 0.233, each loyalty point is worth $0.233 of reward value. To find out how many points are needed, the system divides the reward value by the point value: 5 ÷ 0.233 = 21.459 points, which is a decimal number. By default, Loyalty programs are configured to allow redemptions only in whole numbers (multiples of 1). In this case, the redemption would fail because 21.459 is not a valid whole number of points. You have to configure "Allow redemption in multiples of" settings in loyalty program to 0.001 for the program to accept redemptions in decimals, allowing 21.459 points to go through successfully.
You've now configured the incentive and cost. You can set inventory limits to control how often the reward can be redeemed.
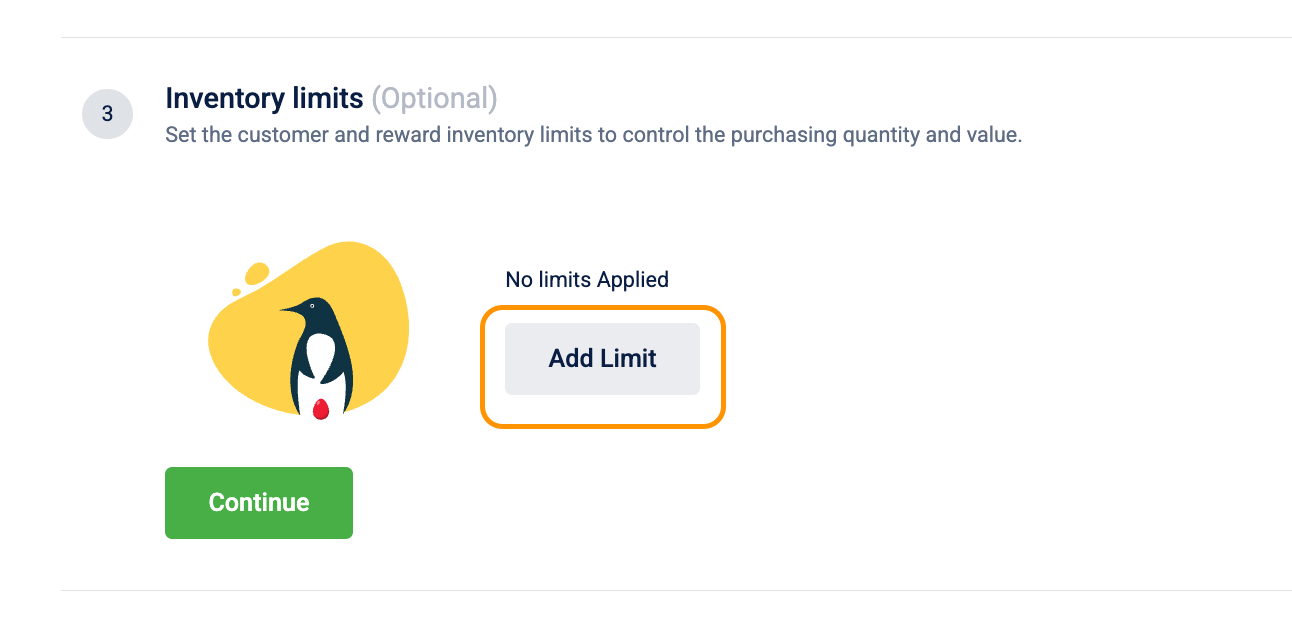
Step 4: Inventory limits
Set limits on how many times the reward can be redeemed. On every redemption attempt, the system checks all configured limits. If any limit is exhausted, the redemption is blocked until the restriction period resets or the limit is cleared.
Inventory limits are optional. Without them, the reward is redeemable unlimited times by any eligible customer.
Select Add Limit to add a limit row.
Each limit is a single row with three fields:
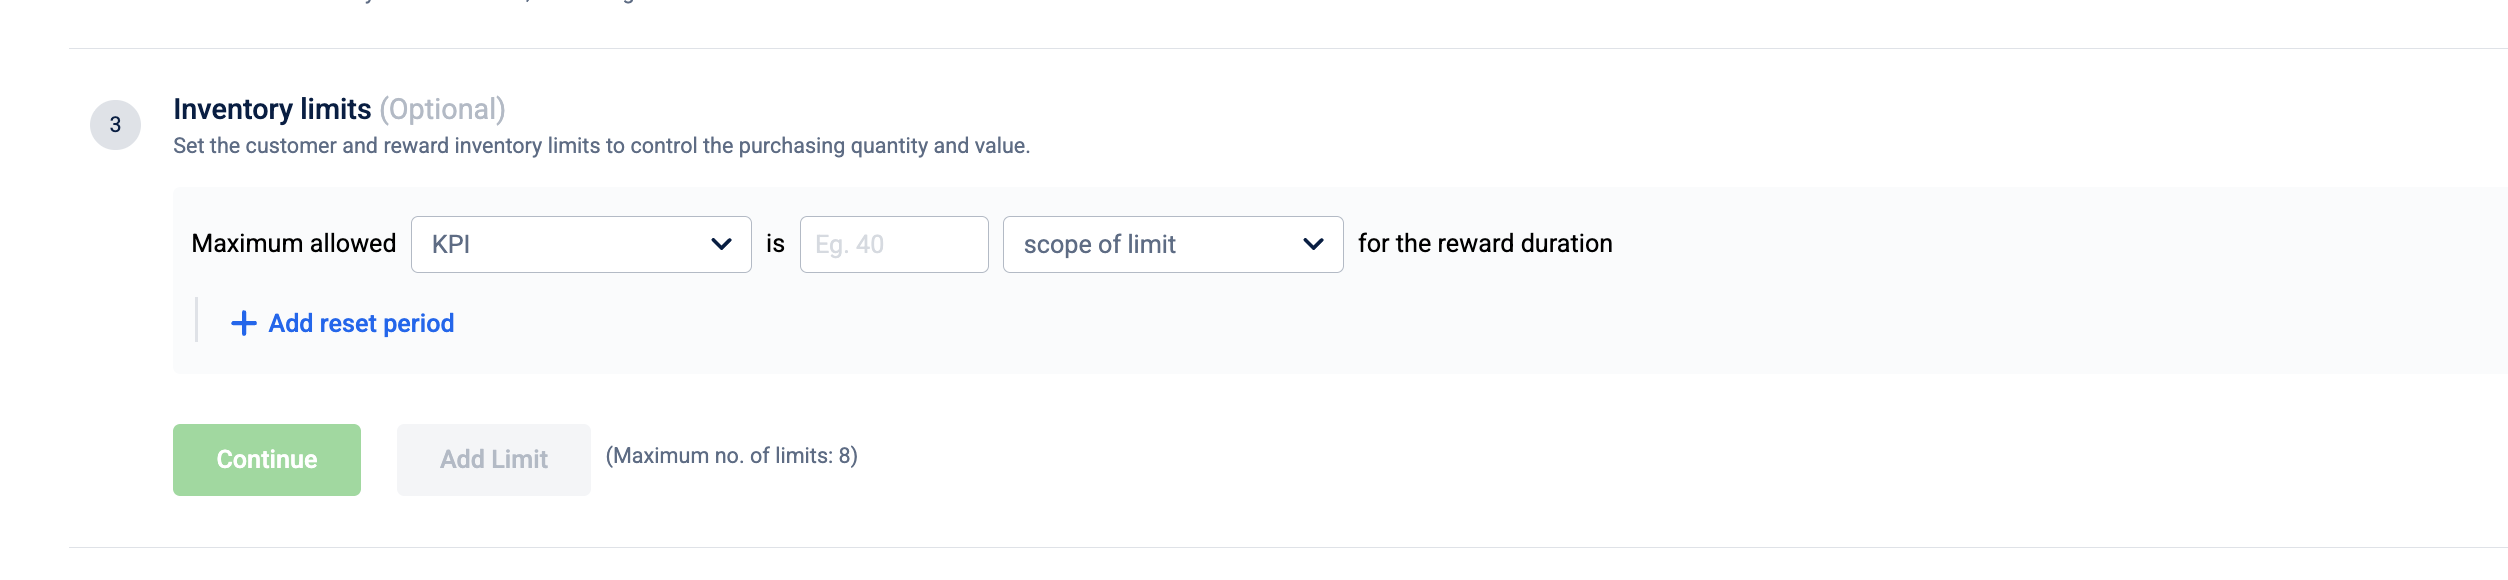
Maximum allowed [KPI] is [value] [scope of limit] for the reward duration
| Field | Options | Notes |
|---|---|---|
| KPI |
| "value of reward" is only available for variable-cost reward types (Auction, Charity, Miles, Cash Wallet, Sweepstakes, Gift Card) when a variable cost payment mode is configured in Step 3. |
| Value | A positive number. | Enter the maximum allowed value before the limit blocks further redemptions. |
| Scope of limit |
| Both options are always available regardless of reward type. |
By default, the limit applies for the reward duration (lifetime cap with no reset). To make the limit reset periodically, select + Add reset period.
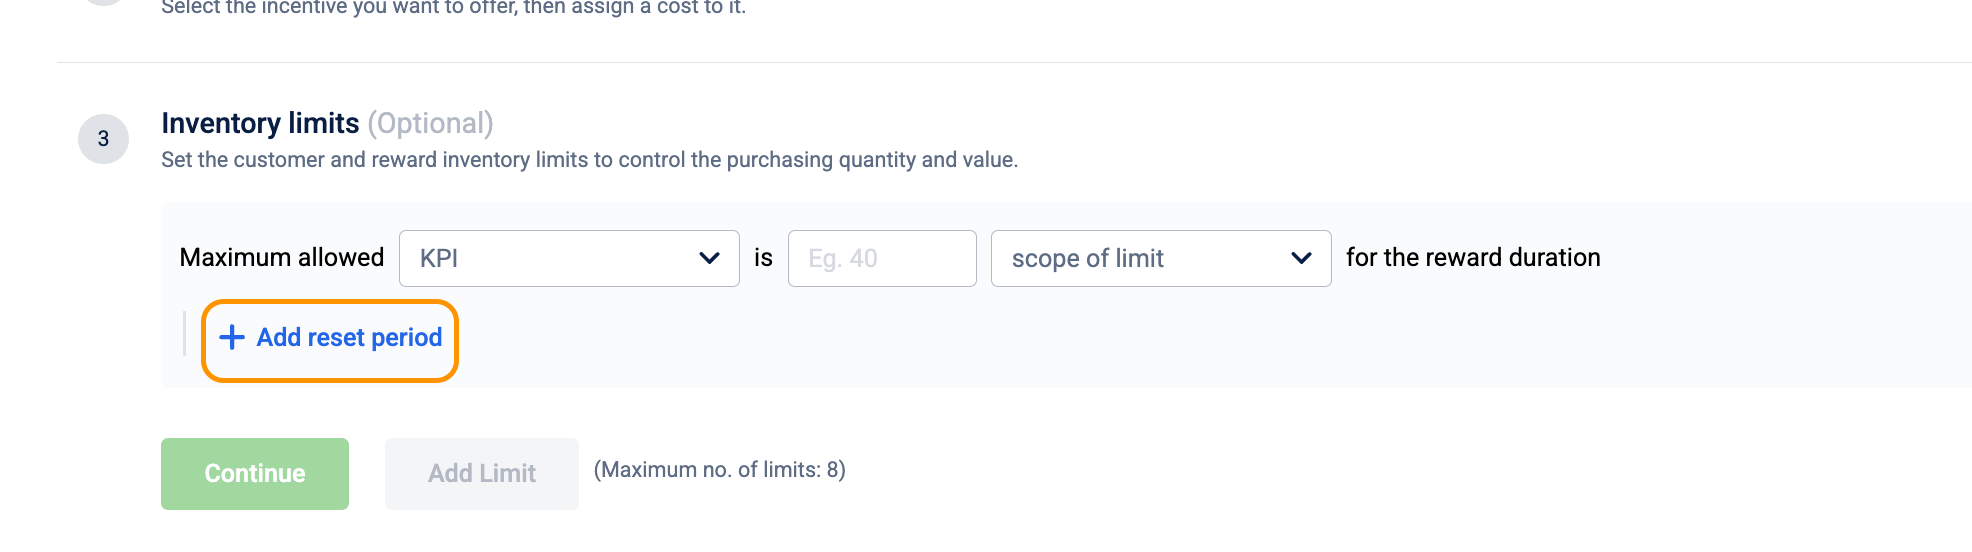
Reset periods
Select + Add reset period on a limit row to add a recurring reset. The period dropdown offers:
| Period | How it works |
|---|---|
| every X day(s) | Fixed window — all customers share the same cycle. Enter the number of days. The cycle anchor date is set when the reward is created. |
| every week | Fixed window — resets for all customers at the start of each week. |
| every calendar month | Fixed window — resets for all customers at the start of each calendar month. |
| for last X day(s) | Rolling window — evaluates each customer’s history in real time. A redemption on June 3 with a 7-day window counts until June 10. Enter the number of days. |
Fixed and rolling windows cannot be mixed. Once one limit on the reward uses a fixed window period, all subsequent timed limits must also use a fixed window period, and vice versa.
To remove a reset period from a limit, select Remove reset period. The limit reverts to a lifetime cap.
Add multiple limits
Select Add Limit to add another limit row. You can stack limits of different scopes and periods — for example, a per-member limit of 1 per day and a per-reward limit of 500 for the full duration. On every redemption attempt, all limits are checked. If any one is exhausted, the redemption is blocked.
Maximum limits per reward:
- Up to 8 limits when no reset periods are configured.
- Up to 10 limits when at least one limit has a reset period.
- Per-member (scope) limits are capped at 8. Per-reward (scope) limits are capped at 10.
You’ve now configured inventory limits. You can add localized content for a global audience next.
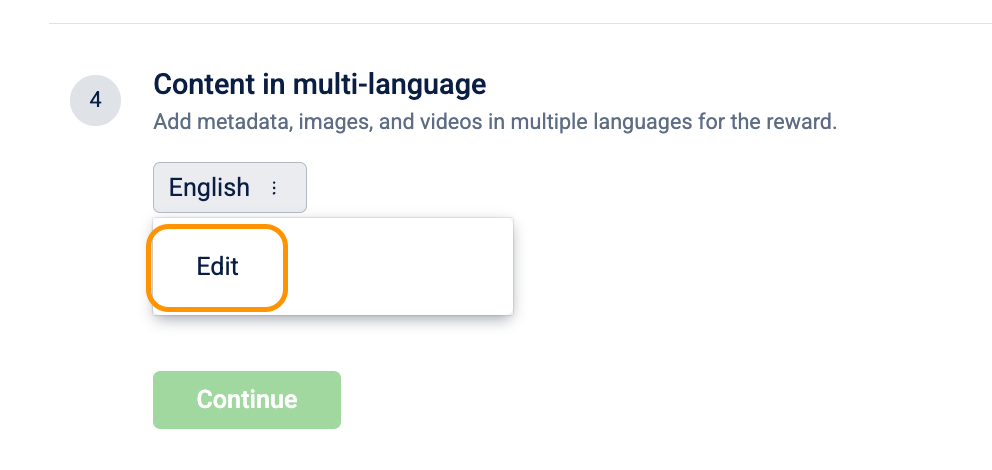
Step 5: Content in multi-language
Localize the reward's name, description, terms, and media so the system serves each customer the version that matches their language preference. If a customer's app or website is set to Arabic, they see the Arabic name, description, terms, and images you configure here. If you haven't configured Arabic, they see the default language (English).
Configure content for each language set up in your organization's language settings.
-
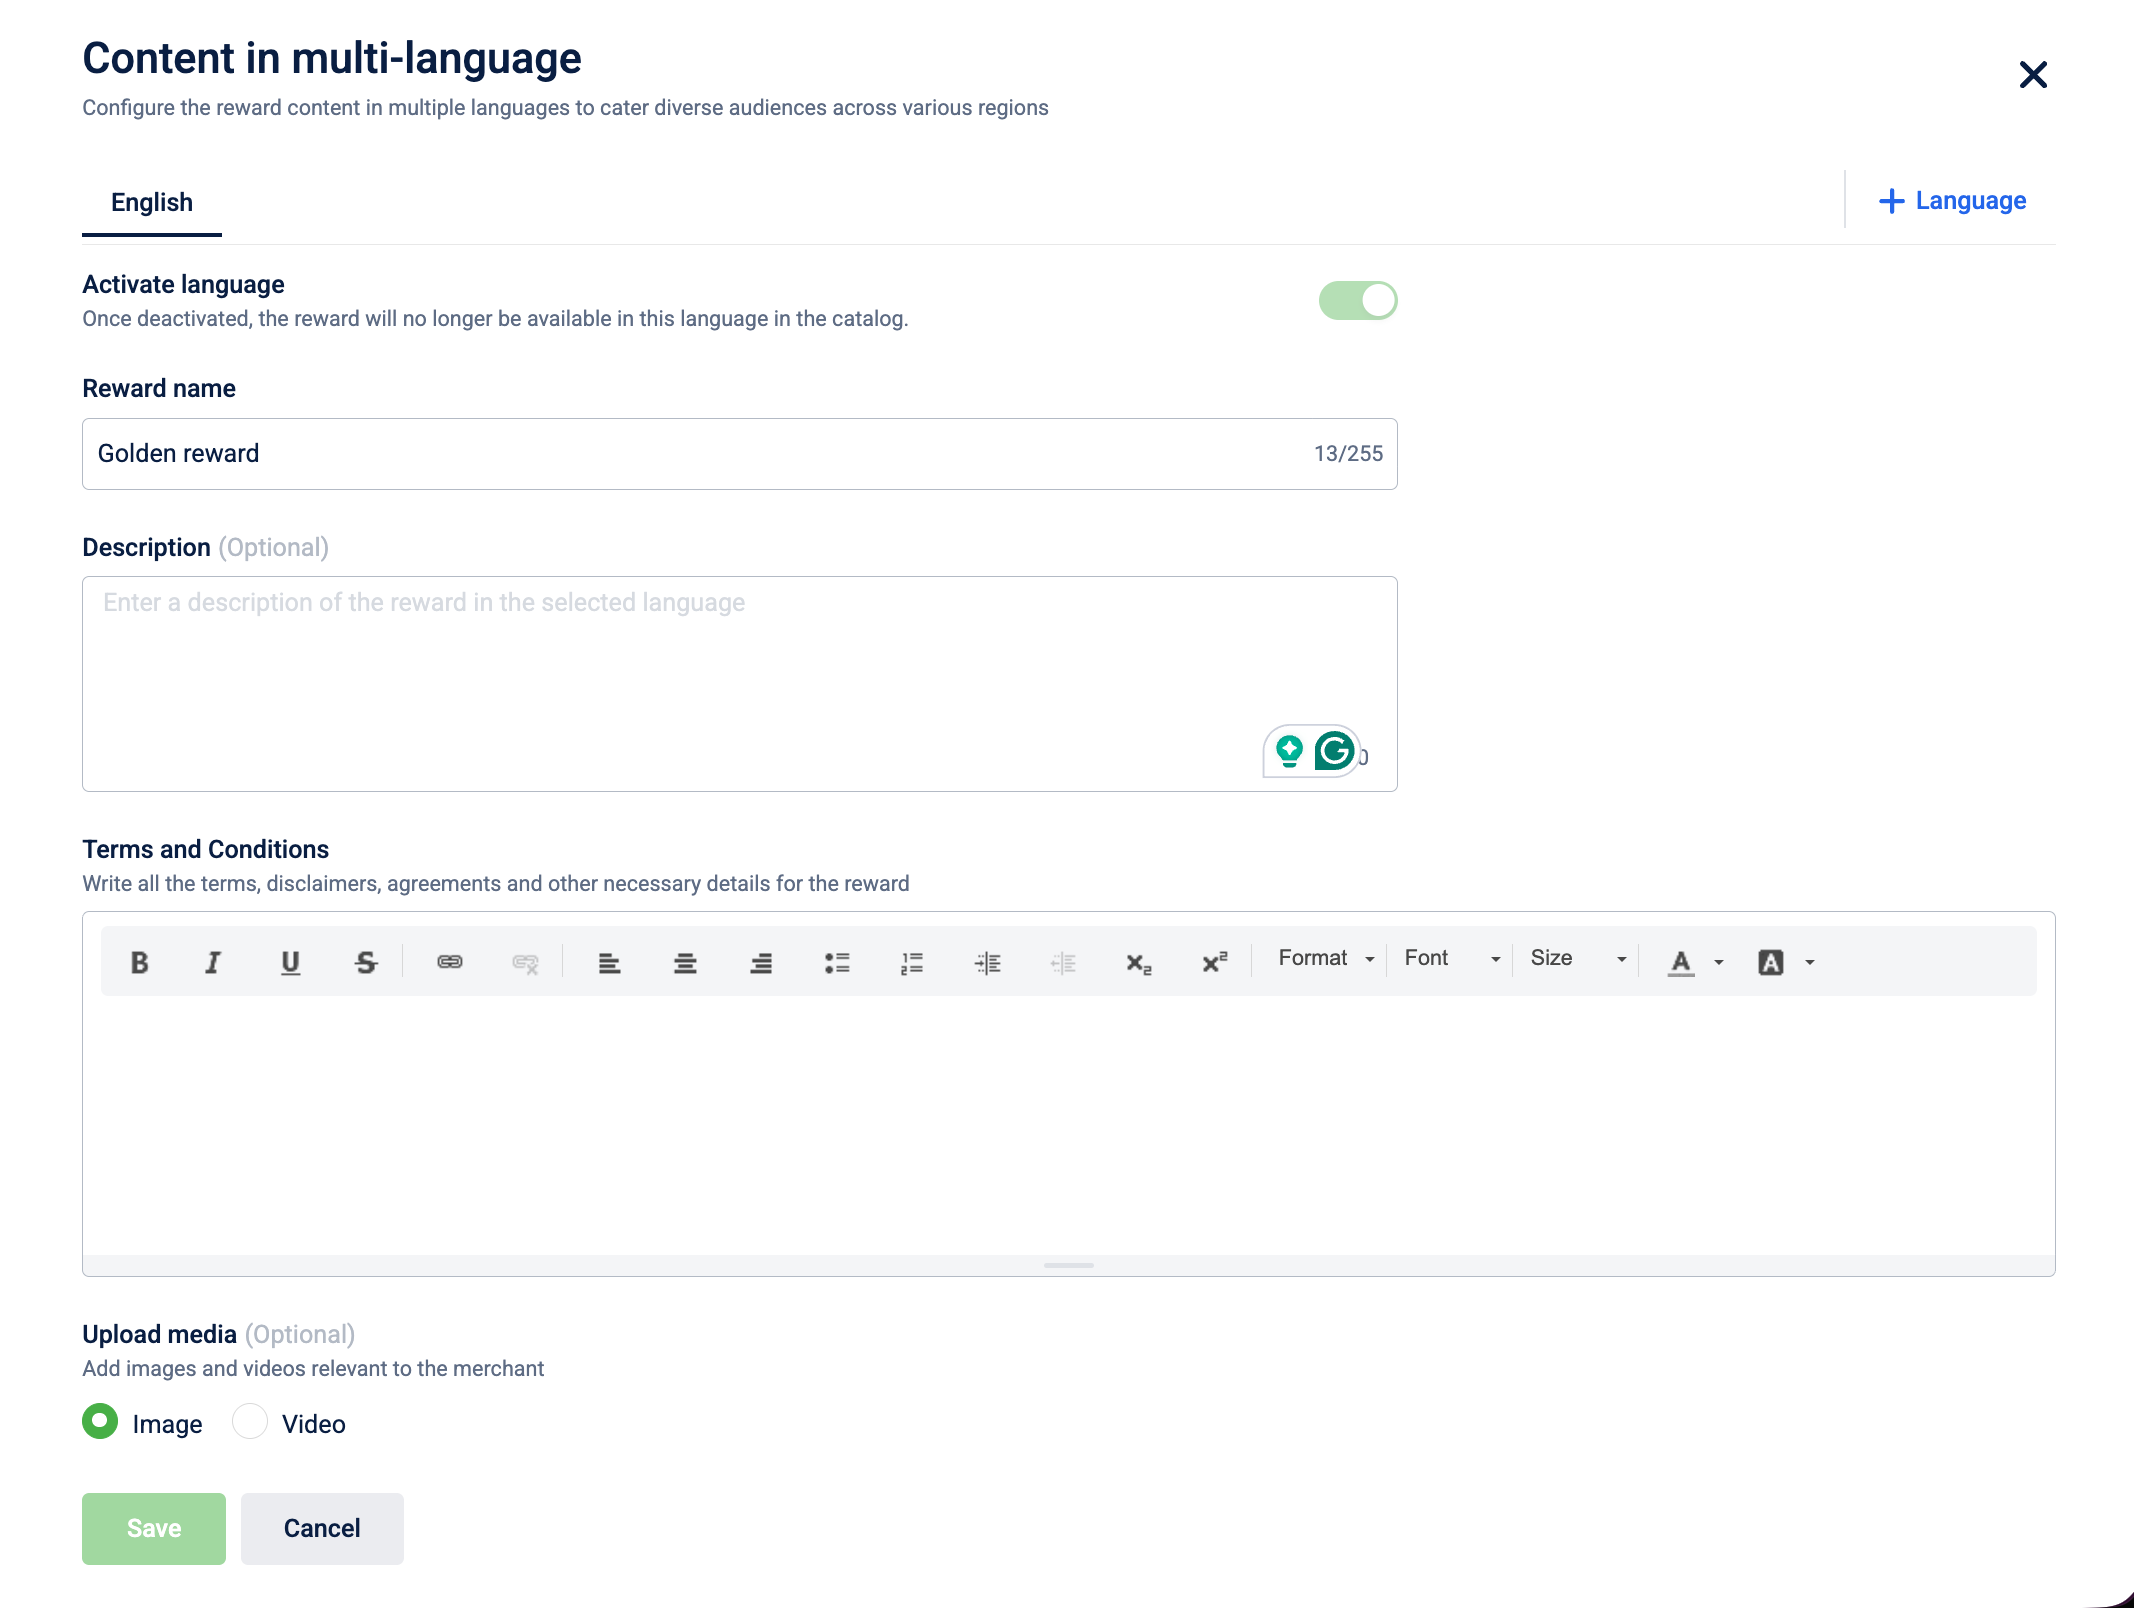
In the Content in multi-language section, select Edit next to the language you want to configure.
-
Configure the following fields:
| Field | What it does |
|---|---|
| Activate language | Turning this off for a specific language doesn't remove the reward from those customers. It reverts them to the default language. The reward stays visible; only the language version switches. The default language can't be turned off. |
| Reward name | The localized reward name shown to customers browsing in this language. Maximum 255 characters. |
| Description | (Optional) The localized description shown on the reward detail page. Maximum 4,000 characters. |
| Terms and Conditions | (Optional) Appears as expandable fine print on the reward detail page. Supports rich text so you can format it with bullet points, bold text, and links. Maximum 50,000 characters. |
| Upload media | Localized images and videos. Drag and drop files, select Upload to browse, or select Paste URL to link media from a web address. Up to 10 images (10 MB each) and 2 videos (25 MB each). |
| Reward image | The main image displayed on the reward detail page for this language. |
| Thumbnail image | A smaller image is used in the list and preview views for this language. |
| Custom fields | (Optional) These are "Reward creation" scoped custom fields from your organization settings. They appear here so their values can vary per language, for example, a localized tagline or market-specific product code. Select Add custom field to choose from available fields. |
-
Select Save to confirm the content for this language.
-
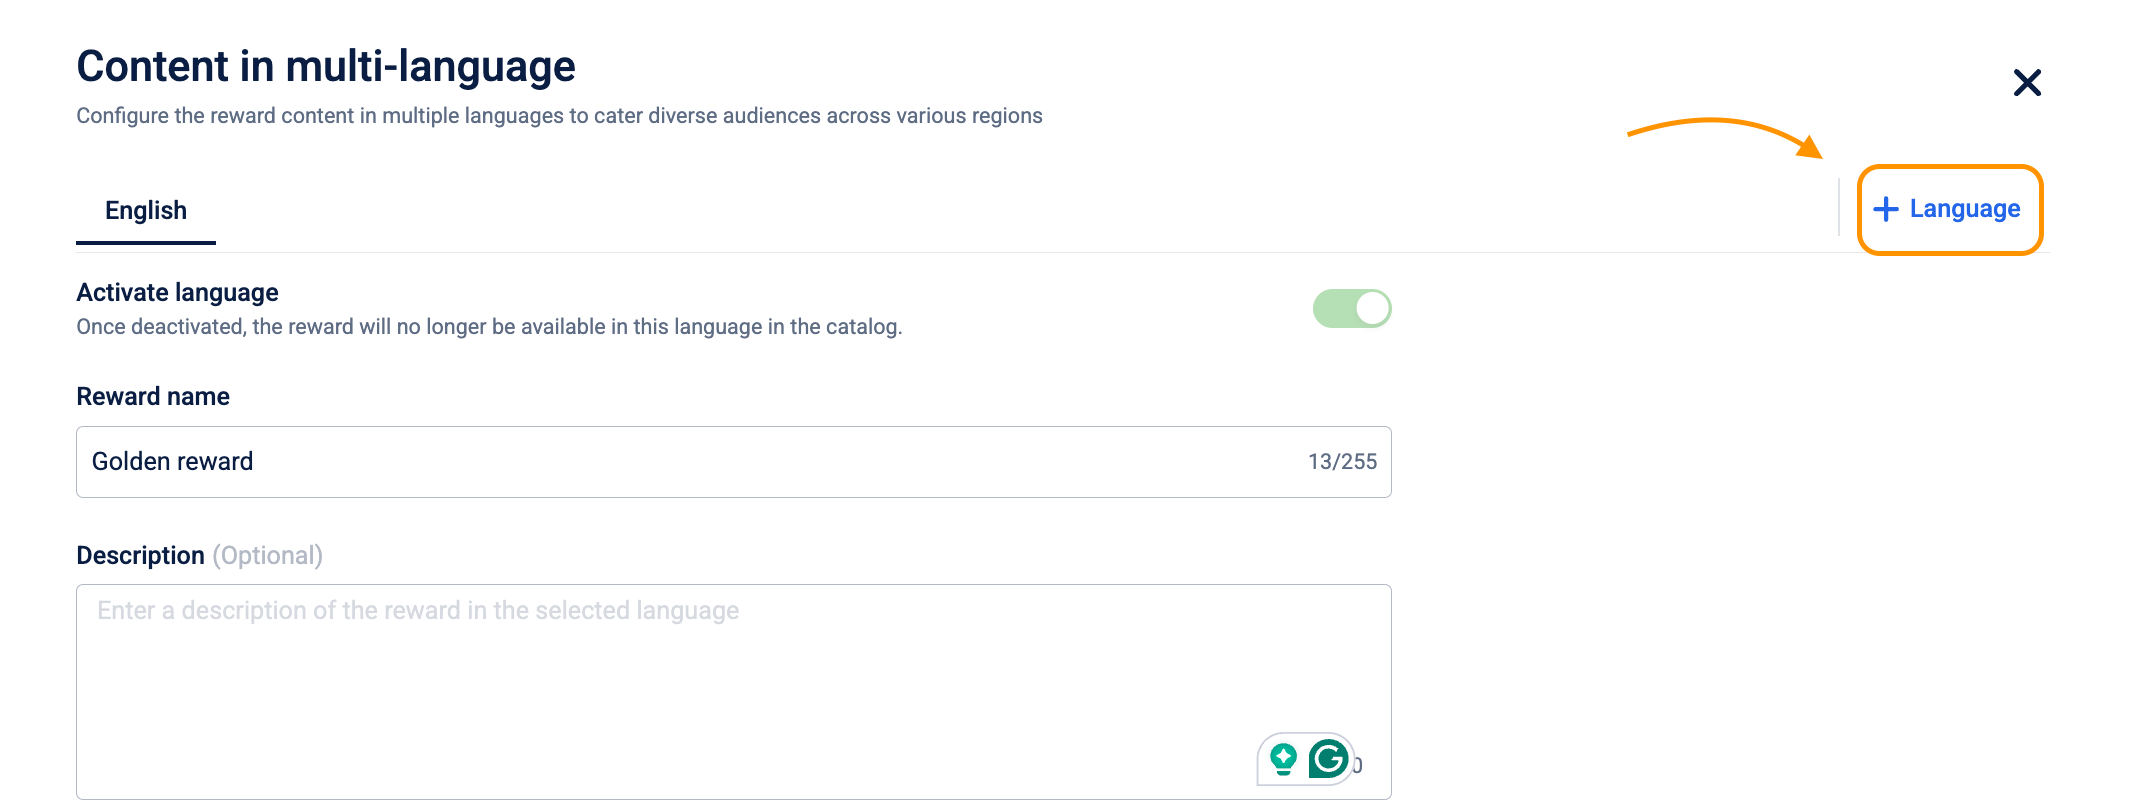
To add content for another language, select + Language and repeat the steps above. To add languages, go to Settings > Languages > New language.
You've now localized the reward content. You can add internal metadata to organize the reward in the catalog next.
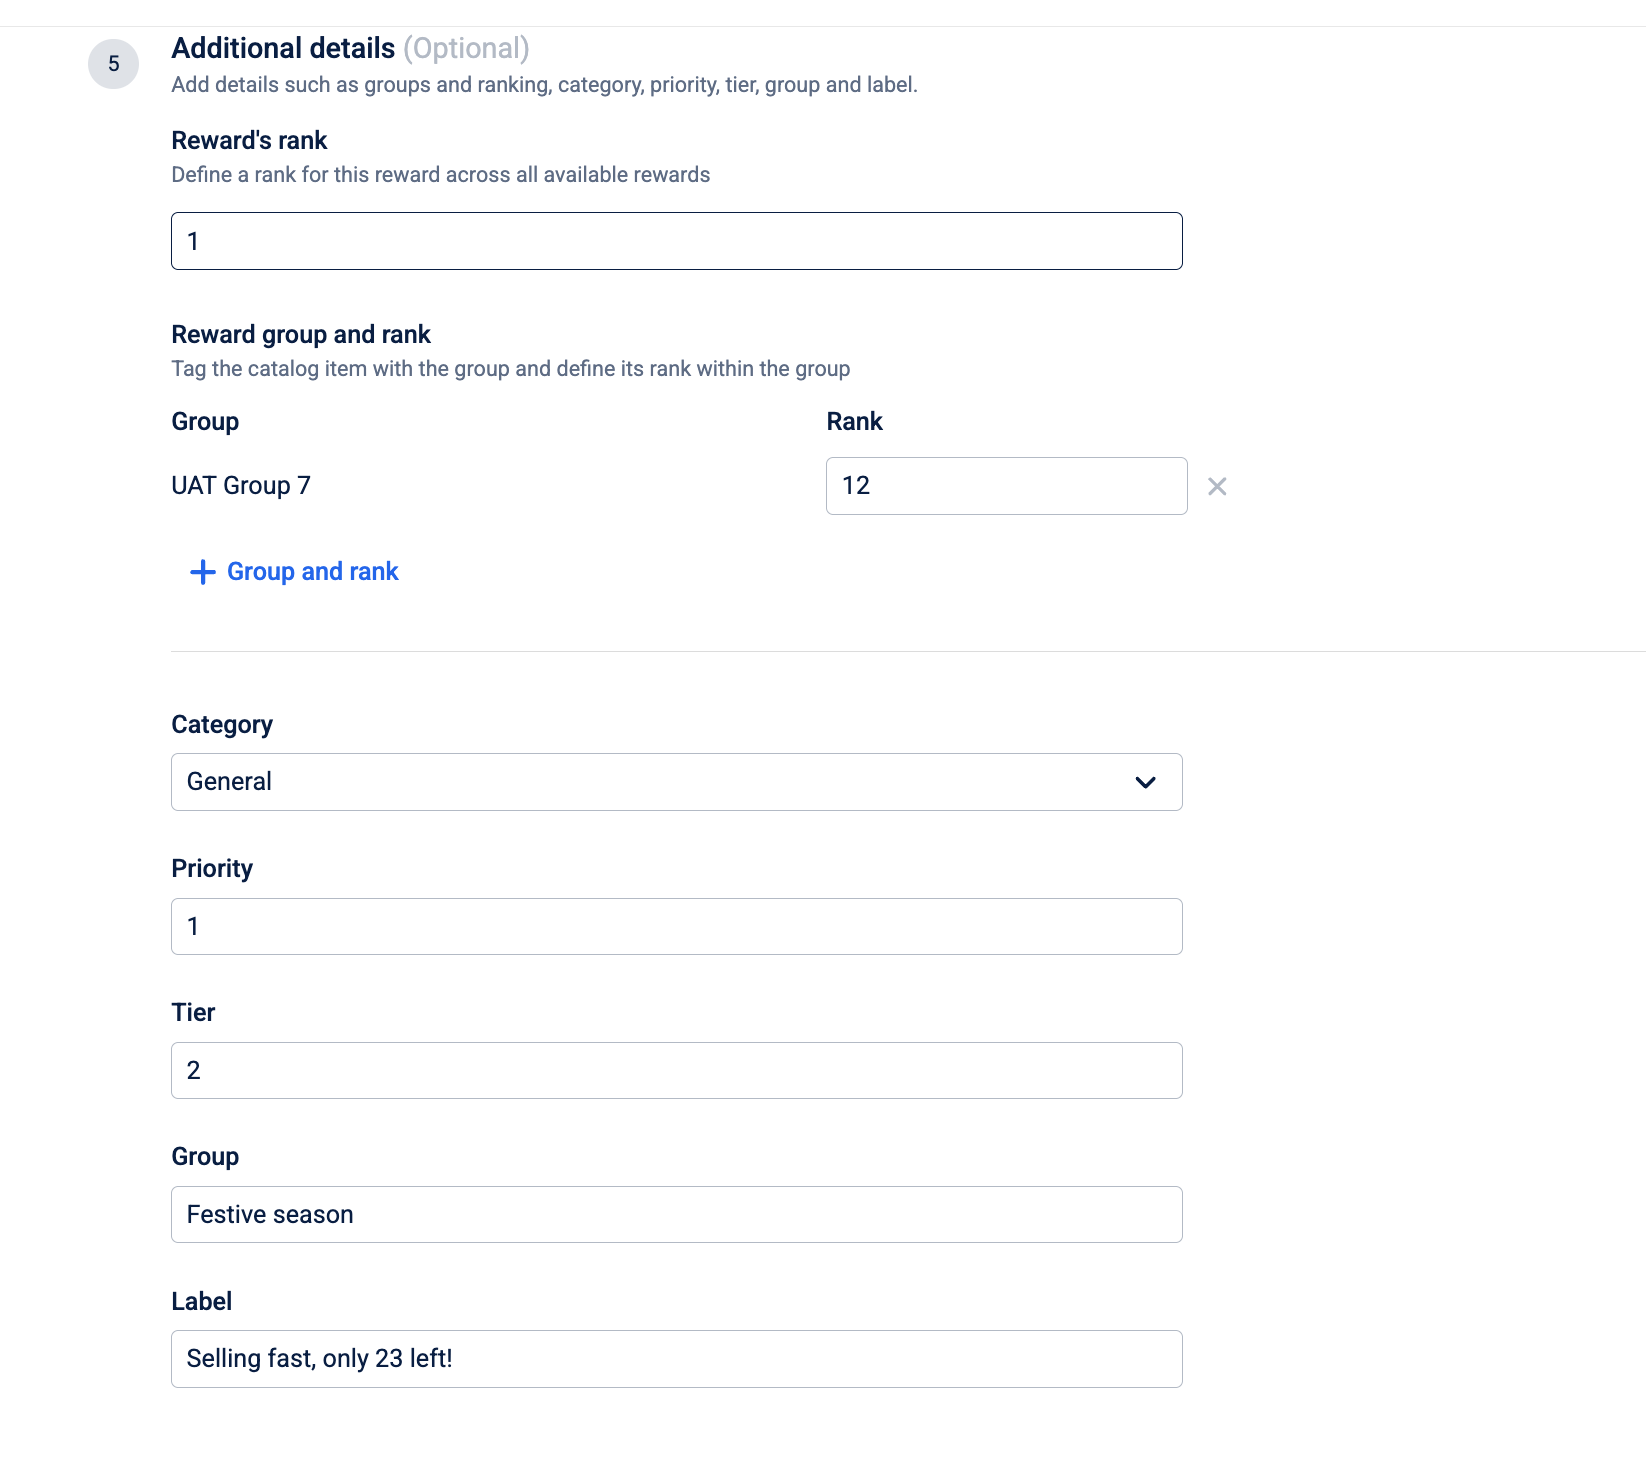
Step 6: Additional details
Add metadata to control how the reward appears in the catalog and how it's organized internally. All fields in this step are optional. Create groups and categories in catalog settings before assigning them here.
| Field | What it does | Character limit |
|---|---|---|
| Reward rank | Controls the order rewards appear in the catalog list view. Rank 1 appears at the top. Rewards with no rank assigned appear below all ranked rewards, in creation order. Lower number = higher position. Must be a positive integer. | Not applicable |
| Group and rank | Assigns the reward to a browsable group in the catalog. The rank within the group controls the order rewards appear within that group's view. Nesting groups creates a hierarchy (for example, "Summer Sale > Clothing > Women's") that customers navigate. The group rank must be a positive integer. | Not applicable |
| Category | Customers can filter the catalog by category. Assigning "Electronics" makes this reward appear when a customer applies the Electronics filter. A reward can belong to only one category. | Not applicable |
| Priority | Internal only. Customers never see this. Use it for workflow prioritization when reviewing or approving rewards. It has no effect on catalog display order. | Not applicable |
| Tier | A text label for reporting and internal organization. This does NOT control who can see or redeem the reward, which is configured in Step 2. Use it to tag rewards as "Gold" or "Platinum" so you can filter by tier in analytics. | 255 characters |
| Group | Different from the Group and rank field above. This is a free-text internal tag used for grouping in reports. Customers don't see it. | 255 characters |
| Label | Appears as a visible badge directly on the reward card in the catalog while customers browse. Use it for urgency cues like "Selling fast, only 23 left!" or "Ends tonight at 11:59 PM." | 255 characters |
You've now added the reward's metadata. Review the full configuration before saving.
Step 7: Preview and save
Before creating the reward, review the complete configuration.
-
Select Preview at the bottom of the page.
-
The preview screen shows a read-only summary across all sections:
-
Basic details
-
Who can view the reward
-
Incentive and cost details
-
Inventory limits
-
Content in multi-language
-
Additional details
-
-
Expand any section to review the details. Select Back to return and make changes.
-
Select Save to create the reward and add it to the catalog.
If you exit before saving, a confirmation dialog appears: "Discard unsaved reward details?" with the message "This reward's configuration will be lost and cannot be recovered." Confirming this dialog permanently discards all entered configuration.
You've now fully configured a new reward. It goes live on its scheduled start date if the Activate reward toggle is on, or stays invisible to customers until you activate it manually.