
Use Cases
These use cases demonstrate how to design User Group Loyalty programs for different business scenarios, covering group structure, tier behaviour, points model, and configuration decisions.
B2C use cases
Accelerated tier progression for families
Description: A fashion retailer wants family members to pool their spending toward a shared loyalty account, so the group reaches premium tiers faster and all members enjoy the same benefits. Each group can have up to five members.
Prerequisites
- Enable the
CONF_USER_GROUP_ENABLEDflag for your organisation by raising a JIRA ticket to the Capillary product support team. - Enable
CONF_USER_GROUP_SIZEand set the cap to5to restrict each group to one primary member and up to four secondary members. - Ensure your POS or API integration is configured to pass the
member_card_swipedextended field (or equivalent) in theAddTransactionpayload to indicate whether a transaction is a group transaction. - Configure webhooks for
tierUpgraded,tierDowngraded, andtierRenewedevents to support tier synchronisation. - Configure a Neo extension dataflow to receive webhook events and call the manual tier adjustment API.
Step 1: Configuring group creation
- Use
POST /v2/userGroup2to create the group entity with a name and maximum size of5. - Use
POST /v2/userGroup2/jointo add the primary member. SetprimaryMembertotrue. - Add secondary members using the same endpoint with
primaryMemberset tofalse.
Example request body for adding a secondary member:
[
  {
    "userId": 564662499,
    "primaryMember": false,
    "permissions": [
      "allow_points_redemption",
      "allow_points_transfer"
    ],
    "defaultGroup": true,
    "active": true
  }
]
Step 2: Configuring points earning
All member transactions should credit the group wallet rather than individual wallets. To do this, configure a mutually exclusive workflow in Loyalty+:
- Create a transaction-level extended field, for example
member_card_swiped, with valuesYesandNo. - Configure your POS integration to pass this field in the
AddTransactionpayload. - In Loyalty+ > Programs, open the Workflows tab and create two conditions for the
TransactionAddactivity:-
Individual transaction condition:
currentTxn.extField_member_card_swiped=="No" || currentTxn.extField_member_card_swiped.isNull()with the action set to Transaction point allocation for individuals.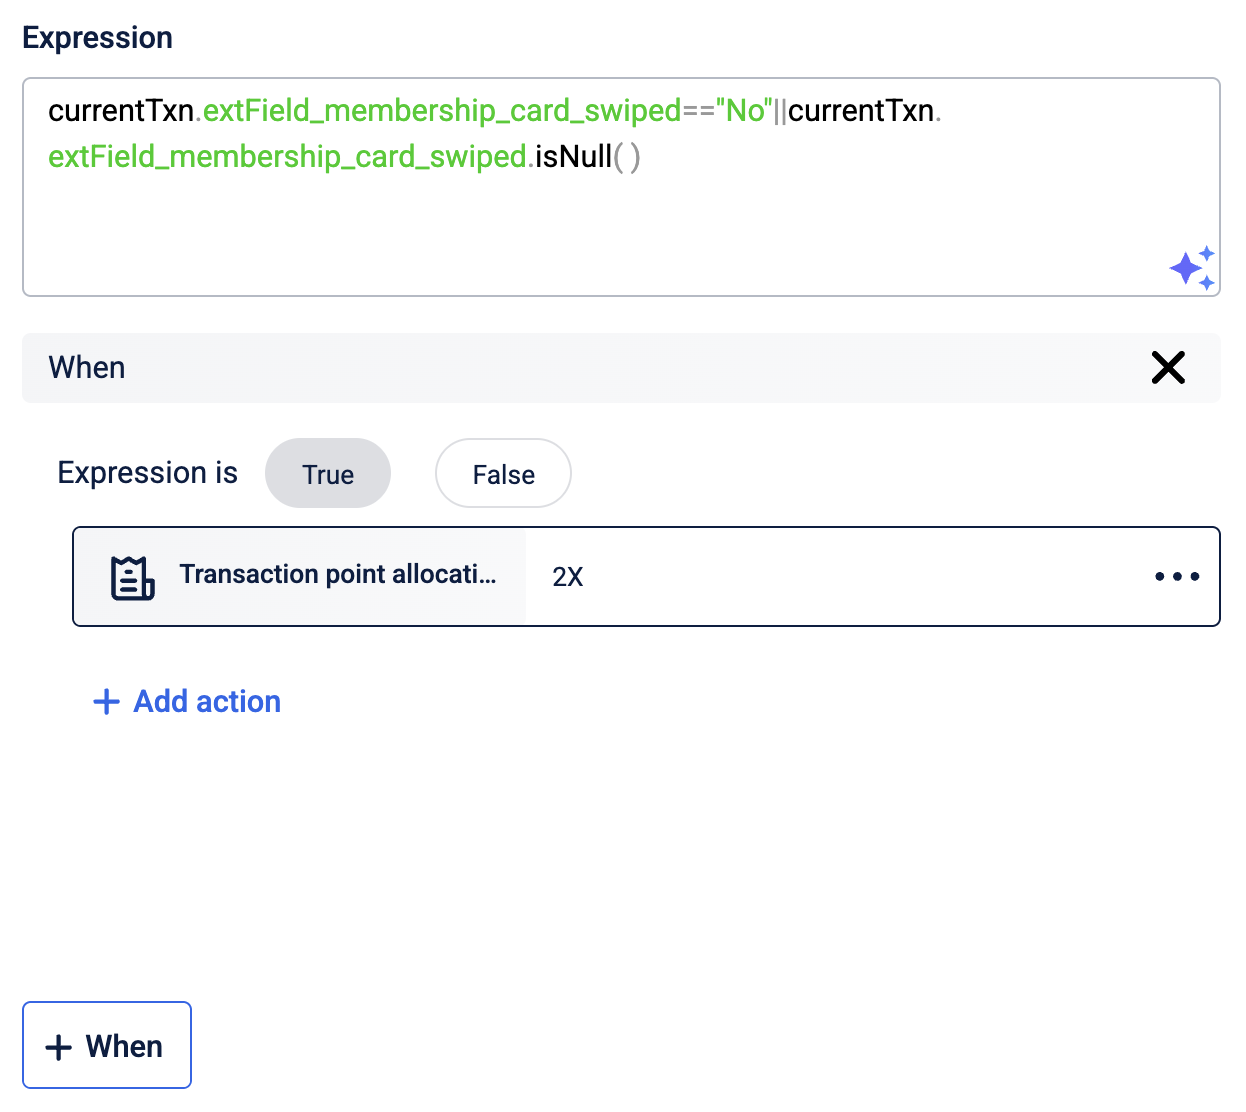
-
Group transaction condition:
currentTxn.extField_member_card_swiped=="Yes", with the action set to Transaction point allocation for user groups.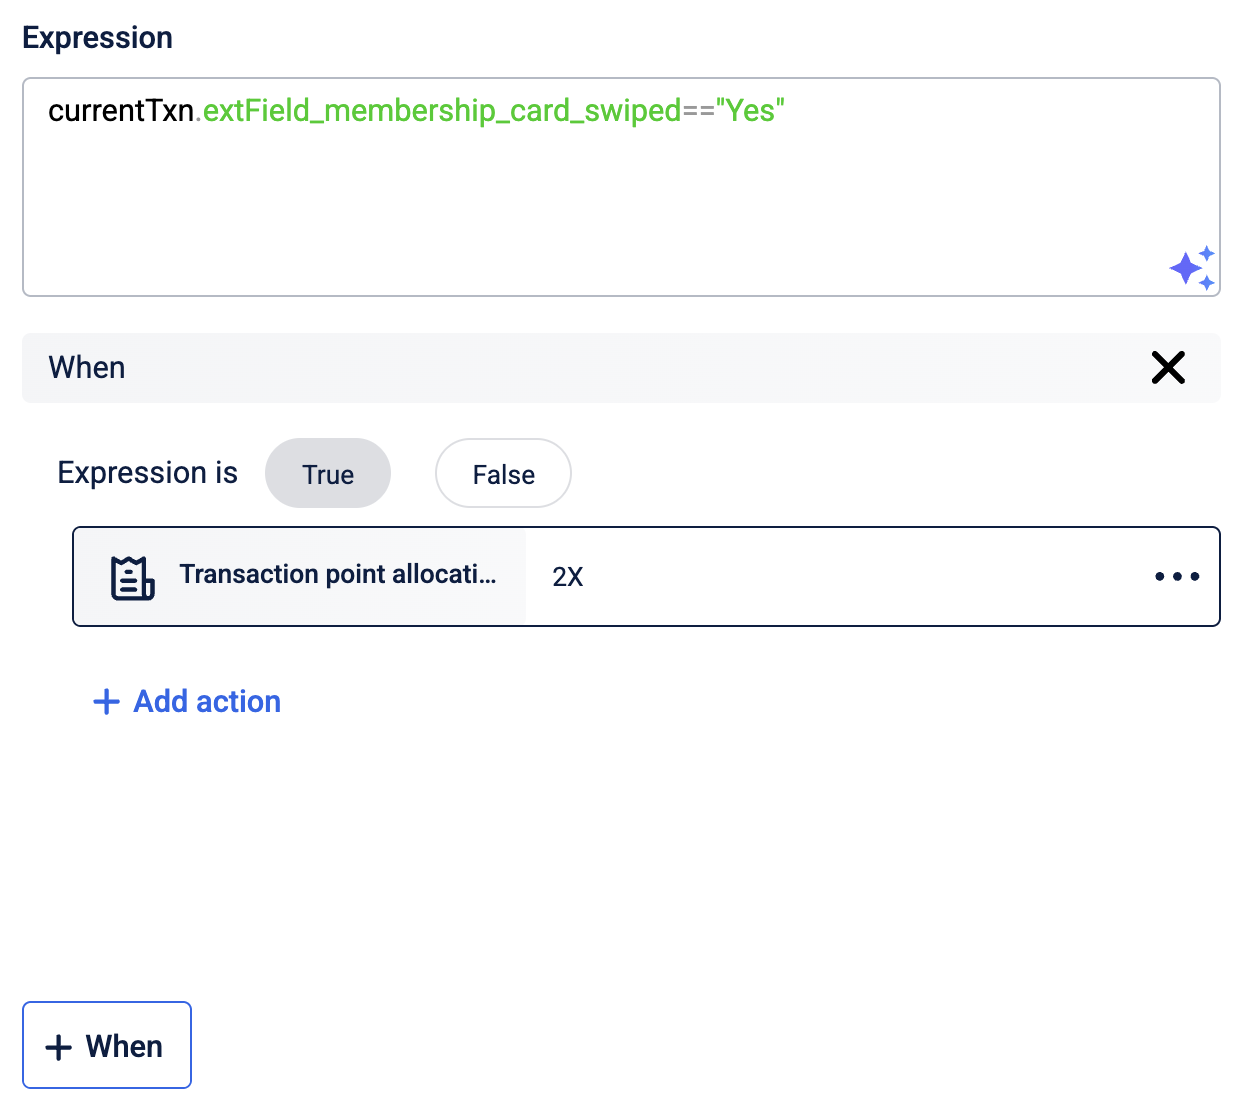
-
- Select Save and Continue, then Publish changes.
Note: When a user joins the group, use a custom job to transfer any existing individual points to the group wallet. Promotional points are never moved to the group wallet and remain with the individual.
Step 3: Configuring tier synchronisation
The group tier does not sync automatically. Use a primary-led synchronisation pattern:
- Configure event notifications for
tierUpgraded,tierDowngraded, andtierRenewed. - When a webhook fires, parse the payload to identify the tier name. Match the
upgradedTierNumber(ordowngradedTierNumber) against thetiersarray to find the tier name. Do not use the tier number directly in the manual adjustment call. - Call the Retrieve User Group Members List API to get all secondary member IDs.
- For each secondary member, call
POST /v2/slab/manualSlabAdjustmentwith the tier name from the payload. Repeat for every secondary member retrieved.
Friends and family shared points pool
Description: A consumer loyalty program lets customers invite up tp three friends or family into a group. All members share a single points bucket. Any member can earn and redeem from the shared pool. A user cannot hold both an individual wallet and a group wallet simultaneously.
Prerequisites
- Enable
CONF_USER_GROUP_ENABLEDfor the organisation. - Enable
CONF_USER_GROUP_SIZEand set the cap to3to restrict each group to one primary member and up to three secondary members. - Configure webhooks for
tierUpgraded,tierDowngraded, andtierRenewedevents to support tier synchronisation. - Configure a Neo extension dataflow to receive webhook events and call the manual tier adjustment API.
Step 1: Configuring group creation
- Use
POST /v2/userGroup2to create the group entity. - Add the primary member with
primaryMember: true. - When invitations are accepted, add secondary members using
POST /v2/userGroup2/join. Grantallow_points_redemptionto allow any member to redeem from the shared pool.
Example request body for a secondary member with redemption permission:
[
  {
    "userId": 564662501,
    "primaryMember": false,
    "permissions": [
      "allow_points_redemption"
    ],
    "defaultGroup": true,
    "active": true
  }
]
Step 2: Configuring points earning
Transactions by any group member should credit the shared group bucket:
-
In Loyalty+ > Programs, open the Workflows tab.
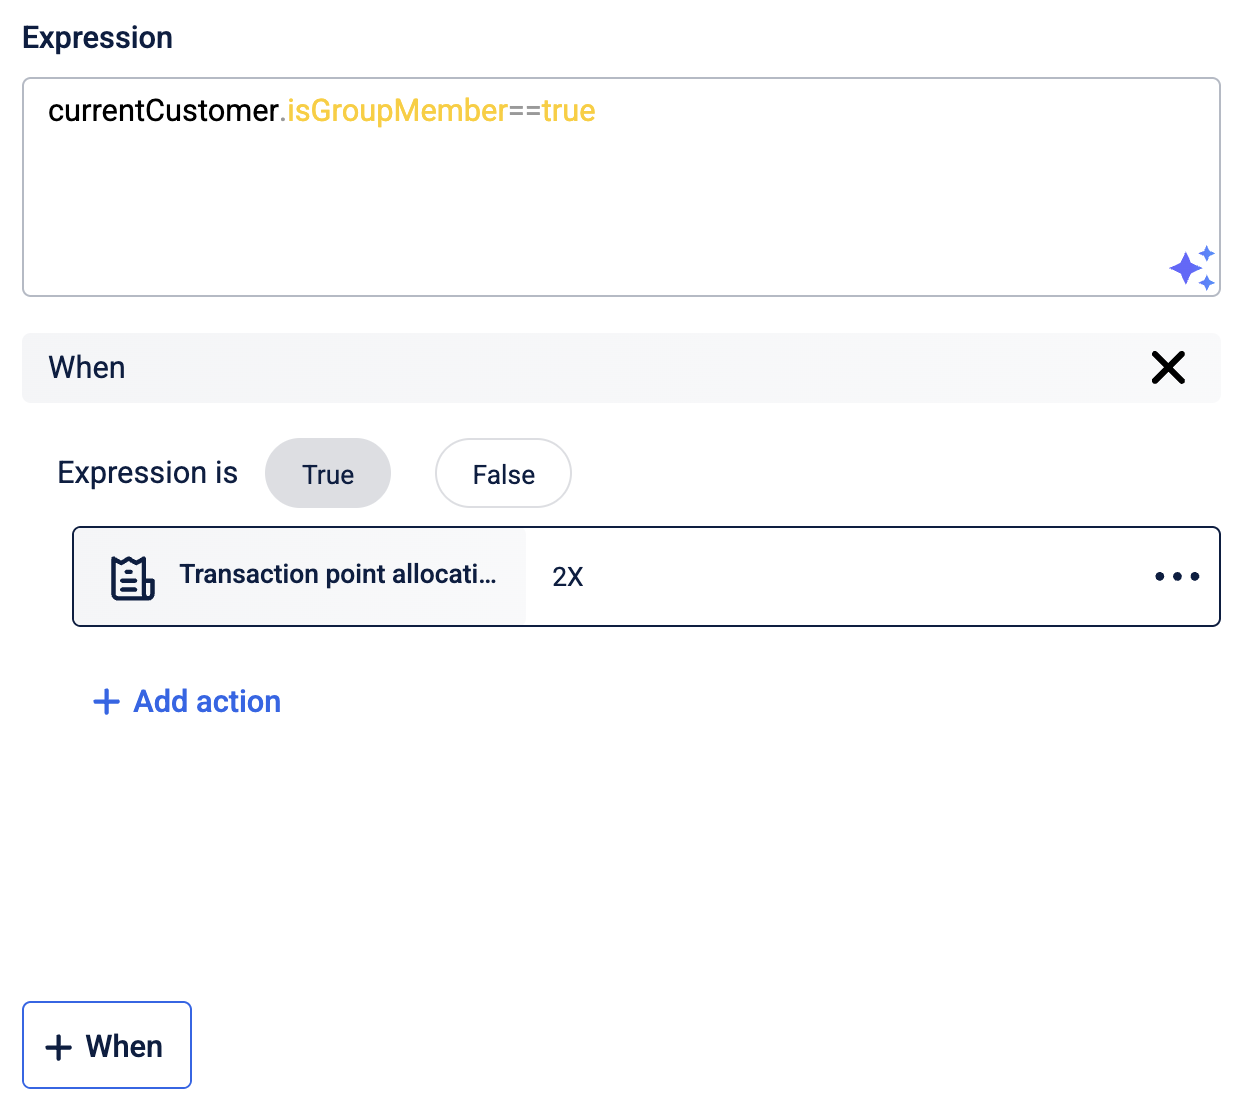
-
Create a condition on the
TransactionAddactivity using thecurrentCustomer.isGroupMember==Yesexpression to scope it to group members. -
Set the action to Transaction point allocation for user groups.
Step 3: Configuring tier synchronisation
The group tier does not sync automatically. Use a primary-led synchronisation pattern:
- Configure event notifications for
tierUpgraded,tierDowngraded, andtierRenewed. - When a webhook fires, parse the payload to identify the tier name. Match the
upgradedTierNumber(ordowngradedTierNumber) against thetiersarray to find the tier name. Do not use the tier number directly in the manual adjustment call. - Call the Retrieve User Group Members List API to get all secondary member IDs.
- For each secondary member, call
POST /v2/slab/manualSlabAdjustmentwith the tier name from the payload. Repeat for every secondary member retrieved.
B2B use case
Fleet owner earns from driver transactions
Description: A fuel brand wants to reward fleet companies based on the combined refuelling activity of their drivers. Each time a driver refuels, points are credited to the fleet owner's shared group wallet. The fleet owner manages all redemptions; drivers cannot redeem.
Prerequisites
- Enable
CONF_USER_GROUP_ENABLEDfor the organisation by raising a JIRA ticket to the Capillary product support team. - Enable
FLEET_GROUP_LOYALTY_ENABLEDfor the organisation to activate fleet-specific earning and expiry logic. - Set
FLEET_ENTITY_TYPEto configure the entity type used for fleet group loyalty. - Ensure your POS or API integration is configured to pass the
member_card_swipedextended field (or equivalent) in theAddTransactionpayload to indicate whether a transaction is a group transaction. - Configure webhooks for
tierUpgraded,tierDowngraded, andtierRenewedevents to support tier synchronisation. - Configure a Neo extension dataflow to receive webhook events and call the manual tier adjustment API.
Step 1: Creating the fleet hierarchy
Before creating any group or associating customers, define the hierarchy structure using POST /v2/fleetHierarchy. The hierarchy defines the role levels (for example, Owner and Driver) and the rules governing how they relate to each other.
Example request body:
{
  "name": "Fleet Hierarchy",
  "code": "FLEET_HIER_001",
  "description": "Hierarchy for fleet owner and driver roles",
  "isAutoGroupCreationEnabled": true,
  "isHierarchyCreationStrict": true,
  "isSkipRoleAllowed": false,
  "isDefault": true,
  "isActive": true
}
The key fields to configure:
| Field | Description |
|---|---|
isAutoGroupCreationEnabled | When true, a group is automatically created when a customer is assigned to the owner role. No manual group creation API call is needed. |
isHierarchyCreationStrict | When true, members must follow the exact role sequence. A driver cannot be added without an owner being present. |
isSkipRoleAllowed | When true, intermediate roles in the hierarchy can be bypassed. Set to false for a strict owner-driver model. |
Step 2: Associating customers with the hierarchy
Once the hierarchy is defined, associate each customer with a role using the customer create or update API. Pass the associationDetails object with the hierarchy code, role, and company details.
Example request body:
{
  "profiles": [
    {
      "identifiers": [
        {
          "type": "mobile",
          "value": "9781027293"
        }
      ]
    }
  ],
  "associationDetails": {
    "hierarchyCode": "FLEET_HIER_001",
    "roleCode": "Driver",
    "fleetCompany": {
      "name": "ABC Logistics",
      "hierarchyDefinitionCode": "FLEET_HIER_001",
      "externalId": "abc_logistics_001"
    }
  }
}
If isAutoGroupCreationEnabled is true on the hierarchy, assigning the owner role automatically creates the group. For driver associations, the driver is added to the owner's existing group.
Step 3: Creating the group entity
If auto group creation is not enabled, create the group manually using POST /v2/userGroup2 after the hierarchy is set up.
Example request body:
{
  "externalId": "fleet_ug_001",
  "groupName": "ABC Logistics Fleet",
  "maxGroupSize": 20,
  "extendedFields": {
    "ug_status": "Active",
    "ug_registration_date": "2025-11-10T15:10:00Z"
  }
}
Step 4: Adding members to the group
Use POST /v2/userGroup2/join to add the fleet owner as the primary member and drivers as secondary members. Block redemption and transfer for drivers so that only the fleet owner can redeem.
Example request body for the fleet owner:
[
  {
    "userId": 564662499,
    "primaryMember": true,
    "permissions": [
      "allow_points_redemption",
      "allow_points_transfer"
    ],
    "defaultGroup": true,
    "active": true
  }
]
Example request body for a driver:
[
  {
    "userId": 564662500,
    "primaryMember": false,
    "permissions": [
      "block_points_redemption",
      "block_points_transfer"
    ],
    "defaultGroup": true,
    "active": true
  }
]
Step 5: Configuring points earning
Configure a mutually exclusive workflow in Loyalty+ so that group transactions credit the group wallet and individual transactions credit the individual wallet:
-
Create a transaction-level extended field (for example,
member_card_swiped) with valuesYesandNo. -
Configure your POS integration to pass
Yeswhen the fleet card is swiped, andNoor null otherwise. -
In Loyalty+ > Programs, open the Workflows tab and create two conditions for the
TransactionAddactivity:-
Individual transaction condition:
currentTxn.extField_member_card_swiped=="No" || currentTxn.extField_member_card_swiped.isNull()with the action set to Transaction point allocation for individuals. -
Group transaction condition:
currentTxn.extField_member_card_swiped=="Yes", with the action set to Transaction point allocation for user groups.
-
-
Select Save and Continue, then Publish changes.
Step 6: Configuring tier synchronisation
The group tier does not sync automatically. Use a primary-led synchronisation pattern:
- Configure event notifications for
tierUpgraded,tierDowngraded, andtierRenewed. - When a webhook fires, parse the payload to identify the tier name. Match the
upgradedTierNumber(ordowngradedTierNumber) against thetiersarray to find the tier name. Do not use the tier number directly in the manual adjustment call. - Call the Retrieve User Group Members List API to get all secondary member IDs.
- For each secondary member, call
POST /v2/slab/manualSlabAdjustmentwith the tier name from the payload. Repeat for every secondary member retrieved.
Multi-level buyer group with role-based earning
Description: A consumer goods brand operates through a network of regional distributors and store owners. Regional distributors manage multiple store owners beneath them. All purchases by store owners contribute to the distributor's group wallet. The regional distributor controls redemption; store owners can only earn points.
Prerequisites
- Enable
CONF_USER_GROUP_ENABLEDfor the organisation by raising a JIRA ticket to the Capillary product support team. - Enable
FLEET_GROUP_LOYALTY_ENABLEDfor the organisation to activate fleet-specific earning and expiry logic. - Set
FLEET_ENTITY_TYPEto configure the entity type used for fleet group loyalty. - Configure webhooks for
tierUpgraded,tierDowngraded, andtierRenewedevents to support tier synchronisation. - Configure a Neo extension dataflow to receive webhook events and call the manual tier adjustment API.
Step 1: Creating the distributor hierarchy
Define the hierarchy with skip-role support to allow Store Owners to be linked directly to Regional Distributors when no Area Manager is needed.
Example request body:
{
  "name": "Distributor Hierarchy",
  "code": "DIST_HIER_001",
  "description": "Regional distributor and store owner hierarchy",
  "isAutoGroupCreationEnabled": true,
  "isHierarchyCreationStrict": false,
  "isSkipRoleAllowed": true,
  "isDefault": true,
  "isActive": true
}
Setting isSkipRoleAllowed to true allows a Store Owner to be associated directly with a Regional Distributor, bypassing the Area Manager level for smaller regions.
Step 2: Associating customers with the hierarchy
Associate each customer with their role using the customer create or update API. Pass the associationDetails object with the hierarchy code and role assignment.
Example: Associating a store owner with a regional distributor's company:
{
  "profiles": [
    {
      "identifiers": [
        {
          "type": "mobile",
          "value": "9876543210"
        }
      ]
    }
  ],
  "associationDetails": {
    "hierarchyCode": "DIST_HIER_001",
    "roleCode": "StoreOwner",
    "fleetCompany": {
      "name": "North Region Distributors",
      "hierarchyDefinitionCode": "DIST_HIER_001",
      "externalId": "north_region_001"
    }
  }
}
If isAutoGroupCreationEnabled is true, the group is created automatically when the Regional Distributor is onboarded. Store Owners are added to the existing group as secondary members.
Step 3: Creating the group entity
If auto group creation is not enabled, create the group manually after hierarchy setup.
Example request body:
{
  "externalId": "dist_ug_north_001",
  "groupName": "North Region Distributor Group",
  "maxGroupSize": 100,
  "extendedFields": {
    "ug_status": "Active",
    "ug_registration_date": "2025-11-10T15:10:00Z"
  }
}
Step 4: Adding members to the group
Add the Regional Distributor as the primary member with full redemption rights. Add Store Owners as secondary members with redemption blocked.
Example request body for a store owner:
[
  {
    "userId": 564662501,
    "primaryMember": false,
    "permissions": [
      "block_points_redemption",
      "block_points_transfer"
    ],
    "defaultGroup": true,
    "active": true
  }
]
Step 5: Configuring points earning
All store owner transactions should credit the distributor's group wallet. Configure earning via Loyalty+ promotions rather than core loyalty rules:
-
Define a promotion triggered by the
TransactionAddactivity. -
Scope eligibility using the
currentCustomer.isGroupMember==truecondition to target group members only. -
Set the reward action to Transaction point allocation for user groups.
-
Select Save and Continue, then Publish changes.
Step 6: Configuring tier synchronisation
The group tier does not sync automatically. Use a primary-led synchronisation pattern:
- Configure event notifications for
tierUpgraded,tierDowngraded, andtierRenewed. - When a webhook fires, parse the payload to identify the tier name. Match the
upgradedTierNumber(ordowngradedTierNumber) against thetiersarray to find the tier name. Do not use the tier number directly in the manual adjustment call. - Call the Retrieve User Group Members List API to get all secondary member IDs.
- For each secondary member, call
POST /v2/slab/manualSlabAdjustmentwith the tier name from the payload. Repeat for every secondary member retrieved.