
Example Use Cases
Use case 1: Buy 2 Get 1 Free
Requirement: Automatically discount 1 item when a customer adds 3 qualifying items to their cart.
Promotion Type: POS Cart Promotion, which automatically apply discount if the criteria are fulfilled. (no coupon code required).
Step 1: Basic setup
- Navigate: Go to Engage+ > Campaigns > Select your active campaign.
- Create: Go to the Promotions tab and click New cart promotion.
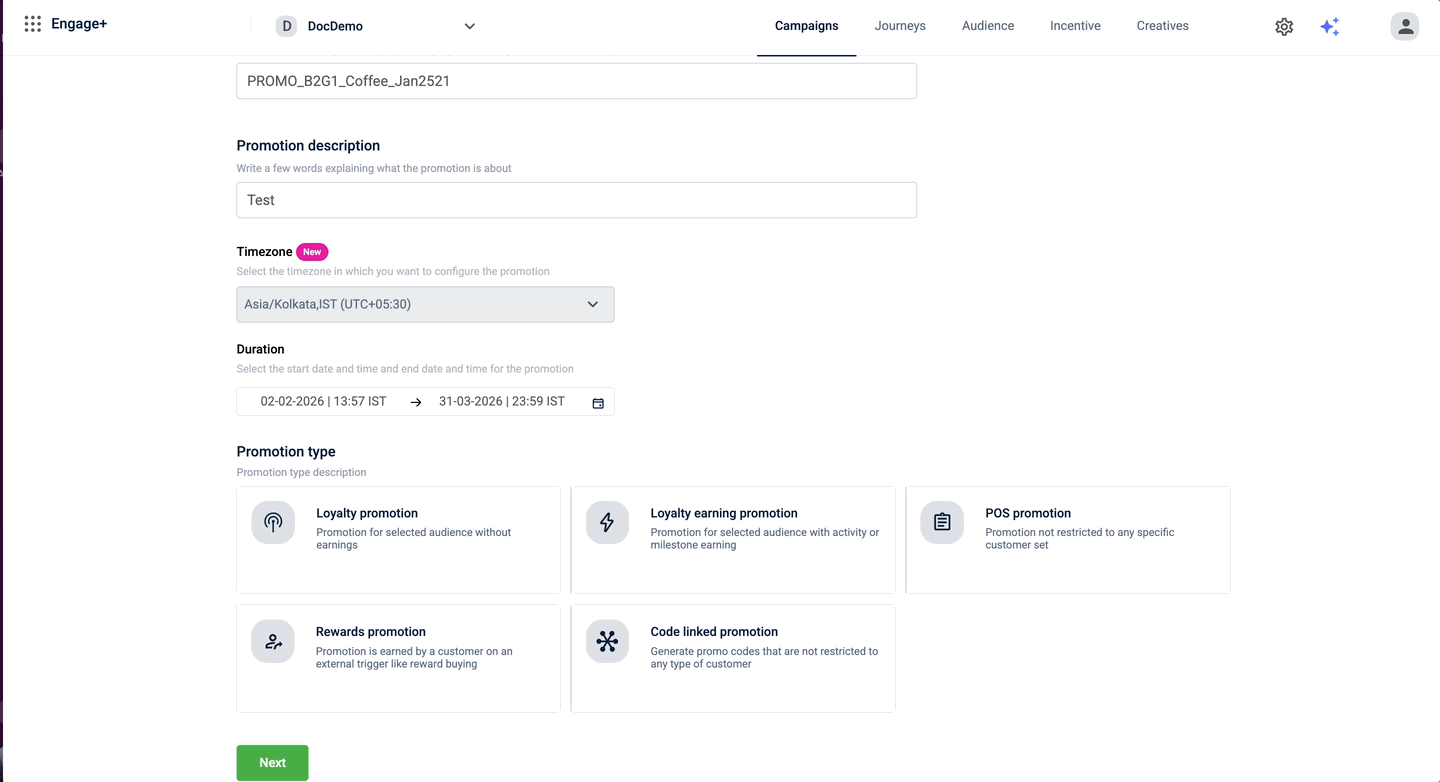
- Define Basic Details:
- Name: Enter a clear system name (for example, PROMO_B2G1_Coffee_Jan25).
- Description: "Buy any 2 Coffees, Get the 3rd Free. Applied to the lowest price item."
- Timezone: Specifies the timezone where the promotion was created
- Duration: Set the Start Date and End Date.
- Promotion Type: Select POS Cart Promotion. This type ensures that the POS automatically triggers the discount when the cart rules are met.
Step 2: Configuration
Scroll to the section Availing conditions and benefits.
Step 2.2: Set the trigger (condition)
You need to tell the system to count specific items.
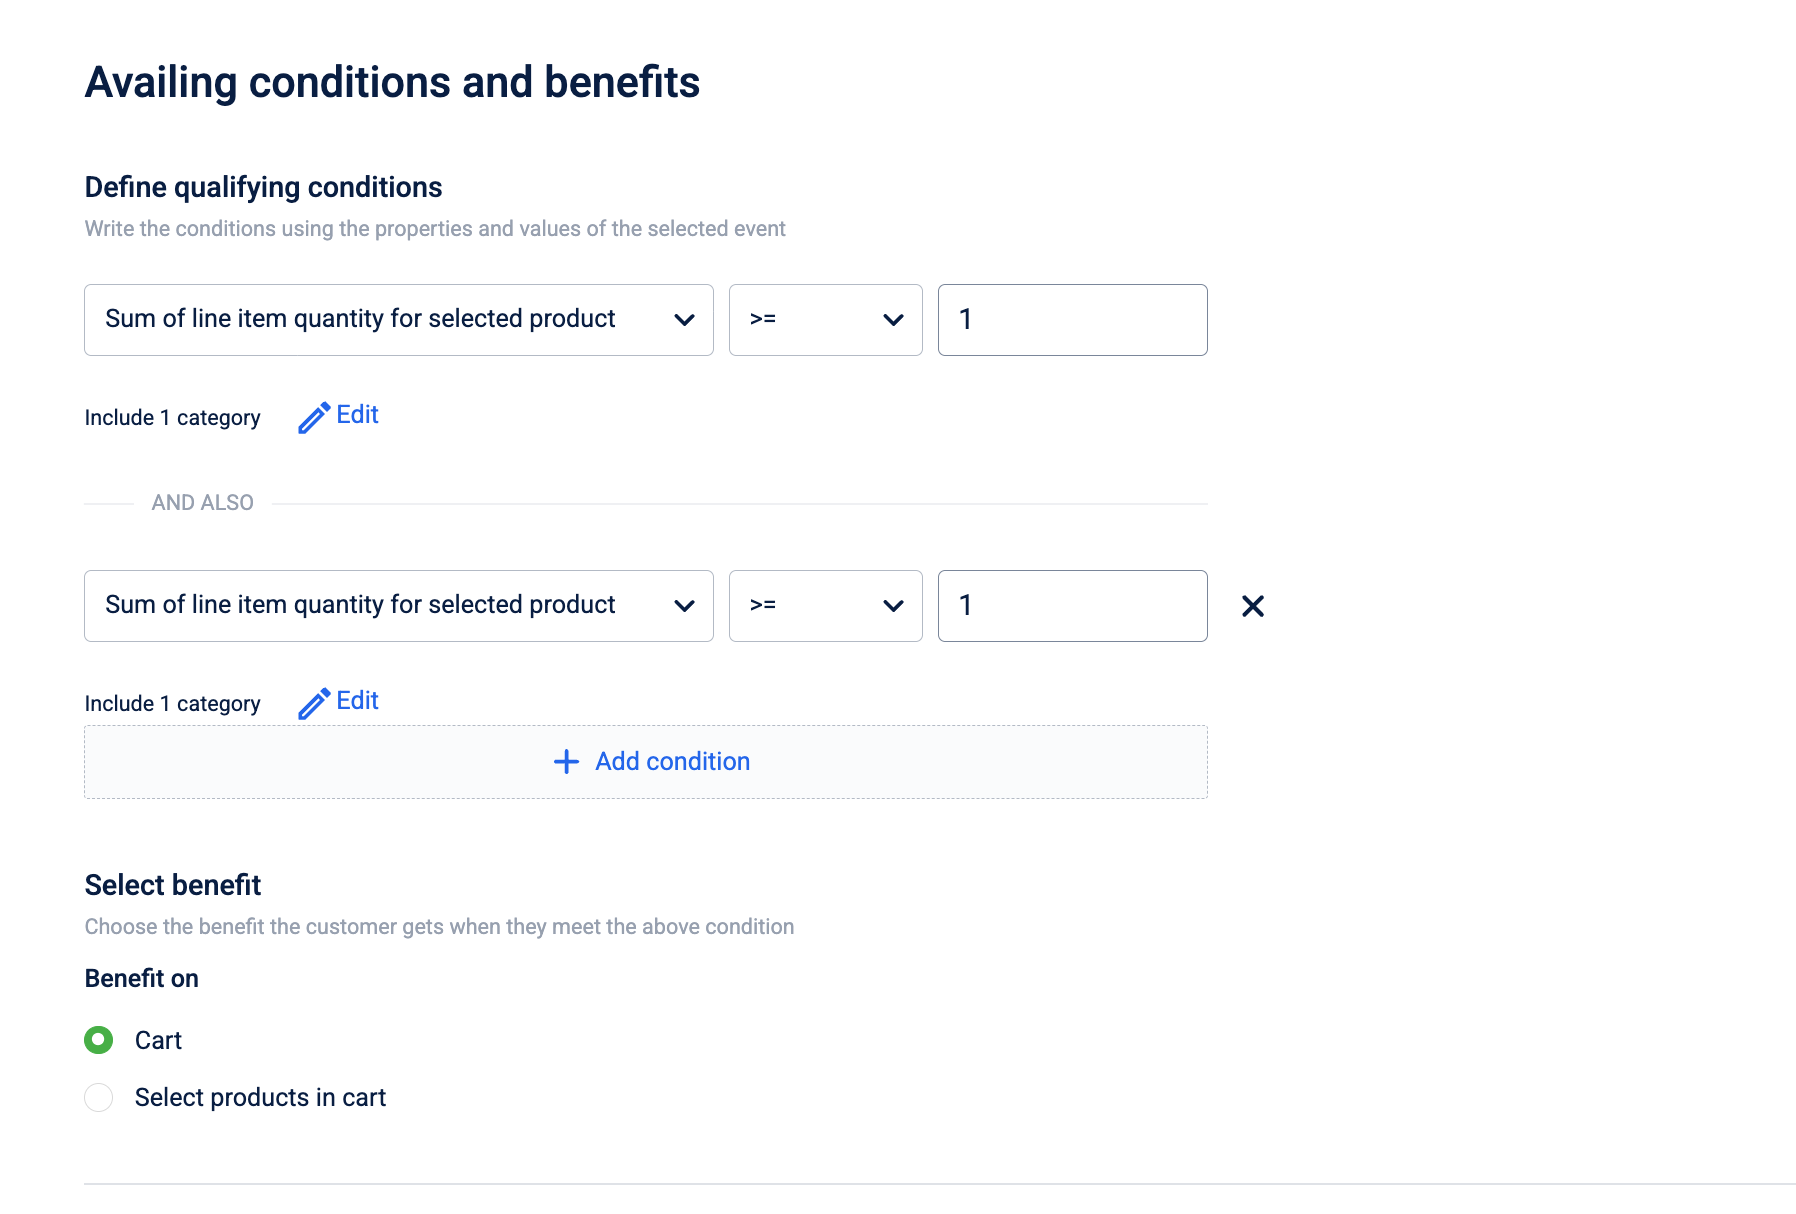
- Click Add conditions/benefits.
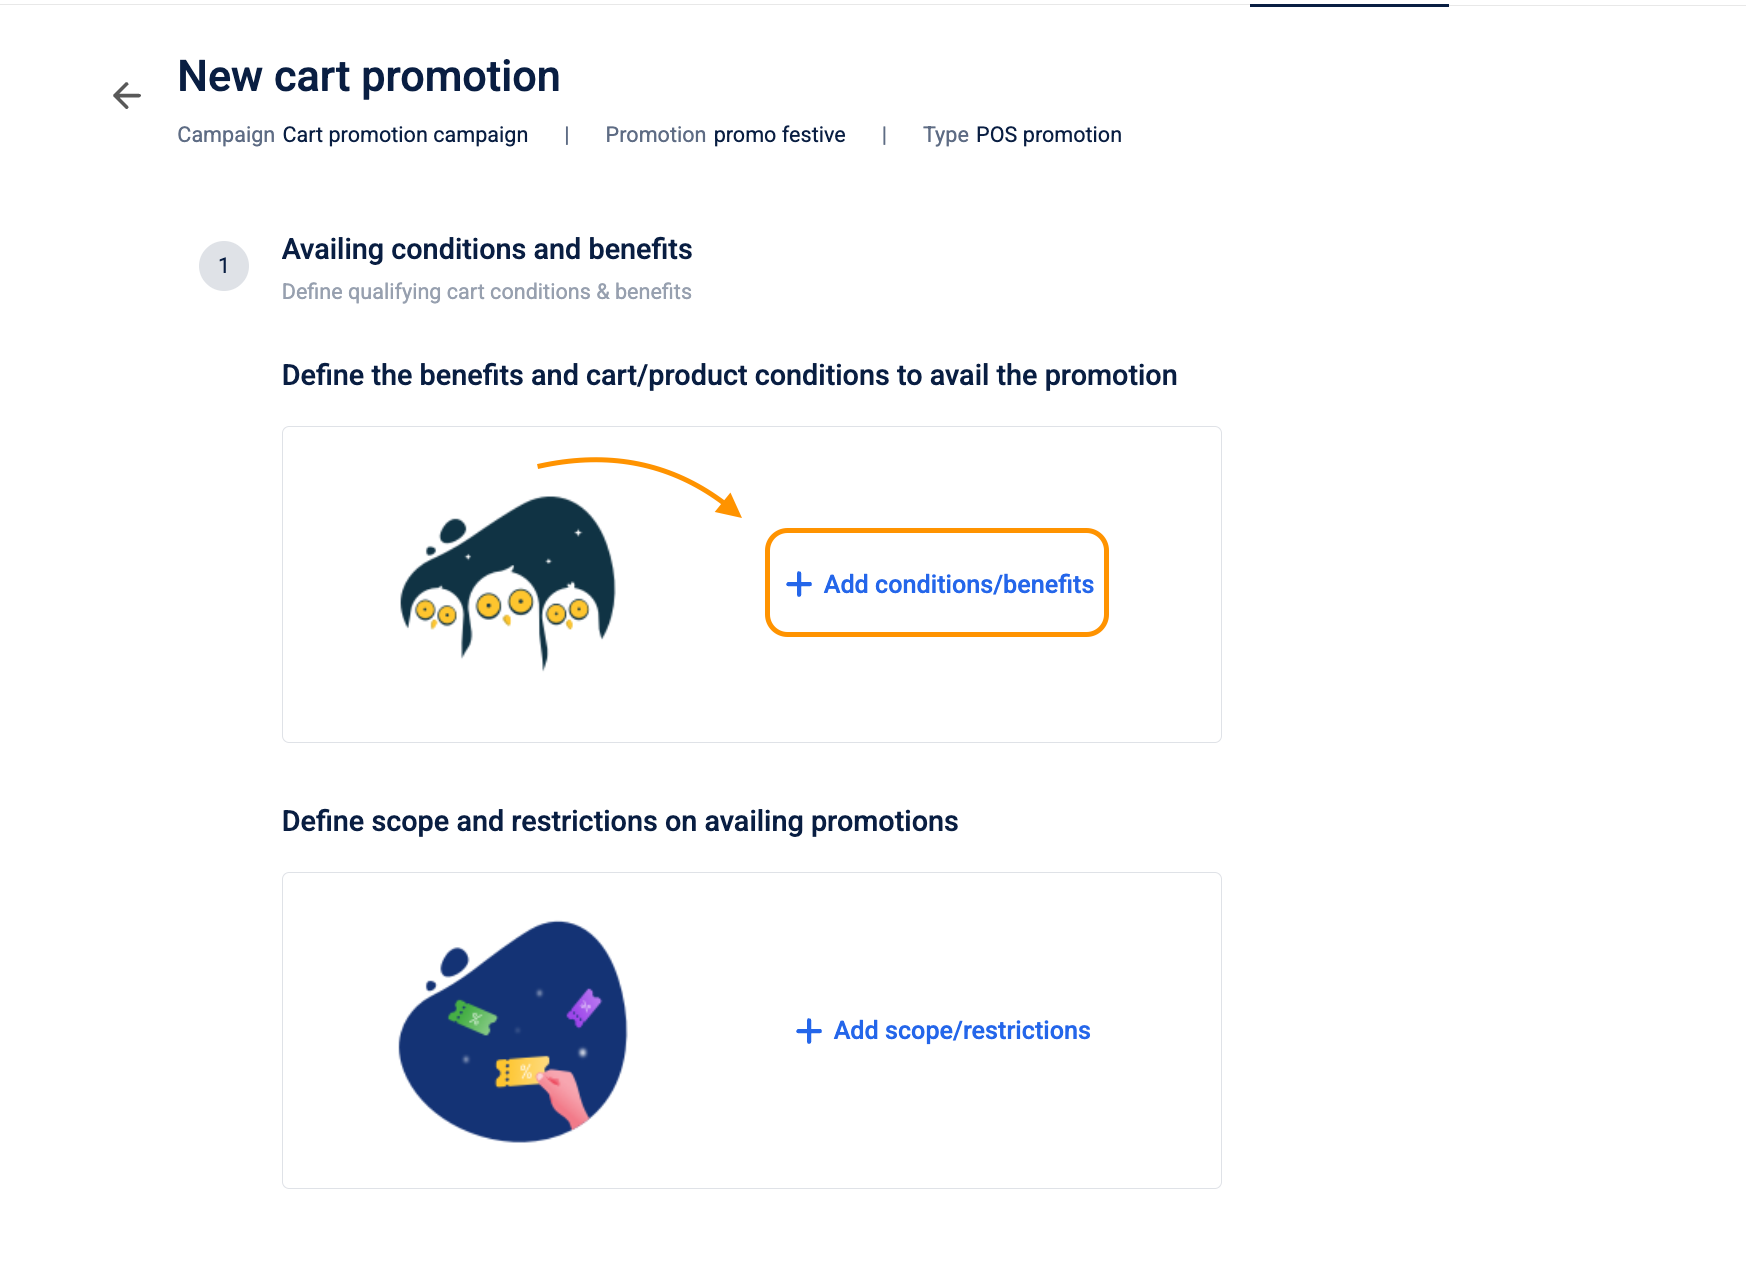
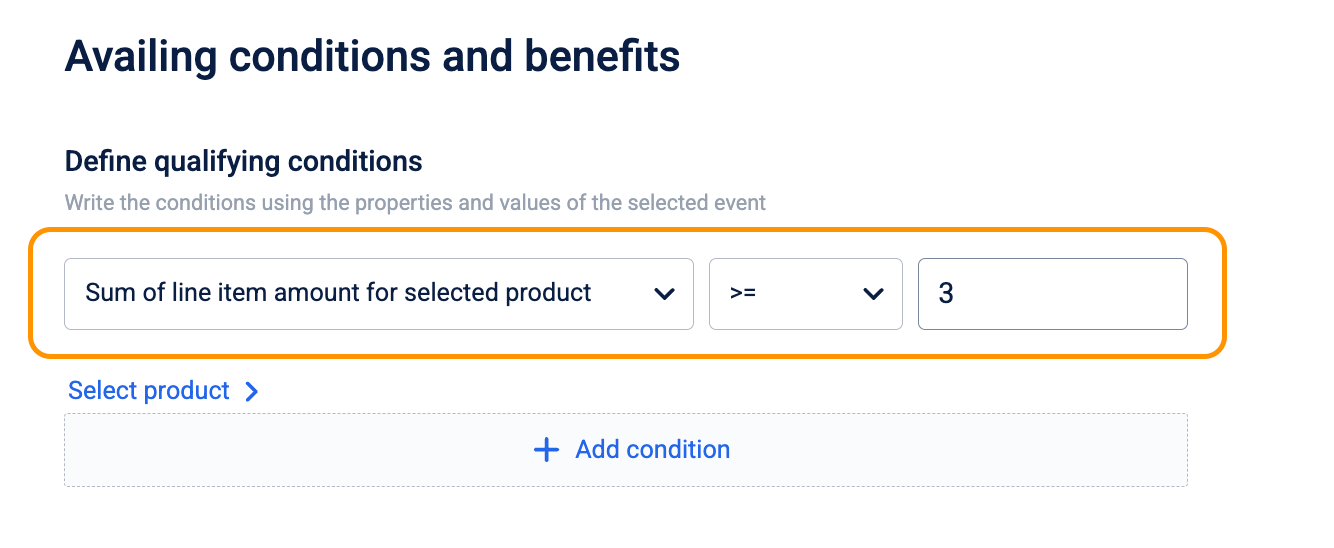
- In the Conditions column, configure the following:
| Field Name | Selection / Value | Explanation |
|---|---|---|
| Qualifying Condition | Sum of line item quantity for the selected product | We are counting how many items are in the basket, not the price of the items. |
| Select Product | Select or upload sku | Defines which items count toward the deal. You can also select specific categories here. |
| Operator | Greater than or equal to | Allows the deal to trigger when the product quantity reaches the specified criteria. |
| Value | 3 | CRITICAL: This is the Total Cart Count required. The customer must bring 2 paid items + 1 free item to the counter (Total = 3). |
Step 2.3: Set the reward benefits
You need to tell the system which item gets the discount.
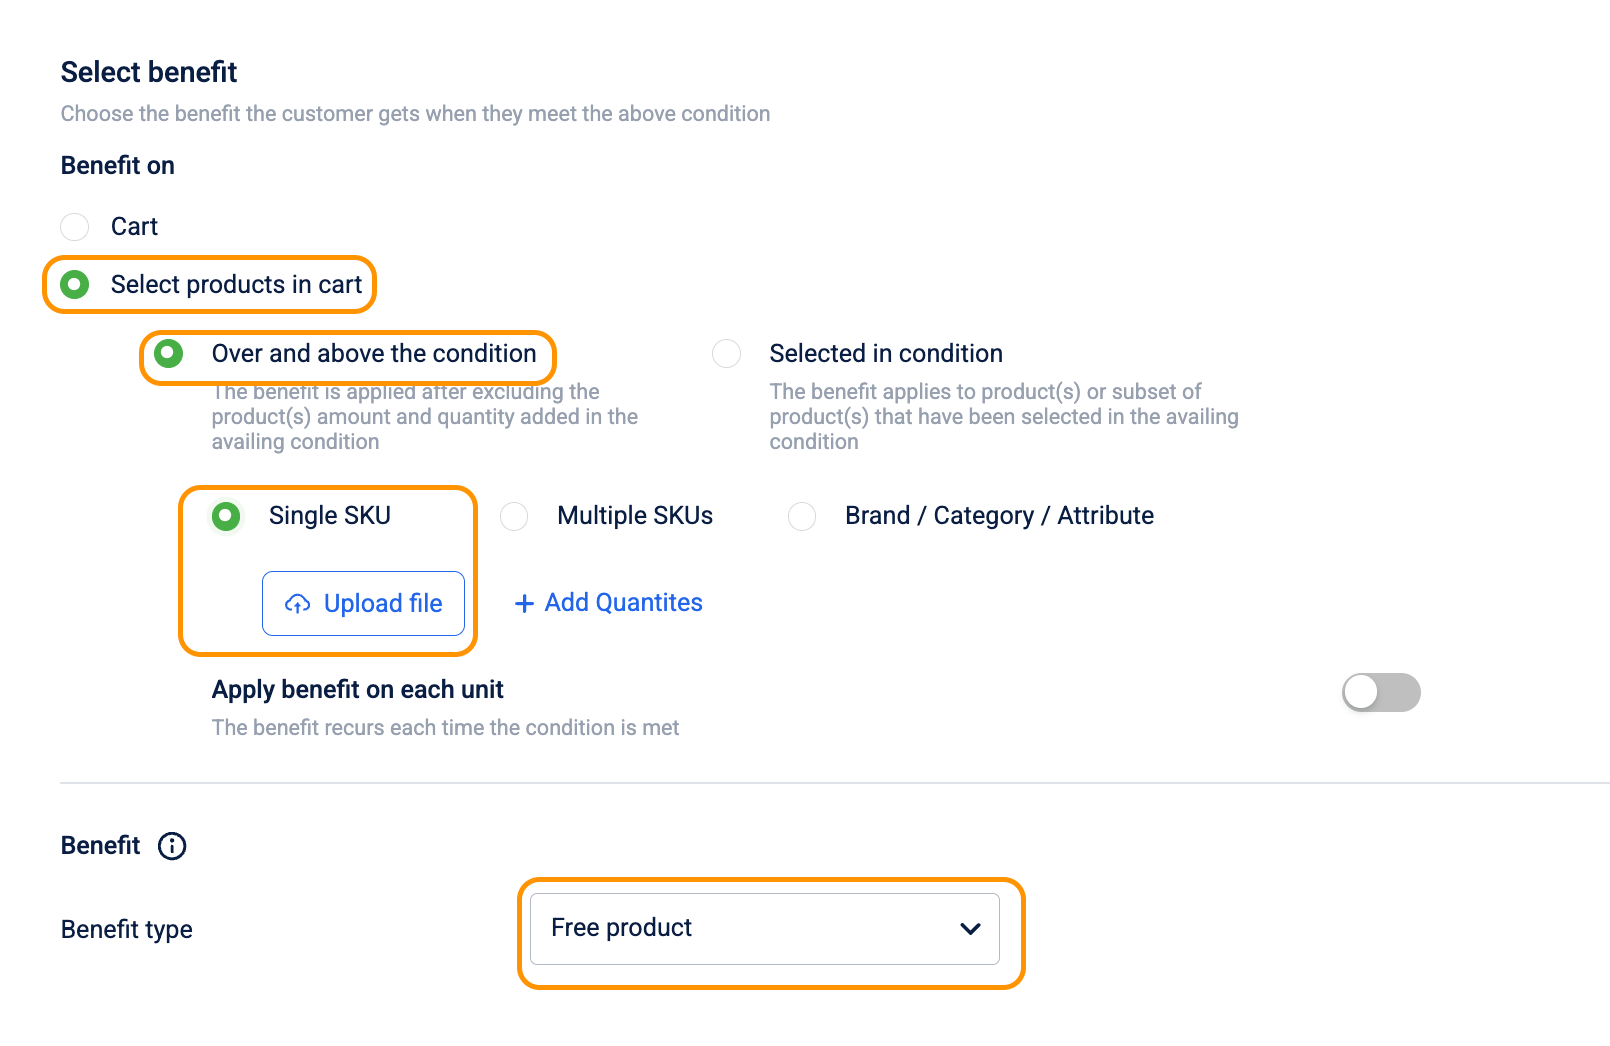
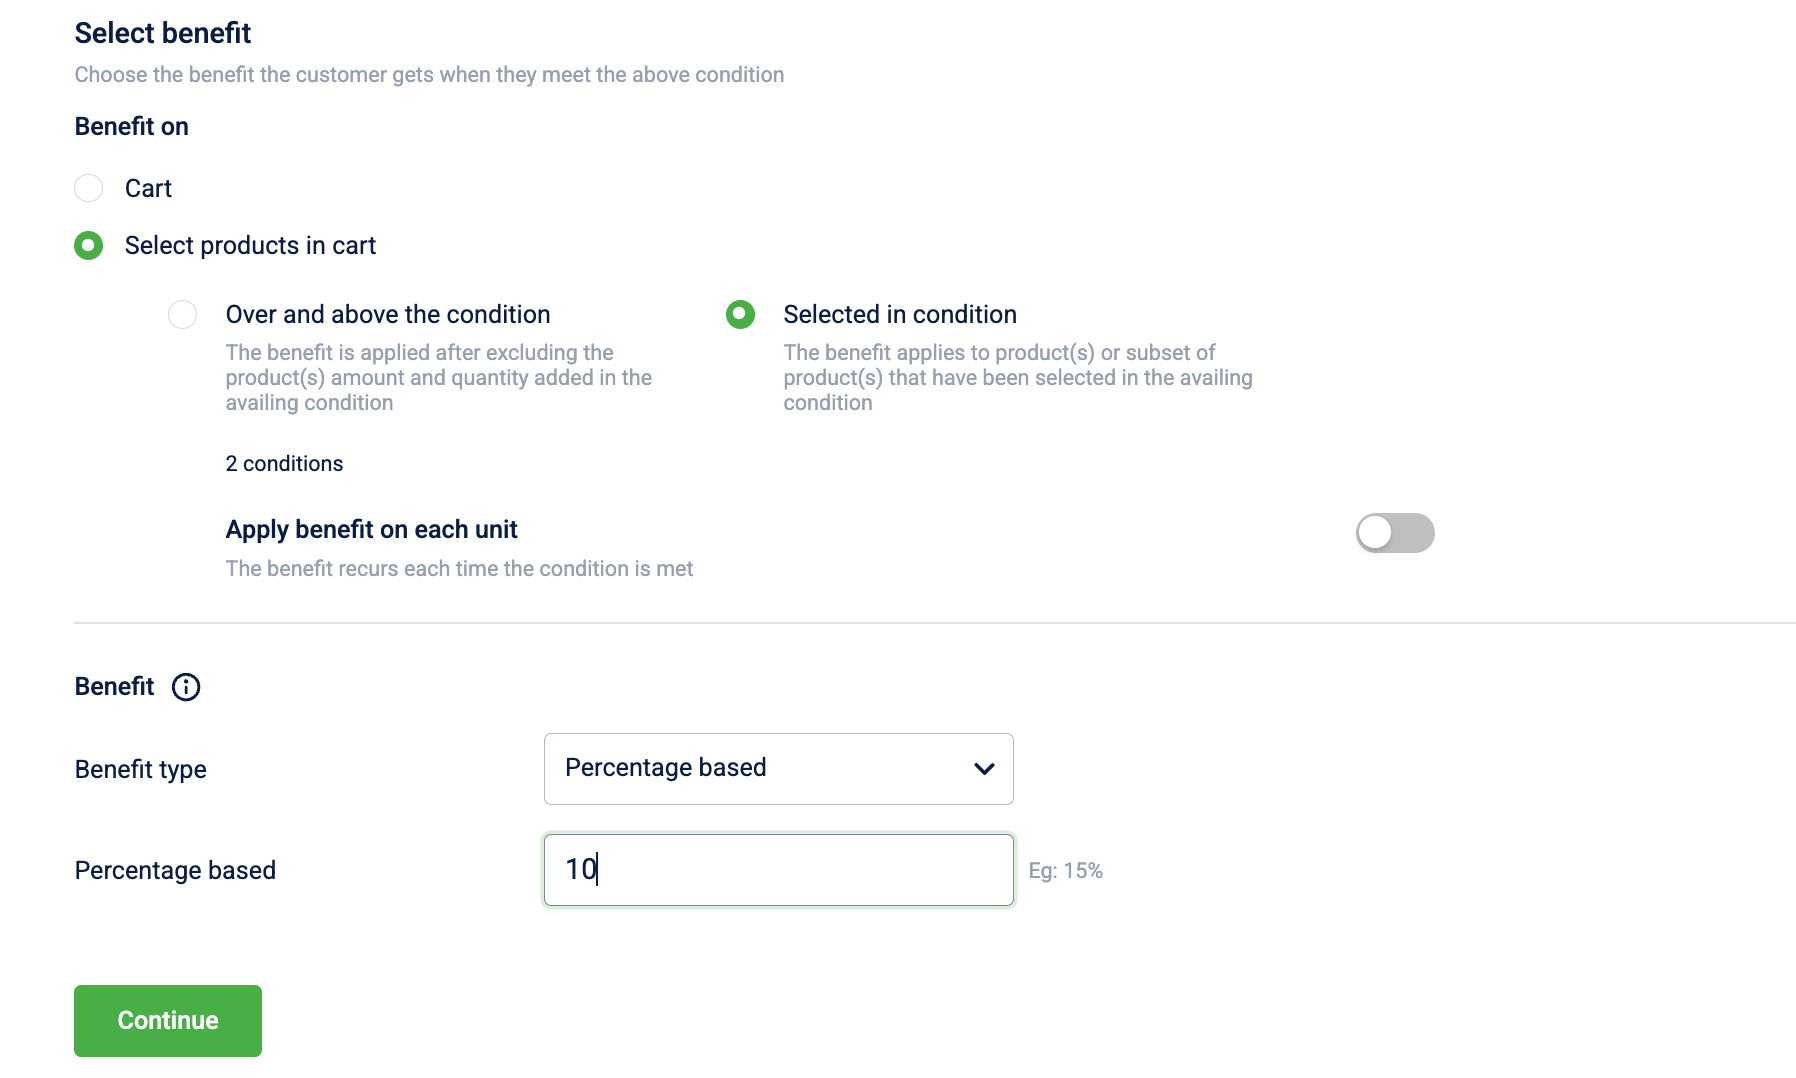
- In the Benefits column, configure the following:
| Field Name | Selection / Value | Explanation |
|---|---|---|
| Benefit On | Selected products in the cart | Ensures the discount applies only to the coffee, not unrelated items like gum or water. |
| Select Product | SKU | Must match the sku selected in Conditions. |
| Benefit type | Free product | This gives the qualifying item for free when the cart quantity condition is met. |
Step 3: Restrictions and limits
Prevent revenue loss and system abuse.
3.1. Repeat behavior (cart limits)
Scroll to Define scope and restrictions on availing promotions Click on continue towards Restriction tab
- Field: Number of times promotion can be redeemed in a single cart
-
Option A: Add value as
1for Single Use.- Behavior: Customer buys 6 coffees -> Gets 1 free.
- Use Case: Limited-time offers.
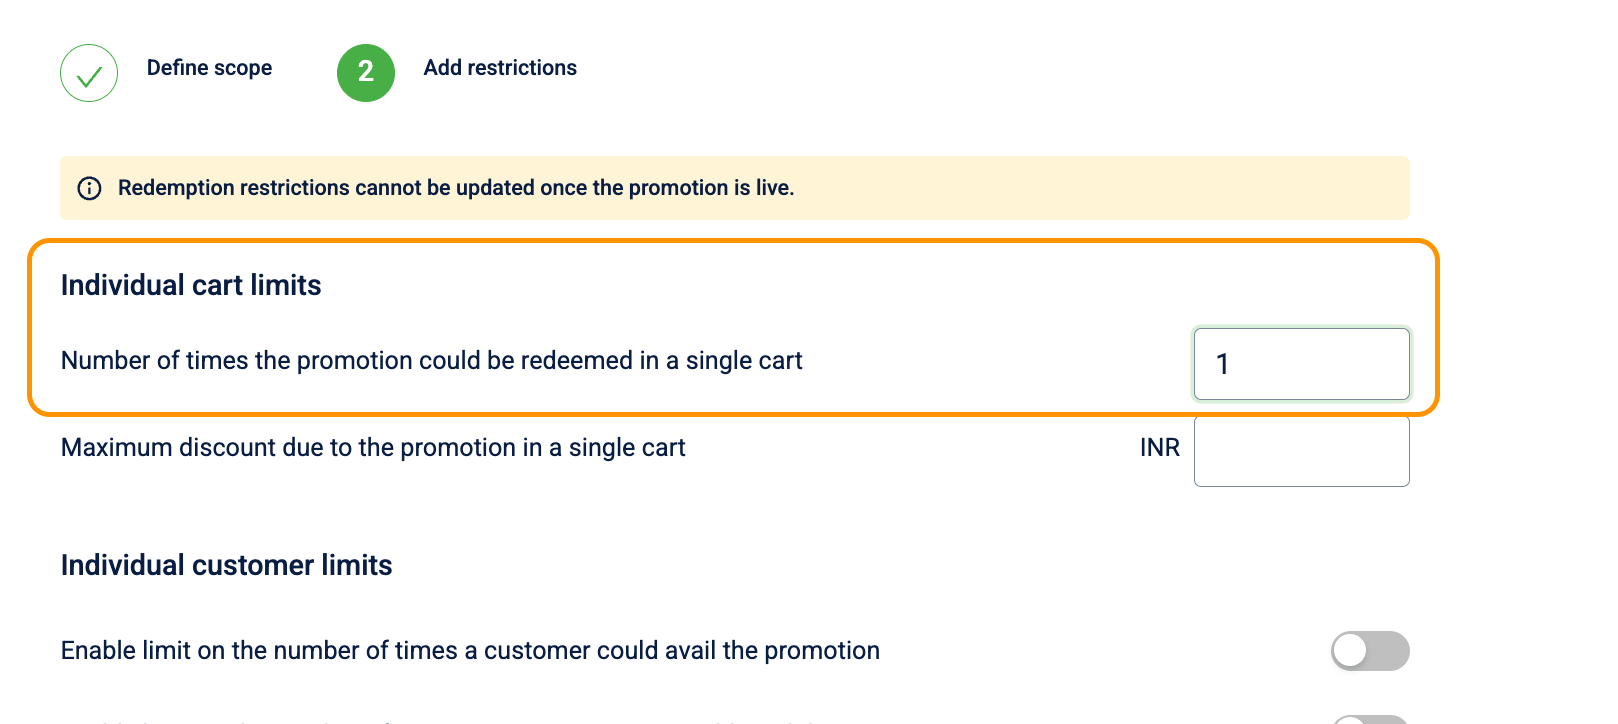
- Option B: You can leave the value empty if you require no limit.
- Behavior: Customer buys 6 coffees -> Gets 2 free.
- Use Case: Standard "Happy Hour" behavior.
-
4.2. Stacking and exclusivity
Navigate to Compatibility settings (bottom of page).
- Setting: Mark this promotion as exclusive at the cart level.
- Action: Turn the toggle
ON. - Why: This prevents "Double Dipping." If a customer has a "10% Off Entire Bill" coupon, enabling exclusivity ensures they cannot use it on top of getting a free coffee. The system will calculate which offer gives the customer the best deal and apply only that one.
Use case 2: Configuring combo product promotion (Coffee + Sandwich)
Requirement: Increase average transaction value by offering a 10% discount on both items when a customer purchases at least one Coffee and one Sandwich together.
Promotion Type: POS Cart Promotion, which automatically applies the discount if the criteria are fulfilled (no coupon code required).
Step 1: Basic setup
- Navigate: Go to Engage+ > Campaigns > Select your active campaign.
- Create: Go to the Promotions tab and click New cart promotion.
- Define Basic Details:
- Name: PROMO_BUNDLE_COFFEE_SANDWICH_2026.
- Description: "Purchase any Coffee and any Sandwich together to receive 10% off both items."
- Timezone: Set to the local timezone of the store.
- Duration: Set the Start Date and End Date.
- Promotion Type: Select POS Cart Promotion.
Step 2: Configuration
Scroll to the section Availing conditions and benefits.
Step 2.2: Set the Trigger (Condition)
You need to tell the system to look for a specific mix of different categories.
| Field Name | Selection / Value | Explanation |
|---|---|---|
| Cart Property | Sum of line item quantity for selected product | Allows the system to look for a specific mix of units across categories. |
| Product Scope | Group 1: Category: Coffee Group 2: Category: Sandwich | Defines that both a Coffee and a Sandwich must be present to trigger the deal. |
| Operator | Greater than or equal to (>=) | Triggers once the minimum quantity for both groups is met. |
| Value | 1 (for both groups) | Requires at least one unit from each category to be in the cart. |
Step 2.3: Set the Reward Benefits
You need to tell the system which items in the bundle get the discount.
| Field Name | Selection / Value | Explanation |
|---|---|---|
| Benefit On | Selected products in the cart | Ensures the discount applies specifically to the Coffee and Sandwich. |
| Product Logic | Selected in condition | Directs the 10% discount only to the specific items that met the trigger criteria. |
| Benefit Action | Percentage Based | The discount is calculated as a fraction of the item's price. |
| Value | 10 | The percentage amount to be deducted from each qualifying item. |
- Why: This prevents "Double Dipping." If the Coffee is already discounted via another item-level offer, this prevents the bundle discount from stacking on that same unit.
Use case 3: Configuring tiered milestone rewards
Requirement: Reward repeat customers by offering a 25% discount on their 3rd purchase of high-value lubricants after completing two prior qualifying transactions.
Promotion Type: Loyalty Earning Promotion, which requires customer identification at the POS to track historical behavior.
Step 1: Basic setup
- Navigate: Go to Engage+ > Campaigns > Select your active campaign.
- Create: Go to the Promotions tab and click New cart promotion.
- Define Basic Details:
- Name: PROMO_LUBE_LOYALTY_25OFF_2026.
- Description: "25% off your 3rd Oil Change after 2 prior qualifying purchases."
- Promotion Type: Select Loyalty Earning Promotion.
Step 2: Configuration
Scroll to the Promotion Earning section.
Step 2.2: Set the Milestone Trigger
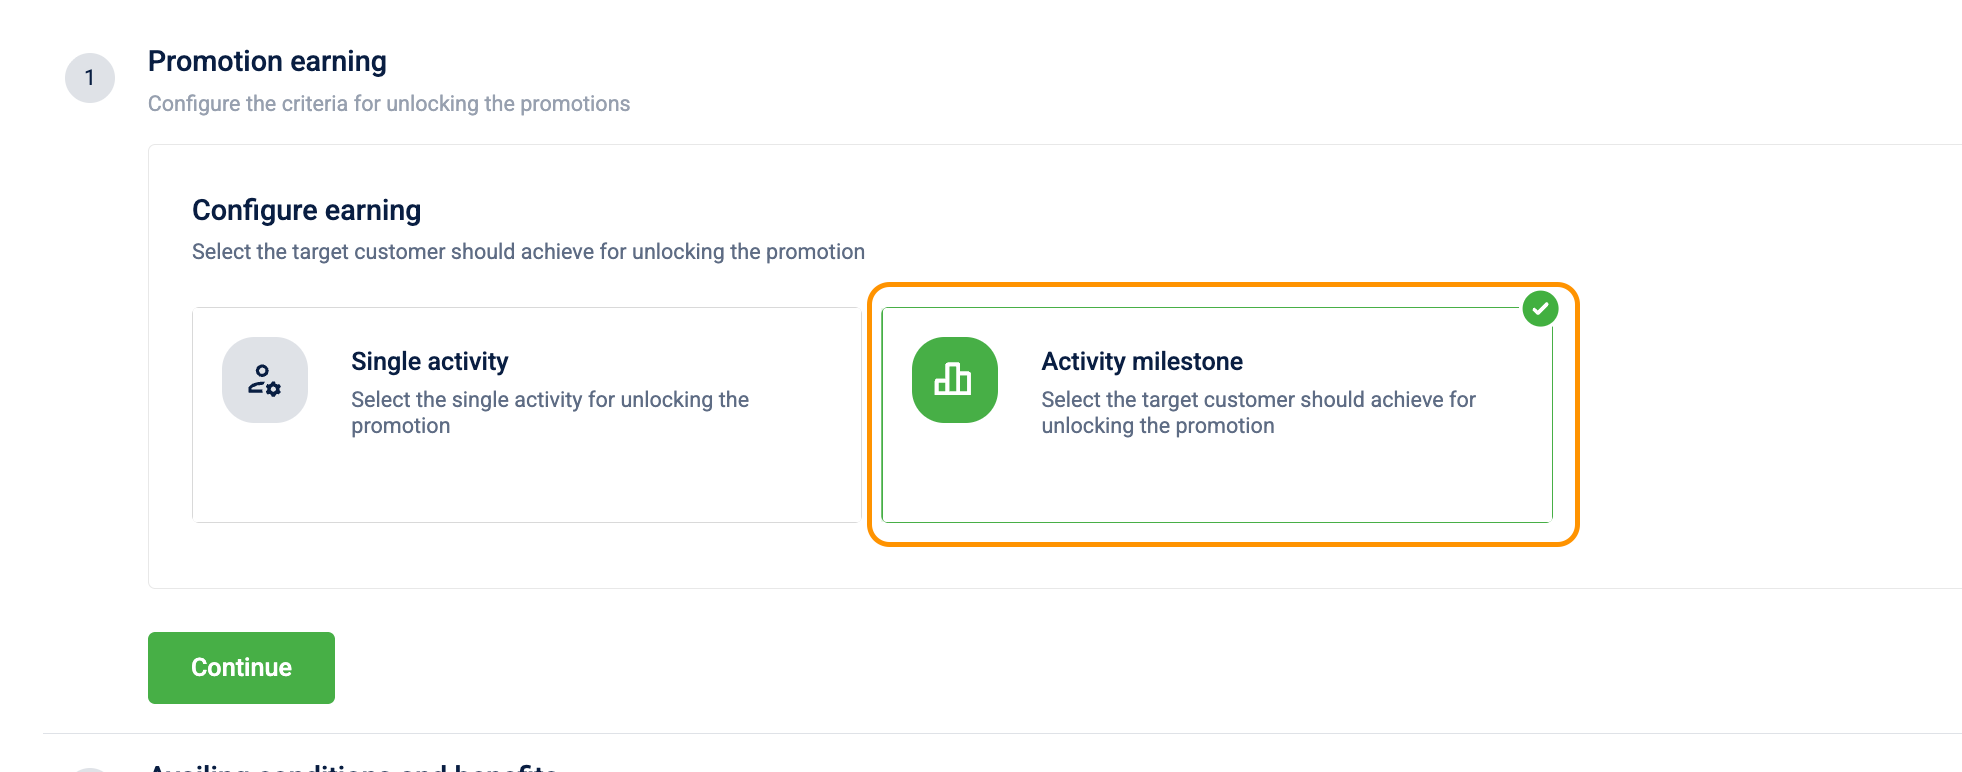
You need to target a specific milestone goal that the audience group must achieve.
| Field Name | Selection / Value | Explanation |
|---|---|---|
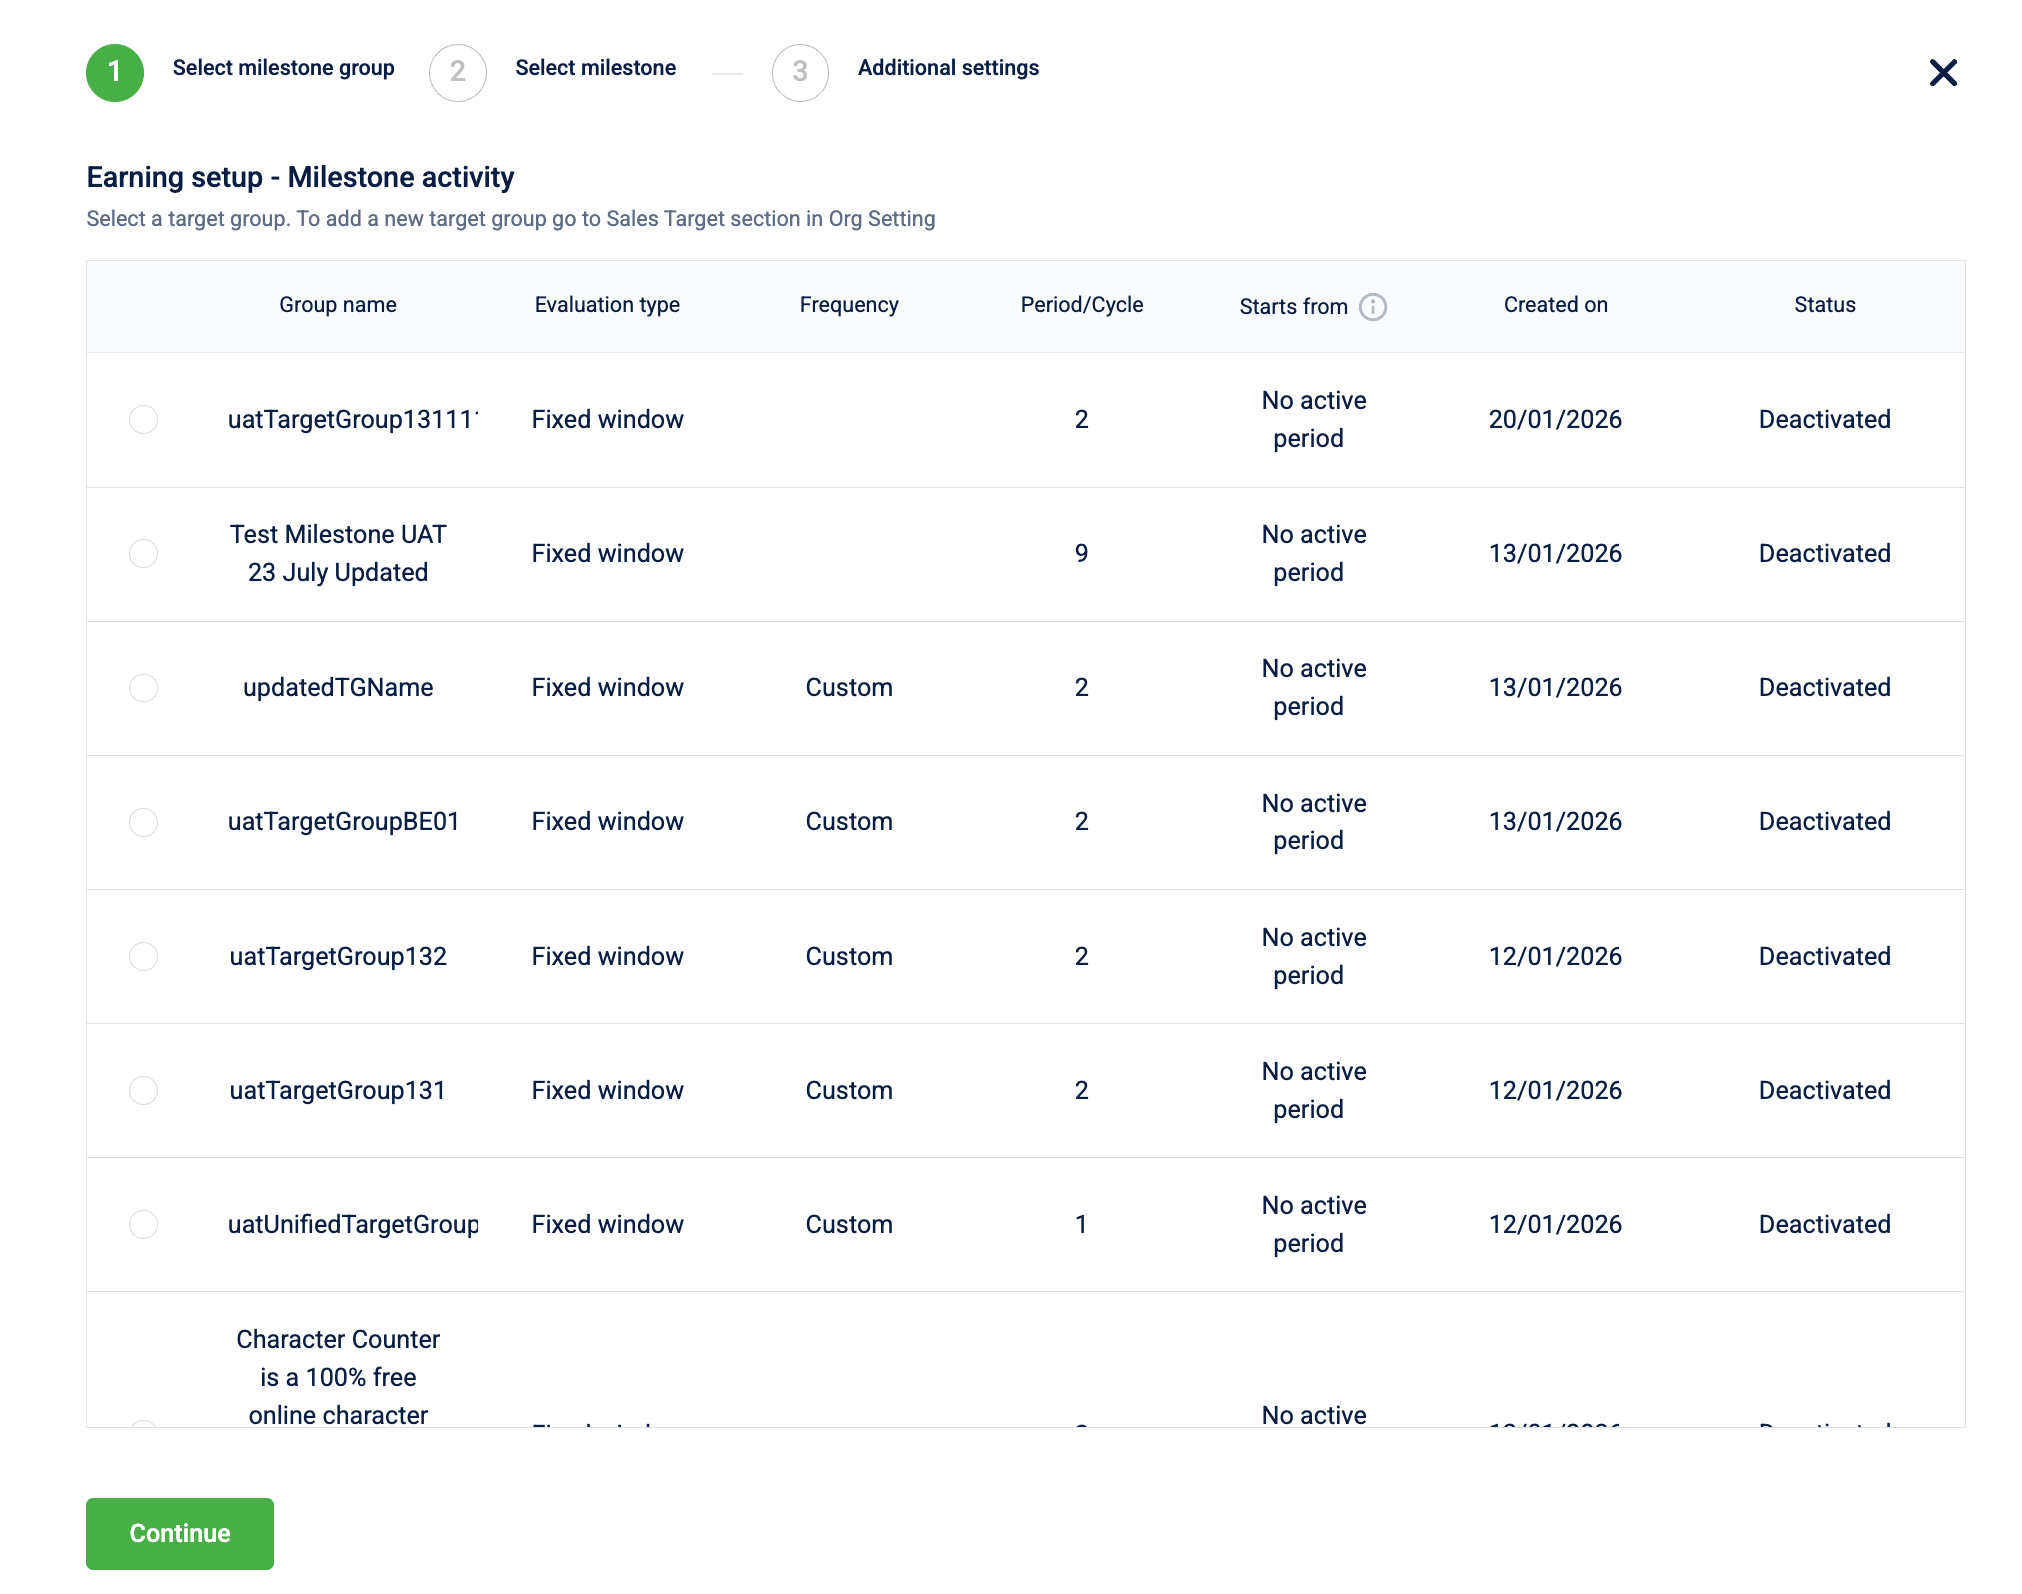
| Select Milestone Group | Choose your predefined group | Connects the promotion to a specific group of customers tracked for oil changes. |
| Select Milestone | Predefined Milestone Target | Defines the specific goal (e.g., 3 transactions) required to earn the reward. |
| Maximum earning per customer | Toggle ON & Enter "1" | Limits how many times the reward is issued. |
Step 2.3: Set the Reward Benefits
You need to define the discount available once the milestone is met.
Set the specific conditions that trigger the earning process for each transaction.
| Field Name | Selection / Value | Explanation |
|---|---|---|
| Cart Property | Cart amount | Evaluates the total monetary value of the transaction. |
| Operator | Greater than or equal to | Triggers the earning logic once the spend reaches the target. |
| Value | [Enter Minimum Spend] | The required spend to qualify for this transaction toward the milestone. |
Step 2.3: Set the reward benefits
Define the discount available once the milestone is met.
| Field Name | Selection / Value | Explanation |
|---|---|---|
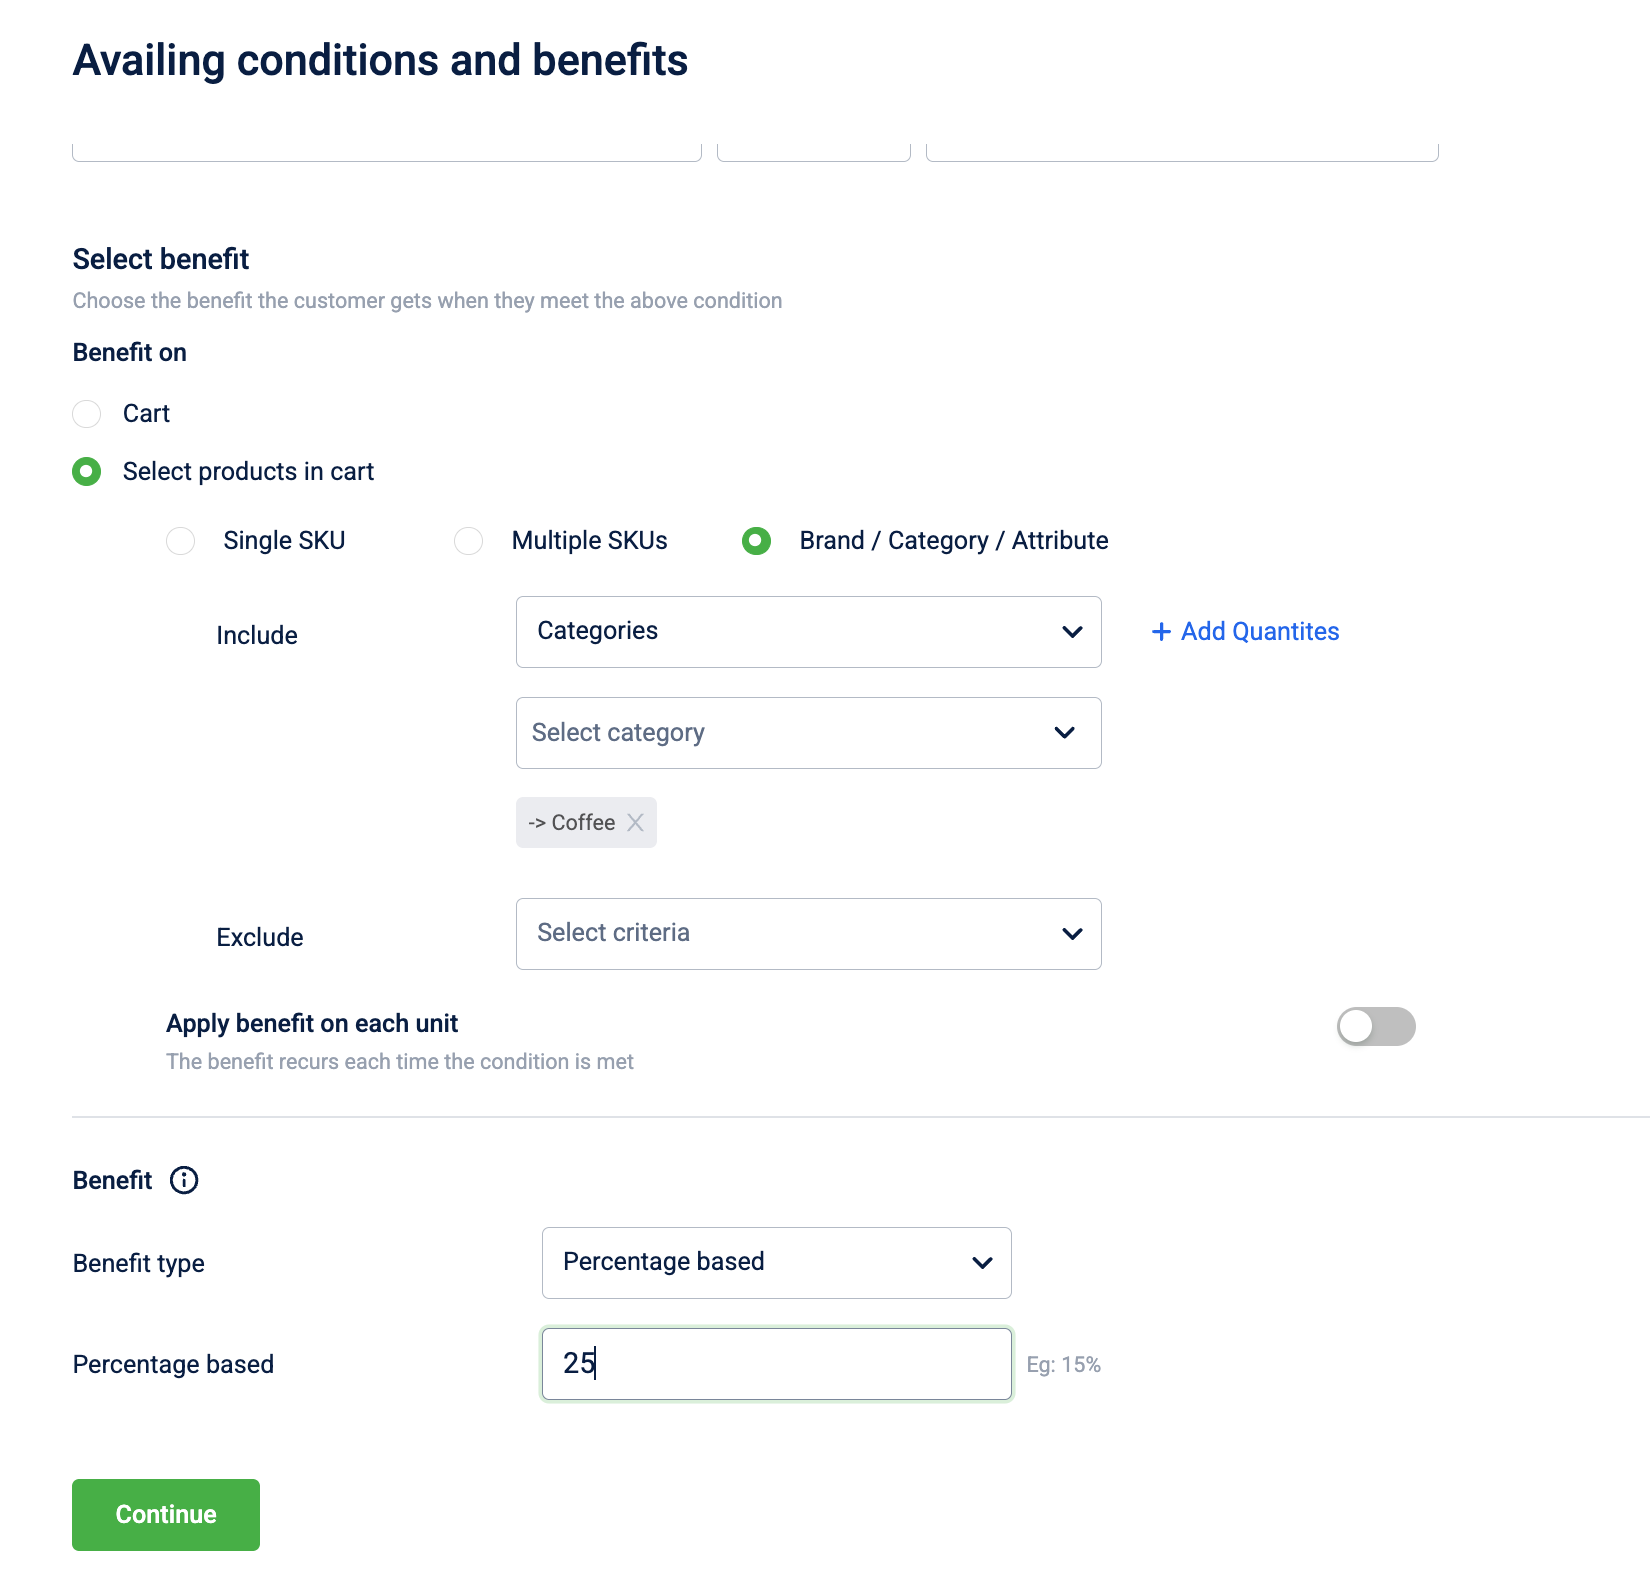
| Benefit On | Selected products in the cart | Restricts the discount to specific qualifying items. |
| Product Identification | List of SKU codes | CRITICAL: Select the specific SKU for the high-value lubricant here. |
| Benefit Action | Percentage Based | Deducts a fixed percentage from the price. |
| Value | 25 | The percentage amount to be deducted. |
Step 3: Restrictions and limits
3.1. Set redemption limits and expiry
Scroll to Define scope and restrictions on availing promotions and click Modify >. Within the configuration wizard, click Continue to navigate to the Add restrictions tab.
-
Go to Tab 2: Add restrictions
- Click the Issual restrictions section at the top of the page.
- Select the button for Individual promotion issue limit and add value "1".
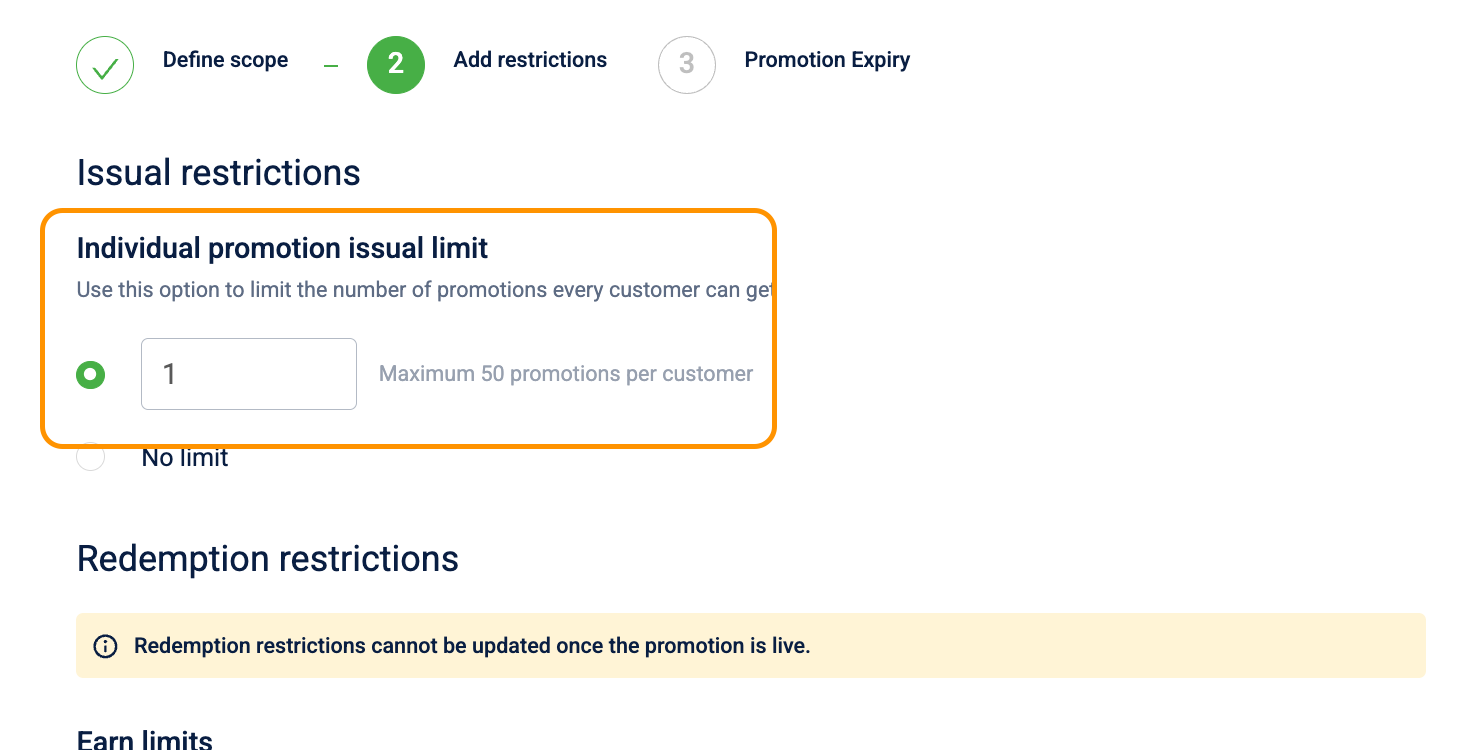
This restricts the customer to receiving this specific reward only once during the campaign period.
-
Go to Tab 3: Promotion Expiry
- Select the button for From the date of earning.
- Enter "30" in the Days value field.
- Click Done.
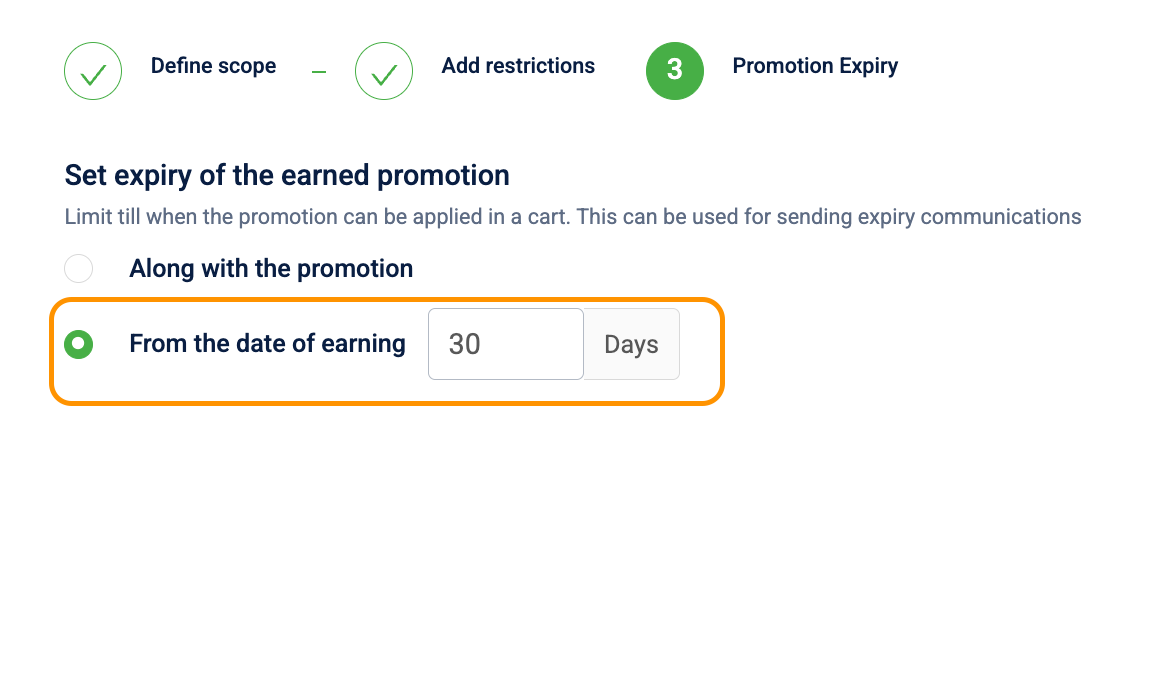
Once the customer completes the milestone, they must use the discount within 30 days before it expires.
3.2. Stacking and exclusivity
Navigate to Compatibility settings at the bottom of the page.
- Setting: Mark this promotion as exclusive at the cart level.
- Action: Turn the toggle ON.
- Why: This protects high-margin lubricants by ensuring the 25% discount is a standalone offer that cannot be combined with general "Total Bill" discounts or other store-wide coupons.
Use case 3: Configuring weekend clearance (POS promotion)
Requirement: Automatically discount all items in a specific category (for example, Wafers) to a fixed price during designated weekend hours.
Promotion Type: POS Cart Promotion (No coupon code required).
Step 1: Basic setup
- Navigate: Go to Engage+ > Campaigns > Select your active campaign.
- Create: Go to the Promotions tab and click New cart promotion.
- Define Basic Details:
- Name: PROMO_WEEKEND_WAFER_CLEARANCE
- Description: "Clearance sale: All Wafers at $2.90. Available Saturday and Sunday between 10 AM - 6 PM."
- Promotion Type: Select POS Cart Promotion.
Step 2: Configuration
Step 2.1: Set the trigger (condition)
- Click Add conditions/benefits.
- In the Conditions column, configure the following:
| Field Name | Selection / Value | Explanation |
|---|---|---|
| Qualifying Condition | Sum of line item quantity for the selected product | Counts the total number of items in the basket to trigger the rule. |
| Product Scope | Category: Wafers | Defines that the discount applies only to this specific group. |
| Operator | Greater than or equal to (≥) | Triggers the deal once the quantity hits the target. |
| Value | 1 | The minimum quantity required in the cart to qualify. |
Step 2.2: Set the reward benefits
- In the Benefits column, configure the following:
| Field Name | Selection / Value | Explanation |
|---|---|---|
| Benefit On | Selected products in the cart | Ensures the discount applies specifically to the wafers. |
| Product Logic | Selected in condition | Directs the benefit to the same items that met the trigger criteria. |
| Benefit Action | Fixed target amount | Sets the final price regardless of the original cost. |
| Value | 2.90 | The specific price all qualifying wafers will be set to. |
Step 3: Restrictions and scoping
3.1. Time-based activation
Scroll to Define scope and restrictions on availing promotions and navigate to Scoping.
- Days of Week: Check Saturday and Sunday.
- Start Time: Set to 10:00 AM.
- Duration in Hours: Set to 8 hours (Automatically sets end time to 6 PM).
3.2. Stacking and exclusivity
Navigate to Compatibility settings (bottom of page).
- Setting: Mark this promotion as Exclusive at quantity level.
- Action: Toggle ON.
Use case 4: Configuring digital greetings (profile update)
Requirement: Create a one-time 15% discount issued when a member completes their profile or updates their email.
Promotion Type: Loyalty Earning Promotion (Issued upon a non-purchase activity).
Step 1: Basic setup
- Navigate: Go to Engage+ > Campaigns > Select your active loyalty campaign.
- Create: Click New cart promotion.
- Define Basic Details:
- Name: PROMO_PROFILE_UPDATE_INCENTIVE
- Description: "Complete your profile to receive 15% off your next purchase."
- Promotion Type: Select Loyalty earning promotion.
Step 2: Configuration
Step 2.1: Set the earning trigger
- In the Promotion Earning section, configure the following:
| Field Name | Selection / Value | Explanation |
|---|---|---|
| Earning Setup | Single activity | Triggered by a one-time action. |
| Earning Activity | Updates profile | The system monitors for profile completions. |
| Logic | Automatic Issuance | Once updated, the promo moves to "Earned" status. |
Step 2.2: Set the reward benefits
- In the Benefits column, configure the following:
| Field Name | Selection / Value | Explanation |
|---|---|---|
| Benefit On | Complete cart | Applies the discount to the final subtotal of the next visit. |
| Benefit Action | Percentage based | The discount is calculated as a fraction of the total price. |
| Value | 15 | The percentage amount to be deducted. |
Step 3: Restrictions and communication
3.1. Usage limits
Scroll to Restriction tab.
- Field: Enable limit on the number of times a customer could avail the promotion
- Action: Toggle ON.
- Maximum times: Set to 1.
- Field: Expiry of Earned Promotion
- Value: 30 days.
Use case 5: Configuring Gold Member VIP
Requirement: Offer an exclusive "Gold-Tier Only" 20% discount on total bills over $100.
Promotion Type: Loyalty Promotion.
Step 1: Basic setup
- Navigate: Go to Engage+ > Campaigns.
- Create: Click New cart promotion.
- Define Metadata:
- Name: PROMO_GOLD_EXCLUSIVE_20OFF_2026
- Description: "Exclusive Gold Member Benefit: 20% off your entire purchase over $100. Standalone offer."
- Promotion Type: Select Loyalty promotion.
Step 2: Configuration
Step 2.1: Set the trigger
- Click Add conditions/benefits.
- In the Conditions column, configure the following:
| Field Name | Selection / Value | Explanation |
|---|---|---|
| Qualifying Condition | Sum of line item amount | Evaluates the total monetary value of the transaction. |
| Operator | Greater than or equal to (≥) | Triggers once the subtotal reaches $100. |
| Value | 100 | The minimum spend required to unlock the VIP discount. |
| Limit to Customers | Filter by Tier (Gold) | Restricts the offer specifically to identified Gold members. |
Step 2.2: Set the reward benefits
- In the Benefits column, configure the following:
| Field Name | Selection / Value | Explanation |
|---|---|---|
| Benefit On | Entire Cart | Applies the discount to the final subtotal of the transaction. |
| Benefit Action | Percentage based | Calculates the discount as a fraction of the total price. |
| Value | 20 | The VIP discount percentage. |
Step 3: Restrictions and exclusivity
3.1. Stacking strategy
Navigate to Compatibility settings at the bottom of the page.
- Setting: Mark this promotion as Exclusive at cart level.
- Action: Toggle ON.
- Why: Ensures the 20% VIP discount is the only offer applied.
Use case 6: Configuring the agnostic stacker
Requirement: Allow multiple fuel-specific discounts to apply to the same liter of fuel simultaneously.
Promotion Type: POS Cart Promotion (Automatic application).
Step 1: Global settings
- In Cart Promotion Settings, ensure Apply multiple promotions on a single line item is toggled ON.
- Strategy: Ensure Category Overrides are enabled for the target category (for example, Fuel) to "Allow multiple promotions on same quantity."
Step 2: Configuration
Step 2.1: Set the trigger
- In the Conditions column, configure the following:
| Field Name | Selection / Value | Explanation |
|---|---|---|
| Qualifying Condition | Sum of line item quantity | Counts the units (Liters/Gallons) in the basket. |
| Product Scope | Category: Fuel | Defines the group of products that allow stacking. |
| Operator | Greater than or equal to (≥) | Triggers as long as fuel is present. |
| Value | 1 | Ensures logic evaluates even for a single liter purchase. |
Step 2.2: Set the reward benefits
- In the Benefits column, configure the following:
| Field Name | Selection / Value | Explanation |
|---|---|---|
| Benefit On | Selected products in the cart | Targeted discount on the specific qualifying items. |
| Benefit Action | Percentage based | Calculates the discount based on the price. |
| Calculation Logic | Gross Value | CRITICAL: Ensures discounts apply to the original price, not the net price. |
Step 3: Restrictions and non-exclusivity
3.1. Stacking settings
Navigate to Compatibility settings.
- Setting: Mark this promotion as Exclusive at quantity level.
- Action: Toggle OFF.
- Why: Exclusivity must be disabled to allow multiple promotions to compound.
Use case 7: Configuring points visibility
Requirement: Display a point-earning opportunity in the mobile app (for example, "Earn 50 pts") without issuing a real reward.
Promotion Type: Loyalty Earning Promotion.
Step 1: Basic setup
- Name: DUMMY_MARKETING_POINTS_VISIBILITY_2026.
- Description: "Internal promo used to provide Points Eligibility metadata to the Mobile App."
- Promotion Type: Select Loyalty earning promotion.
Step 2: Configuration
Step 2.1: Set the trigger
- In the Conditions column, configure:
| Field Name | Selection / Value | Explanation |
|---|---|---|
| Qualifying Condition | Sum of line item amount | Evaluates the monetary value of the cart. |
| Select Product | Category: Fuel | Defines where the points icon should appear. |
| Operator | Greater than (>) | Triggers based on value exceeding target. |
| Value | 9,999,999 | Impossible spend to ensure no reward is ever issued. |
Step 2.2: Set the reward benefits
- In the Benefits column, configure:
| Field Name | Selection / Value | Explanation |
|---|---|---|
| Benefit Action | Fixed amount | Sets a flat deduction value. |
| Value | 0 | Ensures no financial impact. |
Step 3: App UI Customization
3.1. Custom fields
Navigate to the Additional Information tab.
- applicable_screen: Product_Details
- standard_image: Points_Bonus_Icon.png
- marketing_text: "Earn 50 Points today!"
3.2. Scoping
- Display in App/Web: Toggle ON.
Use case 8: Configuring progressive slab logic
Requirement: Drive higher Average Transaction Value by offering increasing discounts based on spend tiers (for example, 10 off 100 OR 25 off 200).
Promotion Type: POS Cart Promotion (Requires two separate promotions).
Step 1: Basic setup
- In Cart Promotion Settings, ensure Promotion Ranking Order is set to Maximum Discount.
- Create Slab A (10 off 100) and Slab B (25 off 200).
Step 2: Configuration
Step 2.1: Set the trigger
| Promotion | Qualifying Condition | Operator | Value |
|---|---|---|---|
| Slab A | Sum of line item amount | ≥ | 100 |
| Slab B | Sum of line item amount | ≥ | 200 |
Step 2.2: Set the reward benefits
| Field Name | Selection / Value | Explanation |
|---|---|---|
| Benefit On | Entire Cart | Discount comes off the total payable amount. |
| Benefit Action | Fixed amount | Deducts a specific cash value. |
| Value | 10 (Slab A) / 25 (Slab B) | The monetary discount for each tier. |
Step 3: Restrictions and exclusivity
3.1. Stacking Control
Navigate to Compatibility settings for both.
- Setting: Mark as Exclusive at cart level.
- Action: Toggle ON.
- Behavior: When spending 250, only the 25 discount applies.
Use case 9: Configuring "fixed discount for every spend"
Requirement: Reward bulk buying by providing a fixed discount for every specific amount spent (e.g., ₹50 off for every ₹500).
Promotion Type: POS Cart Promotion.
Step 1: Basic setup
- Name: PROMO_WHOLESALE_EVERY_500.
- Promotion Type: Select POS Cart Promotion.
Step 2: Configuration
Step 2.1: Set the trigger
| Field Name | Selection / Value | Explanation |
|---|---|---|
| Qualifying Condition | Sum of line item amount | Evaluates total monetary value in the basket. |
| Select Product | All Products | All items contribute to the spending goal. |
| Operator | Greater than or equal to (≥) | Triggers at target subtotal. |
| Value | 500 | Minimum spend for the first block. |
Step 2.2: Set the reward benefits
| Field Name | Selection / Value | Explanation |
|---|---|---|
| Benefit Action | Fixed amount | Deducts specific currency value. |
| Value | 50 | Amount deducted for every qualifying block. |
| Apply Benefit on Each Unit | Enabled | CRITICAL: Ensures the discount repeats (for example, 100 off 1000). |
Step 3: Restrictions and exclusivity
3.1. Usage limits
- Individual Cart Limit: Leave empty to allow the recurring logic to trigger.
Use case 10: Configuring gift voucher benefits
Requirement: Automatically apply a 50% discount only when a specific internal employee gift voucher is scanned.
Promotion Type: POS Cart Promotion.
Step 1: Basic setup
- Name: PROMO_EMPLOYEE_HIDDEN_50OFF.
- Promotion Type: Select POS Cart Promotion.
Step 2: Configuration
Step 2.1: Set the condition (gift voucher)
| UI Field / Property | Selection / Value | Explanation |
|---|---|---|
| Primary Condition | Gift Voucher | Focuses rule on the presence of a voucher. |
| Operator | Equals | Requires an exact match for the code. |
| Voucher Identifier | EMP_PRIVATE_2026 | The pre-configured gift voucher. |
Step 2.2: Set the reward benefits
| Field Name | Selection / Value | Explanation |
|---|---|---|
| Benefit On | Entire Cart | Applies the discount to the total value. |
| Benefit Action | Percentage based | Discount is calculated as the percentage of total amount. |
| Value | 50 | The percentage amount to be deducted. |
Step 3: Restrictions and limits
3.1. Stacking and exclusivity
Navigate to Compatibility settings.
- Setting: Mark as Exclusive at cart level.
- Action: Toggle ON.
- Why: Ensures employee discount does not stack with public sales.
Use case 11: Configuring a percentage discount with a maximum discount value
Requirement: Apply a 10% discount when a cart contains either SKU A or SKU B, but cap the total discount at Rs 12 regardless of cart value.
Promotion Type: POS Cart Promotion, which automatically applies the discount if the criteria are fulfilled (no coupon code required).
Step 1: Basic setup
- Navigate: Go to Engage+ > Campaigns > Select your active campaign.
- Create: Go to the Promotions tab and click New cart promotion.
- Define Basic Details:
- Name: PROMO_10PCT_MAXDISC_12.
- Description: "10% off on SKU A or SKU B. Maximum discount value: Rs 12."
- Promotion Type: Select POS Cart Promotion.
Step 2: Configuration
Scroll to the section Availing conditions and benefits.
Step 2.1: Set the trigger (condition)
- Click Add conditions/benefits.
- In the Conditions column, configure the following:
| Field Name | Selection / Value | Explanation |
|---|---|---|
| Qualifying Condition | Sum of line item amount for the selected product | Evaluates the total monetary value of the qualifying items. |
| Select Product | SKU A, SKU B | Defines which items count toward the promotion trigger. |
| Operator | Greater than or equal to (≥) | Triggers once the combined value of qualifying items meets the rule. |
| Value | 1 | Ensures the promotion evaluates as long as either SKU is present. |
Step 2.2: Set the reward benefits
- In the Benefits column, configure the following:
| Field Name | Selection / Value | Explanation |
|---|---|---|
| Benefit On | Selected products in the cart | Restricts the discount to SKU A and SKU B only. |
| Product Logic | Selected in condition | Applies the discount to the same items that met the trigger criteria. |
| Benefit Action | Percentage based | Calculates the discount as a fraction of each qualifying item's price. |
| Value | 10 | The percentage amount to be deducted. |
| Maximum discount value | 12 | The discount will not exceed Rs 12 regardless of cart value. Excess discount is not applied. |
Refer here to understand how the discount is evaluated by cart promotions.
Step 3: Restrictions and limits
3.1. Stacking and exclusivity
Navigate to Compatibility settings at the bottom of the page.
- Setting: Mark this promotion as exclusive at the cart level.
- Action: Turn the toggle ON.
- Why: Prevents the percentage discount from combining with other cart-level offers, which would cause the maximum discount value to be exceeded across stacked promotions.
Updated 3 months ago