
Data Import
The Data Import framework lets you load large volumes of data directly into the Capillary Data Platform. It is designed for data teams that need to migrate historical data into Capillary. Data loaded through this framework is written directly to the Capillary database and does not trigger loyalty programs, making it the right choice when you need to load data without affecting live loyalty processes.
What you can import
The framework is organised around profiles. Each profile corresponds to a specific type of data and defines the fields, validations, and rules that apply when loading that data into the platform.
The framework currently supports the Customer profile, which lets you load all customer-related data in a single import job. Support for additional profiles covering transactions, cards, and inventory will be available in subsequent releases.
| Profile | What can be loaded |
|---|---|
| Customer | Standard fields (name, identifiers, registration date), custom fields, extended fields, loyalty type, loyalty slab, and slab expiry, customer status |
| Transactions | Payment mode, Not interested transaction, and Points expiry profiles are available. Standard bulk import for regular transaction bills is still coming soon. |
| Cards | (coming soon) Standard fields, custom fields, extended fields |
| Inventory | (coming soon) Standard fields, attributes, category, hierarchy |
Supported data sources
Once you know the profile and the data you want to import, you connect it to a source. The framework supports the following data sources:
- Databricks: Connect directly to a table in your organisation's Databricks workspace. This is the recommended source for large-scale migrations.
NoteWhen you select Databricks as your data source, the system connects to your organisation's
import_<orgid>database, a dedicated namespace in your Databricks workspace that holds all import-ready tables for your organisation, where<orgid>is your organisation's unique ID in Capillary. For example, if your organisation ID is1234, your Databricks database name will beimport_1234
Import methods
After you select a profile and a source, choose how records are written to the platform. The available methods vary by profile. The following methods are available:
| Method | Description |
|---|---|
| Insert | Creates new records only. If a matching record already exists, it is skipped. |
| Update | Updates existing records only. If no matching record is found, no action is taken. |
| Upsert | Updates a record if it already exists; creates a new one if it does not. |
The mandatory fields required for the import vary depending on the method you select. For example, when using the Insert method for the Customer profile, the mandatory fields are the primary customer identifier, registration date, loyalty type, and the store or till code associated with the registration.
NoteYou can run multiple import jobs simultaneously. There is no restriction on the number of import jobs that can run at the same time.
Prerequisite
Before creating an import job, ensure the following:
- The source table is available in Databricks under the
import_<org_id>database. Newly created tables may take up to 10 minutes to appear in the selection list. - The appropriate profile and import method for the data have been identified.
- All mandatory fields required for the selected profile and import method are present in the source table.
- Access to Databricks and the Graviton Import Cluster is enabled. This access allows visibility of the
import_<org_id>database. For access raise a ticket to the Capillary Access mangement team (ACM).
Creating an Import Job
Go to the imports listing page (sample URL: https://eu.intouch.capillarytech.com/import/ui/jobs), then go through a five-step process:
Step 1: Job settings
Set the job type, schedule, approval thresholds, and notification recipients. See Step 1: Job settings below.
Step 2: Data to import
Select the data source and the table you want to import.
Step 3: Profile and method
Choose the import profile and how records are written to the platform.
Step 4: Fields mapping
Map the fields from your source data to the corresponding profile fields in the platform.
Step 5: Review and proceed
Review the full configuration summary and trigger the import job for validation before the data is written to the platform.
Step 1: Job settings
Step 1 is the same for every profile. Set up the job type, schedule, and safeguards before you choose what data to import. Steps 2 through 5 depend on the profile you select, so see the relevant profile page for those details.
- Select the job type:
- One-time: runs a single import and stops.
- Recurring: runs automatically on a schedule you define.
- If you selected Recurring, set the frequency: Every 15 mins, Hourly, Daily (select a time), Weekly (select a day and time), Monthly (select a day of the month and time), or Custom (enter a cron expression).
- If you selected Recurring, set the Start time (Start immediately or a specific date and time) and End time (Runs indefinitely or a specific date and time).
- Under Run approval, select how the job is approved before importing:
- Auto-approve this import (default): the job runs without manual review.
- Send for approval when the import crosses a limit of: the system holds the job for manual approval when the import meets either condition you select:
- Number of records: a threshold above which the import is held.
- Error rate: a percentage above which the import is held.
- In the Notify field, enter the email addresses of anyone who should get a notification when a run crosses a limit. Select Enter after each address.
NoteApproval thresholds apply only to Recurring jobs. A One-time import always writes its valid records, regardless of the thresholds you set.
NoteThe schedule's owner and the person who last edited it always get the breach notification, even if you didn't add them under Notify. Even if the notification email fails to send, the import is still held for approval. The hold never depends on the notification being sent.
Once you proceed, the system runs a validation pass on your data before writing anything to the platform. You can track validation progress in real time on the Job status page. After validation completes, the job moves to an approval stage. Only after you approve is the data written to the Capillary database.
View Data Import Status
The Job status page lets you view the current status of your import job and track validation progress in real time.
Job details
The following details are displayed at the top of the page:
| Field | Description |
|---|---|
| Job name | The name entered for the import job during configuration. |
| Status | The current state of the job. Displays Validation in progress while validation is running. |
| Job ID | A unique system-generated identifier for the import job. |
| Description | The description entered during configuration, if provided. |
Tabs
The page has two tabs:
- Job status: Shows the current progress of the validation job.
- Configuration summary: Shows the complete configuration of the import job as set up across the five steps.
Job status tab
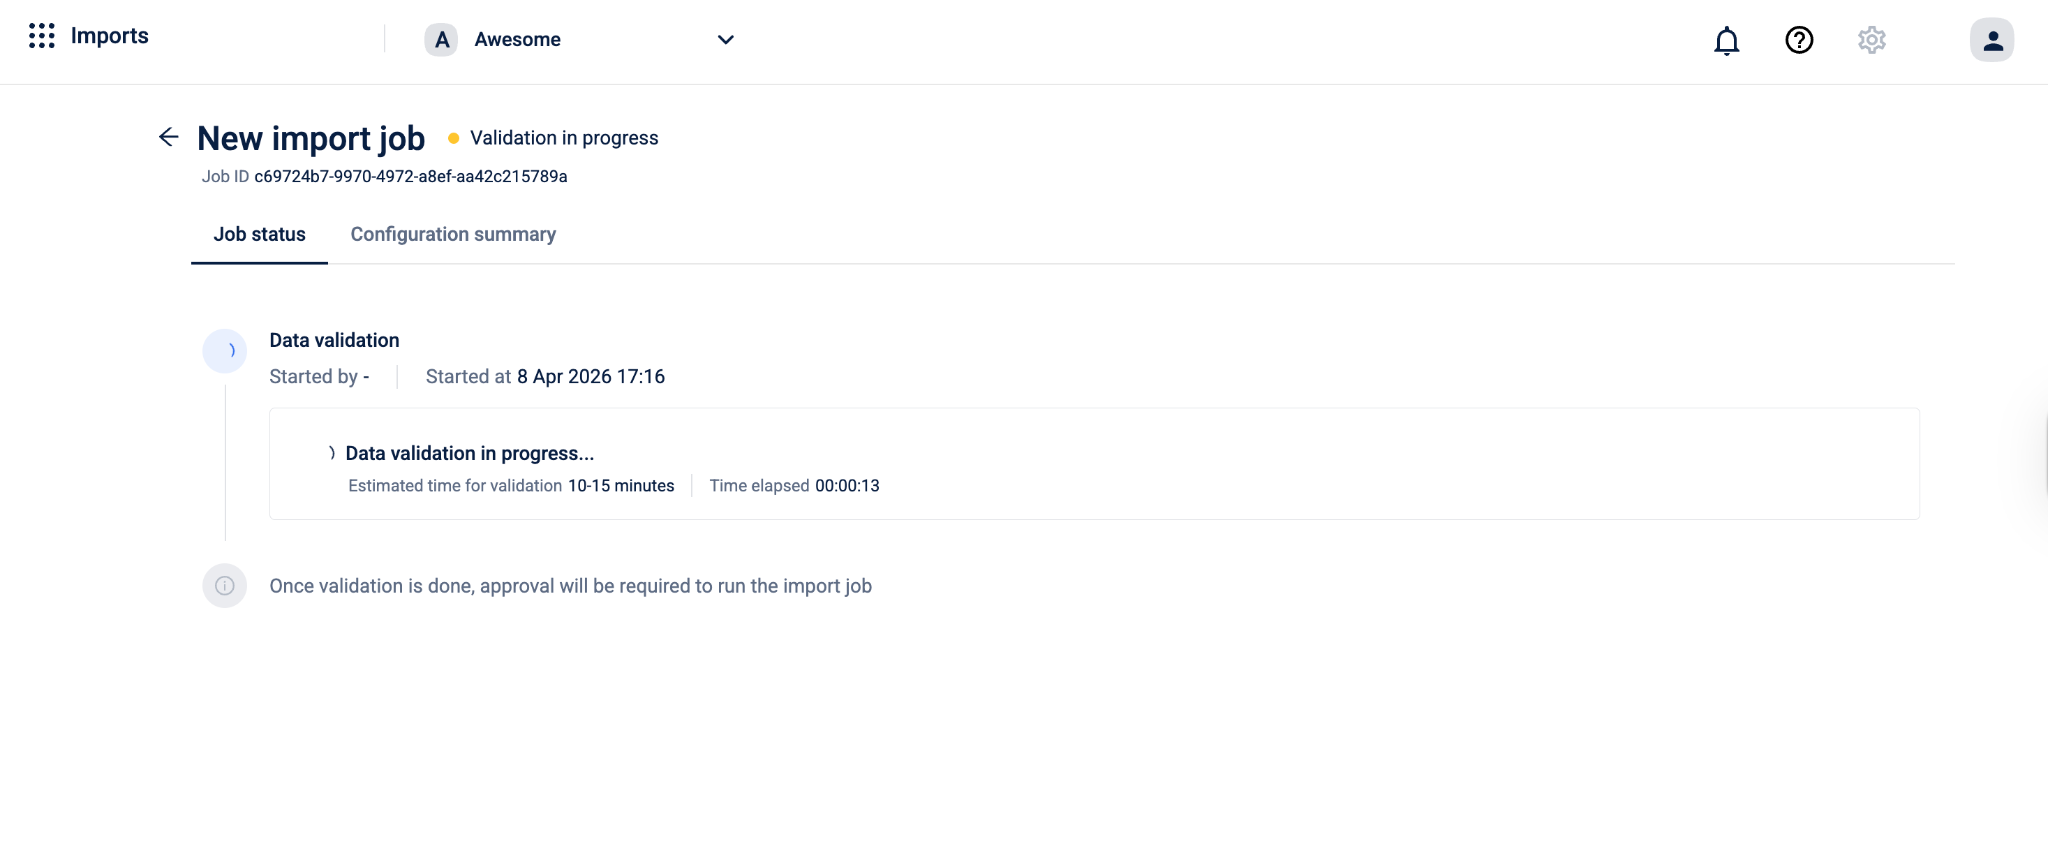
The Job status tab displays the following during validation:
Data validation
- Started by: The name of the user who triggered the validation.
- Started at: The date and time when validation began.
Data validation in progress...
- Estimated time for validation: The approximate time the validation is expected to take, for example, 10–15 minutes.
- Time elapsed: The time that has passed since validation started, displayed in
HH:MM:SSformat.
What Happens During Validation
The system validates every record in your source table against the rules defined for the profile and method you selected. Validation runs field by field and record by record. Records that pass all checks are marked as valid. Records that fail one or more checks are marked as invalid and are not written to the database.
You do not need to take any action during this stage. The system processes the data automatically.
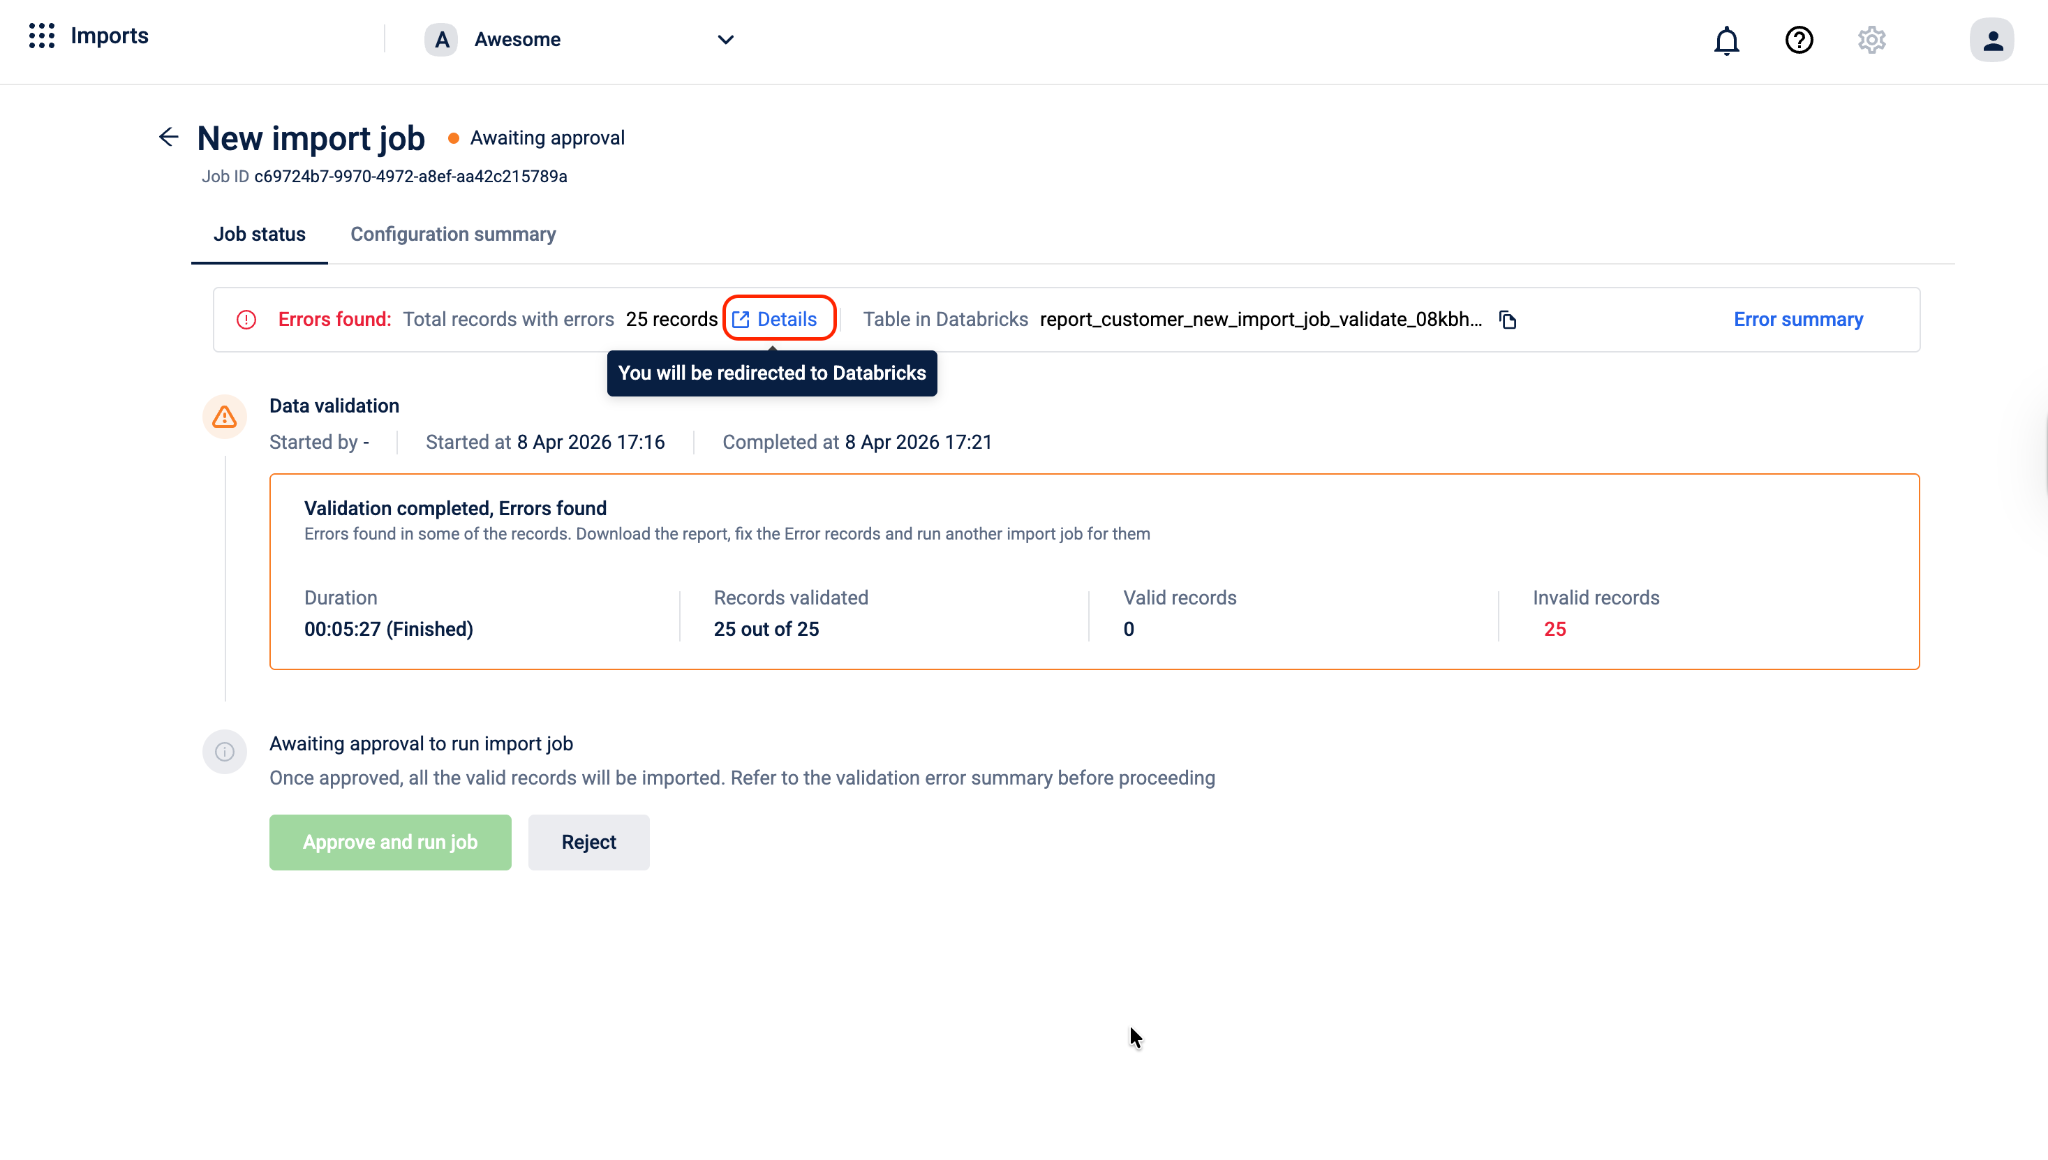
Once validation is complete, the job status page shows a summary of the results:
- Duration — how long the validation took to complete
- Records validated — the total number of records processed
- Valid records — the number of records that passed all checks and are ready to be imported
- Invalid records — the number of records that failed one or more checks
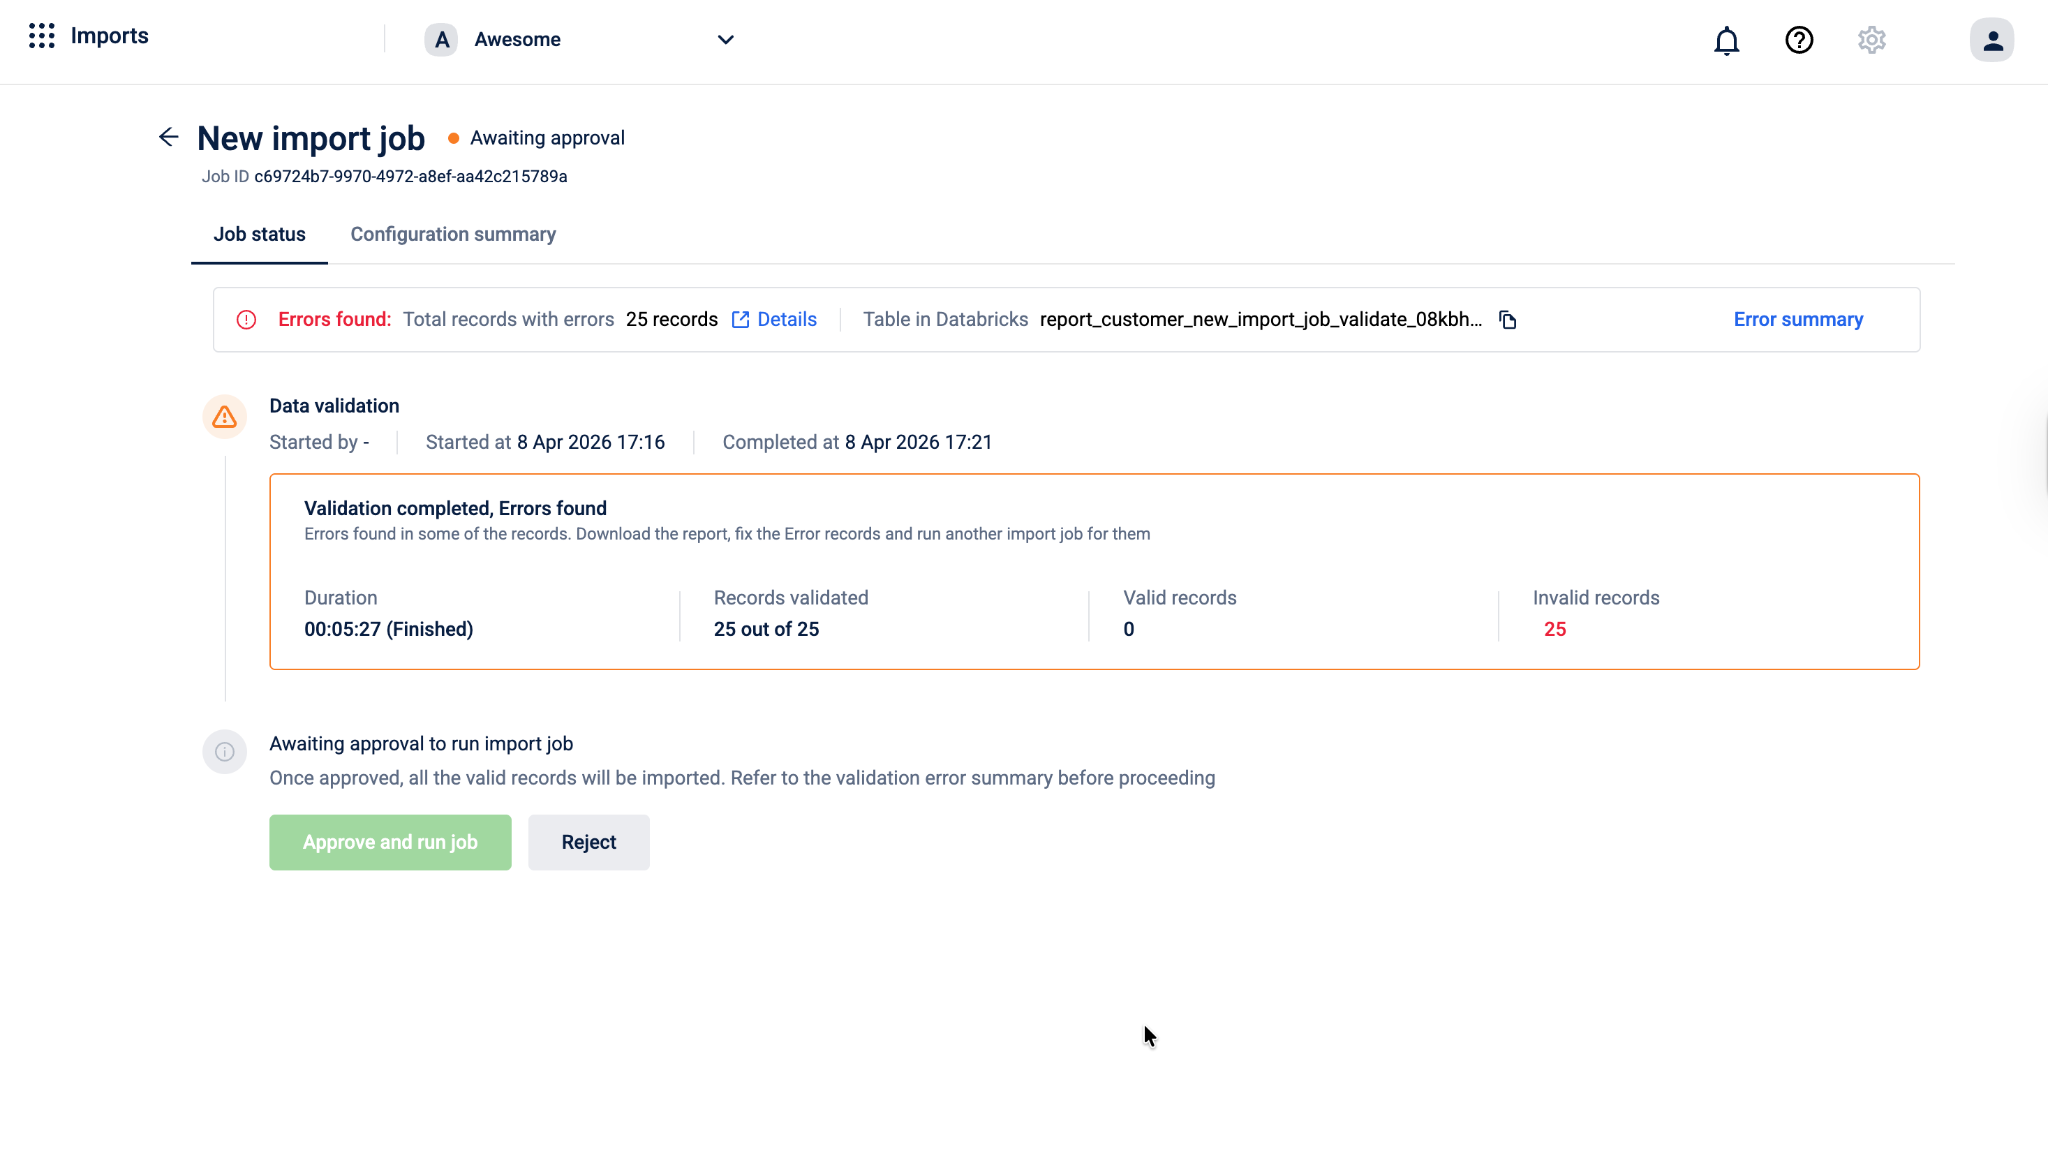
To check error details in Databricks, navigate to the Error section and select Details. You will be redirected to the Databricks page.
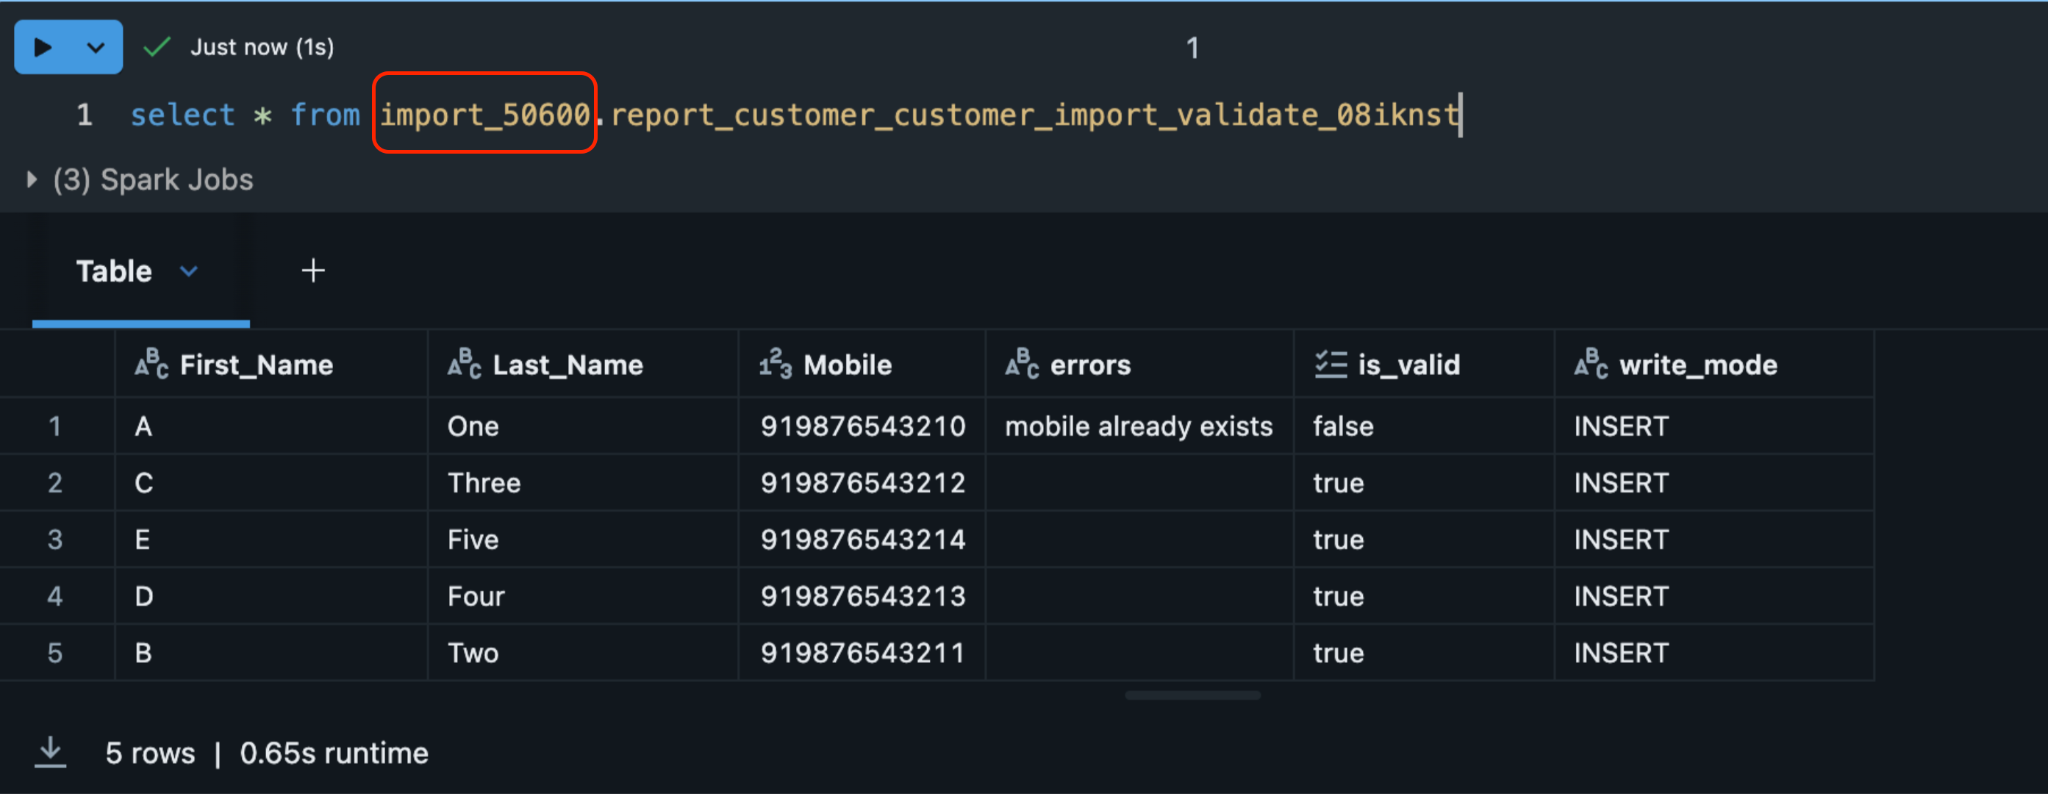
Validation Result Table in Databricks
After validation completes, the system automatically creates a result table in your organisation's Databricks workspace. This table contains every record from your source along with its validation status and, for records that failed, the specific error message logged against it.
The result table is created under the import_<orgId> database and follows this naming format:
import_{orgId}.report_{profileType}_{job_name}_validate_{suffix}For example, a customer import job named testing would create a table like:
import_1001.report_customer_testing_validate_08kar5z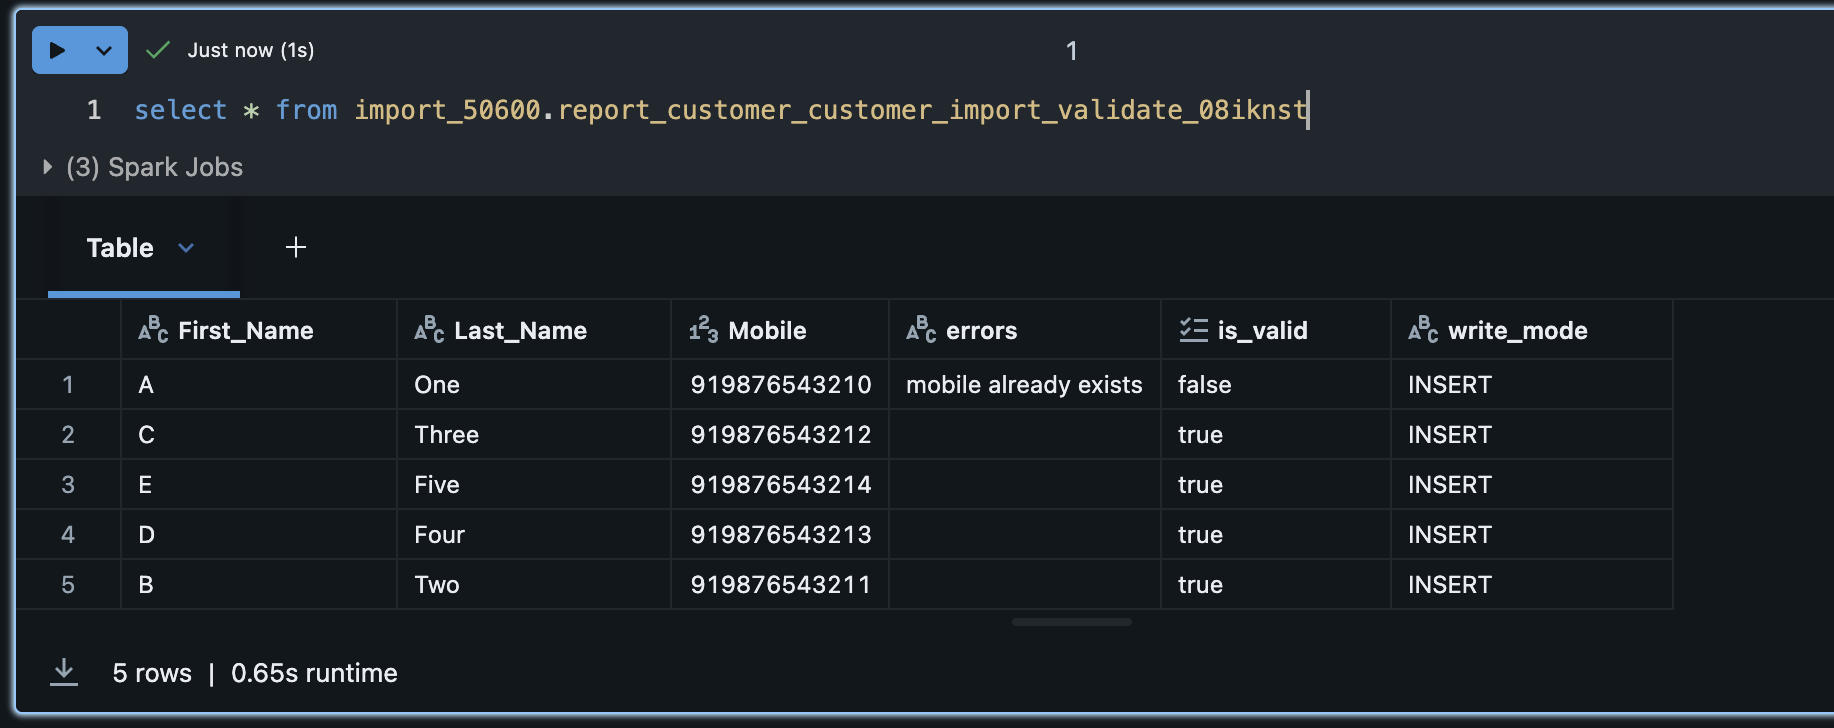
What happens after validation
Once validation is complete, the job moves to an approval stage before the actual import runs.
On the job status page, you can do one of the following:
- If there are no invalid records, Select Approve and run job. The system will import all valid records into the Capillary Database. Any invalid records are skipped and not imported.
- If the validation results are not acceptable for example, too many records failed or the errors indicate a problem with the source data. Select Reject. The job is cancelled and no data is written. You can go back, fix the issues in your source table, and create a new import job.
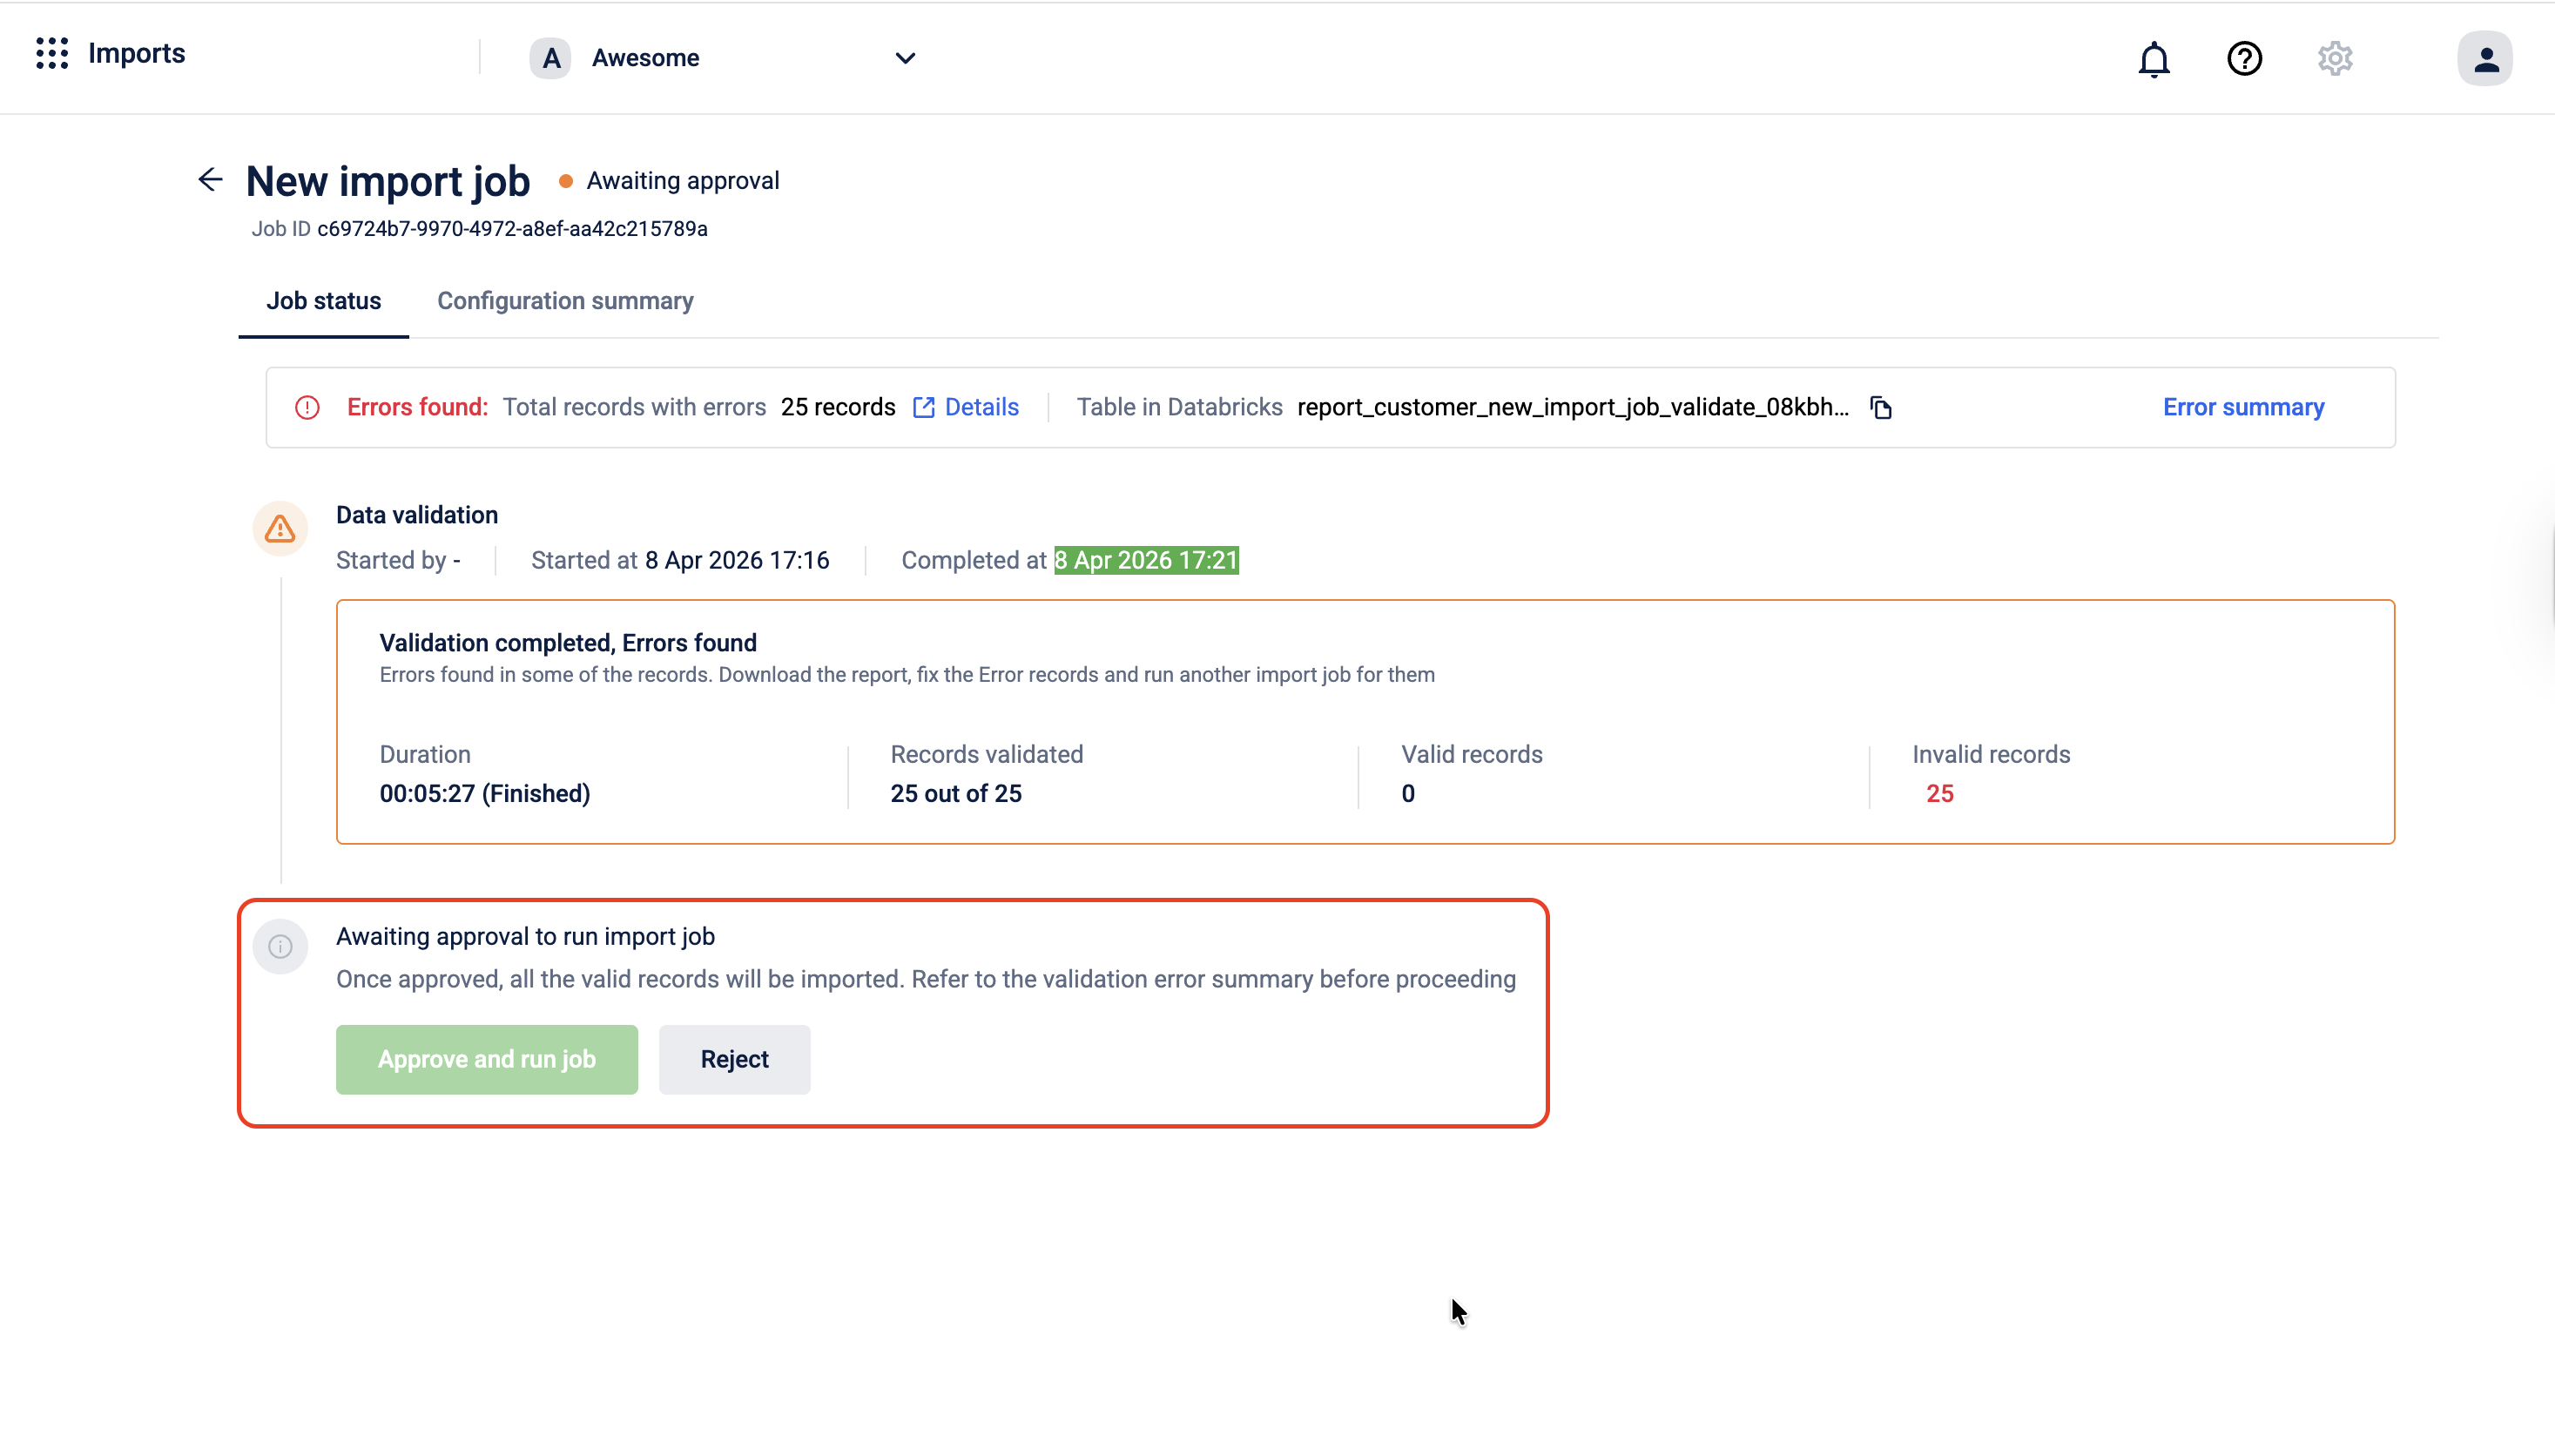
Note: Selecting Approve and run job imports only the records that passed validation. Invalid records are never written to the database, regardless of approval.
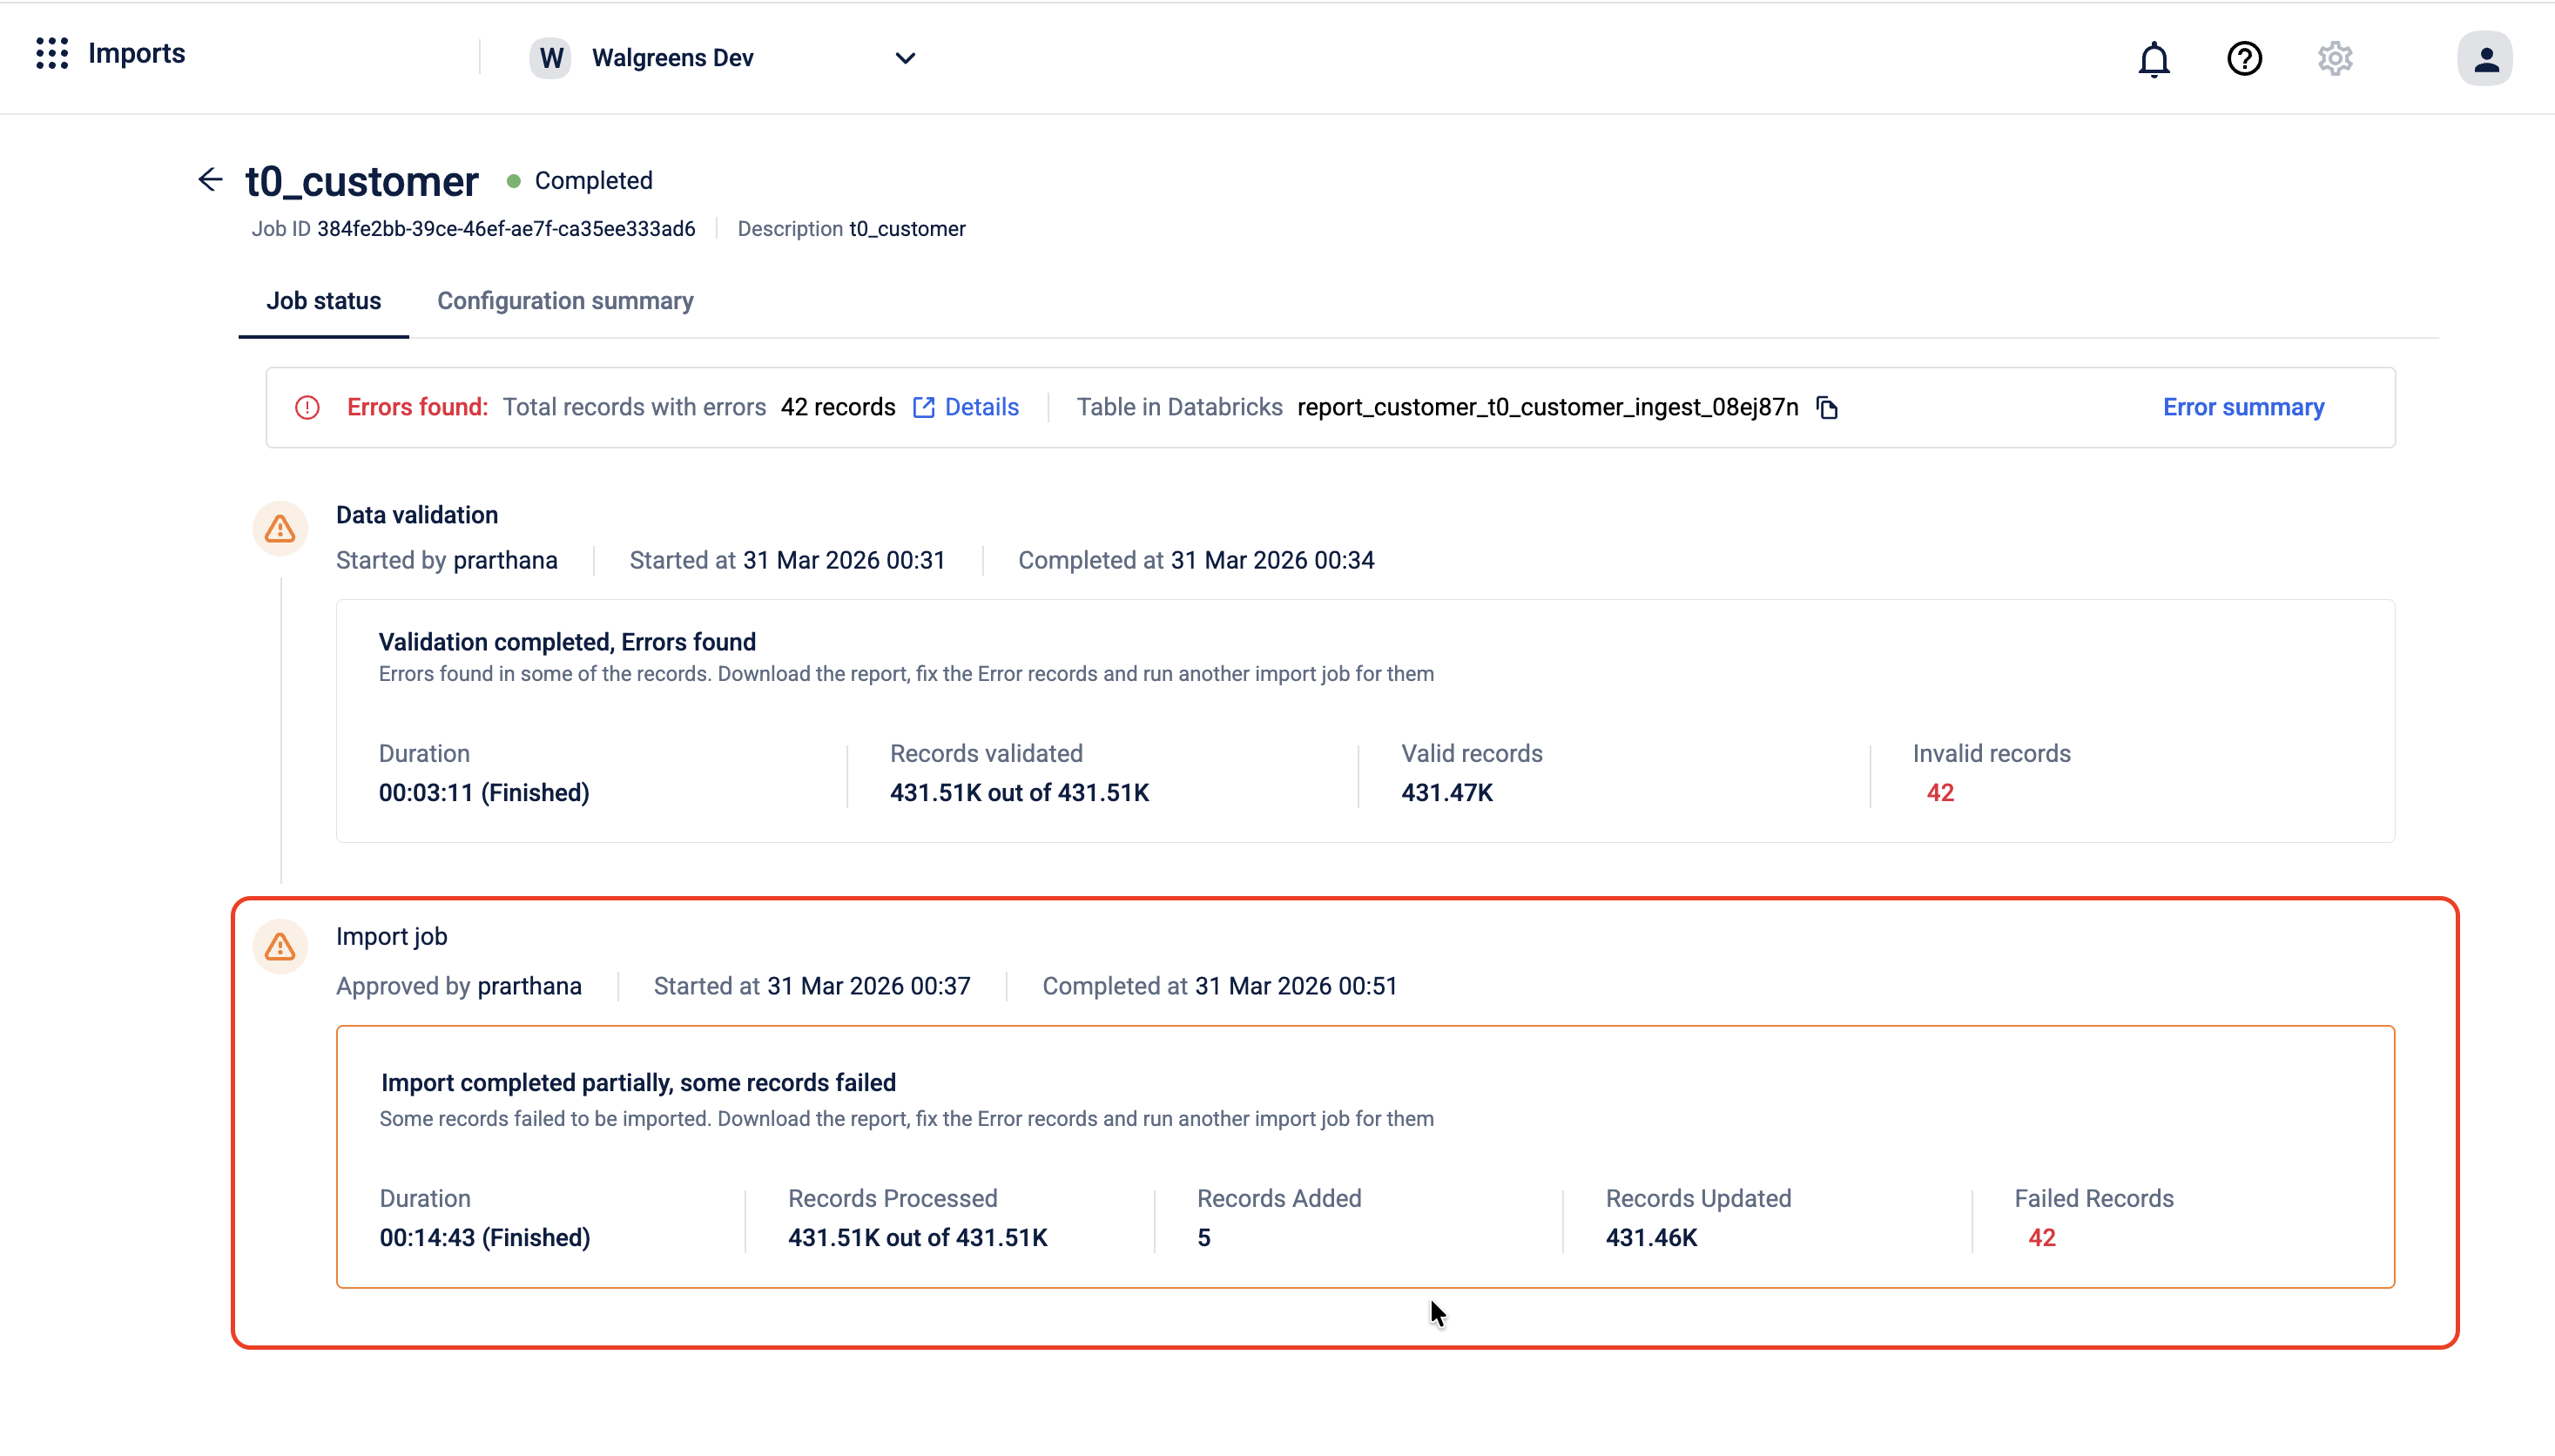
What Happens After Approval
Once you approve the job, the system begins writing the valid records to the Capillary Database. The job status page updates in real time to reflect the progress of the import.
When the import is complete, the page shows a summary of the run:
- Duration - how long the import took to complete
- Records processed - the total number of records the system attempted to write
- Records added - the number of new records successfully created in the database
- Records updated - the number of existing records successfully updated in the database
- Failed records - the number of records that could not be written, shown in red
If some records failed during the import, the page shows the message Import completed partially, some records failed. This means the import ran but not all records were written to the database successfully. The records that were processed are already in the database. For the ones that failed, download the error report, fix the data in your source table, and run a new import job for those records.
Ingest Result Table in Databricks
After the import run completes, the system creates a second result table in Databricks — separate from the validation table. This ingest table captures the outcome of the actual write operation, including which records were written successfully and which failed at the database level.
The ingest table follows this naming format:
import_{orgId}.report_{profileType}_{job_name}_ingest_{suffix}For example:
import_1001.report_customer_testing_ingest_08kar5z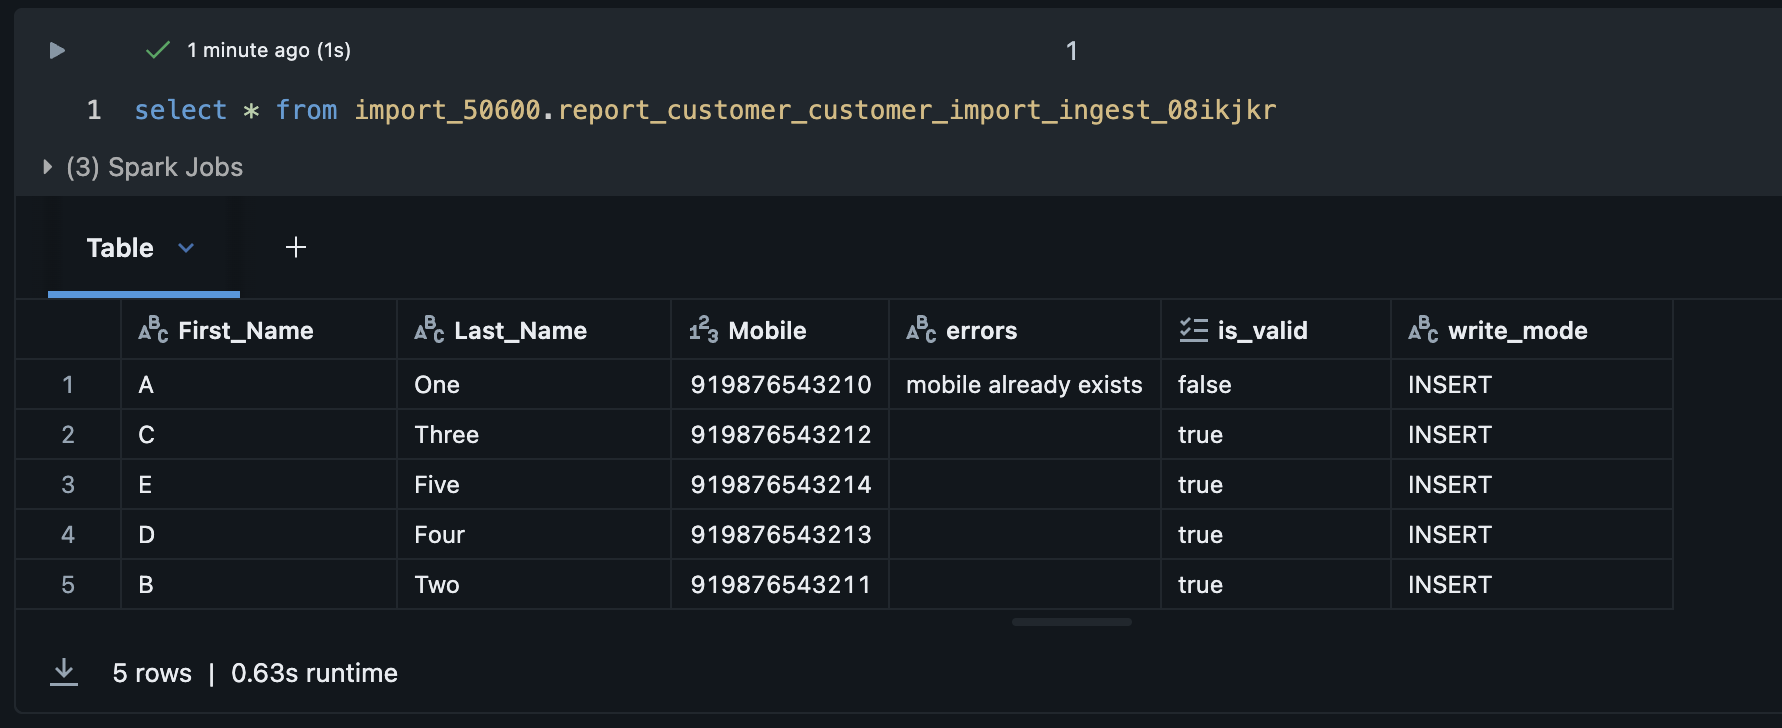
Together, the validate table and the ingest table give you a complete audit trail for every import job what was validated, what passed, and what was actually written to the database.
Databricks Tables Summary
| Table | When it is created | What it contains |
|---|---|---|
report_{profileType}_{job_name}_validate_{suffix} | After validation completes | Every record has its validation status and error messages for failed records |
report_{profileType}_{job_name}_ingest_{suffix} | After the import run completes | Each record along with its status and error details for failed entries. |
Troubleshooting
This section helps identify and resolve issues encountered during the import process. The following table lists common validation errors, their meaning, and the steps to fix them.
Records failed validation
After validation completes, the import job details page shows the total records processed, records successfully written, and records marked as invalid. If records failed, download the error report and use the table below to identify and fix the issue.
| Error message | What it means | How to fix |
|---|---|---|
At least one identifier required | The record has no mobile, email, or external ID. | Add at least one valid identifier to the record in your source table. |
mobile already exists | The mobile number is already registered to another customer. | Remove the duplicate or use the Update method to modify the existing customer. |
email already exists | The email is already registered to another customer. | Remove the duplicate or use the Update method to modify the existing customer. |
external_id already exists | The external ID is already in use by another customer. | Remove the duplicate or use the Update method to modify the existing customer. |
slab name is invalid | The slab name does not match any slab in the loyalty program. | Verify the slab name against your loyalty program configuration and correct the value in your source table. |
slab cannot be attached to non loyalty customer | A slab was provided for a customer whose loyalty type is Non-Loyalty. | Remove the slab value for non-loyalty customers, or correct the loyalty type in your source table. |
no slab change found | The slab name provided is the same as the customer's current slab. | No action needed if this is expected. Remove the record from the import if no change is required. |
status label is invalid | The status label is null or does not match any status configured for your organisation. | Check your organisation's configured status labels and correct the value in your source table. |
Deleted status cannot be changed | The customer's current status is Deleted. This status cannot be updated through import. | Remove this record from the import. Deleted customer status cannot be changed through the Data Import framework. |
Pending Deletion status cannot be changed | The customer's current status is Pending Deletion. This status cannot be updated through import. | Remove this record from the import. Pending Deletion status cannot be changed through the Data Import framework. |
no status change found | The status provided is the same as the customer's current status. | No action needed if this is expected. Remove the record from the import if no change is required. |
USER_INSERTION_FAILED | The record passed all validation checks but could not be written to the database. | See USER_INSERTION_FAILED below. |
Scenarios
Table not appearing in the dropdown
Symptom: A table you created in Databricks does not appear in the Select the table dropdown in Step 1.
What to check:
- Confirm the table exists in Databricks under the
import_<orgid>database. Tables in other databases or schemas are not listed. - Wait up to 10 minutes after table creation.
- Refresh the page and check again.
When to escalate: If the table does not appear after 10 minutes and you have confirmed it exists under the correct database, raise a ticket with the Capillary support team and provide the org ID and table name.
Upsert method not available
Symptom: The Upsert method is greyed out or not selectable in Step 2.
What to check:
- Upsert is disabled when Identifier Flexibility is enabled for your organisation. These two configurations are mutually exclusive.
- Check with your organisation administrator to confirm whether Identifier Flexibility is active.
When to escalate: If you need Upsert enabled and Identifier Flexibility disabled (or vice versa), raise a ticket with the Capillary support team. Provide the org ID and the required configuration.
[PLACEHOLDER — CSM + PSV]: Add the specific ticket type or team name to contact for Identifier Flexibility configuration changes.
USER_INSERTION_FAILED
Symptom: One or more records show USER_INSERTION_FAILED in the error report after validation completes.
What it means: The record passed all validation checks but could not be written to the database at the write stage.
What to check:
- Check whether the error affects a small number of isolated records or the majority of the batch. Isolated failures may indicate a data issue; bulk failures may indicate a system-level problem.
- Retry the import for the affected records as a separate job before escalating.
When to escalate: If the error persists after a retry, raise a ticket with the Capillary support team. Include the following information:
- Job ID
- Org ID
- Number of affected records
- Whether the error is isolated or affects the majority of the batch
Updated 3 days ago