
Locations
Create and manage your organization's business location, geographic grouping, business grouping, and point of transaction from a single self-serve Locations page.
Locations represent the physical structure of your business. They help you organize where your business operates, from high-level business groupings down to individual stores and checkout points.
By organizing your locations into a structured hierarchy, you can manage your business more consistently as it grows. Instead of maintaining disconnected lists of stores or regions, Locations provide a single, standardized view of your business structure.
For example, a retail brand with stores across multiple cities might organize its business by region, group stores by business line, manage individual stores, and track the checkout terminals within each store.
To represent this hierarchy, Locations are organized into four entities:
- A geographical grouping of stores (for example, North India or Bangalore East) is referred to as a Zone.
- A grouping of stores by business line or brand (for example, Fashion or Electronics) is referred to as a Concept.
- A business location or channel (online/physical) where customer transactions are recorded is referred to as a Store.
- A checkout or POS terminal within a store where transactions are processed is referred to as a Till.
Zone, Concept, Store, and Till are Capillary's default names for these four levels. If your organization uses different terminology internally, you can rename any of them, for example, calling a Store an "Outlet," or a Zone a "Region" without changing how the entity works underneath. See Renaming location terms below.
Notes
- Locations manage the same hierarchy described in the Setup Store hierarchy. If your organization already has Concepts, Zones, Stores, and Tills configured in the old flow, they appear automatically here as well.
- Permanently deleting a Store, Zone, Concept, or Till is not supported.
Creating a business location (stores)
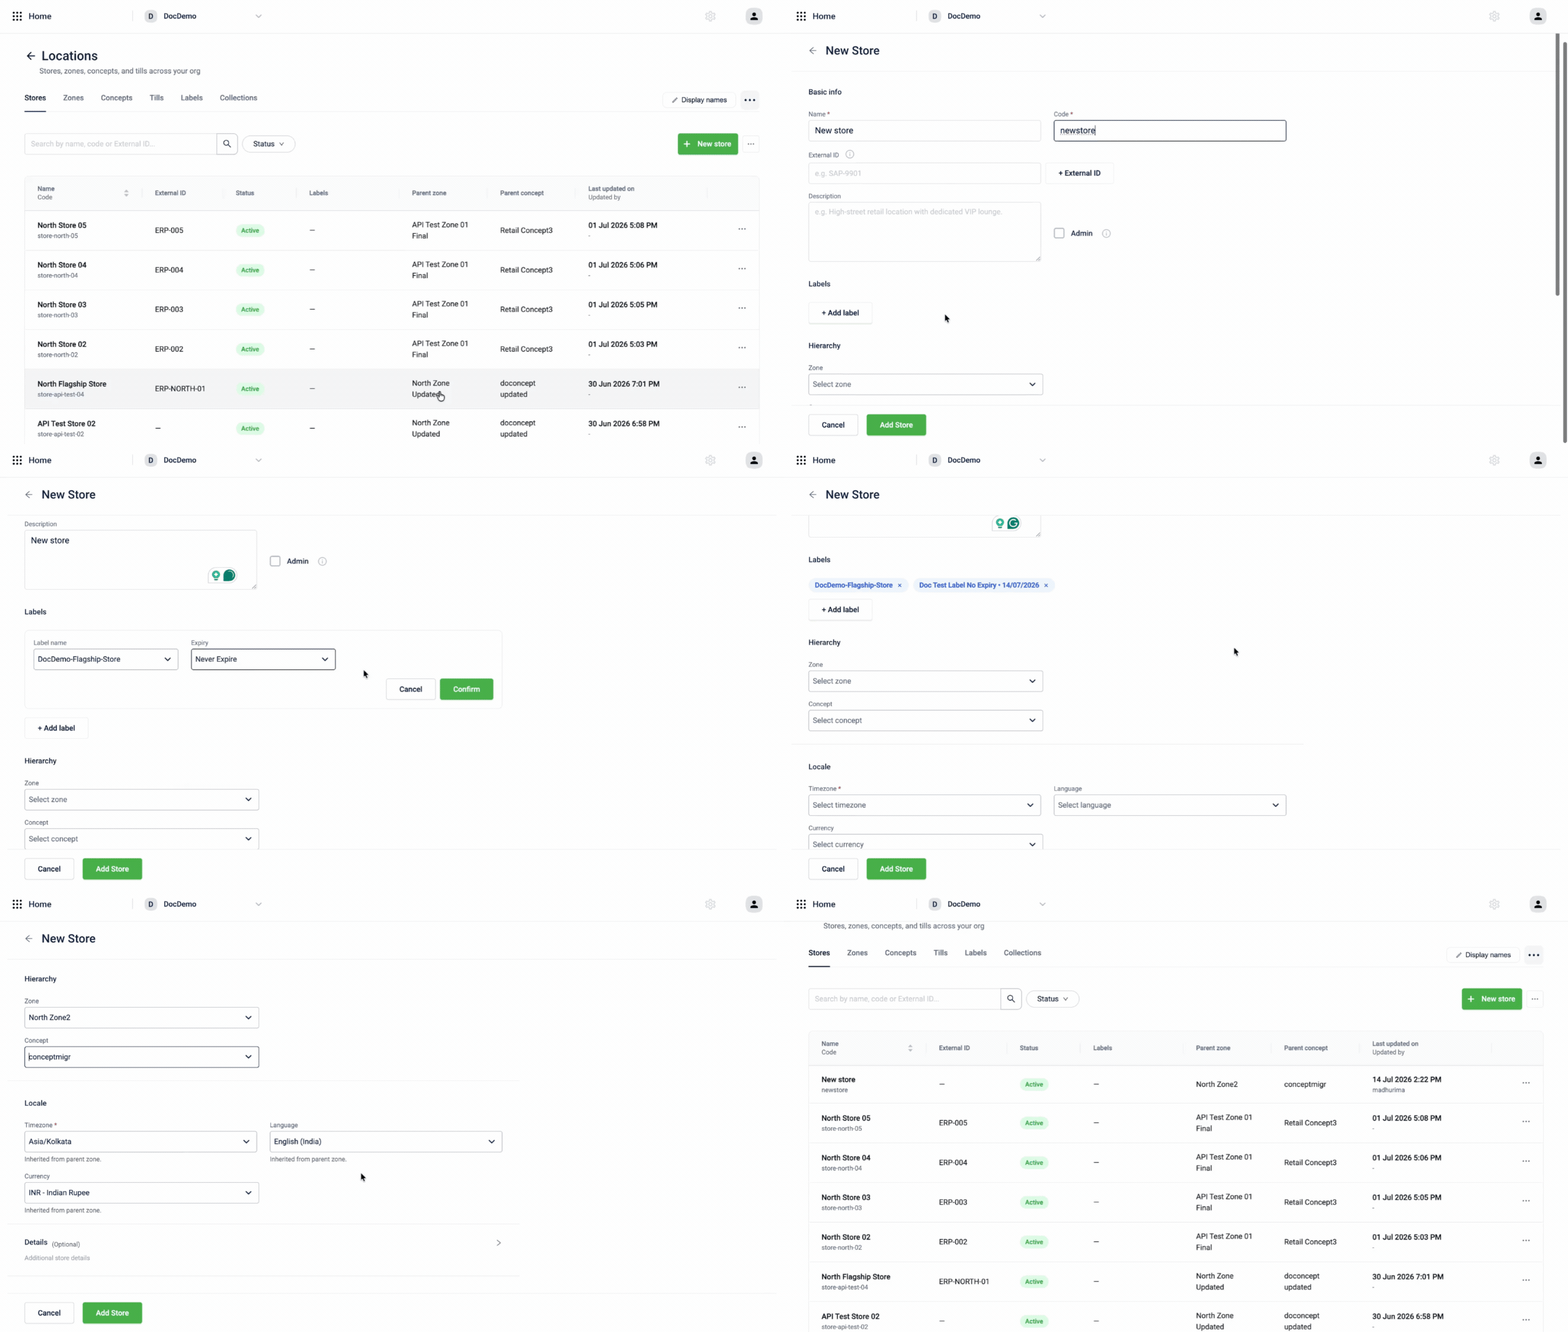
To create a store, follow these steps:
- Go to Entities > Locations > Stores.
- Select New store.
- Fill in the store details:
| Field | Required / Optional | Description |
|---|---|---|
| Name | Required | The name of the store, shown wherever the store appears across the platform. Note: Name only contains letters, numbers, underscores, and spaces |
| Code | Required | A unique code that identifies the store. Note: Code must start with a lowercase letter or digit, and may only contain lowercase letters, digits, ., _, or -, up to 50 characters. It can't be changed once the store is created. |
| External ID | Optional | A code that already identifies this store in another system your brand uses, such as SAP (Systems, Applications, and Products in Data Processing) or an inventory system. Enter it here so Capillary can match that system's records to this store. If the store is tracked under different IDs in more than one external system, select + External ID to add each one. Note: You can add up to 5 External IDs. |
| Description | Optional | Free-text notes about the store. |
| Labels | Optional | Labels are tags you attach to a store to group or filter it later, for example, marking it "Flagship" or "Pop-up." Adding one here attaches an existing Label to the store; select + New label to create one on the spot if it doesn't exist yet. There's no limit on how many Labels you can add. |
| Admin | Optional | Marks the store as an admin store, which can manage other stores in the hierarchy. |
| Zone | Optional | Places the store under a geographical Zone. |
| Concept | Optional | Places the store under a business-line Concept. |
| Timezone | Required | The store's own timezone. It's pre-filled from the parent Zone if one is set, but you can override it. |
| Language | Optional | The store's own display language. Pre-filled from the parent Zone if one is set, but you can override it. |
| Currency | Optional | The store's own currency. Pre-filled from the parent Zone if one is set, but you can override it. |
-
(Optional) Select Details to add more information about the store. The table below shows the additional details you can add.
Field What it's for Store email A contact email address for the store. Store number A contact phone number for the store. Store landline A landline number for the store. Latitude The store's geographic latitude, used to pin its exact location on a map. Longitude The store's geographic longitude, used to pin its exact location on a map. Custom attributes Attach any of your org's pre-configured custom fields to this store, each with its own value. Select + Add attribute to add more than one. -
Select Add Store.
Note: Timezone, Language, and Currency set here are the store's own locale. They don't have to match your organization's defaults.
Viewing and editing a business location (stores)
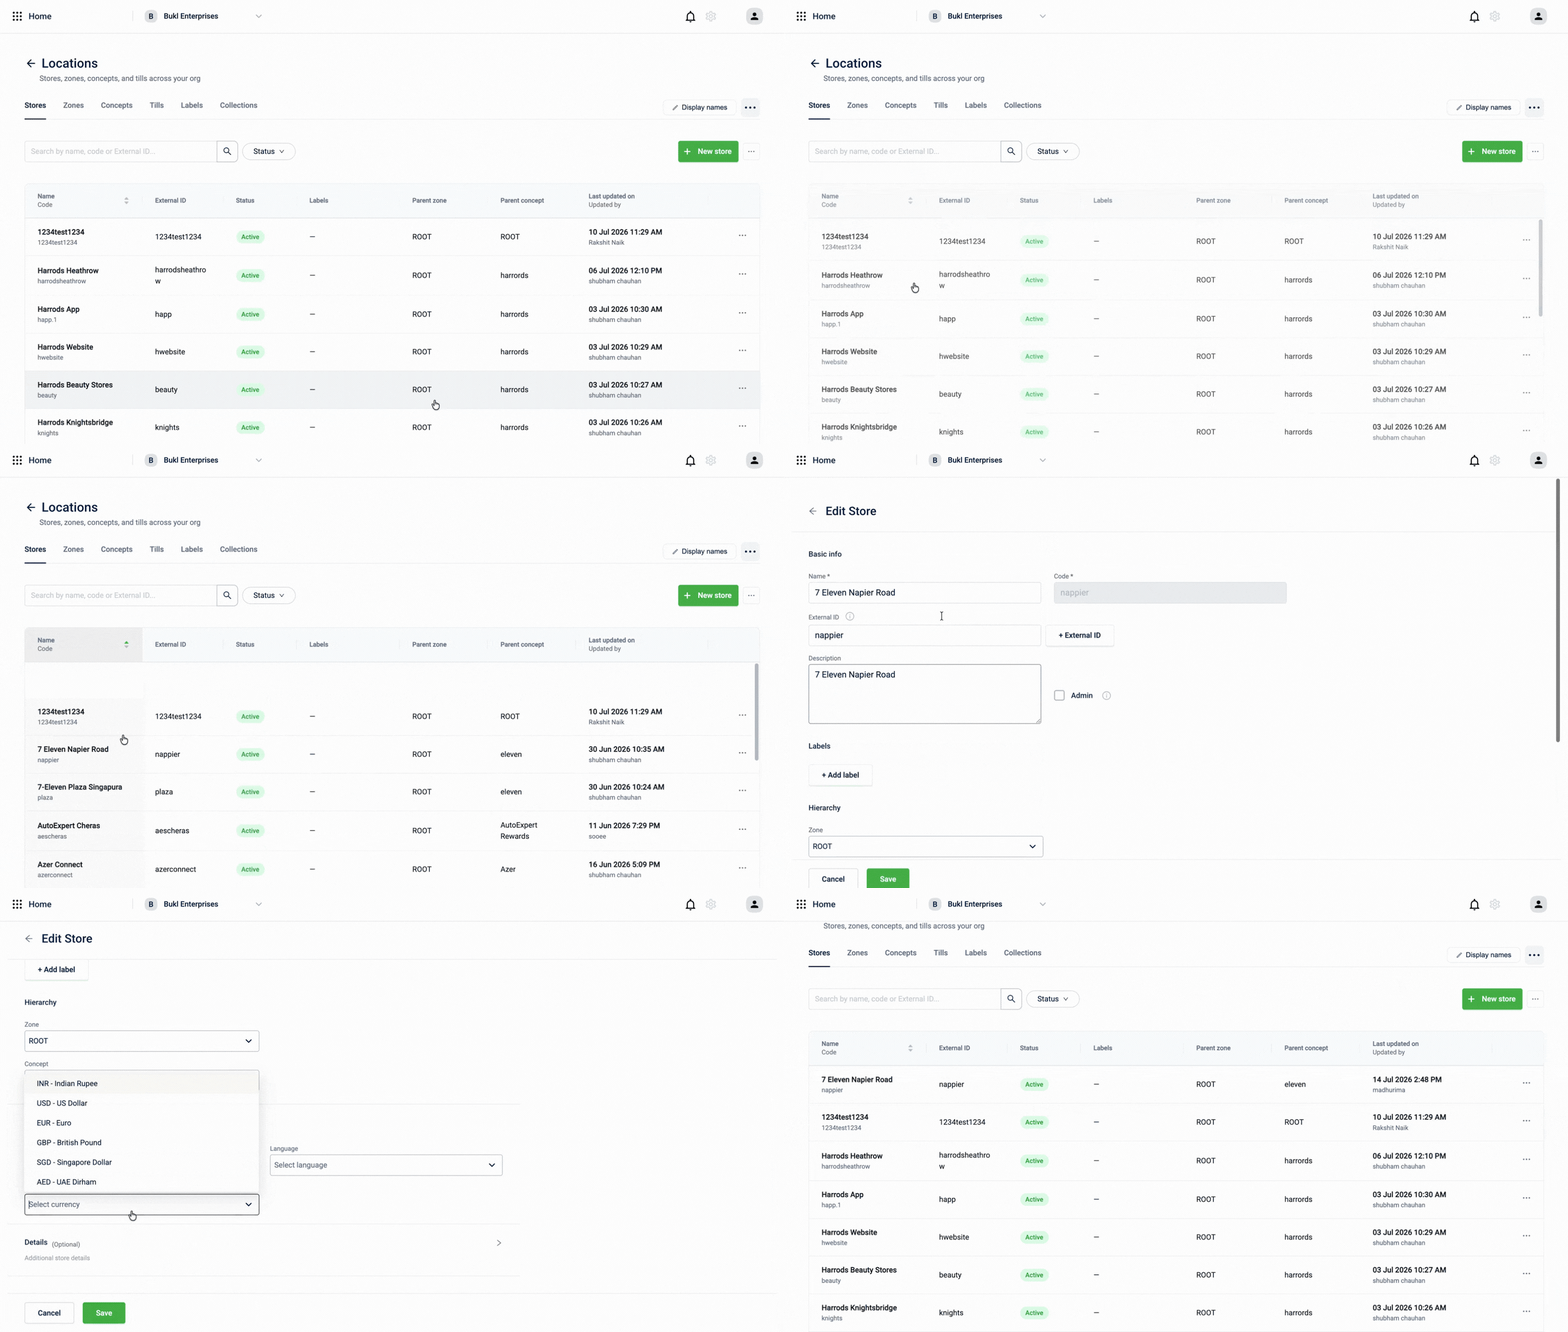
To view or edit a store, follow these steps:
- Go to Entities > Locations > Stores.
- On the Stores listing page, review each store's Name and Code, External ID, Status (Active or Deactivated), Labels, Parent zone, Parent concept, and when it was last updated. Select the Name/Code column header to sort stores alphabetically. Use the search bar to find a specific store, or the Status filter to show only Active or Deactivated stores.
- Select a store to open its detail page, which displays all the information you configured when you created it.
- Select Edit to change any field except Code, then select Save. Your changes appear on the list right away.
Deactivating a business location (stores)
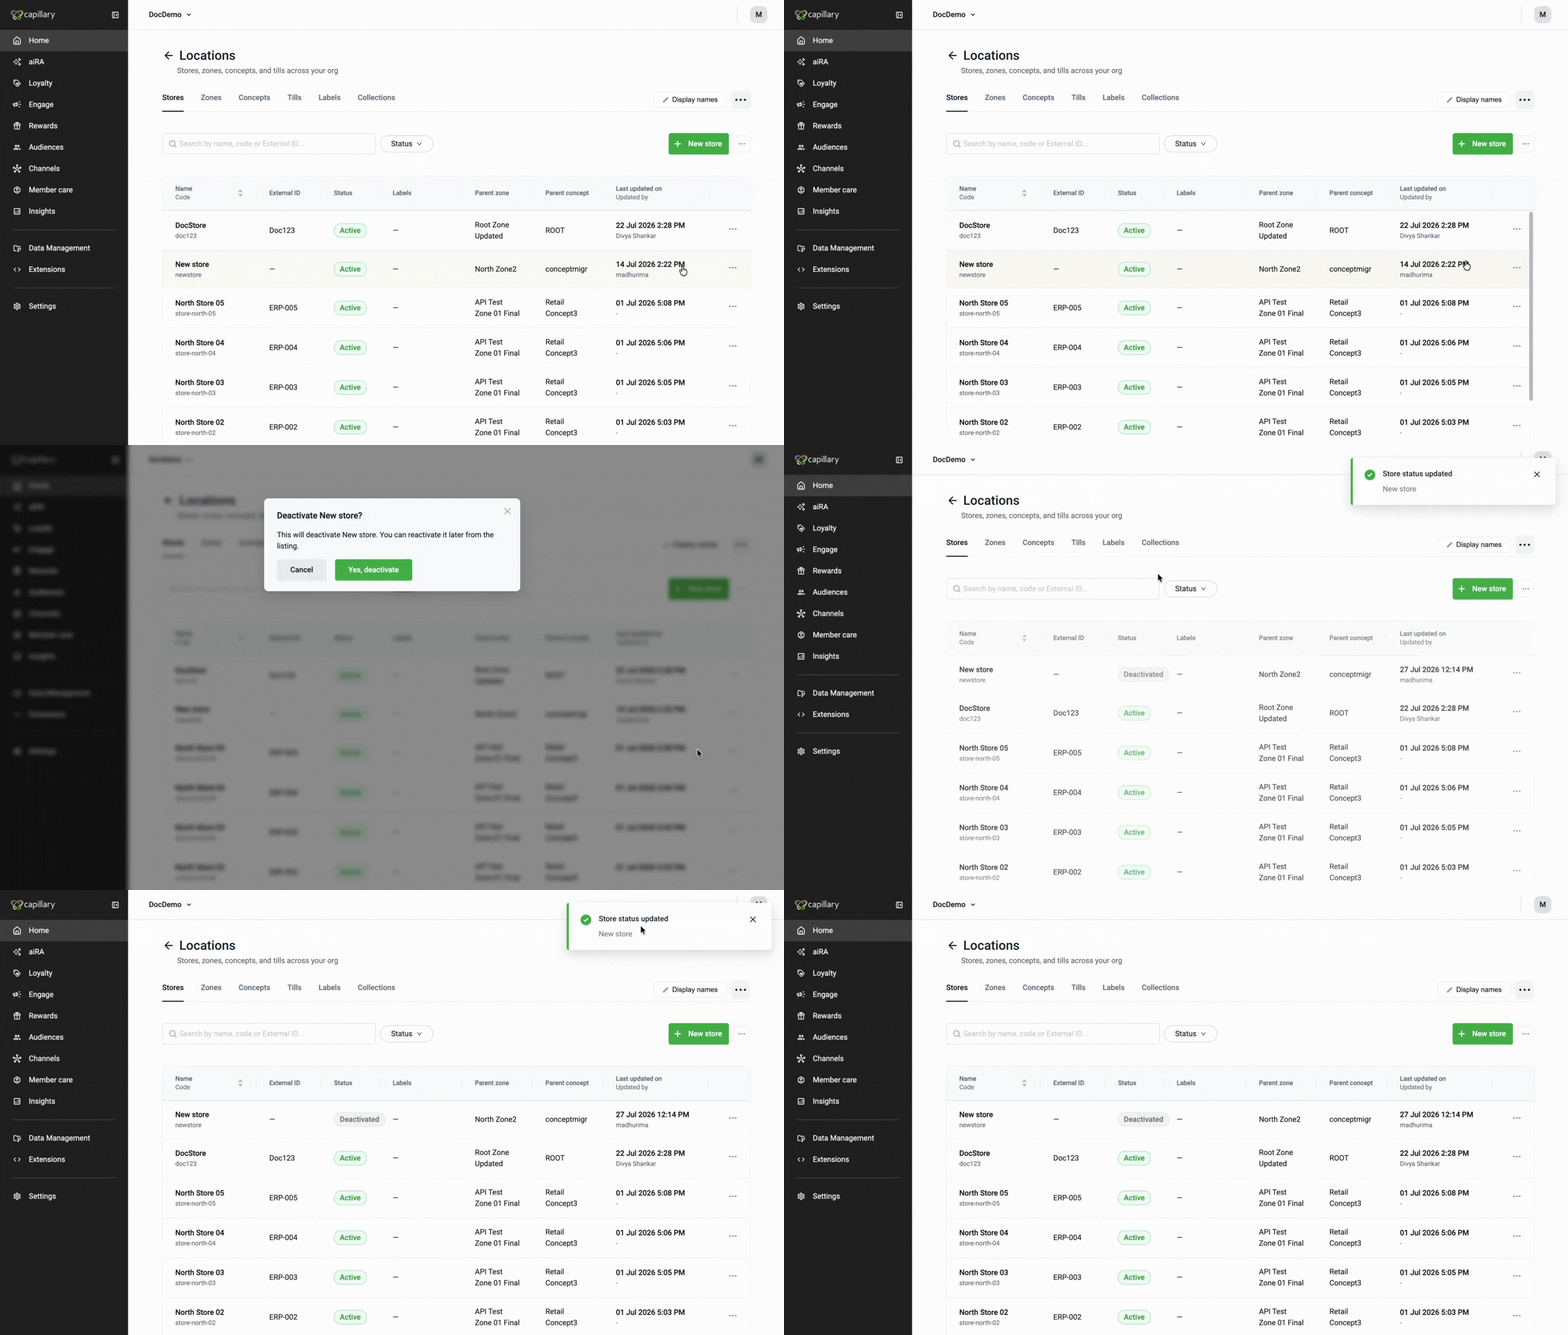
To deactivate a store, follow these steps:
- Go to Entities > Locations > Stores.
- Locate the store you want to deactivate, select the three-dot menu, and then select Deactivate.
- In the confirmation dialog box, select Yes, deactivate.
The store is deactivated and appears in the Stores listing with the Deactivated status.
Activating a business location (stores)
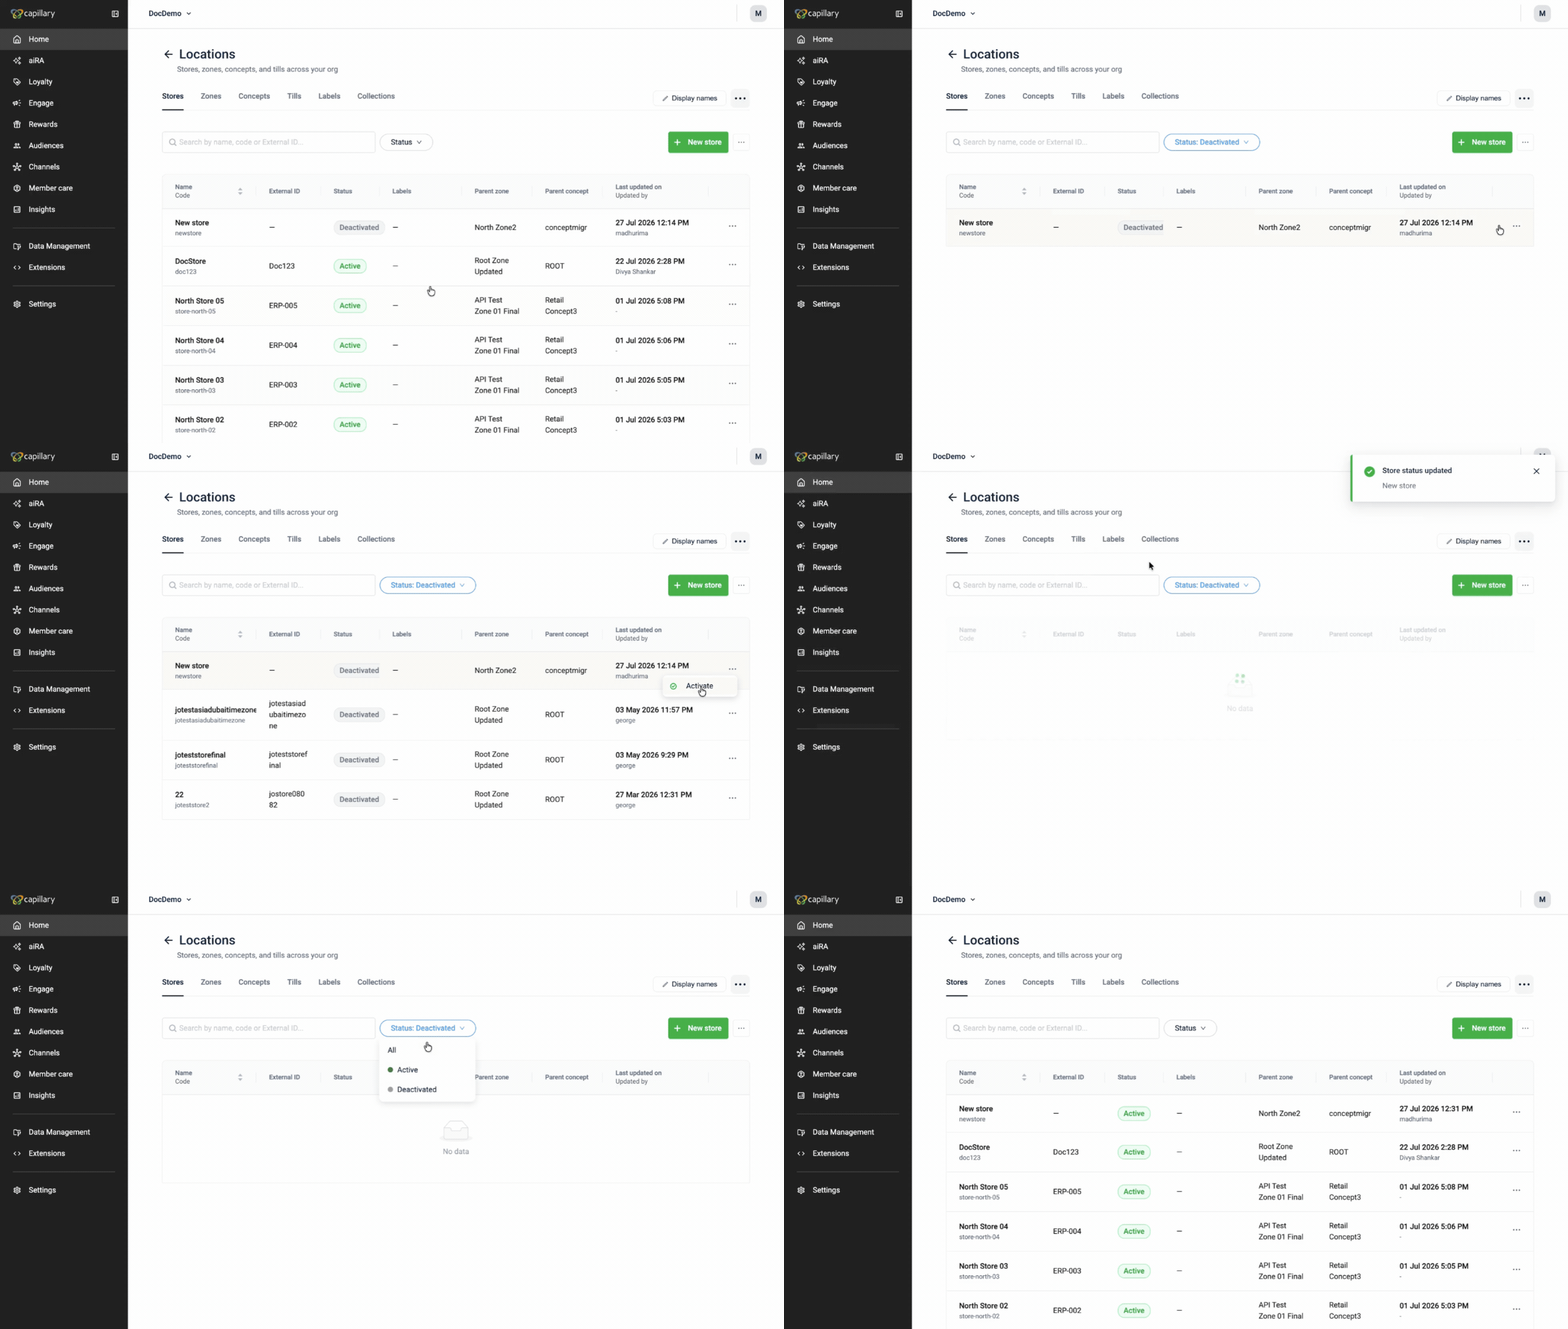
To activate a deactivated store, follow these steps:
- On the Stores listing page, go to the Status filter and select Deactivated. This displays only the deactivated stores.
- Locate the store you want to activate, select the three-dot menu, and then select Activate.
- In the confirmation dialog box, select Yes, activate.
The store is activated and appears in the Stores listing with the Activated status.
Bulk-uploading business location (stores)
To add many stores at once, follow these steps:
- Select the (⋯) menu next to New store, then select Bulk upload stores.
- Download the sample CSV.
- Fill in the mandatory columns without changing the headers or column order.
- Upload the file. You can add up to 500 stores in a single file.
Creating a geographic grouping (zones)
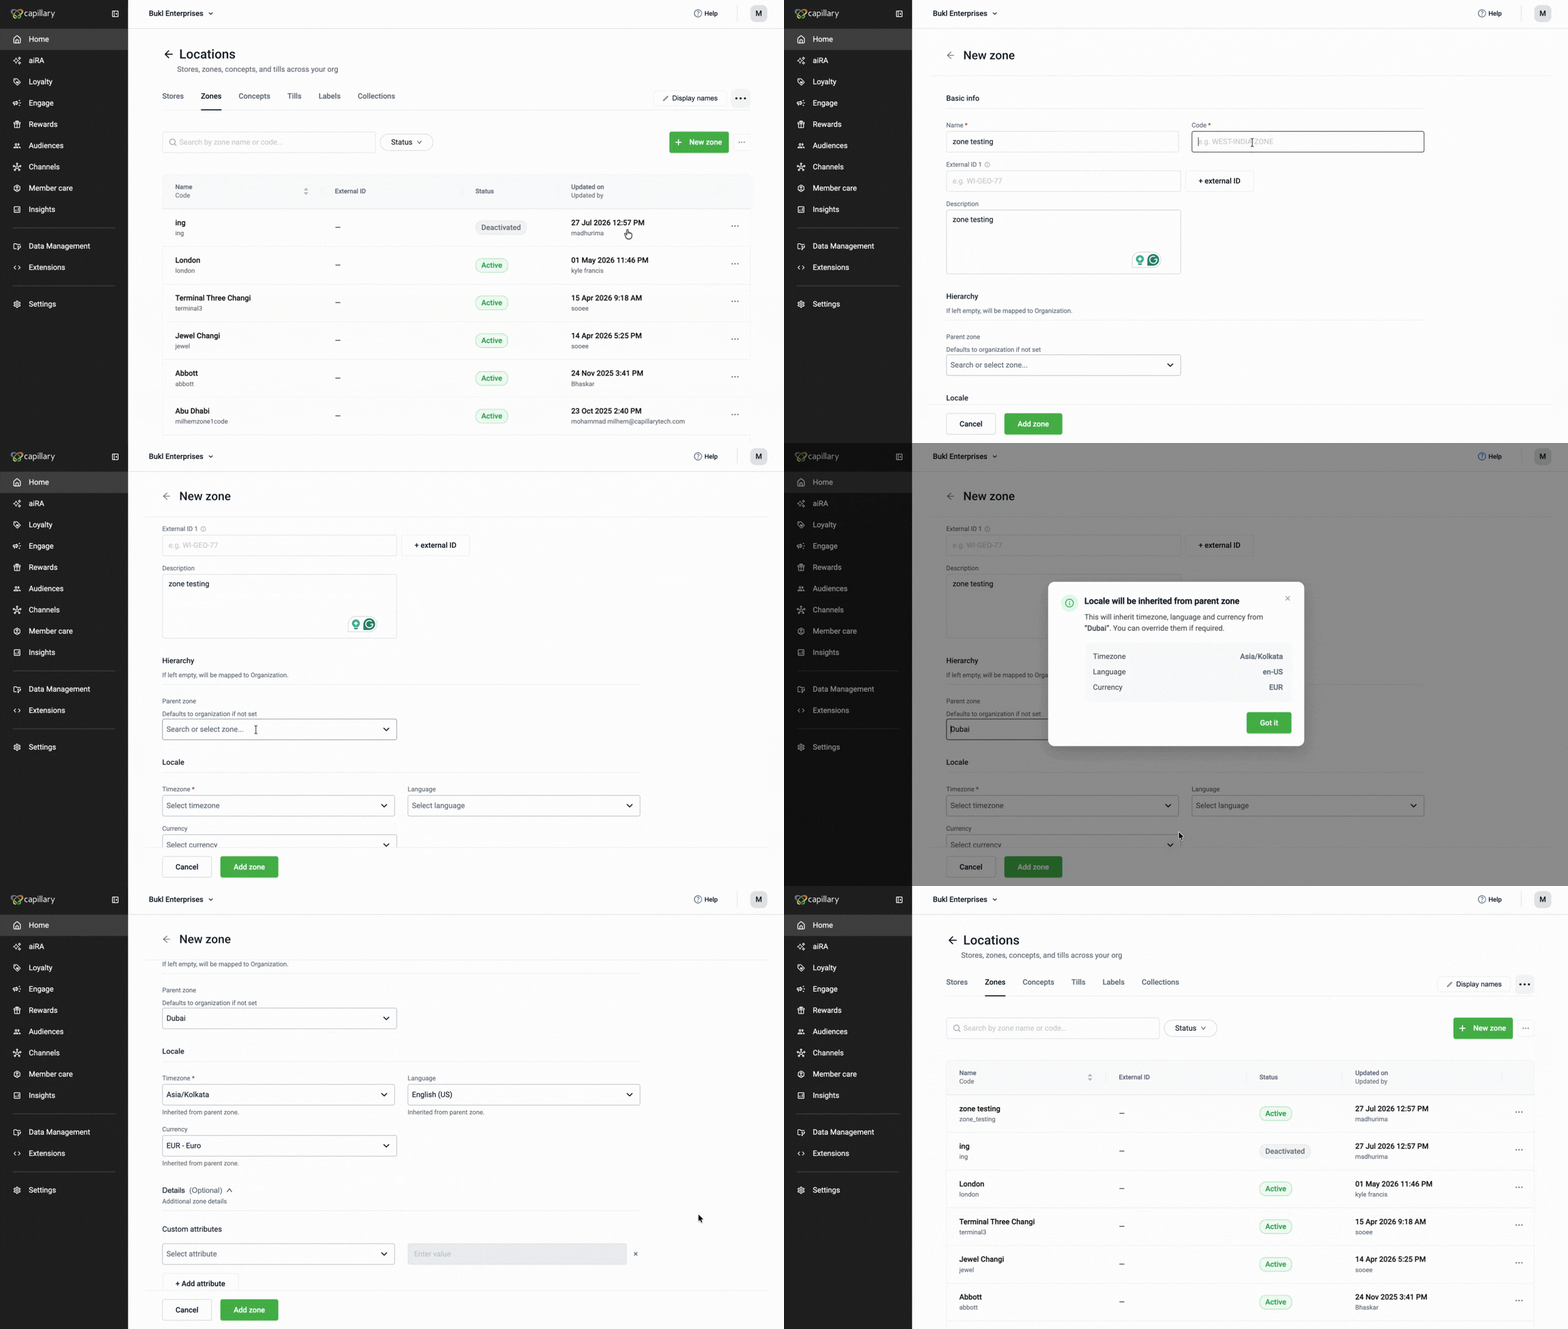
To create a zone, follow these steps:
- Go to Entities > Locations > Zones.
- Select New zone.
- Enter a Name and Code.
Note: The Name can contain only letters, numbers, underscores (_), and spaces. The Code must start with a lowercase letter or digit and can contain only lowercase letters, digits, periods (.), underscores (_), or hyphens (-), up to 50 characters. The code cannot be changed after the zone is created. - (Optional) Enter an External ID and Description.
Note: You can add up to 5 External IDs. - Under Hierarchy, select a Parent zone to nest the zone under an existing zone. Leave this field blank to map the zone directly to your organization.
- Under Locale, set the zone's Timezone (required), Language (required), and Currency. If you select a Parent zone, Timezone, Language, and Currency are pre-filled from it, but you can override them.
- (Optional) Under Details, select + Add attribute to add a pre-configured custom field to the zone and enter its value. If the required field is not available, see Configuring custom fields.
- Select Add zone.
Note: Your organization is limited to a maximum of 30 zones. If you have reached this limit, deactivate a zone you no longer need or raise a Jira ticket with the Product Support team to request a higher limit.
Viewing and editing a geographic grouping (zones)
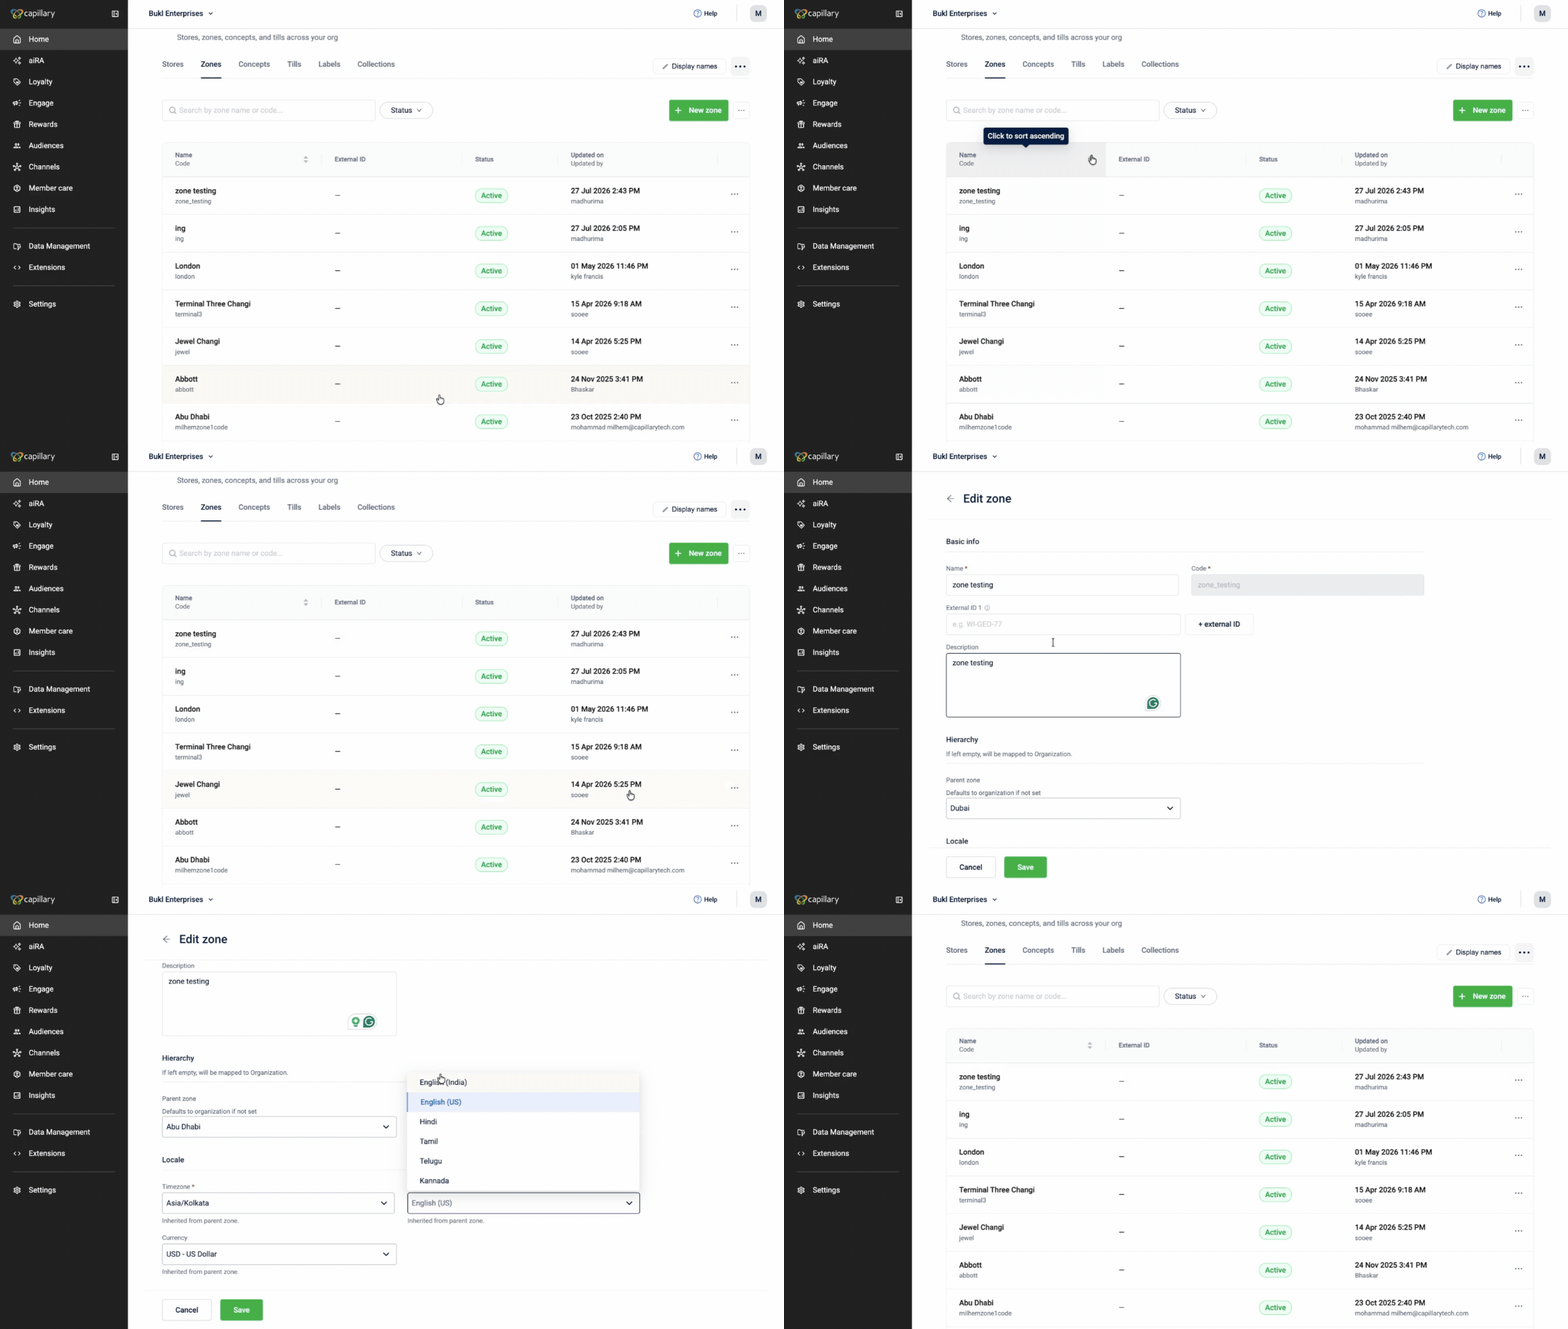
To view or edit a zone, follow these steps:
- Go to Entities > Locations > Zones.
- On the Zones listing page, review each zone's Name and Code, External ID, Status, and when it was last updated. Select the Name/Code column header to sort zones alphabetically. Use the search bar to find a specific zone, or the Status filter to show only Active or Deactivated zones.
- Select a zone to open its detail page, which displays all the information you configured when you created it.
- Select Edit to change any field, then Save. Your changes appear on the list right away.
Deactivating a geographic grouping (zones)
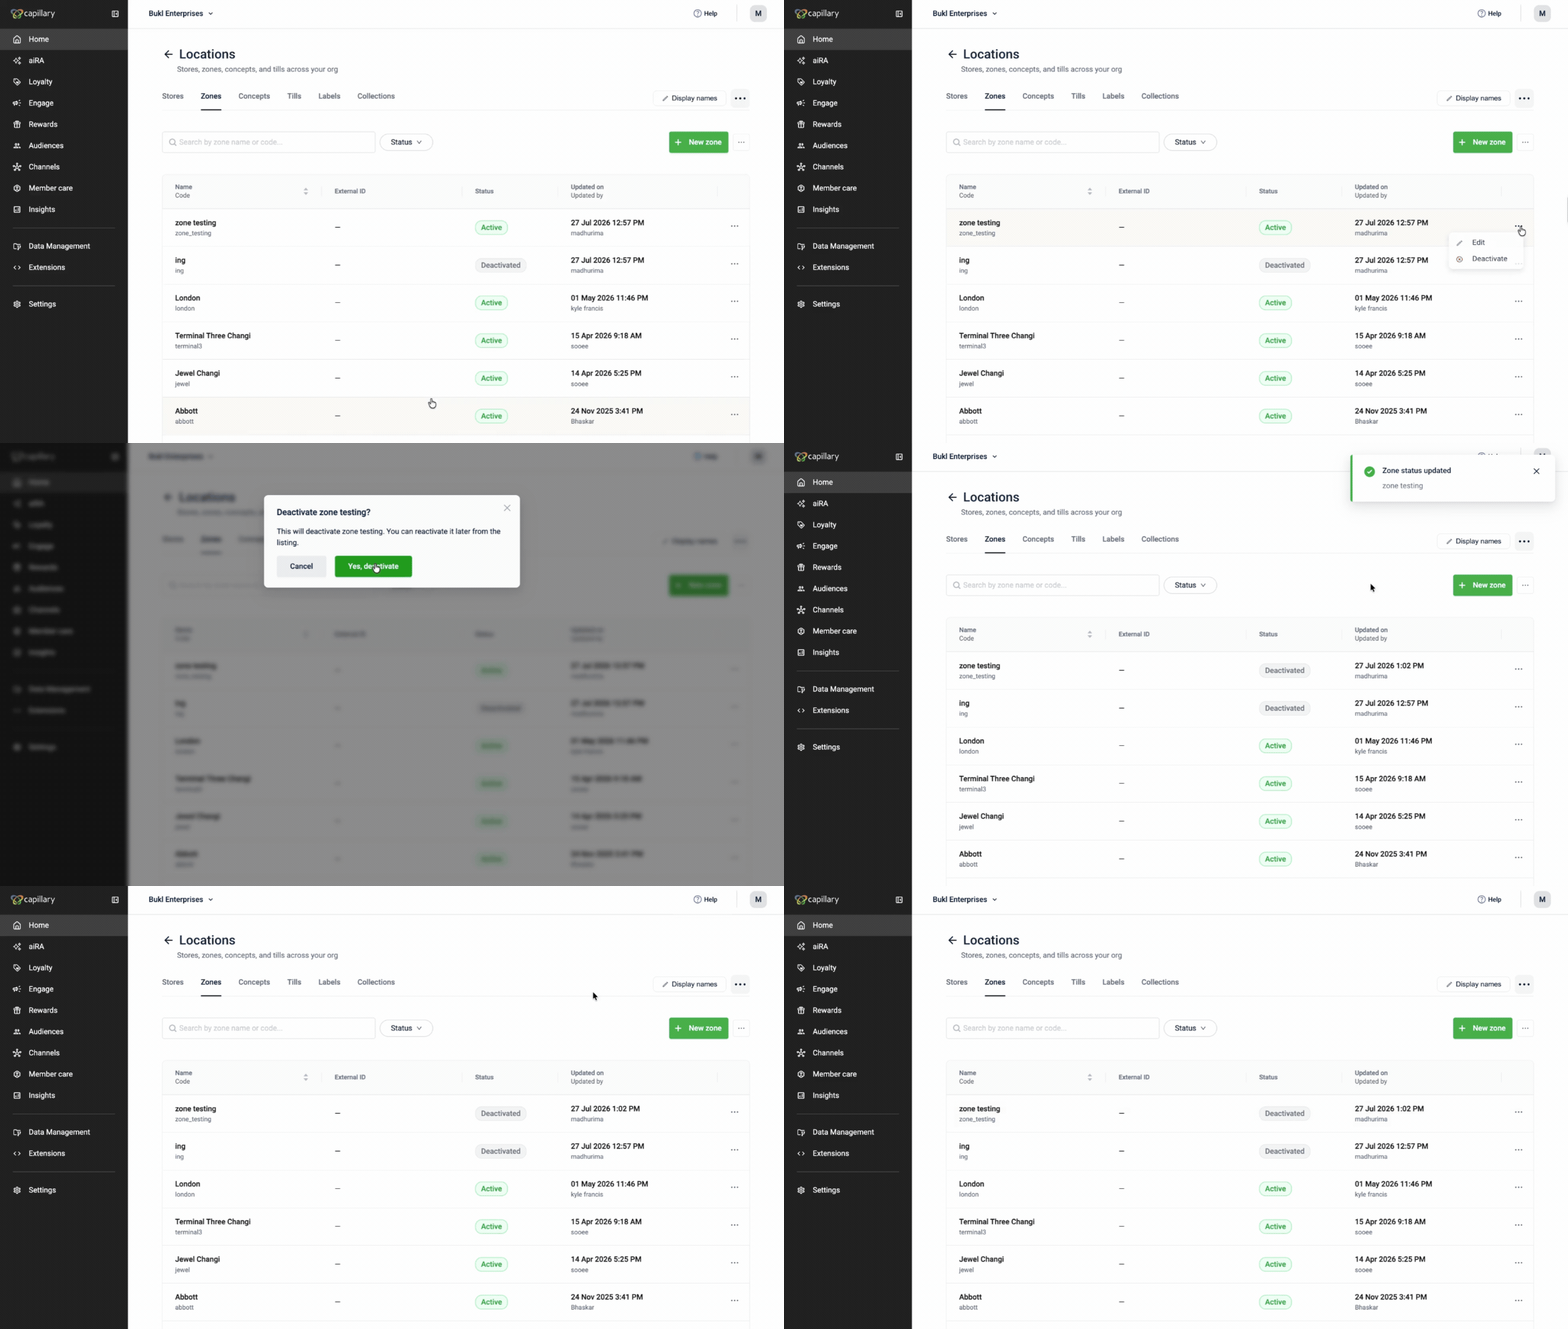
To deactivate a zone, follow these steps:
- Go to Entities > Locations > Zones.
- Locate the zone you want to deactivate, select the three-dot menu, and then select Deactivate.
- In the confirmation dialog box, select Yes, deactivate.
The zone is deactivated and appears in the Zones listing with the Deactivated status.
Activating a geographic grouping (zones)
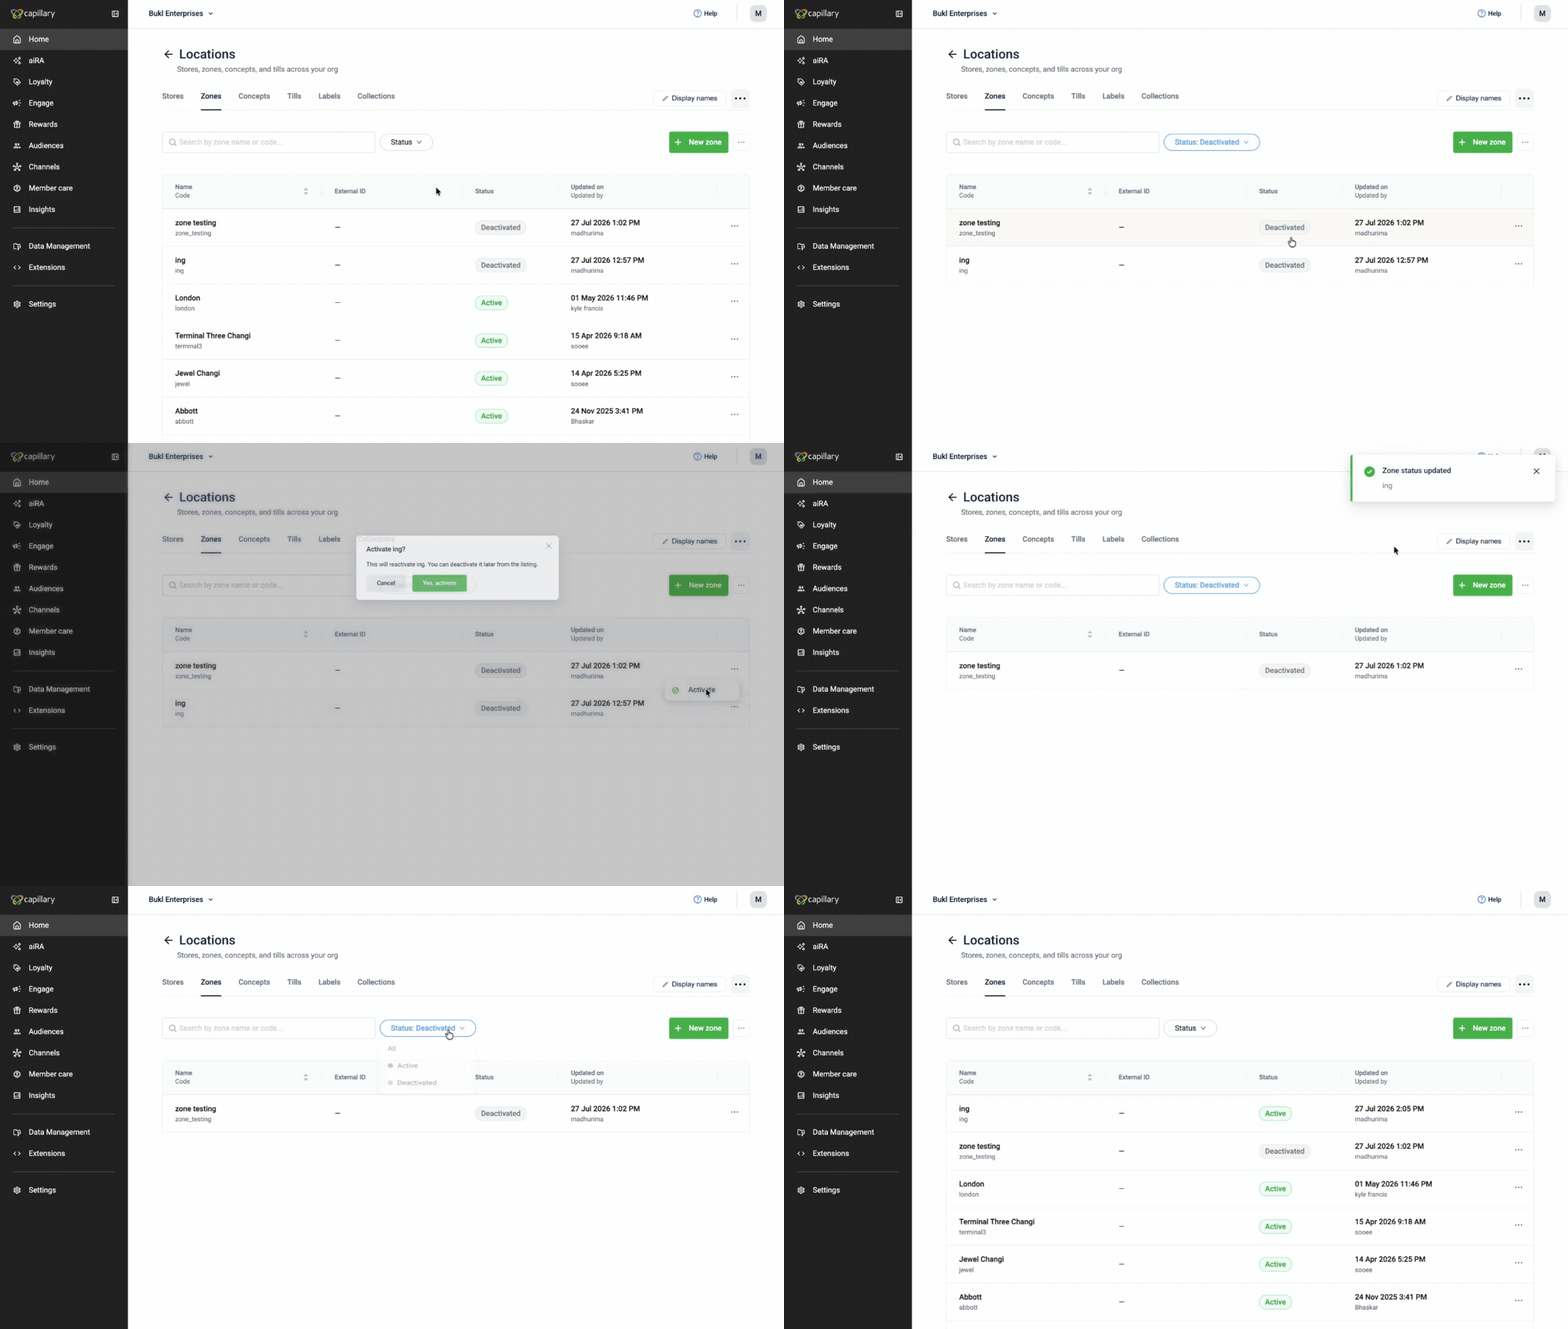
To activate a deactivated zone, follow these steps:
- On the Zones listing page, go to the Status filter and select Deactivated. This displays only the deactivated zones.
- Locate the zone you want to activate, select the three-dot menu, and then select Activate.
- In the confirmation dialog box, select Yes, activate.
The zone is activated and appears in the Zones listing with the Activated status.
Bulk-uploading geographic grouping (zones)
To add many zones at once, follow these steps:
- Select the (⋯) menu next to New zone, then select Bulk upload zones.
- Download the sample CSV.
- Fill in the mandatory columns (name, code, description, and pipe-separated externalId for multiple IDs) without changing the headers or column order.
- Upload the file.
Creating a business grouping (concepts)
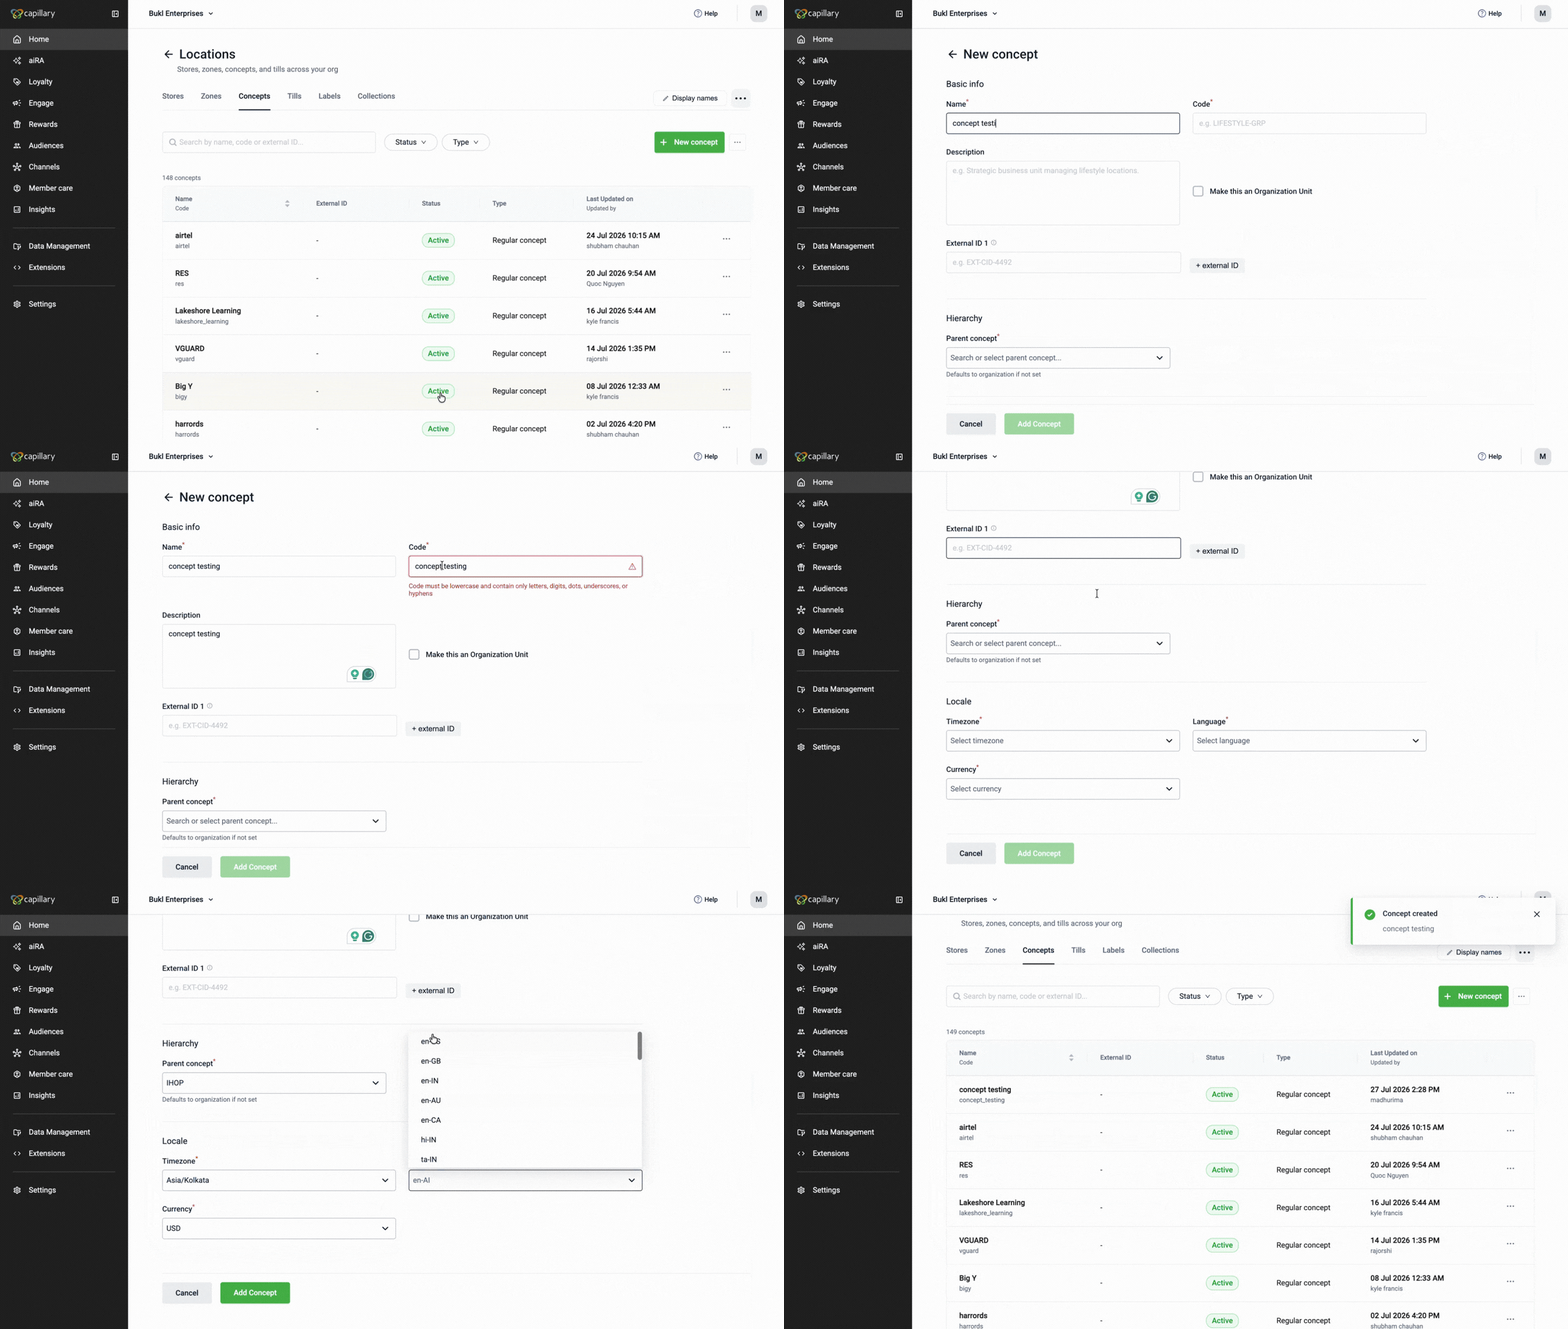
To create a concept, follow these steps:
-
Go to Entities > Locations > Concepts.
-
Select New concept.
-
Enter a Name and Code, and optionally a Description.
Note: The Name can contain only letters, numbers, underscores (_), and spaces. The Code must start with a lowercase letter or digit and can contain only lowercase letters, digits, periods (.), underscores (_), or hyphens (-), up to 50 characters. The code cannot be changed after the concept is created. -
(Optional) Select Make this an Organization Unit to mark this Concept as an Organization Unit (OU)
Note: You can turn Make this an Organization Unit on or off later from the Concept's Edit screen.
-
(Optional) Select + external ID to add more than one External ID.
-
Under Hierarchy, select a Parent concept to nest it under an existing concept. Leave it blank to map the concept directly to your organization.
-
Under Locale, select a Timezone, Language, and Currency. All three are required. If you selected a Parent concept, these are pre-filled from its locale, but you can still override them.
-
Select Add Concept.
Viewing and editing a business grouping (concepts)
To view or edit a concept, follow these steps:
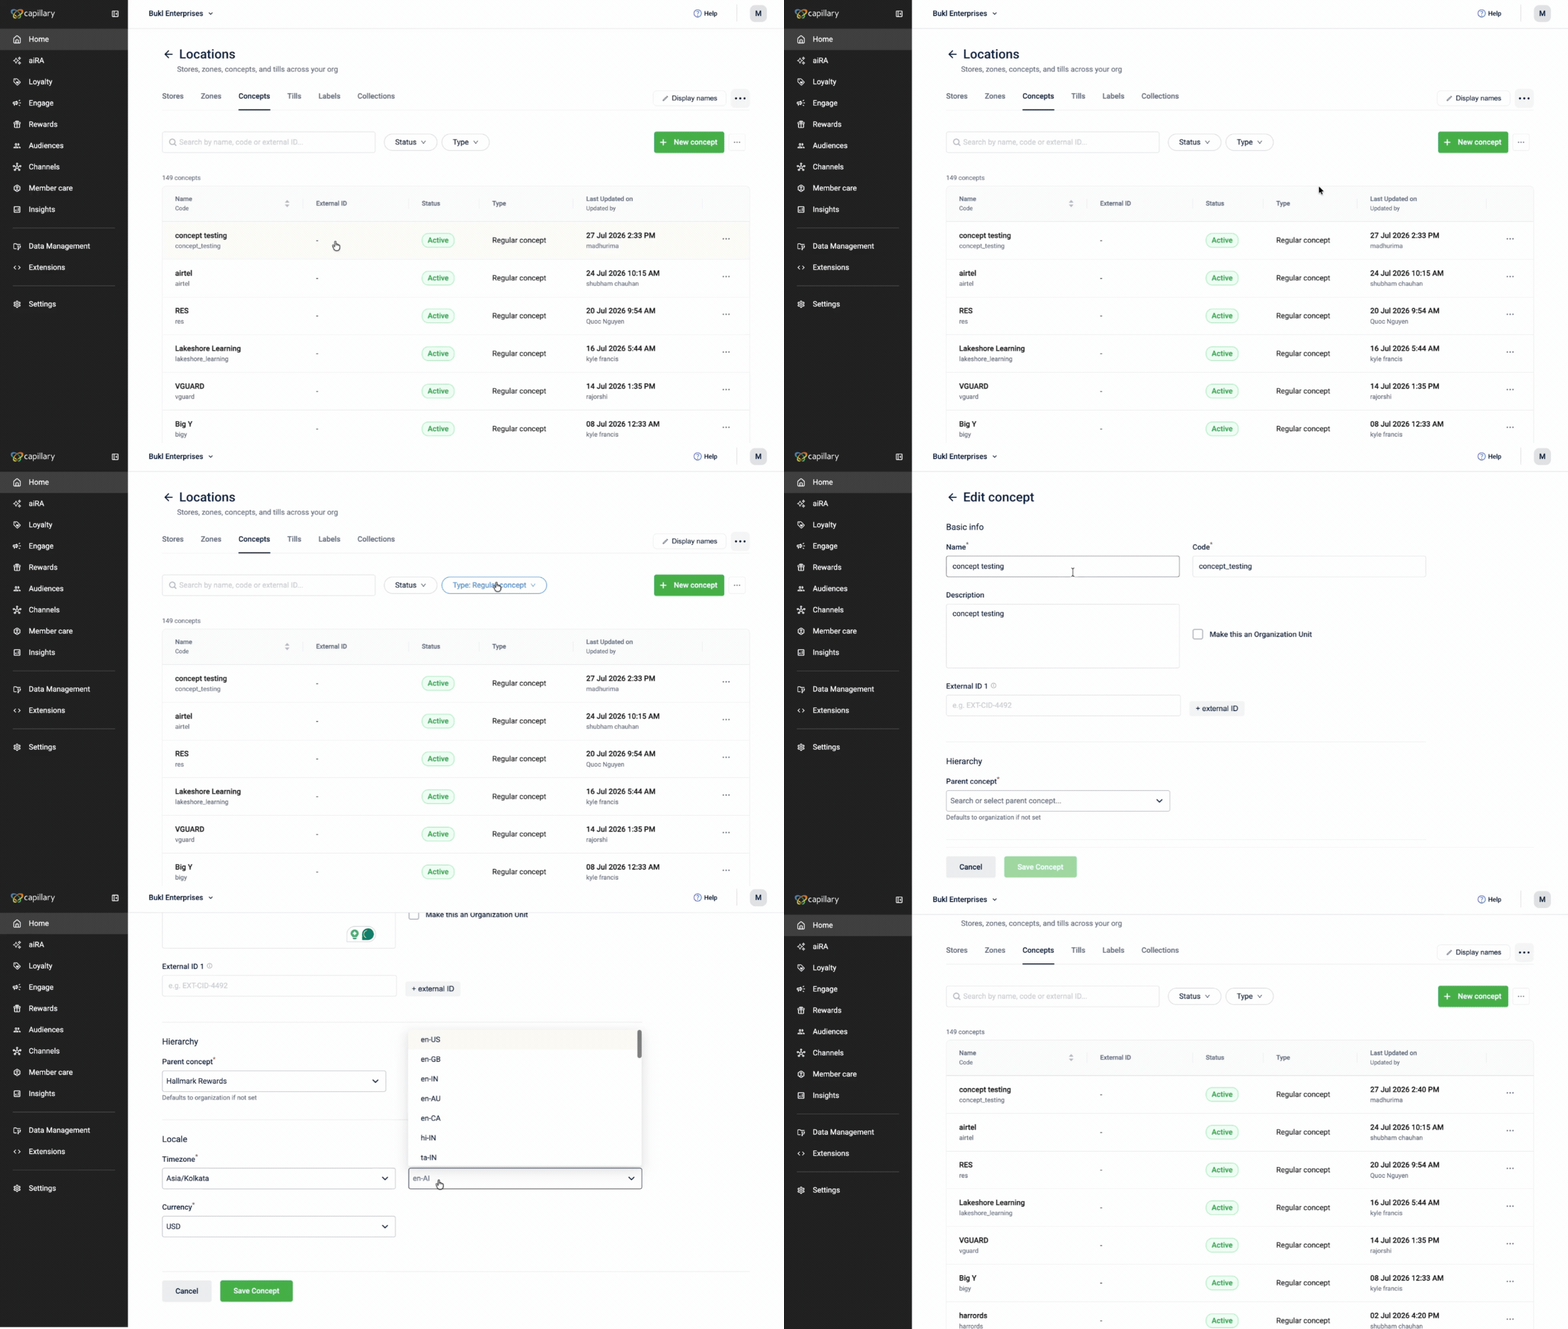
- Go to Entities > Locations > Concepts.
- On the Concepts listing page, review each zone's Name and Code, External ID, Status, Type and when it was last updated. Select the Name/Code column header to sort concepts alphabetically. Use the search bar to find a specific concepts, or the Status filter to show only Active or Deactivated concepts. Use the Type filter (All, Organization unit, or Regular concept) to see which Concepts are enabled as OUs.
- Select a concept to open its detail page, which displays all the information you configured when you created it.
- Select Edit to change any field, then Save. Your changes appear on the list right away.
Note: Bulk-uploading Concepts isn't available yet; create and edit them one at a time.
Deactivating a business grouping (concepts)
To deactivate a concept, follow these steps:
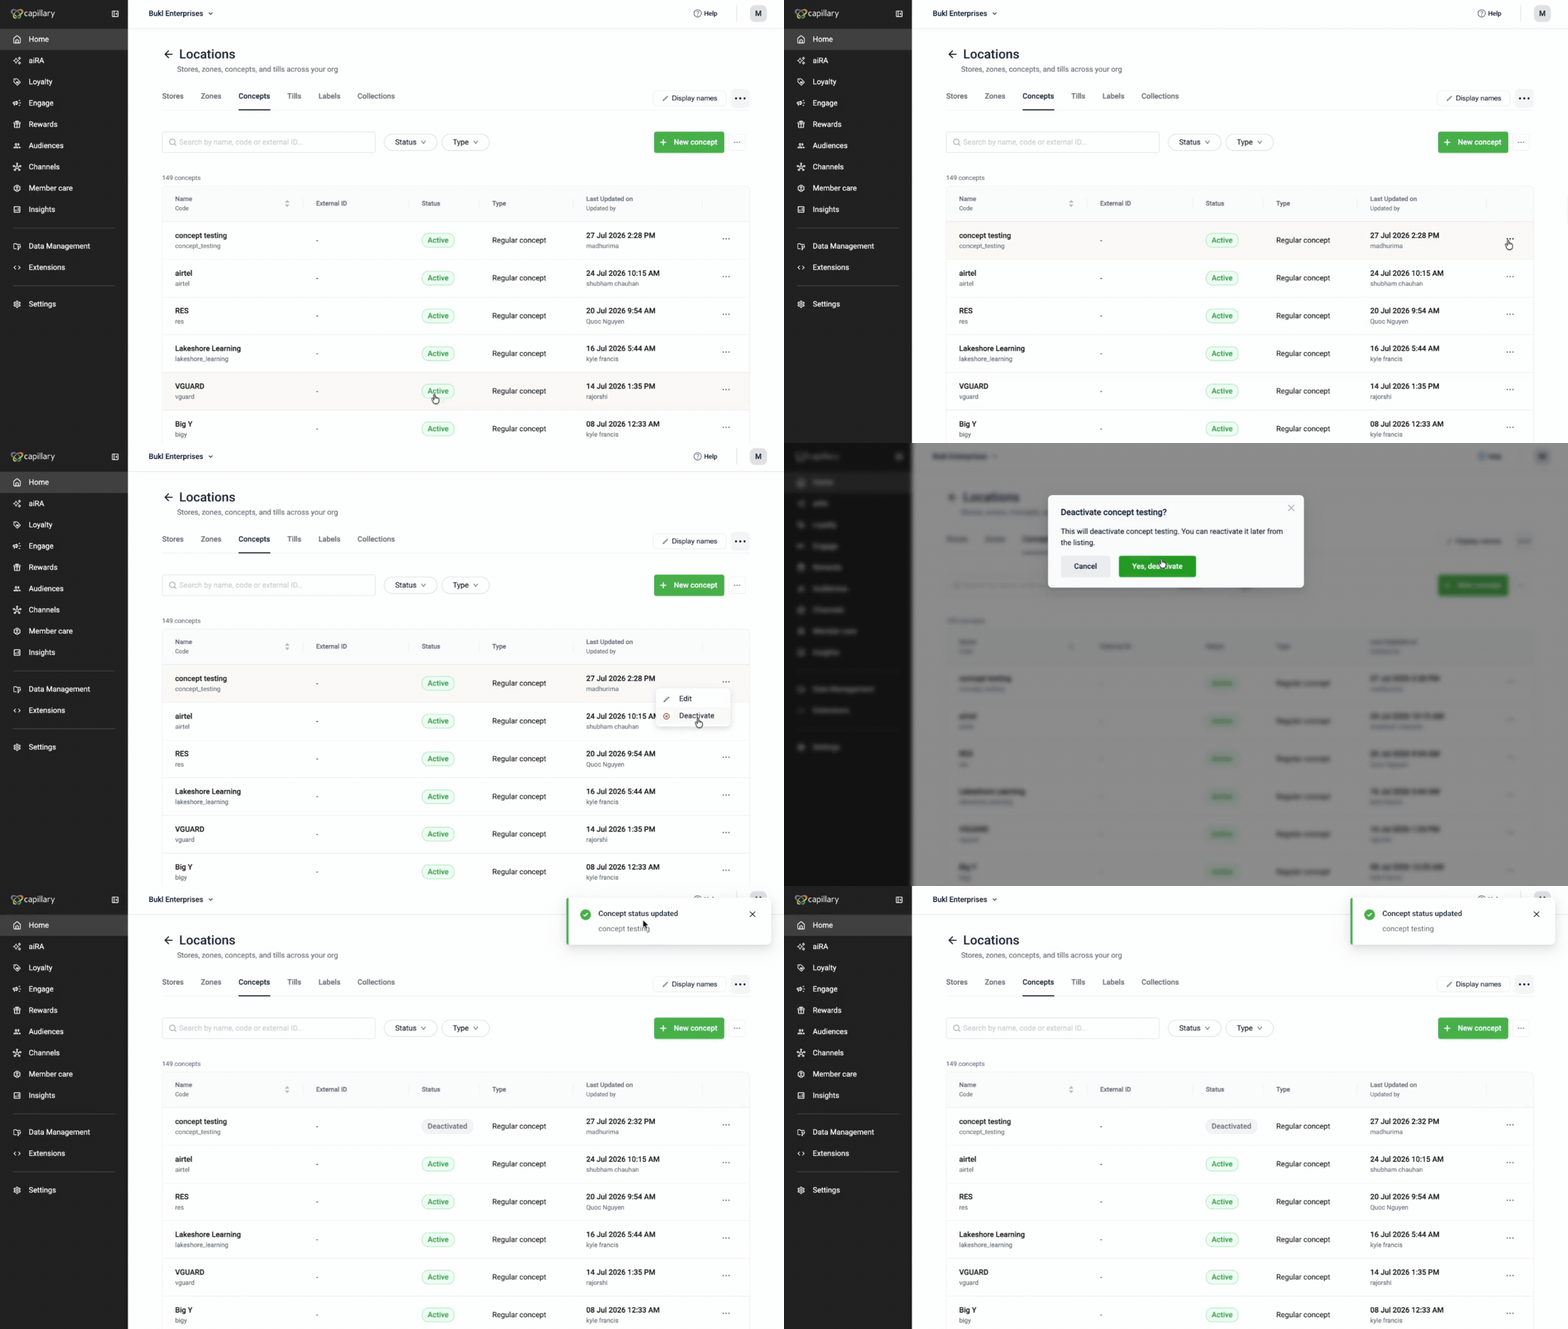
- Go to Entities > Locations > Concepts.
- Locate the concept you want to deactivate, select the three-dot menu, and then select Deactivate.
- In the confirmation dialog box, select Yes, deactivate.
The concept is deactivated and appears in the Concepts listing with the Deactivated status.
Activating a business grouping (concepts)
To activate a deactivated concept, follow these steps:
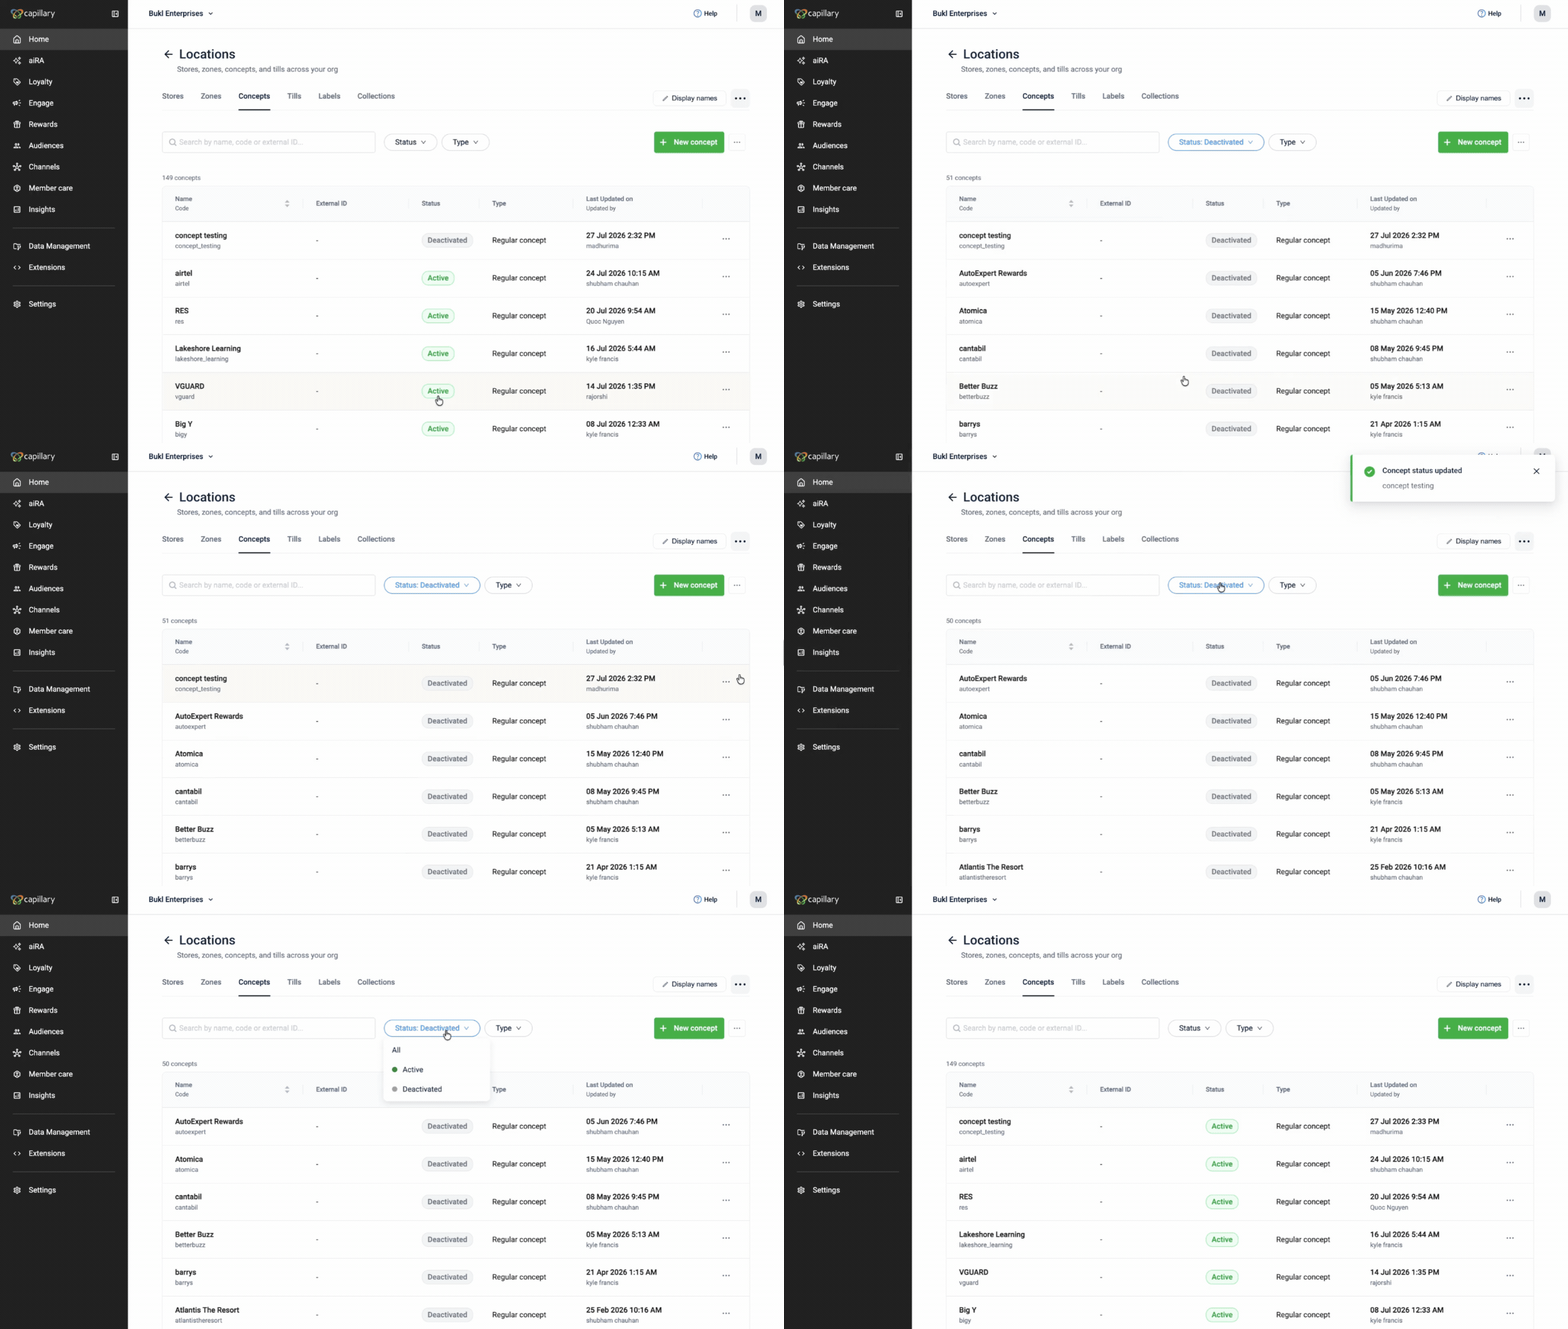
- On the Concepts listing page, go to the Status filter and select Deactivated. This displays only the deactivated concepts.
- Locate the concept you want to activate, select the three-dot menu, and then select Activate.
- In the confirmation dialog box, select Yes, activate.
The concept is activated and appears in the Concepts listing with the Activated status.
Creating a point of transaction (tills)
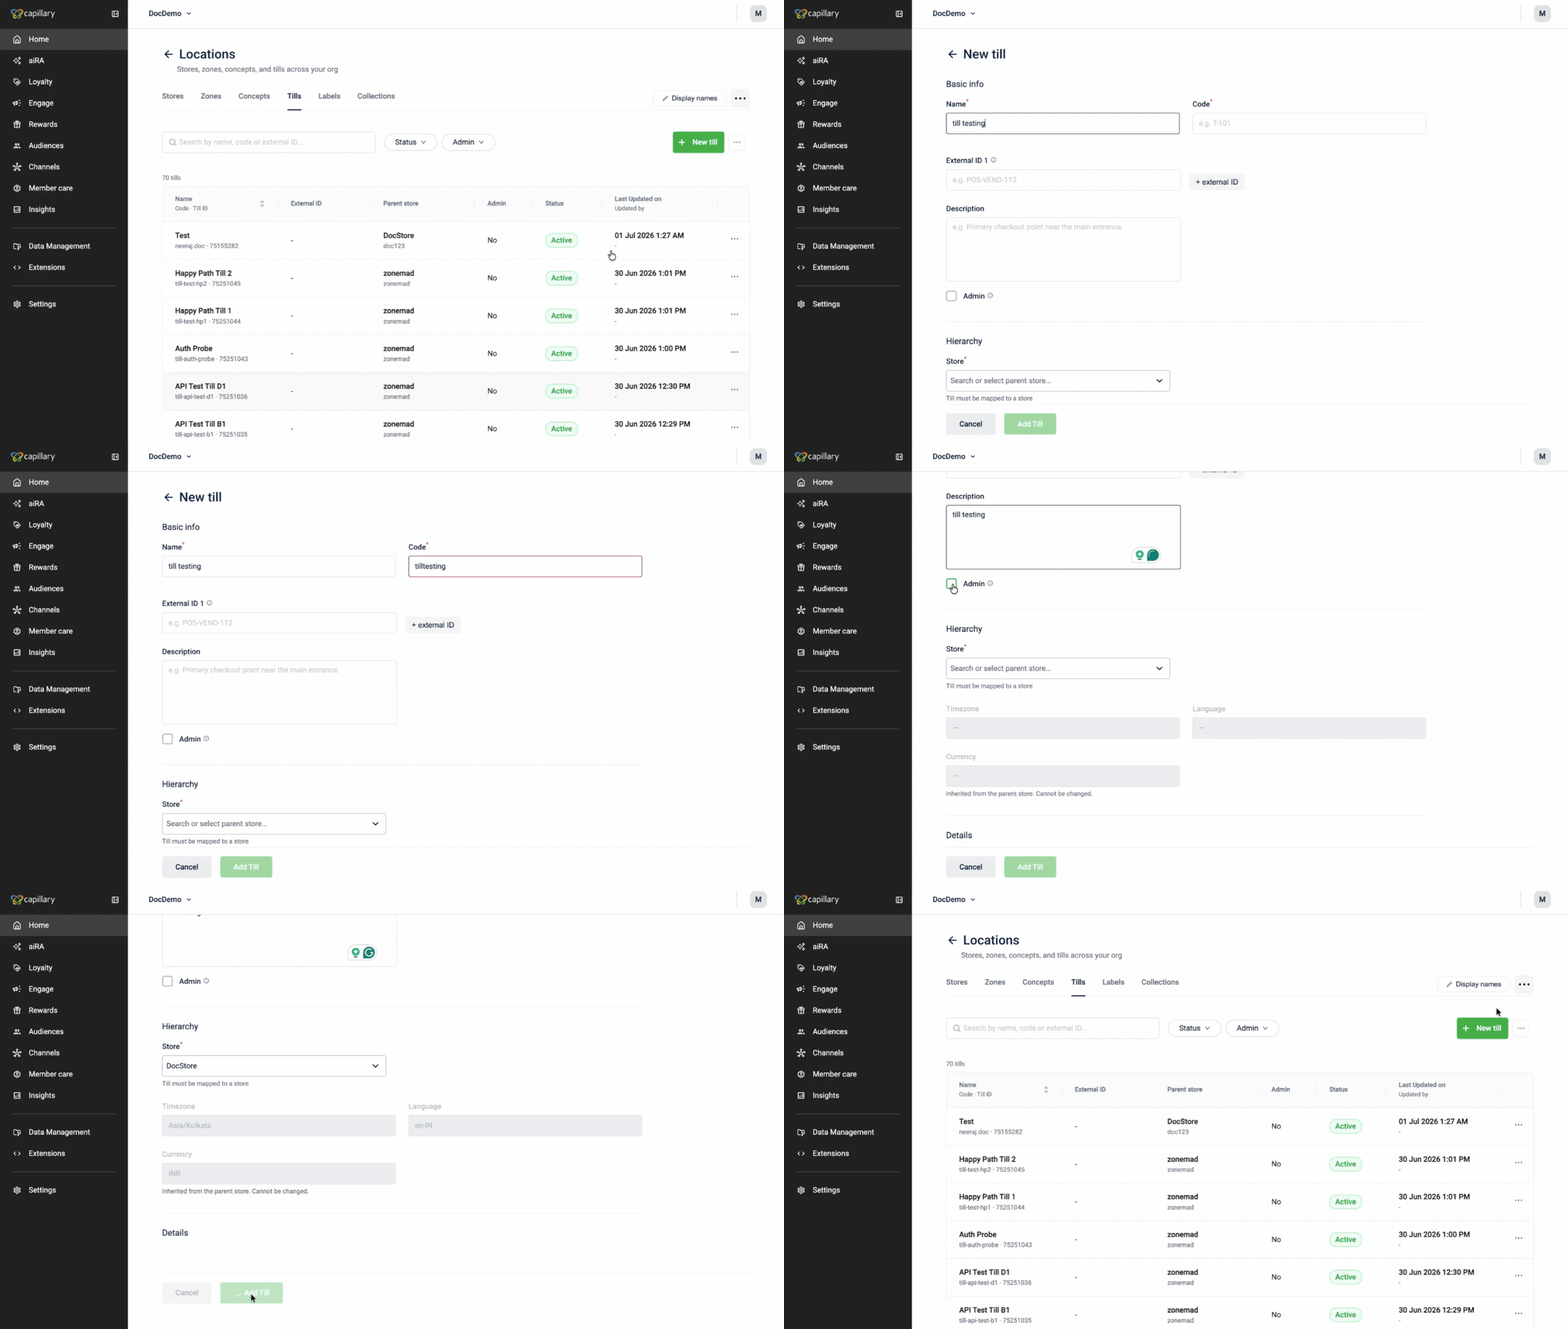
To create a till, follow these steps:
- Go to Entities > Locations > Tills.
- Select New till.
- Enter a Name and Code.
Note: The Name can contain only letters, numbers, underscores (_), and spaces. The Code must start with a lowercase letter or digit and can contain only lowercase letters, digits, periods (.), underscores (_), or hyphens (-), up to 50 characters. The code cannot be changed after the till is created. - (Optional) Enter an External ID and Description.
Note: You can add up to 5 External IDs. - Select Admin if this is a test till rather than a live one.
- Under Hierarchy, select the parent Store. Every Till belongs to exactly one Store.
- Select Add Till.
Viewing and editing a point of transaction (tills)
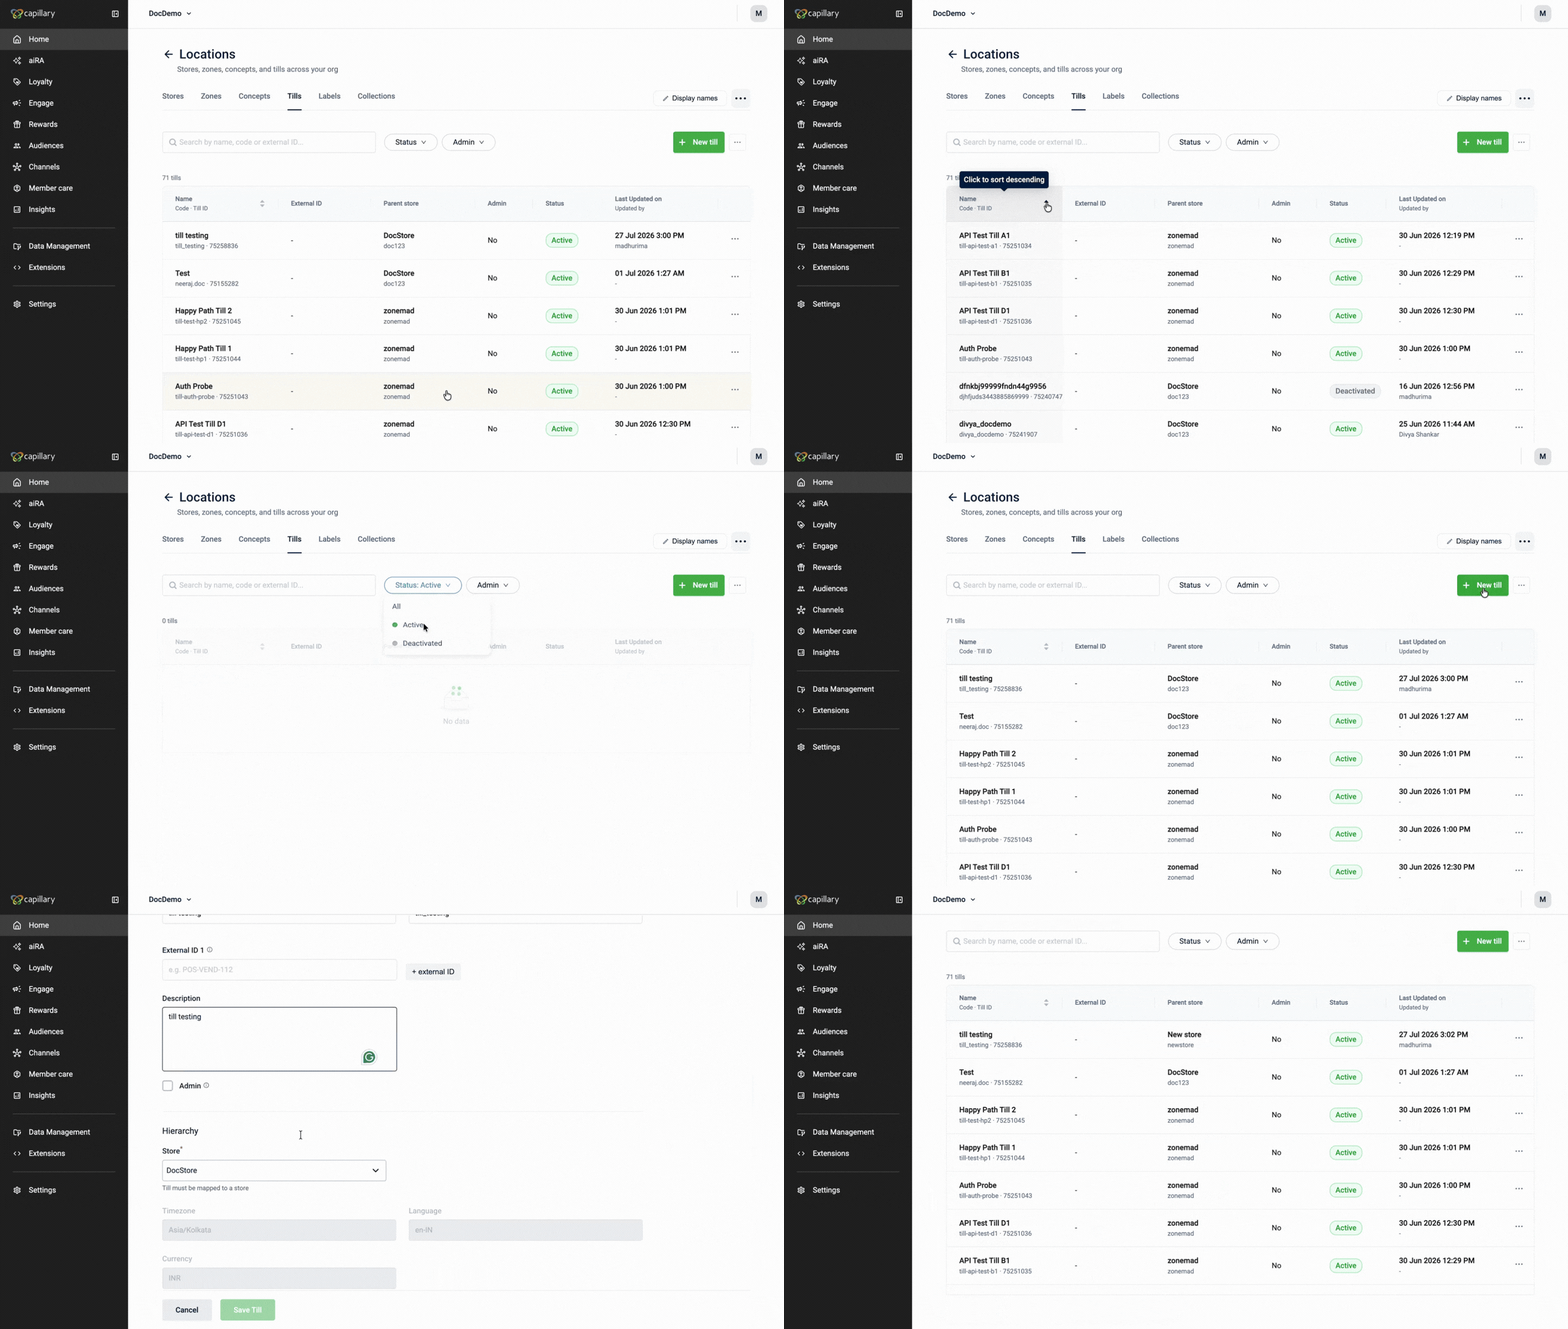
To view or edit a till, follow these steps:
-
Go to Entities > Locations > Tills.
-
On the tills listing page, review each zone's Name and Code, External ID, Status, Admin, and when it was last updated. Select the Name/Code column header to sort tills alphabetically. Use the search bar to find a specific tills, or the Status filter to show only Active or Deactivated tills. Use the Admin filter to display tills that are marked as admins or not marked as admins.
-
Select a till to open its detail page, which displays all the information you configured when you created it.
-
Select Edit to change any field, then Save. Your changes appear on the list right away.
Note: Bulk-uploading Tills is not supported; create and edit them one at a time.
Deactivating a point of transaction (tills)
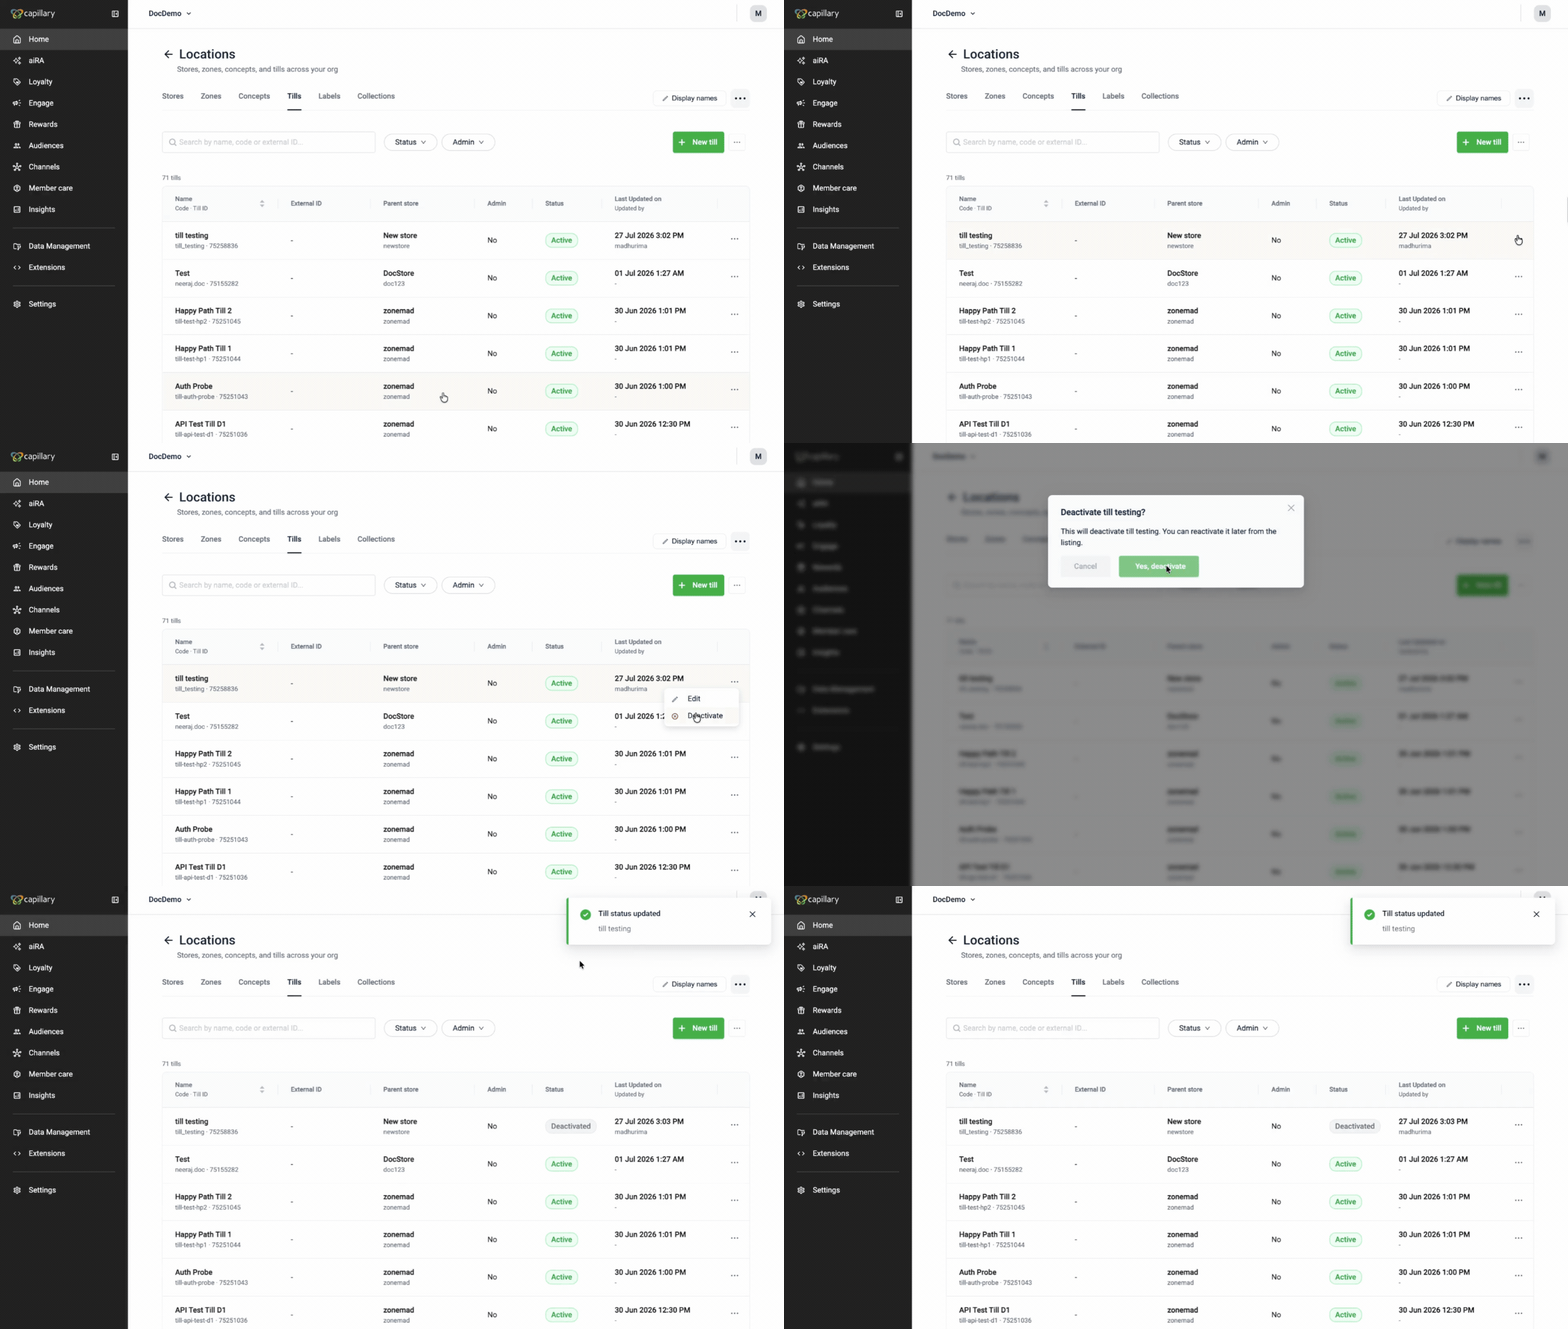
To deactivate a till, follow these steps:
- Go to Entities > Locations > Tills.
- Locate the till you want to deactivate, select the three-dot menu, and then select Deactivate.
- In the confirmation dialog box, select Yes, deactivate.
The till is deactivated and appears in the Tills listing with the Deactivated status.
Activating a point of transaction (tills)
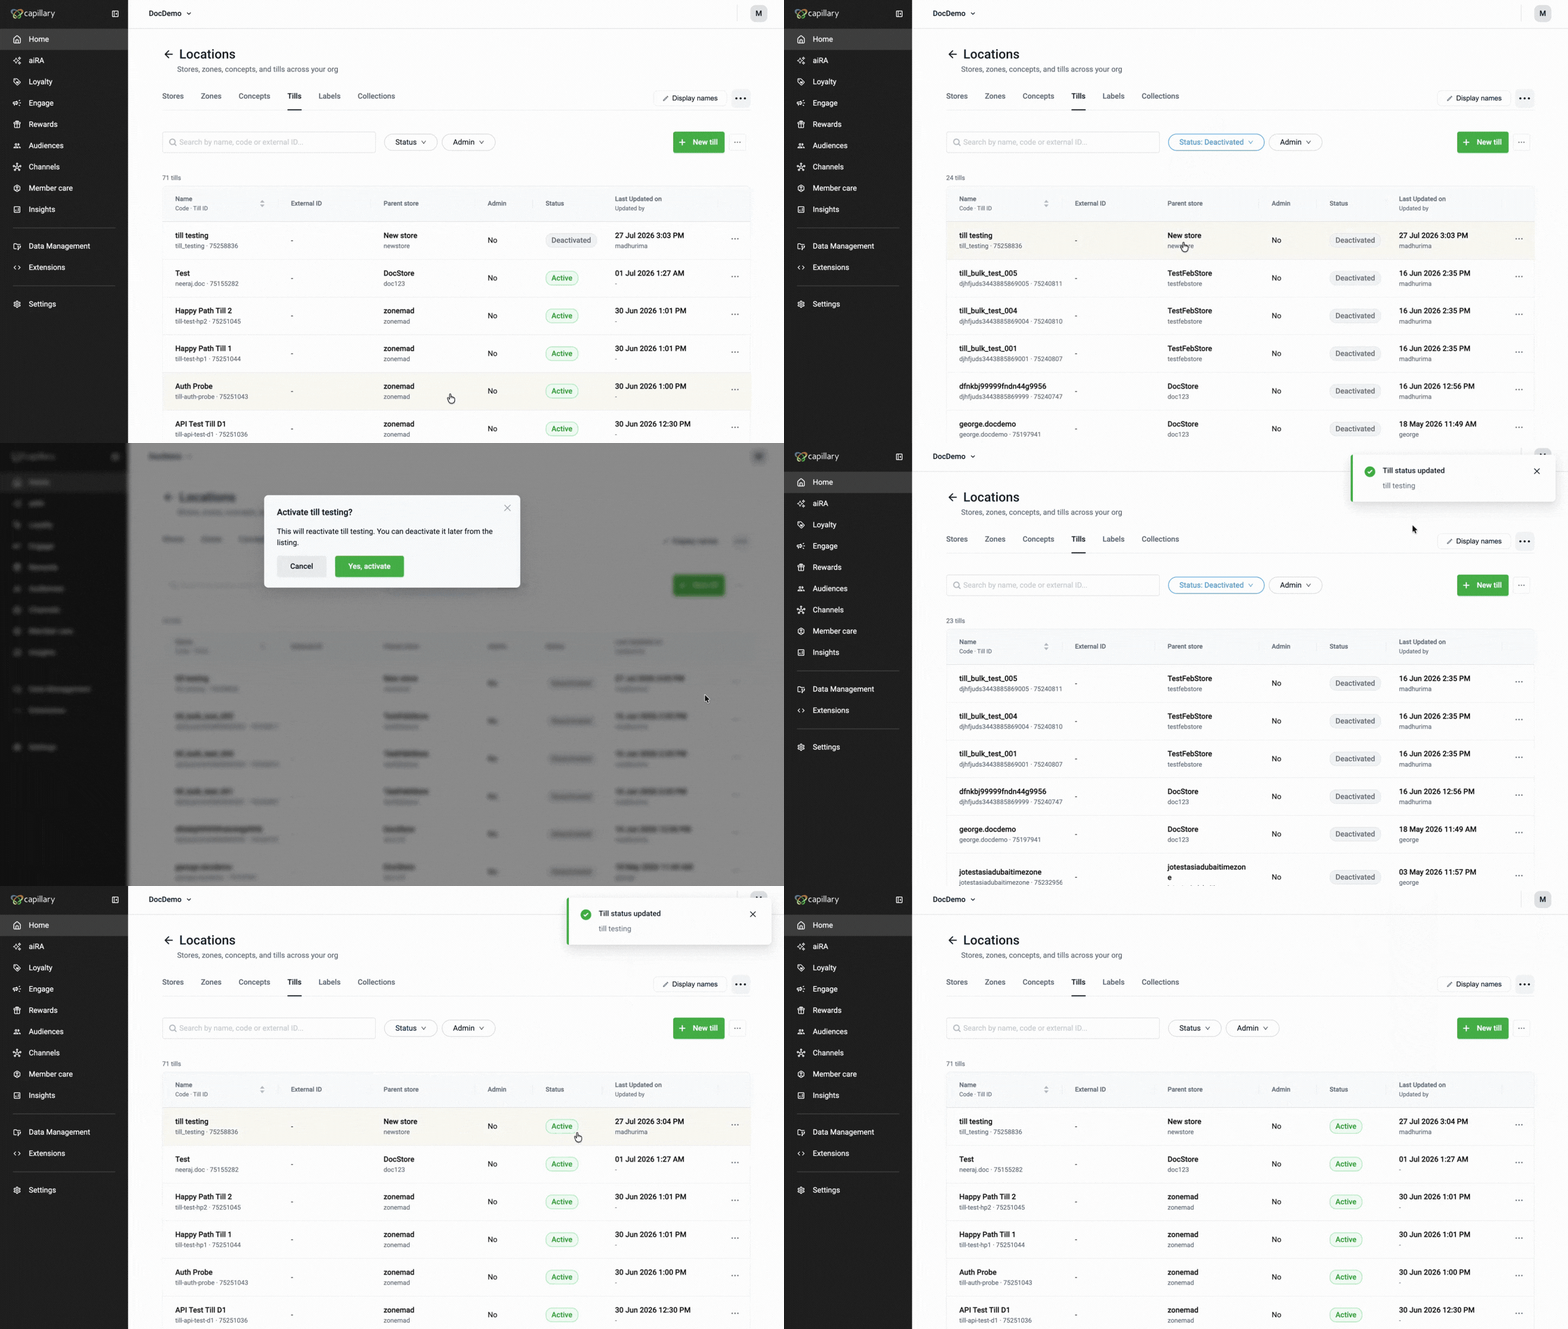
To activate a deactivated till, follow these steps:
- On the Tills listing page, go to the Status filter and select Deactivated. This displays only the deactivated tills.
- Locate the till you want to activate, select the three-dot menu, and then select Activate.
- In the confirmation dialog box, select Yes, activate.
The till is activated and appears in the Tills listing with the Activated status.
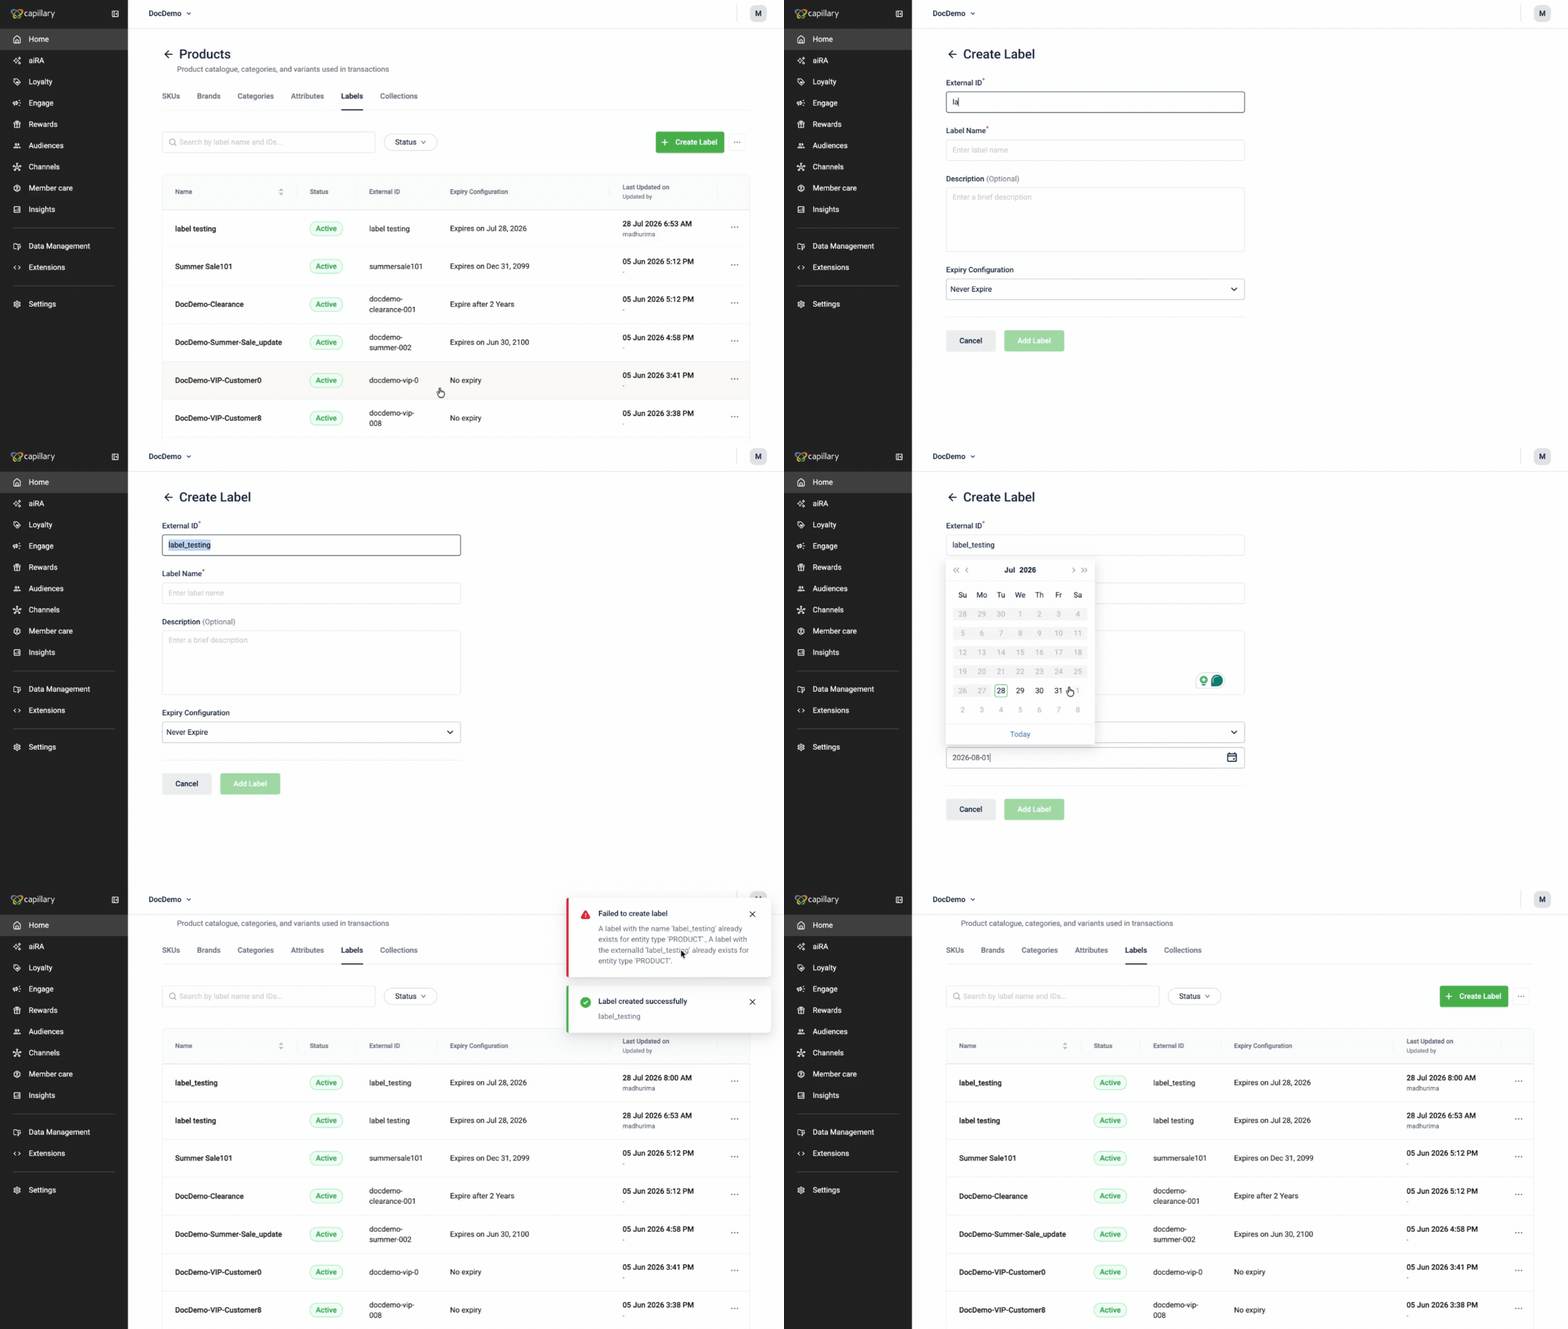
Creating a label
Labels let you tag Stores and other entities, for filtering and reporting.
To create a label, follow these steps:
-
Go to Entities > Locations > Labels.
-
Select Create Label.
-
Enter an External ID and Label Name (both required), and an optional Description.
-
Set an Expiry Configuration:
Option Behavior Never Expire The label stays on the entity indefinitely. Expire on a fixed date You choose a specific calendar date. Expire after X days The label expires a set number of days after it's applied. Expire at end of current month The label expires on the last day of the current month. Expire at end of current year The label expires on the last day of the current year. Expire at end of next year The label expires on the last day of next year. -
Select Add Label.
Note: Bulk-uploading labels is not supported; create and edit them one at a time.
Viewing and editing a label
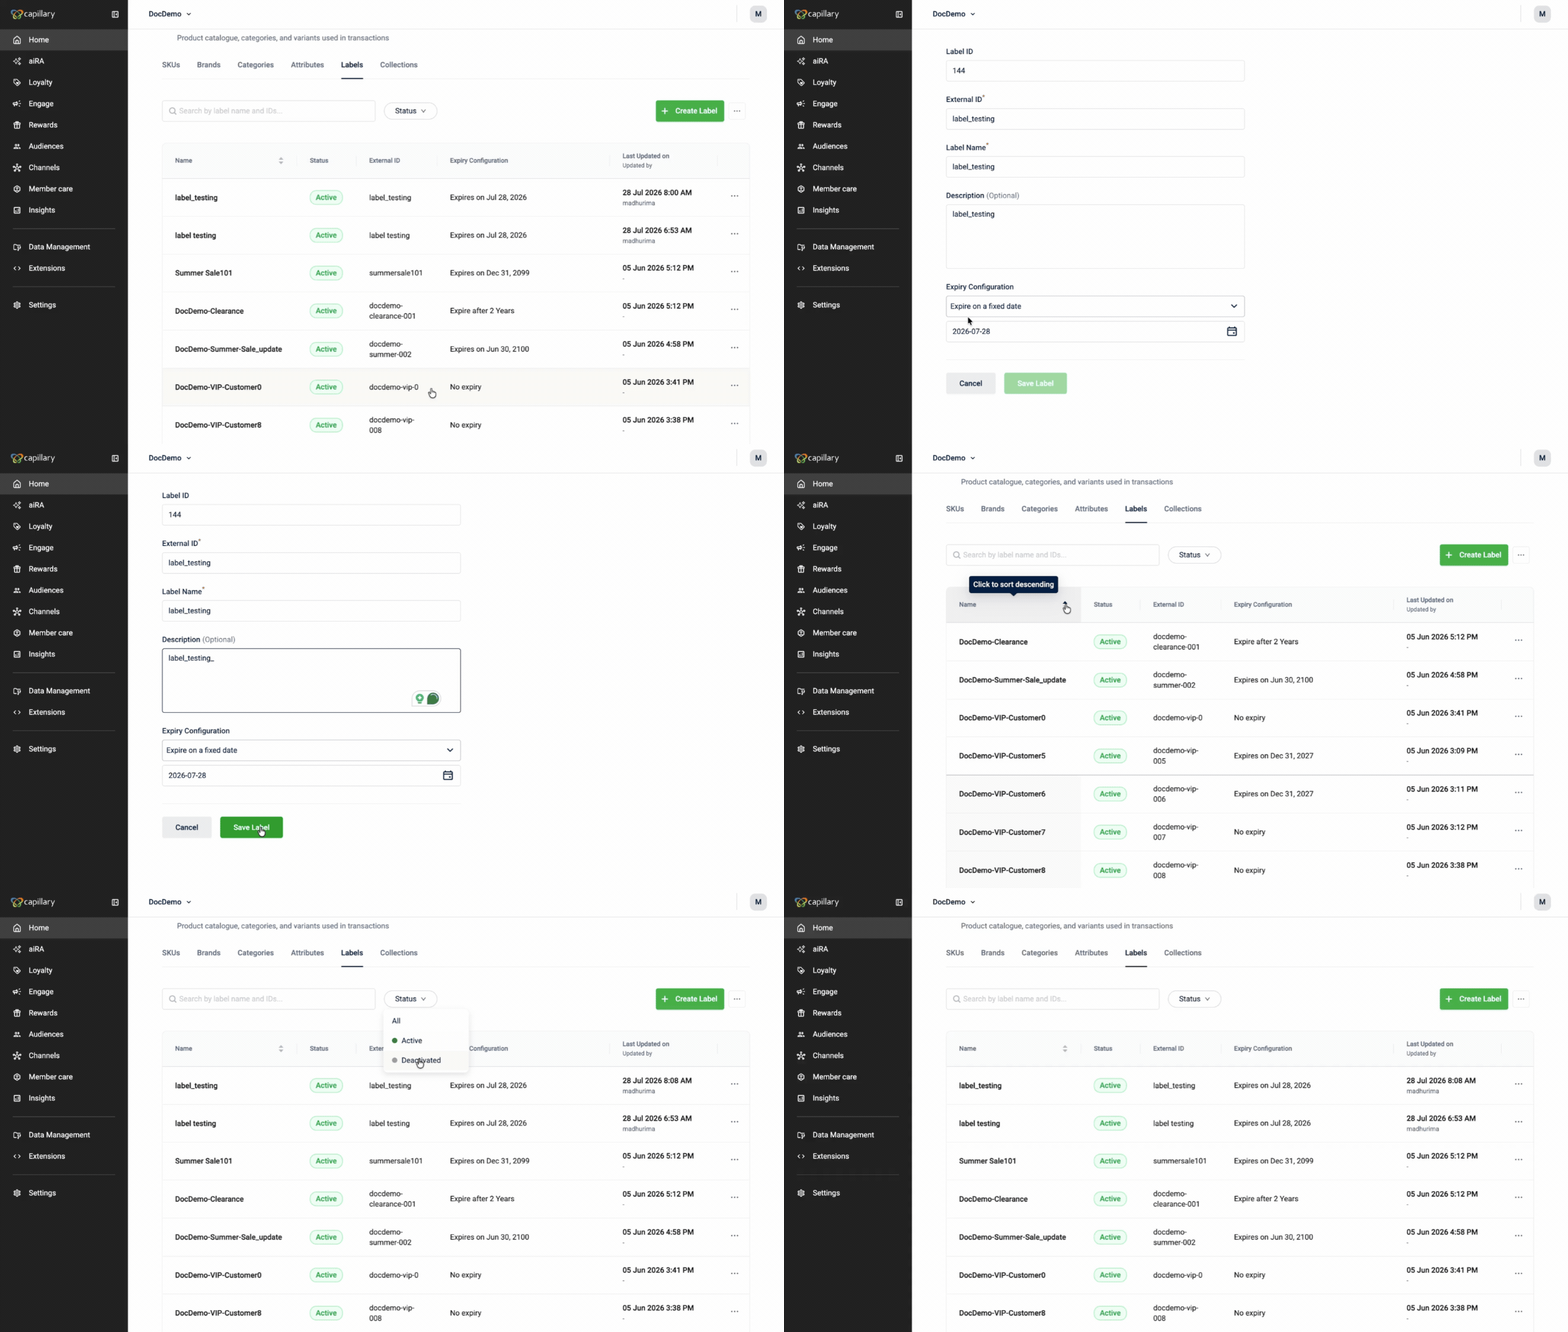
To view or edit a label, follow these steps:
-
Go to Entities > Locations > Labels.
-
On the Labels list, review each label's Name, Status, External ID, Expiry configuration, and Last updated details. Select the Name column header to sort labels alphabetically. Use Search by label name and IDs to find a specific label.
-
Select a label to open its detail page. Review the label details, including the Label ID, External ID, Name, Status, Description, and Expiry configuration.
-
(Optional) Select Edit to update the label details. You can edit the External ID, Label name, Description, and Expiry configuration. The Label ID cannot be edited. Select Save Label.
The changes are saved for that label. Use the Status filter above the list to switch between active and deactivated labels.
Deactivating a label
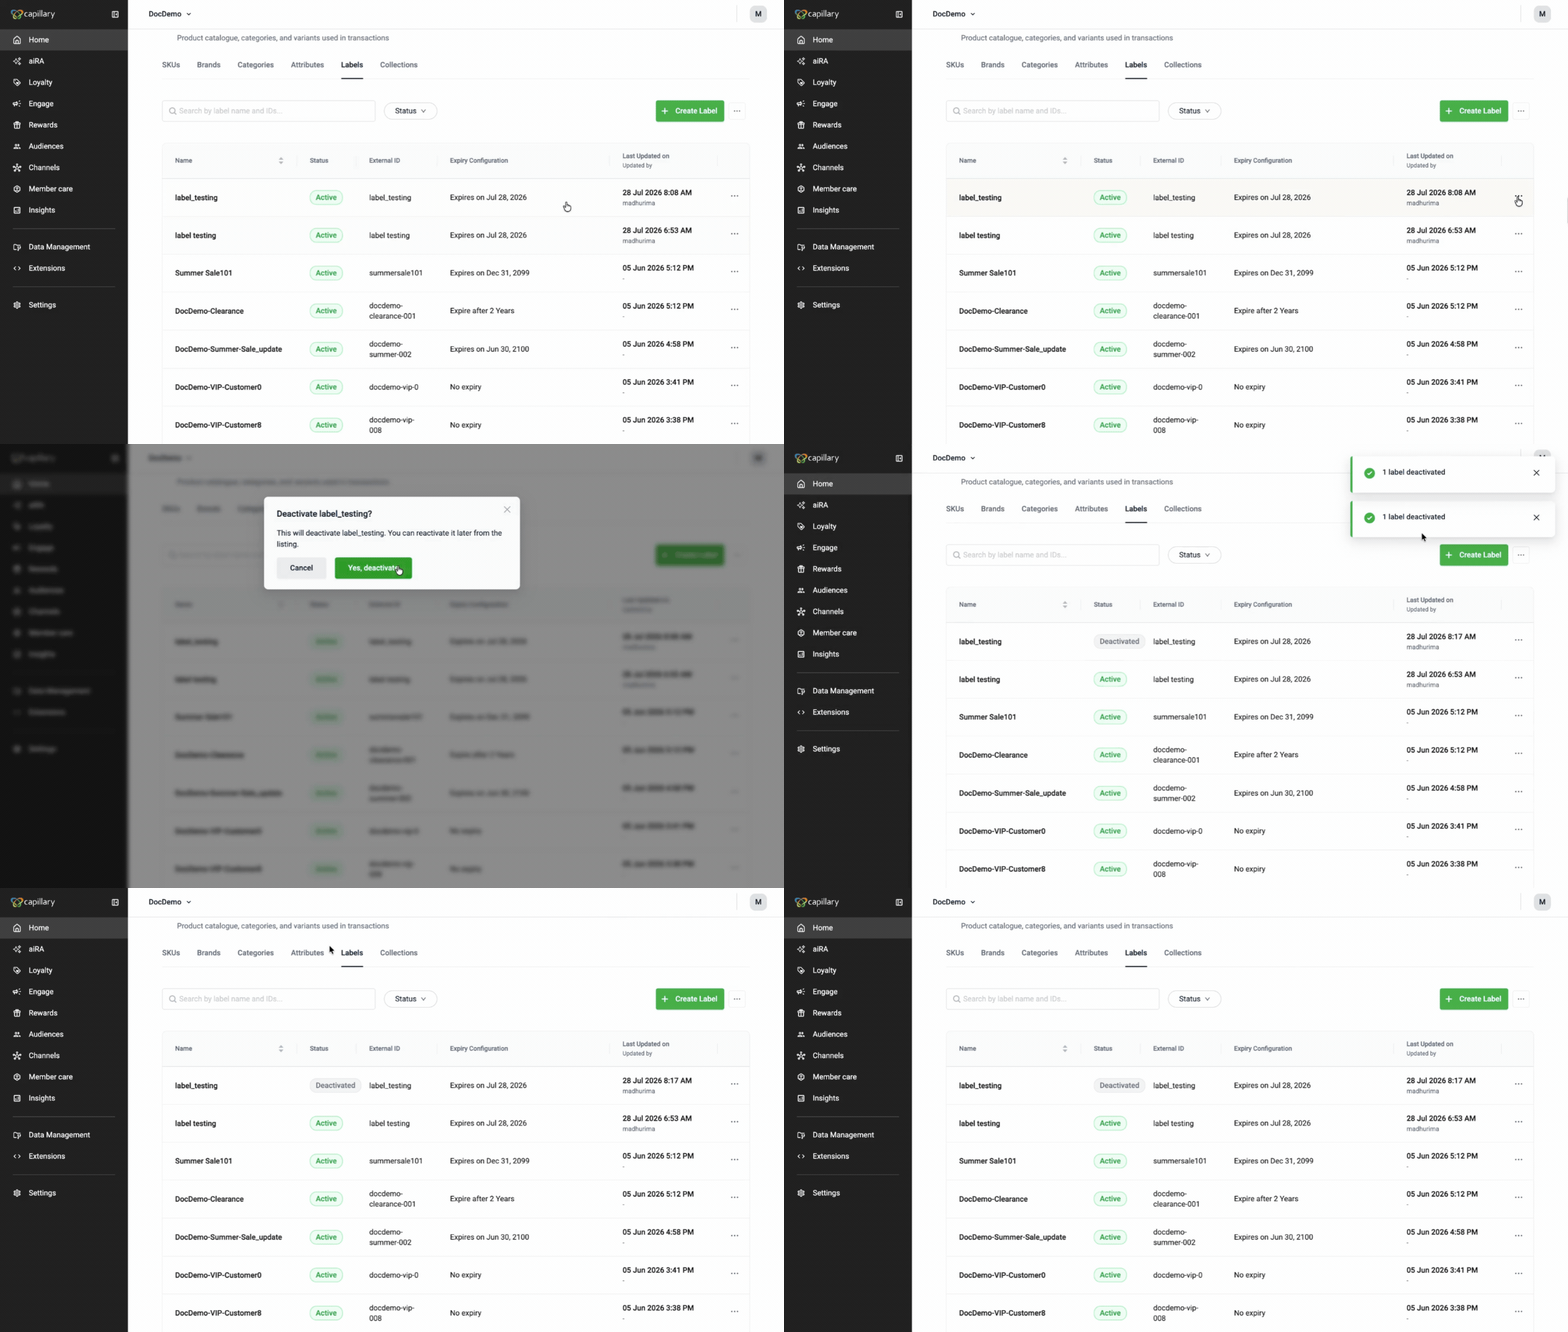
To deactivate a label, follow these steps:
- Go to Entities > Labels.
- Locate the label you want to deactivate, select the three-dot menu, and then select Deactivate.
- In the confirmation dialog box, select Yes, deactivate.
The label is deactivated and appears in the Labels listing with the Deactivated status.
Activating a label
To activate a deactivated label, follow these steps:
- On the Labels listing page, go to the Status filter and select Deactivated. This displays only the deactivated labels.
- Locate the label you want to activate, select the three-dot menu, and then select Activate.
- In the confirmation dialog box, select Yes, activate.
The label is activated and appears in the Labels listing with the Activated status.
Grouping locations dynamically (collections)
Collections are rule-based groups of locations that refresh on a schedule, instead of a static list you maintain by hand.
-
Go to Entities > Locations > Collections.
-
Select Create collection.
-
Enter a Collection name and optional External ID and Description.
-
Choose a Refresh frequency for how often membership recalculates.
-
Under Membership criteria, add one or more condition blocks (attribute, operator, value). Choose AND or OR to control how conditions combine within a block and across blocks.
-
Select Save collection.
Renaming location terms (display names)
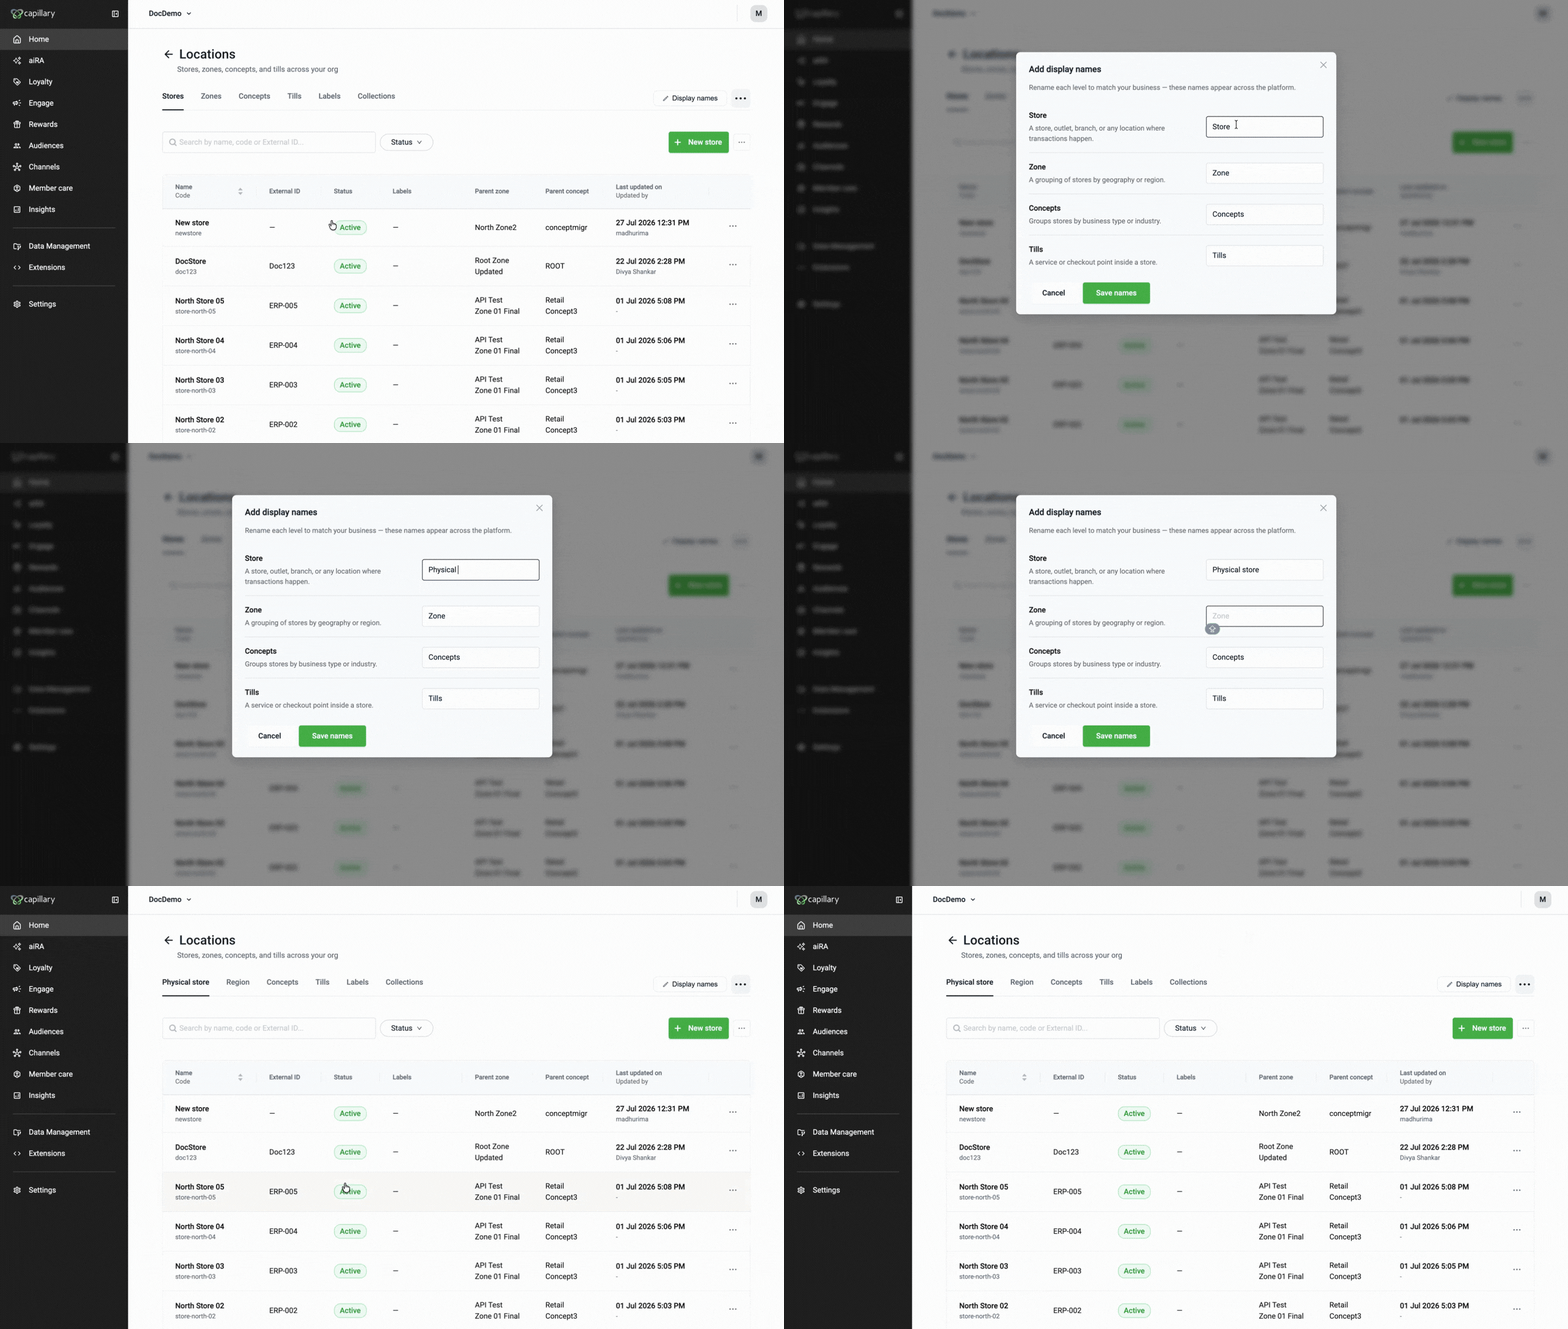
If your org uses different terminology internally, rename Store, Zone, Concepts, and Tills without changing how they work. Follow the steps below to rename display names:
- From any tab on the Locations page, select Display names.
- Enter your preferred name for each level.
- Select Save names.
These names appear across the platform wherever that entity is shown.
Updated 1 day ago