
Creating a Loyalty Promotion
Creating a loyalty promotion is a structured process that translates your business objective into a functional configuration. The following steps will guide you through defining the promotion's metadata, audience, and earning activities, as well as applying optional limits and advanced settings to fine-tune its behavior
Step 1: Defining the promotion details
Start by defining the promotion's basic details, such as its name, description, duration, and the loyalty program it belongs to.
-
Go to the Promotions tab under Loyalty+.
-
Select Create Promotion.
-
In the Promotion Name box, enter a unique name. The character limit for the promotion name is 255 characters.
TipUse a consistent naming convention for easier analysis. A recommended format is
[Timeframe]_[Audience]_[Offer]_[Objective], for example,Q4-2025_GoldTier_2xPoints_ProductLaunch.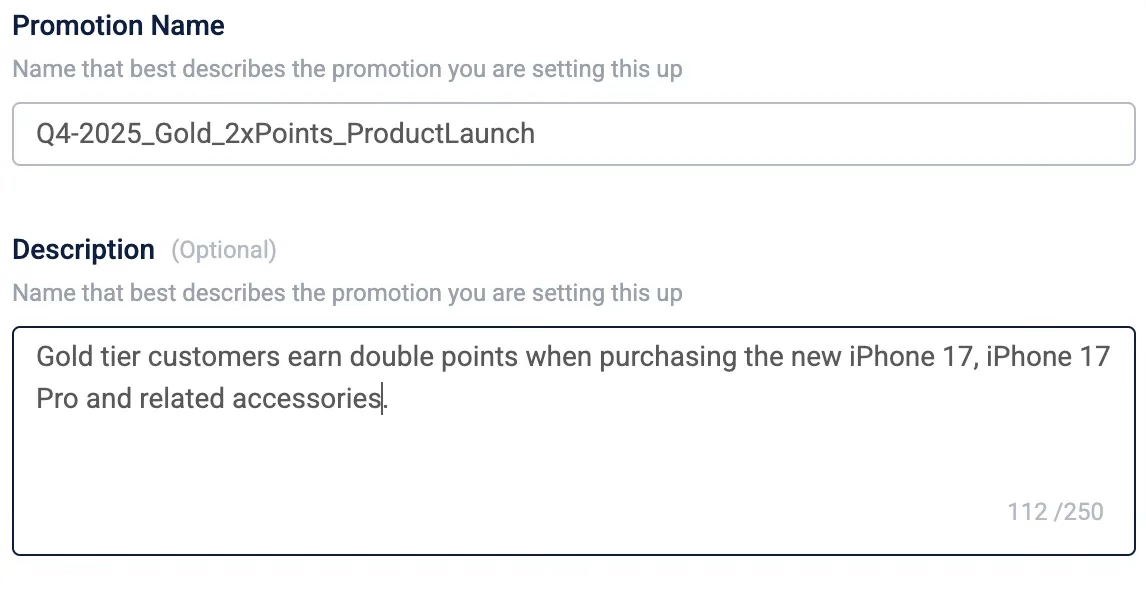
-
(Optional) In the Description box, outline the business case or key configuration details. The character limit for description is 1000 characters.
-
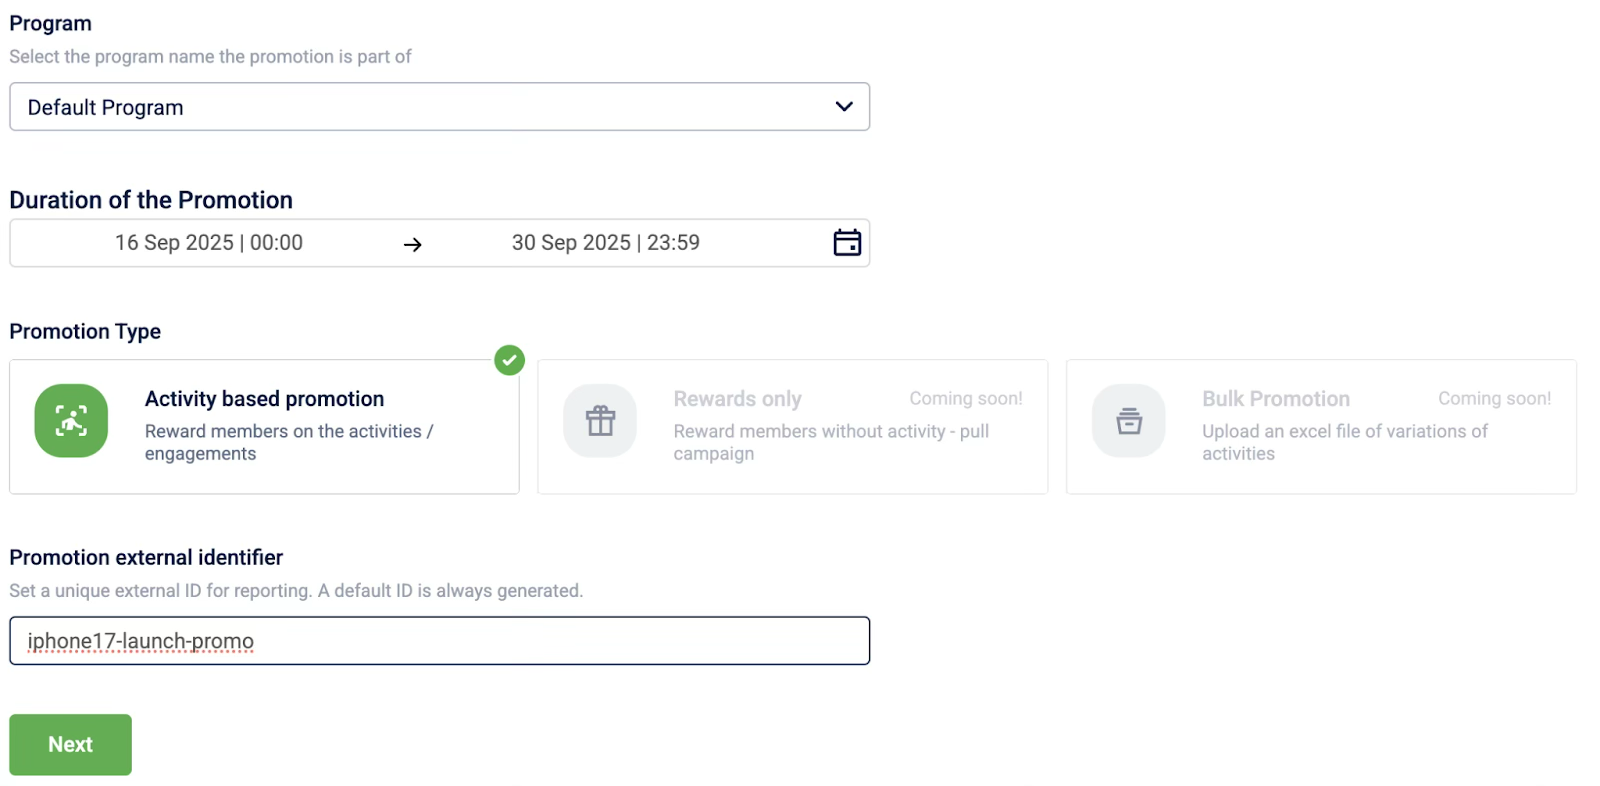
From the Program dropdown, select a loyalty program. Link a loyalty program to include its customers and apply its strategies. This step is required for organisations with multiple loyalty programs (MLP).
-
From the Timezone dropdown, select a time zone. This is the time zone where the loyalty promotion was created. Add more time zone tags in organization settings.
NoteThis information is for reference only. The system always displays information in the organization time zone.
-
In the Duration of the promotion box, select the start and end date and time. The promotion operates in your organization's time zone.
NoteIf you do not provide a time along with the date, the times will default to 00:00 and 23:59 (start of the day to end of the day).
-
Under Promotion type, select a type.
-
In the Promotion external identifier box, enter a unique ID for tracking and reporting. The character limit for the promotion name is 255 characters.
-
Select Next.
You have now established the promotion's core identity and schedule, preparing you to define the target audience.
Step 2: Defining who is eligible (Enrolment)
Specify which customers are eligible to join this promotion. You can either enrol all loyalty program members or target a specific segment of members.
Option 1: Enrol loyal members
Select Loyal members to target customers who are already actively participating in your loyalty program. This option allows you to utilize the full range of promotion features, including all activity types and reward actions.
Option 2: Enrol non-loyal members
Select Non-loyal members to target customers who are not yet part of the loyalty program This can be used for customer acquisition campaigns.
Note: When targeting non-loyal members, the following promotion capabilities are restricted to ensure compatibility with non-member profiles:
- Opt-in: Opt-in criteria cannot be configured.
- Activities: Milestone and Streak-based activities are not supported; you can only configure Single activities.
- Rewards: The only supported brand actions are Send Communication, Tag Member, and Update Customer Status. You cannot issue points or coupons or other incentives to non-loyal members.
Option 3: Enrol all members of the program
Select All members of the program for broad promotions where every member, loyal and non-loyal is eligible to participate.
Note: As this option includes non-loyal members, specific restrictions apply based on the activity type configured:
- Single activities: For non-loyal members, the only supported brand actions are Send Communication, Tag Member, and Update Customer Status. All other actions are supported only for loyal members.
- Milestone and streak activities: These activity types and their associated actions are supported only for loyal members.
Option 4: Enrol specific members
Choose this to create a targeted promotion for a specific audience. These audiences can be:
- A specific audience group or
- A set of customers who are enrolled if they complete an activity or
- A set of customers who are enrolled via the enrol API, which functions as the external trigger for the promotion. This API call can be initiated from various sources, such as a customer journey, a mobile app promotion, or a third-party CRM.
| Enrolment method | Use case |
|---|---|
| Audience group | Target a known, predefined customer segment, such as "Gold Tier Members." |
| Activity based | Make customers eligible only after they perform a specific action, like making their first purchase. |
| External trigger | Manage enrolment through the enrol API that can be initiated from various sources, such as a customer journey, a mobile app promotion, or a third-party CRM. |
Enrolling a predefined audience group:
Use this method to target a known customer segment that is already defined in the system.
-
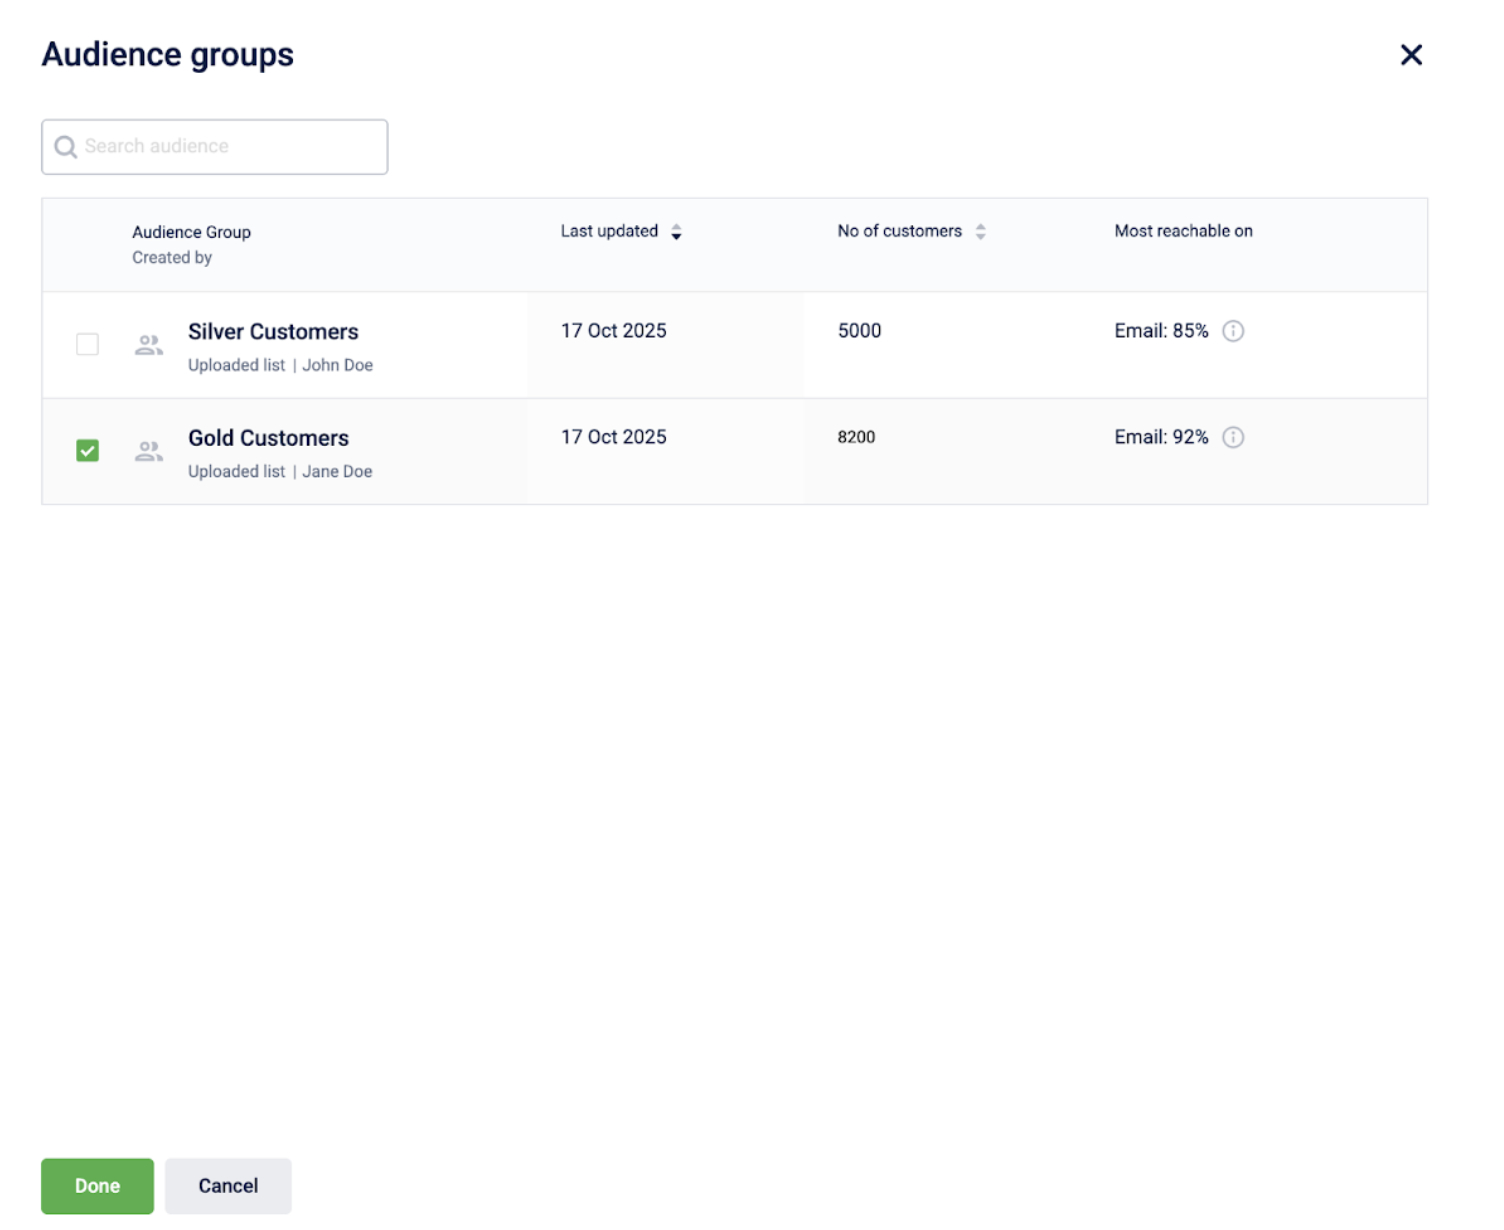
Select Specific members, and then select Audience group from the dropdown.
-
Select Add to open the audience groups list.
-
In the Audience groups window, select the checkboxes for the groups you want to include.
-
Select Done.
You have successfully targeted a specific audience group, ensuring that only members of this segment are eligible to enrol in the promotion.
Enrolling members based on a qualifying activity:
Use this method to make enrolment conditional. Customers become eligible only after they complete an action you define.
-
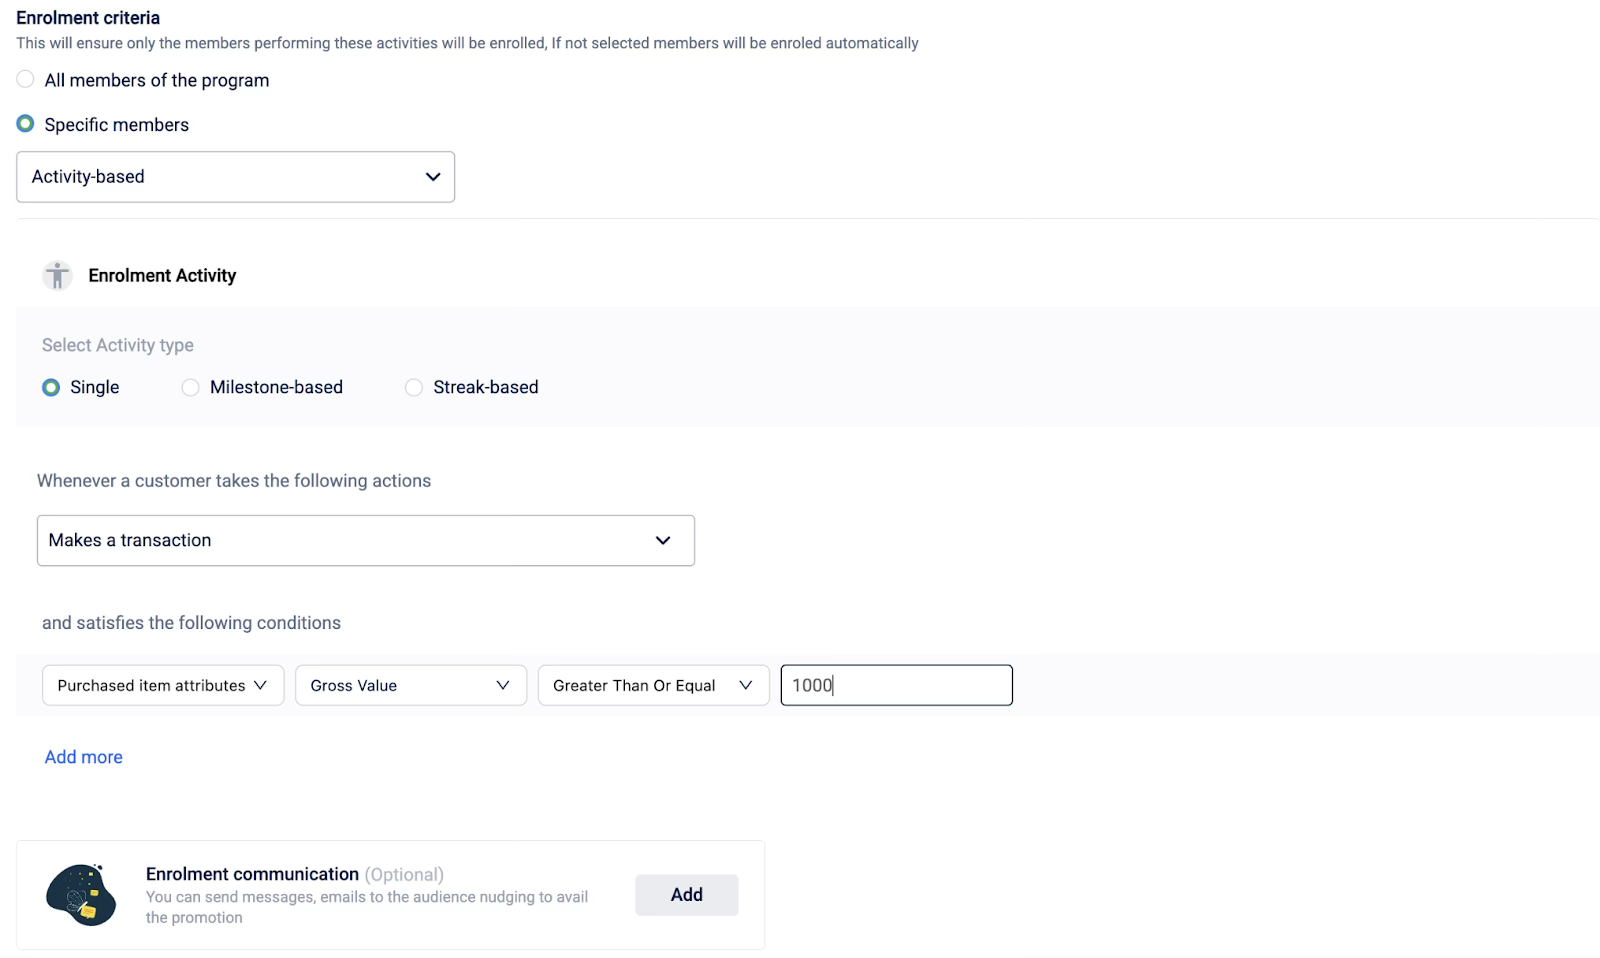
Select Specific members, and then select Activity-based from the dropdown.
-
Configure the activity or group of activities that a customer must complete to be enrolled.
-
(Optional) Under Enrolment communication, select Add to configure a message that is sent upon successful enrolment.
You have now set up conditional enrolment, meaning customers will only become eligible for the promotion after completing the specified qualifying activity.
Enroling members via an external trigger (API):
Use this method when enrolment is managed by an outside system that will initiate the enrolment via the enrol API call.
Select Specific members, and then select External trigger from the dropdown to enrol members through the enrol API

The promotion is now configured to accept enrolments via an external API call, giving an outside system control over who becomes eligible.
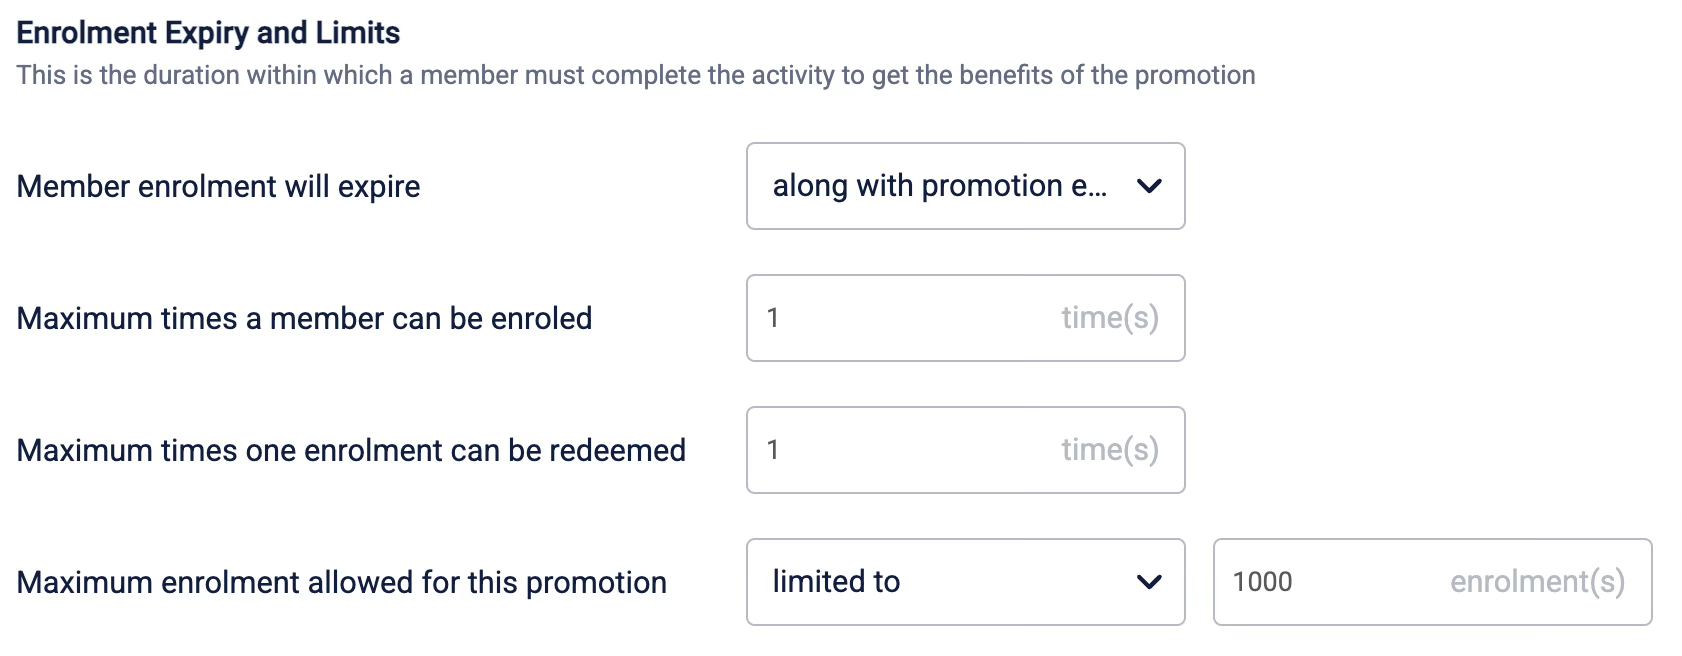
Set enrolment limits and expiration
Define the expiration and limits for enrolment to set clear boundaries on customer participation. These controls are essential for managing the duration of an individual's enrolment, limiting how many times they can join, and capping the total number of participants for the entire promotion.
You can define the following:
- Define Expiration: Configure how long an individual's enrolment is valid.
- Define Limits: Set a cap on the total number of overall participants or limit how many times a single customer can enrol.
Refer to the Loyalty Promotion Limits document for more information.
Step 3: Defining how members join (Optional opt-in)
Once you have defined the audience eligible for enrolment, you can configure the opt-in criteria. This adds a required step where customers must perform an explicit action to signal their interest before they can participate in the promotion. This is essential for ensuring active engagement, as only customers who have consciously opted in will be able to earn rewards. You can define the opt-in criteria by requiring customers to complete an Opt-in Activity or by opting them in via an External trigger, such as an API call.
| Opt-in method | Use case |
|---|---|
| Activity based | Require customers to perform an action to join, such as downloading the mobile application. |
| External trigger | Manage enrolment through the opt-in API that can be initiated from various sources, such as a customer journey, a mobile app promotion, or a third-party CRM. |
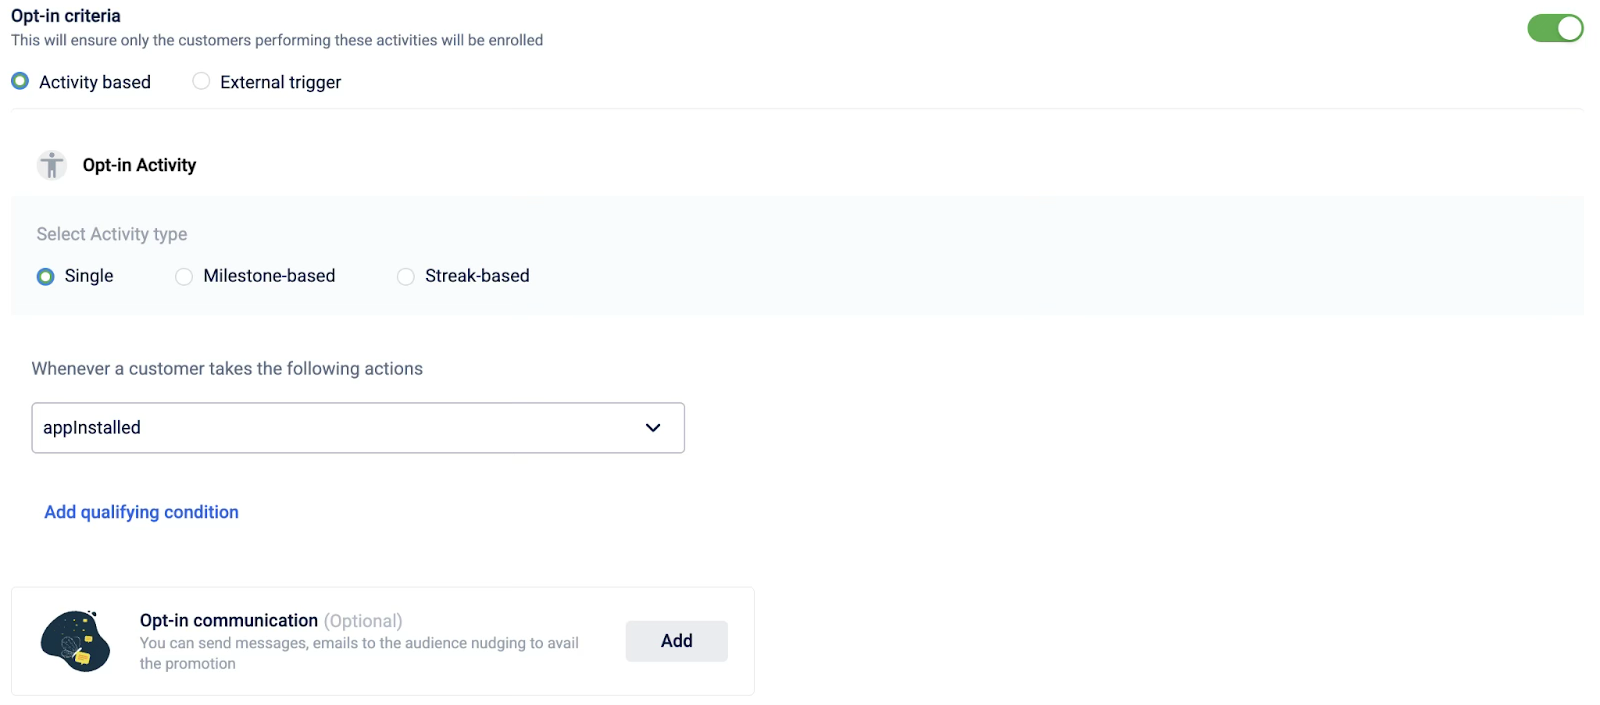
Opting in members based on a qualifying activity:
Use this method to make opt-in conditional. When you create an opt-in condition based on an activity, customers are eligible only after they complete a criteria you define.
-
Select Specific members, and then select Activity-based from the dropdown.
-
Configure the activity or group of activities that a customer must complete to opt in.
-
(Optional) Under Enrolment communication, select Add to configure a message that is sent upon successful opt-in.
You have configured an activity-based opt-in, requiring eligible customers to perform a specific action to actively participate in the promotion.
Opting in members via an external trigger (API):
Use this method when opt-in is managed by an outside system that will initiate the opt-in via the opt-in API call.
Select External trigger from the dropdown to opt-in members through the opt-in API

The promotion is now set to manage opt-ins via an external API call, allowing an outside system to confirm customer participation.
Set opt-in limits and expiration
Define the expiration and limits for opting in to set clear boundaries on customer participation. These controls are essential for managing the duration of an individual's opt-in, limiting how many times they can opt in, and capping the total number of participants for the entire promotion.
You can define the following:
- Define Expiration: Configure how long an individual's enrolment is valid.
- Define Limits: Set a cap on the total number of overall participants or limit how many times a single customer can opt in.

Refer to the Loyalty Promotion Limits document for more information.
Step 4: Defining earning activities
This is the core of your promotion. Here, you define what actions customers must take to earn rewards. You can define an individual activity or a group of activities. You can add up to 25 individual activities and up to 10 groups and sub-activities in a group, per loyalty promotion. You can add up to 10 brand actions per activity.
Option 1: Define an individual earning activity
Choose this for straightforward promotions where a reward is tied to a single customer action. First, decide which type of activity best fits your promotion's goal:
- Single: A customer qualifies for the promotion by performing a one-time action, such as updating their profile.
- Milestone: A customer qualifies for the promotion by reaching a cumulative goal, such as making a total transaction of $200 or more in a month.
- Streak: A customer qualifies for the promotion by completing a repeated action, such as spending $100 or more once a week for three consecutive weeks.
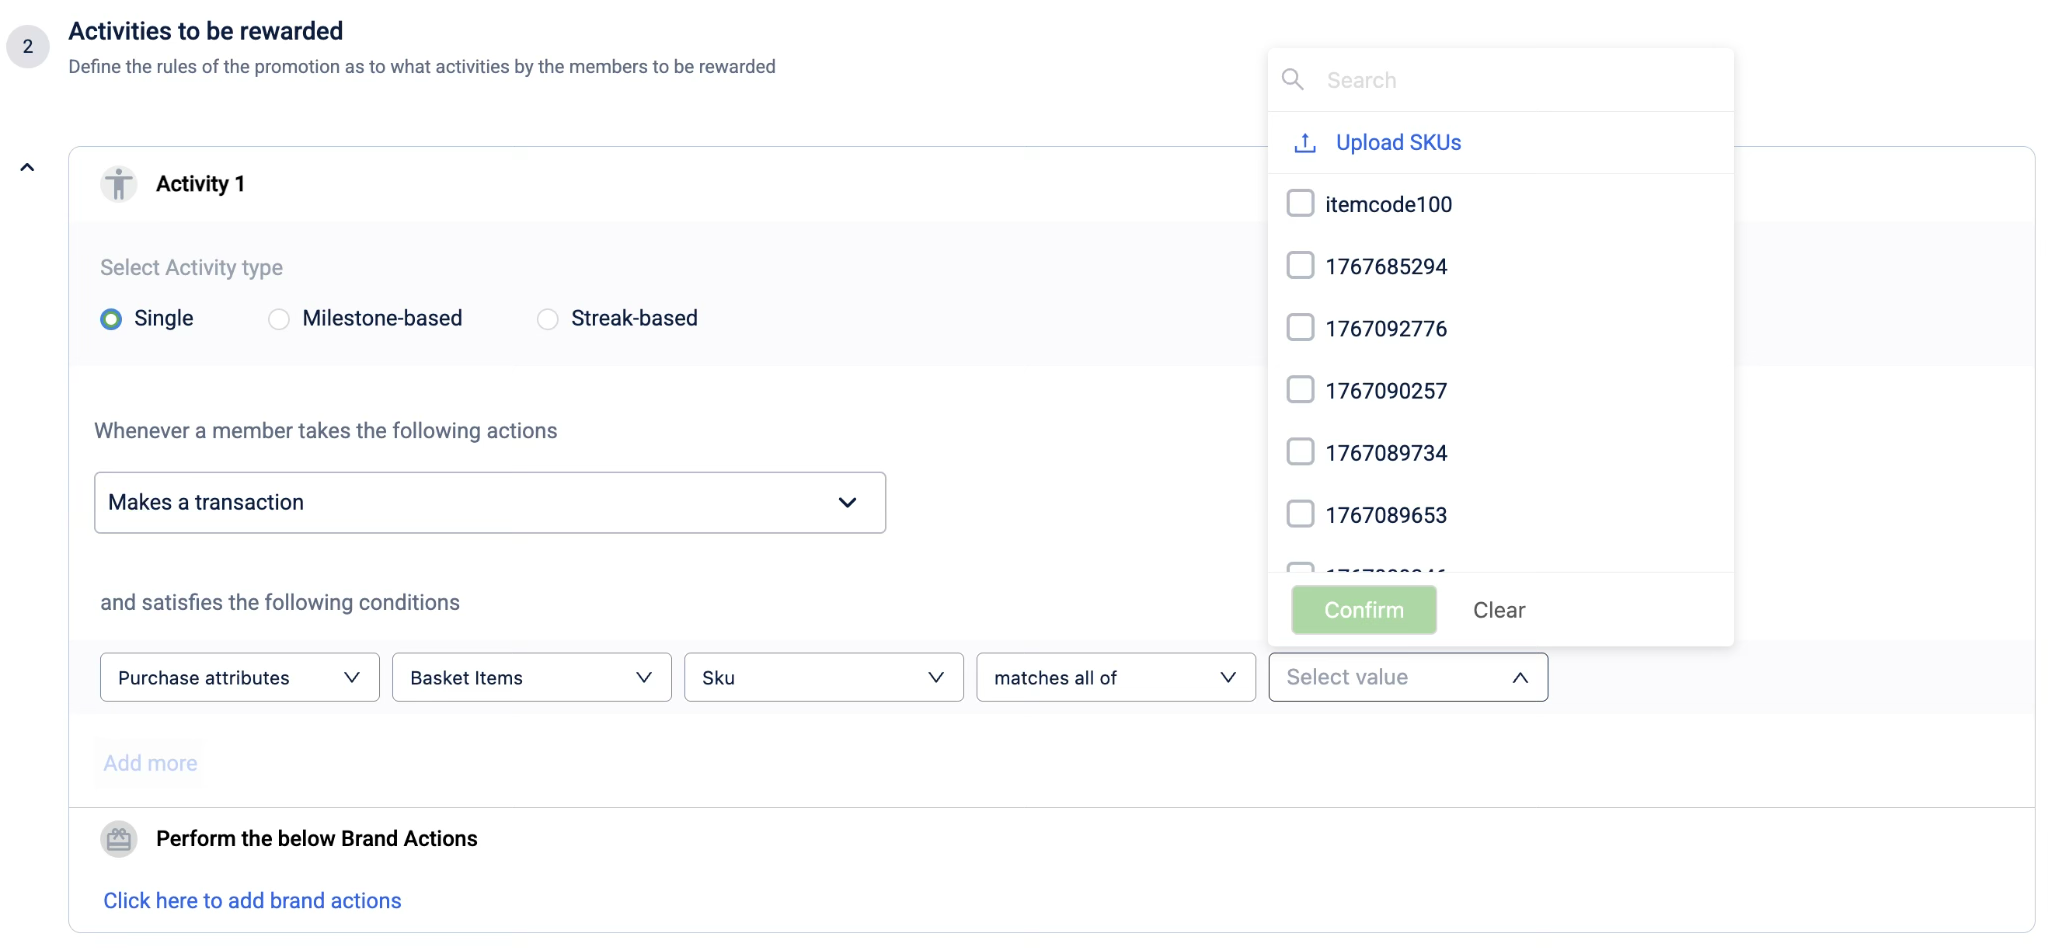
To configure a Single activity
-
Select Activity.
-
Select Single.
-
From the Actions dropdown, select the member action.
-
(Optional) Select Add qualifying condition and define a specific qualifying condition for the action. You can add multiple qualifying conditions if required. You can use the search tool to search for a specific value when available.
Note:When providing values for SKUs, you can also upload a .csv file that includes all the values. Select Upload SKUs to upload the .csv file.
-
Select + Add brand actions to configure the incentive.
-
Select Next.
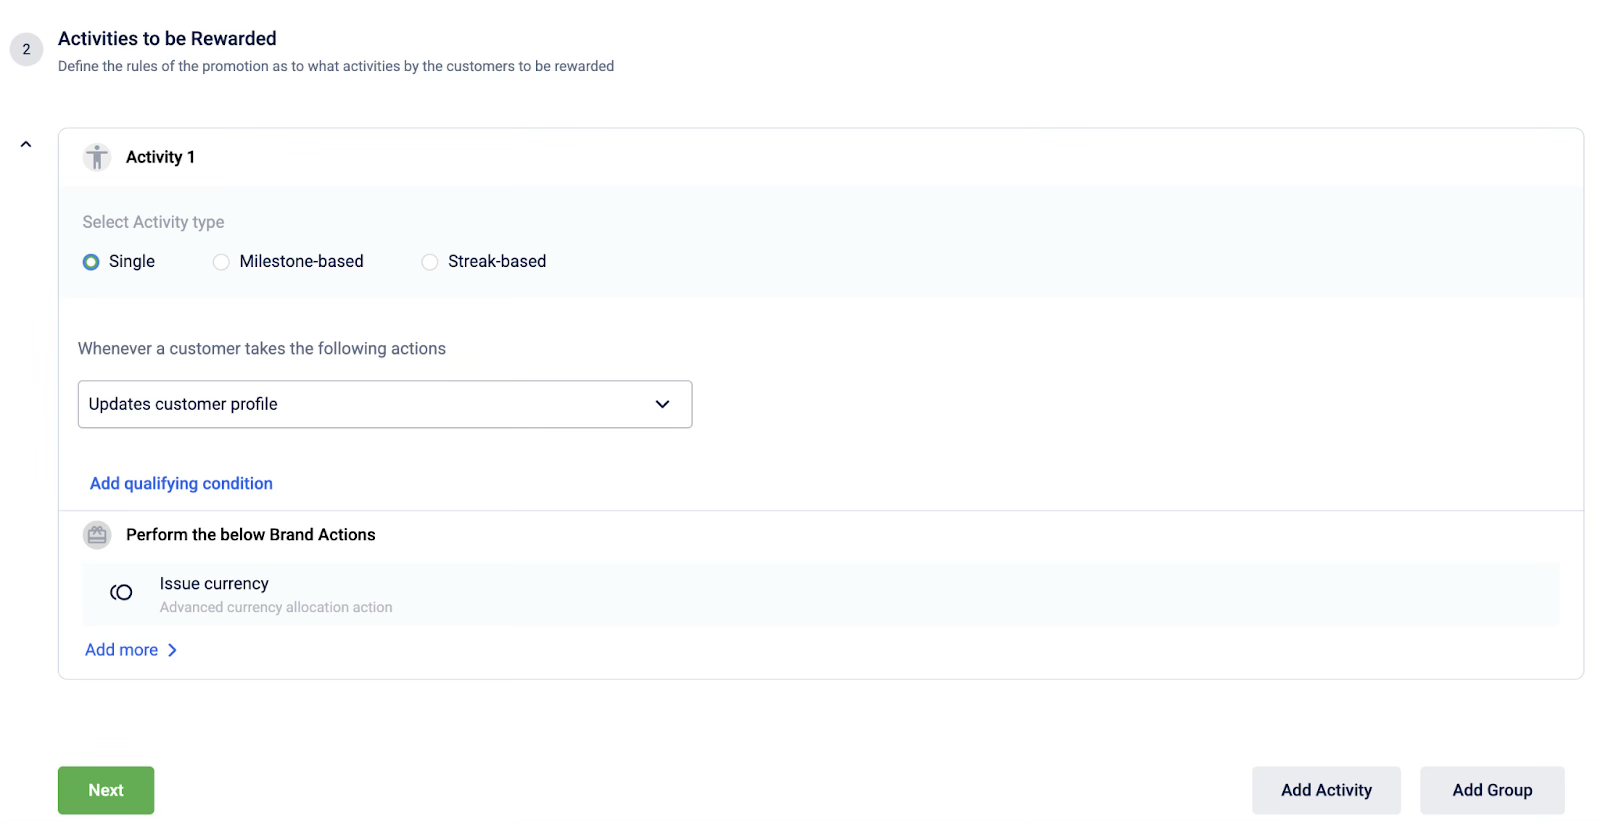
You have defined a single earning rule, and customers will now receive a reward for completing this one-time action.
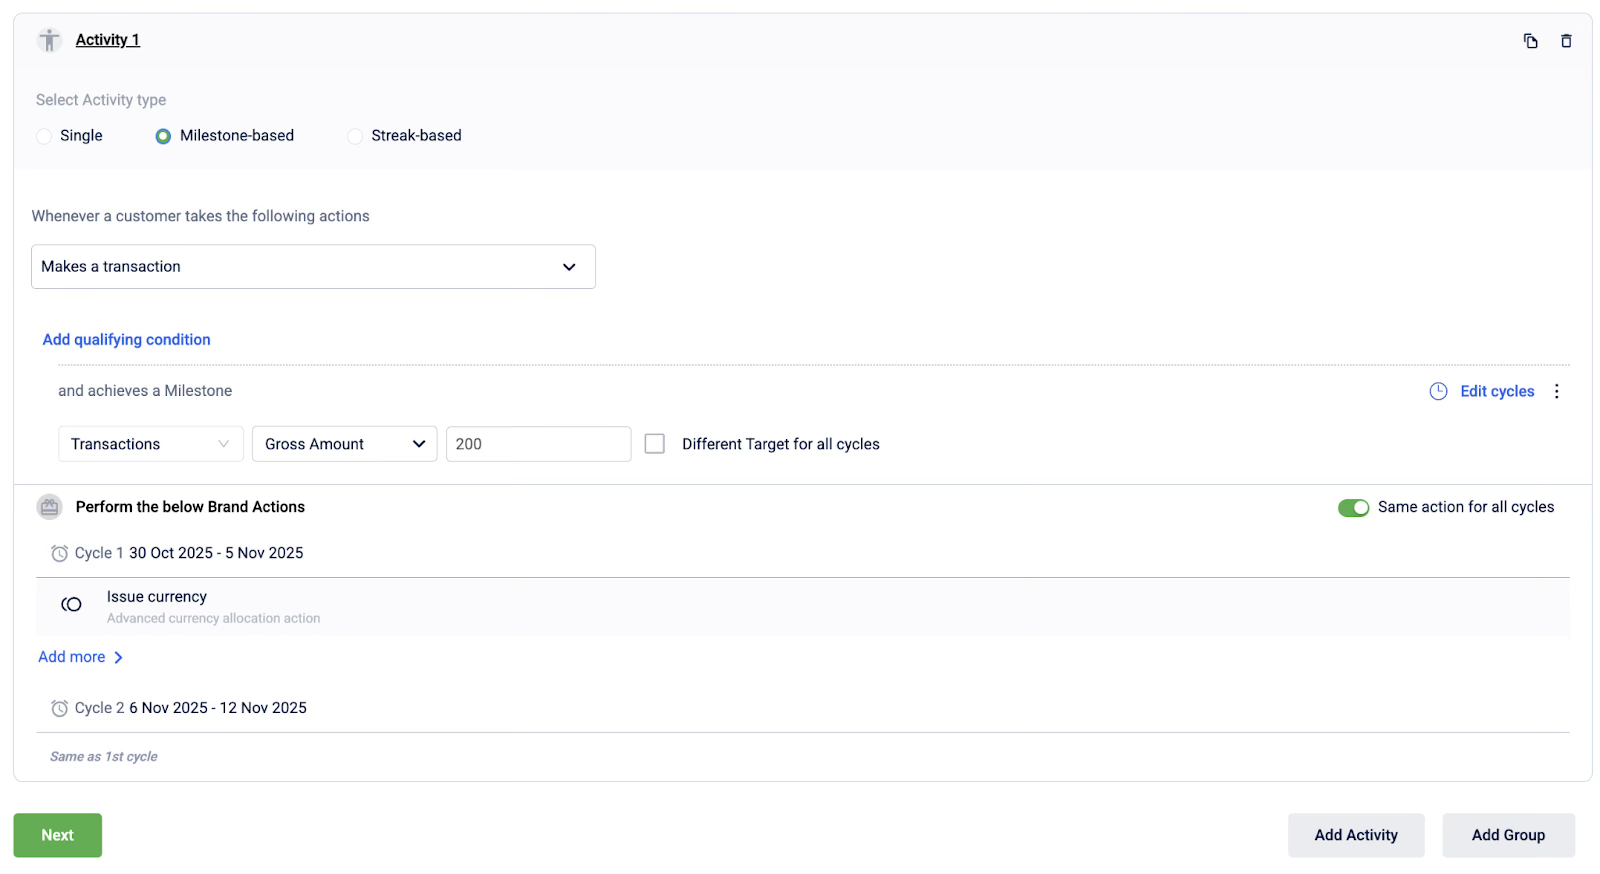
To configure a milestone activity
-
Select Activity.
-
Select Milestone-based.
-
From the Actions dropdown, select the member action.
-
(Optional) Select Add qualifying condition and define a specific qualifying condition for the action. You can add multiple qualifying conditions if required. You can use the search tool to search for a specific value when available.
Note: When providing values for SKUs, you can also upload a .csv file that includes all the values. Select Upload SKUs to upload the .csv file.
-
Under achieves a Milestone, define the target entity, target type, and target value that the customer must reach.
-
(Optional) To create a recurring challenge, select Add Cycles and configure the reset period.
- Select the cycle duration type from the dropdown. This defines how often a cycle resets. You can either choose a defined recurring cycle (daily, weekly, monthly, yearly), a custom cycle, or on target achievement.
- Select the cycle start date from the dropdown. This defines when a cycle starts for a customer. You can choose to start on the promotion start date, from the customer’s first activity, or on a specific date.
-
(Optional) Select Upload Individual Customer Targets from the three-dot menu to upload a
.csvfile. You can then upload a.csvfile containing the target cycle values for each customer. You can download a sample.csvfile from here.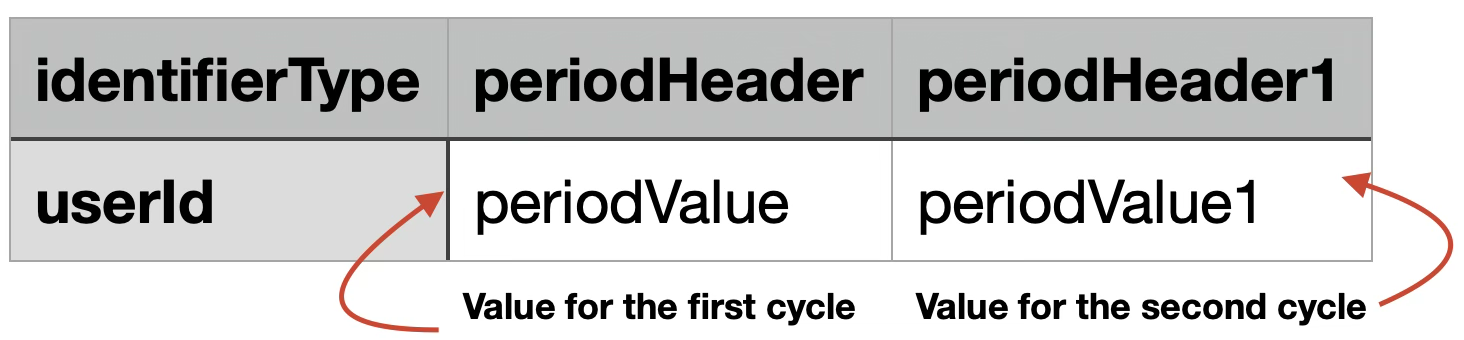
-
(Optional) Select Upload Individual Member Targets from the three-dot menu to enable leaderboard tracking for the milestone.
-
Select + Add brand actions to configure the incentive.
-
Select Next.
You have configured a milestone activity, and customers will now be rewarded upon reaching the cumulative target you have set.
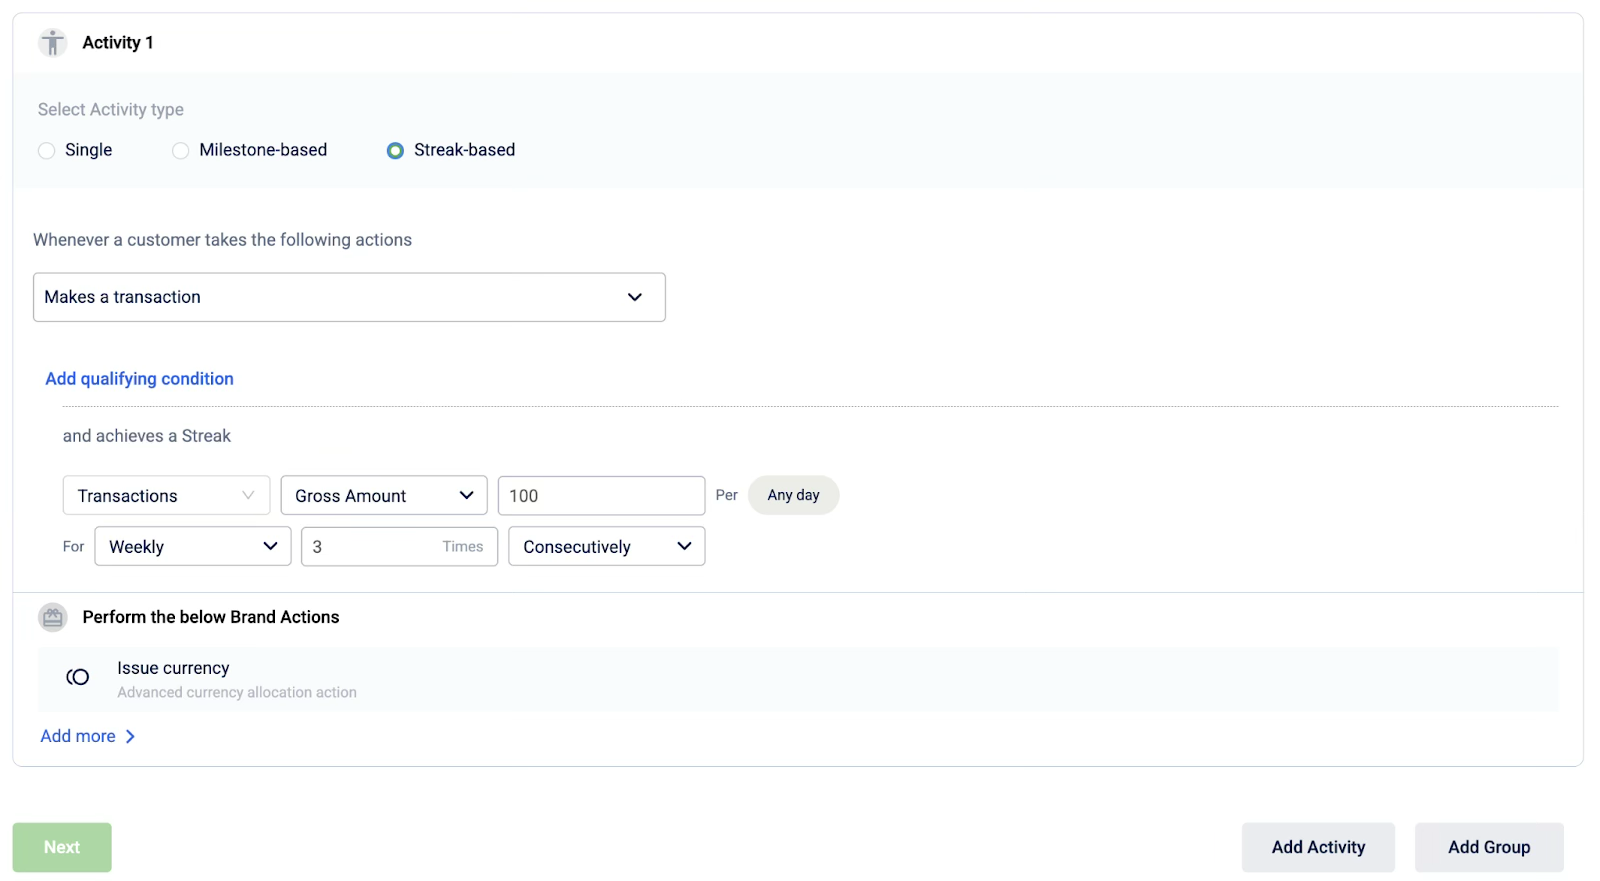
To configure a streak activity
-
Select Activity.
-
Select Streak-based.
-
From the Actions dropdown, select the member action.
-
Select Add qualifying condition and define a specific qualifying condition for the action. You can add multiple qualifying conditions if required. You can use the search tool to search for a specific value when available.
Note: When providing values for SKUs, you can also upload a
.csvfile that includes all the values. Select Upload SKUs to upload the.csvfile. -
Under achieves a Streak, defines the target entity, target type, target value, period, the number of times the action must be completed, and the time period (daily, weekly, monthly, yearly, or a custom duration). For example, enter the following to create a transaction streak of four times per week for a gross amount of $20:
transaction, gross amount, $20, weekly, 4 times, consecutively. -
(Optional) Select Add custom duration and define a custom cycle duration for the streak. This is applicable for a custom streak duration.
-
Select + Add duration and define the cycle durations.
-
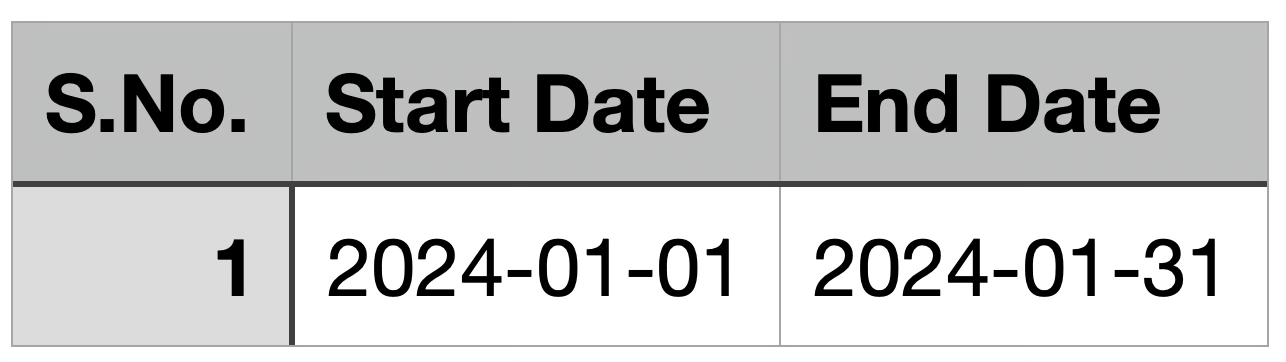
Select the Upload duration radio button to upload a
.csvfile that includes the custom durations. -
Select Done to save the changes.
-
-
Select + Add brand actions to configure the incentive.
-
Select Next.
You have created a streak challenge, requiring customers to perform an action consecutively over a set period to earn a reward.
Managing your configured activities:
Once an activity is configured within the group, you can do the following to manage it.
-
To rename the activity, select the activity name.
-
To duplicate the activity, select the copy button.
-
To delete the activity, select the delete button.

Option 2: Define a group of earning activities
Choose this for more complex promotions where customers must complete multiple actions. You can require them to complete all activities (an "AND" condition) or just a certain number of them (an "OR" condition).
To configure a group of earning activities:
- Select Group of Activities.
- Select the earning condition for the group:
- All: The customer must complete all defined activities to earn the reward.
- Any: The customer must complete a specific number of activities from the group. If you select this, also select the required number from the dropdown.
- From the Add Item dropdown, begin building your group by adding one or more of the following:
- Select Add Sub Activity to add an individual earning rule to the group.
- Select Add Sub Group to create a nested group with its own All or Any condition for even more complex logic.
- From the actions dropdown, select the member action.
- Select Add qualifying condition and define a specific qualifying condition for the action. You can add multiple qualifying conditions if required.
- Under achieves a Milestone, define the target value the customer must reach (for example, enter
500for a goal of $500). - (Optional) To create a recurring challenge, select Add Cycles and configure the cycles (reset period).
- Select the cycle duration type from the dropdown. This defines how often a cycle resets. You can either choose a defined recurring cycle (daily, weekly, monthly, yearly), a custom cycle, or on target achievement.
- Select the cycle start date from the dropdown. This defines when a cycle starts for a customer. You can choose to start on the promotion start date, from the customer’s first activity, or on a specific date.
- Select + Add brand actions to configure the incentive.
- Select Next.

You have built a complex earning rule with multiple actions, and customers must now complete the required combination of activities to earn the reward.
To manage activities within a group:
Use the icons in the top right corner of any sub-activity or sub-group box to manage it.
-
To rename the group or subgroup, select the group or subgroup name.
-
To rename the sub-activity, select the sub-activity name.
-
To duplicate an item, select the copy button.
-
To delete an item, select the delete button.

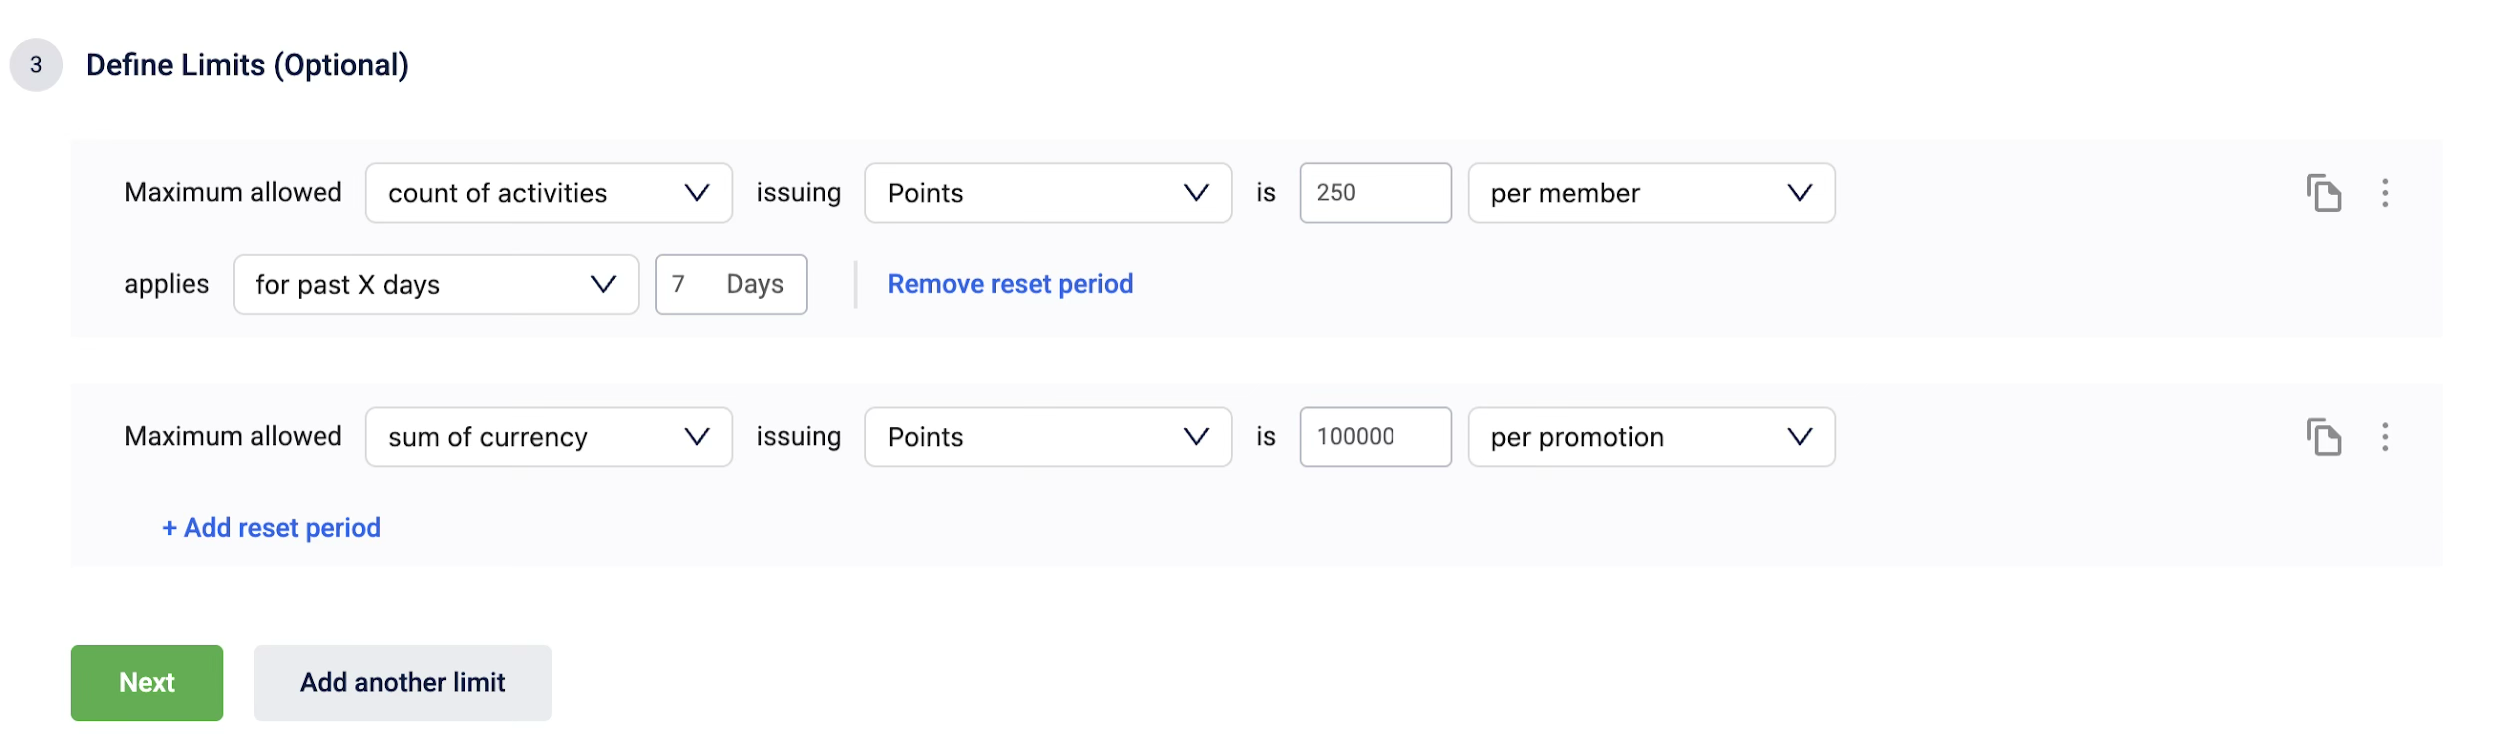
Step 5: Defining the promotion limits (Optional)
Set overall limits to control your budget and manage the promotion's scale. These are different from the enrolment and opt-in limits defined in earlier steps.
To add and define limits:
-
Select Add now to create a new limit.
-
Define the limit rules, for example:
- Cap the total rewards a single customer can earn from this promotion.
- Limit the number of times a qualifying activity can be performed for a reward.
-
Select +Add reset period to make the limit recurring within a specific timeframe. For example, by selecting Past X Days and entering 10, the limit will reset every 10 days, checking the customer's activity only within that rolling window.
-
After you have finished configuring the limits, select Next.
You have now applied overall limits to the promotion, which will control the budget and cap the rewards a customer can earn.
To manage your configured limits:
Once a limit is configured, you can manage it using the icons on the limit entry.
-
To duplicate an existing limit, select the copy button.
-
To remove a limit, select the three-dot menu on the limit to remove, and then select Remove.

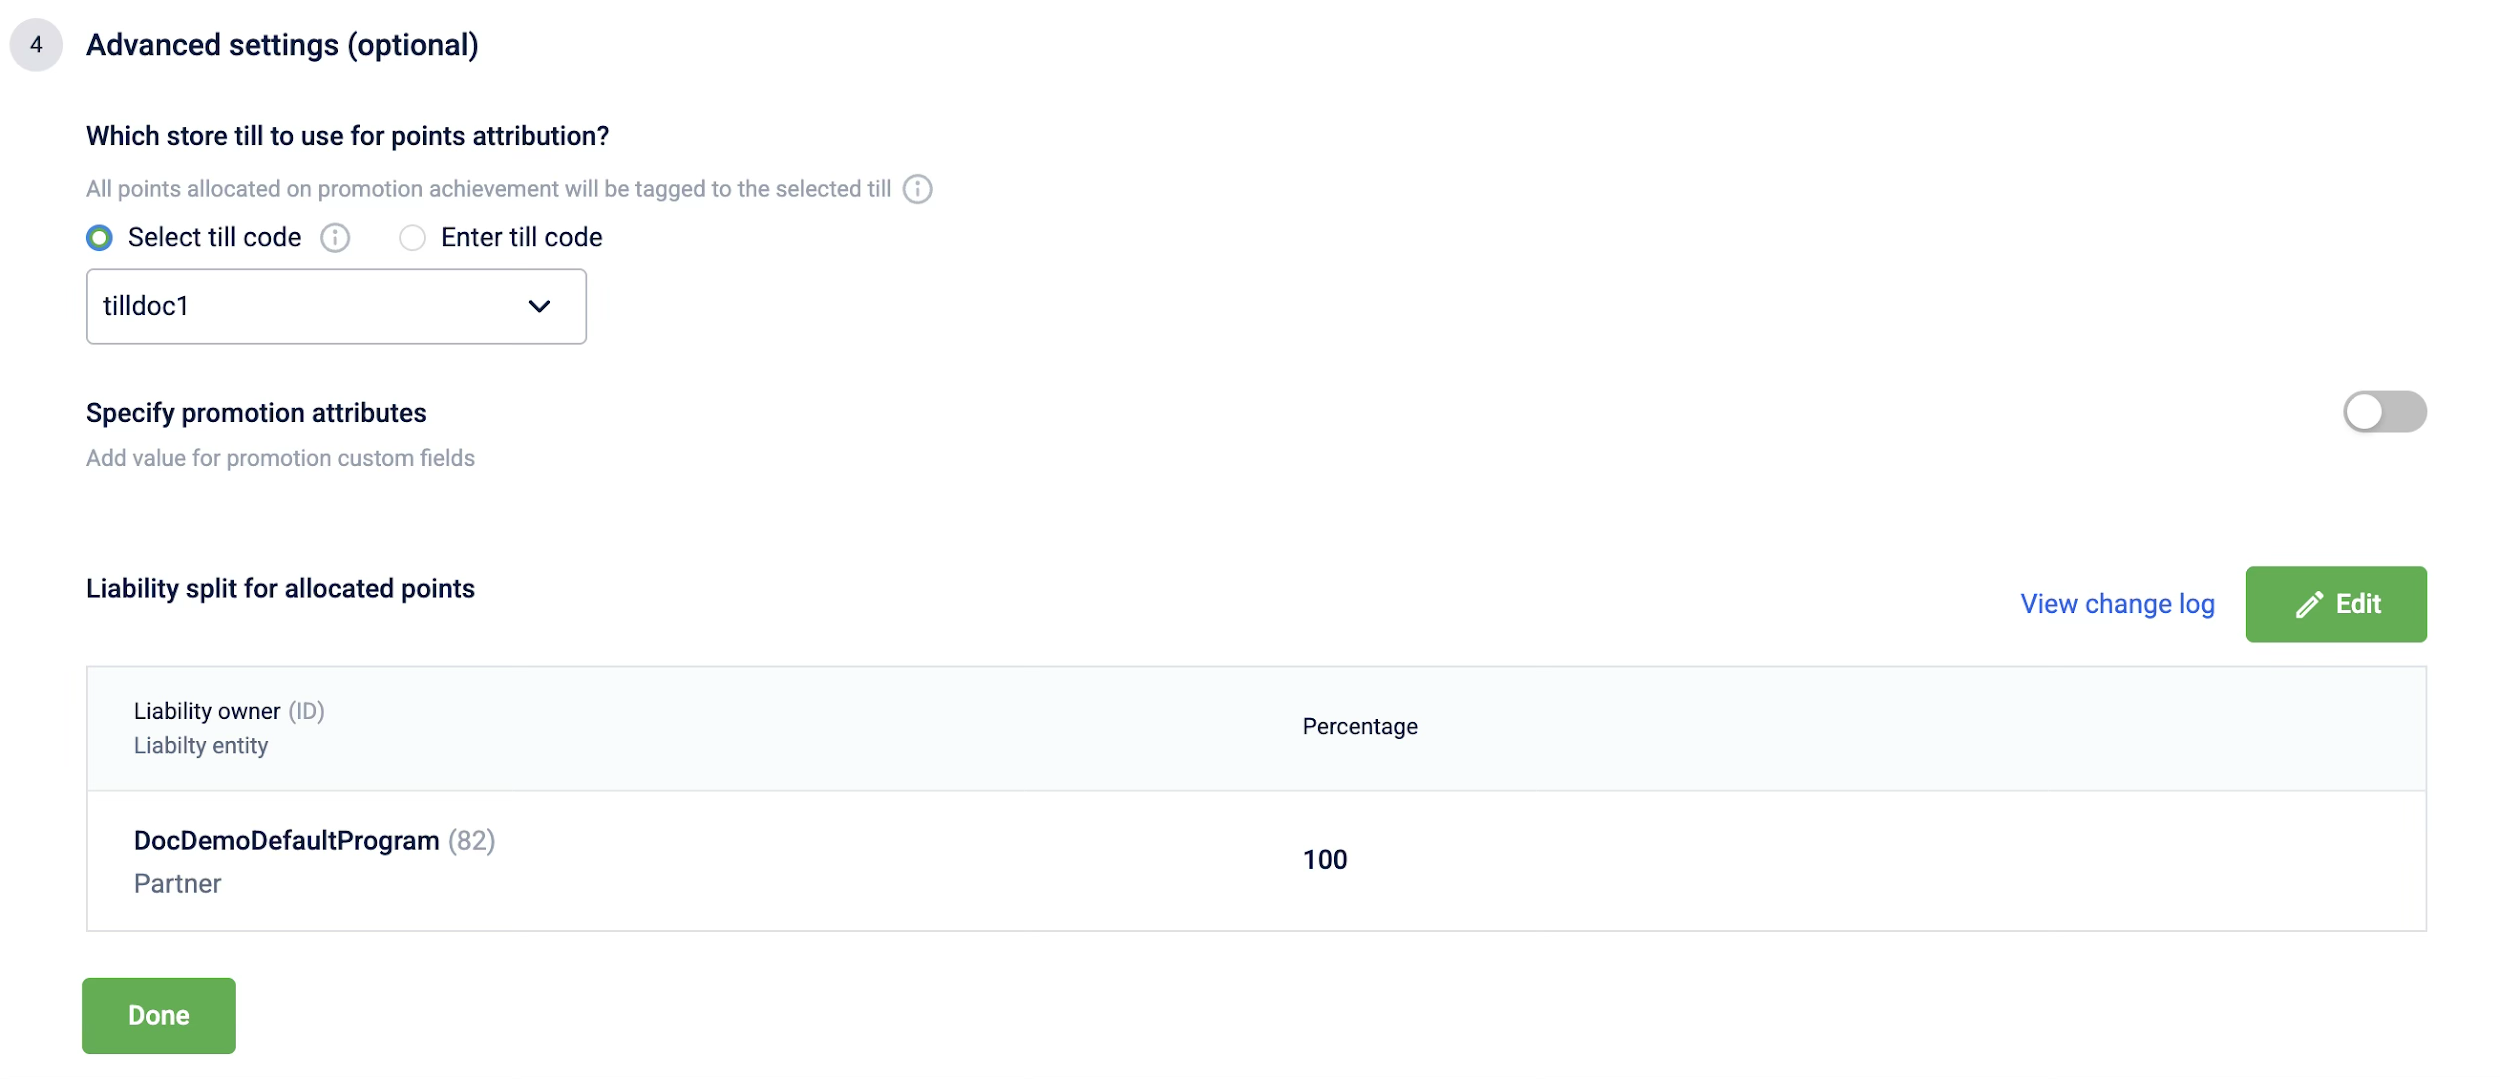
Step 6: Configuring additional settings (Optional)
You can configure settings for internal operations and reporting, such as associating a till code, adding custom promotion attributes for tracking, or defining the liability split for shared promotions.
To configure the additional settings, follow these steps:
- Select a till code from the dropdown or enter a till code to associate with the loyalty promotion. All points allocated on promotion achievement will be tagged to the selected till.
- Enable the Allow member events before enrolment for benefit issual toggle to issue incentives to customers for activities they performed before they enrolled in the loyalty promotion.
- Enable the Specify promotion attributes toggle to configure promotion attribute custom fields for the loyalty promotion. To add a promotion attribute, go to Old promotion > Org settings > Custom fields > New custom field.
- Select Edit to define the liability split for the loyalty promotion, select Add liability owner, and select a new liability partner from the dropdown. This feature serves primarily as metadata for accounting and reconciliation purposes and does not affect the customer's experience or the logic of the promotion itself.
- Select Done to save the changes.
You have configured advanced operational settings, ensuring the promotion is properly tagged for internal reporting and financial tracking.
Step 7: Finalizing the promotion
Once you have completed all the configuration steps, you have two options:
- Save and exit: Save the promotion as a draft to continue working on it later.
- Send for approval: Submit the promotion to be reviewed and activated.

By following these steps, you have fully configured a new loyalty promotion, which is now saved as a draft or is awaiting approval from a checker.
Updated 1 day ago